Delta Electronics orporated DN-715 NoteBook User Manual MANUAL CHAP 3
Delta Electronics Incorporated NoteBook MANUAL CHAP 3
Contents
MANUAL CHAP 3

C
Ch
ha
ap
pt
te
er
r
3
3
Configuring the Notebook
This chapter provides
an overview of the
System Configuration
Utility program, which
allows you to adjust the
basic notebook settings
to your needs
3-1
System Configuration Utility
The System Configuration Utility lets you use the firmware installed on the
notebook to configure your system according to the kind of hardware that you
install. Using setup, you can set timing parameters for the memory and
processor, define drive specifications, control power management, and so on.
Using the System Configuration Utility
You can only display the setup utility by pressing the [Ctrl] + [Alt] + [s] key
combination shortly after the system is turned on. A prompt appears on the
screen that reads “<CTRL – ALT – S> to enter System Configuration Utility”.
When you see this prompt, press the key combination and the setup utility will
display the main page of the System Configuration Utility program.
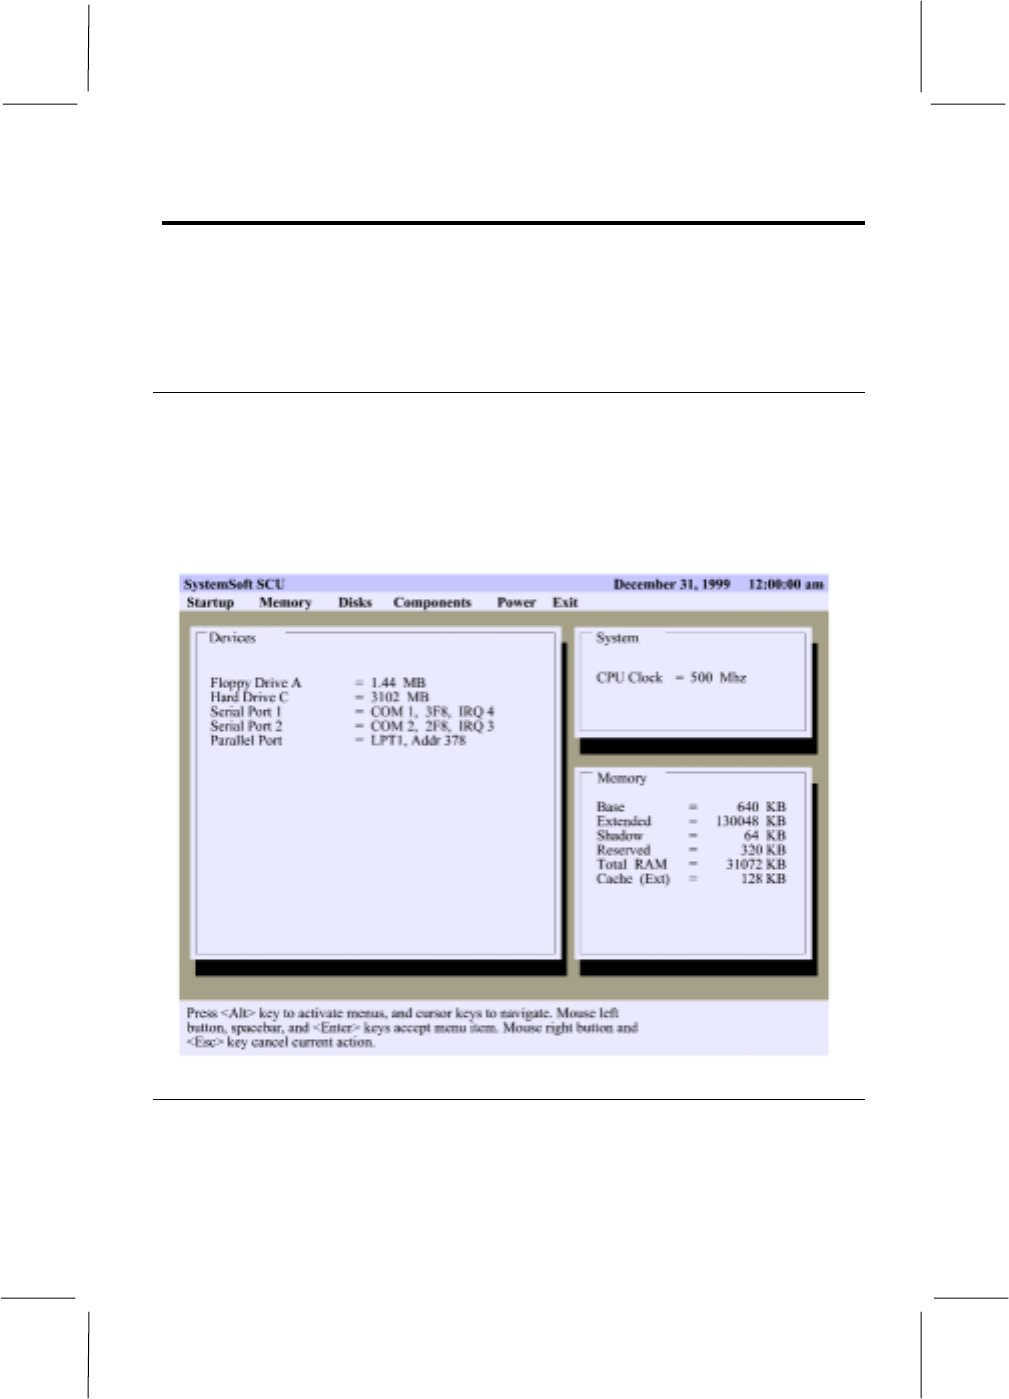
Navigating
The main screen of the utility program is divided in three major sections. The
top section holds a menu bar, the middle section shows three windows, i.e.
Devices, System and Memory. These windows provide a quick overview of the
current setup settings of your system. Some values are detected automatically;

3-2
other values are set to a default value and can be changed through the menu
bar at the top of the screen. The third section, at the bottom of the screen,
displays hints and help messages relevant to the topic highlighted at the
moment.
Press the [Alt] key to activate menus. Use the cursor arrow keys to move the
highlight through the header list of setup windows. When the option you need
is highlighted, [Enter] key to select an option. Use the [Esc] key to cancel the
current action, to close a menu, to go back to the main menu, and/or to exit the
System configuration Utility program.
Startup, Memory, Disks, Components, Power, and Exit are the principal
options in the main menu bar for system configuration. When you select one
of these options, the screen displays a list of items in a drop down menu. Some
items you can only enable or disable. Others bring up a separate dialog box
once you select them.
The items that can only be enabled or disabled will either have an _ or
mark in front of them, marking that they are currently disabled or enabled.
Items that hide a separate dialog box will have a ! symbol behind them.
Within a dialog box you can use the [Tab] key to select a control. Use the
[OK] button or the [Enter] key to confirm an entry, and the [Cancel] or [Esc]
key to cancel an entry. To change a value of a field, use the cursor keys,
spacebar, and/or numeric keys.
At any given point, you can use the [Alt] key in combination with a letter,
highlighted red, and use it as a shortcut to jump directly to that function.

3-3
Startup
This option displays basic information about your system and hardware.
Date and Time
When you select this option, a dialog box will pop up allowing you to
customize the date and time to be used by the system clock.
Fast Boot
You can either enable or disable this option. If enabled you allow the system
to boot fast without first testing all functions.
Boot Device
When you select this option, a dialog box will pop up allowing you to
customize the order of devices the system tries to boot from consecutively.
You can choose from three devices: Hard disk C, CD-ROM Drive, and
Diskette A. Set the most important boot device in the 1st Boot Device box, and
continue with the second and third box. The system will only move on to the
alternative boot devices after a previous one failed.
Boot Password
When you select this option, a dialog box will pop up allowing you to set or
customize a boot password.
Enter old Power-On Password
This field will be available if you return to this dialog box after previously
having set a boot password. You will need to confirm your old password again
before you can change it to a new one.

3-4
Enter new Power-On Password
This field allows you to enter a new password to be used every time the
system starts. The password can be up to eight characters long, consisting of
both letters and numbers.
Verify new Power-On Password
After you have entered a new password, you’ll need to retype it in this field to
confirm it.
Enable Password to Power-On
After you have set a password in the previous fields, you can either enable or
disable it. If this field is enabled, you need to type in the password every time
the computer is turned on. If you do not type the correct password, the
computer does not start.
SCU Password
When you select this option, a dialog box will pop up allowing you to set or
customize a password to enter the System Configuration Utility program
Enter old Setup Password
This field will be available if you return to this dialog box after previously
having set a SCU password. You will need to confirm your old password again
before you can change it to a new one.
Enter new Setup Password
This field allows you to enter a new password to be used every time one tries
to enter the System Configuration Utility. The password can be up to eight
characters long, consisting of both letters and numbers.
Verify new Setup Password
After you have entered a new password, you’ll need to retype it in this field to
confirm it.
Enable Setup Password
After you have set a password in the previous fields, you can either enable or
disable it. If this field is enabled, you need to type in the password every time
you try to enter the System Configuration Utility. If you do not type the
correct password, you will not be able to enter the System Configuration
Utility program.
3-5
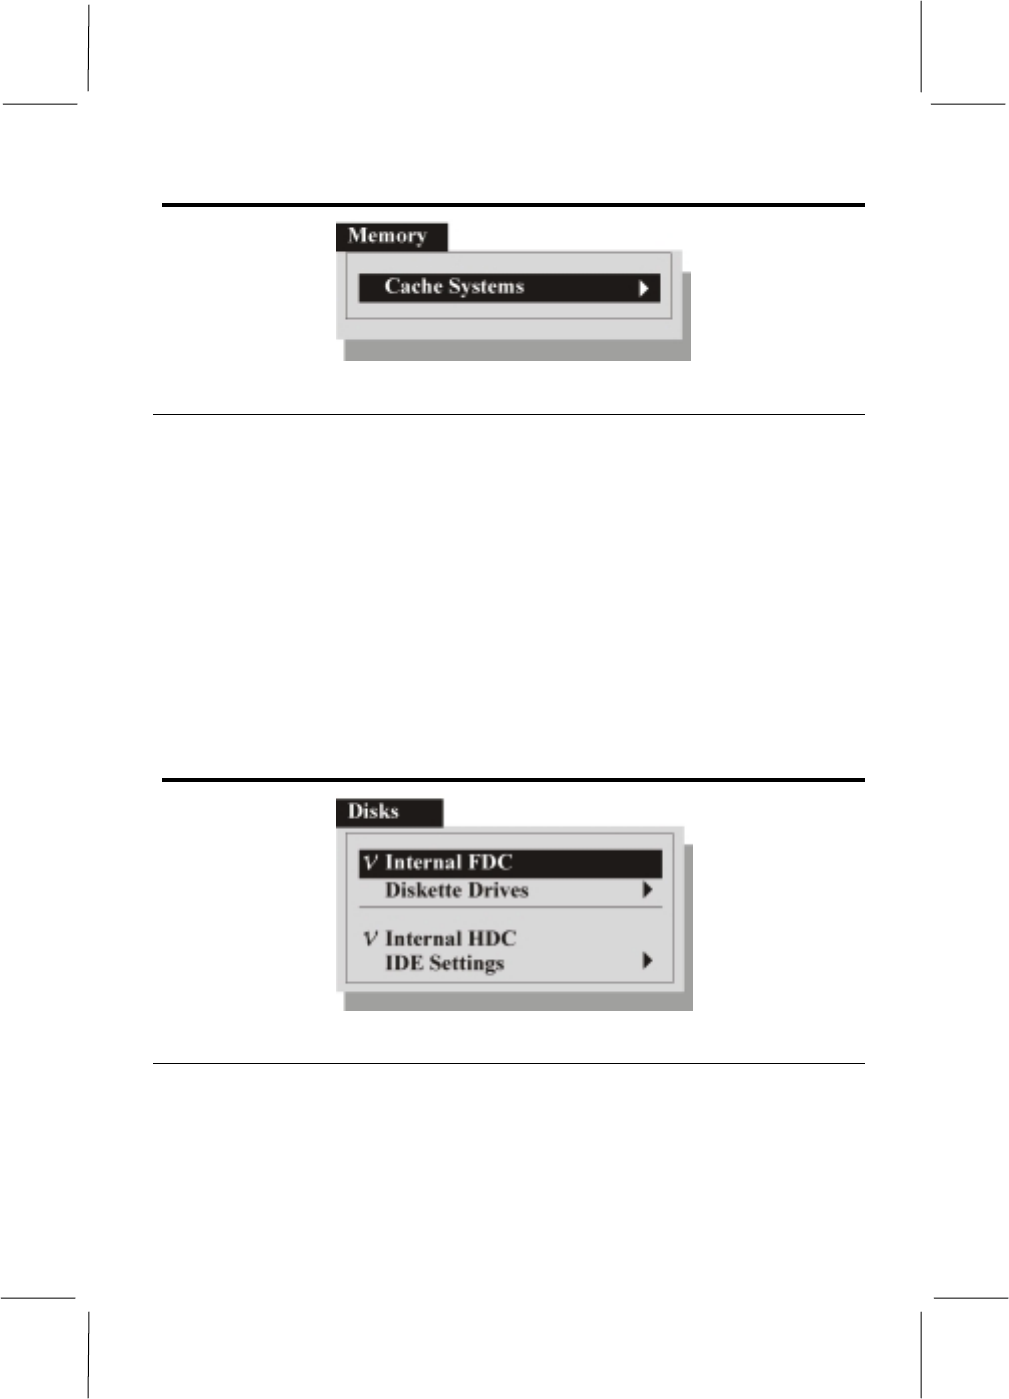
Memory
Cache Systems
When you select this option, a dialog box will pop up allowing you to
customize the system’s use of Cache memory.
L1 Cache/L2 Cache
These boxes allow you to enable (Write Back) or disable Level 1 and/or Level
2 Cache.
BIOS Shadow
This field allows you to enable or disable BIOS shadow memory caching.
Video Shadow
This field allows you to enable or disable Video shadow memory caching.
Disks
Internal FDC
You can either enable or disable this option. Set this option to enable in order
to use the internal floppy disk drive.

3-6
Diskette Drives
When you select this option, a dialog box will pop up allowing you to set the
types of diskette drives used with your system. You can set the diskette drive
type to None, 1.44 MB, or 2.88 MB. The internal diskette drive is by default
referred to as Drive A.
Internal HDC
You can either enable or disable this option. Set this option to enable in order
to use the internal hard disk drive.
IDE Settings
When you select this option, a dialog box will pop up allowing you to set the
IDE settings for the internal hard disk drive.
HDD Timing
This box allows you to select the speed of the internal hard disk drive. Leave
this item at the default value, unless you change the internal hard disk drive. In
that case, refer to the documentation that comes with the new disk drive to find
the proper value for this item.
I/O 32 bit transfer
This field allows you to enable or disable 32 bits transfer mode while reading
and writing to the internal hard disk drive.
HDD Block transfer
This field allows you to enable or disable block transfer while reading and
writing to the internal hard disk drive.
3-7
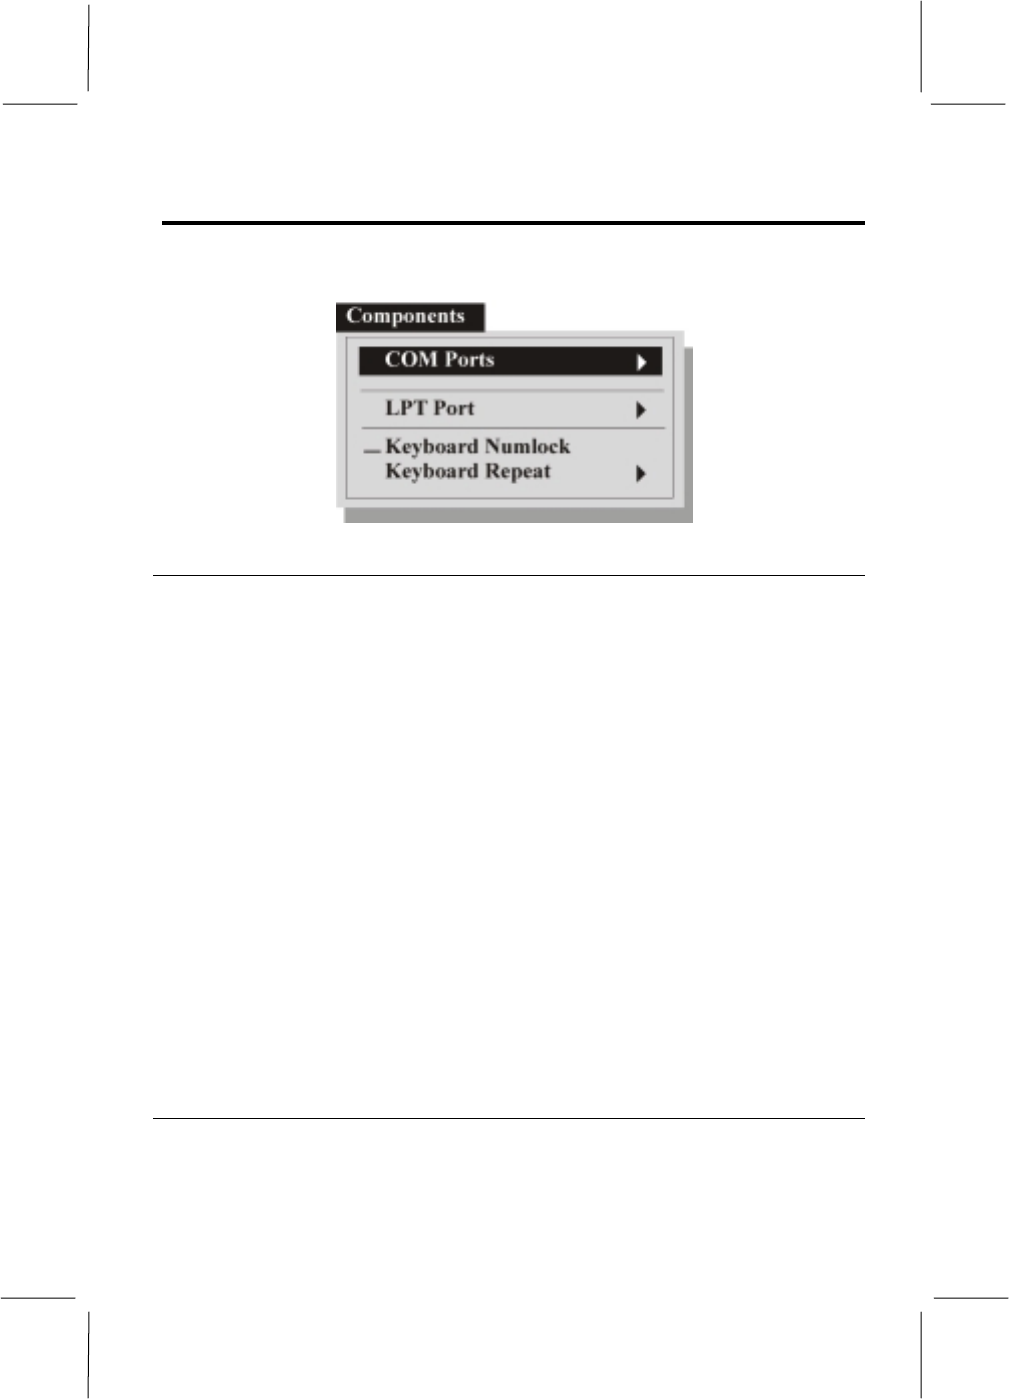
Components
Use the components item on the menu bar to configure some of the peripheral
devices found in your notebook.
COM Ports
When you select this option, a dialog box will pop up allowing you to
enable/disable and to modify the settings of the different serial (COM) ports.
COM A I/O Settings
This option box allows you to enable or disable (None) serial port COM A. If
you decide to enable this serial port you should allocate a serial and interrupt
address to it.
COM B I/O Settings
This option box allows you to enable or disable (None) serial port COM B, by
default used for the infrared port. If you decide to enable this serial port you
should allocate a serial and interrupt address to it.
Mode Setting for COM B
This option box allows you set an infrared mode for serial port COM B.
DMA Setting For Fast IR
This option box allows you to allocate a DMA address to COM B when using
Fast IR mode. If you are not using this infrared mode, this box will be grayed
out.0
LPT Port
When you select this option, a dialog box will pop up allowing you to
customize the parallel port located on the rear of the notebook.

3-8
Port Address
This option box allows you to enable/disable (None) the parallel port in the
back of the notebook. If you decide to enable the parallel port you should
allocate an LPT and interrupt address to it. If you disable the parallel port, all
other boxes on this page will be grayed out.
Port Definition
This option box allows you to set a port mode for parallel communications.
Interrupt Setting
This option box allows you to change the IRQ address for the parallel port.
DMA Setting For ECP Mode
This option box allows you to allocate a DMA address to the parallel port
when using ECP mode. If you are not using ECP mode, this box will be
grayed out.
Keyboard Num Lock
You can either enable or disable this option. If enabled the keyboard Num
Lock function will always be on by default when you start the system.
Keyboard Repeat
When you select this option, a dialog box will pop up allowing you to
customize the keyboard auto repeat rate and repeat delay. These options set the
reaction speed of your keyboard to your typing.

3-9
Power
Use the power item on the menu bar to define the progressive power reduction
of your computer when it is not being used.
Enable Power Saving
You can either enable or disable this option, which acts like a master switch
for all the other power down functions on this menu. If you disable this field,
none of the other system power downs in the setup program will function and
will thus be grayed out. If it is enabled, you are able to set more specific power
saving functions through the other options on the menu.
Low Power Saving
You can either enable or disable this option, which will be grayed out if the
Enable Power Saving option above is not enabled. Enabling this option will
set the power saving function of your system to a preset level that allows
maximum performance and minimum power saving management.
Medium Power Saving
You can either enable or disable this option, which will be grayed out if the
Enable Power Saving option above is not enabled. Enabling this option will
set the power saving function of your system to a preset level that strikes a
balance between performance and power saving management.
High Power Saving
You can either enable or disable this option, which will be grayed out if the
Enable Power Saving option above is not enabled. Enabling this option will

3-10
set the power saving function of your system to a preset level that allows
maximum power saving. If you take your notebook on the road, it is
recommended you use this aggressive level of power saving to ensure the
longest possible battery life.
Customize
When you select this item, a dialog box will pop up allowing you to manually
customize some power down timeouts.
Video Timeout
Since the screen of your notebook consumes a lot of power, this field allows
you to set a separate timeout value for the screen. You can set this field to
either Always On, or a timeout between 30 seconds and 10 minutes. The
screen will blank if the system has been idle for the selected period of time.
Screen activity will be restored immediately when system activity is detected.
Disk Timeout
Since the hard disk of your notebook consumes a lot of power, this field
allows you to set a separate timeout value for the hard disk. You can set this
field to either Always On, or a timeout between 30 seconds and 2 minutes. The
hard disk will be powered down if there has not been any disk access for the
selected period of time. Hard disk power will be restored immediately when
the disk is accessed again.
Global Timeout
This field allows you to set a timeout value for whole system to shut down
power consumption. You can set this field to either Always On, or a timeout
between 1 and 16 minutes. System power will be restored when system
activity is detected.
Monitor Video Activity
You can either enable or disable this option. If enabled, the system will
monitor if there is any activity on the video screen and allow this to interrupt
the video timeout countdown.
Suspend Controls
When you select this item, a dialog box will pop up allowing you to manually
customize some suspend timeouts.
Power Button Function
This field is used to set the activity linked to pressing the power button. If the
field is set to Suspend/Resume, pressing the power button will suspend/resume

3-11
the system to/from the Suspend Type set below. If the field is set to Power
On/Off, pressing the power button will actually power up/down the system.
Lid Switch Function
This field is used to set the activity linked to pressing the lid switch, as in
closing the notebook screen cover. If the field is set to Suspend/Resume,
closing/opening the screen cover will suspend/resume the system to/from the
Suspend Type set below. If the field is set to Blank LCD, closing the screen
cover will merely blank the video screen.
Suspend Type
This box allows you to choose the type of suspend mode the system should
enter when a suspend event or demand occurs.
! Suspend To Disk – This is really another way of turning off your
computer. When you suspend to disk, the contents of your computer’s
memory are copied to your hard disk drive as a file. When the contents of
the memory have been safely stored to disk, your computer turns off. The
next time the computer is turned on after a Suspend to disk, the file on the
hard disk is quickly read back into memory. In just a few moments, your
computer appears exactly as it was when you last suspended to disk.
! Suspend To RAM – In a suspend to RAM, the contents of your
computer’s memory are held intact, while practically all the rest of the
components in your computer turn off completely, or reduce power
consumption to a minimum. In a Suspend to RAM, your computer remains
active but with the minimum possible power consumption. You can return
the computer to full power by pressing the Space Bar. If you are operating
your computer on battery power, a fully-charged battery can maintain a
suspend to RAM for many hours.
Suspend Timeout
This value sets the timeout for the system suspend mode. If the system has
been idle for the selected period of time, the system will enter the user defined
suspend mode. The value can be set to either Never, or to a value ranging from
1 to 30 minutes.
Resume Timer
When you select this item, a dialog box will pop up allowing you to set a
specific date and time for the system to wake up from suspend mode.

3-12
Alarm Resume
You can either enable or disable this option. If this field is enabled, the system
will wake up from suspend mode at the date and time set below. If the field is
set to disabled, the date and time set in the fields below will have no effect.
Resume Day/Resume Hour/Resume Minute
These fields allow you to set a specific date and time for the system to wake
up from suspend mode.
3-13
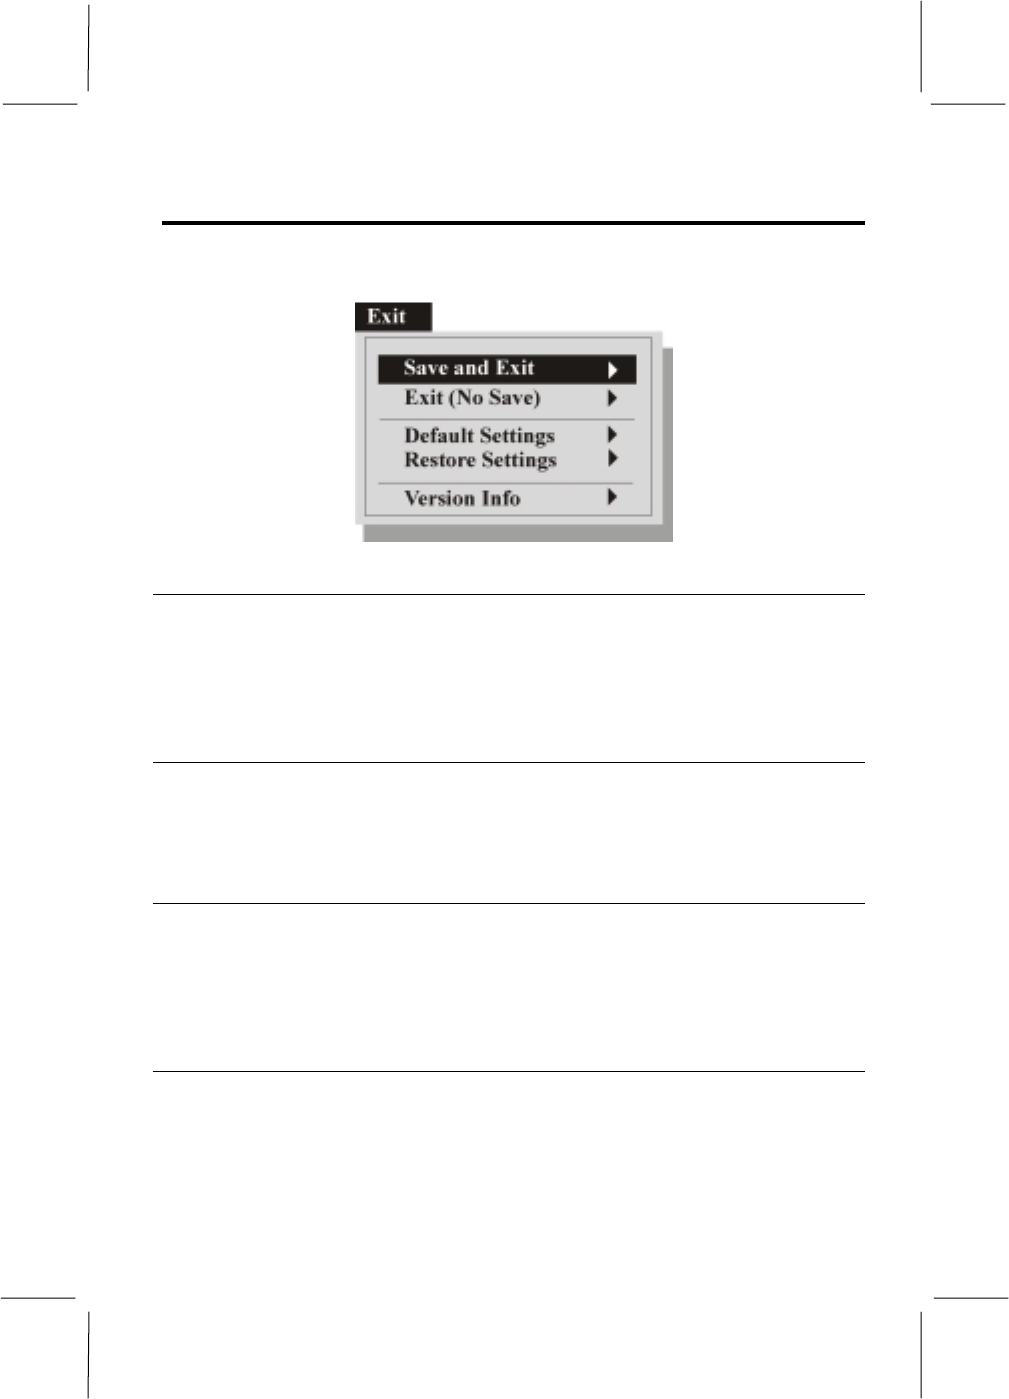
Exit
When you have made changes to the setup utility, either press the [Esc] key, or
highlight the Exit option on the menu bar.
Save and Exit
When you select this item, a dialog box will pop up asking you to confirm
your choice to save the changes you just made and restart the computer. This
dialog box will also appear if you press the [Esc] key in the main screen area
of the system configuration utility.
Exit (No Save)
When you select this option, a dialog box will pop up asking you to confirm
your choice to discard any changes you just made and restart the computer.
The computer will then restart using the old values.
Default Settings
When you select this option, a dialog box will pop up asking you to confirm
your choice to load the default values for all fields. The computer does not
restart. You must use the Save and Exit option above to restart the computer
using the default values.
Restore Settings
When you select this option, a dialog box will pop up asking you to confirm
your choice to restore the current setup values to the original custom values.
The computer does not restart. You must use the Save and Exit option above
to restart the computer using the default values.

3-14
Version Info
When you select this option, a dialog box will pop up informing you about the
version of the System Configuration Utility you are using.