Delta Electronics orporated DN-715 NoteBook User Manual CHAP 6
Delta Electronics Incorporated NoteBook CHAP 6
Contents
USER MANUAL CHAP 6

C
Ch
ha
ap
pt
te
er
r
6
6
Expanding your Notebook
This chapter gives short
descriptions of how to
add devices to your
computer using the
ports and connectors
of the notebook

6-1
Upgrading and Options
Your notebook is designed to provide the best technology currently available,
but recognizing that computer hardware and software change quickly, your
notebook can easily be upgraded and expanded to meet your changing
computing needs.
Nowadays, many devices support Plug and Play technology. This means that
Windows can automatically detect the device when it is connected to your
system. If the device requires a driver, Windows will load it automatically. If
Windows does not have the device driver stored on your notebook, it will ask
you to supply either the original Windows disc or diskettes, or a disc or
diskettes from the device manufacturer so that the device driver can be
installed.
Troubleshooting Devices
If you have problems getting a device to operate, it may be because the device
requires resources that are already being used by another device, for example
an IRQ (interrupt request) or an address space.
1. You can identify this kind of problem by running Windows Device
Manager.
2. Click on the Start button. Point to Settings and click on Control Panel.
3. Double-click the System icon and then select the Device Manager tab in
the System Properties window.
4. Click on the device that you are interested in, and then click on the
Properties button.
5. For many items, the Properties window will have tabs for Drivers and
Resources. You can use these windows to identify if the device is
conflicting with resources used by other devices, and perhaps resolve the
problem.
6. You may be able to resolve some conflicts my making changes to the port
configurations by using the System Configuration Utility (see Chapter 3).
NOTE: If you want to install a new device into system but the system
resource(for example : IRQ) is not enough, you should stop or release
the installed device.

6-2
I/O Ports
The rear and left side of your notebook have a full range of I/O ports that
allow you to connect a variety of peripheral devices to your system. We will
discuss here the ports that are not already covered in a previous part of the
manual.
Printer
Whether you purchase a portable computer or a desktop model, you will
probably connect the printer to the computer via the parallel cable. You might
also connect to a printer via a USB connection, a network connection, a serial
connection, or via the IR (infrared) port. See Chapter 5 for more information
on using the infrared port option. Whatever the nature of the connection, you
will need to set up the necessary drivers for the printer. You can vary the port
connection, or network setup, at the step it is required.
Installing Your Printer
When you first boot your notebook, you will be offered the opportunity to set
up your printer. If you did not set up your printer at that time, or if you have
added a printer to your system, you can follow the steps below to prepare your
printer for use in Windows.
Select Start/Settings/Printers and then Add Printer. In the “Add Printer
Wizard” click on Next. Scroll through the list of manufacturers and printers to
find yours. If your model is not listed here, check your printer documentation
for a compatible printer to use as a source of the printer driver. The program
will then ask you to identify the connection for that printer, usually LPT 1.
You will then be prompted for a name for this printer. You can accept the
default, but you can choose any name you want. If you are going to work in an
environment where there might be more than one printer of the same model,
the names become an important way of distinguishing your printers from each
other. On the same screen you are also asked whether this will be your default
printer.
You will then be asked if you want to print a test page. This would be a good
idea if this is a new printer, or the first printer that you have set up for your
notebook.
When Windows has finished loading your printer drivers, you will be returned
to the Printers window. You should now see your printer listed there. You
may also see some other drivers, e.g. for fax software.
6-3
You may have noticed that there is a fax driver in your printer choices. You
can select the fax program as a printer device for any Windows-based
document that you are running in Windows. The document will be sent to the
fax program just as it would be sent to the printer.
Other Parallel Devices
Your parallel port can also be used with other parallel devices, e.g.. Your
parallel port is capable of supporting enhanced EPP and ECP transfer modes.
EPP transfer mode provides significant performances increases for transfer to
1-way parallel devices, such as printers. ECP transfer mode provides increased
performance for 2-way transfers such as those used to link another computer to
your notebook system for file transfer. You might need to check the
documentation of your device to determine the modes supported. If you need
to change the transfer mode of your printer, you can do so in the System
Configuration Utility. See Chapter 3 for information on the System
Configuration Utility.
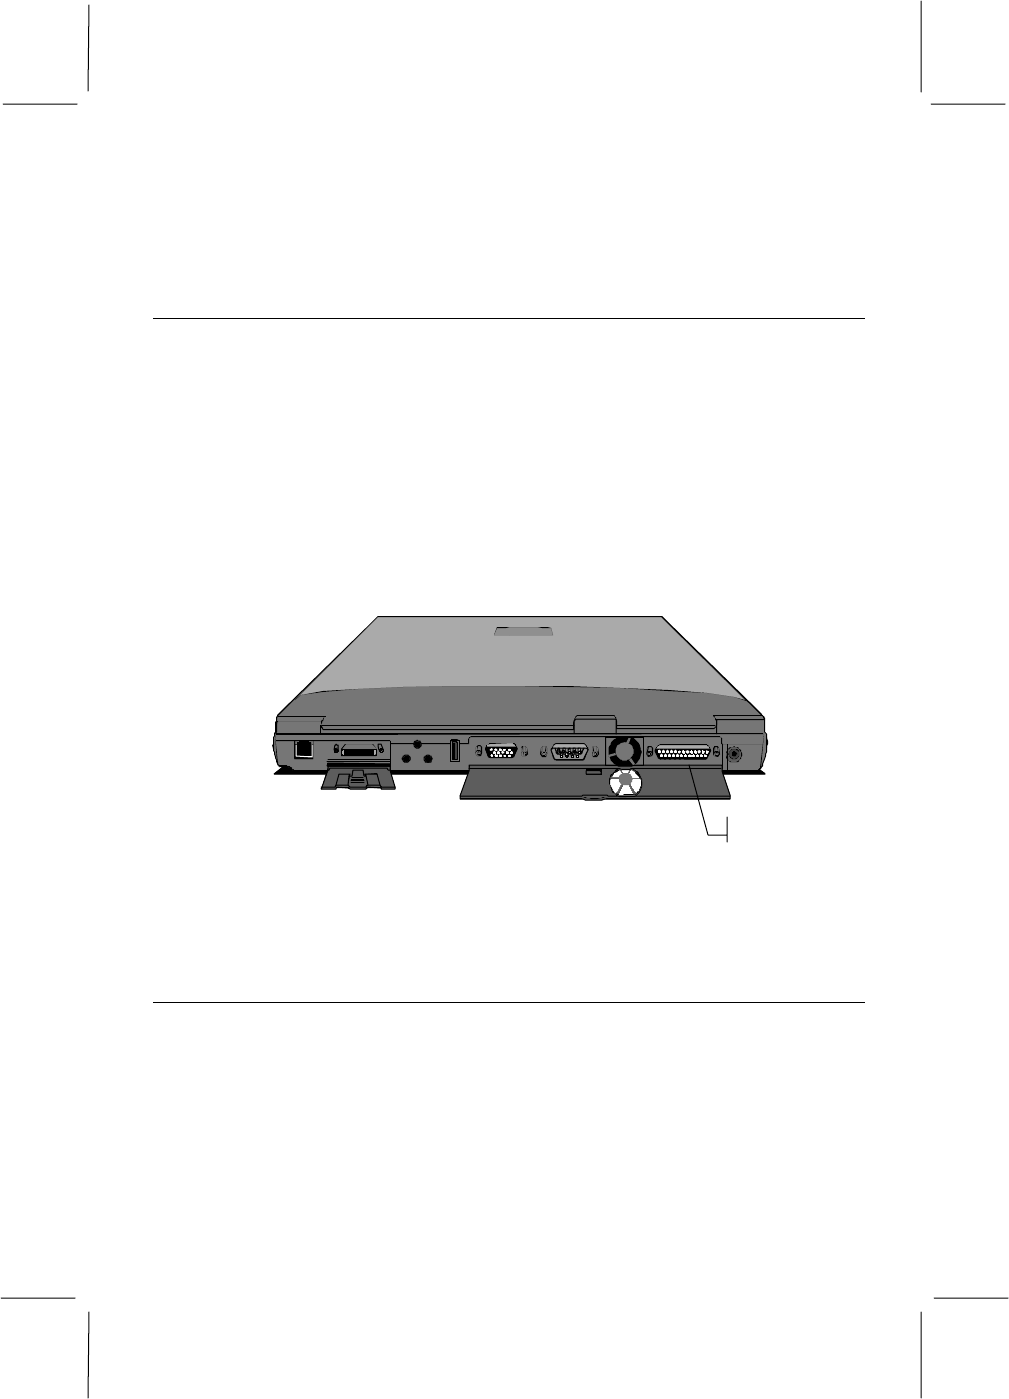
Parallel Port
Figure 6-1: Parallel Port
Be sure to shut down your system before connecting the device to your
notebook to prevent damage to your system and the parallel device.
External Pointing Device
You can connect a serial mouse to your notebook. If you use a serial mouse,
connect the mouse to the serial port located on the backside of your notebook.
6-4
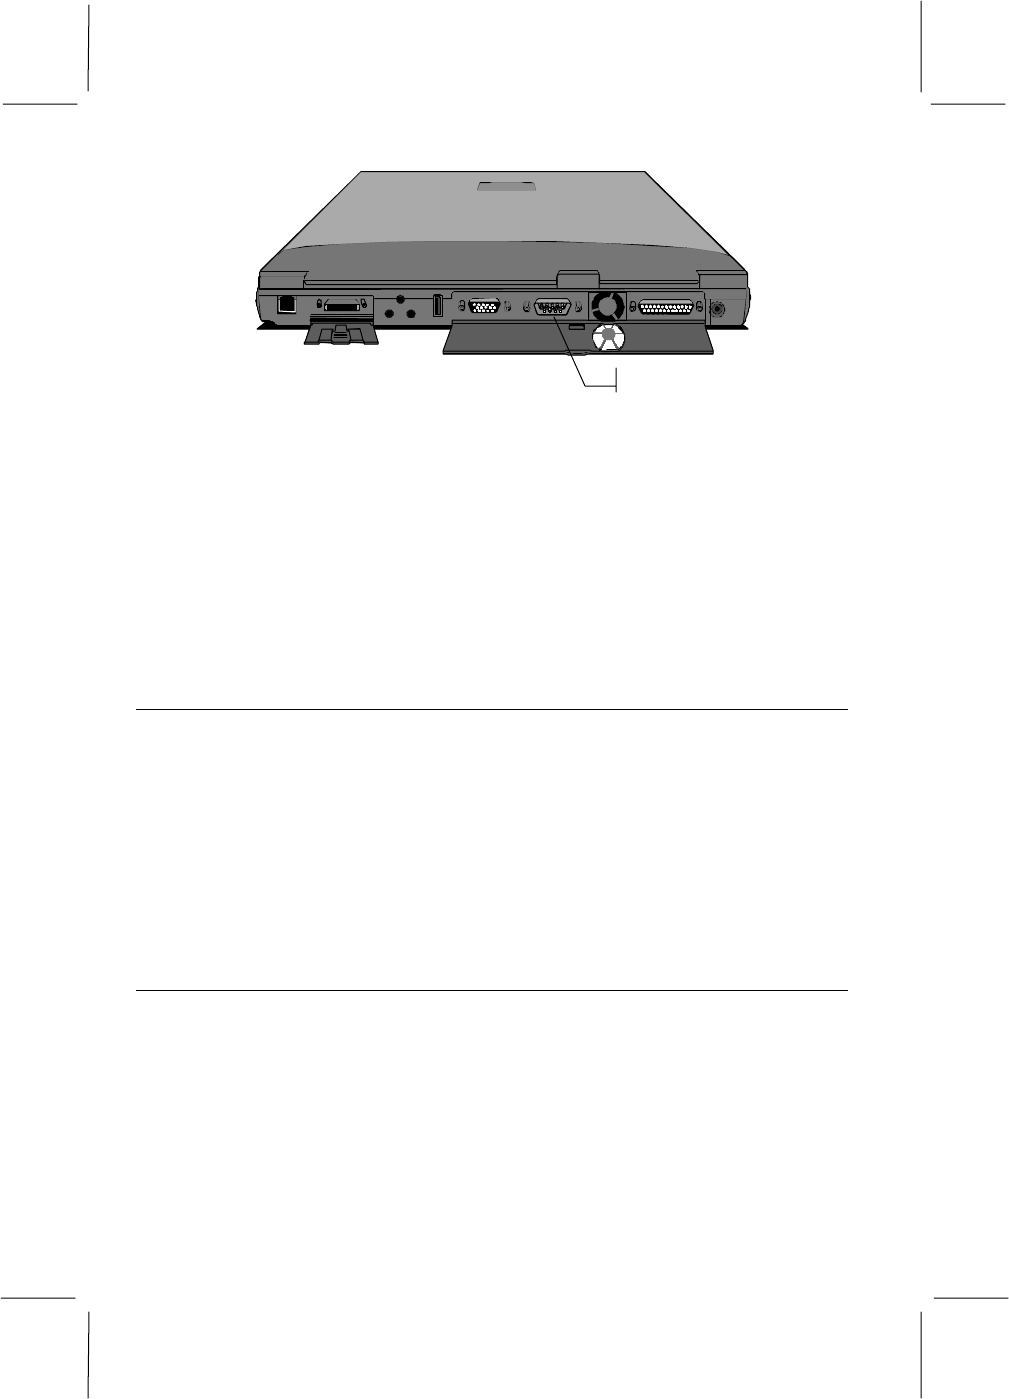
Serial Port
Figure 6-2: Serial Port
If your serial mouse is Windows compliant, the notebook should detect new
hardware and take you through the process of installing the hardware. If
Windows does not recognize your serial mouse, you will need to use Windows
to Add New Hardware (Start/Settings/Control Panel/Add New Hardware).
You can have Windows search for the mouse, or if you know the correct
settings, you can set up the mouse manually. If Windows does not have drivers
for your mouse, you can use a standard driver, or use a disk provided by the
mouse manufacturer.
Serial Devices
The Communications Ports on your notebook allow you to connect external
devices such as a mouse, a modem, a printer, a scanner, or another computer to
the notebook.
Devices connected after the notebook is powered up may not work reliable.
Connect devices to the serial port while the system is turned off. This not only
helps to protect your notebook from damage, but turning on the notebook after
connecting an external device to the port allows the computer to prepare itself
and the device to operate together.
USB Ports
The notebook is equipped with one USB port, which allows you to take
advantage of a high-speed connection to newer devices. A USB port allows
you to connect up to 127 devices through a single port, at very high transfer
rates of up to 12 Mbps. Devices can be connected through a USB hub, an
external device that provides power and connection for other USB devices, or
connected one to the other in a chain. Your notebook will automatically check
the USB port to determine what devices are attached. If they are new to your
system, the Plug-and-Play interface will detect the new equipment. The
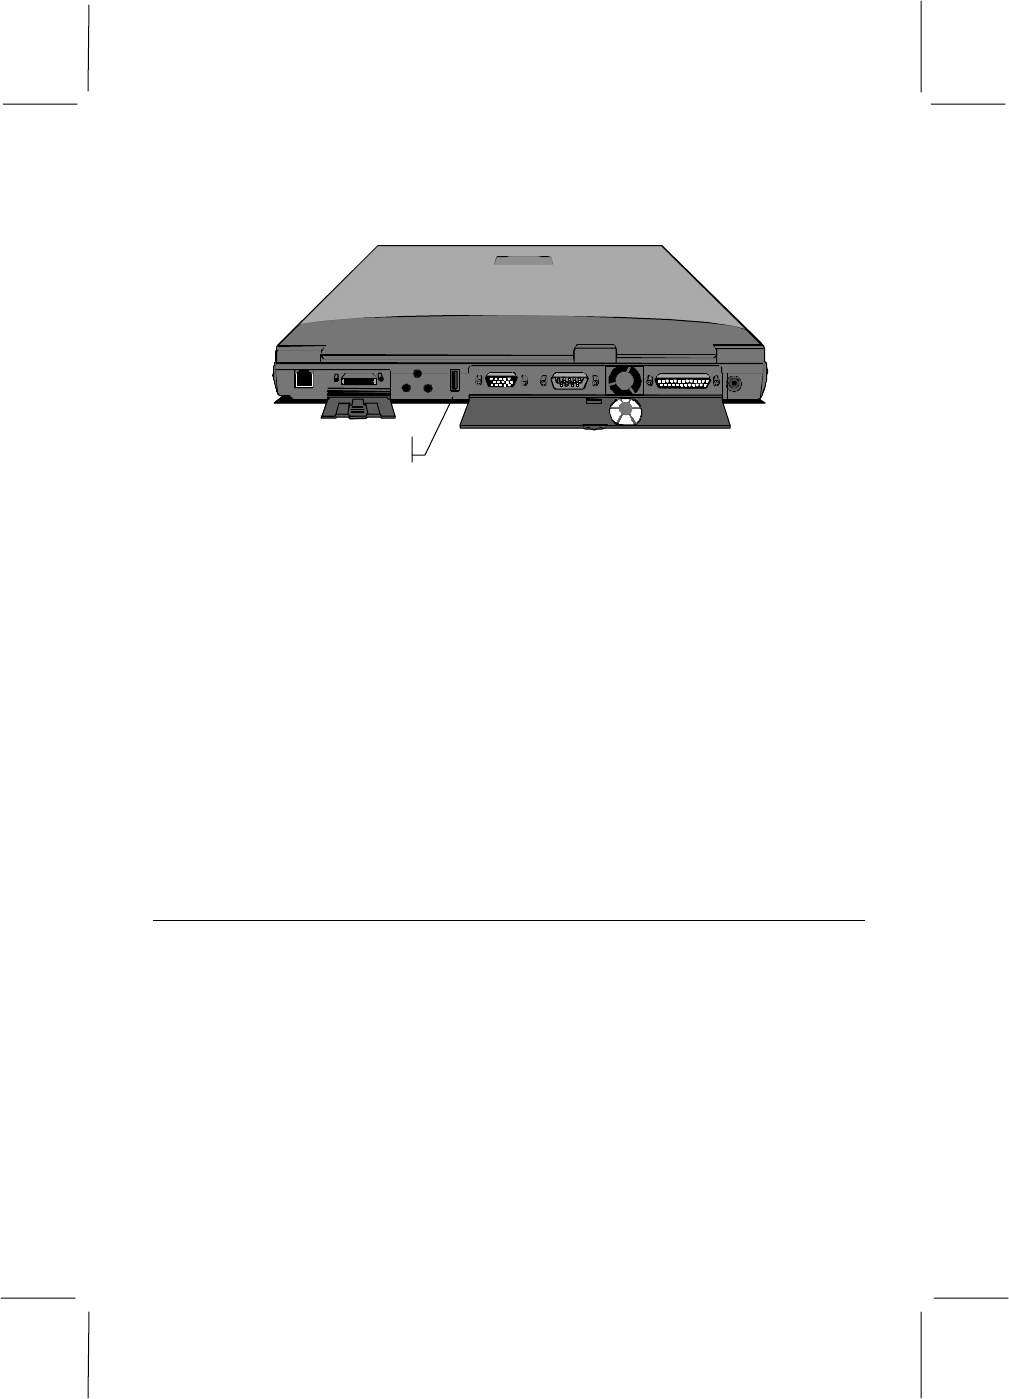
6-5
constant communication between the USB port and your devices allows you to
connect and disconnect devices without shutting down first.
USB Port
Figure 6-3: USB Port
You can connect a USB device by plugging the USB cable into the USB port
on the left side of the notebook.
The system should automatically detect the new device and make it available
for you. If the device is not immediately recognized, check the documentation
for the device.
The USB port not only provides a connection between your notebook and the
external devices, but they are also capable of providing electrical current to
run those devices. If you make considerable use of your notebook under
battery power, you should consider how USB devices might drain your battery
or slow battery charging. If you have a USB device that has its own electrical
power source, you should consider using this device as a hub for your other
devices. These devices can then draw power through the hub device, leaving
your notebook free to conserve or recharge battery power.
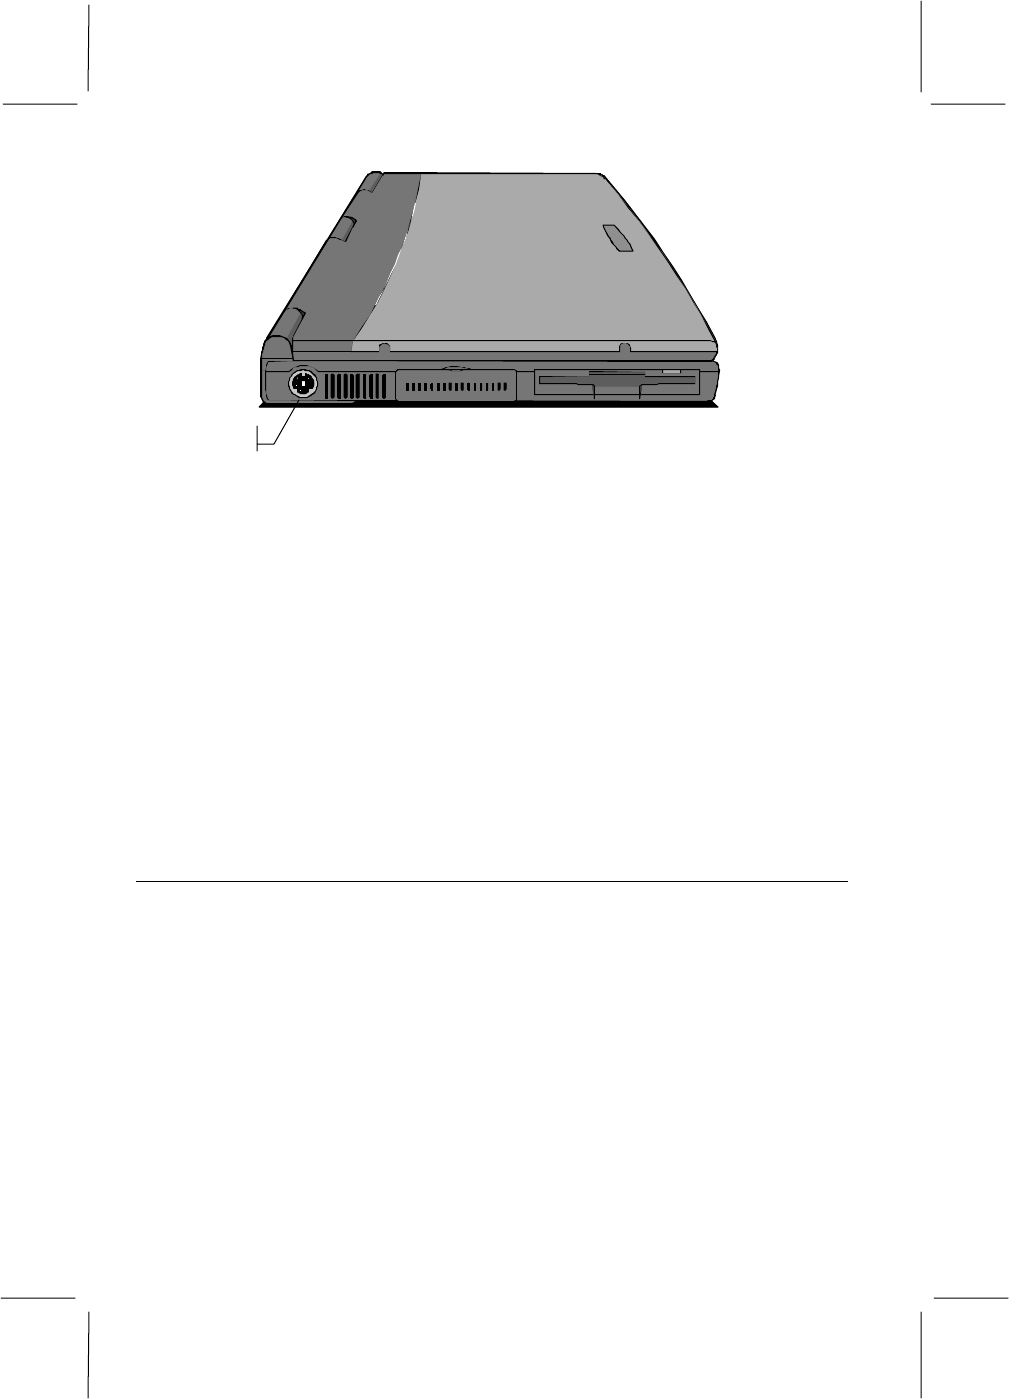
Using the PS/2 Port
The PS/2 port on the left side of the notebook lets you connect an external
keyboard to your system, such as a full size AT-enhanced keyboard, or an
external pointing device to your system, such as a mouse or a trackball. The
PS/2 device must have a mini-DIN PS/2 connector. If your device uses a larger
AT DIN connector or a 9-pin serial connector, you can easily get an adapter to
change it to a mini-DIN PS/2 connector.
6-6
PS/2 Por
t
Figure 6-4: PS/2 Port
You can plug in, and unplug an external keyboard even when your system is
turned on. When you connect the external keyboard to your system, the built-
in keyboard remains active and you can enter data through either keyboard.
When you use this port for connecting an external PS/2 pointing device to
your system, such as a mouse or a trackball, you can plug in, and unplug, the
external pointing device even when your system is turned on. When you
connect the device to your system, the built-in touchpad remains active and
you can control the screen pointer with either the touchpad or the external
pointing device.
Using the other Ports
The use of the infrared port is explained in Chapter 4.
The use of the AC adapter is explained in Chapter 4.
The use of the telephone jack is explained in Chapter 4.
The use of the audio jacks is explained in Chapter 5.
The use of the external monitor port and the TV-out port is explained in
Chapter 5.

6-7
Using the Optional Port Replicator
The optional port replicator duplicates most of the ports of your notebook. If
you usually connect your notebook to a number of peripheral devices, such as
a printer, a monitor, a mouse, a scanner, and so on, you can permanently
connect the devices to the port replicator. When you dock your notebook into
the port replicator, you will have immediate access to the devices connected to
the replicator.
NOTE: The ports on the back of the notebook are no longer accessible
when you connect the port replicator to the notebook. These ports are all
duplicated on the replicator, including one extra Game, one S-video, and
two PS/2 ports.
Port Replicator Components
Ports duplicated on the port replicator:
! Serial Port, explained earlier in this chapter.
! Parallel Port, explained earlier in this chapter.
! External Monitor Port, explained in Chapter 5.
! Line out/Line in/Microphone in - audio jacks, explained in Chapter 5.
! PS/2 Ports (Two), for simultaneous connection of a keyboard and a mouse.
Usage is explained earlier in this chapter.
! USB Ports (Two), explained earlier in this chapter.
! TV-out Port, explained in Chapter 5.
The use of these ports is explained elsewhere in this manual, as indicated.
New ports included on the replicator:
Game
The 15-pin Game port can be used to connect your computer to an IBM-
compatible joystick or similar device. The notebook will automatically detect
if you are connecting a joystick device.
S-video
The S-video jack can be used to output video to devices that use S-video plugs
such as camcorders.
6-8
Installing Memory
This notebook has a memory compartment, which contains two sockets for
industry standard SODIMMS (small outline dual in-line memory modules).
These modules are readily available from numerous third-party manufacturers.
The memory compartment is located in the base of the notebook. Install extra
memory as follows:
1. Before you begin, turn off your computer, disconnect the AC adapter, and
remove the internal battery.
2. Take precautions to prevent static electricity causing damage to your
memory card as follows:
• If you can, wear a grounding wrist strap that’s connected to a safely
grounded connection during the installation.
• Discharge any accumulated static electricity by touching the metal
case of a safely grounded device before beginning the installation.
• Leave all electronic components inside their static-proof packaging
until they are required for the installation.
• Handle all circuit boards and electronic components carefully. Hold
boards by the edges only. Do not flex or stress circuit boards.
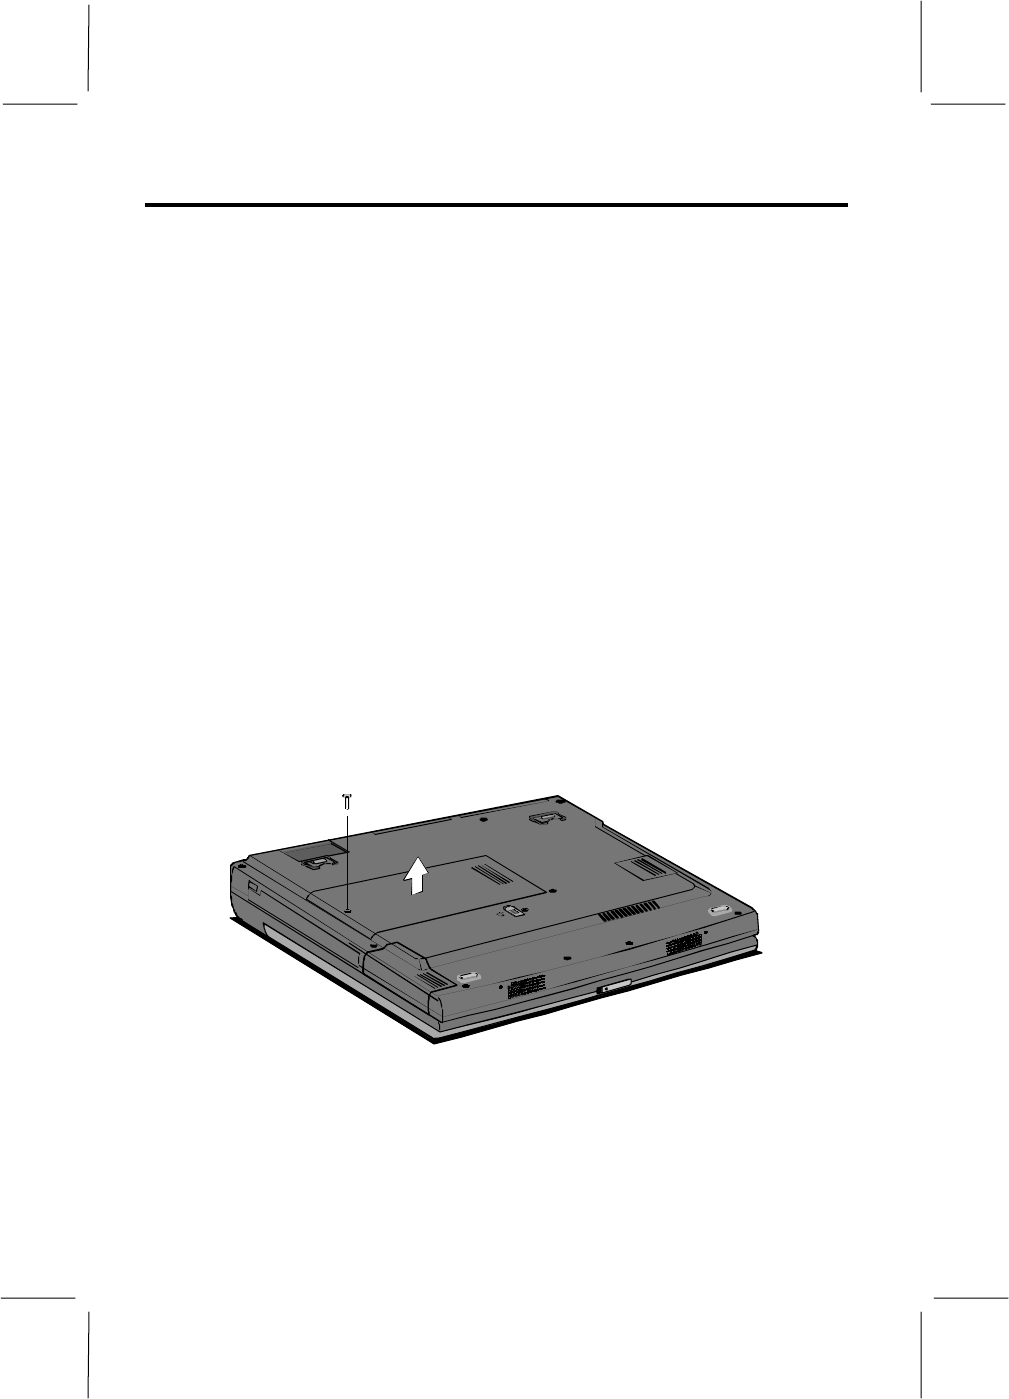
3. Locate the memory compartment cover and remove the locking screw.
Figure 6-5: Removing the Memory Compartment Cover
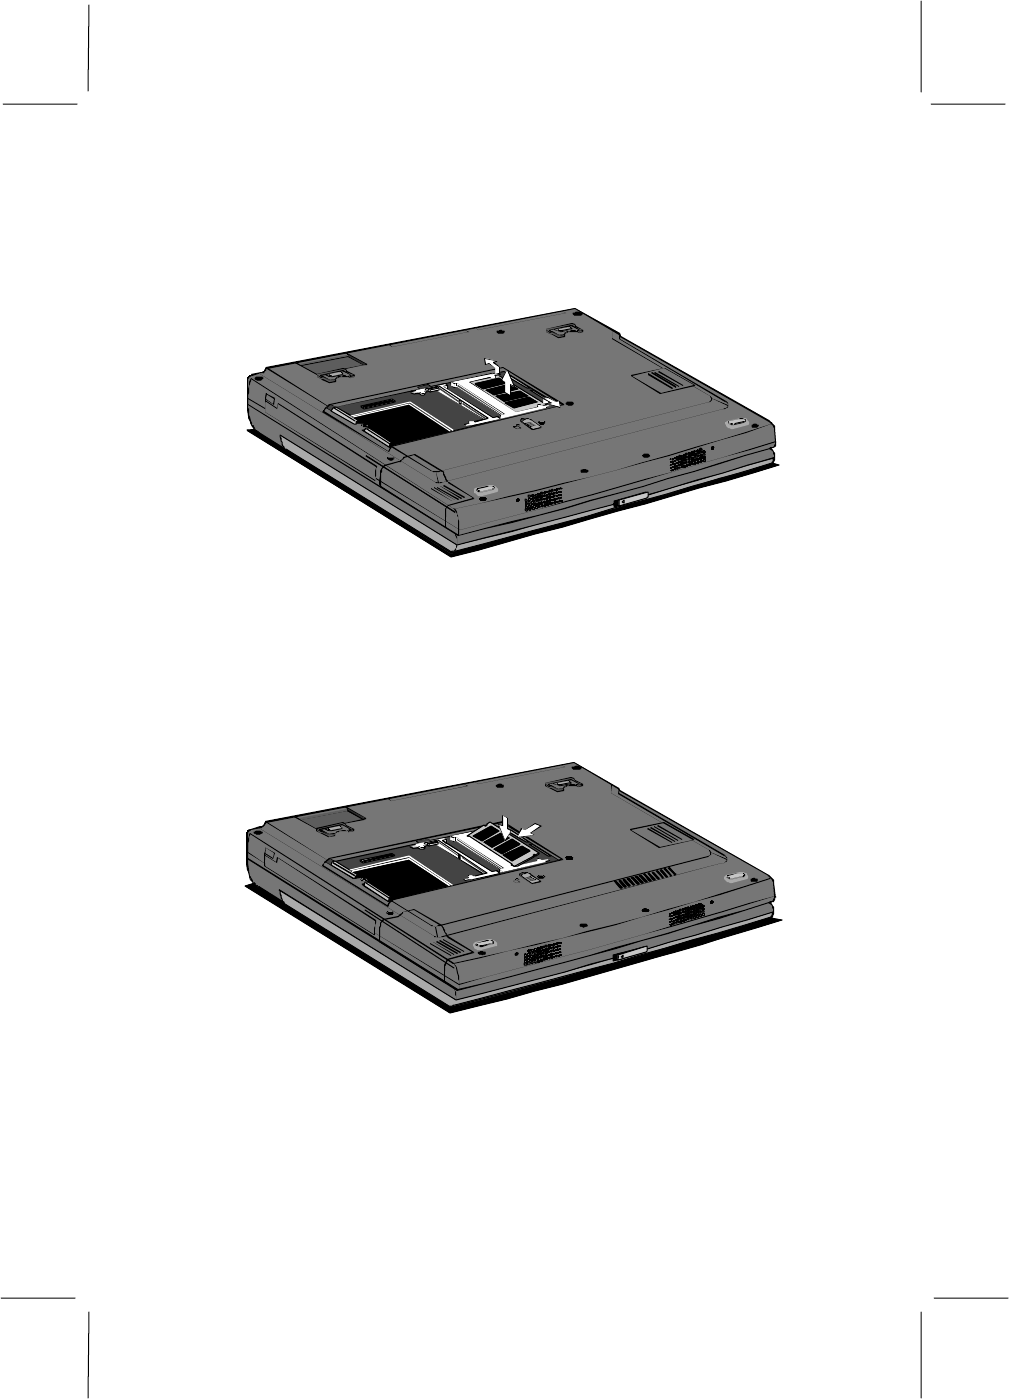
4. Inside the memory compartment, you will see two sockets for the
SODIMMs. In some configurations of this notebook, a 32 or 64 MB
module will occupy one of the sockets. You can install the second socket
with another SODIMM. You can install any size of SODIMM from 8 MB
up to 128 MB in any of the free sockets.
6-9
5. If both sockets are occupied by SODIMMs, and you want to change one or
both of the SODIMMs for a higher capacity module, locate the locking
latches at each side of the socket. Pull these locking latches outwards. This
will allow the socket and module to pop up to an angle of about 20
degrees. You can then slide the module out of the SODIMM socket.
Figure 6-6: Removing a Memory Module
6. Hold the new module at the same angle as the socket and slide the edge
connector side of the module into the socket. The edge connector has a
cutout and the socket has a notch so that it can only be installed in the
correct way. Press the module into the socket until you can no longer see
the gold-teeth of the edge connector.
Figure 6-7: Inserting a Memory Module
7. Press the module down into the memory compartment so that the locking
latches on either side of the socket engage, and hold the card down flat
inside the compartment.
8. Replace the memory compartment cover and secure it with the locking
screw.
6-10
9. Reconnect the AC adapter and/or replace the internal battery. Restart your
notebook. When the system POST (power on self test) appears, you can
verify that the system has automatically recognized the new memory
configuration.
NOTE: Please note that your notebook has a preinstalled suspend-to-
disk partition to support the amount of memory that was factory
installed in your notebook. If you expand the memory beyond the
capacity of the original suspend-to-disk partition, you will need to create
a larger partition on your hard disk drive. This may involve reorganizing
your complete hard disk drive. Please refer to a certified technician
familiar with this notebook if you are not familiar with this procedure.
Modem
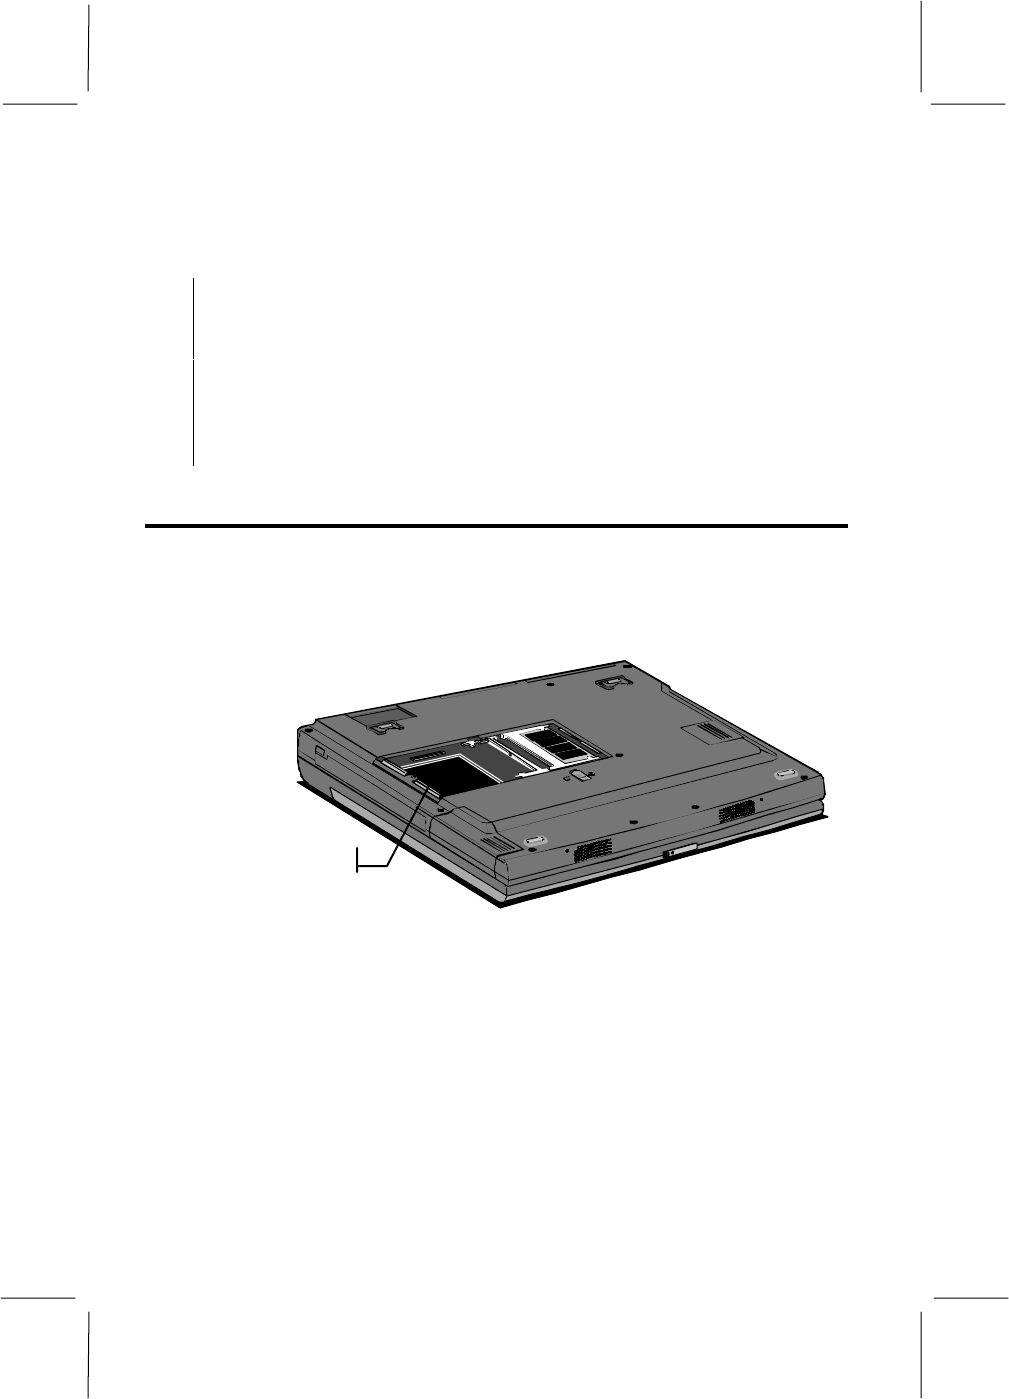
Inside the memory compartment there is also space for the optional internal
fax/modem device. The fax/modem is a factory-installed option. If your
notebook did not originally come with this option, and you want to expand
your notebook with a modem, contact your vendor for more information.
Modem compartment
Figure 6-8: Modem Compartment