Festool CTFIM Wireless Vacuum Control Sytsem based on BTLE implemented within multiple devices. User Manual OBJ BUCH 0000000962 001
Festool GmbH Wireless Vacuum Control Sytsem based on BTLE implemented within multiple devices. OBJ BUCH 0000000962 001
Festool >
Contents
- 1. Users Manual-1
- 2. Users Manual-2
- 3. Users Manual-3
- 4. Users Manual-4
- 5. Users Manual-5
Users Manual-1
10033900_003
Originalbetriebsanleitung
D
Original operating manual
GB
Notice d’utilisation d’origine
F
PL
CZ
CT-F I, CT-F I/M
E
I
NL
S
FIN
DK
N
P
Manual de instrucciones original
Istruzioni per l'uso originali
Originele gebruiksaanwijzing
Originalbruksanvisning
Alkuperäiset käyttöohjeet
Original brugsanvisning
Originalbruksanvisning
Manual de instruções original
Originál návodu k obsluze
Oryginalna instrukcja eksploatacji
BG
EST
HR
LV
LT
SLO
H
GR
SK
RO
TR
Оригинално “Ръководство за работа”
Originaalkasutusjuhend
Izvornik naputka za uporabu
Oriģinālā lietošanas pamācība
Originali naudojimo instrukcija
Originalna navodila za uporabo
Eredeti kezelési utasítás
Γνήσιες οδηγίες χειρισµού
Originálny návod na používanie
Manual de utilizare original
Orijinal kullanım kılavuzu
1-1
1-2
2-1
1-3
CT-F I CT-F I / M
1-5
1-4
2-2
12
Ø 36
Ø 27
CT-F I
3
CT-F I / M 4
12
34
45°
45°
CT-F I
512
3
Fernbedienung/Nachrüst-
Empfangsmodul
Remote control/Retrofit
receiving module
Contrôle à distance/Module de
réception de rattrapage
Seriennummer *
Serial number *
N° de série *
(T-Nr.)
CT-F I 10029918
CT- F I/M 10026515
EG-Konformitätserklärung.
Wir erklären in alleiniger Ver-
antwortung, dass dieses Produkt
allen ein-schlägigen Bestimmun-
gen der folgenden Richtlinien
einschließlich ihrer Änderungen
entspricht und mit den folgenden
Normen übereinstimmt:
EC-Declaration of
Conformity. We declare under our
sole responsibility that this
product is in conformity with all
relevant provisions of the
following directives including their
amendments and complies with
the following standards:
CE-Déclaration de
conformité communautaire. Nous
déclarons sous notre propre
responsabilité que ce produit est
conforme aux normes ou
documents de normalisation
suivants:
CE-Declaración de
conformidad. Declaramos bajo
nuestra exclusiva responsabilidad
que este producto corresponde a
las siguientes normas o docu-
mentos normalizados:
CE-Dichiarazione di
conformità. Dichiariamo sotto la
nostra esclusiva responsabilità
che il presente prodotto e
conforme alle norme e ai
documenti normativi seguenti:
EG-conformiteitsverkla-
ring. Wij verklaren op eigen
verantwoordelijkheid dat dit
produkt voldoet aan de volgende
normen of normatieve documen-
ten:
EG-konformitetsförklaring.
Vi förklarar i eget ansvar, att
denna produkt stämmer överens
med följande normer och
normativa dokument:
EY-standardinmukaisuus-
vakuutus. Vakuutamme yksinvas-
tuullisina, etta tuote on seuraavi-
en standardien ja normatiivisten
ohjeiden mukainen:
EF-konformitetserklæring
Vi erklærer at have alene ansvaret
for, at dette produkt er i overens-
stemmelse med de følgende
normer eller normative dokumen-
ter:
E-Konformitetserklæring Vi
erklærer på eget ansvar at dette
produktet er i overensstemmelse
med følgende normer eller
normative dokumenter:
CE-Declaração de
conformidade: Declaramos, sob a
nossa exclusiva responsabilidade,
que este produto corresponde às
normas ou aos documentos
normativos citados a seguir:
Декларация соответствия
ЕС: Мы заявляем с
исключительной
ответственностью, что данный
продукт соответствует
следующим нормам или
нормативным документам:
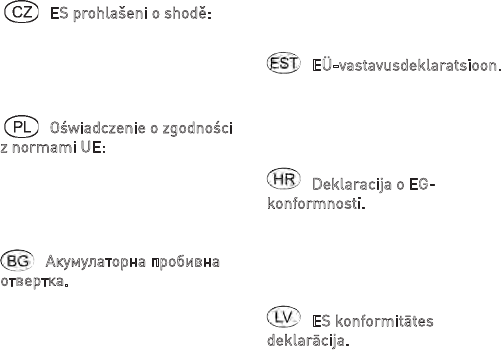
ES prohlašeni o shodě:
Prohlašujeme s veškerou
odpovědnosti, že tento vyrobek je
ve shodě s nasledujicimi normami
nebo normativnimi dokumenty: .
Oświadczenie o zgodności
z normami UE: Niniejszym
oświadczamy na własną odpowie-
dzialność, że produkt ten spełnia
następujące normy lub dokumenty
normatywne:
Акумулаторна пробивна
отвертка. Ние обявяваме с
еднолична отговорност, че този
продукт е съгласуван с всички
релевантни изисквания на
следните ръководни линии,
норми или нормативни
документи:
EÜ-vastavusdeklaratsioon.
Kinnitame ainuvastutajatena, et
käesolev toode vastab järgmistele
standarditele ja
normdokumentidele:
Deklaracija o EG-
konformnosti. Izjavljujemo pod
vlastitom odgovornošću da je ovaj
proizvod u skladu sa svim važnim
zahtjevima sljedećih smjernica,
normi ili normativnih isprava:
ES konformitātes
deklarācija. Uzņemoties pilnu
atbildību, mēs apliecinām, ka šis
produkts atbilst šādām
direktīvām, standartiem vai
normatīvajiem dokumentiem:
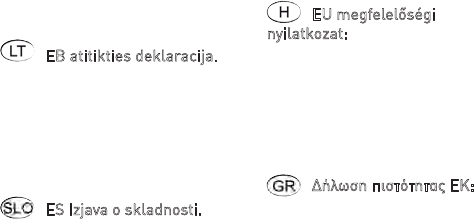
EB atitikties deklaracija.
Prisiimdami visą atsakomybę
pareiškiame, kad šis gaminys
tenkina visus aktualius šių
direktyvų, normų arba
normatyvinių dokumentų
reikalavimus:
ES Izjava o skladnosti. S
polno odgovornostjo izjavljamo, da
je ta proizvod skladen z vsemi
veljavnimi zahtevami naslednjih
direktiv, standardov ali
normativnih dokumentov:
EU megfelelőségi
nyilatkozat: Kizárólagos
felelõsségünk tudatában
kijelentjük, hogy ez a termék az
alábbi irányelvek, szabványok vagy
normatív dokumentumok minden
vonatkozó követelményének
megfelel:
Δήλωση πιστότητας ΕΚ:
Δηλώνουμε με αποκλειστική μας
ευθύνη, ότι αυτό το προϊόν
ταυτίζεται με όλες τις σχετικές
απαιτήσεις των ακόλουθων
οδηγιών, προτύπων ή εγγράφων
τυποποίησης:
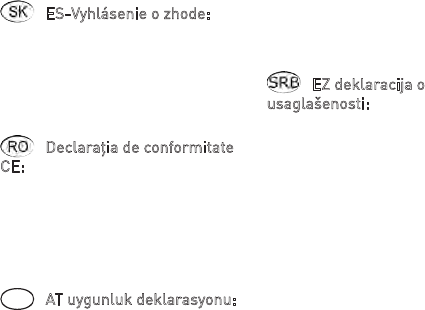
ES-Vyhlásenie o zhode:
Zodpovedne vyhlasujeme, že tento
produkt súhlasí so všetkými
relevantnými požiadavkami
nasledujúcich smerníc, noriem
alebo normatívnych dokumentov:
Declaraţia de conformitate
CE: Declarăm pe proprie
răspundere că acest produs este
conform cu toate cerinţele
relevante din următoarele
directive, norme sau documente
normative:
TR AT uygunluk deklarasyonu:
Bütün sorumlulukları firmamıza
ait olmak kaydıyla bu ürünün
aşağıda açıklanan ilgili direktifle-
rin yönetmeliklerini, norm ve
norm dokümanlarının koşullarını
karşıladığını taahhüt ederiz.
EZ deklaracija o
usaglašenosti: Mi izjavljujemo na
sopstvenu odgovornost da je ovaj
proizvod usklađen sa svim
relevantnim zahtevima sledece
direktive, standardima i
normativnim dokumentima:
718402_A
____________________________
2006/42/EG, 2014/30/EU, 2014/53/
EU, 2011/65/EU
EN 60335-1: 2012, EN 60335-2-69:
2012, EN 55014-1: 2006 + A1: 2009 +
A2: 2011, EN 55014-2: 2015, EN 61000-
3-2: 2014, EN 61000-3-3: 2013, EN
50581: 2012, EN300328:2016 V2.1.1,
EN 301489-1:2017 V.2.1.1, EN301489-
17:2017 V3.1.1
____________________________
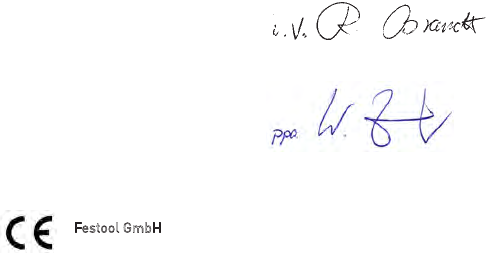
Festool GmbH
Wertstr. 20, D-73240
Wendlingen
GERMANY
Ralf Brandt
Head of Standardization & Approbation
Wolfgang Zondler
Head of Research, Development
and Technical Documentation
Wendlingen, 14.09.2017
* im definierten Seriennummer-Bereich (S-
Nr.) von 40000000 - 49999999
in the specified serial number range (S-Nr.)
from 40000000 - 49999999
dans la plage de numéro de série (S-Nr.) de
40000000 - 49999999
D Originalbetriebsanleitung
12
Originalbetriebsanleitung
1Symbole
2 Allgemeine Sicherheitshin-
weise
Warnung! Lesen Sie alle Si-
cherheitshinweise und Anwei-
sungen.
Versäumnisse bei der
Einhaltung der Sicherheitshinweise und
Anweisungen können elektrischen
Schlag, Brand und/oder schwere Verlet-
zungen verursachen.
Bewahren Sie alle Sicherheitshinweise
und Anleitungen für die Zukunft auf.
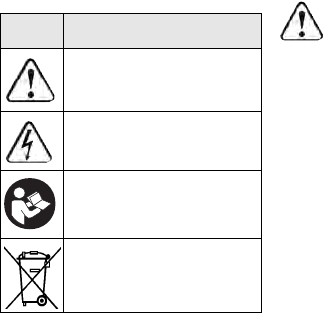
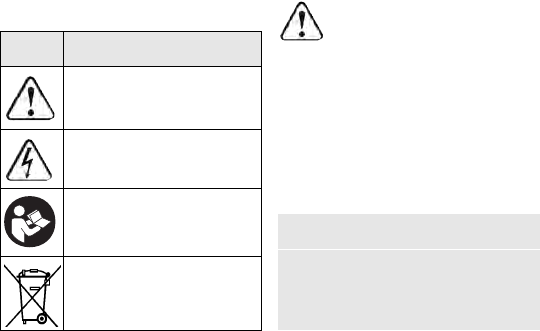
Symbol Bedeutung
Warnung vor allgemeiner
Gefahr
Warnung vor Stromschlag
Betriebsanleitung, Sicher-
heitshinweise lesen!
Nicht in den Hausmüll geben.

13
Originalbetriebsanleitung D
3 Technische Daten
4 Bestimmungsgemäße Ver-
wendung
Die Fernbedienung sowie ein Bluetooth-
Akkupack in Verbindung mit einem Akku-
Elektrowerkzeug können ein Absaugmo-
bil automatisch ein- und ausschalten,
wenn am Absaugmobil ein Nachrüst-
Empfangsmodul eingebaut ist. Das Nach-
rüst-Empfangsmodul kann an allen Abs-
saugmobilen mit Modulschacht einge-
setzt werden (CT 26/36/48).
Bei nicht bestimmungsgemä-
ßem Gebrauch haftet der Be-
nutzer.
5 Geräteelemente
Fernbedienung
Fernbedienung CT-F I
Nachrüst-Empfangs-
modul
CT-F I/M
Frequenz 2402 Mhz – 2480
Mhz
Äquivalente isotrope
Strahlungsleistung
(EIRP)
< 10 dBm
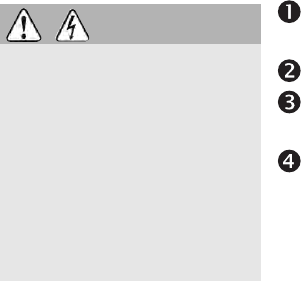
[1-1]
Verbindungstaste
[1-2]
LED-Anzeige
[1-3]
MAN-Taste (manuelles Einschal-
ten)
[1-4]
Aufnahme für Befestigungsbän-
der Fernbedienung

D Originalbetriebsanleitung
14
Nachrüst-Empfangsmodul
Die angegebenen Abbildungen* befinden
sich am Anfang der Betriebsanleitung.
* Abbildungen können vom Original ab-
weichen.
6 Betrieb
[1-5]
Befestigungsbänder Fernbedie-
nung (Ø 27/Ø 36)
[2-1]
Verbindungstaste
[2-2]
LED-Anzeige
VORSICHT
Verletzungsgefahr, unerwarteter An-
lauf Absaugmobil
Vor allen Arbeiten mit dem Absaugmo-
bil prüfen welche Fernbedienung und
welches Akku-Elektrowerkzeug mit
dem Absaugmobil verbunden sind!
15
Originalbetriebsanleitung D
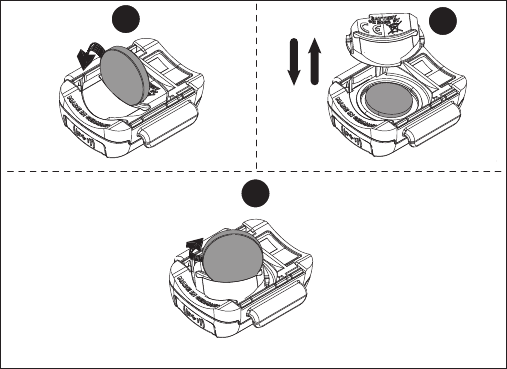
6.1 Nachrüst-Empfangsmodul Montage [4]
Die Innensechskantschrauben an
der Blende oben und unten entfer-
nen.
Die Blende am Absaugmobil abneh-
men.
Das Nachrüst-Empfangsmodul pas-
send mit der Elektronik am Absaugmobil
einstecken.
Die Innensechskantschrauben am
Nachrüst-Empfangsmodul oben und un-
ten festziehen.
LED-Anzeige
Die LED-Anzeige
[2-2]
zeigt die Bluetoo-
th-Funktionalität des Nachrüst-Emp-
fangsmoduls an:
WARNUNG
Verletzungsgefahr, Stromschlag
Vor allen Arbeiten an der Maschine
stets den Netzstecker aus der Steck-
dose ziehen!
Der Einbau des Nachrüst-Empfangs-
moduls darf nur von einer autorisier-
ten Elektrofachkraft durchgeführt
werden.
Nach dem Einbau eine elektrische Si-
cherheitsprüfung entsprechend der
geltenden Vorschriften durchführen.

D Originalbetriebsanleitung
16
Verbinden eines mobilen Endgeräts
Verfügbar ab Mitte 2018.
Um zu überprüfen ob es ein Software-Up-
date gibt, das die Funktionalität des Nach-
rüst-Empfangsmoduls erweitert oder be-
stehende Funktionen verbessert, kann
eine Bluetooth Verbindung mit der
Festool-App aufgebaut werden.
Die Verbindungstaste am Nachrüst-
Empfangsmodul
[2-1]
drücken, bis die
LED-Anzeige schnell rotierend blinkt
[2-2]
.
Das Nachrüstempfangsmodul ist für
60 Sekunden verbindungsbereit.
Den Anweisungen in der Festool-App
folgen.
6.2 Fernbedienung
Montage
Die Fernbedienung mit dem entspre-
chenden Befestigungsband
[1-5]
am
Saugschlauch anbringen
[3]
.
LED-Anzeige
Die LED-Anzeige der Fernbedienung
zeigt zusätzlich zur Bluetooth-Funktiona-
langsam rotierendes blaues
Blinken
bereit um ein Akku-Elektro-
werkzeug temporär zu ver-
binden
schnell rotierendes blaues
Blinken
bereit um eine Fernbedie-
nung dauerhaft zu verbinden
17
Originalbetriebsanleitung D
lität den Ladezustand der Fernbedienung
an:
Verbinden eines mobilen Endgeräts
Verfügbar ab Mitte 2018.
Um zu überprüfen ob es ein Software-Up-
date gibt, das die Funktionalität der Fern-
bedienung erweitert oder bestehende
Funktionen verbessert, kann eine Blue-
tooth Verbindung mit der Festool-App
aufgebaut werden.
Die Verbindungstaste an der Fernbe-
dienung
[1-1]
drücken, bis die LED-An-
zeige
[1-2]
blau pulsiert.
Das Nachrüstempfangsmodul ist für
60 Sekunden verbindungsbereit.
Den Anweisungen in der Festool-App
folgen.
1x blaues Blinken
Betätigung der Verbin-
dungstaste
[1-1]
oder
der MAN-Taste
[1-3]
registriert.
1x magenta Blinken
Der Reset der Fernbe-
dienung ist erfolgt.
rotes Blinken
Die Batterie der Fernbe-
dienung ist fast leer und
muss ausgetauscht wer-
den.
D Originalbetriebsanleitung
18
Fernbedienung mit Absaugmobil verbin-
den
Wenn im Lieferumfang die Fernbe-
dienung und das Nachrüst-Emp-
fangsmodul enthalten sind, ist die
Verbindung zwischen den Geräten
voreingestellt und dieser Schritt
kann übersprungen werden.
Um eine Fernbedienung mit einem
anderen Absaugmobil verbinden zu
können, muss ein Reset der Fernbe-
dienung durchgeführt werden (siehe
Kapitel Fehlerbehebung).
Den Automatik-Modus des Absaugmo-
bils aktivieren.
Die Verbindungstaste am Nachrüst-
Empfangsmodul
[2-1]
drücken, bis die
LED-Anzeige schnell rotierend blinkt
[2-2]
.
Das Nachrüstempfangsmodul ist für
60 Sekunden verbindungsbereit.
Den Anweisungen in der Festool-App
folgen.
Die MAN-Taste
[1-3]
an der Fernbedie-
nung drücken.
Die Fernbedienung ist dauerhaft im
Nachrüst-Empfangsmodul gespei-
chert.
Das Absaugmobil kann gleichzeitig
mit bis zu fünf Fernbedienungen
verbunden werden.
Ein-/Ausschalten
Nachdem die Fernbedienung mit dem Ab-
saugmobil verbunden ist, kann das Ab-

19
Originalbetriebsanleitung D
saugmobil mit der Fernbedienung ein-
und ausgeschaltet werden.
Den Automatik-Modus des Absaugmo-
bils aktivieren.
Zum Ein-/Ausschalten die MAN-Taste
an der Fernbedienung
[1-2]
drücken.
Wenn das Absaugmobil initial mit
dem Akkupack eingeschaltet wurde
und mit der Fernbedienung ausge-
schaltet wird, verliert ein verbunde-
ner Akkupack seine temporäre Ver-
bindung zum Absaugmobil. An-
schließend kann der Akkupack neu
verbunden werden.
Eine hergestellte Verbindung zwi-
schen einer Fernbedienung und
dem Absaugmobil bleibt auch nach
dem manuellen Ausschalten des
Absaugmobils dauerhaft bestehen.
Batterie der Fernbedienung wechseln
[5]
Die Fernbedienung wird mit einer
Batterie vom Typ CR 2032 betrieben.
Wenn das Batteriefach geöffnet
wird, empfiehlt es sich die Dichtung
(20x1,3mm) auszutauschen.
Den Verschluss des Batteriefachs
öffnen.
Die Batterie austauschen.
Das Batteriefach verschließen.
D Originalbetriebsanleitung
20
6.3 Akkupack
Akkupack mit Absaugmobil verbinden
Den Automatik-Modus des Absaugmo-
bils aktivieren (siehe Betriebsanleitung
Absaugmobil).
Wenn das Akku-Elektrowerkzeug be-
reits in Betrieb war, sicherstellen dass
die Kapazitätsanzeige des Akkupacks
erloschen ist, damit das Verbinden
möglich ist (kann in Einzelfällen meh-
rere Sekunden dauern).
Die Verbindungstaste am Absaugmobil
[2-1]
oder an der Fernbedienung
[1-1]
einmal drücken.
Die LED am Absaugmobil blinkt
langsam rotierend blau und das Ab-
saugmobil ist für 60 Sekunden ver-
bindungsbereit.
Das Akku-Elektrowerkzeug einschal-
ten.
Das Absaugmobil läuft an und der
Akkupack ist bis zum manuellen
Ausschalten des Absaugmobils ver-
bunden.
Wenn ein zweiter Akkupack mit dem
Absaugmobil verbunden wird, wird
die Verbindung des ersten Akku-
packs getrennt.
Akkupack vom Absaugmobil trennen
Um die Verbindung von Akkupack und Ab-
saugmobil zu trennen, führen Sie einen
der folgenden Schritte aus:
– Absaugmobil stromlos schalten
– Akkupack auf Ladegerät aufsetzen
21
Originalbetriebsanleitung D
– Anderen Akkupack mit Absaugmobil
verbinden
7 Wartung und Pflege
Kundendienst und
Reparatur
nur durch
Hersteller oder durch
Servicewerkstätten:
Nächstgelegene Ad-
resse unter:
www.festool.com/
service
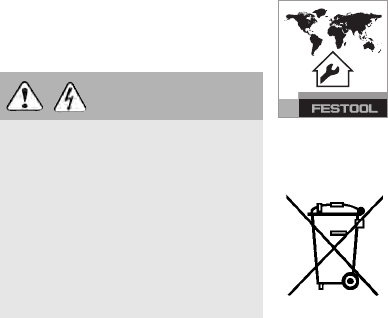
8 Umwelt
Gerät nicht in den
Hausmüll werfen!
Geräte, Zubehör und
Verpackungen einer
umweltgerechten
Wiederverwertung
zuführen. Geltende
nationale Vorschriften beachten.
WARNUNG
Verletzungsgefahr, Stromschlag
Vor allen Wartungs- und Pflegearbei-
ten stets den Akkupack von dem Elek-
trowerkzeug abnehmen!
Alle Wartungs- und Reparaturarbei-
ten, die ein Öffnen des Motorgehäuses
erfordern, dürfen nur von einer Autori-
sierten Kundendienstwerkstatt durch-
geführt werden.

D Originalbetriebsanleitung
22
Nur EU:
Gemäß Europäischer Richtlinie
über Elektro- und Elektronik-Altgeräte
und Umsetzung in nationales Recht müs-
sen verbrauchte Elektrowerkzeuge ge-
trennt gesammelt und einer umweltge-
rechten Wiederverwertung zugeführt
werden.
Informationen zur REACh:
www.festool.com/reach
"Die Bluetooth®" Wortmarke und -Logos
sind eingetragene Warenzeichen der
Bluetooth SIG, Inc. und jede Verwendung
dieser Marken durch die Festool GmbH
erfolgt unter Lizenz.
Informationen zum Datenschutz
Das Elektrowerkzeug enthält einen Chip
zur automatischen Speicherung von Ma-
schinen- und Betriebsdaten. Die gespei-
cherten Daten enthalten keinen direkten
Personenbezug.
Die Daten können mit speziellen Geräten
kontaktlos ausgelesen werden, und wer-
den von Festool ausschließlich zur Feh-
lerdiagnose, Reparatur- und Garantieab-
wicklung sowie zur Qualitätsverbesse-
rung bzw. Weiterentwicklung des
Elektrowerkzeugs verwendet. Eine darü-
ber hinausgehende Nutzung der Daten –
ohne ausdrückliche Einwilligung des
Kunden – erfolgt nicht.

23
Originalbetriebsanleitung D
9 Fehlerbehebung
Problem Mögliche Ursachen Abhilfen
Dem Absaugmobil ist
eine Fernbedienung
zugewiesen, auf die es
keinen Zugriff mehr
gibt.
Unterschiedliche
Besitzer bzw. Nutzer
des Absaugmobils.
Reset des Nachrüst-Empfangs-
moduls
Den Automatikmodus des
Absaugmobils aktivieren (siehe
Betriebsanleitung Absaugmobil)
und anschließend die Verbin-
dungstaste
[2-1]
für 10 Sekun-
den gedrückt halten, bis die
rotierende LED erloschen ist.
Alle gespeicherten Geräte im
Nachrüst-Empfangsmodul wer-
den gelöscht.

D Originalbetriebsanleitung
24
Das Absaugmobil
nimmt keine Signale
einer verbundenen
Fernbedienung an
Die Verbindungspara-
meter von Fernbedie-
nung und Absaugmobil
stimmen nicht mehr
überein.
Reset der Fernbedienung
Die Verbindungstaste
[1-1]
und
die MAN-Taste
[1-3]
an der
Fernbedienung für 10 Sekunden
gedrückt halten.
Die LED-Anzeige blinkt in
magenta, wenn der Reset
erfolgt ist.
Die Fernbedienung kann neu
mit dem Absaugmobil verbun-
den werden (siehe Kapitel 6.2
Fernbedienung)
Problem Mögliche Ursachen Abhilfen

25
Originalbetriebsanleitung D
Ein zuvor erfolgreich
verbundener Akkupack
kann das Absaugmobil
nicht mehr steuern.
Das Absaugmobil
wurde mit dem Akku-
pack eingeschaltet und
mit der Fernbedienung
ausgeschaltet. Das
Ausschaltsignal der
Fernbedienung hat
Vorrang vor dem
gerade verbundenen
Akkupack, so dass die
Verbindung des Akku-
packs aufgehoben wird.
Akkupack mit Absaugmobil
verbinden
siehe Kapitel 6.3
Problem Mögliche Ursachen Abhilfen
GB Original operating manual
26
Original operating manual
1Symbols
2 General safety instructions
Warning! Read and observe all
information and safety instruc-
tions.
Failure to observe the
safety guidelines and instructions may
lead to electric shocks, fires and/or seri-
ous injuries.
Keep all safety information and other in-
structions in a safe place for future ref-
erence.
3Technical data
Symbol Significance
Warning of general danger
Risk of electric shock
Read operating instructions
and safety notices!
Do not dispose of as domestic
waste.
Remote control CT-F I
Retrofit receiver
module
CT-F I/M
Frequency 2402–2480 Mhz

27
Original operating manual GB
4 Intended use
The remote control and a Bluetooth bat-
tery pack in connection with a cordless
power tool can automatically switch a mo-
bile dust extractor on and off, if a retrofit
receiver module is installed on the mobile
dust extractor. The retrofit receiver mod-
ule is compatible with all mobile dust ex-
tractors equipped with a receiver module
(CT 26/36/48).
The user is liable for improper
or non-intended use.
5 Machine features
Remote control
Retrofit receiver module
Equivalent Isotropi-
cally Radiated Power
(EIRP)
< 10 dBm
Remote control CT-F I
Retrofit receiver
module
CT-F I/M
[1-1]
Connection button
[1-2]
LED-Display
[1-3]
MAN button (for manual switching
on)
[1-4]
Attachment point for the remote
control fastening straps
[1-5]
Remote control fastening straps
(dia. 27/dia. 36)
[2-1]
Connection button

GB Original operating manual
28
The specified illustrations* appear at the
beginning of the operating instructions.
* Illustrations may deviate from the origi-
nal.
6Operation
6.1 Retrofit receiver module
[2-2]
LED indicator
CAUTION
Risk of injury from the mobile dust ext-
ractor starting up unexpectedly
Before performing any work with the
mobile dust extractor, check which re-
mote control and which cordless pow-
er tool are connected to the mobile
dust extractor!
WARNING
Risk of injury from electric shock
Always disconnect the mains plug
from the power point before perfor-
ming any work on the machine!
Only authorised electricians are allo-
wed to install the retrofit receiver mo-
dule.
After installation, perform an electri-
cal safety test in compliance with the
applicable regulations.

29
Original operating manual GB
Installation [4]
Remove the Allen screws from the
top and bottom of the cover plate.
Take the cover plate off the mobile
dust extractor.
Plug in the retrofit receiver module
in compliance with the electronics on the
mobile dust extractor.
Tighten the Allen screws at the top
and bottom on the retrofit receiver mod-
ule.
LED indicator
The LED indicator
[2-2]
displays the Blue-
tooth functionality of the retrofit receiver
module:
Connecting a mobile terminal
Available from the middle of 2018.
To check whether a software update that
will enhance the functions of the retrofit
receiver module or improve existing func-
tions is available, a Bluetooth connection
to the Festool app can be established.
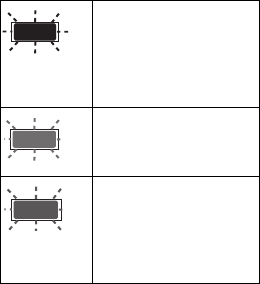
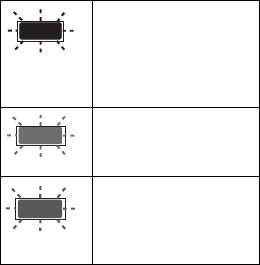
Slowly rotating flashing blue
light
Ready to connect a cordless
power tool for a certain
amount of time
Quickly rotating flashing
blue light
Ready to connect a remote
control indefinitely
GB Original operating manual
30
Press the connection button on the ret-
rofit receiver module
[2-1]
until the
LED display rapidly starts to flash
[2-2]
.
The retrofit receiver module is ready
for connection for 60 seconds.
Follow the instructions provided in the
Festool app.
6.2 Remote control
Installation
Attach the remote control to the suction
hose using the corresponding fastening
strap.
[1-5]
[3]
LED indicator
The remote control's LED indicator dis-
plays the charge status of the remote con-
trol, as well as the Bluetooth functionality:
Connecting a mobile terminal
Available from the middle of 2018.
To check whether a software update that
will enhance the functions of the remote
Flashes blue once
Confirmation of the con-
nection button
[1-1]
or
MAN button
[1-3]
having
been pressed.
Flashes purple once
The remote control has
been reset.
Flashes red
The remote control's bat-
tery is nearly empty and
must be replaced.
31
Original operating manual GB
control or improve existing functions is
available, a Bluetooth connection to the
Festool app can be established.
Press the connection button on the re-
mote control
[1-1]
until the LED display
[1-2]
flashes blue.
The retrofit receiver module is ready
for connection for 60 seconds.
Follow the instructions provided in the
Festool app.
Connecting a remote control to the mo-
bile dust extractor
If the remote control and the retrofit
receiver module are provided, the
connection between the devices has
been preset and you can skip this
step.
To be able to connect a remote con-
trol to another mobile dust extractor,
the remote control must be reset
(see chapter on trouble shooting).
Activate the mobile dust extractor's au-
tomatic mode.
Press the connection button on the ret-
rofit receiver module
[2-1]
until the
LED display rapidly starts to flash
[2-2]
.
The retrofit receiver module is ready
for connection for 60 seconds.
Follow the instructions provided in the
Festool app.
Press the MAN button
[1-3]
on the re-
mote control.
The remote control is permanently
stored in the retrofit receiver mod-
ule.

GB Original operating manual
32
The mobile dust extractor can be
connected to as many as five remote
controls at the same time.
Switching on/off
Once the remote control is connected to
the mobile dust extractor, the mobile dust
extractor can be switched on and off with
the remote control.
Activate the mobile dust extractor's au-
tomatic mode.
Press the MAN button on the remote
control
[1-2]
to switch the device on and
off.
If a mobile dust extractor which was
initially switched on using the bat-
tery pack is switched off using the
remote control, the temporary con-
nection between the connected bat-
tery pack and the mobile dust ex-
tractor will be lost. The battery pack
can then be connected again.
Once a connection has been estab-
lished between a remote control and
the mobile dust extractor, the devic-
es will remain connected even when
the mobile dust extractor has been
manually switched off.
Changing the remote control's battery
[5]
The remote control is operated us-
ing a CR 2032-type battery.
If the battery compartment is
opened, we recommend that you re-
place the seal (20 x 1.3 mm).
Open the battery compartment clo-
sure.

33
Original operating manual GB
Replace the battery.
Close the battery compartment.
6.3 Battery pack
Connecting the battery pack to the mo-
bile dust extractor
Activate the mobile dust extractor's au-
tomatic mode (see the operating in-
structions for the mobile dust ex-
tractor).
Should you have used the cordless pow-
er tool already, ensure that the battery
pack's capacity indicator has gone out
so that you can connect it (in certain
cases this can take a few seconds).
Press the connection button on the mo-
bile dust extractor
[2-1]
or on the re-
mote control
[1-1]
once.
The LED on the mobile dust ex-
tractor shows a slowly rotating
flashing blue light and the mobile
dust extractor is ready for connec-
tion for 60 seconds.
Switch on the cordless power tool.
The mobile dust extractor starts up
and the battery pack is connected
until the mobile dust extractor is
manually switched off.
If a second battery pack is connected
to the mobile dust extractor, the con-
nection to the first battery pack is
lost.

GB Original operating manual
34
Disconnecting the battery pack from the
mobile dust extractor
To disconnect the battery pack from the
mobile dust extractor, take one of the fol-
lowing steps:
– Disconnect the mobile dust extractor
– Put the battery pack on the charger
– Connect another battery pack to the
mobile dust extractor
7 Service and maintenance
WARNING
Risk of injury from electric shock
Always remove the battery pack from
the power tool before performing any
maintenance or service work!
Only an authorized service workshop is
allowed to perform any maintenance
or repair work that requires the motor
housing to be opened.