Fujitsu OS-F905I Cellular Phone User Manual QIR
Fujitsu Limited Cellular Phone QIR
UserManual.wiki
>
Fujitsu
>
OS-F905I User Manual
>
Manual 2
Contents
1.
Manual Part 1 1
2.
Manual Part 1 2
3.
Manual Part 1 3
4.
Manual Part 1 4
5.
Manual Part 1 5
6.
Manual Part 1 6
7.
Manual Part 2
8.
Manual Part 3
9.
Manual 1 1
10.
Manual 1 2
11.
Manual 1 3
12.
Manual 1 4
13.
Manual 1 5
14.
Manual 1 6
15.
Manual 2
16.
Manual 3
Manual 2
Navigation menu
Upload a User Manual
Namespaces
Wiki Guide
HTML
PDF
Info
Views
User Manual
Discussion / Help
Navigation
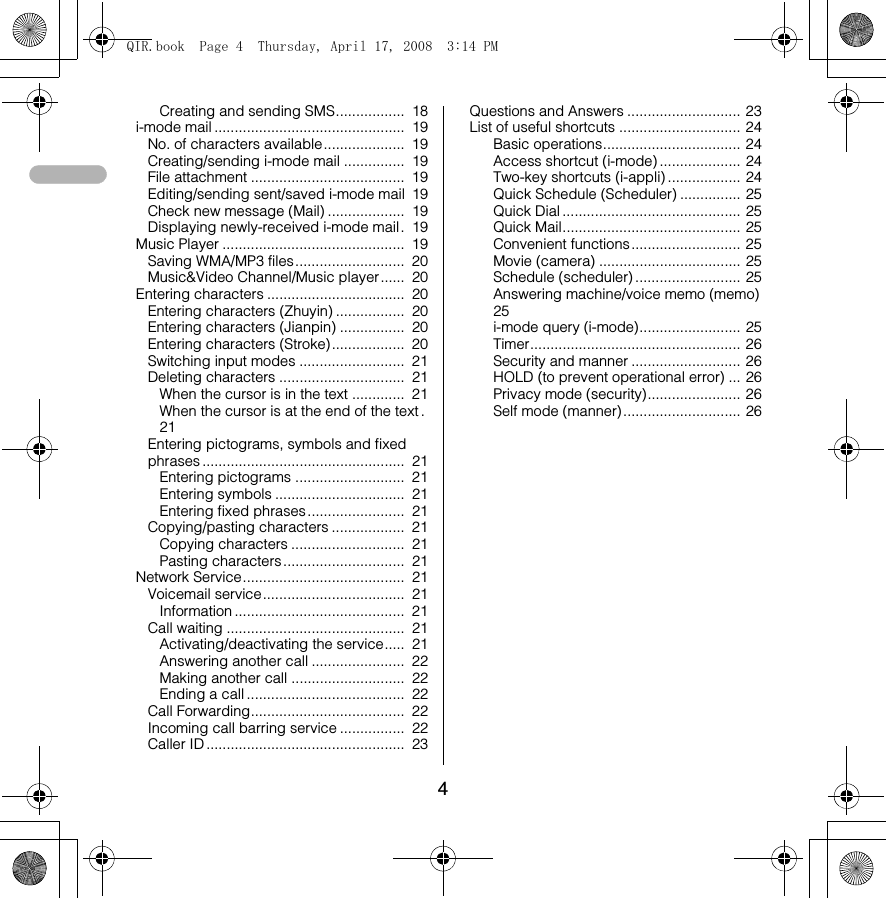
![2❖Emergency CallsMaking emergency calls from the terminal112enorme[Settings & NW services]e* Information Your phone supports emergency numbers, such as 112, which allow to make emergency calls with or without a SIM/USIM card inserted, if a 3G (UMTS) or GSM network is within range. However emergency calls may not be possible on all mobile phone networks, or when certain network services or phone features are in use. You should therefore never rely solely upon any mobile phone for essential communications, such as medical emergencies. QIR.book Page 2 Thursday, April 17, 2008 3:14 PM](https://usermanual.wiki/Fujitsu/OS-F905I.Manual-2/User-Guide-1061543-Page-2.png)
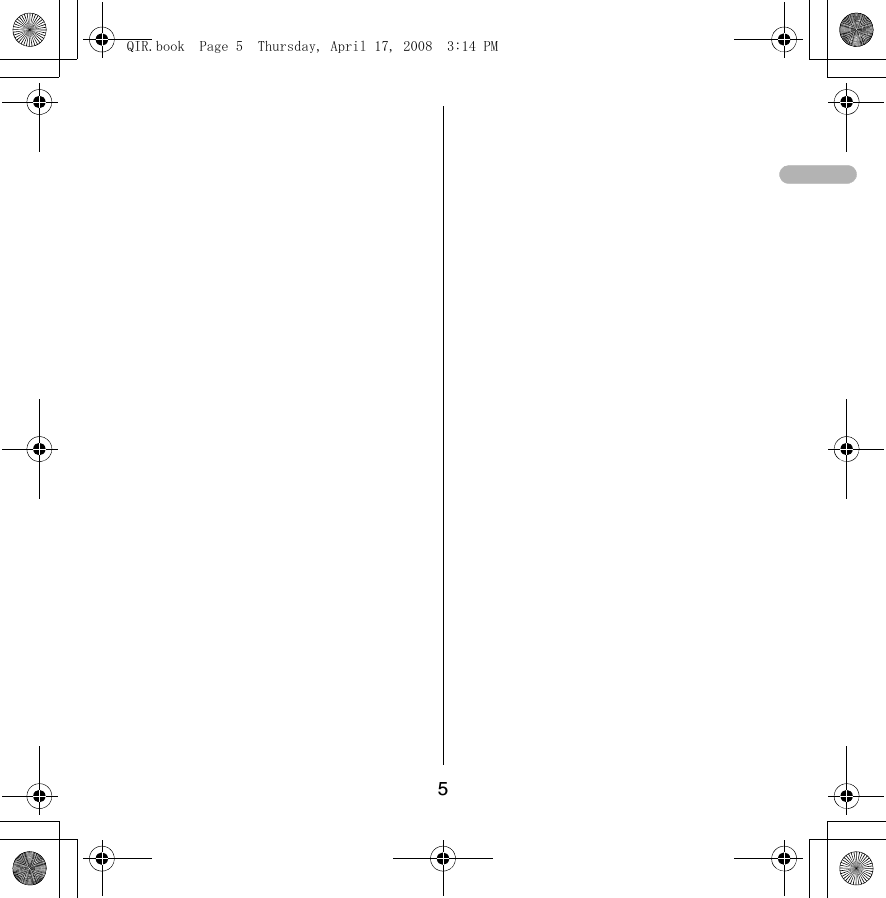
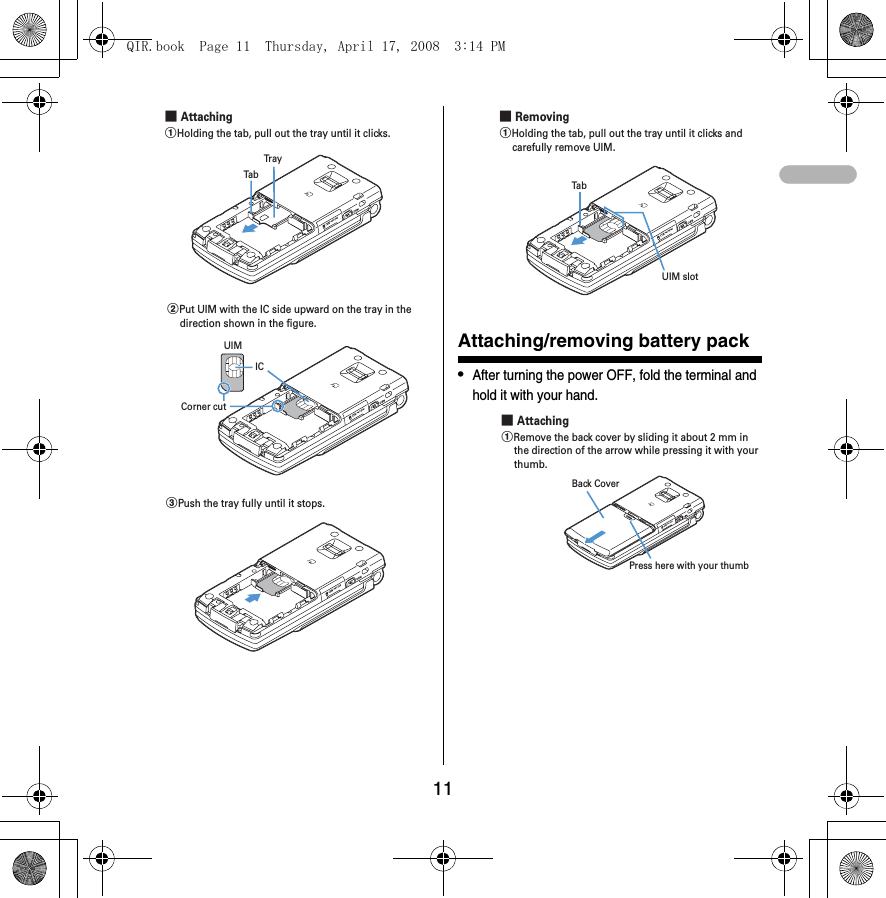
![8Press and hold for 1 second or more : Display Scheduler.paMail/▼ (Scroll) keyUse to display mail menu, scroll downward the mail screen or site/website display by pages, perform the operation shown in the lower-right corner of the guide area.Press 2 times : Check new messagePress and hold for 1 second or more : Display Compose message screen.qfPower/End keyUse to terminate on-hold, calling/operating function, display/hide calendar layout.Press and hold for 2 seconds or more : Turn power ON/OFF.r##/Line-feed key/Macro shooting/Silent modeUse to enter "#", start a new line when entering characters, switch Macro mode while using out-camera.Press and hold for 1 second or more : Start/cancel Silent mode.ssMultitask keyUse to perform another function while talking or perform an operation (Multiaccess/Multitask).tCharging jackuJackConnect various optional devices.vOut-cameraUse to shoot still images or movies, send images over a videophone call.wLight➝P62, 102, 138, 349, 102Turn on or blink when activating Lock on close, shooting an image, recording a movie, operating Music player operate according to the settings of Indicator light or Light alert, Simple light or Light.xSub-display➝P29yBuilt-in antenna* The terminal has a Built-in antenna. To talk in better conditions, do not cover the antenna with your hand.zFingerprint sensor➝P108Register/authenticate fingerprintABack coverBStrap openingCSpeakerDPLeft Side keyActivate Simple light.EmicroSD memory card slot➝P294FMMusic keyUse to perform menu items on the sub-display, operate Music playerPress and hold for 1 second or more : Start/Stop Music playerGSide keys [▲▼]Side key [▲] : Stop ring tone, alarm or vibrate effect, increase the volume during a call, turn on the light of the sub-display while the terminal is folded, switch display, select menuSide key [▲](1 sec. or more) : Start Quick answer machine while a call is incoming, start/stop voice memo/movie memo during a call, start/cancel Silent mode while the terminal is folded*, activate answer machines/voice memos on the stand-by display while the terminal is openSide key[▼] : Decrease the volume during a call, Turn sub-display light ON while the terminal is open, switch display, select menu itemQIR.book Page 8 Thursday, April 17, 2008 3:14 PM](https://usermanual.wiki/Fujitsu/OS-F905I.Manual-2/User-Guide-1061543-Page-8.png)
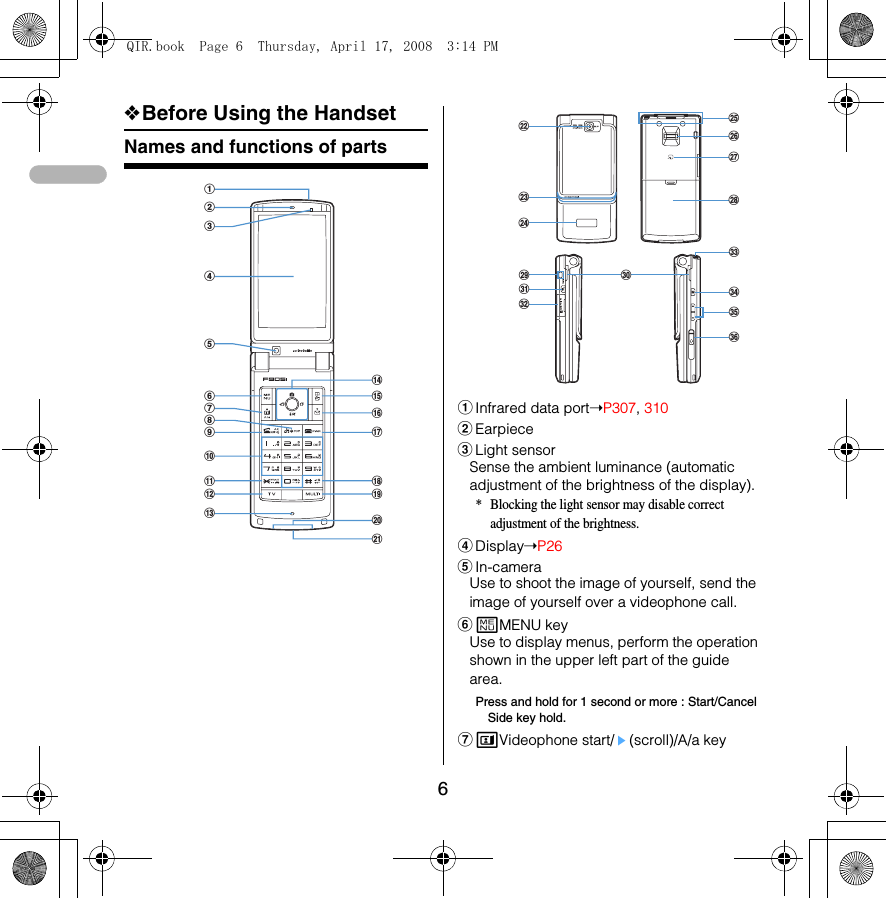
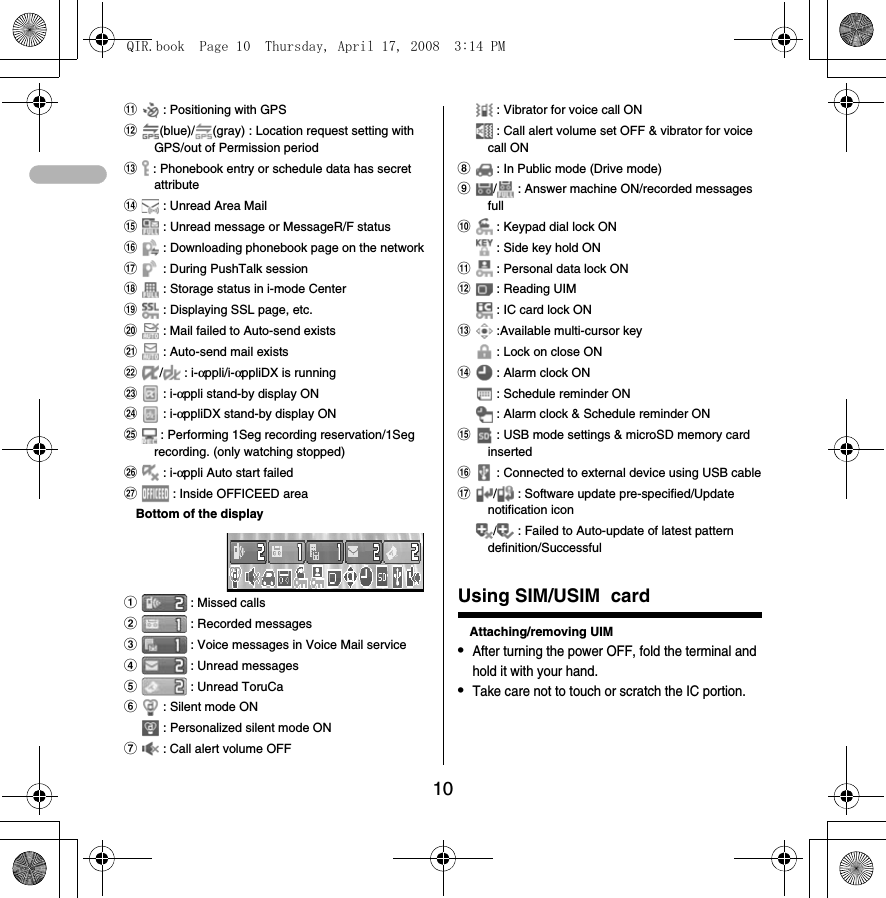
![9Side key [▼] (1 sec. or more) : Silence while playing video, check new message on the stand-by display.** The setting of pressing and holding the side keys is the operation in the default state.HEarphone/microphone jack➝P356Connecting the Earphone/microphone with switch Slide cover in the direction of a, connect a Flat-plug Earphone/Microphone with Switch, etc (b).* Securely insert the plug.* Avoid wrapping the cord around the terminal or bringing it close to the antenna. Doing so may lower wave reception level or generate noise.Swinging display (YOKO-MOTION)With the terminal open, rotate the display 90 degrees to the right or left to display Horizontal display.InformationDo not rotate the display with the terminal folded. May cause the display and around the keys to be scratched.Display overviewTop of the displaya : Battery iconb : Signal level iconc : Out of service aread : Self mode ONe : In data transfer modef/ : In i-mode communication (i-mode site)/(packet communication)g : In infrared communication, etc.h : The total calls cost exceeds the limiti : Communication using handsfree-compatible device in progressj : Speakerphone function in useCoverWhen swung to the rightabcdefghijklmQIR.book Page 9 Thursday, April 17, 2008 3:14 PM](https://usermanual.wiki/Fujitsu/OS-F905I.Manual-2/User-Guide-1061543-Page-9.png)
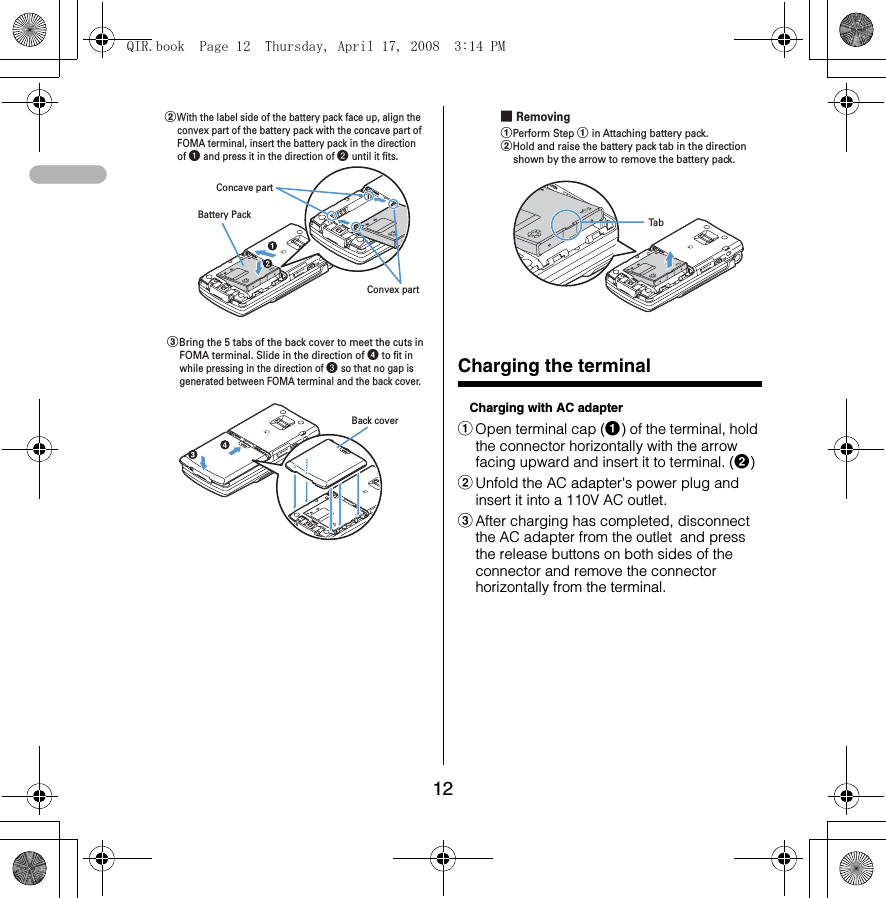
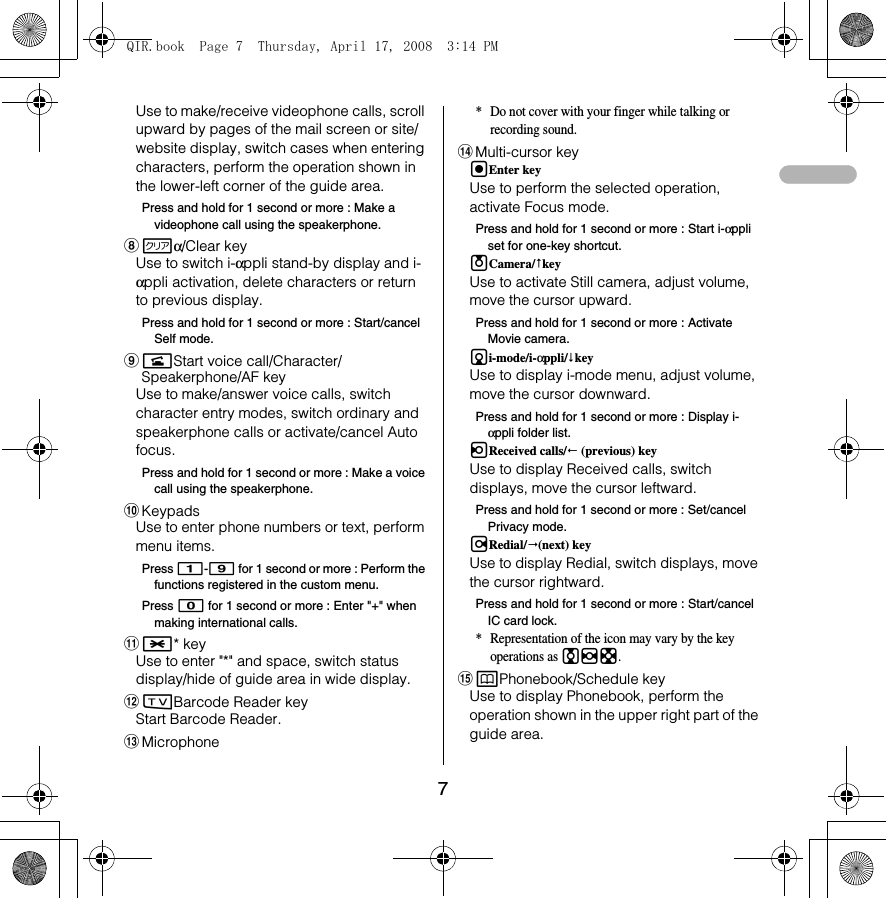
![13Power ON/OFFTurning power ON/OFFTurning power ON1f (2 sec. or more)Turning power OFF1f (2 sec. or more)Date & timeSetting date and time1me[Settings & NW services]e721eSet the required itemsepInformationWhen you are setting the time and date, change the network to GSM to set up the time automatically. The following shows how to change the NW. •me[Settings & NW services]e92eSelect GSMIf network is not GSM, change the Automatic Time/Time-Difference Correction to "OFF" and set up manually. ❖Voice/Videophone CallsMaking voice/videophone calls1 Enter a phone number.2 Select a call type.Making a voice call : nMaking videophone calls : t3 When ending the call, f.Redial/Received callsMaking a call using Redial/Received calls1r (Redial) or l (Received calls)ePlace the cursor on a party to redial2n or tReceivin g voice/vide ophone callsReceiving voice/videophone calls1 A call is received.2 Select call reception type.Receiving a voice call : nReceiving videophone calls : n or t3 When ending the call, f.ab<AC adapter>ConnectorRelease buttonJack capCharging jackAC adapterPower plug100V AC outletLampQIR.book Page 13 Thursday, April 17, 2008 3:14 PM](https://usermanual.wiki/Fujitsu/OS-F905I.Manual-2/User-Guide-1061543-Page-13.png)
![14❖PhonebookAdding entries in PhonebookSaving in the terminal phonebook1me[Phonebook & Logs]e2eEnter a nameeSet the required itemsepSaving in UIM phonebook1me[Phonebook & Logs]e3eEnter a nameeSet the required itemsepSaving from redial list or received call list1h2 Place the cursor on the party and me21•Adding to phonebook data already saved : me2231 (terminal phonebook) or 2 (UIM phonebook)•To add to the saved entry, select the party to edit.4 Set the required itemsepEditing Phonebook1p•Switching phonebook : p2 Place the cursor on the party and me31•For UIM phonebook, place the cursor on the party and me33 Editep•Overwriting confirmation screen appears.Deleting phonebook entries<Example> Deleting a phonebook entry in the Terminal phonebook1peSearch the phonebook2 Place the cursor on a phonebook entry and me4e1 or 2e"Yes"•Deleting from UIM phonebook : Place the cursor on a party and me4e"Yes"Searching the Phonebook1me[Phonebook & Logs]e1•Switching phonebook : p21-6•For UIM phonebook, 1-3.❖Sound/Screen/Light SettingsSound settingsSetting volume of various sounds such as ring alert and alarm sound1me[Settings & NW services]e12e1-7•When Alarm volume is selected, select 1 or 2.2 Side keys[▲▼] or kegFont sizeScreen settingsChanging font sizeQIR.book Page 14 Thursday, April 17, 2008 3:14 PM](https://usermanual.wiki/Fujitsu/OS-F905I.Manual-2/User-Guide-1061543-Page-14.png)
![151me[Settings & NW services]e271Switching to English1me[Settings & NW services]e272e1 or 2Setting clock display1me[Settings & NW services]e724eSet the required itemsepInformationSee "Setting date and time" for how to set up time and date.(Page 8)Light settingsSetting the lighting patterns and colors used for an incoming call/mail or during a call• This setting is reflected to Light alert in Call alert, Videophone alert and Mail alert.1me[Settings & NW services]e25e1-32 Select the Light color fieldeSelect a lighting color3p❖Other SettingsUsing fingerprint authenticationRegistering fingerprint to be used for authentication <Register fingerprint>1me[Settings & NW services]e462eAuthenticateep2"OK"ePress the sensor with your finger and slide slowly downwards by following the instruction message3 Enter a display nameepSet whether to use only fingerprint authentication for authentication <Fingerprint access>1me[Settings & NW services]e463eAuthenticate21 (Turn off : 2)3"OK"eaAuthenticating fingerprint1 When the fingerprint authentication screen appears, slide your fingertip on the fingerprint sensor.Fingerprint sensor areaFigure A Figure BQIR.book Page 15 Thursday, April 17, 2008 3:14 PM](https://usermanual.wiki/Fujitsu/OS-F905I.Manual-2/User-Guide-1061543-Page-15.png)
![16❖Camera functionShooting still imagesuePoint the camera at the object and gegRecording moviesu (1 sec. or more)ePoint the camera at the object and gepegDisplaying imageme[Data Box]e1e1eSelect an imagePlaying movieme[Data Box]e3e2eSelect a movie•Operation available in playing movie•j/Side keys [▲▼] : Adjust volume•h : Reverse play/Fast play•g : Pause/Play•p : Stopisplaying sites❖i-mode/i-motionDisplaying sites1de12 "English iMenu"e"Menu List"•p while downloading a page : Stopping downloading a page.3 Select an item to view.4 When you quit viewing a site, fe"Yes"Go to locationDisplaying websites1de512 Enter a URLep•In alphabet input mode, repeatedly press 1 to enter " . ", " / ", " - ", etc. and $TV$ to enter "@imode.net.tw", ".com", ".com.tw", "http://www.", "https://www.", "www.", ".asp", ".html", etc.Fingerprint accessFingerprint authentication・ The current position relative to the whole display appears temporarily by pressing and holding j for 1 second or more when reading a page is completed or all lines are not displayed during a page appearing.Scroll barQIR.book Page 16 Thursday, April 17, 2008 3:14 PM](https://usermanual.wiki/Fujitsu/OS-F905I.Manual-2/User-Guide-1061543-Page-16.png)
![17BookmarkRecording websites and sites for quick browsingRecording in Bookmark1 Display the site or websiteeme21eSelect a folder to add to2 Enter a title nameepDisplaying site or website from Bookmark1de2eSelect a folder•Icon definitions : : No bookmark : Bookmark exists : No bookmark (Secrecy ON) : Bookmark exists (Secrecy ON)2 Select a bookmark.Screen memoSaving site contentsSaving screen memo1 Display a siteeme312 Enter a title nameepDisplaying screen memo1de3eSelect a screen memo•Icons used for the screen memo list are defined as follows : : Ordinary screen memo : Protected screen memoDownloading i-motion from sites1 Display a siteeSelect an i-motion•During downloading, press p and select "Yes" to stop downloading.g : Pause/Play (Normal type)j/Side keys [▲▼] : Adjust volumep : Streaming type is interrupted by selecting "Yes" on the confirmation screen, and Normal type is stopped (Pressing g while stopped plays the i-motion from the beginning)m : Display detail information2"Save"3 Enter a display nameep❖i-αppliDownloading i-αppli1 Displaying a siteeSelect an i-αppli2 Select a destination to save.3"Yes"Starting i-αppli1d (1 sec. or more)2 Select a folder.3 Select i-αppli to start.The amount of data received/total amount of dataQIR.book Page 17 Thursday, April 17, 2008 3:14 PM](https://usermanual.wiki/Fujitsu/OS-F905I.Manual-2/User-Guide-1061543-Page-17.png)

![193 Select the Message text fieldeEnter the message text4pReading received SMS immediately : On the reception result screen, 1eSelect a foldereSelect SMS❖i-mode mailNo. of characters availableCreating/sending i-mode mail1ae[Mail]e32 Select eSelect input methodeEnter or select receiver3 Select eEnter the subject4 Select eEnter message text•Composing Deco-mail : aeSelect decorationeEnter characters5p•Saving message : me3•Auto-send : me2File attachment1 Select on the mail creation screen.Displaying the mail creation screen➝P9•Removing attachment : ae"Yes"2 Select the type of the file to attacheSelect the attachment sourceeSelect a foldereSelect a fileEditing/sending sent/saved i-mode mail<Example> Editing unsent messages1ae4•Editing sent message : ae52 Select a folder.3 Select a message.•Editing sent message : Select a messageep4 EditepCheck new message (Mail)1 Side key [▼] (1 sec. or more)Displaying newly-received i-mode mail1 On the reception result screen, 1.2 Select a foldereSelect a mail❖Music PlayerItem SizeSubject 200 bytesMail address 50 bytesMessage text 10,000 bytesReceiver fieldSubject fieldAttachment fieldMessage text fieldTotal bytes of characters, decoration data and images input to textQIR.book Page 19 Thursday, April 17, 2008 3:14 PM](https://usermanual.wiki/Fujitsu/OS-F905I.Manual-2/User-Guide-1061543-Page-19.png)
![20Saving WMA/MP3 files1 Prepare WMA/MP3 file in PC using Windows Media PlayereChange USB mode settings of the terminal to "MTP mode"2 Start Windows Media PlayereConnect the terminal to PC using USB cable3 Transfer WMA/MP3 file from PCeWhen data transfer is over, change USB mode settings of the terminal to "Communication mode"eRemove USB cableMusic&Video Channel/Music playerM (1 sec. or more) : Start/Stopg, M : Play/Pausej, side keys [▲▼] : Adjust volumel (1 sec. or more)/r (1 sec. or more) : Rewind/fast forwardl, Side key [▲] (1 sec. or more) : Move to the beginning of the current chapter/tuner, Side key [▼] (1 sec. or more) : Move to the next chapter/tuneM (Pressing twice quickly) : Save the current tune or tune in pause to Quick playlist❖Entering charactersThe allocation of the keys is as follows.(TBD: the following figure will be replaced)Entering characters (Zhuyin)<Example> Entering " "1 Enter characters in the BoPoMoFo entry mode. 99052 Move cursor to " see Excel instructions" with Reg3gegEntering characters (Jianpin)<Example> Entering " "1 Enter characters in the BoPoMoFo entry mode. 9050eg with the cursor on ""2gegEntering characters (Stroke)<Example> Entering " " in " "1 Enter characters in the Stroke entry modeQIR.book Page 20 Thursday, April 17, 2008 3:14 PM](https://usermanual.wiki/Fujitsu/OS-F905I.Manual-2/User-Guide-1061543-Page-20.png)
![21"": 3121 ()eg 2gegSwitching input modesOn the character entry screen, n (several times)eg• Press j to switch input mode one-byte/two-byte.Deleting charactersWhen the cursor is in the textc : Delete characters at the cursor•Pressing and holding for 1 sec. or more deletes characters at the cursor and all the characters on the right of the cursor.When the cursor is at the end of the textc : Delete a character at the left of the cursor position•Pressing and holding for 1 sec. or more deletes all the characters entered.Entering pictograms, symbols and fixed phrasesEntering pictogramsOn the character entry screen, peSelect pictogramEntering symbolsOn the character entry screen, pemeSelect symbolEntering fixed phrasesOn the character entry screen, me41 (51 on the message text entry screen)eSelect fixed phrase typeeSelect fixed phraseCopying/pasting charactersCopying charactersOn the character entry screen, me1 (31 on the message text entry screen)eSelect the start pointeSelect the end pointPasting charactersOn the character entry screen, place the cursor at the position to paste characters and me3 (4 on the message text entry screen)❖Network ServiceVoicemail service1me[Setting/NW service]e81eSelect a menu item to operateInformationIf the setting of the Select Menu has been left the same as the factory default, pushing $1$ for more than a second in the stand-by display enables you to replay the Voice Mail message. Call waitingActivating/deactivating the serviceMenu item Function and operationa Play messages eOperate following the audio guidance instruction b Voice Mail setting eEnter the phone number for the Voice Mail service centerepIf you are using a Voice Mail service other than FET, change the Service connection field to "User setting" and enter a phone number that is less than 26 digits to the field. QIR.book Page 21 Thursday, April 17, 2008 3:14 PM](https://usermanual.wiki/Fujitsu/OS-F905I.Manual-2/User-Guide-1061543-Page-21.png)
![221me[Settings & NW services]e1 [Activate] or 2 [Deactivate]e"Yes"Answering another calln during a call.•Switching to another party to talk : tMaking another callDuring a call, me0eEnter a phone numberen•Switching to another party to talk : tEnding a callWhen ending the call, f.•Switching to the other party on-hold : n or gCall Forwarding 1me[Setting/NW service]e8eSelect a menu item to operate3Call Forward (Voice) e Unconditionala Set and activate e *1b Clear and deactivatee "Yes" c Check settinge "Yes"e Busya Set and activatee *1b Clear and deactivatee "Yes"c Check settinge "Yes"e No replya Set and activatee *1b Clear and deactivatee "Yes"c Check settinge "Yes"e Not reachablea Set and activatee *1b Clear and deactivatee "Yes"c Check settinge "Yes"e Remove all settingse "Yes"4 Call Forward(Videophone)e Unconditionala Set and activatee *1b Clear and deactivatee "Yes"c Check settinge "Yes"e Busya Set and activatee *1b Clear and deactivatee "Yes"c Check settinge "Yes"e No replya Set and activatee *1b Clear and deactivatee "Yes"c Check settinge "Yes"e Not reachablea Set and activatee *1b Clear and deactivatee "Yes"c Check settinge "Yes"e Remove all settingse "Yes"*1 (Set and activate) "Yes" e Enter call forwarding number, enter ring time [For the cases of No reply (voice), No reply (video)] epIncoming call barring service1me[Setting/NW service]e8eSelect a menu item to operate5Bar incoming call Menu item Function and operationaActivate e "Yes" e Enter password for barring incoming and outgoing callsepbDeactivate e "Yes" e Enter password for barring incoming and outgoing callsepcCheck setting e "Yes"QIR.book Page 22 Thursday, April 17, 2008 3:14 PM](https://usermanual.wiki/Fujitsu/OS-F905I.Manual-2/User-Guide-1061543-Page-22.png)
![236 Bar incoming videophone call7Clear all call barring settings "Yes"eEnter password for barring incoming and outgoing callsep8Change password "Yes"eEnter new and old passwordsepCaller ID1me[Setting/NW service]e89eSelect a menu item to operate ❖Questions and Answers●I don't know the PIN number for the terminal.The terminal PIN number at the time of purchase is set to "0000" but you can change it yourself. In addition, you can set two pin numbers (PIN1 code and PIN2 code) for the SIM/USIM card. They are both set to "0000" at the time when you signed the contract but you can change them yourself. ➝p.___ ●I typed the PIN1 code wrongly three times. If you erroneously typed the PIN1/PIN2 codes for three consecutive times and locked the SIM/USIM card, enter PUK. If you made 10 errors in a row typing the PUK, please contact the FET service center.➝p.___●Can I receive the HSDPA service anywhere? You can have up to 3.6Mbps of incoming data for high-speed communication, but only with the FET 3.5G.●Receiver can't read my decomail or i-mode mail with pictograms. This terminal supports decomail but if the destination terminal does not support decomail, it will be displayed differently. In addition, if i-mode mail with pictograms is sent to a non-imode terminal, the message may not be displayed correctly.➝p.___●I can't connect to i-mode. i-mode is a service that requires subscription. If you would like to utilize the service please contact the FET service center. ➝p.___●I can't use the answering machine.Network services such as voicemail require subscription. If you would like to utilize these services please contact the FET service center. Menu item Function and operationaActivate e "Yes" e Enter password for barring incoming and outgoing callsepbDeactivate e "Yes" e Enter password for barring incoming and outgoing callsepcCheck setting e "Yes"Menu item Function and operationaActivate/DeactivateaShow caller ID Set to show caller ID.bHide caller ID Set to hide caller ID.cUnspecified No setting will be made for the caller ID notification and the network setting will be used. bCheck setting e "Yes"QIR.book Page 23 Thursday, April 17, 2008 3:14 PM](https://usermanual.wiki/Fujitsu/OS-F905I.Manual-2/User-Guide-1061543-Page-23.png)
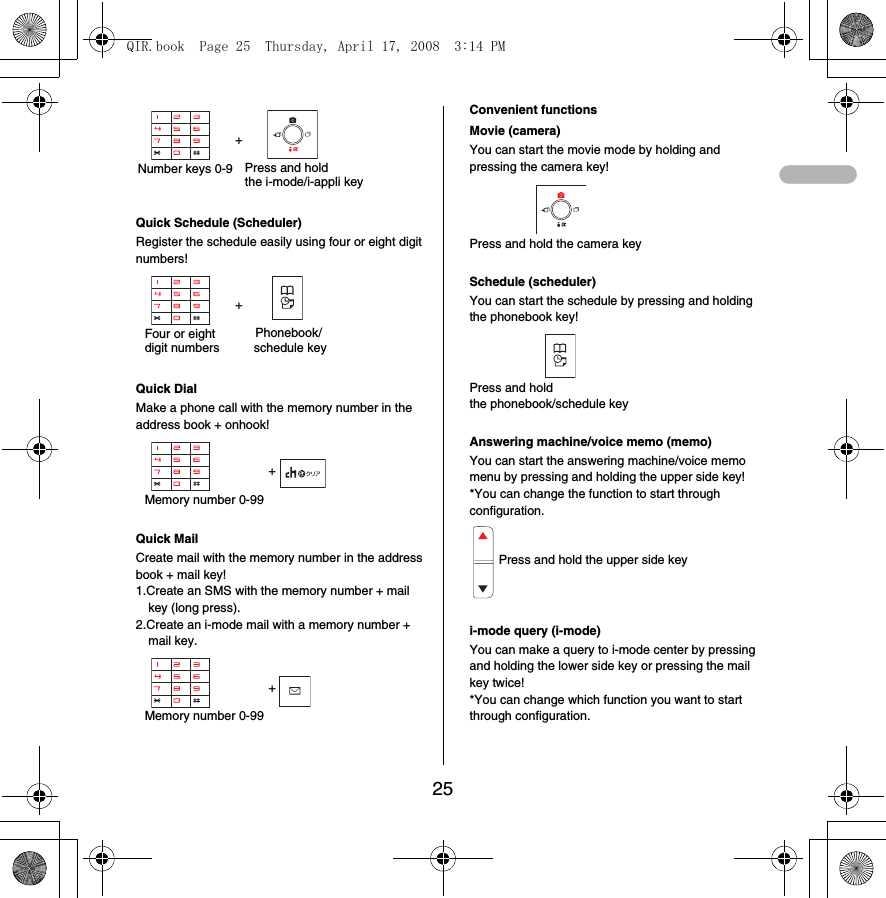
![24If you can't use it even when you are subscribed, it is possible that the voicemail service has not been initiated. Please refer to the detailed instruction manual for how to initiate the service. ➝p.___●I tried to make a call using a prepaid SIM/USIM card but I couldn't connect. If you are using a prepaid SIM/USIM, you cannot make a call unless you have enough money left in the account. ●I cannot save an image to the terminal.It is possible that you do not have enough storage space. Delete unnecessary data and try again.➝p.___●I can't find the address book I registered.Try switching the address book in the terminal with the SIM card address book and search again. If it is set to Show All (Zhuyin), it will be shown in the first relevant BoPoMoFo tab that is in the Zhuyin field in the address book. ➝p.___●I want to change the Chinese display to English or the English display to Chinese. Please refer to the "Bilingual setting." ➝p.___●I don't know how to enter characters.Please refer to "Entering characters." ➝p.___●I cannot receive the network very well.Your network setting may be incorrect. Refer to "Network search setting." ➝p.___●Using the Kisekae tool changes the order of the menu.Some Kisekae tools do not support horizontal screens. In addition, depending on the kind of menu, the menu structure for the first layer of the tree may change according to the frequency of usage. ➝p.___●The profile information does not display the phone number. The profile does not show your own phone number. Neither does it allow you to edit it. However, if you have registered your own phone number to the SIM/USIM card with a terminal other than F905i, it will be displayed as your own phone number. [*This is TBD as the specifications will change] ●I want to change the terminal back to the factory default. Please refer to "Delete all data" in the detailed instruction manual.➝p.___❖List of useful shortcutsWe have shortcut keys that enable you to access functions by pressing only a few keys. This is a convenient function unique to F. Basic operationsAccess shortcut (i-mode)You can access a website by pressing just two keys!*You need to register in advance. +Two-key shortcuts (i-appli)You can start i-appli by pressing just two keys!*You need to register in advance. Number keys 0-9 i-mode/i-appli keyQIR.book Page 24 Thursday, April 17, 2008 3:14 PM](https://usermanual.wiki/Fujitsu/OS-F905I.Manual-2/User-Guide-1061543-Page-24.png)