Fujitsu OS-F905I Cellular Phone User Manual F905i
Fujitsu Limited Cellular Phone F905i
UserManual.wiki
>
Fujitsu
>
OS-F905I User Manual
>
Manual Part 1 6
Contents
1.
Manual Part 1 1
2.
Manual Part 1 2
3.
Manual Part 1 3
4.
Manual Part 1 4
5.
Manual Part 1 5
6.
Manual Part 1 6
7.
Manual Part 2
8.
Manual Part 3
9.
Manual 1 1
10.
Manual 1 2
11.
Manual 1 3
12.
Manual 1 4
13.
Manual 1 5
14.
Manual 1 6
15.
Manual 2
16.
Manual 3
Manual Part 1 6
Navigation menu
Upload a User Manual
Namespaces
Wiki Guide
HTML
PDF
Info
Views
User Manual
Discussion / Help
Navigation
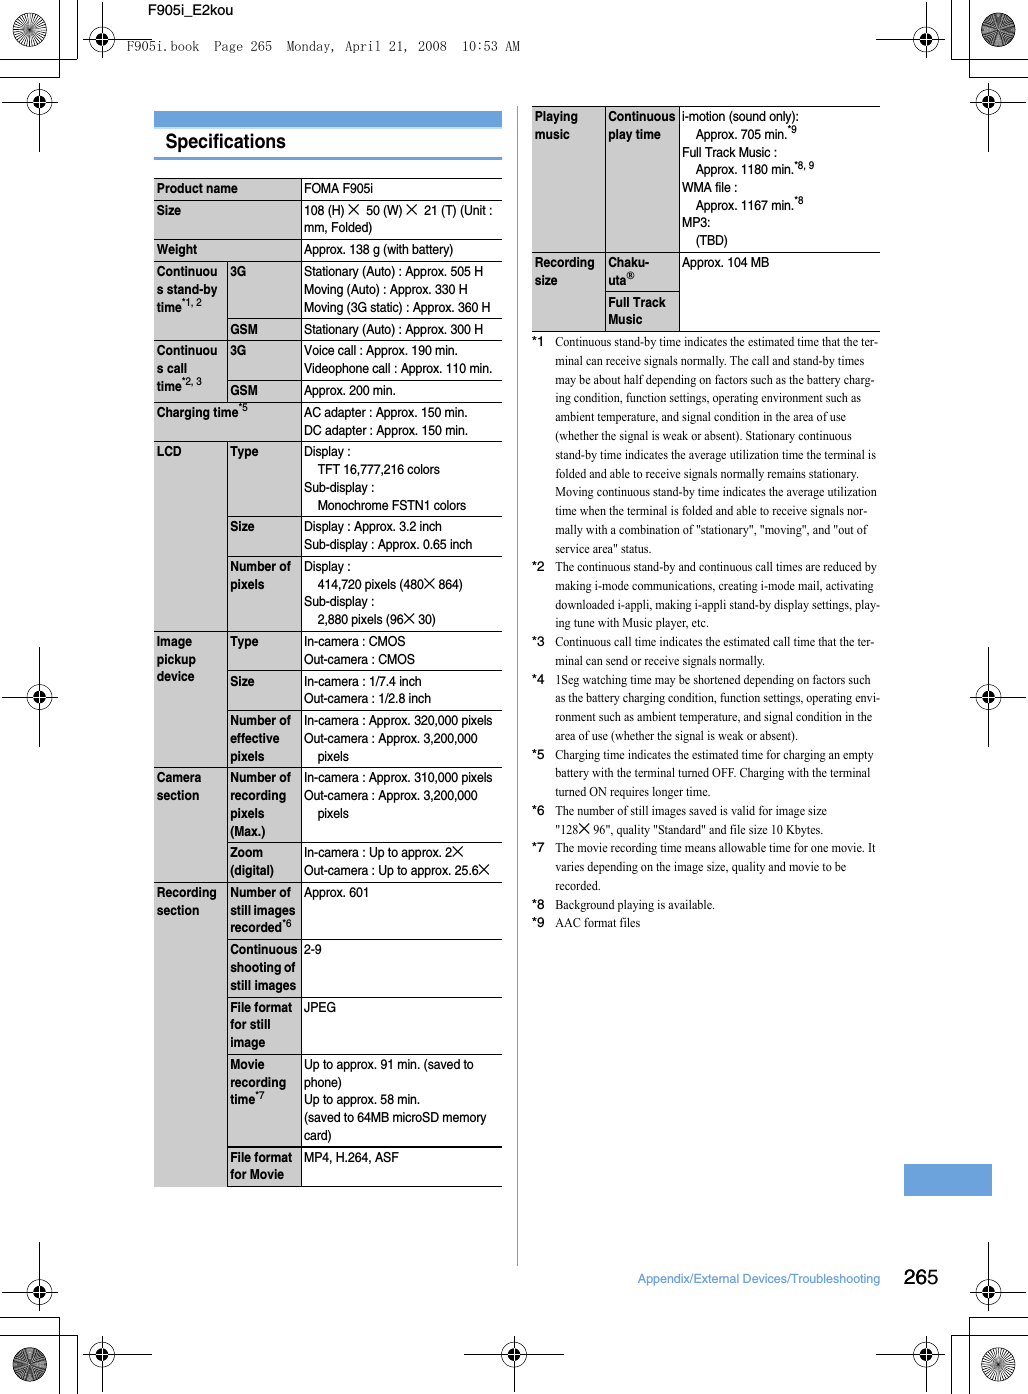
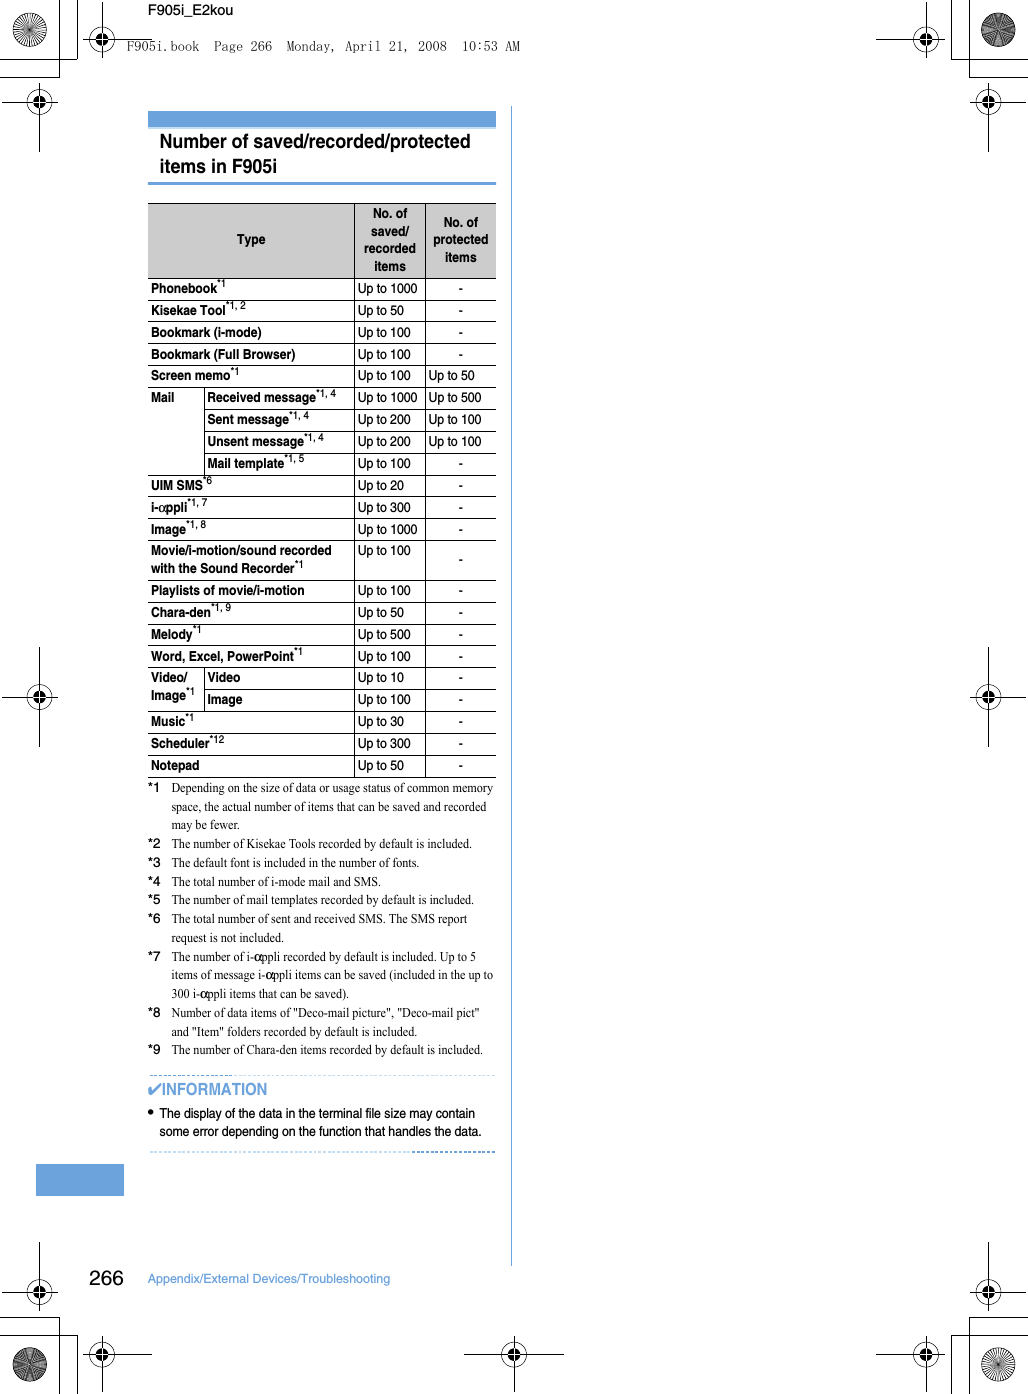
![201Data Display/Edit/ManagementF905i_E2kouF905i_E2kou◆Searching for a character string1Display datae5eEnter a character string in the field for text to searcheSet the required itemsSearch method : Select "Partial match" or "Exact match" for Search method.2pp : Display Key function help•You can also press a key with a key function help displayed. When returning to the original screen without doing any operations, press g.◆Jumping from page to page1Display dataeme1e1-5•When "Specified page" is selected, enter a page to jump to and press g.◆Zooming in/out the display1Display dataeme3e1 or 2Specifying a magnification : Display dataeme33eEnter a magnification•It does not operate if specifying a magnification smaller than that for Fit page.◆Rotating display1Display dataeme4e1-3◆Changing screen display settingSwitch status or title display/hide. The settings remain after the display is closed.1Display dataeme6e1 or 2You can also set it by pressing 0 during data display. Each time you press it, the display switches as title hide➝status hide➝all hide➝all display.◆Switching the displaying method <Display mode switching>You can set if you display a screen with the PC screen size (PC mode(full scale)) or aligned with the lateral display size of the terminal (Mobile mode).•This item can be set to Word only.1Data displayeme8SettingsSetting operating conditions of Word, Excel and PowerPoint1me[Data Box]e7eme5e1 or 2•Set "Display icons" for thumbnail display or "List view" for list display.F905i.book Page 201 Monday, April 21, 2008 10:53 AM](https://usermanual.wiki/Fujitsu/OS-F905I.Manual-Part-1-6/User-Guide-1061503-Page-1.png)
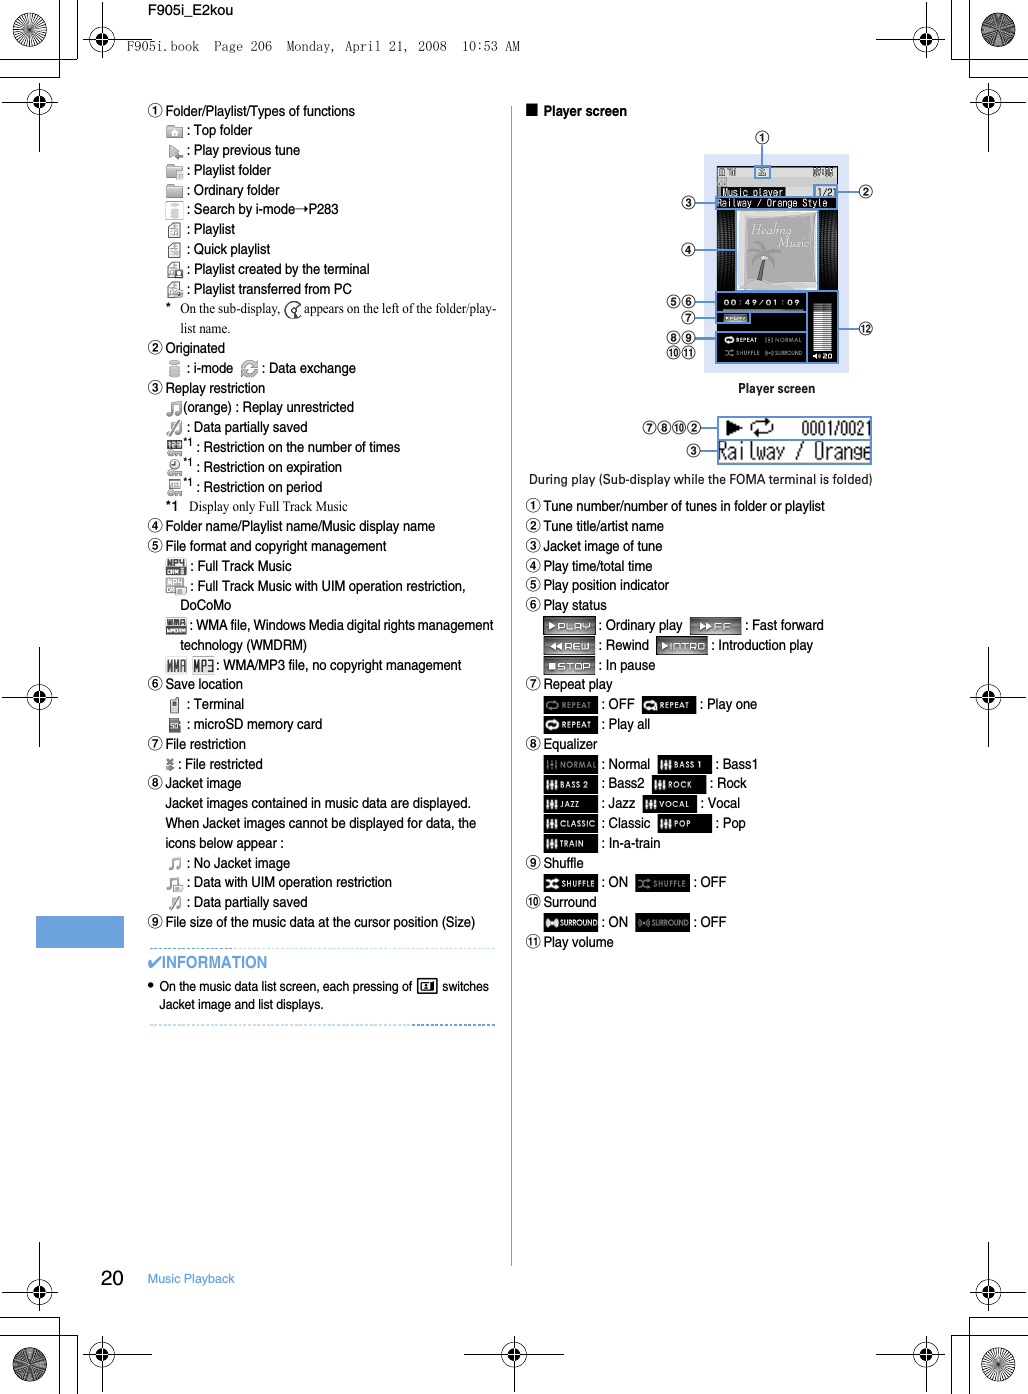
![20Music PlaybackF905i_E2kou❖Operations on player screeng, M : Play/Pausej, side keys [ST] : Adjust volumel (1 sec. or more)/r (1 sec. or more) : Rewind/fast forwardl, Side key [S] (1 sec. or more) : Move to the beginning of the current tune*1r, Side key [T] (1 sec. or more) : Move to the next tunea/P (1 sec. or more) : Display music data list screen without stopping playing*2c : Stop playing and display music data list screenM (Pressing twice quickly) : Save the current tune or tune in pause to Quick playlist*4M (1 sec. or more) : Stop Music playerP : Display the clock*5*1Operation within 3 seconds from the start of tune moves you to the previous tune.*2Press a to return to the player screen.*3The confirmation sound is heard.*4This is enabled only when the terminal is closed.•With the terminal folded and music data list screen displayed on the sub-display during playing, press P to display the player screen.•With the terminal folded, on the music data list screen, folder list screen or playlist list screen, press and hold P for 1 second or more to move to the upper folder. While displaying the top folder, press and hold P for 1 second or more to stop Music player.✔INFORMATION•When the tune cannot be recognized by deleting the original music data saved to the playlist of the terminal or removing microSD memory card, the name of the tune displayed on the playlist is "---" and the tune cannot be played. When the original music data is deleted, remove from the playlist. When the microSD memory card to which the original music data is saved is removed, the name of the saved tune appears by inserting the microSD memory card.Playing music dataMENU [Data Box] 2MENU [LifeKit] 318MENU [MUSIC] 1◆Continuously playing music data in the folder1M (1 sec. or more)eSelect a folder or playlist•From the menu on the sub-display, Music player can be started.➝P332Select music data.Playing starts.•The light goes lit or flashing depending on operations.•Full Track Music partially downloaded due to downloading failure or interruption cannot be played. When selected, a confirmation screen for downloading the remaining data appears. When it cannot be downloaded by retry, data partially saved is deleted.Full Track Music partially downloaded cannot be downloaded again after the replay period or replay expiration. In this case, a confirmation screen for deletion appears and Full Track Music partially saved can be deleted.When selecting "Last played songs"Play the tune played when turning ON the terminal last timeWhen selecting "Search by i-mode"You can connect to i-mode and select the tune to download.➝P326✔INFORMATION•In the cases below, play is paused. Play restarts automatically after the operation is over.- When there is an incoming voice call or a videophone call- When mail is received (Display priority is "Show message")- When i-mode inquiry is performed- When the date and time specified in Countdown timer, Alarm clock or schedule comes- When a function that cannot be used simultaneously with Music player is executedCombination of Multitask functionsÅ®P428•When many functions are used simultaneously, the tune being played may be interrupted.•If the remaining battery level is l 2 or lower, a confirmation screen for playing appears.F905i.book Page 207 Monday, April 21, 2008 10:53 AM](https://usermanual.wiki/Fujitsu/OS-F905I.Manual-Part-1-6/User-Guide-1061503-Page-7.png)
![21Music PlaybackF905i_E2kouEnjoying music in various waysBGM playUsing i-αppli while playing musicYou can set if you play Music player tune in background while using i-αppli.1me[Settings & NW services] e17e1-2Remote controller with microphoneUsing remote controller with micro-phone You can use the switch of a remote controller with a microphone to operate Music player.R (1 sec. or more)*1 : Start*2/EndR : Play/PauseR (Pressing twice quickly on the player screen)*1 : Save the current or paused tune to Quick playlist+- (Player screen) : Adjust volume+- (Folder list screen, playlist list screen, music data list screen) : Move the cursor.+ (1 sec. or more) : Move to the next chapter/tune- (1 sec. or more)*3 : Move to the header of the next chapter/tuneW (Slide in the direction of T) : Disable R, + and - keys.W (Slide in the opposite direction of T) : Enable disabled keys*1This is enabled only for Music player. When saving to Quick playlist or starting/ending Music player, the confirmation sound is emitted.*2This is enabled only when the terminal is closed.*3Operation within 3 seconds from the start of a chapter/tune moves you to the previous tune.F905i.book Page 213 Monday, April 21, 2008 10:53 AM](https://usermanual.wiki/Fujitsu/OS-F905I.Manual-Part-1-6/User-Guide-1061503-Page-13.png)
![216 Other Convenient FunctionsF905i_E2kouMultiaccessMultiaccessMultiaccess is the function that allows you to use 3 functions; voice call, packet communication and short message (SMS) simultaneously.•The icon indicating the function in progress appears on the task area.•The functions below are available simultaneously : - Voice call : 1 communication-i-mode, i-αppli, i-mode mail, packet communication connected with PC : 1 communication of these- SMS : 1 communication•You are charged separately for each communication when using the Multiaccess function.•Combination of Multiaccess functions➝P427◆Main operations available with Multiaccess❖Receiving voice call during communication<Example> Answering a voice call during i-mode1A call is comes in during i-modeenThe call is connected.•Press f to end the current function on the display.❖Performing another communication during communication<Example> Connecting to i-mode during a voice call1During a voice call, se21•Press f to end the current function on the display.<Example> Sending i-mode mail during a voice call1During a voice call, se12eSend an i-mode mail•Press f to end the current function on the display.MultitaskMultitaskMultitask allows you to execute multiple functions at the same time and perform operations by switching the screen.•The icon indicating the function in progress appears on the task area.•Up to 2 functions can be executed at the same time. However, Dial, User information or Silent mode ON/OFF function may be started even while 2 other functions are active.•Combination of Multitask functions➝P428◆Executing new function<Example> Saving schedule during a call1During a call,se71eSave schedule•Press f to end the current function on the display.◆Exiting all running functions1In Multitask, sepe"Yes"Auto power ON/OFFTurning power ON/OFF automaticallyThe power can be automatically turned ON/OFF at the specified time.<Example> Turning power ON automatically1me[Settings & NW services]e722Turning power OFF automatically : me[Settings & NW services]e7232Set the required itemsep✔INFORMATION•Even when Auto power OFF is "ON", when the specified time arrives while the terminal is in any mode except stand-by, the power is not turned OFF. The power is turned OFF after exiting the currently active function.In addition to turning the terminal OFF, keep Auto power ON set to "OFF" in areas where use of a mobile phone is prohibited, such as in airplanes, medical facilities or hospitals.New Task start menuF905i.book Page 216 Monday, April 21, 2008 10:53 AM](https://usermanual.wiki/Fujitsu/OS-F905I.Manual-Part-1-6/User-Guide-1061503-Page-16.png)
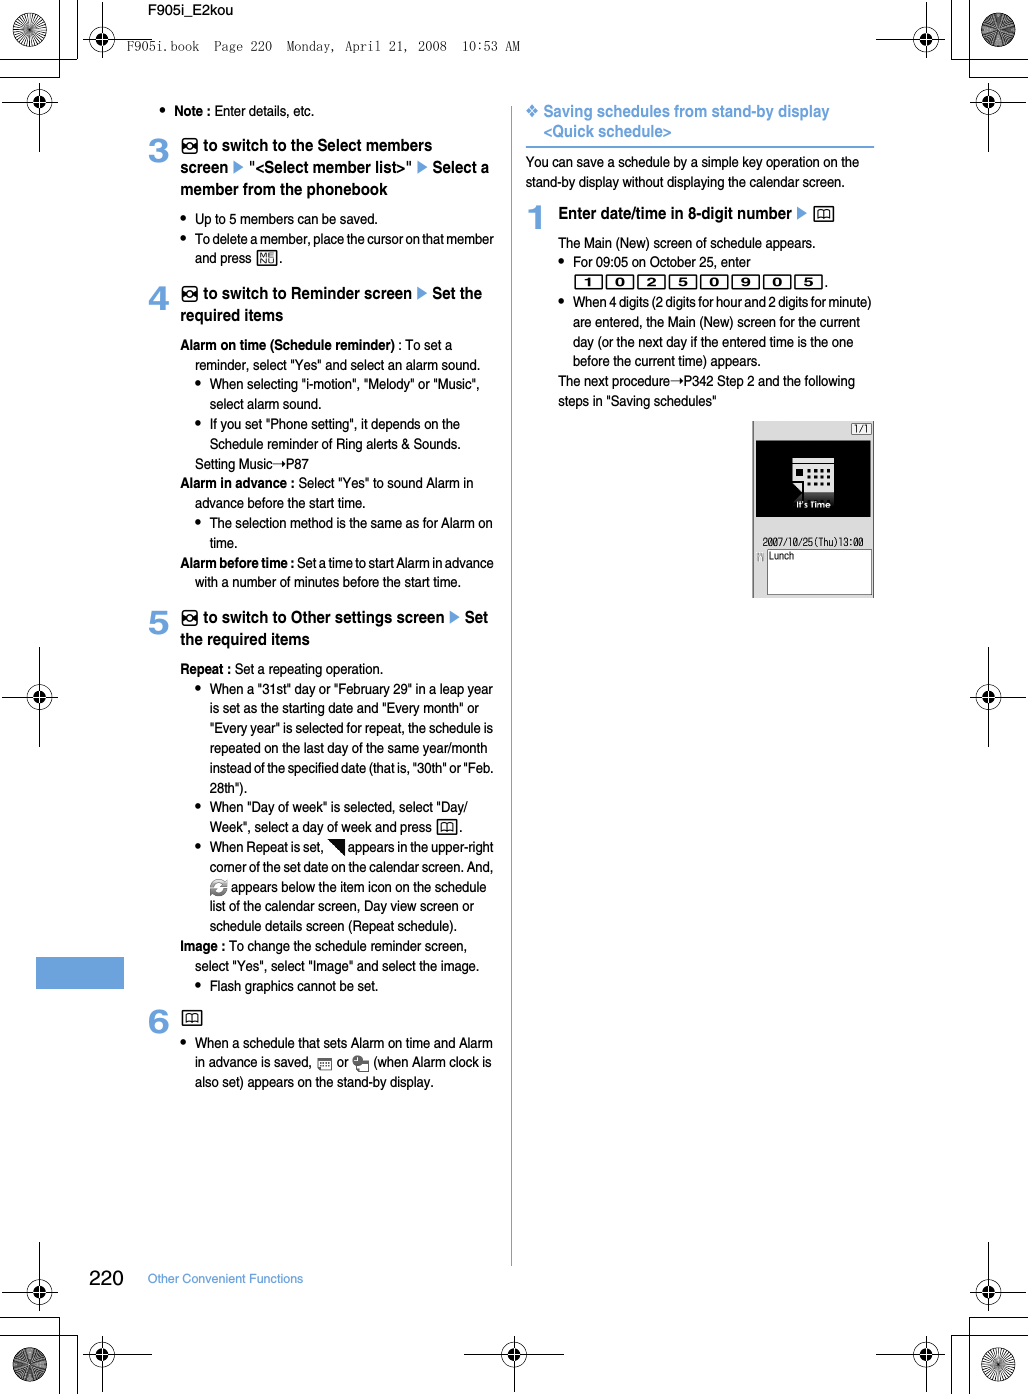
![217Other Convenient FunctionsF905i_E2kouCountdown timerSetting the timer with a simple opera-tionMENU [Accessory] 6On the stand-by display, you can enter and set the time (minutes) to elapse before the timer sounds.1Enter a time (minutes)er•The time is entered between 1 and 60 minutes.•When c or f is pressed during the countdown, a screen appears for confirming the end.•Press f to stop the timer.•When no operation is carried out for about 1 minute or any key except f or side key [T] is pressed, the timer stops.Alarm clockRinging alarm clock at specified time•Up to 9 alarm clocks can be set.1me[Accessory]e3e1-9Setting/canceling : Place the cursor on a set alarm clock and m.• appears at the left of the time for the set alarm clock.2Set the required items.Time : Enter the time to sound an alarm clock.Repeat : Set a repeating operation.•When "Day of week" is selected, select "Day/Week", select a day of week and press p.•When Repeat is set, appears to the right of the time in an alarm clock list.Message : Enter a message to be displayed on the screen upon activation of the alarm clock.Snooze(Snz) : Set whether to repeat Snooze operation (sounding continues approx. 1 minute and stops) for approx. 30 minutes.•Select "5 min", "10 min" or "15 min" to stop approx. 4 minutes, 9 minutes or 14 minutes, respectively.3h to switch to Set sound screeneSet the required items4p•When Alarm clock is set, or (when a schedule reminder is also set) appears on the stand-by display.❖When the specified time arrives•Press f to stop the alarm clock.•When no operation is carried out for about 1 minute or any key except f and side key [▼] is pressed, the alarm clock stops or Snooze operation starts.•While alarm clock is stopped with Snooze operation activated, "瞌睡鬧鈴" appears on the display and the light blinks slowly.•While Alarm clock is stopped, press c or f to deactivate it. While alarm clock is stopped with Snooze operation activated, press f to deactivate.✔INFORMATION•If alarm clock and a schedule reminder are set for the same date and time, the alarm clock sounds, succeeded by notification of the schedule reminder. When f is pressed, the schedule reminder ends, but the alarm clock stops or snooze operation is performed.F905i.book Page 217 Monday, April 21, 2008 10:53 AM](https://usermanual.wiki/Fujitsu/OS-F905I.Manual-Part-1-6/User-Guide-1061503-Page-17.png)
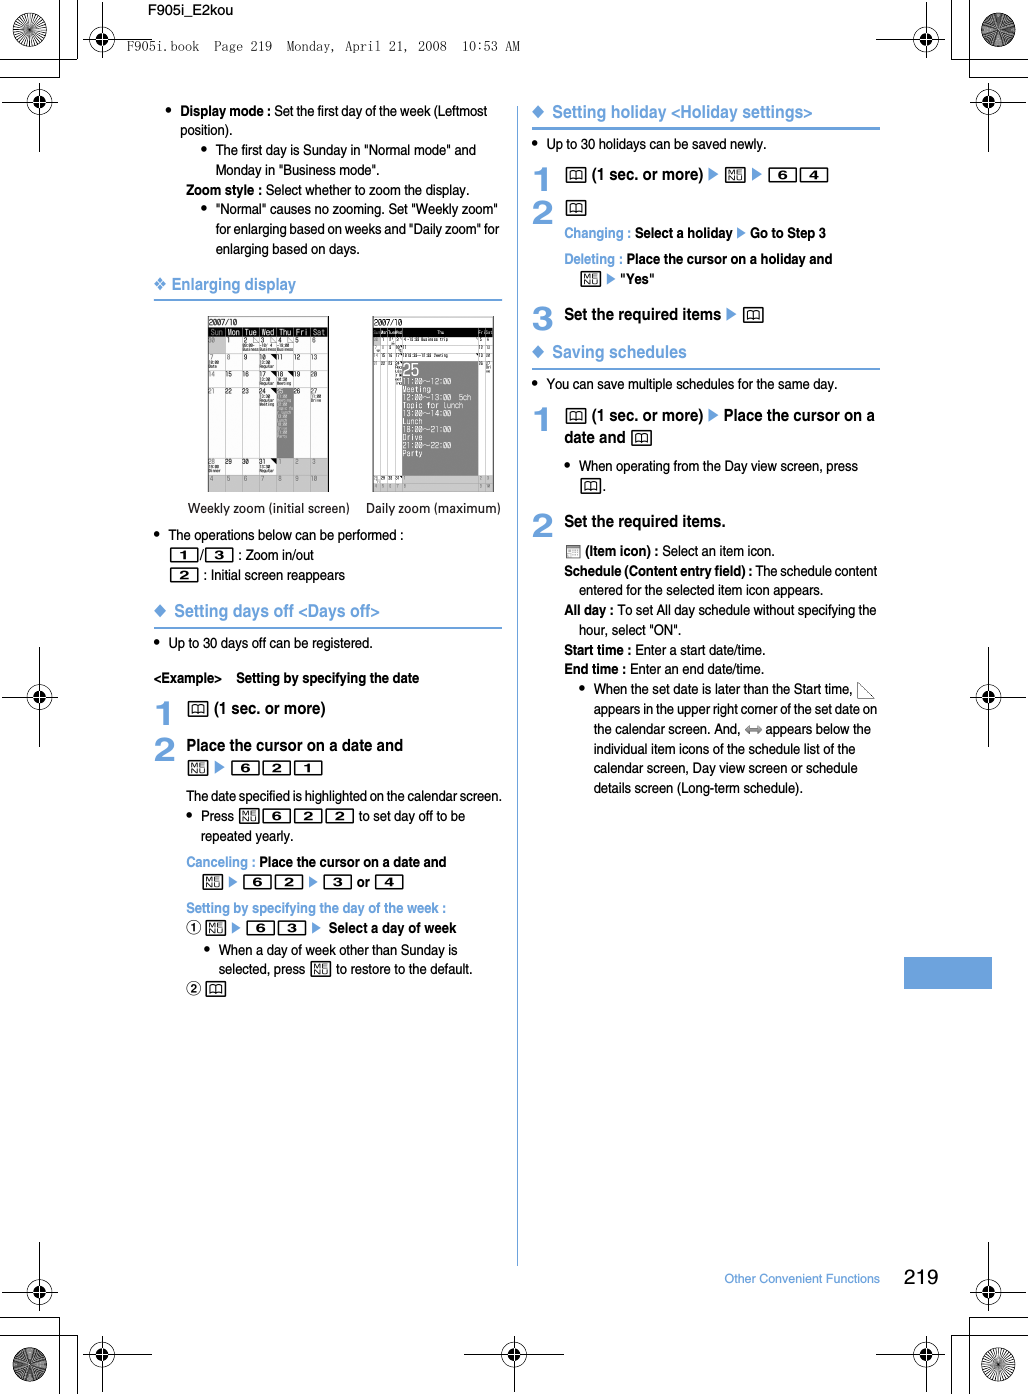
![218 Other Convenient FunctionsF905i_E2kouAlarm auto power ONTurning power ON automatically at set alarm timeYou can set whether to automatically turn the power ON to activate the alarm if the power is OFF when the date and time specified for the alarm clock or schedule arrive.1me[Settings & NW services]e725e1 or 2✔INFORMATION•This function does not operate if power supply to the terminal is stopped in a way except power OFF operation or Auto power OFF settings, (e.g. by removing the battery pack).•In addition to turning the terminal OFF, keep this function set to "OFF" in areas where use of a mobile phone is prohibited, such as in hospitals, medical facilities or airplanes.SchedulerManaging scheduleYou can save various schedules. At the specified time, you are notified with the display and/or alarm.◆Displaying calendarMENU [Accessory] 11p (1 sec. or more)•While displaying a calendar screen, the operations below are enabled : k : Move dateg : Day view screent/a : Switching previous/next monthm0 : Key operation list display•Reading the screen is described below : aItem icon•For a date with multiple schedules set, the schedule item icon set for the earliest time is indicated.bList of schedules set for the date at cursor position•Reading the list is in the same way as Day view screen (➝P344).cIndicates 4 or more schedulesSpecifying a particular date to display (Move date) : me42eEnter a date•Press m41 to restore the current date.•When operating from the Day view screen, press m52. Press m51 to restore the current date.✔INFORMATION•The calendar can display dates between January 1, 2000 and December 31, 2060.•The displayed color may differ depending on the settings of Kisekae Tool and Color scheme.•The list of schedules does not appear on the horizontal display of the calendar screen.◆Setting display style for calendar <Calendar view mode>•By default, Scroll mode is "Monthly mode", Display mode is "Normal mode", and Zoom style is "Normal".1p(1 sec. or more)eme61eSet the required itemsepScroll mode : Set a calendar display style of the date moved by pressing k.•Set "Monthly mode" to switch the display by month. Set "Slide mode" to scroll and switch the display by week.Calendar screencbCursoraF905i.book Page 218 Monday, April 21, 2008 10:53 AM](https://usermanual.wiki/Fujitsu/OS-F905I.Manual-Part-1-6/User-Guide-1061503-Page-18.png)
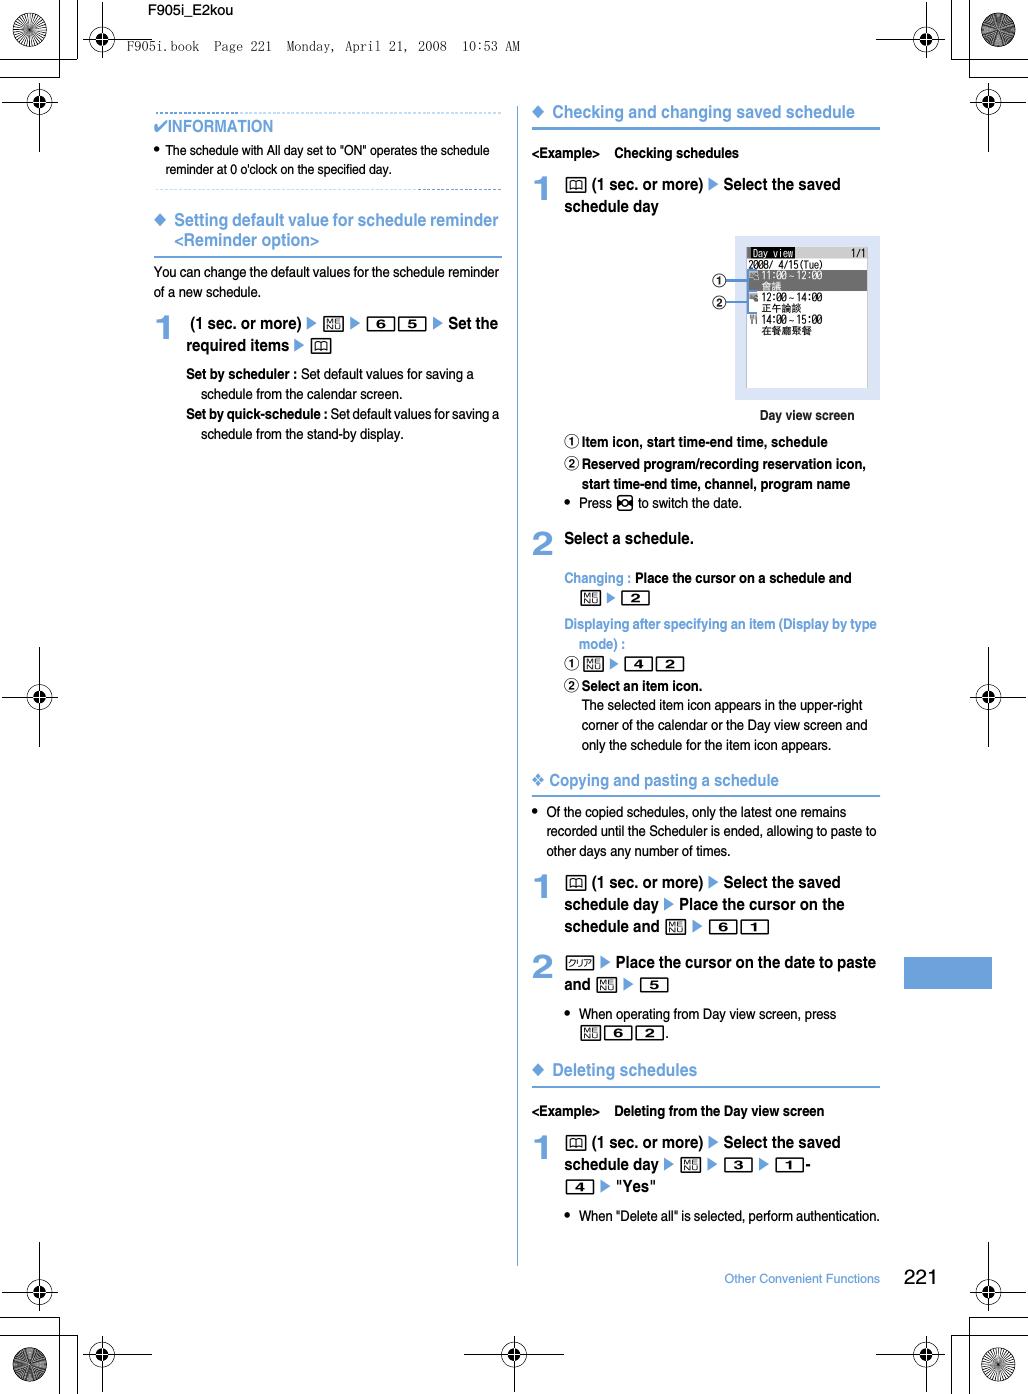
![223Other Convenient FunctionsF905i_E2kou◆Protecting secret schedules <Secrecy>Set secret attribute to a schedule. In Privacy mode ("Hide set schedule" set for Schedule), the schedule with secret attribute does not appear.•Setting Privacy mode➝P1141p (1 sec. or more)eSelect the saved schedule day2Place the cursor on a schedule and me9•To cancel the secret attribute, place the cursor on the schedule and press m9.•When operating from the schedule details screen, press m6.◆Checking number of saved schedule items <No. of items>You can check the numbers of schedule data and Set day off.1p (1 sec. or more)eme7Custom menuRegistering often-used functionsMENU [Settings & NW services] 222You can register frequently used functions and make your own menu.•One of functions saved in the first level of custom menu can be activated by pressing and holding the related key (1-9) for 1 second or more on the stand-by display. However, a menu with lower level functions, person or group saved cannot be activated.◆Creating custom menu•Up to 9 menu items can be registered in a level of custom menu.1mep2Register the menu item.Adding a function to item : ame11bPlace the cursor on a menu item and p.•A menu item without lower levels can be registered also by selecting the menu item.Adding a person to item : me12eSelect a person from phonebook•The image (except Flash graphics and movies/i-motion) or character icon registered in the phonebook appears on the menu screen.Adding a group to item : ame13eEnter the group name•Up to 9 two-byte (18 one-byte) characters can be entered.bpWhen secret attribute is set for the schedule at the cursor position, blinksF905i.book Page 223 Monday, April 21, 2008 10:53 AM](https://usermanual.wiki/Fujitsu/OS-F905I.Manual-Part-1-6/User-Guide-1061503-Page-23.png)
![225Other Convenient FunctionsF905i_E2kouTurn-display optionSetting a function to be activated/operated by turning the displayYou can set a function to be activated or operated when the display is turned right or left 90 degrees.1me[Settings & NW services]e71eSet the required itemsep•If "No setting" is set, no function is activated or operated.Stand-by turned right/Stand-by turned left : Select a function to be activated by turning the display right or left in stand-by mode in the vertical position.•With "Others" set, "Other" of Data Box is activated.Mailer turned right/Mailer turned left : Select a function to be activated by turning the display right or left while entering characters in the vertical position.Receiving call : Set if you make it possible to answer a voice call received in horizontal display by rotating the display to vertical.•If the call can be answered in horizontal display and Select language is set to ***mojibake_L19-223-1*** (Japanese), "(***mojibake_L19-223-2***)" appears. However, it does not appear while Answer machine is active, but you can answer the call.❖Using entry function of Turn-display option1Display character entry screen in the vertical positioneTurn the display right or left 90 degrees to put it in horizontal positionAn entry function set from Turn-display option is activated, displaying the character or symbol selection screen.•The entry function cannot be activated while converting characters.2Place the cursor on a character or symbol and return the display to vertical position.The character entry screen reappears and the character or symbol is entered.•You can also enter a character or symbol by selecting it on the horizontal display.✔INFORMATION•While using Camera or editing or saving data, incoming calls may not be answered by turning the display.Side key shortcutSetting a function to be activated by pressing and holding a side keyYou can set a function so that it is activated by pressing and holding one of side keys [ST] for 1 second or more with the terminal folded.1me[Settings & NW services]e77eSet the required itemsepUp Key: Press & hold/Down Key: Press & hold : Select a function to be activated by pressing and holding one of side keys [ST] for 1 second or more.•If "No setting" is set, no function is activated.Simple lightUsing as small size lightThe light of the terminal can be used as a small size light.•Operate the terminal in folded state.1Press Left side key for 1 second and more.or1P while sub-display light is ONePlace the cursor on "Quick light" using side keys [ST] and MThe light goes lit for about 30 seconds.•When the terminal is opened or any of P, M or side keys [ST] are pressed, the light is turned off.•With "Simple light" set in Side key shortcut, pressing and holding the side key set for "Simple light" for 1 second or more while the light is lit extend the lighting time by about 30 seconds.Profile InformationRegister your nameMENU [Phonebook & Logs] 9IRegister your mobile number, name, or e-mail address.1me[Profile]•Profile information does not display your own mobile number.2peAuthentication operationeSet up each itemep•Setting items➝P75 Step 2 and the following steps in "Adding entries into the terminal phonebook" (None of phonebook number or group can be set.)✔INFORMATION•The Profile does not show your own mobile number. Neither does it allow you to edit it. However, if you have registered your F905i.book Page 225 Monday, April 21, 2008 10:53 AM](https://usermanual.wiki/Fujitsu/OS-F905I.Manual-Part-1-6/User-Guide-1061503-Page-25.png)
![226 Other Convenient FunctionsF905i_E2kouown mobile number to the SIM/USIM card with a terminal other than F905i, it will be displayed as your own mobile number.•To view your own mobile number in the Profile information, register the number to [telephone number] in the edit screen. Then you can check your number from the detailed screen.◆Checking user information details1me[User information]egeAuthenticate•Each time you press h, the details screen is switched.•When the registered phone number has Caller ID settings, appears in the top of the details screen.Displaying user information : me81The phone number, mail address, etc. of the first entry appear.Switching details screen display : me82e1-3Setting items ➝P79 "Switching details screen display"Editing the recorded data : me2eEdit and pResetting the recorded data : me3e"Yes"Voice memo/Movie memoRecording voice/imageYou can record voice or images while talking over a call or in stand-by mode.•Up to 4 voice memo while talking or voice memo in stand-by can be recorded in total, with up to 30 seconds for each memo.•Movie memos up to 30 seconds each can be recorded.•Some messages such as out of service area notice or number change information may not be recorded.•The recording of the voice memo while talking or movie memo may be distorted or the image may be blurred if the signal quality is poor.◆Recording voice/image of the other party while talking1During a call, side key [S] (1 sec. or more).Recording starts.•During movie memo recording, pressing g switches display between lapse of the recording time and call duration.•When the remaining time becomes about 5 seconds, 2 short beeps noticing the end of recording sound. A long beep sounds at the end of recording.•To stop in the middle of recording, press and hold side key [S] for 1 second or more.•Movie memo is saved in "Camera" folder of i-motion.F905i.book Page 226 Monday, April 21, 2008 10:53 AM](https://usermanual.wiki/Fujitsu/OS-F905I.Manual-Part-1-6/User-Guide-1061503-Page-26.png)
![227Other Convenient FunctionsF905i_E2kou◆Recording your own voice during stand-byMENU [Phonebook & Logs] 73•Operate the terminal in open state.1Side key [S] (1 sec. or more)e3After about 3 seconds, a long beep sounds and recording starts.•When the remaining time becomes about 5 seconds, 2 short beeps noticing the end of recording sound. A long beep sounds at the end of recording.◆Playing voice memosMENU [Phonebook & Logs] 74•Operate the terminal in open state.1Side key [S] (1 sec. or more)e4aStatus icon : Voice memo while talkingNo icon : Voice memo in stand-bybVoice memo icon appearing overseas (except GMT+08:00)*1cVoice memo while talking icon appearing in international calldPhone number*2/name (if saved in the phonebook)/reason for hiding caller ID/Voice memo (Voice memo in stand-by)eRecording date/time of item at cursor position (local date/time in overseas), phone number*2/reason for hiding caller ID/Voice memo (Voice memo in stand-by)fMulti number name of outgoing/incoming call (when subscribing to Multi number)*1This may not appear, for example, when recording date/time is not recorded.*2For international call, "+" appears before phone number.2Select voice memo.•During playing, elapsed playing time appears in the bottom of the screen.•During playing, the operations below are enabled : j/Side keys [ST] : Adjust volumeg : Stopn : Switch the speakerphone function ON/OFFDeleting : Place the cursor on a voice memo and me2e1 or 2e"Yes"•When "All items" is selected, perform authentication.Making call : Place the cursor on the voice memo while talking and n or t•To make a call specifying conditions, press m3.➝P51Adding a phone number to the phonebook : aPlace the cursor on the voice memo while talking and me4 or 5e1 or 2•When adding data to existing phonebook entry, select the phonebook entry to add.bSave the name, phone number, etc.Phonebook new entry➝P75, 763Select if you delete the voice memo.CalculatorUsing CalculatorYou can perform addition, subtraction, multiplication and division (+, –, ×, ÷) calculation on your terminal.•Up to 8 digits can be entered.•You can use the calculator from the entry fields of Scheduler or Notepad and quote the calculation result.➝P3661me[Accessory]e4eCalculateFunctions assigned to the terminal keys appear on the calculator screen.0-9 : Enter digitsrlud : Enter +, –, ×, and ÷g : Enter = (Executing calculation)* : Enter a decimal point# : Switch +and – of entered numbersa : Delete one digit from the number enteredc : Delete an entered number or calculation resultCopying a calculation result : me1•To paste the copied number, press m2.•Of the copied numbers, only the latest one remains recorded until the terminal is turned OFF, allowing to paste to other locations any number of times.a efgdcbF905i.book Page 227 Monday, April 21, 2008 10:53 AM](https://usermanual.wiki/Fujitsu/OS-F905I.Manual-Part-1-6/User-Guide-1061503-Page-27.png)
![228 Other Convenient FunctionsF905i_E2kou✔INFORMATION•An error is generated and "E" appears when the integral part of the calculation result exceeds 8 digits or a divide-by-zero occurs. When the number including a decimal point exceeds 8 digits, any decimals that do not fit in the display are rounded off.NotepadCreating notesYou can enter important information or notes in Notepad.•Maximum number of recorded items➝P4471me[Accessory]e2ep•When operating from the Display notepad screen, press m1.2Set the required itemsepCatg icons : Select the category icon.Note content : Enter notes.Due date : To set an expiration date, select "ON" and enter a date.◆Checking notes1me[Accessory]e2aStatus iconIndicate expiration status of a note (Completed/Uncompleted) (Top in green) : Uncompleted (2 or more days before expiration) (Top in yellow) : Uncompleted (The previous day or current day of expiration) (Top in red) : Uncompleted (Past expiration) (Check in red) : CompletedNo icon : No expirationbCategory iconcNote contentdExpiration1-row displayab2-row displaytabcdF905i.book Page 228 Monday, April 21, 2008 10:53 AM](https://usermanual.wiki/Fujitsu/OS-F905I.Manual-Part-1-6/User-Guide-1061503-Page-28.png)
![229Other Convenient FunctionsF905i_E2kou2Select note.Display notepad screen appears.Specifying category icon to display (List by category mode) : me42eSelect a category iconThe selected category icon appears in the upper-right corner of List of notes and only the note for category icon appears.•Press m41 to restore the display.Specifying Completed/Uncompleted to display (List by status) : me5e2 or 3The completed note list or uncompleted note list appears.•Press m51 to restore the display.Changing Completed/Uncompleted : Place the cursor on a note with expiration set and a.•When operating from the Display notepad screen, press m4.Sorting notes : me6eSet the required itemsepBy : Select a sort type.Order : Select sorting order.Creating an i-mode mail : Place the cursor on a note and me7•When operating from the Display notepad screen, press m5.Changing a memo : Place the cursor on a note and me2•When operating from the Display notepad screen, press p.The next procedure➝P354 Step 2 in "Creating notes"◆Deleting notes<Example> Deleting a note1me[Accessory]e22Place the cursor on a note and me31•When operating from the Display notepad screen, press m3.Deleting selected notes : me32eSelect notesepDeleting all notes : me33eAuthenticateDeleting completed notes only : me343"Yes"Earphone/microphone with switchUsing the earphone/microphone with switchBy connecting the optional Flat-plug Earphone/Microphone with Switch (including stereo earphone set) to the earphone/microphone jack, it is possible to make voice calls or receive voice and videophone calls simply by pressing the switch.•When using remote controller with microphone F01 (optional), press F before operation.◆Connecting earphone/microphone with switchFor the connection of Flat-plug Earphone/Microphone with Switch to the terminal, open the cover and insert the connection plug of Flat-plug Earphone/Microphone with Switch.➝P25•With Flat-plug Earphone/Microphone with Switch connected in Silent mode, the sound is emitted from the earphone regardless of the settings of Alert preference. If the earphone is disconnected before completion, a melody stops. i-αppli, Music, Movie/i-motion, etc. is performed and played silently.◆Setting switch operation of earphone/microphone <Headset key control>You can set so that the switch of Flat-plug Earphone/Microphone with Switch allows to make a voice call.•Headset quick-dial ➝P3561me[Settings & NW services]e543eSet the required itemsepControl function : Set if you use the switch to make voice calls.Phonebook No. : Search the party to call with Headset quick-dial from the terminal phonebook and set.F905i.book Page 229 Monday, April 21, 2008 10:53 AM](https://usermanual.wiki/Fujitsu/OS-F905I.Manual-Part-1-6/User-Guide-1061503-Page-29.png)
![230 Other Convenient FunctionsF905i_E2kou◆Making voice call by pressing switch <Headset quick-dial>You can make a voice call to a party set with Headset key control by pressing a switch of Flat-plug Earphone/Microphone with Switch.1Press the switch (1 sec. or more) until you hear 2 short beepseWhen ending the call, press the switch (1 sec. or more) until you hear a short beep✔INFORMATION•When the phonebook No. of Headset key control contains multiple phone numbers, the voice call is made to the first phone number registered.•When the phonebook entry of the phonebook No. in Headset key control is deleted, overwritten by another phonebook entry, or its phonebook No. is switched, Headset key control is canceled.◆Receiving calls by pressing switch Auto answer <Headset quick-answer>1When there is an incoming call, press the switch (1 sec. or more) until you hear 2 short beepseWhen ending the call, press the switch (1 sec. or more) until you hear a short beep✔INFORMATION•In reply to a videophone call received, a camera image is sent if the terminal is open or a substitute image is sent if the terminal is folded.•When the terminal is folded during a call by connecting Flat-plug Earphone/Microphone with Switch, the operations below take place : - The call can be continued regardless of Close settings.- A substitute image appears on the terminal of the other party during a videophone call.- If a camera image with frame is being sent, the frame is released and a substitute image appears on the other party's terminal.◆Answering call automatically with earphone connected <Auto answer setting>If you receive an incoming call when connecting Flat-plug Earphone/Microphone with Switch, you can set if you answer the call automatically after the specified ring time.•This function is unavailable to incoming calls during another call.1me[Settings & NW services]e542eSet the required itemsepAuto answering : Set if you automatically answer while Flat-plug Earphone/Microphone with Switch is connected.Delayed time(Sec) : Set time before automatically answering an incoming call in the range of 0-120 seconds.✔INFORMATION•When a videophone call has been answered by Auto answer, a substitute image is sent and a videophone call is automatically started.•The same time period cannot be set for both Delayed time and greeting response time of Answer machine.•With Delayed time set within the time of Ring alert delay, Auto answer does not operate when a call is received from a caller not saved in Phonebook.◆Hearing the ring tone only through the earphone <Alert preference>By connecting Flat-plug Earphone/Microphone with Switch, you can set to hear the ring tone through both headset and speaker or only through the headset.•Alert tone such as alarm sound is operated according to this setting.1me[Settings & NW services]e541e1-3•With "HS, + SP after 20sec" set, the ring alert is emitted from the speaker about 20 seconds after the ring alert is emitted only from the earphone.Quick start-upShortening start time after power-ONYou can set if you shorten the start-time after turning ON the terminal.1me[Settings & NW services]e75e1 or 2✔INFORMATION•The terminal starts normally in the cases below.- When the remaining battery level is 2 or lowerF905i.book Page 230 Monday, April 21, 2008 10:53 AM](https://usermanual.wiki/Fujitsu/OS-F905I.Manual-Part-1-6/User-Guide-1061503-Page-30.png)
![231Other Convenient FunctionsF905i_E2kou- When the battery pack is removed and installed- When 24 hours elapse after the terminal is turned OFFConfirmConfirming current settings of func-tionsYou can confirm the terminal settings.1me[Settings & NW services]e762eh to confirm current settings✔INFORMATION•In Personal data lock, the set conditions for locked items are displayed as "---".•In Privacy mode ("Authorized access" set for My Picture or i-motion), authentication is required.ResetResetting functionsThis function resets functions to their default settings.•For the functions to be returned to the default settings, see "Menu list".➝P398•The functions below and data items are restored to their default settings, though they are not listed in "Menu list" : - Preferences : Silent mode, setting of Kisekae Tool, input history of Pictogram/Symbol/Smiley- Full Browser Settings : Cookie data, Showing/hiding pointer, Switching enlarge/small size display, Section map colors, Character string search setting- Predict dict. data : Data recorded using the input prediction function1me[Settings & NW services]e765eAuthenticateeSelect an item to resetepe"Yes"Delete all dataDeleting registered data all at onceData saved, registered and set in the terminal can be deleted all at once.•The protected data is also deleted.•The preinstalled data below is deleted : -i-αppli -Chara-den- Images in "Deco-mail picture", "Deco-mail pict" and "Item" folders in My Picture•The functions listed in Reset return to the default.•The data and functions below saved, registered or set, if any, are deleted or return to the default : - Date & time-Redial- Received calls- Recorded status message- Recorded messages (including the recorded greeting message)- External device- Phonebook data - Settings made from Phonebook- Stereo sound effect- Menu operation log- Select language- Terminal security code- Fingerprint authentication- Privacy mode setting- Privacy mode- Receive display option- Side key hold- Security indicator- Still camera- Movie camera- Data read by Bar code reader-Enter URL-Entry URL log-Browser history- Original certificate- Bookmark- Save shortcut for Bookmark- Screen memo-i-mode mail- Mail template- Mail logs- Sort method- Mail group-SMS-i-αppli- Settings made from i-αppli list- Display history of i-αppli- Data saved in My Picture, Music, i-motion, Melody, Kisekae Tool, Chara-den and Other- Settings made from My Picture, Music, i-motion, Melody, Kisekae Tool, Chara-den and Other- Created folders and albums- Changed folder name- Data in INBOX of infrared communication- Data exchange settings- Sound recorder-Alarm clock- Schedule- Settings made from Scheduler- Custom menu- User information (except for My phone number)- Voice memos-Notepad- Record reply message of Additional service-Save phrase- Password saved in Password managerF905i.book Page 231 Monday, April 21, 2008 10:53 AM](https://usermanual.wiki/Fujitsu/OS-F905I.Manual-Part-1-6/User-Guide-1061503-Page-31.png)
![232 Other Convenient FunctionsF905i_E2kou1me[Settings & NW services]e766eAuthenticatee"Yes"Delete all data is performed while restarting.✔INFORMATION•When restarting after this function is executed, the same screen as that for the first activation of the terminal appears (AdvancedMode setting appears only when the confirmation screen is closed without any settings).➝P39•The data below cannot be deleted. Also, they cannot be restored to the default : - Data saved, registered or set in the terminal and the microSD memory card- Data communication settings set from PC•When deleting a large size of data, restarting may take approximately 1 minute. Be careful not to turn the power OFF before deletion completes.F905i.book Page 232 Monday, April 21, 2008 10:53 AM](https://usermanual.wiki/Fujitsu/OS-F905I.Manual-Part-1-6/User-Guide-1061503-Page-32.png)
![238F905i_E2kouSave phraseStoring fixed phrase1me[Settings & NW services]e7339e"<New phrase>"Deleting the saved fixed phrases : Place the cursor on the fixed phrase and me"Yes"•To check the fixed phrase already stored, place the cursor on the phrase to check and press p. Edit it by pressing g.2Enter the fixed phrase.3pPhrases are stored in "My phrase".•When editing a stored fixed phrase, a confirmation screen appears. Select "Yes" to replace or "No" to cancel the operation.❖Storing words during character entry1On the character entry screen, me62•Press m72 on the message text entry screen.2Select the start point.Selecting a whole sentence : megeGo to Step 4•On the message text entry screen, press a to select the whole sentence. Go to Step 4.3Select the end point.The characters in the selected range are displayed on the edit phrase screen.Selecting from the starting position to the beginning of the sentence : megSelecting from the starting position to the end of the sentence : peg4p✔INFORMATION•A character storing selected above that contains blank spaces is processed as follows : Blank spaces only : Cannot be stored as a fixed phrase.Blank spaces before and after a character string : Only character string is enabled.Blank spaces between characters : Blank spaces are also enabled.Copying/cutting and pasting charac-ters•Only the last item of the copied or cut characters are recorded until the power is turned OFF, and they can be pasted any number of times.◆Copying/cutting characters1On the character entry screen, me1 or 2•On the message text entry screen, press m31 to copy or m32 to cut.2Select the start point.Selecting the whole sentence : meg•On the message text entry screen, press a to select the whole sentence.3Select the end point.The characters in the selected range are copied or cut.Selecting from the starting position to the beginning of the sentence : megSelecting from the starting position to the end of the sentence : peg◆Pasting characters•When the pasted phrase exceeds the permitted number of characters, a message appears indicating not all characters can be pasted. Select "Yes" to paste the phrase with excessive characters deleted.1On the character entry screen, place the cursor at the position to paste characters and me3The characters are inserted at the cursor position.•Press m4 on the message text entry screen.Save wordSaving frequently used words in advanceIf you save frequently used words in advance you can access them easily for character conversion.1me[Settings & NW services]e7312Enter a word to save in the word field.Enter a word of 32 double-byte characters (64 single-byte characters) or less3pF905i.book Page 238 Monday, April 21, 2008 10:53 AM](https://usermanual.wiki/Fujitsu/OS-F905I.Manual-Part-1-6/User-Guide-1061503-Page-38.png)
![239F905i_E2kouPassword managerRegistering passwords in advanceWith authentication information such as user names and passwords saved, you can quote and enter saved information to a site or website that requires such information.•Fingerprint authentication must be enabled to use Password manager.➝P108•Quoting saved password➝P3661me[Settings & NW services]e47eAuthenticate2pDeleting a password : Place the cursor on the password and me2e"Yes"Deleting selected passwords : me3eSelect passwordsepe"Yes"Deleting all passwords at a time : me4e"Yes"Changing the order : Place the cursor on the password and me5 or 63Enter the title in the title field.4Enter the password in the password field.5p❖Storing words during character entryYou can select entered characters and save them as a password.1On the character entry screen, me63•Press me73 on the message text entry screen.2Select the start position.Selecting a whole sentence : megeGo to Step 4•When selecting the whole sentence from the message text entry screen, press a, perform authentication and go to Step 4.3Select the end positioneAuthenticateThe characters in the selected range are displayed in the password entry field.Selecting from the starting position to the beginning of the sentence : megSelecting from the starting position to the end of the sentence : peg4Enter a title nameep•Passwords are displayed in the order they are saved.Text input methodConfiguring the input method settings1me[Settings & NW services]e734eSet up each itemepInput prediction : Select whether to set the "BoPoMoFo input mode" or "Stroke input mode."Input prediction : Configure whether a list of suggestions is displayed while entering characters in the "English input mode."•If set to "Open", the character prediction conversion is enabled using English T9•If set to "Closed", the characters are displayed through the multi-tap method, without using English T9.The multi-tap method refers to an input method that switches letters each time you press multiple keys assigned to one key.Auto cursor : Configure the time to pass before the cursor moves to the right automatically.•If set to "OFF", the cursor will not move automatically.•If set to "Slow", the cursor will move after about 1.5 seconds. •If set to "Normal", the cursor will move after about 1 second.•If set to "Fast", the cursor will move after about 0.5 second.❖Changing settings while entering characters•You cannot change settings before the characters are confirmed or in the decomail decoration selection screen.•You can switch the input mode and change the auto cursor while entering inline.1On the character entry screen, m in the character input screene7e1-3•Press m8 in the input screen for the mail body.•Press 1 to switch between the ON/OFF for the input prediction.•Press 2 then $1$Å`$4$ to select and configure the time for the auto cursor movement.F905i.book Page 239 Monday, April 21, 2008 10:53 AM](https://usermanual.wiki/Fujitsu/OS-F905I.Manual-Part-1-6/User-Guide-1061503-Page-39.png)
![242F905i_E2kouVoicemail serviceIf you are at a place that receives no signal or if your phone is off, this service forwards voice calls and video calls to the Voice Mail service center and records the caller's message.It enables you to connect to the center to replay the recorded message and setting up the phone number of the center.1me[Settings & NW services]e81eSelect a menu item to operate✔INFORMATIONIf the setting of the Select Menu has been left the same as when you purchased, pushing $1$ for more than a second in the standby screen enables you to replay the Voice Mail message.Call waitingWhen there is another incoming voice call during a voice call, this service notifies you with the call waiting ring tone. This allows you to place your current voice call on hold and then answer the other voice call. You can also make a call to another party, putting the current call on hold.•When a videophone call is received during a videophone or voice call, Call waiting does not operate but the call is recorded as a missed call.•When using Call waiting service, set Arrival call act to "Answer" in advance. If not, you cannot answer calls received during a voice call with Call waiting service active.•To answer the other incoming voice call during a voice call, perform the operations below.n : Put the current call on hold and answers the incoming calln : The current call is disconnected and the calling screen of the incoming call appears. Press n and answer the call•During Call waiting, you can switch the party to talk to by pressing t.•When making a voice call to another party during a current voice call, press m and select "Dial up".1me[Settings & NW services]e882eOperate by selecting a menu itemMenu items Functions and operationsa Play messageseOperate following the audio guidance instructionb Voice mail settingeEnter the phone number of the Voice Mail service centerepIf you are using a voice mail service other than FET, change the service connection field to "User Setting" and enter a phone number that is less than 26 digits to the field.Menu items Functions and operationsa Activatee"Yes"b Deactivatee"Yes"c Check settinge"Yes"F905i.book Page 242 Monday, April 21, 2008 10:53 AM](https://usermanual.wiki/Fujitsu/OS-F905I.Manual-Part-1-6/User-Guide-1061503-Page-42.png)
![243F905i_E2kouCall ForwardingIf you are engaged in a phone call, did not answer the phone within a specified ringtime, are at a place that does not receive a signal, or your phone is off and receives a voice call or video call, this service forwards the call. It enables you to change/cancel/confirm the redirection service according to the kind of service.1me[Settings & NW services]e8eSelect a menu item and operate 3Call Forward (Voice) eUnconditionalaSet and activate e *1bClear and deactivatee "Yes" cCheck settinge "Yes"eBusyaSet and activatee *1bClear and deactivatee "Yes"cCheck settinge "Yes"eNo replyaSet and activatee *1bClear and deactivatee "Yes"cCheck settinge "Yes"eNot reachableaSet and activatee *1bClear and deactivatee "Yes"cCheck settinge "Yes"eRemove all settingse "Yes"4 Call Forward(Videophone)eUnconditionalaSet and activate *1bClear and deactivatee "Yes"cCheck settinge "Yes"eBusyaSet and activatee *1bClear and deactivatee "Yes"cCheck settinge "Yes"eNo replyaSet and activatee *1bClear and deactivatee "Yes"cCheck settinge "Yes"eNot reachableaSet and activatee *1bClear and deactivatee "Yes"cCheck settinge "Yes"eRemove all settingse "Yes"*1 (Set and activat) : "Yes" e Enter call forwarding number, enter ring time [For the cases of No reply (voice), No reply (video)] epIncoming call barring serviceThis service prevents incoming voice calls and video calls.It enables to start/stop/confirm the setting of the incoming call barring service according to the type of service. You can also change the password to set up the outgoing and incoming call prohibition service.1me[Settings & NW services]e8eSelect a menu item to operate 5Bar incoming call 6Bar incoming videophone call 7Stop all incoming call barringe"Yes"e Enter outgoing and incoming call barring passwordep8Change passworde"Yes"e Enter new and old passwordsepMenu items Functions and operationsa Activatee"Yes"eEnter outgoing and incoming call prohibition passwordepb Deactivatee"Yes"eEnter outgoing and incoming call prohibition passwordepc Confirm incoming call prohibitione"Yes"Menu items Functions and operationsa Activatee"Yes"eEnter outgoing and incoming call prohibition passwordepb Deactivatee"Yes"eEnter outgoing and incoming call prohibition passwordepc Check settinge"Yes"F905i.book Page 243 Monday, April 21, 2008 10:53 AM](https://usermanual.wiki/Fujitsu/OS-F905I.Manual-Part-1-6/User-Guide-1061503-Page-43.png)
![244F905i_E2kouCaller IDWhen you make a voice call or video call, this service displays your mobile phone number (caller number) to the destination phone.It sets up the terminal to show/hide the caller ID and confirms the network setting. When a call is made, the terminal setting determines if the caller ID will be showd or hidden.1me[Settings & NW services]e89eSelect a menu item to operate tion✔INFOEMATIONPriority of caller IDThere are several ways to show/hide your phone number to the person you are calling.. If you set up or operate them at the same time, the following priority is applied to determine whether or not to show your phone number. Note that the status displayed on the screen may be different from the actual show/hide setting. aSpecify showing or hiding the number through the call option when you make a callaAdd "*31#" (show) or "#31#" (hide) before the phone number of the person you are calling bCaller ID configuration in the phonebook cCaller ID configuration for the terminaldCaller ID network configuration Menu items Functions and operationsa Activatea Show caller IDSet to show caller IDb Hide caller IDSet to hide caller IDc Unspecified No setting will be made whether to show/hide caller ID and the network setting will be used.bCheck settinge"Yes"F905i.book Page 244 Monday, April 21, 2008 10:53 AM](https://usermanual.wiki/Fujitsu/OS-F905I.Manual-Part-1-6/User-Guide-1061503-Page-44.png)
![246F905i_E2kouNetwork search modeSetting type of searching for telecom-munications carrierYou can automatically search for an applicable telecommunications carrier and make reconnection when starting international roaming or the terminal is placed outside a current network.•Setting may be disabled for some wave and/or network conditions.1me[Settings & NW services]e911e1-3Auto : Automatically reconnect to applicable telecommunication carrier.Manual : Display Available networks. Select a telecommunication carrier.Network re-search : When "Auto" is set, telecommunications carriers are automatically switched. When "Manual" is set, a list of telecommunications carriers appears after re-searching. Select a telecommunication carrier.m : Re-searching telecommunications carriers✔INFORMATION• appears for unavailable telecommunications carrier in Available networks, 3G appears for 3G Network and GSM appears for GSM/GPRS Network.•When the terminal is placed out of the connected network of the selected telecommunications carrier while "Manual", search for the telecommunications carrier again, or set to "Auto".•NW search is possible for USIM, but not for SIM.PLMN settingSetting a telecommunications carrier to be connected by priorityYou can set priority of a telecommunications carrier to be connected when Network search mode is "Auto".1me[Settings & NW services]e911e4Telecommunications carriers are listed from the one with the highest priority.•Connection priority levels, operator codes (MCC-MNC), country names, operator names and RAT (3G, GSM, 3G/GSM) appear.2Place the cursor on the telecommunications carrier and me2Displaying detail information : Select the telecommunications carrierOperator codes (MCC-MNC), country names, operator names, telecommunications carrier name and RAT (3G, GSM, 3G/GSM) appear.Deleting 1 telecommunications carrier : Place the cursor on the telecommunications carrier and me31e"Yes"Deleting selected telecommunications carriers : me32eSelect telecommunications carriersepe"Yes"Deleting all telecommunications carriers : me33eAuthenticatee"Yes"3Select a priority levelepThe telecommunications carrier moves to the selected priority with a different level.•To give the lowest priority, select "<Insert last>".F905i.book Page 246 Monday, April 21, 2008 10:53 AM](https://usermanual.wiki/Fujitsu/OS-F905I.Manual-Part-1-6/User-Guide-1061503-Page-46.png)
![247F905i_E2kou◆Adding telecommunications carriers to priority network list<Example>Adding a telecommunications carrier not registered in the terminal1me[Settings & NW services]e911e42me11eSet the required itemsepMCC : Enter the country code by 3 digits.MNC : Enter the network number by 2-3 digits.Selecting a telecommunications carrier from a list of those registered in the terminal : me12eSelect the country nameeSelect the telecommunications carrierSelect a telecommunications carrier from a list of those currently available : me13ePlace the cursor on the telecommunications carrier and peGo to Step 431-3ep4Select a priority levelepThe telecommunications carrier added to the selected priority with a different level.•To give the lowest priority, select "<Insert last>".3G/GSM settingSwitching networks•When set to "AUTO", automatically connected to an available network even when moving to a service area of a different type of network.1me[Settings & NW services]e92e1-3✔INFORMATION•When set to "AUTO", if both 3G and GSM/GPRS Networks are detected, 3G Network takes precedence.Area service statusDisplaying current Area service status1me[Settings & NW services]e764The service status of the currently connected network appears.Stand-by display during international roaming services◆Setting if you display an operator name <Operator name disp.>You can display an operator name at the top of the display.1me[Settings & NW services]e93e1 or 2✔INFORMATION•No operator name appears in the following cases, regardless of the settings of this function : - When using FOMA Network- When out of service area◆Setting if you display Two time zone clocks <Two time zone clocks>You can display the times of the country you stay and Taipei.1me[Settings & NW services]e94e1 or 2✔INFORMATION•With Auto time adjust is "ON", Two time zone clocks appear in 24 hour when the time difference correction information is received from a telecommunications carrier of the country you stay to be connected.•On Two time zone clocks, Japan time is displayed on the right side. When displaying time of another country on the right side, set Two time zone clocks to "OFF" and set the design of Clock display format to "World time clock".•Two time zone clocks do not appear in the cases below : - When movie/i-motion or Chara-den is set on the stand-by display-When i-αppli stand-by display is setF905i.book Page 247 Monday, April 21, 2008 10:53 AM](https://usermanual.wiki/Fujitsu/OS-F905I.Manual-Part-1-6/User-Guide-1061503-Page-47.png)
![250 Appendix/External Devices/TroubleshootingF905i_E2kouList of keypads and character assignments*1The symbols are as follows., 。 ? ! . : ; … 、 ` “ SP ( ) 《 》 @ 々 & , - ¥ $ € £| \ ~ % = / # + * ^ < > { } _ [ ] ・ ℃ ℉(Note: SP is a space, LF is a line feed)*2The symbols are as follows.. - ? ! ‘ @ : ; /*3You can enter by pressing the relevant key for more than a secondKey BoPoMoDo entry mode Stroke entry mode English entry mode Number entry mode1ㄅ ㄉ ㄚ 1 Symbols (*1)一1 Symbols (*1) 1 Symbols (*2) 12ㄍ ㄐ ㄞ ㄧ 2 A a B b C c丨 2 A a B b C c A a B b C c 2 23ㄓ ㄗ ㄢ ㄦ 3 D d E e F f丿 3 D d E e F f D d E e F f 3 34ㄆ ㄊ ㄛ 4 G g H h I i丶 4 G g H h I i G g H h I i 4 45ㄎ ㄑ ㄟ ㄨ 5 J j K k L l¬ 5 J j K k L l J j K k L l 5 56ㄔ ㄘ ㄣ 6 M m N n O o ? 6 M m N n O o M m N n O o 6 67ㄇ ㄋ ㄜ ㄝ 7 P p Q q R r S s 7 P p Q q R r S s P p Q q R r S s7 78ㄏ ㄒ ㄠ ㄩ 8 T t U u V v 8 T t U u V v T t U u V v 8 89ㄕ ㄙ ㄤ ㄥ 9 W w X x Y y Z z 9 W w X x Y y Z z W w X x Y y Z z 9 90ㄈ ㄌ ㄡ ㄖ 0000 + *3* Single-byte space Single-byte space Single-byte space * P *3# Line feed Line feed Line feed # T *3F905i.book Page 250 Monday, April 21, 2008 10:53 AM](https://usermanual.wiki/Fujitsu/OS-F905I.Manual-Part-1-6/User-Guide-1061503-Page-50.png)
![25Appendix/External Devices/Troubleshooting 255F905i_E2kouTroubleshootingTroubleshooting■Power supply and charging●The terminal cannot be turned ON (the terminal cannot be used).•Is the battery pack connected properly?➝P35•Is the battery depleted?➝P37, 39•When the mova terminal is active in Dual network service, the terminal service is not available. Check whether the terminal is active or not. For details, see "Mobile Phone User's Guide [Network Services]".●The terminal cannot be charged.•Is the battery pack connected properly?➝P35•Is the charger terminal dirty? Clean the terminal with dry cotton swab, etc.•Is the AC adapter connector securely inserted to the terminals jack or the desktop holder connection terminal? Is the terminal correctly mounted on the desktop holder?➝P37●The light on sub-display flashes during charging.•End any calls or communications immediately. Remove the AC adapter (Desktop holder) and DC adapter from the terminal, then connect them correctly and start over.➝P37•If the problem still persists, contact a sales outlet such as FET Service Center.●An icon on the top of the display blinks and alarm is heard.The battery is almost exhausted. Charge the battery.➝P36, 39■Phone●Calls cannot be made using the keypads.•Have you activated Self mode?➝P112•Have you activated Keypad dial lock?➝P113•Have you set Lock on close?➝P119●After dialing a number, you hear a busy tone and cannot establish a call.•Have you dialed the area code?•Did you hear the dial tone before dialing?•Is åóäO (out of service area) displayed?➝P39●The ring alert does not sound.•Is Call alert volume of Adjust volume set to "Silent"?➝P88•Is the function below set?- Specified caller➝P121- Anonymous caller➝P121- Ring alert delay➝P121- Unregistered caller➝P122•Have you activated Silent mode?➝P91•Have you activated Self mode?➝P112•When Ring time for Voice Mail or Call forwarding service is "0 Sec.", the ring tone does not sound. For details, see "Mobile Phone User's Guide [Network Services]".•Is Greeting msg resp time "0 Sec."?➝P60•Is Delayed time(Sec) in Auto answer setting "0sec"?➝P357●During a voice call, the distant party's voice is hard to listen to or too loud.•If you set Voice clear or Voice slowing to ON, the other party's voice becomes easy to hear.➝P46•Has Listen volume of Adjust volume been changed?➝P46, 88●When a call comes in, the terminal operates in a ring alert, image or light not set.•Ring alerts, if any, set in multiple functions sound according to the priority levels.➝P88•Incoming images, if any, set for multiple functions appear according to the priority levels.➝P96•Lighting patterns and/or light colors, if any, set for multiple functions operate according to the priority levels.➝P102•Have you activated All lock?➝P111•Have you activated Personal data lock?➝P112•Have you activated Privacy mode?➝P114•Is Receive display option set?➝P118●When there is an incoming call, functions for displaying the name or sounding the ring alert as saved in the Phonebook are not activated.•The phone number of the caller does not match that saved in Phonebook. Register the correct phone number in the Phonebook (Name displays➝P74).•Have you activated All lock?➝P111•Have you activated Personal data lock?➝P112•Have you activated Privacy mode?➝P114•Is Receive display option set?➝P118F905i.book Page 255 Monday, April 21, 2008 10:53 AM](https://usermanual.wiki/Fujitsu/OS-F905I.Manual-Part-1-6/User-Guide-1061503-Page-55.png)