Fujitsu OS-F905I Cellular Phone User Manual F905i
Fujitsu Limited Cellular Phone F905i
UserManual.wiki
>
Fujitsu
>
OS-F905I User Manual
>
Manual Part 1 3
Contents
1.
Manual Part 1 1
2.
Manual Part 1 2
3.
Manual Part 1 3
4.
Manual Part 1 4
5.
Manual Part 1 5
6.
Manual Part 1 6
7.
Manual Part 2
8.
Manual Part 3
9.
Manual 1 1
10.
Manual 1 2
11.
Manual 1 3
12.
Manual 1 4
13.
Manual 1 5
14.
Manual 1 6
15.
Manual 2
16.
Manual 3
Manual Part 1 3
Navigation menu
Upload a User Manual
Namespaces
Wiki Guide
HTML
PDF
Info
Views
User Manual
Discussion / Help
Navigation
![66 Sound/Screen/Light SettingsF905i_E2kouset as the stand-by display. GIF Animation, created animation or Flash graphics can also be set.•Still image, GIF animation, created animation or Flash graphics can be set on a Horizontal position.1me[Settings & NW services]e21121Setting horizontal display stand-by display : 23Select any of 1, 3, 4, 6Selecting horizontal display : 1 or 24Select a foldereSelect an image, movie/i-motion or Chara-den•Images and movies/i-motion saved in microSD memory card cannot be selected. Select them after moving/copying to the terminal.Setting action of Chara-den : Place the cursor on the Chara-den to set and meOn the Stand-by settings screen, set the required itemsepSetting items➝P289 Step a in "Setting to the stand-by display"5"Yes"•When setting movie/i-motion as the stand-by display, the first image is displayed.•If the selected image, movie/i-motion or Chara-den can be zoomed, a confirmation screen appears asking if you display at the same magnification or zoom. Select "Yes (Same size)" to maintain the image size or select "Yes (Large size)" to enlarge the image to the screen size to display on the stand-by display.•If i-αppli stand-by display has been set, a confirmation screen appears asking if you terminate the i-αppli stand-by display. When selecting "Yes", the i-αppli stand-by display is terminated.•When the movie/i-motion or Chara-den is canceled with no i-αppli stand-by display set, Show ticker of i-Channel ticker is set to "Yes".❖To play movie/i-motion, animation or Chara-den set as the stand-by display•The operations below are available for movie/i-motion : f/Opening the terminal : Playc/f : StopSide keys [▲▼] : Adjust volume•The operations below are available for GIF animation, created animation or Flash graphic : Opening the terminal/Turning the display/Returning to the stand-by display/Turning power on : Playf : Pause/Play•The following operations are available for Chara-den : c/Opening the terminal : Playc/f : Stop◆Displaying images at random <Set random image>You can display multiple still images saved in folders in My Picture on the stand-by display (Vertical display) switching at random at the specified timings.•Only JPEG/GIF format images (except for GIF animation) can be displayed.1me[Settings & NW services]e21112eSet the required itemsFolder : Select the folder containing the images.F905i.book Page 66 Monday, April 21, 2008 10:53 AM](https://usermanual.wiki/Fujitsu/OS-F905I.Manual-Part-1-3/User-Guide-1061500-Page-1.png)
![67Sound/Screen/Light SettingsF905i_E2kouChange image : Set the timing for changing images.2pe"Yes"◆Setting i-αppli stand-by display•Only i-αppli compatible with the i-αppli stand-by display can be set.•The i-αppli stand-by display takes precedence over other stand-by display settings.•Canceling operation, setting and stand-by display of i-αppli➝P2231me[Settings & NW services]e21115A list of i-αppli compatible with the i-αppli stand-by display appears.2Select i-αppli e "Yes" or is displayed when the i-αppli stand-by display is set.•With no movie/i-motion or Chara-den set on the stand-by display, if i-αppli stand-by display is canceled, Show ticker of i-Channel ticker is set to "Yes".◆Customizing stand-by display <Info/calendar layout>You can divide the stand-by display to several and make settings to display newly arrived information such as unread mail or missed call, schedule, calendar, list of notes or contents of a note in individual areas.1me[Settings & NW services]e21521Canceling : 23h to switch patternseSelect an areae1-6•Press m and select "Yes" to cancel all area settings.Setting newly arrived information : 2eSelect informationep•"When selecting " Unread messages", reception date/time and titles of unread mails appear.•When selecting " Missed call", reception date/time and the phone number of the caller (or name if saved in phonebook) appear.F905i.book Page 67 Monday, April 21, 2008 10:53 AM](https://usermanual.wiki/Fujitsu/OS-F905I.Manual-Part-1-3/User-Guide-1061500-Page-2.png)
![68 Sound/Screen/Light SettingsF905i_E2kou•When selecting " Recorded messages", recording date/time and the phone number of the caller (or name if saved in phonebook) appear.Setting Calendar : 4e1-4•The number of months that calendar can be displayed varies by the area size.Setting Note content : 6eSelect a note4pe"Yes"❖Checking information on the stand-by display1g2Move the cursor with k and egCall imageChanging images for outgoing voice/videophone callsMENU [Settings & NW services] 511MENU [Settings & NW services] 611<Example> For voice call1me[Settings & NW services]e2321eSelect the Display image fielde1-3Changing image displayed while making a videophone call : me[Settings & NW services]e2323eSelect the Display image fielde1-32p❖Outgoing call image priorityWhen setting outgoing images in multiple functions, they are displayed in order of the priority below.aImage saved in the terminal phonebook*bAlert/image by group of the terminal phonebookcOutgoing call/Videophone dialing (V.phone dialing img.)*When Contact image is set to "ON", it is effective.Call imageChanging images for incoming voice/videophone calls•This setting is also reflected to Call alert of Call & Answer or Videophone alert of Videophone.<Example> For voice call1me[Settings & NW services]e2322eSelect the Show image fielde1-5Changing image displayed while receiving a videophone call : me[Settings & NW services]e2324eSelect the Show image fielde1-5•When "Standard image" is set, the image set by default appears.•When "Select image" is selected, select the Image list field and select an image.•When "i-motion" is selected, select a movie/i-motion from the movie list.•When movie/i-motion containing sound and images is set for Call ring alert or V.phone ring alert, "Sync ring alert" is set.2p❖Incoming call image priorityWhen setting incoming images in multiple functions, they are displayed in order of the priority below.dImage saved in the Terminal phonebook*1eAlert/image by group of the Terminal phonebookfCall ring alert*2/V.phone ring alert*2/Call alert (Incoming call)/Videophone alert (Videophone receiving)*1When Contact image is set to "ON", it is effective.*2When movie/i-motion containing sound and image is set in "Movie ringtone", it is effective. When movie/i-motion containing sound and image has been set in "Movie ring-tone" for ring alert, ring alert and Show image set for "Movie ringtone" have precedence over images or movie/i-motion set in phonebook.•When the other party does not notify the caller ID, the incoming image for voice call depends on Anonymous caller. An incoming image for videophone call depends on the settings of Videophone alert.•When the sound or image data used in Anonymous caller is deleted, the settings are automatically modified. The sound actually heard or the image actually displayed may differ from the settings.Contact imageSetting Contact image display from Phonebook at incoming/outgoing callYou can set if you display the image saved in the Terminal phonebook for incoming/outgoing voice calls/videophone calls.•The image saved in Phonebook is displayed when the recorded person calls with the caller ID.1me[Settings & NW services]e2325e1 or 2F905i.book Page 68 Monday, April 21, 2008 10:53 AM](https://usermanual.wiki/Fujitsu/OS-F905I.Manual-Part-1-3/User-Guide-1061500-Page-3.png)
![69Sound/Screen/Light SettingsF905i_E2kouSent/received/retrieving mail imageChanging displays for incoming/out-going messages and retrievingYou can set images to appear when sending mails, receiving mails or received mails, or checking new messages.1me[Settings & NW services]e233e1-42Select the Display image fielde1-3•When "Default" is selected, the image set by default appears.•When "Select image" is selected, select the List images field and select an image.Setting Image message alert : Select the Display image fielde1-53pSub-displaySetting sub-display◆Setting an image to display on sub-display <Clock & alert image>1me[Settings & NW services]e282eSet the required itemsep◆Displaying phone number or mail address when receiving an incoming call or mail <Show sender info>1me[Settings & NW services]e281e1 or 2Show callers' info : The display depends on Receive display option.Hide callers' info : Only the status of incoming/receiving is displayed.Display lightSetting display and key light◆Setting lighting time <Display light time>The lighting time of display can be set. When the light is ON, the display becomes brighter and key area is lit.<Example> Setting lighting time for Normal use1me[Settings & NW services]e24121e1-7Setting lighting time for AC adapter connected, i-mode session, Camera session, Movie camera session, i-motion or i-αppli : 2-7e1 or 2◆Setting lighting range <Light area>1me[Settings & NW services]e242e1 or 2◆Setting brightness of light <Brightness>1me[Settings & NW services]e243e1-6Color schemeChanging display colors1me[Settings & NW services]e231eSelect the color schemeSelect startup menuChanging startup menuSet the menu displayed when pressing m on the stand-by display.1me[Settings & NW services]e221e1-3Using Kisekae ToolMENU [Settings & NW services] 31Use of Kisekae Tool allows to collectively set stand-by display image, menu icons, incoming/outgoing call images, ring alerts, etc.•Using Kisekae Tool, the items below can be set (settable combinations of items vary by Kisekae Tool).- Stand-by display, stand-by display (Horizontal), Kisekae menu*1, Basic menu, Basic menu (Background), Battery icon, Antenna icon, Outgoing call image, Call alert image, Videophone call image, Videophone alert image, Outgoing message image, Mail alert image, Image message alert, Message retrieving, Call ring alert, Videophone ring alert, Mail ring alert, Alarm clock sound, Screen theme*2, Clock format*3, sub-display*4*1There are such cases that operation when pressing d or a on the stand-by display may cause different actions to occur from ordinary ones to be performed or short-cut operations may be disabled.*2Set color theme (Color scheme), font and brightness.*3Set Style, Time format, Day and Layout.*4Set Clock style, Alert image and incoming mail img.•Depending on the type of Kisekae menu, the menu structure of the first layer may change according to usage F905i.book Page 69 Monday, April 21, 2008 10:53 AM](https://usermanual.wiki/Fujitsu/OS-F905I.Manual-Part-1-3/User-Guide-1061500-Page-4.png)
![70 Sound/Screen/Light SettingsF905i_E2koufrequency. Also, the number assigned to menu item (item number) may not be applicable to some menu items. In such a case, as operations cannot be performed as described in this manual, switch to the basic menu (➝P31) or reset (➝P100) the menu operation log.◆Changing Kisekae Tool1me[Data BOX]e52Select a folderePlace the cursor on Kisekae ToolResetting the settings : me6eAuthenticatee"Reset all" or "Reset menu"Setting list screen operations : Select a foldereme5e1 or 2Checking memory : me4ePlace the cursor on a data type•t : Change unit3pe"Yes"Displaying/changing detail information : me2e1 or 2Detail information➝P304Canceling the setting : me3e1-3Moving/restoring datame4e1 or 2Moving/restoring➝P302, 303Deleting data : me5e1-3Deleting➝P305Sorting data : me6eSet the required itemsepSorting➝P306❖Setting to Special modeIf you set to Special mode, "Honey" is added to "Preinstalled" folder, and automatically set to Kisekae Tool.1mepeme13eEnter "Honey" in Group name fieldep•The items below are set.- Stand-by display, Stand-by(Horizontal), Kisekae menu, Battery icon, Antenna icon, screen theme, Clock display•If you perform the same operations as the setting procedure, "Honey" is deleted from "Preinstalled" folder, and the set items are restored to the default settings.Customizing the menuThe menu items of Kisekae menu can be changed by yourself, or icons of Basic menu can be changed.•Items that can be changed or replaced vary by the set contents.•Only when using a Kisekae Tool compatible with changing or replacing of the menu items, or when setting "Honey" of Special mode (➝P99), the menu items of Kisekae menu can be customized.◆Customizing the menu items of Kisekae menu❖Changing menu items1mePlace the cursor on the menu itemme2eSelect a function to save•You can select till second level.❖Switching menu items1mePlace the cursor on the menu itemme3eSelect the menu item to be switched toF905i.book Page 70 Monday, April 21, 2008 10:53 AM](https://usermanual.wiki/Fujitsu/OS-F905I.Manual-Part-1-3/User-Guide-1061500-Page-5.png)
![71Sound/Screen/Light SettingsF905i_E2kou❖Resetting the operation logs of the menu1me[Settings & NW services]e2231e"Yes"◆Changing the icons and Background of Basic menu1met•When the display menu is Basic menu, you do not need to press t.2me23Select a functioneSelect a folder eSelect an imageMenu icons of other functions can be set successively in the same way.Canceling an item : Place the cursor on an icon and me1e"Yes"Canceling all items : me2e"Yes"4aeSelect a foldereSelect an imageBackground is set.Canceling a background : me4e"Yes"5pe"Yes"•When the display menu is Basic menu, the confirmation screen of changing to the Basic menu does not appear.◆Reset to default menu items and icons•Shortcut menu is also reset to default state.1me[Settings & NW services]e2232eAuthenticatee"Yes"Displays/Lights settingsStyle themeCustomizing the terminal screenYou can make 3 types of original coordinates by changing the screen designs such as stand-by display, menu, Clock, battery icon, antenna icon or Sub-display pattern.1me[Settings & NW services]e322Select any of 1-3eSet the required itemsepBattery icon/Signal level iconChanging battery/signal level icon1me[Settings & NW services]e21e3 or 4e1-6F905i.book Page 71 Monday, April 21, 2008 10:53 AM](https://usermanual.wiki/Fujitsu/OS-F905I.Manual-Part-1-3/User-Guide-1061500-Page-6.png)
![72 Sound/Screen/Light SettingsF905i_E2kouIndicator lightIndicating newly arrived information such as missed calls and unread mails with lightingYou can set if you indicate unchecked missed call (voice/videophone call) or unread information (mail/SMS), if any, by flashing the light while the terminal is folded.1me[Settings & NW services]e26e1 or 2•When there are unchecked missed calls when this field is "ON", the light flashes at intervals of approximately 6 seconds according to Light color for Call in Light alert. When there is unread information, the light flashes at intervals of approximately 6 seconds according to Light color for Mail in Light alert. Checking a newly arrived information stops blinking.✔INFORMATION•If there is multiple newly arrived information, the light turns on in the priority below : aMissed call (voice/videophone call)bUnread information (mail/SMS)•When you set indicator light to "ON", if about 6 hours elapsed since the last information was received or you delete (the number indicates the number of items) from the stand-by display, the light stops flashing even if you do not check the information.Light alertSetting the lighting patterns and col-ors used for an incoming call/mail or during a call•This setting is reflected to Light alert in Call alert, Videophone alert and Mail alert.◆Setting the lighting patterns and colors for incoming call/mail <Light alert><Example> Setting the Light alert for incoming calls and mail/messages1me[Settings & NW services]e2512Select the Lighting pattern fielde1-6•When setting to "Sync melody", the light blinks in "Rainbow". Note that it may not be synchronized depending on the melody.•When there is newly arrived information with Indicator light set to "ON", the lighting color for the presence of newly arrived information is as set for incoming call or mail with "Sync melody" set.•When you select "Sync melody" or "OFF", go to Step 4.3Select the Light color fieldeSelect a lighting color4p❖Light alert priorityWhen setting Light pattern and Light color for Light Alert of the light in multiple functions, Light turns on in order of the priority below.aAlert by contact of the terminal phonebookbAlert/image by group of the terminal phonebookcLight alert/Call alert/Videophone alert/Mail alert◆Setting lighting and lighting color during a call <Call session light>1me[Settings & NW services]e25e2eSelect the Light fielde1 or 2•With this field set to "ON", the lighting color can be set.F905i.book Page 72 Monday, April 21, 2008 10:53 AM](https://usermanual.wiki/Fujitsu/OS-F905I.Manual-Part-1-3/User-Guide-1061500-Page-7.png)
![73Sound/Screen/Light SettingsF905i_E2kou2Select the Color fieldeSelect a lighting colorep◆Setting lighting for opening, closing and turning <Open/close/turn>1me[Settings & NW services]e253e1 or 2Font sizeChanging font sizeMENU [Settings & NW services] 74The size of font used for full-screen entry of notepad, message text, etc. or for displaying screen memo, i-mode site, Full Browser or mail can be changed.<Example> When setting with All listed1me[Settings & NW services]e27121e1-6Setting i-mode : 2e1-5Setting Full Browser : 3e1-4Setting Mail view : 4e1-5Setting Text input : 5e1-6Setting Phonebook & log : 6e1 or 2Clock formatSetting clock displayMENU [Settings & NW services] 212Whether to display clock, the design, size or layout of clock display on the stand-by display can be set. The language to use to display the day of the week or the display format can also be set.1me[Settings & NW services]e724eSet the required itemsepStyle : Set if you display clock. Select the clock style from "Analogue", "Digital 1-4" and "World time clock" when setting it to "ON".•When "World time clock" is set, the Japan's time and the time in the specified time zone appear on the left and right sides, respectively.Time format : Set the clock display format to either "24 hour" or "12 hour".Clock layout : Set the position to display the clock.Day : Set if you use Japanese or English to display the day of the week.•The display depends on the Select language setting if "Terminal settings" is set.World time clock : Set the time zone to be displayed or set if you enable summer time when "World time clock" is selected in Style. And, set the name of the time zone.•When Summer time is "ON", the displayed time is set forward one hour from the time of the specified time zone.F905i.book Page 73 Monday, April 21, 2008 10:53 AM](https://usermanual.wiki/Fujitsu/OS-F905I.Manual-Part-1-3/User-Guide-1061500-Page-8.png)
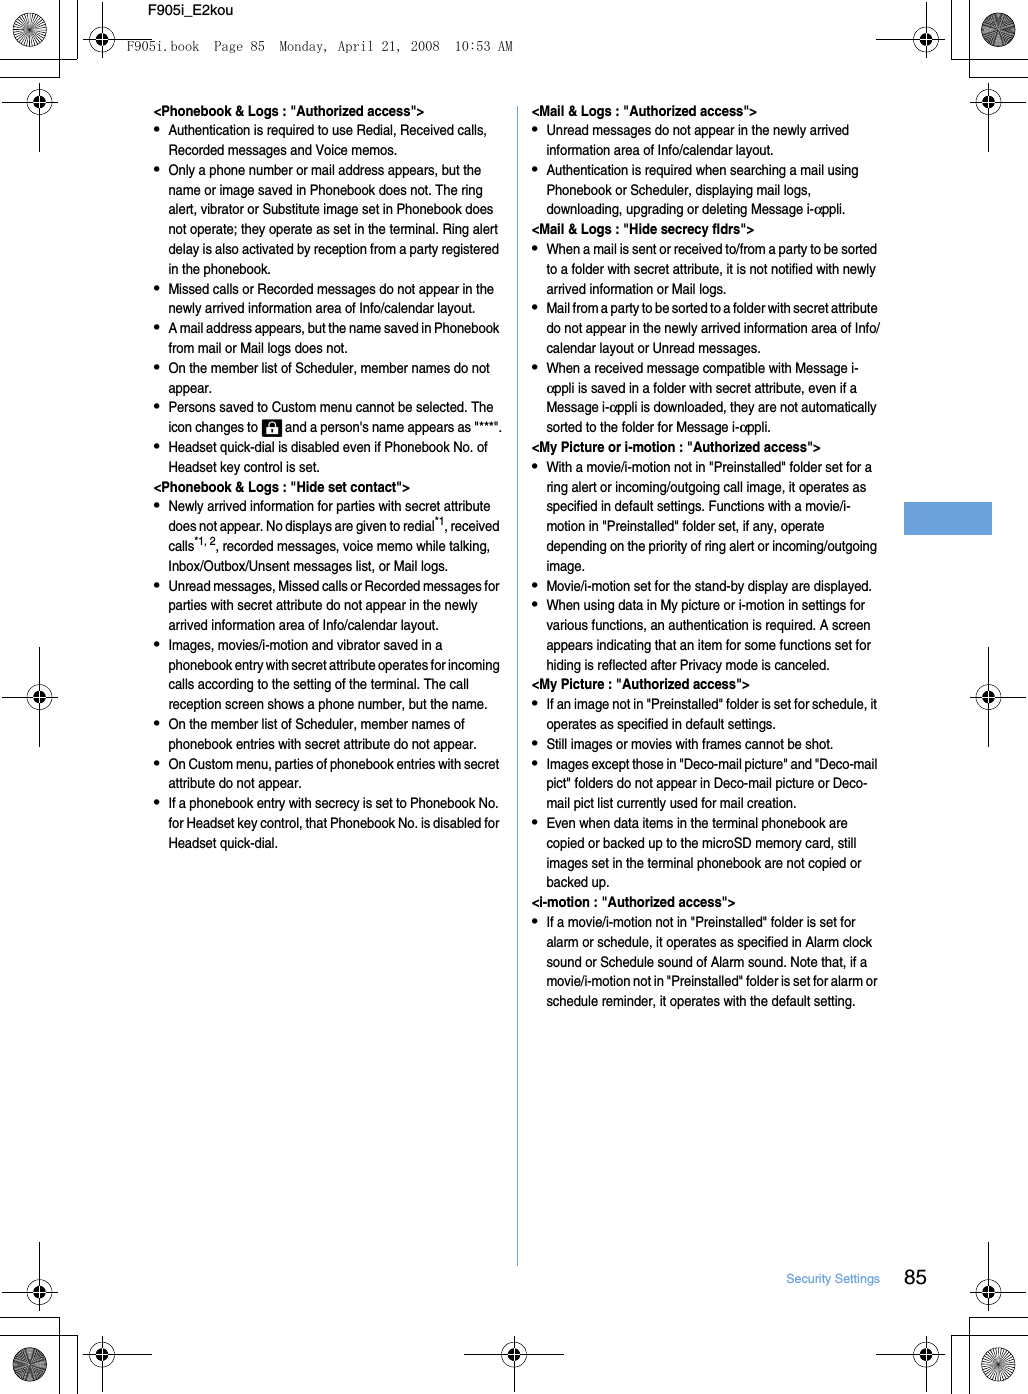
![77Security SettingsF905i_E2kou❖PUK (PIN Unblocking Key)PUK is a number of 8-digit code used to unblock PIN or PIN2 lock. You cannot change PUK by yourself.•If a wrong PUK is entered 10 times consecutively, the UIM is locked.✔INFORMATION•When using Password manager with the fingerprint authentication and a terminal security code access enabled, change the terminal security code. For the new terminal security code, avoid use of an easily-guessed number such as the low-order 4 digits of the phone number and take care not to let others know the terminal security code. Keep a separate note of the set security codes.*Note that DoCoMo is not liable for any damages caused through incorrect use of the data by a third party.Terminal security code changeChanging terminal security code1me[Settings & NW services]e461eAuthenticateeEnter new terminal security code2Enter the new terminal security code in New security codecheck fieldepSetting PIN code◆Setting whether to require entry of PIN code when turning power ON <PIN1 code ON/OFF>If a wrong PIN code is entered 3 times consecutively, the PIN code is locked. Press g and enter PUK.•The PIN code entry screen is displayed only when the current setting is changed.1me[Settings & NW services]e453e1 or 2eEnter PIN code❖When PIN1 code ON/OFF is set to "ON"When the terminal is powered on, the PIN code entry screen is displayed. The stand-by display appears when correct PIN code is entered, but all operations are disabled when not.•You can make emergency calls (112) even while PIN code entry screen is being displayed.✔INFORMATION•When the date/time specified in Alarm clock or schedule has ome with Alarm auto power ON is "ON", the power is turned ON and the alarm starts sounding before the PIN code entry screen is displayed. When f is pressed to stop the alarm, the PIN code entry screen is displayed. Even if a downloaded melody, i-motion or music is set as an alarm, operations are carried out as specified in the default settings.Enter PUK.Enter PIN code/PIN2 codeContact a DoCoMo shopInput error 3 times in a rowInput error 10 times in a rowSetting a new PIN code/PIN2 code is enabledOKF905i.book Page 77 Monday, April 21, 2008 10:53 AM](https://usermanual.wiki/Fujitsu/OS-F905I.Manual-Part-1-3/User-Guide-1061500-Page-12.png)
![78 Security SettingsF905i_E2kou◆Changing PIN/PIN2 code•To change the PIN code, you need to set PIN1 code ON/OFF to "ON".1me[Settings & NW services]e45e1 or 2eAuthenticate2Enter the current PIN/PIN2 codeeEnter a new PIN/PIN2 code in the New PIN/PIN2 code entry fieldeEnter the new PIN/PIN2 code in the New PIN/PIN2 code - check fieldep•If the PIN/PIN2 code was not correctly entered, a screen indicating the failure of authentication appears. Press g and enter the correct PIN/PIN2 code. If a wrong code is entered 3 times consecutively, the PIN code is locked. Press g and enter the PUK.✔INFORMATION•Even if PIN2 code is locked by entering incorrect PIN2 code 3 times consecutively, making/receiving calls, PushTalk calls or sending/receiving mail is enabled; if PIN code is locked by entering incorrect PIN code 3 times consecutively, these operations are disabled.Unblocking PIN/PIN2 codeIf a wrong PIN/PIN2 code is entered 3 times consecutively on the PIN code entry screen, lock is set. If this happens, unblock and enter a new PIN code.1On the confirmation screen of the PUK, "OK"eEnter the PUK (8 digits)2Enter a new PIN/PIN2 code in the New PIN/PIN2 code entry fieldeEnter the new PIN/PIN2 code in the New PIN/PIN2 code - check fieldepUsing fingerprint authenticationUse of the fingerprint authentication allows you to skip the operation of entering the terminal security code with keypads by sliding your fingertip on the fingerprint sensor.•Even with fingerprint authentication set, pressing m on the fingerprint authentication screen displays the terminal security code entry screen, allowing to enter terminal security code for authentication. The terminal security code cannot be entered when Fingerprint access is "ON".•Simultaneous use of the fingerprint authentication and a terminal security code access➝P107 INFORMATION in "Security code available with the terminal"◆Precautions for using fingerprint authentication•This function is used to authenticate the information on the characteristics of fingerprint image. For this reason, user with fingerprint that does not provide enough characteristics information may not be able to use the fingerprint authentication.•The 3 readings with the same finger are needed to register your fingerprint. Do not register the different finger.•Authentication performance (the probability of successful fingerprint authentication for correct sliding of the finger) depends on the condition of use. The finger conditions below may make fingerprint registration difficult or reduce the authentication performance. Taking measures according to the condition of your finger including washing hands, wiping hands, using a different finger for fingertip authentication and applying cream if the hand is rough or dry may improve the authentication performance.- Fingers are wrinkled, wet or sweaty after taking a bath, etc.- Fingers are sweaty or oily enough to obscure ridges of fingertip, or fingers are soiled with dirt or oil- Rough or damaged (cut, inflamed, etc.)- Extremely dry or having tendency to get dry- Became fat or thin to cause the fingerprint to change- Fingerprint unclear by wearing away- Surface in a condition extremely different from that at the time of fingerprint registration•For registration/authentication of fingerprint, align the first joint of one of your fingers to the center of the fingerprint sensor, let your finger contact the sensor while sliding your finger downward and keep sliding your finger until the fingerprint sensor becomes visible. When sliding your finger, keep it in the same direction as the terminal. If not, the likelihood of authentication failure due to difference in finger positions at registration and authentication becomes higher.•If the sliding movement is too fast or too slow, the fingerprint may not be correctly recognized. Follow the instruction message on the screen to adjust the sliding speed.•Slide your finger over the fingerprint sensor area (enclosed in a frame in Figure A).Fingerprint sensor areaFigure A Figure BF905i.book Page 78 Monday, April 21, 2008 10:53 AM](https://usermanual.wiki/Fujitsu/OS-F905I.Manual-Part-1-3/User-Guide-1061500-Page-13.png)
![79Security SettingsF905i_E2kou•The center of the whorl of the fingerprint may be largely displaced or distorted, which is more often the case with thumbs. Since this may make registration difficult or reduce the authentication performance, check the center of the whorl of your fingerprint and rub your finger against the fingerprint sensor in such a way that the center of the whorl passes along the center of the fingerprint sensor as shown in Figure B.•For sliding your finger on the fingerprint sensor, do not set up your finger on the sensor but place it on the fingerprint sensor in such as way that the right finger is parallel to the sensor.•Each finger has a different fingerprint. For authentication, use the finger set for use.•If the fingerprint was not correctly read, a warning message appears. If the fingerprint was not authenticated within a certain period of time, a confirmation message appears and the screen returns to the previous screen.•When fingerprint registration or authentication is started with the finger put on the fingerprint sensor, a screen indicating failure of the activation may appear. Put the finger off from the fingerprint sensor and retry the operation.•When connecting the terminal using a USB cable to a device which requires grounding such as a desktop PC, make sure that the device is grounded in advance. If the connected device is not grounded, fingerprint authentication may be disabled. In such a case, carry out fingerprint authentication while touching a metallic part (frame, external connection jack, etc.) of the connected device or after disconnecting the terminal from the device.•Fingerprint authentication technology does not guarantee complete identity authentication or verification. Please be notified that DoCoMo assumes no responsibility for any damage caused by use of this product or failure to use this product.◆Fingerprint sensor•The conditions below may cause failure or damage of the surface of the finger print sensor.- Strike or give a hard shock- Scratch or pick with a pointed object- Rubbed hard with a fingernail or hard object (such as metal piece of strap) and scratched- Fingerprint sensor touched with a hand soiled with dirt, etc. and the fingerprint sensor surface soiled or scratched by fine foreign objects, etc.- Covered with a sticker or painted with ink, etc.•The conditions below may make fingerprint scanning difficult or reduce the authentication performance. Clean the fingerprint sensor surface from time to time.- Tainted with dust or sebum, or moisture such as sweat is attached and condensed•If any of the phenomena below occurs, clean the fingerprint sensor. The phenomena may be improved.- "Clean surface of sensor." appears- Fingerprint registration or authenticatithe terminalon fails often•To clean the fingerprint sensor, wipe its surface with a dry, soft, static-free cloth. Long-term use may cause the fingerprint sensor to get dusty. Do not attempt to remove the dust with a pointed object.•Static electricity may cause malfunction. Before placing the finger on the fingerprint sensor, eliminate static electricity by touching a metal object with the hand, etc. Take particular care in dry seasons such as winter.◆Registering fingerprint to be used for authentication <Register fingerprint>•Up to 10 fingerprints can be registered.1me[Settings & NW services]e462eAuthenticateep2"OK"ePress the sensor with your finger and slide slowly downwards by following the instruction message3Enter a display nameep•Up to 10 two-byte (20 one-byte) characters can be entered.• appears with the finger print set for use.◆Set whether to use only fingerprint authentication for authentication <Fingerprint access>•When setting Fingerprint access to "ON", 2 or more registrations of different fingers and use for authorize are required.•When setting Fingerprint access to "ON", authentication using terminal security code is disabled. If authentication is disabled for any registered fingers due to the terminal’s operating conditions, finger conditions, failure of the fingerprint sensor or other reasons, you need to bring a document (such as a driver's license) for identifying that you are a subscriber, the terminal and UIM to the FET Service Center.<Example> Setting to "ON"1me[Settings & NW services]e463eAuthenticate21Canceling : 23"OK"eaF905i.book Page 79 Monday, April 21, 2008 10:53 AM](https://usermanual.wiki/Fujitsu/OS-F905I.Manual-Part-1-3/User-Guide-1061500-Page-14.png)
![80 Security SettingsF905i_E2kou◆Authenticating fingerprint1When the fingerprint authentication screen appears, slide your fingertip on the fingerprint sensor.•For fingerprint authentication, press the finger set for use against the fingerprint sensor.•If the authentication is failed, remove the finger from the fingerprint sensor and retry authentication. When authentication performance is low, retry the fingerprint registration.•Pressing m or a keypad displays the terminal security code entry screen, except when Fingerprint access is "ON".✔INFORMATION•If fingerprint authentication failed 5 times consecutively, the terminal security code entry screen appears. If authentication failed 5 times consecutively when Fingerprint access is "ON", the power is turned OFF. The cumulative number of authentication failure is cleared by correct authentication or redisplaying of fingerprint authentication screen.◆Managing fingerprintYou can delete fingerprint set for authentication, or change the registered name, etc.•If all fingerprints set for authentication are canceled or deleted, the fingerprint authentication becomes unavailable.•When setting Fingerprint access to "ON", and there are 3 or more registered fingerprints set for authentication, the fingerprints can be deleted after canceling authorize. Note that if there are 2 or less fingerprints, they cannot be canceled authorize or deleted.<Example> Deleting fingerprint (1 item)1me[Settings & NW services]e462eAuthenticate2Place the cursor on a fingerprint to delete and me31e"Yes"•To check the registered fingerprint, press t.Setting/canceling authentication : Select a fingerprint to set/cancel authentication appears with the finger print set for use.Deleting selected items : me32eSelect fingerprint'sepe"Yes"Deleting all data at a time : me33e"Yes"Renaming data : me4eEdit the nameepChanging the order : Place the cursor on the fingerprint and me5 or 6Restricting mobile phone operationsVarious lock functionsThe terminal is equipped with various lock functions. You can choose the function to suit your needs.•Multiple lock functions can be set simultaneously.•You can make emergency calls (112) even when lock functions are set.All lockPreventing unauthorized useWhen All lock is activated, menu operations are disabled to prevent unauthorized use by third parties.To make an emergency call (112) in All lock, enter the emergency call number on the stand-by display and press n.*The emergency call number entered on the terminal security code entry screen is marked with " ".■For Verify fingerprintPress m on the stand-by display, enter the emergency call number on the fingerprint authentication screen and press n.Fingerprint accessFingerprint authenticationLock functions Description PageAll lockThis function disables menu operations to prevent unauthorized use by othersP111Self modeThis function disables all functions that require communications such as calls, i-mode, mail, infrared communicationP112Personal data lockTemporarily restrict use of i-mode, mail, personal information, etc.P112Keypad dial lockThis function prevents from making calls by using of the keypadsP113Privacy modeSetting operations for using or displaying personal informationP114Receive display optionSet if you display information such as a name when receiving a call or mail from a party saved in the phonebook or phonebookP118Side key holdThis function disables P, M and the side keys [ţŕ] when the terminal is folded to prevent inadvertent operationsP119Lock on closeEach time the terminal is folded, keys except P, M or the side keys [ţŕ] are disabled to avoid unauthorized use of the terminal by othersP119F905i.book Page 80 Monday, April 21, 2008 10:53 AM](https://usermanual.wiki/Fujitsu/OS-F905I.Manual-Part-1-3/User-Guide-1061500-Page-15.png)
![81Security SettingsF905i_E2kou■When Fingerprint access is "ON"Press mn on the stand-by display, enter the emergency call number and press n.•The microSD memory card and UIM remain unlocked.1me[Settings & NW services]e412eAuthenticate"All locked." appears on the stand-by display.Canceling : Enter the terminal security code on the stand-by display.•If fingerprint authentication is set, press m and perform authentication.✔INFORMATION•A call is received regardless of the settings of Specified caller.•Even if a stand-by display is set, the image set by default appears.•All lock takes precedence over it even if Lock on close is "ON".•The alarm clock and schedule reminder do not operate even when the specified date and time arrives.•The functions below are available.- Receiving voice/videophone calls*1- Receiving i-mode mail and SMS*2- Auto-updating pattern definitions*1Only a phone number appears, but the other party's name or image saved in phonebook does not. The incoming image, ring alert and other settings are reset to default settings, and the default image appears as videophone substitute image. Chaku-moji can be received, but it does not appear on the incoming call screen. It appears in Received calls when All lock is canceled.*2No receiving actions such as displaying the receiving or reception result screen, emitting ring alert are taken.*3Even when the requestor ID of Location request matches a phonebook entry, the requestor name does not appear.F905i.book Page 81 Monday, April 21, 2008 10:53 AM](https://usermanual.wiki/Fujitsu/OS-F905I.Manual-Part-1-3/User-Guide-1061500-Page-16.png)
![82 Security SettingsF905i_E2kouSelf modePreventing making/receiving callsMENU [Settings & NW services] 58This function disables all functions that require communications such as calls, i-mode, mail, infrared communication.1c (1 sec. or more)e"Yes" appears on the stand-by display.Canceling : c(1 sec. or more)e"Yes"✔INFORMATION•If emergency calls (112) are dialed, Self mode is canceled.Personal data lock Disabling to use personal informationYou can temporarily restrict use of i-mode, mail, personal information, etc.•This function cannot be activated when Unregistered caller is "ON".•Calls made or received in Personal data lock are recorded. Making calls from Redial or Received calls is enabled.1me[Settings & NW services]e413eAuthenticatee1 or 2When "ON" is set, appears on the stand-by display.❖When Personal data lock is ONAll or a part of the settings in the functions below are unavailable : The microSD memory card and UIM remain unlocked.- receive Mail*1and SMS*1- i-mode, Check new message, Full Browser-i-αppli- Phonebook, Ans.Machine & Voice memo (Movie memo), Mail logs*2- Data Box (All functions)- Bar code reader, Ir/PC connection*3, microSD, Camera, Sound recorder*4- Notepad, Alarm clock- Call ring alert, Mail ring alert, Alarm sound, Display turn sound, Melody effect sound, Image/i-αppli, Reset of Menu preference, Call image (excluding Contact image), Mail image, Kisekae/Themes, Sound & Image, Anonymous caller, Headset key control, Reject/Accept call, Videophone dialing, Videophone receiving, Video image*5, Reset, Delete all data, Alert settings- Music player- IC card content, DCMX, ToruCa, Search by i-mode- User information-1Seg*1Automatic reception is enabled, but none of receiving actions such as displaying the receiving or reception result screen, emitting ring alert are not taken. Mail cre-ation from Mail logs is also disabled.*2Only a mail address appears, but the other party's name or image saved in phonebook does not.*3Data transfer in infrared communication or using USB connection is disabled.*4The default image appears as videophone substitute image.*5Chaku-moji can be received, but it does not appear on an incoming call screen. It appears in Received calls when Personal data lock is canceled.F905i.book Page 82 Monday, April 21, 2008 10:53 AM](https://usermanual.wiki/Fujitsu/OS-F905I.Manual-Part-1-3/User-Guide-1061500-Page-17.png)
![83Security SettingsF905i_E2kou✔INFORMATION•When making/receiving a call to/from the party saved in the phonebook, neither name nor image saved appears and only the phone number appears.• does not appear on the stand-by display even when Answer machine is activated, and an icon for a recorded message which has not been played is also not displayed.•When data to which Personal data lock applies is set as the stand-by display or ring alert, the default setting becomes active in Personal data lock (when menu is a Kisekae menu except the one set by default, Basic menu appears). The setting you made is restored when canceled. When data saved in "Preinstalled" folder is set, however, the setting does not change even in Personal data lock.•On Basic menu or Custom menu, icons of functions and parties with activation restricted are changed to and person names appear as "***". For Kisekae menu, the font color is displayed in gray or the reason is displayed why activation cannot be performed.Keypad dial lockProhibiting keypad dialYou can set so that calls or PushTalk calls cannot be made without using Phonebook.1me[Settings & NW services]e414eAuthenticatee1 or 2When "ON" is set, appears on the stand-by display.❖When Keypad dial lock is ONThe operations below cannot be performed : - Making calls from Redial or Received calls*1- Editing, adding, deleting entries or setting group of Phonebook- Editing and resetting recorded user information data- Phone To (AV Phone To), SMS To and Mail To functions- Phonebook data or user information transfer to/from external devices- Sending mail/SMS*1, Sending from Mail logs*1- Reading template on the mail creation screen, creating mail from the mail template list screen or the detail view screen of mail template*2- Using network services by the dial up operation- Packet communication with a PC*1Calls/messages can be made or sent to parties saved in Phonebook.*2A mail can be created from a template that a mail address saved in the phonebook is entered as the desti-nation.Privacy modeSetting operations for using or dis-playing personal informationYou can set to require authentication each time using personal information such as phonebook, not to display a phonebook or schedule with secret attribute or not to display calls or mails sent/received from parties with secret attribute.•Items and settings of Privacy mode are as follows : ❍ : Setting - : No setting*Setting secrecy is required. Phonebook➝P82, Bookmark➝P154, Mail➝P188, My Picture, i-motion, Other➝P302, Schedule➝P346•To enable Privacy mode settings, you need to start Privacy mode. You can also set automatic activation.•If Contact setting is not performed after changing phonebook entry secret attribute or editing the phone book entry, activating Privacy mode does not hide mail or SMS of the changed or edited phonebook entry. To hide them, perform Contact setting.➝P117ItemSettingShow all Authorized accessHide set contact/Hide secrecy fldrs/Hide secrecy album/Hide set schedulePhonebook & Logs❍❍❍*Mail & Logs❍❍❍*My Picture❍❍❍*i-motion❍❍❍*Other❍❍❍*Schedule❍❍❍*Notepad❍❍-i-αppli❍❍-Bookmark❍❍❍*Screen memo❍❍-F905i.book Page 83 Monday, April 21, 2008 10:53 AM](https://usermanual.wiki/Fujitsu/OS-F905I.Manual-Part-1-3/User-Guide-1061500-Page-18.png)
![84 Security SettingsF905i_E2kou◆Setting Privacy mode operation1me[Settings & NW services]e421eAuthenticateeSet the required itemsepegPhonebook & Logs : When using Phonebook, you can set if you perform authentication.•With "Hide set contact" set, phonebook entries or groups (including phonebook entries in those groups) with secret attribute, redial, received calls, mail or SMS for parties with secret attribute do not appear. When there is an incoming mail or SMS from a party with secret attribute set, it is received, but not notified on the screen or with ring alert. With Incoming: privacy mode set, you can check newly arrived information by the battery icon.Mail & Logs : Set if you require authentication before using mail or mail logs, etc.•With "Hide secrecy fldrs" set, folders with secret attribute do not appear. When a mail is received from a party to be sorted to a folder with secret attribute, it is not notified on the screen or with ring alert. With Incoming: privacy mode set, you can check newly arrived information by the battery icon.My Picture : Set if you require authentication before using My Picture.•With "Hide secrecy album" set, albums with secret attribute do not appear.i-motion : Set if you require authentication before using i-motion.•With "Hide secrecy album" set, albums with secrecy are not displayed. When a movie/i-motion in an album with secrecy is added to playlist, the title in the playlist is not displayed either.Other : Set if you perform authentication when using other (Word, Excel, PowerPoint) files.•With "Hide secrecy fldrs" set, folders with secret attribute do not appear.Schedule : Set if you perform authentication when using Scheduler.•With "Hide set schedule" set, schedules with secret attribute do not appear.Notepad : Set if you perform authentication when using Notepad.i-αppli : Set if you require authentication before using i-αppli.Bookmark : Set if you perform authentication when using Bookmark.•With "Hide secrecy fldrs" set, folders with secret attribute do not appear.Screen memo : Set if you require authentication before using Screen memo.Incoming: privacy mode : Set if you notify the presence of newly arrived information by changing the battery icon type when there is an incoming call or mail from a party of a phonebook entry with secrecy or when a mail is received from a party to be sorted to a folder with secrecy. Select a battery icon to appear or select "OFF".Auto start : Set the time period till Privacy mode automatically starts when you do nothing on stand-by display.◆Activating Privacy mode1l (1 sec. or more)Canceling : l (1 sec. or more)eAuthenticate•When Auto start of Privacy mode setting is other than "OFF", Privacy mode is activated when the set time elapses while the stand-by display is on.❖When Privacy mode is activatedThere are restrictions as below depending on the contents set by the items of Privacy mode.<Except i-αppli : "Authorized access">•There is unavailable i-αppli.<Phonebook & Logs/Mail & Logs : Except "Show all">•When displaying mail group, mail sort or starting Chat mail, an authentication is required.<Phonebook & Logs : Except "Show all">•When sending mail with a still image shot during a call, even if a mail address of the party you are talking over a call is registered in the phonebook, that mail address is not entered as a destination.F905i.book Page 84 Monday, April 21, 2008 10:53 AM](https://usermanual.wiki/Fujitsu/OS-F905I.Manual-Part-1-3/User-Guide-1061500-Page-19.png)
![87Security SettingsF905i_E2kou◆Hiding mails from/to senders/receivers with secret attribute in the phonebook <Contact setting>When performing Contact setting after secret attribute of a phonebook entry is changed or a mail received via data communications is saved to the terminal, secret attribute can be set to sent or received mail and SMS in correspondence with phone numbers or mail addresses in the phonebook entry with secret attribute.•In Privacy mode (when Phonebook & Logs is "Hide set contact"), mail or SMS with secrecy does not appear.1me[Settings & NW services]e422eAuthenticatee"Yes"✔INFORMATION•If Contact setting is not performed after changing phonebook entry secret attribute or editing the phone book entry, activating Privacy mode does not hide mail or SMS of the changed/edited phonebook entry.•Mail and SMS to have secret attribute are as follows : - Sent/unsent messages or SMS with secret attribute in phonebook entries saved in destination address (TO, CC, BCC)- Received messages or SMS sent from phonebook entries with secret attribute• appears at the top of the display and the terminal is in the data transfer mode (same condition as out of service area) during Contact setting, the terminal is not available for phone calls, i-mode operation or data communication. Also, you cannot switch to other functions by pressing s.•When returning to the stand-by display after receiving an external phonebook entry with secret attribute or setting secret attribute for a phonebook entry, a confirmation screen appears asking if you reflect the secret attribute of the phonebook entry to mail. Select "Yes" to perform Contact setting. With Privacy mode inactive, a message appears prompting you to set Privacy mode.•Performing Contact setting in the cases below causes cancellation of secret attribute for the related mail and/or SMS : - When secret attribute of a phonebook entry is canceled- When a phonebook entry with secret attribute is changed (targeted at a previous phone number or mail address)- When a phonebook entry with secret attribute is deleted (including deletion of the phone number or mail address of the phonebook entry)Receive display optionDisabling display of a caller's or sender's name, etc. of a call or mail receivedYou can set if you display information such as a name when receiving a call or mail from a party saved in the phonebook.•This setting takes priority over the settings of Personal data lock.•With "Privacy mode" not set, in Privacy mode (when Phonebook & Logs is "Hide set contact"), this setting takes precedence in operations for incoming calls and mail/messages.•The incoming operation when setting Privacy mode and Receive display option are as listed below.Operate according to the priority of Select ring alert➝P88● : Operate according to the settings of the terminal regardless of multiple incoming call settings× : No incoming call operation*1It is assumed that multiple functions are not set simulta-neously.*2Only for phonebook entry with secret attribute set.*3Only when sorted to the folders with secrecy set.Privacy mode is ON.*1Receive display option (Call display)Privacy modePhone No. onlyCaller name onlyCaller name+Phone No.Phonebook & LogsShow all❍❍❍ ❍Authorized access●❍❍ ❍Hide set contact*2●❍❍ ❍i-motion Show all❍❍❍ ❍Authorized access*4●●● ●Privacy mode is ON.*1Receive display option (Message display)Privacy modeMail address+SubjectSender name+SubjectTickerNo tickerPhone-book & LogsShow all❍❍ ❍❍❍Author-ized access●●❍●●Hide set contact*2✕❍❍❍✕Mail & LogsShow all❍❍ ❍❍❍Author-ized access❍❍ ❍❍❍Hide secrecy fldrs*3✕❍❍❍✕i-motion Show all❍❍ ❍❍❍Author-ized access*4●● ●●●F905i.book Page 87 Monday, April 21, 2008 10:53 AM](https://usermanual.wiki/Fujitsu/OS-F905I.Manual-Part-1-3/User-Guide-1061500-Page-22.png)
![88 Security SettingsF905i_E2kou*4For when movie/i-motion in except "Preinstalled" folder is set as ring alert in Alert by contact or Alert by group.◆Setting receive display option1me[Settings & NW services]e44eAuthenticateeSet the required itemsepCall display : Set if you display a name and phone number when receiving a voice or videophone call (including during communications).•With "Privacy mode" set, no names appear in Privacy mode (when Phonebook & Logs is "Authorized access" or "Hide set contact").•When "Caller name+Phone No." is set, a phone number and name appear for an incoming voice call or videophone call. And, name or phone number appears on the sub-display.Message display : Set how to display results of mail reception.•With "Privacy mode" set, no names appear in Privacy mode (when Phonebook & Logs is "Authorized access" or "Hide set contact"). In Privacy mode (when Mail & Logs is "Authorized access"), the reception result ticker shows only a message indicating mail reception.•Even if setting to display the subject, it does not appear on the sub-display.•When "Ticker" is set, the reception result ticker or sub-display shows only a message indicating that the mail was received.•When "No ticker" is set, no reception result ticker appears. Although name, etc., are displayed on the sub-display, mail address or phone number is displayed in Privacy mode (when Phonebook & Logs is "Authorized access"), and nothing is displayed on the sub-display in Privacy mode (when Phonebook & Logs is "Hide set contact").Side key holdPreventing inadvertent operation of side keysThis function disables P, M and side keys [▲] while the terminal is folded, thus avoiding accidental operations of the terminal (e.g. when carrying in a bag).1m (1 sec. or more) appears on the stand-by display.Canceling : m (1 sec. or more)Lock on closeLocking keypad each time the terminal is foldedWhen setting Lock on close to "ON", all keys except P, M and side keys [▼] are locked when the terminal is folded. Even when Lock on close is canceled, the authentication screen appears every time the terminal is opened to prevent unauthorized use by others.To make an emergency call (112) in Lock on close, enter the emergency call number from a terminal security code entry screen, stand-by display or Lock on close ON screen and press n.*The emergency call number entered on the terminal security code entry screen is masked with " ".■For Verify fingerprintOn the fingerprint authentication screen, enter the emergency call number and press n. When a stand-by display or Lock on close ON screen appears, press m or s to make an emergency call.■When Fingerprint access is "ON"Press n on the fingerprint authentication screen, enter the emergency call number and press n. When a stand-by display or Lock on close ON screen appears, press mn or sn to make an emergency call.F905i.book Page 88 Monday, April 21, 2008 10:53 AM](https://usermanual.wiki/Fujitsu/OS-F905I.Manual-Part-1-3/User-Guide-1061500-Page-23.png)
![89Security SettingsF905i_E2kou•Lock on close is not activated when theterminal is as below.- During a voice call*- While playing melody*- Reception via Infrared communication/iC transmission- During sounding of schedule reminder, alarm clock or Countdown timer (including during snoozing, counting down or in stop state)- While activating Music player*- Sending/receiving of data using USB connection- Repeat playing movie saved in microSD memory card*When the operation completes with the terminal folded, Lock on close is activated.◆Setting Lock on close "ON"1me[Settings & NW services]e411eAuthenticateeSet the required itemsepLock on close : Set if you start Lock on close automatically.Lock after phone close : Set the time period from closing the terminal till activating auto start.❖When Lock on close is startedEach time the terminal is folded, Lock on close on time set in Lock after phone close and locks the keys except P, M and side keys [ţŕ]. Pressing side key [Å£] does not operate Answer machine, Voice memo or Movie memo.•To cancel Lock on close, open the terminal and perform authentication. When the next screen appears, directly enter terminal security code or perform authentication by pressing m or s.✔INFORMATION•Even with Lock on close, making a call by pressing the switch of Remote Control with Mic (optional) is available.•When Lock on close is "ON", it is activated by turning the power OFF and ON.•The functions below are available.- Turning power ON/OFF- Receiving a voiceor videophonecall- Auto update of Data Center- Switching displaying/hiding calendar layout- Receiving i-mode mail and SMS**When receiving with the terminal open, none of receiving actions such as displaying the receiving or reception result screen, emitting ring alert are not taken.◆Indicating activation of Lock on close with a light <Security indicator>You can set if you indicate status of Lock on close with a light.1me[Settings & NW services]e43eAuthenticatee1 or 2❖When Security indicator is setIf the terminal is closed and the Lock on close is activated, the light flashes in blue for about 3 seconds. When set to other than "Right after", if the set time elapses, the light flashes in blue for approximately 3 seconds to indicate that Lock on close was activated. Note that when the light flashes in white for approximately 3 seconds, it indicates that Lock on close was not activated.F905i.book Page 89 Monday, April 21, 2008 10:53 AM](https://usermanual.wiki/Fujitsu/OS-F905I.Manual-Part-1-3/User-Guide-1061500-Page-24.png)
![90 Security SettingsF905i_E2kouRestricting calls/mail/data transferAccepting/rejecting calls from speci-fied phone numbersAccepting/rejecting incoming call can be set for each phone number saved in the terminal phonebook.•To use this function, specifying Accept/Reject call for each phone number and Specified caller setting are required. The settings and the operations of Accept/Reject call are as listed below.*The call from a specified phone number is disconnected without acti-vating ring alert and the caller hears a busy tone.•This function is activated only when the other party sends caller ID.•Rejected calls are recorded as missed calls.◆Specifying phone numbers to accept/reject <Accept/Reject call>Accepting/rejecting incoming call is set for phone numbers saved in the terminal phonebook.1peSearch the phonebookePlace the cursor on a phonebook entry to set and me343eAuthenticateeSelect a phone numbere1-3•To accept/reject calls from specified phone numbers, activate settings of Specified caller in succession to the above step.✔INFORMATION•When you change or delete the phone number with Accept/Reject call is set, this setting is canceled. Set Accept/Reject call again for the new number.◆Enabling Accept/Reject call from specified numbers <Specified caller>•This setting applies to all phone numbers with Accept/Reject call set.•Reject call and Accept call are not enabled simultaneously.1me[Settings & NW services]e551eAuthenticatee1-3Anonymous callerSetting operations for incoming calls not to notify caller IDMENU [Settings & NW services] 1114MENU [Settings & NW services] 2326For each reason for hiding caller ID, you can set a receiving operation for incoming calls notifying no caller ID.•For the ring alert and incoming call image for an incoming voice call that does not notify the caller ID, this setting takes precedence over the settings of Call alert (Incoming call).1me[Settings & NW services]e52eAuthenticatee1-3eSet the required itemsep(Incoming operation) : Set operations for incoming calls or PushTalk calls that do not notify caller ID.•When "Disable settings" is set, the ring tone set in each ring alert setting sounds.•When setting "Call Rejection", incomings calls from other parties are rejected.•When setting "Ring alert off", ring alert does not sound. Set an image in "Show image".•When setting "Melody", select a melody and set an image in "Show image".•When setting "Movie ringtone", select a movie/i-motion.•When setting "Music", select a music data and set an image in "Show image".Setting Music➝P87SettingAccept/Reject call for each phone numberAccept call Reject call No settingSpecified callerCancel settingsAccepted Accepted AcceptedReject callAccepted Rejected*AcceptedAccept callAccepted Rejected*Rejected*F905i.book Page 90 Monday, April 21, 2008 10:53 AM](https://usermanual.wiki/Fujitsu/OS-F905I.Manual-Part-1-3/User-Guide-1061500-Page-25.png)
![91Security SettingsF905i_E2kouShow image : Set an image for incoming calls that do not notify caller ID.•When "i-motion" is selected, select a movie/i-motion from the movie list.List images : When "Select image" is selected in Show image, select the List images field and set an image.Ring alert delaySetting not to answer calls from the party not saved in Phonebook•This function cannot be set when Unregistered caller is "ON".1me[Settings & NW services]e15eSet the required itemsepDelayed ring alert : Specify if you enable Delayed ring alert.Delay time (sec) : Set the time between the arrival of calls and the start of ringing. (1-99 seconds)Missed call : Set whether to display a missed call which ends in less than the time set in Delay time in Received calls.❖When Delayed ring alert is setWhen an incoming voice, videophone or PushTalk call is received from a party not registered in Phonebook or such call is received without caller ID notification, the reception is notified only with screen display for the specified period of time. After the set time has elapsed, normal ring alert action starts.•Before the specified time elapses, ordinary call receiving operation such as answering an incoming call or replying it with Answer machine can be performed.•This function operates even for incoming call from the other party saved in Phonebook in Personal data lock or Privacy mode (when Phonebook & Logs is "Authorized access").•This function operates also when there is an incoming call from a party with secrecy in Phonebook in Privacy mode (when Phonebook & Logs is "Hide set contact").Unregistered callerRejecting calls from phone numbers not saved•Combination of Caller ID request service is recommended when used.•This function cannot be set in Personal data lock or when Delayed ring alert of Ring alert delay is "ON".1me[Settings & NW services]e552eAuthenticatee1 or 2❖When Unregistered caller is setThe voice/videophone/PushTalk call from a caller who is not saved in Phonebook is disconnected without activating ring alert and the caller hears a busy tone.•Rejected calls are recorded as missed calls.•Reject calls from a party with secret attribute in Phonebook in Privacy mode (when Phonebook & Logs is "Hide set contact").•Regardless of this setting, i-mode mail and SMS are received.F905i.book Page 91 Monday, April 21, 2008 10:53 AM](https://usermanual.wiki/Fujitsu/OS-F905I.Manual-Part-1-3/User-Guide-1061500-Page-26.png)
![94 CameraF905i_E2kouBefore using camera◆Using camera•Though the camera is manufactured using extremely accurate technology, some pixels and lines may always be displayed to be lighter or darker than you expect. Images shot under very low light intensity contain increased noise such as white lines, but it is not a malfunction.•If the terminal is left in a warm place or exposed to direct sunlight for a long time, images to be shot may be deteriorated.•When attempting to take a photo of a strong light source such as the sun or a lamp, images may become dark or degraded.•Depending on the characteristics of the lens, distorted images may be displayed.•Shooting images under illumination flickering at high frequency such as fluorescent lamp, mercury vapor lamp or sodium vapor lamp may cause the screen to flicker or stripe patterns to appear on the screen, which is called flicker phenomena, giving different coloring for some shooting timings. Flickers or stripes may be reduced by adjusting the brightness for shooting.•Images shot with the camera may differ from actual subjects in color and brightness, depending on conditions.•There is a small time lag between taking a picture and pressing g or side key [▲]. Do not move the terminal for a while after pressing g or side key [▲]. If you take a fast moving subject, the image taken might slightly differ from the subject displayed in the screen when pressing g or side key [▲].◆Shooting procedure*Shooting with side key [▲] is also available.•More in-focus still camera➝P130•Image shooting without blurring➝P141•Rotating the display during shooting switches horizontal/vertical mode of shot images.➝P139•If no operations are performed for approximately 3 minutes during shooting stand-by, camera ends.❖Reading shooting screenaShooting setting guidancePress h to indicate that shooting settings are enabled.bFull/standard screen operation guidancePress * to indicate that switching full/standard screen is enabled.cAuto focusIndicate ON/OFF of Auto focus : Stand-by (orange) : Adjusting focus (green) : Focused (red) : UnfocuseddMemory to save➝P136eRecording type➝P136fLight➝P138gMacro shooting➝P138hAuto timer➝P138Compatible mode➝P138Portrait recording Landscape recordingShooting with g*Still image shooting screendfghijutsrponmlkbcaMovie recording screenautsqonmlkjdefghiF905i.book Page 94 Monday, April 21, 2008 10:53 AM](https://usermanual.wiki/Fujitsu/OS-F905I.Manual-Part-1-3/User-Guide-1061500-Page-29.png)
![95CameraF905i_E2kouiIndicator (Stand-by) Indicate the usage rate of the memory. Indicate the remaining time before the shutter is released during counting down of Auto timer.•The microSD memory card usage rate may not become 0 even when no still image or movie has been shot.Indicator (Recording movie/In pause)Indicate the rate of the recorded image size to the file size set in Size restrictions.jCounter (Shooting still image) Indicate the approximate maximum shooting number of still images that can be saved in the memory currently set. Indicate the remaining time before the shutter is released during counting down of Auto timer. The total number of shot still images and total number of still images to be shot are indicated during continuous (Manual) shoot, 4 frames (Manual) shoot and continuous panorama shoot.Counter (Recording movie) Indicate the approximate maximum recording time that can be saved in the memory currently set. While recording, indicate the elapsed time and remaining time (approximate) of the file size specified by the Size restrictions.kScene mode/effect➝P140lBrightness➝P140mWhite balance➝P140nFrame➝P140oAuto correction➝P141pSkew correction➝P141qCodec type➝P141rContinuous shooting➝P132, 133sQuality➝P141tSize restriction➝P141uImage size➝P142Still cameraShooting still images with CameraMENU [LifeKit] 41Various ways of shooting such as Auto focus, Continuous shooting or frame shooting are available.•Shooting method can be selected before shooting.➝P137•The settings for shooting can be changed.➝P139•Shutter sound is emitted even when "Silent" is set for volume settings or in Silent mode.•Maximum number of saved items➝P4471uFocusing on with Auto focus : Point the camera at the object and nAuto focus is activated and the focus frame (orange) and (orange) are displayed on the screen. A confirmation sound is heard when the camera is brought into focus, and the frame changes to "+" (green), and changes to (green).•The distance that you can focus on the object is 30 cm or longer. When you simultaneously use Macro shooting, the distance is 8 to 40 cm.•This function is unavailable when using In-camera or when setting Scene mode/effect to to "Night scene".•Press n again to cancel.•When the camera is not brought into focus, the focus frame changes to "+" (red) and (red) may appear. Cancel the focus and try again.Switching in-camera and out-camera : t2Point the camera at the object and g or side key [▲].F905i.book Page 95 Monday, April 21, 2008 10:53 AM](https://usermanual.wiki/Fujitsu/OS-F905I.Manual-Part-1-3/User-Guide-1061500-Page-30.png)
![96 CameraF905i_E2kou3Check the shot still image.Saving immediately : Go to Step 4.Recording again without saving : cSwitching view to actual size : tCreating a mail with a still image attached : aSetting as the stand-by display : me31eSelect "Vertical view" or "Horizontal view"e"Yes"Adding to Phonebook entry (Only for when the size is for the phonebook (96×72))me3e2 or 3e"Yes"Changing the title : me41eChange the title and p•Up to 31 characters can be entered (Up to 30 characters for continuously shot images).Adjusting brightness and color balance : pSwitching the normal display/mirror display (only while shooting with the in-camera) : me52Saving as mirror image (only while shooting with the in-camera) : me63•When a setting frame image to a shot still image, the still image cannot be saved as mirror image.Switching the memory to save between the terminal and microSD memory card : me9Displaying the list of images saved : me0e1 or 24g or side key [▲]Checking the saved still image : peSelect a still imageProcedure for displaying sites➝P278 Step 2-3 in "Displaying image"•After checking, press c twice to return to the still image shooting screen.F905i.book Page 96 Monday, April 21, 2008 10:53 AM](https://usermanual.wiki/Fujitsu/OS-F905I.Manual-Part-1-3/User-Guide-1061500-Page-31.png)
![97CameraF905i_E2kou✔INFORMATION•In the cases below, Auto focus may be disabled : - When shooting an object with no shading in color- When shooting a moving object- When shooting in a dark place- When shooting while moving the terminal- When there is light in the shooting area•When activating Auto focus, shooting function settings cannot be changed.•Saving shot still images may take a long time depending on the image size, quality or the destination to save.◆Shooting continuously <Continuous shooting>Still images can be shot continuously. There are 4 types of continuous shooting : Continuous (Auto) : Shoot automatically and continuously the specified number of images (up to 9 still images).Continuous (Manual) : Shoot manually and continuously the specified number of images (up to 9 still images).4 frames (Auto) : Shoot automatically 4 frames and makes 1 still image.4 frames (Manual) : Shoot manually 4 frames and makes 1 still image.•Still images can be shot at interval of approximately 0.4 seconds in Continuous (Auto) or 4 frames (Auto).•The number of images to be continuously shot can be set in Continuous shot photos for Image settings.•Continuous (Auto) and Continuous (Manual) are available for Image sizes listed below.-Sub-QCIF (128×96)-QCIF (176×144)- H-QVGA/V-QVGA(320×240, 240×320)•4 frames (Auto) is available when the Image size is H-QVGA/V-QVGA (320×240, 240×320).•4 frames (Manual) is available when the Image size is any one listed below.- H-QVGA/V-QVGA(320×240, 240×320)- H-VGA/V-VGA (640×480, 480×640)- Horizontal/Vertical standby (864×480, 480×864)1uePlace the cursor on the icon of continuous shooting using heSwitch the type of continuous shooting using j and g.The position of Continuous shooting icon➝P127 : Continuous (Auto) : Continuous (Manual) : 4 frames (Auto) : 4 frames (Manual) : Continuous shooting OFF (Shoot 1 image)2Point the camera at the object and g or side key [▲].3Check the continuously shot still images.4g or side key [▲]Continuous shooting 4 framesF905i.book Page 97 Monday, April 21, 2008 10:53 AM](https://usermanual.wiki/Fujitsu/OS-F905I.Manual-Part-1-3/User-Guide-1061500-Page-32.png)
![98 CameraF905i_E2kouSaving only the displayed still image (during shooting with the out-camera in Continuous (Auto) or Continuous (Manual)) : g (1 sec. or more)e"Yes"Saving only the displayed still image after switching normal/mirror (during shooting with the in-camera in Continuous (Auto) or Continuous (Manual)) : g (1 sec. or more)e"Save normal" or "Save mirror"Selecting selected still images to be saved from still images shot continuously (for thumbnail display in Continuous (Auto) or Continuous (Manual)) : ame62eSelect the still images to save•Press a to zoom in the still image at the cursor position. Press g or c to return to thumbnail display.bpe"Yes"The selected still images are saved.•When shooting with the in-camera, a confirmation screen appears asking if you save the image as normal or mirror.Saving all still images shot continuously as mirror images (during shooting with in-camera in Continuous (Auto) or Continuous (Manual)) : me63◆Making continuous panorama shooting <Panorama>2-8 still images continuously shot changing the terminal direction toward the object can be connected to form 1 still image.1ueme65The continuous shooting icon changes from to .Canceling : me66•Press t to switch the direction of continuous panorama shooting.2Point the camera at the object and g or side key [▲].Shift the terminal rightward or downward and perform shooting. If you press c, shooting is terminated and the shot images are discarded.Stitching : Shoot 2 or more images and p•If the maximum number images are shot, they are automatically stitched.•If you shoot 1 image and press p, shooting is terminated and the shot image is discarded.•During continuous panorama shooting, approximately one fifth area of the previously shot still image is transparently displayed on the connection side. Shoot the next image overlaying the transparent area.•When Auto save is "Yes", the shot still images are automatically saved by pressing p after shooting 2-7 images.3Check the still image of continuous panorama shooting.Approximately one fifth area of the previously shot image is transparently displayed on the left or top of the shooting screen.F905i.book Page 98 Monday, April 21, 2008 10:53 AM](https://usermanual.wiki/Fujitsu/OS-F905I.Manual-Part-1-3/User-Guide-1061500-Page-33.png)
![99CameraF905i_E2kouSwitching view to actual size : t•Press k to scroll the screen.•Press any of c, m, t, p or a to cancel.Auto scroll : p4g or side key [▲]✔INFORMATION•Images may not be connected smoothly depending on the object or how to shoot.•When microSD memory card is the memory to save, the image is saved in "My Picture" folder of the microSD memory card.•When there is an incoming call or the date and time specified in Alarm clock or schedule has come during continuous panorama shooting, the shooting stops and the shot still images up to that point are discarded.Movie cameraRecording movies with CameraMENU [LifeKit] 42Movies with sound can be recorded.•Shooting method can be selected before shooting.➝P137•The settings for shooting can be changed.➝P139•A shutter sound is emitted even when volume setting is "Silent" or in Silent mode.•Maximum number of saved items➝P4471u (1 sec. or more)Switching in-camera and out-camera : t2Point the camera at the object and g or side key [▲].•Press g to pause. The light is lit in green and switches to while in pause. Press g or side key [▲] again to restart the recording.F905i.book Page 99 Monday, April 21, 2008 10:53 AM](https://usermanual.wiki/Fujitsu/OS-F905I.Manual-Part-1-3/User-Guide-1061500-Page-34.png)
![100 CameraF905i_E2kou3p or side key [▲]•During in pause, pressing p ends the recording.4Check the recorded movie.•The recorded movie can be played by pressing p.Saving immediately : Go to Step 5.Recording again without saving : cAttaching recorded movie to mail : aSetting as the stand-by display (Stand-by i-motion) : me21e"Yes"Adding to Phonebook entry : me2e2 or 3e"Yes"Changing the title : me3eChange the title and p•Up to 31 characters can be enteredSwitching the saving destination between the terminal and microSD memory card : me5Displaying the list of movies saved : me6e1 or 25g or side key [▲]Checking the saved movie : peSelect the movie to checkProcedure for displaying movie➝P284 Step 2-3 in "Playing movie/i-motion"•Press c twice to return to the movie recording screen.Image settings/Recording settingsSetting image size and saving method of still images/moviesShooting conditions such as image size, quality, type of recording, size restriction and destination to save can be set.•This setting is not available when Still camera or Movie camera is started from Phonebook, mail creation screen or i-αppli.<Example> Changing Image settings1ueme9Changing Recording settings : u (1 sec. or more)eme82Set the required itemsepSetting items➝P136 "Description of settings"Setting shooting method before shootingVarious ways of shooting such as Zoom, Auto timer, Macro shooting and Light are available for camera of the terminal.•Shooting after setting➝P130 "Shooting still images with Camera", 134 "Recording movies with Camera"F905i.book Page 100 Monday, April 21, 2008 10:53 AM](https://usermanual.wiki/Fujitsu/OS-F905I.Manual-Part-1-3/User-Guide-1061500-Page-35.png)
![101CameraF905i_E2kou1On the movie recording screen, j.Each time you press the key, the slider scale shifts and zooming factor changes.During still image shootingWith out-camera, the range can be changed from (Standard) to (Maximum zoom), and with in-camera, the range can be changed from ×1 (Standard) and ×2.During movie recordingThe values available are ×1 (Standard), ×2, ×4, ×6, ×8, ×10, ×12, and ×16.◆Using Auto timer <Auto timer>Since the shutter is automatically released after the specified time elapses, you can take your own picture and avoid blurring of images due to hand movement.1On the still image shooting screen, me5e1-4Canceling : me552Point the camera at the object and g or side key [▲].Canceling : p◆Shooting nearby object <Macro shooting>You can focus on the subject approximately 8-10 cm away from the camera.•When Auto focus is used together, you can bring the subject into focus from a distance of approx. 8-40 cm.•Macro shooting is unavailable for shooting with the in-camera.1On the movie recording screen, #.Camera switches to Macro shooting and appears.Canceling : #◆Switching Full screen mode and Standard screen modeThe Full screen displays no icons or guide area and is convenient for checking the object.1On the movie recording screen, *.◆Switching still image shooting and movie recording1On the shooting/recording screen, t (1 sec. or more).•You can also switch the camera by pressing m01 on the still image shooting screen or m91 on the movie shooting screen.SliderF905i.book Page 101 Monday, April 21, 2008 10:53 AM](https://usermanual.wiki/Fujitsu/OS-F905I.Manual-Part-1-3/User-Guide-1061500-Page-36.png)
![102 CameraF905i_E2kou◆Displaying guide line1Side key [▲] on the still image shooting screen.Guide line appears.•Pressing side key [▼] switches Guide line ON/OFF.•Guide line cannot be displayed when a frame is set for the image.Changing setting for shootingSettings of Scene mode/effect, Brightness, White balance, Frames, Auto correction, Skew correction, Codec type, Quality, Size restrictions, Image size and Adjust flicker can be changed.•When "Voice only" is set in Recording Type for recording movies, the settings except Quality and Size restrictions cannot be changed.◆Setting using icons on displayYou can change settings for shooting by placing the cursor on an icon at the bottom of the shooting screen.<Example> Setting Frames1On the shooting/recording screen, hePlace the cursor on the frame icon•During shooting stand-by, you can also press 4 to select the frame icon.2j to switch the frame.Canceling : 4 (1 sec. or more)•When adjusting the cursor to the mark of the frame, select "No frame" to cancel.3g❖Setting shooting modesShooting modes can be applied to still images/movies being shot according to the shooting conditions or your preference. : Auto : Portrait*1 : Landscape : Night scene*1 : Backlight : Sport : Texts*1 : Monotone : Sepia : Monochrome sketch*1, 2, 3 : Colored sketch*1, 2, 4❖Adjusting brightnessAdjust brightness of still images or movies to be shot in 5 levels : -2 to +2.Guide line displayIcon of frameFrame nameF905i.book Page 102 Monday, April 21, 2008 10:53 AM](https://usermanual.wiki/Fujitsu/OS-F905I.Manual-Part-1-3/User-Guide-1061500-Page-37.png)
![106 CameraF905i_E2kou❖Scanning divided QR codesWhen one data item is divided into multiple (up to 16) QR codes, scan them one by one following the instructions on the display.•Press c and select "Yes" to cancel scanning.◆Using scanned data after saving<Example> Adding data to the terminal phonebook or UIM phonebook1me[LifeKit]e1epeSelect the scanned data to useDeleting scanned data : Place the cursor on the scanned datame31e"Yes"•To delete all scanned data, press m32, perform authentication, and select "Yes".2Place the cursor on the data to add to Phonebook and me3e1 or 2e1 or 2The phonebook data entry screen appears with the selected data entered.Adding all data to Phonebook at a time : "Add to phonebook"e1 or 2The phonebook data entry screen appears with name, reading, phone number, mail address, birthday, notepad, postal code/address and URL entered.Sending i-mode mail : Select a mail address or "Compose message".The mail creation screen with the mail address entered appears.•Mail address, subject and text are already entered when "Compose message" is selected.aving URL as bookmark : aPlace the cursor on the URL and me33•Select "Add bookmark" to save.bSelect a folder where the bookmark is saved.The next procedure➝P153 Step 2 in "Recording in Bookmark"•When "Add bookmark" is selected, the site name is entered for the title.Starting i-αppli : "Start i-αppli".Making a voice or videophone call : Select a phone numbereSelect from Call type field of Call optioneme"Yes"Making a call under set conditions➝P51Sending SMS : Select a phone numbereSelect SMS from Call type field of Call optioneme"Yes"eCreate and send SMSSaving a still image file : Select a still image filee"Save"The next procedure➝P157 Step 2 and the following steps in "Downloading images"•However, select the destination to save from either folder of "Deco-mail picture" or "Data transfer" of My Picture.•Selecting "Display" displays the still image file.Saving melody data : Select a melody datae"Save"The next procedure➝P157 Step 3 in "Downloading melodies"•Note that the destination to save is "Data transfer" folder of Melody.•Selecting "Play" plays the melody data.The number of squares displayed is the same as that of QR codes. The squares already scanned are displayed in blue, those not yet scanned in gray and the one scanned the last in green.Indicates the remaining number of QR codes to be scanned and total number of QR codes. F905i.book Page 106 Monday, April 21, 2008 10:53 AM](https://usermanual.wiki/Fujitsu/OS-F905I.Manual-Part-1-3/User-Guide-1061500-Page-41.png)
![108 i-mode/i-motionF905i_E2koui-modeWith i-mode, you can use online services such as site (Program), Internet or i-mode mail by way of the display of i-mode compatible terminal (hereinafter called as i-mode terminal).Displaying sitesDisplaying sitesMENU [i-mode] 1You can connect to i-mode to view various sites.1de12"English iMenu"e"Menu List"•pwhile downloading a page : Stopping downloading a page.3Select an item to view.4When you quit viewing a site, fe"Yes"◆Connecting to SSL pageSites compatible with SSL (SSL page) can be displayed.•Some SSL pages may not allow connection when date and time have not been set.•Establishment of SSL sessions may require electronic information called "Certificate" for the connected site and the terminal issued by the same certification organization.➝P162•To connect to FirstPass compatible site, you need to download a user certificate for the site from the FirstPass center and save it on UIM.1Displaying indication screen of the start of SSL session. appears at the top of the display.Displaying certificate while SSL page is displayed : me92•When proceeding from an SSL page to an ordinary page, a confirmation screen appears. Select "Yes" to display the ordinary page, disappears from the top of the display.◆Reconnecting to the page displayed before <Browser history>MENU [i-mode] 4The URL of the site or website displayed before is recorded in the terminal. Using Browser history allows you to reconnect quickly to the page displayed before.・ The current position relative to the whole display appears temporarily by pressing and holding j for 1 second or more when reading a page is completed or all lines are not displayed during a page appearing.Scroll barF905i.book Page 108 Monday, April 21, 2008 10:53 AM](https://usermanual.wiki/Fujitsu/OS-F905I.Manual-Part-1-3/User-Guide-1061500-Page-43.png)
![110 i-mode/i-motionF905i_E2kou◆Displaying next or previous pagesThe terminal records the display history of up to 20 pages. A storage area in the terminal that temporarily stores the display history of pages is called "Cache" and the recorded pages in the cache can be displayed by pressing h without making communications.•When the terminal cache size has been exceeded or when displaying a page which has been set by the site to forcibly read the latest information, communications are started.◆Scrolling screen•You can scroll the screen up and down by pressing j. Hold down to scroll continuously.◆Reloading information1During site display, me5◆Displaying URL1During site display, me91◆Switching Scroll bar display1During site display, me98•You can switch displaying/hiding the Scroll bar each time you press m98.Go to locationDisplaying websitesMENU [i-mode] 51You can connect to the Internet and access i-mode compatible websites. Specify websites by entering the address (URL) to connect to.1de512Enter a URLep•In alphabet input mode, repeatedly press 1 to enter " . ", " / ", " - ", etc. and * to enter "@imode.net.tw", ".com", ".com.tw", ".net.tw", ".edu.tw", ".org.tw", ".gov.tw", "http://www.", "https://www.", "www.", ".asp", ".html", ".htm" or ".php".◆Displaying pages using Entry URL log <Entry URL log>MENU [i-mode] 52•Up to 20 URLs are stored in the Entry URL log of each of i-mode and Full Browser. When exceeding the limit, record is overwritten chronologically.1de522Select the URL of websiteIndicate you can return to the previous pages already displayed.Indicate you can proceed to the next pages already displayed.Scroll the page by screen.Hold down the key to scroll continuously by screen.When all lines are not displayed or the cursor can be moved to a link item, ▲ or ▼ appears in the guide area.F905i.book Page 110 Monday, April 21, 2008 10:53 AM](https://usermanual.wiki/Fujitsu/OS-F905I.Manual-Part-1-3/User-Guide-1061500-Page-45.png)
![111i-mode/i-motionF905i_E2kouDeleting a URL : Place the cursor on the URL and me41e"Yes"Deleting selected URLs : me42eSelect URLsepe"Yes"Deleting all URLs : me43eAuthenticatee"Yes"◆Displaying characters correctly <Switch encode>1While the site or website is displayed, me961•The character encode is switched each time m961 is pressed in the order below : Auto switch ➝ SJIS ➝ EUC ➝ JIS ➝ UTF8. Press m962 to switch to "Auto switch".•When displaying a site or website, "Auto switch" is set.BookmarkRecording websites and sites for quick browsing◆Recording in Bookmark1Display the site or websiteeme21eSelect a folder to add to2Enter a title nameep◆Displaying site or website from BookmarkMENU [i-mode] 21de2eSelect a folder•Icon definitions : : No bookmark : Bookmark exists : No bookmark (Secrecy ON) : Bookmark exists (Secrecy ON)2Select a bookmark.The meaning of the icon➝P154 Step 3 in "Saving bookmarks in Access shortcuts"◆Creating/deleting folders•You can set secret attribute to a created folder. In Privacy mode (when Bookmark is "Hide secrecy fldrs"), folders with Secrecy set to "ON" are not displayed.•Up to 20 folders can be created for each of i-mode and Full Browser.•Preinstalled "Folder 1" folder cannot be deleted.•In Privacy mode (when Bookmark is "Hide secrecy fldrs"), the secrecy cannot be set and folders with secrecy cannot be operated.•Setting Privacy mode➝P114<Example> Create1de22me1Changing folder setting : Place the cursor on the folder and me3Changing the order of the folder : Place the cursor on the folder and me7 or 8Deleting : Place the cursor on the folder and me2eAuthenticatee"Yes"3Set the required itemsepSecrecy: Set if you display a folder in Privacy mode (when Bookmark is "Hide secrecy fldrs").F905i.book Page 111 Monday, April 21, 2008 10:53 AM](https://usermanual.wiki/Fujitsu/OS-F905I.Manual-Part-1-3/User-Guide-1061500-Page-46.png)
![112 i-mode/i-motionF905i_E2kou◆Connecting to sites or websites using simple key sequence <Access shortcuts>When recording a bookmark as access shortcut, you can quickly display the site or website from the stand-by display.❖Saving bookmarks in Access shortcuts•You can record 1 bookmark for each key of the keypad, up to 10 bookmarks in total for i-mode and Full Browser.•Bookmark in a folder that Secrecy is "ON" cannot be saved.1de2eSelect a folder2Place the cursor on the bookmark to record and a.Canceling : Place the cursor on the bookmark and me23Select a destination to save.•On the bookmark list, the icon for the recorded bookmark switches from to - .❖Displaying site or website using Access shortcuts10-9ed❖Operating from Access shortcuts listMENU [i-mode] 81<Example> Saving shortcut1de612Place the cursor on Not recorded and g.Displaying sites : Select a bookmark.Canceling : Place the cursor on the bookmark and me2e"Yes"3"i-mode" or "Full Browser"eSelect a foldereSelect a bookmark to recordFor the bookmark of Full Browser recorded as access shortcut, appears on the access shortcut list.F905i.book Page 112 Monday, April 21, 2008 10:53 AM](https://usermanual.wiki/Fujitsu/OS-F905I.Manual-Part-1-3/User-Guide-1061500-Page-47.png)
![113i-mode/i-motionF905i_E2kou◆Deleting bookmark1de22Select a folder.Deleting all bookmarks : me4eAuthenticateeGo to Step 43Place the cursor on a bookmark and me31Deleting selected bookmarks : me32eSelect bookmarksepDeleting all the bookmarks in the folder : me33eAuthenticate4"Yes"◆Moving bookmarkYou can move saved bookmarks to another folder.•Bookmarks can be copied to microSD memory card.➝P2941de2eSelect a folder2Place the cursor on a bookmark and me51Moving selected bookmarks : me52eSelect bookmarksepMoving all in the folder : me533Select a folder to move the bookmark to.•If you try to move a shortcut-saved bookmark to a folder with Secrecy set to "ON", a confirmation screen for canceling Access shortcuts appears.◆Sorting bookmarks <Sort>The bookmark list can be sorted temporarily. When the list display is closed, sorting is restored to "By access date".•You can sort all folders.1de2eSelect a foldereme6e1-4◆Attaching bookmark data to an i-mode mail1de2eSelect a folderePlace the cursor on the bookmark and me9The next procedure➝P170Screen memoSaving site contentsSite screens in a display can be saved as screen memo.◆Saving screen memo•The maximum size of screen memo file that can be saved is 100 Kbytes.1Display a siteeme312Enter a title nameep•If you register the screen memo without entering a title, "無主旨" appears in the screen memo list.◆Displaying screen memoMENU [i-mode] 31de3eSelect a screen memo•Icons used for the screen memo list are defined as follows : : Ordinary screen memo : Protected screen memo•The bar indicating the usage rate of the memory appears on the screen memo list.•Operation of the screen memo display is the same as during site display except for a part.◆Protecting screen memoBy protecting, they can be prevented from being erroneously erased or being overwritten because of the lack of the memory space.•Maximum number of protected items➝P447<Example> Protecting one entry1de32Place the cursor on the screen memo and me11•The icons of the protected screen memo changes from to .Protecting selected screen memos : me12eSelect screen memosep Unprotecting one entry : Place the cursor on a screen memo and me13Unprotecting selected items : me14eSelect screen memosepUnprotecting all screen memos : me15◆Deleting screen memo<Example> Deleting one entry1de32Place the cursor on the screen memo and me21Deleting selected screen memos : me22eSelect screen memosepF905i.book Page 113 Monday, April 21, 2008 10:53 AM](https://usermanual.wiki/Fujitsu/OS-F905I.Manual-Part-1-3/User-Guide-1061500-Page-48.png)
![115i-mode/i-motionF905i_E2kou- Skip password◆Setting connection time out <Connection timeout>MENU [i-mode] 82Set the timeout for connection with the i-mode Center. If connection is not normally established, it is automatically interrupted after the set period of time.1de62e1-3◆Setting Display lightMENU [i-mode] 83Set the display light to be used to display the sites or screen memos or MessageR/F or i-Channel.1de63e1 or 2•If you set "Terminal setting", the settings of Display light of Display is used.◆Setting image display and sound effect <Image & Effect>MENU [i-mode] 86You can set an image or Flash graphics sound effect to be used when displaying a site, screen memo, etc.1de65eSet the required itemsepImage : Set if you display images.•When "Not display" is set, appears instead of image, Flash graphics or GIF animation.•When "Display" is set, Animation and Use phone information can be set.Animation : Set if you display GIF animation.•When "Not display" is set, the first image of the GIF animation appears.Use phone information : Set if you use data saved in the terminal for displaying Flash graphics.Sound effect setting : Set if you play the sound effect of Flash graphics or data broadcasting, data broadcasting site.Using CertificateOperating certificate(TBD)Using i-motioni-motionMovie and sound can be downloaded from sites or websites and played/saved. Saved movie and sound can be played as i-motion and be set for Movie ringtone. The vocals of singers can be used for a ring alert as well as melodies (some i-motion may not be set for Movie ringtone).•i-motion items can be categorized to 2 types listed below. The data types cannot be changed or selected when downloading.Type Playing actionNormal type (can be saved*)Play while downloading i-motion data (Up to 10 Mbytes). After completion of receiving, the i-motion can be operated in the same way as i-motions playable after downloading all data.Play after downloading all i-motion data (Up to 10 Mbytes).F905i.book Page 115 Monday, April 21, 2008 10:53 AM](https://usermanual.wiki/Fujitsu/OS-F905I.Manual-Part-1-3/User-Guide-1061500-Page-50.png)
![116 i-mode/i-motionF905i_E2kou*Some i-motion may not allow saving.Downloading i-motion from sites•Maximum number of items that can be saved➝P4471Display a siteeSelect an i-motionDownloading starts, and when completed, completion message appears.•During downloading, press p and select "Yes" to stop downloading.For i-motion with file size of 500 Kbytes to 10 Mbytes that can be saved partially, resuming confirmation screen appears. If you select "Yes", downloading is resumed, and if you select "No", partial saving confirmation screen appears. The rest of partially saved i-motion can be downloaded.➝P285 INFORMATION in "Playing movie/i-motion"•When a streaming type i-motion is selected, playing confirmation screen appears.•The operations below can be performed while playing i-motion playable while being downloaded. After completion of playing, the i-motion can be operated in the same way as i-motions playable after downloading all data.g : Pause/Play (Normal type)j/Side keys [▲▼] : Adjust volumep : Streaming type is interrupted by selecting "Yes" on the confirmation screen, and Normal type is stopped (Pressing g while stopped plays the i-motion from the beginning)m : Display detail information*Even when pausing or stopping the play, the data download continues.•Key operations (except c) for playing back i-motion playable after downloading all data➝P284 Step 3 in "Playing movie/i-motion"2"Save"•i-motion of streaming type cannot be saved.Replaying : "Play"Displaying detail information : "File property"Stopping saving : "Back"e"No"•For streaming type i-motion, if you select "Back", the site screen reappears.3Enter a display nameepThe downloaded i-motion is saved in "i-mode" folder of i-motion.•When " " appears in the guide area, pressing t and p saves data without file restriction to "Movie" folder (saves i-motion with sound only to "Other movie" folder) of microSD memory card. After pressing p, place the cursor on the destination folder of microSD memory card and press p to save data with file restriction to the selected folder.•When saving in the terminal, pressing m displays the usage list of the i-motions, and the i-motion can be set for the stand-by display, etc.➝P286✔INFORMATION•Only i-motion files in MP4 (Mobile MP4) format can be downloaded and/or played. Downloading or playing of i-motion files in ASF format is disabled.•Even if ticker (text) is included in i-motion, the text cannot be played.•The replay restrictions such as number of playable times or expiration of playing may be set for i-motion files.•When i-motion is played while the data is being downloaded, play may be temporarily stopped in waiting for data reception. The playing is automatically resumed when data reception starts.•When i-motion is played while the data is being downloaded, it may become unable to play, or image may be blurred depending on the condition such as signal quality. i-motion can be played after the download if the data is normally received. However, some i-motion may allow download of data but may not be played correctly.•When i-motion data is improper, reception of i-motion may be canceled.•Even when Ring alert or Receive display appears as "Available" in detail information displayed before saving i-motion used from i-αppli, saving of it may be disabled. The i-motion cannot be set as Ring alert or Movie alert.•When playing streaming type i-motion while the data is being downloaded, if you fold the terminal or a call comes in or the set date/time of the recording timer reception of 1Seg, alarm clock or schedule comes, downloading is interrupted and the playing is stopped. When playing normal type i-motion while the data is being downloaded, if you fold the terminal, the playing is stopped but downloading continues.•When the maximum number of saved items/area is reached ➝P306Streaming type (cannot be saved)Play while downloading i-motion data (Up to 10 Mbytes). Deleting i-motion data after playing.Type Playing actionThe amount of data received/total amount of dataF905i.book Page 116 Monday, April 21, 2008 10:53 AM](https://usermanual.wiki/Fujitsu/OS-F905I.Manual-Part-1-3/User-Guide-1061500-Page-51.png)
![117i-mode/i-motionF905i_E2koui-motion settingsSetting Auto play of i-motionMENU [i-mode] 87Set if you automatically play normal type i-motion while or after downloading.1de66eSelect Auto replay setting fielde1 or 2ep✔INFORMATION•Press m and select "Display" ➝ "i-motion settings" to operate from the site screen.•Even when "Auto Play OFF" is set, i-motion can be played by selecting "Play" on the download completion screen.•For streaming type i-motion, replaying confirmation screen appears regardless of this setting.F905i.book Page 117 Monday, April 21, 2008 10:53 AM](https://usermanual.wiki/Fujitsu/OS-F905I.Manual-Part-1-3/User-Guide-1061500-Page-52.png)
![120 MailF905i_E2kouUsing SMSCreating and sending SMSCreating and sending SMSMENU [Mail] 811Send a character message to a mobile phone number as the destination.•Maximum number of saved items➝P447•Reading received/sent/unsent SMS list/detail view screen ➝P185<Example> Creating/sending by entering address directly1a (one second or more) Select the receiver field2"Direct input"eEnter the addressEntering mail address from Mail logs : Select "Sent msg log" or "Received msg log"eSelect a logEntering by searching phonebook : "View phonebook"eSearch the phonebookeSelect a phonebook entry3Select the Message text fieldeEnter the message text•When "Chinese" is set for Font type in SMS settings, up to 670 characters can be entered. When "English" is set, up to 1530 characters including one-byte alphanumerics and symbols (except for `。「」、・゛゜) can be entered.•Press # to enter line feed (except one-/two-byte number input mode). A line feed is counted as a character of message text. The line feed may be replaced by a space on the other party's terminal.Inserting signature : me464p•To save SMS without sending it, press m2. The SMS is saved of "Unsent" folder of Unsent messages.✔INFORMATION•If, in the SMS setting, the sending character type is set to "Chinese" and characters entered are 70 characters or less it will be sent as one SMS. If characters entered are more than 70 characters you can send it as a maximum of 10 combined SMSes containing 67 characters per message. If the sending character type is "English" and characters entered are 160 characters or less it will be sent as one SMS. If the characters entered are more than 160 characters you can send it as a maximum of 10 combined SMSes that contain 153 characters per message. •When transmission is completed correctly, the SMS is saved in a folder of Outbox. When the memory is not enough or the maximum number of saved items is reached, the unprotected sent mails are overwritten chronologically.•Depending on the signal quality, font type or the terminal of the other party, characters may not be displayed correctly at the receiver side.•The type of font and whether to receive SMS report request are set in SMS settings beforehand. You can also change the settings of SMS report request and Keep in SMS center after starting creation of SMS.•When Font type is English and symbols (| ^ { } ~ ¥) are entered, the number of characters that can be sent is reduced. Moreover, symbol (-) can be entered and sent, but it is replaced with a space on the receiver's terminal.•When transmission fails, an error message appears and the SMS is saved in "Unsent" folder of Unsent messages.•If setting SMS report request to "Request" and send SMS, you receive SMS report request that notifies you that the other terminal received the SMS. SMS report request is saved in the folder in Inbox.•Even if Activate/Deactivate of caller ID notification is "Not notify", caller ID is sent to the receiver when SMS is sent.•When the memory is not enough or the maximum number of saved items is reached, SMS cannot be created. Delete unnecessary i-mode mail and/or SMS from the folder in Unsent messages.•With the 2in1 service activated, you cannot send SMS for Number B.F905i.book Page 120 Monday, April 21, 2008 10:53 AM](https://usermanual.wiki/Fujitsu/OS-F905I.Manual-Part-1-3/User-Guide-1061500-Page-55.png)
![121MailF905i_E2koui-mode mailOnly by subscribing to i-mode, i-mode mails can be exchanged not only with i-mode terminals but also via Internet.In addition to message text, you can attach up to 10 files (images, etc.) of up to 2 Mbytes in total to a mail. Moreover, Deco-mail is available, a font color, size and background color of message text can be changed, and many Deco-mail pictograms that can be inserted similarly to pictograms are preinstalled, allowing you to easily create and send expressive mails.Creating i-mode mail/Deco-mailCompose messageCreating and sending i-mode mailA2MENU [Mail] 21me1e32Select the receiver field.3Select entry methodeEnter the address4Select the subject fieldeEnter the subject•Up to 200 bytes can be entered.5Select the message text fieldeEnter the message text•Up to 10,000 bytes can be entered.Inserting signature : me576p•To stop transmission, press g on the connecting screen or press p on the sending screen. Note that the i-mode mail may be sent depending on the operation timing. The sent mail is saved in "Unsent" folder of Unsent messages.Total bytes of characters and decorationReceiver fieldMail creation screenSubject fieldAttachment fieldMessage text fieldThe remaining number of characters that can be entered as the text (bytes)F905i.book Page 121 Monday, April 21, 2008 10:53 AM](https://usermanual.wiki/Fujitsu/OS-F905I.Manual-Part-1-3/User-Guide-1061500-Page-56.png)
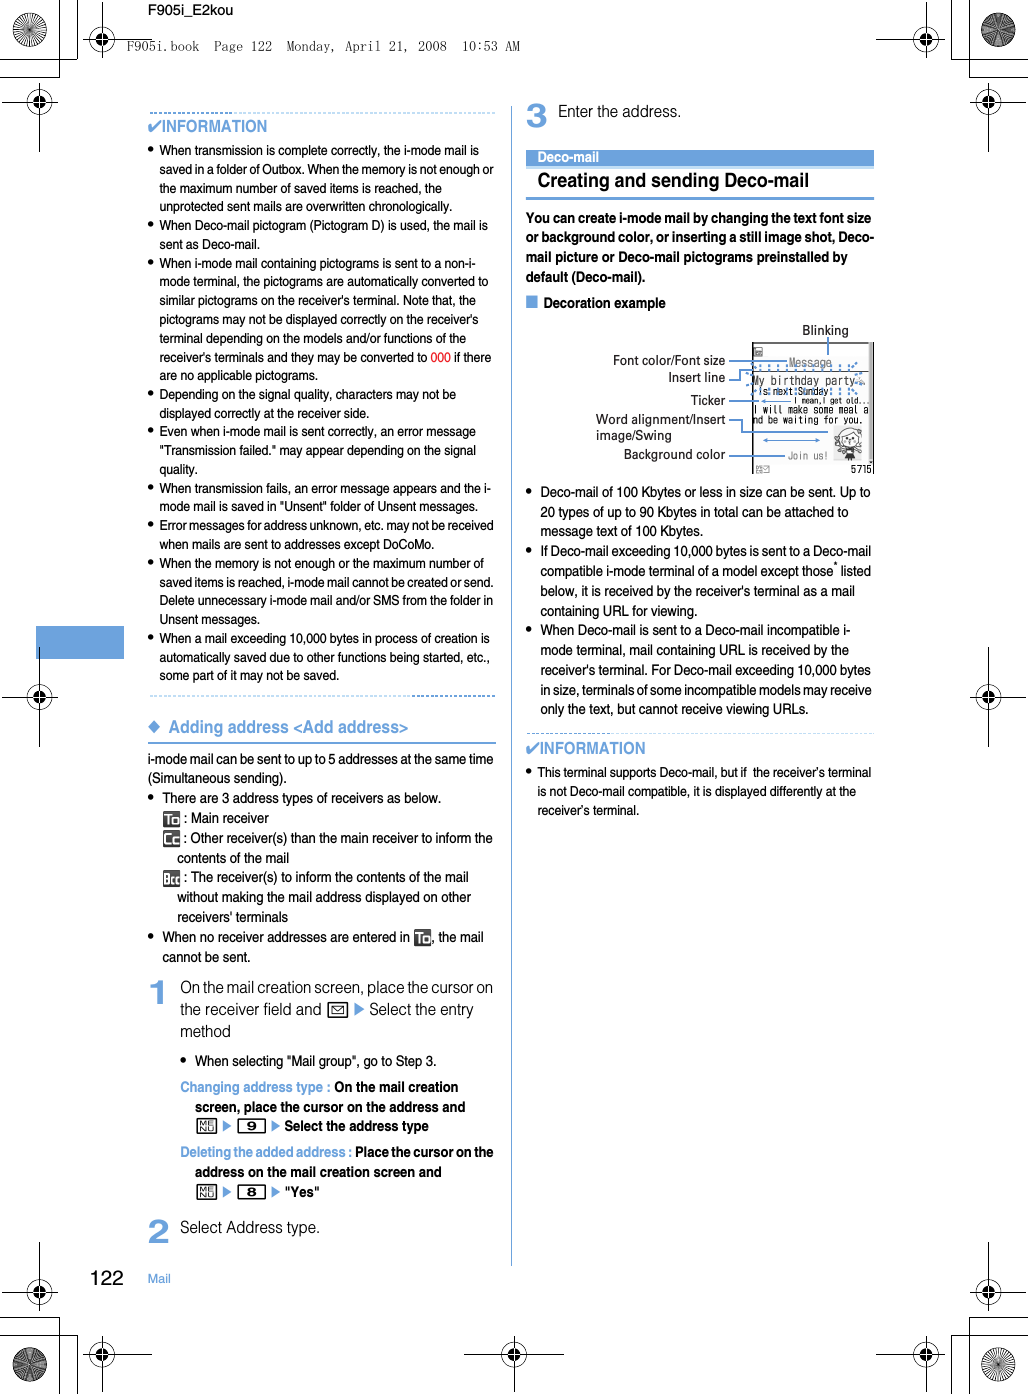
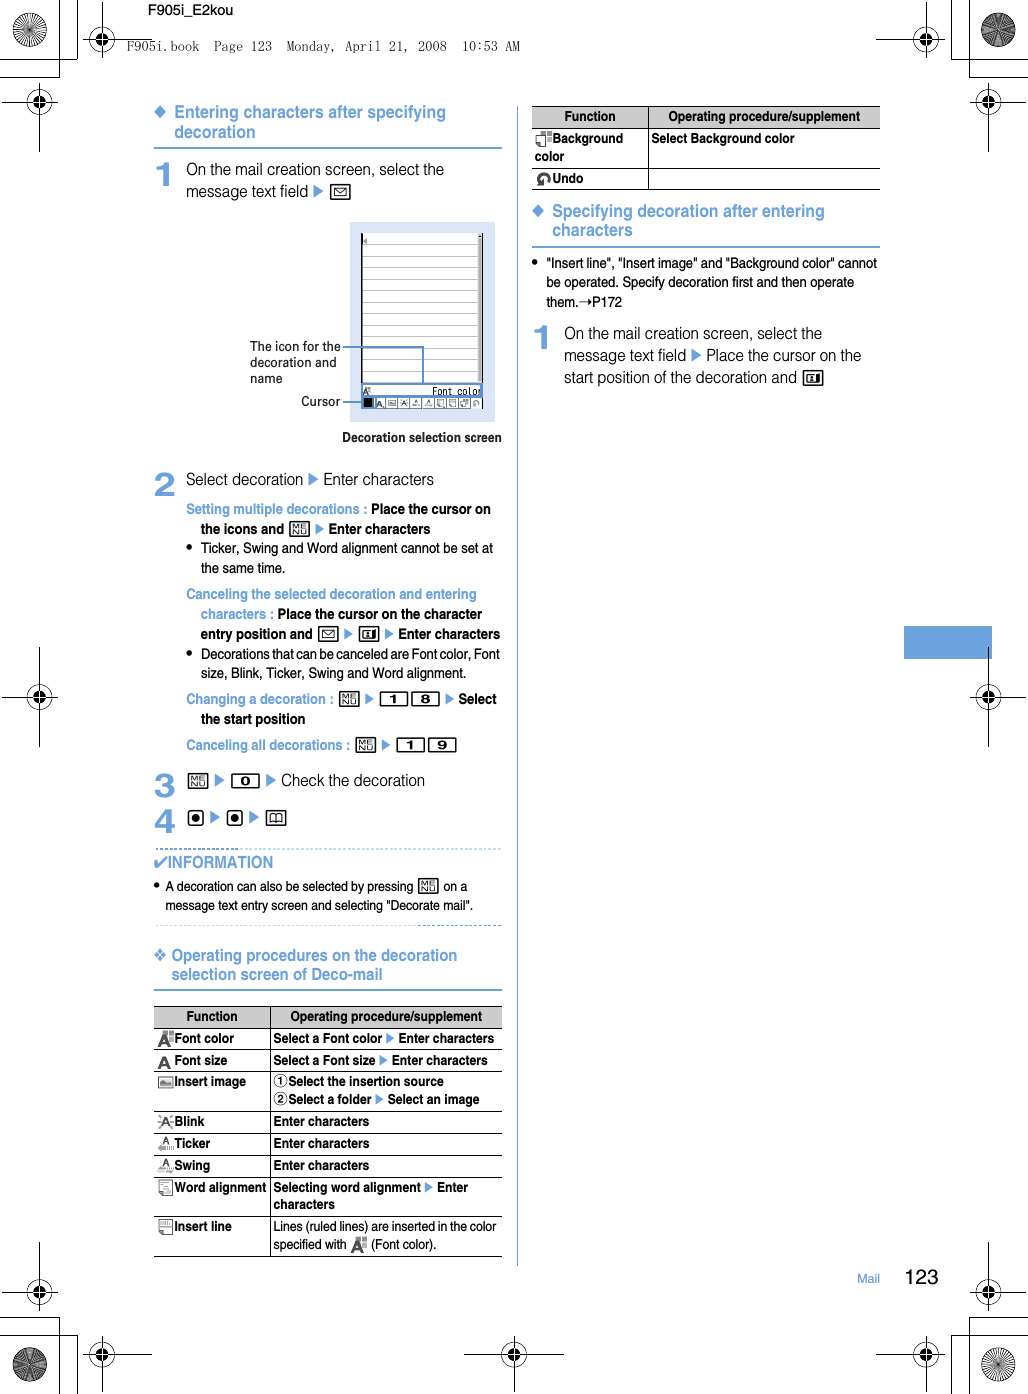
![124 MailF905i_E2kou2Select the end point.Selecting from the starting position to the end of the sentence : megSelecting from the starting position to the beginning of the sentence : pegSelecting the whole sentence : a3Select the decoration.Changing font color : 1eSelect a font color•The color of separating line (ruled line) is also changed.•To change the color back to the default, select "Default".Changing font size : 2e1-3Blinking characters : 3e1•Press 2 to cancel.Making characters into ticker to run from right to left : 4e1•Press 2 to cancel.Making characters swing left and right : 5e1•Press 2 to cancel.Changing word alignment : 6e1-3•Display position of image is also changed.Canceling all decorations in a selected range : 7Copying characters : 8Cutting characters : 9Returning to the previous setting : 0•Last set decoration or character entry is canceled.Decorating characters continuously : meRepeat Step 3Procedures for checking or canceling decoration➝P172 Step 2-3 in "Entering characters after specifying decoration"4gegep✔INFORMATION•When mails are exchanged with other than the terminal supporting Deco-mail, such as PC, the decoration may not be correctly displayed.Using mail templates◆Using template for creating a mail <Load template>1On the mail creation screen, me6e1 or 2•If the text already exceeds 10,000 bytes, "Read" cannot be selected.•When selecting "Load & Insert" with the message text decorated, a confirmation screen for canceling decoration appears.•When you select "Load & Overwrite", a confirmation screen for discarding entered contents to load appears.•Icons used for the list display are defined as follows : : Template using image with UIM operation restriction set : Search by i-mode➝P283Definitions of icons except the above➝P185 "Inbox message list screen"•A thumbnail image of a template appears for thumbnail display. The icons below appear for other than thumbnail images of template. : Template using image with UIM operation restriction set : Template that an incorrect image is used : Search by i-mode➝P283•Each time you press t, thumbnail display and list display switch.2Select a template.3Edit the mailep◆Viewing templates and creating mailMENU [Mail] *1ae8eSelect a template2peEdit the mailep◆Creating and saving template <Save as template>•Saving i-mode mail as a template is disabled in the cases below : - When total size of text and decoration data exceeds 10,000 bytes- When the total size of text, decoration and attached file exceeds 100 Kbytes1On the mail creation screen, me63e"Yes"Saving sent/received i-mode mail as template : On the mail detail view screen, me452Set the required items.Display name : Up to 10 two-byte (20 one-byte) characters can be entered.File name : Up to 36 one-byte alphanumeric characters, " . ", " - " or " _ " can be entered. " . " cannot be used for the first character of the file name.3pF905i.book Page 124 Monday, April 21, 2008 10:53 AM](https://usermanual.wiki/Fujitsu/OS-F905I.Manual-Part-1-3/User-Guide-1061500-Page-59.png)
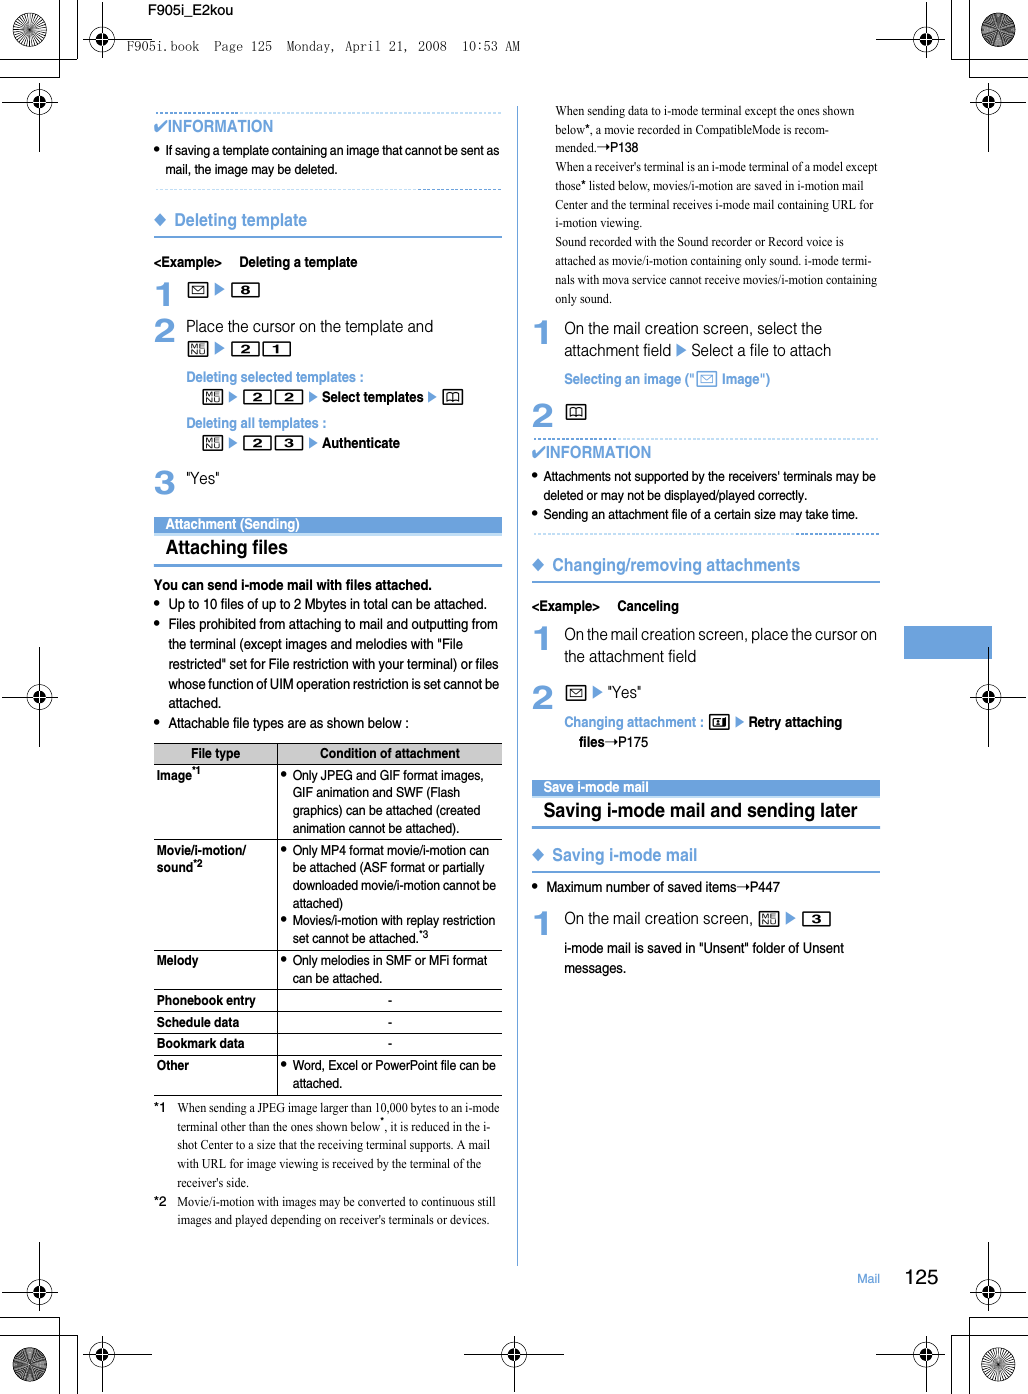
![128 MailF905i_E2kouReceiving and handling i-mode mailMail auto receiveWhen i-mode mail is received•Maximum number of saved items➝P4471Receive an i-mode mail. and blink and "Receiving messages…" appears.Mail ring alert sounds, the light is lit or flashed and the reception result screen appears.The received i-mode mail is saved in a folder of Inbox.•g : Cancel receivingThe mail may be received depending on the receiving conditions.aIcon : Unread i-mode mail exists : Unread i-mode mail and SMS existsbReception result tickercNumber of received i-mode mails•When the terminal is folded, the sub-display shows the caller's name or mail address.➝P97When reception has failed"×" appears on the right side of "Mail" on the reception result screen. To receive again, perform i-mode inquiry.Displaying newly-received i-mode mail1On the reception result screen, 1.2Select a foldereSelect a maili-mode messageChecking for i-mode mailMENU [Mail] 6MENU [i-mode] 63AA1Side key [▼] (1 sec. or more).Replying to i-mode mailReplying to i-mode mailYou can reply the received i-mode mail or SMS.•You cannot reply to received SMS sent from "User unset", "Payphone" or "Not support".1ae1eSelect a folderePlace the cursor on the mail and pBlinkingabcReceiving screen Reception result screenBlinkingF905i.book Page 128 Monday, April 21, 2008 10:53 AM](https://usermanual.wiki/Fujitsu/OS-F905I.Manual-Part-1-3/User-Guide-1061500-Page-63.png)
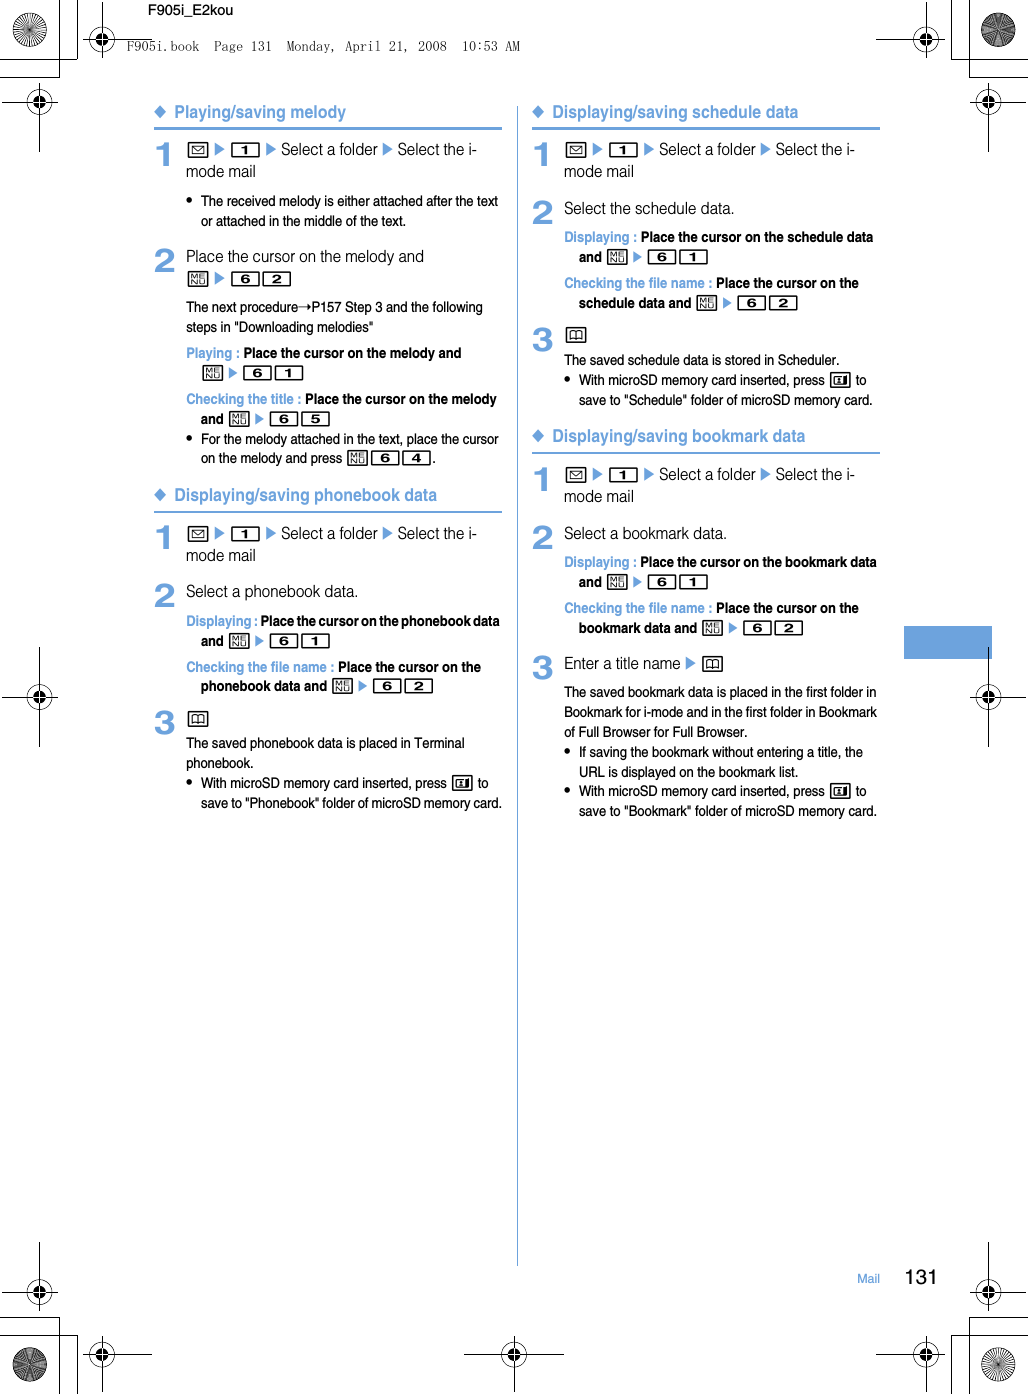
![132 MailF905i_E2kou◆Displaying/saving Word, Excel or PowerPoint file1ae1eSelect a foldereSelect the i-mode mail2Place the cursor on the file and me63Displaying : Place the cursor on the file and me61Checking the file name : Place the cursor on the file and me623Enter a display nameepThe saved file is placed in a folder in Other.When there are more than one folder in Other, a screen appears asking to select a save destination folder. The file is saved in the selected folder.•When " " appears in the guide area, pressing t and p saves to "Other" folder of microSD memory card.✔INFORMATION•If a document (Word, Excel, or PowerPoint file) is attached, it is necessary to switch from i-mode Browser to Full Browser to download the file.◆Saving various filesSave files that cannot be displayed in this terminal to microSD memory card.•Data cannot be saved to or displayed to the terminal.1ae1eSelect a foldereSelect the i-mode mail2Place the cursor on the file and me63Checking the file name : Place the cursor on the file and me623"Yes"The files are saved in "Other" folder of microSD memory card.Deleting attachmentDeleting attachment1ae1eSelect a foldereSelect the i-mode mail2Place the cursor on the file and me64•To delete all attached files at a time, place the cursor on the file name and press m65.Deleting attached melodies or Receive option attachment files : Place the cursor on the file name and me63•To delete all attached melodies or Receive option attachment file at a time, place the cursor on the file name of melodies or Receive option attachment file and m64.3"Yes"Operating Inbox/OutboxInbox/OutboxDisplaying mail in Inbox/OutboxMENU [Mail] 1MENU [Mail] 4MENU [Mail] 5Received/sent/unsent i-mode mail or SMS can be checked.<Example> Displaying received mails1ae1Displaying Outbox folder list : ae5Displaying Unsent messages folder list : ae42Select a folder.•Select a folder for Message i-αppli to activate the corresponding i-αppli. To display a mail without starting i-αppli, place the cursor on the folder for Message i-αppli and press m1.TempTempTempTempF905i.book Page 132 Monday, April 21, 2008 10:53 AM](https://usermanual.wiki/Fujitsu/OS-F905I.Manual-Part-1-3/User-Guide-1061500-Page-67.png)