Getac Technology 101 Tablet PC User Manual Notebook
Getac Technology Corp. Tablet PC Notebook
Contents
users manual 3

CHAPTER 2
Operating Your Tablet PC
This chapter provides information about the use of the computer.
If you are new to computers, reading this chapter will help you learn the
operating basics. If you are already a computer user but are new to Tablet
PCs, you may choose to read only the parts containing information
unique to your computer.
Described in this chapter are the operating basics of these components:
! Wireless Keyboard
! Touchscreen
! Floppy disk drive
! Hard disk drive
! CD/DVD drive
And these features:
! Starting and stopping the computer
! Function keys
! Video features
! Audio features
! Communication features
2-2 Operating Your Tablet PC
Starting and Stopping the Computer
There are a number of ways to start and stop the computer.
Starting the Computer
You always start the computer using the power button .
A computer starts up with an operating system (OS) existing on the
storage device such as the hard disk; or from a floppy disk or CD if you
have the docking station installed. The computer will automatically load
the OS after you turn it on. This process is called booting.
NOTE: An operating system is the platform for all your software application programs to
run on. The most widely used operating system today is Microsoft Windows.
Stopping the Computer
When you finish a working session, you can stop the computer by turning
off the power or leaving the computer in Standby or Suspend mode:
To stop in
this mode… Do this… To start up or
resume again
Off Follow the shutdown procedure of your
operating system. This can prevent loss of
unsaved data or damage to your software
programs.
If the system is locked up because of
hardware or software problems, press the
power button to turn off the computer.
Press the power
button .
Standby Depending on your settings in Windows,
you can put the computer in Standby
mode by pressing the power button
Press any key.
Suspend Depending on your settings in Windows,
you can put the computer in Suspend
mode by pressing the power button
Press the power
button .

Operating Your Tablet PC 2-3
If you choose to stop in Standby or Suspend mode, you can return to
where you left off the next time you start up the computer. (See “Power
Management” in Chapter 3 for more information.)
2-4 Operating Your Tablet PC
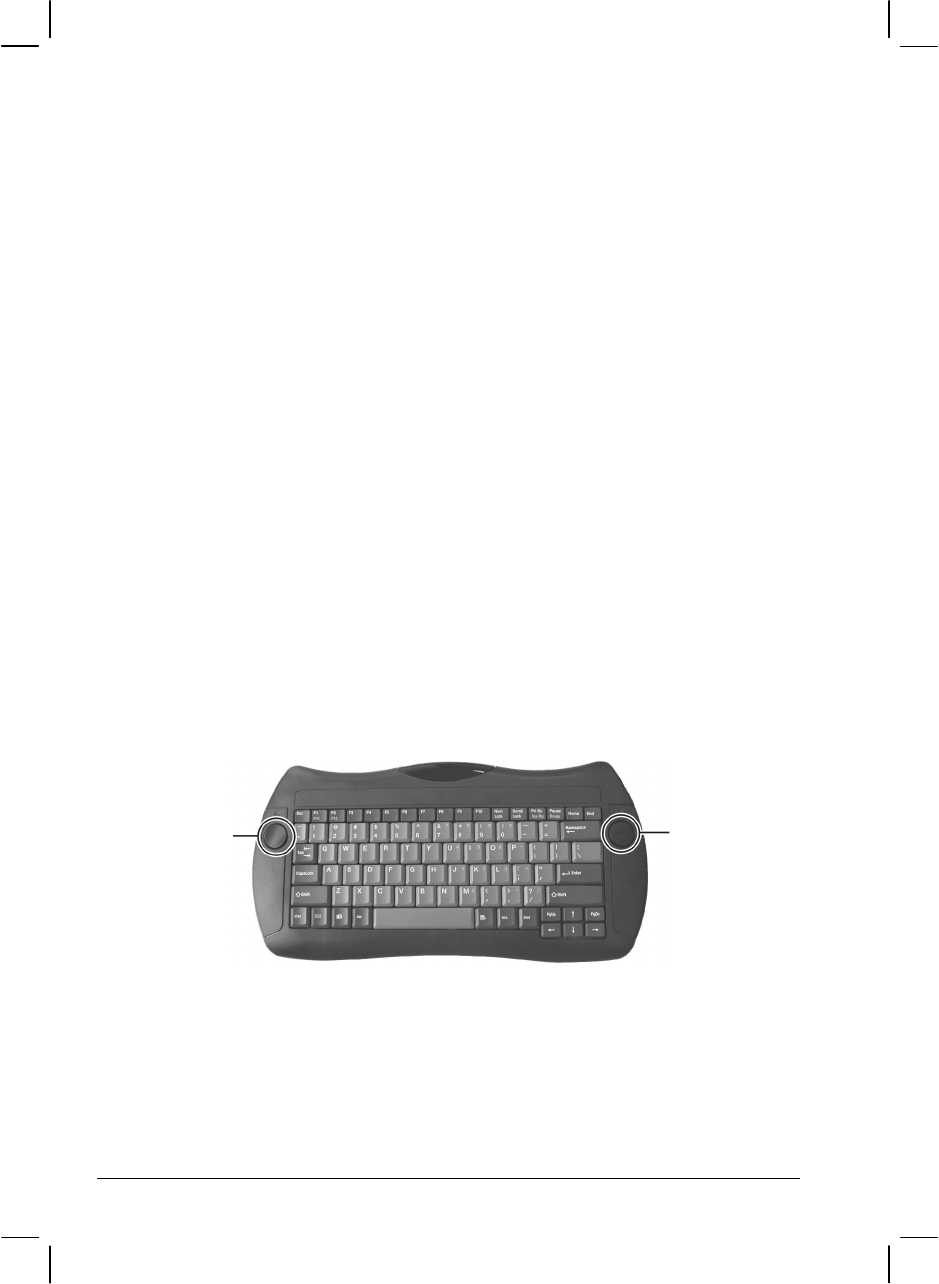
Using the Wireless Keyboard (option)
Before using the wireless keyboard, see section on “Positioning the
Tablet PC and Wireless Keyboard” on chapter 1. Your wireless keyboard
has all the standard functions of a full-sized computer keyboard.
The standard functions of the keyboard can be further divided into five
major categories:
! Mouse-control buttons
! Typewriter keys
! Cursor-control keys
! Numeric keys
! Function keys
Mouse-control Buttons
Mouse-control buttons found on both sides of the wireless keyboard are
similar to the buttons on a mouse. The left button (#) is similar to the
left- and right-click mouse function. The right button ($) allows you to
slide the on-screen pointer horizontally, vertically, or diagonally.
# $
Operating Your Tablet PC 2-5
Typewriter Keys
Typewriter keys are similar to the keys on a typewriter. Several keys are
added such as the Ctrl, Alt, Esc, and lock keys for special purposes. The
Control key is normally used in combination with other keys for
program-specific functions. The Alternate key is normally used in
combination with other keys for program-specific functions. The Escape
key is usually used for stopping a process. Examples are exiting a
program and canceling a command. The function depends on the program
you are using. When the lock keys (Caps Lock, Num Lock, and Scroll
Lock) are pressed, their corresponding indicators light up on the Tablet
PC front panel’s device indicators.
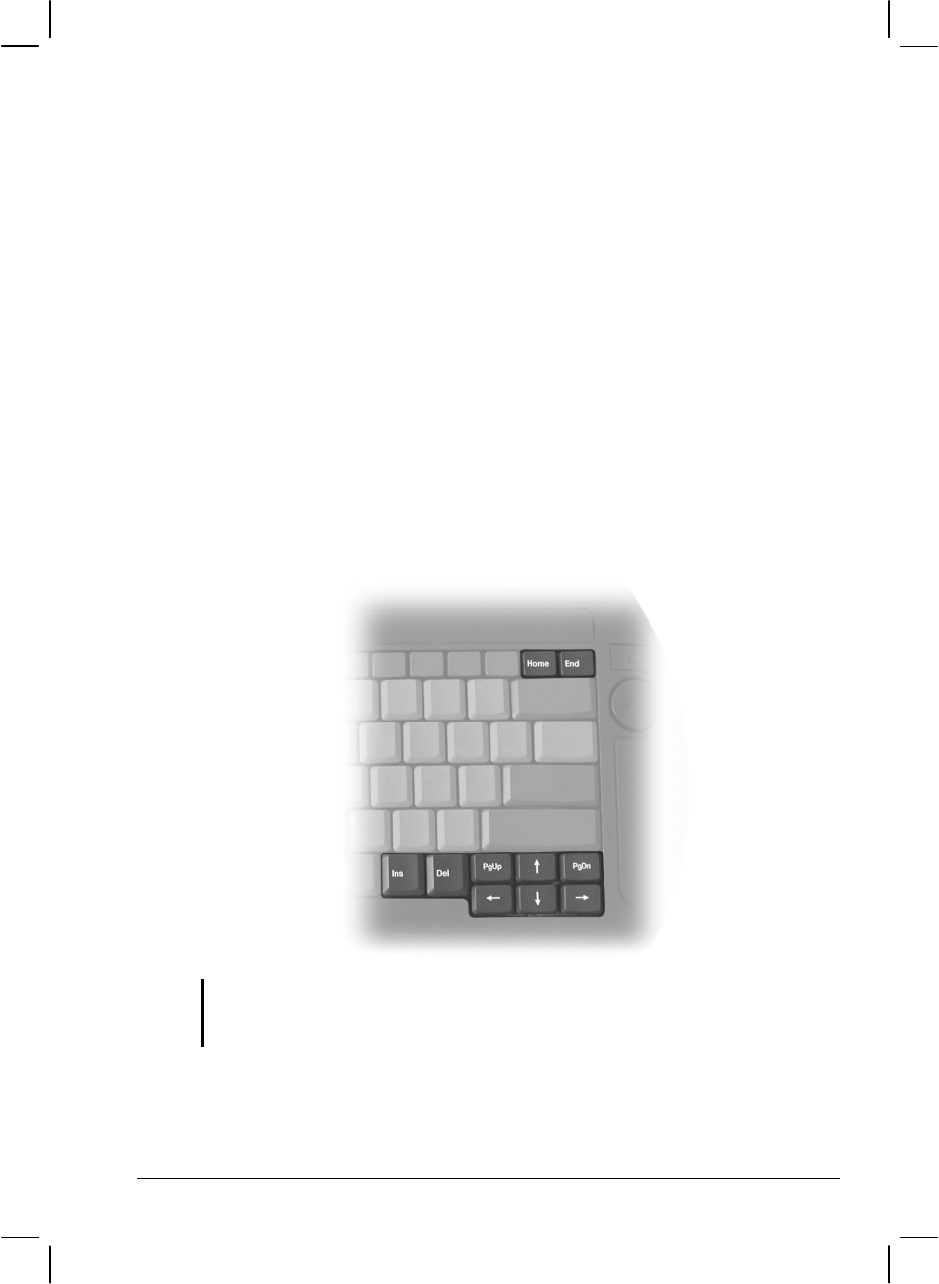
Cursor-Control Keys
NOTE: The word “cursor” refers to the indicator on the screen that lets you know
exactly where on your screen anything you type will appear. It can take the form of a
vertical or horizontal line, a block, or one of many other shapes.
2-6 Operating Your Tablet PC
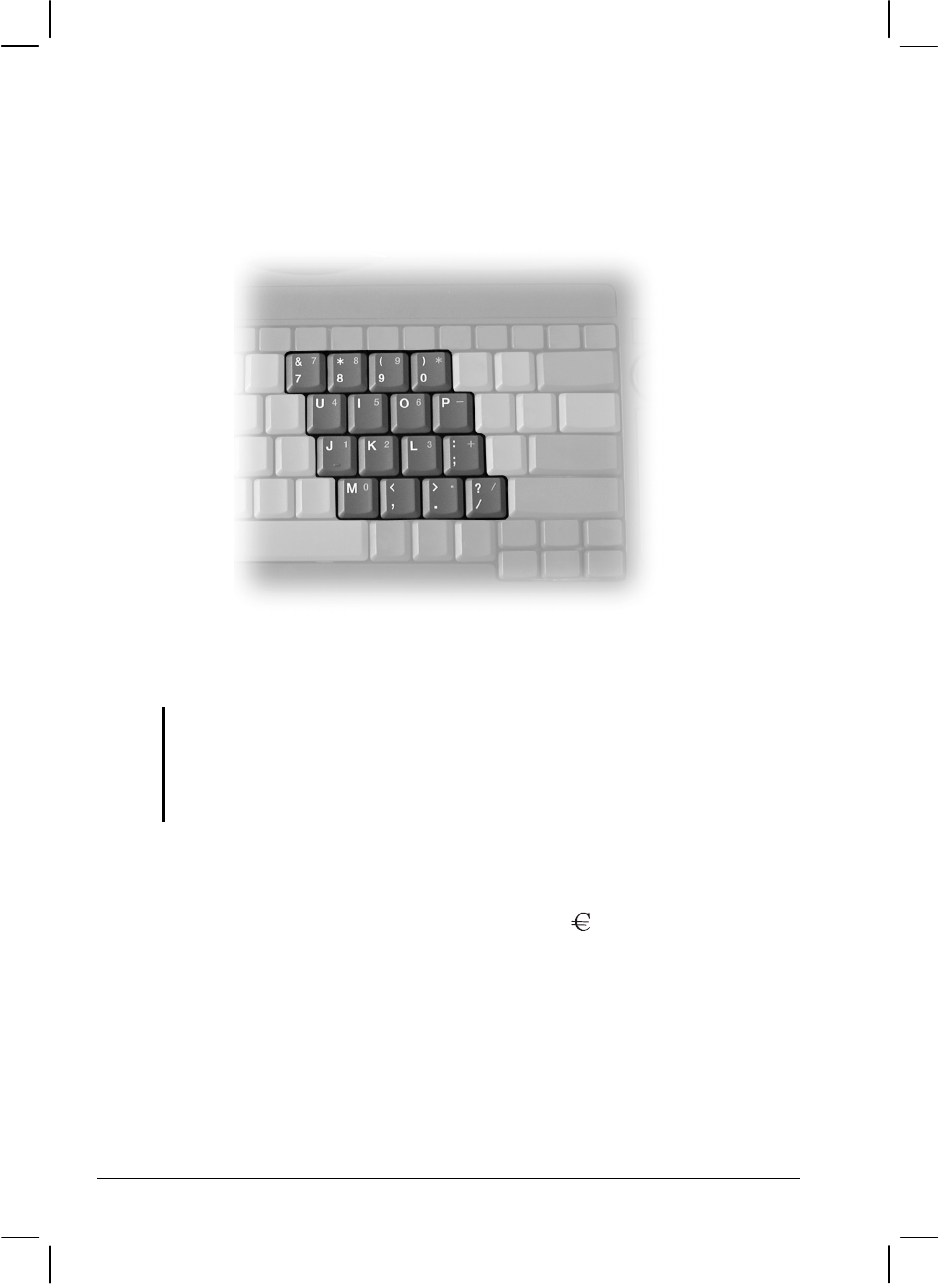
Numeric Keypad
A 15-key numeric keypad is embedded in the typewriter keys as shown
next:
Numeric keys facilitate entering of numbers and calculations. When Num
Lock is on, the numeric keys are activated; meaning you can use these
keys to enter numerals.
NOTE:
! When the numeric keypad is activated and you need to type the English letter in the
keypad area, you can turn Num Lock off.
! Some software may not be able to use the numeric keypad on the external wireless
keyboard.
Euro Symbol
If your Windows supports the Euro dollar sign , you can press the sign
on the keyboard.
! To press the Euro sign on the keyboard, hold down either of the Alt
keys and type 0128 on the numeric keypad of your keyboard.
! To press the Euro sign on an UK keyboard, hold down the Alt Gr key
and press 4 (which has an Euro sign on it).

Operating Your Tablet PC 2-7
Windows Keys
The keyboard has two keys that perform Windows-specific functions:
% Windows Logo key and Application key.
The % Windows Logo key opens the Start menu and performs
software-specific functions when used in combination with other keys.
The Application key usually has the same effect as a right mouse
click. (See your Windows manual for more information.)
Function Keys
On the top row of the keys are the function keys: F1 to F12. Function keys
are multi-purpose keys that perform functions defined by individual
programs.

2-8 Operating Your Tablet PC
Using the Touchscreen
CAUTION: Do not use a sharp object such as a ballpoint pen or pencil on the
touchscreen. Doing so may damage the touchscreen surface. Use the included
touchscreen pen instead, which can be stretched for better grip and handling.
The touchscreen is a touch-sensitive device that allows you to
communicate with the computer by controlling the location of the pointer
on the screen and making selection with the buttons.
The touchscreen needs a special device driver support called a PenMount
Utility, which allows you to easily use the Tablet PC without any external
pointing device.
The touchscreen pen is located at the rear of the Tablet PC (refer to “Rear
Components” on chapter 1). You might need to tilt the Tablet PC after
opening the touchscreen pen holder to get it. To use the touchscreen,
place the touchscreen pen or your forefinger on the touchscreen. As you
slide your pen or fingertip across the screen, the pointer, or cursor, on the
screen moves in the same direction across the screen as your fingertip or
pen moves across the screen.
Here are some common terms that you should know when using the
touchscreen:
Touchscreen Pen
Holder
Operating Your Tablet PC 2-9
Term Action
Point Move your finger or pen on the touchscreen until the
cursor points to the selection on the screen.
Click Tap gently anywhere on the touchscreen.
Double-click Tap twice on the touchscreen rapidly.
Drag and
drop Press lightly on the touchscreen and move your finger or
pen until you reach your destination (drag). Finally,
release your finger or pen (drop) when you finish dragging
your selection to the destination. The object will drop into
the new location.
Scroll To scroll is to move up and down or left and right in the
working area on the screen.
To move vertically, place your finger or pen on the right
edge of the touchscreen and slide your finger or pen up and
down along the edge. To move horizontally, place your
finger or pen on the bottom edge of the touchscreen and
slide your finger or pen left and right.
This function works only after you install the touchscreen
driver supplied with the computer and it may not work for
all applications.
TABLE NOTE: If you swap the left and right buttons, “tapping” on the
touchscreen as an alternative method of pressing the left mouse button will no
longer be valid.
Configuring the Touchscreen
You may want to configure the touchscreen to suit your needs. For
example, if you are a left-handed user, you can swap the two buttons
function of the left mouse-control button on the wireless keyboard so that
you can use the right mouse button as the left mouse button and vise
versa. You can also change the size of the on-screen pointer, the speed of
the pointer, and so on.
To configure the touchscreen, you can use the standard Microsoft or IBM
PS/2 driver if you are using Windows. However, you can install the
touchscreen driver supplied with your computer to take advantage of
more powerful features. (For information on installing the driver, see
“How to Use the CD” in Chapter 6.)
2-10 Operating Your Tablet PC
Using the Floppy Disk Drive (option)
Your Tablet PC comes with an USB floppy disk drive as drive A through
the USB port on the right side, or port replicator on an optional expansion
box, or through the USB port located on the plug of an optional CD-ROM
drive module.
A floppy disk drive allows you to install new programs into your
computer, or to store information on a removable floppy disk so you can
transfer information from one computer to another.
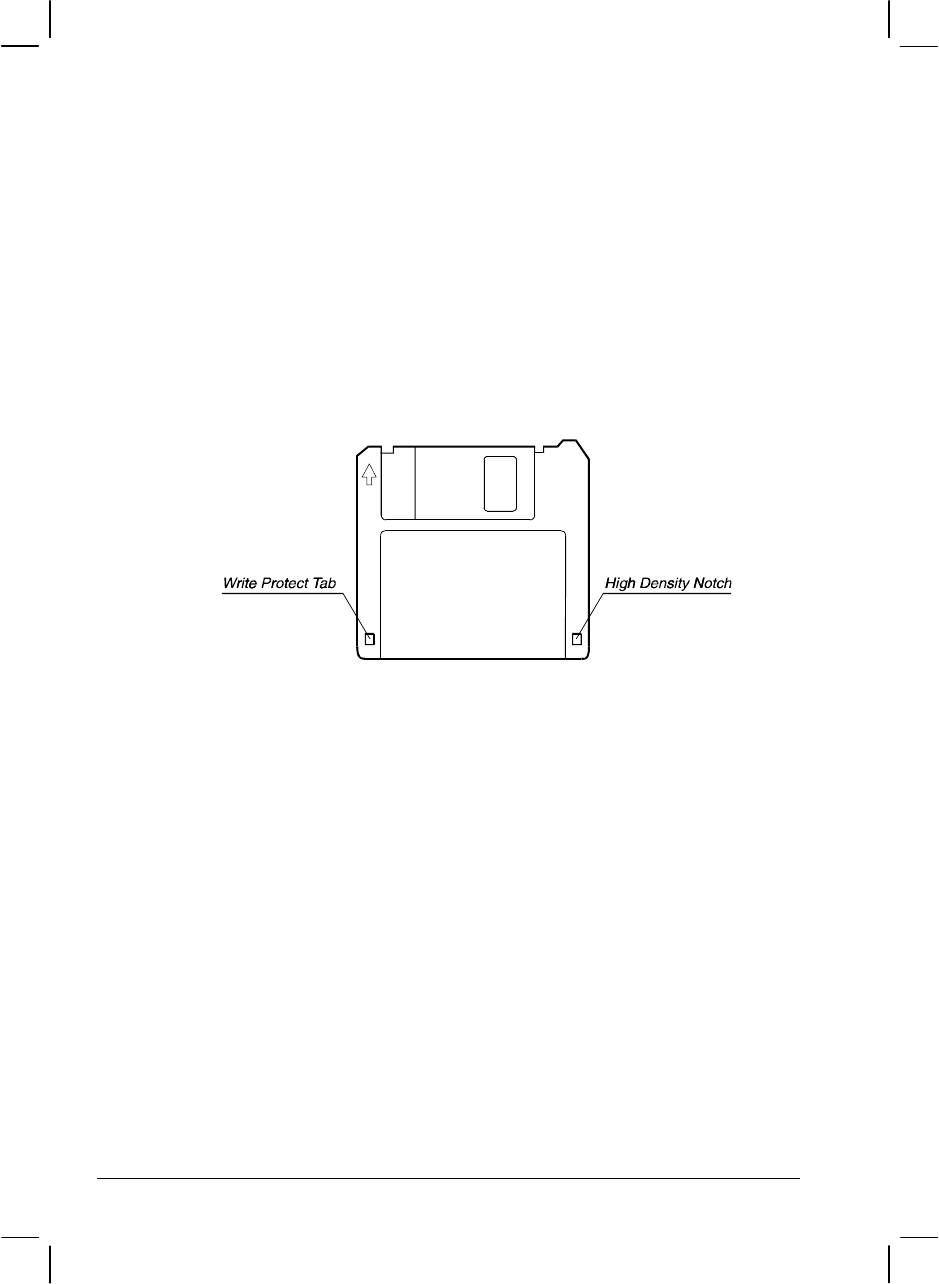
The floppy disk drive is a high-density 3.5-inch one, which can read and
write to either double-density (2DD) 720-KB floppy disks or
high-density (2HD) 1.44-MB floppy disks. Notice that both types of
floppy disk have an arrow imprinted on the front upper left corner, and a
sliding write-protect tab on the bottom left corner, as illustrated above.
When opened, the write-protect tab prevents data from being written to,
or erased from the floppy disk.
Connecting the Floppy Disk Drive
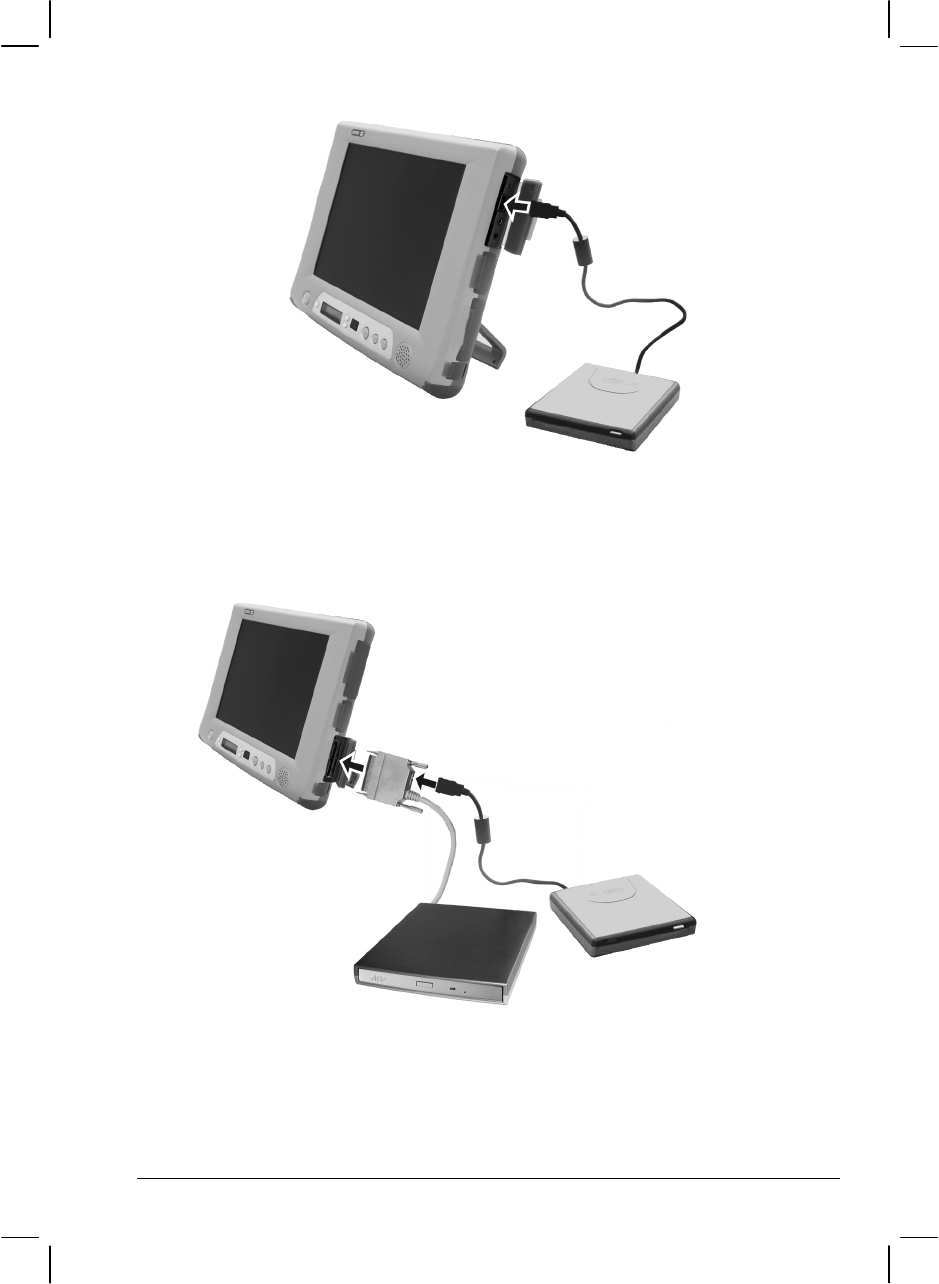
Connect the floppy disk drive through any of the following methods:
! Through the Tablet PC’s USB Port –
Insert the USB plug of floppy disk drive into the USB port located on
the right side of the Tablet PC.
Operating Your Tablet PC 2-11
! Through the Expansion Port Plug of the CD-ROM Drive
Module –
Insert the USB plug of floppy disk drive into the USB port located on
the expansion port plug of the CD-ROM drive module.
2-12 Operating Your Tablet PC
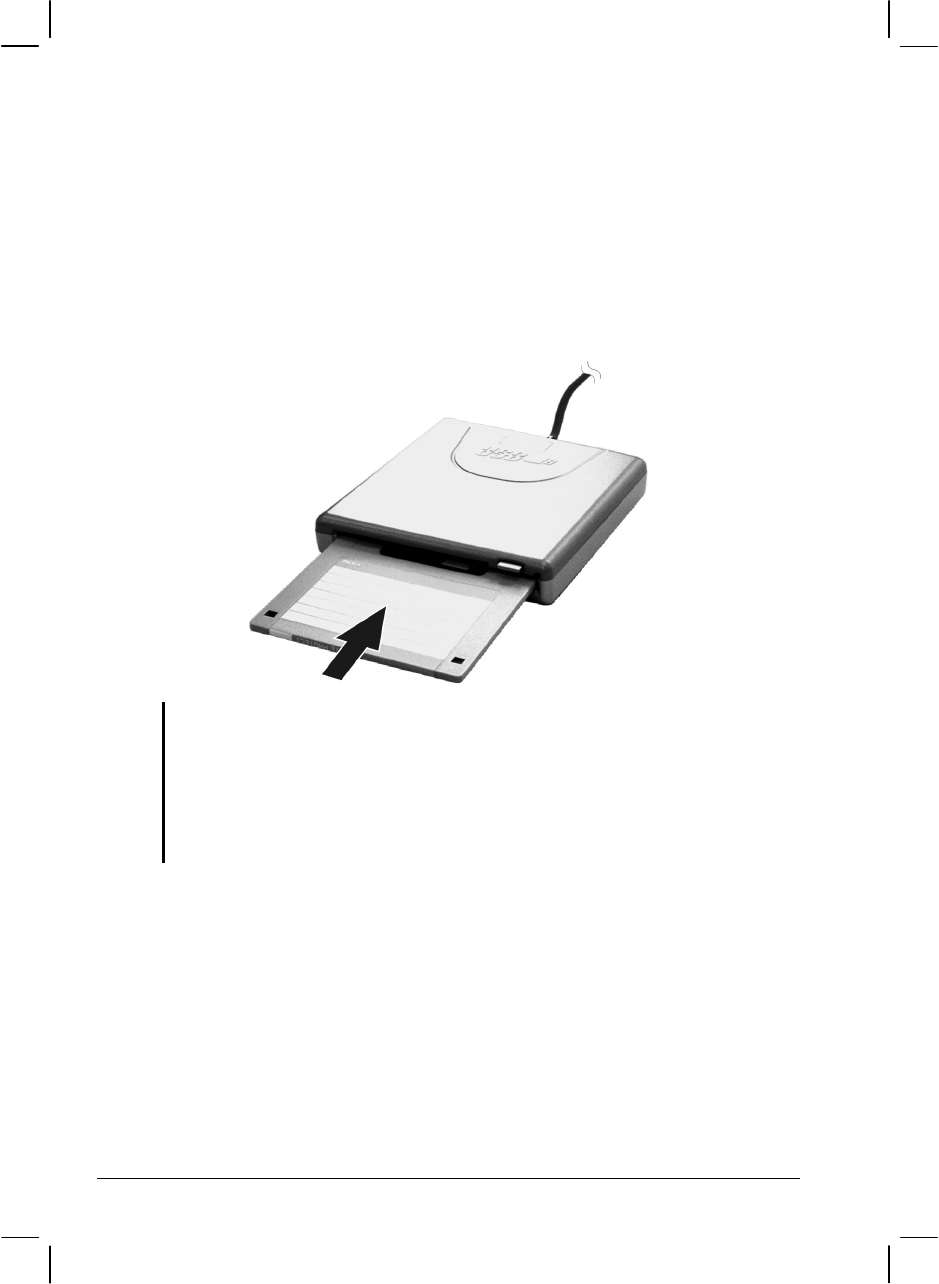
Inserting and Ejecting Floppy Disks
To insert a floppy disk, hold it with the arrow facing up and towards the
drive. Slide the disk into the drive until it clicks into place.
To eject a floppy disk, first ensure that the floppy disk drive in-use
indicator is off, and then press the eject button on the drive. When the
floppy disk pops out of the drive, remove the floppy disk and store it
properly.
CAUTION:
! Never turn off or reset the computer while the floppy disk drive in-use indicator is
on.
! Always store your floppy disks in a safe, clean container, to protect them from the
environment and magnetic fields.
! A floppy disk must be formatted before you can use it. (To know how to format a
floppy disk, see your operating system manual.)

Operating Your Tablet PC 2-13
Using the Hard Disk Drive
Your computer comes with a hard disk drive as drive C.
A hard disk drive is a storage device with non-removable, rotating,
magnetic storage platters inside it. It is where your operating system and
application software programs are stored.
Your hard disk drive is a 2.5-inch IDE (Integrated Drive Electronics) hard
disk drive. This type of drive embodies the latest in fast, reliable mass
storage by integrating all the control circuitry necessary for operation
directly onto the drive itself. This allows the drive manufacturer to
carefully optimize drive performance.
CAUTION:
! Make regular backups of your data files from your hard disk drive to floppy disks or
other storage media.
! Never try to remove or install the hard disk drive while the computer is powered on.
Doing so can result in loss of data, and can damage the computer and the hard disk
drive’s sensitive circuitry.
! Never turn off or reset the computer while the hard disk drive in-use indicator is on.

2-14 Operating Your Tablet PC
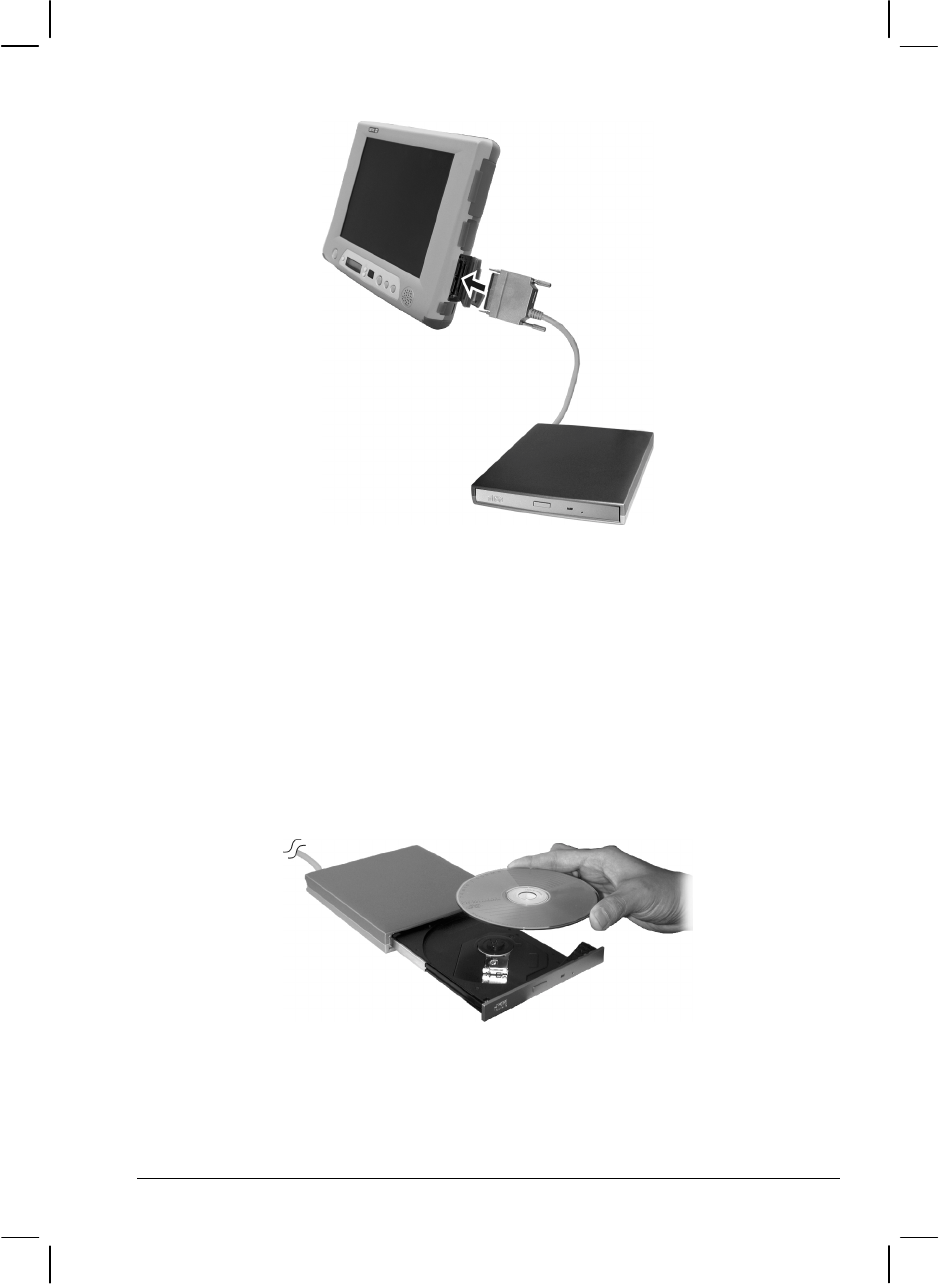
Using the CD/DVD Drive (option)
Depending on the model, your computer comes with a CD-ROM drive or
DVD-ROM drive module. This drive is usually configured as drive D and
is connected to the expansion port located on the right side of the Tablet
PC.
The drive uses removable 5.25-inch silver CD-ROM discs, which look
like standard music CDs. It is an ideal medium to use for distributing
multimedia because of the huge amount of data that a disc can store.
A CD-ROM drive can read CD-ROMs, audio CDs, and CD-R disk. A
DVD-ROM drive can read DVD (Digital Versatile Disc) discs in addition
to the above discs.
NOTE: If the DVD-ROM drive would be operating for more than half an hour (such as
showing a DVD title), use the AC or car power source instead of the battery. If not, the
battery may run out of power before the operation is complete.
CAUTION:
1. When inserting a CD, do not use force.
2. Make sure the CD is correctly inserted into the tray, and then close the tray.
3. Do not leave the CD tray open. Also, avoid touching the lens in the tray with your
hand. If the lens becomes dirty, the CD-ROM may malfunction.
4. Do not wipe the lens using materials with rough surface (such as paper towel).
Instead, use a cotton swab to gently wipe the lens.
FDA regulations require the following statement for all laser-based devices:
“Caution, Use of controls or adjustments or performance of procedures other than
those specified herein may result in hazardous radiation exposure.”
Connecting the CD/DVD Drive
Insert the expansion plug of CD/DVD drive into the expansion port
located on the right side of the Tablet PC.
Operating Your Tablet PC 2-15
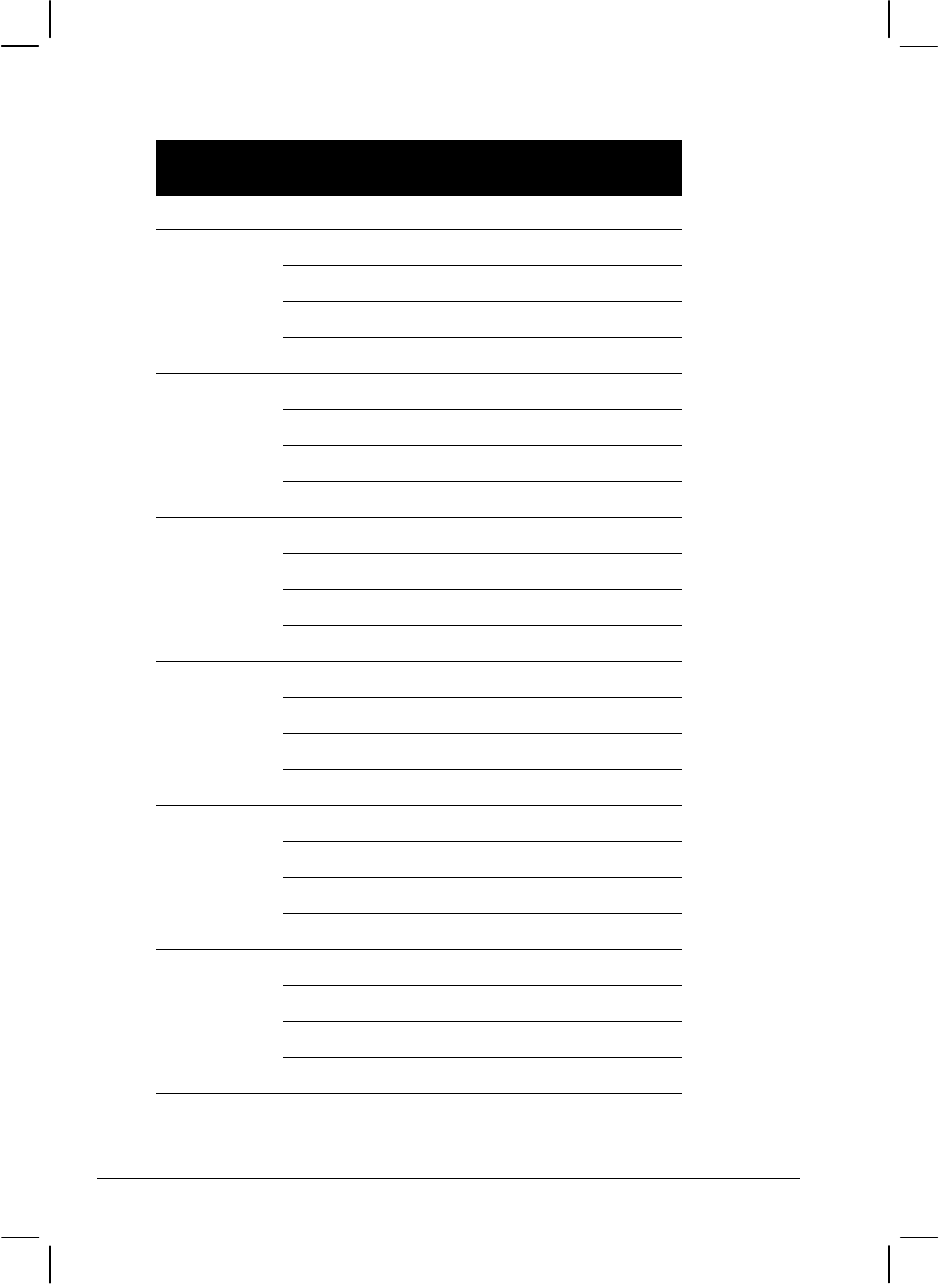
Inserting and Removing a CD
Follow this procedure to insert or remove a CD.
1. Turn on the computer.
2. Press the eject button and the CD tray will slide out partially. Gently
pull on it until it is fully extended.
3. To insert a CD, place down the CD in the tray with its label facing up.
Slightly press the center of the CD until it clicks into place.
To remove a CD, hold the CD by its outer edge and lift it up from the tray.
4. Gently push the tray back into the drive.

2-16 Operating Your Tablet PC
NOTE: In the unlikely event that you are unable to release the CD tray by pressing the
eject button, you can manually release the CD. (See “CD/DVD Drive Problems” in
Chapter 8.)

Operating Your Tablet PC 2-17
Using the Video Features
The video subsystem of your computer features:
! 10.4-inch TFT (Thin-Film Transistor) 18-bit color LCD display with
1024x768 XVGA (Extended Video Graphics Array) resolution.
! Simultaneous display on LCD and external monitor, which is useful
when you have a presentation as you can control the screen from your
computer and face the audience at the same time.
! Multi-display capability, which allows you to expand your desktop
on the screen to another display device so that you have more desktop
space to work on.
! Power Management.
Configuring the Display Modes
NOTE: To take advantage of the enhanced video capabilities, the video driver supplied
with your computer must be installed.
Your computer has been set to a default resolution and number of colors
before shipment. You can view and change display settings through your
operating system. See your operating system documentation or online
help for specific information.
For displaying in higher resolutions, you can connect an external CRT
monitor that supports higher resolutions. (See “Connecting a Monitor” in
Chapter 4 for more information.)
The following table lists the display modes supported by your computer.
2-18 Operating Your Tablet PC
Display Mode
LCD Only
CRT Only Simultaneous
Display
Resolution Colors
8-bit √ √ √
16-bit √ √ √
24-bit √ √ √
640x480
32-bit √ √ √
8-bit √ √ √
16-bit √ √ √
24-bit √ √ √
720x480
32-bit √ √ √
8-bit √ √ √
16-bit √ √ √
24-bit √ √ √
800x600
32-bit √ √ √
8-bit √ √ √
16-bit √ √ √
24-bit √ √ √
848x480
32-bit √ √ √
8-bit √ √ √
16-bit √ √ √
24-bit √ √ √
1024x768
32-bit √ √ √
8-bit √
16-bit √
24-bit √
1152x864
32-bit √

Operating Your Tablet PC 2-19
Display Mode
LCD Only
CRT Only Simultaneous
Display
8-bit √
16-bit √
1280x1024
24-bit √
8-bit √ 1600x1200
16-bit √
TABLE NOTE: 8-bit = 256 colors; 16-bit = High Color or 65,536 (64 K)
colors; 24 and 32-bit = True Color 16,770,000 (16 M) colors.
2-20 Operating Your Tablet PC
Using the Audio Features
NOTE:
! To take advantage of the enhanced audio capabilities, the audio driver supplied
with your computer must be installed.
! If you experience interference while recording, try lowering the microphone
recording volume.
The audio subsystem of your computer features:
! Digital audio and analog mixing functions required for recording and
playing sound on your computer
! SoundBlaster Pro, Adlib, and Microsoft Windows Sound System
support
! Volume control select (#)
! Volume adjust (increase or decrease) ($)
! Speaker (&)
! External audio connectors (')
Operating Your Tablet PC 2-21
Ways of playing and recording sound vary with the operating system
used. See your operating system documentation or online help for
specific information.
Connecting Audio Devices
For higher audio quality, you can send or receive sound through external
audio devices.
! Microphone Connector ( ) can be connected to an external
microphone for recording voice or sound.
! Audio Output Connector ( ) can be connected to the line-in
connector of powered speakers with built-in amplifiers, headphones,
or earphone set. This connector is compliant with S/PDIF
(Sony/Philips Digital Interface). You can connect audio equipment
with S/PDIF to the computer.
2-22 Operating Your Tablet PC
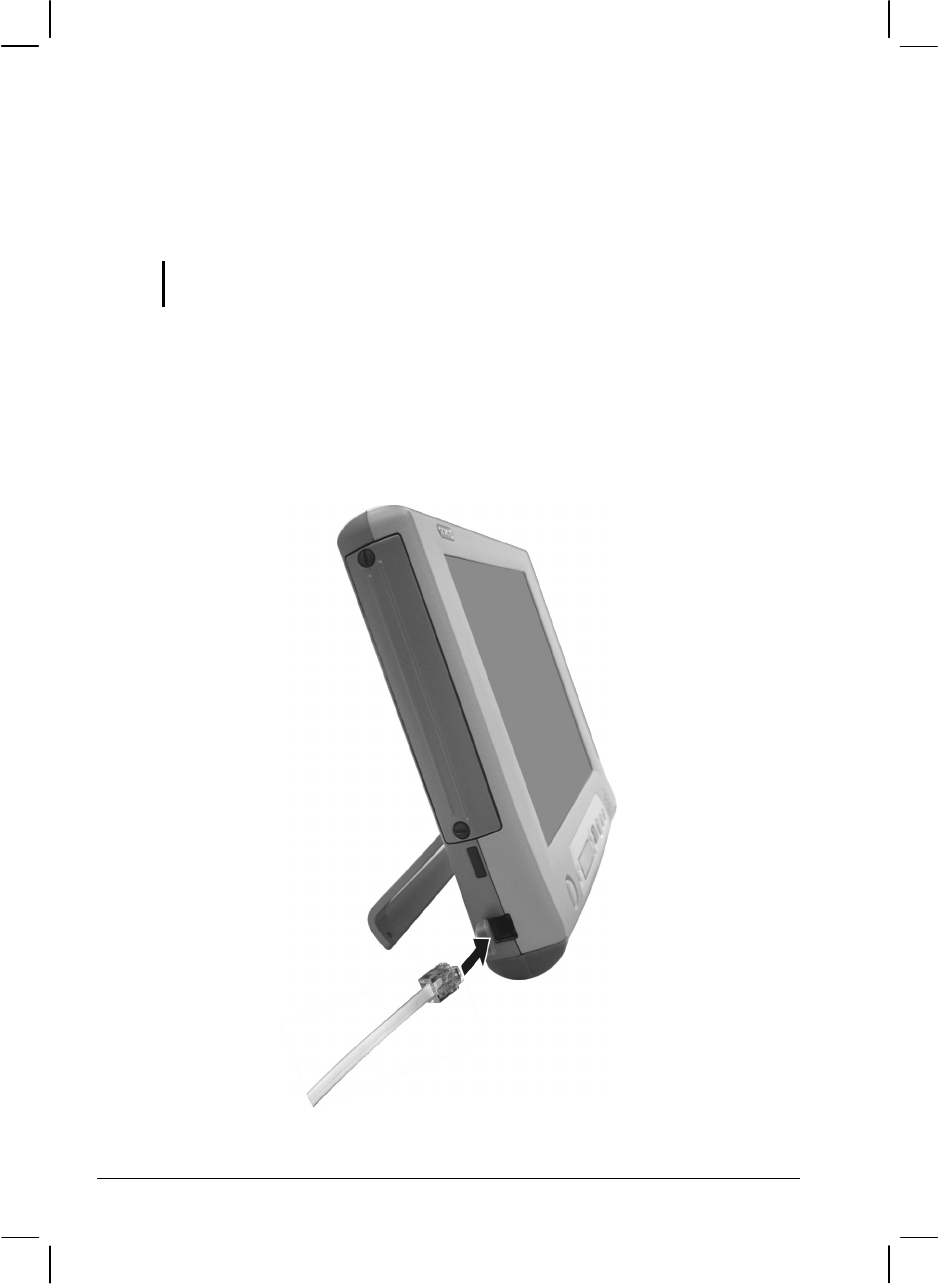
Using the Communication Features
Using the Modem
NOTE: To take advantage of the modem feature, the modem driver supplied with your
computer must be installed.
The internal 56 K fax/data modem allows you to use the telephone line to
communicate with others by fax, email, or connect to an online service or
bulletin board.
To connect the telephone line to the modem, connect the end nearest the
core on the modem cable to the computer’s RJ-11 connector and the other
end to the telephone line.

Operating Your Tablet PC 2-23
NOTE:
! When using communication software, you may have to disable power
management.
! Set the COM port of the modem to COM2.
! Set parameters such as modem speed (baud rate) and line type (pulse dialing or
tone dialing).
! Do not enter Standby when using communication software.