Getac Technology 101 Tablet PC User Manual Notebook
Getac Technology Corp. Tablet PC Notebook
Contents
users manual 4

CHAPTER 3
Managing Power
Your computer operates either on external AC power, car adapter, or
internal battery power.
This chapter tells you how you can effectively manage power. To
maintain optimal battery performance, it is important that you use the
battery in the proper way.
The topics in this chapter include:
! What is an AC or car adapter
! How to charge the battery pack
! When and how to initialize the battery pack
! How to check the battery level
! How to replace the battery pack
! What happens when the battery is low and what actions to take
! What is Power Management
! How to save power

3-2 Managing Power
AC and Car Adapter
CAUTION:
! The AC and car adapter is designed for use with your computer only. Connecting
the AC adapter to another device can damage the adapter.
! The AC power cord supplied with your computer is for use in the country where you
purchased your computer. If you plan to go overseas with the computer, consult
your dealer for the appropriate power cord.
! When you disconnect the AC adapter, disconnect from the electrical outlet first and
then from the computer. A reverse procedure may damage the AC adapter or
computer.
! When unplugging the connector, always hold the plug head. Never pull on the cord.
The AC adapter serves as a converter from AC (Alternating Current) to
DC (Direct Current) power because your computer runs on DC power,
but an electrical outlet usually provides AC power. It also charges the
battery pack when connected to AC power. The AC adapter operates on
any voltage in the range of 100 ~ 240 V AC.
The car adapter serves as a converter from car battery to DC power. The
cigarette lighter port of the car usually provides DC power. It also charges
the battery pack when connected. The car adapter operates on any voltage
in the range of 10.7 ~ 32 V DC.
NOTE: The battery pack cannot be charged when the input power of car adapter falls
below 11.5 V DC.

Managing Power 3-3
Battery Pack
The battery pack is the internal power source for the computer. It is
rechargeable using the AC or car adapter.
The operating time of a fully charged battery pack depends on how you
are using the computer. When your applications often access peripherals,
you will experience a shorter operating time.
NOTE: Located on the bottom-side of the Tablet PC is the CCD USB port that contains
a switch for turning off power coming from the internal primary battery. (Refer to
“Bottom-side Components” on chapter 1 for the actual location.)
CAUTION: Care and maintenance information for the battery is provided in Chapter 8.
In addition to this chapter, be sure to read the “Battery Pack Guidelines” section in
Chapter 8 as well.
Charging the Battery Pack
NOTE:
! Charging will not start if the battery’s temperature is below 0°C (32°F) or above
40°C (104°F).
! The charging process will stop and the Battery Charge Indicator flashes orange
when the battery’s temperature gets above 60°C (140°F). If this happens, the
battery pack may be damaged, please contact your dealer.
! During charging, do not disconnect the AC adapter before the battery has been fully
charged; otherwise you will get a prematurely charged battery.
To charge the battery pack, connect the AC adapter to the computer and
an electrical outlet. The Battery Charge Indicator ( or ) on the
Tablet PC’s Device Indicators appears to indicate that charging is in
progress. You are advised to keep the computer power off while the
battery is being charged. When the battery is fully charged, the Battery
Charge Indicator disappears.
It takes approximately 90 minutes to charge the battery pack to 80%
capacity and two or three more hours to fully charge the battery pack.
CAUTION: After the computer has been fully recharged, do not immediately disconnect
and reconnect the AC adapter to charge it again. Doing so may damage the battery.

3-4 Managing Power
Initializing the Battery Pack
You need to initialize a new battery pack before using it for the first time
or when the actual operating time of a battery pack is much less than
expected.
Initializing is the process of fully charging, discharging, and then
charging. It can take several hours.
1. Make sure the computer power is turned off. Connect the AC adapter
to fully charge the battery pack.
2. After the battery pack is fully charged, turn on the computer.
3. Disconnect the AC adapter and leave the computer on until the
battery is fully discharged. The computer will shut down
automatically.
4. Connect the AC adapter to fully charge the battery pack.
Checking the Battery Level
NOTE: Any battery level indication is an estimated result. The actual operating time can
be different from the estimated time, depending on how you are using the computer.
By Operating System
You can check the approximate battery level using the battery meter
function of the operating system. To read the battery level in Windows,
click the icon on the taskbar. (Click the icon if the computer is
using AC power.)

Managing Power 3-5
By Gas Gauge
The internal primary battery pack does not support the gas gauge display
on the battery itself, but on the exterior side of the secondary battery pack
(option) is a gas gauge for displaying the estimated battery charge. When
the secondary battery pack is not installed in the Tablet PC and you want
to know the battery charge, you can press the on/off switch with a pointed
device to see the corresponding value of indicator segment that light
green. The value of the corresponding green segment indicates the
relative percentage of the battery charge. The battery pack is fully
discharged when you see no segment glowing green.
Replacing the Secondary Battery Pack
CAUTION:
! There is danger of explosion if the battery is incorrectly replaced. Replace the
battery only with the computer manufacturer’s optional battery packs. Discard used
batteries according to the dealer’s instructions.
! Do not attempt to disassemble the battery pack.
If you often rely on battery power for a long period of time while
traveling, you may consider the purchase of an additional secondary
battery pack from your dealer and keep it with you in a fully charged state
as a backup.
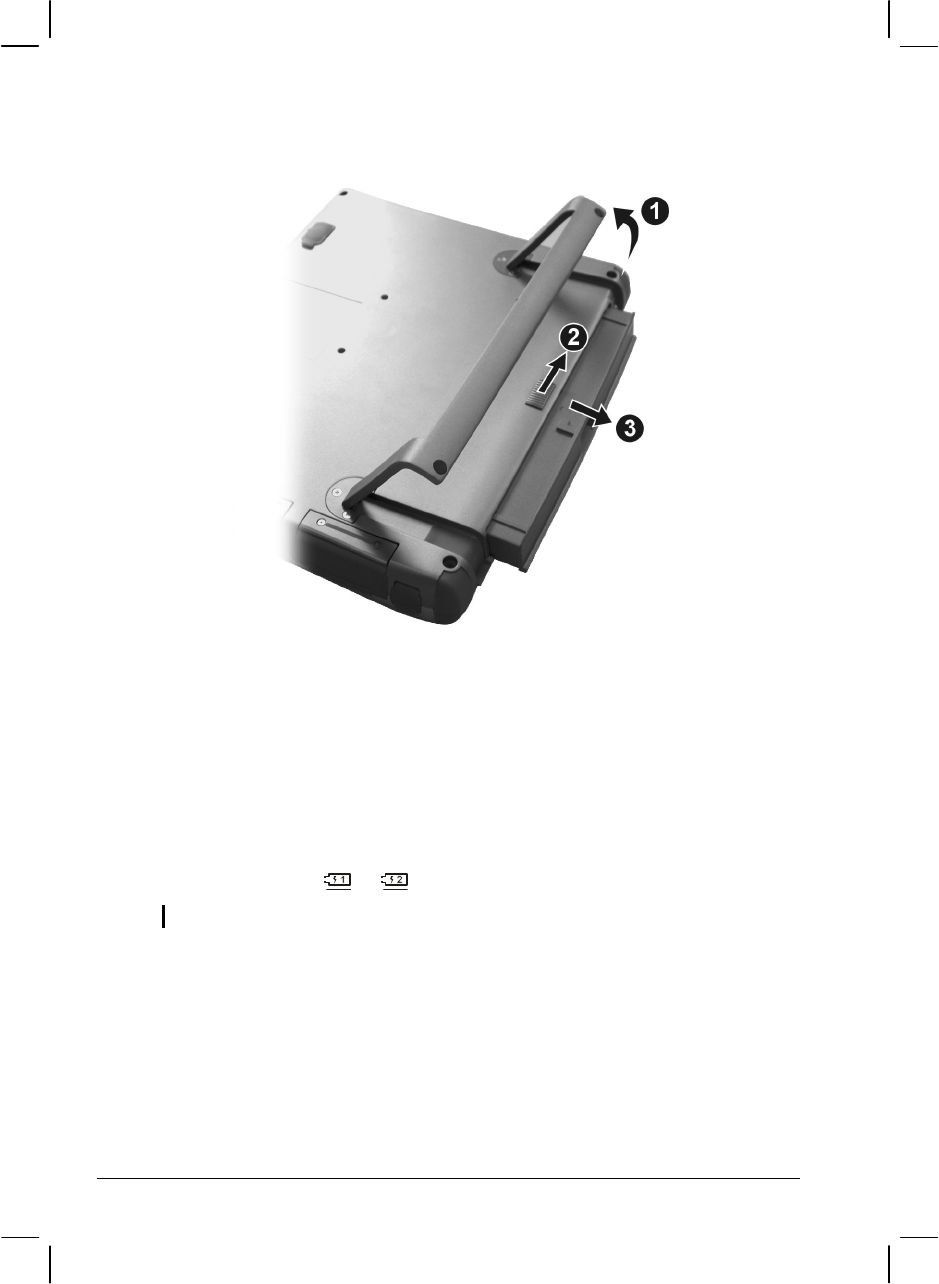
To replace the battery pack, follow these steps:
1. Make sure the computer is not turned on or connected to AC power.
However, the Tablet PC supports the battery hot-swap function,
providing you the ability to replace the battery even during system
on.
2. Carefully place the computer upside down.
3. Open the stand fully (#).
On/Off
Switch Device Indicator
Segment
3-6 Managing Power
4. Slide the release lever ($) to the right and pull the battery pack out of
its compartment (%) by using your thumb and index finger.
5. Insert the new battery pack into the compartment and slide the release
lever first to the right to accommodate it, then releasing it to the lock
position.
Battery Low Signals and Actions
Battery Low occurs when the battery has approximately 10% of its
charge remaining. The computer gives warning beeps and the Battery
Charge Indicator ( or ) blinks to alert you to take actions.
NOTE: You can set up your threshold and signals of Battery Low under Windows.
Immediately save your data upon Battery Low. The remaining operating
time depends on how you are using the computer. If you are using the
audio subsystem, PC Card, hard or floppy disk drives, the battery might
run out of charge very quickly.
Always respond to Battery Low by placing your computer on
suspend-to-disk, turning off the computer, or connecting the AC or car
adapter.

Managing Power 3-7
If you do not take any action and after two minutes’ of warning beeps, the
computer will automatically suspend-to-disk and turn off.
CAUTION:
! If the “Battery Low Warning Beep” item is disabled in the Setup Configuration Utility
(SCU) program, the computer will not beep.
! If you are using a flash PC Card, do not access the card during battery low periods.
This is because the access may take longer than the time it takes the battery to run
out of charge, thus making your access to the card unsuccessful.
! If you fail to save your data when the battery completely runs out of charge, then
you lose your data.

3-8 Managing Power
Power Management
Your computer supports APM (Advanced Power Management) and
ACPI (Advanced Configuration and Power Interface) for power
management. The power management feature allows you to reduce the
power consumption for energy saving.
With an ACPI-compliant operating system such as Windows 98 and
Windows 2000, power supply to different computer components is
controlled on an as-needed basis. This allows maximum power
conservation and performance at the same time.
In general, Windows’ power management works in this way:
What… When…
Power to the hard disk is turned off When the hard disk has been idle for a
set period.
Power to the display is turned off When the display has been idle for a
set period.
The computer enters Standby mode.
The hard disk and display are turned
off and the entire system consumes
less power.
When the entire system has been idle
for a set period.
The computer enters Suspend mode.
(See the next subsection for more
information.)
When you press the power button .
*
* depends on your settings in Windows.
For detailed information on power management, see Windows’ Help.
Suspend-to-Disk (Suspend mode)
NOTE: If your operating system does not support ACPI, you can use the computer’s
“Suspend-to-Disk” function, which is equivalent to Windows’ Hibernation function. (See
“Power Menu” in Chapter 5 for more information.)

Managing Power 3-9
Manual Power Management
You can manually initiate Suspend-to-disk mode at any time in one of
two ways:
! Use the O/S that supports the Suspend function.
! Press down the power button and release it in less than 4 seconds
with the system on. Repeat the action to wake up the system under
Suspend mode.
NOTE:
1. The suspend-to-disk partition may not exist on your hard disk. Check with your
dealer to know if it exists. If there is no suspend-to-disk partition, you cannot use
the Suspend-to-disk feature.
2. The OVMAKFIL utility allows you to create the suspend-to-disk partition. (Refer to
section on “OVMAKFIL Utility” for information.)
Suspend-to-disk is a very useful feature. People frequently open many
applications when they use computers. It takes some time to get all these
applications open and running, and normally they all have to be closed
before the system can be turned off.
When you use the Suspend-to-disk feature, you do not have to close the
applications. The computer stores the state of your computer to a file on
the hard disk and then shut down. The next time you turn on your
computer, you return to exactly where you left off.

3-10 Managing Power
Power-Saving Tips
In addition to your computer’s automatic power management, you can do
your part to maximize the battery’s operating time by following these
suggestions.
! Do not disable Power Management.
! Decrease the LCD brightness to the lowest comfortable level.
! Disable the parallel and serial ports if no devices are connected to
these ports. (See “Advanced Menu” in Chapter 5.)
! If you work with an application that uses the serial port or a PC Card,
exit the application when you finish using it.
! If you have a PC Card installed, remove it when not in use. Some PC
Cards drain power even while they are inactive.
! Turn off the computer when you are not using it.