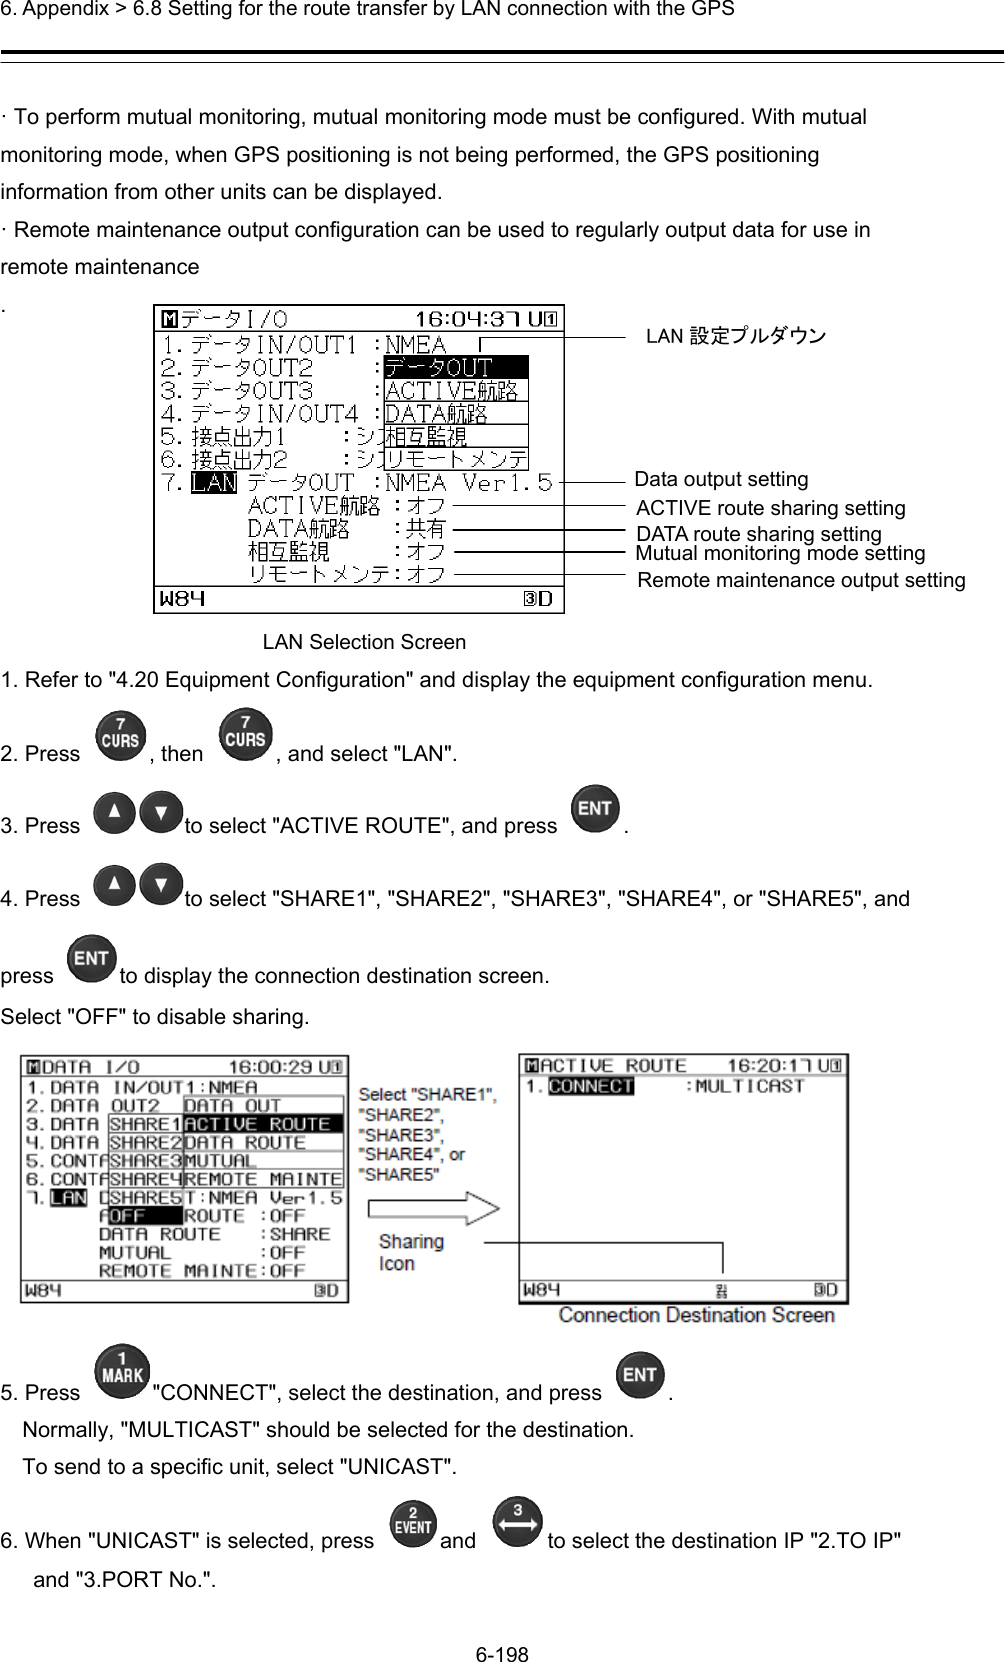
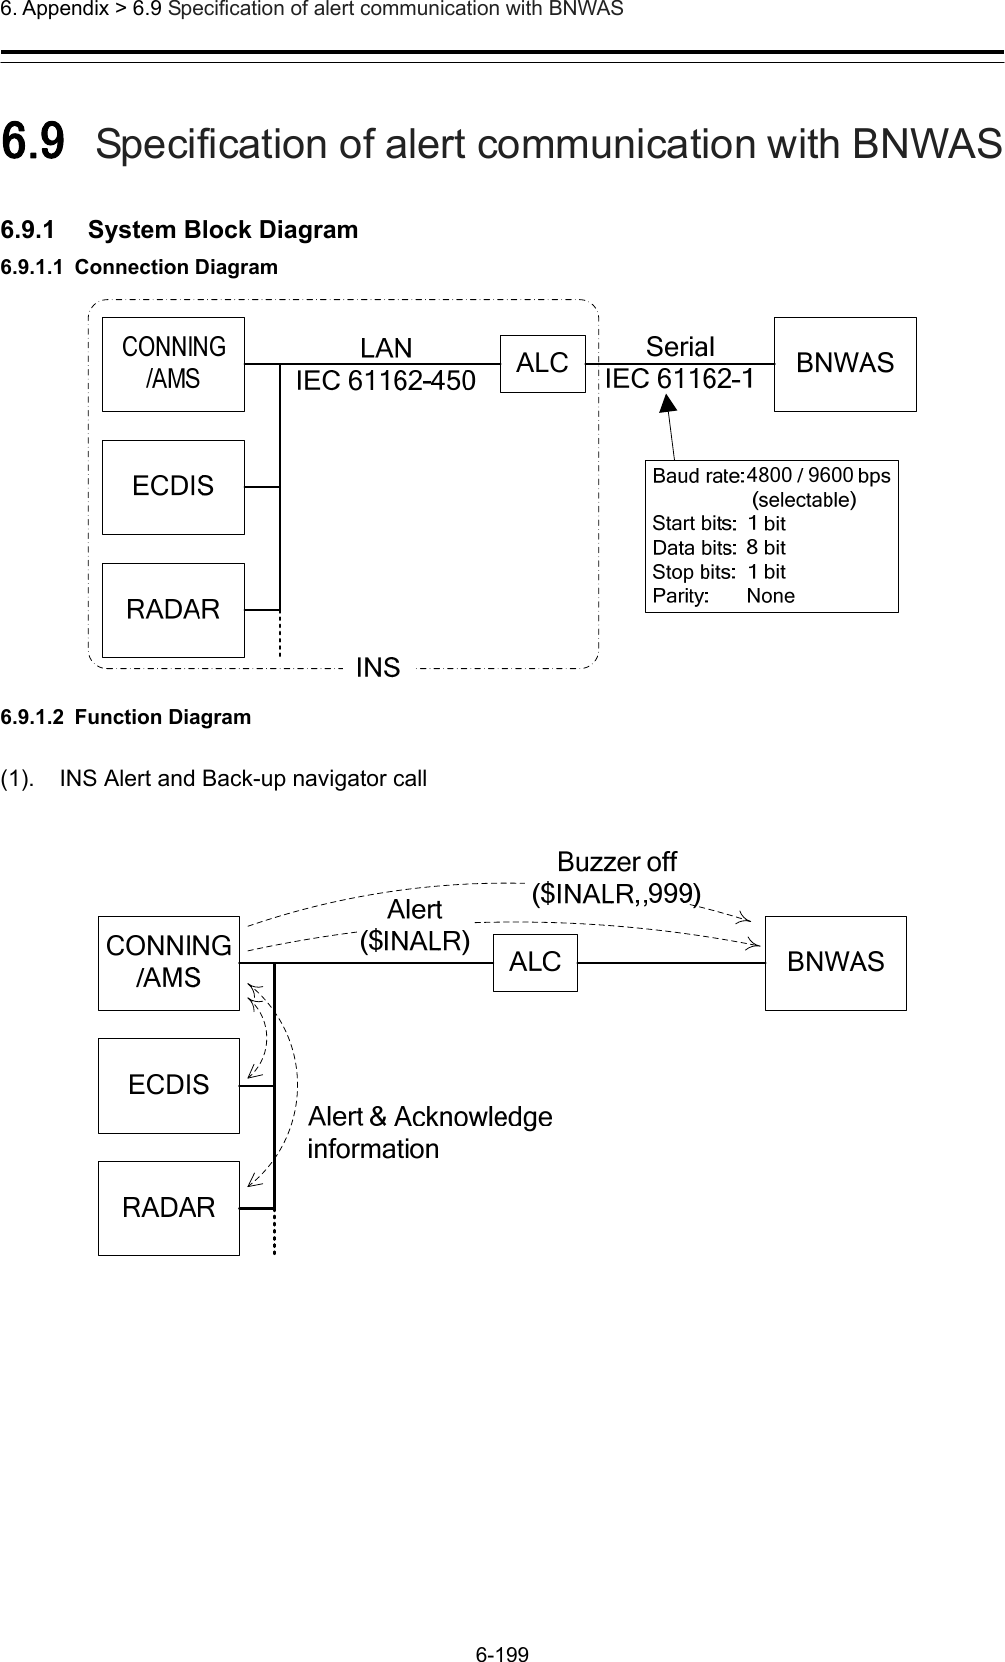
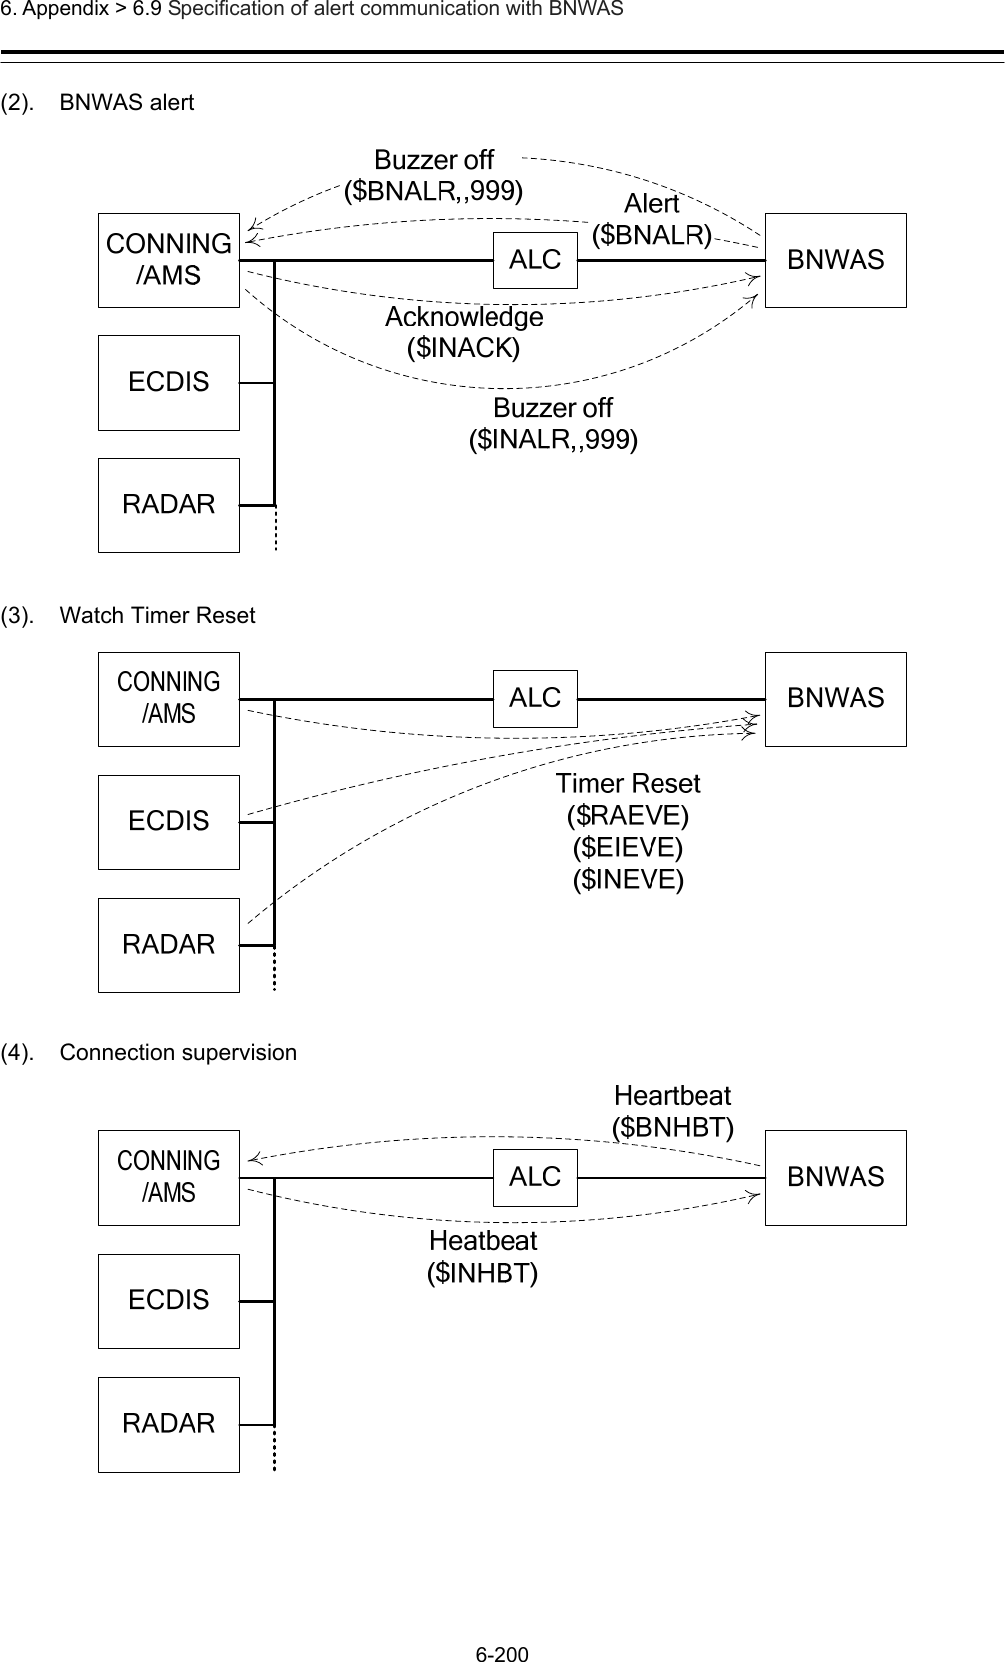
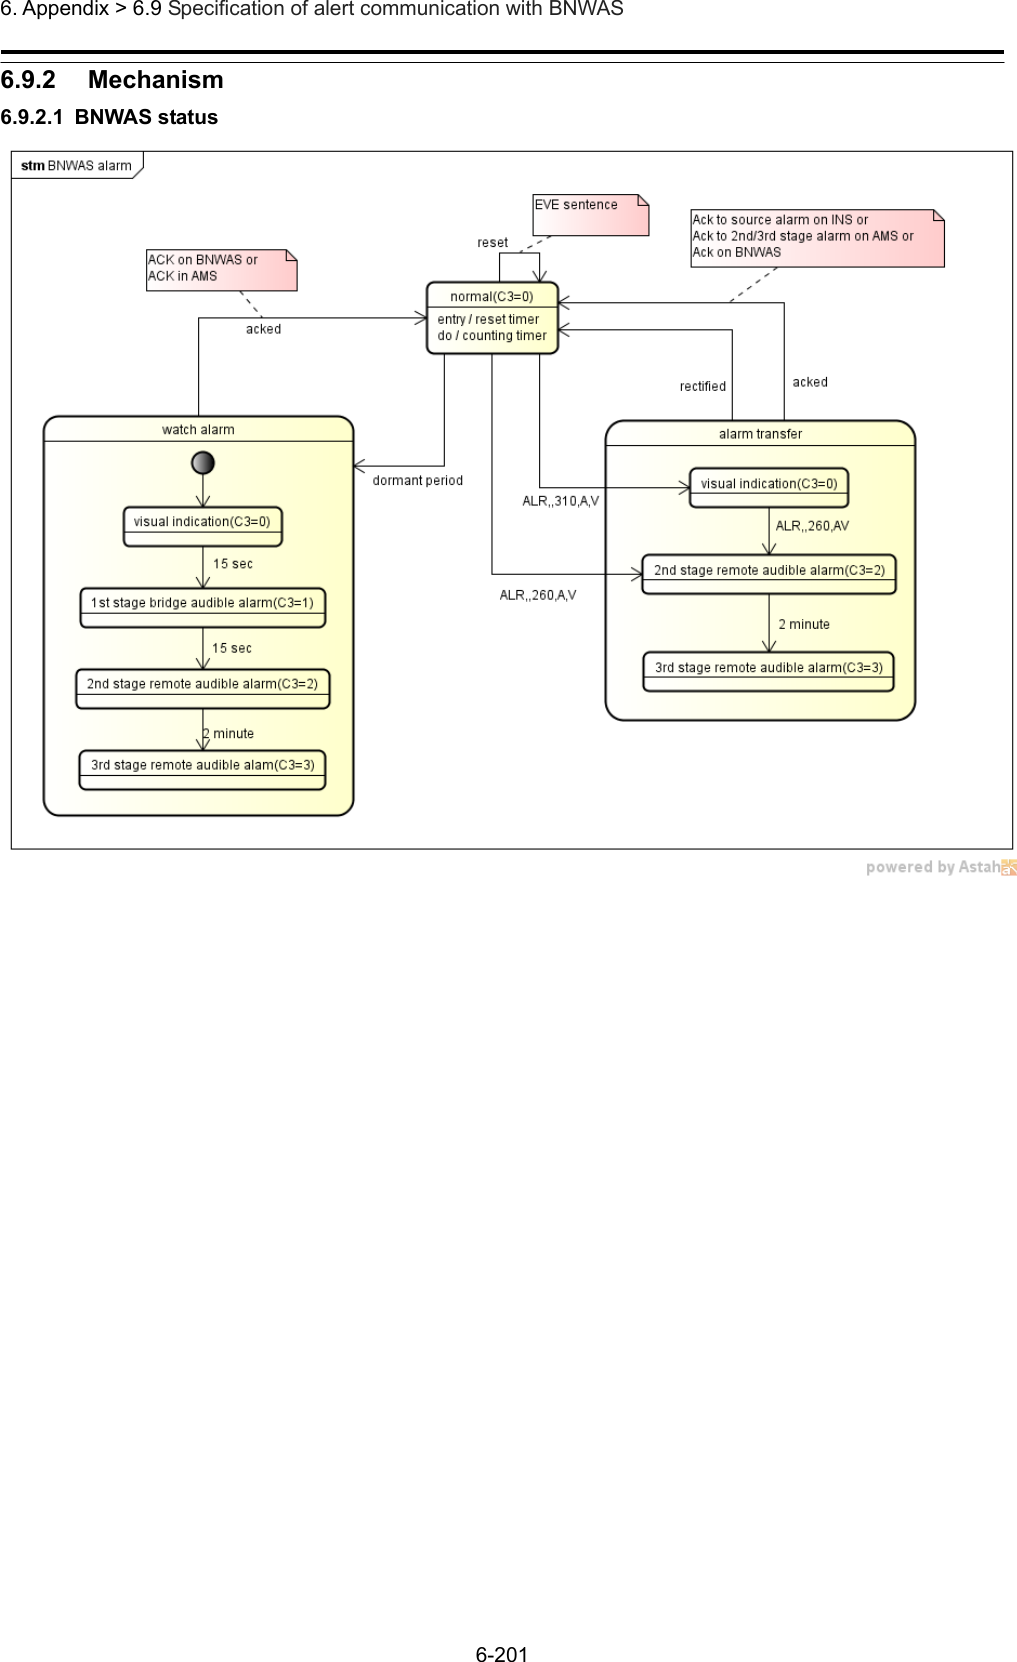
Japan Radio NKE2632 Solid State S-Band Marine Radar User Manual Installation Manual Part 11
Japan Radio Co Ltd. Solid State S-Band Marine Radar Installation Manual Part 11
Contents
- 1. Installation Manual Part 1
- 2. Installation Manual Part 2
- 3. Installation Manual Part 3
- 4. Installation Manual Part 4
- 5. Installation Manual Part 5
- 6. Installation Manual Part 6
- 7. Installation Manual Part 7
- 8. Installation Manual Part 8
- 9. Installation Manual Part 9
- 10. Installation Manual Part 10
- 11. Installation Manual Part 11
- 12. Instruction Manual Operation Part 1
- 13. Instruction Manual Operation Part 2
- 14. Instruction Manual Operation Part 3
- 15. Instruction Manual Operation Part 4
- 16. Instruction Manual Funtion Part 1
- 17. Instruction Manual Funtion Part 2
- 18. Instruction Manual Funtion Part 3
- 19. Instruction Manual Funtion Part 4
- 20. Instruction Manual Funtion Part 5
- 21. Instruction Manual Funtion Part 6
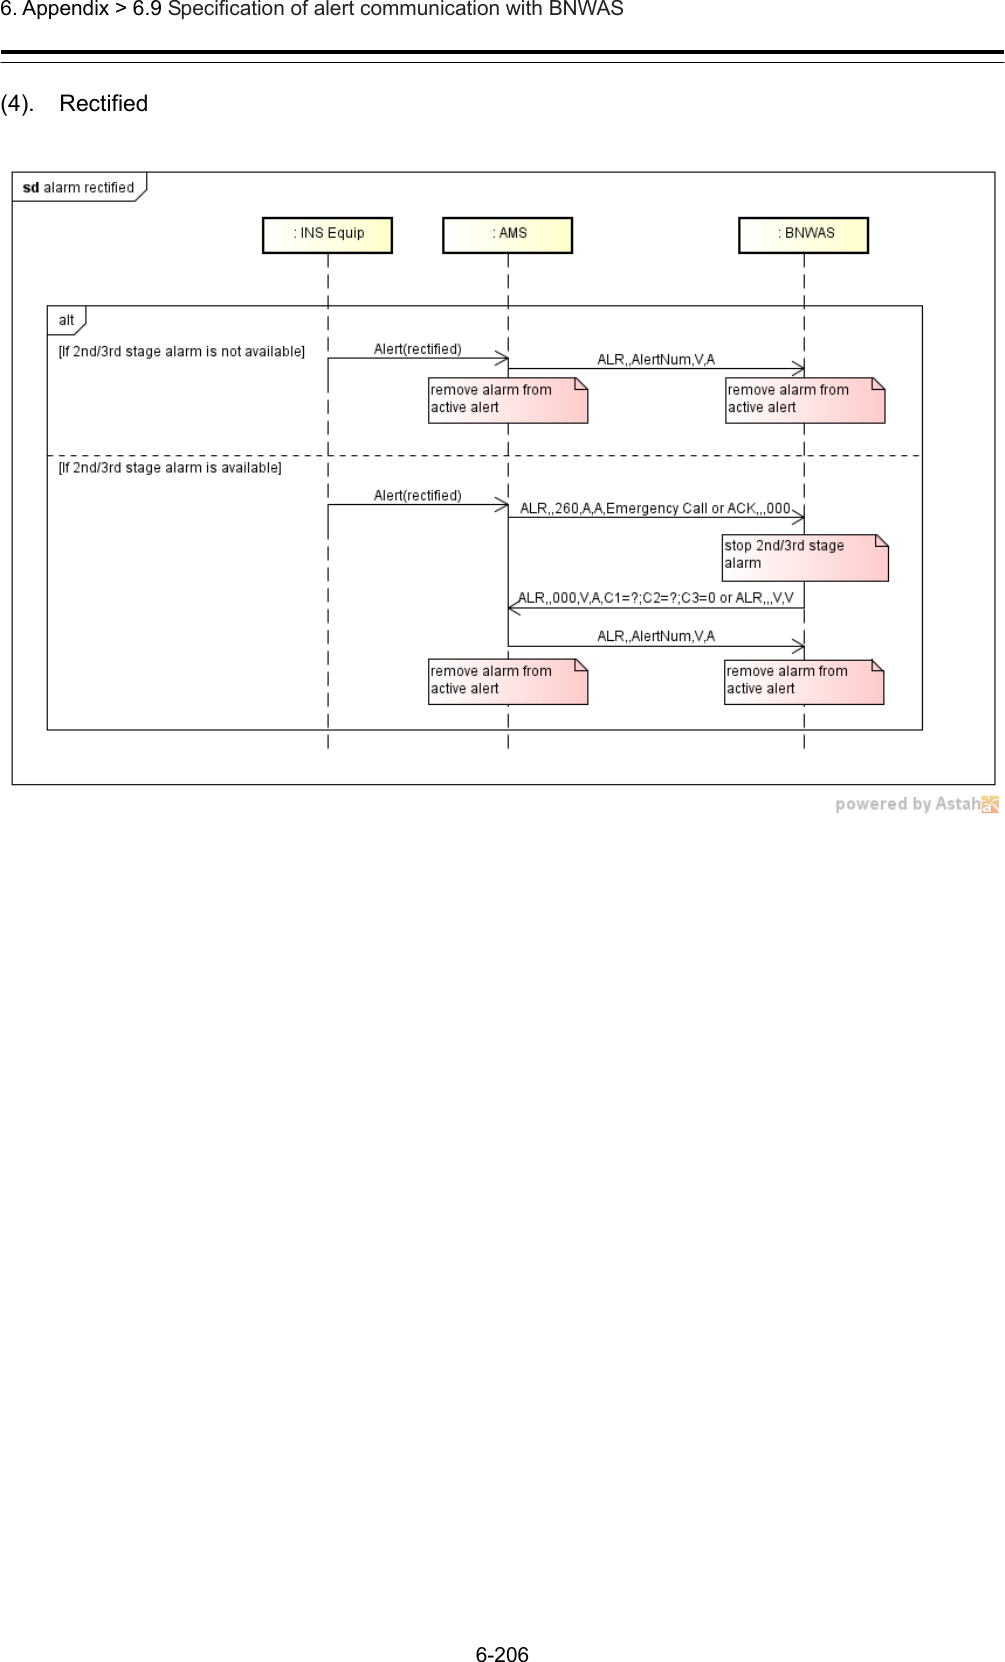
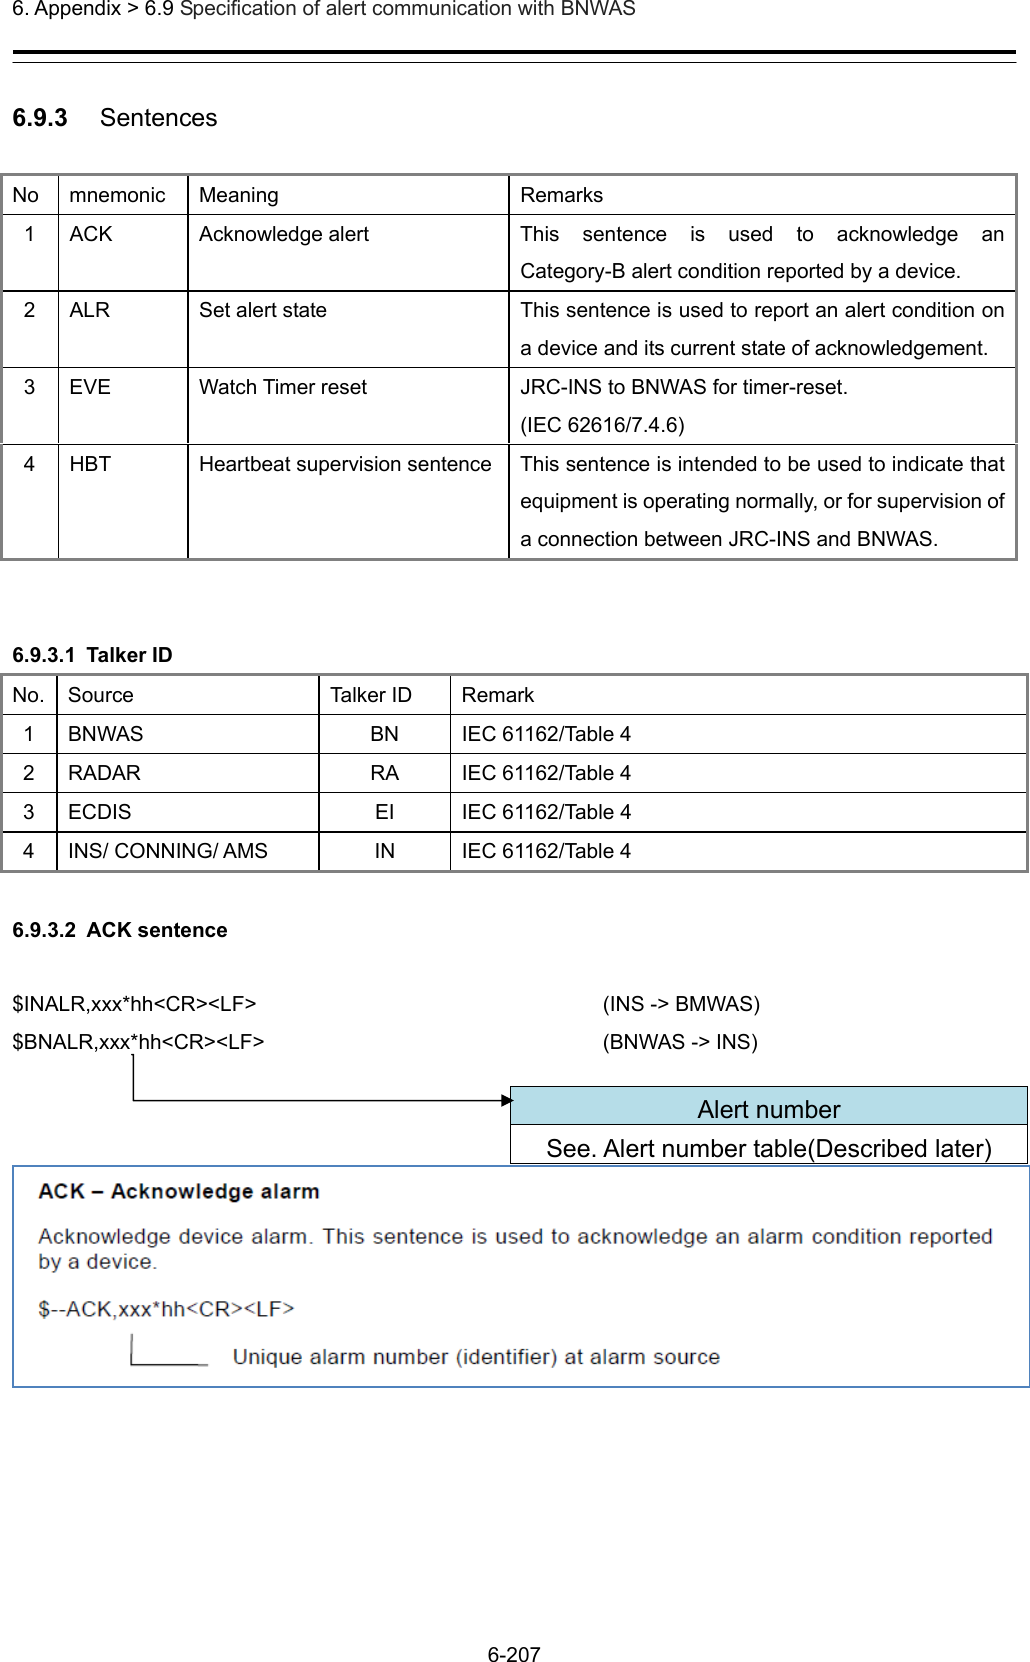
Installation Manual Part 11
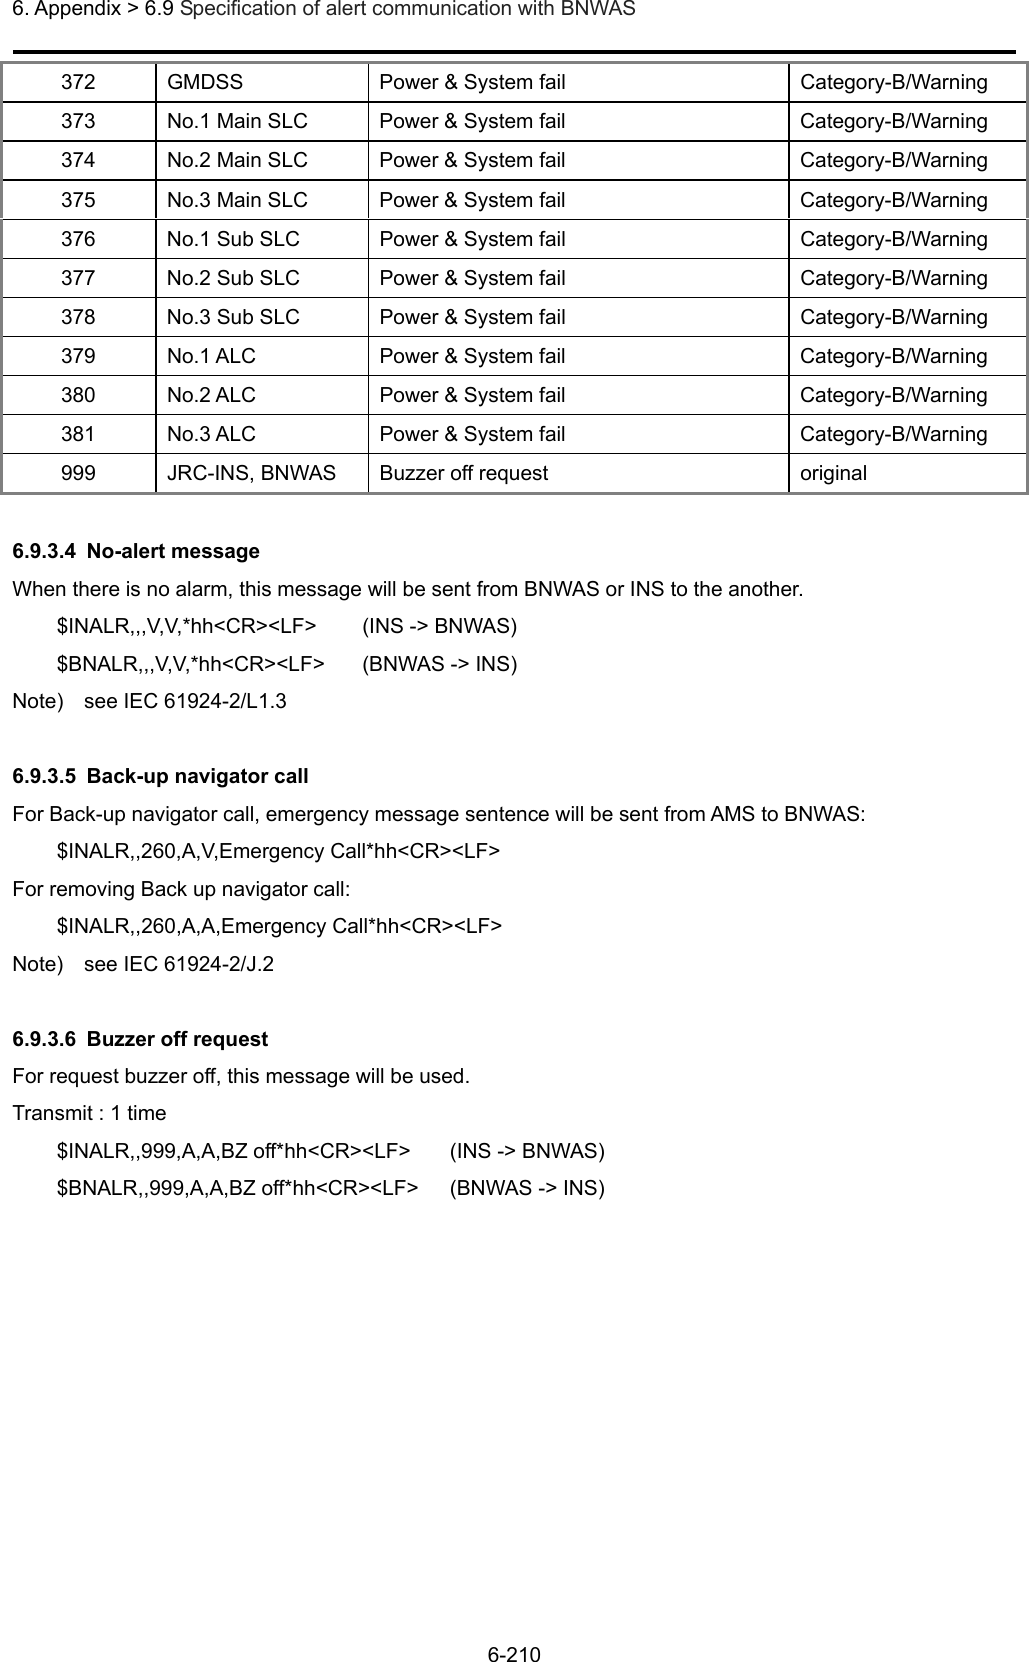
![6. Appendix > 6.6 Scanner Unit Interconnection Unit 6-176 6.6.13 NKE-1632 258396RF_ANTPM_OUTPERFORMANCE MONITOR ANTENNARED.TBLK.T 3.MV1.MU2.NC4.NC1.+12V2.GNDWHT.TU1V1UTHUVU1V1UTHUV2.NC4.NC1.S12.S23.S34.S45.S56.S63.M21.M15.M3MOTORB1011.+12V1.MNT-RX-P2.MNT-TX-P3.MNT-RX-N4.MNT-TX-N5.MNTEFAN1.+32V2.GND1. +32V2. GNDB2PS-VH1. +3.3V2. GND+3.3VGND2.RTNJ5105J5203J5201J5301J5901TB102OGM-300NE-6P-04CJ3505J2901J2902DATA I/FCPU JTAGFPGA JTAGJ29031.VD+2.VD-3.GND4.BP5.BZ6.GND7.TIY8.MTR_TRX-9.TIY_RTN10.MTR_TRX+11.GND12.GND13.MNT_TX+14.GND15.MNT_TX-16.PHZ17.GND18.PHA19.MNT_RX-20.PHB21.MNT_RX+22.GND23.GND24.MOT_TRX-25.C226.MOT_TRX+27.GND28.GND29.FAN_CNT030.PS_STATUS1.VD2.GND3.GND4.BP5.BZ6.GND7.TIY8.MTR_TRX-9.TIY_RTN10.MTR_TRX+11.GND12.GND13.MNT_TX+14.GND15.MNT_TX-16.PHZ17.GND18.PHA19.MNT_RX-20.PHB21.MNT_RX+22.GND23.GND24.MOT_TRX-25.C226.MOT_TRX+27.GND28.GND29.FAN_CNT030.PS_STATUSJ2501PV-3-TJ2502PV-3-TJ2503DF20F-30DP-1H(59)DF20F-30DP-1H(59)1.VD+2.VD-3.TRIG+4.TRIG-5.BP+6.BP-7.BZ+8.BZ-9.MTR+10.MTR-11.MTRG12. NC13. DC48V+TB101231-344/001-000 [WAGO]DF3A- 5P-2DSA3.MOT_TRX+4.MOT_TRX-5.GNDJ1501B4P-VH(LF,SN)J150553426-0510(L angle)J1504B3P-VH(LF,SN) B3P5-VH(LF,SN)J1503B06BOXASK-1(LF,SN)J1301P1301J4301P4301P3104P3102P3505P5301P5201 P2501P2502P5105P1505SC02B-J42SK-GHXPR SC02B-J42SK-GHXPRP1501P1504S2B-XH-A14. DC48VGJ3102P0B-R-35J3104P0B-R-35W2047ZCRD1669*W1037ZCRD1668* W2037ZCRD1675W1027ZCRD1667*W2017ZCRD1676*W2027ZCRD1677*W1047ZCRD1671*W17ZCRD1680*W302W3017ZCRD1692*W3037ZCRD1694*W1017ZCRD1673*W5017ZCRD1674*W4017ZCRD1682*J1502“*” means revision of the specfication document.7ZCRD1693*RED.TBLK.TRED.TRED.TWHT.T(TRANSDUCER)(ROTARY JOINT)(N type connector)](https://usermanual.wiki/Japan-Radio/NKE2632.Installation-Manual-Part-11/User-Guide-2791044-Page-1.png)
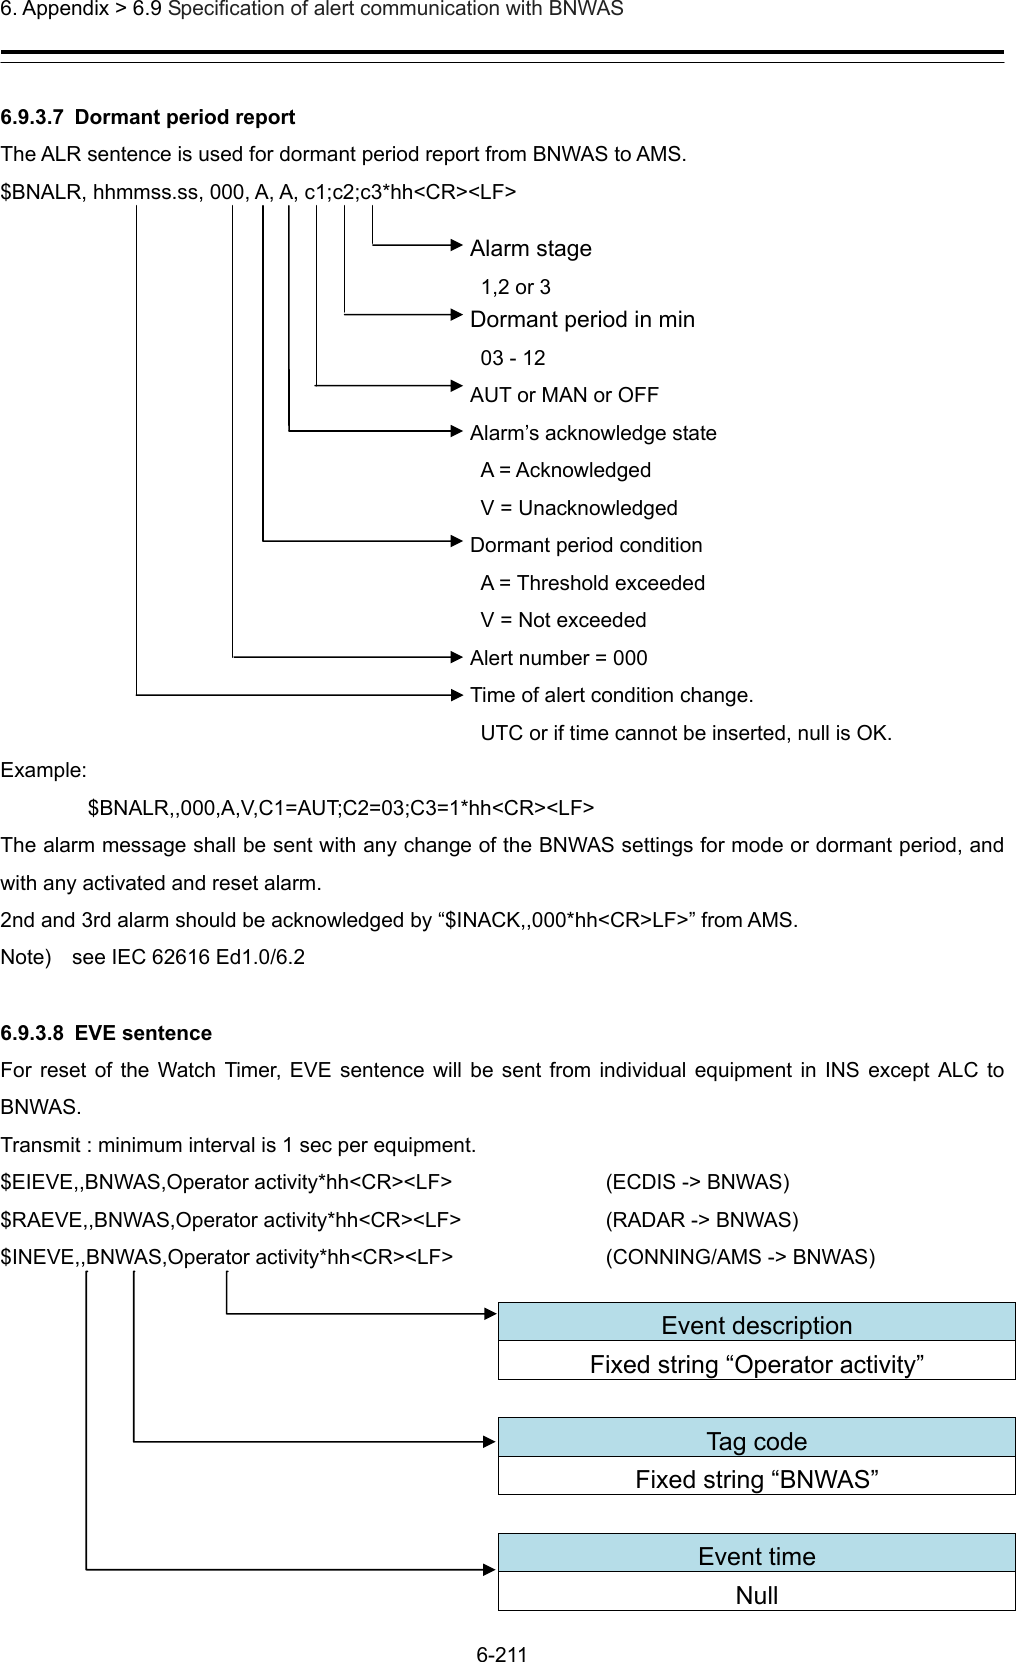
![6. Appendix > 6.6 Scanner Unit Interconnection Unit 6-177 6.6.14 NKE-2632/2632-H 258396REDBLKWHTBLUBLK(SHIELD)1.+12V2.C21.+12V2.RTN1.+12V2.RTN3.PHA4.PHB5.PHZ6.GNDIF_OUT(Rx)RF_ANTPM_OUTIF_IN(Tx)PERFORMANCE MONITOR ANTENNARED.TBLK.T1.R13.R22.NC3.MV1.MU2.NC4.NC1.+12V2.GNDWHT.TU1V1UTHUVU1V1UTHUV2.NC4.NC1.S12.S23.S34.S45.S56.S63.M21.M15.M3MOTORB1011.+12V1.MNT-RX-P2.MNT-TX-P3.MNT-RX-N4.MNT-TX-N5.MNTEFAN1.+32V2.GND1. +32V2. GNDB2PS-VH1. +3.3V2. GND+3.3VGND2.RTNJ5105J5101J5102J5203J5201J5103J5301J5901TB102OGM-300NE-6P-04CJ320127DP-LR-PS-1J320327DP-LR-PS-1J3206DF20F-10DP-1H(59)J3505J2901J2902DATA I/FCPU JTAGFPGA JTAGJ29031.VD+2.VD-3.GND4.BP5.BZ6.GND7.TIY8.MTR_TRX-9.TIY_RTN10.MTR_TRX+11.GND12.GND13.MNT_TX+14.GND15.MNT_TX-16.PHZ17.GND18.PHA19.MNT_RX-20.PHB21.MNT_RX+22.GND23.GND24.MOT_TRX-25.C226.MOT_TRX+27.GND28.GND29.FAN_CNT030.PS_STATUS1.VD2.GND3.GND4.BP5.BZ6.GND7.TIY8.MTR_TRX-9.TIY_RTN10.MTR_TRX+11.GND12.GND13.MNT_TX+14.GND15.MNT_TX-16.PHZ17.GND18.PHA19.MNT_RX-20.PHB21.MNT_RX+22.GND23.GND24.MOT_TRX-25.C226.MOT_TRX+27.GND28.GND29.FAN_CNT030.PS_STATUS1.GND2.RF_STC3.NC4.LO_MODE5.GND6.RF_GATE7.GND8.PM_MODE9.GND10.TX_MONIJ2303DF20F-10DP-1H(59)J2501PV-3-TJ2502PV-3-TJ2503DF20F-30DP-1H(59)J230127DP-LR-PS-1J230227DP-LR-PS-1IF_OUT(Tx)IF_IN(Rx)1.GND2.RF_STC3.NC4.LO_MODE5.GND6.RF_GATE7.GND8.PM_MODE9.GND10.TX_MONI3.MOT_TRX+4.MOT_TRX-5.GNDDF20F-30DP-1H(59)1.VD+2.VD-3.TRIG+4.TRIG-5.BP+6.BP-7.BZ+8.BZ-9.MTR+10.MTR-11.MTRG12. NC13. DC48V+TB101231-344/001-000 [WAGO]DF3A-5P-2DSADF3A-6P-2DS(01)3.MOT_TRX+4.MOT_TRX-5.GND53426-021053426-0510J1501B4P-VH(LF,SN)J150553426-0510(L angle)J1504B3P-VH(LF,SN)B3P5-VH(LF,SN)J1503B06BOXASK-1(LF,SN)J1301P1301J4301P4301P3206P2303P2302P2301P3201P3203P3104P3102P3505P5301P5203P2503P5201P2501P2502P5101P5102P5103P5105P1505SC02B-J42SK-GHXPRSC02B-J42SK-GHXPRP1501P1504S2B-XH-A14. DC48VGJ3102P0B-R-35J3104P0B-R-35W2047ZCRD1669*W1037ZCRD1668*W2037ZCRD1675W1027ZCRD1667*W2017ZCRD1676*W2027ZCRD1677*W1047ZCRD1671*W17ZCRD1680*W302W3017ZCRD1678*W3037ZCRD1670*W1017ZCRD1673*W5017ZCRD1674*W4017ZCRD1682*J1502Normal:7ZCRD1679*HS :7ZCRD1706*RED.TBLK.TRED.TRED.TWHT.T(TRANSDUCER)(ROTARY JOINT)(N type connector)YEL“*” means revision of the specfication document.](https://usermanual.wiki/Japan-Radio/NKE2632.Installation-Manual-Part-11/User-Guide-2791044-Page-2.png)

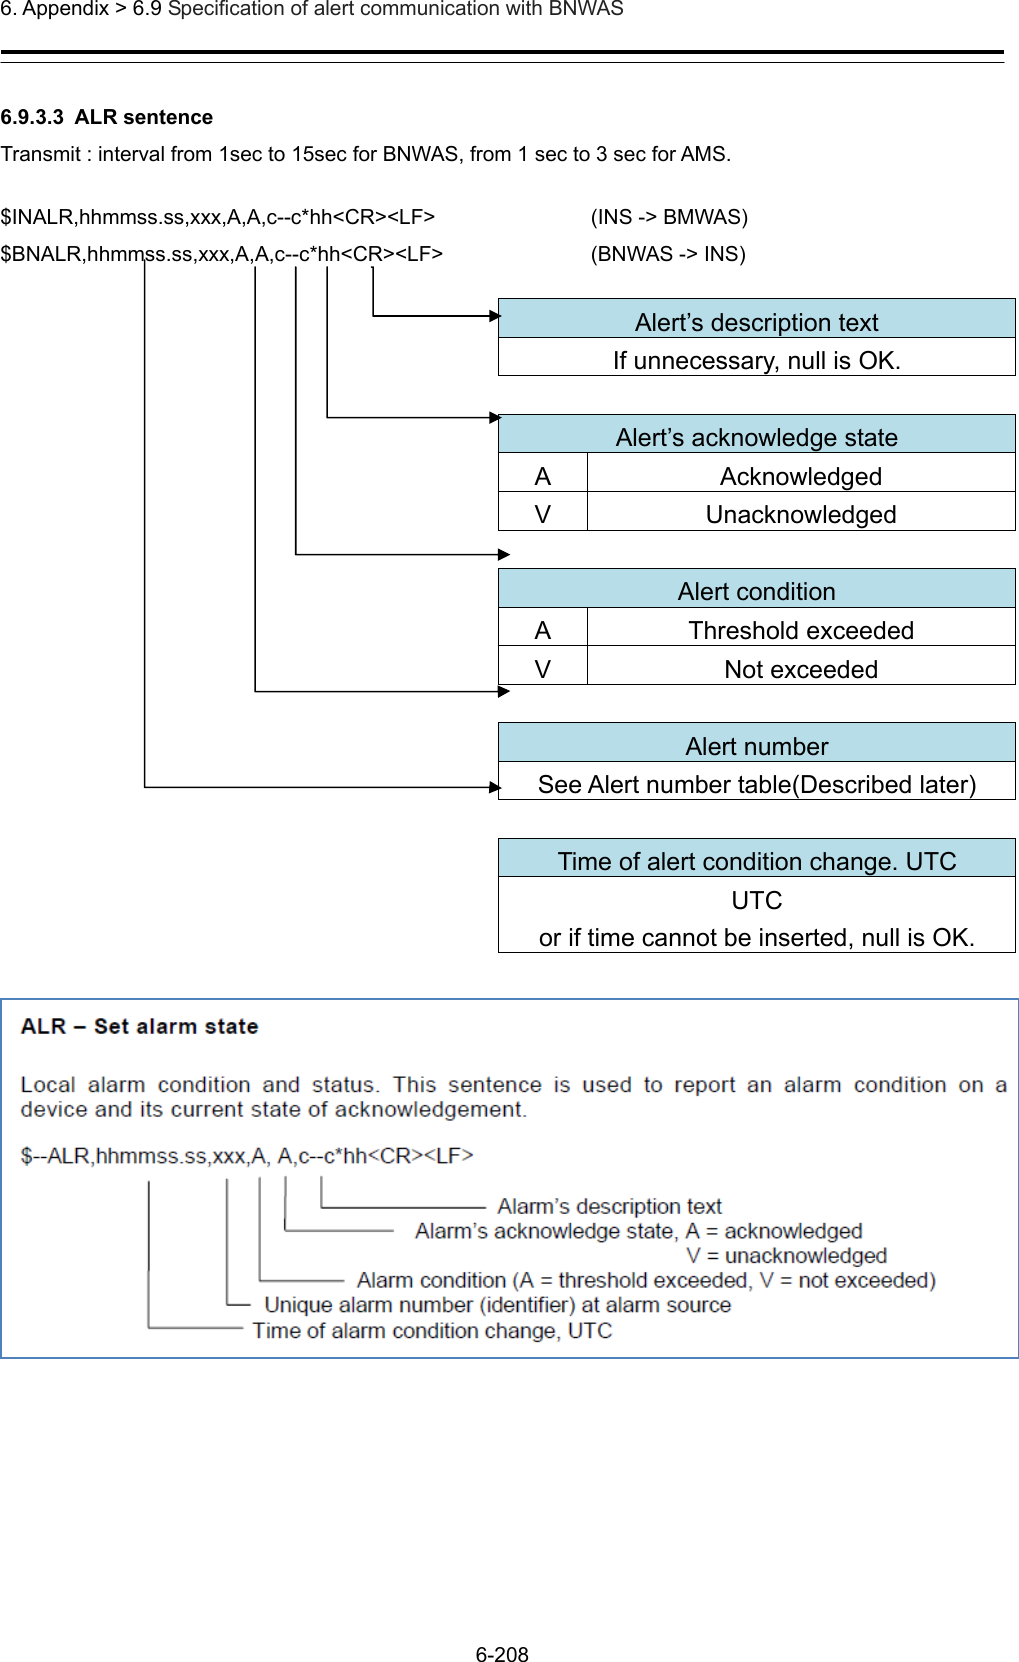
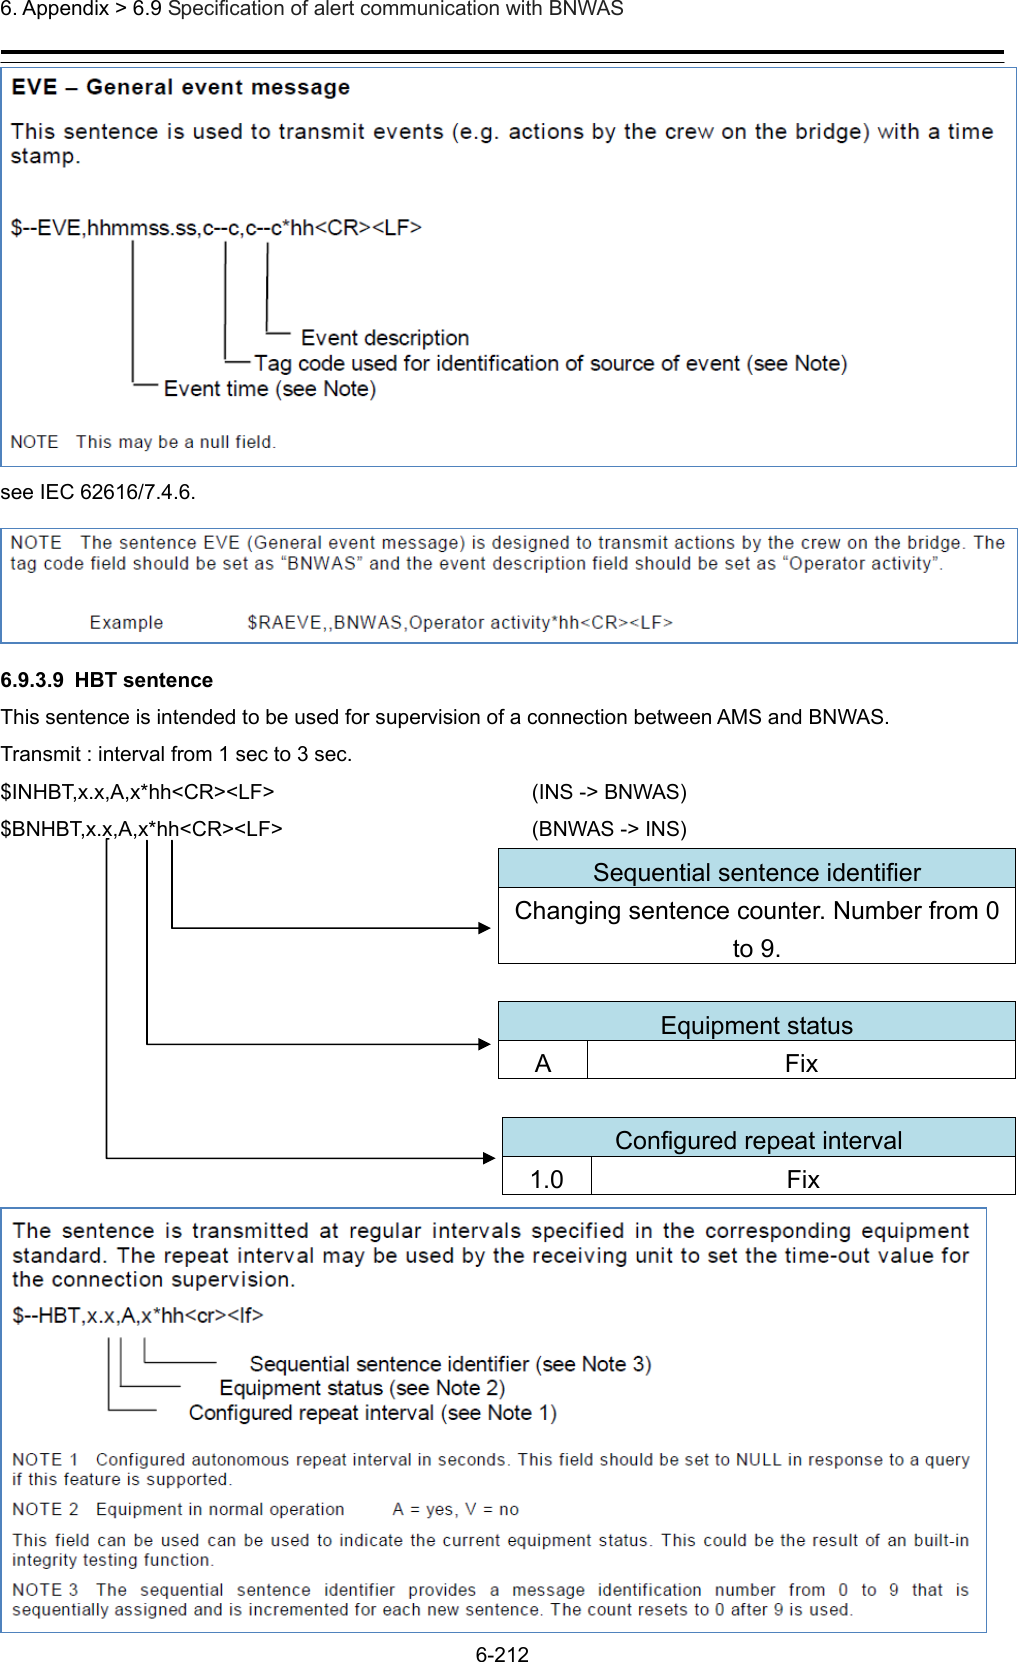
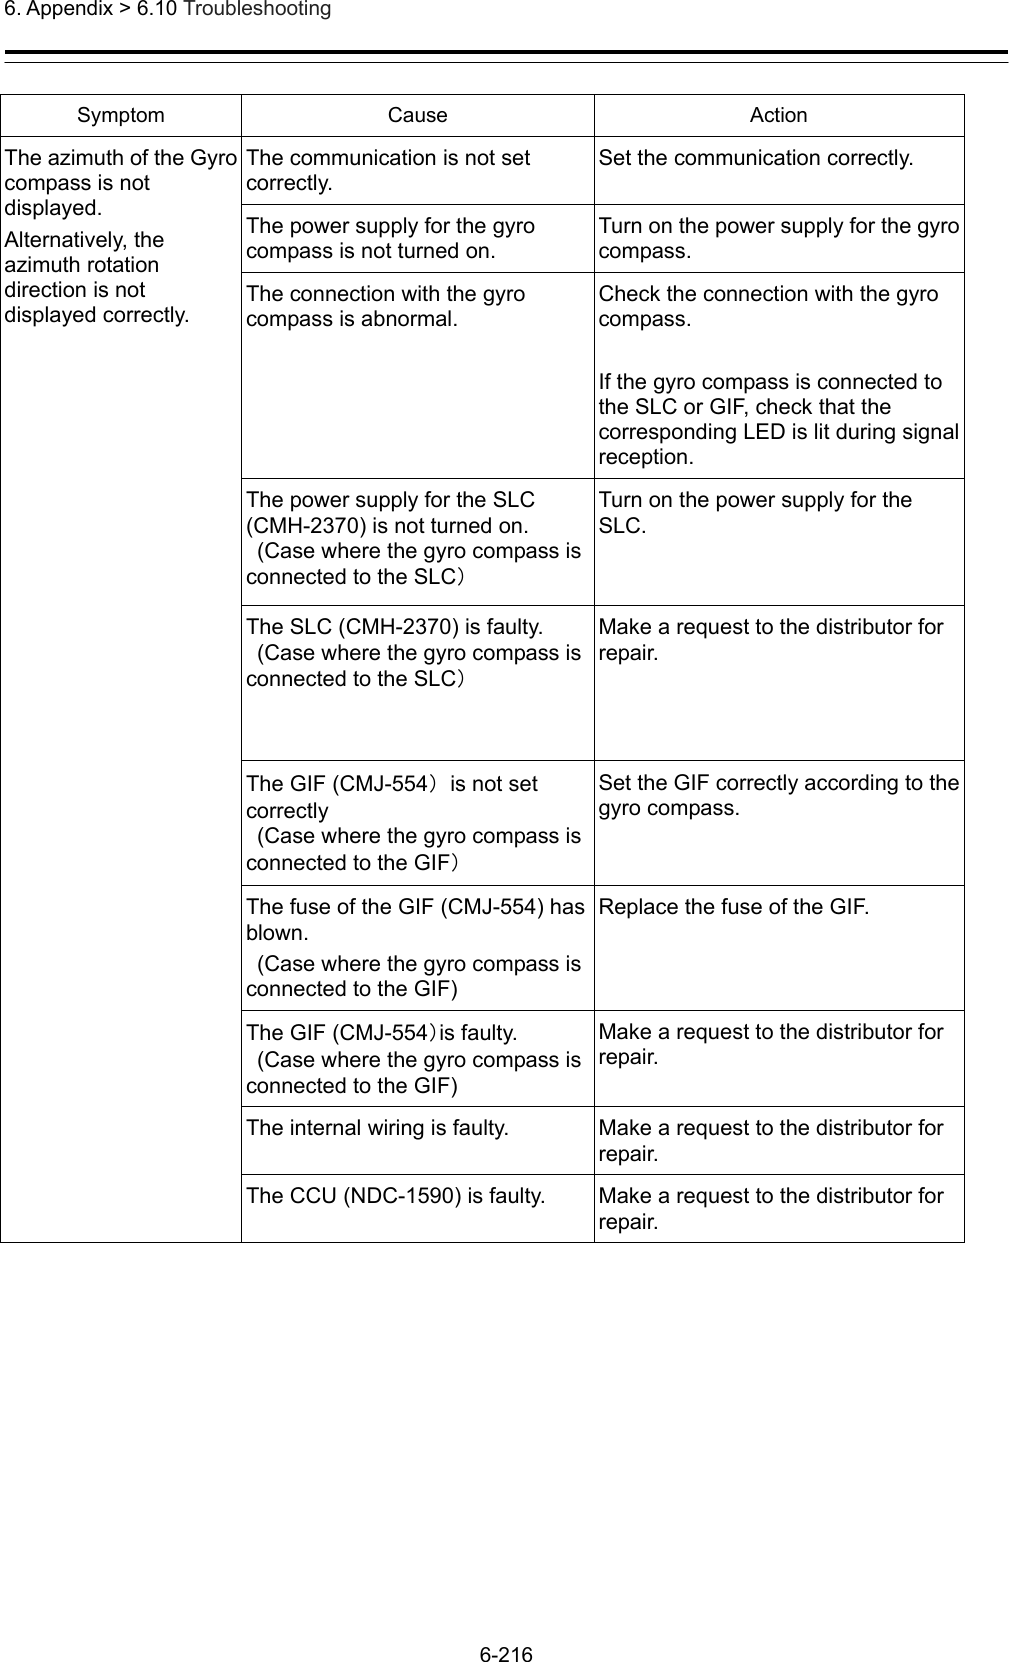
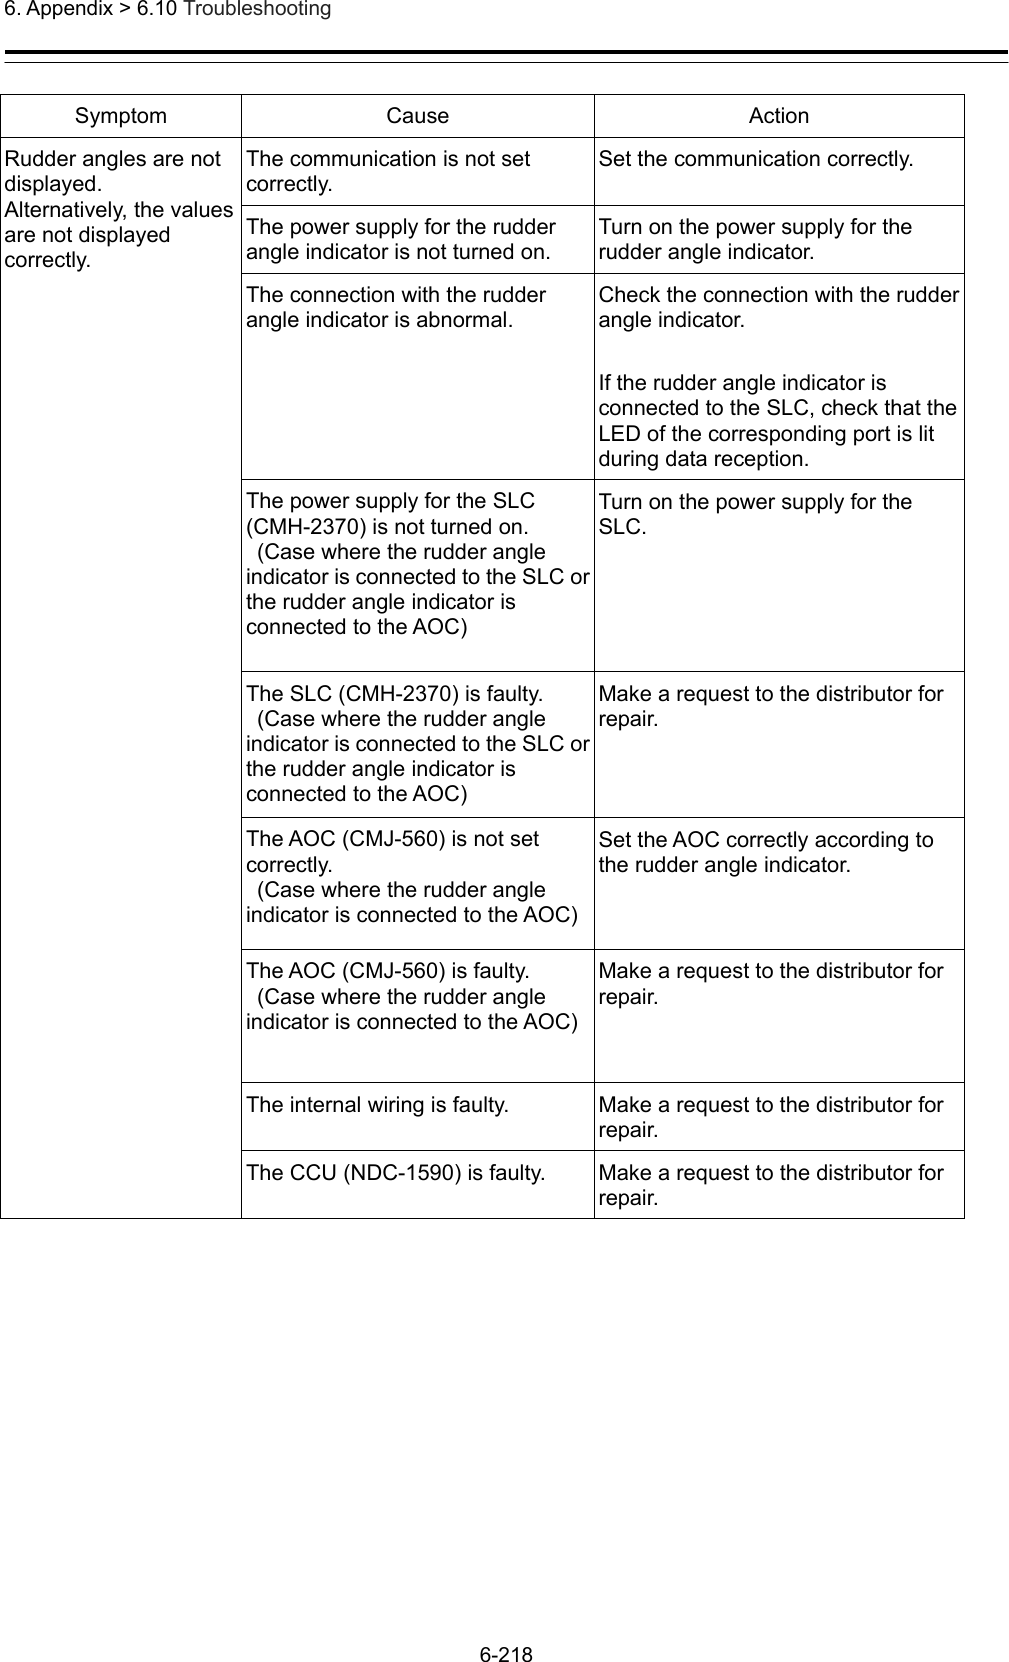
![6. Appendix > 6.10 Troubleshooting 6-221 Symptom Cause Action Contact signals are not output. The power supply for the SLC (CMH-2370) is not turned on. (Case where contact signal output is acquired from the SLC) Turn on the power supply for the SLC. The SLC (CMH-2370) is faulty. (Case where contact signal output is acquired from the SLC) Make a request to the distributor for repair. The internal wiring is faulty. Make a request to the distributor for repair. The CCU (NDC-1590) is faulty. Make a request to the distributor for repair. The scanner unit is not recognized The connection with the scanner unit is abnormal. Check the connection with the scanner unit. Power is not supplied from the PSU to the scanner unit. Check the power supply wiring between the PSU and the RIF. Check the power supply connection inside of the scanner unit. [Note] For checking wiring inside of the scanner unit, always request the work to the specialized service person. Before starting the work, turn off the power supply of the display unit. Otherwise, an unexpected accident may occur. Only AC power is supplied to the PSU. (NKE-2254 or NKE-2103 is connected as the scanner unit) To connect the NKE-2254 or NKE-2103 scanner unit, the DC power supply must be connected to the PSU. The RIF (CQD-2273) is not set correctly. Set the RIF correctly. The RIF (CQD-2273) is faulty. Make a request to the distributor for repair. The scanner unit is faulty. Make a request to the distributor for repair. The internal wiring is faulty. Make a request to the distributor for repair. The CCU (NDC-1590) is faulty. Make a request to the distributor for repair.](https://usermanual.wiki/Japan-Radio/NKE2632.Installation-Manual-Part-11/User-Guide-2791044-Page-46.png)
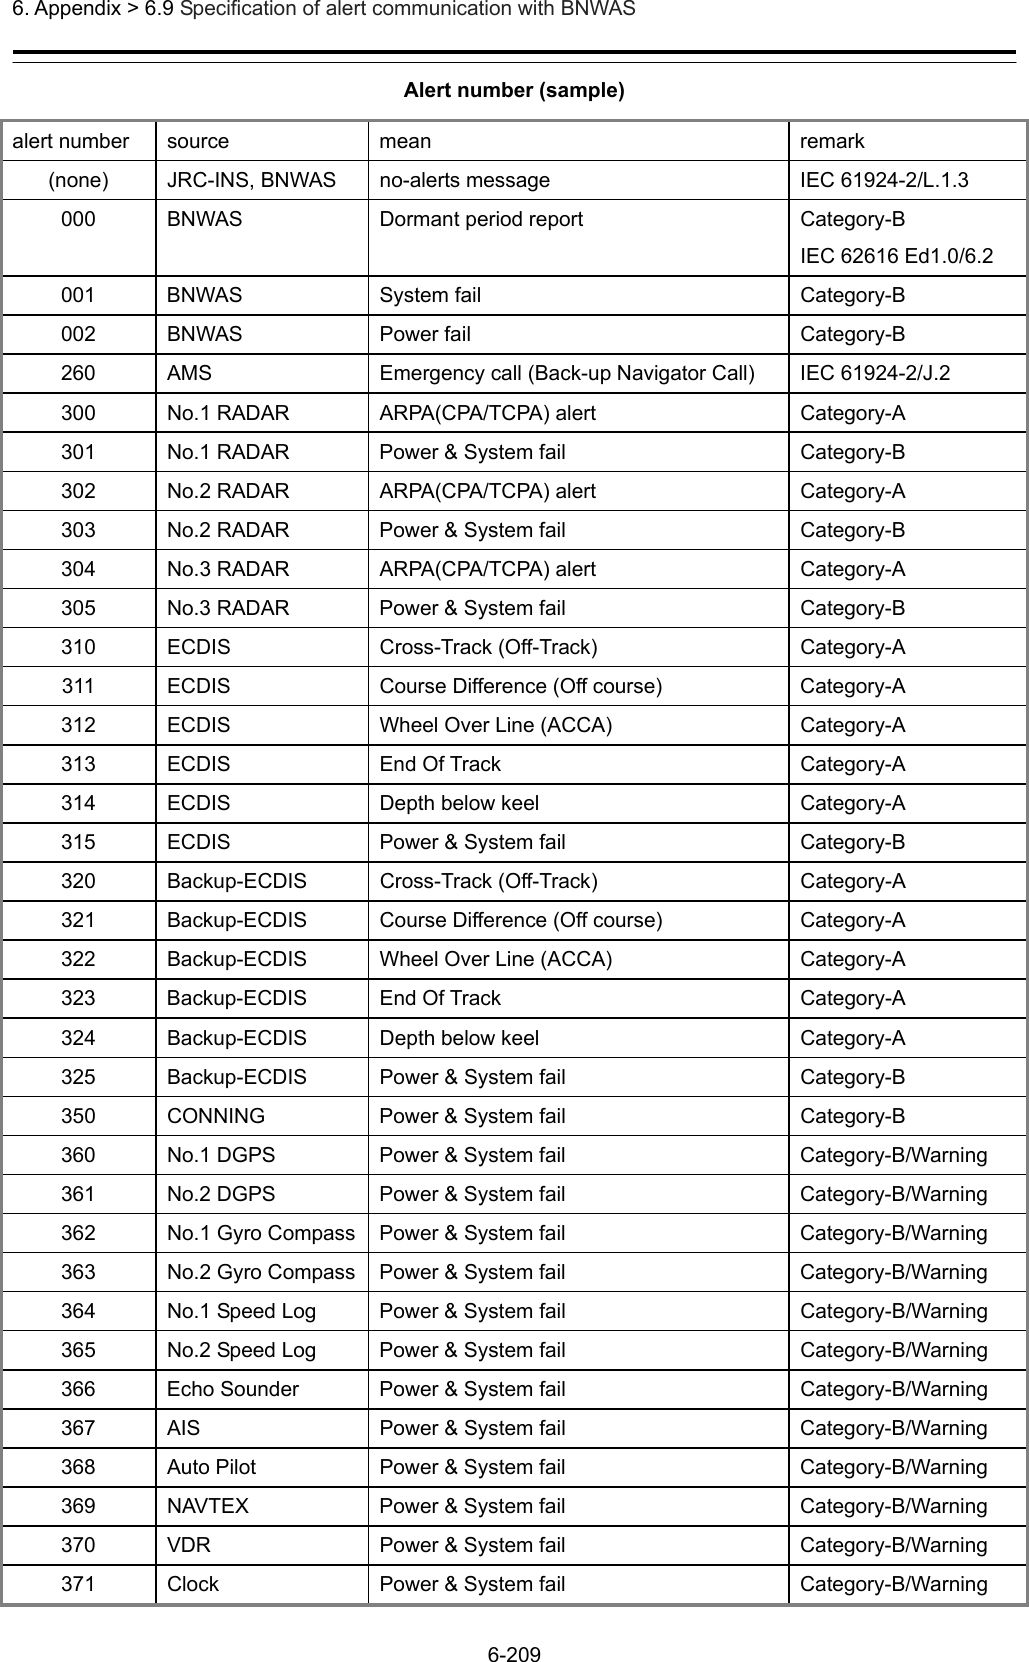
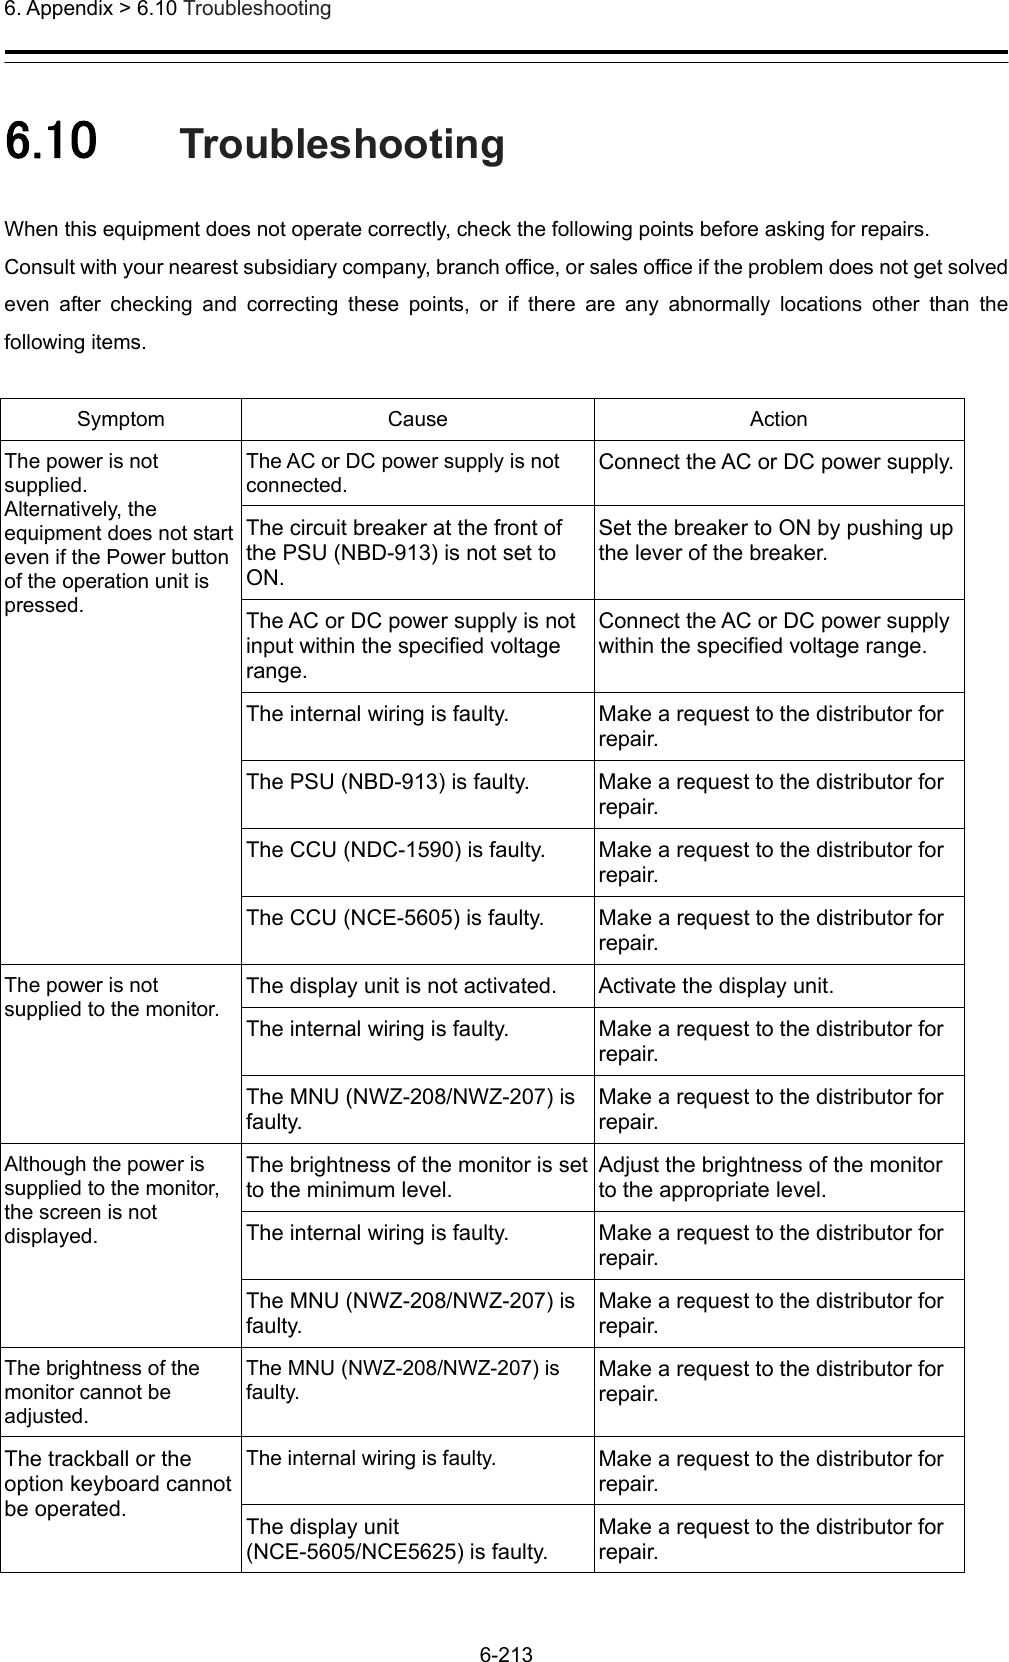
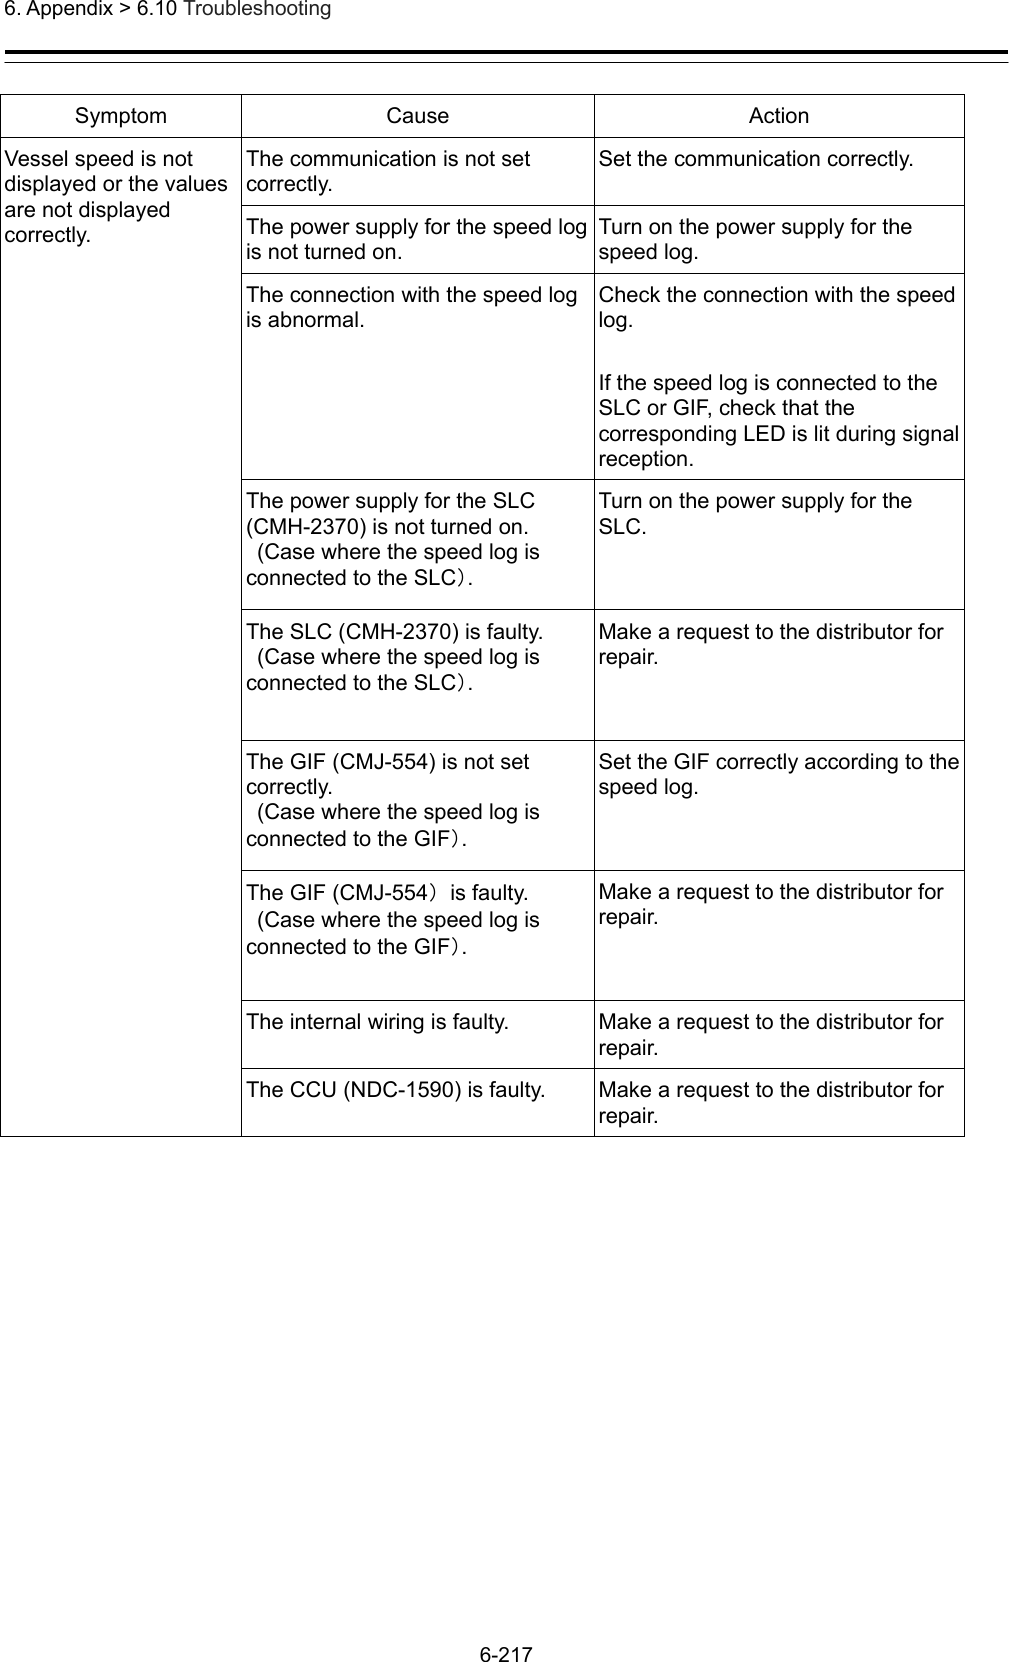
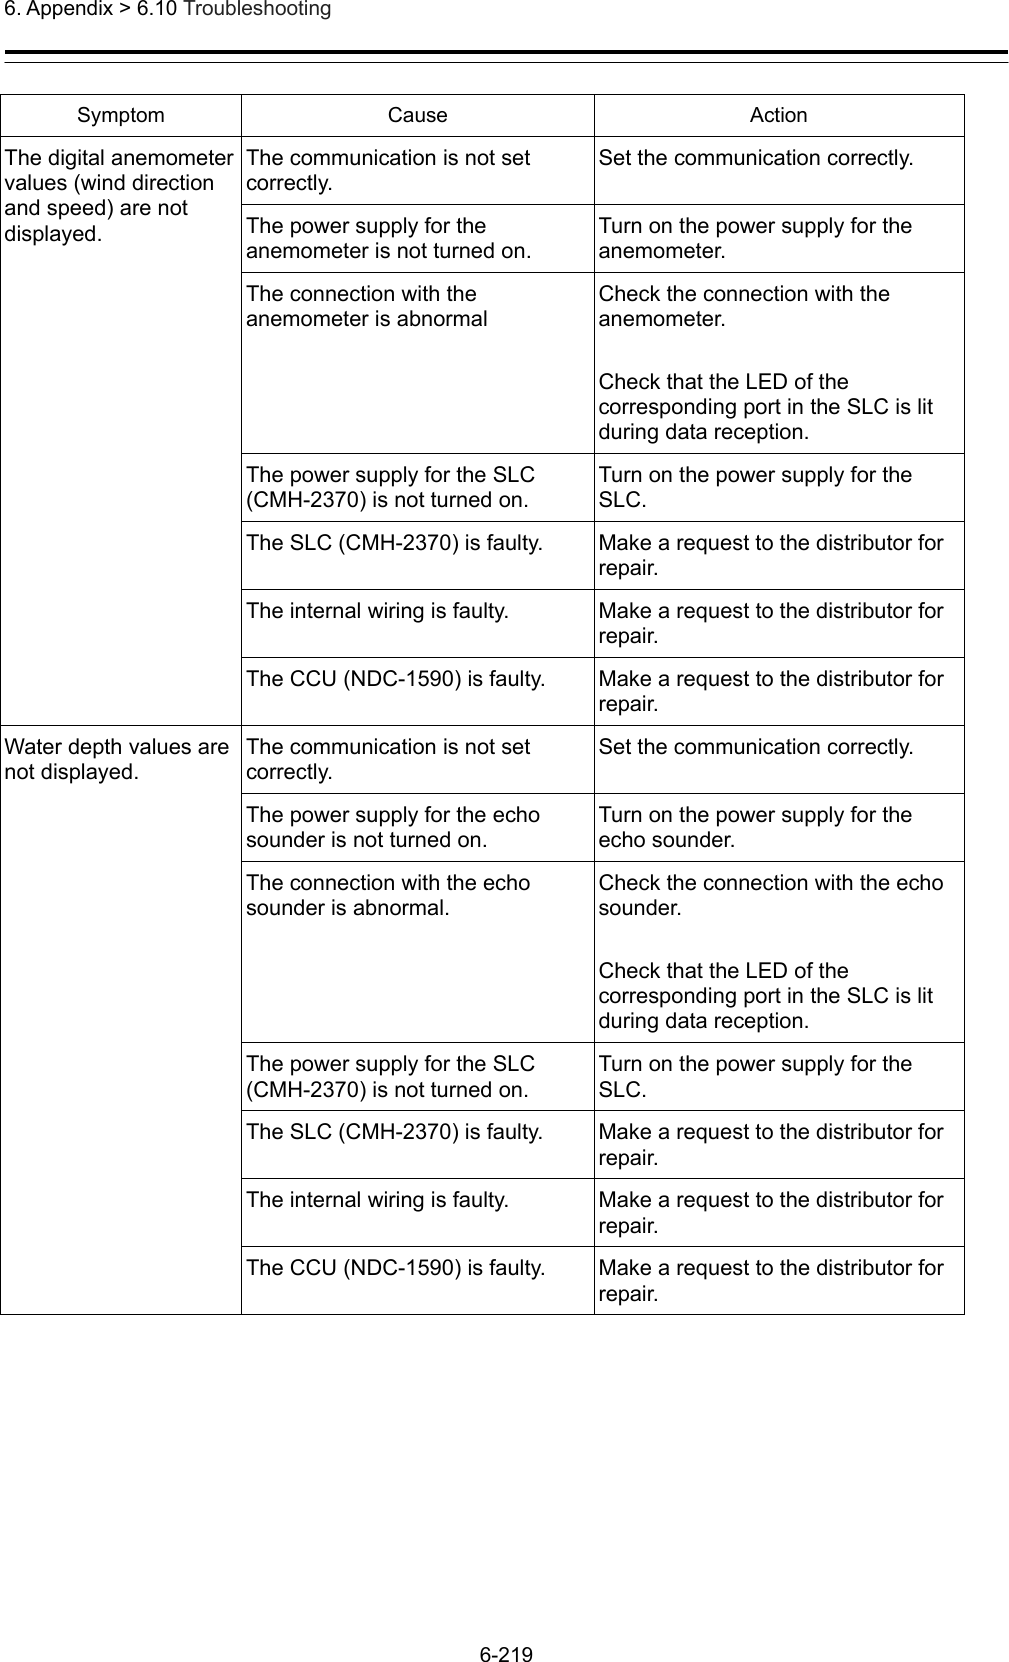
![6. Appendix > 6.10 Troubleshooting 6-222 Symptom Cause Action The power is not supplied to the scanner unit. The connection with the scanner unit is abnormal. Check the connection with the scanner unit. The connection with the scanner unit is abnormal and overcurrent protection is functioning in the PSU.Check the connection with the scanner unit and remove the cause of short-circuit. DC power is not supplied to the PSU. (NKE-2254 or NKE-2103 is connected as the scanner unit) To connect the NKE-2254 or NKE-2103 scanner unit, DC power supply must be connected to the PSU. The DC24V output fuse is blown out. (NKE-2254 or NKE-2103 is connected as the scanner unit.) After removing the cause of fuse blow-out, replace the fuse. The fuse is the 15A blade fuse at the front of the PSU (NBD-913). The RIF (CQD-2273) is faulty. Make a request to the distributor for repair. The internal wiring is faulty. Make a request to the distributor for repair. The PSU (NBD-913) is abnormal. Make a request to the distributor for repair. The CCU (NDC-1590) is faulty. Make a request to the distributor for repair. The preheat count down of the scanner unit is not displayed. The connection with the scanner unit is abnormal. Check the connection with the scanner unit. The safety switch of the scanner unit is set to OFF. Set the safety switch of the scanner unit to ON. [Note] For operating the safety switch of the scanner unit, always request the work to the specialized service person. Before starting the work, turn off the power supply of the display unit. Otherwise, an unexpected accident may occur. A solid-state scanner unit is connected. Preheat count-down is not displayed for a solid-state scanner unit. The scanner unit is faulty. Make a request to the distributor for repair. The RIF (CQD-2273) is not set correctly. Set the RIF correctly. The RIF (CQD-2273) is faulty. Make a request to the distributor for repair.](https://usermanual.wiki/Japan-Radio/NKE2632.Installation-Manual-Part-11/User-Guide-2791044-Page-47.png)
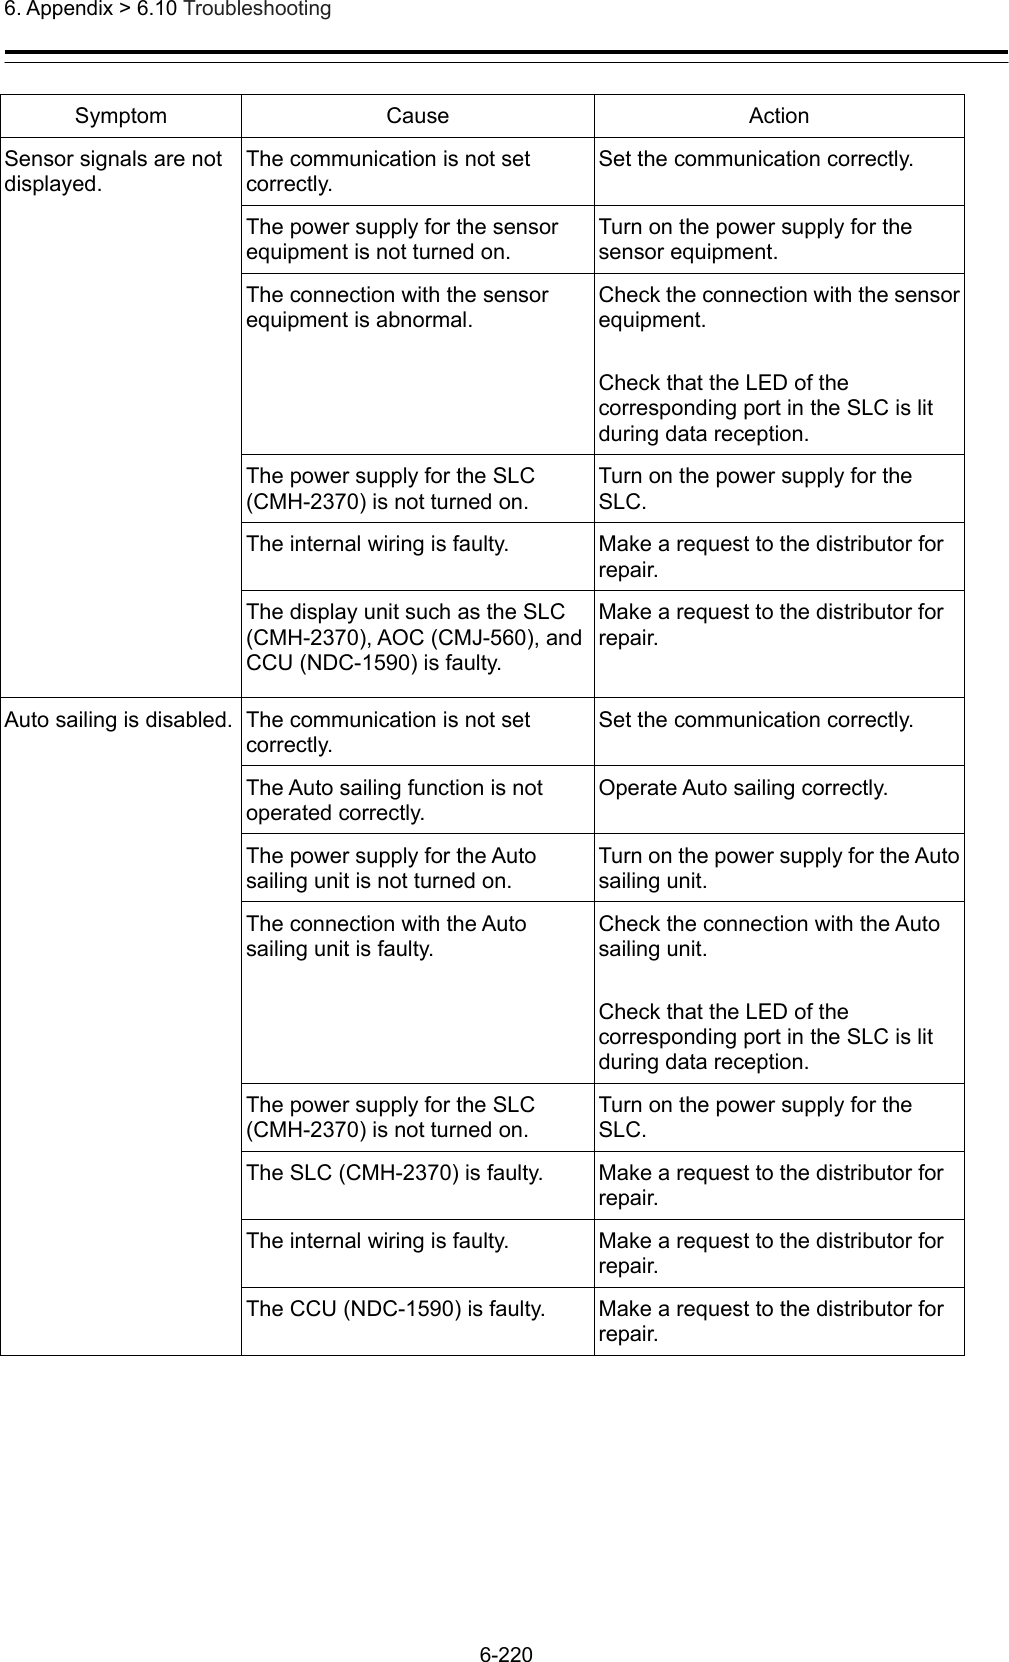
![6. Appendix > 6.10 Troubleshooting 6-223 Symptom Cause Action The internal wiring is faulty. Make a request to the distributor for repair. The CCU (NDC-1590) is faulty. Make a request to the distributor for repair. The scanner unit does not rotate even if the [Transmit] button is pressed. The connection with the scanner unit is abnormal. Check the connection with the scanner unit. The safety switch of the scanner unit is set to OFF. Set the safety switch of the scanner unit to ON. [Note] For operating the safety switch of the scanner unit, always request the work to the specialized service person. Before starting the work, turn off the power supply of the display unit. Otherwise, an unexpected accident may occur. Power is not supplied from the PSU to the scanner unit. Check the power supply wiring between the PSU and the RIF. Check the power supply connection inside of the scanner unit. [Note] For checking the wiring inside of the scanner unit, always request the work to the specialized service person. Before starting the work, turn off the power supply of the display unit. Otherwise, an unexpected accident may occur. The motor driver circuit inside of the scanner unit is not set correctly. (NKE-1632, NKE-2632, or NKE-2632-H is connected as the scanner unit.) Set the motor driver circuit correctly. [Note] For setting the motor driver circuit, always request the work to the specialized service person. Before starting the work, turn off the power supply of the display unit. Otherwise, an unexpected accident may occur. The rotating part of the scanner unit is frozen. De-freeze the frozen section by using the neck heater option.](https://usermanual.wiki/Japan-Radio/NKE2632.Installation-Manual-Part-11/User-Guide-2791044-Page-48.png)
![6. Appendix > 6.10 Troubleshooting 6-224 Symptom Cause Action Strong wind of relative wind velocity exceeding 100 kt (about 51.5 m/s) is blowing. When strong wind of relative wind velocity exceeding 100 kt is blowing, the scanner unit does not rotate due to the protection function. The scanner unit is faulty. Make a request to the distributor for repair. The RIF (CQD-2273) is faulty. Make a request to the distributor for repair. The internal wiring is faulty. Make a request to the distributor for repair. The PSU (NBD-913) is abnormal. Make a request to the distributor for repair. The CCU (NDC-1590) is faulty. Make a request to the distributor for repair. No radar image is displayed. The connection with the scanner unit is abnormal. Check the connection with the scanner unit. The GAIN value is set to the minimum. Set a proper value for GAIN. The SEA/RAIN value is set to the maximum. Set a proper value for SEA/RAIN. The magnetron is deteriorated significantly. (Case where an scanner unit that uses a magnetron is connected) Replace the magnetron. [Note] For magnetron replacement, always request the work to the specialized service person. Before starting the work, turn off the power supply of the display unit. Otherwise, an unexpected accident may occur. The scanner unit is faulty. Make a request to the distributor for repair. The RIF (CQD-2273) is faulty. Make a request to the distributor for repair. The internal wiring is faulty. Make a request to the distributor for repair. The PSU (NBD-913) is abnormal. Make a request to the distributor for repair. The CCU (NDC-1590) is faulty. Make a request to the distributor for repair.](https://usermanual.wiki/Japan-Radio/NKE2632.Installation-Manual-Part-11/User-Guide-2791044-Page-49.png)
![6. Appendix > 6.10 Troubleshooting 6-225 Symptom Cause Action Radar images cannot be tuned The magnetron is deteriorated significantly. (Case where a scanner unit that uses a magnetron is connected) Replace the magnetron. [Note] For magnetron replacement, always request the work to the specialized service person. Before starting the work, turn off the power supply of the display unit. Otherwise, an unexpected accident may occur. A solid-state scanner unit is connected. Tuning bar is not displayed for a solid-state scanner unit. The azimuth of the radar image is not displayed correctly. The azimuth is not set correctly. Set the azimuth correctly. CCRP is not set correctly. Set CCRP correctly. The GPS antenna position is not set correctly. Set the GPS antenna position correctly. The range of the radar image is not displayed correctly. The range is not set correctly. Set the range correctly. CCRP is not set correctly. Set CCRP correctly. The GPS antenna position is not set correctly. Set the GPS antenna position correctly. Interswitch Unit does not function. Power for the Interswitch Unit is not turned on. Turn on the power for the Interswitch Unit. The connection with the Interswitch Unit is abnormal. Check the connection with the Interswitch Unit. The Interswitch Unit is faulty. Make a request to the distributor for repair. The RIF (CQD-2273) is not set correctly. Set the RIF correctly. The RIF (CQD-2273) is faulty. Make a request to the distributor for repair. The internal wiring is faulty. Make a request to the distributor for repair. The CCU (NDC-1590) is faulty. Make a request to the distributor for repair. If the power supply is turned off, the trail data is cleared without being stored. The CCU (NDC-1590) is faulty. Make a request to the distributor for repair.](https://usermanual.wiki/Japan-Radio/NKE2632.Installation-Manual-Part-11/User-Guide-2791044-Page-50.png)
![6. Appendix > 6.10 Troubleshooting 6-226 Symptom Cause Action Radar images cannot be overlaid. There is no optional license for radar overlay. Implement an optional license for radar overlay. The connection with the scanner unit is abnormal. Check the connection with the scanner unit. The connection with the radar display unit is abnormal. Check the connection with the radar display unit. The RIF (CQD-2273) is faulty. Make a request to the distributor for repair. The internal wiring is faulty. Make a request to the distributor for repair. The PSU (NBD-913) is faulty. Make a request to the distributor for repair. The CCU (NDC-1590) is faulty. Make a request to the distributor for repair. UPS does not function. The connection with UPS is faulty. Check the connection with UPS. UPS is not set correctly. Set UPS correctly. The UPS battery is extremely depleted. Replace the battery. [Note] At the battery replacement, make a request for the work to the specialized service staff. During the replacement, turn off the corresponding power supply breaker in the ship. Otherwise, an unexpected accident may occur. The internal wiring is faulty. Make a request to the distributor for repair. UPS is faulty. Make a request to the distributor for repair.](https://usermanual.wiki/Japan-Radio/NKE2632.Installation-Manual-Part-11/User-Guide-2791044-Page-51.png)