Japan Radio NKE2632 Solid State S-Band Marine Radar User Manual Installation Manual Part 7
Japan Radio Co Ltd. Solid State S-Band Marine Radar Installation Manual Part 7
Contents
- 1. Installation Manual Part 1
- 2. Installation Manual Part 2
- 3. Installation Manual Part 3
- 4. Installation Manual Part 4
- 5. Installation Manual Part 5
- 6. Installation Manual Part 6
- 7. Installation Manual Part 7
- 8. Installation Manual Part 8
- 9. Installation Manual Part 9
- 10. Installation Manual Part 10
- 11. Installation Manual Part 11
- 12. Instruction Manual Operation Part 1
- 13. Instruction Manual Operation Part 2
- 14. Instruction Manual Operation Part 3
- 15. Instruction Manual Operation Part 4
- 16. Instruction Manual Funtion Part 1
- 17. Instruction Manual Funtion Part 2
- 18. Instruction Manual Funtion Part 3
- 19. Instruction Manual Funtion Part 4
- 20. Instruction Manual Funtion Part 5
- 21. Instruction Manual Funtion Part 6
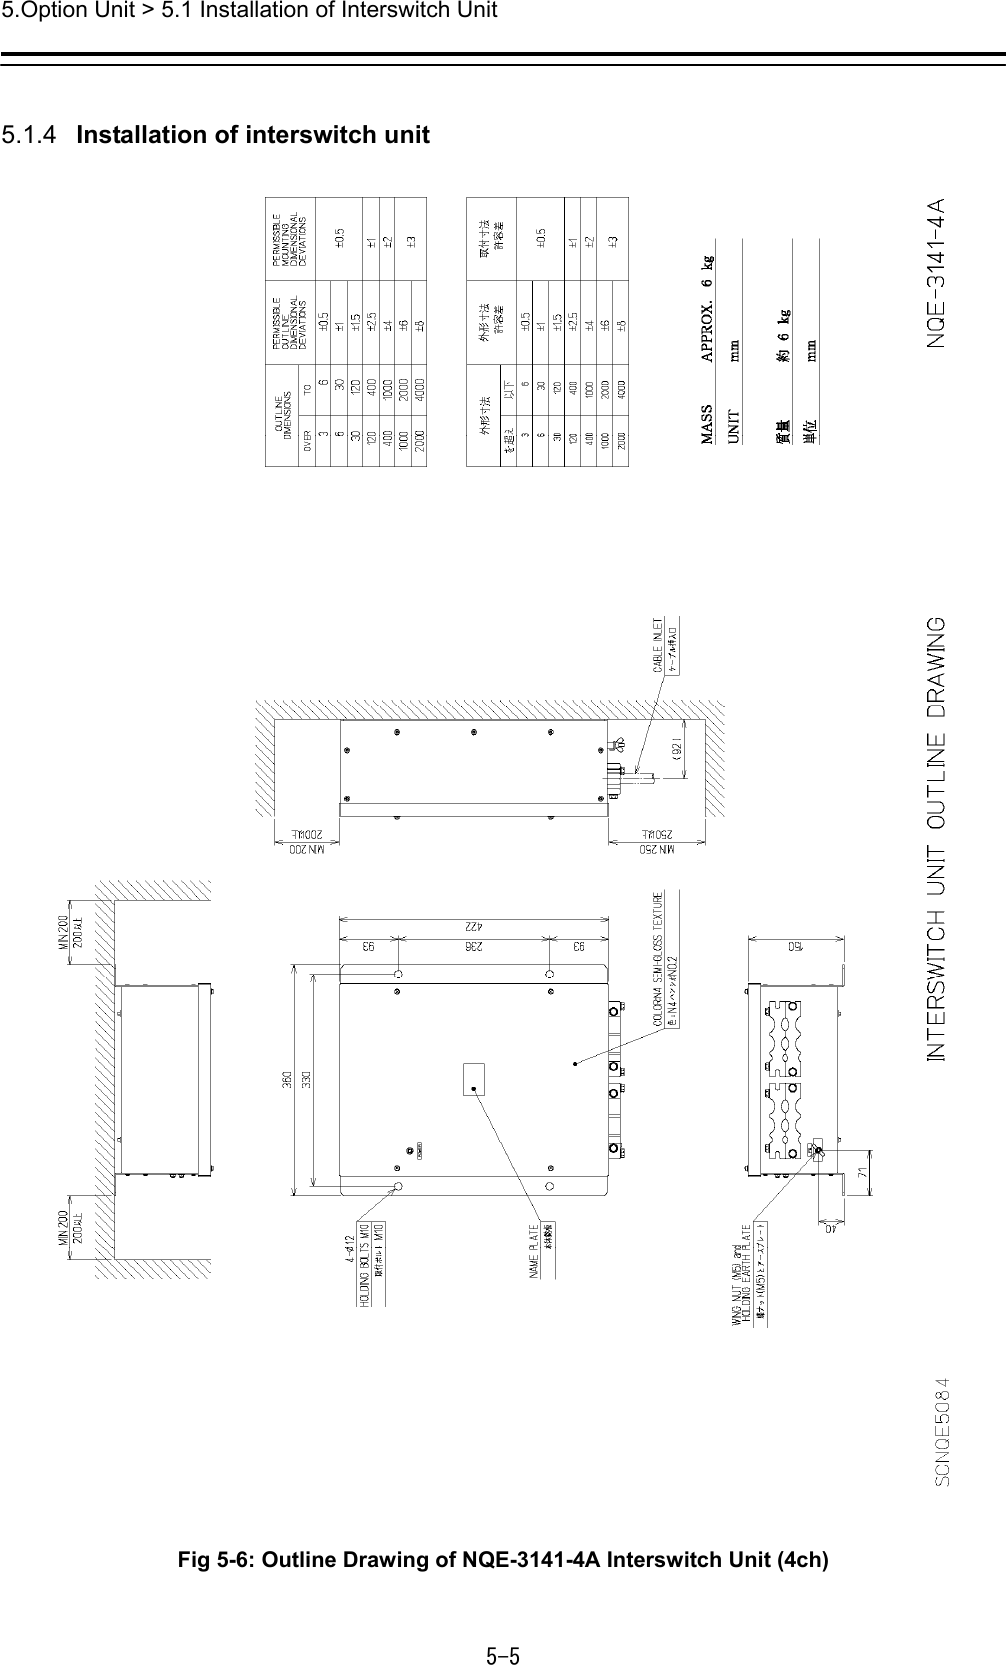
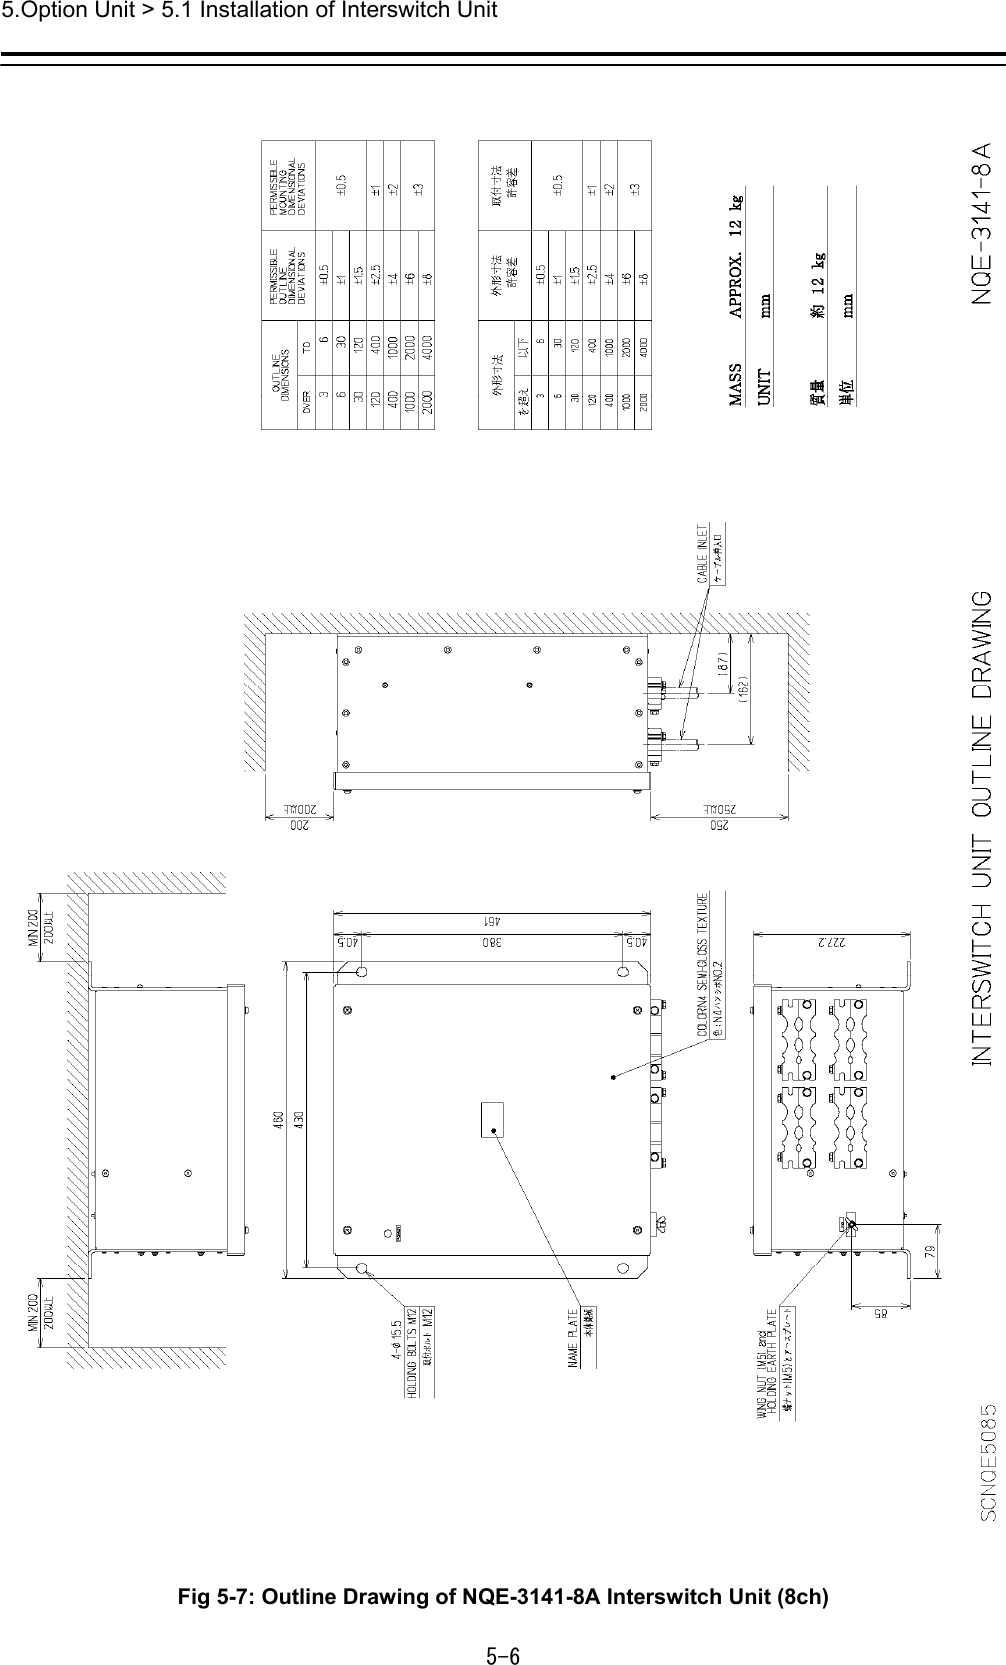
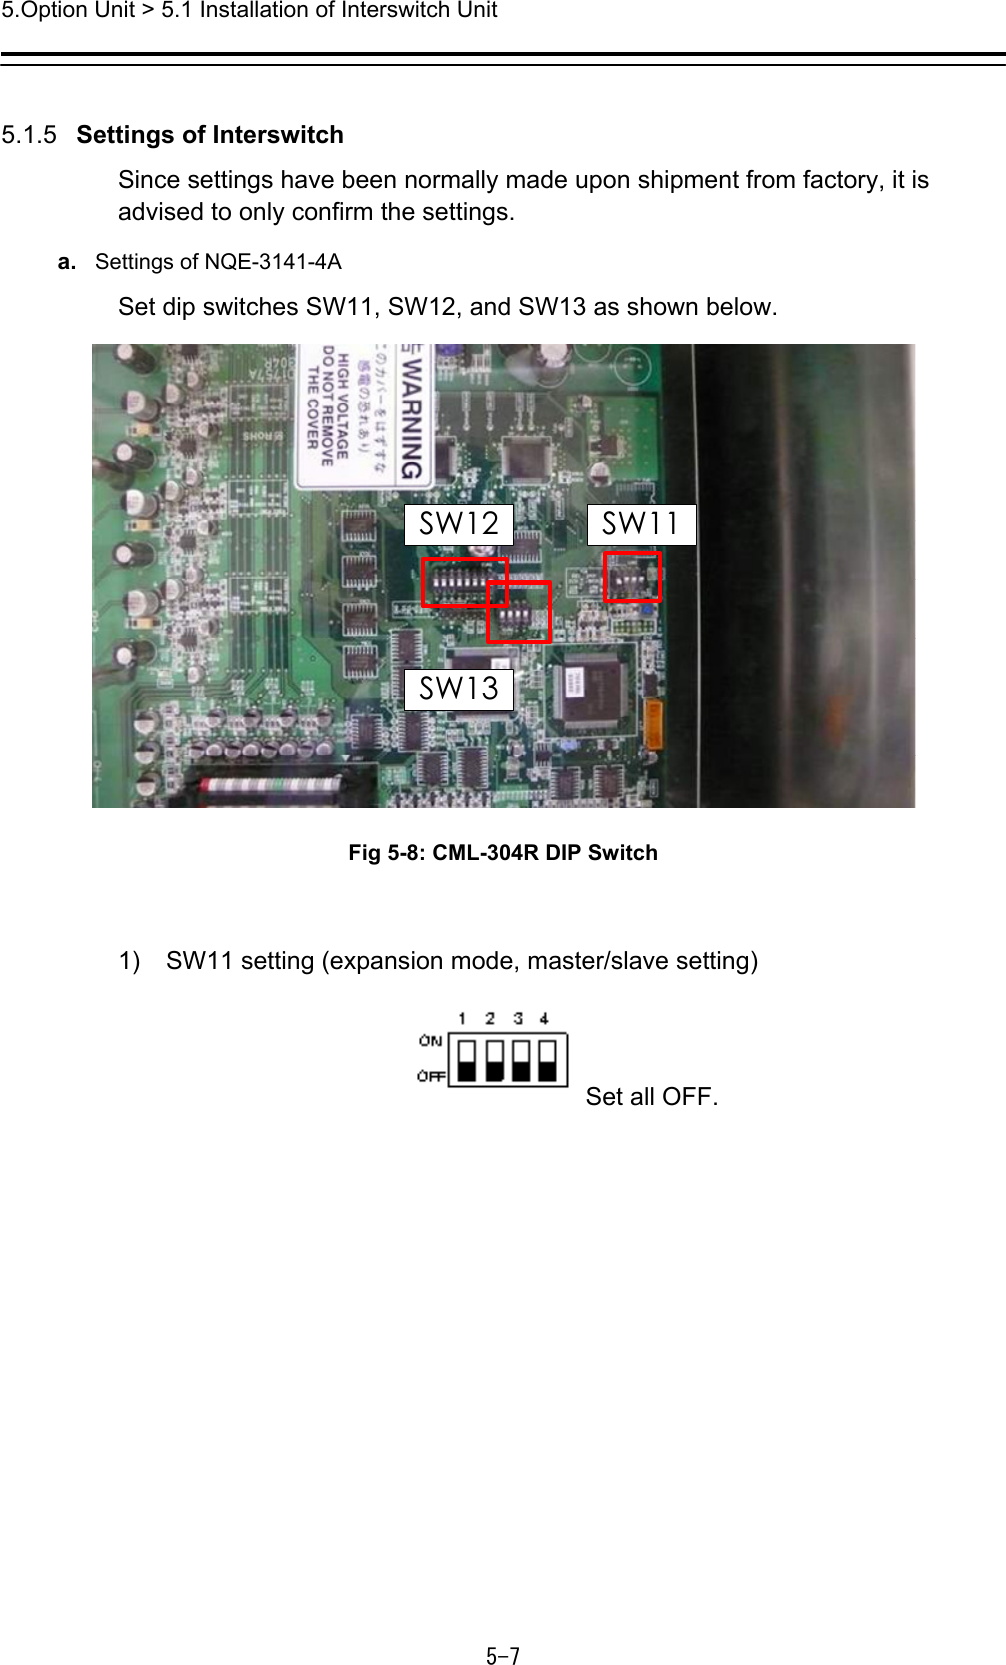
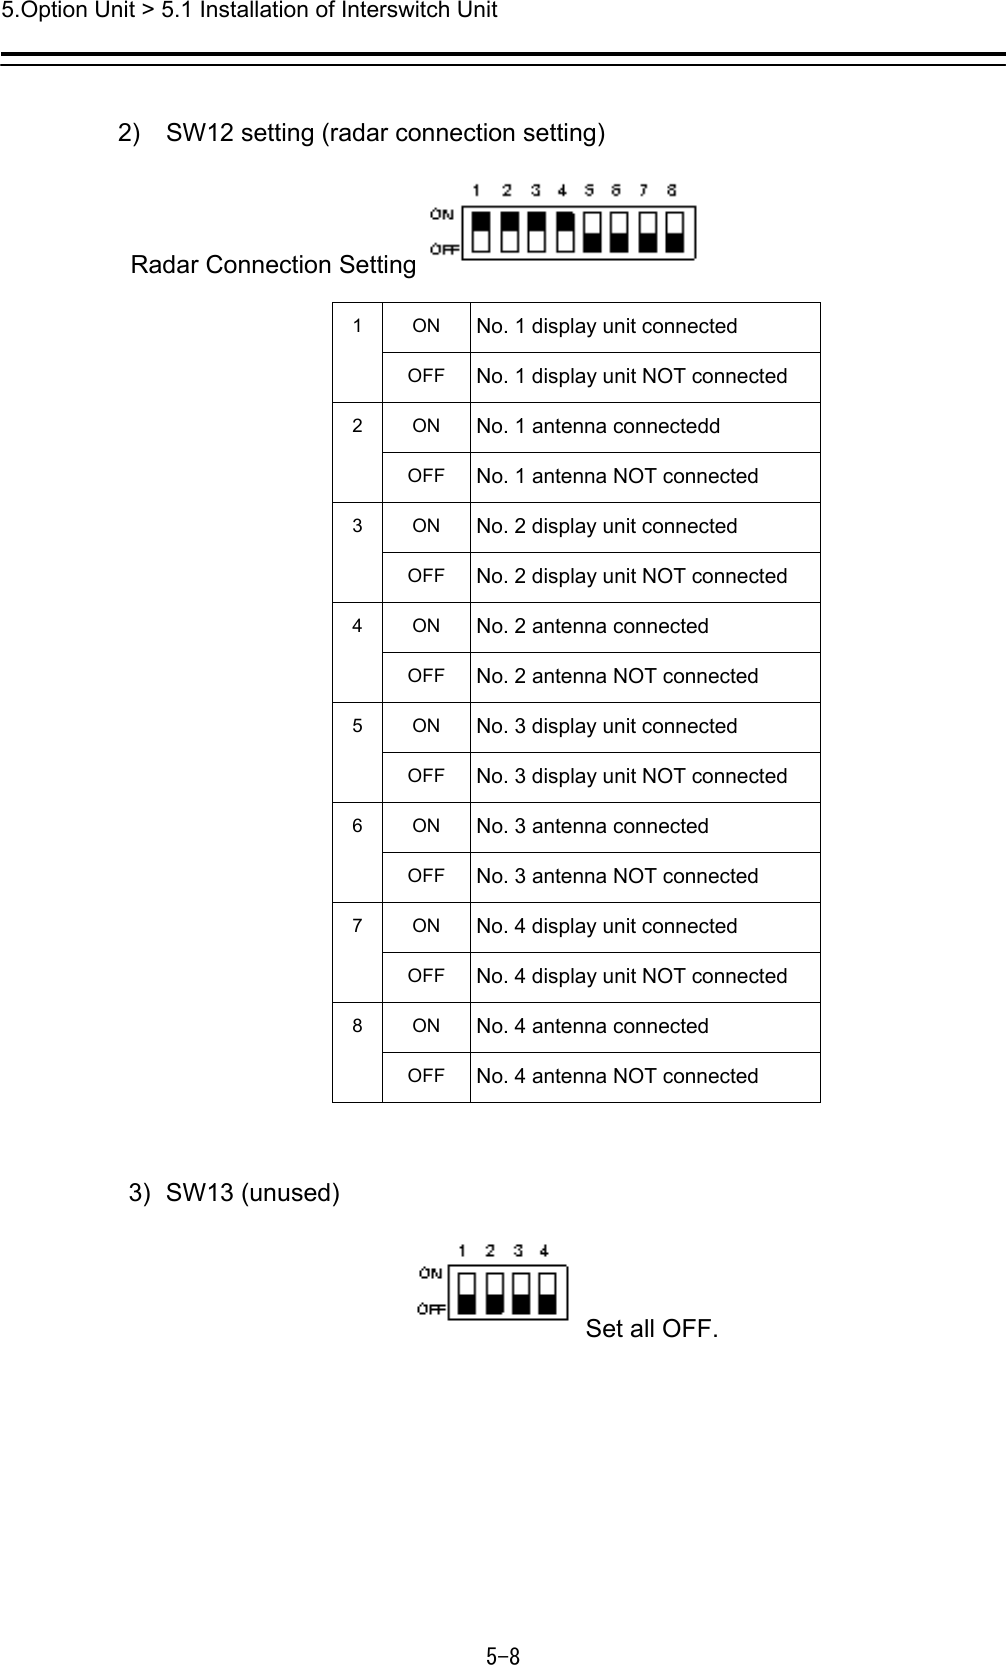
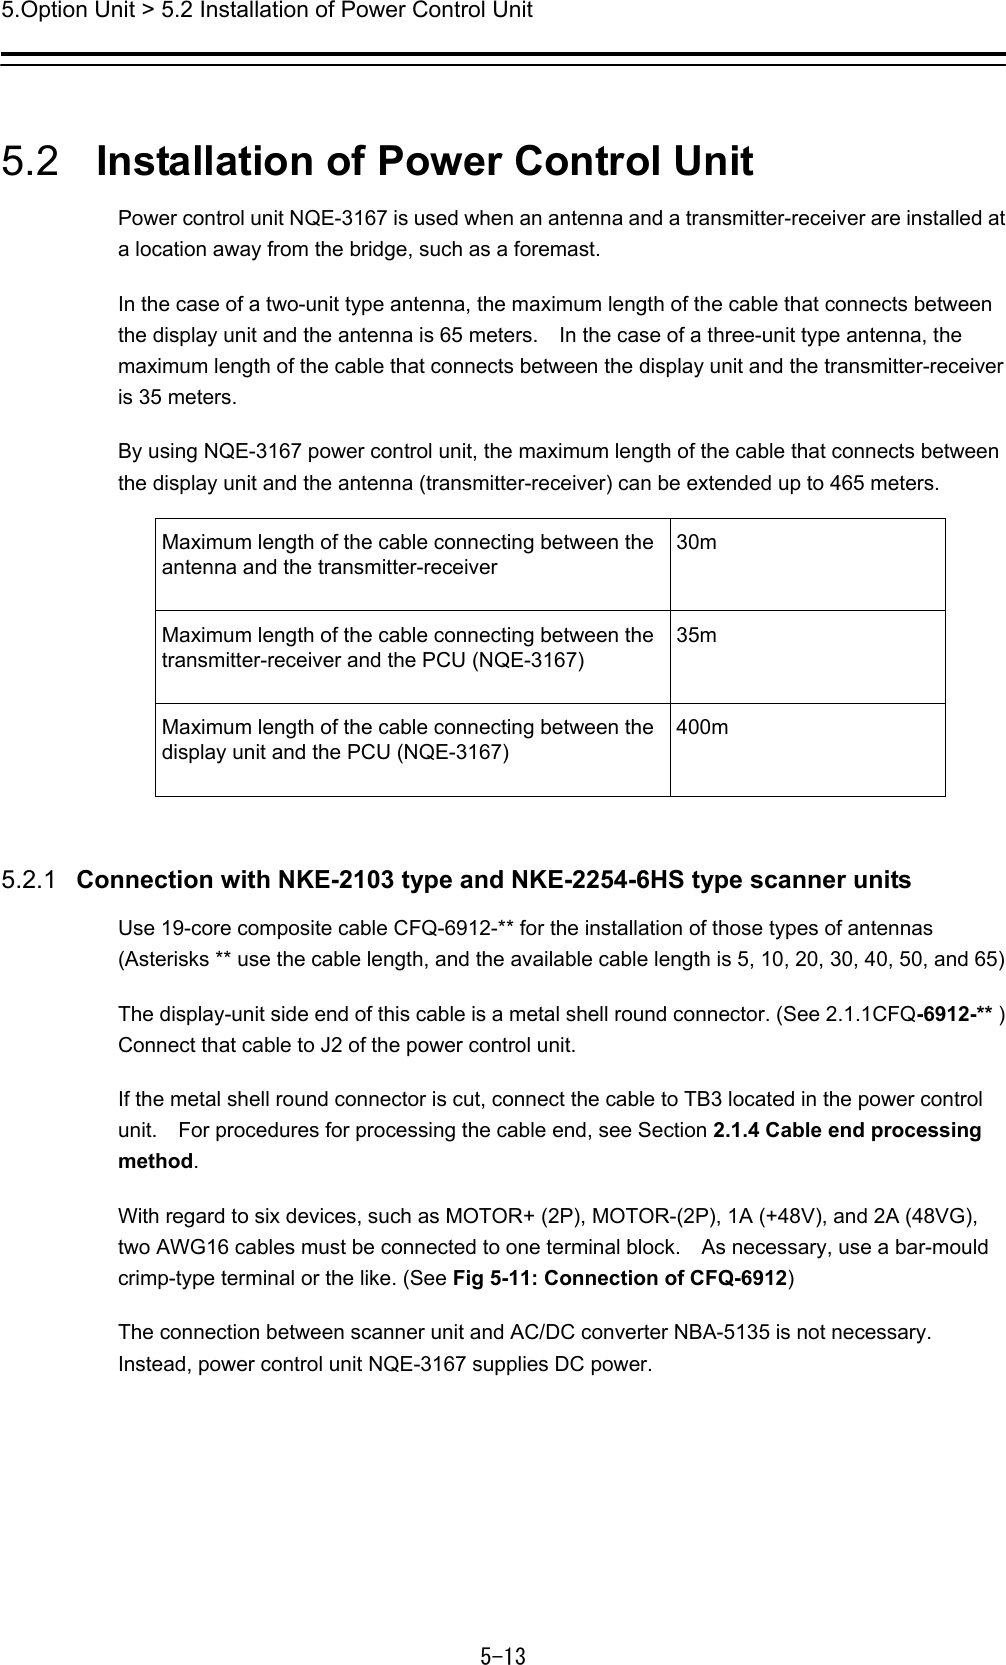
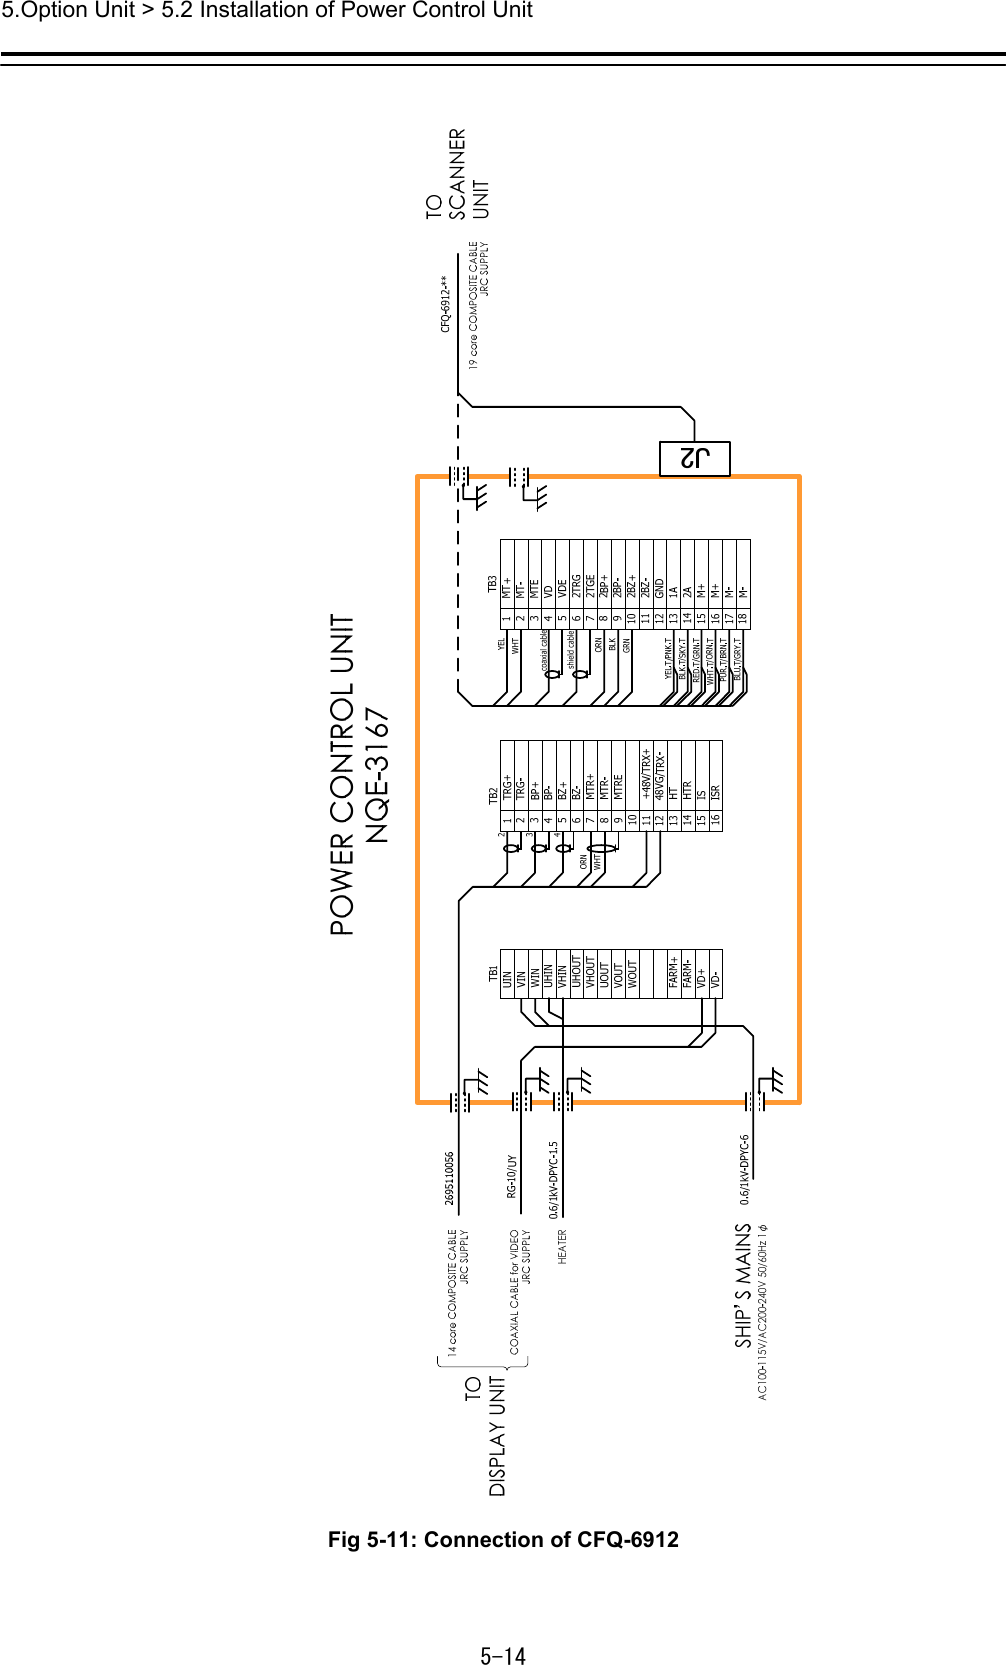
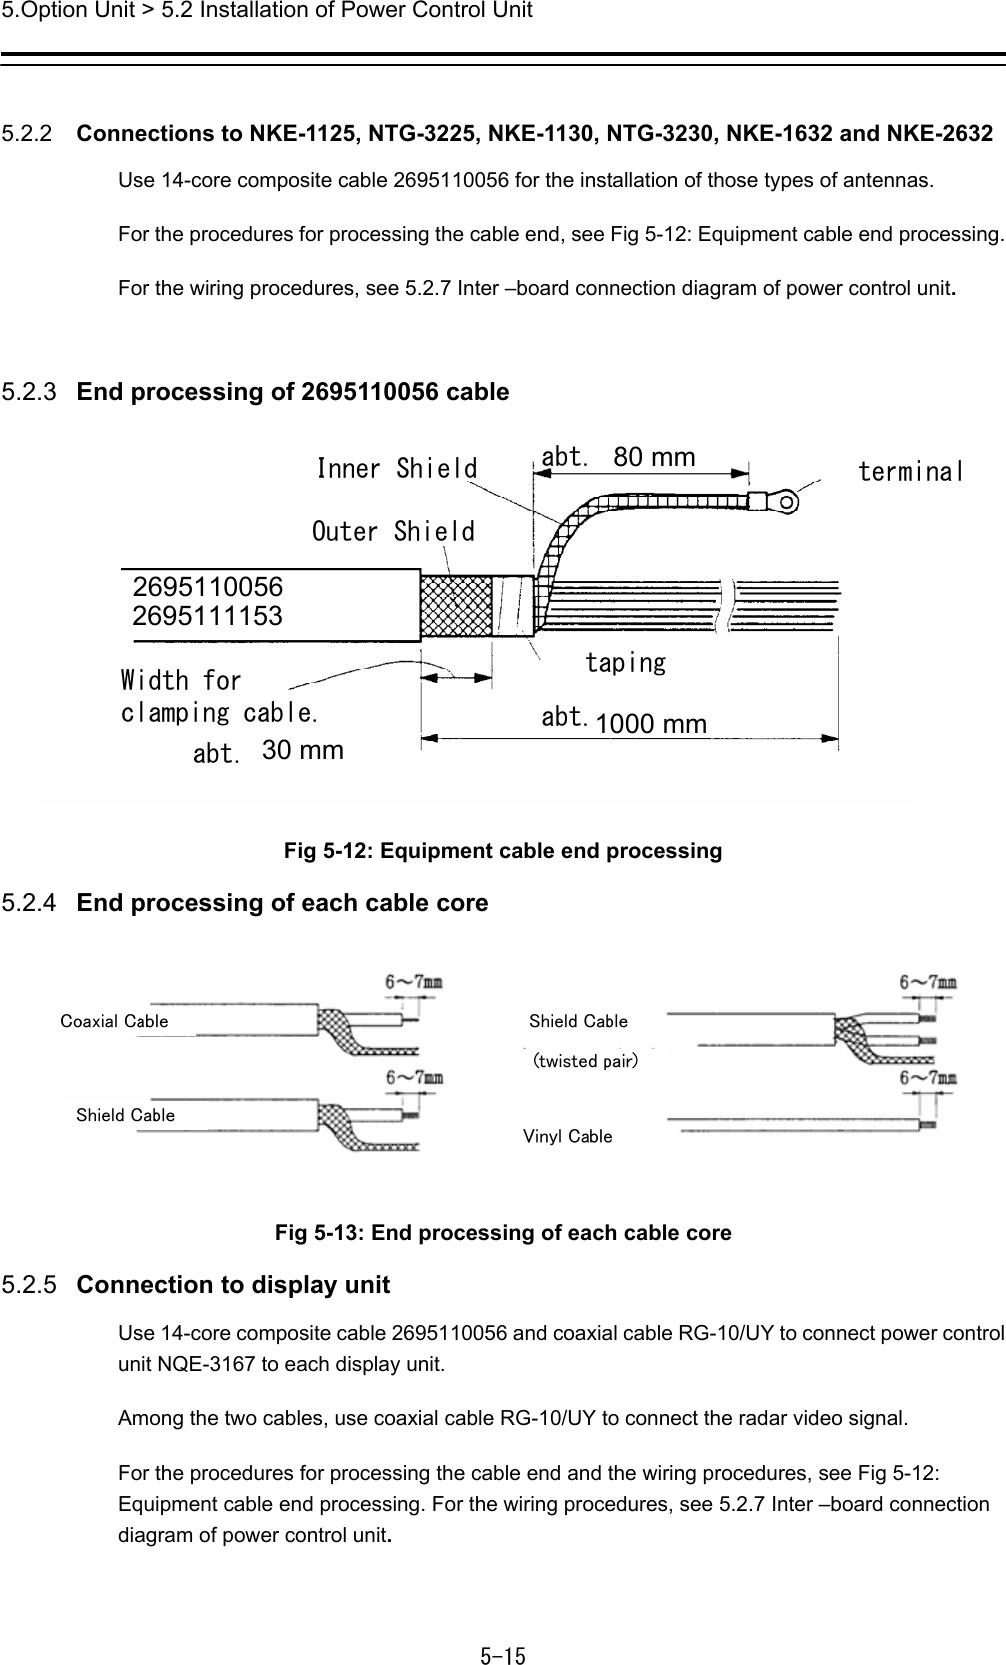
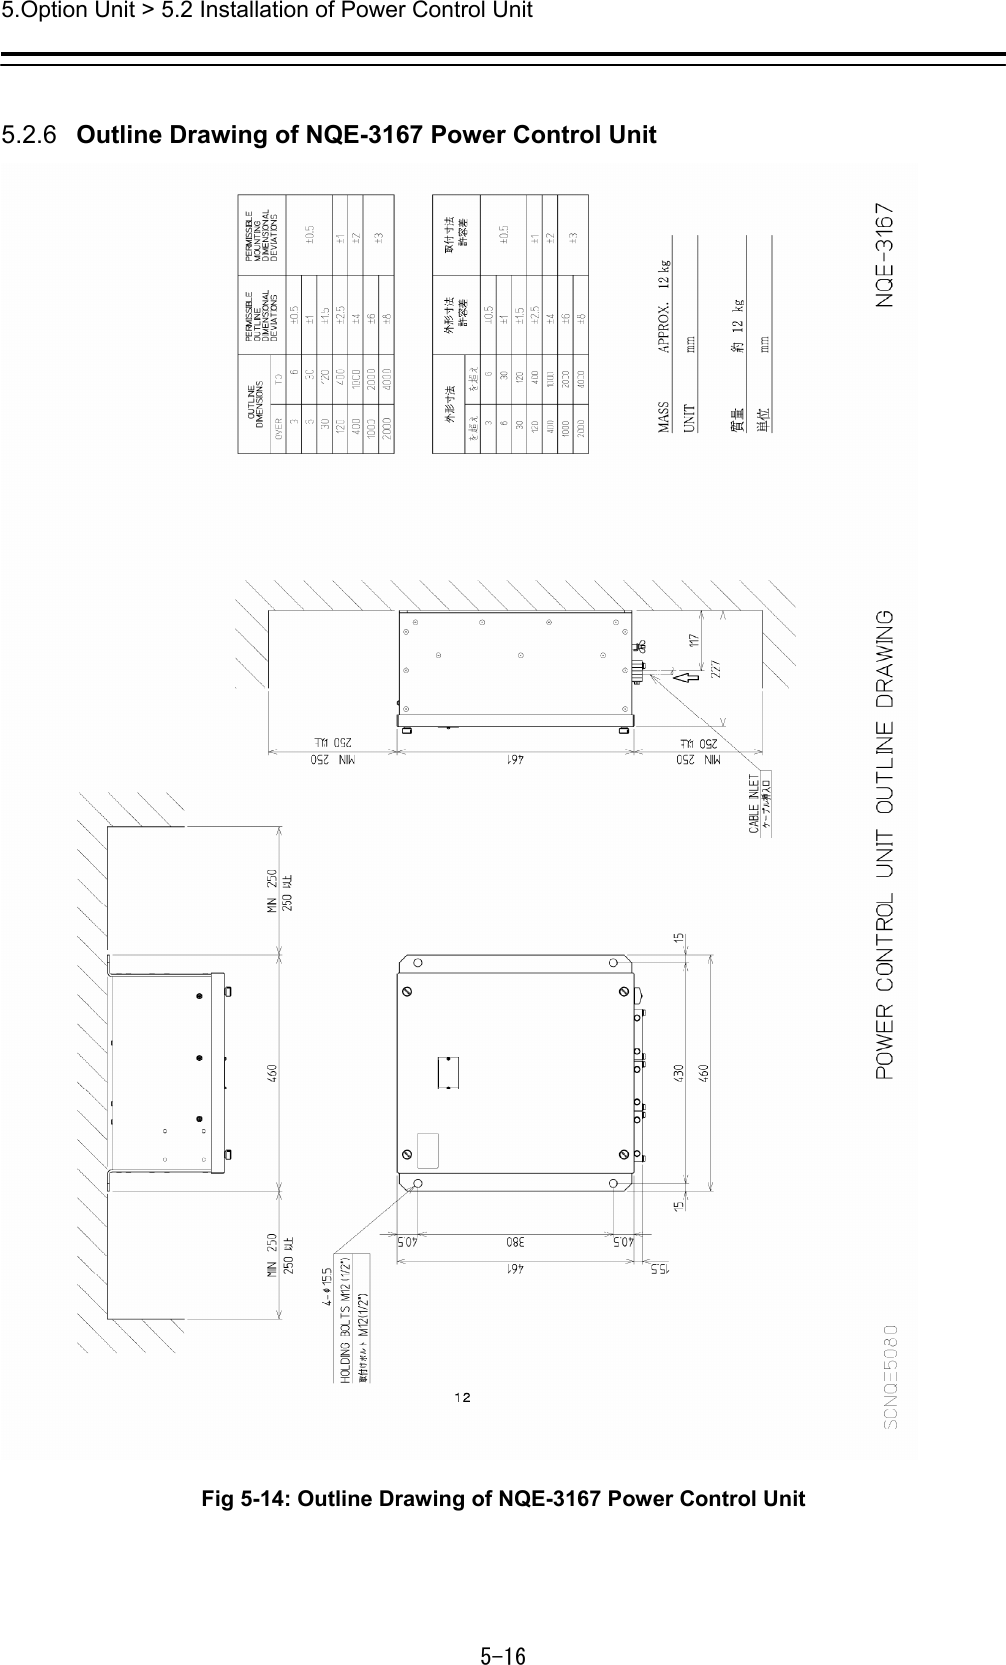
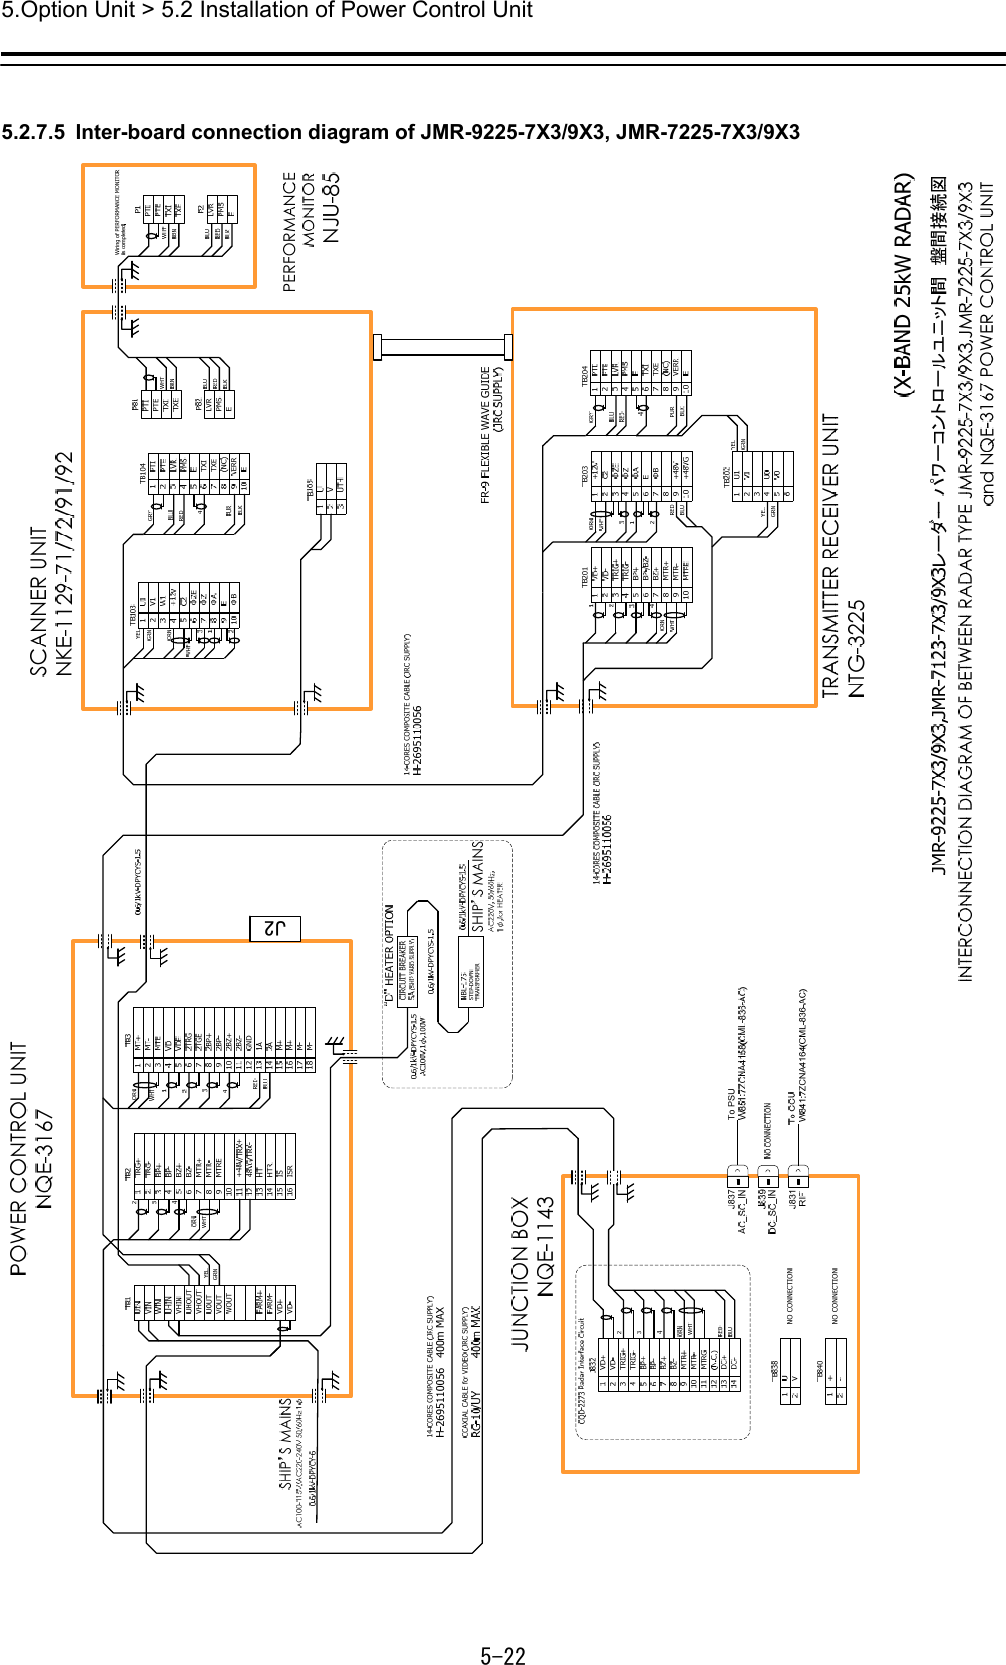
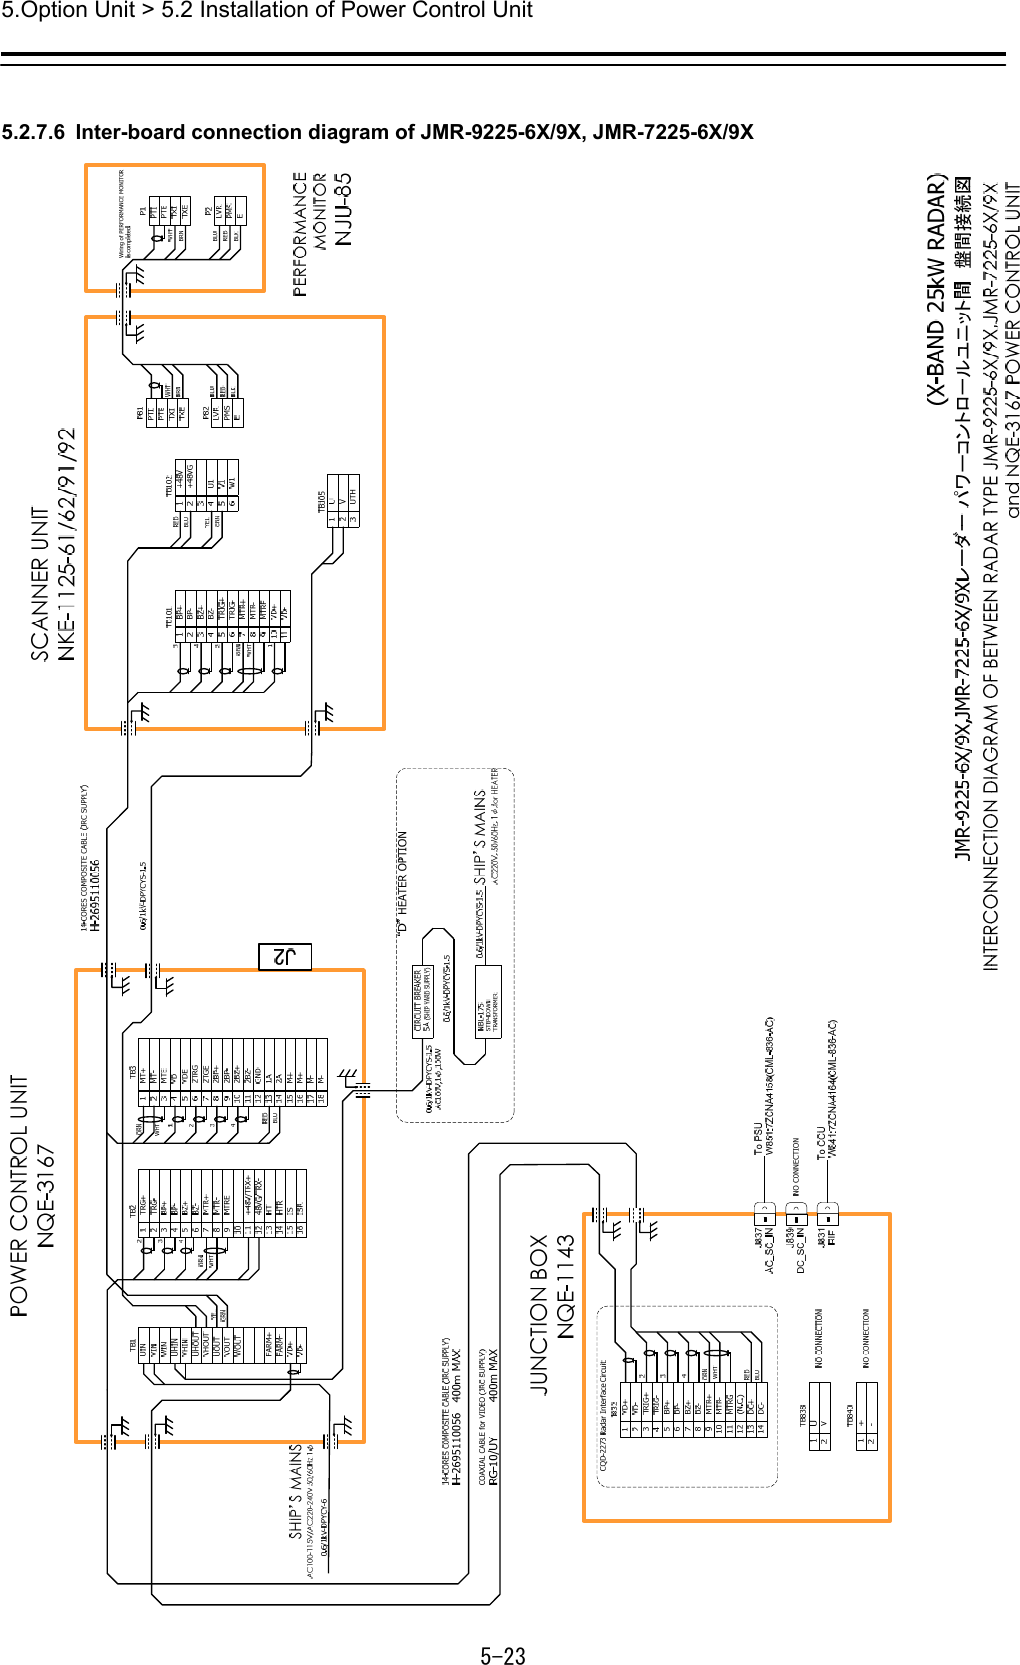
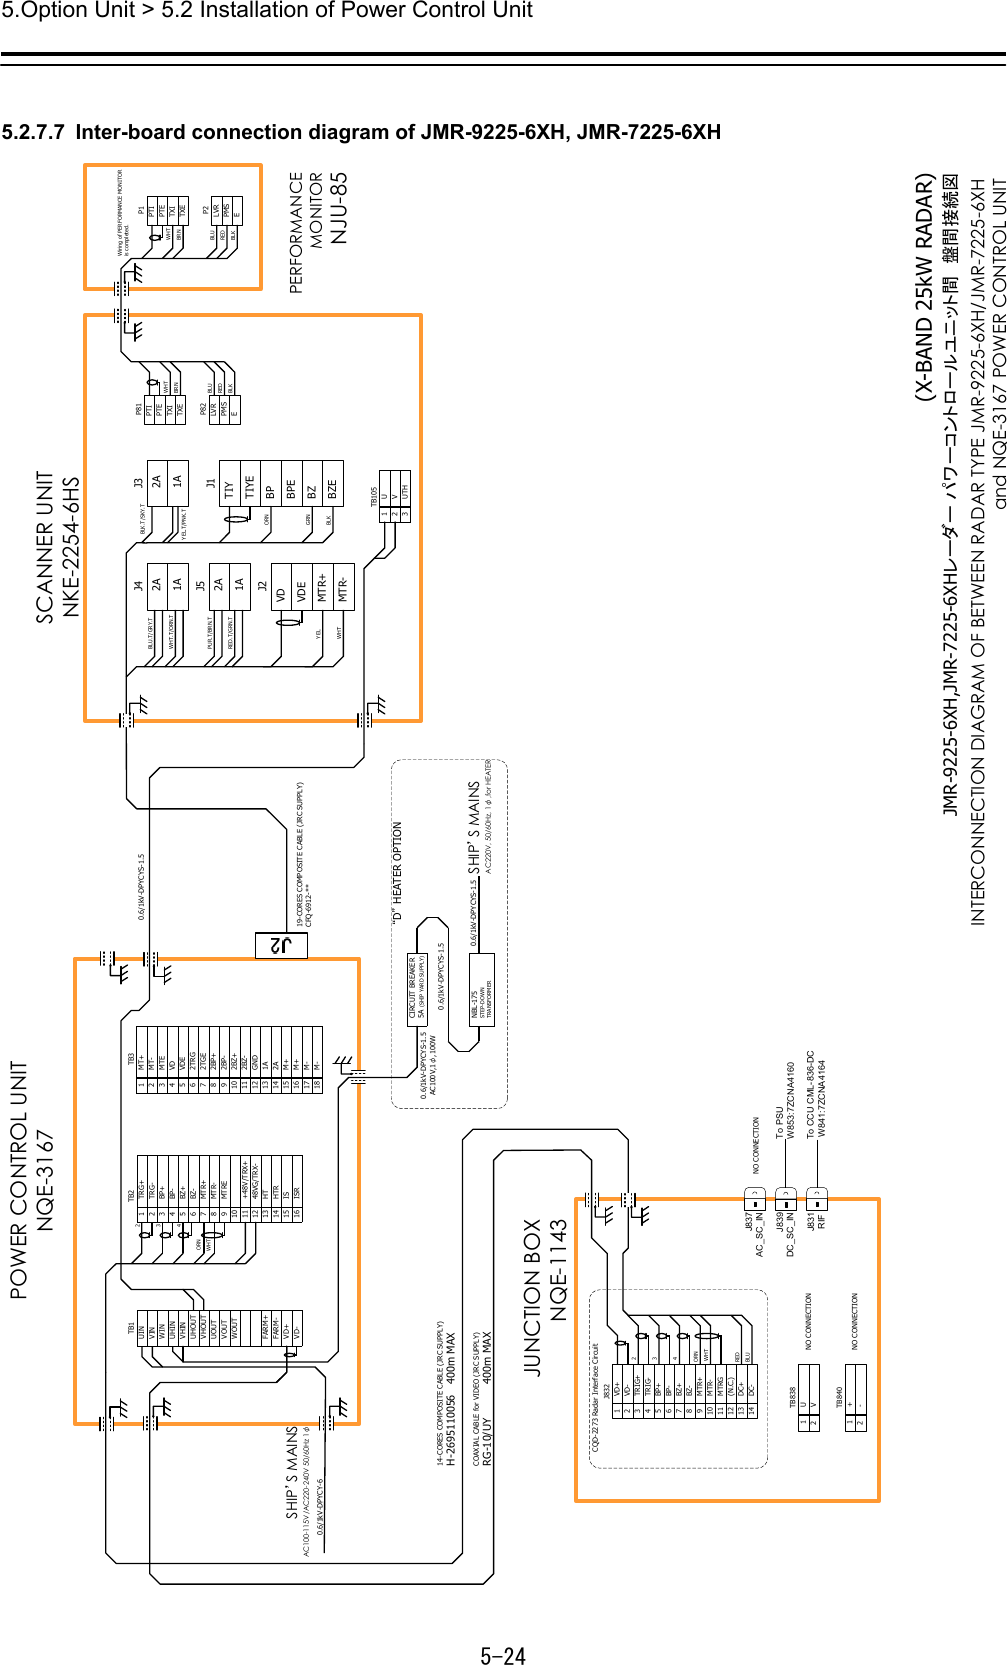
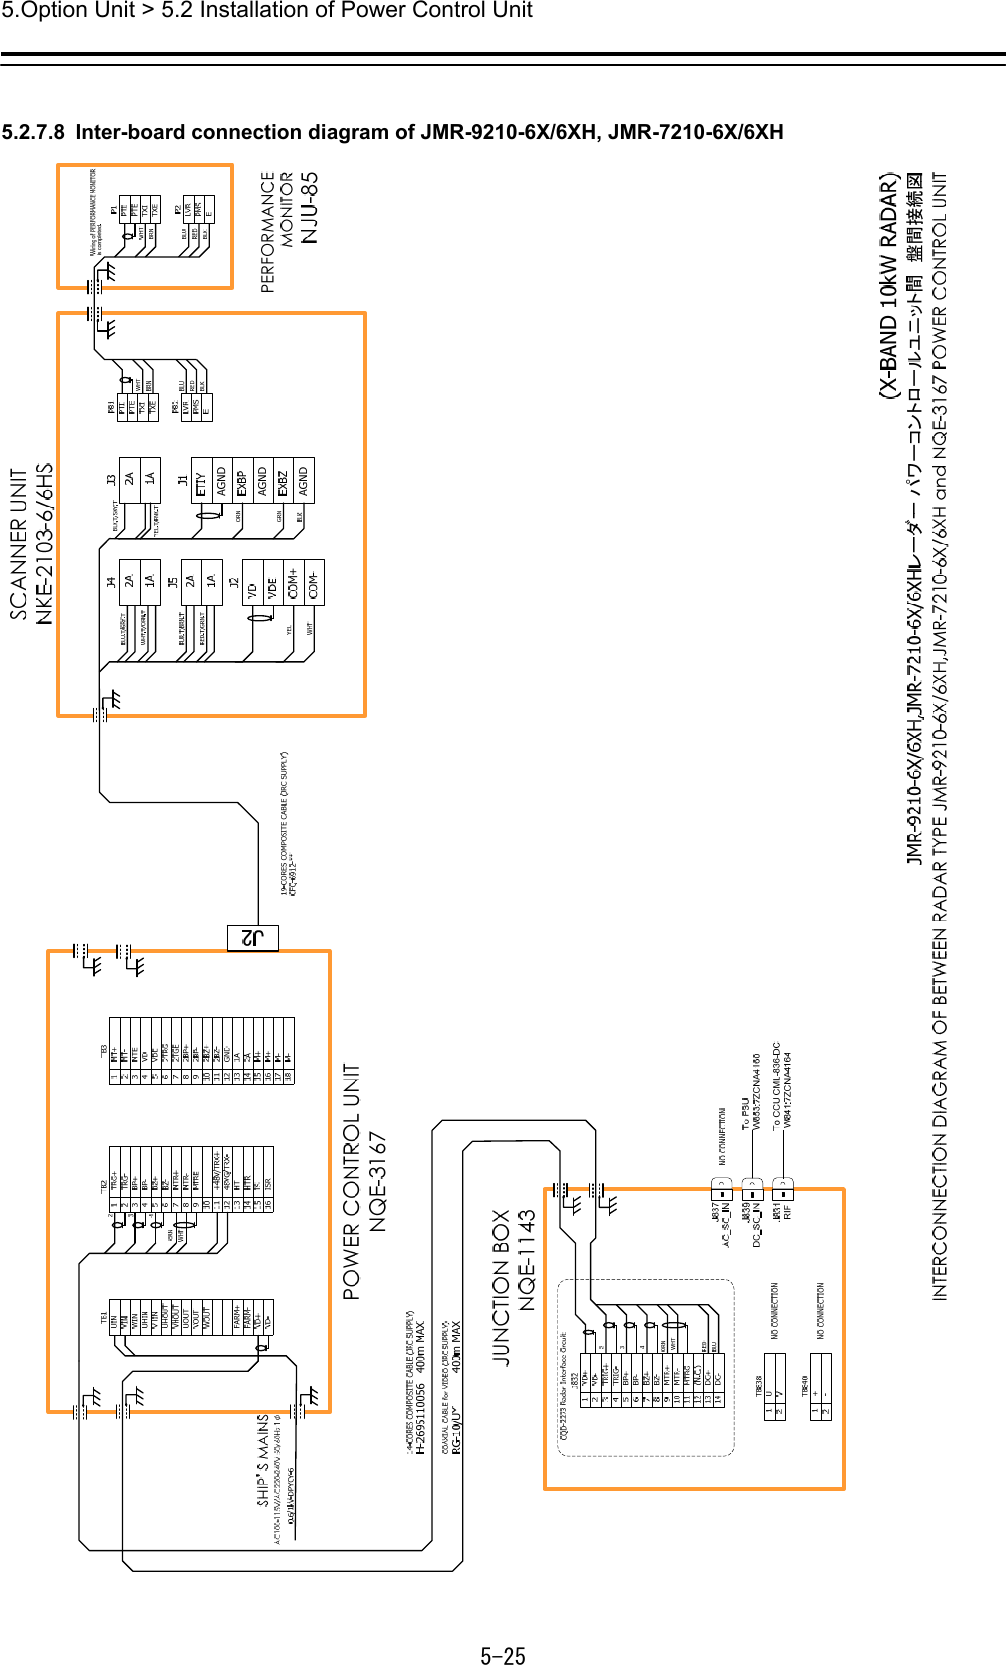
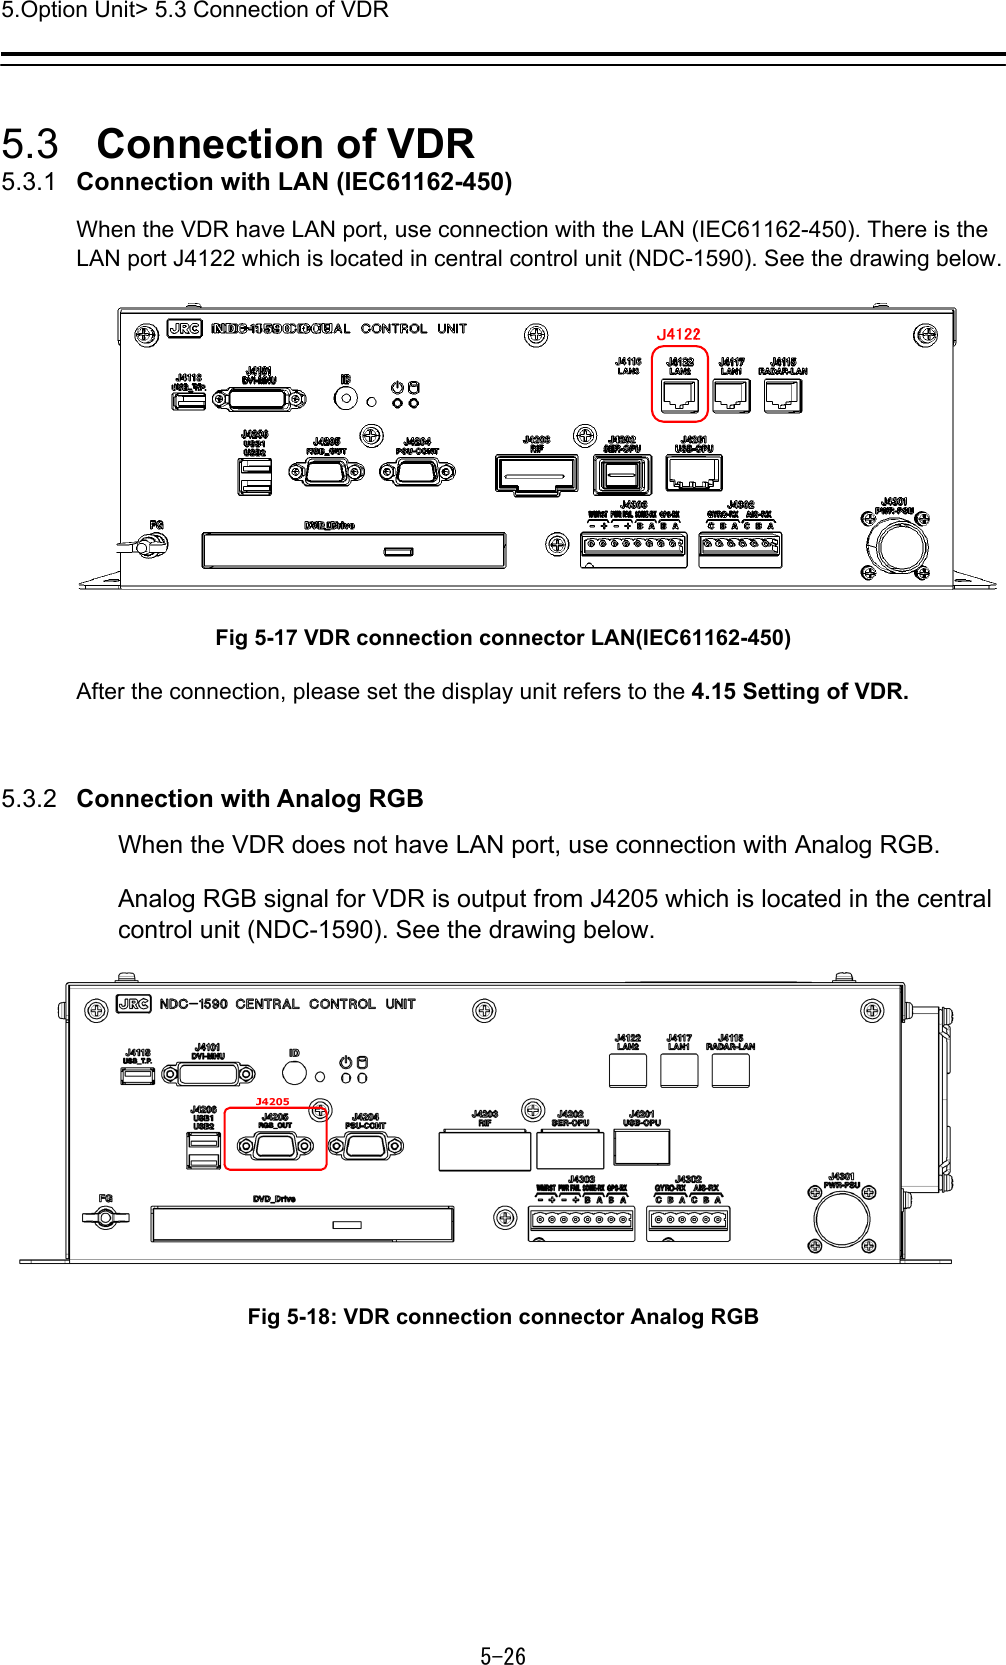
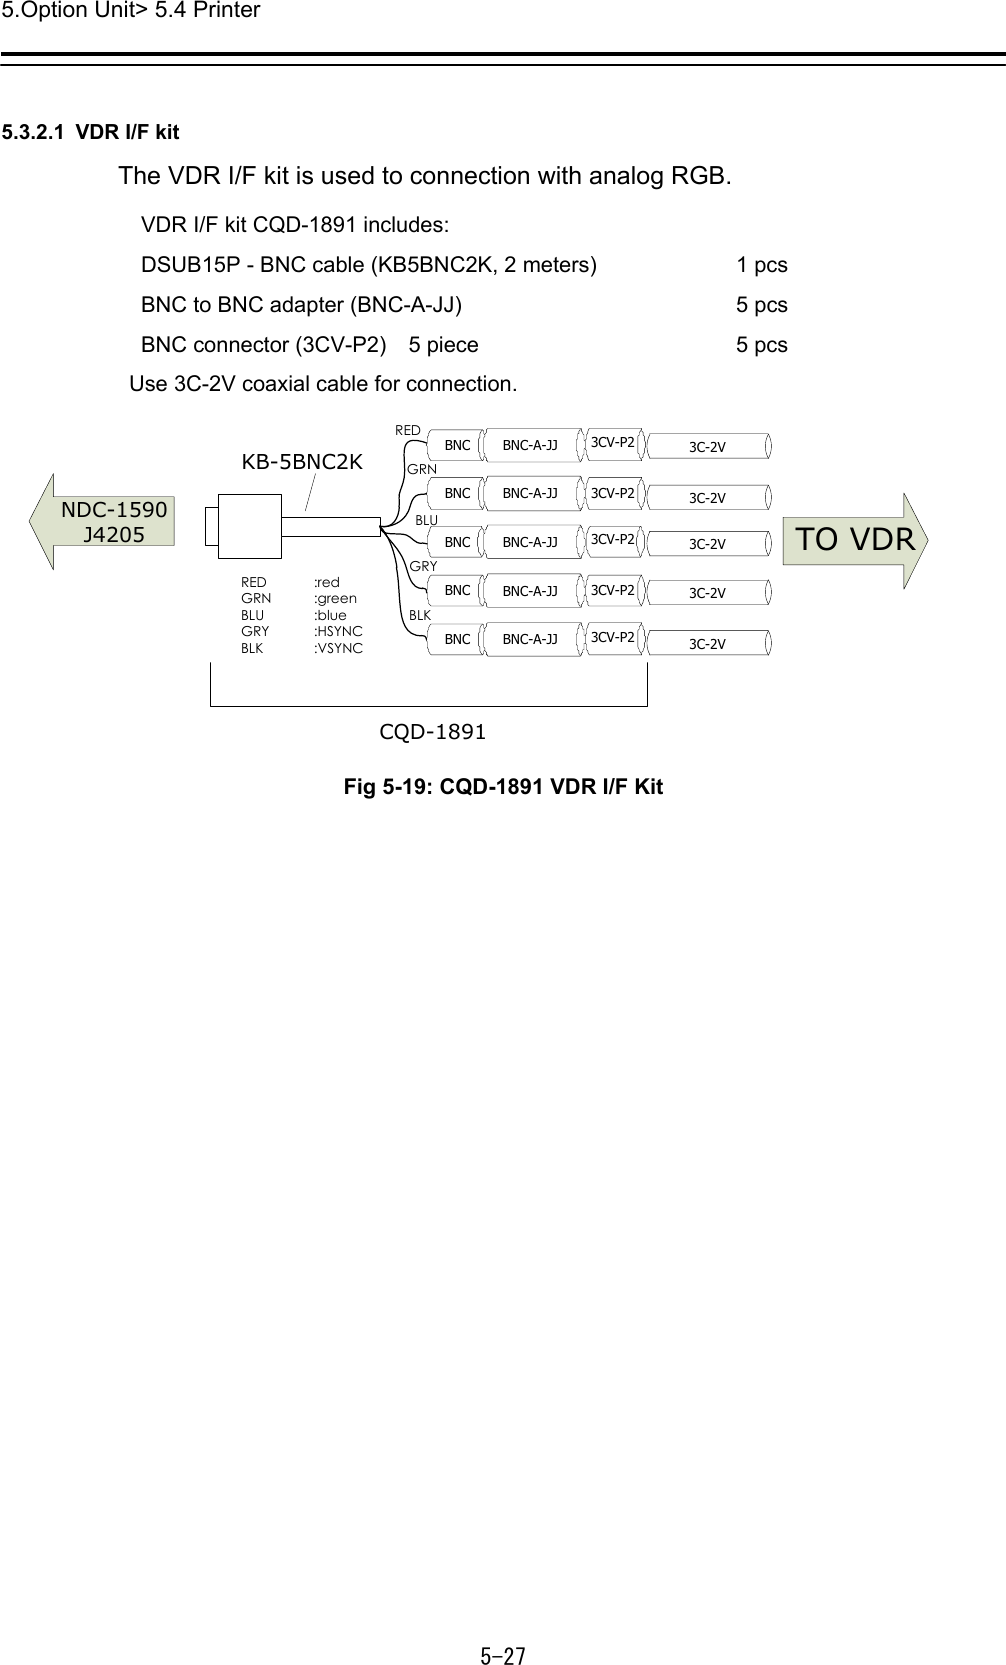
Installation Manual Part 7

![5.Option Unit> 5.4 Printer 5-31 3. Confirm default ”IP Address” and ”Subnet Mask” on the “HP Network Configuration Page”. 5.4.3.3 Setting Printer IP Address Set up the IP address of the printer according to the following procedures. 1. Power on this equipment. 2. After the default task starts, click the [Menu] button of the “Left Tool Bar”. The “Menu” dialog is displayed. Default ”IP Address” and ”Subnet Mask” IP Address Subnet Mask ex)](https://usermanual.wiki/Japan-Radio/NKE2632.Installation-Manual-Part-7/User-Guide-2791040-Page-31.png)
![5.Option Unit> 5.4 Printer 5-32 3. Click [Code Input] button. The “Password” dialog is displayed. 4. After the password "0009" is input with the software keyboard, click the [Enter] button. The [service] button is added to the menu. Once the [Service] button is added, it will be dis-played until the task menu is finished. 5. Click the [Service] button of the “Menu” dialog. The sub menu of [Service] is displayed. 6. Click the [Installation] button. The “Installation” dialog is displayed.](https://usermanual.wiki/Japan-Radio/NKE2632.Installation-Manual-Part-7/User-Guide-2791040-Page-32.png)
![5.Option Unit> 5.4 Printer 5-33 7. [System Configuration] is chosen by the first classification pane, and [Network] is chosen by the second classification pane. The “Network” dialog is displayed on the edit pane. Make a note of the present IP address. 8. According to the following explanation, input the IP address of "Own Task Station" and click the [Set] button. 9. Click the [Code Input] button of the “Menu” dialog. And after the password "9999" is input with the software keyboard, click the [Enter] button. The task is finished and it returns to the task menu screen. 1st to 3rd octet Input the default IP address of the printer. 4th octet Input a different value from the default IP address of the printer. Click after input Make a note of the IP address.](https://usermanual.wiki/Japan-Radio/NKE2632.Installation-Manual-Part-7/User-Guide-2791040-Page-33.png)
![5.Option Unit> 5.4 Printer 5-34 10. Input the password "0913" into the “Code input” box of the task menu screen. The “Internet Explore” is displayed. 11. Input [http://IP address of printer] into the address bar. “HP Officejet Pro 8100 N811a” page is displayed.](https://usermanual.wiki/Japan-Radio/NKE2632.Installation-Manual-Part-7/User-Guide-2791040-Page-34.png)
![5.Option Unit> 5.4 Printer 5-35 Note: When following error is displayed, delete “Temporary Internet files” as follows. 1) Start Internet explorer again. Select "Tools" - “Internet Options…" 2) “Internet Options" dialog is displayed. Click [Delete...] button. Click [Delete...] button 1) Select "Tools". 2) Select “Internet Options…".](https://usermanual.wiki/Japan-Radio/NKE2632.Installation-Manual-Part-7/User-Guide-2791040-Page-35.png)
![5.Option Unit> 5.4 Printer 5-36 3) “Delete Browsing History” dialog is displayed. Check “Temporary Internet Files” and click [Delete] button. 12. Click [Network] and select ”IPv4”of ”Wired (802.3)”. 13. Enter “Manual IP Address”, ”Manual Subnet Mask” and “Manual Default Gate-way” according to bellow diagram. After enter the value, click button. 1) Click ”Network” tab 2) Select ”IPv4” 1) Check "Temporary Internet files" 2) Click [Delete] button](https://usermanual.wiki/Japan-Radio/NKE2632.Installation-Manual-Part-7/User-Guide-2791040-Page-36.png)
![5.Option Unit> 5.4 Printer 5-37 No.1 Printer No.2 Printer IP Address 172.16.60.181 172.16.60.182 Subnet Mask 255.255.0.0 255.255.0.0 Default Gateway 172.16.60.225 172.16.60.225 14. After setup, close the "Internet Explore" and start a task. 15. Return the IP address of this equipment to the original value according to the proce-dure of 8. 16. The IP address assigned for the printer setup is added to Network List of the Network dialog. Check the line of relevance and click the [Delete] button. 1) Check 2) Click [Delete]button](https://usermanual.wiki/Japan-Radio/NKE2632.Installation-Manual-Part-7/User-Guide-2791040-Page-37.png)
![5.Option Unit> 5.4 Printer 5-38 5.4.4 Equipment setup The existence of a printer is set up by equipment setup of a subsystem. Change the equipment setup of the subsystem in the “Subsystem Installation” dialog. Note: Refer to 4.4 "Subsystem Installation". 1. Click the [Menu] button of the “Left Tool Bar”. The “Menu” dialog is displayed. 2. Click [Code Input] button. The “Password” dialog is displayed. 3. After the password "0009" is input with the software keyboard, click the [Enter] button. The [service] button is added to the menu. Once the [Service] button is added, it will be dis-played until the task menu is finished. 4. Click the [Service] button of the “Menu” dialog. The sub menu of [Service] is displayed. 5. Click the [Installation] button. The “Installation” dialog is displayed. 6. [System Configuration] is chosen by the first classification pane, and [Subsystem Instal-lation] is chosen by the second classification pane. The “Subsystem Installation” dialog is displayed on the edit pane.](https://usermanual.wiki/Japan-Radio/NKE2632.Installation-Manual-Part-7/User-Guide-2791040-Page-38.png)
![5.Option Unit> 5.4 Printer 5-39 7. Check [Printer] in "Device Installation" and click the [Set] button. 1) Check 2) Click [Set]button](https://usermanual.wiki/Japan-Radio/NKE2632.Installation-Manual-Part-7/User-Guide-2791040-Page-39.png)
![5.Option Unit> 5.4 Printer 5-40 5.4.5 Confirming Printing Operation Confirm the printer prints normally on the sheet according to the following procedures. Since there is no print function in "Conning Display", it cannot confirm in "Conning Display". 1. Click the [Print] button of “Left Tool Bar”. 2. Confirm a screen image on display is printed. When the image cannot printed Set the printer port refer to the following steps. In this steps need the keyboard. When there is no keyboard operating unit, prepare the keyboard of a USB interface. 1. Input the password [9999], and click the [Enter]. Task manager will open. Input the password [9999] and click the [Enter]. Click [Print] button](https://usermanual.wiki/Japan-Radio/NKE2632.Installation-Manual-Part-7/User-Guide-2791040-Page-40.png)
![5.Option Unit> 5.4 Printer 5-41 2. Select the [File]-[New Task(Run…)]. 3. Following dialog opens. Input the [explorer] and click the [OK] button. 4. Click the [Open Control Panel] from the open explorer. Click the [Open Control Panel].1)Input the [Explorer]. 2)Click the 「OK」 button. Select the [New Task(Run…)].](https://usermanual.wiki/Japan-Radio/NKE2632.Installation-Manual-Part-7/User-Guide-2791040-Page-41.png)
![5.Option Unit> 5.4 Printer 5-42 5. Click the [Devices and Printers] from [Control Panel]. 6. Right-click the [HP Officejet Pro 8100(Network)] and select the [Printer properties]. 7. Click the [Add Port] button from[Ports] tab. 2)Click the [Add Port...].1)Click the [Ports] tab.1)Right click the [HP Officejet Pro 8100(Network]. 2)select the [Printer properties]. Click the [Devices and Printers].](https://usermanual.wiki/Japan-Radio/NKE2632.Installation-Manual-Part-7/User-Guide-2791040-Page-42.png)
![5.Option Unit> 5.4 Printer 5-43 8. Select the [Standard TCP/IP Port] and click the [New Port…] button. 9. Following dialog opens. Check the printer is connected to the network and turned on. After checking, click the [Next] button. Click the [Next] button.1)Click the [Standard TCP/IP Port] tab.2)Click the [New Port...] button.](https://usermanual.wiki/Japan-Radio/NKE2632.Installation-Manual-Part-7/User-Guide-2791040-Page-43.png)
![5.Option Unit> 5.4 Printer 5-44 10. Input the No.1 Printer IP address-[172.16.60.181] and click the [Next] button. When set the No.2 Printer, input the IP address [172.16.60.182]. 11. Click the [Finish] button. Setting of the printer port is end. Restart the display unit, and confirm a screen image on display is printed. Refer to the 5.4.5 Confirming Printing Operation. 12. Set the other display unit about the printer port By the same procedure(When the image cannot print 1-11). Setting of the printer port is end above. 1)Click the [Finish] button.2)Click the [Next] button.1)Input the IP address.](https://usermanual.wiki/Japan-Radio/NKE2632.Installation-Manual-Part-7/User-Guide-2791040-Page-44.png)