Kondo Kagaku T125003 Remote Control Transmitter User Manual manual 27 51
Kondo Kagaku Co., Ltd. Remote Control Transmitter manual 27 51
Contents
- 1. manual 52 78
- 2. manual 1 26
- 3. manual 27 51
manual 27 51
27
Features Main Menu
Function Menu
Connecting
the receiver Notes on
installing Description Index
Back Key
Enter Key
JogDial
+/- Key
Reset
Usage of the
transmitter
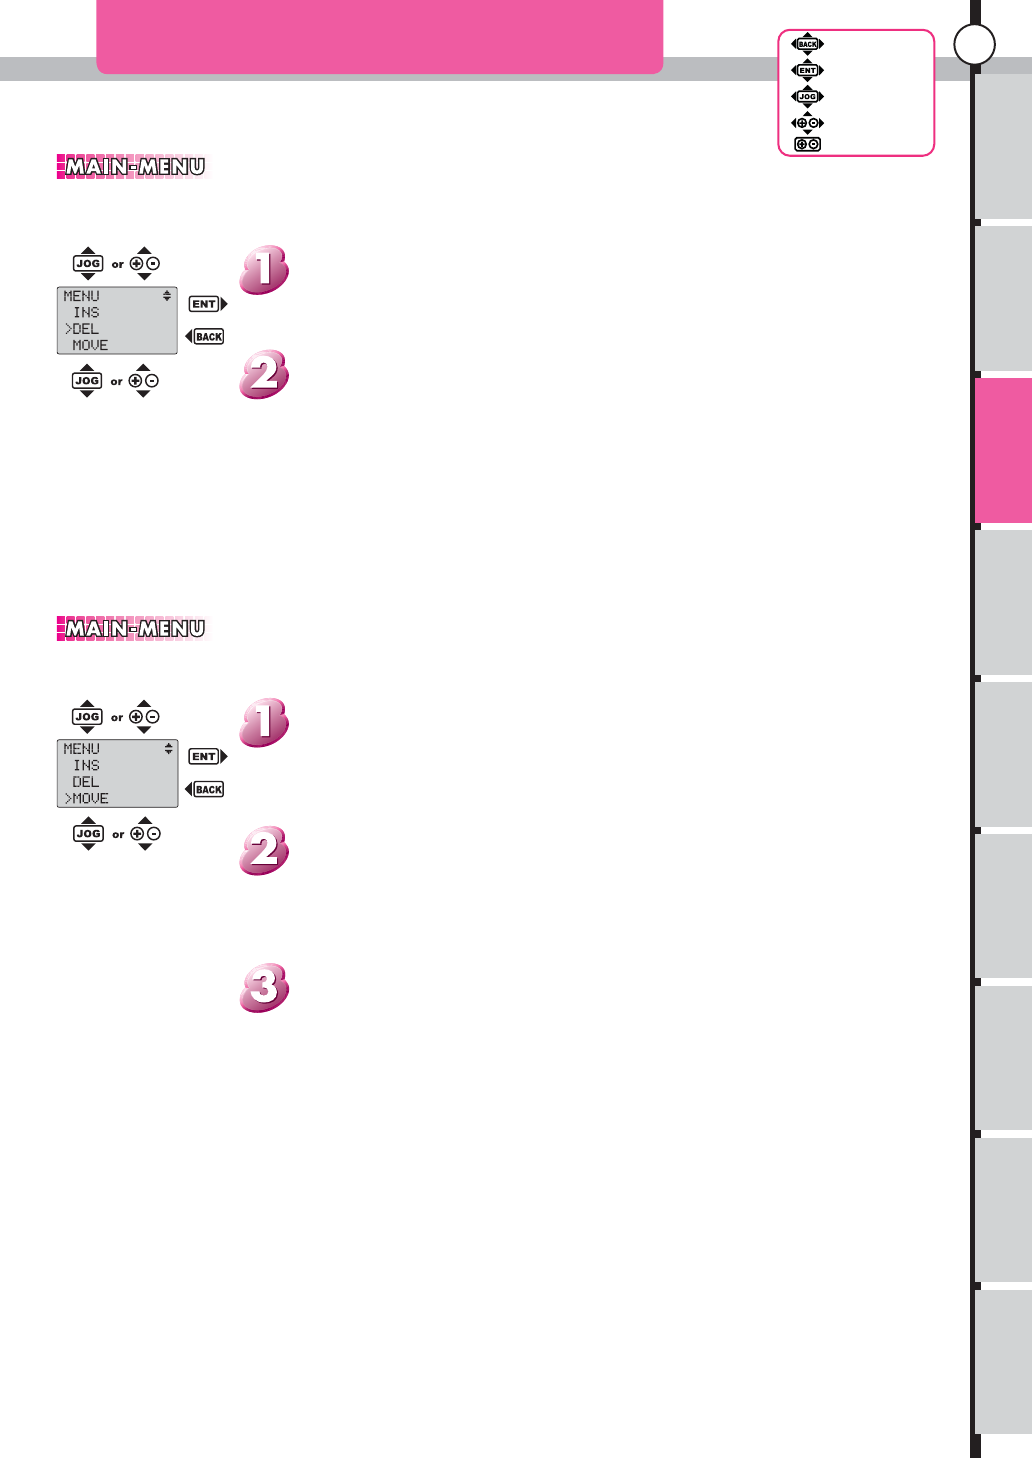
It is the menu displayed when "Enter" is pushed from the initial screen.
Main menu(2)
Delete the function from the menu list.
CUSTOM1 and CUSTOM2 can be delete.(It is not possible to delete MASTER)
Menu deletion
The cursor moves with Jogdial or the +/- key. Select
the function name that needs to be deleted and push
"Enter". Even if the deletion ends, it is possible to delete
it continuously.
Select function name
Select the added list name.
Move the cursor to either of CUSTOM1 or CUSTOM2
with Jogdial or +/- key and push "Enter"
Select list name
DRAF
T
Back Key
Enter Key
JogDial
+/- Key
Reset
Features Function Menu Connecting
the receiver
Usage of the
transmitter Notes on
installing Description Index
Main Menu
28
MAIN MENU (3)
Back Key
Enter Key
JogDial
+/- Key
Reset
Main Menu
DRAF
T

29
Features Main Menu
Function Menu
Connecting
the receiver Notes on
installing Description Index
Back Key
Enter Key
JogDial
+/- Key
Reset
Usage of the
transmitter
It is the menu displayed when "Enter" is pushed from the initial screen.
MAIN MENU (4)
Adjusting the contrast to a very light setting in a high temperature
room may cause characters to become invisible at low temperatures
out doors. please be careful.
BUZZER TONE
SYS: System default tone
CS1: Custom Tone 1
CS2: Custom Tone 2
CS3: Custom Tone 3
CS4: Custom Tone 4
CS5: Custom Tone 5
CS6: Custom Tone 6
UP.T
LAP.T
DOWN.T
POWER
BATTERY
STARTUP
UP Timer
Lap Timer
Down Timer
Power Alarm
Battery Alarm
Startup
Up Timer
Lap Timer
Down Timer
Power Alarm
Battery Alarm
Startup
A buzzer sound sounds in various Sheen, but it
is setting about that buzzer sound
Can edit or create the tone.
Adjust An interval of a buzzer. An interval of
normal beep sound changes.
Push "Enter" key at each item, cursor will change from
after change cursor use Jogdial or +,- keys to change the setup.
ALARM BUZZER
Jog Dial or +,- keys to adjust the interval of the buzzer.
CUSTOM TONE
ALARM BUZZER
BUZZER TONE
BUZZER Setting about the buzzer sound which a system sounds. Three setting about a buzzer.
Use "Jog dial" key or "+,-" keys. to adjust contrast of LCD display.
can adjust contrast at 8 stages.
CONTRAST (LCD Contrast) Adjust contrast of LCD display.
DRAF
T
Back Key
Enter Key
JogDial
+/- Key
Reset
Features Function Menu Connecting
the receiver
Usage of the
transmitter Notes on
installing Description Index
Main Menu
30
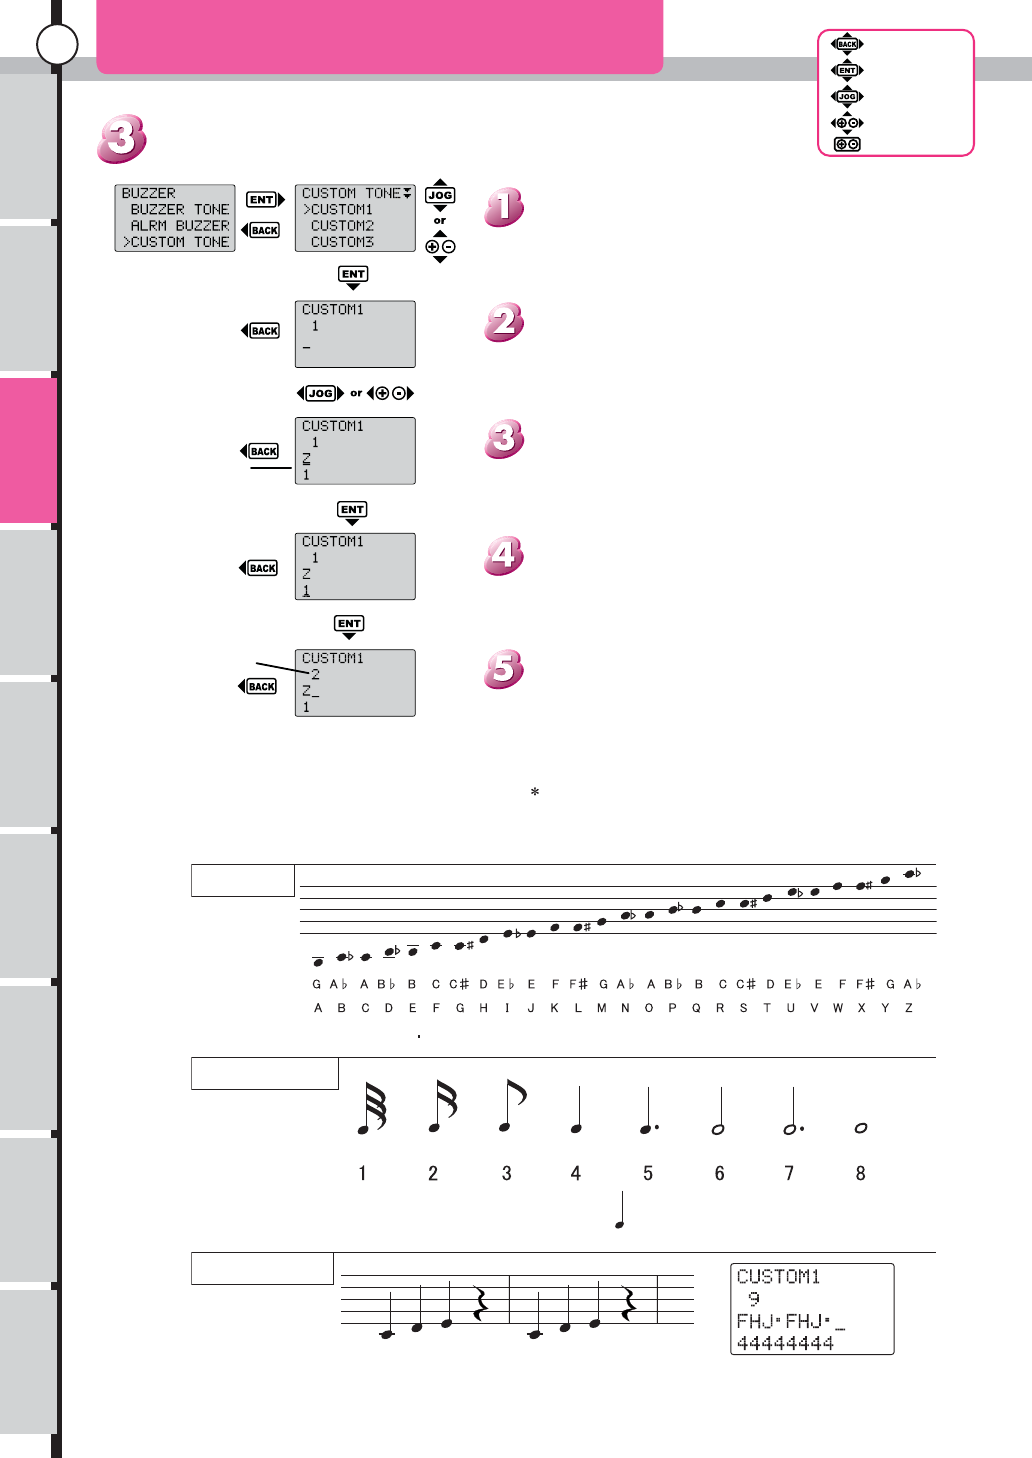
Custom tone editor
MAIN MENU (5)
Back to select number
Change data
pointing cursor
Return to Select
number
Return to Select
number
Return to Select
number
The upper part is an
interval.
The lower part is
length of a sound.
Display the position
of sounds now.
LCD indication
Note
In LCD indication.
Length of each note is fixed. Tempo become
Interval
Length of a sound
The input example
LCD indication
(Point) means Long silence (a rest).
Name of musical
pitch
=120
Move the cursor to the custom(1 to 6), using Jog
Dial or "+,-" keys.
In this example there is no data yet.
Use Jog dial or "+,-" keys to choice the sounds. and
push Enter key. (A to Z.see down for details)
Cursor move to the next row to choice the lenght of the
sounds. (1 to 8)
When push Enter key, cursor will move to next line.
Push reset key (push + and - keys Together) to clear the data after
the cursor.
A real interval and relation with indication seem to become follows.
DRAF
T
31
Features Main Menu
Function Menu
Connecting
the receiver Notes on
installing Description Index
Back Key
Enter Key
JogDial
+/- Key
Reset
Usage of the
transmitter
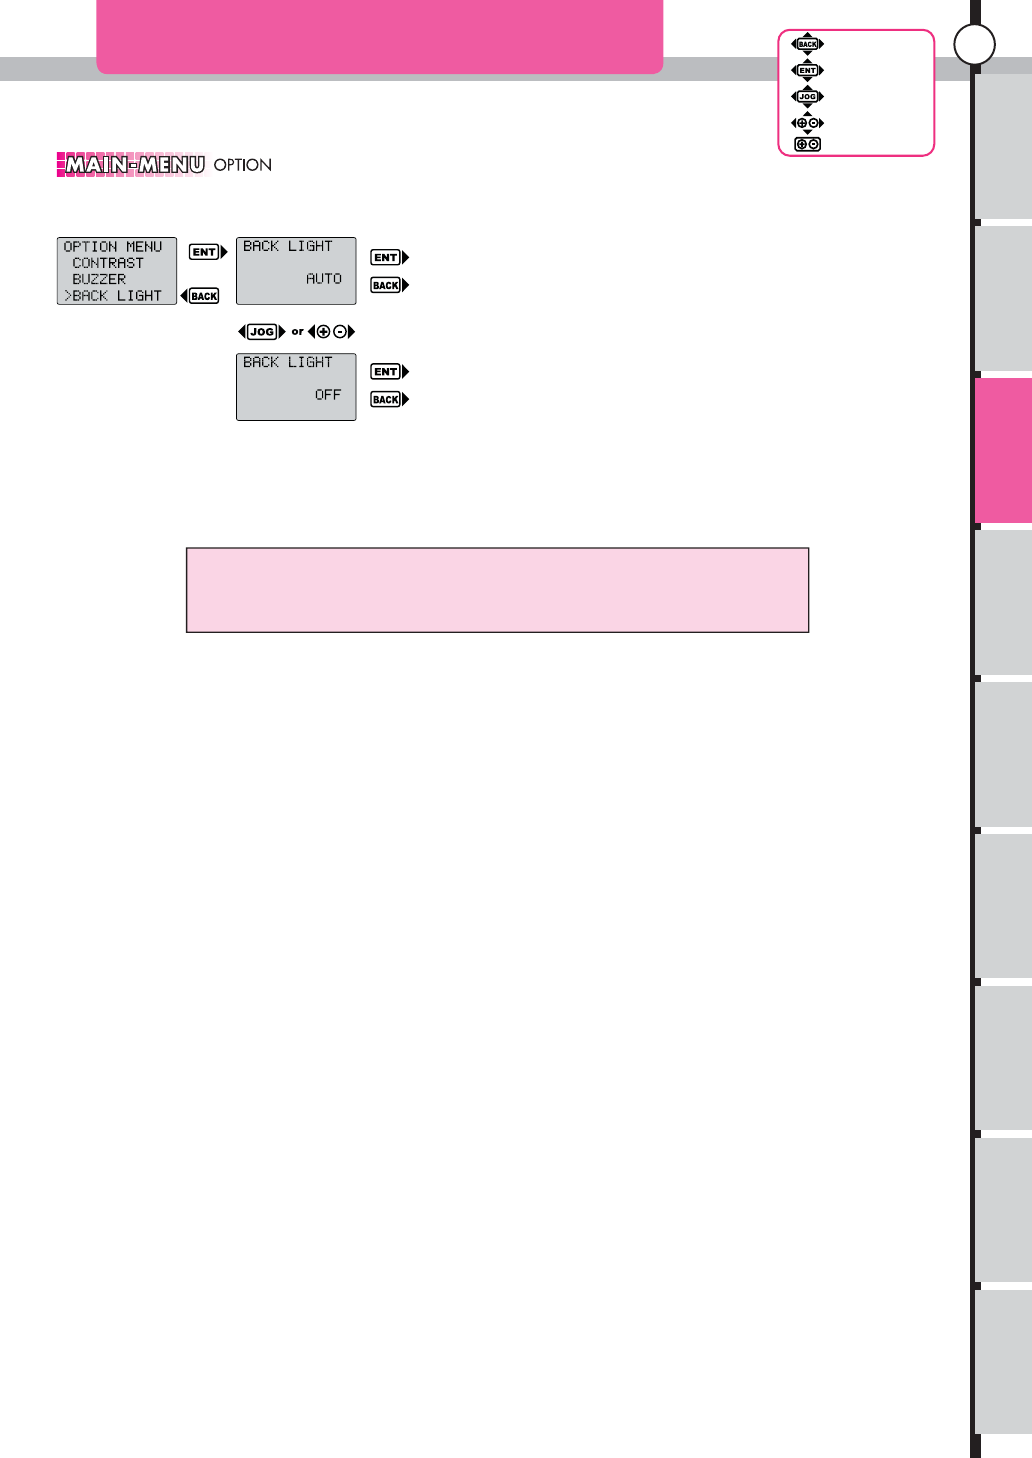
This is the menu displayed when "Enter" is pushed from the initial screen.
MAIN MENU (6)
Setting will change when you
pushed Enter key or Back key.
Change Setting
Setting of backlight doesn't turn on even "Auto". besides a
Function Key, ET lever, BT button.
Set the lighting method of the backlight.
Can choose from "AUTO" and "OFF".
BACK LIGHT
AUTO: lighting the display When key function
was done. or, when "auto display" are active.
When didn't operate any key, the light will be
off. (around 3 sec.)
(Factory default is AUTO.)
OFF: Back lights are always off.
DRAF
T
Usage of the
transmitter Features Main Menu Connecting
the receiver Notes on
installing Description Index
32
Back Key
Enter Key
JogDial
+/- Key
Reset
Function Menu
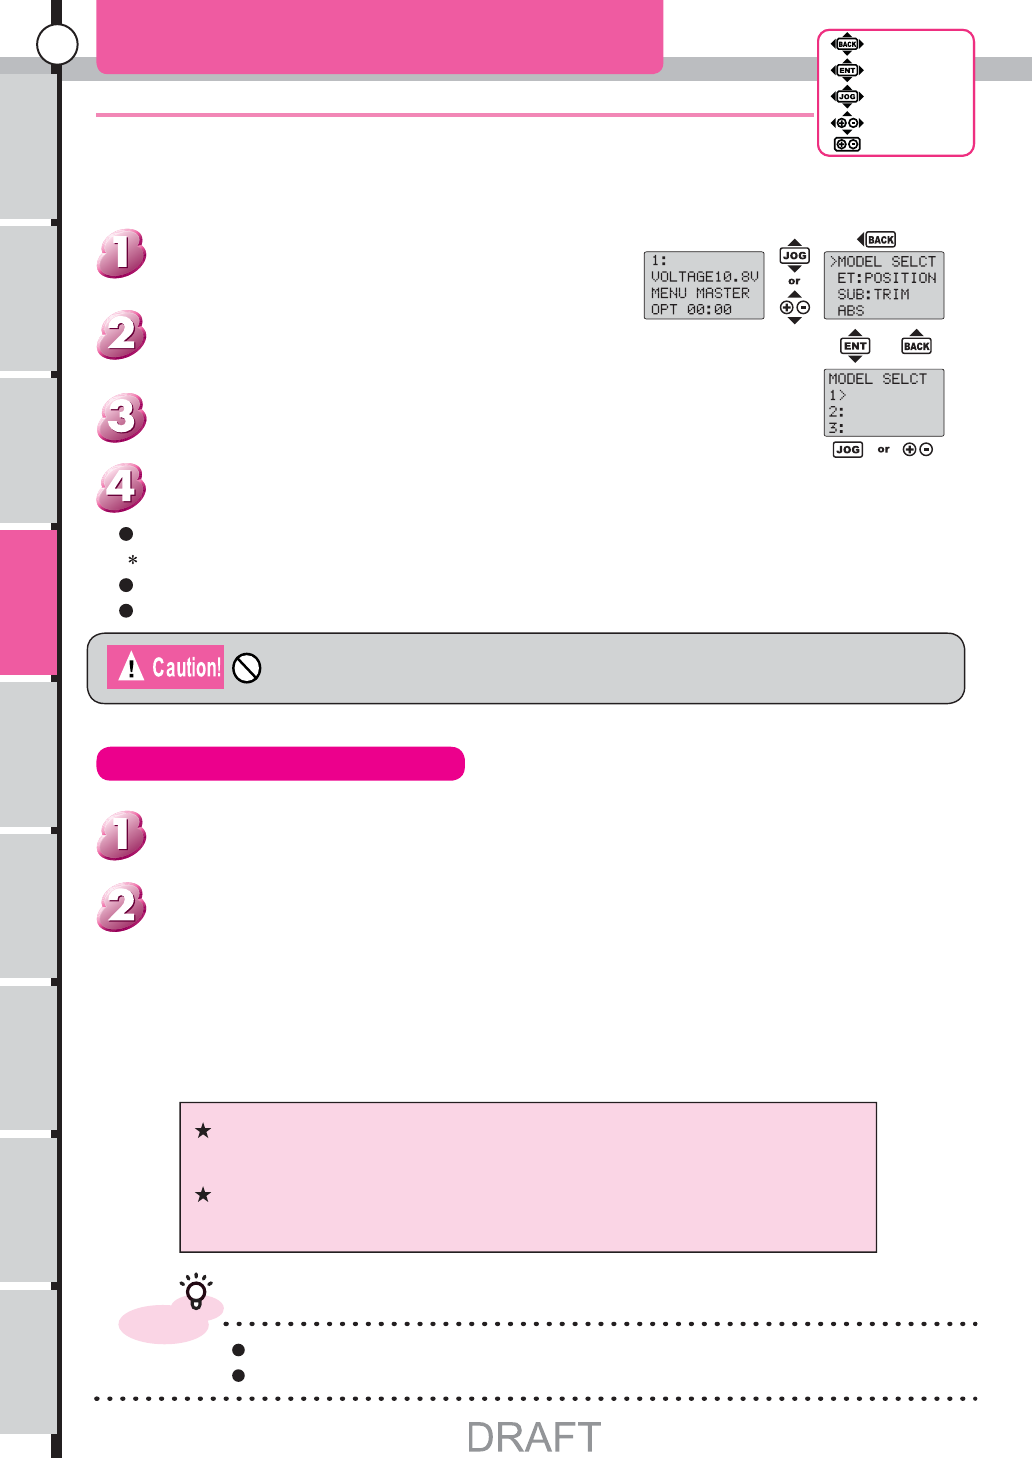
MODEL SELECT
It is cause of out of control when Changing Model memory while running.
Model memory 0(Zero)
Use Model select function to change to other Model memory
(Data in Model memory 0 will lost)
Copy the Setup of MEMORY 0 to other memory by MODEL
COPY (page 53)
advice
Setup at Function menu. that can save at MODEL MEMORY
Can not set per Model memory the setup at main menu (see page 26).
Model 0 will display when do this control as follow.
Do following procedure to back to Ordinarily MODEL MEMORY. don't come back unless this
operation is done
Model memory 0 use for avoid Lost the data
When remove the DATA PACK while using MODEL MEMORY of DATA PACK
Model memory 0 use for avoid Lost the data
When model memory in data pack was used, and it was switched off, and data pack was pulled,
and it was switched on
Back Key
Enter Key
JogDial
+/- Key
Reset
Can put a name at Model memory (max 10 character)
Memory of unit display at 1 to 9. A to P for Data Pack.
It is usable to assign each car the each number.
Even same car, can change the Setting every course.
Back to function menu with out any changes when push BACK key.
Push Enter at the MODEL number to select.
In MODEL SELECT Screen. Control Jog dial or +,-
keys to move the cursor at left side
Use Jog dial or "+,-" keys to select MODEL SELECT at
function menu. then Push "ENTER" key
[How to open the screen]
Can save the setting for 9 car
Select model memory
Usage of the
transmitter Features Main Menu Connecting
the receiver Notes on
installing Description Index
33
Back Key
Enter Key
JogDial
+/- Key
Reset
Function Menu
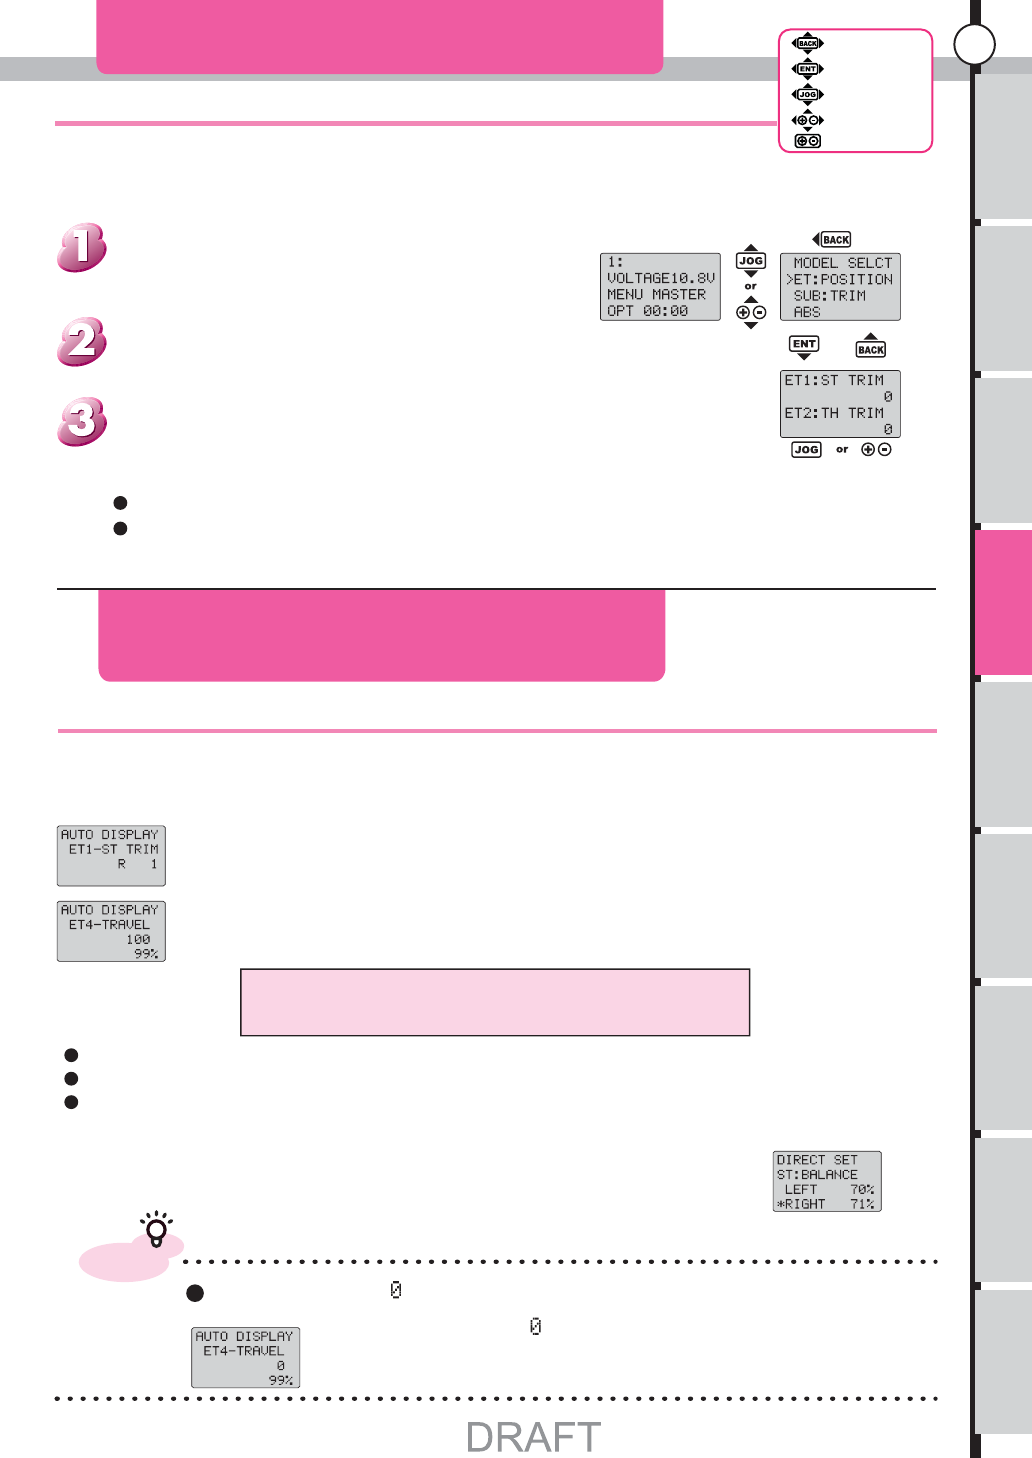
Confirm Position of ET rever.
ET POSITION
AUTO DISPLAY
DIRECT SET
An original screen is returned to in about 3 seconds
Push BACK key to returened to original screen.
advice
When persentage is . the function was not working
sample: Steering travel is
Steerring wheel not working In this case.
Can change the assigned button to other button when use SET UP function (see page 60)
When control the ET. The Auto display will activate,
Push BACK key to return to initial screen.
AUTO DISPLAY didn't function when display the MAIN MENU (see page 26)
AUTO DISPLAY didn't function when display the SET UP (see page 60)
Can adjust the Steering balance to Push ET that assigned Steering trim then control the steering to right or left. it's
call Direct set.
ET1 : Display Steering Trim.
If a function is assigned to an ET lever, control contents of a controlled lever are displayed automatically.
When the lever which a function is assigned to is controlled, contents
are displayed automatically.
At ET POSITION they displaed function name assigned
and the value of each setup.
From initial screen. use "Jog dial" key or "+,-" keys. to
open Function menu.
Select ET POSITION then push ENTER.
[How to open the screen]
Can confi rm the function name and value of setup
Can not adjust the setup from this function.
[Sample]
ET4 : Steering Travel.

Usage of the
transmitter Features Main Menu Connecting
the receiver Notes on
installing Description Index
34
Back Key
Enter Key
JogDial
+/- Key
Reset
Function Menu
Adjust the steering and throttle
can not put to the center point of neutral position of servo, when only using the linkage of car.
[How to open the set-up screen.]
SUB TRIM
SubTrim
Trim
(Center Trim)
advice
When getting bigger the value of sub trim please adjust the linkage and make it
smaller the value of sub trim.
See page 23 for more details
Back Key
Enter Key
JogDial
+/- Key
Reset
Function Menu
What is sub trim
Usually set the neutral of servo when put at car the servo, then adjust linkage. Use Sub trim to fine
adjustment
Different of trim and sub trim
Sub trim are not only the center point of servo, it is changed also the movement angle.
Push Back key to return to Initial screen.
Push Enter or Back key to done the setup.
The cursor will change from to . Adjust the value using by Jog dial or +,- keys.
Push + and - keys together to reset the value to .
Push "Enter" key. to enter setup menu. use "Jog dial" key or "+,-" keys. to adjust
the value.
Use "Jog dial" key or "+,-" keys. to choose the "ABS" from Menu list.
From initial screen. use "Jog dial" key or "+,-" keys. to open Function menu.
D
RAF
T
Usage of the
transmitter Features Main Menu Connecting
the receiver Notes on
installing Description Index
35
Back Key
Enter Key
JogDial
+/- Key
Reset
Function Menu
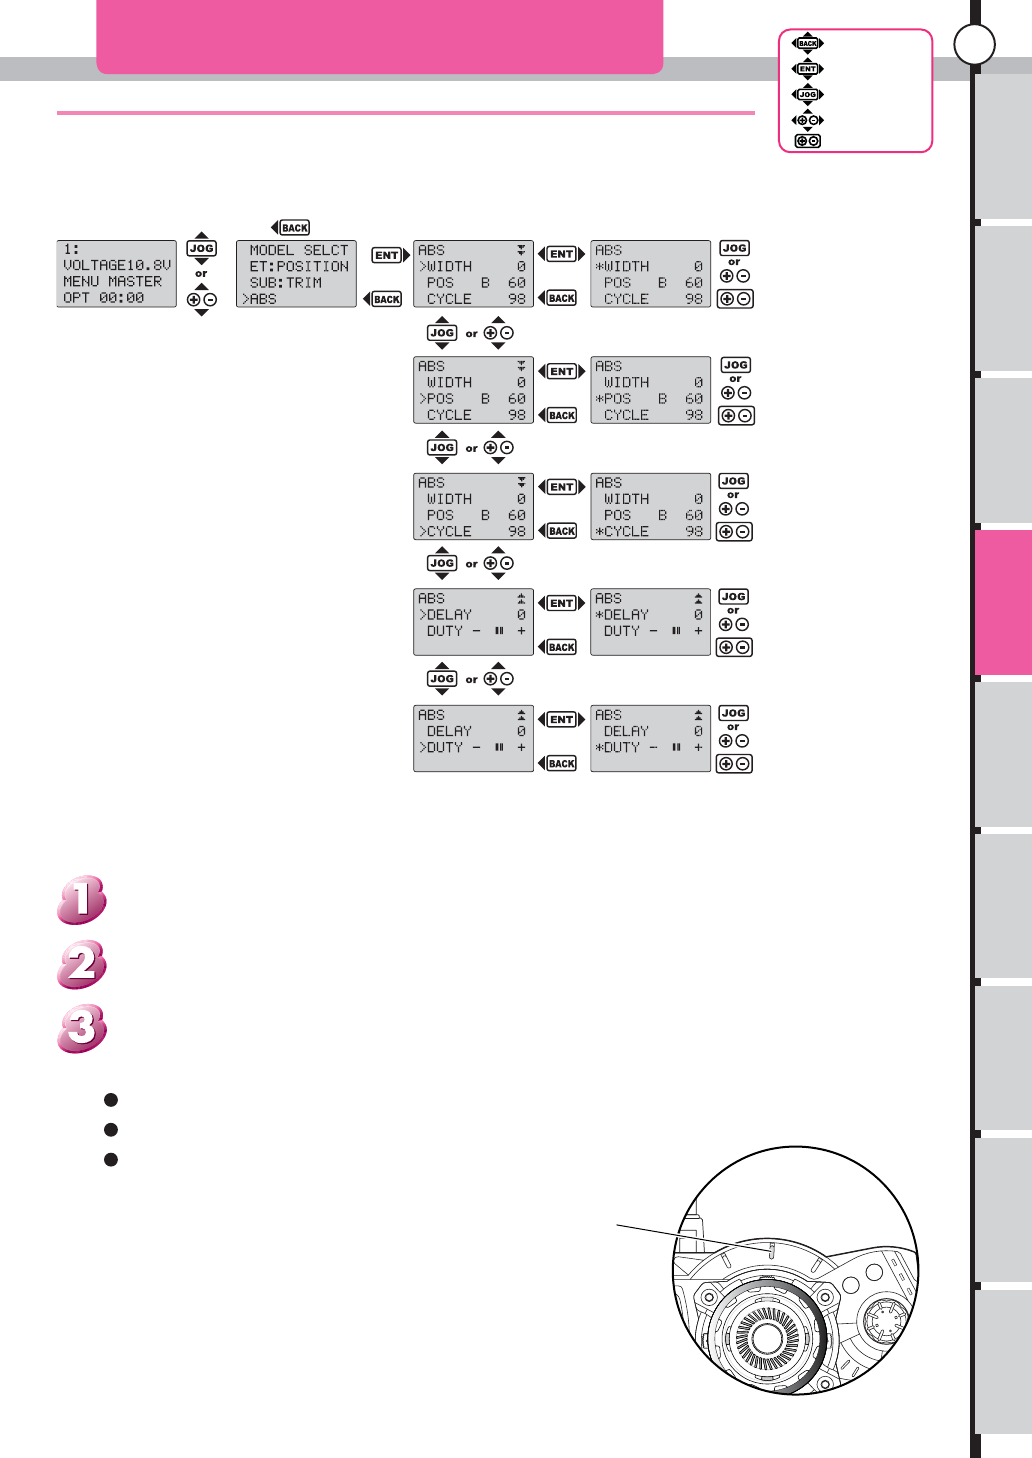
ABS Indicator
Pumping brake will activate, when use brake at throttle.
From initial screen. use "Jog dial" key or "+,-" keys. to open Function menu.
A.B.S (Active Brake controll System) 1
ABS indicator get blink. when ABS are active.
Can adjust the 5 parameter in ABS function.
Full brake are depend on to throttle brake (see Page 41).
Push "Enter" key. to enter setup menu. use "Jog dial" key or "+,-" keys. to adjust the value.
Use "Jog dial" key or "+,-" keys. to choose the "ABS" from Menu list.
[How to open the set-up screen.]
Foil locks it with brakes and is effective when posture of a car collapses.
As a result, a corner ring gets possible to be done smoothly.
DRAF
T
Usage of the
transmitter Features Main Menu Connecting
the receiver Notes on
installing Description Index
36
Back Key
Enter Key
JogDial
+/- Key
Reset
Function Menu
Set pumping
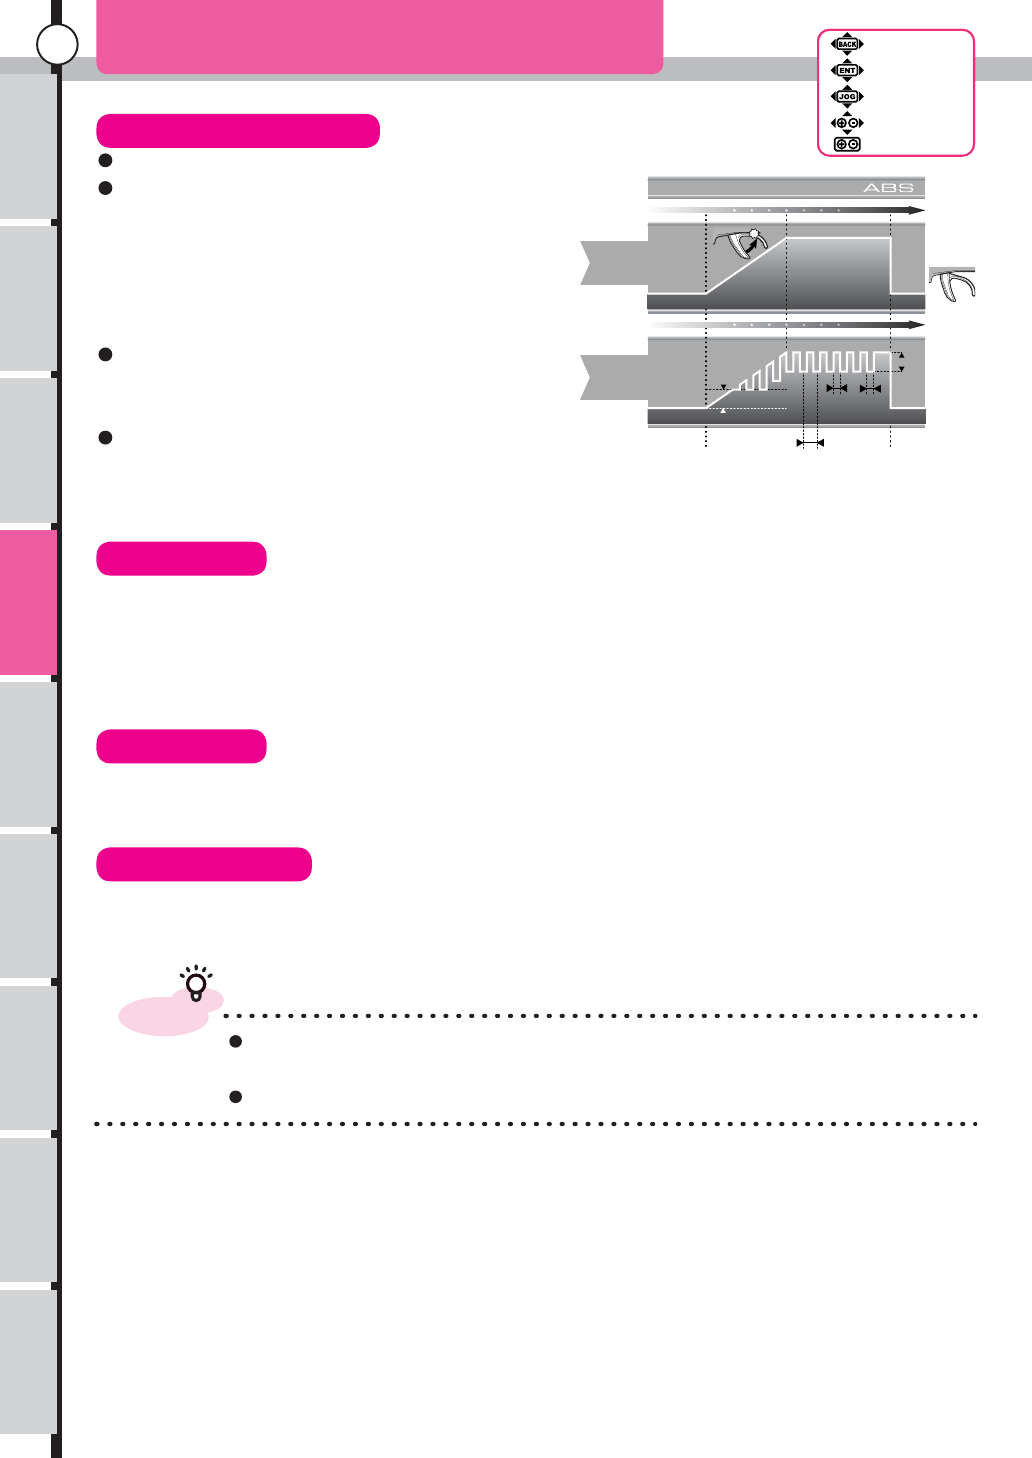
ABS movement will change at Control volume of
throttle trigger and position of width. Base at Position
of throttle triger. when width are 100. the servo move
back to position to set, The servo didn' move back to
point to set when make small the value of width.
The movement of servo getting bigger, when the
value at position setup are small.
BS doesn't function When set 0 to width, and then
set position to 100.
A.B.S (Active Brake controll System) 2
Back Key
Enter Key
JogDial
+/- Key
Reset
ABS width and position
ABS Cycle
ABS Delay
ABS Duty
advice
It will be easy to understand when servo connected instead of ESC at throttle
channel.
ABS function. it is depend at specification of servo.
Cycle
Neutral
Brake Max
Neutral
Brake Max
Operating
Trigger
Servo
movement
Operating
Trigger
Servo
movement
Time
Time
Width
Braking
Pos (beginning) B
A
A : B=Duty
N
Setting
ABS.WIDTH
ABS.POS 50
30
Set cycle of pumping action.
When make large the value. the servo move fast and cycle become short.
Set delay of ABS Action.
Make strong the brake when put the delay at this function
Set ratio of time to brake and time to release the brake with 7 stages.
D
RAF
T
Usage of the
transmitter Features Main Menu Connecting
the receiver Notes on
installing Description Index
37
Back Key
Enter Key
JogDial
+/- Key
Reset
Function Menu
Reaction velocity of a throttle is made late.
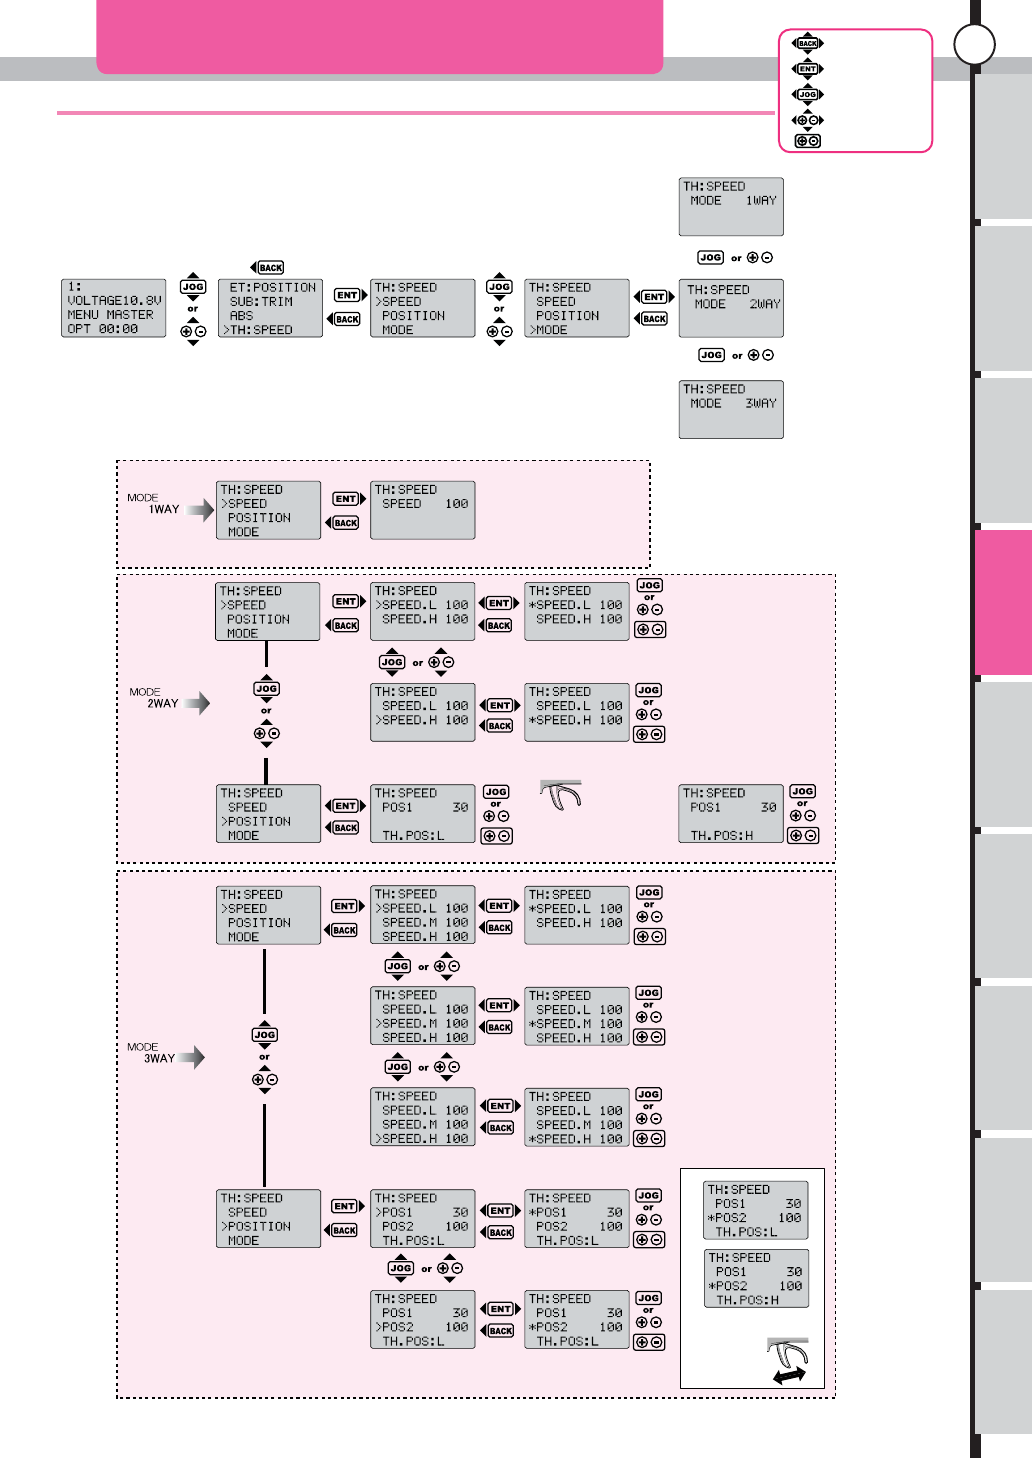
TH SPEED (Throttle speed) 1
Initial screen Function menu TH SPEED
Setup of SPEED and POSITION will change on setup of MODE.
In 1 WAY. can not select POSITION.
Indication of TH.POS
changes by a position
of trigger
Indication of TH.POS
changes by a position
of trigger
It to slow the changes of signal, to make easy to controll the car.
[How to open the set-up screen.]
DRAFT
DRAFT
Usage of the
transmitter Features Main Menu Connecting
the receiver Notes on
installing Description Index
38
Back Key
Enter Key
JogDial
+/- Key
Reset
Function Menu
When control the throttle quickly, the car might be out of control.
Use this function to limit the throttle speed.
TH SPEED (Throttle speed) 2
Throttle speed
MODE
POSITION
SPEED
Throttle Speed
Indicator
advice
As same as Engine car, This function are functioning also at The Electric car that using ESC.
Back Key
Enter Key
JogDial
+/- Key
Reset
When controll trigger position will appear
If throttle trigger are active the throttle indicator will blink
Can set at ET the speed of each aria (see page 60)
The value can set at ET are when set TH:SPEED at 100%
Can assign ON/OFF function at ET or BT button.
Even the value are not effective the light will be blinking when ON the function.
A setting item changes by setting value
Normally 100 is the Setting value. when make it smaller
the value reaction of servo getting smaller too.
The value of Position 1 are always same or smaller then
position 2.
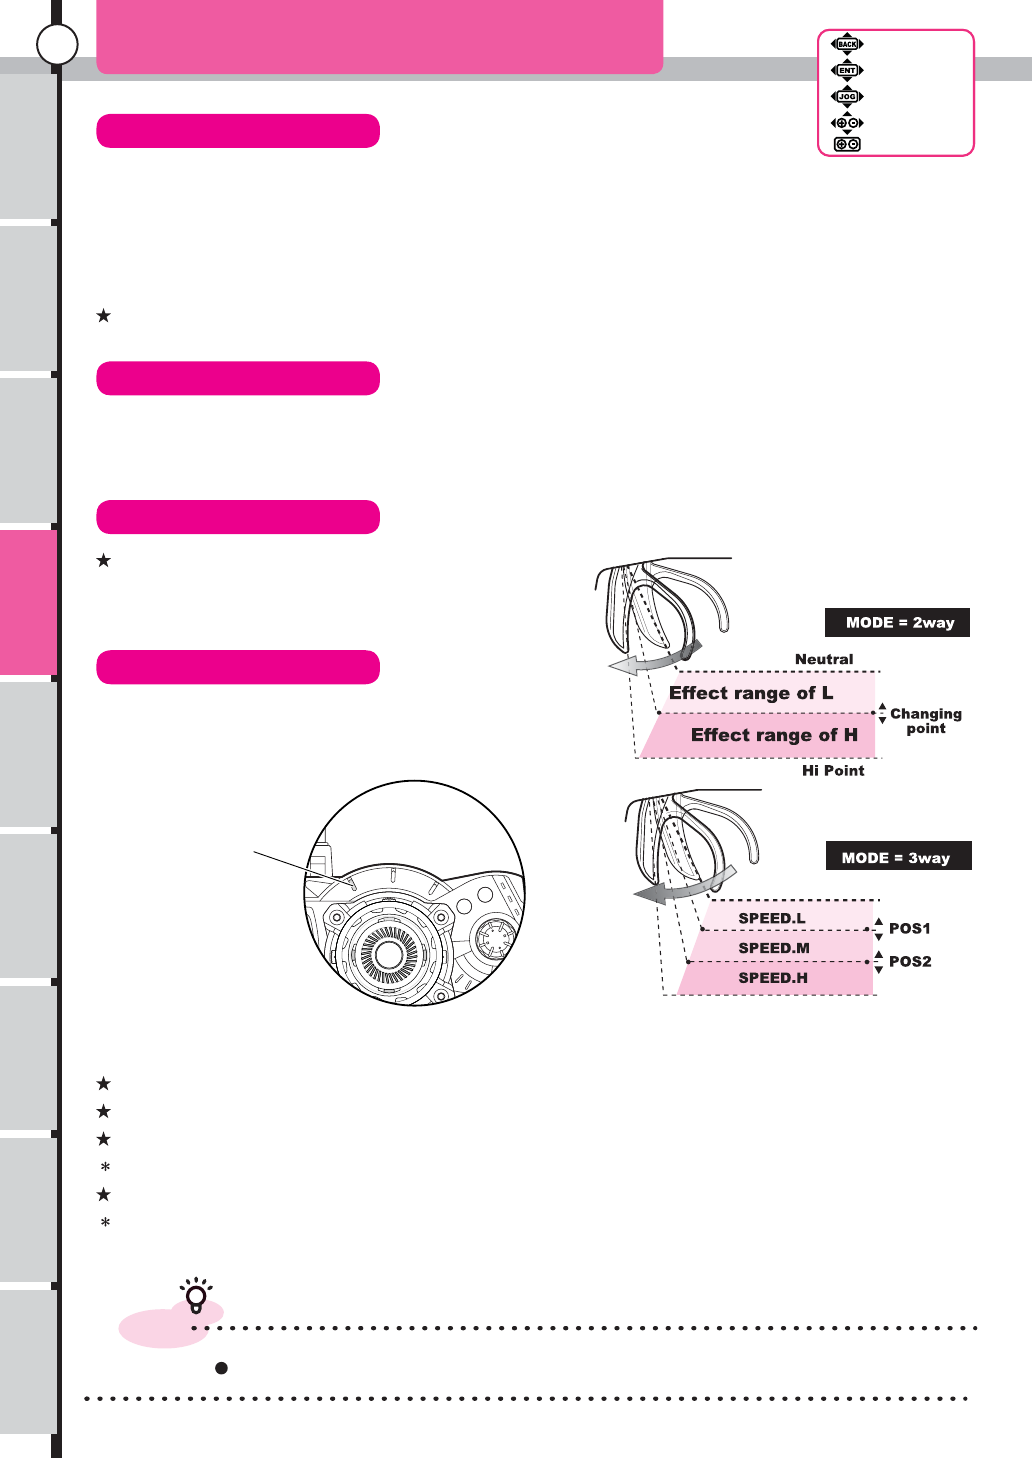
1 WAY: Use full area for the throttle trigger control
2 WAY: Divide to 2 areas the throttle trigger control
3 WAY: Divide to 3 areas the throttle trigger control
This function will effect when pull the trigger. It is not effective for Brake control.
In this function can set Speed, Position, Mode.
The Speed and Position setup will depend at mode setup.
Choose from 1 to 3 WAY
Set the divition of area
Set each speed of each
area
D
RAF
T
Usage of the
transmitter Features Main Menu Connecting
the receiver Notes on
installing Description Index
39
Back Key
Enter Key
JogDial
+/- Key
Reset
Function Menu
To adjust only an initial reaction of throttle.
When move the throttle to forward or to brakes. can skip the first field.
[How to open the set-up screen.]
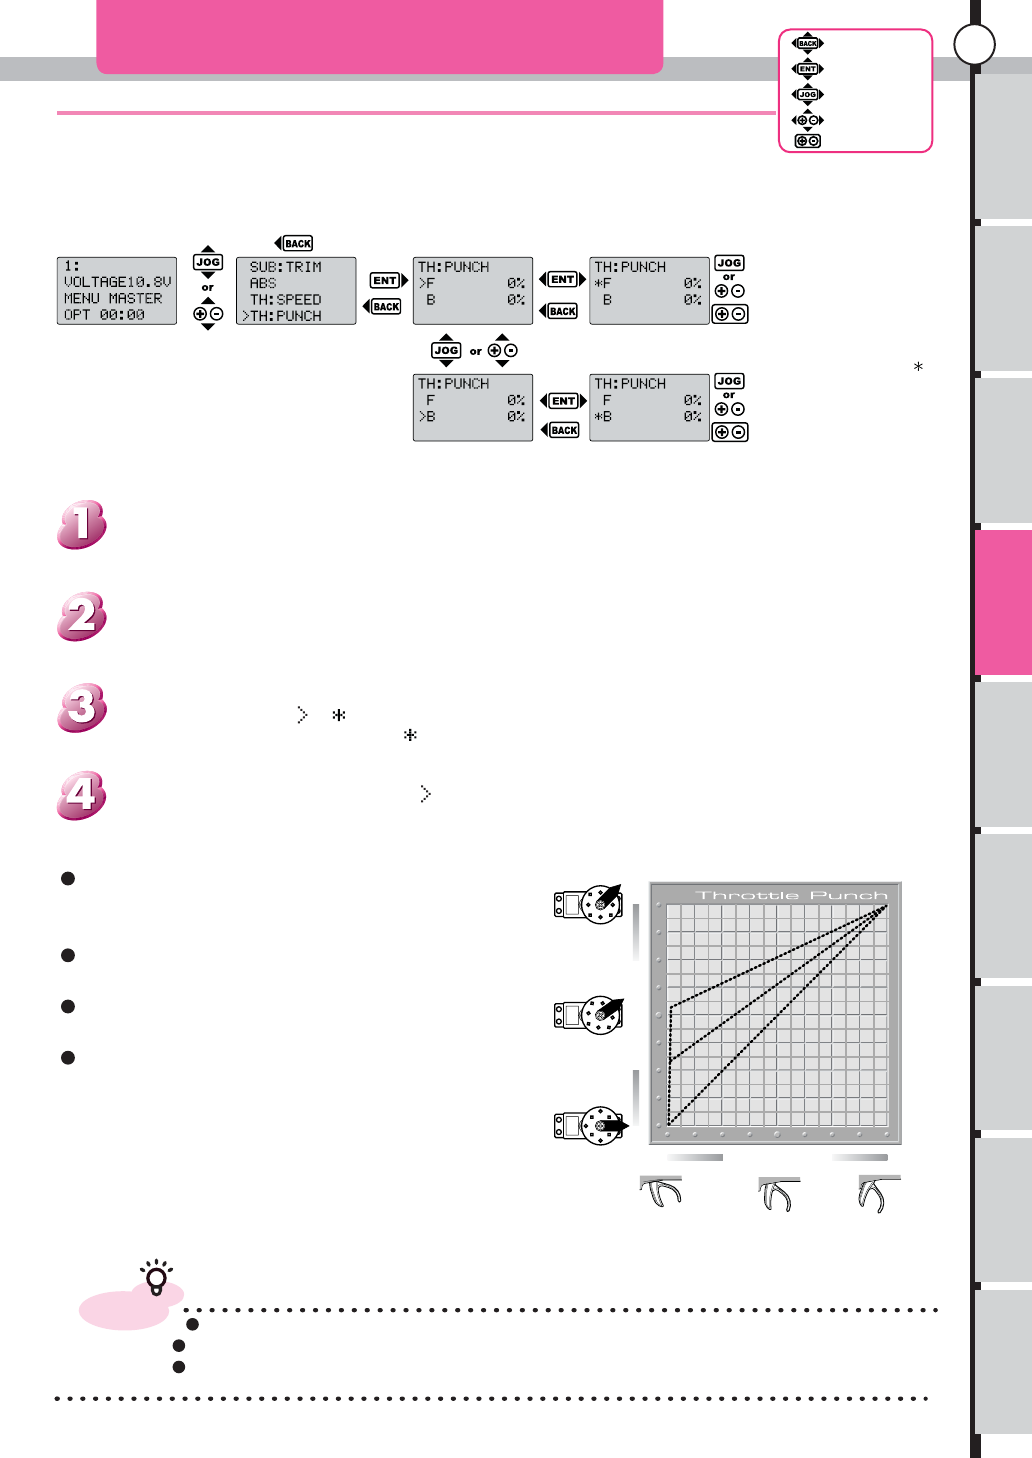
TH PUNCH (Throttle punch)
advice
This function are useful to avoid time-lag of clutch meet at Engine car.
Can adjust starting point of brakes of engine car.
Can put the initial punch to Forward and backing of ESC, in electric car.
When Push "Enter"
at each Item . the
cursor change to .
0Setting
100 Setting
50 Setting
Servo Movement
Triger operation
Neutral Half Full Throttle
Setting value of throttle punch is in proportion to initial
movement. but when use combination of other setting, the
throttle will move like a switches between two points.
When using combination with ABS function, please
check the movement carefully before use.
This function are useful to avoid time-lag of clutch meet
at Engine car.
Can put the initial punch to Forward and backing of ESC,
in electric car.
Push "Enter" key. the cursor return to . When push Back Key after that the
display will return to menu list.
Use Jog Dial or +,- keys to choice F(forward) or B(Brakes). then push "Enter"
to cursor change from to . and can adjust the value using Jog dial or +,-
keys.To reset. When cursor display , push +,- keys toghter.
Use "Jog dial" key or "+,-" keys. to choose the "TH:PUNCH" from Menu list.
and then push "Enter" key.
From initial screen. use "Jog dial" key or "+,-" keys. to open Function menu.
DRAF
T
Usage of the
transmitter Features Main Menu Connecting
the receiver Notes on
installing Description Index
40
Back Key
Enter Key
JogDial
+/- Key
Reset
Function Menu
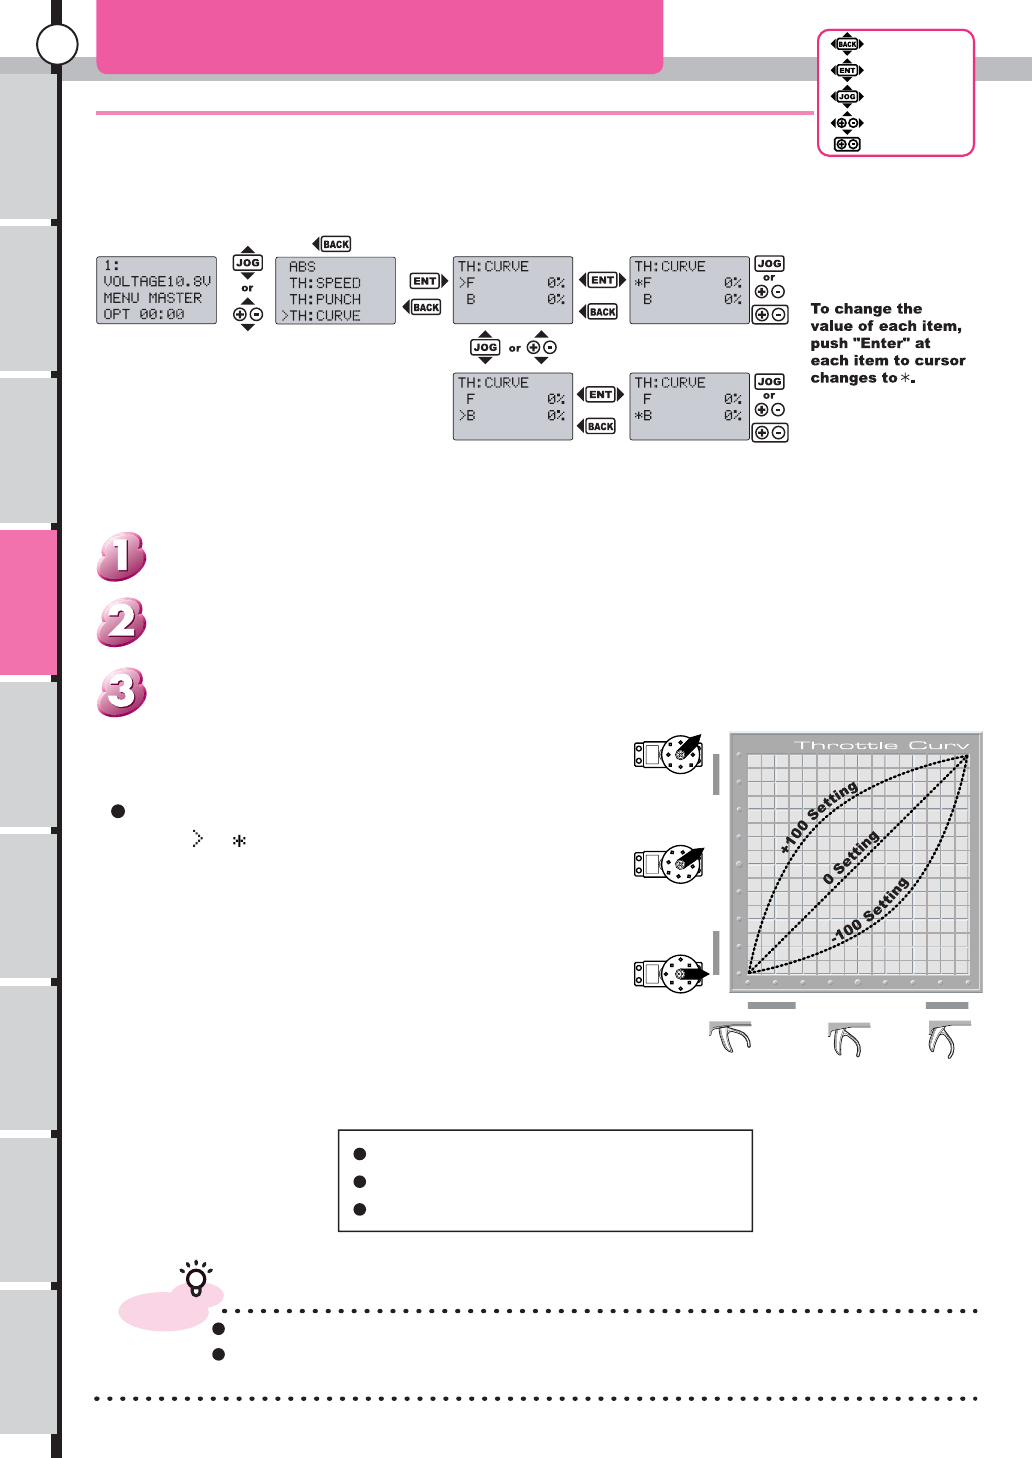
Put the curve on actual servo operation to the trigger operation of the throttle.
TH CURVE (Thorottle curve)
advice
When other functions are used together, please set up while confirming movement.
Only the curve can adjust at this function. to adjust throttle punch (Page 39) to be make
bigger the initial movement .
Setting value : + makes quick - makes mild.
Quick curve : sensitive at initial response
Mild curve : insensitive at initial response
Servo Movement
Quick
+100 Setting
Mild
Trigger operation
Neutral Half Full Throttle
Back Key
Enter Key
JogDial
+/- Key
Reset
When push Enter key at F(Forward) or B(Brakes), cursor
change to . then can adjust the value using by Jog
dial or +,- keys.
Push Enter key to start setup the Thorottle curve.
Use "Jog dial" key or "+,-" keys. to choose the "TH:CURVE" from Menu list. and then push "Enter"
key.
From initial screen. use "Jog dial" key or "+,-" keys. to open Function menu.
[How to open the set-up screen.]
In throttle operation, can be made quick or mild by hanging a curve to a signal. Besides, can
brakes made quick or mild by hanging a curve.
Function Menu
D
RAF
T

Usage of the
transmitter Features Main Menu Connecting
the receiver Notes on
installing Description Index
41
Back Key
Enter Key
JogDial
+/- Key
Reset
Function Menu
Adjust only the brake of throttle.
Adjust only the brake of throttle. maximum brake will change.
TH BRAKE (Throttle Brake)
To Adjust the movement of servo,
of the time that push the trigger.
When make large the value at Engine car, a burden of Servo to increase. please check the movement while
adjust the value.
In Electric car, When set value is too small the amplifier can not show better performance. Please start from
100 (factory setting) the setup.
This function can be assigned and adjusted to ET lever. but It becomes a relative value over the value set up
on this screen. (It is assigned to ET-3 at the time of factory shipments.) Keep in mind that a brake does not
work even if it enlarges a numerical value, when a setup is 0.
When assigning ET lever, the contents of operation are automatically displayed only by operating a lever.
(AUTO Display) and Keep in mind that a brake does not work even if it enlarges the numerical value of this
function, when a setup with ET lever is 0%.
advice
Can change the assigned button (ET-3) to other button when use SET UP function
(see page 60)
Minimum value are 0, but doesn't operate to braking.
Push "Enter" key. to enter setup menu. use "Jog dial" key or "+,-" keys, to adjust the value..
Use "Jog dial" key or "+,-" keys. to choose the "TH:BRAKE" from Menu list.
From initial screen. use "Jog dial" key or "+,-" keys. to open Function menu.
[How to open the set-up screen.]
DRAF
T
Usage of the
transmitter Features Main Menu Connecting
the receiver Notes on
installing Description Index
42
Back Key
Enter Key
JogDial
+/- Key
Reset
Function Menu
Set only the value of forward movement, on the throttle.
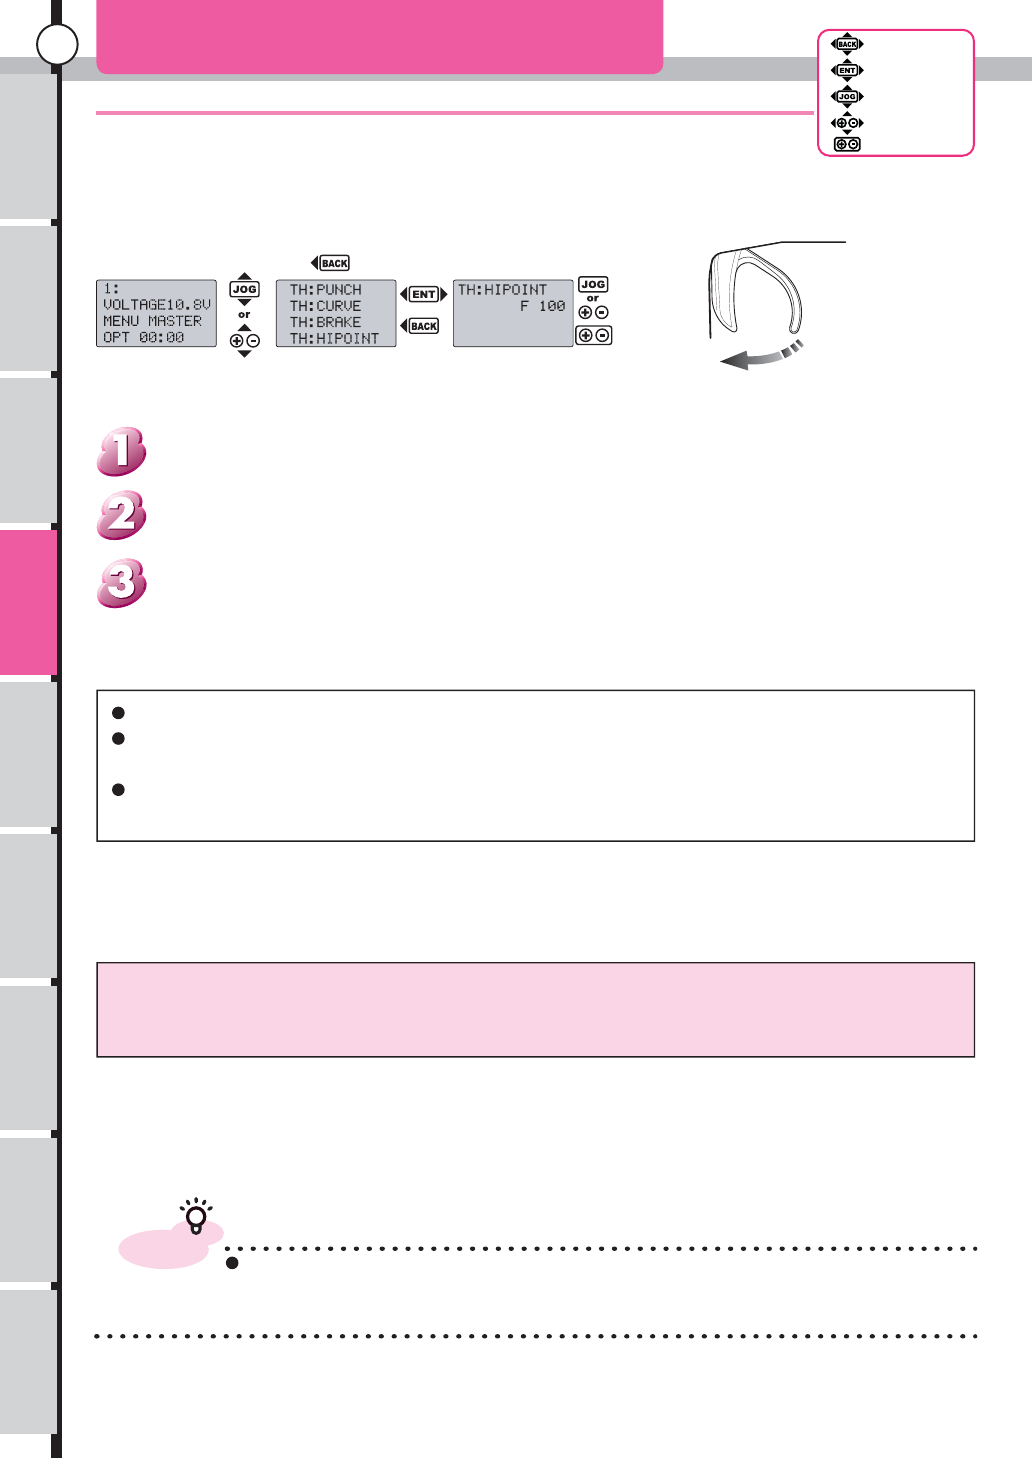
TH HIPOINT (Throttle high points)
To Adjust the movement of servo,
of the time that pull the trigger
Set only the value of forward movement on the throttle. It is easy to set up especialy on Engine car.
When make large the value at Engine car, a burden of Servo to increase. please check the movement while
adjust the value.
In Electric car, When set value is too small the amplifier can not show better performance. Please start from
100 (factory setting) the setup.
Minimum value are 0, but doesn't operate to forward.
advice
Throttle trim is a center trim.When made small the value of "TH HIPOINT".
and then, when set large value to an advance direction of the trim.the amount
of operation extremely will be small.(Please see page 23 about Center trim)
Push "Enter" key. to enter setup menu. use "Jog dial" key or "+,-" keys. to adjust the value.
Use "Jog dial" key or "+,-" keys. to choose the "TH:HIPOINT" from Menu list.
From initial screen. use "Jog dial" key or "+,-" keys. to open Function menu.
[How to open set-up screen]
Set only the value of forward movement on the throttle. use this function. Electric car use
Highest point of ESC. Engine car use "High"
D
RAF
T
Usage of the
transmitter Features Main Menu Connecting
the receiver Notes on
installing Description Index
43
Back Key
Enter Key
JogDial
+/- Key
Reset
Function Menu
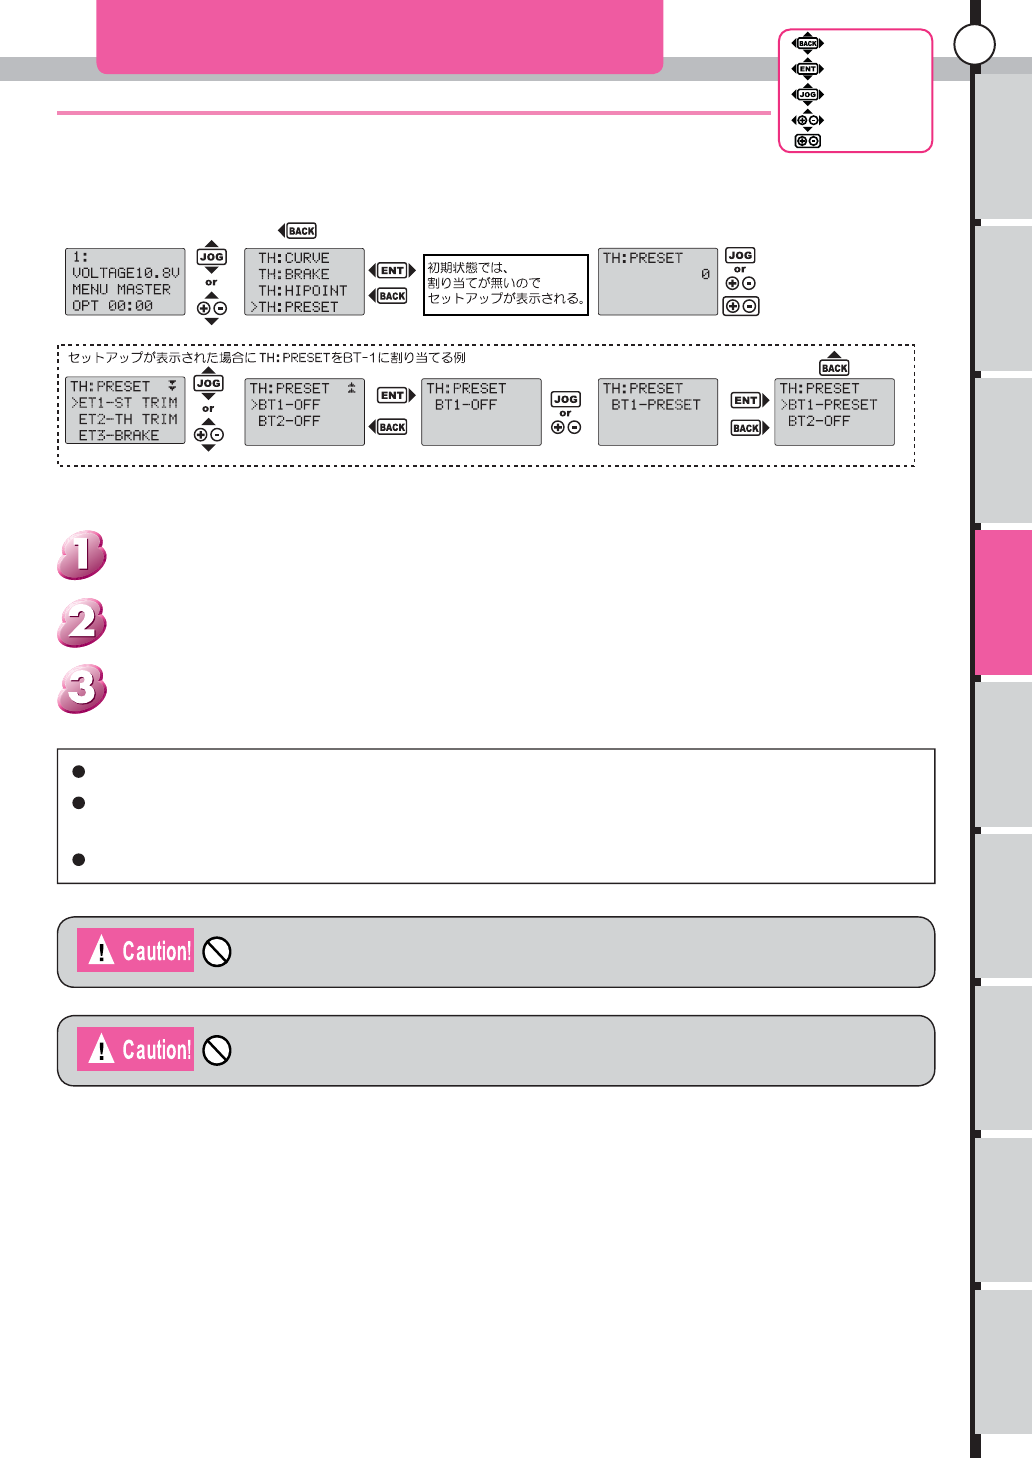
Move the throttle servo to set point, using by ET or BT button.
TH PRESET (Throttle Preset)
The range can setup 0 to F150 and 0 to B150
Other function for the throttle are not affected by this function. (If set at F100 when control ET or BT button, the
throttle will move to the set point, even TH:HIPOINT are 0.)
It is useful for Engine cut, Idling up, Full brake, Move Backward
Trigger will not function and throttle is fixing at point while controlled the ET or BT button
that assigned as preset.
Please check the movement before use, to avoid lost control.
use "Jog dial" key or "+,-" keys. to choose the "TH:PRESET" from Menu list.
Use "Jog dial" key or "+,-" keys. to choose the "TH:PRESET" from Menu list.
From initial screen. use "Jog dial" key or "+,-" keys. to open Function menu.
[How to open the set-up screen.]
Use this function to set at ET or BT button.
Can move at point you set when control the button assigned.
DRAF
T
Usage of the
transmitter Features Main Menu Connecting
the receiver Notes on
installing Description Index
44
Back Key
Enter Key
JogDial
+/- Key
Reset
Function Menu
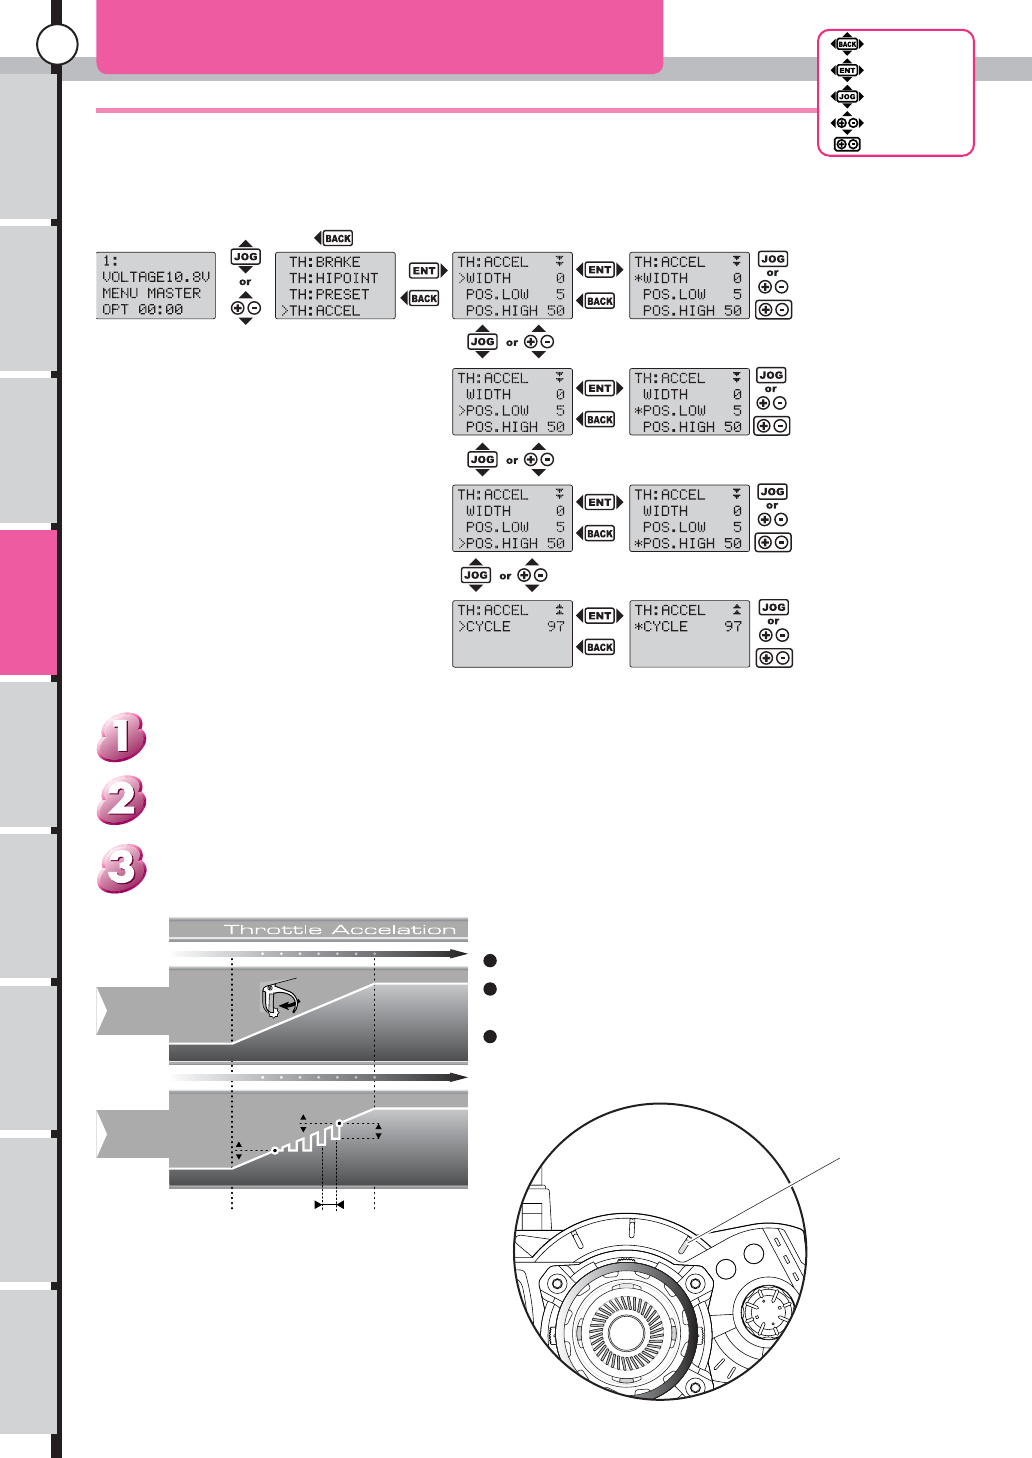
TH ACCEL (Throttle Acceleration) 1
Push enter at each item
to change the cursor
C
y
cle
Maximum
Neutral
Maximum
Neutral
Operating
Trigger
Operating
Trigger
Servo
movement
Servo
movement
Pull the triger
Time
Time
PosL
PosH
Width
If you set this fanction that
POS L 10 POS H 80 the effect shown
Push "Enter" key. to enter setup menu. use "Jog dial" key or "+,-" keys. to adjust the value.
Use "Jog dial" key or "+,-" keys. to choose the "TH:ACCEL" from Menu list.
From initial screen. use "Jog dial" key or "+,-" keys. to open Function menu.
[How to open the set-up screen.]
Set a awing at forward part of throttle.
The expert driver using Delicate throttle work.
In this function do automatically to make faster the cornering of the car
Throttle Accelaration
Indicator
Accelaration are off When WIDTH set at 0.
Accelaration are off when POS.LOW and POS.HIGH are
same
Indicator will blinking when on the throttle accelaration.
D
RAF
T
Usage of the
transmitter Features Main Menu Connecting
the receiver Notes on
installing Description Index
45
Back Key
Enter Key
JogDial
+/- Key
Reset
Function Menu
TH ACCEL (Throttle Acceleration) 2
Setting Item
Range of setting value
When set large value at set up, increase Consumption electric currents, It will
cause of damage to servo.
advice
To use ET or BT with other function. Modified at "SET UP" function (page 60).
An Ideal setup isn't know till actual run. because it will change in various factors (Servo, Car,
road surface, etc.)
Start swing action, When throttle trigger was position between POS.LOW and POS.HIGH.
Set the swing width at WIDTH. This function can adjust during running, when assign it to ET (from
ET1 to ET5) the "WIDTH" (set the "WIDTH" to 100)
"CYCLE" can adjust during running the cycle of swing action When assign this function to ET (From
ET1 to ET5)
Can assign to the BT1 or BT2, on/off of functions.
When activate on/off at BT button, then even if the setting are not effective (ex. "WIDTH" is 0),
The Throttle Acceleration Indicator be flashing.
WIDTH(Width) Set the swing width
POS.LOW(Low Position) Set the lower part of throttle trigger for swing action
POS.HIGH(High Position) Set the upper part of throttle trigger for swing action
CYCLE(Cycle) Set the cycele of swing action
Setting Item Maximum Minimum Initial value
ACCEL.WIDTH 100 0 0
ACCEL POS.LOW 100 0 5 (Can not set higher value than POS.HIGH)
ACCEL POS,HIGH 100 0 50 (Can not set lower value than POS.LOW)
ACCEL CYCLE 100 1 97
DRAF
T
Usage of the
transmitter Features Main Menu Connecting
the receiver Notes on
installing Description Index
46
Back Key
Enter Key
JogDial
+/- Key
Reset
Function Menu
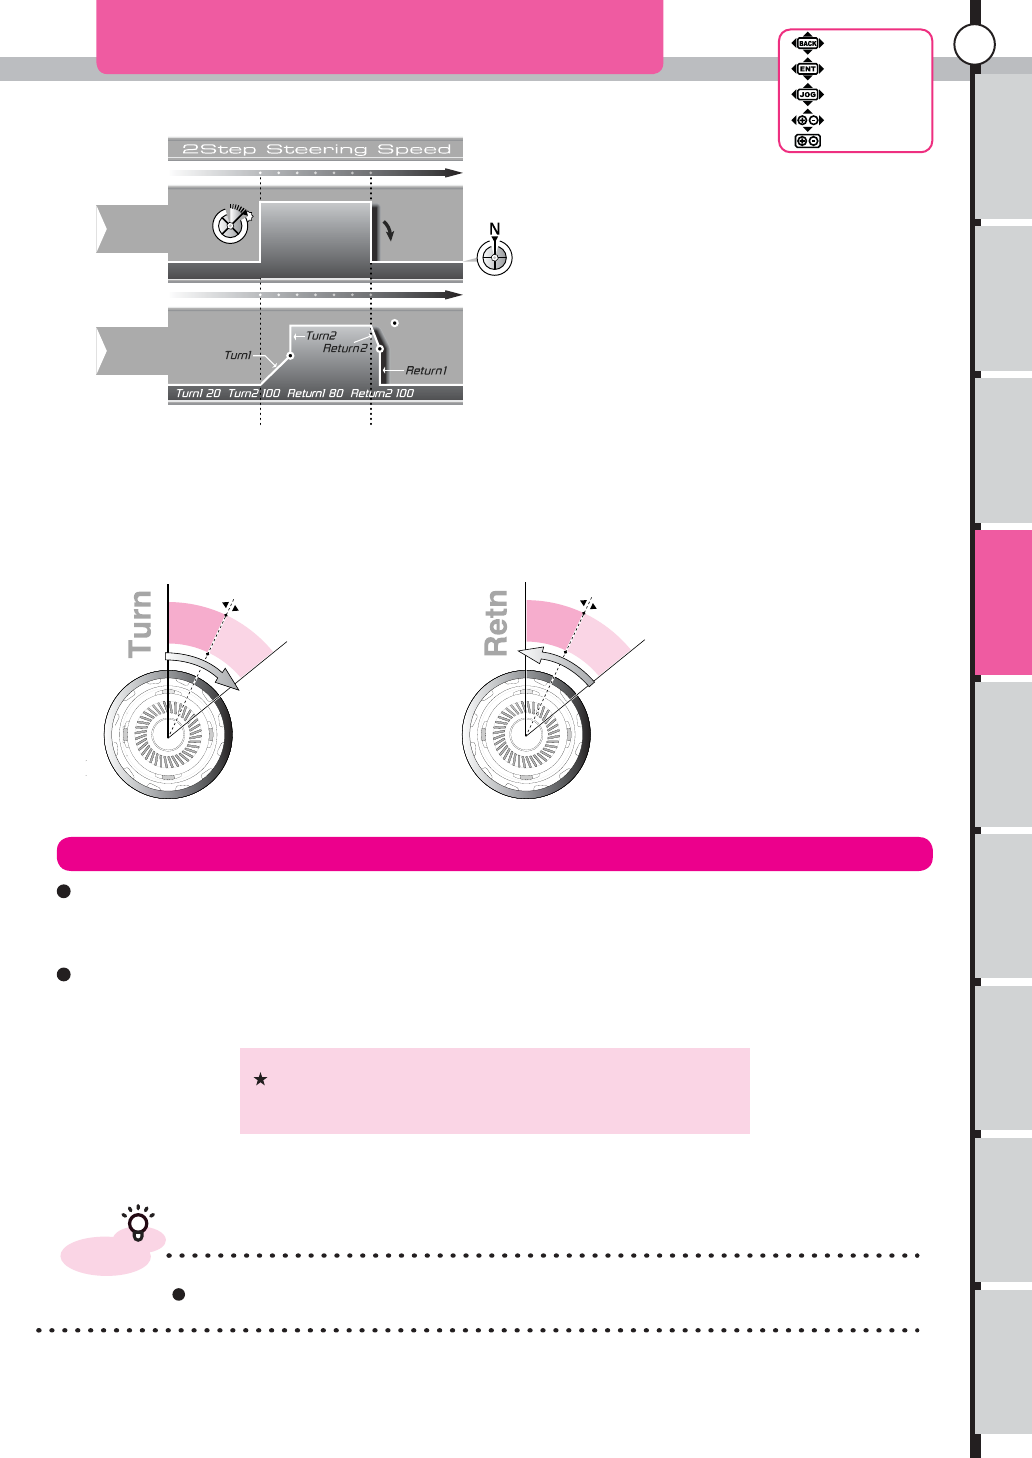
It can be chosen between
1 way and 2 way.
Displayed contents at "SPEED" and "POSITION" are change by setting value of MODE.
Can not set "POSITION"
at 1 WAY mode.
Use Steering to move to TURN2.
Can change the value, where cursor are pointing.
Use Steering to move to RETURN2.
TURN1 at bottom row, By steering can
change to TURN2.
RETURN1 at bottom row, By steering
can change to RETURN2
Make late the Speed of steering Servo.
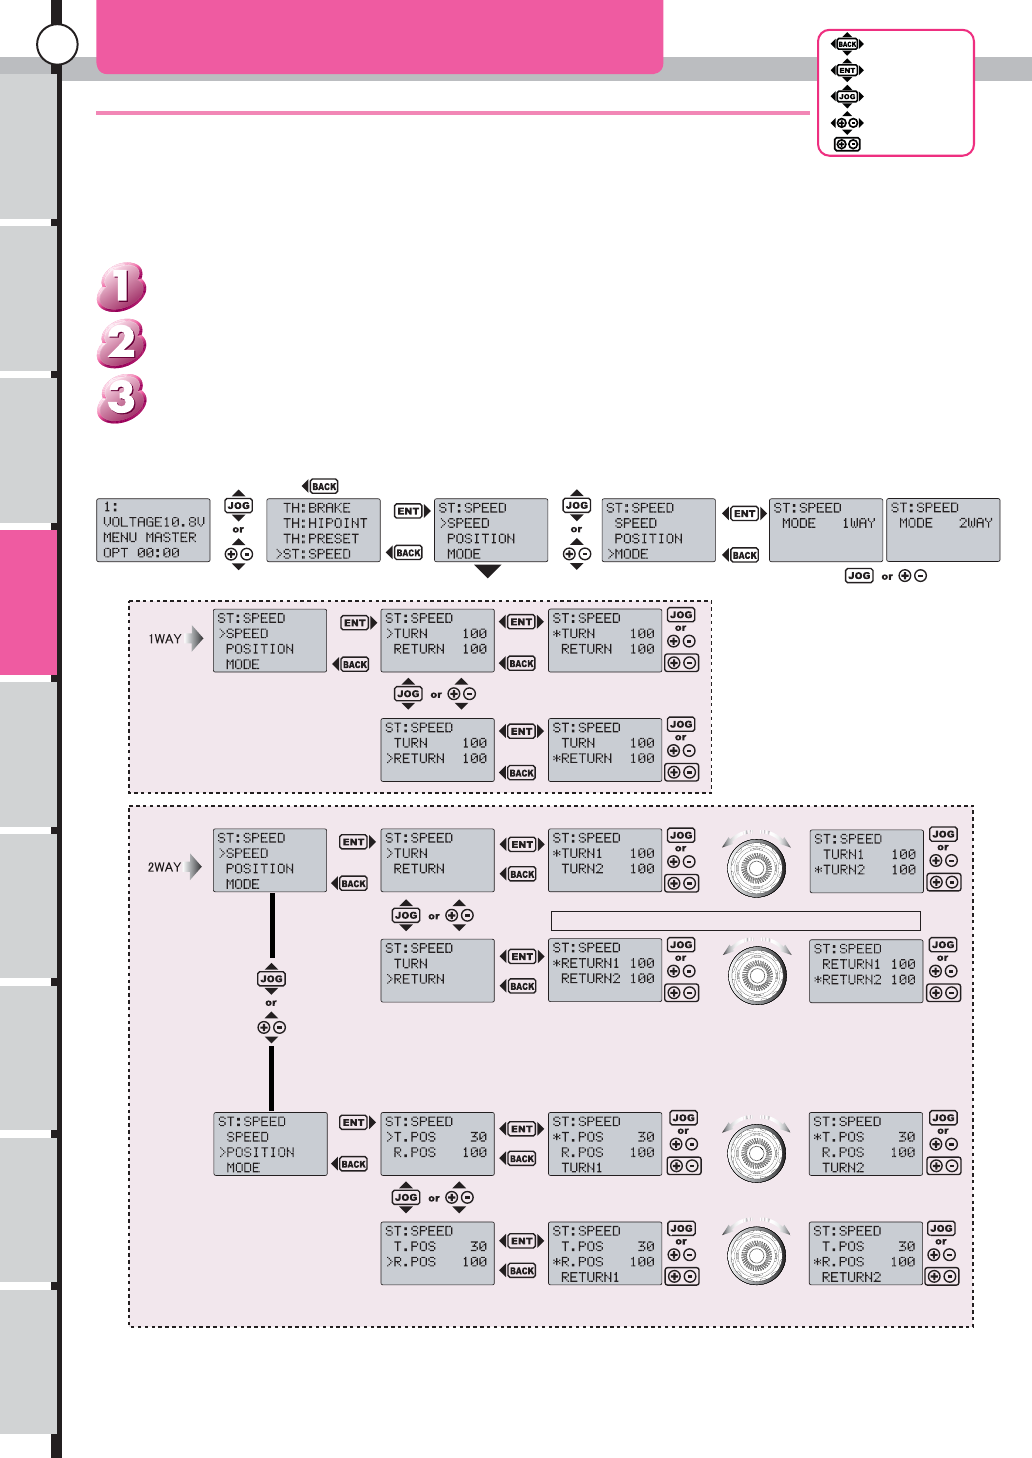
ST SPEED (Steering speed) 1
Push "Enter" key. to enter setup menu. use "Jog dial" key or "+,-" keys. to adjust the value.
Use "Jog dial" key or "+,-" keys. to choose the "ST:SPEED" from Menu list.
From initial screen. use "Jog dial" key or "+,-" keys. to open Function menu.
[How to open the set-up screen.]
Limit the Max speed of Steering servo. Can set separately the Turn and Return.
Divide between center of neutral and maximum rudder angle. It is possible to set each angle. (2 WAY)
D
RAF
T
Usage of the
transmitter Features Main Menu Connecting
the receiver Notes on
installing Description Index
47
Back Key
Enter Key
JogDial
+/- Key
Reset
Function Menu
Neutral Neutral
The
changing point
can be adjusted
The speed range of
Turn1
The speed range of
Turn2
The
changing point
can be adjusted
The speed range of
Return1
The speed range of
Return2
End End
Time
Time
Maximum
Maximum
Operating
Wheel
Operating
Wheel
Neutral
Neutral
Turning Returning
Servo
movement
Servo
movement
Speed
Speed
changing
point
Setting
1WAY 1 WAY: become same speed in whole area. Can set each TURN and RETURN speed. In 1way,
displayed POSITION but isn't functioning. (Can't be chosen)
2WAY To set the position can assign by two areas.
ST SPEED (Steering Speed) 2
Display contents at "1 way" and "2 way" are different by setting item of MODE.
advice
It is totally different about result of this function by speed spec of servo.
An Ideal setup isn't know till actual run. because it will
change in various factors (Servo, Car, road surface, etc.)
DRAF
T
Usage of the
transmitter Features Main Menu Connecting
the receiver Notes on
installing Description Index
48
Back Key
Enter Key
JogDial
+/- Key
Reset
Function Menu
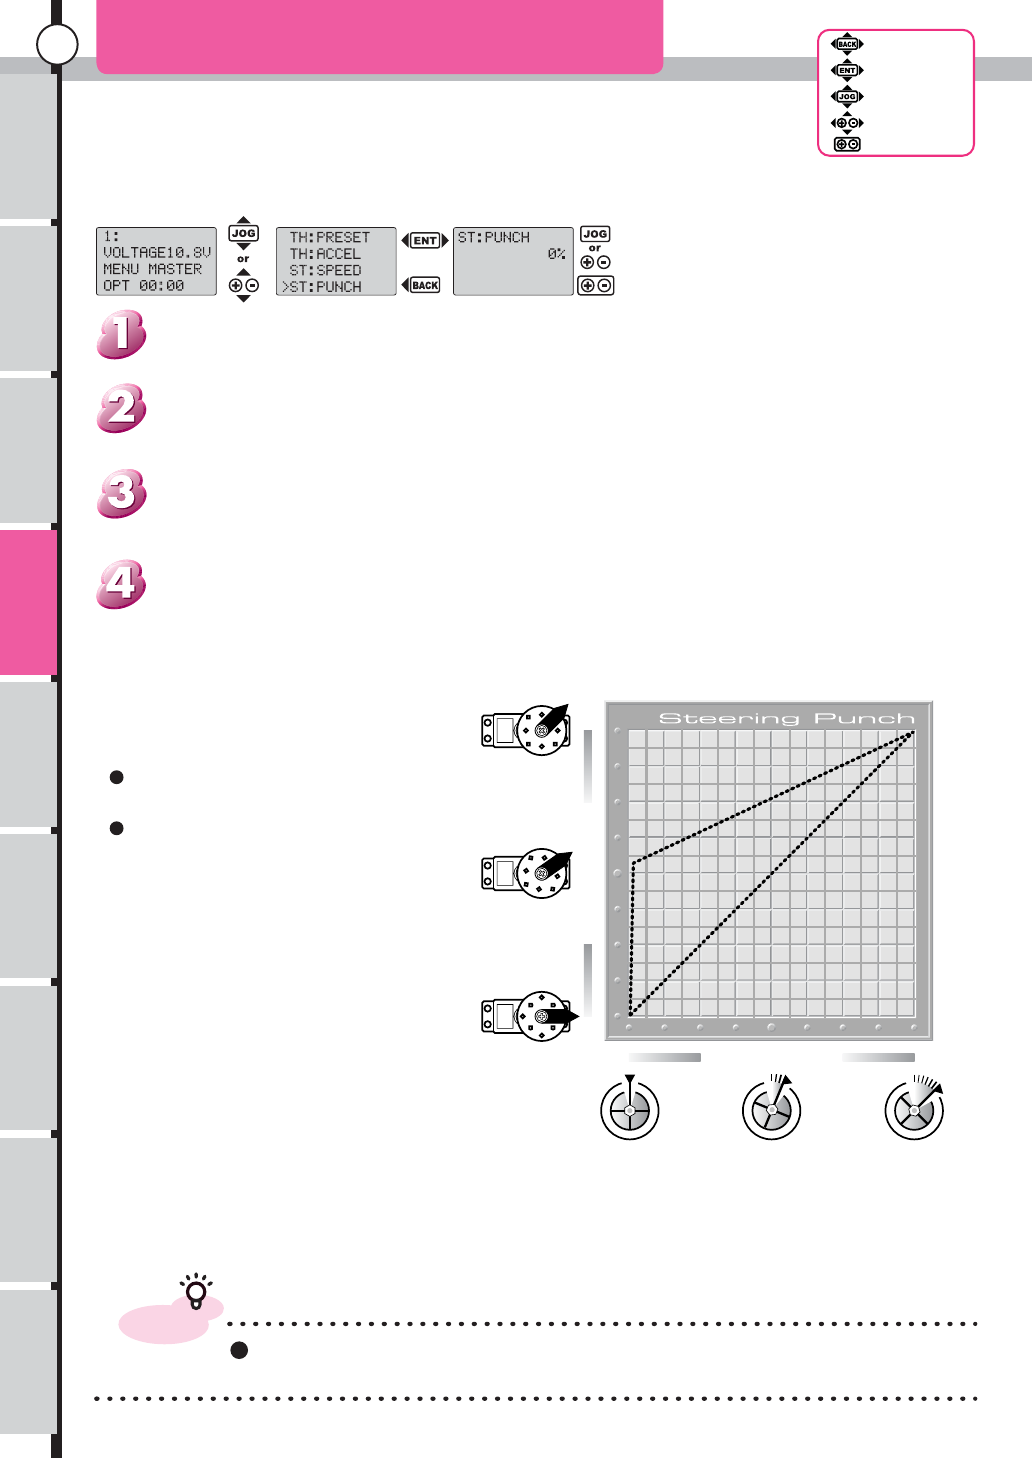
ST PUNCH (Steering Punch)
Servo Movement
Wheel Angle
0Setting
100 Setting
advice
When use with other function please check the effect one by
one.
Push Back key or Enter key to return at menu list.
Push "Enter" key. to enter setup menu. use "Jog dial" key or "+,-" keys. to adjust the value.
To reset the value Push together "+,-" keys.
Use "Jog dial" key or "+,-" keys. to choose the "ST:PUNCH" from Menu list.
From initial screen. use "Jog dial" key or "+,-" keys. to open Function menu.
[How to open the set-up screen.]
When large the set value, the
moving volume become big.
Effective at Steering linkage. But
Don’t improve straightness.
D
RAF
T
Usage of the
transmitter Features Main Menu Connecting
the receiver Notes on
installing Description Index
49
Back Key
Enter Key
JogDial
+/- Key
Reset
Function Menu
Adjusting the steering servo turning angle with the wheel operation.
ST CURVE (Steering Curve)
Servo Movement
-
1
0
0
S
e
t
t
i
n
g
+
1
0
0
S
e
t
t
i
n
g
0 Setting
Wheel Operation
advice
When use with other function please check the effect one by one.
Adjust Steering punch (see page 50) to change initial reaction of
steering.
Change a movement angle of Servo for an
operation angle of wheel like a fi gure.
At + side (+1 to +100), react greatly at the
start, and a response becomes loose later.
At - side (-1 to -100), react loosely at the
start, and a response becomes big later.
Push Back key or Enter key to return at menu list.
Push "Enter" key. to enter setup menu. use "Jog dial" key or "+,-" keys. to adjust
the value.
Use "Jog dial" key or "+,-" keys. to choose the "ST:CURVE" from Menu list.
From initial screen. use "Jog dial" key or "+,-" keys. to open Function menu.
[How to open the set-up screen.]
Put a curve in Servo movement against for steering operation.
Can set to quick curve or mild. curve.
DRAF
T
Usage of the
transmitter Features Main Menu Connecting
the receiver Notes on
installing Description Index
50
Back Key
Enter Key
JogDial
+/- Key
Reset
Function Menu
Adjusting the steering servo turning angle in the left and
right directions independently. (Steering Balance)
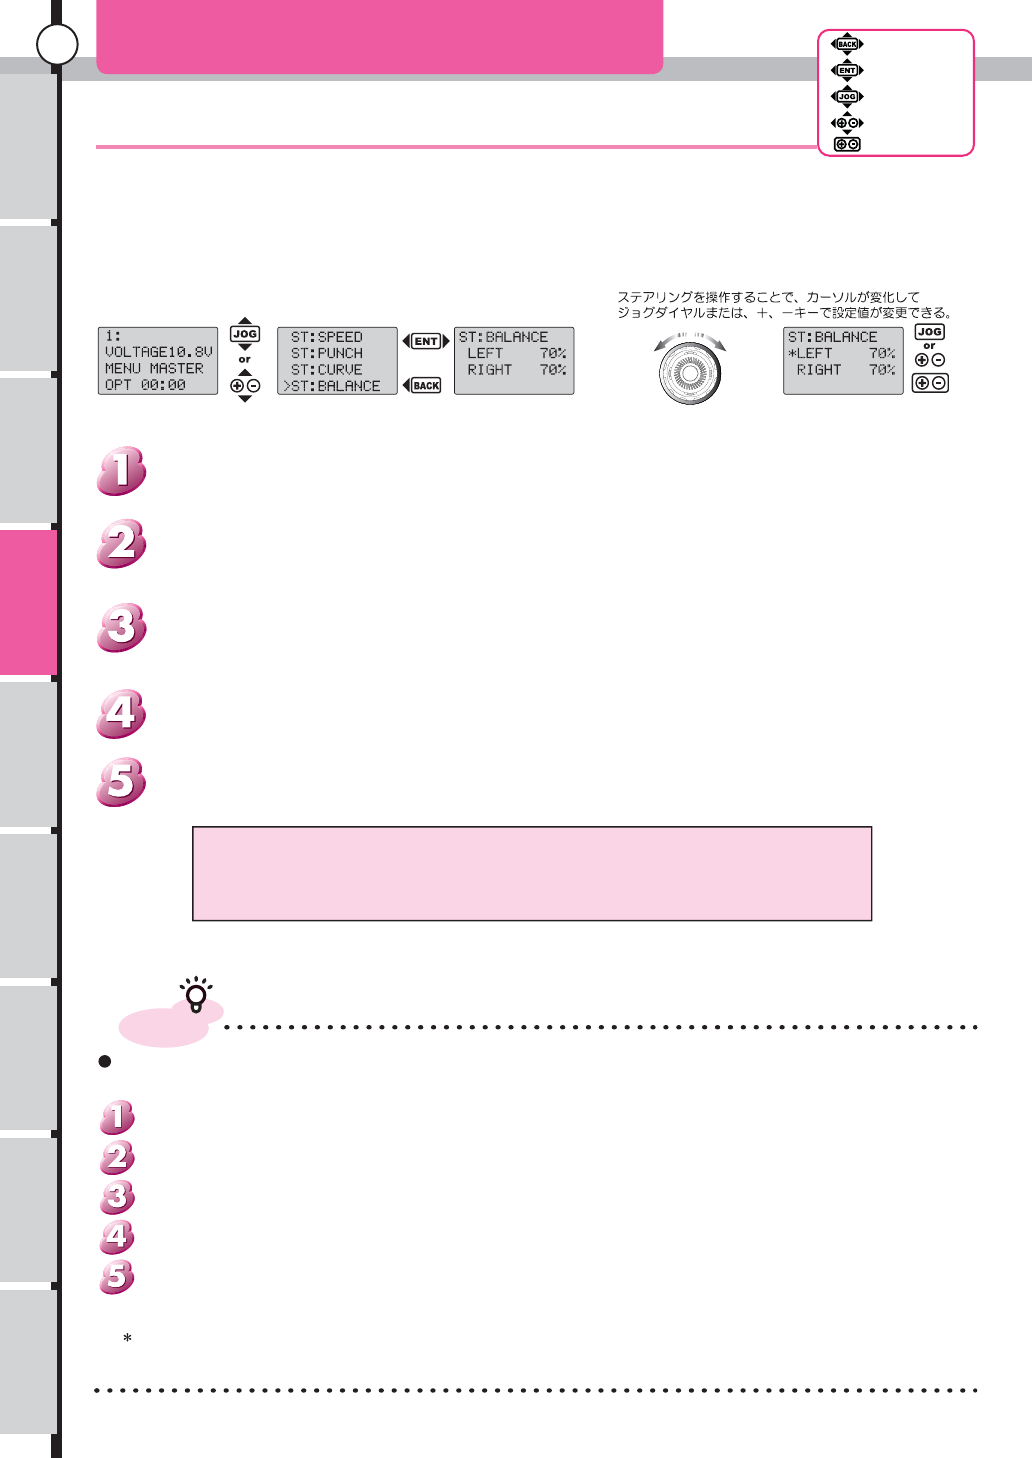
ST BALANCE (Steering Balance)
advice
When adjust the steering balance
Steering show up to turn left or right When push Et button
that assign steering trim
Press "Back Key",back to function menu list screen.
A setting value is a reset key (+--simultaneous aggressiveness), and is
initialized to 70%.
Push "Enter" key. to enter setup menu. use "Jog dial" key or "+,-" keys. to adjust the value.
Use "Jog dial" key or "+,-" keys. to choose the "ST:BALANCE" from Menu list.
From initial screen. use "Jog dial" key or "+,-" keys. to open Function menu.
[How to open the set-up screen.]
See also About Sub trim (page 23 and page 34)
Adjust the trim when didn't run straight.
Adjust at steering travel the full rudder angle.
Adjust at steering balance the each turn radius.
Adjust sub trim to run straight at neutral position.
Make 0 the Trim.
Adjust the steering servo turning angle in the left and right directions independently when turnig
the wheel fully.
D
RAF
T
Usage of the
transmitter Features Main Menu Connecting
the receiver Notes on
installing Description Index
51
Back Key
Enter Key
JogDial
+/- Key
Reset
Function Menu
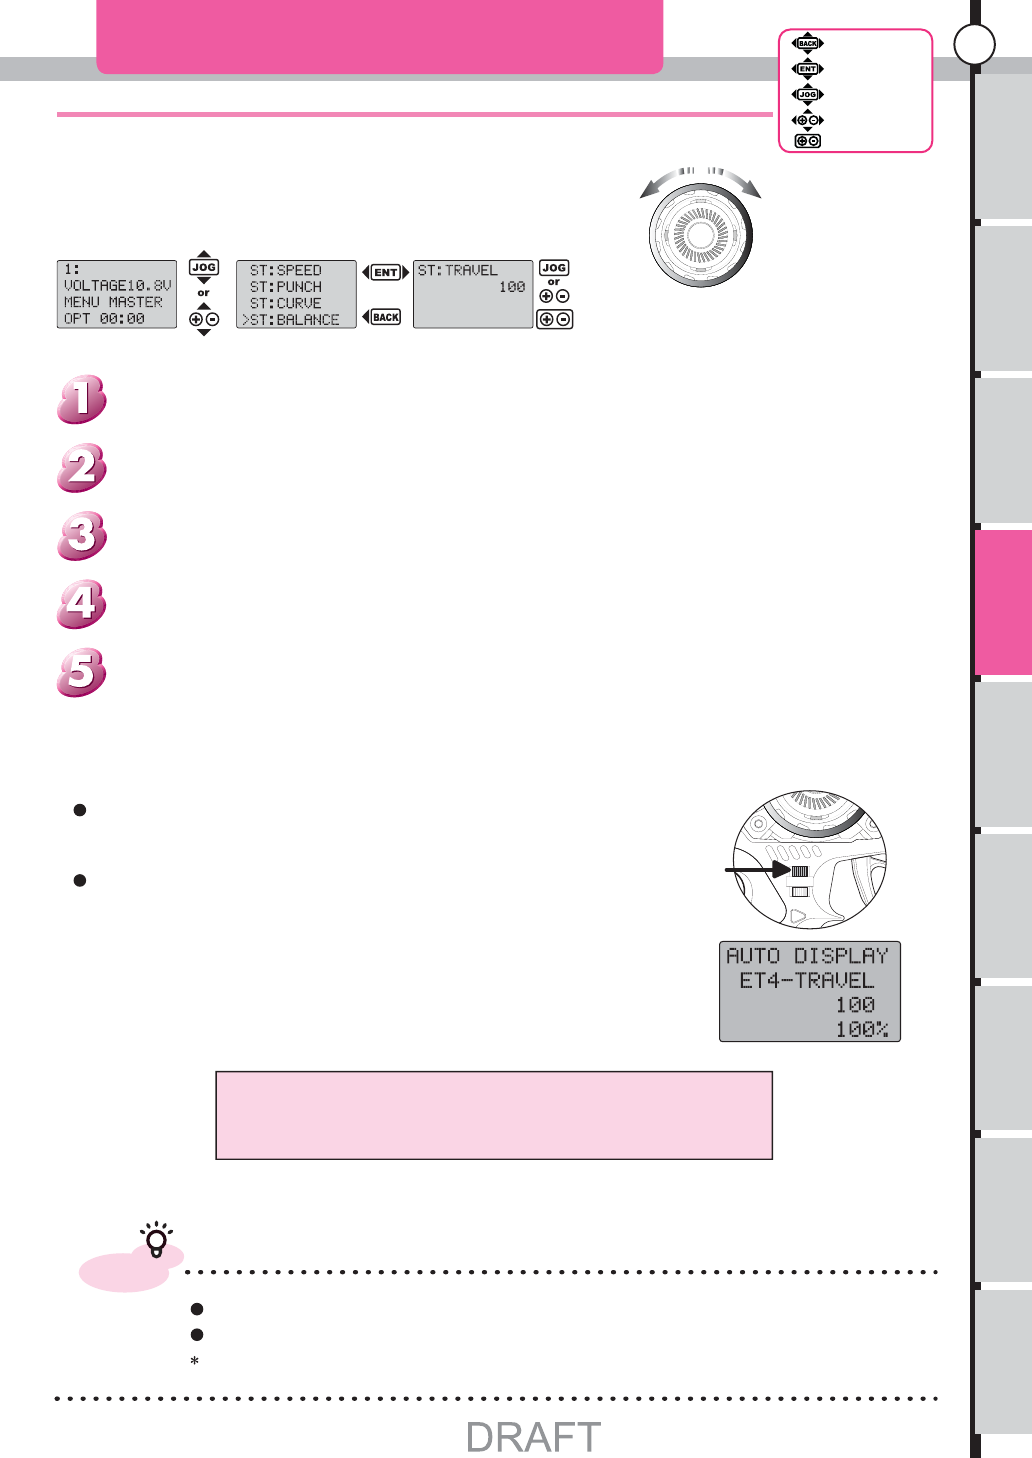
Adjust the total movement of steering.
ST TRAVEL(Steering Travel)
ET-4
advice
Use Steering balance (see page 50) to adjust Right and left individually.
do not set at excessive angle.
It will cause of damage to the servo
Steering will not function, When the value of
steering travel are 0.
Press "Enter Key" or "Back Key",back to function menu list screen.
Push "Enter" key. to enter setup menu. use "Jog dial" key or "+,-" keys. to adjust the value.
Push "Enter" key. to enter setup menu. Use "Jog dial" key or "+,-" keys, to adjust the value.
Initial value is 100. Maximum value is 150. Minimum value is 0.
Use "Jog dial" key or "+,-" keys. to choose the "ST:TRAVEL" from Menu list.
From initial screen. use "Jog dial" key or "+,-" keys. to open Function menu.
ET4 assign initialy for steering travel. when control ET4 Indication such as the
right appears.
The number displayed that is a ratio for a number set up at steering travel
function.
[How to open the set-up screen.]
Adjust the movement of steering servo when cut the steering wheel..