LG Electronics USA PF80AJE DLP PROJECTOR User Manual G User s manual
LG Electronics USA DLP PROJECTOR G User s manual
Contents
User Manaul Part 2
8SAFETY INSTRUCTIONS
yRemove the plug from the outlet
before cleaning the product.
- Otherwise, this may result in electric
shock.
Others
WARNING
yWhen you go out, place the projector
out of reach of animals, and remove
the power plug from the wall outlet.
- Using a damaged power cord may
result in short circuit or fire.
yDo not use the projector near high-
precision electronic devices or those
that transmit weak radio signal.
- This may affect the operation of the
product, causing an accident.
yOnly a qualified technician can
disassemble or modify the projector.
For diagnosis, adjustment, or repair,
contact your seller or our service
center.
- This may result in fire or electric
shock.
yDo not stare directly into lens when in
operation, eye damage can occure.
yNo user serviceable parts inside unit.
High voltage parts can cause shock
and even electrocution.
yProper ventilation required, do not
block airflow around unit. Doing
so can cause injury and internal
overheating.
yTo prevent damage to lamp, unit must
remain plugged in for approximately 3
minutes after power down to allow for
proper cool down (not applicable on
LED models).
yDo not touch the lens; doing so can
result in burns or damage to lens.
Lens and unit may be HOT during
and immediately after use. Use
caution when handling unit, allowing
for proper cool down.
yOnly use a grounded electrical outlet.
yDo not insert anything into or cover
up the exhaust vents.
- This may result in fire or electric
shock.
yFollow all maintenance guidelines
for optimal use; service only at an
authorized service center.
yLamp contains mercury and as such
must be disposed of according to
local, state and federal laws (not
applicable on LED models).
CAUTION
yDo not mix new batteries with old
ones.
- Burst or leaking batteries may result
in damage or injury.
yBe sure to unplug if the projector is not
to be used for a long
period
.
- Accumulated dust may result in fire or
electric shock
due to overheating, igni-
tion, or poor insulation.
yOnly use the specified type of battery.
- Burst or leaking batteries may result in
damage or injury.
yDo not charge the battery using any
devices other than the one provided with
the product.
- This may result in damage to the
battery or fire.

9
SAFETY INSTRUCTIONS
yDispose of used batteries properly.
- This may result in explosion or fire. The
correct method of disposal may vary
depending on your country or region.
Dispose of the battery pack
as instructed.
yDo not throw or disassemble the battery.
- This may result in fire or explosion due
to damage to the battery.
yStore batteries away from metallic
objects, such as keys and paper clips.
- Excess current may cause a rapid
increase in temperature, resulting in
fire or burns.
yDo not store the batteries near any
heat source, such as a heater.
- This may result in fire or damage to
the product.
yDo not store batteries at temperatures
higher than 60 °C or in high humidity.
- This may result in explosion or fire.
yKeep the batteries and remote out of
reach of children.
- This will prevent personal injury or
damage to the product.
yMake sure that the battery is installed
correctly.
- This prevent explosion or fire.
yThe battery contains lithium-ion, so it
must be handled with care.
- This may result in explosion or fire.
yMake sure you use the same type of
batteries for replacement.
yIncorrect battery replacement may
cause fire.
Risk Group 2
CAUTION: Hazardous optical
radiation may be emitted from this
product. Do not stare into the lens at
the operating lamp. It may be harmful
to your eyes.

10 SAFETY INSTRUCTIONS
FCC NOTICE
Federal Communications
Commission (FCC) Statement
You are cautioned that changes or
modications not expressly approved
by the part responsible for compliance
could void the user’s authority to operate
the equipment.
This equipment has been tested and
found to comply with the limits for a
Class B digital device, pursuant to
part 15 of the FCC rules. These limits
are designed to provide reasonable
protection against harmful interference
in a residential installation. This
equipment generates, uses and can
radiate radio frequency energy and, if
not installed and used in accordance
with the instructions, may cause harmful
interference to radio communications.
However, there is no guarantee that
interference will not occur in a particular
installation. If this equipment does
cause harmful interference to radio
or television reception, which can be
determined by turning the equipment off
and on, the user is encouraged to try to
correct the interference by one or more
of the following measures:
- Reorient or relocate the receiving
antenna.
- Increase the separation between the
equipment and receiver.
- Connect the equipment into an outlet
on a circuit different from that to which
the receiver is connected.
- Consult the dealer or an experienced
radio/projector technician for help.
This device complies with Part 15 of the
FCC Rules. Operation is subject to the
following two conditions:
1) This device may not cause harmful
interference, and
2) This device must accept any
interference received, including
interference that may cause undesired
operation of the device of the device.
FCC Caution
Any changes or modications not
expressly approved by the party
responsible for compliance could void
the user's authority to operate this
equipment and for indoor use only, use
outdoors or in other modes not covered
by this manual may violate the FCC
regulation and violate the user authority
to use the product.
Specially, within the 5.15-5.25 GHz
band, U-NII device is restricted to indoor
operations to reduce any potential for
harmful interference to co-channel MSS
operations.
FCC RF Radiation Exposure
Statement:
This equipment complies with FCC
radiation exposure limits set forth for
an uncontrolled environment. This
equipment should be installed and
operated with minimum distance 20
cm (7.8 inches) between the radiator
and your body. End users must follow
the specic operating instructions for
satisfying RF exposure compliance.

11
SAFETY INSTRUCTIONS
IC (CANADA)
Industry Canada Statement:
This device complies with RSS-210 of
the Industry Canada Rules. Operation is
subject to the following two conditions:
1) this device may not cause
interference and
2) this device must accept any
interference, including interference
that may cause undesired operation
of the device.
Avis d’Industrie Canada :
Cet appareil est conforme à la norme
CNR-210 des règlements d’Industrie
Canada. Son fonctionnement est sujet
aux deux conditions suivantes :
1) Cet appareil ne doit pas provoquer
d’interférences et
2) Cet appareil doit accepter toutes
les interférences, y compris
celles pouvant entraîner son
dysfonctionnement.
IC Radiation Exposure Statement:
This equipment complies with IC
radiation exposure limits set forth for an
uncontrolled environment.
NOTE: THE MANUFACTURER IS NOT
RESPONSIBLE FOR ANY RADIO OR
Projector INTERFERENCE CAUSED
BY UNAUTHORIZED MODIFICATIONS
TO THIS EQUIPMENT. SUCH
MODIFICATIONS COULD VOID THE
USER’S AUTHORITY TO OPERATE
THE EQUIPMENT.
Avis d’Industrie Canada sur
l’exposition aux rayonnements
Cet appareil est conforme aux limites
d’exposition aux rayonnements
d’Industrie Canada pour un
environnement non contrôlé.
REMARQUE : LE FABRICANT
N’EST PAS RESPONSABLE
DES INTERFÉRENCES
RADIOÉLECTRIQUES CAUSÉES
PAR DES MODIFICATIONS NON
AUTORISÉES APPORTÉES À
CET APPAREIL. DE TELLES
MODIFICATIONS POURRAIT
ANNULER L’AUTORISATION
ACCORDÉE À L’UTILISATEUR DE
FAIRE FONCTIONNER L’APPAREIL.

12 CONTENTS
ENTERTAINMENT 32
To connect network 32
-One-click network connection 32
-To connect to a network through Set
Expert 32
-To use the Wi-Fi Direct function 33
-To use the Miracast™/Intel’s WiDi
function 33
-Tips for Network Settings 34
SMARTSHARE 35
Before Using 35
-Connecting a USB Device 35
-Removing a USB Device 35
To use SmartShare™ 37
-Watching the Videos 38
-Viewing the Photos 40
-Listening to Music 41
-Viewing Files 42
-To set SmartShare™ related functions 43
To connect DLNA 47
-To connect a DLNA-authenticated
Smartphone 47
-To connect DLNA DMR (Digital Media
Renderer) 47
-To connect DLNA DMP (Digital Media
Player) 48
-SmartShare™ PC SW Installing & Setting
49
-In case of a DLNA malfunction 50
CUSTOMIZING SETTINGS 51
SETTINGS 51
PICTURE Settings 52
LICENSE 2
SAFETY INSTRUCTIONS 3
PREPARATION 14
Accessories 14
Optional Extras 15
Parts and Components 16
-Front 16
-Back 17
Installation 18
-Installation Precautions 18
-Projection Distance per Screen Size 19
-How to Install the Projector On a Tripod
20
-Kensington Security System 20
REMOTE CONTROL 21
USING THE PROJECTOR 23
Watching Projector 23
-Initial Setup 23
-Focus and Position of the Screen Image
24
Additional Options 25
-Adjusting Aspect Ratio 25
-Using the Keystone Function 25
-Changing input device 26
-To use SIMPLINK 26
Using the Quick Menu 28
To set Sound 29
-To set sound output 29
-To Connect and Use a Bluetooth headset
31
CONTENTS

13
CONTENTS
SOUND Settings 57
TIME Settings 60
OPTION Settings 61
NETWORK Settings 63
SUPPORT 64
CONNECTING DEVICES 65
Connecting to HD Receiver, DVD, or VCR
Player, External Devices 66
-HDMI Connection 66
-AV Connection 67
-Component Connection 67
Connecting to Headphones 68
Connecting a digital amp 69
Connecting to PC and Laptop 70
-HDMI Connection 70
Using the mirroring function of a mobile
phone 71
-MHL Connection 71
MAINTENANCE 72
Cleaning 72
-Cleaning the Lens 72
-Cleaning the projector case 72
INFORMATION 73
To update projector software 73
SPECIFICATIONS 74
14 PREPARATION
PREPARATION
Accessories
Accessories included with the project are show below. The pictures may differ slightly
from the actual product. Accessories are subject to change without prior notice. New
accessories may be added or old ones removed.
70- 1"(&
Remote Control
Two AAA Batteries Owner's Manual Power Cord
Composite Gender Component Gender Owner's Manual CD
yWhen connecting an HDMI or USB cable, or
connecting a USB flash drive to the HDMI or USB
port, use a product that has a width of 18 mm or
less and a height of 10 mm or less. If the USB cable
or USB flash drive does not fit the USB ports of the
projector, use an extension cable that supports USB
2.0.
15
PREPARATION
Optional Extras
To purchase optional accessories, visit an electronics store or online shopping site or
contact the retail store where you purchased the product. Optional accessories are
subject to change without prior notice.
Projection Screen Tripod HDMI Cable
Video Cable Audio Cable MHL Cable
Optical Cable LG Audio Device

16 PREPARATION
Parts and Components
The projector is manufactured using high-precision technology. You may, however, see
tiny black dots and/or bright colored dots (red, blue or green) that continuously appear
on the projector screen. This is a normal result of the manufacturing process and does
not indicate a malfunction.
Front
Control Panel
Lens
2
Speaker
Speaker
Vent
1
Button Description
(POWER) Turns the projector on or off.
(MENU) Displays or closes the Settings menu.
, (Volume) Adjusts the volume level.
, , , Moves between menus and changes the settings.
(OK) Shows the current mode and saves changes to the settings.
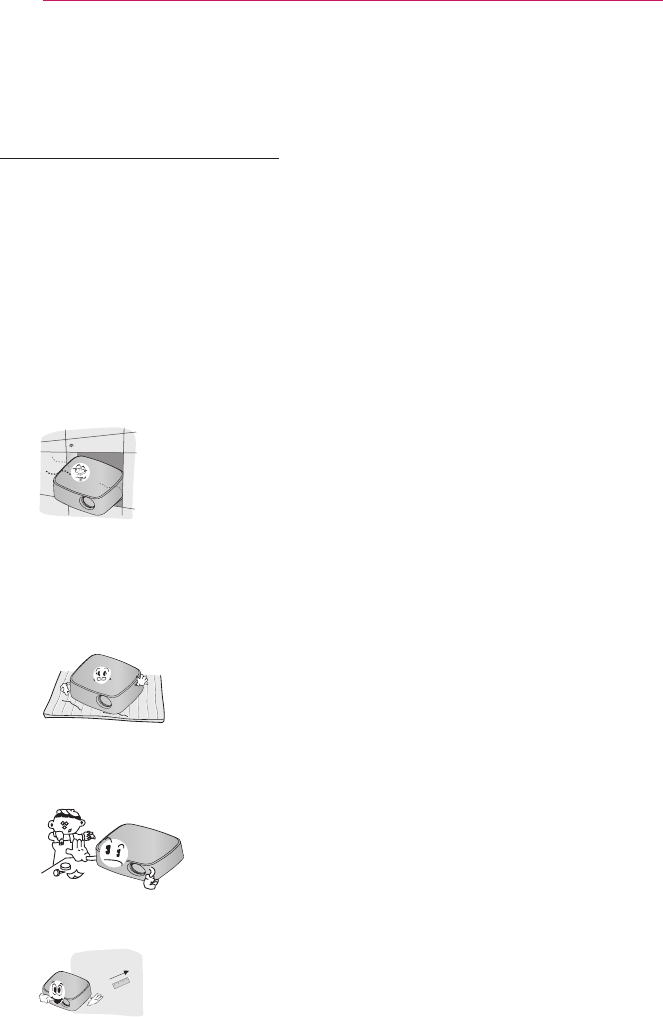
1 Due to the high temperature of vent area, do not get close to the vent area.
2 Do not touch the lens while using the projector. The lens may be damaged.
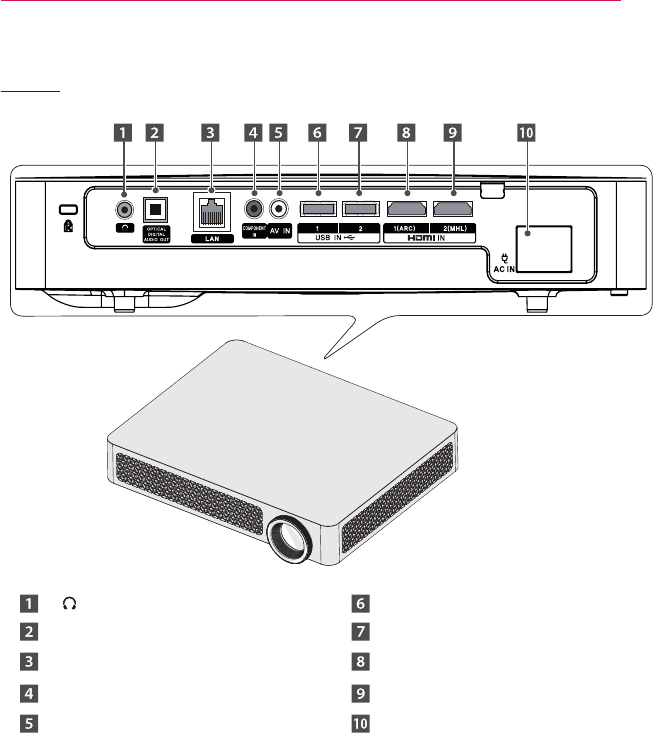
17
PREPARATION
Back
(Headphone Port) USB IN 1 Port
OPTICAL DIGITAL AUDIO OUT Port
USB IN 2 Port
LAN Port HDMI IN 1(ARC) Port
COMPONENT IN Port HDMI IN 2(MHL) Port
AV IN Port AC IN Port
18 PREPARATION
Installation
Installation Precautions
yPlace the projector in a well-ventilated
environment.
- To prevent internal heat build-up,
install the projector in a well-
ventilated place.
Do not place anything near the
projector as this may block its air
vents. If the air vents are blocked,
the internal temperature will
increase.
- Do not place the projector on a
carpet or rug. If the vent is on the
bottom, use the projector on a solid
level surface
and ensure the vent
is
not blocked.
- Be sure to prevent foreign objects
such as paper debris from entering
the projector.
- Leave enough distance (30 cm or
more) around the projector.
yDo not place the projector in a hot
or humid environment.
- Do not place the projector in a hot,
cold, or humid environment.
yDo not place the projector in a place
where it will easily attract dust.
- This may result in fire.
yNever open any cover on the
projector. There is a high risk of
electric shock.
yThe projector is manufactured using
high-precision technology. You may,
however, see tiny black dots and/
or bright colored dots (red, blue or
green) that continuously appear on
the projector screen. This is a normal
result of the manufacturing process
and does not indicate a malfunction.
yThe remote control may not work
in an environment where a lamp
equipped with electronic ballasts or
a three-wavelength fluorescent lamp
is installed. Replace the lamp with an
international standard lamp for the
remote control to work normally.
yTo adjust the angle of the projector,
turn the adjustment legs to the left or
right while pressing on the rubber part
at the same time.
19
PREPARATION
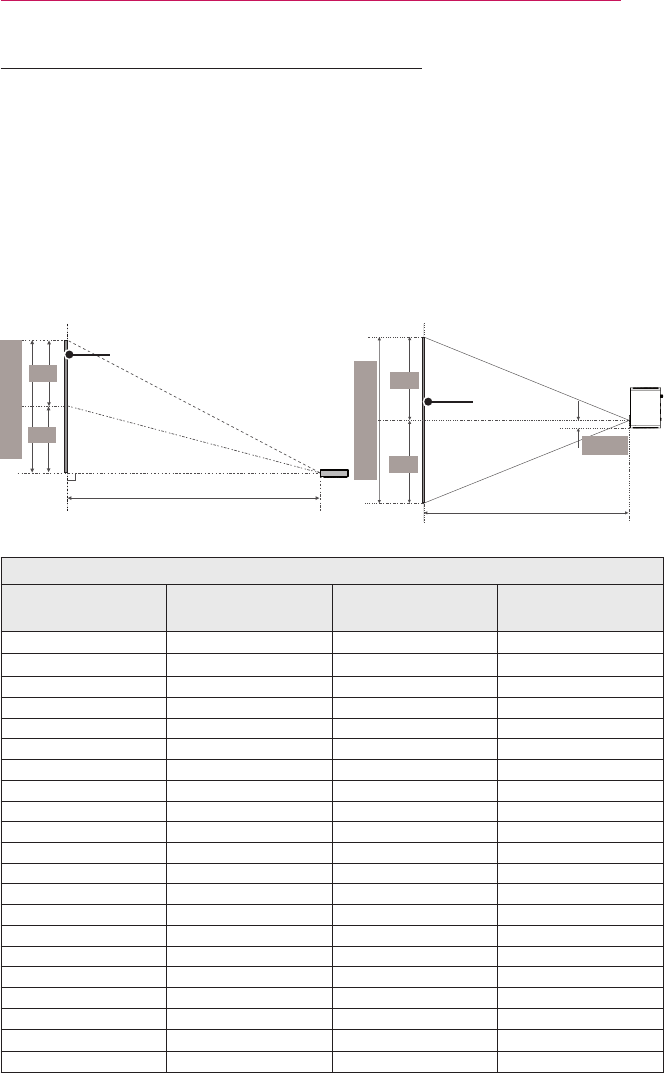
Projection Distance per Screen Size
1 Place the projector on a sturdy, level surface, together with the PC or audio/video
source.
2 Place the projector an appropriate distance away from the screen. The distance
between the projector and the screen determines the actual size of the image.
3 Position the projector so that the lens is at a right angle to the screen. If the
projector is not at a right angle, the projected image will look distorted. To correct the
distortion, use the Keystone function. (see page 25)
4 Connect the power cord of the projector and the connected device to the wall outlet.
Ratio of upward projection: 100 %
Screen Height (X)
X/2
X/2
Screen Width (Y)
Y/2
Y/2
DISPLAY
Projection distance (D) Projection distance (D)
DISPLAY
47.7
mm
16:9 Ratio
Screen Size (mm) Screen Width (Y) (mm) Screen Height (X)
(mm)
Projection Distance
(D) (mm)
508 443 249 621
635 553 311 776
762 664 374 932
889 775 436 1087
1016 886 498 1242
1143 996 560 1397
1270 1107 623 1553
1397 1218 685 1708
1524 1328 747 1863
1651 1439 809 2018
1778 1550 872 2174
1905 1660 934 2329
2032 1771 996 2484
2159 1882 1058 2639
2286 1992 1121 2795
2413 2103 1183 2950
2540 2214 1245 3105
2667 2324 1308 3260
2794 2435 1370 3416
2921 2546 1432 3571
3048 2657 1494 3726