LG Electronics USA PF80AJE DLP PROJECTOR User Manual G User s manual
LG Electronics USA DLP PROJECTOR G User s manual
Contents
User Manaul Part 6
60 CUSTOMIZING SETTINGS
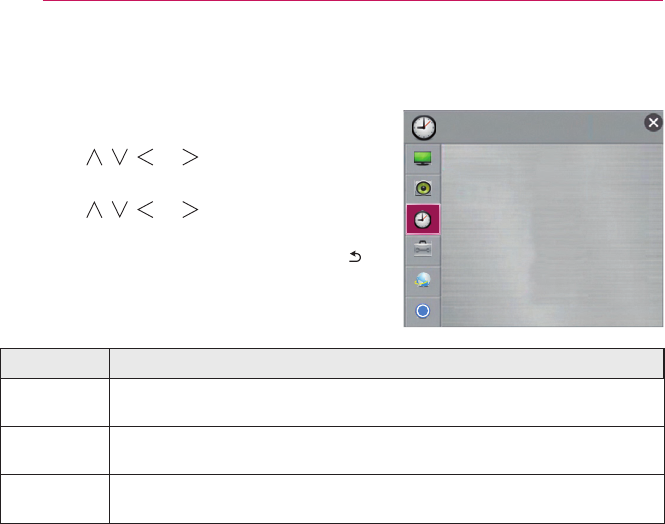
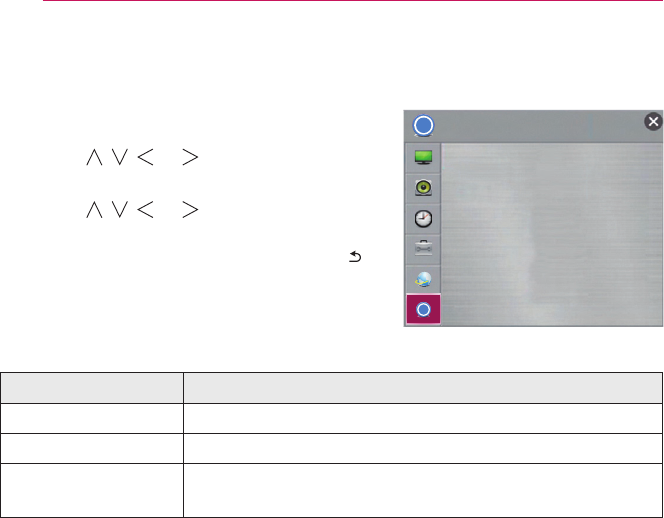
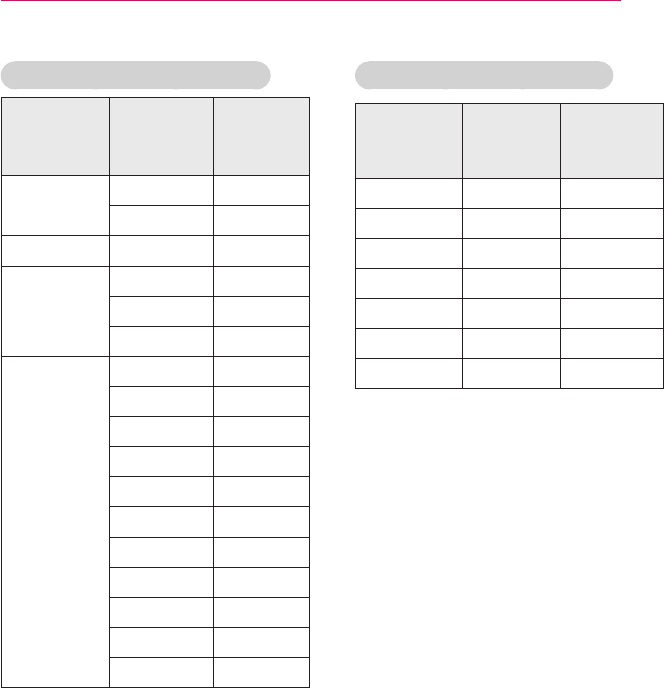
TIME Settings
1 Press the SETTINGS button.
2 Use the , , , or button to select TIME and
press the OK button.
3 Use the , , , or button to set up the
desired item and press the OK button.
- To return to the previous menu, press the
button.
The available time settings are described as follows.
Item Description
Sleep Timer Turns off the Projector after a preset number of minutes.
To cancel the Sleep Timer, select Off.
Auto Off If there is no signal, the projector automatically turns off after the preset
time has elapsed.
Automatic
Standby If you do not press any button on the projector or remote control for a
certain period, the projector will automatically switch to standby mode.
Ͱ
TIME
ySleep Timer : Off
yAuto Off : 60 min.
yAutomatic Standby
: 4 hours
61
CUSTOMIZING SETTINGS
OPTION Settings
1 Press the SETTINGS button.
2 Use the , , , or button to select
OPTION and press the OK button.
3 Use the , , , or button to set up the
desired item and press the OK button.
- To return to the previous menu, press the
button.
The available option settings are described as follows.
Item Description
Language Selects a screen menu language.
Standby Light Adjusts the LED button indicator.
Item
On When the buttons are touched, their indicators are
all turned on at maximum brightness. In standby
mode, LED indicators are turned on at 20 % of the
maximum brightness.
Off When the buttons are touched, their indicators are
all turned on at maximum brightness. In standby
mode, all LED indicators are turned off.
PJT Mode
This function turns the projected image upside down or ips horizontal.
Auto Keystone Auto Keystone provides a rectangular screen image by
automatically adjusting the Keystone number when there is a
trapezoidal screen image caused by tilting of the projector.
Item
On Automatically adjusts the Keystone number.
Off Manually adjusts the Keystone number.
Keystone To prevent the screen image from becoming trapezoidal,
Keystone adjusts the top and bottom width of the image if the
projector is not set at a right angle to the screen.
Blank Image Selects a background for blank Image.
Ͱ
OPTION
yLanguage
yStandby Light
: On
yPJT Mode : Front
yAuto Keystone
: On
yKeystone 0
-+
yBlank Image : Blue
yAuto Power
: On
62 CUSTOMIZING SETTINGS
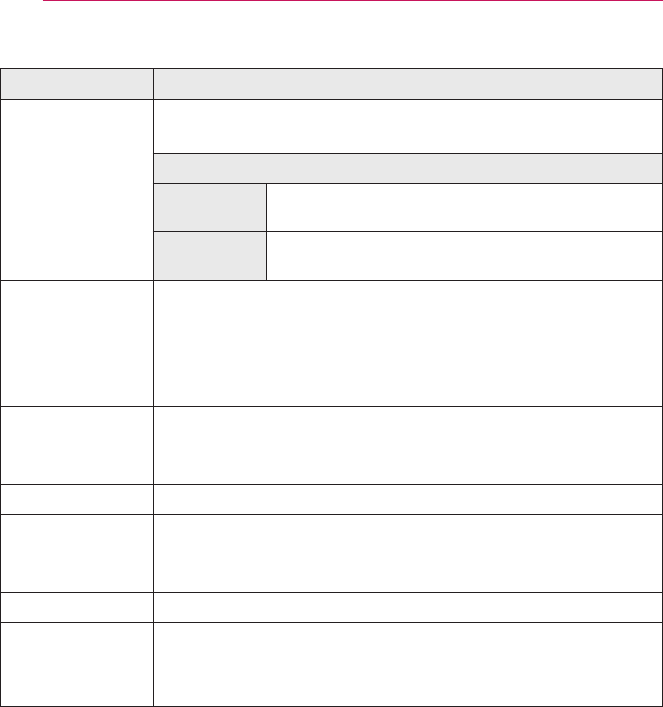
Item Description
Auto Power Makes the projector turn on automatically When the power code
is connected to the projector.
Item
On When the power code is connected to the
projector, it turns on automatically.
Off When the power code is connected to the
projector, it goes into standby mode.
High Altitude If the projector is used at an altitude higher than 1200 meters,
turn this on.
Otherwise, the projector may overheat or its protection function
may be activated. If this happens, turn the projector off and then
on again after waiting for several minutes.
Auto Input
Search Automatically searches for and displays the input signal type
when it is received. It is available only with external inputs (RGB,
HDMI, AV, and Component).
Balloon Help Enables/disables the balloon help.
Grid Pattern Shows 20 grids built into projector to align and compose images
and designs. The grids can be used alone as a template or
overlaid on any photo or image from any source.
Grayscale Changes color to black and white.
Initial Setting
Deletes all optional settings and returns to initial default mode. Once
initialization is complete, the projector will turn off and on by itself.
yDo not turn off the power during initialization.
63
CUSTOMIZING SETTINGS
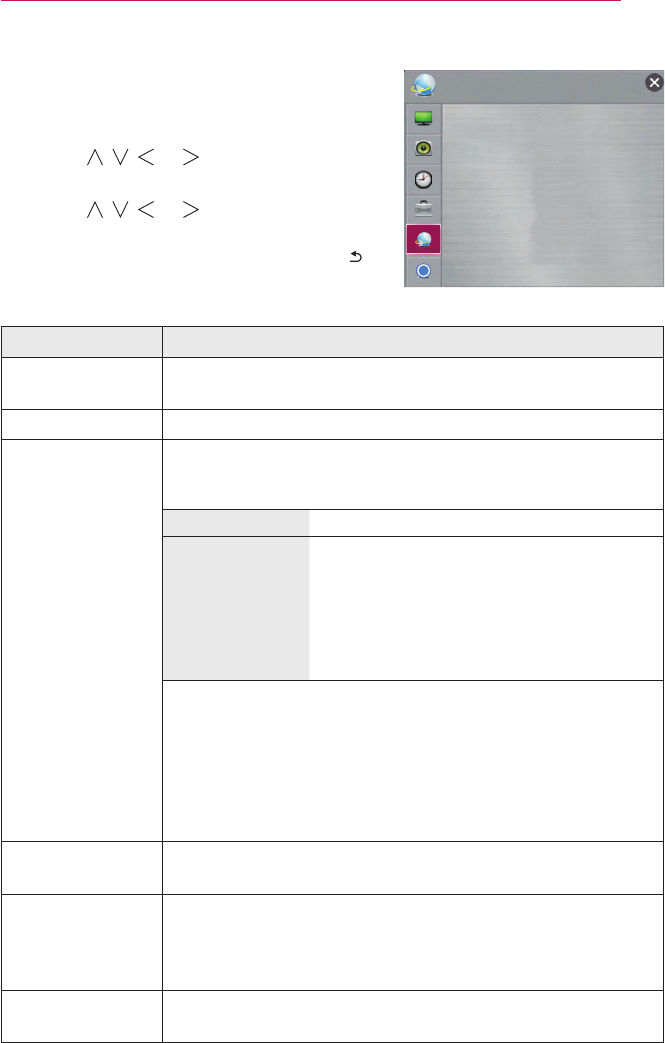
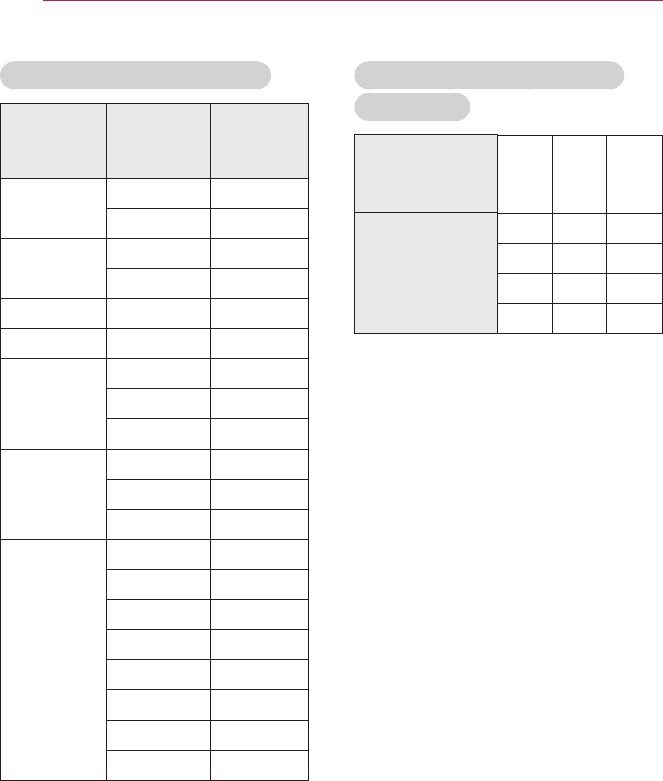
NETWORK Settings
1 Press the SETTINGS button.
2 Use the , , , or button to select
NETWORK and press the OK button.
3 Use the , , , or button to set up the
desired item and press the OK button.
- To return to the previous menu, press the
button.
The available network settings are described as follows.
Item Description
Network
Connection Connects a network.
Network Status Displays the connection status of the network.
Soft AP This function allows you to change a wired Internet connection
to your projector to Wi-Fi, allowing you to connect various
external devices or to use wireless Internet.
Soft AP Sets to On/Off.
Security Key Sets the Wi-Fi security number.
yYou can set the security key with a
combination of English letters and
numbers between 8 and 64 characters
long.
yThe default setting is “AR123456”.
yTo enable the Soft AP function, your projector must be turned
on and have a wired Internet connection.
yUp to four external devices can be connected.
yIf the Soft AP function is enabled, the Wi-Fi Direct and
MiracastTM functions become unavailable. You must set the
Soft AP function to Off to use the Wi-Fi Direct and MiracastTM
functions.
Wi-Fi Direct Wi-Fi Direct is a function that allows your projector to connect
with a Wi-Fi Direct device without Internet connection.
Miracast
TM
/ Intel's
WiDi The Miracast
TM
allows you to enjoy video and audio from a
portable device through the projector wirelessly. Intel's WiDi
allows you to view a laptop screen through the projector without
a cable.
My Projector
Name Changes the name that appears when searching for the
projector from other devices.
Ͱ
NETWORK
yNetwork Connection
yNetwork Status
ySoft AP
yWi-Fi Direct
yMiracastTM / Intel's WiDi
yMy Projector Name : PF80A-JE
64 CUSTOMIZING SETTINGS
SUPPORT
1 Press the SETTINGS button.
2 Use the , , , or button to select
SUPPORT and press the OK button.
3 Use the , , , or button to set up the
desired item and press the OK button.
- To return to the previous menu, press the
button.
The available support settings are described as follows.
Item Description
Software Update Updates to the latest software.
Product/Service Info. Shows the product/service information.
Self Diagnosis Troubleshoots functional problems that can arise while using
the product.
Ͱ
Ͱ
SUPPORT
ySoftware Update
yProduct/Service Info.
ySelf Diagnosis
65
CONNECTING DEVICES
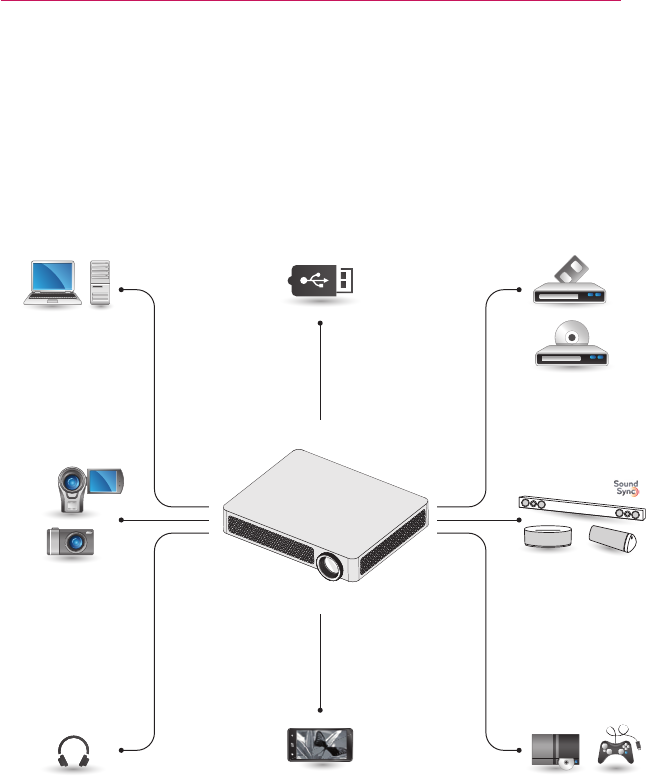
CONNECTING DEVICES
You can connect various external devices to the projector.
HDMI - page 66
Composite (AV) - page 67(AV) - page 67
Component - page 67
USB Devices - page 35
Headphones - page 68
Digital Amp - page 69
Mobile Phone - page 71
Computer/Notebook Video/DVDUSB
Digital Device LG Audio Device
Headphones Game Console
Mobile Phone
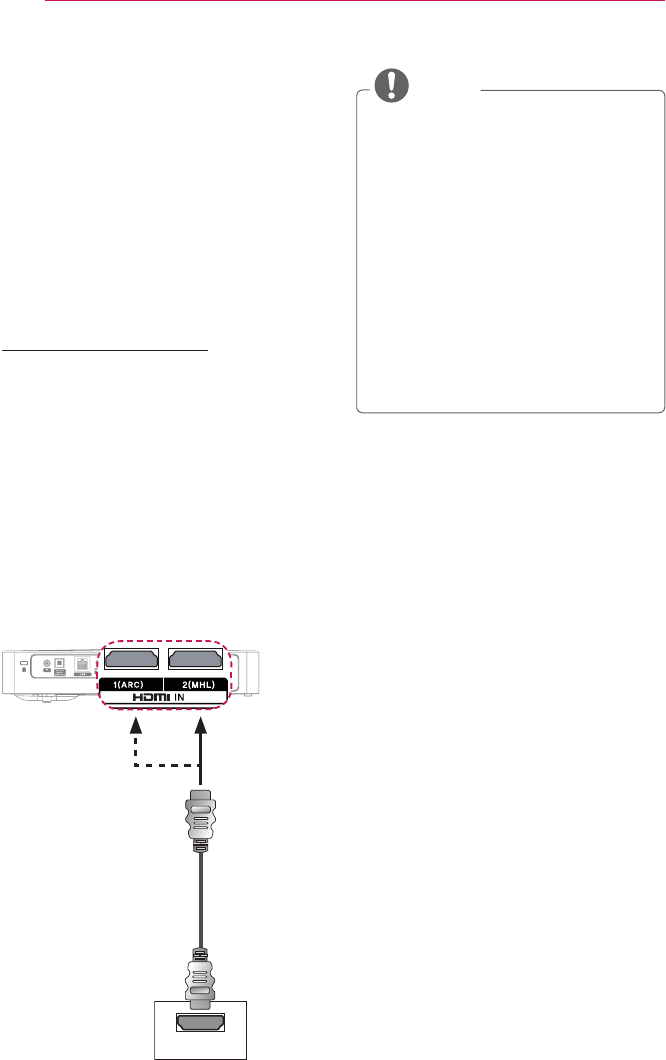
66 CONNECTING DEVICES
Connecting to HD
Receiver, DVD, or
VCR Player, External
Devices
Connect an HD receiver, DVD, VCR
player, or External Devices to the
projector and select an appropriate input
mode.
HDMI Connection
With an HDMI cable, you can enjoy high
quality picture and sound.
Using a HDMI cable, connect the HDMI
IN 1 (ARC) port of the projector to
the HDMI output port of the device to
connect. Both video and audio is output
at the same time. You can also use the
HDMI IN 2 (MHL).
Press the INPUT button on the remote
control to select HDMI. You can connect
with any HDMI input port.
+'0,
* Optional
Extras
NOTE
ARC(Audio Return Channel)
yExternal audio devices that
support SIMPLINK and ARC
must be connected using HDMI
IN 1(ARC) port.
yWhen connected with a high-
speed HDMI
®
cable, external
audio devices that support ARC
output or SPDIF work with the
SIMPLINK function without the
need for an additional optical
audio cable.
67
CONNECTING DEVICES
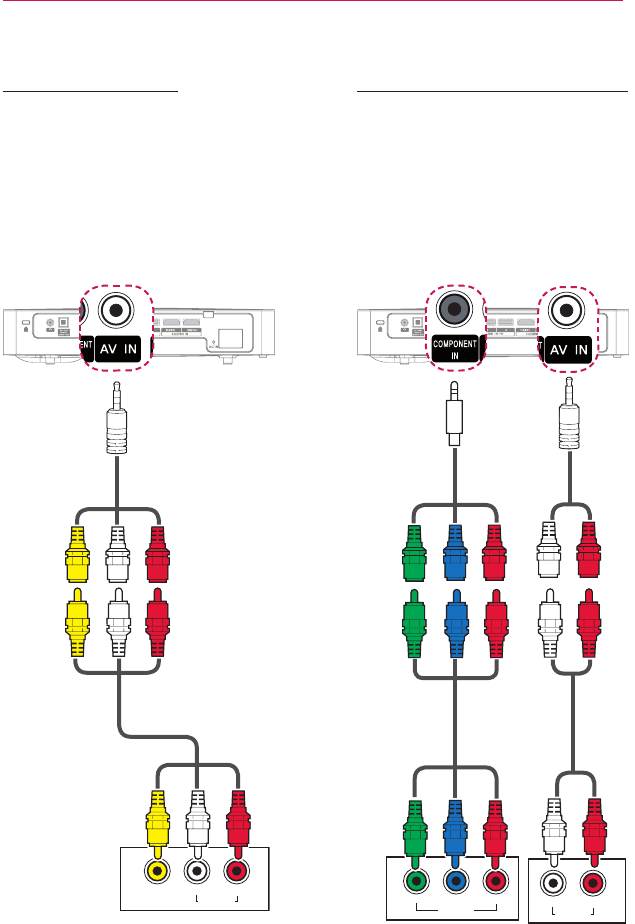
AV Connection
Connect the output ports of an external
device and the AV IN ports of the
projector using an AV cable. Press the
INPUT button on the remote control to
select AV.
Check whether cables of the same color
are connected properly.
$9287
/HIW 5LJKW
$8',2287
YELLOW YELLOW
YELLOW
WHITE WHITE
WHITE
RED RED
RED
Component Connection
You can enjoy a video by connecting the
Component port of an external device
to the COMPONENT IN port of the
projector. Press the INPUT button on the
remote control to select Component.
Check whether cables of the same color
are connected properly.
$9287
/HIW
< 3%35
5LJKW
$8',2287
RED RED RED
BLUE BLUE BLUE
GREEN GREEN GREEN
WHITE
RED
$9287
/HIW 5LJKW
$8',2287
WHITE WHITE
RED RED
* Accessories
(
Video
)
* Optional
Extras
* Accessories
* Optional
Extras
(Audio)
* Optional
Extras
(Video)
* Optional
Extras
(Audio)
68 CONNECTING DEVICES
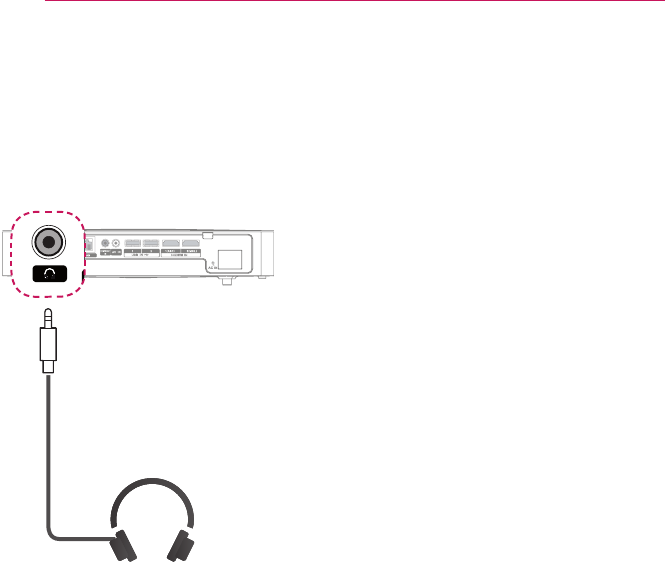
Connecting to
Headphones
You can listen to the audio through a
headphone.
* Optional
Extras
69
CONNECTING DEVICES
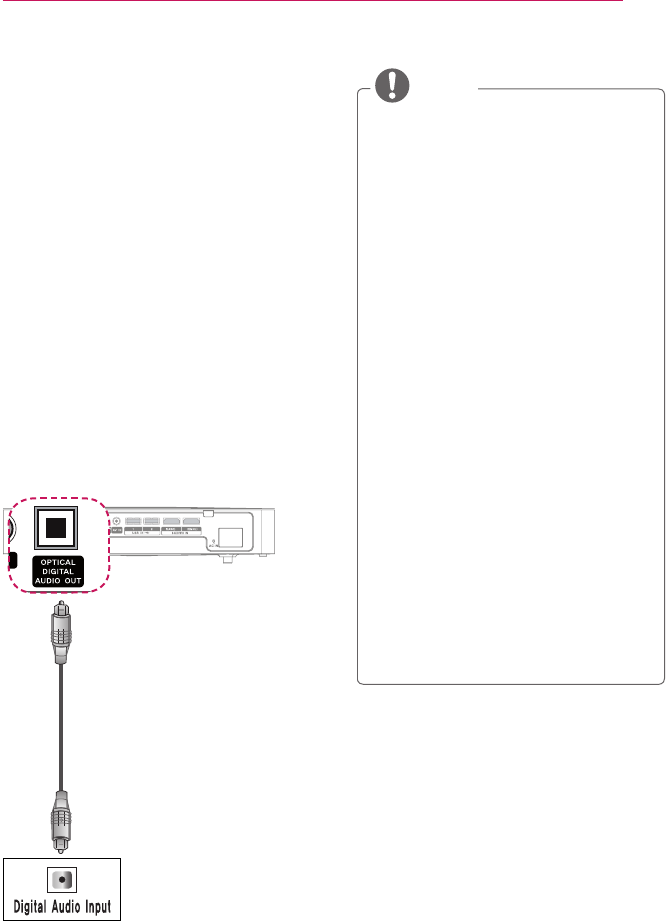
Connecting a digital
amp
Using an optical cable, connect the
digital audio input port of a digital amp
to the OPTICAL DIGITAL AUDIO OUT
port of the projector. The output of an
amp with a digital converter must be set
to the desired audio format. When using
a HDMI cable to connect a home theater
or when connecting an optical output
to an external audio device, set Sound
Out to External Speaker (Optical/HDMI
ARC) as shown below. If a projector,
home theater, or the speaker of an
external audio device is operating at the
same time, there will be an echo.
NOTE
yAlso, refer to the user manual of
the audio device to connect.
yWhen connecting this product to
other devices, make sure to turn
off and unplug all the devices.
yThe audio output of this
product has wide-ranging audio
bandwidth, so the receiver
volume must be adjusted
properly.
Speakers can be damaged by
unexpected high frequencies.
yConnecting the OPTICAL
DIGITAL AUDIO OUT port of
the projector to the digital audio
input port of a digital amp and the
audio input port of the projector
to the analog audio output port of
the digital amp can cause sound
oscillation due to the closed
loop. Remove one of the two
connections to prevent this.
(This also applies to home theater
devices.)
* Optional
Extras

70 CONNECTING DEVICES
Connecting to PC and
Laptop
The projector supports Plug & Play. Your
PC will automatically detect the projector
and requires no driver installation.
You can connect the projector to a
laptop to use various functions.
HDMI Connection
Using an HDMI cable, connect the HDMI
IN 1 (ARC) port of the projector to the
HDMI output port of your PC. Both video
and audio is output at the same time.
You can also use the HDMI IN 2 (MHL).
+'0,
The table below shows examples
of switching the output. For more
information, refer to the External
Output, Connecting to an External
Monitor, or similar sections of the
owner's manual of your computer.
Brand Switching Output
NEC [Fn]+[F3]
Panasonic [Fn]+[F3]
Toshiba [Fn]+[F5]
IBM [Fn]+[F7]
Sony [Fn]+[F7]
Fujitsu [Fn]+[F10]
LG [Fn]+[F7]
Samsung [Fn]+[F4]
Macintosh Adjust the control panel
to enable mirroring after
start-up.
* Optional
Extras
71
CONNECTING DEVICES
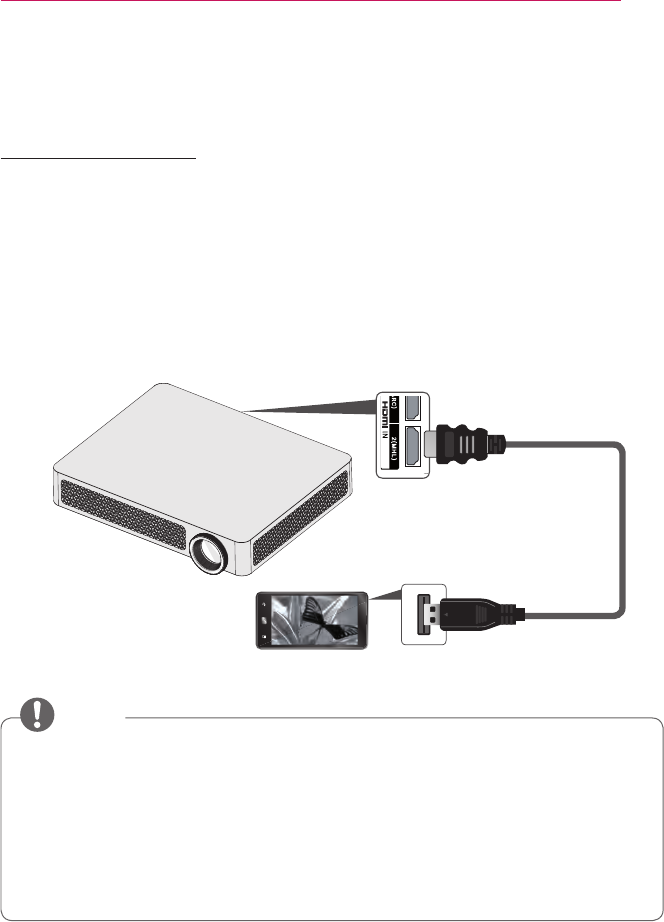
Using the mirroring function of a mobile phone
MHL Connection
The Mobile High-denition Link (MHL) is an interface that can connect a mobile
phone to the projector and play video and audio from the mobile phone through the
projector.
This only applies to products with a HDMI input that supports MHL.
(To nd out whether your device is MHL-certied, please contact your device
manufacturer.)
For MHL support, check the HDMI IN 2 (MHL) port.
Use a dedicated cable for MHL.
* Optional Extras
NOTE
yWhen you connect a mobile phone to the HDMI IN 2 (MHL) port, you can see
the mobile phone screen through a projector.
- This only applies to mobile phones that support MHL.
- You can use the remote control for some applications.
yDisconnect the MHL cable from the projector when:
- The MHL function is disabled.
- Your mobile device is fully charged in standby mode.

72 MAINTENANCE
MAINTENANCE
Clean your Projector to keep it in optimal condition.
Cleaning
Cleaning the Lens
If there is any dust or staining on the lens surface, you must clean the lens.
Use an air spray or a cleaning cloth to clean the lens.
To remove dust or stains, use an air spray or apply a small amount of cleaning agent
onto a swab or soft cloth to lightly rub the lens.
Please be aware that liquid may ow into the lens if the product is sprayed directly onto
the lens.
Cleaning the projector case
To clean the projector case, rst unplug the power cord.
To remove dust or stains, use only a dry, lint-free, nonabrasive cloth to polish the lens.
Do not use alcohol, benzene, thinners, or other chemicals, which may damage the
case.

73
INFORMATION
INFORMATION
To update projector software
Uses Software Update to check and obtain the latest version.
It is also possible to check manually for available updates.
1 Press the SETTINGS button.
2 Select SUPPORT and go to Software Update.
Item Description
Software Update Set it to On.
If an update is available, a prompt will appear to perform
the update.
Automatic update
mode If an update is available, the update automatically starts
without prompting.
Check Update Version Checks the latest update version installed. When a
new update is available, the download process can be
performed manually.
yWhen the update starts, the update progress window appears for a short time and
disappears.
yThe update service to get the latest version is provided through an Internet
connection.
yIf software is not updated, certain functions may not work properly.
74 SPECIFICATIONS
SPECIFICATIONS
Model PF80A(PF80A-JE)
Resolution (Pixel) 1920 (Horizontal) × 1080 (Vertical)
Aspect ratio 16:9 (Horizontal:Vertical)
Panel size (mm) 16.654
Projection distance
(Video size) 0.63 m - 3.72 m (50.8 cm - 304.8 cm)
Ratio of upward
projection 100 %
Working range of
the remote control 6 m
POWER AC 100 ~ 240 V, 50 Hz/ 60 Hz
Audio output 5 W + 5 W
Height (mm) Min. 45.9(without foot), Max. 55.3(without foot), 56.9(with foot)
Width (mm) 275.0
Depth (mm) 219.0(without lens), 226.0(with lens)
Weight (kg) 2.2
USB Device 5 V, 0.5 A (Max.)
Operation
environment
Temperature
Operation 0 °C to 40 °C
Storage -20 °C to 60 °C
Relative humidity
Operation 0 % - 80 %
Storage 0 % - 85 %
* Contents in this manual may be changed without prior notice due to upgrade of
product functions.
75
SPECIFICATIONS
HDMI (DTV) supported mode
Resolution Horizontal
Frequency
(kHz)
Vertical
Frequency
(Hz)
720 x 480 31.469 59.94
31.50 60.00
720 x 576 31.25 50
1280 x 720
37.5 50
44.96 59.94
45.00 60.00
1920 x 1080
28.125 50
33.72 59.94
33.75 60.00
26.97 23.97
27.000 24.000
28.125 25
33.716 29.976
33.75 30.00
56.25 50
67.43 59.94
67.500 60
HDMI (PC) supported mode
Resolution Horizontal
Frequency
(kHz)
Vertical
Frequency
(Hz)
640 x 480
31.469 59.94
800 x 600
37.879 60.31
1024 x 768
48.363 60.00
1152 x 864
54.348 60.053
1360 x 768
47.712 60.015
1280 x 1024
63.981 60.020
1920 x 1080
67.5 60.00
yIf an invalid signal is input into the
projector, it will not be displayed
properly on the screen or a message
such as No Signal or Invalid Mode
will be displayed.
yThe projector supports the DDC1/2B
type as the Plug & Play function
(Auto-recognition of PC monitor).
yThe 1920 x 1080 resolution may not
be supported depending on the PC
type.
76 SPECIFICATIONS
Component supported mode
Resolution Horizontal
Frequency
(kHz)
Vertical
Frequency
(Hz)
720 x 480i 15.73 59.94
15.75 60.00
720 x 480p 31.47 59.94
31.5 60
720 x 576i 15.625 50
720 x 576p 31.25 50
1280 x 720p
37.5 50
44.96 59.94
45.00 60.00
1920 x 1080i
28.125 50
33.72 59.94
33.75 60.00
1920 x 1080p
26.97 23.976
27.00 24.00
28.125 25.00
33.71 29.97
33.75 30.00
56.25 50.00
67.432 59.94
67.500 60.00
Component Port Connecting
information
Component
ports on the
Projector
Y PB PR
Video output
ports on DVD
player
Y PB PR
Y B-Y R-Y
Y Cb Cr
Y Pb Pr

77
SPECIFICATIONS
Open Source Software Information
To obtain the source code under GPL,
LGPL, MPL and other open source
licenses, that is contained in this
product,
please visit http://opensource.lge.com.
In addition to the source code, all
referred license terms, warranty
disclaimers and copyright notices are
available for download.
LG Electronics will also provide open
source code to you on CD-ROM for a
charge covering the cost of performing
such distribution (such as the cost of
media, shipping and handling) upon
email request to opensource@lge.com.
This offer is valid for three (3) years from
the date on which you purchased the
product.

The model and serial number of the projector
are located on the back or on the side of the
projector. Record them below should you ever
need service.
MODEL
SERIAL