LG Electronics USA PF80AJE DLP PROJECTOR User Manual G User s manual
LG Electronics USA DLP PROJECTOR G User s manual
Contents
User Manaul Part 5
40 SMARTSHARE
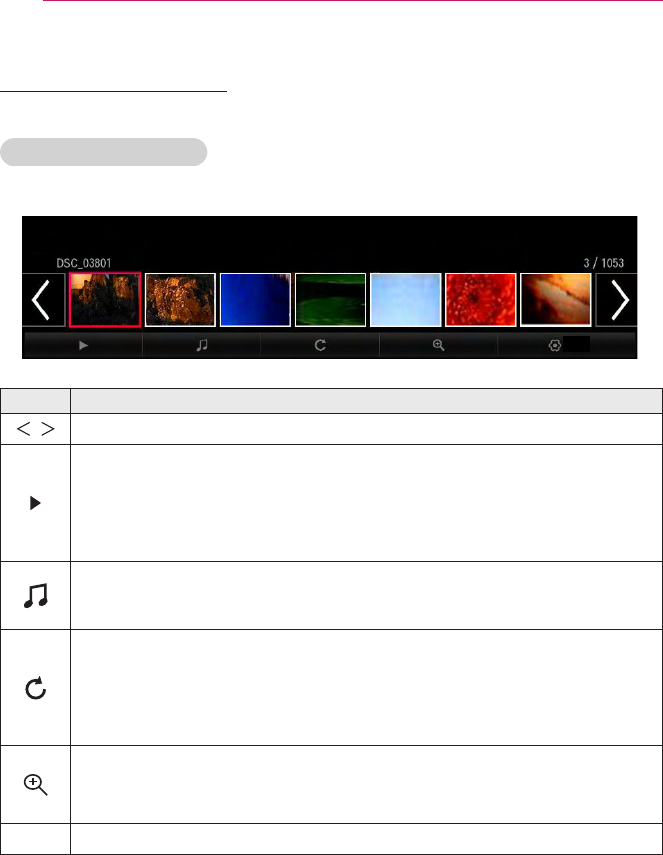
Viewing the Photos
You can view photos stored on a connected device.
To control photo view
You can control playback using the following buttons.
Option
Item Description
, Selects the previous or next photo.
If no picture is selected, all photos in the current folder are displayed in a
slide show. If some photos are selected, those photos are displayed in a
slide show.
ySet Slide Show Speed in the Option
→
Set Photo View. menu.
You can listen to music while viewing full-size photos.
ySet BGM in the Option → Set Photo View. menu.
Rotates photos.
yRotates a photo 90 °, 180 °, 270 °, 360 ° clockwise.
yPhotos cannot be rotated if their width is greater than the height of the
maximum supported resolution.
Enlarges or reduces the photo.
Use the Up/Down/Left/Right buttons to select a page and press the OK
button.
Option A setting popup window will appear.
41
SMARTSHARE
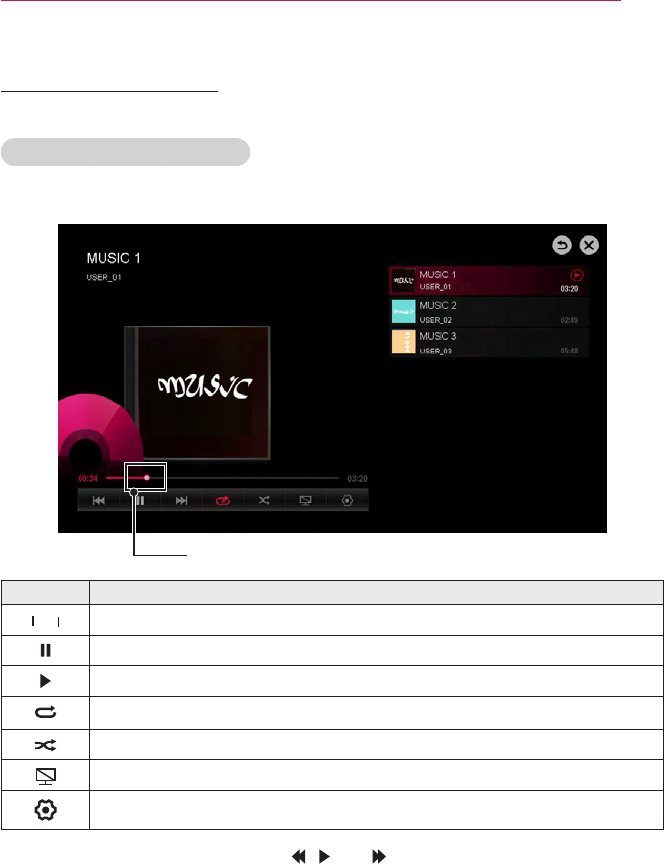
Listening to Music
You can play audio les stored on the connected device.
To control music playback
You can control playback using the following buttons.
Changes the playing position.
Item Description
ꕙ
ꕙ
Plays the previous/next le.
Pauses the music player.
Resumes normal playback.
Sets the repeat playback.
Sets the random playback.
Plays music with the projector screen turned off.
Sets Option for the music list.
yYou can control playback using the , , and keys on a remote control.
yIf you use the USB device, time information will be not shown on screen.

42 SMARTSHARE
Viewing Files
You can see document les stored on a connected device.
Supported File Formats
XLS, DOC, PPT, TXT, XLSX, PPTX, DOCX, PDF
Microsoft Ofce 97/2000/2002/2003/2007 version
Adobe PDF 1.0/1.1/1.2/1.3/ 1.4 version
yFile Viewer realigns a document, so it may look different from what is displayed on a
PC.
yFor documents that include images, the resolution may look lower during the
realigning process.
yIf the document is large or has many pages, it may take longer to load.
yUnsupported fonts may be replaced by other fonts.
yThe file viewer may not open for Office documents that contain many high resolution
images. In that case, reduce the image file size, save it on a USB storage device
and run the file viewer again or connect your PC to the projector and open the file on
your PC.
Browsing File Viewer
You can control playback using the following buttons.
yPress the Go Page button to move to the previous or next page.
yPress the volume button to zoom in or zoom out.
- Press the OK button.
- Press the Up/Down/Left/Right buttons to move to Go Page or Zoom.
Go Page Zoom Option List
[125%] 11.pptx 1 / 2 31 KB
Item Description
Go Page Moves to the page you specify.
Zoom Enlarges or reduces the document.
Option Sets Option for File Viewer.
List Returns to a list.
43
SMARTSHARE
To set SmartShare™ related functions
Press the SETTINGS button on the remote control. Select SMART SHARE →
Settings.
Changes settings related to SmartShare™ content playback.
Advanced Setting
Item Description
My Projector Name Changes the name that appears when searching for the
projector from other devices.
Network Status Checks the network connection.
Wi-Fi Direct Allows use of wireless connection functions such as Wi-Fi
Direct and WiDi.
Auto Play on
Receive Accepts / rejects content transferred from other devices.
DivX(R) VOD Registers or releases DivX.
Checks DivX Registration Code for playing DivX-protected
videos. Register at http://vod.divx.com.
Uses Registration Code to rent or purchase movies at www.
divx.com/vod.
yRented/purchased DivX files cannot be played if the DivX
Registration Code of a different device is used. Use only the
DivX Registration Code granted to this device.
yConverted files not conforming to the DivX Codec Standard
may not play or may produce abnormal images and sound.
Delete History
yTo delete contents history, press Delete History button.
yUse the contents at Recent menu.
44 SMARTSHARE
SmartShare™ supporting file
yMaximum data transfer rate: 20
Mbps(Mega bit per second)
yExternal subtitle formats supported:
*.smi, *.srt, *.sub (MicroDVD,
SubViewer 1.0/2.0), *.ass, *.ssa, *.txt
(TMPlayer), *.psb(PowerDivX)
yInternal subtitle formats supported:
XSUB (supports internal subtitles
generated from DivX6)
Subtitle Language
Subtitle
Language Language
Latin1 English, Spanish,
French, German, Italian,
Swedish, Finnish, Dutch,
Portuguese, Danish,
Romanian, Norwegian,
Albanian, Gaelic, Welsh,
Irish, Catalan, Valencian
Latin2 Bosnian, Polish,
Croatian, Czech, Slovak,
Slovenian, Serbian,
Hungarian
Latin4 Estonian, Latvian,
Lithuanian
Cyrillic Bulgarian, Macedonian,
Russian, Ukranian,
Kazakh
Greek Greek
Turkish Turkish
Hebrew Modern Hebrew
Chinese Simplied Chinese
Korean Korean
Arabic Arabic

45
SMARTSHARE
Video Supported Codec
Maximum resolution: 1920 x 1080 @ 30p
Extension Codec
.asf
.wmv
Video VC-1 Advanced Prole, VC-1 Simple and Main Prole
Audio WMA Standard, WMA 9 Professional
.divx
.avi
Video DivX3.11, DivX4, DivX5, DivX6, XViD, H.264/AVC,
Motion Jpeg, MPEG-4 Part 2
Audio MPEG-1 Layer I, II, MPEG-1 Layer III (MP3),
Dolby Digital, Dolby Digital Plus, LPCM, ADPCM, DTS
.mp4
.m4v
.mov
Video H.264/AVC, MPEG-4 Part 2
Audio AAC , MPEG-1 Layer III (MP3)
.3gp
.3g2
Video H.264/AVC, MPEG-4 Part 2
Audio AAC, AMR-NB, AMR-WB
.mkv Video H.264/AVC
Audio HE-AAC, Dolby Digital
.ts
.trp
.tp
.mts
.m2ts
Video H.264/AVC, MPEG-2, VC-1
Audio MPEG-1 Layer I, II, MPEG-1 Layer III (MP3)
Dolby Digital, Dolby Digital Plus, AAC
.vob Video MPEG-1, MPEG-2
Audio Dolby Digital, MPEG-1 Layer I, II, DVD-LPCM
.mpg
.mpeg
Video MPEG-1, MPEG-2
Audio MPEG-1 Layer I, II, MPEG-1 Layer III(MP3), AAC

46 SMARTSHARE
Audio File
File type Item Info
mp3
Bit rate 32 Kbps - 320 Kbps
Sample freq. 16 kHz - 48 kHz
Support MPEG1, MPEG2, Layer2, Layer3
Available photo file
File type Item Prole
2D
(jpeg, jpg,
jpe) JPEG Minimum: 64 x 64
Maximum: Normal Type: 15360 (W) x 8640 (H)
Progressive Type: 1920 (W) x 1440 (H)

47
SMARTSHARE
To connect DLNA
DLNA stands for Digital Living Network
Alliance, which allows you to enjoy
video / music / photo les stored on a
PC or server on your Projector via home
networking.
To connect a DLNA-
authenticated
Smartphone
The
Projector
and the smartphone should
be on the same network.
1 Ensure that Wi-Fi is enabled on the
smartphone.
2 Install / run the app to share content
on the smartphone.
3 Run “Share my mobile phone
Content”.
4 Select the kind of content (video /
music / photo) you wish to play.
5 Select the video, music or photo le
to play on the Projector.
6 Select Add to Play List.
7 Select Projector model name on the
device you want to play content from.
(Projector model name is on the label
of the device.)
8 Play Shows the selected le on
Projector.
To connect DLNA DMR
(Digital Media Renderer)
If the PC's operating system is Windows
7 or Windows 8 or the DLNA-certied
device (e.g. mobile phone) is connected
via a network, you can play music /
videos / photos on Projector without
installing a separate program.
1 Congure Projector and PC on the
same network. Congure Windows
7 or Windows 8-installed PC on the
network.
2 Right-click the music / video / photo
le that you want to play and use
the “Remote Playback” feature that
comes with Windows 7 or Windows
8.To play content from a device
such as a mobile phone, refer to the
Owner's Manual for the device.
3 Content will be played on one device
only even if more than one Projector or
device is connected. Play speed can
vary depending on network speed.

48 SMARTSHARE
To connect DLNA DMP
(Digital Media Player)
With a PC having SmartShare™ PC
software, music / video / photo les may
be replayed on the Projector by linking
them via home networking.
1 Congure Projector and PC on the
same network. The Projector and
each device should be connected
through a single access point to
enable DLNA service.
2 Install SmartShare™ PC software
on the PC from the website. Before
installation, close all running
programs including rewall and anti-
virus programs.
3 The sever should be running in order
to watch the shared le on your
Projector.
49
SMARTSHARE
SmartShare™ PC SW Installing & Setting
Install the SmartShare™ PC SW(DLNA) programme on your PC.
1 Download the setup le from the path below in order to use the DLNA function.
http://liu.lge.com/smartshare/release/smartshare.zip
2 Install the downloaded SmartShare™ PC software.
3 You can run the programme when installation is complete.
NOTE
yDLNA or Media Link service is only available if projector and other devices are
connected via a single router.
PC requirement for installing LG SmartShare™
Item Minimum Specications Recommended
Specications
CPU Intel Pentium4 2.0 G or higher/
AMD Sempron 2000 or higher
Intel Pentium Dual Core or
higher/AMD Athlon 64 x 2 or
higher
RAM 1 GB or higher 2 GB or higher
VGA
64 MB RAM, 1024 x 768 or
higher resolution, and a video
card that supports 16 bit or
more colors
128 MB RAM, 1024 x 768 or
higher resolution, and a video
card that supports 16 bit or
more colors
Hard Disk Drive 200 MB or higher
Operating
System
Windows XP (Service Pack 2 or later), Windows Vista, Windows
7, Windows 8
l Windows Media Player: 11.0.5721.5280 or higher is
recommended
Network
Environment 100 MB Ethernet, Wireless LAN (WLAN) IEEE 802.11g or higher
yProgram speed can be delayed depending on the system performance and the
network environment.

50 SMARTSHARE
In case of a DLNA
malfunction
yIf the DLNA feature does not work
properly, check your network settings.
yA 5-GHz access point is needed to
view 1080p videos via DLNA. A 2.4-
GHz access point may cause frequent
buffering or other problems.
yDLNA may not work properly in the
wireless network. It is recommended
to connect to the wired network.
yWhen playing video in DLNA mode,
Multi Audio and internal subtitles are
not supported.
yIf more than one Projector is
connected to a single server in DLNA
mode, the content may not play
depending on server performance.
ySubtitles may not be supported
depending on the DLNA device.
yDLNA feature may not work
properly depending on the network
environment.
yDLNA feature cannot be used with
some access points that do not
support multicasting. For more
information, refer to the access point
manual or consult the manufacturer.
ySupported file types may differ
depending on DLNA server
environment, even for file types
supported by the Projector.
yToo many sub-folders and files in one
folder may cause malfunction.
yThe information about the file from the
DLNA server may not be displayed
correctly.
yWhen viewing video subtitles on a
DLNA server, we recommend that
you use SmartShare™ PC Software.
yIf subtitle file is added later, turn off
the shared folder and reset.
yDRM file located on a SmartShare PC
Software server cannot be played.
51
CUSTOMIZING SETTINGS
CUSTOMIZING SETTINGS
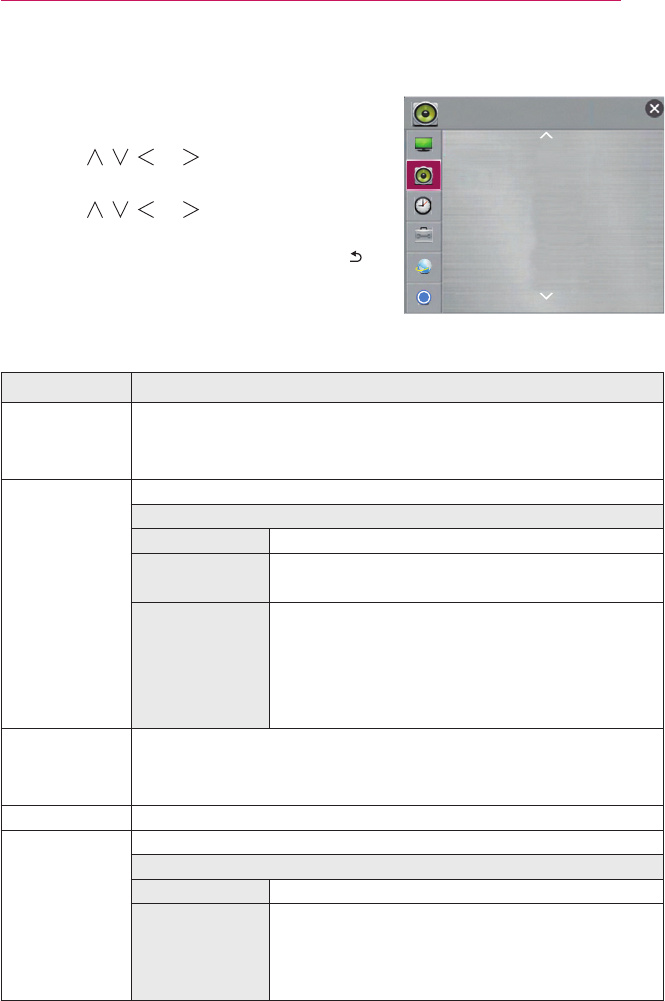
SETTINGS
1 Press the SETTINGS button.
2 Use the , , , or button to select the desired item and press the OK button.
3 Use the , , , or button to set up the desired item and press the OK button.
4 Press the EXIT button when completed.
Menu Description
PICTURE Adjusts the image quality for optimal viewing.
SOUND Adjusts the sound quality and volume level.
TIME Sets the time and time-related features.
OPTION Customizes the general settings.
NETWORK Sets the network.
SUPPORT Shows the projector information.
52 CUSTOMIZING SETTINGS
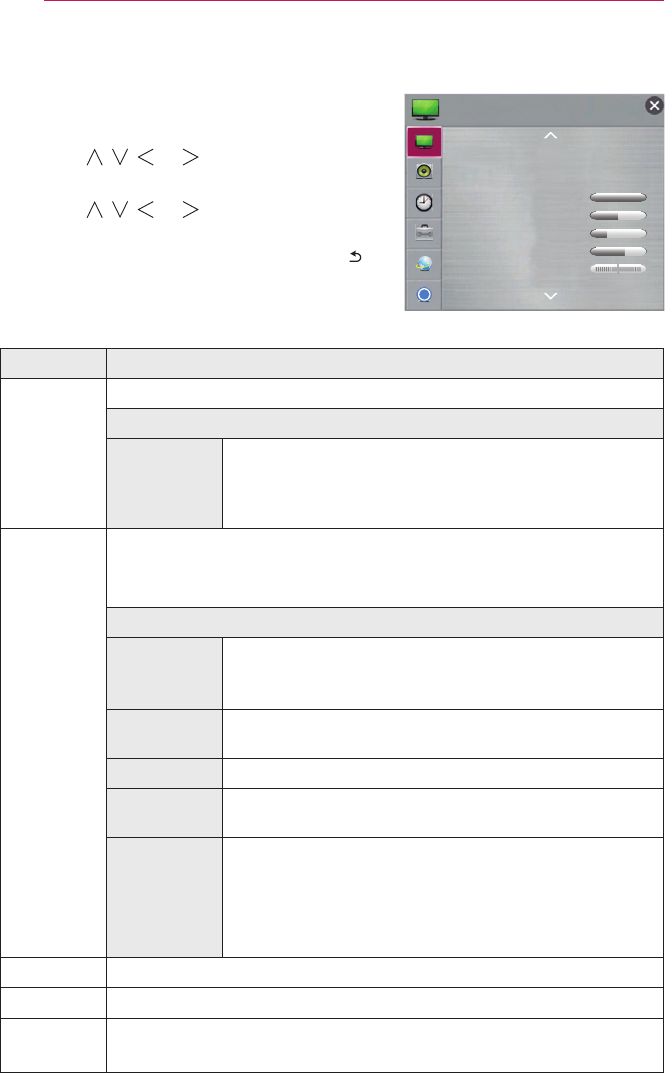
PICTURE Settings
1 Press the SETTINGS button.
2 Use the , , , or button to select
PICTURE and press the OK button.
3 Use the , , , or button to set up the
desired item and press the OK button.
- To return to the previous menu, press the
button.
The available picture settings are described as follows.
Item Description
Energy
Saving Reduces power consumption by adjusting screen brightness.
Mode
Minimum/
Medium/
Maximum
Applies the pre-set Energy Saving mode.
- If Energy Saving is set to Minimum and the ambient
temperature is 35 °C or higher, Energy Saving will be
disabled.
Picture
Mode Selects the picture mode optimized for the viewing environment or the
programme.
You can also customize advanced options for each mode.
Mode
Vivid Maximizes the visual effect of video.
Heightens contrast, brightness and sharpness to display
vivid images.
Standard Displays images in standard levels of contrast,
brightness and sharpness.
Cinema Optimizes the image for a movie.
Game Optimizes the image for playing games on fast-moving
screens.
Expert1/2 Menu for adjusting picture quality that allows experts
and amateurs to enjoy the best Projector viewing.
- Expert mode is for picture tuning professionals to
control and ne-tune using a specic image. For
normal images, the effects may not be dramatic.
Contrast Adjusts the difference between bright and dark regions of the screen.
Brightness Adjusts the overall screen brightness.
Sharpness Adjusts the sharpness of the borders between bright and dark.
Horizontal and Vertical Sharpness are available only in Expert1/2.
Ͱ
PICTURE
yꕊ Energy Saving : Minimum
yPicture Mode : Standard
yContrast 100
yBrightness
50
ySharpness
20
yColor 60
yTint 0
R G

53
CUSTOMIZING SETTINGS
Item Description
Color Adjusts the colours on the screen darker or lighter.
Tint Adjusts the red/green colour balance.
Advanced
Control Customizes the advanced settings.
Picture
Option Sets optional settings.
Picture
Reset Resets values customized by the user.
Each picture mode is reset. Select the picture mode you wish to reset.
Aspect
Ratio Resizes the picture.
Picture
Wizard II Use the remote control and follow the instructions of the Picture Wizard
to calibrate and adjust for optimum picture quality without expensive
pattern devices or help from a specialist. Follow the instructions to
obtain the optimum picture quality.
54 CUSTOMIZING SETTINGS
Advanced Control
Item Description
Dynamic
Contrast Adjusts contrast and colour to the optimal level according to the
screen’s brightness.
Dynamic
Color Adjusts colours for more natural-looking colours.
Preferred
Color Skin Color Skin colour spectrum can be separately set to implement
the skin colour as dened by the user.
Grass
Color
Natural colour spectrum (meadows, hills, etc.) can be
separately set.
Sky Color Sky colour is set separately.
Super
Resolution Provides a crystal-clear picture by improving the details in areas where
the picture is blurry or unclear.
Gamma Sets the gradation curve according to the output of the picture signal in
relation to the input signal.
Expert Control
Item Description
Dynamic
Contrast Adjusts contrast and colour to the optimal level according to the
screen’s brightness.
Super
Resolution Provides a crystal-clear picture by improving the details in areas
where the picture is blurry or unclear.
Color Gamut Selects the range of colours that can be expressed.
yStandard: Displays the original colors of an input signal
regardless of the display features.
yWide: Makes use of the display's rich colors.
Edge Enhancer Shows clearer and distinctive yet natural edges of the video.
xvYCC Displays much richer colors.
Color Filter Filters a specic colour spectrum in RGB colours to ne-tune colour
saturation and hue accurately.
Gamma Sets the gradation curve according to the output of the picture
signal in relation to the input signal.

55
CUSTOMIZING SETTINGS
Item Description
White Balance
Adjusts white balance. Detailed adjustment is possible as shown below.
a. Method: 2 points
- Pattern: Inner, Outer
- Points: Low, High
- Red/Green/Blue: Adjustable range -50 - +50.
- Apply to all inputs: The values of the White Balance is applied
to all the input modes.
b. Method: 20 point IRE
- Pattern: Inner, Outer
- Institute of Radio Engineers (IRE) is the unit indicating the size
of a video signal and can be set to 5, 10, 15, ... 100.You can
ne-tune for each setting as shown below.
- Red/Green/Blue: The adjustment range is -50 - +50.
- Apply to all inputs: The values of the White Balance is applied
to all the input modes.
Color
Management
System
Adjusts Red/Green/Blue/Cyan/Magenta/Yellow colors. Allows an
expert to adjust the tint using a test pattern. Six colors (Red/Green/
Blue/Cyan/Magenta/Yellow) can be selectively adjusted without
affecting other colors. You may not see colors change on a normal
picture even after adjustment.
- Saturation Red/Green/Blue/Yellow/Cyan/Magenta,
Tint Red/Green/Blue/Yellow/Cyan/Magenta,
Luminance Red/Green/Blue/Yellow/Cyan/Magenta:
The adjustment range is -30 - +30 each.
* Depending on input signal or other picture settings, the range of detailed items for
adjustment may differ.
56 CUSTOMIZING SETTINGS
Picture Option
Item Description
Noise Reduction
Reduces screen noise in the video.
MPEG Noise
Reduction Eliminates noise generated while creating digital picture signals.
Black Level
Adjusts the brightness or darkness of the screen to suit the black level of
the picture input using the degree of darkness (black level) of the screen.
Real Cinema Optimizes the screen for movie viewing.
TruMotion Corrects images to display smoother motion sequences.
Mode
Smooth De-Judder value is set to 3.
Clear De-Judder value is set to 7.
User De-Judder can be set manually.
yDe-Judder: This function adjusts juddering of the screen.
Color
Temperature Adjusts the overall color of the screen to suit your preference.
You can select Medium, Warm, Natural or Cool.
Peak Mode Adjusts the brightness to the optimal level for the image.
- If the image is mostly white, the brightness level increases. If the
image mainly consists of red/green/blue/blue green/magenta/
yellow colors, you may not see a change in brightness.
- Peak Mode is only enabled when Picture Mode is set to Vivid
and Energy Saving is set to Minimum.
- If Peak Mode is enabled, Energy Saving and Color
Temperature are disabled.
* If the video signal is 60 Hz, TruMotion may not work.
57
CUSTOMIZING SETTINGS
SOUND Settings
1 Press the SETTINGS button.
2 Use the , , , or button to select SOUND
and press the OK button.
3 Use the , , , or button to set up the
desired item and press the OK button.
- To return to the previous menu, press the
button.
The available sound settings are described as follows.
Item Description
Smart Sound
Mode Provides the optimized sound adjusted for each content type.
yIf the Smart Sound Mode function is enabled, Sound Mode, Virtual
Surround Plus and Clear Voice ll are automatically adjusted.
Sound Mode Sets the sound mode.
Mode
Standard Suitable for all types of video.
Music/ Cinema/
Sport/ Game
Sets audio optimized for a specic genre.
User Setting Adjusts volume level.
y100 Hz/ 300 Hz/ 1 kHz/ 3 kHz/ 10 kHz:
Sets EQ by manual adjustment of sound bands.
yReset: Resets the equalizer value changed by
the user.
Virtual
Surround Plus
Provides realistic 5.1 channel stereo sound from two speakers.
yIf Clear Voice ll is set to On, Virtual Surround plus will not be
chosen.
Clear Voice II Boosts voice clarity.
Volume Mode Sets various modes for volume control.
Mode
Auto Volume Automatically adjusts the volume level.
Volume Control Using a single volume curve may result in
an inaudible or loud sound depending on the
environment. Adjusts volume levels depending on
the time of day (day/night).
Ͱ
SOUND
ySmart Sound Mode : Off
ySound Mode
: Standard
yVirtual Surround Plus
: Off
yClear Voice II
: Off
yVolume Mode
ySound Out
: Projector Speaker
yAV Sync. Adjust
: Off

58 CUSTOMIZING SETTINGS
Item Description
Sound Out Sets the audio output of the projector.
Mode
Projector
Speaker Sound is output through the Projector speaker.
External
Speaker
(Optical/HDMI
ARC)
Sound is output through the speaker connected to
the optical port.
SIMPLINK is supported.
yARC Mode: External audio devices can be
connected via High-Speed HDMI® cable
without an extra optical audio cable to output
SPDIF. It interfaces with SIMPLINK.
For an external device that supports ARC (Audio
Return Channel), connect it to the HDMI IN
1(ARC) port.
yDigital Sound Out: Sets up Digital Sound
Output.
LG Sound
Sync (Optical) Sound is output through an LG audio device
connected to the OPTICAL DIGITAL AUDIO OUT
port.
LG Sound Sync
(Wireless) Sound is output through a wirelessly connected
LG audio device.
Headphone Sound is output through headphones.
yHeadphones are detected and connected
automatically when the projector is on.

59
CUSTOMIZING SETTINGS
Item Description
AV Sync.
Adjust Synchronizes video and audio directly when they do not match.
If you set AV Sync. Adjust to On, you can adjust the sound output
(Projector speakers or SPDIF) to the screen image.
Mode
Projector
Speaker Adjusts the synchronization of the sound from the
projector's internal speakers.
The - button makes the sound output faster and
the + button slower than the default value.
External
Speaker Adjusts how the sound is synced to external
speakers, such as an external speaker connected
to the digital audio output port, LG audio device
and headphone.
The + and - buttons allow the viewer to
synchronize the audio with the video.
Bypass Sends the natural sound of external devices
without any audio delay. Audio may be output
before video as it takes time to process video
input into the Projector.
Sound Option
Setting Balance: Adjusts left/right audio balance.