Proxim Wireless MESHMAXMP11R 802.11 a/b/g Access Point User Manual 2 MeshMAX5054Series User Guide
Proxim Wireless Corporation 802.11 a/b/g Access Point 2 MeshMAX5054Series User Guide
Contents
- 1. Users Manual 1
- 2. Users Manual 3
- 3. Users Manual 4
- 4. Users Manual 2 part 1
- 5. Users Manual 2 part 2
Users Manual 2 part 2

Configuration MeshMAX 5054 Series User Guide
Advanced Configuration of Mesh and Access Point Module
149
Wireless Interface/Card Trap Group
Operational Trap Group
oriTrapAuthenticationFailure Client authentication failure has occurred.
Authentication failures can range from:
• MAC Access Control table
• RADIUS MAC authentication
• 802.1x authentication specifying the
EAP-Type
• WORP mutual authentication
• SSID authorization failure specifying the
SSID
• VLAN ID authorization failure specifying the
VLAN ID
Major
oriTrapUnauthorizedManagerDetected Unauthorized manager has attempted to view
and/or modify parameters
Major
oriTrapRADScanComplete RAD scan is successfully completed Informational
oriTrapRADScanResults Provides information on the RAD Scan results Informational
oriTrapRogueScanStationDetected Rogue station detected Informational
oriTrapRogueScanCycleComplete Rogue scan successfully completed Informational
Trap Name Description Severity Level
oriTrapWLCFailure General failure wireless interface/card failure. Critical
oriTrapWLCRadarInterferenceDetected Radar interference detected on the channel being
used by the wireless interface
Major
MIC Attack Detected Supported in Web interface only Major
MIC Attack Report Detected Supported in Web interface only Major
Trap Name Description Severity Level
oriTrapUnrecoverableSoftwareErrorDetected Unrecoverable software error detected. Causes
software watch dog timer to expire, which in turn
causes the device to reboot.
Critical
oriTrapRADIUSServerNotResponding RADIUS server not responding to authentication
requests sent from the RADIUS client in the
device
Major
oriTrapModuleNotInitialized Module (hardware or software) not initialized Major
oriTrapDeviceRebooting Device rebooting Informational
oriTrapTaskSuspended Task suspended Critical
oriTrapBootPFailed Response to the BootP request not received;
device not dynamically assigned an IP address
Major
Trap Name Description Severity Level

Configuration MeshMAX 5054 Series User Guide
Advanced Configuration of Mesh and Access Point Module
150
Flash Memory Trap Group
TFTP Trap Group
oriTrapDHCPFailed Response to the DHCP client request not
received; device not dynamically assigned an IP
address
Major
oriTrapDNSClientLookupFailure DNS client attempts to resolve a specified
hostname (DNS lookup) and a failure occurs
because either the DNS server is unreachable or
there is an error for the hostname lookup. Trap
specifies the hostname that was being resolved.
Major
oriTrapSSLInitializationFailure SSL initialization failure Major
oriTrapWirelessServiceShutdown Wireless interface has shutdown services for
wireless clients
Informational
oriTrapWirelessServiceResumed Wireless interface has resumed service and is
ready for wireless client connections
Informational
oriTrapSSHInitializationStatus SSH initialization status Major
oriTrapVLANIDUserAssignment User is assigned a VLAN ID from the RADIUS
server
Informational
oriTrapDHCPLeaseRenewal AP requests DHCP renewal and receives new
information from the DHCP server. Information
includes the DHCP server IP address that replied
to the DHCP client request, and the IP address,
subnet mask, and gateway IP address returned
from the DHCP server.
Informational
oriTrapTemperatureAlert Temperature is above or below acceptable
operating margin.
Critical
Temperature is within 5°C of upper or lower limit. Major
Trap Name Description Severity Level
oriTrapFlashMemoryEmpty No data present in flash memory Informational
Flash Memory Corrupted Flash memory corrupted Critical
oriTrapFlashMemoryRestoringLastKnownGoo
dConfiguration
Current/original configuration data file is found to
be corrupted, and the device loads the last known
good configuration file
Informational
Trap Name Description Severity Level
oriTrapTFTPFailedOperation TFTP operation failed Major
oriTrapTFTPOperationInitiated TFTP operation Initiated Informational
oriTrapTFTPOperationCompleted TFTP operation completed Informational
Trap Name Description Severity Level

Configuration MeshMAX 5054 Series User Guide
Advanced Configuration of Mesh and Access Point Module
151
Image Trap Group
SNTP Trap Group
Generic Trap Group
A generic SNMP trap may be sent for any of the following reasons:
System Feature/License Group
In addition, the AP supports these standard traps, which are always enabled:
Trap Name Description Severity Level
oriTrapZeroSizeImage Zero size image loaded onto device Major
oriTrapInvalidImage Invalid image loaded onto device Major
oriTrapImageTooLarge Image loaded on the device exceeds the size
limitation of flash
Major
oriTrapIncompatibleImage Incompatible image loaded onto device Major
oriTrapInvalidImageDigitalSignature Image with invalid digital signature is loaded onto
device
Major
Trap Name Description Severity Level
oriTrapSNTPFailure SNTP time retrieval failure Minor
oriTrapSNTPFailure SNTP sync-up failure Minor
Trap Name Description Severity Level
oriTrapGenericNotification (see following table) Generic SNMP Trap Variable
Trap Reason/Type Additional Trap Information Severity Level
Mesh Connection Failure Connection failure reason Major
Link Integrity Failure Target IP address of down link Major
Topology Change Ethernet MAC address of Mesh AP causing
change; Mesh SSID
Informational
Trap Name Description Severity Level
oriTrapIncompatibleLicenseFile Incompatible license file Major
oriTrapInvalidLicenseFile Invalid license file Major

Configuration MeshMAX 5054 Series User Guide
Advanced Configuration of Mesh and Access Point Module
152
RFC 1215-Trap
Bridge MIB (RFC 1493) Alarms
All these alarm groups correspond to System Alarms that are displayed in the System Status, including the traps that are
sent by the AP to the SNMP managers specified in the Alarm Host Table.
Alarm Host Table
To add an entry and enable the AP to send SNMP trap messages to a Trap Host, click Add, and then specify the IP
Address and Password for the Trap Host.
NOTE: Up to 10 entries are possible in the Alarm Host table.
•IP Address: Enter the Trap Host IP Address.
•Password: Enter the password in the Password field and the Confirm field.
•Comment: Enter an optional comment, such as the alarm (trap) host station name.
To edit or delete an entry, click Edit. Edit the information, or select Enable,Disable, or Delete from the Status
drop-down menu.
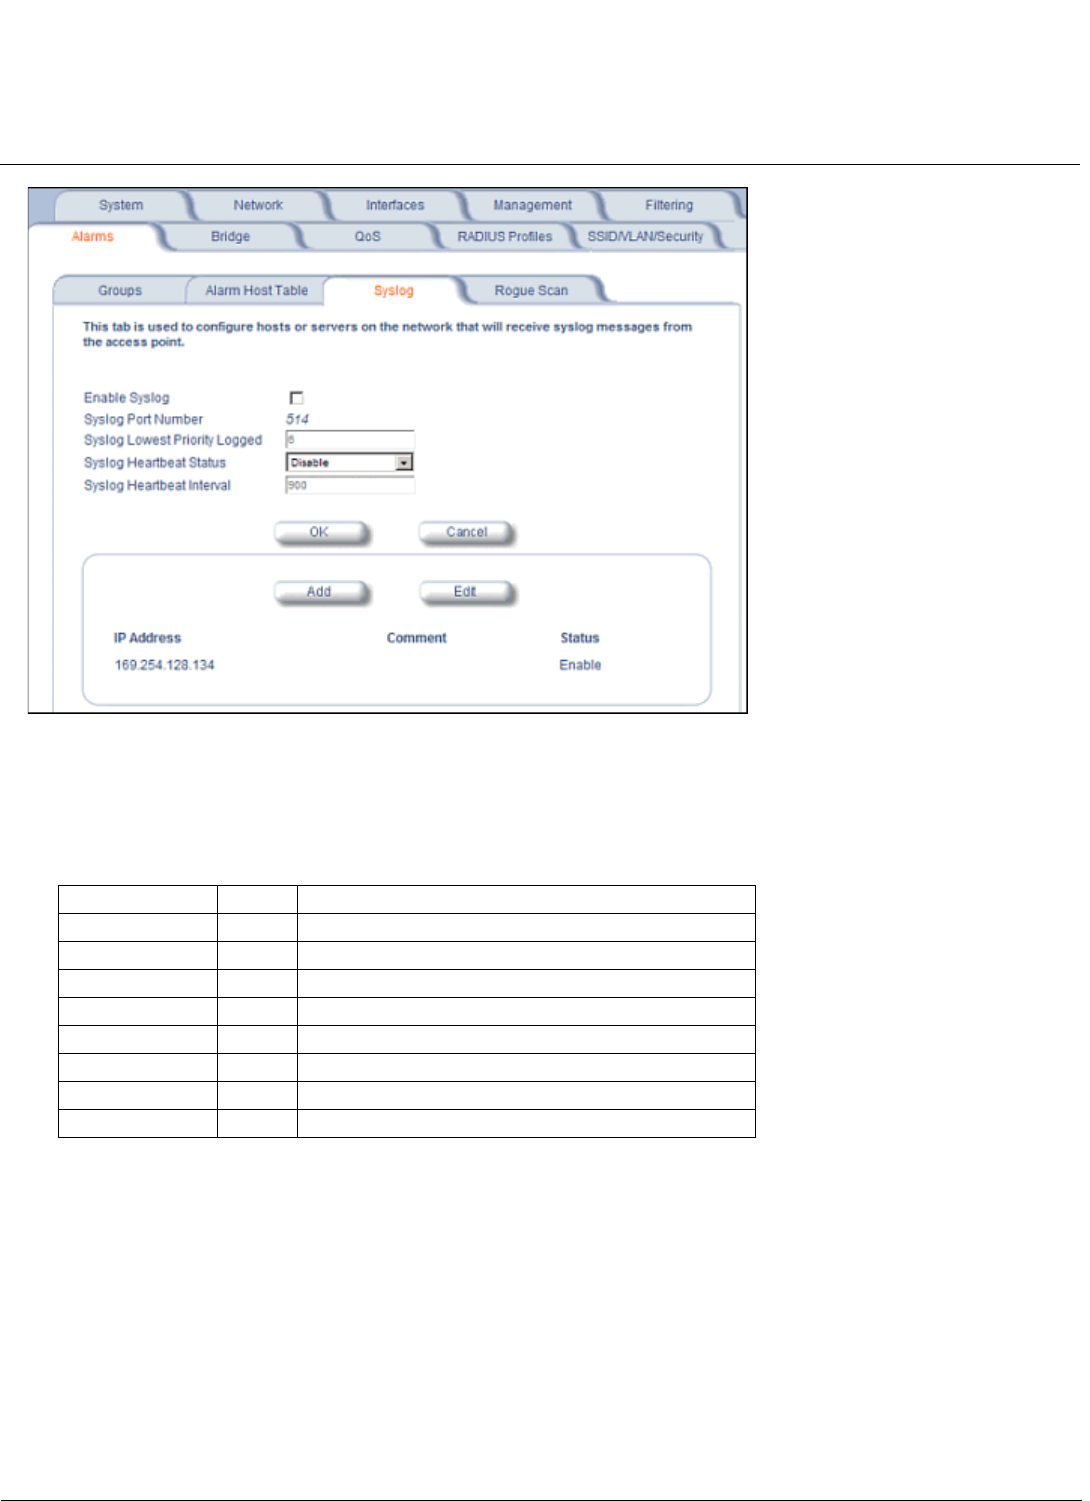
Syslog
The Syslog messaging system enables the AP to transmit event messages to a central server for monitoring and
troubleshooting. The access point logs “Session Start (Log-in)” and “Session Stop (Log-out)” events for each wireless
client as an alternative to RADIUS accounting.
See RFC 3164 at http://www.rfc-editor.org for more information on the Syslog standard.
Trap Name Description Severity Level
coldStart AP is on or rebooted Informational
linkUp AP's Ethernet interface link is up (working) Informational
linkDown AP's Ethernet interface link is down (not working) Informational
Trap Name Description Severity Level
New Root AP has become the new root in the Spanning
Tree network
Informational
topologyChange Trap is not sent if a newRoot trap is sent for the
same transition
Informational
Configuration MeshMAX 5054 Series User Guide
Advanced Configuration of Mesh and Access Point Module
153
Figure 6-36 Syslog Configuration Screen
Setting Syslog Event Notifications
Syslog Events are logged according to the level of detail specified by the administrator. Logging only urgent system
messages will create a far smaller, more easily read log than a log of every event the system encounters. Determine
which events to log by selecting a priority defined by the following scale:
Configuring Syslog Event Notifications
You can configure the following Syslog settings from the HTTP interface:
•Enable Syslog: Place a check mark in the box provided to enable system logging.
•Syslog Port Number: This field is read-only and displays the port number (514) assigned for system logging.
•Syslog Lowest Priority Logged: The AP will send event messages to the Syslog server that correspond to the
selected priority number and any priority numbers below it. For example, if set to 6, the AP will transmit event
messages labeled priority 1 to 6 to the Syslog server. This parameter supports a range between 1 and 7; 6 is the
default.
•Syslog Heartbeat Status: When Heartbeat is enabled, the AP periodically sends a message to the Syslog server to
indicate that it is active.
Event Priority Description
LOG_EMERG 0 System is unusable
LOG_ALERT 1 Action must be taken immediately
LOG_CRIT 2 Critical conditions
LOG_ERR 3 Error conditions
LOG_WARNING 4 Warning conditions
LOG_NOTICE 5 Normal but significant condition
LOG_INFO 6 Informational
LOG_DEBUG 7 Debug-level messages

Configuration MeshMAX 5054 Series User Guide
Advanced Configuration of Mesh and Access Point Module
154
•Syslog Heartbeat Interval: If Syslog Heartbeat Status is enabled this field provides the interval for the heartbeat in
seconds (between 1 and 604800). The default is 900 seconds.
•Syslog Host Table: This table specifies the IP addresses of a network servers that the AP will send Syslog messages
to. Click Add to create a new entry. Click Edit to change an existing entry. Each entry contains the following field:
–IP Address: Enter the IP Address for the management host.
–Comment: Enter an optional comment such as the host name.
–Status: The entry is enabled automatically when saved (so the Status field is only visible when editing an entry).
You can also disable or delete entries by changing this field’s value.
Syslog Messages
The following messages are supported in the AP:
Syslog Message Name Priority Severity Description
Auto Configuration using DHCP 6 Informational Configuration filename and TFTP server address
are obtained from DHCP when dynamic IP is
configured on the device.
Auto Configuration using Static IP 6 Informational Configured TFTP server address and configuration
filename is used when Static IP is configured on
the device.
TFTP Server IP and configuration
filename not present in DHCP
response
4 Minor Configuration filename and/or TFTP server
address is not present in the DHCP response when
using DHCP.
TFTP Server IP Address used in
AutoConfig feature
6 Informational TFTP server IP address used for AutoConfig.
TFTP Server filename used in
AutoConfig feature
6 Informational TFTP filename used for AutoConfig.
Auto Configuration TFTP
Download Failure
4 Minor TFTP download of a configuration file for
AutoConfig fails for the following reasons:
• Incorrect or non-reachable TFTP server
address
• Incorrect or unavailable configuration
filename
• TFTP transfer timeout.
Image Compatibility Check,
Invalid Image
2 Major One of the following failures occurs:
• Invalid Signature
• Zero File Size
• Large File
• Non VxWork Image
• Incompatible Image
AP Heartbeat Status 5 Informational AP syslog keep alive message.

Configuration MeshMAX 5054 Series User Guide
Advanced Configuration of Mesh and Access Point Module
155
Client Login Authentication
Status
6 Informational Client logs in/authenticates. Message includes:
• Client MAC Address
• Authentication Type = None, ACL, RADIUS
MAC, 802.1X
• Cipher Type = None, WEP, TKIP, AES
• Status = Allow, Deny
• SSID to which client is connecting
Sample Message:
<client mac address> | Status = <value> | SSID =
<value> | Auth Type = <value> | Cipher Type =
<value>
Client De-Authentication Status 6 Informational Client de-authenticates. Message includes:
• Client MAC Address
• Cipher Type = None, WEP, TKIP, AES
• Status = De-authentication reason, which can
be any of the following:
– Unknown reason
– Stale authentication information
– Authenticated STA leaving BSS
– Inactivity
– Association error
– Class 2 frame received from
non-authenticated STA
– Class 3 frame received from
non-associated STA
– Associated STA leaving BSS
– STA requesting information, but not yet
authenticated
– Enhanced security (RSN) required
– Enhanced security (RSN) used
inconsistently
– Invalid Information Element
– MIC Failure
– WPA module de-auth
• SSID to which client was connected
Sample Message:
<client mac address> | Status = <value> | SSID =
<value> | Cipher Type = <value>
RADIUS Accounting Start and
Stop Messages
6 Informational Start and Stop accounting messages for wireless
clients.
CLI Configuration File Start
Execution
6 Informational CLI configuration file execution starts.
CLI Configuration File End
Execution
6 Informational CLI configuration file execution ends.
Syslog Message Name Priority Severity Description

Configuration MeshMAX 5054 Series User Guide
Advanced Configuration of Mesh and Access Point Module
156
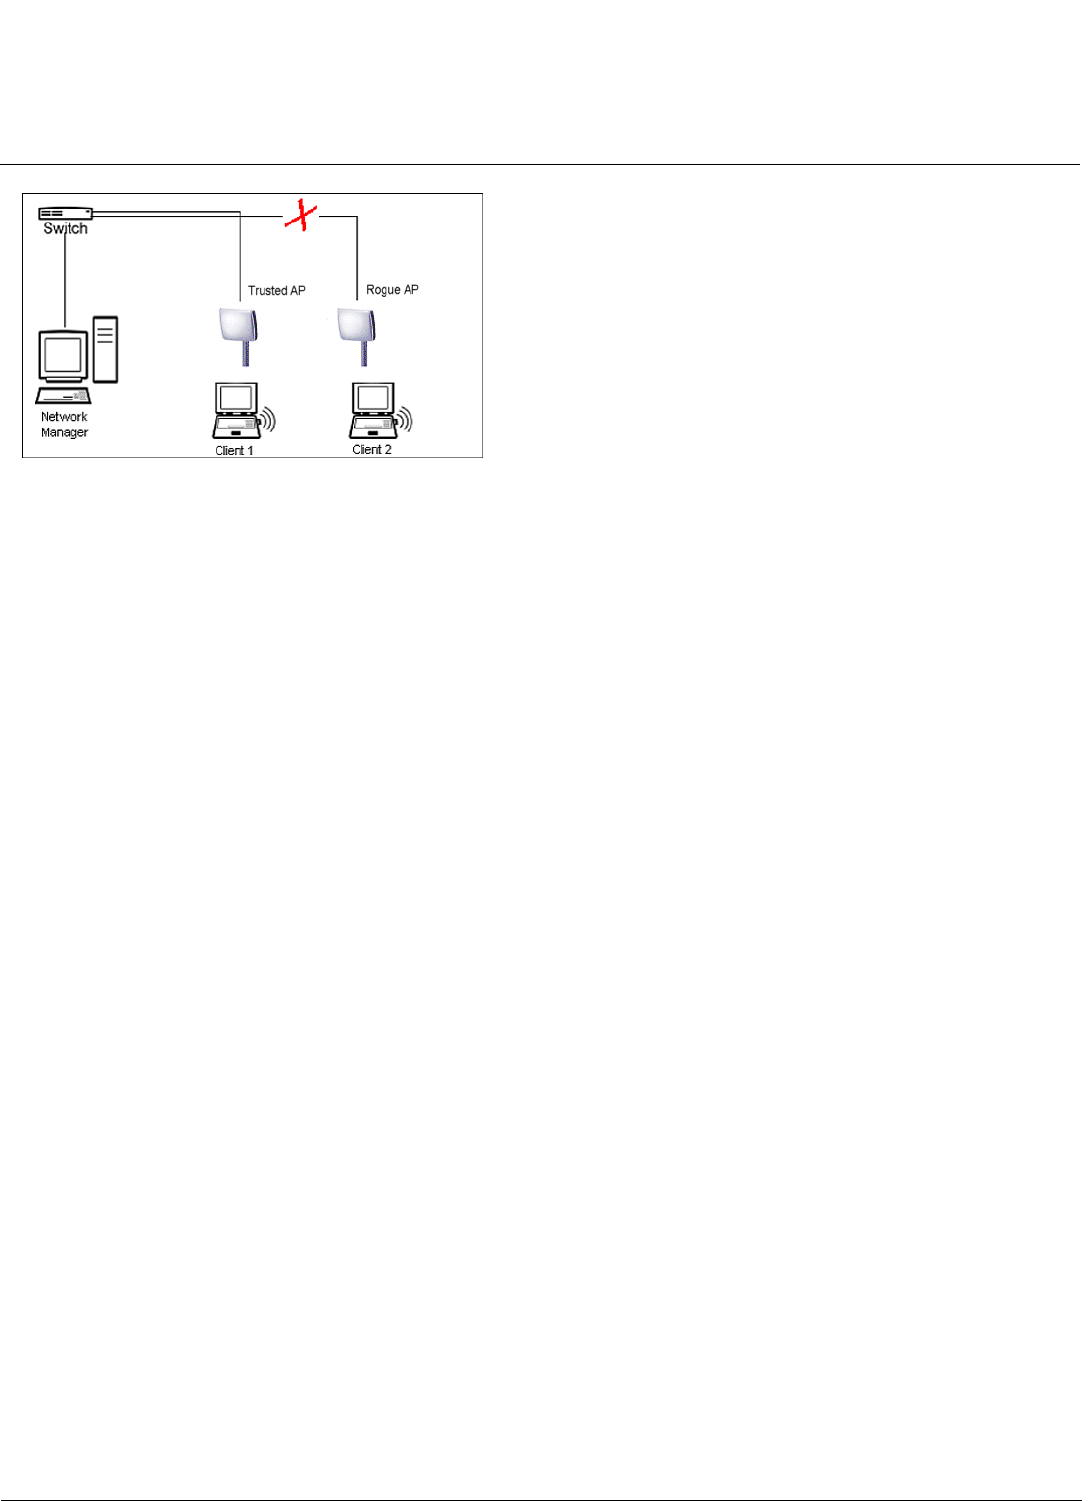
Rogue Scan
The Rogue Scan feature provides an additional security level for wireless LAN deployments. Rogue Scan uses the
selected wireless interface(s) for scanning its coverage area for Access Points and clients.
A centralized Network Manager receives MAC address information from the AP on all wireless clients detected by the AP.
The Network Manager then queries all wired switches to find out the inbound switch/port of these wireless clients. If the
switch/port does not have a valid Access Point connected to it as per a pre-configured database, the Network Manager
proceeds to block that switch/port and prevent the Rogue AP from connecting to the wired network.
CLI Configuration File Execution
Errors
4 Minor There is an error in execution of the CLI
configuration file. The message specifies the
filename, line number, and error reason.
SSH Initialization Failure 3 Major One of the following failures occurs:
Keys not present
Keys cannot be generated
Internal error (no available resources)
SSH Key Generation Successful 6 Informational SSH Key generation is successful.
Wireless Service Shutdown 6 Informational Wireless service is shutdown.
Wireless Service Resume 6 Informational Wireless service resumes.
MIC Attack Occurred 4 Minor MIC attack occurred; wireless interface is shut
down for 60 seconds
MIC Attack from Wireless Station 4 Minor A MIC attack is detected from a wireless station.
SNTP Time Retrieval Failure 4 Minor SNTP Client in the AP fails to retrieve time
information from the configured SNTP servers.
Also included in message: IP Address of SNTP
server.
SNTP Time Sync-Up Failure 4 Minor SNTP Client in the AP fails to synchronize the time
with the SNTP server it was communicating with.
Also included in message: IP Address of SNTP
server.
Incompatible license file 3 Major Incompatible license file is stored in flash memory
during initialization or license file download. Also
included in message: incompatibility reason.
Invalid license file 3 Major Invalid license file is stored in flash memory during
initialization or license file download. The license
file is found to be invalid if the signed checksum
verification fails.
Mesh Connection Failure 3 Major AP fails to connect with an uplink Mesh AP or
Mesh portal. Also included in message: uplink
Mesh portal/AP MAC address, Mesh SSID, and
reason for connection failure.
Link Integrity Failure 3 Major Link integrity feature determines that link integrity
target is down. Also included in message: Link
Integrity target IP address.
Topology Change 6 Informational Mesh AP changes its uplink Mesh connection. Also
included in message: uplink Mesh AP/portal MAC
address and Mesh SSID.
Syslog Message Name Priority Severity Description
Configuration MeshMAX 5054 Series User Guide
Advanced Configuration of Mesh and Access Point Module
157
Figure 6-37 Preventing Rogue AP Attacks
The figure above shows Client 1 connected to a Trusted AP and Client 2 connected to a Rogue AP. The Trusted AP
scans the networks, detects Client 2, and notifies the Network Manager. The Network Manager uses SNMP/CLI to query
the wired switch to find the inbound switch port of Client 2’s packets. The Network Manager verifies that this switch/router
and port does not have a valid Access Point as per the administrator’s database. Thus it labels Client 2’s AP as a Rogue
AP and proceeds to prevent the Rogue AP attack by blocking this switch’s port.
APs can be detected either by active scanning using 802.11 probe request frames or passively by detecting periodic
beacons, or both. Wireless clients are detected by monitoring 802.11 connection establishment messages such as
association/authentication messages or data traffic to or from the wireless clients.
There are two scanning modes available per wireless interface: continuous scanning mode and background scanning
mode.
Continuous Scanning Mode
The continuous scanning mode is a dedicated scanning mode where the wireless interface performs scanning alone and
does not perform the normal AP operation of servicing client traffic.
In continuous scanning mode the AP scans each channel for a channel scan time of one second and then moves to the
next channel in the scan channel list. With a channel scan time of one second, the scan cycle time will take less than a
minute (one second per channel). Once the entire scan channel list has been scanned the AP restarts scanning from the
beginning of the scan channel list.
Background Scanning Mode
In background scanning mode the AP performs background scanning while performing normal AP operations on the
wireless interface.
You can configure the scan cycle time between 1-1440 minutes (24 hours). The scan cycle time indicates how
frequently a channel is sampled and defines the minimum attack period that can go unnoticed.
In background scanning mode the AP will scan one channel then wait for a time known as channel scan time. The
channel scan time affects the amount of data collected during scanning and defines the maximum number of samples
(possible detections) in one scan. This is increased to improve scanning efficiency; the tradeoff is that it decreases
throughput. The optimum value for this parameter during background scanning mode is 20ms.The channel scan time is
calculated from the scan cycle time parameter and the number of channels in the scan channel list as follows:
intra-channel scan time = (scan cycle time - (channel scan time * number of channels in the scan list))/number of
channels in the scan list.
NOTE: If the AP is configured as a Mesh AP, the background scanning interval will be the same as the Mesh scanning
interval (20 ms if there is no uplink, or 180 ms if there is an uplink).
NOTE: In Background Scanning mode, the Mesh AP may not immediately detect all APs entering the network. To ensure
immediate detection of all APs entering the network, select Continuous Scanning mode.

Configuration MeshMAX 5054 Series User Guide
Advanced Configuration of Mesh and Access Point Module
158
Rogue Scan Data Collection
The AP stores information gathered about detected stations during scanning in a Rogue Scan result table. The Rogue
Scan result table can store a maximum of 2000 entries. When the table fills, the oldest entry gets overwritten. The Rogue
Scan result table lists the following information about each detected station:
• Station Type: indicates one of the following types of station:
– Unknown station
– AP station
– Infrastructure Client Station
– IBSS Client Station
• MAC Address of the detected station
• Channel: the working channel of the detected station
• SNR: the SNR value of the last frame from the station as received by the AP
• BSSID: the BSSID field stores the:
– MAC address of the associated Access Point in the case of a client.
– Zero MAC address or MAC address of the partner Access Point if the AP is a partner of a WDS link
The AP ages out older entries in the Rogue Scan result table if a detected station is inactive for more than the Scan
Result Table Ageing Time.
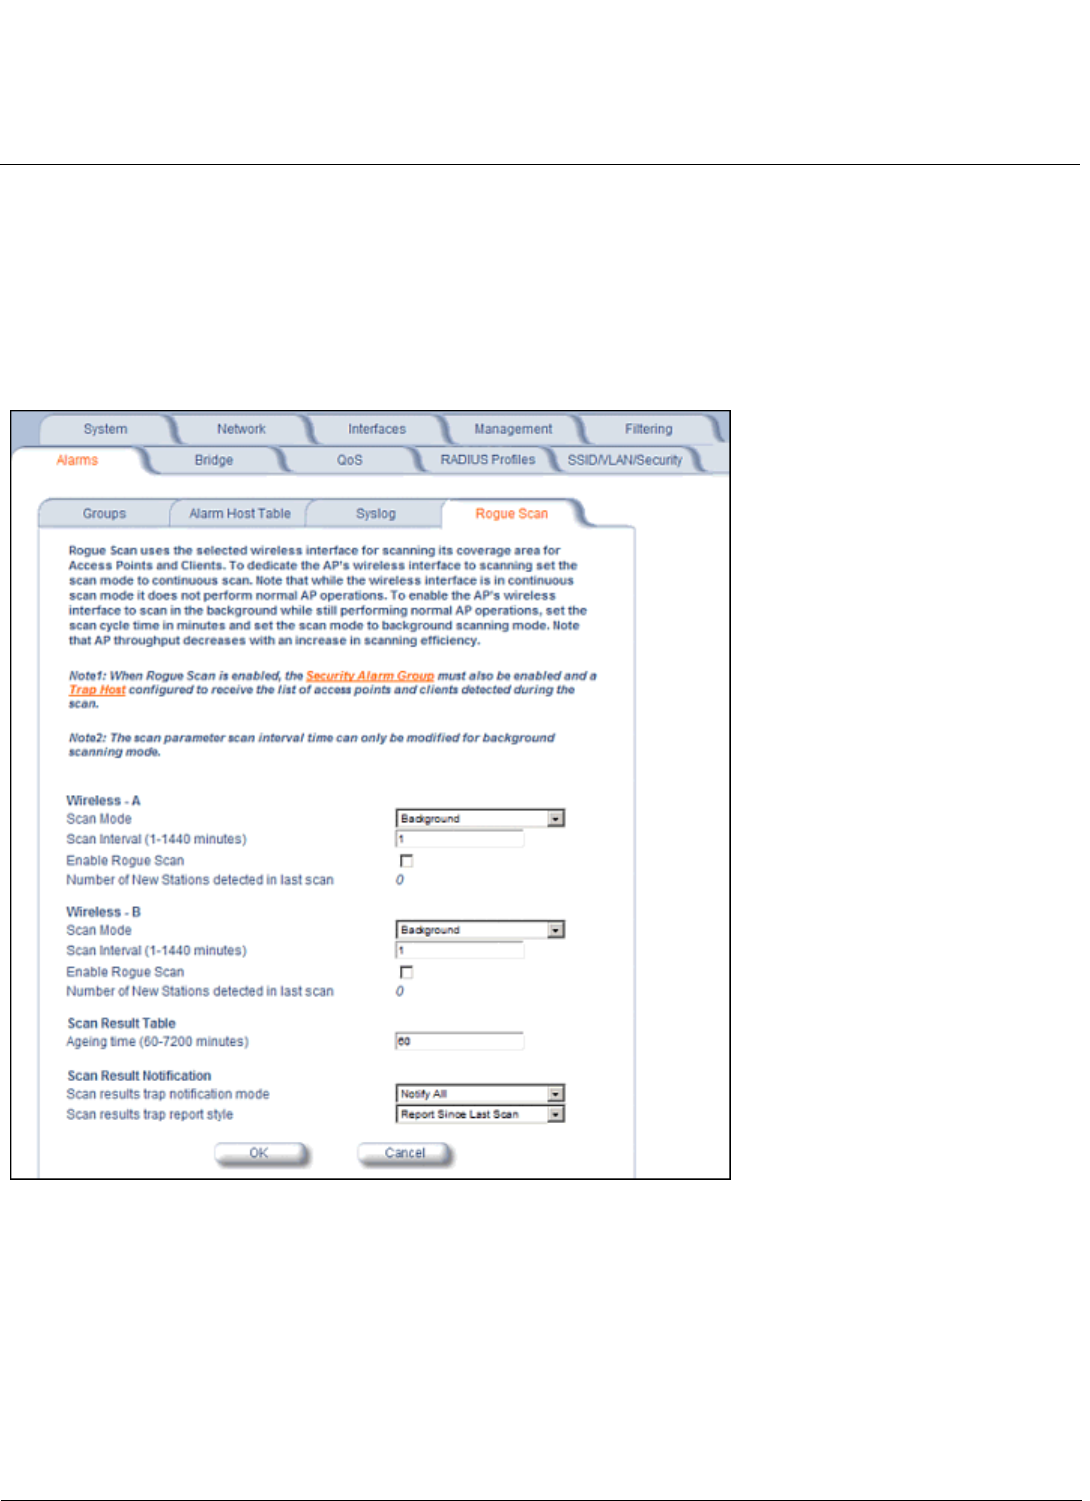
Rogue Scan
Perform this procedure to enable Rogue Scan on a particular interface or interfaces and define the Scan Interval and
Scan Interface. See Figure 6-38.
The Rogue Scan screen also displays the number of new access points and clients detected in the last scan on each
wireless interface.
1. Enable the Security Alarm Group. Select the Security Alarm Group link from the Rogue Scan screen. Configure a
Trap Host to receive the list of access points (and clients) detected during the scan.
2. Click Configure > Alarms > Rogue Scan.
3. Enable Rogue Scan on the wireless interface by checking Enable Rogue Scan.
NOTE: Rogue Scan cannot be enabled on a wireless interface when the Wireless Service Status on that interface is
shutdown. First, resume service on the wireless interface.
NOTE: Enabling Rogue Scan simultaneously with Broadcast Unique Beacon will cause a drift in the beacon interval
and the occasional missing of beacons.
4. Enter the Scan Mode. Select Background Scanning or Continuous Scanning. In Continuous Scanning mode the AP
stops normal operation and scans continuously on that interface. In Background Scanning mode, the AP performs
background scanning while doing normal AP operation on that interface.
5. If the Scan Mode is Background Scanning, then enter the Scan Interval.
• The Scan Interval specifies the time period in minutes between scans in Background Scanning mode and can be
set to any value between 1 and 1440 minutes.
6. Configure the Scan Result Table Ageing Time. The AP ages out older entries in the Rogue Scan result table if a
detected station is inactive for more than this time. The valid range is from 60-7200 minutes, the default is 60 minutes.
7. Configure the Scan Results Trap Notification Mode to control the notification behavior when APs or stations are
detected in a scan:
• No Notification
•Notify AP
• Notify Client
Configuration MeshMAX 5054 Series User Guide
Advanced Configuration of Mesh and Access Point Module
159
• Notify All (Notify both AP and Client detection)
8. Configure the Scan Results Trap Report Style to control the way detected stations are reported in the notification:
• Report all detected stations since last scan (default)
• Report all detected stations since start of scan
9. Configure the second wireless interface, if required.
10.Click OK.
The results of the Rogue Scan can be viewed in the Status page in the HTTP interface.
Figure 6-38 Rogue Scan Screen
Bridge
The AP is a bridge between your wired and wireless networking devices. As a bridge, the functions performed by the AP
include:
• MAC address learning
• Forward and filtering decision making
• Spanning Tree protocol used for loop avoidance

Configuration MeshMAX 5054 Series User Guide
Advanced Configuration of Mesh and Access Point Module
160
Once the AP is connected to your network, it learns which devices are connected to it and records their MAC addresses
in the Learn Table. The table can hold up to 10,000 entries. To view the Learn Table, click on the Monitor button in the
web interface and select the Learn Table tab.
The Bridge tab has four sub-tabs:
•Spanning Tree
•Intra BSS
•Packet Forwarding
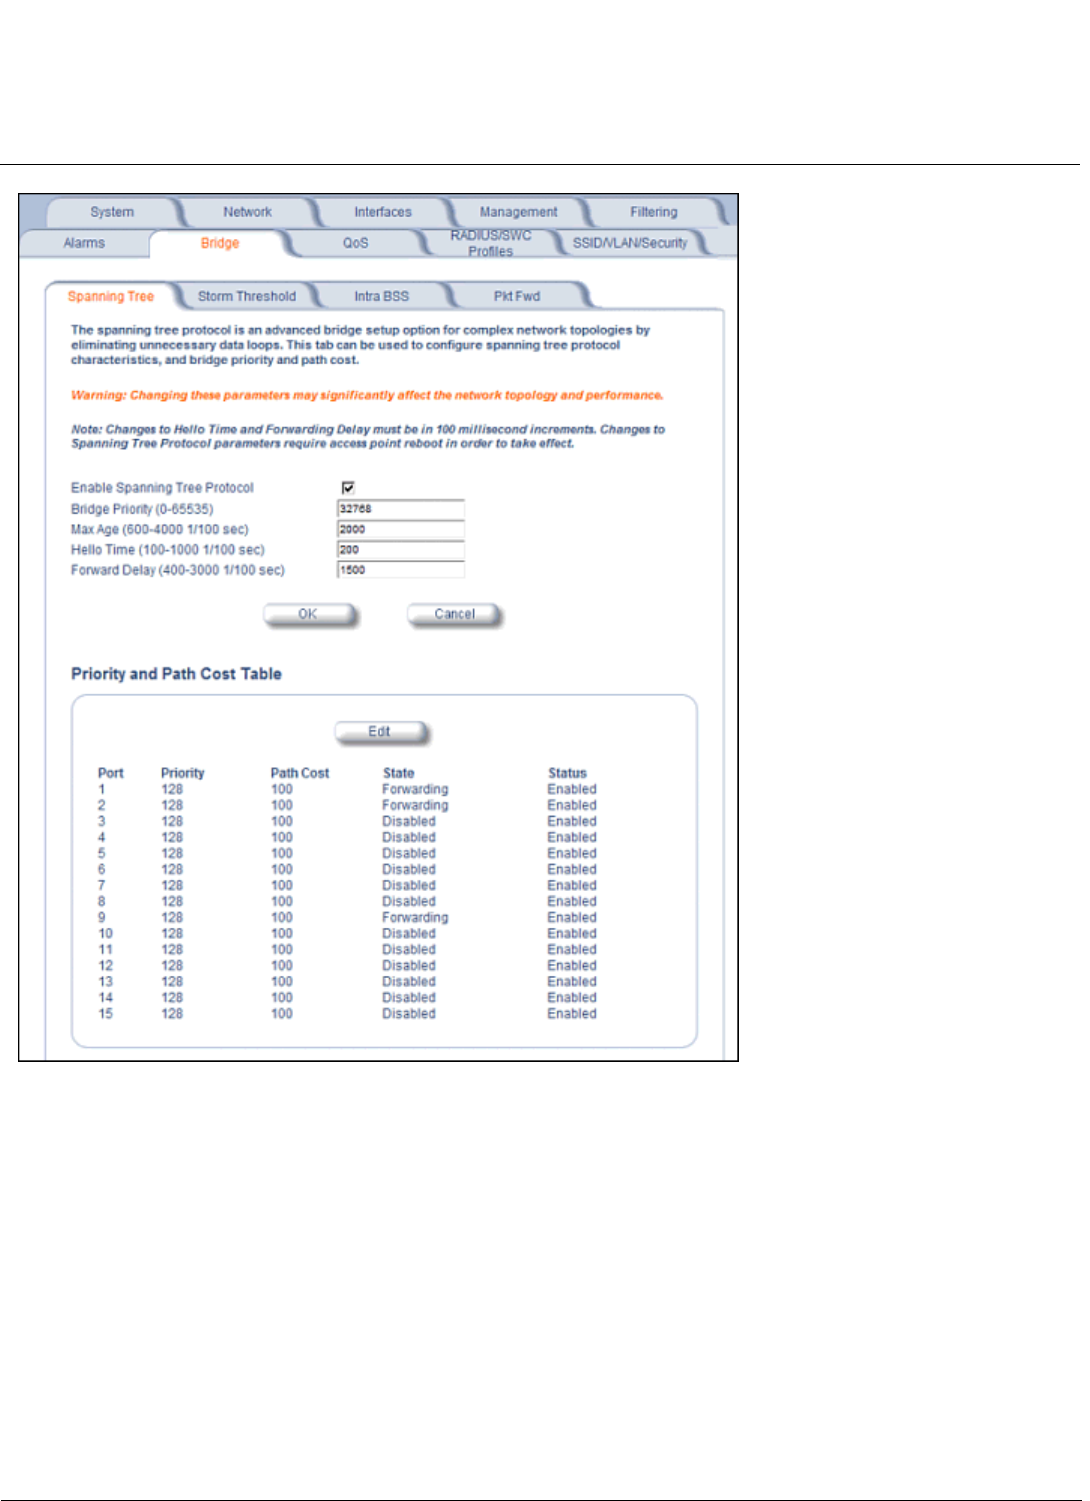
Spanning Tree
A Spanning Tree is used to avoid redundant communication loops in networks with multiple bridging devices. Bridges do
not have any inherent mechanism to avoid loops, because having redundant systems is a necessity in certain networks.
However, redundant systems can cause Broadcast Storms, multiple frame copies, and MAC address table instability
problems.
Complex network structures can create multiple loops within a network. The Spanning Tree configuration blocks certain
ports on AP devices to control the path of communication within the network, avoiding loops and following a spanning
tree structure.
For more information on Spanning Tree protocol, please see Section 8.0 of the IEEE 802.1d standard. The Spanning
Tree configuration options are advanced settings. Proxim recommends that you leave these parameters at their default
values unless you are familiar with the Spanning Tree protocol.
NOTE: Spanning Tree protocol does not run on Mesh ports.
NOTE: Spanning Tree protocol is disabled by default. When WDS is enabled, Spanning Tree protocol is automatically
enabled. It may be manually disabled. If Spanning Tree protocol is enabled by WDS and WDS is subsequently
disabled, Spanning tree will remain enabled until it is manually disabled.
Configuration MeshMAX 5054 Series User Guide
Advanced Configuration of Mesh and Access Point Module
161
Figure 6-39 Spanning Tree Sub-Tab
Storm Threshold
Storm Threshold is an advanced Bridge setup option that you can use to protect the network against data overload by:
• Specifying a maximum number of frames per second as received from a single network device (identified by its MAC
address).
• Specifying an absolute maximum number of messages per interface.
The Storm Threshold parameters allow you to specify a set of thresholds for each interface of the AP, identifying separate
values for the number of broadcast messages/second and Multicast messages/second.
When the number of frames for an interface or from a single network device exceeds the maximum value per second, the
AP will ignore all subsequent messages in that second received on that interface or from that network device.
•Address Threshold: Enter the maximum allowed number of packets per second.
•Ethernet Threshold: Enter the maximum allowed number of packets per second.

Configuration MeshMAX 5054 Series User Guide
Advanced Configuration of Mesh and Access Point Module
162
•Wireless Threshold: Enter the maximum allowed number of packets per second.
Intra BSS
The wireless clients (or subscribers) that associate with a certain AP form the Basic Service Set (BSS) of a network
infrastructure. By default, wireless subscribers in the same BSS can communicate with each other. However, some
administrators (such as wireless public spaces) may wish to block traffic between wireless subscribers that are
associated with the same AP to prevent unauthorized communication and to conserve bandwidth. This feature enables
you to prevent wireless subscribers within a BSS from exchanging traffic.
Although this feature is generally enabled in public access environments, Enterprise LAN administrators use it to
conserve wireless bandwidth by limiting communication between wireless clients. For example, this feature prevents
peer-to-peer file sharing or gaming over the wireless network.
To block Intra BSS traffic, set Intra BSS Traffic Operation to Block.
To allow Intra BSS traffic, set Intra BSS Traffic Operation to Passthru.
Packet Forwarding
The Packet Forwarding feature enables you to redirect traffic generated by wireless clients that are all associated to the
same AP to a single MAC address. This filters wireless traffic without burdening the AP and provides additional security
by limiting potential destinations or by routing the traffic directly to a firewall. You can redirect to a specific port (Ethernet
or WDS) or allow the bridge’s learning process (and the forwarding table entry for the selected MAC address) to
determine the optimal port.
NOTE: The gateway to which traffic will be redirected should be node on the Ethernet network. It should not be a
wireless client.
Configuring Interfaces for Packet Forwarding
Configure your AP to forward packets by specifying port(s) to which packets are redirected and a destination MAC
address.
1. Within the Packet Forwarding Configuration screen, check the box labeled Enable Packet Forwarding.
2. Specify a destination Packet Forwarding MAC Address. The AP will redirect all unicast, multicast, and broadcast
packets received from wireless clients to the address you specify.
3. Select a Packet Forwarding Interface Port from the drop-down menu. You can redirect traffic to:
– Ethernet
– A WDS connection (see Wireless Distribution System (WDS) for details)
– Any (traffic is redirected to a port based on the bridge learning process)
4. Click OK to save your changes.
QoS
Wi-Fi Multimedia (WMM)/Quality of Service (QoS) Introduction
The AP supports Wi-Fi Multimedia (WMM), which is a solution for QoS functionality based on the IEEE 802.11e
specification. WMM defines enhancements to the MAC for wireless LAN applications with Quality of Service
requirements, which include transport of voice traffic over IEEE 802.11 wireless LANs.
The enhancement are in the form of changes in protocol frame formats (addition of new fields and information elements),
addition of new messages, definition of new protocol actions, channel access mechanisms (differentiated control of
access to medium) and network elements (QoS/WME aware APs, STAs), and configuration management.
WME supports Enhanced Distributed Channel Access (EDCA) for prioritized QoS services. The WME/QoS feature can
be enabled or disabled per wireless interface. For more information on QoS, see “Technical Bulletin 69504 Revision 2” at
<http://keygen.proxim.com/support/orinoco/tb/tb69504_3wmm.pdf>.
Configuration MeshMAX 5054 Series User Guide
Advanced Configuration of Mesh and Access Point Module
163
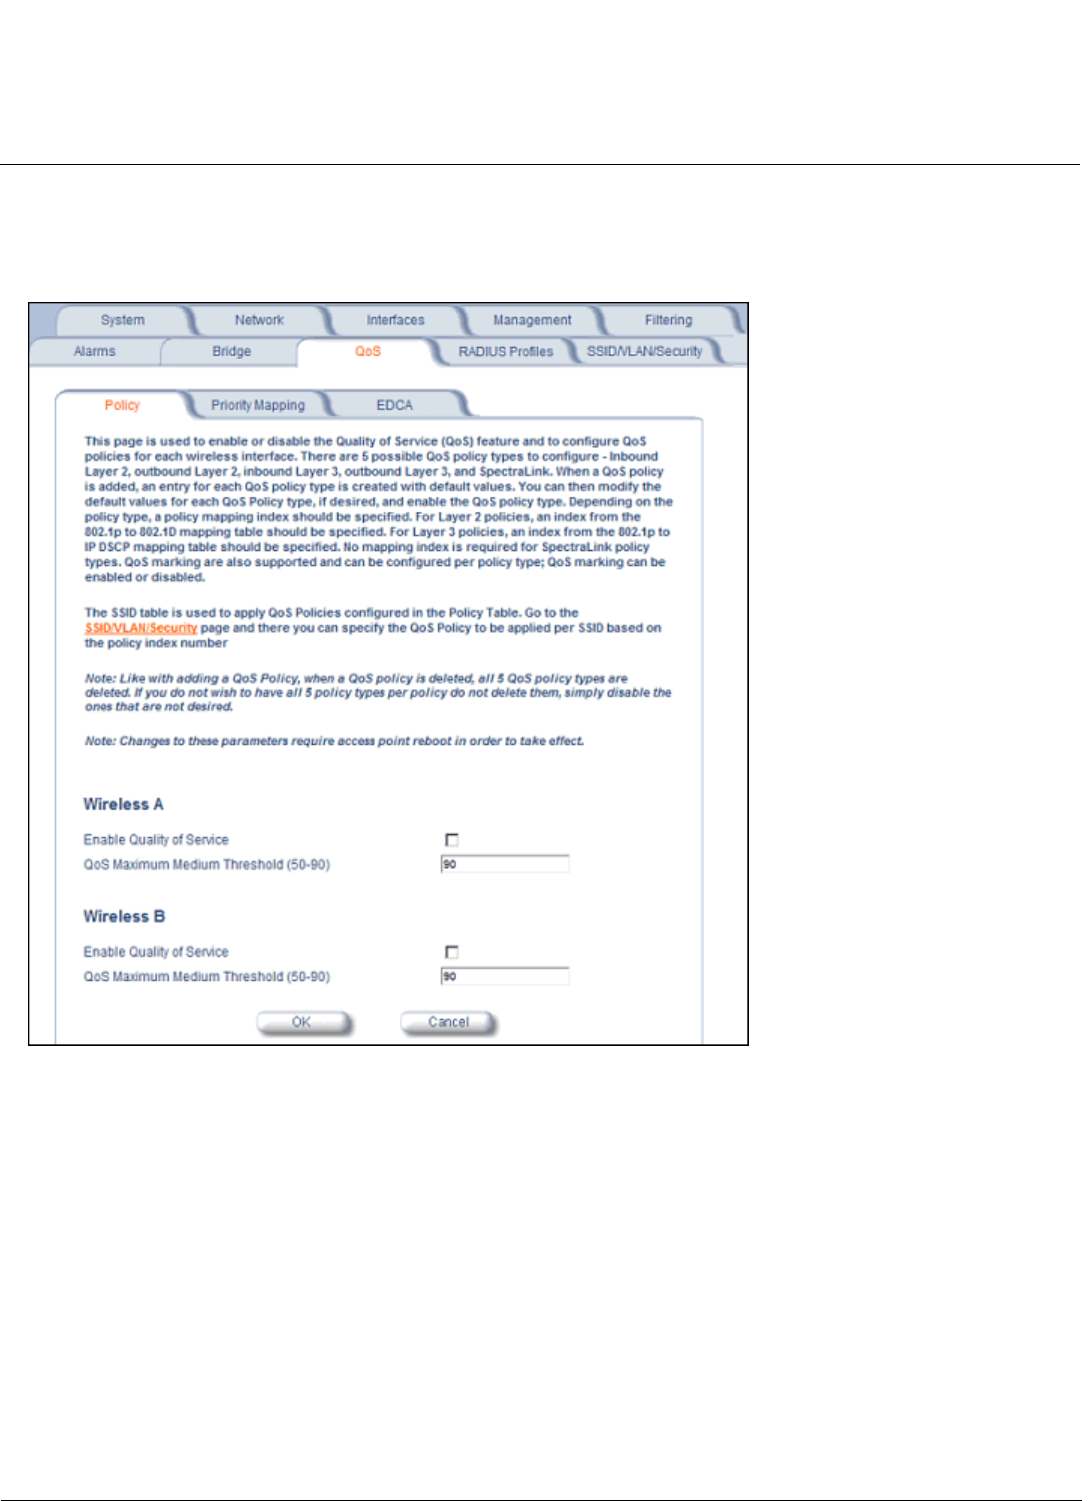
Policy
Perform the following procedure to enable QoS and add QoS policies:
1. Click Configure > QoS > Policy.
Figure 6-40 QoS Policy Sub-Tab
2. To enable QoS, check the Enable Quality of Service checkbox.
3. Configure the QoS Maximum Medium Threshold for all Admission Controls. Admission will be granted if the new
requested traffic stream and already admitted time is less than the medium maximum threshold.
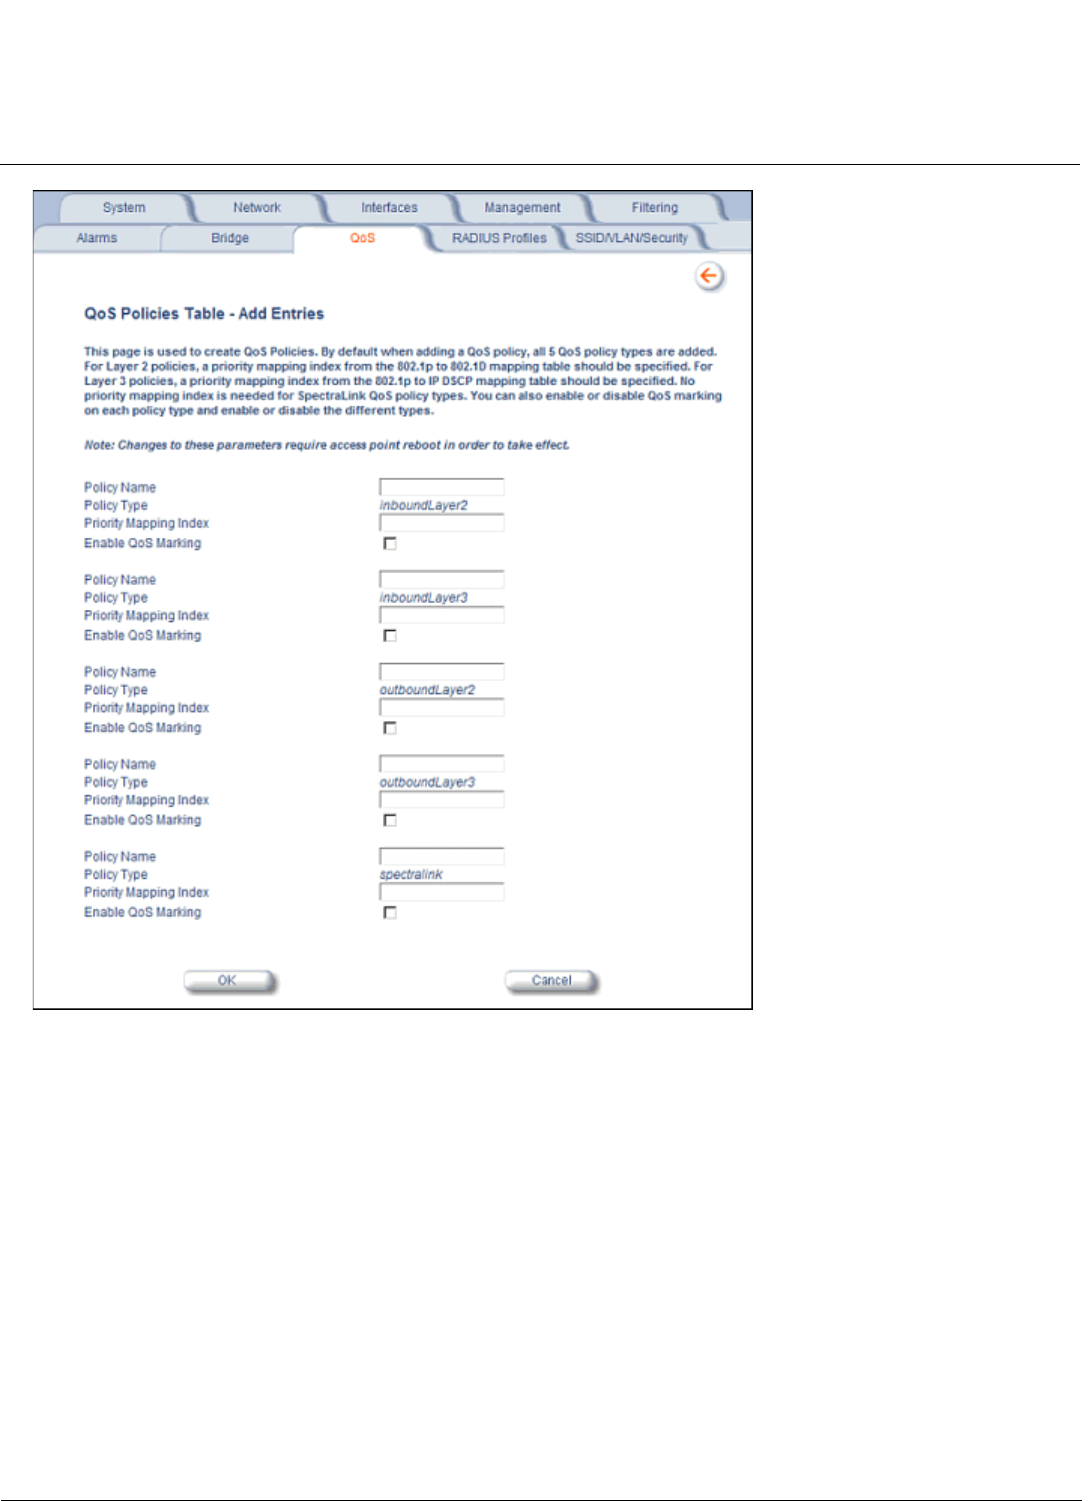
4. To add a QoS Policy, click the Add button in the “QoS Policies Table” box. The Add Entries box appears.
Configuration MeshMAX 5054 Series User Guide
Advanced Configuration of Mesh and Access Point Module
164
Figure 6-41 Add QoS Policy
5. Enter the Policy Name.
6. Select the Policy Type:
•inlayer2: inbound traffic direction, Layer 2 traffic type
•inlayer3: inbound traffic direction, Layer 3 traffic type
•outlayer2: outbound traffic direction, Layer 2 traffic type
•outlayer3: inbound traffic direction, Layer 3 traffic type
•spectralink: SpectraLink traffic
7. Enter the Priority Mapping Index.
For layer 2 policies, an index from the 802.1p to 802.1d mapping table should be specified. For layer 3 policies, an
index from the 802.1p to IP DSCP mapping table should be specified. No mapping index is required for SpectraLink.
8. Select whether to Enable QoS Marking.
9. Click OK.
Configuration MeshMAX 5054 Series User Guide
Advanced Configuration of Mesh and Access Point Module
165
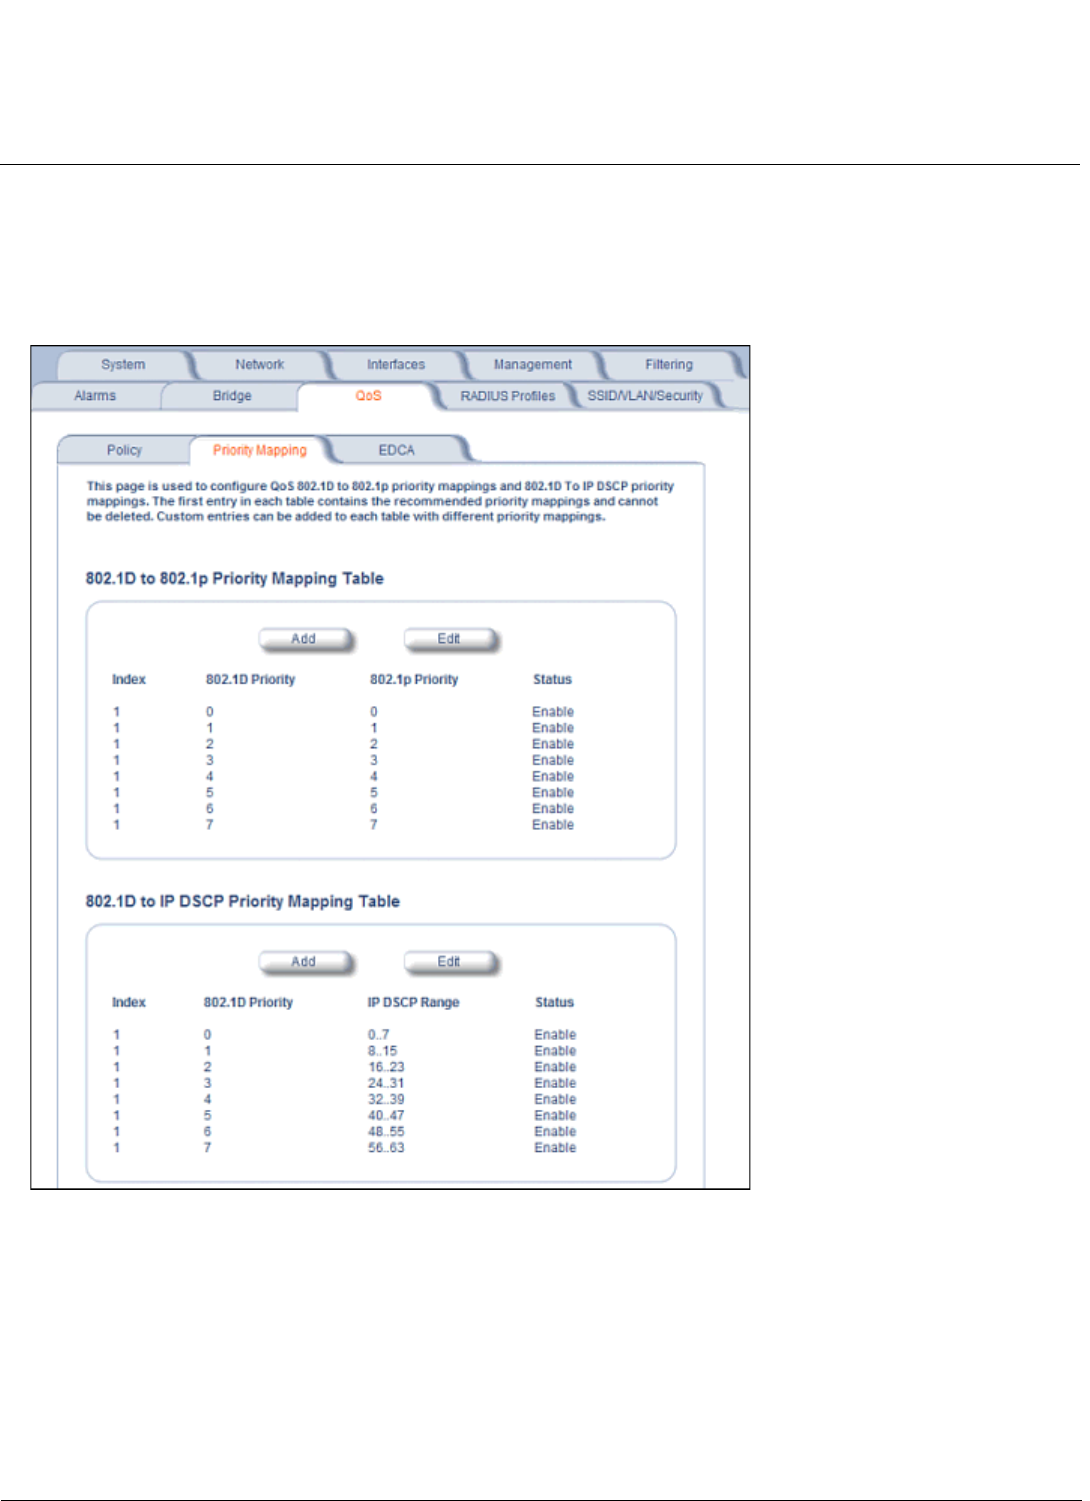
Priority Mapping
Use this page to configure QoS 802.1p to 802.1d priority mappings (for layer 2 policies) and IP DSCP to 802.1d priority
mappings (for layer 3 policies). The first entry in each table contains the recommended priority mappings. Custom entries
can be added to each table with different priority mappings.
1. Click Configure > QoS > Priority Mapping.
Figure 6-42 Priority Mapping
2. Click Add in the 802.1p and 802.1d priority mapping table.
Configuration MeshMAX 5054 Series User Guide
Advanced Configuration of Mesh and Access Point Module
166
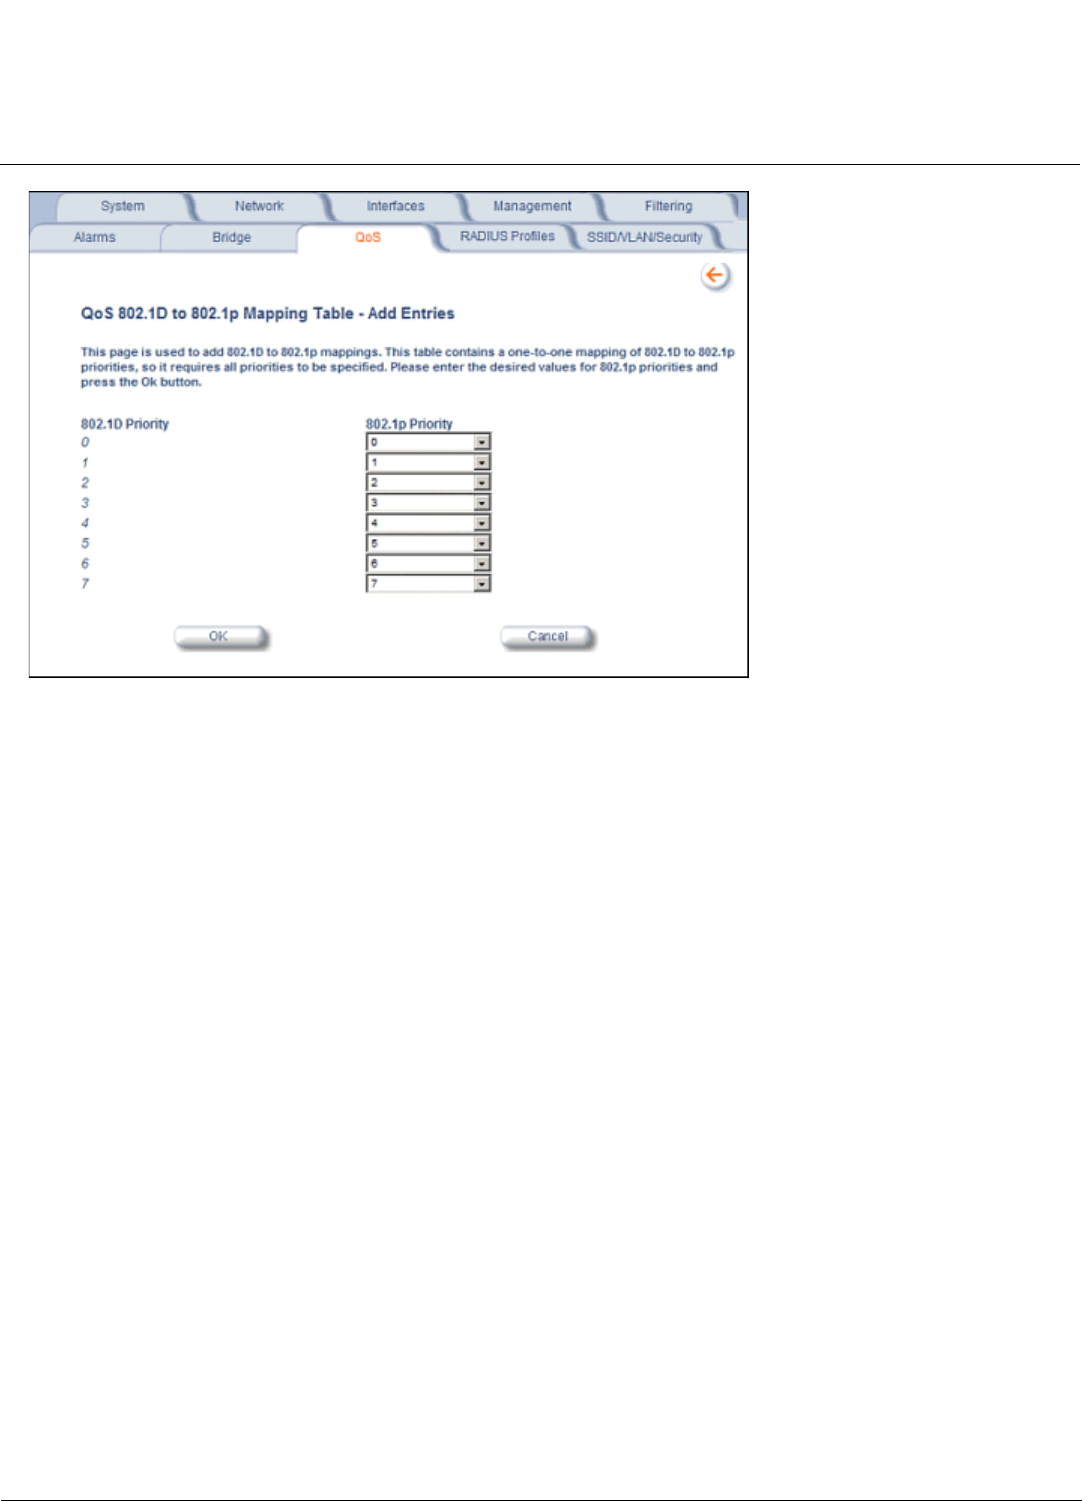
Figure 6-43 Add Priority Mapping Entry
3. Select the 802.1p Priority (from 0-7) for 802.1d Priorities 0-7.
4. Click OK.
5. Click Add in the IP Precedence/DSCP ranges and 802.1d Priority table.
6. Select the IP DSCP Range for each 802.1d Priority.
7. Click OK.
NOTE: Changes to Priority Mapping require a reboot of the AP to take effect.
Enhanced Distributed Channel Access (EDCA)
WME uses Enhanced Distributed Channel Access, a prioritized CSMA/CA access mechanism used by WME-enabled
clients/AP in a WME enabled BSS to realize different classes of differentiated Channel Access.
A wireless Entity is defined as all wireless clients and APs in the wireless medium contending for the common wireless
medium. EDCA uses a separate channel access function for each of the Access Categories (Index) within a wireless
entity. Each channel access function in a wireless entity that contends for the wireless medium as if it were a separate
client contending for the wireless medium. Different channel access functions in a given Wireless Entity contend among
themselves for access to the wireless medium in addition to contending with other clients.
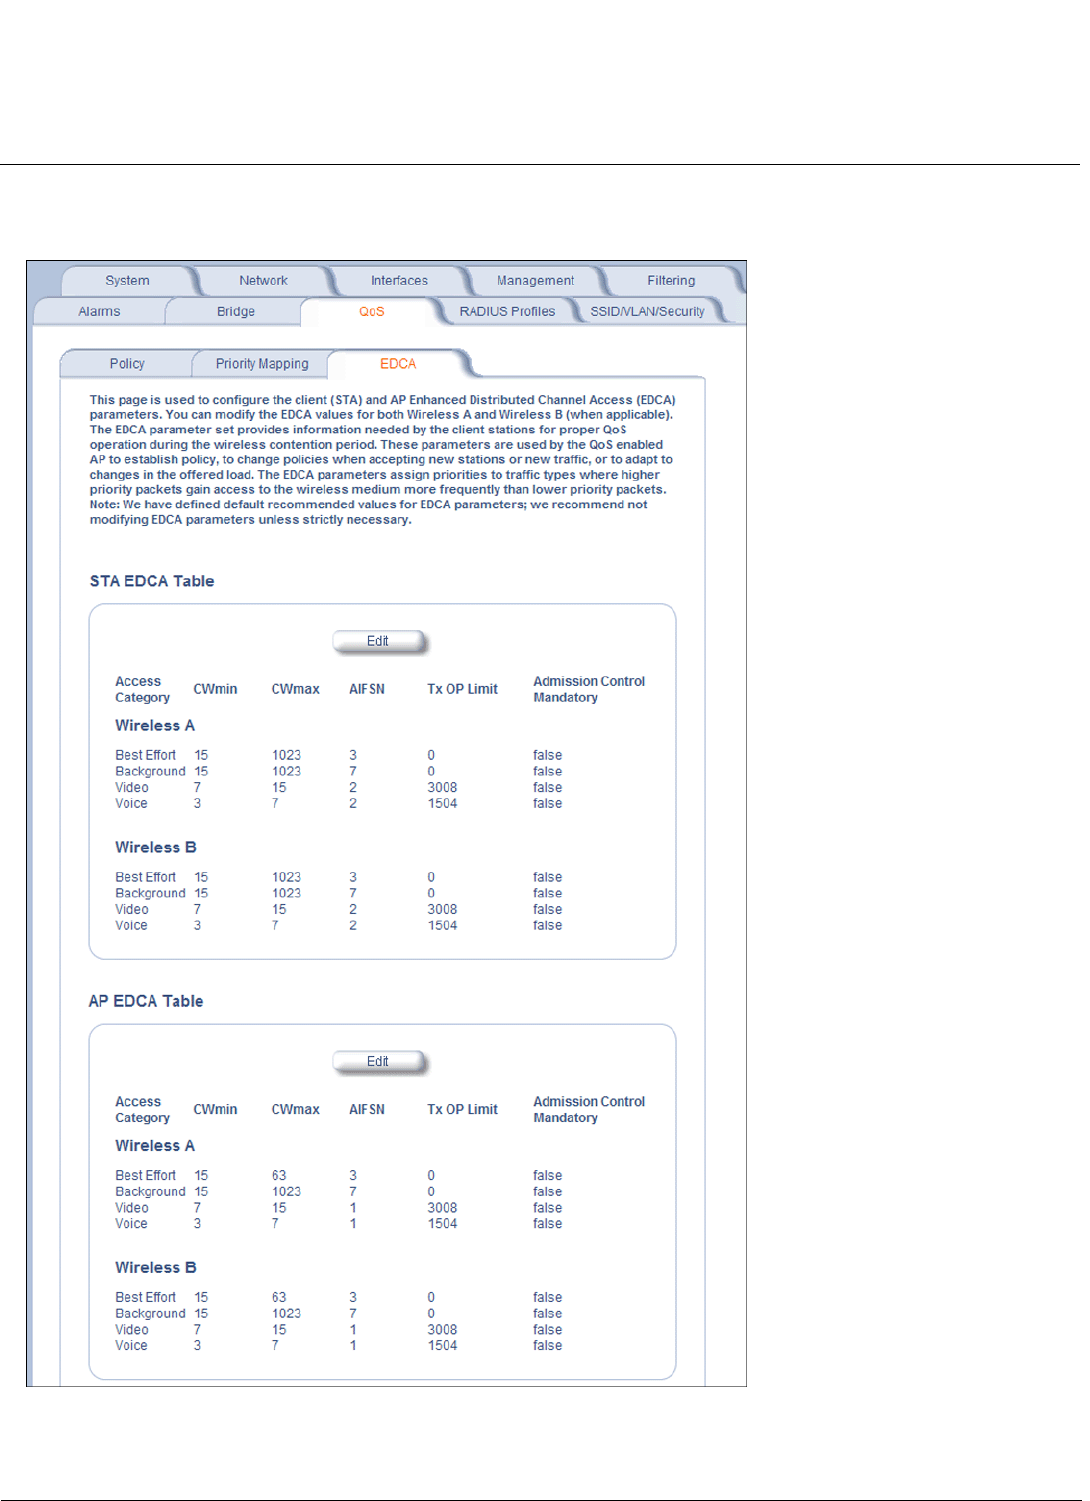
STA EDCA Table and AP EDCA Table
This page is used to configure the client (STA) and AP Enhanced Distributed Channel Access (EDCA) parameters. You
can modify the EDCA values for both Wireless A and Wireless B.
The EDCA parameter set provides information needed by the client stations for proper QoS operation during the wireless
contention period. These parameters are used by the QoS enabled AP to establish policy, to change policies when
accepting new stations or new traffic, or to adapt to changes in the offered load. The EDCA parameters assign priorities
to traffic types where higher priority packets gain access to the wireless medium more frequently than lower priority
packets.
NOTE: Default recommended values for EDCA parameters have been defined; Proxim recommends not modifying
EDCA parameters unless strictly necessary.
Configuration MeshMAX 5054 Series User Guide
Advanced Configuration of Mesh and Access Point Module
167
Perform the following procedure to configure the Station and AP EDCA tables.
1. Click Configure > QoS > EDCA.
Figure 6-44 EDCA Tables
2. Click Edit and configure the following parameters in each table:

Configuration MeshMAX 5054 Series User Guide
Advanced Configuration of Mesh and Access Point Module
168
NOTE: Changes to EDCA parameters require a reboot of the AP to take effect.
•Index: read-only. Indicates the index of the Access Category (1-4) being defined:
– 1 = Best Effort
– 2 = Background
–3 = Video
–4 = Voice
•CWMin: minimum Contention Window. Configurable range is 0 to 255.
•CWMax: maximum Contention Window. Configurable range is 0 to 65535.
•AIFSN: Arbitration IFS per access category. Configurable range is 2 to 15.
•Tx OP Limit: The Transmission Opportunity Limit. The Tx OP is an interval of time during which a particular QoS
enhanced client has the right to initiate a frame exchange sequence onto the wireless medium. The Tx OP Limit
defines the upper limit placed on the value of Tx OP a wireless entity can obtain for a particular access category.
Configurable range is 0 to 65535.
•MSDU Lifetime: specifies the maximum elapsed time between a MSDU transfer request and delivery to the
destination, beyond which delivery becomes unnecessary. Configurable range is 0 to 500 seconds.
•Admission Control Mandatory: Possible values are True or False. Admission control defines if an Access Point
accepts or rejects a requested traffic stream with certain QoS specifications, based on available channel capacity
and link conditions. Admission control can be configured for each Access Category (Index).
On the Policy sub-tab, the user can also configure a medium maximum threshold for all Admission Controls.
Admission will be granted if the new requested traffic stream and already admitted time is less than the medium
maximum threshold.
Radius Profiles
Configuring Radius Profiles on the AP allows the administrator to define a profile for RADIUS Servers used by the system
or by a VLAN. The network administrator can define RADIUS Servers per Authentication Mode and per VLAN.
The AP communicates with the RADIUS server defined in a profile to provide the following features:
•MAC Access Control Via RADIUS Authentication
•802.1x Authentication using RADIUS
•RADIUS Accounting
Also, RADIUS Based Management Access allows centralized user management.
The network administrator can configure default RADIUS authentication servers to be used on a system-wide basis, or in
networks with VLANs enabled the administrator can also configure separate authentication servers to be used for MAC
authentication, EAP authentication, or Accounting in each VLAN. You can configure the AP to communicate with up to six
different RADIUS servers per VLAN/SSID:
• Primary Authentication Server (MAC-based authentication)
• Back-up Authentication Server (MAC-based authentication)
• Primary Authentication Server (EAP/802.1x authentication)
• Back-up Authentication Server (EAP/802.1x authentication)
• Primary Accounting Server
• Back-up Accounting Server
The back-up servers are optional, but when configured, the AP will communicate with the back-up server if the primary
server is off-line. After the AP has switched to the backup server, it will periodically check the status of the primary
RADIUS server every five (5) minutes. Once the primary RADIUS server is again online, the AP automatically reverts
from the backup RADIUS server back to the primary RADIUS server. All subsequent requests are then sent to the
primary RADIUS server.
Configuration MeshMAX 5054 Series User Guide
Advanced Configuration of Mesh and Access Point Module
169
You can view monitoring statistics for each of the configured RADIUS servers.
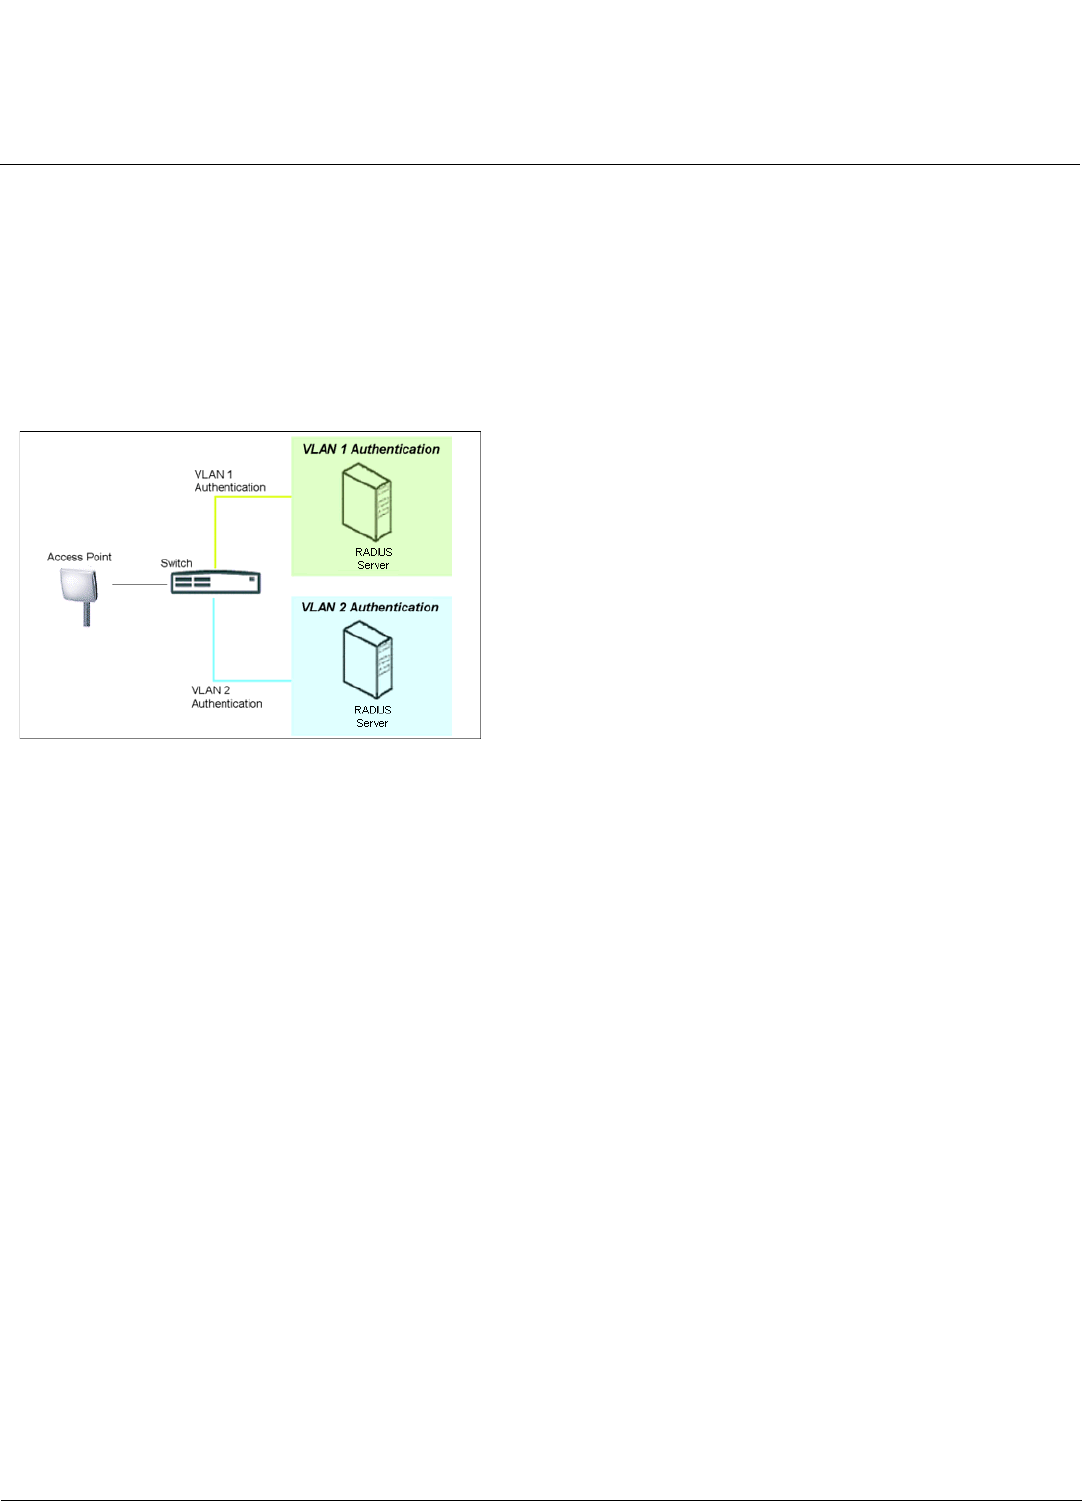
RADIUS Servers per Authentication Mode and per VLAN
The user can configure separate RADIUS authentication servers for each authentication mode and for each SSID
(VLAN). For example:
• The user can configure separate RADIUS servers for RADIUS MAC authentication and 802.1x authentication
• The user can configure separate RADIUS servers for each VLAN: VLAN1 could support only WEP clients, whereas
VLAN2 could support 802.1x and WEP clients.
Figure 6-45 RADIUS Servers per VLAN
This figure shows a network with separate authentication servers for each authentication type and for each VLAN. The
clients in VLAN 1 are authenticated using the authentication servers configured for VLAN 1. The type of authentication
server used depends on whether the authentication is done for an 802.1x client or a non-802.1x client. The clients in
VLAN 2 are authenticated using a different set of authentication servers configured for authenticating users in VLAN 2.
Authentication servers for each VLAN are configured as part of the configuration options for that VLAN. RADIUS profiles
are independent of VLANs. The user can define any profile to be the default and associate all VLANs to that profile. Four
profiles are created by default, “MAC Authentication”, “EAP Authentication”, Accounting”, and “Management”.
RADIUS Servers Enforcing VLAN Access Control
A RADIUS server can be used to enforce VLAN access control in two ways:
• Authorize the SSID the client uses to connect to the AP. The SSID determines the VLAN that the client gets assigned
to.
• Assigning the user to a VLAN by specifying the VLAN membership information of the user.
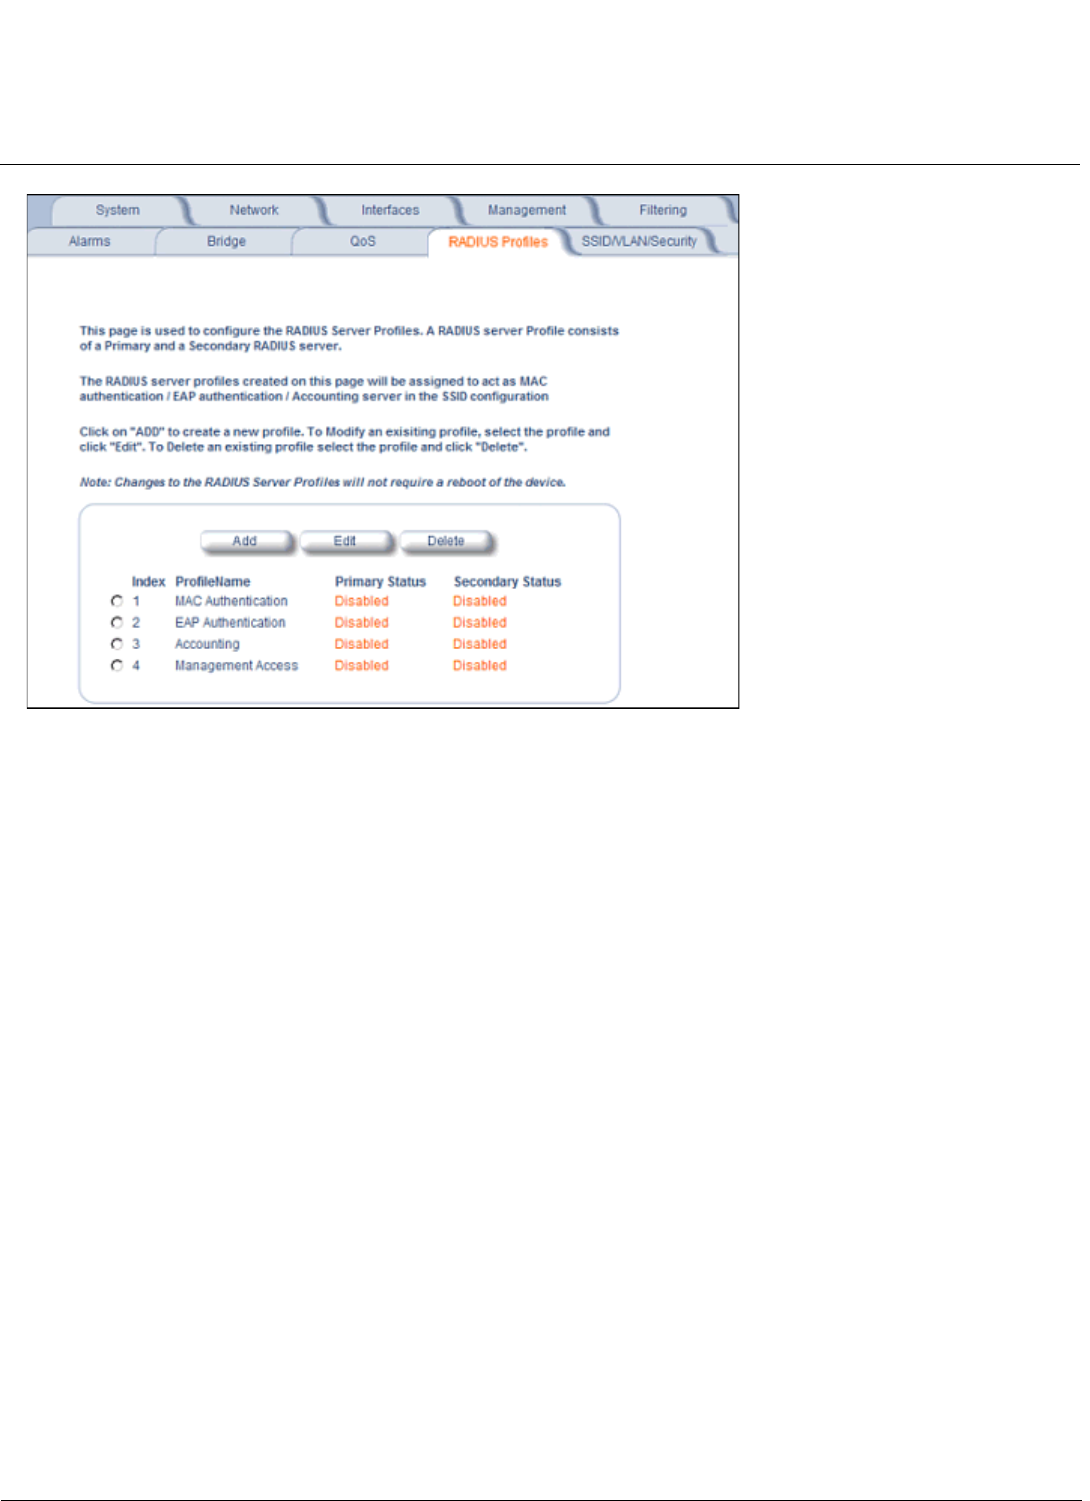
Configuring Radius Profiles
A RADIUS server Profile consists of a Primary and a Secondary RADIUS server that get assigned to act as either MAC
Authentication servers, 802.1x/EAP Authentication servers, or Accounting Servers in the VLAN Configuration. See
Configuring Security Profiles.
The RADIUS Profiles tab allows you to add new RADIUS profiles or modify or delete existing profiles.
Configuration MeshMAX 5054 Series User Guide
Advanced Configuration of Mesh and Access Point Module
170
Figure 6-46 RADIUS Server Profiles
Adding or Modifying a RADIUS Server Profile
Perform the following procedure to add a RADIUS server profile and to configure its parameters.
1. Click Add to create a new profile. To Modify an existing profile, select the profile and click Edit. To delete an existing
profile, select the profile and click Delete. You cannot delete a RADIUS server profile if it is applied to an SSID.
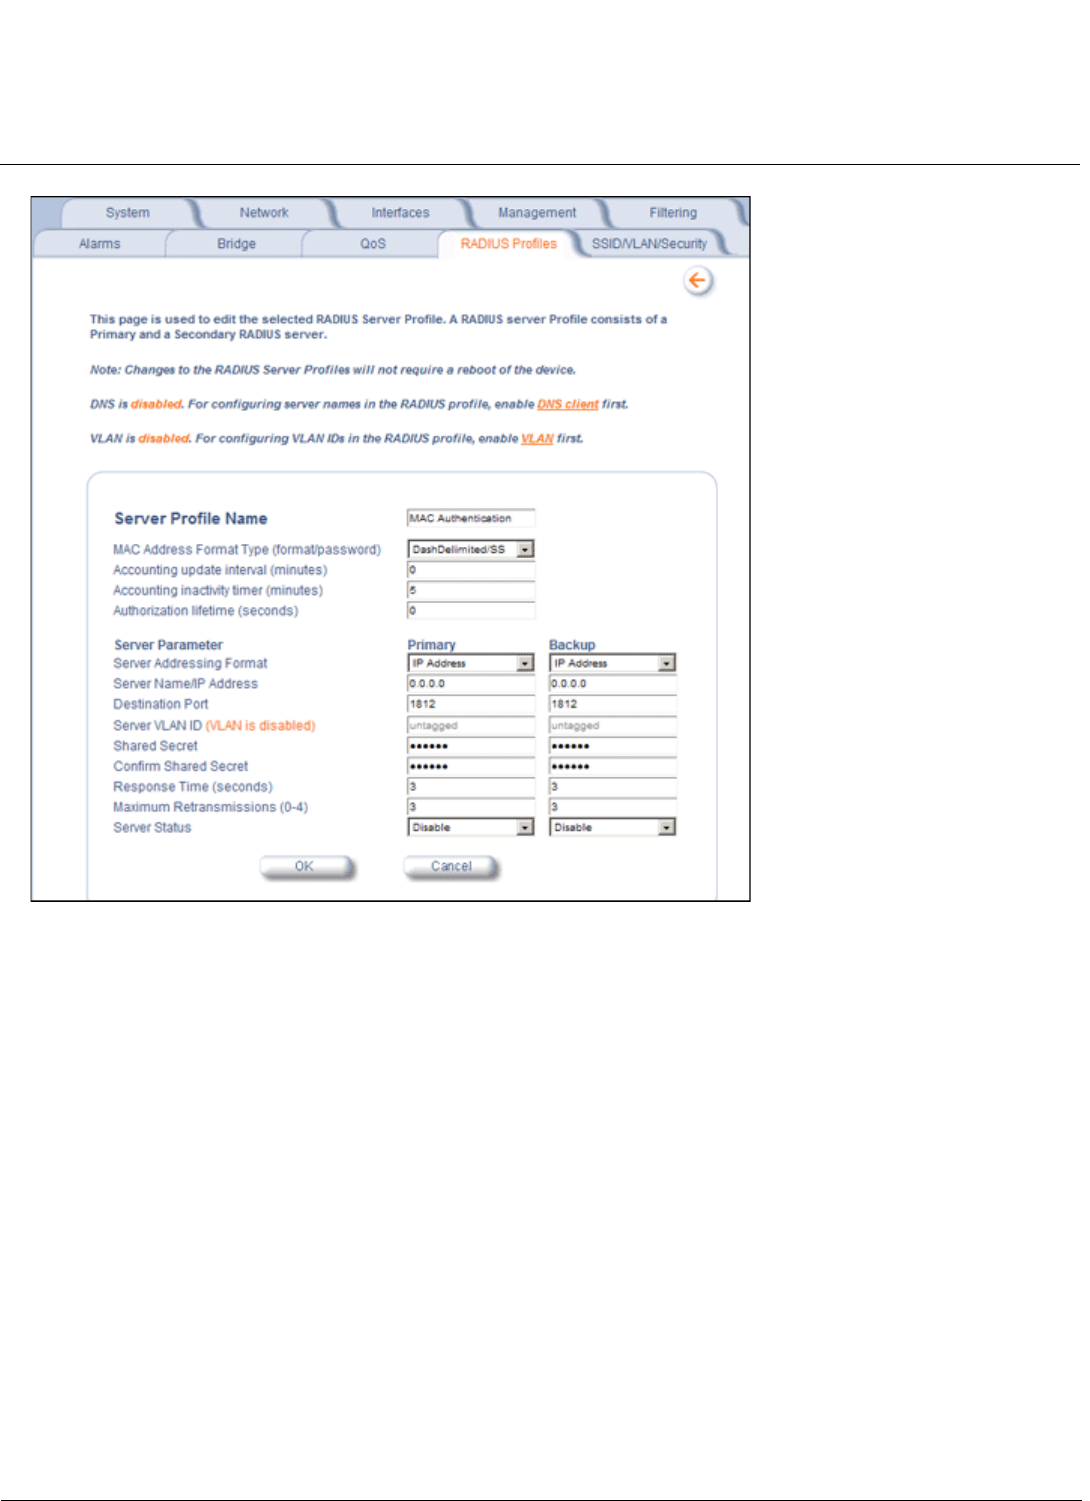
2. Configure the following parameters for the RADIUS Server profile (see Figure 6-47):
NOTE: This page configures only the Primary RADIUS Server associated with the profile. After configuring these
parameters, save them by clicking OK. Then, to configure the Secondary RADIUS Server, edit the profile from
the main page.
Configuration MeshMAX 5054 Series User Guide
Advanced Configuration of Mesh and Access Point Module
171
Figure 6-47 Add RADIUS Server Profile
•Server Profile Name: the profile name. This is the name used to associated a VLAN to the profile. See
Configuring Security Profiles. The Server Profile Name is also used in the Configure > Management > Services
page to specify the RADIUS profile to be used for RADIUS Based Management Access.
•MAC Address Format Type: This parameter should correspond to the format in which the clients’ 12-digit MAC
addresses are listed within the RADIUS server and the way passwords are sent to the RADIUS server. Available
options are:
– Dash delimited/SS: MAC addresses are formatted with a dash between each pair of digits (xx-yy-zz-aa-bb),
and the password sent to the RADIUS server is the shared secret (configured below).
– Colon delimited/SS: MAC addresses are formatted with a colon between each pair of digits (xx:yy:zz:aa:bb:cc)
and the password sent to the RADIUS server is the shared secret (configured below).
– Single dash delimited/SS: MAC addresses are formatted with a dash between the sixth and seventh digits
(xxyyzz-aabbcc) and the password sent to the RADIUS server is the shared secret (configured below).
– No delimiters/SS: MAC addresses are formatted with no characters or spaces between pairs of hexadecimal
digits (xxyyzzaabbcc) and the password sent to the RADIUS server is the shared secret (configured below).
– Dash delimited/MAC: MAC addresses are formatted with a dash between each pair of digits (xx-yy-zz-aa-bb),
and the password sent to the RADIUS server is the MAC address of the client.
– Colon delimited/MAC: MAC addresses are formatted with a colon between each pair of digits
(xx:yy:zz:aa:bb:cc) and the password sent to the RADIUS server is the MAC address of the client.

Configuration MeshMAX 5054 Series User Guide
Advanced Configuration of Mesh and Access Point Module
172
– Single dash delimited/MAC: MAC addresses are formatted with a dash between the sixth and seventh digits
(xxyyzz-aabbcc) and the password sent to the RADIUS server is the MAC address of the client.
– No delimiters/MAC: MAC addresses are formatted with no characters or spaces between pairs of hexadecimal
digits (xxyyzzaabbcc) and the password sent to the RADIUS server is the MAC address of the client.
•Accounting update interval: Enter the time interval (in minutes) for sending Accounting Update messages to the
RADIUS server. A value of 0 (default) means that the AP will not send Accounting Update messages.
•Accounting inactivity timer: Enter the accounting inactivity timer. This parameter supports a value from 1-60
minutes. The default is 5 minutes.
•Authorization lifetime: Enter the time, in seconds, each client session may be active before being automatically
re-authenticated. This parameter supports a value between 900 and 43200 seconds. The default is 0 (disabled).
•Server Addressing Format: select IP Address or Name. If you want to identify RADIUS servers by name, you
must configure the AP as a DNS Client. See DNS Client for details.
•Server Name/IP Address: Enter the server’s name or IP address.
•Destination Port: Enter the port number which the AP and the server will use to communicate. By default,
RADIUS servers communicate on port 1812.
•Server VLAN ID: Indicates the VLAN that uses this RADIUS server profile. If VLAN is disabled, this field will be
grayed out.
•Shared Secret and Confirm Shared Secret: Enter the password shared by the RADIUS server and the AP. The
same password must also be configured on the RADIUS server. The default password is “public.”
•Response Time (seconds): Enter the maximum time, in seconds, that the AP should wait for the RADIUS server
to respond to a request. The range is 1-10 seconds; the default is 3 seconds.
•Maximum Retransmissions (0-4): Enter the maximum number of times an authentication request may be
transmitted. The range is 0 to 4, the default is 3.
•Server Status: Select Enable from the drop-down box to enable the RADIUS Server Profile.
3. Click OK.
4. Select the Profile and click Edit to configure the Secondary RADIUS Server, if required.
MAC Access Control Via RADIUS Authentication
If you want to control wireless access to the network and if your network includes a RADIUS Server, you can store the list
of MAC addresses on the RADIUS server rather than configure each AP individually. You can define a RADIUS Profile
that specifies the IP Address of the server that contains a central list of MAC Address values identifying the authorized
stations that may access the wireless network. You must specify information for at least the primary RADIUS server. The
back-up RADIUS server is optional.
NOTE: Each VLAN can be configured to use a separate RADIUS server (and backup server) for MAC authentication.
MAC access control can be separately enabled for each VLAN.
NOTE: Contact your RADIUS server manufacturer if you have problems configuring the server or have problems using
RADIUS authentication.
802.1x Authentication using RADIUS
You must configure a primary EAP/802.1x Authentication server to use 802.1x security. A back-up server is optional.
NOTE: Each VLAN can be configured to use a separate RADIUS server (and backup server) for 802.1x authentication.
802.1x authentication (“EAP authentication”) can be separately enabled for each VLAN.
RADIUS Accounting
Using an external RADIUS server, the AP can track and record the length of client sessions on the access point by
sending RADIUS accounting messages per RFC2866. When a wireless client is successfully authenticated, RADIUS

Configuration MeshMAX 5054 Series User Guide
Advanced Configuration of Mesh and Access Point Module
173
accounting is initiated by sending an “Accounting Start” request to the RADIUS server. When the wireless client session
ends, an “Accounting Stop” request is sent to the RADIUS server.
NOTE: Each VLAN can be configured to use a separate RADIUS accounting server (and backup accounting server).
Session Length
Accounting sessions continue when a client reauthenticates to the same AP. Sessions are terminated when:
• A client disassociates.
• A client does not transmit any data to the AP for a fixed amount of time.
• A client is detected on a different interface.
• Idle-Timeout or Session-Timeout attributes are configured in the Radius server.
If the client roams from one AP to another, one session is terminated and a new session is begun.
NOTE: This feature requires RADIUS authentication using MAC Access Control or 802.1x. Wireless clients configured in
the Access Point’s static MAC Access Control list are not tracked.
Authentication and Accounting Attributes
Additionally, the AP supports a number of Authentication and Accounting Attributes defined in RFC2865, RFC2866,
RFC2869, and RFC3580.
Authentication Attributes
• State: Received in Access-Accept Packet by the AP during Authentication and sent back as-is during
Re-Authentication.
• Class: Received in Access-Accept Packet by the AP during Authentication and back as in Accounting Packets.
• Session-Timeout
– If the RADIUS server does not send a Session-Timeout, the AP will set the subscriber expiration time to 0, which
means indefinite access.
– The Termination Action attribute defines how the Session-Timeout attribute will be interpreted. If the Termination
Action is DEFAULT, then the session is terminated on expiration of the Session-Timeout time interval. If
Termination Action is RADIUS-Request, then re-authentication is done on expiration on the session.
– If the RADIUS server sends a Session-Timeout, the value specified by the Session-Timeout attribute will take
precedence over the configured Authorization Lifetime value.
• Termination-Action
– Valid values are: Default (0), RADIUS-Request (1). When the value is “default,” the Termination-Action attribute
sends an accounting stop message and then reauthenticates. If the value is “RADIUS-Request,” the
Termination-Action attribute reauthenticates without sending an accounting stop.
• Idle Timeout
– The AP internally maintains the Idle-Timeout attribute obtained for each of the users during their authentication
process, and uses this time interval in place of accounting inactivity time for timing out clients.
• Calling Station Id
– MAC address of the client being authenticated.
• Called Station Id
– The AP sends the MAC address of its own wireless interface with which the client getting authenticated is getting
associated, appended with the SSID. If VLAN is enabled, the SSID and corresponding VLAN ID get appended.
• Acct-Interim-Interval
– Obtained during the Authentication process and used for determining the time interval for sending Accounting
Update messages.
– This attribute value takes precedence over the value of the Accounting Update Interval.

Configuration MeshMAX 5054 Series User Guide
Advanced Configuration of Mesh and Access Point Module
174
Accounting Attributes
• Acct-Delay-Time
– Indicates how many seconds the AP has been trying to send a particular packet related to a particular user. This
time can be used at the server to determine the approximate time of the event generating this accounting request.
• Acct-Session-Id
– Unique accounting ID that aids in tracking client accounting records. This attribute is sent in Start and Stop
RADIUS accounting messages, and contains the client MAC address appended with the unique session ID.
•Acct-Session-Time
– Acct-Session-Time is calculated the following way (for each transmitted/retransmitted Acct-Stop):
Acct-Session-Time = time of last sent packet - subscriber login time.
• Acct-Input-Octets
– Number of octets (bytes) received by subscriber.
• Acct-Output-Octets
– Number of octets (bytes) sent by subscriber.
• Acct-Input-Packets
– Number of packets received by subscriber.
• Acct-Output-Packets
– Number of packets sent by subscriber.
• Acct-Terminate Cause
– Indicates how the session was terminated.
• Vendor Specific Attributes
SSID/VLAN/Security
The AP provides several security features to protect your network from unauthorized access. This section gives an
overview of VLANs and then discusses the SSID/VLAN/Security configuration options in the AP:
•VLAN Overview
•Management VLAN
•Security Profile
•MAC Access
•Wireless-A or Wireless-B
The AP also provides Broadcast Unique Beacon/Closed System and Rogue Scan to protect your network from
unauthorized access. See the Wireless-A or Wireless-B and Rogue Scan sections from more information.
VLAN Overview
Virtual Local Area Networks (VLANs) are logical groupings of network hosts. Defined by software settings, other VLAN
members or resources appear (to clients) to be on the same physical segment, no matter where they are attached on the
logical LAN or WAN segment. They simplify traffic flow between clients and their frequently-used or restricted resources.
VLANs now extend as far as the reach of the access point signal. Clients can be segmented into wireless sub-networks
via SSID and VLAN assignment. A Client can access the network by connecting to an AP configured to support its
assigned SSID/VLAN.
AP devices are fully VLAN-ready; however, by default VLAN support is disabled. Before enabling VLAN support, certain
network settings should be configured, and network resources such as a VLAN-aware switch, a RADIUS server, and
possibly a DHCP server should be available.
Once enabled, VLANs are used to conveniently, efficiently, and easily manage your network in the following ways:
Configuration MeshMAX 5054 Series User Guide
Advanced Configuration of Mesh and Access Point Module
175
• Manage adds, moves, and changes from a single point of contact
• Define and monitor groups
• Reduce broadcast and multicast traffic to unnecessary destinations
– Improve network performance and reduce latency
• Increase security
– Secure network restricts members to resources on their own VLAN
– Clients roam without compromising security
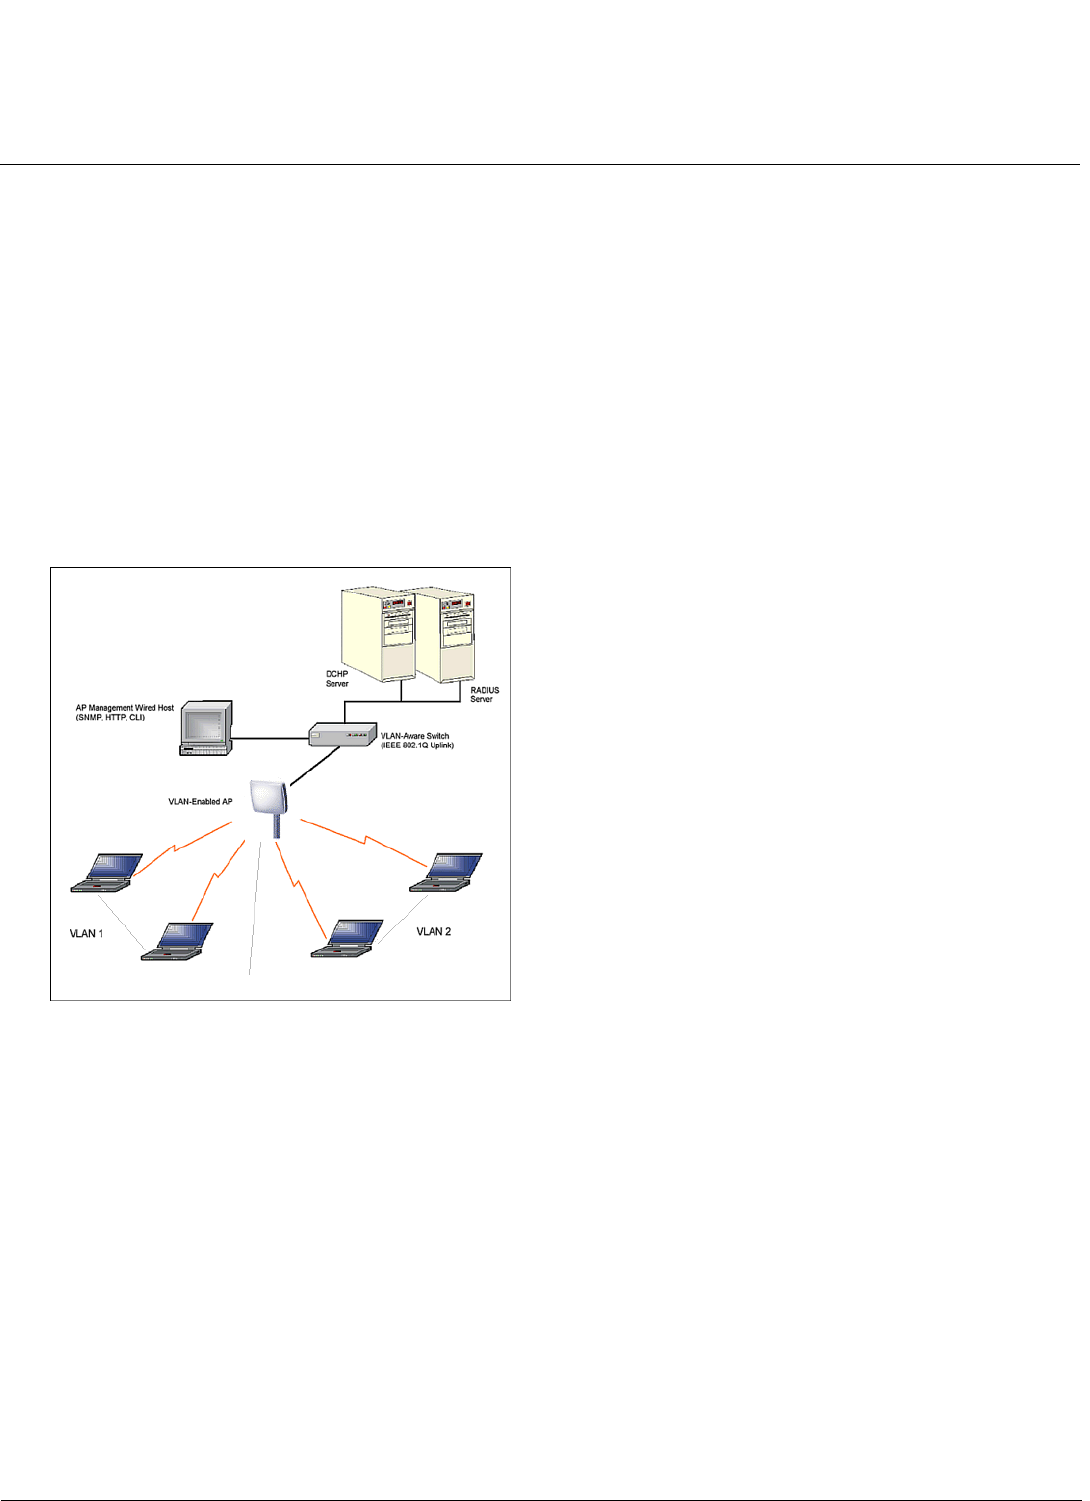
VLAN tagged data is collected and distributed through an AP's wireless interface(s) based on Network Name (SSID). An
Ethernet port on the access point connects a wireless cell or network to a wired backbone. The access points
communicate across a VLAN-capable switch that analyzes VLAN-tagged packet headers and directs traffic to the
appropriate ports. On the wired network, a RADIUS server authenticates traffic and a DHCP server manages IP
addresses for the VLAN(s). Resources like servers and printers may be present, and a hub may include multiple APs,
extending the network over a larger area.
Figure 6-48 Components of a Typical VLAN
VLAN Workgroups and Traffic Management
Access Points that are not VLAN-capable typically transmit broadcast and multicast traffic to all wireless Network
Interface Cards (NICs). This process wastes wireless bandwidth and degrades throughput performance. In comparison,
a VLAN-capable AP is designed to efficiently manage delivery of broadcast, multicast, and unicast traffic to wireless
clients.
The AP assigns clients to a VLAN based on a Network Name (SSID). The AP can support up to 16 SSIDs per radio, with
a unique VLAN configurable per SSID.
The AP matches packets transmitted or received to a network name with the associated VLAN. Traffic received by a
VLAN is only sent on the wireless interface associated with that same VLAN. This eliminates unnecessary traffic on the
wireless LAN, conserving bandwidth and maximizing throughput.
In addition to enhancing wireless traffic management, the VLAN-capable AP supports easy assignment of wireless users
to workgroups. In a typical scenario, each user VLAN represents a workgroup; for example, one VLAN could be used for
an EMPLOYEE workgroup and the other for a GUEST workgroup.
Configuration MeshMAX 5054 Series User Guide
Advanced Configuration of Mesh and Access Point Module
176
In this scenario, the AP would assign every packet it accepted to a VLAN. Each packet would then be identified as
EMPLOYEE or GUEST, depending on which wireless NIC received it. The AP would insert VLAN headers or “tags” with
identifiers into the packets transmitted on the wired backbone to a network switch.
Finally, the switch would be configured to route packets from the EMPLOYEE workgroup to the appropriate corporate
resources such as printers and servers. Packets from the GUEST workgroup could be restricted to a gateway that
allowed access to only the Internet. A member of the GUEST workgroup could send and receive e-mail and access the
Internet, but would be prevented from accessing servers or hosts on the local corporate network.
Typical User VLAN Configurations
VLANs segment network traffic into workgroups, which enable you to limit broadcast and multicast traffic. Workgroups
enable clients from different VLANs to access different resources using the same network infrastructure. Clients using the
same physical network are limited to those resources available to their workgroup.
The AP can segment users into a maximum of 16 different workgroups per radio, based on an SSID/VLAN grouping (also
referred as a VLAN Workgroup or a Sub-network).
NOTE: VLAN must be enabled to configure security per SSID.
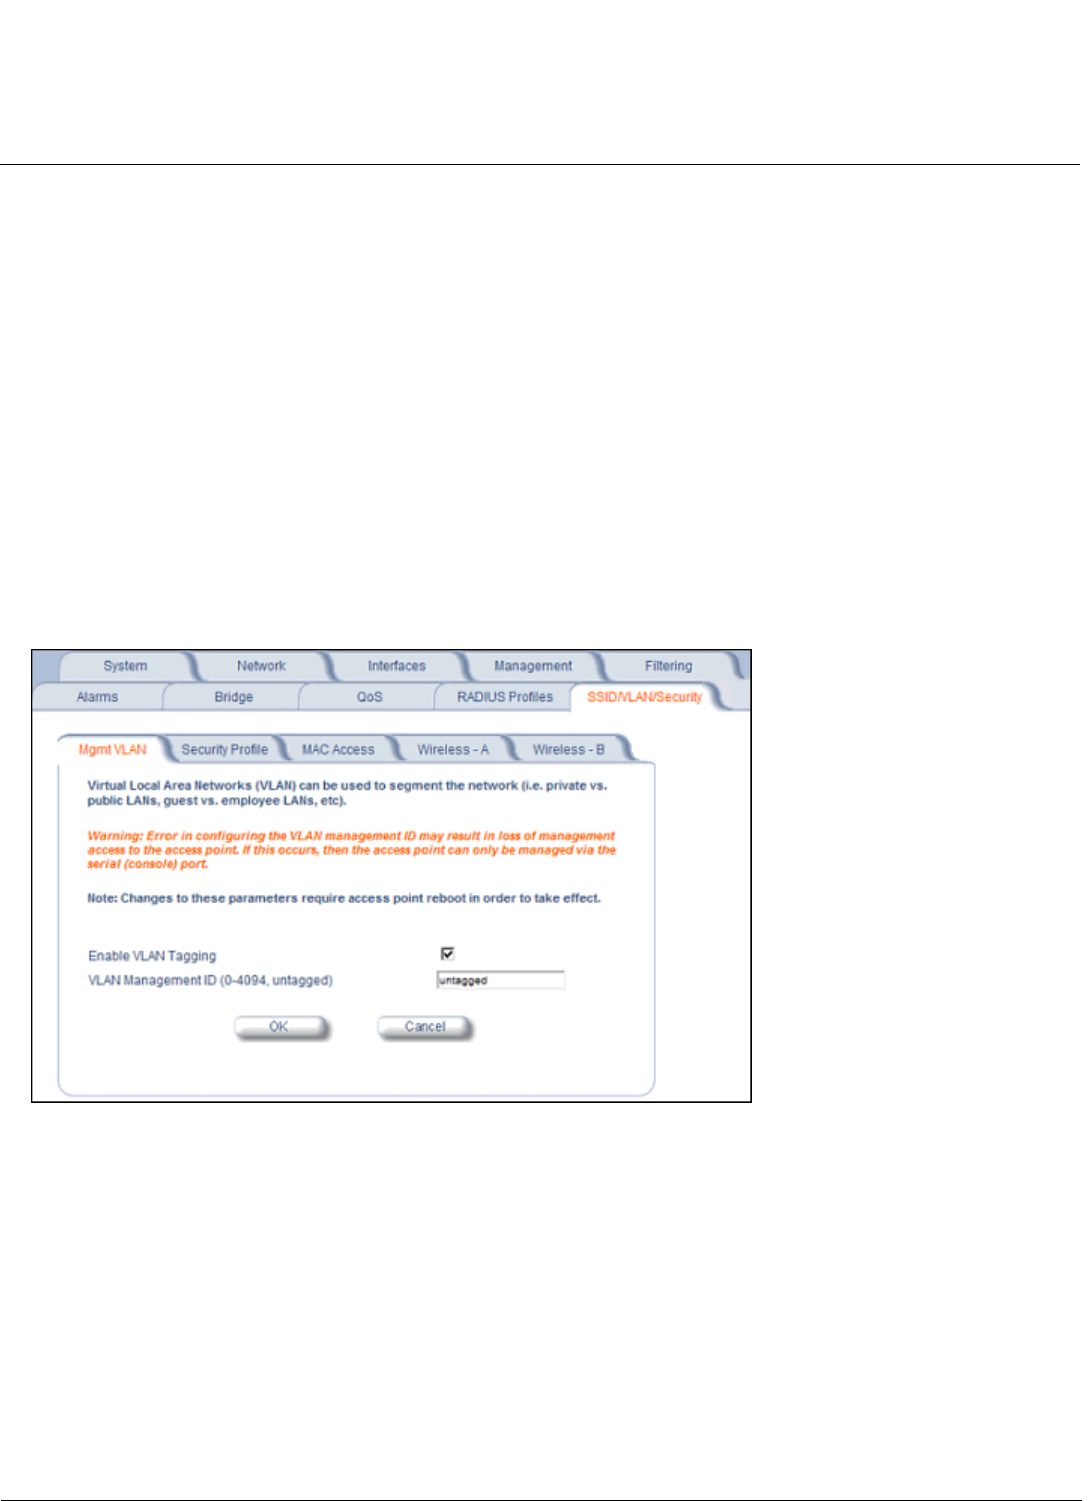
Management VLAN
Figure 6-49 Mgmt VLAN
VLAN Tagging Management
Control Access to the AP
Management access to the AP can easily be secured by making management stations or hosts and the AP itself
members of a common VLAN. Simply configure a non-zero management VLAN ID and enable VLAN to restrict
management of the AP to members of the same VLAN.
CAUTION: If a non-zero management VLAN ID is configured then management access to the AP is restricted to wired
or wireless hosts that are members of the same VLAN. Ensure your management platform or host is a
member of the same VLAN before attempting to manage the AP.
NOTE: When VLAN is enabled, ensure that all devices in the network share the same VLAN ID.
1. Click Configure > SSID/VLAN/Security > Mgmt VLAN.

Configuration MeshMAX 5054 Series User Guide
Advanced Configuration of Mesh and Access Point Module
177
2. Set the VLAN Management ID to a value of between 1 and 4094. (A value of -1 disables VLAN Tagging).
3. Place a check mark in the Enable VLAN Tagging box.
Provide Access to a Wireless Host in the Same Workgroup
The VLAN feature can allow wireless clients to manage the AP. If the VLAN Management ID matches a VLAN User ID,
then those wireless clients who are members of that VLAN will have AP management access.
CAUTION: Once a VLAN Management ID is configured and is equivalent to one of the VLAN User IDs on the AP, all
members of that User VLAN will have management access to the AP. Be careful to restrict VLAN
membership to those with legitimate access to the AP.
NOTE: When VLAN is enabled, ensure that all devices in the network share the same VLAN ID.
1. Click Configure > SSID/VLAN/Security > Mgmt VLAN.
2. Set the VLAN Management ID to use the same VLAN ID as one of the configured SSIDs.
3. Place a check mark in the Enable VLAN Tagging box.
Disable VLAN Tagging
1. Click Configure > SSID/VLAN/Security > Mgmt VLAN.
2. Remove the check mark from the Enable VLAN Tagging box (to disable all VLAN functionality) or set the VLAN
Management ID to -1 (to disable VLAN Tagging only).
NOTE: If you disable VLAN Tagging, you will be unable to configure security per SSID.
Security Profile
See the following sections:
•Security Features
•Authentication Protocol Hierarchy
•VLANs and Security Profiles
•Configuring Security Profiles
Security Features
The AP supports the following security features:
•WEP Encryption: The original encryption technique specified by the IEEE 802.11 standard.
•802.1x Authentication: An IEEE standard for client authentication.
•Wi-Fi Protected Access (WPA/802.11i [WPA2]): A new standard that provides improved encryption security over WEP.
NOTE: The AP does not support shared key 802.11 MAC level authentication. Clients with this MAC level feature must
disable it.
WEP Encryption
The IEEE 802.11 standards specify an optional encryption feature, known as Wired Equivalent Privacy or WEP, that is
designed to provide a wireless LAN with a security level equal to what is found on a wired Ethernet network. WEP
encrypts the data portion of each packet exchanged on an 802.11 network using an Encryption Key (also known as a
WEP Key).
When Encryption is enabled, two 802.11 devices must have the same Encryption Keys and both devices must be
configured to use Encryption in order to communicate. If one device is configured to use Encryption but a second device
is not, then the two devices will not communicate, even if both devices have the same Encryption Keys.

Configuration MeshMAX 5054 Series User Guide
Advanced Configuration of Mesh and Access Point Module
178
802.1x Authentication
IEEE 802.1x is a standard that provides a means to authenticate and authorize network devices attached to a LAN port.
A port in the context of IEEE 802.1x is a point of attachment to the LAN, either a physical Ethernet connection or a
wireless link to an Access Point. 802.1x requires a RADIUS server and uses the Extensible Authentication Protocol
(EAP) as a standards-based authentication framework, and supports automatic key distribution for enhanced security.
The EAP-based authentication framework can easily be upgraded to keep pace with future EAP types.
Popular EAP types include:
• EAP-Message Digest 5 (MD5): Username/Password-based authentication; does not support automatic key
distribution
• EAP-Transport Layer Security (TLS): Certificate-based authentication (a certificate is required on the server and each
client); supports automatic key distribution
• EAP-Tunneled Transport Layer Security (TTLS): Certificate-based authentication (a certificate is required on the
server; a client’s username/password is tunneled to the server over a secure connection); supports automatic key
distribution
• PEAP - Protected EAP with MS-CHAP: Secure username/password-based authentication; supports automatic key
distribution
Different servers support different EAP types and each EAP type provides different features. See the documentation that
came with your RADIUS server to determine which EAP types it supports.
NOTE: The AP supports the following EAP types when Security Mode is set to 802.1x, WPA, or 802.11i (WPA2):
EAP-TLS, PEAP, EAP-TTLS, EAP-MD5, and EAP-SIM.
Authentication Process
There are three main components in the authentication process. The standard refers to them as:
1. Supplicant (client PC)
2. Authenticator (Access Point)
3. Authentication server (RADIUS server)
When the Security Mode is set to 802.1x Station, WPA Station, or 802.11i Station you need to configure your RADIUS
server for authentication purposes.
Prior to successful authentication, an unauthenticated client PC cannot send any data traffic through the AP device to
other systems on the LAN. The AP inhibits all data traffic from a particular client PC until the client PC is authenticated.
Regardless of its authentication status, a client PC can always exchange 802.1x messages in the clear with the AP (the
client begins encrypting data after it has been authenticated).
Figure 6-50 RADIUS Authentication Illustrated
The AP acts as a pass-through device to facilitate communications between the client PC and the RADIUS server. The
AP (2) and the client (1) exchange 802.1x messages using an EAPOL (EAP Over LAN) protocol (A). Messages sent from
the client station are encapsulated by the AP and transmitted to the RADIUS (3) server using EAP extensions (B).
Upon receiving a reply EAP packet from the RADIUS, the message is typically forwarded to the client, after translating it
back to the EAPOL format. Negotiations take place between the client and the RADIUS server. After the client has been

Configuration MeshMAX 5054 Series User Guide
Advanced Configuration of Mesh and Access Point Module
179
successfully authenticated, the client receives an Encryption Key from the AP (if the EAP type supports automatic key
distribution). The client uses this key to encrypt data after it has been authenticated.
For 802.11a, 4.9 GHz, and 802.11b/g clients that communicate with an AP, each client receives its own unique encryption
key; this is known as Per User Per Session Encryption Keys.
Wi-Fi Protected Access (WPA/802.11i [WPA2])
Wi-Fi Protected Access (WPA) is a security standard designed by the Wi-Fi Alliance in conjunction with the Institute of
Electrical and Electronics Engineers (IEEE). The AP supports 802.11i (WPA2), based on the IEEE 802.11i security
standard.
WPA is a replacement for Wired Equivalent Privacy (WEP), the encryption technique specified by the original 802.11
standard. WEP has several vulnerabilities that have been widely publicized. WPA addresses these weaknesses and
provides a stronger security system to protect wireless networks.
WPA provides the following new security measures not available with WEP:
• Improved packet encryption using the Temporal Key Integrity Protocol (TKIP) and the Michael Message Integrity
Check (MIC).
• Per-user, per-session dynamic encryption keys:
– Each client uses a different key to encrypt and decrypt unicast packets exchanged with the AP
– A client's key is different for every session; it changes each time the client associates with an AP
– The AP uses a single global key to encrypt broadcast packets that are sent to all clients simultaneously
– Encryption keys change periodically based on the Re-keying Interval parameter
– WPA uses 128-bit encryption keys
• Dynamic Key distribution
– The AP generates and maintains the keys for its clients
– The AP securely delivers the appropriate keys to its clients
• Client/server mutual authentication
–802.1x
– Pre-shared key (for networks that do not have an 802.1x solution implemented)
The AP supports the following WPA security modes:
•WPA: The AP uses 802.1x to authenticate clients and TKIP for encryption. You should only use an EAP that supports
mutual authentication and session key generation, such as EAP-TLS, EAP-TTLS, and PEAP. See 802.1x
Authentication for details.
•WPA-PSK (Pre-Shared Key): For networks that do not have 802.1x implemented, you can configure the AP to
authenticate clients based on a Pre-Shared Key. This is a shared secret that is manually configured on the AP and
each of its clients. The Pre-Shared Key must be 256 bits long, which is either 64 hexadecimal digits or 32
alphanumeric characters. The AP also supports a PSK Pass Phrase option to facilitate the creation of the TKIP
Pre-Shared Key (so a user can enter an easy-to-remember phrase rather than a string of characters).
•802.11i (also known as WPA2): The AP provides security to clients according to the 802.11i draft standard, using
802.1x authentication, a CCMP cipher based on AES, and re-keying.
•802.11i-PSK (also known as WPA2 PSK): The AP uses a CCMP cipher based on AES, and encrypts frames to clients
based on a Pre-Shared Key. The Pre-Shared Key must be 256 bits long, which is either 64 hexadecimal digits or 32
alphanumeric characters. The AP also supports a PSK Pass Phrase option to facilitate the creation of the Pre-Shared
Key (so a user can enter an easy-to-remember phrase rather than a string of characters).
NOTE: For more information on WPA, see the Wi-Fi Alliance Web site at http://www.wi-fi.org.
Authentication Protocol Hierarchy
There is a hierarchy of authentication protocols defined for the AP. The hierarchy is as follows, from highest to lowest:

Configuration MeshMAX 5054 Series User Guide
Advanced Configuration of Mesh and Access Point Module
180
• 802.1x authentication (including 802.1x, WPA, WPA-PSK, 802.11i, 802.11i-PSK)
• MAC Access Control via RADIUS Authentication
• MAC Access Control through individual APs' MAC Access Control Lists
If you have both 802.1x and MAC Access Control authentication enabled, the 802.1x authentication takes precedence
because it is higher in the authentication protocol hierarchy. This is required in order to propagate the WEP/TKIP/AES
keys to the clients in such cases. If you disable 802.1x on the AP, you will see the effects of MAC authentication.
In addition, setting MAC Access Control status to Strict will cause both MAC ACL settings and 802.1x settings to be
applied.
For example, assume that the MAC Access Control List contains MAC addresses to block, and that WPA-PSK is
configured to allow access to clients with the appropriate PSK Passphrase.
• If the MAC ACL status is set to Enable, WPA-PSK will take precedence, and clients in the MAC ACL with the correct
PSK passphrase will be allowed. Only the WPA-PSK setting is taken into consideration.
• If the MAC ACL status is set to Strict, then clients in the MAC ACL will be blocked even if they have the correct PSK
passphrase. Clients will only be allowed if they have the correct passphrase and are NOT listed in the MAC ACL. In
this way, both MAC and WPA-PSK settings are taken into consideration.
VLANs and Security Profiles
The AP allows you to segment wireless networks into multiple sub-networks based on Network Name (SSID) and VLAN
membership. A Network Name (SSID) identifies a wireless network. Clients associate with Access Points that share an
SSID. During installation, the Setup Wizard prompts you to configure a Primary Network Name for each wireless
interface.
After initial setup and once VLAN is enabled, the AP can be configured to support up to 16 SSIDs per wireless interface
to segment wireless networks based on VLAN membership.
Each VLAN can associated to a Security Profile and RADIUS Server Profiles. A Security Profile defines the allowed
wireless clients, and authentication and encryption types. See the following sections for configuration details.
Configuring Security Profiles
Security policies can be configured and applied on the AP as a whole, or on a per VLAN basis. When VLAN is disabled
on the AP, the user can configure a security profile for each interface of the AP. When VLANs are enabled and Security
per SSID is enabled, the user can configure a security profile for each VLAN.
The user defines a security policy by specifying one or more values for the following parameters:
• Wireless STA types (WPA station, 802.11i (WPA2) station, 802.1x station, WEP station, WPA-PSK, and 802.11i-PSK)
that can associate to the AP.
• Authentication mechanisms (802.1x, RADIUS MAC authentication) that are used to authenticate clients for each type
of station.
• Cipher Suites (CCMP, TKIP, WEP, None) used for encapsulating the wireless data for each type of station.
Up to 16 security profiles can be configured per wireless interface.
NOTE: Mesh security is configured on the Mesh tab.
1. Click Configure > SSID/VLAN/Security > Security Profile.
Configuration MeshMAX 5054 Series User Guide
Advanced Configuration of Mesh and Access Point Module
181
Figure 6-51 Security Profile Configuration
2. Click Add in the Security Profile Table to create a new entry. To modify an existing profile, select the profile and click
Edit. To delete an existing profile, select the profile and click Delete. You cannot delete a Security Profile used in an
SSID. Also, the first Security Profile cannot be deleted.
3. Configure one or more types of wireless stations (security modes) that are allowed access to the AP under the
security profile. The WEP/PSK parameters are separately configurable for each security mode. To enable a security
mode in the profile (Non Secure Station, WEP Station, 802.1x Station, WPA Station, WPA-PSK Station, 802.11i
(WPA2) Station, 802.11i-PSK Station), check the box next to the mode. See Figure 6-52.
If the security mode selected in a profile is WEP, WPA-PSK, or 802.11i-PSK, then you must configure the WEP or
Pre-Shared Keys.
NOTE: If an 802.1x client that has already been authenticated attempts to switch to WEP, or if a WEP client that has
already been connected attempts to switch to 802.1x, the AP will not allow the client to switch immediately. If
this happens, either reboot the AP or disable the client/roam to a new AP for five minutes, and then attempt to
reconnect to the AP. If the client is still unable to connect after waiting five minutes, reboot the AP.
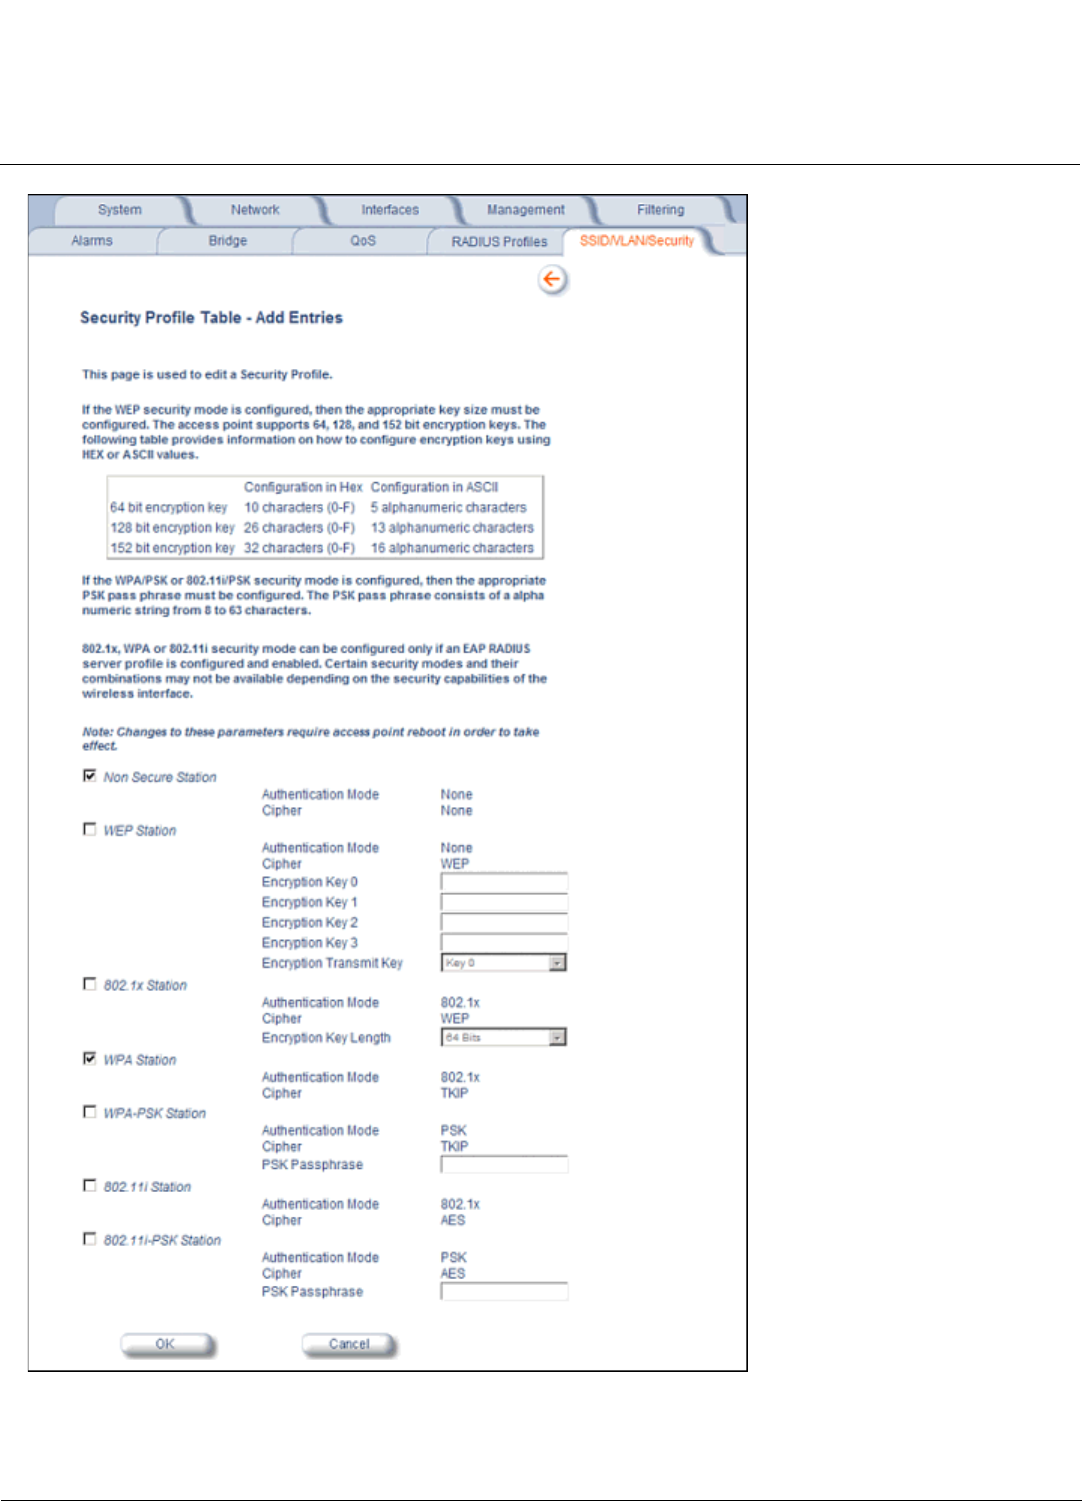
4. Configure the parameters as follows for each enabled security mode. See Figure 6-52.
•Non Secure Station:
• Authentication Mode: None. The AP allows access to Stations without authentication.
— Non secure station should be used only with WEP or 802.1x security mode.
• Cipher: None
•WEP Station:
• Authentication Mode: None
• Cipher: WEP
• Encryption Key 0, Encryption Key 1, Encryption Key 2, Encryption Key 3
NOTE: When VLAN tagging is enabled, only Key 0 can be configured.
• Encryption Key Length: 64, 128, or 152 Bits.

Configuration MeshMAX 5054 Series User Guide
Advanced Configuration of Mesh and Access Point Module
182
— For 64-bit encryption, an encryption key is 10 hexadecimal characters (0-9 and A-F) or 5 ASCII characters
(see ASCII Chart for Mesh and Access Point Module).
— For 128-bit encryption, an encryption key is 26 hexadecimal characters or 13 ASCII characters.
— For 152-bit encryption, an encryption key is 32 hexadecimal characters or 16 ASCII characters.
• Encryption Transmit Key: select Key 0, Key 1, Key 2, or Key 3
NOTE: When VLAN tagging is enabled, only Key 0 can be configured.
•802.1x Station:
• Authentication Mode: 802.1x
• Cipher: WEP
• Encryption Key Length: 64 or 128 Bits.
— If 802.1x is enabled simultaneously with WEP, the 802.1x Station’s encryption key length is determined by
the WEP encryption key.
•WPA Station:
• Authentication Mode: 802.1x
• Cipher: TKIP
•WPA-PSK Station:
• Authentication Mode: PSK
• Cipher: TKIP
• PSK Passphrase: an 8-63 character user-defined phrase. It is recommended a passphrase of at least 13
characters, including both letters and numbers, and upper and lower case characters, be used to ensure that
the generated key cannot be easily deciphered by network infiltrators.
•802.11i Station:
• Authentication Mode: 802.1x
• Cipher: CCMP based on AES
•802.11i-PSK Station:
• Authentication Mode: PSK
• Cipher: CCMP based on AES
• PSK Passphrase: an 8-63 character user-defined phrase. It is recommended a passphrase of at least 13
characters, including both letters and numbers, and upper and lower case characters, to ensure that the
generated key cannot be easily deciphered by network infiltrators.
5. When finished configuring all parameters, click OK.
6. If you selected a Security Mode of 802.1x Station, WPA Station, or 802.11i Station, you must configure a RADIUS
802.1x/EAP server.
Security Profile 1 will be used by default for all wireless interfaces.
7. Reboot the AP.
Configuration MeshMAX 5054 Series User Guide
Advanced Configuration of Mesh and Access Point Module
183
Figure 6-52 Security Profile Table - Add Entries
Configuration MeshMAX 5054 Series User Guide
Advanced Configuration of Mesh and Access Point Module
184
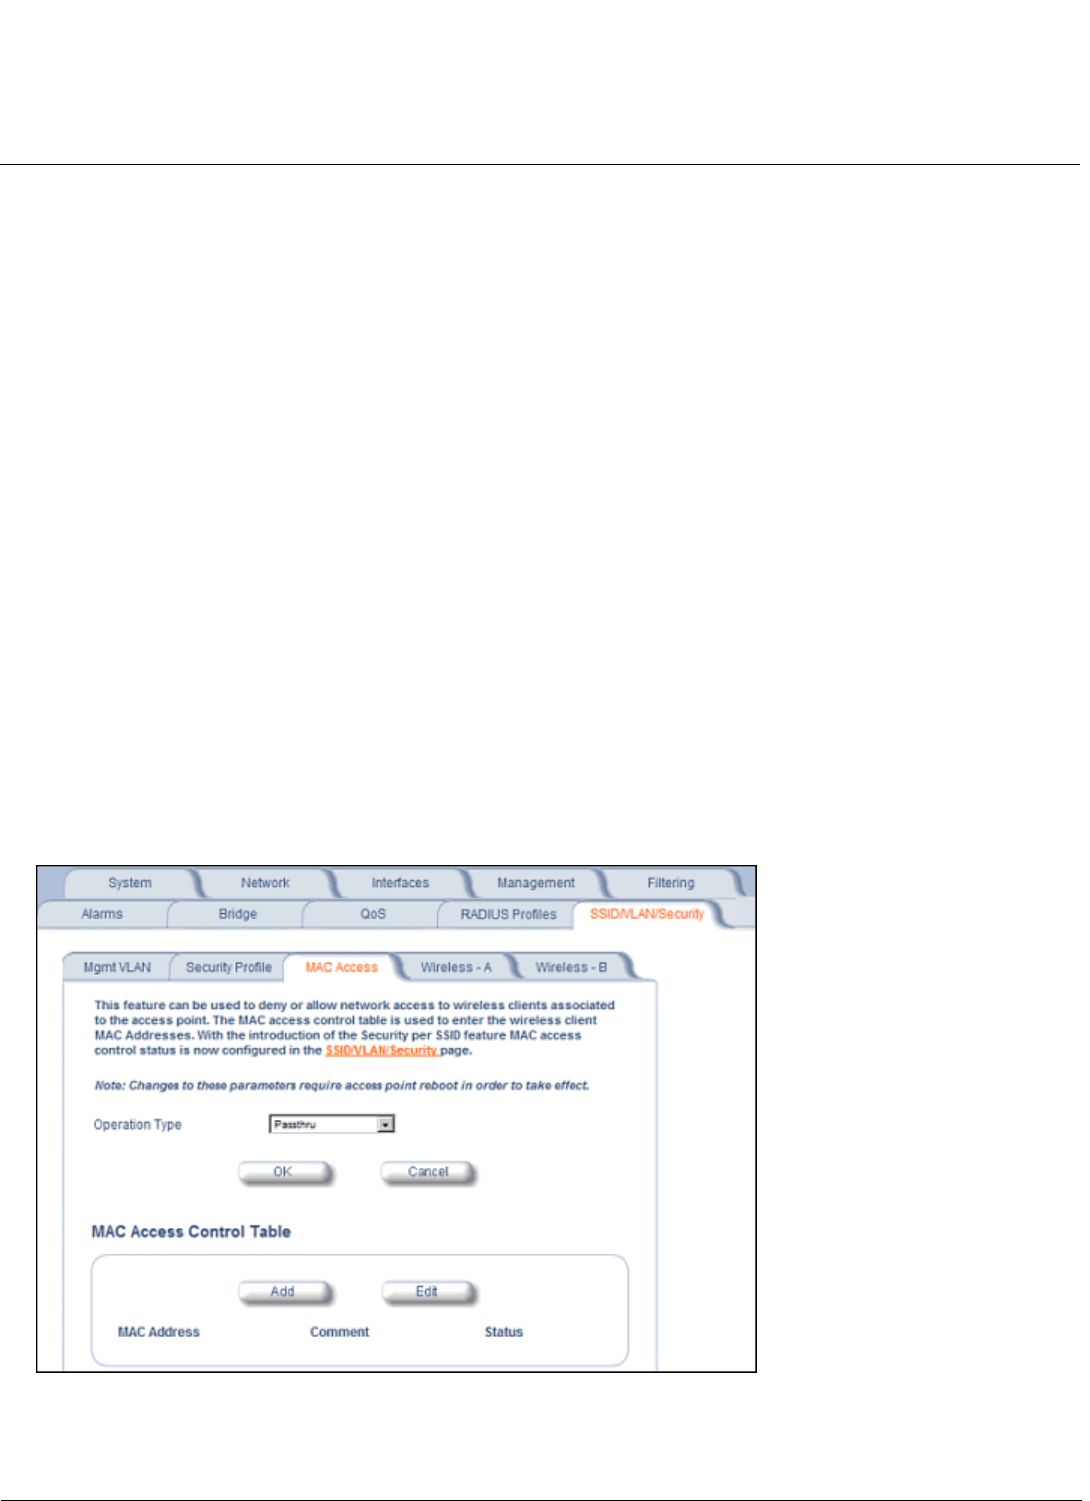
MAC Access
The MAC Access sub-tab allows you to build a list of stations, identified by their MAC addresses, authorized to access
the network through the AP. The list is stored inside each AP within your network. Note that you must reboot the AP for
any changes to the MAC Access Control Table to take effect. Up to 1000 entries can be made in the table.
The “MAC ACL Status” parameter (configurable on the SSID/VLAN/Security > Wireless A or B sub-tab) is per VLAN if
VLAN Management is enabled. All other parameters besides “MAC ACL Status” are configured per AP, even if VLAN is
enabled.
The following list details the configurable MAC Access parameters.
NOTE: MAC Access Control status is controlled on the SSID/VLAN/Security > Wireless A or B sub-tab. When set to
Strict, changes to the MAC ACL table will take effect immediately, without a unit reboot. When not set to Strict,
changes will not take effect until the unit is rebooted.
•Operation Type: Choose between Passthru and Block. This determines how the stations identified in the MAC
Access Control Table are filtered.
– If set to Passthru, only the addresses listed in the Control Table will pass through the bridge.
– If set to Block, the bridge will block traffic to or from the addresses listed in the Control Table.
•MAC Access Control Table: Click Add to create a new entry. Click Edit to change an existing entry. Each entry
contains the following field:
–MAC Address: Enter the wireless client’s MAC address.
–Comment: Enter an optional comment such as the client’s name.
–Status: The entry is enabled automatically when saved (so the Status field is only visible when editing an entry).
You can also disable or delete entries by changing this field’s value.
NOTE: For larger networks that include multiple Access Points, you may prefer to maintain this list on a centralized
location using the MAC Access Control Via RADIUS Authentication.
Figure 6-53 MAC Access Configuration Screen
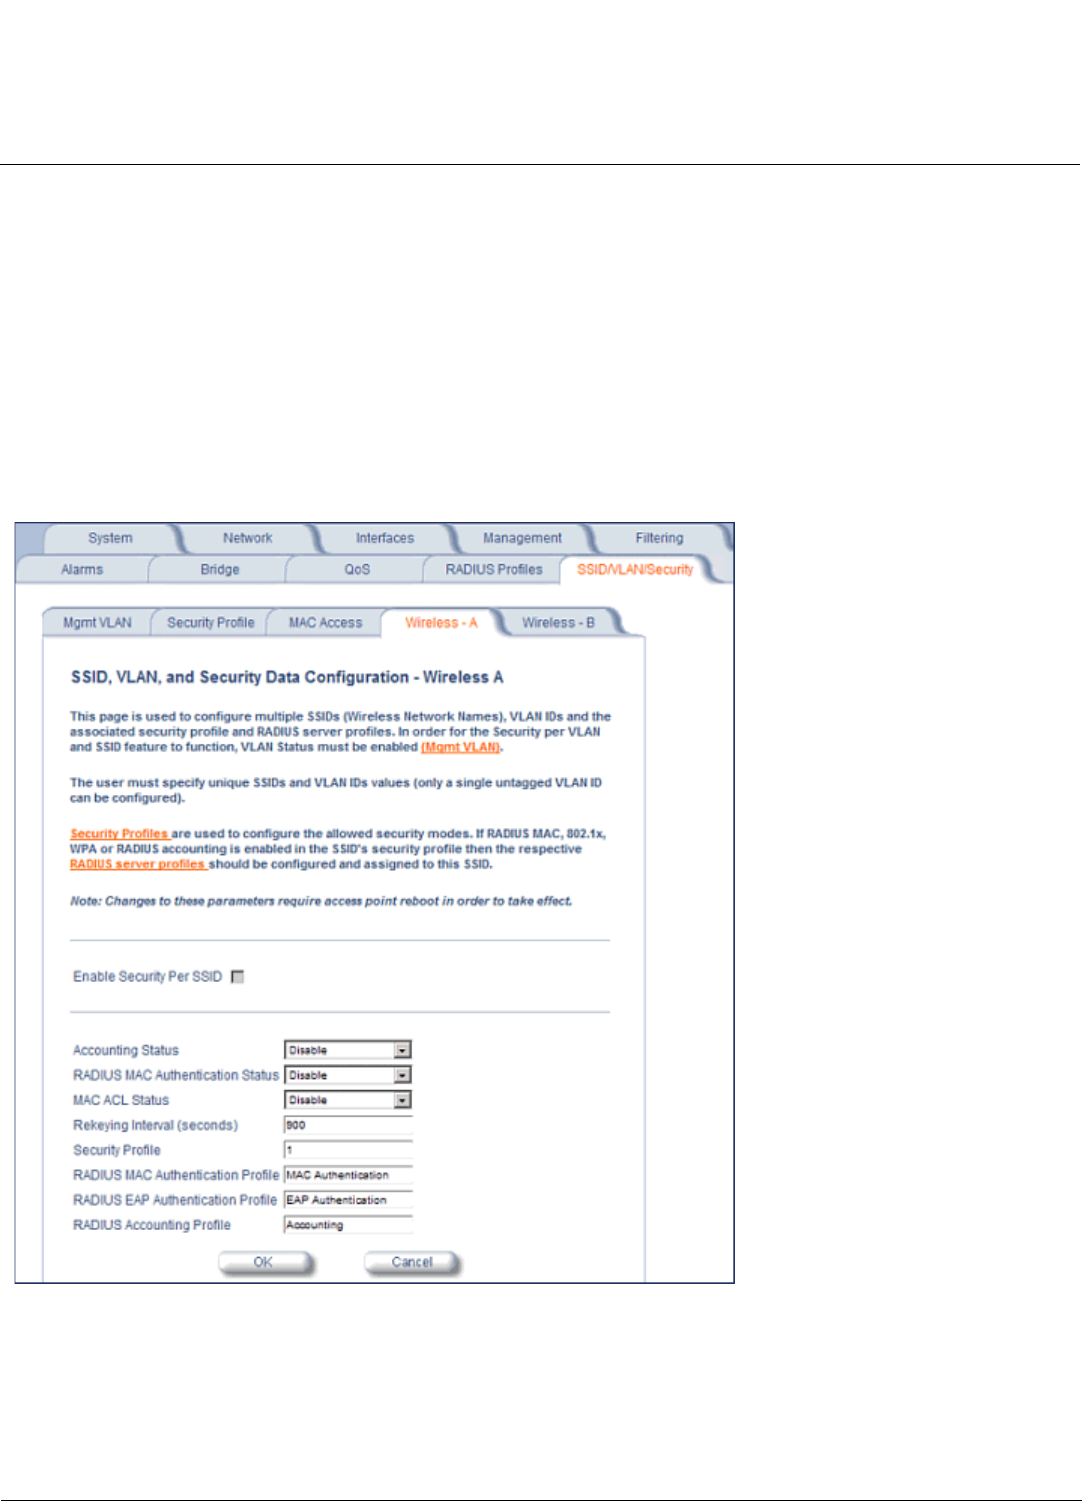
Configuration MeshMAX 5054 Series User Guide
Advanced Configuration of Mesh and Access Point Module
185
Wireless-A or Wireless-B
Each SSID can have its own Security Profile that defines its security mode, authentication mechanism, and encryption,
so that customers can have multiple types of clients (non-WEP, WEP, 802.1x, WPA, WPA-PSK, 802.11i, 802.11i-PSK) on
the same system separated per VLAN. See the Security Profile section for more information. Each SSID can support a
unique VLAN. In order for the AP to support multiple SSID/VLANs, VLAN Tagging must be enabled. These parameters
are configurable on the Wireless-A and Wireless-B screens.
Configuring an SSID/VLAN with VLAN Tagging Disabled
With VLAN tagging disabled (from the SSID/VLAN/Security > Mgmt VLAN tab), only one SSID can be configured per
interface. All parameters set on the Wireless-A or Wireless-B tab will be applied to that SSID.
1. Click SSID/VLAN/Security > Wireless-A or Wireless-B.
The SSID, VLAN, and Security Configuration page is displayed.
Figure 6-54 SSID, VLAN, and Security Configuration (VLAN Tagging Disabled)
2. Enable or disable RADIUS accounting on the VLAN/SSID by selecting Enable or Disable from the Accounting
Status drop-down menu.
3. Control the functionality of RADIUS MAC Authentication on the VLAN/SSID by selecting one of the following from the
the RADIUS Authentication Status drop-down menu.

Configuration MeshMAX 5054 Series User Guide
Advanced Configuration of Mesh and Access Point Module
186
•Enable: MAC addresses in the MAC Access Control List stored on the RADIUS server are blocked or allowed,
based on the MAC ACL settings. If a higher priority authentication protocol is also enabled, the higher-priority
settings will override the MAC ACL settings.
•Disable: RADIUS MAC ACL settings are disabled.
•Strict: RADIUS MAC ACL settings are enabled. If a higher-priority authentication protocol is also enabled,
RADIUS MAC ACL settings will be applied in addition to the higher priority authentication protocol settings.
4. Control the functionality of the MAC Access Control List on the VLAN/SSID by selecting one of the following from the
MAC ACL Status drop-down menu:
•Enable: MAC addresses in the MAC Access Control List are blocked or allowed, based on the MAC ACL settings.
If a higher priority authentication protocol is also enabled, the higher-priority settings will override the MAC ACL
settings.
•Disable: MAC ACL settings are disabled.
•Strict: MAC ACL settings are enabled. If a higher-priority authentication protocol is also enabled, MAC ACL
settings will be applied in addition to the higher priority authentication protocol settings. When MAC ACL Status is
set to Strict, changes to the MAC ACL table will take effect without a device reboot.
5. Enter Rekeying Interval in seconds (between 300 and 65525). When set to 0, this parameter is disabled. The default
is 900 seconds.
6. Enter the Security Profile used by the VLAN in the Security Profile field.
7. Define the RADIUS Server Profile Configuration for the VLAN/SSID:
• RADIUS MAC Authentication Profile
• RADIUS EAP Authentication Profile
• RADIUS Accounting Profile
If 802.1x, WPA, or 802.11i security mode is used, the RADIUS EAP Authentication Profile must have a value.
A RADIUS Server Profile for authentication for each VLAN shall be configured as part of the configuration options
for that VLAN. RADIUS profiles are independent of VLANs. The user can define any profile to be the default and
associate all VLANs to that profile. Four profiles are created by default, “MAC Authentication”, “EAP
Authentication”, Accounting”, and “Management”
8. If desired, scroll down to the scroll down to the SSID and VLAN Table and click Edit to modify the Network Name,
VLAN ID, or QoS profile of the SSID/VLAN.
NOTE: Because VLAN tagging is disabled, attempting to add a new SSID/VLAN will produce an error message.
The Edit Entries screen will be displayed.
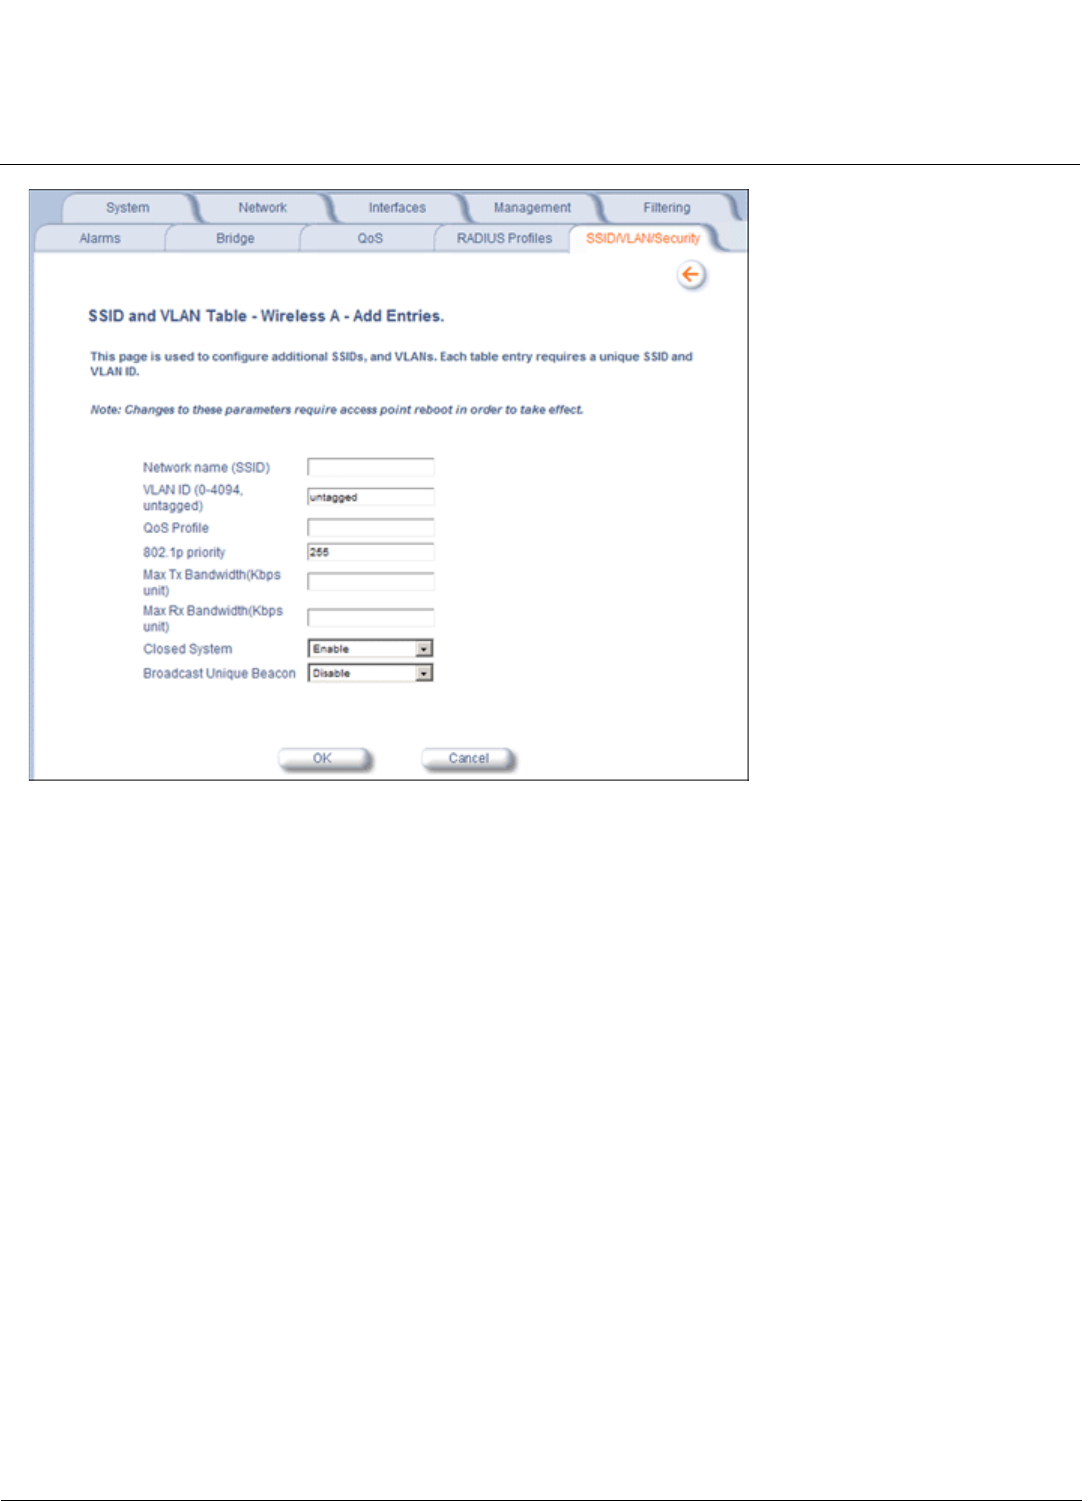
Configuration MeshMAX 5054 Series User Guide
Advanced Configuration of Mesh and Access Point Module
187
Figure 6-55 SSID/VLAN Edit Entries Screen (VLAN Tagging Disabled)
9. Enter a unique Network Name (SSID) between 1 and 32 characters. This parameter is mandatory.
NOTE: Do not use quotation marks (single or double) in the Network Name; this will cause the AP to misinterpret the
name.
10.Enter a unique VLAN ID. This parameter is mandatory.
• A VLAN ID is a number from -1 to 4094. A value of -1 means that an entry is “untagged.”
• You can set the VLAN ID to “-1” or “untagged” if you do not want clients that are using a specific SSID to be
members of a VLAN workgroup.
• The VLAN ID must match an ID used by your network; contact your network administrator if you need assistance
defining the VLAN IDs.
11. Specify a QoS profile.
12.Specify a 802.1p Priority.
13.Set the Maximum TX Bandwidth in Kbps. If this parameter is set to 0, full bandwidth is available.
14.Set the Maximum RX Bandwidth in Kbps. If this parameter is set to 0, full bandwidth is available.
15.Select the status of Closed System to control whether the SSID is advertised in the beacon and manage the way
probe requests are handled, as follows:
•Enable: The SSID is not advertised in the beacon, and the AP will respond to probe requests with an SSID only if
the client has specified the SSID in the probe request. If the client sends a probe request with a null or “ANY”
SSID, the AP will not respond.
•Partial: The SSID is advertised in the beacon, and the AP will not respond to "ANY" SSID requests. The Partial
setting reduces network traffic by eliminating the repeated broadcast of SSIDs in probe responses.
•Disable: The SSID is advertised in the beacon, and the AP will respond with each configured SSID, whether or
not an SSID has been specified in the probe request.
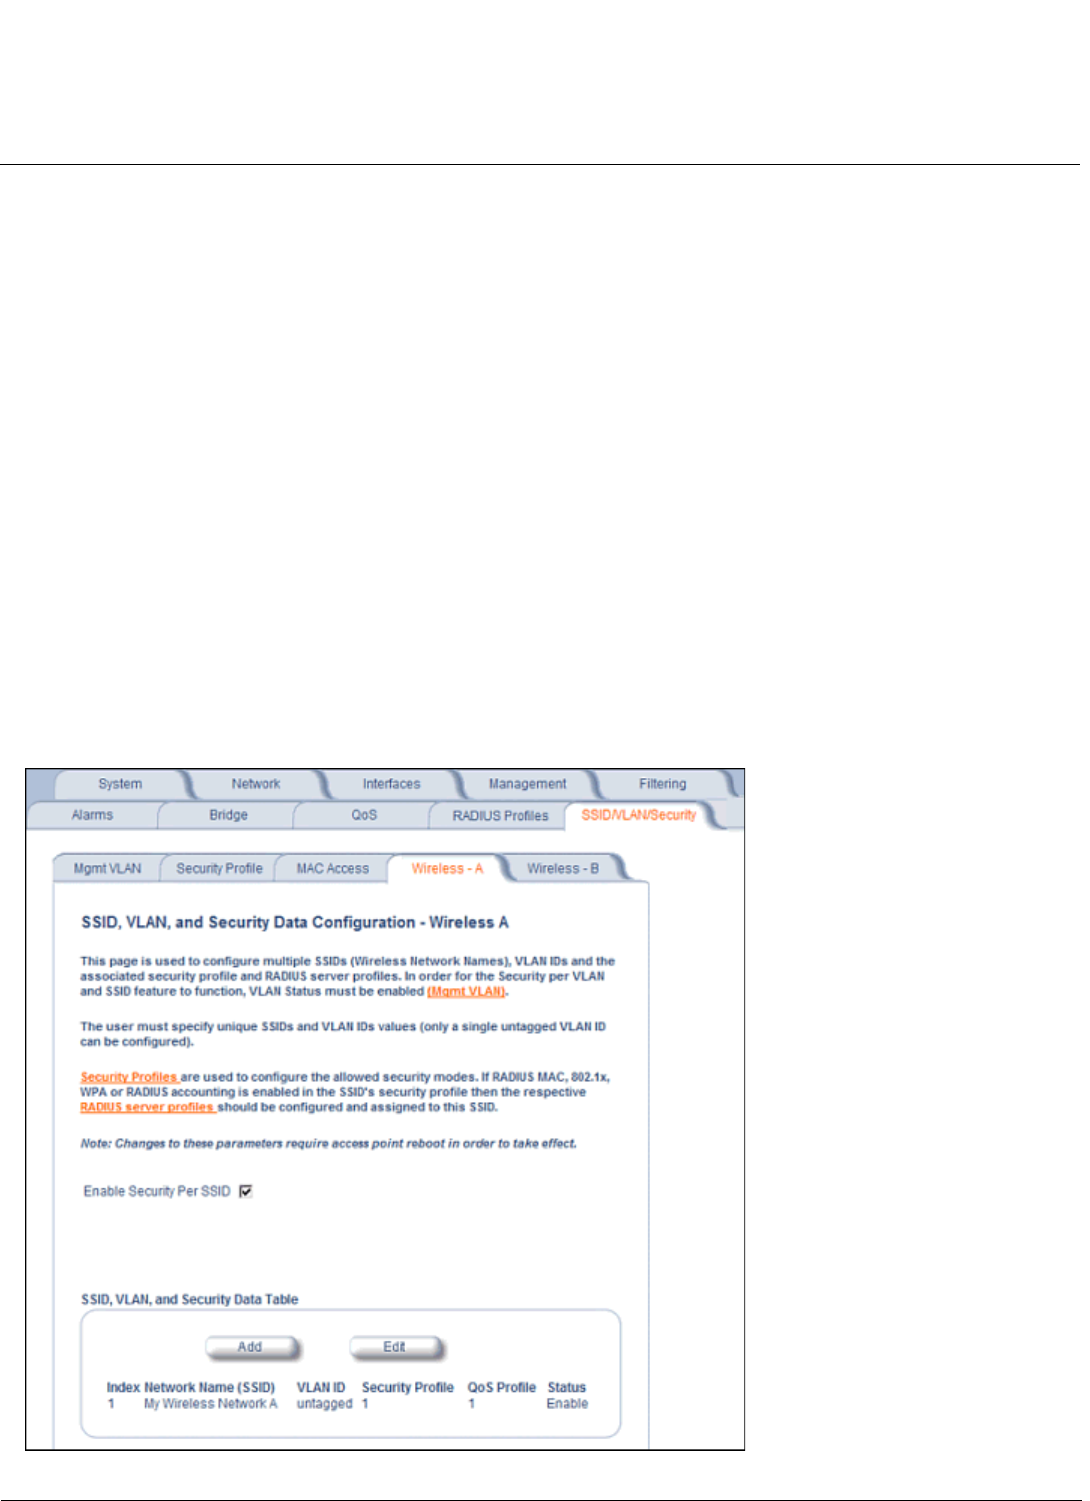
Configuration MeshMAX 5054 Series User Guide
Advanced Configuration of Mesh and Access Point Module
188
16.Enable Broadcast Unique Beacon using the drop-down menu. When enabled, Broadcast Unique Beacon allows the
broadcast of a up to four unique beacons when the AP is configured for multiple SSIDs. If Closed System (above) is
set to Partial or Disable, each beacon (up to four) will be broadcast a single SSID. If more than four SSIDs are
configured, then three SSIDs will be broadcast in individual beacons; the fourth and subsequent SSIDs will be
combined in one beacon and will not be broadcast. If Closed System is set to Enable, the SSID will not be broadcast
in the beacon. If Broadcast Unique Beacon is disabled, a combined beacon will be broadcast.
NOTE: Enabling Broadcast Unique Beacon will lower the total throughput of the AP by 2-4%. Enabling Broadcast
Unique Beacon simultaneously with Rogue Scan will cause a drift in the beacon interval and the occasional
missing of beacons.
17.Set the 802.1p Priority given to packets tagged with this VLAN ID. Enter a number between 0-7.
18.If editing an entry, enable or disable the parameters on this page by electing Enable or Disable from the Status
drop-down menu. If adding a new entry, this drop-down menu will not appear.
19.Click OK to return to Wireless-A or Wireless-B Security Configuration Screen.
20.Reboot the AP.
Configuring SSID/VLANs with VLAN Tagging Enabled
With VLAN Tagging enabled (from the SSID/VLAN/Security > Mgmt VLAN tab), multiple SSID/VLANs are supported.
Parameters set on the Wireless-A or Wireless-B tab can be enabled per SSID by choosing the Enable Security per
SSID option.
1. Click SSID/VLAN/Security >Wireless-A or Wireless-B.
2. Select the Enable Security Per SSID option. The screen will update to the following:
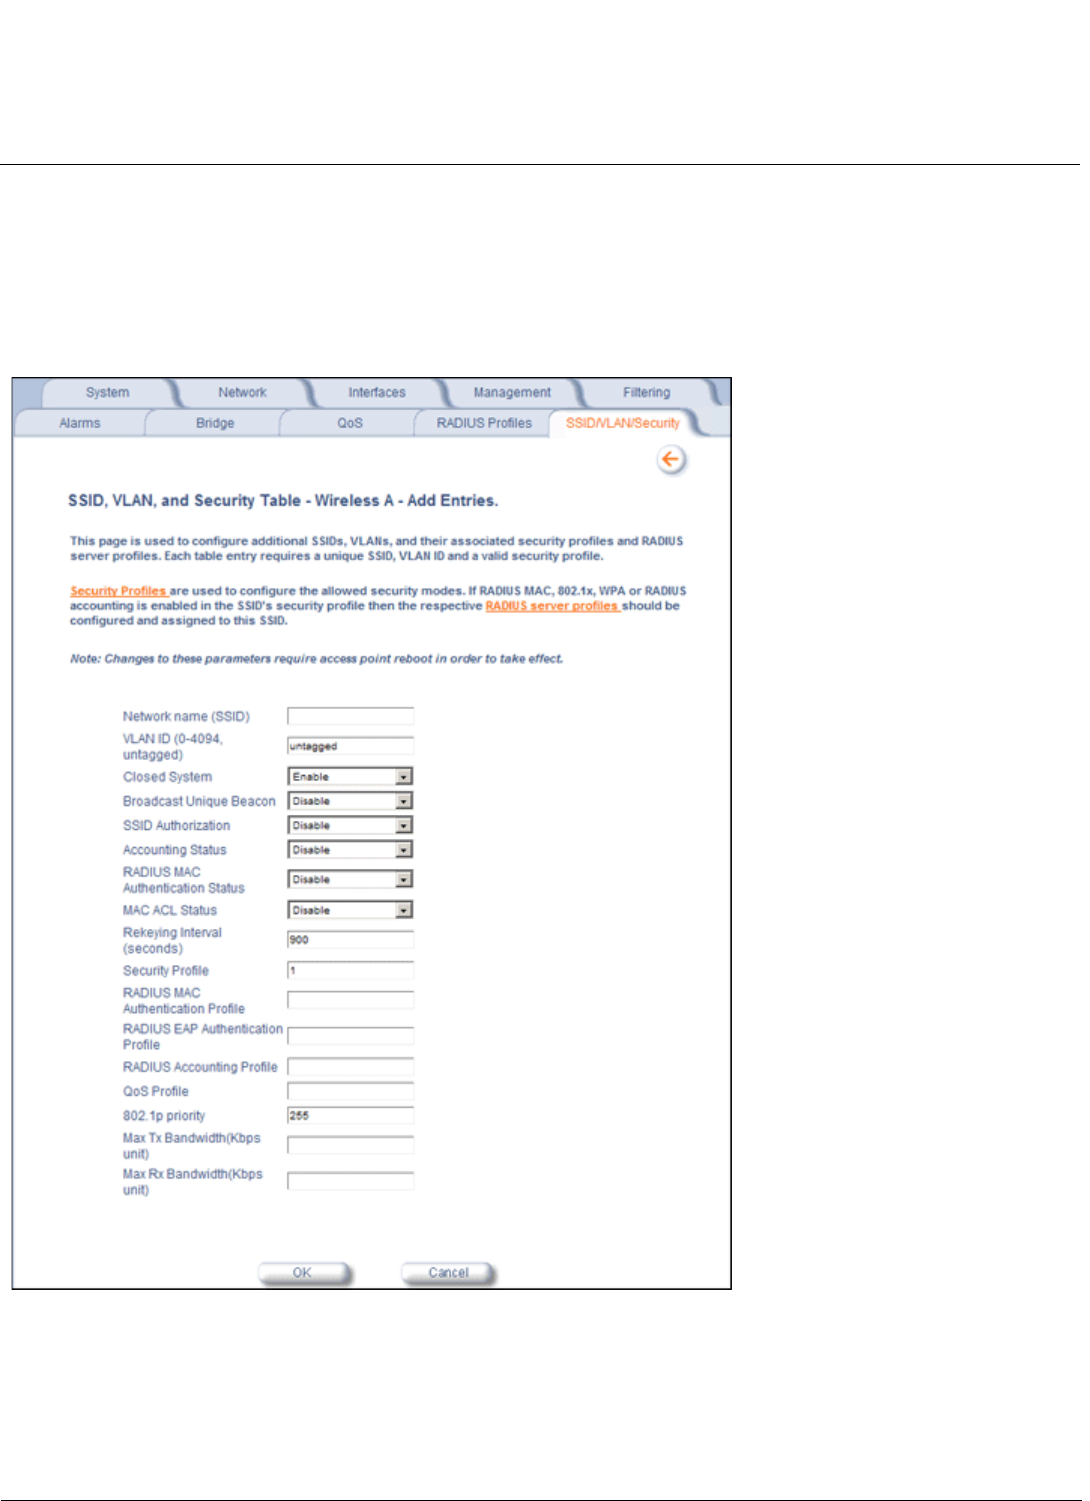
Configuration MeshMAX 5054 Series User Guide
Advanced Configuration of Mesh and Access Point Module
189
Figure 6-56 SSID/VLAN Configuration (VLAN Tagging Enabled)
NOTE: If you disable (uncheck) the Enable Security per SSID option, you will be able to add multiple SSID/VLANs,
but the same configuration parameters (described below) will applied to all of them.
3. Click Add to configure additional SSIDs, VLANs, and their associated security profiles and RADIUS server profiles, or
click Edit to modify existing SSIDs.
The Add Entries or Edit Entries screen appears.
Figure 6-57 SSID/VLAN Edit Entries Screen (VLAN Tagging Enabled)
4. Enter a unique Network Name (SSID) between 1 and 32 characters. This parameter is mandatory.
NOTE: Do not use quotation marks (single or double) in the Network Name; this will cause the AP to misinterpret the
name.
5. Enter a unique VLAN ID. This parameter is mandatory.

Configuration MeshMAX 5054 Series User Guide
Advanced Configuration of Mesh and Access Point Module
190
• A VLAN ID is a number from -1 to 4094. A value of -1 means that an entry is “untagged.”
• You can set the VLAN ID to “-1” or “untagged” if you do not want clients that are using a specific SSID to be
members of a VLAN workgroup. Only one “untagged” VLAN ID is allowed per interface.
• The VLAN ID must match an ID used by your network; contact your network administrator if you need assistance
defining the VLAN IDs.
6. Select the status of Closed System to control whether the SSID is advertised in the beacon and manage the way
probe requests are handled, as follows:
•Enable: The SSID is not advertised in the beacon, and the AP will respond to probe requests with an SSID only if
the client has specified the SSID in the probe request. If the client sends a probe request with a null or “ANY”
SSID, the AP will not respond.
•Partial: The SSID is advertised in the beacon, and the AP will not respond to "ANY" SSID requests. The Partial
setting reduces network traffic by eliminating the repeated broadcast of SSIDs in probe responses.
•Disable: The SSID is advertised in the beacon, and the AP will respond with each configured SSID, whether or
not an SSID has been specified in the probe request.
7. Enable Broadcast Unique Beacon using the drop-down menu. When enabled, Broadcast Unique Beacon allows the
broadcast of a up to four unique beacons when the AP is configured for multiple SSIDs. If Closed System (above) is
set to Partial or Disable, each beacon (up to four) will be broadcast a single SSID. If more than four SSIDs are
configured, then three SSIDs will be broadcast in individual beacons; the fourth and subsequent SSIDs will be
combined in one beacon and will not be broadcast. If Closed System is set to Enable, the SSID will not be broadcast
in the beacon. If Broadcast Unique Beacon is disabled, a combined beacon will be broadcast.
NOTE: Enabling Broadcast Unique Beacon will lower the throughput of the AP by 2-4%. Enabling Broadcast Unique
Beacon simultaneously with Rogue Scan will cause a drift in the beacon interval and the occasional missing of
beacons.
8. Enable or disable the SSID Authorization status from the drop-down menu. SSID Authorization is the RADIUS-based
authorization of the SSID for a particular client. The authorized SSIDs are sent as the tunnel attributes.
9. Enable or disable RADIUS accounting on the VLAN/SSID under the Accounting Status drop-down menu.
10.Enable or disable RADIUS MAC authentication status on the VLAN/SSID under the RADIUS Authentication Status
drop-down menu.
11.Enable or disable MAC Access Control List status on the VLAN/SSID under the MAC ACL Status drop-down menu.
12.Enter the Rekeying Interval in seconds (between 300 and 65525). When set to 0, this parameter is disabled. The
default is 900 seconds.
13.Enter the Security Profile used by the VLAN in the Security Profile field.
NOTE: If you have two or more SSIDs per interface using a Security Profile with a security mode of Non Secure, be
aware that security being applied in the VLAN is not being applied in the wireless network.
14.Define the RADIUS Server Profile Configuration for the VLAN/SSID:
• RADIUS MAC Authentication Profile
• RADIUS EAP Authentication Profile
• RADIUS Accounting Profile
If 802.1x, WPA, or 802.11i security mode is used, the RADIUS EAP Authentication Profile must have a value.
A RADIUS Server Profile for authentication for each VLAN shall be configured as part of the configuration options for
that VLAN. RADIUS profiles are independent of VLANs. The user can define any profile to be the default and
associate all VLANs to that profile. Four profiles are created by default, “MAC Authentication”, “EAP Authentication”,
Accounting”, and “Management”.
15.Specify a QoS Profile.
16.Set the 802.1p Priority given to packets tagged with this VLAN ID. Enter a number between 0-7.
17.Set the Maximum TX Bandwidth in Kbps. If this parameter is set to 0, full bandwidth is available.
18.Set the Maximum RX Bandwidth in Kbps. If this parameter is set to 0, full bandwidth is available.

Configuration MeshMAX 5054 Series User Guide
Advanced Configuration of Mesh and Access Point Module
191
19.If editing an entry, enable or disable the parameters on this page using Status drop-down menu. If adding a new entry,
this drop-down menu will not appear.
20.Reboot the AP.

192
MeshMAX 5054 Series User Guide
7
Monitoring
This chapter has the following information:
Monitoring Options for Subscriber Module
•Wireless
–General
–WORP
•ICMP
•Per Station
•Features
•Link Test
•Interfaces
•IP ARP Table
•IP Routes
•Learn Table
•RIP
Monitoring Options for Mesh and Access Point Module
•Version
•ICMP
•IP/ARP Table
•Learn Table
•IAPP
•RADIUS
•Interfaces
–Description of Interface Statistics
•Station Statistics
–Description of Station Statistics
•Mesh Statistics
–Topology
–Neighbors
–Link Statistics
–Link Test
Monitoring Options for Subscriber Module
This section describes using the Web interface to obtain detailed information about the settings and performance of the
Subscriber module.
Click the Monitor button to access this information.
NOTE: The RIP tab is relevant only in Routing mode.
Help and Exit buttons also appear on each page of the Web interface; click the Help button to access online help; click
the Exit button to exit the application.
Monitoring MeshMAX 5054 Series User Guide
Monitoring Options for Subscriber Module
193
For an introduction to the basics of management, see Basic Management of Subscriber Module.
Wireless
General
Click Monitor >General to monitor the general performance of the wireless interface.
WORP
Click Monitor >Wireless > WORP to monitor the performance of the WORP interface.
Possible values for the Registration Last Reason field are as follows:
Monitoring MeshMAX 5054 Series User Guide
Monitoring Options for Subscriber Module
194
• None (successful registration)
• Maximum number of SUs reached
• Authentication failure
• Roaming
• No response from SU within the Registration Timeout Period
• Low Signal Quality
ICMP
Click Monitor > ICMP to view the number of ICMP messages sent and received by the Subscriber unit. It includes ping,
route, and host unreachable messages.
Per Station
Click Monitor > Per Station to view station statistics. The SU Per Station tab contains Site Survey function. When Site
Survey is activated, the SU scans all the available channels and channel bandwidths, and collects information about all
the BSUs on those channels/bandwidths.
Features
Click Monitor > Features to view the features supported on the unit.
Monitoring MeshMAX 5054 Series User Guide
Monitoring Options for Subscriber Module
195
NOTE: The Subscriber unit shows how many Ethernet hosts it supports on its Ethernet port as the “Max Users on
Satellite” parameter.
Link Test
Click Monitor >Link Test to find out which wireless stations are in range and to check their link quality.
NOTE: Link Test requires Internet Explorer version 6.0 or later. Earlier versions do not support Link Test.
Link Test for the unit reports the Signal-to-Noise Ratio (SNR) value in dB; the higher this number, the better the signal
quality. Furthermore, it reports the signal level and noise level in dBm. The latter two are approximations of the level at
which the unit receives the signal of the peer unit and the background noise.
• Clicking Explore from a BSU displays all its registered SUs.
• Clicking Explore from an SU displays only the BSU with which it is registered.
All stations displayed after “Explore” come up “Disabled.” Select a station by changing Disabled to Start and click the
Link Test button. You can change multiple stations to Start, but only the last station in the list is displayed as the remote
partner when you click the Link Test button.
The Link Test provides SNR, Signal, and Noise information for both, the local and the remote unit’s levels. Link Test
stops when you close the Link Test page.

Monitoring MeshMAX 5054 Series User Guide
Monitoring Options for Subscriber Module
196
Interfaces
Click Monitor > Interfaces to view detailed information about the IP-layer performance of the unit’s interfaces. There are
two sub-tabs: Wireless and Ethernet. The following figures show both interfaces.
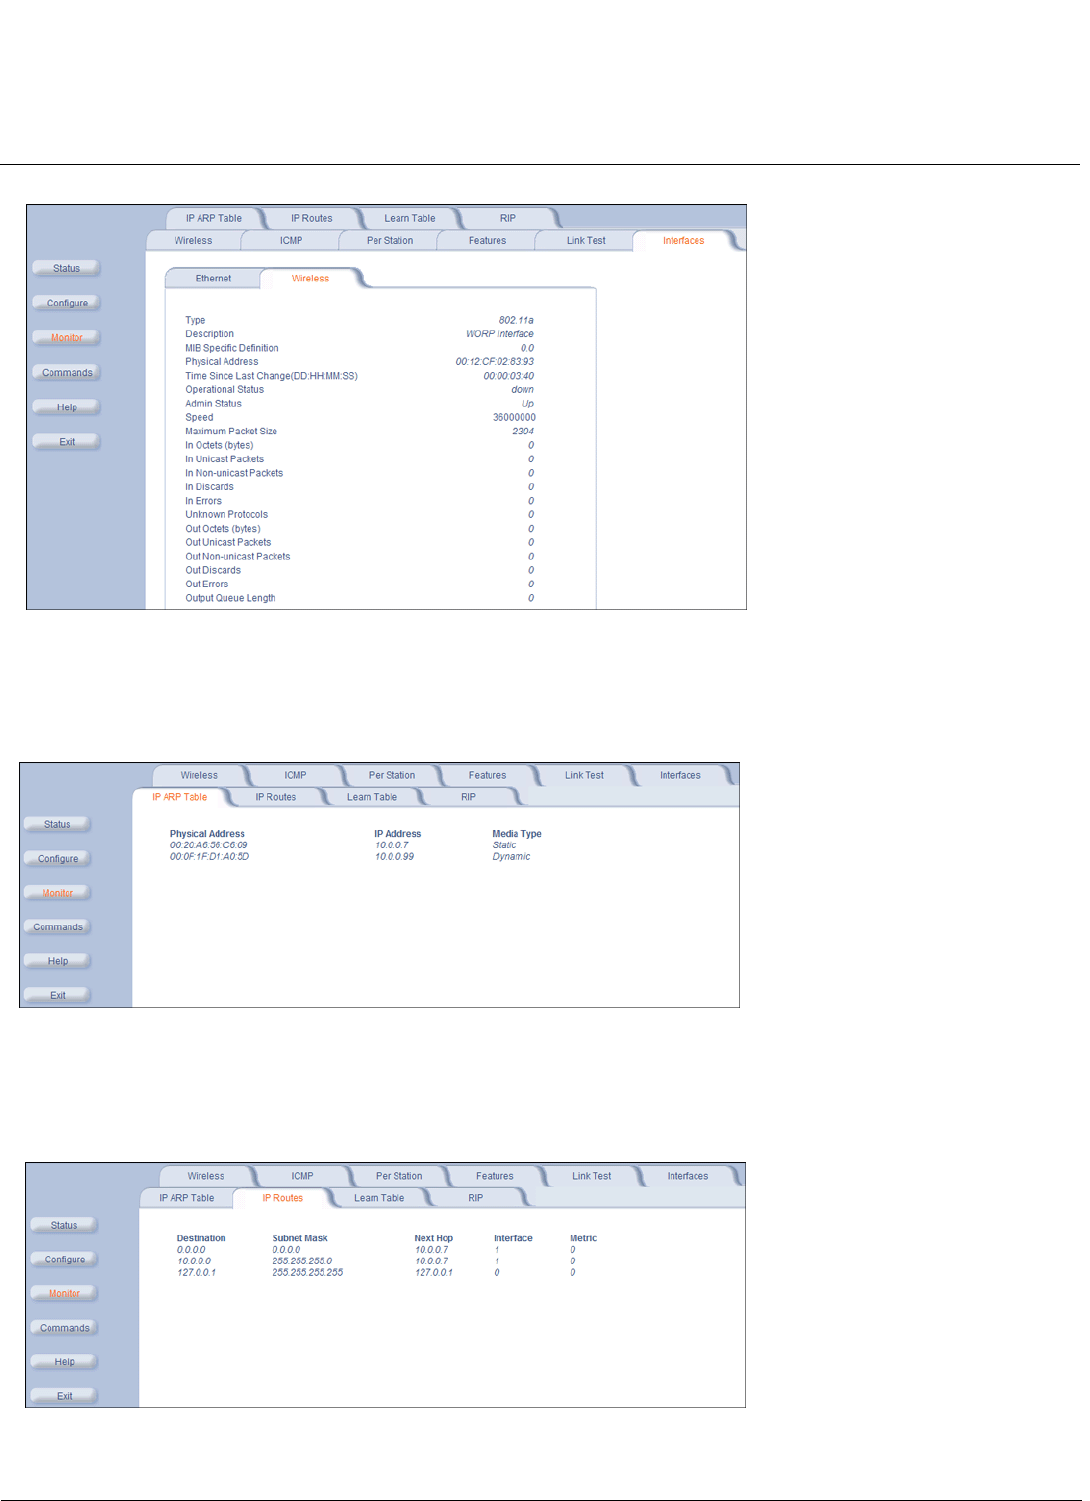
Monitoring MeshMAX 5054 Series User Guide
Monitoring Options for Subscriber Module
197
IP ARP Table
Click Monitor > IP ARP Table to view the mapping of the IP and MAC addresses of all radios registered at the
Subscriber unit. This information is based upon the Address Resolution Protocol (ARP).
IP Routes
Click Monitor > IP Routes to view all active IP routes of the Subscriber unit. These can be either static or dynamic
(obtained through RIP). This tab is available only in Routing mode, and you can add routes only when in Routing mode.
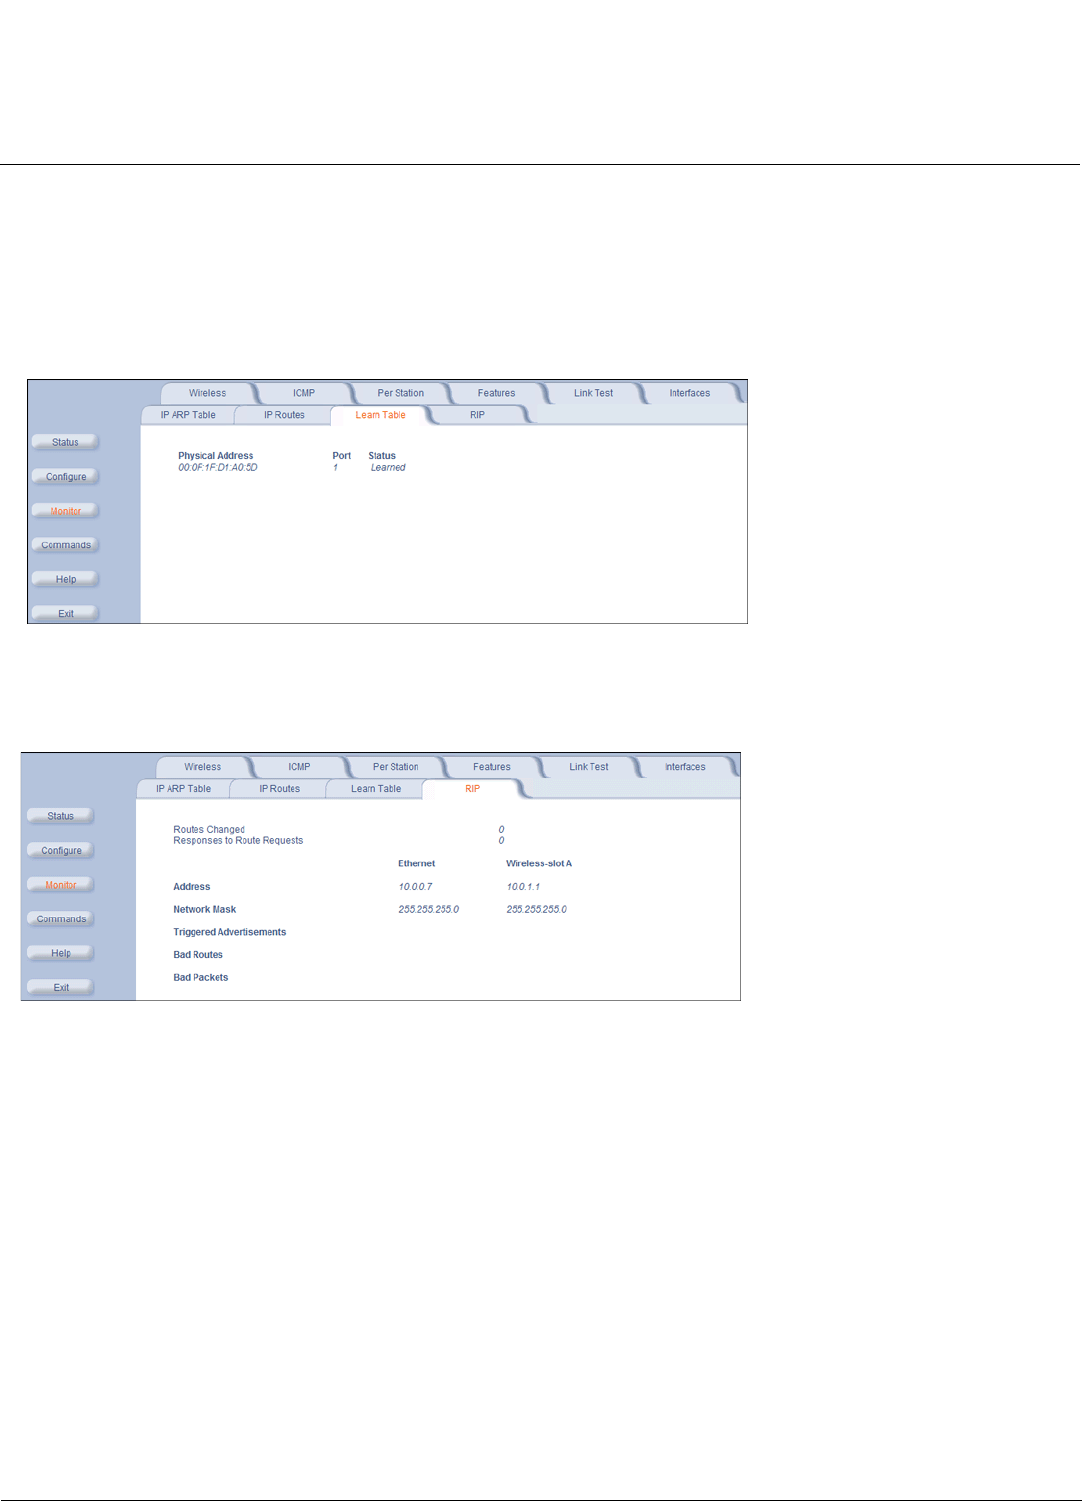
Monitoring MeshMAX 5054 Series User Guide
Monitoring Options for Mesh and Access Point Module
198
Learn Table
Click Monitor > Learn Table to view all MAC addresses the Subscriber unit has detected on an interface. The Learn
Table displays information relating to network bridging. It reports the MAC address for each node that the device has
learned is on the network and the interface on which the node was detected. There can be up to 10,000 entries in the
Learn Table.
This tab is only available in Bridge mode.
RIP
Click Monitor > RIP to view Routing Internet Protocol data for the Ethernet and Wireless interfaces.
Monitoring Options for Mesh and Access Point Module
To monitor the AP using the HTTP/HTTPS interface, you must first log in to a web browser. See Logging In for
instructions.
You may also monitor the AP using the command line interface. See Command Line Interface (CLI) for more information
To monitor the AP via HTTP/HTTPS:
1. Click the Monitor button located on the left-hand side of the screen. The main Monitor screen will be displayed.
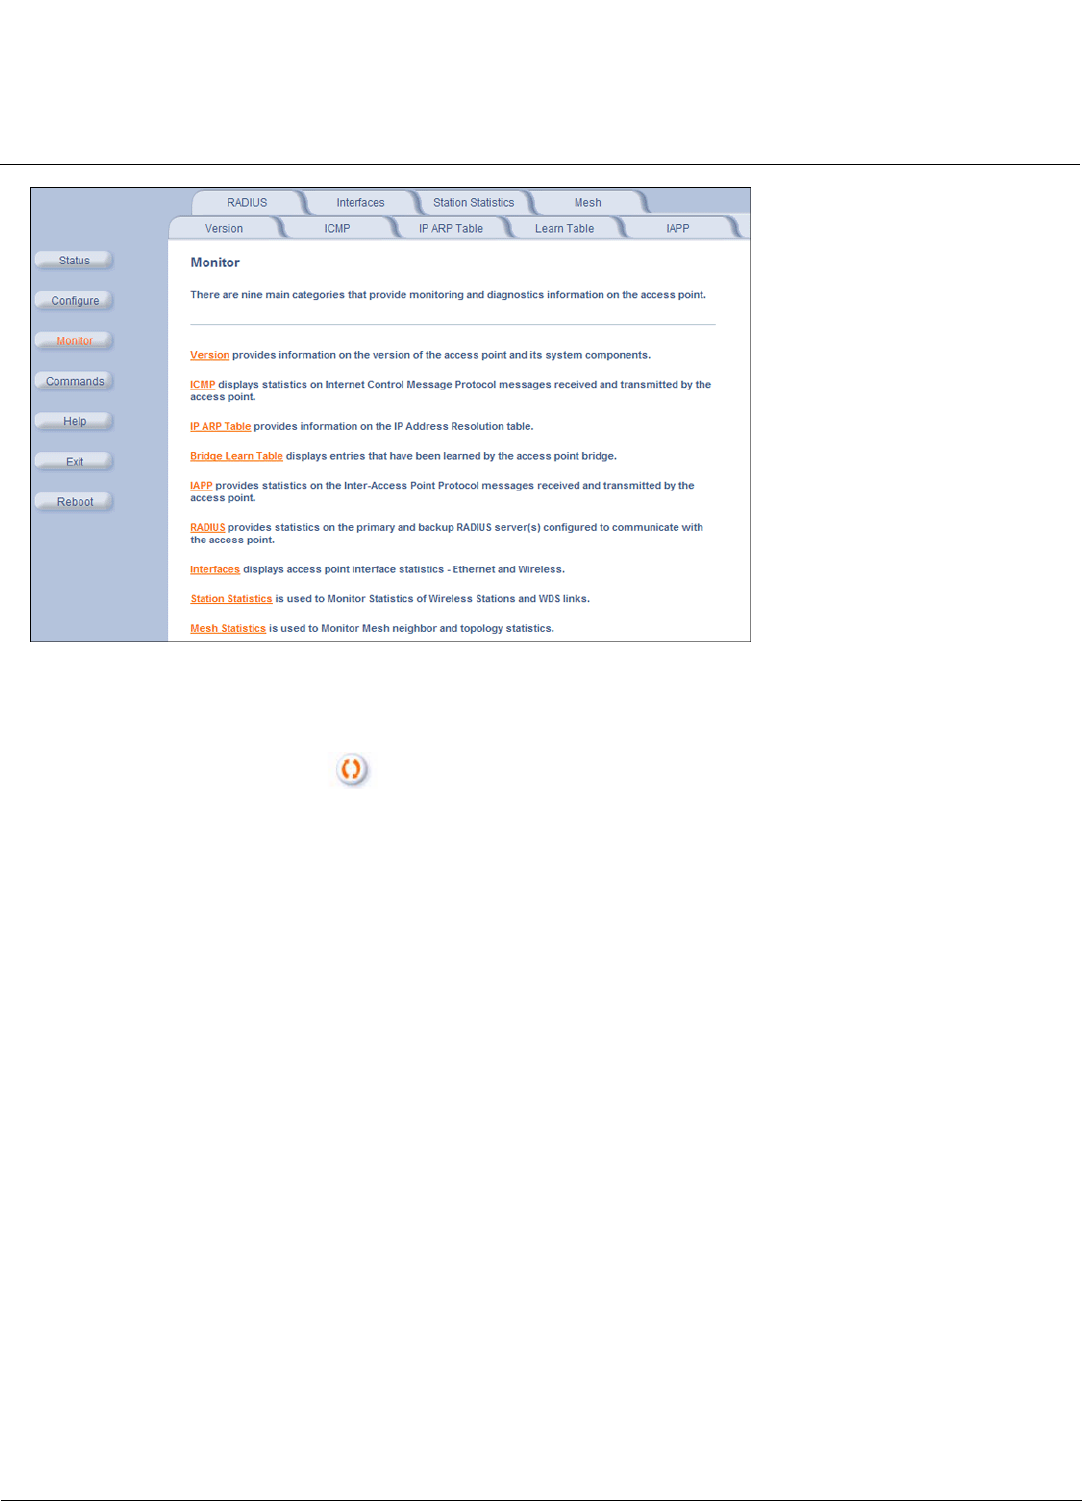
Monitoring MeshMAX 5054 Series User Guide
Monitoring Options for Mesh and Access Point Module
199
Figure 7-1 Monitor Main Screen
2. Click the tab that corresponds to the statistics you want to review. For example, click Learn Table to see the list of
nodes that the AP has discovered on the network.
3. If necessary, click the Refresh button to update the statistics.
Each Monitor tab is described in the remainder of this chapter.
Version
From the HTTP interface, click the Monitor button and select the Version tab. The list displayed provides you with
information that may be pertinent when calling Technical Support. With this information, your Technical Support
representative can verify compatibility issues and make sure the latest software are loaded. This screen displays the
following information for each Access Point component:
•Serial Number: The component’s serial number, if applicable.
•Name/ID: The AP identifies a system component based on its name or ID. Each component has a unique identifier.
•Variant: Several variants may exist of the same component (for example, a hardware component may have two
variants, one with more memory than the other).
•Version: Specifies the component’s version or build number. The Software Image version is the most useful
information on this screen for the typical end user.
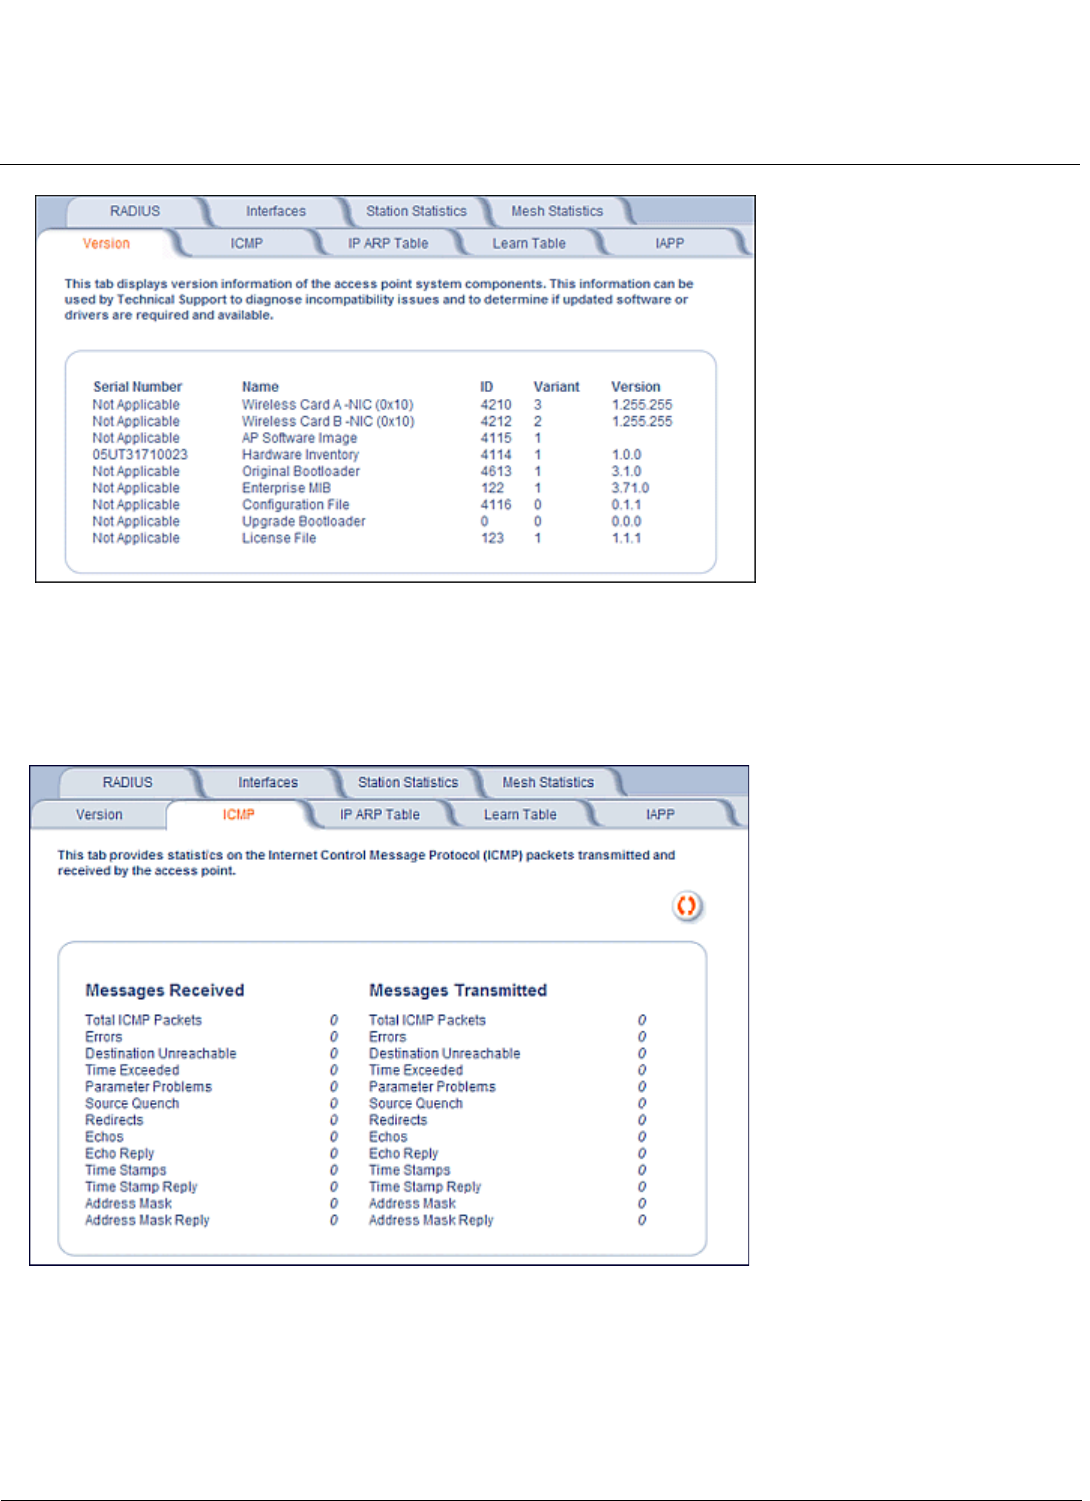
Monitoring MeshMAX 5054 Series User Guide
Monitoring Options for Mesh and Access Point Module
200
Figure 7-2 Version Monitoring Tab
ICMP
This tab provides statistical information for both received and transmitted messages directed to the AP. Not all ICMP
traffic on the network is counted in the ICMP (Internet Control Message Protocol) statistics.
Figure 7-3 ICMP Monitoring Tab
IP/ARP Table
This tab provides information based on the Address Resolution Protocol (ARP), which relates MAC Address and IP
Addresses.
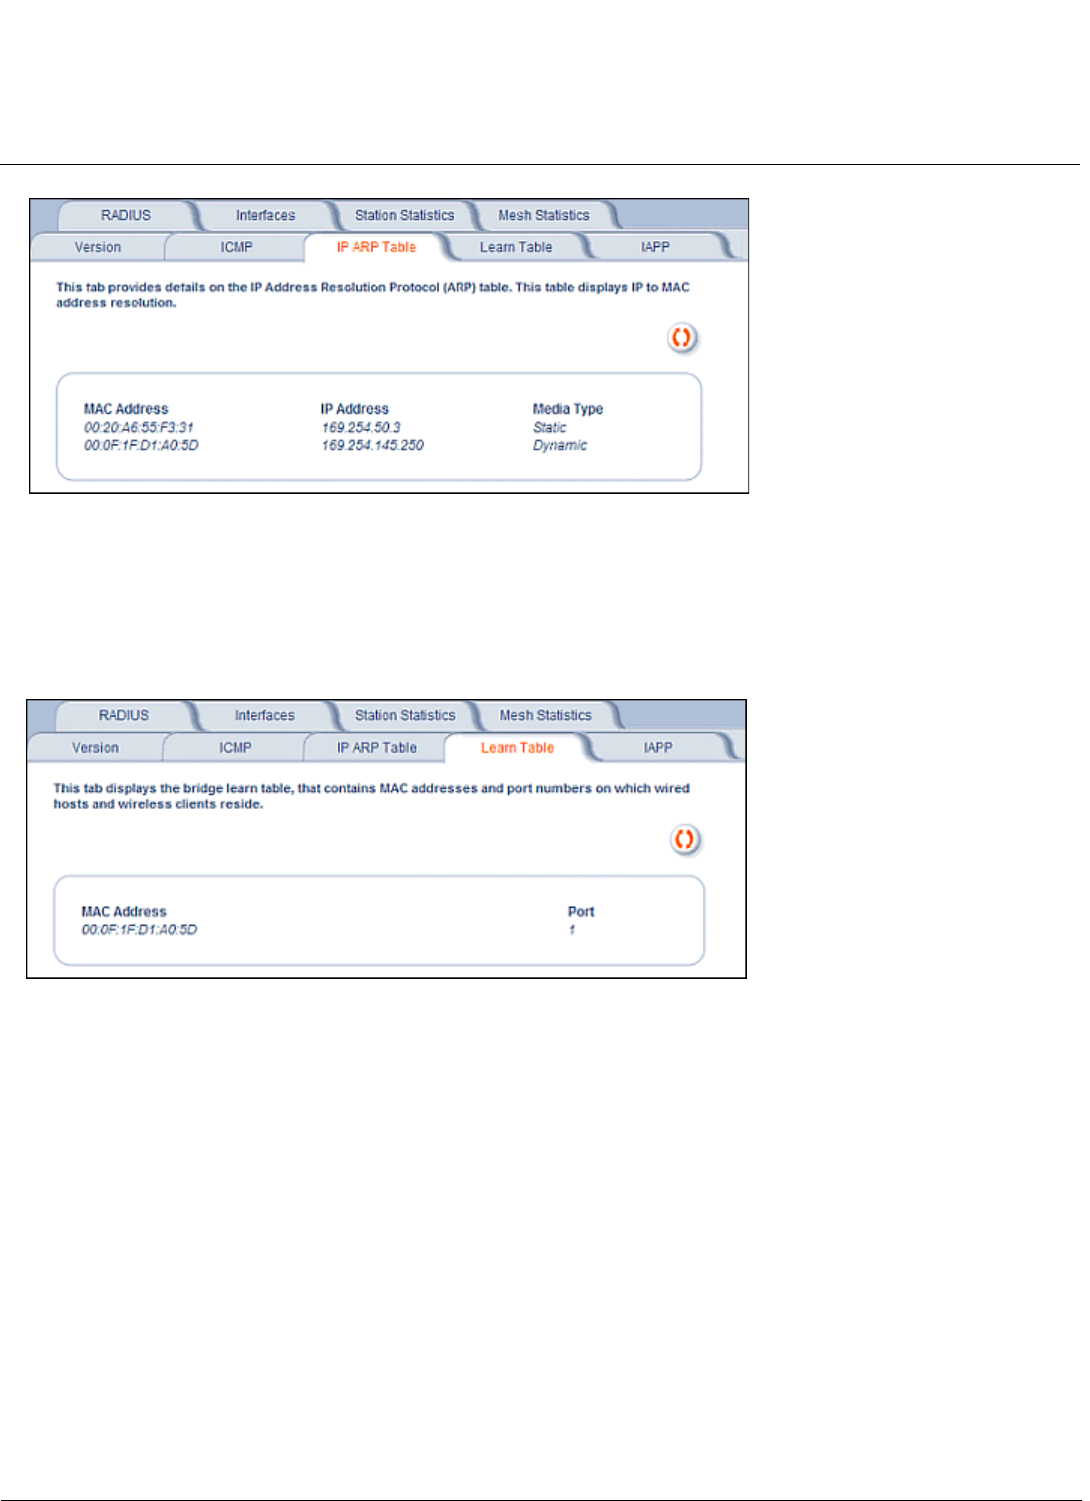
Monitoring MeshMAX 5054 Series User Guide
Monitoring Options for Mesh and Access Point Module
201
Figure 7-4 IP/ARP Table Monitoring Tab
Learn Table
This tab displays information relating to network bridging. It reports the MAC address for each node that the device has
learned is on the network and the interface on which the node was detected. There can be up 10,000 entries in the Learn
Tab le .
Figure 7-5 Learn Table Monitoring Tab
IAPP
This tab displays statistics relating to client handovers and communications between Access Points.
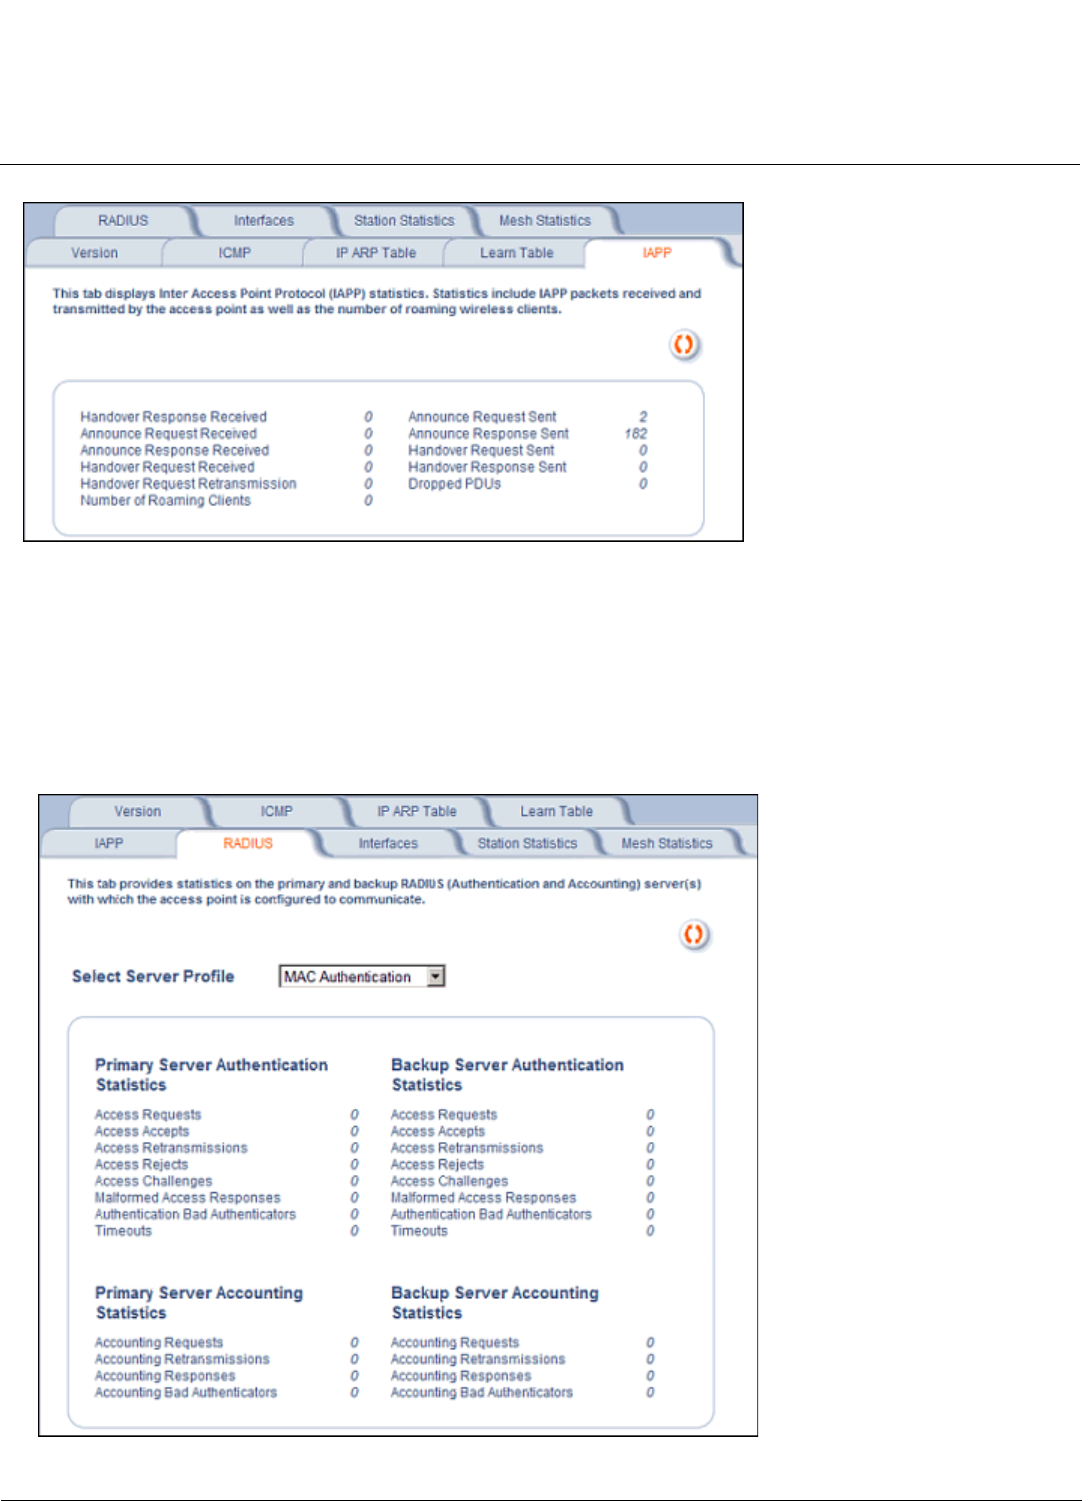
Monitoring MeshMAX 5054 Series User Guide
Monitoring Options for Mesh and Access Point Module
202
Figure 7-6 IAPP Monitoring Tab
RADIUS
This tab provides RADIUS authentication, EAP/802.1x authentication, and accounting information for both the Primary
and Backup RADIUS servers for each RADIUS Server Profile.
NOTE: Separate RADIUS servers can be configured for each RADIUS Server Profile.
Select the RADIUS Server Profile to view statistics on from the Select Server Profile drop-down menu.
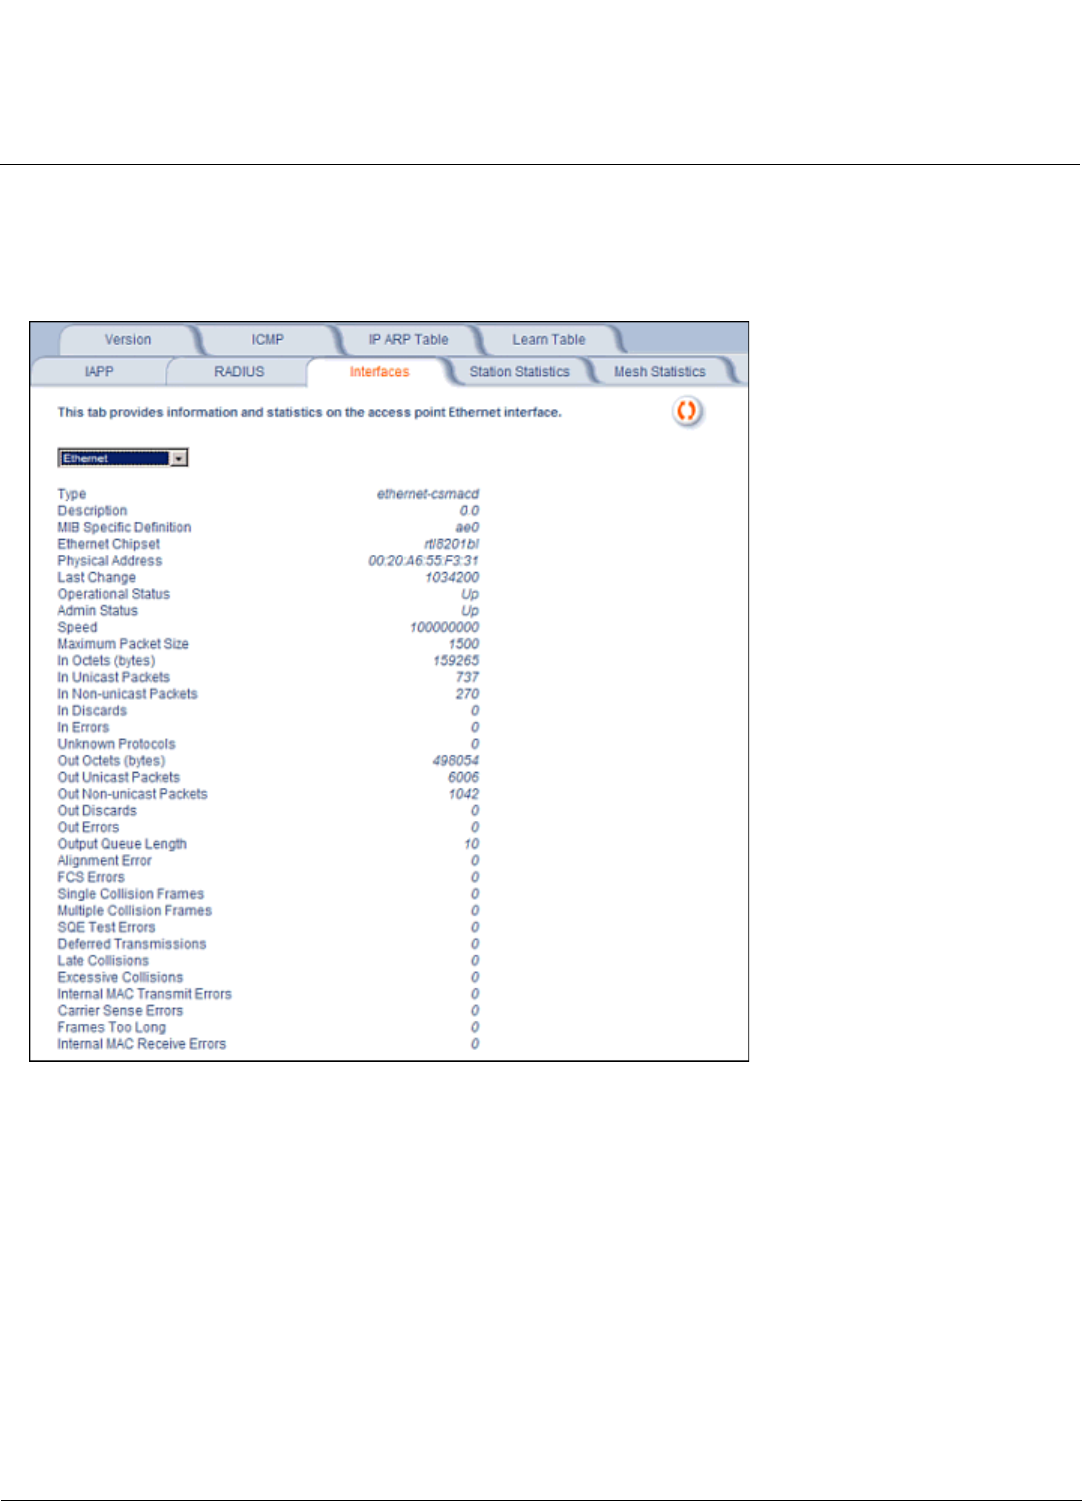
Monitoring MeshMAX 5054 Series User Guide
Monitoring Options for Mesh and Access Point Module
203
Figure 7-7 RADIUS Monitoring Tab
Interfaces
This tab displays statistics for the Ethernet and wireless interfaces.
Figure 7-8 Interface Monitoring Tab (Ethernet)
Description of Interface Statistics
The following statistics are displayed for the Ethernet interface only, either of the wireless interfaces only, or for all
interfaces:
•Admin Status (Ethernet/Wireless-Slot A/B): The desired state of the interface: Up (ready to pass packets), Down (not
ready to pass packets, or Testing (testing and unable to pass packets).
•Alignment Error (Ethernet): The number of frames received that are not an integral number of octets in length and do
not pass the Frame Check Sequence check.
•Carrier Sense Errors (Ethernet): The number of times that the carrier sense condition was lost or never asserted
when attempting to transmit a frame. The count increments at most once per transmission attempt.
•Deferred Transmission (Ethernet): The number of frames for which the first transmission attempt is delayed because
the medium is busy.This number does not include frames involved in collisions.

Monitoring MeshMAX 5054 Series User Guide
Monitoring Options for Mesh and Access Point Module
204
•Description (Ethernet/Wireless-Slot A/B): Information about the interface (e.g., the name of the manufacturer, the
product name and the version of the hardware interface).
•Duplicate Frame Count (Wireless-Slot A/B): The number of duplicate frames received.
•Ethernet Chipset (Ethernet): Identifies the chipset used to realize the interface.
•Excessive Collisions (Ethernet): The number of frames for which transmission fails due to excessive collisions.
•Failed ACK Count (Wireless-Slot A/B): The number of times an acknowledgment (or ACK) is not received when
expected.
•Failed Count (Wireless-Slot A/B): The number of packets not transmitted successfully due to too many transmit
attempts.
•Failed RTS Count (Wireless-Slot A/B): The number of times a Clear to Send (CTS) is not received in response to a
Request to Send (RTS).
•FCS Error (Wireless-Slot A/B): The number of Frame Check Sequence errors detected in received MAC Protocol
Data Units (MPDUs).
•FCS Errors (Ethernet): The number of frames received that are an integral number of octets in length but do not pass
the Frame Check Sequence check.
•Frames Too Long (Ethernet): The number of frames received that exceed the maximum permitted frame size.
•In Discards (Ethernet/Wireless-Slot A/B): The number of error-free inbound packets that were chosen to be
discarded to prevent their being deliverable to a higher-layer protocol. One possible reason for discarding such a
packet could be to free up buffer space.
•In Errors (Ethernet/Wireless-Slot A/B): The number of inbound packets that contained errors preventing them from
being deliverable to a higher-layer protocol.
•In Non-unicast Packets (Ethernet/Wireless-Slot A/B): The number of non-unicast (i.e., subnetwork-broadcast or
subnetwork-multicast) packets delivered to a higher-layer protocol.
•In Octets (bytes) (Ethernet/Wireless-Slot A/B): The total number of octets received on the interface, including framing
characters.
•In Unicast Packets (Ethernet/Wireless-Slot A/B): The number of subnetwork unicast packets delivered to a
higher-layer protocol.
•Internal MAC Receive Errors (Ethernet): The number of frames for which reception fails due to an internal MAC
sublayer transmit error. A frame is only counted if it is not counted by the Frames Too Long, Alignment Error, or FCS
Error counters.
•Internal MAC Transmit Errors (Ethernet): The number of frames for which transmission fails due to an internal MAC
sublayer transmit error. A frame is only counted if it is not counted by Late Collision, Excession Collision, or Carrier
Sense Error counters.
•Last Change (Ethernet/Wireless-Slot A/B): The value of the sysUpTime object at the time the interface entered its
current operational state.
•Late Collisions (Ethernet): The number of times that a collision is detected on a particular interface later than 512
bit-times into the transmission of a packet
•MAC Address (Wireless-Slot A/B): The station's assigned, unique MAC address,
•Maximum Packet Size (Ethernet/Wireless-Slot A/B): The size (in octets) of the largest datagram which can be
sent/received
•MIB Specific Definition (Ethernet/Wireless-Slot A/B): A reference to MIB definitions specific to the particular media
being used to realize the interface. For example, if the interface is an Ethernet interface, then this field refers to a
document defining objects specific to ethernet.
•Multicast Received Frame Count (Wireless-Slot A/B): The number of multicast packets received.
•Multicast Transmitted Frame Count (Wireless-Slot A/B): The number of multicast packets transmitted.
•Multiple Collision Frames (Ethernet): The number of successfully transmitted frames for which transmission is
inhibited by more than one collision.

Monitoring MeshMAX 5054 Series User Guide
Monitoring Options for Mesh and Access Point Module
205
•Multiple Retry Count (Wireless-Slot A/B): The number of packets successfully transmitted after more than one
retransmission.
•Operational Status (Ethernet/Wireless-Slot A/B): The current state of the interface: Up (ready to pass packets),
Down (not ready to pass packets, or Testing (testing and unable to pass packets).
•Out Discards (Ethernet/Wireless-Slot A/B): The number of error-free outbound packets chosen to be discarded to
prevent their being transmitted. One possible reason for discarding such a packet could be to free up buffer space.
•Out Errors (Ethernet/Wireless-Slot A/B): The number of outbound packets that could not be transmitted because of
errors.
•Out Non-unicast Packets (Ethernet/Wireless-Slot A/B): The total number of packets that higher-level protocols
requested be transmitted to a non-unicast (i.e., a subnetwork-broadcast orsubnetwork-multicast) address, including
those that were discarded or not sent.
•Out Octets (bytes) (Ethernet/Wireless-Slot A/B): The total number of octets transmitted out of the interface, including
framing characters.
•Out Unicast Packets (Ethernet/Wireless-Slot A/B): The total number of packets that higher-level protocols requested
be transmitted to a subnetwork-unicast address, including those that were discarded or not sent.
•Output Queue Length (Ethernet/Wireless-Slot A/B): The length of the output packet queue (in packets).
•Physical Address (Ethernet): The interface's address at the protocol layer immediately below the network layer in the
protocol stack.
•Received Fragment Count (Wireless-Slot A/B): The number of successfully received Data or Management MAC
Protocol Data Units (MPDUs).
•Retry Count (Wireless-Slot A/B): The number of packets successfully transmitted after one or more retransmissions.
•Single Collision Frames (Ethernet): The number of successfully transmitted frames for which transmission is
inhibited by exactly one collision
•Speed (Ethernet/Wireless-Slot A/B): An estimate of the interface's current bandwidth in bits per second.
•SQE Test Errors (Ethernet): The number of times that the Signal Quality Error (SQE) Test Error message is
generated by the physical layer signalling (PLS) sublayer.
•Successful RTS Count (Wireless-Slot A/B): The number of times a Clear to Send (CTS) is received in response to
an Request to Send (RTS).
•Transmitted Fragment Count (Wireless-Slot A/B): The number of transmitted fragmented packets.
•Transmitted Frame Count (Wireless-Slot A/B): This number of successfully transmitted packets.
•Type (Ethernet/Wireless-Slot A/B): The type of interface, distinguished according to the physical/link protocol(s)
immediately below the network layer in the protocol stack.
•Unknown Protocols (Ethernet/Wireless-Slot A/B): The number of packets received that were discarded because of
an unknown or unsupported protocol.
•WEP Undecryptable Count (Wireless-Slot A/B): The number of undecryptable WEP frames received.
Station Statistics
This tab displays information on wireless clients attached to the AP and on Wireless Distribution System.
Enable the Monitoring Station Statistics feature (Station Statistics are disabled by default) by checking Enable
Monitoring Station Statistics and click OK.
You do not need to reboot the AP for the changes to take effect. If clients are connected to the device or WDS links are
configured for the device, the statistics will now be shown on the screen. Click Select to view the more detailed statistics
for a client.
Click on the Refresh button in the browser window to view the latest statistics. If any new clients associate to the AP, you
can see the statistics of the new clients after you click the refresh button.
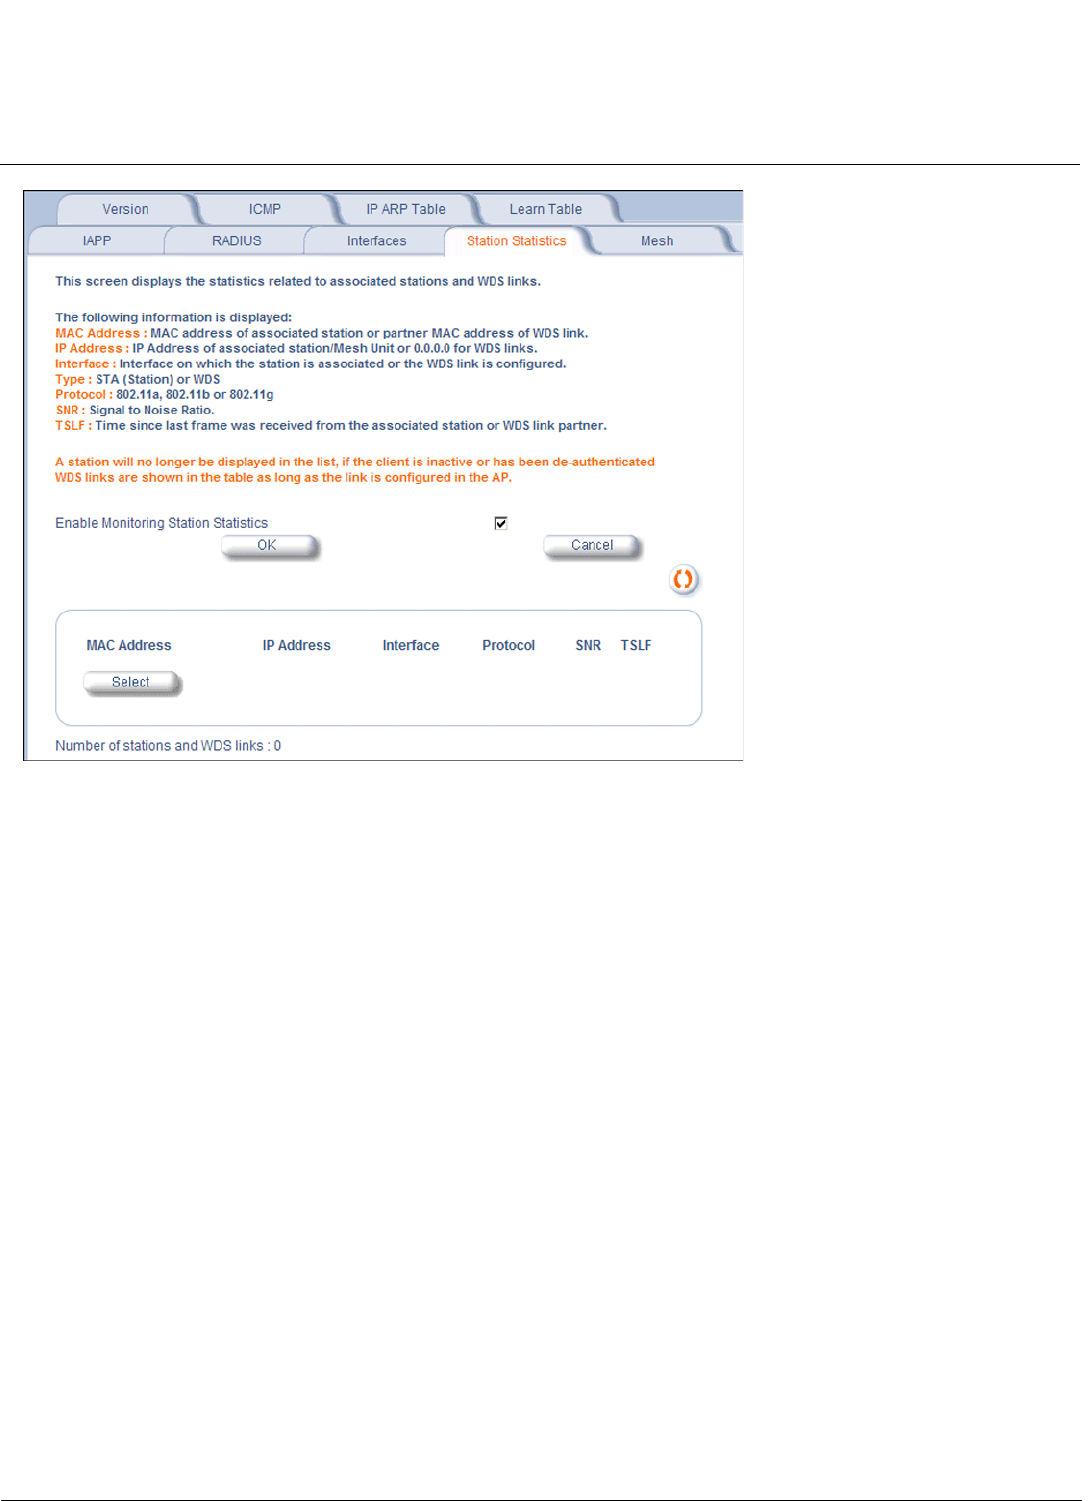
Monitoring MeshMAX 5054 Series User Guide
Monitoring Options for Mesh and Access Point Module
206
Figure 7-9 Station Statistics Monitoring Tab
Description of Station Statistics
The following stations statistics are displayed:
•MAC Address: The MAC address of the wireless client for which the statistics are gathered. For WDS links, this is the
partner MAC address of the link.
•IP Address: The IP address of the associated wireless station for which the Statistics are gathered. (0.0.0.0 for WDS
links)
•Interface to which the Station is connected: The interface number on which the client is connected with the AP. For
WDS links this is the interface on which the link is configured.
•Type: The type of wireless client (STA or WDS).
•MAC Protocol: The MAC protocol for this wireless client (or WDS link partner). The possible values are 802.11a, 4.9
GHz, 802.11b, 802.11g.
•Signal / Noise: The Signal /Noise Level measured at the AP when frames are received from the associated wireless
station (or WDS link partner).
•Time since Last Frame Received: The time elapsed since the last frame from the associated wireless station (or
WDS link partner) was received.
•Number of Stations and WDS Links: The number of stations and WDS links monitored.
The following stations statistics are available through SNMP:
•Octets Received: The number of octets received from the associated wireless station (or WDS link partner) by the
AP.
•Unicast Frames Received: The number of Unicast frames received from the associated wireless station (or WDS link
partner) by the AP.
•Non-Unicast Frames Received: The number of Non-Unicast frames received (i.e. broadcast or multicast) from the
associated wireless station (or WDS link partner) by the AP.
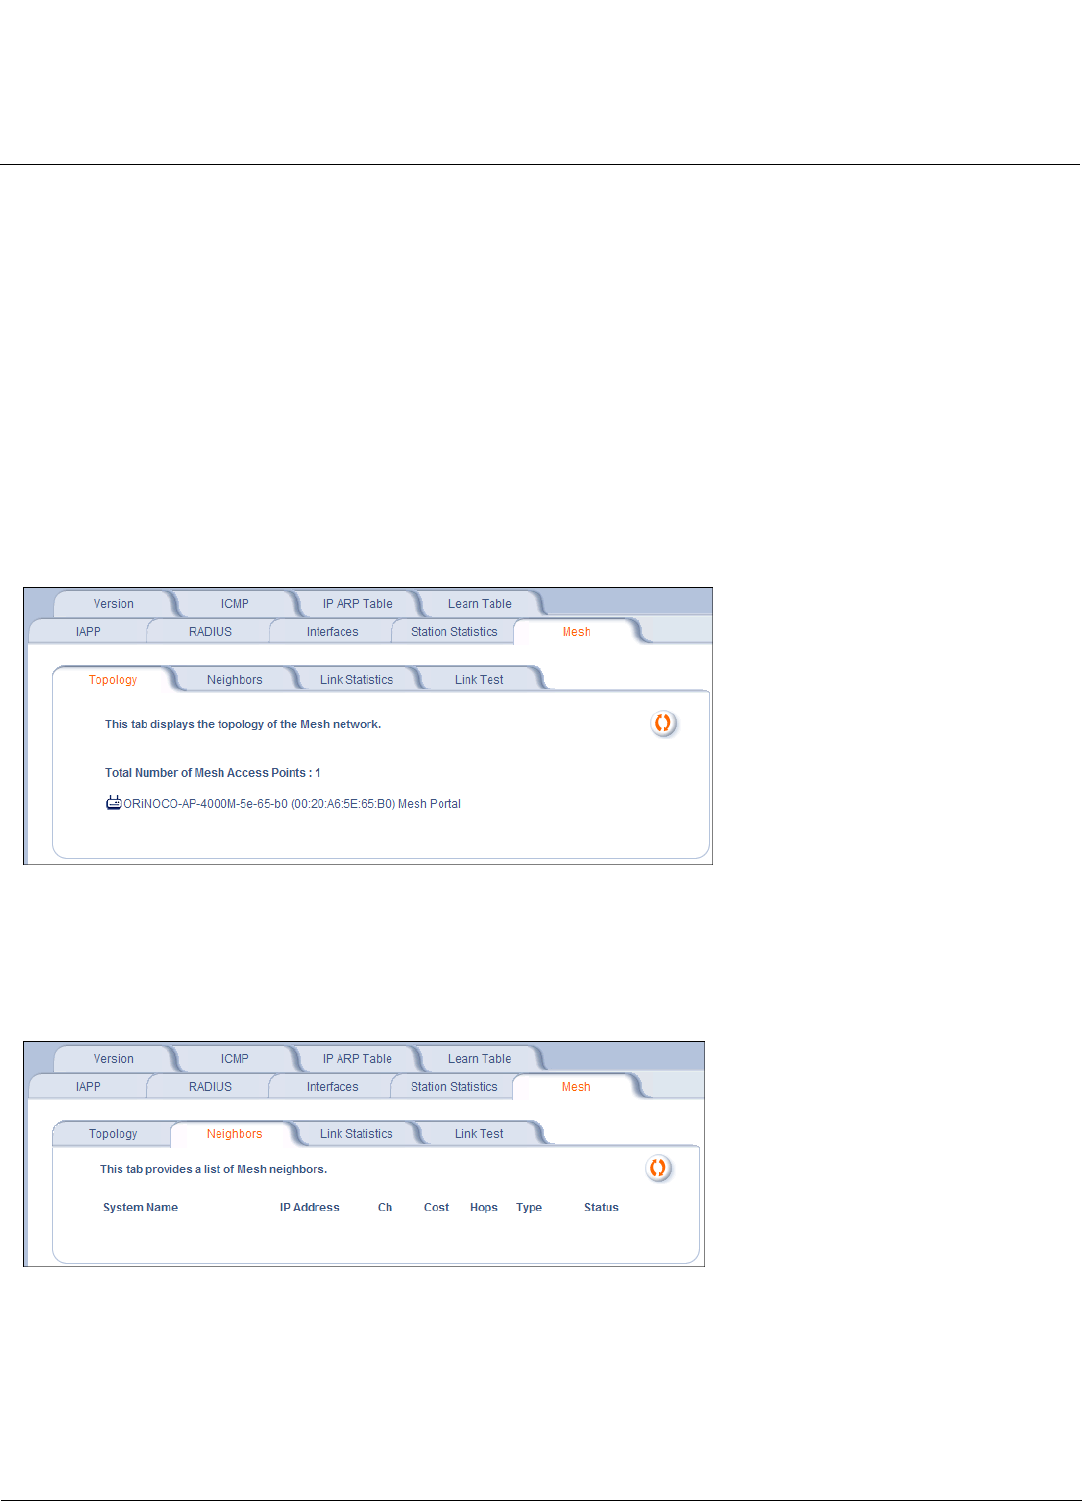
Monitoring MeshMAX 5054 Series User Guide
Monitoring Options for Mesh and Access Point Module
207
•Octets Transmitted: The number of octets sent to the associated wireless station (or WDS link partner) from the AP.
•Unicast Frames Transmitted: The number of Unicast frames transmitted to the associated wireless station (or WDS
link partner) from the AP.
Mesh Statistics
This Mesh tab and its related sub-tabs display statistics relating to Mesh functionality. See the following sections:
•Topology
•Neighbors
•Link Statistics
•Link Test
Topology
The Topology sub-tab displays the network topology of the Mesh network.
Figure 7-10 Mesh Statistics Topology Sub-Tab
Neighbors
The Neighbors sub-tab displays the system name, IP address, channel, path cost, number of hops to portal, Mesh type,
and status of all Mesh APs within range of the AP.
Figure 7-11 Mesh Statistics Neighbors Sub-Tab
Link Statistics
The Link Statistics sub-tab displays the MAC address, IP address, receive rate, transmit rate, receive errors, transmit
errors, and SNR for each Mesh link.
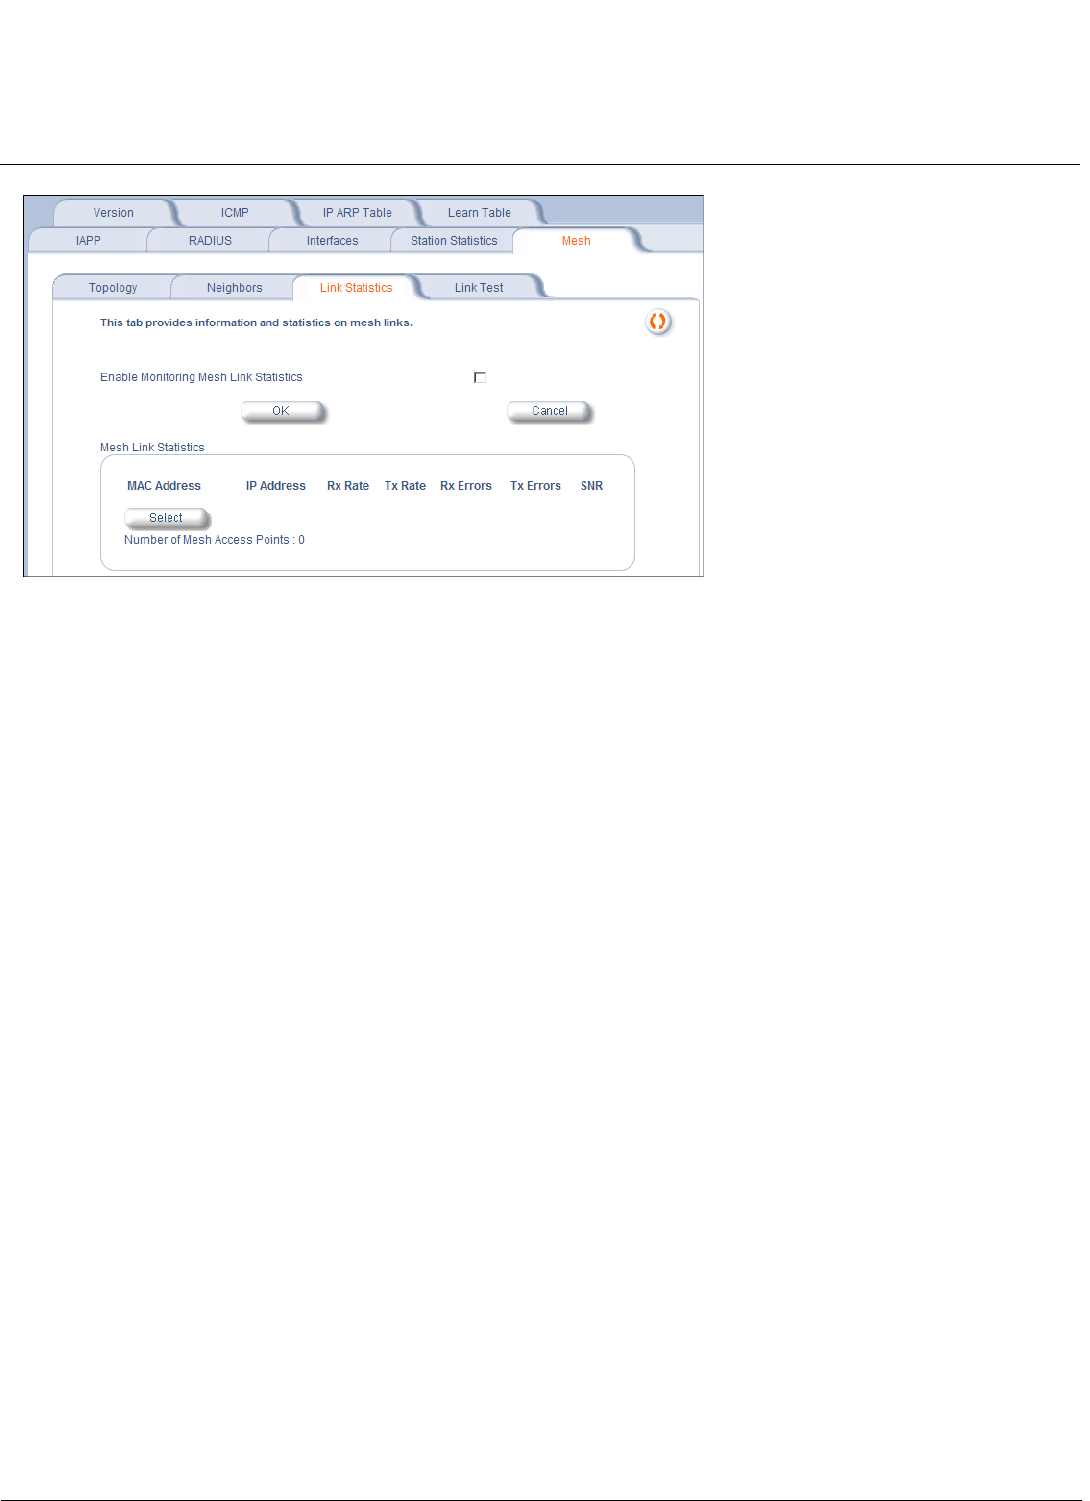
Monitoring MeshMAX 5054 Series User Guide
Monitoring Options for Mesh and Access Point Module
208
Figure 7-12 Mesh Statistics Link Statistics Sub-Tab
Link Test
The Link Test tab allows you to run two types of Mesh link tests: Tree Type or Neighbor Type.
The Tree Type link test is initiated from the Portal to any point on the Mesh tree. The Mesh units involved in the test must
be in the "Active" state
The Neighbor Type link test is initiated from any Mesh unit and to any other Mesh unit in its neighbor list the is in the
"Connected"/"Active" state. The Mesh units involved in the test must be on the same channel.
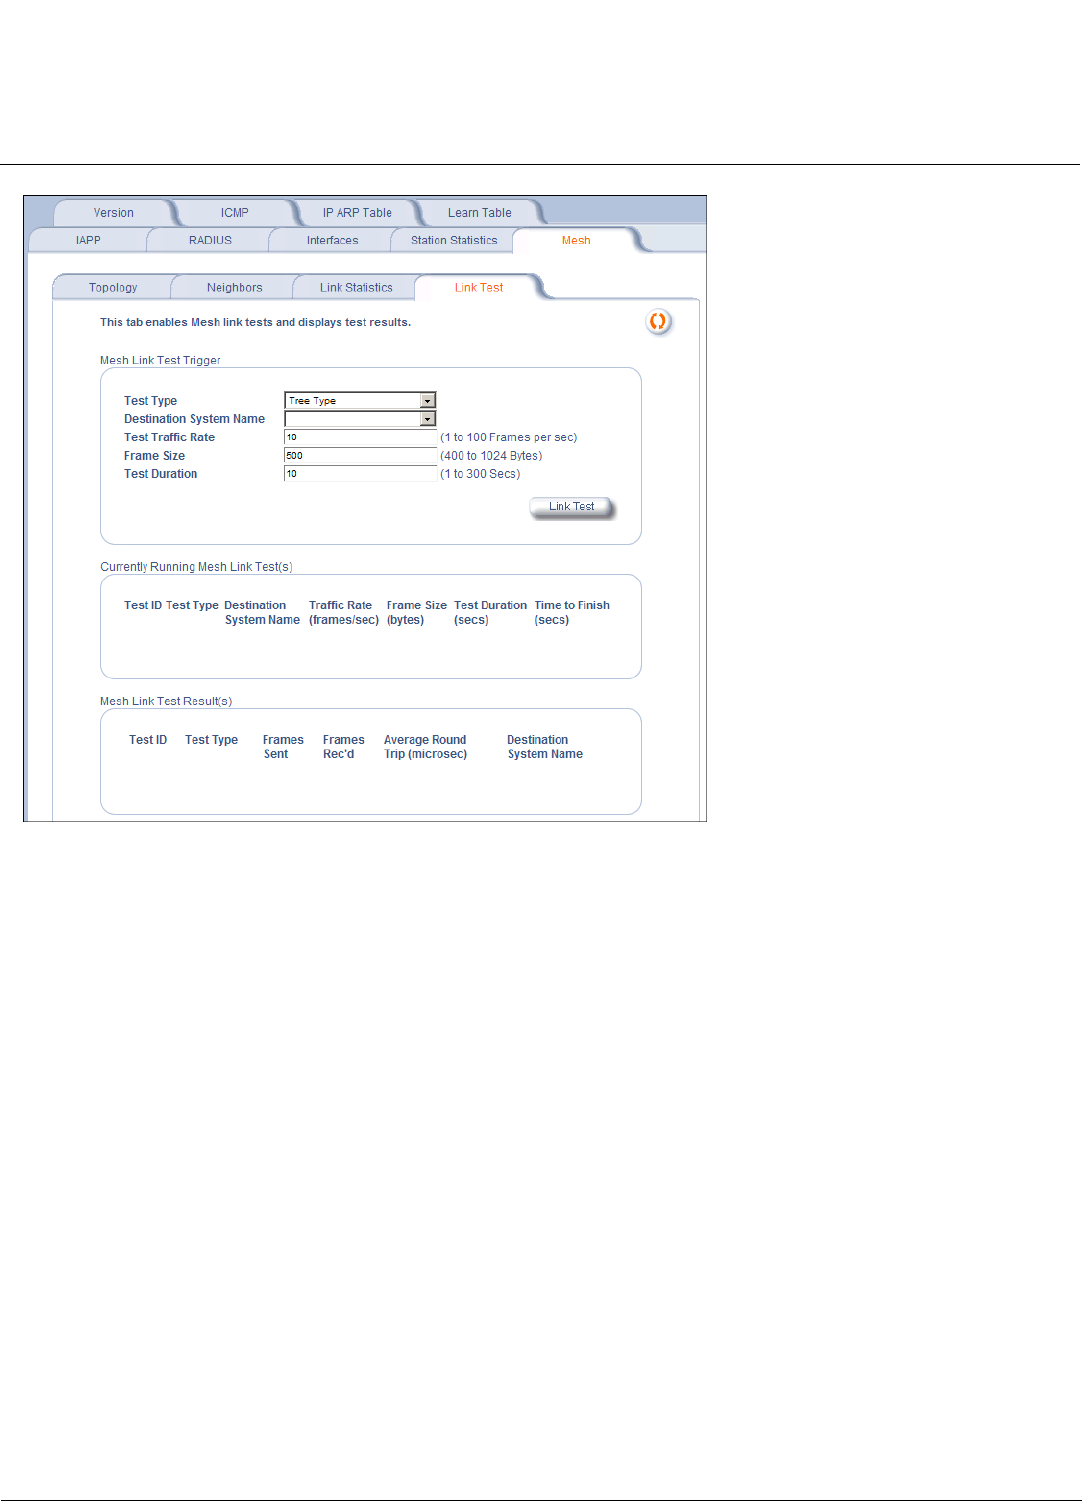
Monitoring MeshMAX 5054 Series User Guide
Monitoring Options for Mesh and Access Point Module
209
Figure 7-13 Mesh Statistics Link Test Sub-Tab
To execute a Link Test, set the following parameters:
•Test Type: Tree Type or Neighbor Type
•Destination System Name: The destination Mesh unit.
•Test Traffic Rate: The number of frames per second to test.
•Frame Size: The size of each frame in test.
•Test Duration: The duration for the entire whole test
When a test is running, it will appear in the “Currently RUnning Mesh Link Test” section of the page. The “Time to Finish”
field updates on each page refresh.
Upon completion of a test, the test will appear under the “Mesh Link Test Results” section of the page. To view full results,
select radio button of the desired test; results will be displayed in a new window., new window will open.
NOTES:
•No more 10 tests can be running and complete simultaneously. (For instance, if there are 5 tests running and 5 tests
finished, when a sixth test begins to run, the oldest result will be deleted.)
•Any topology change will delete all Tree Type tests (running or complete).

210
MeshMAX 5054 Series User Guide
8
Commands
This chapter has following information:
Command Functions for Subscriber Module
•Download
•Upload
•Reboot
•Reset
•Help Link
•Downgrade
Command Function for Mesh and Access Point Module
•Introduction to File Transfer via TFTP or HTTP
–TFTP File Transfer Guidelines
–HTTP File Transfer Guidelines
–Image Error Checking During File Transfer
•Update AP
–Update AP via TFTP
–Update AP via HTTP
•Retrieve File
–Retrieve File via TFTP
–Retrieve File via HTTP
•Reboot
•Reset
•Reset
Command Functions for Subscriber Module
This section describes the commands that you can issue with the Web Interface.
Click the Commands button to access available commands. See the following:
Help and Exit buttons also appear on each page of the Web interface; click the Help button to access online help; click
the Exit button to exit the application.
For an introduction to the basics of management, see Basic Management of Subscriber Module.
Download
Click Commands > Download to download configuration, image and license files to the unit via a TFTP server.
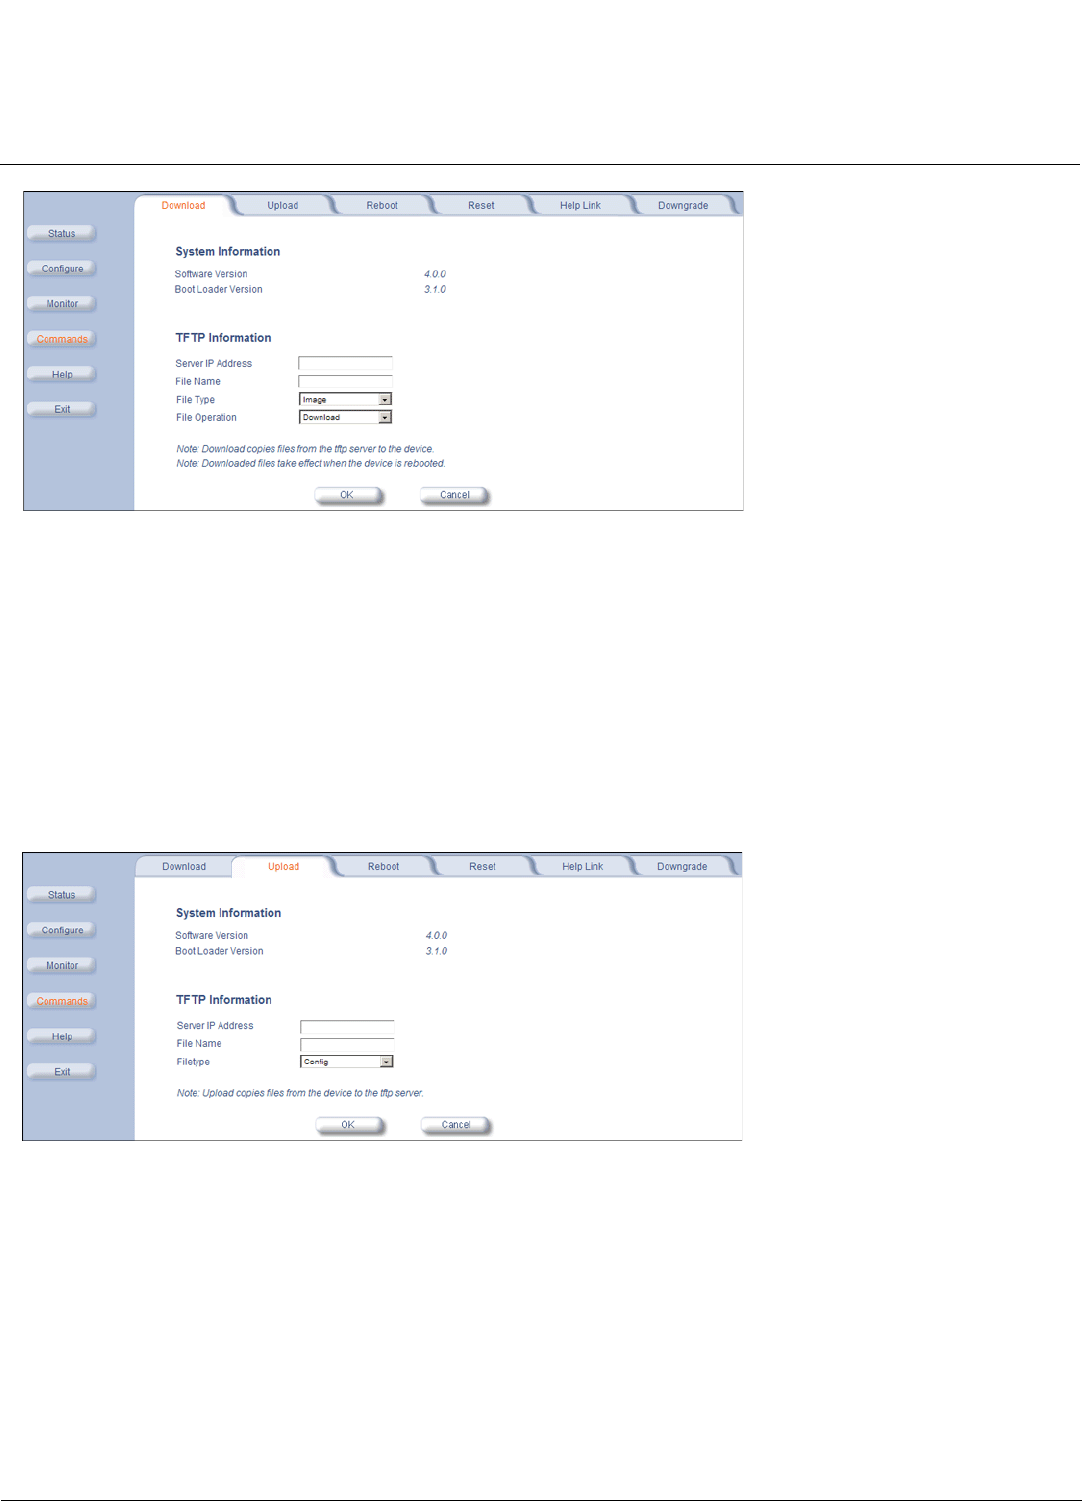
Commands MeshMAX 5054 Series User Guide
Command Functions for Subscriber Module
211
The following parameters may be configured or viewed:
•Server IP address: Enter the TFTP Server IP address.
•File Name: Enter the name of the file to be downloaded. If you are using the SolarWinds TFTP server software
located on your product installation CD, the default directory for downloading files is C:\TFTP-Root.
•File Type: Choose either Config, image, BspBl, or license.
•File Operation: Choose either Download or Download and Reboot.
Click OK to start the download.
Upload
Click Commands > Upload to upload a configuration or log file from the unit to a TFTP server.
The following parameters may be configured or viewed:
•Server IP address: Enter the TFTP Server IP address.
•File Name: Enter the name of the file to be uploaded. If you are using the SolarWinds TFTP server software located
on your product installation CD, the default directory for uploading files is C:\TFTP-Root.
•File Type: Choose either Config or Eventlog.
Click OK to start the upload.
Reboot
Click Commands >Reboot to reboot the embedded software of the Subscriber unit. Configuration changes are saved
and the unit is reset.
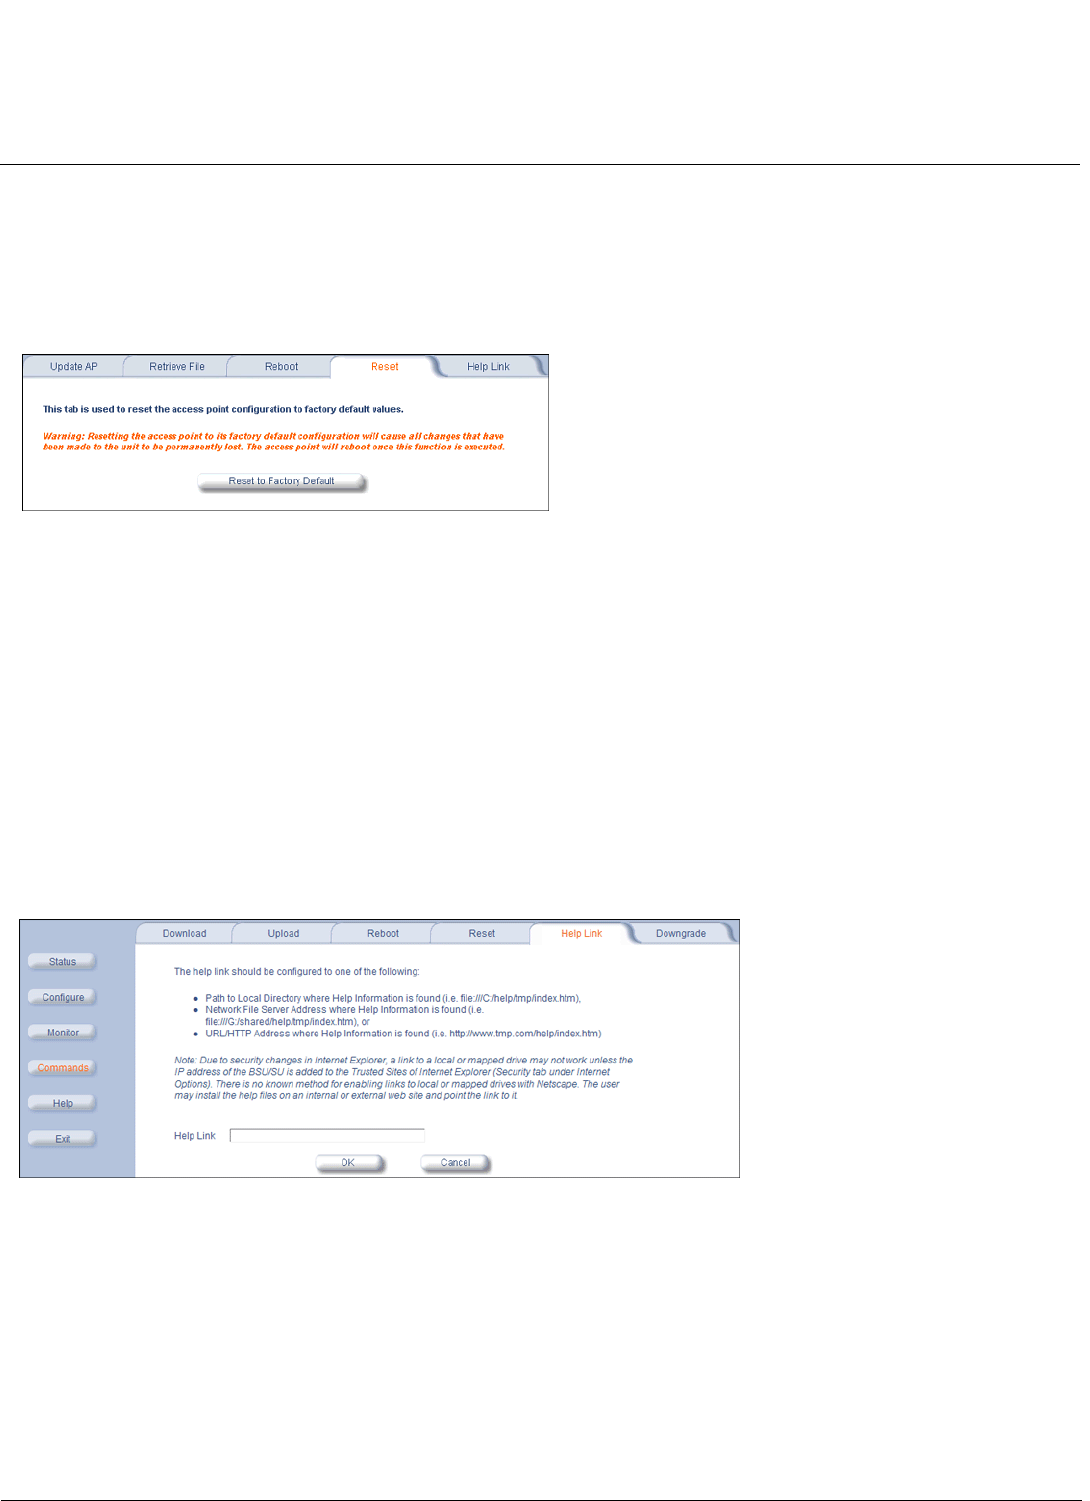
Commands MeshMAX 5054 Series User Guide
Command Functions for Subscriber Module
212
CAUTION: Rebooting the unit causes all users currently connected to lose their connection to the network until the
Subscriber unit has completed the reboot process and resumed operation.
Reset
Click Commands > Reset to restore the configuration of the Subscriber unit to the factory default values.
You can also reset the Subscriber unit by pressing the RESET button located on the side of the unit. Because this resets
the unit’s current IP address, a new IP address must be assigned.
CAUTION: Resetting the unit to its factory default configuration permanently overwrites all changes made to the unit.
The unit reboots automatically after this command has been issued.
Help Link
Click Commands>Help Link to set the location of the help files of the Web Interface. Upon installation, the help files are
installed in the C:\Program Files\Tsunami\[Model Name]\Help folder.
If you want to place these files on a shared drive, copy the Help folder to the new location and specify the new path in the
Help Link box.
Downgrade
Click Commands > Downgrade to downgrade to a previous release. Downgrade currently is supported only to release
2.0.1 and later. Once you enter this command, the unit is downgraded to the specified release and is automatically
rebooted. The filename specified and the filename of the image selected for downgrade must be the same version. The
unit will download the file, re-format the configuration to match the version, and reboot to put the image into effect.

Commands MeshMAX 5054 Series User Guide
Command Function for Mesh and Access Point Module
213
Command Function for Mesh and Access Point Module
To perform commands using the HTTP/HTTPS interface, you must first log in to a web browser. See Logging In for
instructions.
You may also perform commands using the command line interface. See CLI for Mesh and Access Point Module for
more information.
To perform commands via HTTP/HTTPS:
1. Click the Commands button located on the left-hand side of the screen.
Figure 8-1 Commands Main Screen
2. Click the tab that corresponds to the command you want to issue. For example, click Reboot to restart the unit.
Following a brief introduction to TFTP and HTTP file transfer, each Commands tab is described in the remainder of this
chapter.
Introduction to File Transfer via TFTP or HTTP
There are two methods of transferring files to or from the AP: TFTP or HTTP (or HTTPS if enabled):

Commands MeshMAX 5054 Series User Guide
Command Function for Mesh and Access Point Module
214
• Downloading files (Configuration, AP Image, Bootloader, License, Private Key, Certificate, CLI Batch File) to the AP
using one of these two methods is called “Updating the AP.”
• Uploading files (Configuration, CLI Batch File, etc) from the AP is called “Retrieving Files.”
TFTP File Transfer Guidelines
A TFTP server must be running and configured to point to the directory containing the file.
If you do not have a TFTP server installed on your system, install the TFTP server from the installation CD.
HTTP File Transfer Guidelines
HTTP file transfer can be performed either with or without SSL enabled.
HTTP file transfers with SSL require enabling Secure Management and Secure Socket Layer. HTTP transfers that use
SSL may take additional time.
NOTE: SSL requires Internet Explorer version 6, 128 bit encryption, Service Pack 1, and patch Q323308.
Image Error Checking During File Transfer
The Access Point performs checks to verify that an image downloaded through HTTP or TFTP is valid. The following
checks are performed on the downloaded image:
• Zero Image size
• Large image size
• Non VxWorks image
• AP image
• Digital signature verification
If any of the above checks fail on the downloaded image, the Access Point deletes the downloaded image and retains the
old image. Otherwise, if all checks pass successfully, the AP deletes the old image and retains the downloaded image.
These checks are to ensure that the AP does not enter an invalid image state. The storage of the two images is only
temporary to ensure the proper verification; the two images will not be stored in the AP permanently.
Image error checking functions automatically in the background. No user configuration is required.
Update AP
Update AP via TFTP
Use the Update AP via TFTP tab to download Configuration, AP Image, License file, Bootloader files, Certificate and
Private Key files, and CLI Batch File to the AP. A TFTP server must be running and configured to point to the directory
containing the file.
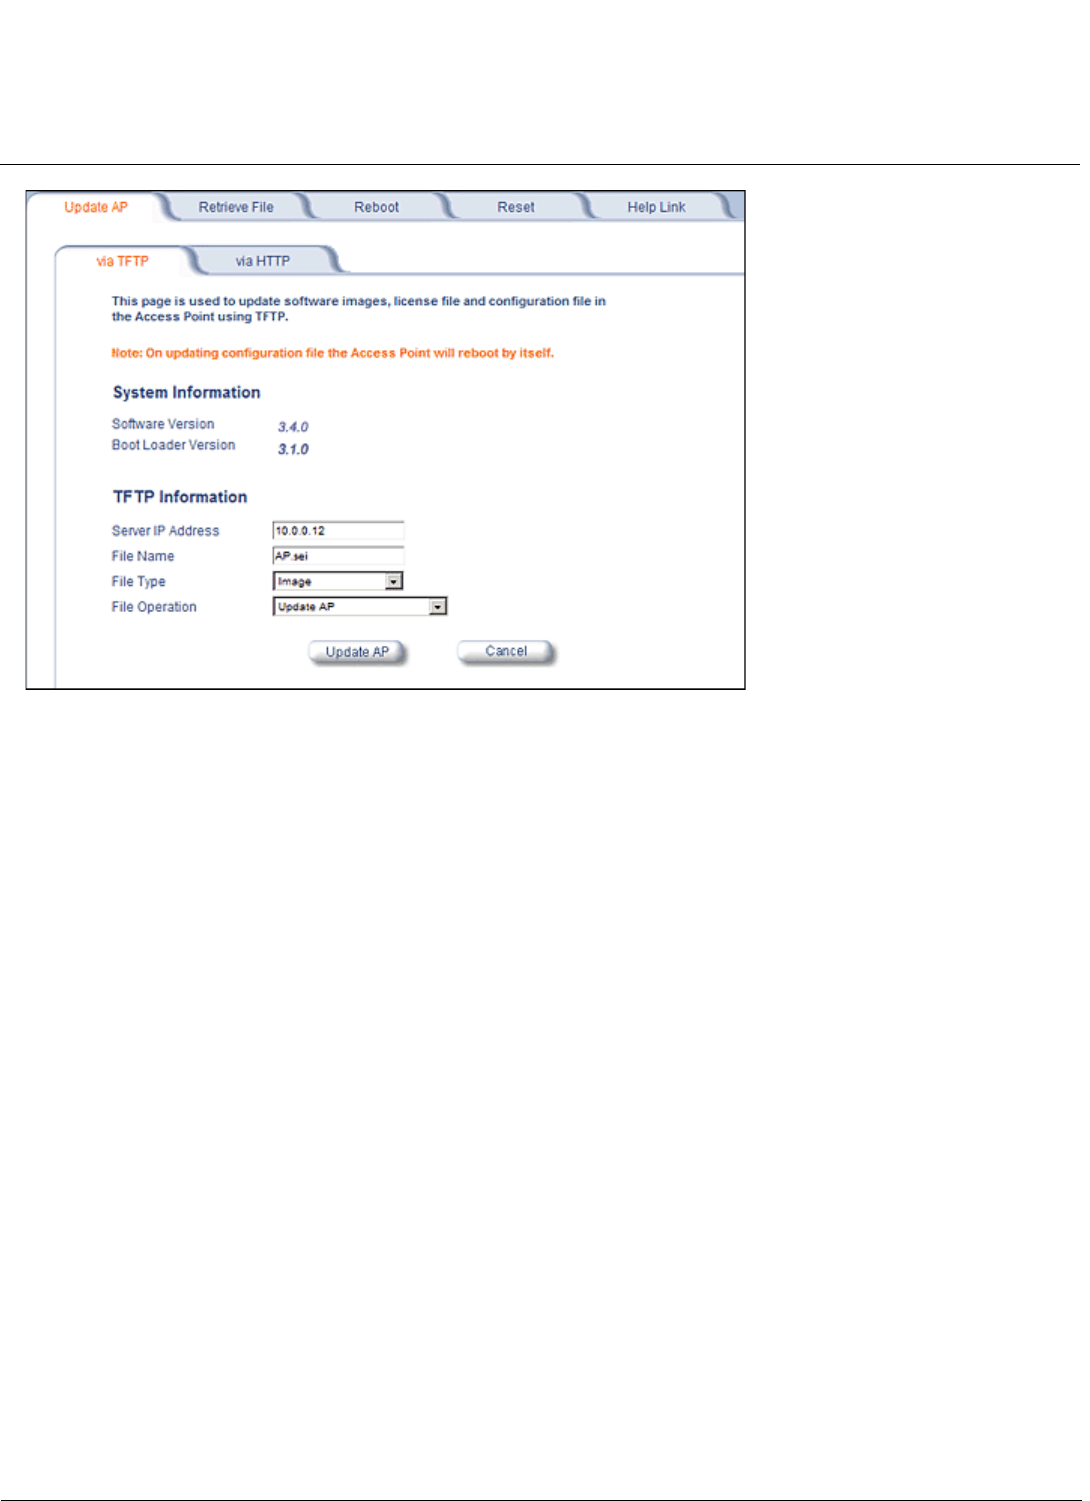
Commands MeshMAX 5054 Series User Guide
Command Function for Mesh and Access Point Module
215
Figure 8-2 Update AP via TFTP Command Screen
If you do not have a TFTP server installed on your system, install the TFTP server from the installation CD. You can either
install the TFTP server from the CD Wizard or run OEM-TFTP-Server.exe found in the CD’s Xtras/SolarWinds
sub-directory.
The Update AP via TFTP tab shows version information and allows you to enter TFTP information as described below.
•Server IP Address: Enter the TFTP server IP Address.
– Double-click the TFTP server icon on your desktop and locate the IP address assigned to the TFTP server.
NOTE: This is the IP address that will be used to point the Access Point to the AP Image file.
•File Name: Enter the name of the file to be downloaded (including the file extension).
– Copy the file to the TFTP server’s root folder.
•File Type: Select the proper file type. Choices include:
–Config: configuration information, such as System Name, Contact Name, and so on.
NOTE: The AP will reboot automatically when downloading a Config file.
–Image: AP Image (executable program).
–Upgrade BspBl: Bootloader software.
–SSL Certificate: the digital certificate for authentication in SSL communications.
–SSL Private Key: the private key for encryption in SSL communications.
–SSH Public Key: the public key in SSH communications.
–SSH Private Key: the private key in SSH communications.
–CLI Batch File: a CLI Batch file that contains CLI commands to configure the AP. This file will be executed by the
AP immediately after being uploaded.
– License File
•File Operation: Select either Update AP or Update AP & Reboot. You should reboot the AP after downloading files.
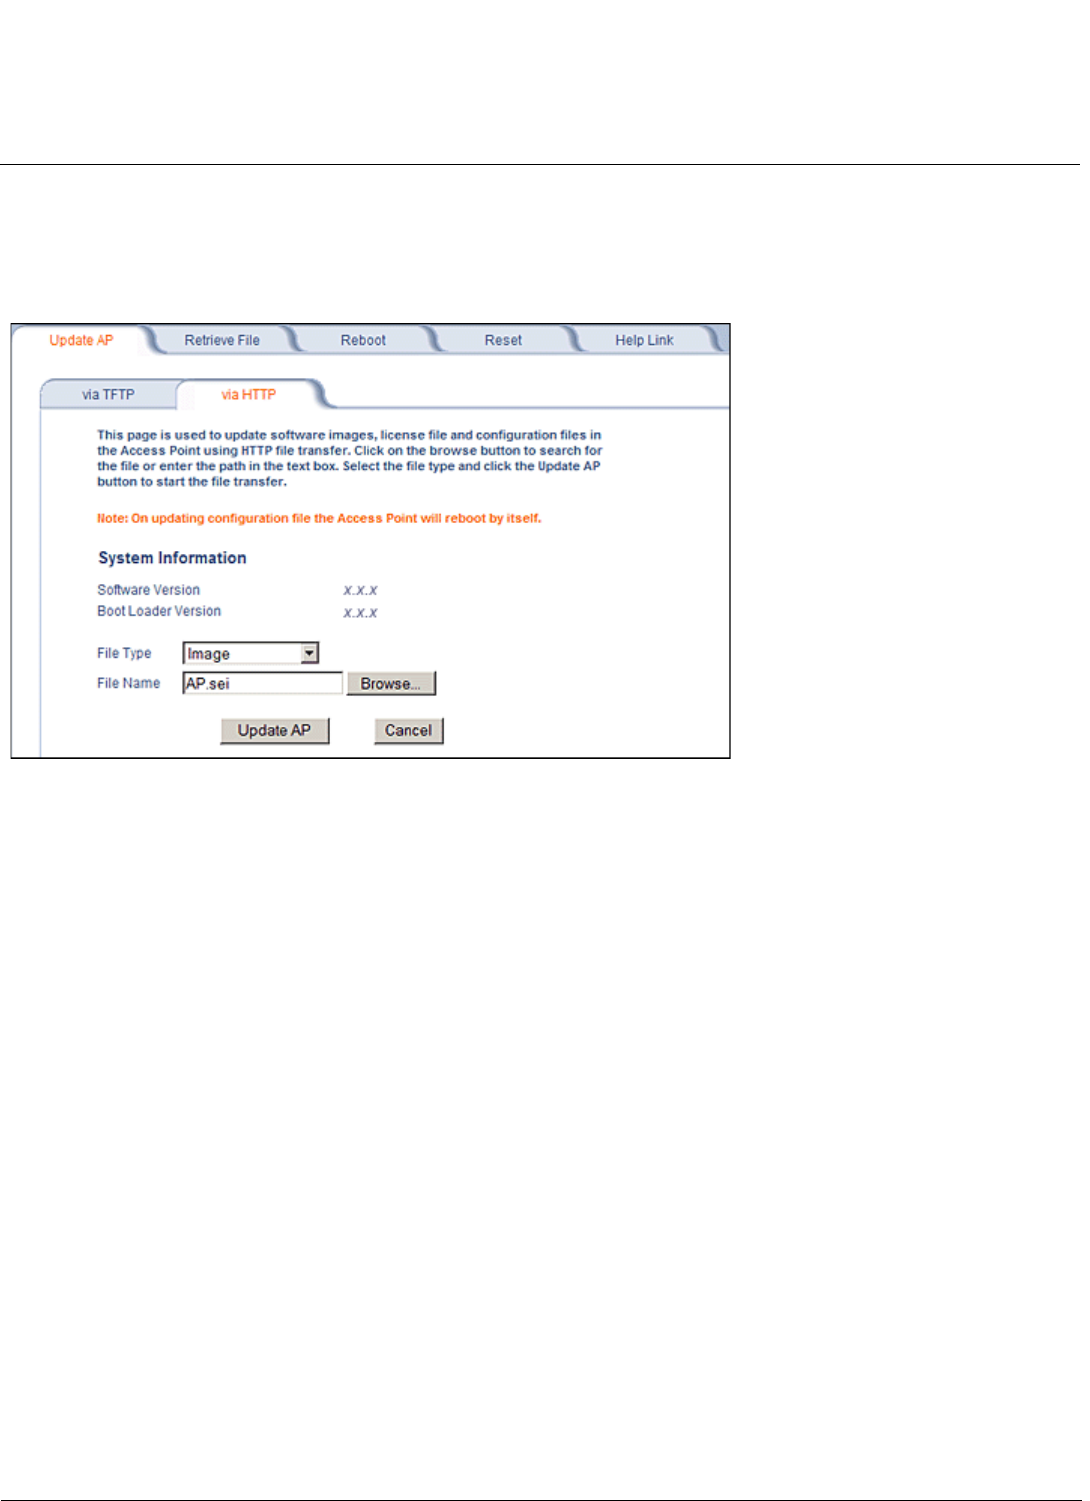
Commands MeshMAX 5054 Series User Guide
Command Function for Mesh and Access Point Module
216
Update AP via HTTP
Use the Update AP via HTTP tab to download Configuration, AP Image, Bootloader files, and Certificate and Private Key
files to the AP.
Once on the Update AP screen, click on the via HTTP tab.
Figure 8-3 Update AP via HTTP Command Screen
The Update AP via HTTP tab shows version information and allows you to enter HTTP information as described below.
1. Select the File Type that needs to be updated from the drop-down box. Choices include:
–Image for the AP Image (executable program).
–Config for configuration information, such as System Name, Contact Name, and so on.
NOTE: The AP will reboot automatically when downloading a Config file.
–SSL Certificate: the digital certificate for authentication in SSL communications.
–SSL Private Key: the private key for encryption in SSL communications.
–Upgrade BSPBL: the Bootloader software.
–CLI Batch File: a CLI Batch file that contains CLI commands to configure the AP. This file will be executed by the
AP immediately after being uploaded.
–SSH Public Key: the public key in SSH communications.
–SSH Private Key: the private key in SSH communications.
– License File
2. Use the Browse button or manually type in the name of the file to be downloaded (including the file extension) in the
File Name field. If typing the file name, you must include the full path and the file extension in the file name text box.
3. To initiate the HTTP Update operation, click the Update AP button.
A warning message gets displayed that advises the user that a reboot of the device will be required for changes to
take effect.
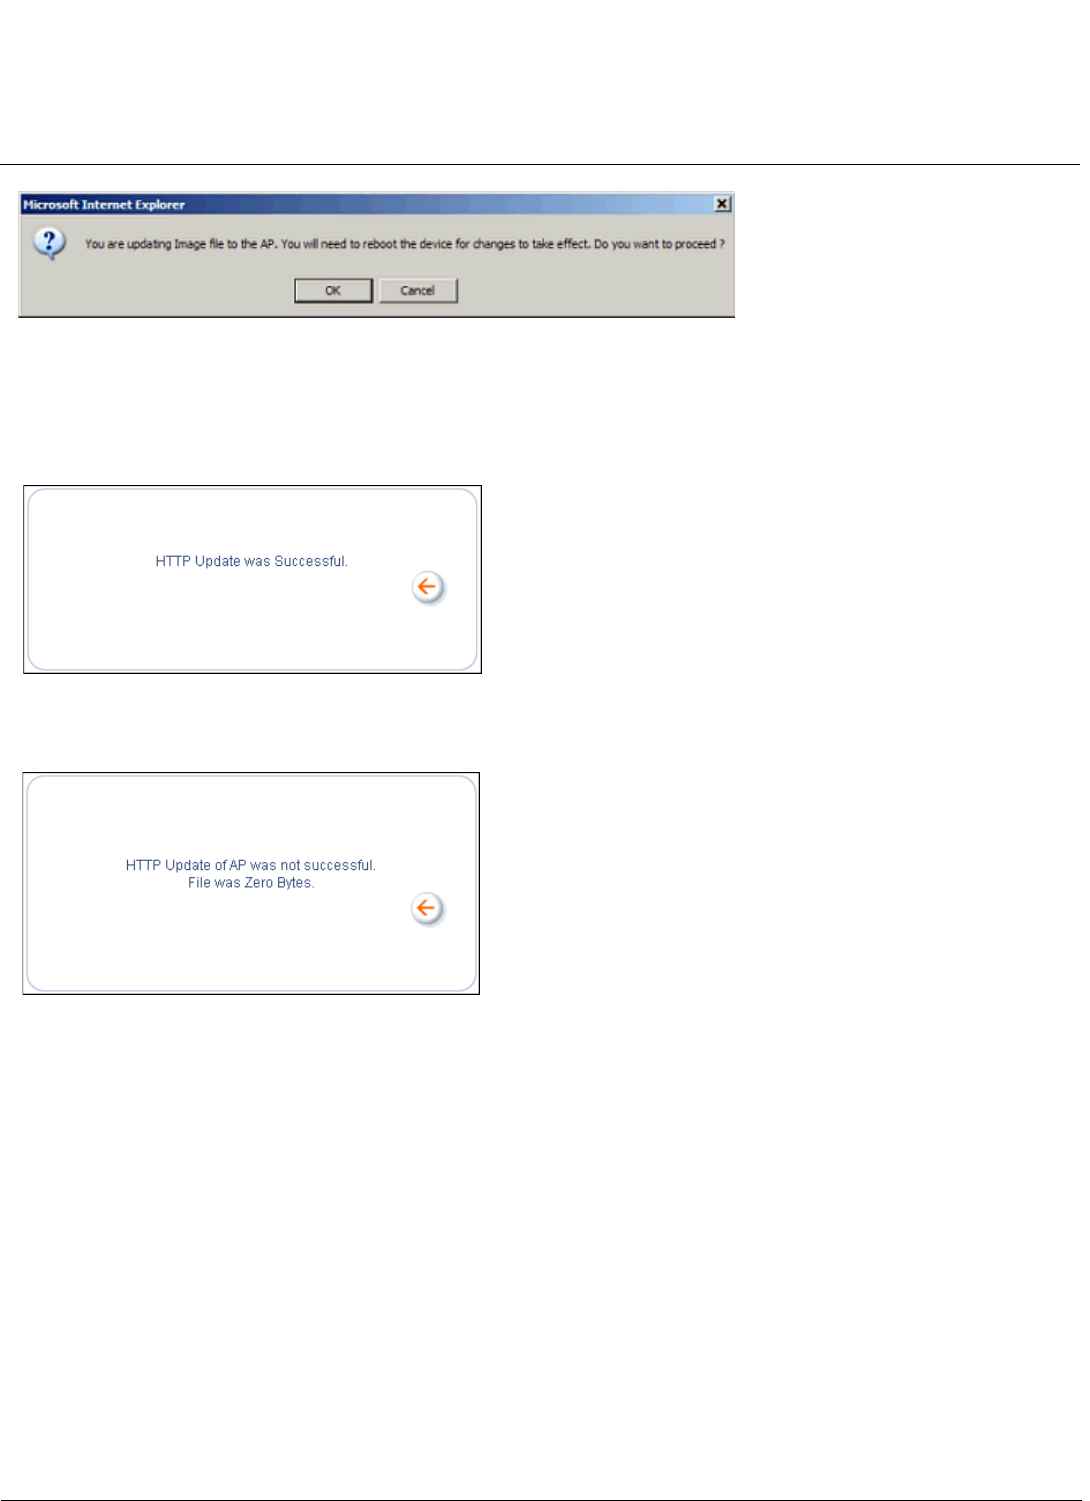
Commands MeshMAX 5054 Series User Guide
Command Function for Mesh and Access Point Module
217
Figure 8-4 Warning Message
4. Click OK to continue with the operation or Cancel to abort the operation.
NOTE: An HTTP file transfer using SSL may take extra time.
If the operation completes successfully the following screen appears.
Figure 8-5 Update AP Successful
If the operation did not complete successfully the following screen appears, and the reason for the failure is displayed.
Figure 8-6 Update AP Unsuccessful
Retrieve File
Retrieve File via TFTP
Use the Retrieve File via TFTP tab to upload files from the AP to the TFTP server. The TFTP server must be running
and configured to point to the directory to which you want to copy the uploaded file. We suggest you assign the file a
meaningful name, which may include version or location information.
If you don’t have a TFTP server installed on your system, install the TFTP server from the installation CD. You can either
install the TFTP server from the CD Wizard or run OEM-TFTP-Server.exe found in the CD’s Xtras/SolarWinds
sub-directory.
The Retrieve AP via TFTP tab shows version information and allows you to enter TFTP information as described below.
•Server IP Address: Enter the TFTP server IP Address.
– Double-click the TFTP server icon on your desktop and locate the IP address assigned to the TFTP server.
•File Name: Enter the name of the file to be uploaded.
•File Type: Select the type of file to be uploaded: Config file, CLI Batch File, or CLI Batch (Error) Log.
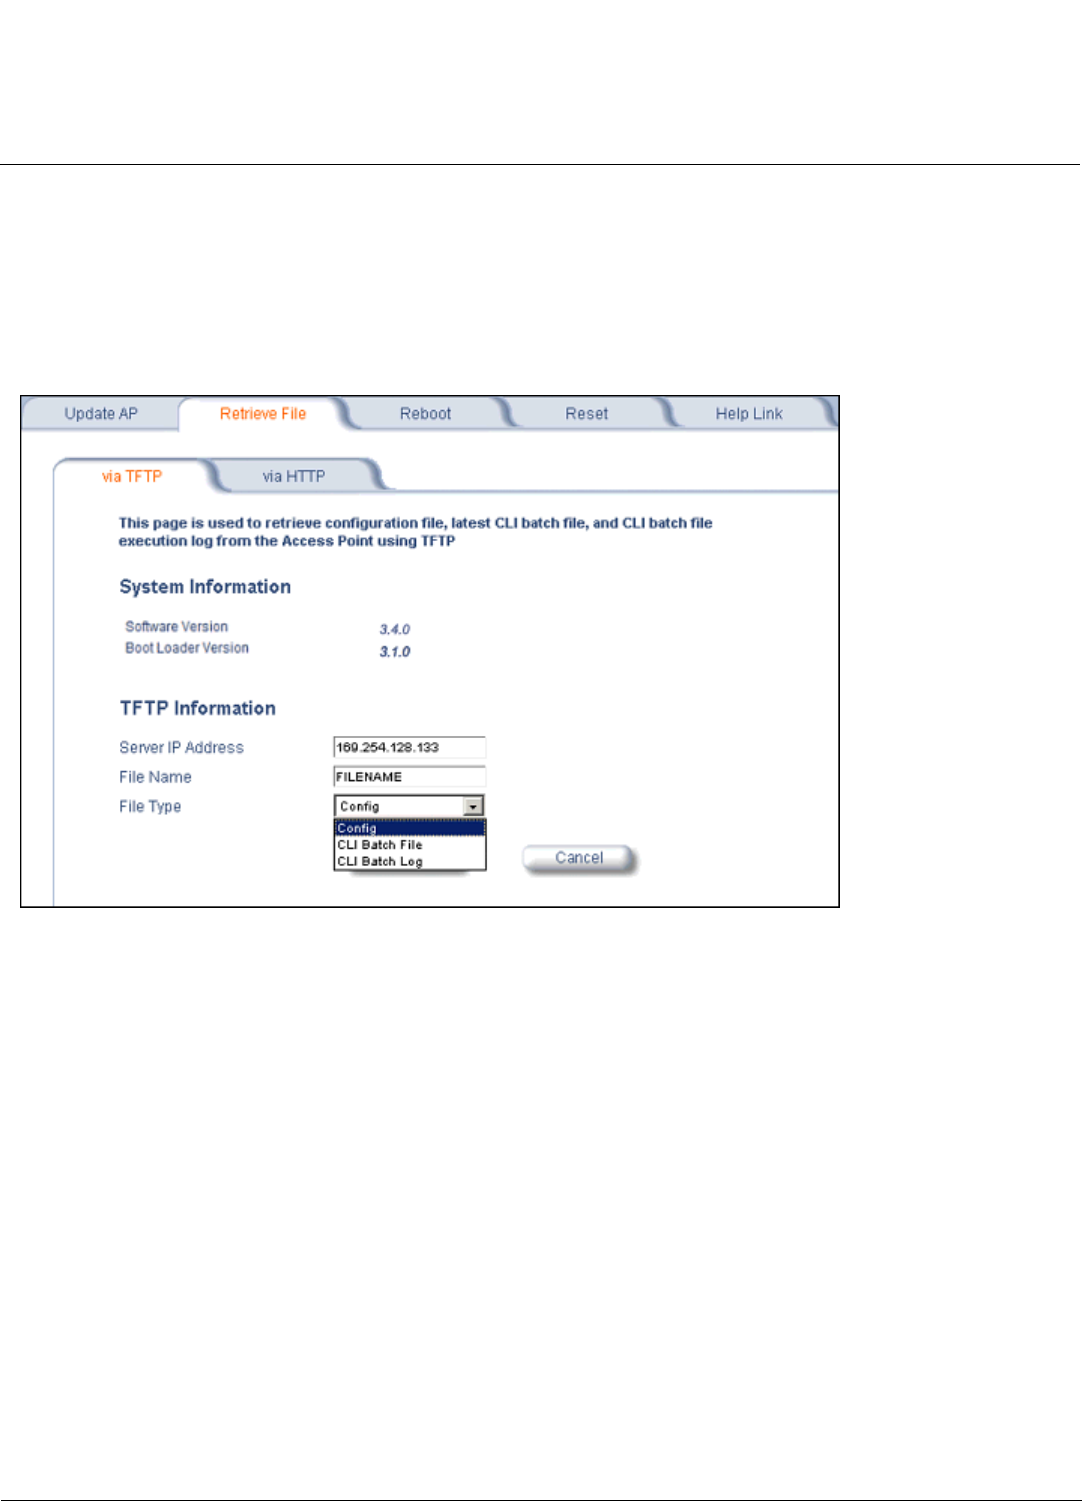
Commands MeshMAX 5054 Series User Guide
Command Function for Mesh and Access Point Module
218
Use the following procedure to retrieve a file from an AP to a TFTP server:
1. If retrieving a Config file, configure all the required parameters in their respective tabs. Reboot the device.
2. Retrieve and store the file. Click the Retrieve File button to initiate the upload of the file from the AP to the TFTP
server.
3. If you retrieved a Configuration file, update the file as necessary.
4. If you retrieved a CLI Batch File or CLI Batch Log, you can examine the file using a standard text editor. For more
information on CLI Batch Files.
Figure 8-7 Retrieve File via TFTP Command Screen
Retrieve File via HTTP
Use the Retrieve File via HTTP tab to retrieve configuration files, CLI Batch Files, or CLI Batch Logs from the AP. For
more information on CLI Batch Files and CLI Batch Logs.
1. Select the type of file (Config, CLI Batch File, CLI Batch Log) from the File Type drop-down menu.
2. Click on the Retrieve File button to initiate the operation.
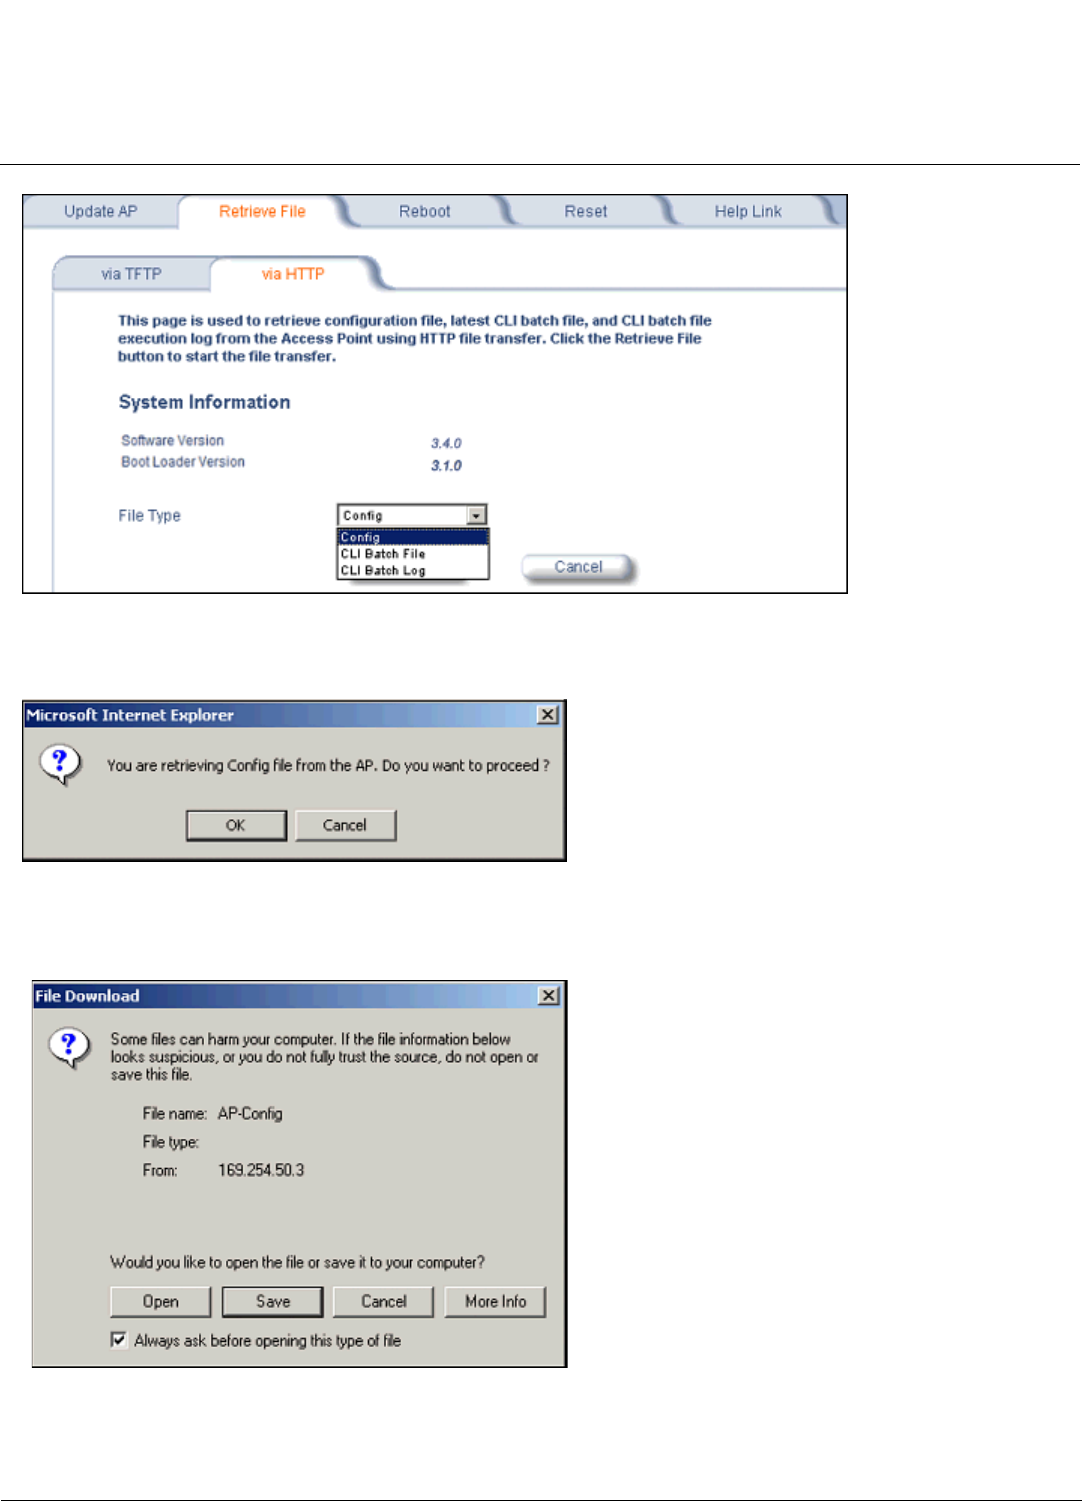
Commands MeshMAX 5054 Series User Guide
Command Function for Mesh and Access Point Module
219
Figure 8-8 Retrieve File via HTTP Command Screen
A confirmation message is displayed, asking if the user wants to proceed with retrieving the file.
Figure 8-9 Retrieve File Confirmation Dialog
3. Click OK to continue with the operation or Cancel to abort the operation. On clicking OK, the File Download window
appears.
Figure 8-10 File Download Dialog Box
4. On clicking the Save button the Save As window displays. Select an appropriate filename and location and click OK.
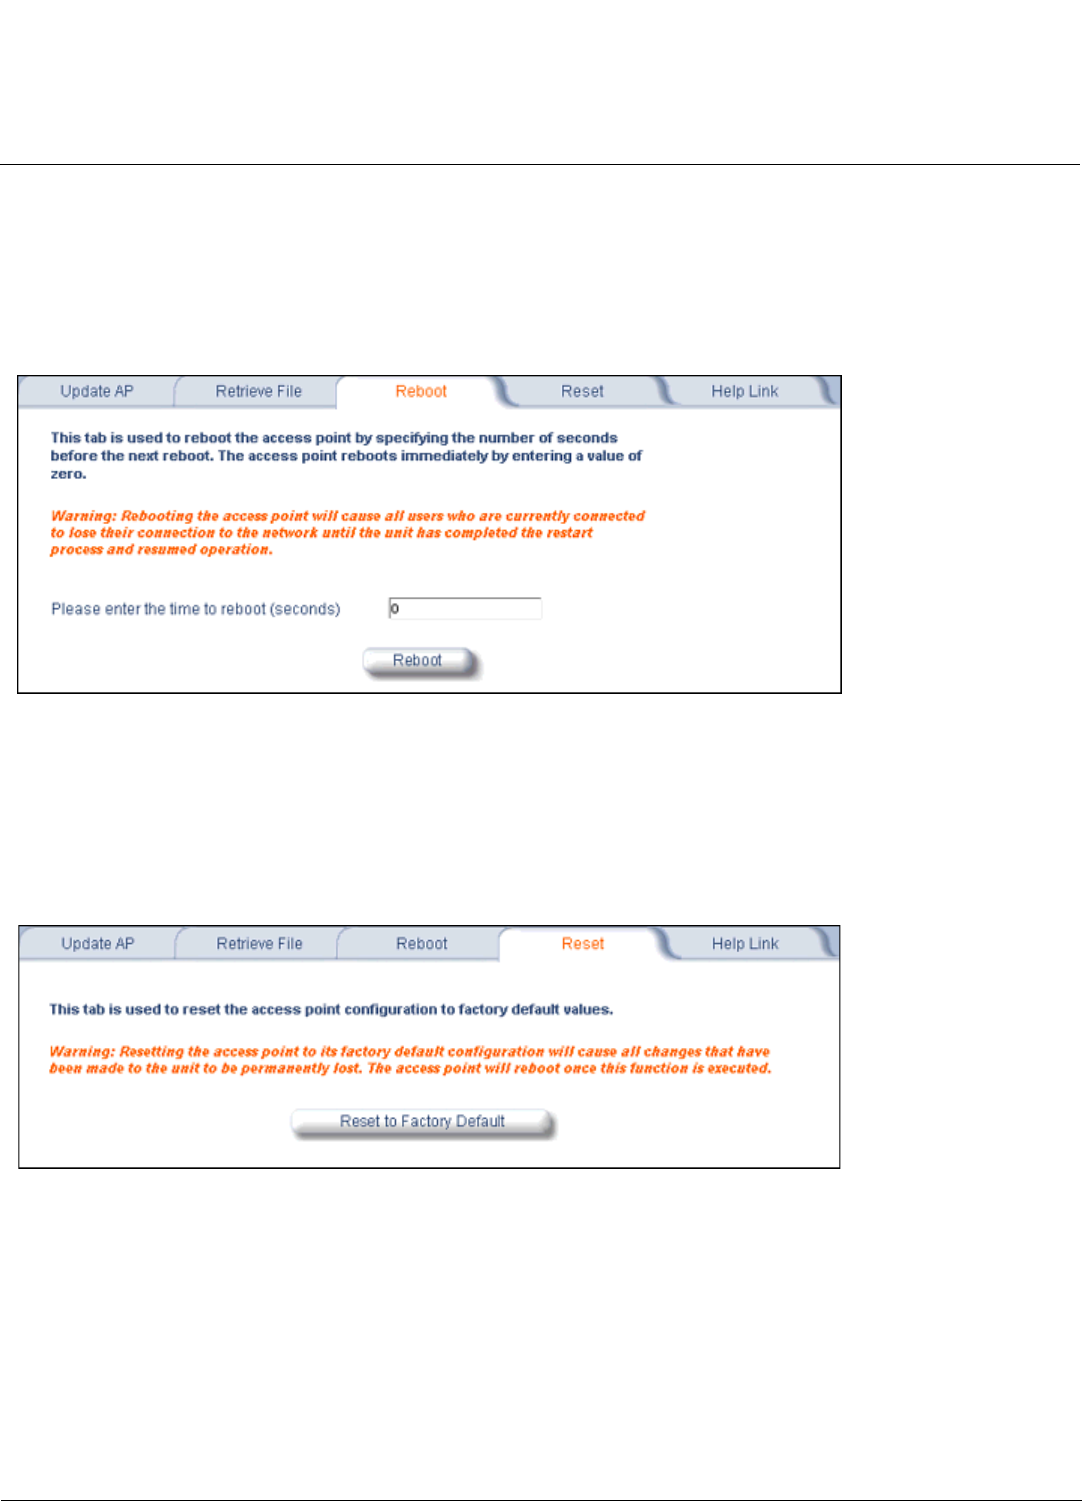
Commands MeshMAX 5054 Series User Guide
Command Function for Mesh and Access Point Module
220
Reboot
Use the Reboot tab to save configuration changes (if any) and reset the AP. Enter a value between 0 and 65535
seconds; entering a value of 0 (zero) seconds causes an immediate reboot. Note that Reset, described below, does not
save configuration changes.
CAUTION: Rebooting the AP will cause all users who are currently connected to lose their connection to the network
until the AP has completed the restart process and resumed operation.
Figure 8-11 Reboot Command Screen
Reset
Use the Reset tab to restore the AP to factory default conditions. Since this will reset the AP’s current IP address, a new
IP address must be assigned. See Logging In for more information.
CAUTION: Resetting the AP to its factory default configuration will permanently overwrite all changes that have made to
the unit. The AP will reboot automatically after this command has been issued.
Figure 8-12 Reset to Factory Defaults Command Screen
Help Link
Use the Help tab to configure the location of the AP Help files.
During initialization, the AP on-line help files are downloaded to the default location:
C:/Program Files/ORiNOCO/AP-4x00MR-LR/HTML/index.htm.
To enable the Help button on each page of the Web interface to access the help files, however, copy the entire Help
folder to a web server, then specify the new HTTP path in the Help Link box.
NOTE: The configured Help Link must point to an HTTP address in order to enable the Help button on each page of the
Web interface.
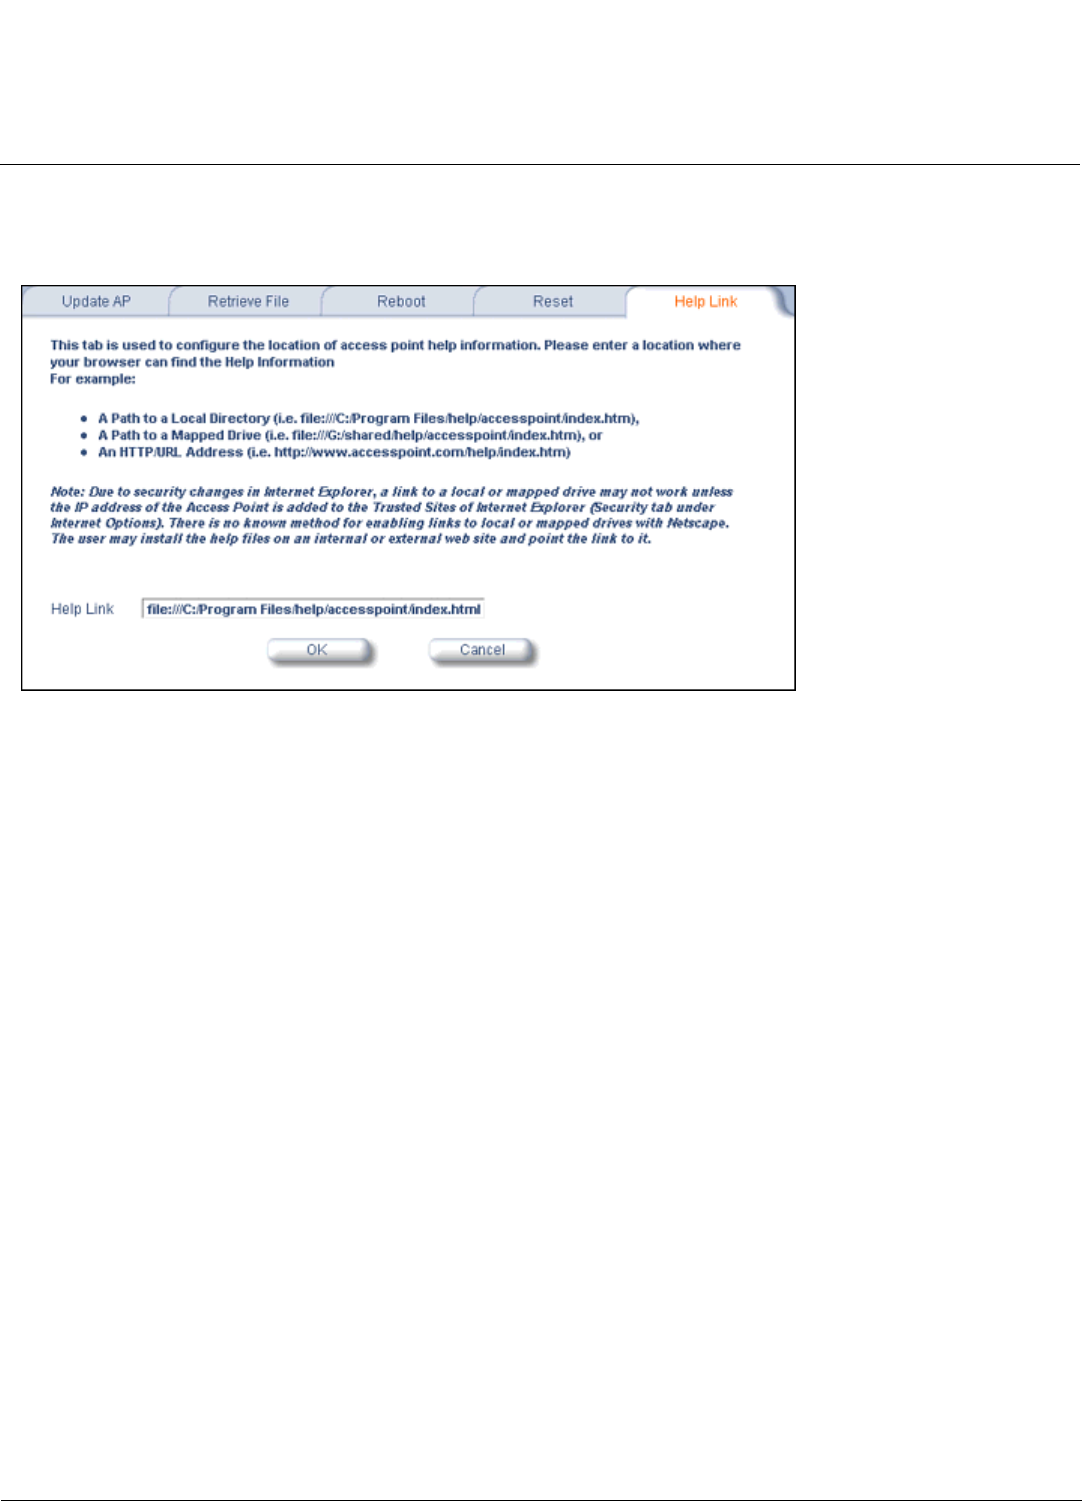
Commands MeshMAX 5054 Series User Guide
Command Function for Mesh and Access Point Module
221
NOTE: Use the forward slash character ("/") rather than the backslash character ("\") when configuring the Help Link
location.
NOTE: Add the AP’s management IP address into the Internet Explorer list of Trusted Sites.
Figure 8-13 Help Link Configuration Screen

MeshMAX 5054 Series User Guide
222
9
Procedures for Subscriber Module
This chapter describes the following procedures:
•TFTP Server Setup: Prepares the TFTP server for transferring files to and from the Subscriber unit. This procedure is
used by the other procedures that transfer files.
•Web Interface Image File Download: Upgrades the embedded software.
•Configuration Backup: Saves the configuration of the Subscriber unit.
•Configuration Restore: Restores a previous configuration through configuration file download.
•Soft Reset to Factory Default: Resets the Subscriber unit to the factory default settings through the Web or Command
Line Interface.
•Hard Reset to Factory Default: In some cases, it may be necessary to revert to the factory default settings (for
example, if you cannot access the Subscriber unit or you lost the password for the Web Interface).
•Forced Reload: Completely resets the Subscriber unit and erases the embedded software. Use this procedure only
as a last resort if the Subscriber unit does not boot and the “Hard Reset to Factory Default” procedure did not help. If
you perform a “Forced Reload,” you must download a new image file as described in Image File Download with the
Bootloader.
•Image File Download with the Bootloader: If the Subscriber unit does not contain embedded software, or the
embedded software is corrupt, you can use this procedure to download a new image file.
TFTP Server Setup
A Trivial File Transfer Protocol (TFTP) server lets you transfer files across a network. You can upload files from the unit
for backup or copying, and you can download the files for configuration and image upgrades. The SolarWinds TFTP
server software is located on the product installation CD, or can be downloaded from http://support.proxim.com. You can
also download the latest TFTP software from SolarWind’s Web site at http://www.solarwinds.net.The instructions that
follow assume that you are using the SolarWinds TFTP server software; other TFTP servers may require different
configurations.
NOTE: If a TFTP server is not available in the network, you can perform similar file transfer operations using the HTTP
interface.
To download or upload a file, you must connect to the computer with the TFTP server through the Subscriber unit. For
information about installing the TFTP server, see Step 12: Install Documentation and Software.
Ensure that:
1. The upload or download directory is correctly set (the default directory is C:\TFTP-Root).
2. The required image file is present in the directory.
3. The TFTP server is running. The TFTP server must be running only during file upload and download. You can
check the connectivity between the Subscriber unit and the TFTP server by pinging the Subscriber unit from the
computer that hosts the TFTP server. The ping program should show replies from the Subscriber unit.
4. The TFTP server is configured to both Transmit and Receive files (on the Security tab under File ! Configure), with
no automatic shutdown or time-out (on the Auto-Close tab).
Web Interface Image File Download
In some cases, it may be necessary to upgrade the embedded software of the Subscriber unit by downloading an image
file. To download an image file through the Web Interface:
1. Set up the TFTP server as described in TFTP Server Setup.

Procedures for Subscriber Module MeshMAX 5054 Series User Guide
223
2. Access the Subscriber unit as described in Logging in to the Web Interface.
3. Click the Commands button and the Download tab.
4. Fill in the following details:
•Server IP Address <IP address TFTP server>
•File Name <image file name>
•File Type Image
•File Operation Download
5. Click OK to start the file transfer.
The Subscriber unit downloads the image file. The TFTP server program should show download activity after a few
seconds. When the download is complete, the Subscriber unit is ready to start the embedded software upon reboot.
Configuration Backup
You can back up the Subscriber unit configuration by uploading the configuration file. You can use this file to restore the
configuration or to configure another Subscriber unit (see Configuration Restore).
To upload a configuration file through the Web Interface:
1. Set up the TFTP server as described in TFTP Server Setup.
2. Access the Subscriber unit as described in Logging in the Web Interface.
3. Click the Commands button and the Upload tab.
4. Fill in the following details:
•Server IP Address <IP address TFTP server>
•File Name <configuration file name>
•File Type Config
•File Operation Upload
5. Click OK to start the file transfer.
The Subscriber unit uploads the configuration file. The TFTP server program should show upload activity after a few
seconds. When the upload is complete, the configuration is backed up.
Configuration Restore
You can restore the configuration of the Subscriber unit by downloading a configuration file. The configuration file
contains the configuration information of an Subscriber unit.
To download a configuration file through the Web Interface:
1. Set up the TFTP server as described in TFTP Server Setup.
2. Access the Subscriber unit as described in Logging in Web Interface.
3. Click the Commands > Download.
4. Fill in the following details:
•Server IP Address <IP address TFTP server>
•File Name <configuration file name>
•File Type Config
•File Operation Download
• Click OK to start the file transfer.
The Subscriber unit downloads the configuration file. The TFTP server program should show download activity after a
few seconds. When the download is complete and the system rebooted, the configuration is restored.

Procedures for Subscriber Module MeshMAX 5054 Series User Guide
224
Soft Reset to Factory Default
If necessary, you can reset the Subscriber unit to the factory default settings. Resetting to default settings means that you
must configure the Subscriber unit anew.
To reset to factory default settings using the Web Interface:
1. Click Commands >Reset.
2. Click the Reset to Factory Default button.
The device configuration parameter values are reset to their factory default values.
If you do not have access to the Subscriber unit, you can use the procedure described in “Hard Reset to Factory Default”
below as an alternative.
Hard Reset to Factory Default
If you cannot access the unit or you have lost its password, you can reset the Subscriber unit to the factory default
settings. Resetting to default settings means you must configure the Subscriber unit anew.
To reset to Subacriber unit, refer Reboot and Reset Functionality for Subscriber Module.
Forced Reload
With Forced Reload, you reset the Subscriber unit to the factory default settings and erase the embedded software. Use
this procedure only as last resort if the Subscriber unit does not boot. If you perform a Forced Reload, refer .Reboot and
Reset Functionality for Subscriber Module
Image File Download with the Bootloader
The following procedures download an image file to the unit after the embedded software has been erased with Forced
Reload or when the embedded software cannot be started by the Bootloader. A new image file can be downloaded to the
unit with ScanTool, or the Command Line Interface through the unit’s serial port. In both cases, the file is transferred
through Ethernet with TFTP. Because the CLI serial port option requires a serial RS-232C cable, Proxim recommends the
ScanTool option.
Download with ScanTool
To download an image file with the ScanTool:
1. Set up the TFTP server as described in TFTP Server Setup.
2. Download the latest software from http://support.proxim.com.
3. Copy the latest software updates to your TFTP server’s root directory.
4. Run ScanTool on a computer that is connected to the same LAN subnet as the unit. ScanTool scans the subnet for
units and displays the found units in the main window. If in Forced Reload, ScanTool does not find the device until the
unit Bootloader times out from its default operation to download an image. Click Rescan to re-scan the subnet and
update the display until the unit shows up in Bootloader mode.
5. Select the unit to which you want to download an image file and click Change.
6. Ensure that IP Address Type Static is selected and fill in the following details:
• Password
• IP Address and Subnet Mask of the unit.
•TFTP Server IP Address and, if necessary, the Gateway IP Address of the TFTP server.
•Image File Name of the file with the new image.
7. Click OK to start the file transfer.

Procedures for Subscriber Module MeshMAX 5054 Series User Guide
225
The unit downloads the image file. The TFTP server program should show download activity after a few seconds. When
the download is complete, the LED pattern should return to reboot state. The unit is ready to start the embedded
software.
After a Forced Reload procedure, the unit returns to factory default settings and must be reconfigured. ScanTool can be
used to set the system name and IP address.
To access the Subscriber unit see Logging in to the Web Interface.
Download with CLI
To use the CLI through the serial port of the unit, you need a standard serial connector and an ASCII terminal program
such as HyperTerminal. Proxim recommends you switch off the unit and the computer before connecting or disconnecting
the serial RS-232C cable.
To download an image file:
1. Set up the TFTP server as described in TFTP Server Setup.
2. Download the latest software from http://support.proxim.com.
3. Copy the latest software updates to your TFTP server’s root directory.
4. Use a straight-through serial cable to connect the unit’s serial port to your computer’s serial port.
5. Start the terminal program (such as HyperTerminal), set the following connection properties, and then connect:
• Connect using: Com Port: <COM1, COM2, etc., depending on your computer>
• Port Settings:
– Baud rate: 9600
–Data Bits: 8
– Stop bits: 1
– Flow Control: None
– Parity: None
• Under File > Properties > Settings > ASCII Setup, enable the Send line ends with line feeds option.
6. Press the RESET button on the unit.
The terminal display shows Power On Self Tests (POST) activity. After approximately 30 seconds, a message
indicates: Sending Traps to SNMP manager periodically. After this message appears, the bootloader prompt
appears.
7. The command prompt is displayed; enter the following commands:
set ipaddr <IP address nit>
set ipsubmask <subnet mask>
set ipaddrtype static
set tftpipaddr <IP address TFTP server>
set tftpfilename <image file name>
set ipgw <gateway IP address>
reboot
For example:
set ipaddr 10.0.0.12
set ipsubmask 255.255.255.0
set ipaddrtype static
set tftpipaddr 10.0.0.20
set tftpfilename image.bin
set ipgw 10.0.0.30
reboot

Procedures for Subscriber Module MeshMAX 5054 Series User Guide
226
The unit reboots and downloads the image file. The TFTP server program should show download activity after a few
seconds. When the download is complete, the unit is ready for configuration.
After a Forced Reload procedure, the unit returns to factory default settings and must be reconfigured. ScanTool can be
used to set the system name and IP address.
To access the Subscriber unit see Logging in to the Web Interface.

227
MeshMAX 5054 Series User Guide
10
Troubleshooting
This chapter has following information:
Troubleshooting for Power-Over-Ethernet (PoE)
Troubleshooting Concepts for Subscriber Module
•Connectivity Issues
–Subscriber Module Does Not Boot
–Cannot use the Web Interface
•Communication Issues
–Two Units Are Unable to Communicate Wirelessly
•Setup and Configuration Issues
–Lost Password
–The Subscriber Module Responds Slowly
–TFTP Server Does Not Work
–Online Help Is Not Available
–Changes Do Not Take Effect
•VLAN Operation Issues
–What if network traffic is being directed to a nonexistent host?
•Link Problems
–General Check
–Statistics Check
–Analyzing the Spectrum
Troubleshooting Concepts for Mesh and Access Point Module
•Troubleshooting Concepts
•Symptoms and Solutions
–Connectivity Issues
–Basic Software Setup and Configuration Problems
–Client Connection Problems
–VLAN Operation Issues
•Recovery Procedures
–Soft Reset to Factory Defaults
–Hard Reset to Factory Defaults
–Forced Reload
–Setting IP Address using Serial Port
•Related Applications
–RADIUS Authentication Server
–TFTP Server

Troubleshooting MeshMAX 5054 Series User Guide
Troubleshooting for Power-Over-Ethernet (PoE)
228
Troubleshooting for Power-Over-Ethernet (PoE)
The PoE Does Not Work
1. Verify that you are using a standard UTP Category 5 cable.
2. Try a different port on the same PoE hub (remember to move the input port accordingly) – if it works, there is probably
a faulty port or bad RJ-45 port connection.
3. If possible, try to connect the MeshMAX unit to a different PoE hub.
4. Try using a different Ethernet cable – if it works, there is probably a faulty connection over the long cable, or a bad
RJ-45 connection.
5. Check power plug and hub.
6. If the Ethernet link goes down, check the cable, cable type, switch, and hub.
Troubleshooting Concepts for Subscriber Module
This section helps you to isolate and solve problems with your Subscriber Module. In the event this chapter does not
provide a solution, or the solution does not solve your problem, check our support website at http://support.proxim.com.
Before you start troubleshooting, check the details in the product documentation. For details about RADIUS, TFTP,
terminal and telnet programs, and Web browsers, refer to their appropriate documentation.
In some cases, rebooting the Subscriber Module clears the problem. If nothing else helps, consider a Soft Reset to
Factory Default or a Forced Reload. The Forced Reload option requires you to download a new image file to the
Subscriber Module.
Connectivity Issues
Subscriber Module Does Not Boot
The Subscriber Module shows no activity (the power LED is off).
1. Ensure that the power supply is properly working and correctly connected.
2. Ensure that all cables are correctly connected.
3. Check the power source.
4. If you are using an Active Ethernet splitter, ensure that the voltage is correct.
Cannot use the Web Interface
1. Open a command prompt window and enter ping <ip address unit> (for example ping 10.0.0.1). If the unit
does not respond, make sure that you have the correct IP address. If the unit responds, the Ethernet connection is
working properly, continue with this procedure.
2. Ensure that you are using Microsoft Internet Explorer 5.0 or later (version 6.0 or later recommended) or Netscape 6.0
or later.
3. Ensure that you are not using a proxy server for the connection with your Web browser.
4. Ensure that you have not exceeded the maximum number of Web Interface or CLI sessions.
5. Double-check the physical network connections. Use a well-known unit to ensure the network connection is properly
functioning.
6. Perform network infrastructure troubleshooting (check switches, routers, and so on).

Troubleshooting MeshMAX 5054 Series User Guide
Troubleshooting Concepts for Subscriber Module
229
Communication Issues
Two Units Are Unable to Communicate Wirelessly
If a wireless link is possible after testing two units within close distance of each other, then there are two possible reasons
why wireless connectivity is not possible while the MP.11 units are at their desired locations:
There may be a problem in the RF path, for example, a bad connector attachment (this is the most common problem in
installations) or a bad cable (water ingress).
NOTE: The cables can be swapped with known good ones as a temporary solution to verify cable quality.
Another reason may be related to an interference problem caused by a high signal level from another radio. This can be
checked by changing the frequency and then verifying whether another channel works better or by changing the
polarization as a way of avoiding the interfering signal. To know in advance how much interference is present in a given
environment, a Spectrum Analyzer can be attached to a (temporary) antenna for measuring the signal levels on all
available Channels.
NOTE: The antennas are usually not the problem, unless mounted upside down causing the drain hole to be quickly
filled with radome.
If a wireless link is not possible after testing two units within close distance of each other, then the problem is either
hardware or configuration related, such as a wrong Network name, Encryption key, Network Secret or Base Station
Name. To eliminate these issues from being a factor, resetting the both units to factory defaults is the recommended
solution.
If a wireless link is not possible after resetting the units and verifying that one unit is a BSU with WORP Base interface
configured and the other is a Satellite, then the problem is not configuration related and the only remaining reason is a
possible hardware problem. Acquiring a third unit and then testing it amongst the existing units will help pinpoint the
broken unit.
Setup and Configuration Issues
The following issues relate to setup and configuration problems.
Lost Password
If you lost your password, you must reset the Subscriber unit to the default settings. See Hard Reset to Factory Default.
The default password is public. If you record your password, keep it in a safe place.
The Subscriber Module Responds Slowly
If the Subscriber unit takes a long time to become available, it could mean that:
• No DHCP server is available.
• The IP address of the Subscriber unit is already in use.
Verify that the IP address is assigned only to the Subscriber unit. Do this by switching off the Subscriber unit and then
pinging the IP address. If there is a response to the ping, another device in the network is using the same IP address.
If the Subscriber unit uses a static IP address, switching to DHCP mode could remedy this problem.
• There is too much network traffic.
TFTP Server Does Not Work
With TFTP, you can transfer files to and from the Subscriber unit. Also see TFTP Server Setup. If a TFTP server is not
properly configured and running, you cannot upload and download files. The TFTP server:
• Can be situated either local or remote
• Must have a valid IP address
• Must be set for send and receive without time-out

Troubleshooting MeshMAX 5054 Series User Guide
Troubleshooting Concepts for Subscriber Module
230
• Must be running only during file upload and download
If the TFTP server does not upload or download files, it could mean:
• The TFTP server is not running
• The IP address of the TFTP server is invalid
• The upload or download directory is not correctly set
• The file name is not correct
Online Help Is Not Available
Online help is not available:
1. Make sure that the Help files are installed on your computer or server. See Step 12: Install Documentation and
Software.
2. Verify whether the path of the help files in the Web Interface refers to the correct directory. See Help Link.
Changes Do Not Take Effect
Changes made in the Web Interface do not take effect:
1. Restart your Web browser.
2. Log into the radio unit again and make changes.
3. Reboot the radio unit when prompted to do so.
Wait until the reboot is completed before accessing the Subscriber unit again.
VLAN Operation Issues
The correct VLAN configuration can be verified by “pinging” wired hosts from both sides of the device and the network
switch. Traffic can be “sniffed” on the wired (Ethernet) network. Packets generated by hosts and viewed on one of the
backbones should contain IEEE 802.1Q compliant VLAN headers when in Transparent mode. The VLAN ID in the
headers should correspond to one of the VLAN Management IDs configured for the unit in Trunk mode.
The correct VLAN assignment can be verified by pinging:
• The unit to ensure connectivity
• The switch to ensure VLAN properties
• Hosts past the switch to confirm the switch is functional
Ultimately, traffic can be “sniffed” on the Ethernet interface using third-party packages. Most problems can be avoided by
ensuring that 802.1Q compliant VLAN tags containing the proper VLAN ID have been inserted in the bridged frames. The
VLAN ID in the header should correspond to the assigned VLAN.
What if network traffic is being directed to a nonexistent host?
• All sessions are disconnected, traffic is lost, and a manual override is necessary.
• Workaround: You can configure the switch to mimic the nonexistent host.
Link Problems
While wireless networking emerges more and more, the number of wireless connections to networks grows every day.
The Tsunami MP.11 Subscriber unit is one of the successful product families used by customers today who enjoy the day
after day high-speed, cost-effective connections. To successfully use the connections, technicians must be able to
troubleshoot the system effectively. This section gives hints on how a Subscriber unit network could be analyzed in the
case of “no link,” a situation in which the customer thinks that the link is down because there is no traffic being passed.
The four general reasons that a wireless link may not work are related to:

Troubleshooting MeshMAX 5054 Series User Guide
Troubleshooting Concepts for Subscriber Module
231
• Hardware
• Configuration
• Path issues (such as distance, cable loss, obstacles)
• Environment (anything that is outside the equipment and not part of the path itself)
You have tested the equipment in the office and have verified that the hardware and configurations are sound. The path
calculation has been reviewed, and the path has been double-checked for obstacles and canceling reflections. Still, the
user reports that the link does not work.
Most likely, the problem reported is caused by the environment or by improper tests to verify the connection. This article
assumes that the test method, cabling, antennas, and antenna alignment have been checked. Always do this before
checking the environment.
General Check
Two general checks are recommended before taking any action:
• Check whether the software version at both sides is the most current
• Check for any reported alarm messages in the Event Log
Statistics Check
Interference and other negative environment factors always have an impact on the number of correctly received frames.
The Tsunami MP.11 models give detailed information about transmission errors in the Web interface, under Monitor.
The windows that are important for validating the health of the link are:
•Monitor / Wireless / General (Lowest level of the wireless network): Check FCS errors: Rising FCS errors
indicate interference or low fade margin. So does Failed count. If only one of those is high, this indicates that a
source of interference is significant near one end of the link.
•Monitor / Interfaces / Wireless (One level higher than Wireless / General): The information is given after the
wireless Ethernet frame is converted into a normal Ethernet frame. The parameters shown are part of the MIB-II.
– Both operational and admin status should be up. An admin status of down indicates that the interface is
configured to be down.
–In Discards and Out Discards indicate overload of the buffers, likely caused by network traffic, which is too
heavy.
–In Errors and Out Errors should never happen; however, it might happen if a frame’s FCS was correct while the
content was still invalid.
•Monitor / Wireless / WORP (Statistics on WORP): WORP runs on top of normal Ethernet, which means that the
WORP frame is in fact the data field of the Ethernet frame. Send Failure or Send Retries must be low in comparison
to Send Success.Low is about 1%. The same applies for Receive Success versus Receive Retries and Receive
Failures. Note that the Receive Failures and Retries can be inaccurate. A frame from the remote site might have
been transmitted without even being received; therefore, the count of that frame might not have been added to the
statistics and the receiver simply could not know that there was a frame.
–Remote Partners indicates how many SUs are connected (in case of a BSU) or whether a Base is connected (in
case of a Subscriber).
–Base Announces should increase continuously.
–Registration Requests and Authentication Requests should be divisible by 3. WORP is designed in a way that
each registration sequence starts with 3 identical requests. It is not a problem if, once in a while, one of those
requests is missing. Missing requests frequently is to be avoided.

Troubleshooting MeshMAX 5054 Series User Guide
Troubleshooting Concepts for Mesh and Access Point Module
232
•Monitor / Per Station (Information per connected remote partner): Check that the received signal level (RSL) is
the same on both sides; this should be the case if output power is the same. Two different RSLs indicate a broken
transmitter or receiver. A significant difference between Local Noise and Remote Noise could indicate a source of
interference near the site with the highest noise. Normally, noise is about –80 dBm at 36 Mbps. This number can vary
from situation to situation, of course, also in a healthy environment.
•Monitor / Link Test (Information used by Administrators for on-the-spot checking): Check the received signal
level (RSL) and noise level. Compare the RSL with the values from path analysis. If the figures differ significantly
from the values recorded at the Per Station window, check for environment conditions that change over time.
Analyzing the Spectrum
The ultimate way to discover whether there is a source of interference is to use a spectrum analyzer. Usually, the antenna
is connected to the analyzer when measuring. By turning the antenna 360 degrees, one can check from which direction
the interference is coming. The analyzer will also display the frequencies and the level of signal is detected.
Proxim recommends performing the test at various locations to find the most ideal location for the equipment.
Avoiding Interference
When a source of interference is identified and when the level and frequencies are known, the next step is to avoid the
interference. Some of the following actions can be tried:
• Changing the channel to a frequency away from the interference is the first step in avoiding interference. The installer
can select a DFS Preferred Channel.
• Each antenna has a polarization; try to change to a polarization different from the interferer.
• A small beam antenna looks only in one particular direction. Because of the higher gain of such an antenna, lowering
the output power or adding extra attenuation might be required to stay legal. This solution cannot help when the
source of interference is right behind the remote site.
• Lowering the antennas can help avoid seeing interference from far away.
Move the antennas to a different location on the premises. This causes the devices to look from a different angle, causing
a different pattern in the reception of the signals. Use obstructions such as buildings, when possible, to shield from the
interference.
Conclusion
A spectrum analyzer can be a great help to identify whether interference might be causing link problems on Tsunami
MP.11 systems.
Before checking for interference, the link should be verified by testing in an isolated environment, to make sure that
hardware works and your configurations are correct. The path analysis, cabling and antennas should be checked as well.
Statistics in the web interface under Monitor tell if there is a link, if the link is healthy, and a continuous test can be done
using the Link Test.
Troubleshooting Concepts for Mesh and Access Point Module
NOTE: This section helps you locate problems related to the AP device setup. For details about RADIUS, TFTP, serial
communication programs (such as HyperTerminal), Telnet applications, or web browsers, please see the
documentation that came with the respective application for assistance.

Troubleshooting MeshMAX 5054 Series User Guide
Troubleshooting Concepts for Mesh and Access Point Module
233
Troubleshooting Concepts
The following list identifies important troubleshooting concepts and topics. The most common initialization and installation
problems relate to IP addressing. For example, you must have valid IP addresses for both the AP and the management
computer to access the unit’s HTTP interface.
•IP Address management is fundamental.
•Factory default units are set for “Dynamic” (DHCP) IP Address assignment. The default IP address for the AP is
169.254.128.132 if your network does not have a DHCP server. If you connect the AP to a network with an active
DHCP server, then use ScanTool to locate the IP address of your unit. If a DHCP server is not active on your subnet,
then use ScanTool to assign a static IP address to the unit.
•The Trivial File Transfer Protocol (TFTP) provides a means to download and upload files. These files include
the AP Image (executable program) and configuration files.
•If the AP password is lost or forgotten, you will need to reset to default values. The Soft Reset to Factory
Default or Hard Reset to Factory Default procedures reset the configuration, but do not change the current AP Image.
•The AP Supports a Command Line Interface (CLI). If you are having trouble locating your AP on the network,
connect to the unit directly using the serial interface and see CLI for Mesh and Access Point Module for CLI command
syntax and parameter names.
•ScanTool does not work over routers. You must be connected to the same subnet/physical LAN segment to use
ScanTool. Note that ScanTool also works over the wireless interface; you can run it on a wireless client connected to
the target AP or an AP connected to the same LAN segment/subnet.
•If all else fails… Use the Forced Reload procedure to erase the current AP Image and configuration file and then
download a new image.
Symptoms and Solutions
Connectivity Issues
Connectivity issues include any problem that prevents you from powering up or connecting to the AP.
AP Unit Will Not Boot - No LED Activity
1. Make sure your power source is operating.
2. Make sure all cables are connected to the AP correctly.
3. If you are using PoE, make sure you are using a Category 5, foiled, twisted pair cable to power the AP.
Serial Link Does Not Work
1. Make sure you are using a standard, straight-through, 9-pin serial cable.
2. Double-check the physical network connections.
3. Make sure your PC terminal program (such as HyperTerminal) is active and configured to the following values:
– Com Port: (COM1, COM2, etc. depending on your computer);
– Baud rate: 9600; Data bits: 8; Stop bits: 1; Flow Control: None; Parity: None;
– Line Feeds with Carriage Returns
(In HyperTerminal select: File > Properties > Settings > ASCII Setup > Send Line Ends with Line Feeds)
Basic Software Setup and Configuration Problems
Lost AP, Telnet, or SNMP Password
1. Perform the Soft Reset to Factory Default in this guide. This procedure resets system and network parameters, but
does not affect the AP Image. The default AP HTTP, Telnet, and SNMP passwords are all public.

Troubleshooting MeshMAX 5054 Series User Guide
Troubleshooting Concepts for Mesh and Access Point Module
234
Client Computer Cannot Connect
1. Client computers should have the same Network Name and security settings as the AP.
2. Network Names should be allocated and maintained by the Network Administrator.
3. See the documentation that came with your client card for additional troubleshooting suggestions.
AP Has Incorrect IP Address
1. Default IP Address Assignment mode is dynamic (DHCP). If you do not have a DHCP server on your network, the
default IP Address is 169.254.128.132. If you have more than one unintialized AP connected to the network, they will
all have the same default IP address and you will not be able to communicate with them (due to an IP address
conflict). In this case, assign each AP a static IP address via the serial cable or turn off all units but one and change
the IP address using ScanTool one at a time.
2. The AP only contacts a DHCP server during boot-up. If your network’s DHCP server is not available while the AP is
booting, the device will use the default IP address (169.254.128.132). Reboot the AP once your DHCP server is
on-line again or use the ScanTool to find the Access Point’s current IP address.
3. To find the unit’s current IP address if using DHCP, open the IP Client Table in the DHCP Server and match the
Access Point’s IP address to its MAC address (found on the product label). Alternatively, use ScanTool to identify an
Access Point’s current IP address.
4. Once you have the current IP address, use the HTTP or CLI Interface to change the unit’s IP settings, if necessary.
5. If you use static IP Address assignments, and cannot access the unit over Ethernet, use the Initializing the IP Addess
using CLI procedure. Once the IP Address is set, you can use the Ethernet Interface to complete configuration.
6. Perform the Soft Reset to Factory Default in this guide. This will reset the unit to “DHCP” mode. If there is a DHCP
Server on the network, the DHCP Server will assign an IP Address to the AP.
HTTP Interface or Telnet Interface Does Not Work
1. Make sure you are using a compatible browser:
– Microsoft Internet Explorer 6 with Service Pack 1 or later
– Netscape 7.1 or later
2. Make sure you have the proper IP address. Enter your Access Point’s IP Address in the browser address bar, similar
to this example:
http://192.168.1.100
When the Enter Network Password window appears, leave the User Name field empty and enter the HTTP
password in the Password field. The default HTTP password is public.
3. Use the CLI over the serial port to check the IP Access Table, which can be restricting access to Telnet and HTTP.
HTML Help Files Do Not Appear
1. Verify that the HTML Help files are installed in the default directory:
C:/Program Files/ORiNOCO/AP-4x00MR-LR/HTML.
If the Help files are not located in this folder, contact your network administrator to find out where the Help files are
located on your server.
2. Copy the entire folder to your Web server.
3. Perform the following steps to specify the path for the Help files:
a. Click the Commands button in the HTTP interface.
b. Select the Help tab located at the top of the screen.
c. Enter the pathname where the Help files are located in the Help Link box. This must be an HTTP address.
d. Click OK.

Troubleshooting MeshMAX 5054 Series User Guide
Troubleshooting Concepts for Mesh and Access Point Module
235
Telnet CLI Does Not Work
1. Make sure you have the proper IP Address. Enter your AP IP address in the Telnet connection dialog, from a DOS
prompt, type:
C:\> telnet <AP IP Address>
2. Use the CLI over the serial port to check the IP Access Table, which can be restricting access to Telnet and HTTP.
TFTP Server Does Not Work
1. Make sure the TFTP Server has been started.
2. Verify the IP address of the TFTP Server. The server may be local or remote, so long as it has a valid IP address.
3. Configure the TFTP Server to “point” to the folder containing the file to be downloaded (or to the folder in which the file
is to be uploaded).
4. Verify that you have entered the proper AP Image file name (including the file extension) and directory path (if
needed).
5. If you have a problem uploading a file, verify that the TFTP server is configured to allow uploads (typically the default
setting is to allow only downloads).
Client Connection Problems
Client Software Finds No Connection
Make sure you have configured your client software with the proper Network Name and Security settings. Network
Names and WEP Keys are typically allocated and maintained by your network administrator.
Client PC Card Does Not Work
1. Make sure you are using the latest PC Card driver software.
2. Download and install the latest ORiNOCO client software from http://support.proxim.com.
Intermittent Loss of Connection
1. Make sure you are within range of an active AP.
2. You can check the signal strength using the signal strength gauge on your client software.
Client Does Not Receive an IP Address - Cannot Connect to Internet
1. If the AP is configured as a DHCP server, open the Web-browser Interface and select the Configure button and then
the Network tab to make sure the proper DHCP settings are being used.
2. If you are not using the DHCP server feature on the AP, then make sure that your local DHCP server is accessible
from the Access Point’s subnet.
3. If using PoE, make sure you are not using a crossover Ethernet cable between the AP and the hub.
VLAN Operation Issues
Verifying Proper Operation of the VLAN Feature
The correct VLAN configuration can be verified by “pinging” both wired and wireless hosts from both sides of the AP
device and the network switch. Traffic can be “sniffed” on both the wired (Ethernet) and wireless (WDS) backbones (if
configured). Bridge frames generated by wireless clients and viewed on one of the backbones should contain IEEE
802.1Q compliant VLAN headers or tags. The VLAN ID in the headers should correspond to one of the VLAN User IDs
configured for the AP.
NOTE: The Mesh and Access Point Module supports 16 VLAN/SSID pairs per wireless interface, each with a configured
security profile.

Troubleshooting MeshMAX 5054 Series User Guide
Troubleshooting Concepts for Mesh and Access Point Module
236
VLAN Workgroups
The correct VLAN assignment can be verified by pinging the AP to ensure connectivity, by pinging the switch to ensure
VLAN properties, and by pinging hosts past the switch to confirm the switch is functional. Ultimately, traffic can be
“sniffed” on the Ethernet or WDS interfaces (if configured) using third-party packages. Most problems can be avoided by
ensuring that 802.1Q compliant VLAN tags containing the proper VLAN ID have been inserted in the bridged frames. The
VLAN ID in the header should correspond to the user’s assigned network name.
What if network traffic is being directed to a nonexistent host?
• All sessions are disconnected, traffic is lost, and a Forced Reload is necessary.
• Workaround: you can configure the switch to mimic the nonexistent host.
I have just configured the Management ID and now I can't manage the AP?
• Check to ensure your password is correct. If your password is incorrect or all inbound packets do NOT have the
correct tag, then a Forced Reload is necessary.
CAUTION: The Forced Reload procedure disconnects all users and resets all values to factory defaults.
There Is No Data Link
1. Verify that the indicator for the port is “on.”
2. Verify that the PoE hub is connected to the Ethernet network with a good connection.
3. Verify that the Ethernet cable is Category 5 or better and is less than 100 meters (approximately 325 feet) in length
from the Ethernet source to the AP.
4. Try to connect a different device to the same port on the PoE hub – if it works and a link is established, there is
probably a faulty data link in the AP.
5. Try to re-connect the AP to a different output port (remember to move the input port accordingly) – if it works, there is
probably a faulty output or input port in the PoE hub or a bad RJ-45 connection.
“Overload” Indications
1. Verify that you are not using a cross-over cable between the PoE output port and the AP.
2. Verify that there is no short over any of the twisted pair cables.
3. Move the device into a different output port (remember to move the input port accordingly); if it works, there is
probably a faulty port or bad RJ-45 connection.
Recovery Procedures
The most common installation problems relate to IP addressing. For example, without the TFTP server IP Address, you
will not be able to download a new AP Image to the AP. IP Address management is fundamental. We suggest you create
a chart to document and validate the IP addresses for your system.
If the password is lost or forgotten, you will need to reset the AP to default values. The Soft Reset to Factory Default and
Hard Reset to Factory Default procedures reset configuration settings, but do not change the current AP Image.
If the AP has a corrupted software image, follow the Forced Reload procedure to erase the current AP Image and
download a new image.
Soft Reset to Factory Defaults
Use this procedure to reset the network configuration values, including the password, IP address, and subnet mask. The
current AP Image is not deleted.
1. Click Commands > Reset.
2. Click Reset to Factory Default; the device is reset to its factory default state.

Troubleshooting MeshMAX 5054 Series User Guide
Troubleshooting Concepts for Mesh and Access Point Module
237
3. If not using DHCP, use the ScanTool or use CLI over a serial connection to set the IP address, subnet mask, and other
IP parameters. See CLI for Mesh and Access Point Module for CLI information.
If you do not have access to the HTTP or CLI interfaces, use the procedure described in Hard Reset to Factory Default.
Hard Reset to Factory Defaults
If you cannot access the unit or you have lost its password, you can reset the unit to the factory default settings using the
Reload button on the power injector, as described below.
NOTE: This option is not available on FC versions of the hardware.
1. Using the end of a paper clip or pin, depress and hold the Reload button on the side of the unit’s power injector for a
minimum of 5 seconds but no more than 10 seconds. The configuration is deleted from the unit and the unit reboots,
using a factory default configuration.
NOTE: You need to use a pin or the end of a paperclip to press the button.
CAUTION: If you hold the Reload button for longer than 20 seconds, you may go into Forced Reload mode, which
erases the unit’s embedded software. This software must be reloaded through an Ethernet connection
with access to a TFTP server. See Forced Reload below for instructions.
2. If not using DHCP, use the ScanTool or use CLI over a serial connection to set the IP address, subnet mask, and other
IP parameters. See CLI for Mesh and Access Point Module for CLI information.
Forced Reload
With Forced Reload, you bring the unit into bootloader mode by erasing the embedded software. Use this procedure only
as a last resort if the unit does not boot and the procedure did not help.
CAUTION: By completing this procedure, the embedded software in the AP will be erased. You will need to reload the
software before the unit is operational.
To do a forced reload:
1. Disconnect and reconnect power to the unit.
2. Using the end of a paper clip or pin, immediate press and hold the Reload button on the side of the unit’s power
injector for about 20 seconds. Image and configuration are deleted from the unit.
3. Follow one of the procedures below to load a new AP Image to the Access Point:
– Download a New Image Using ScanTool
– Download a New Image Using the Bootloader CLI
Because the CLI option requires a physical connection to the unit’s serial port, Proxim recommends the ScanTool
option.
Download a New Image Using ScanTool
To download the AP Image, you will need an Ethernet connection to the computer on which the TFTP server resides and
to a computer that is running ScanTool (this is either two separate computers connected to the same network or a single
computer running both programs).
ScanTool detects if an Access Point does not have a valid software image installed. In this case, the TFTP Server and
Image File Name parameters are enabled in the ScanTool’s Change screen so you can download a new image to the
unit. (These fields are grayed out if ScanTool does not detect a software image problem.)
Preparing to Download the AP Image
Before starting, you need to know the Access Point’s IP address, subnet mask, the TFTP Server IP Address, and the AP
Image file name. Make sure the TFTP server is running and configured to point to the folder containing the image to be
downloaded.

Troubleshooting MeshMAX 5054 Series User Guide
Troubleshooting Concepts for Mesh and Access Point Module
238
Download Procedure
Follow these steps to use ScanTool to download a software image to an Access Point with a missing image:
1. Download the latest software from http://support.proxim.com.
1. Copy the latest software updates to your TFTP server.
2. Launch ScanTool.
3. Highlight the entry for the AP you want to update and click Change.
4. Set IP Address Type to Static.
NOTE: You need to assign static IP information temporarily to the Access Point since its DHCP client functionality is not
available when no image is installed on the device.
5. Enter an unused IP address that is valid on your network in the IP Address field. You may need to contact your
network administrator to get this address.
6. Enter the network’s Subnet Mask in the field provided.
7. Enter the network’s Gateway IP Address, if necessary. You may need to contact your network administrator to get
this address. You should only need to enter the default gateway address (169.254.128.133) if the Access Point and
the TFTP server are separated by a router.
8. Enter the IP address of your TFTP server in the field provided.
9. Enter the Image File Name (including the file extension). Enter the full directory path and file name. If the file is
located in the default TFTP directory, you need enter only the file name.
10.Click OK.
The Access Point will reboot and the download will begin automatically. You should see downloading activity begin
after a few seconds within the TFTP server’s status screen.
11.Click OK when prompted that the device has been updated successfully to return to the Scan List screen.
12.Click Cancel to close the ScanTool.
13.When the download process is complete, configure the AP.
Download a New Image Using the Bootloader CLI
To download the AP Image, you will need an Ethernet connection to the computer on which the TFTP server resides.
This can be any computer on the LAN or connected to the AP with a cross-over Ethernet cable.
You must also connect the AP to a computer with a standard serial cable and use a terminal client, such as
HyperTerminal. From the terminal, enter CLI Commands to set the IP address and download an AP Image.
Preparing to Download the AP Image
Before starting, you need to know the Access Point’s IP address, subnet mask, the TFTP Server IP Address, and the AP
Image file name. Make sure the TFTP server is running and configured to point to the folder containing the image to be
downloaded.
Download Procedure
1. Download the latest software from http://support.proxim.com.
2. Copy the latest software updates to your TFTP server’s default directory.
3. Use a straight-through serial cable to connect the Access Point’s serial port to your computer’s serial port.
4. Open your terminal emulation program (like HyperTerminal) and set the following connection properties:
• Com Port: <COM1, COM2, etc., depending on your computer>
• Baud rate: 9600
•Data Bits: 8
• Stop bits: 1

Troubleshooting MeshMAX 5054 Series User Guide
Troubleshooting Concepts for Mesh and Access Point Module
239
• Flow Control: None
• Parity: None
5. Under File > Properties > Settings > ASCII Setup, enable the Send line ends with line feeds option.
HyperTerminal sends a line return at the end of each line of code.
6. Press the RESET button on the AP.
The terminal display shows Power On Self Tests (POST) activity. After approximately 30 seconds, a message
indicates: Sending Traps to SNMP manager periodically. After this message appears, press the ENTER key
repeatedly until the following prompt appears:
[Device name]>
7. Enter only the following statements:
[Device name]> show (to view configuration parameters and values)
[Device name]> set ipaddrtype static
[Device name]> set ipaddr <Access Point IP Address>
[Device name]> set ipsubmask <IP Mask>
[Device name]> set tftpipaddr <TFTP Server IP Address>
[Device name]> set tftpfilename <AP Image File Name, including file extension>
[Device name]> set ipgw <Gateway IP Address>
[Device name]> show (to confirm your new settings)
[Device name]> reboot
Example:
[Device name]> show
[Device name]> set ipaddrtype static
[Device name]> set ipaddr 10.0.0.12
[Device name]> set ipsubmask 255.255.255.0
[Device name]> set tftpipaddr 10.0.0.20
[Device name]> set tftpfilename MyImage.bin
[Device name]> set ipgw 10.0.0.30
[Device name]> show
[Device name]> reboot
The AP will reboot and then download the image file. You should see downloading activity begin after a few seconds
within the TFTP server’s status screen.
8. When the download process is complete, configure the AP.
Setting IP Address using Serial Port
Use the following procedure to set an IP address over the serial port using the CLI. The network administrator typically
provides the AP IP address.
Hardware and Software Requirements
• Standard straight-through serial data (RS-232) cable with one DB9 connector and one RJ11 connector (not included
with FC units).
• ASCII Terminal software, such as HyperTerminal.
Attaching the Serial Port Cable
1. Connect one end of the serial cable to the AP and the other end to a serial port on your computer.
2. Power on the computer and AP, if necessary.

Troubleshooting MeshMAX 5054 Series User Guide
Troubleshooting Concepts for Mesh and Access Point Module
240
Initializing the IP Address using CLI
After installing the serial port cable, you may use the CLI to communicate with the AP. CLI supports most generic terminal
emulation programs, such as HyperTerminal (which is included with the Windows operating systems). In addition, many
web sites offer shareware or commercial terminal programs you can download. Once the IP address has been assigned,
you can use the HTTP interface or the CLI over Telnet to complete configuration.
Follow these steps to assign the AP an IP address:
1. Open your terminal emulation program (like HyperTerminal) and set the following connection properties:
• Com Port: <COM1, COM2, etc., depending on your computer>
• Baud rate: 9600
•Data Bits: 8
• Stop bits: 1
• Flow Control: None
• Parity: None
2. Under File > Properties > Settings > ASCII Setup, enable the Send line ends with line feeds option.
HyperTerminal sends a line return at the end of each line of code.
3. Press the RESET button on the AP.
The terminal display shows Power On Self Tests (POST) activity, and then displays a CLI prompt, similar to the
example below. This process may take up to 90 seconds.
[Device name]> Please enter password:
4. Enter the CLI password (default is public).
The terminal displays a welcome message and then the CLI Prompt:
[Device name]>
5. Enter show ip. Network parameters appear:
6. Change the IP address and other network values using set and reboot CLI commands, similar to the example below
(use your own IP address and subnet mask). Note that IP Address Type is set to Dynamic by default. If you have a
DHCP server on your network, you should not need to manually configure the Access Point’s IP address; the Access
Point will obtain an IP address from the network’s DHCP server during boot-up.
After each entry the CLI reminds you to reboot; however wait to reboot until all commands have been entered.
[Device name]> set ipaddrtype static
[Device name]> set ipaddr <IP Address>
[Device name]> set ipsubmask <IP Subnet Mask>
[Device name]> set ipgw <Default Gateway IP Address>
[Device name]> show ip (to confirm your new settings)
[Device name]> reboot 0
7. After the AP reboots, verify the new IP address by reconnecting to the CLI and enter a show ip command.
Alternatively, you can ping the AP from a network computer to confirm that the new IP address has taken effect.
8. When the proper IP address is set, use the HTTP interface or CLI over Telnet to configure the rest of the unit’s
operating parameters.
Related Applications
RADIUS Authentication Server
If you enabled RADIUS Authentication on the AP, make sure that your network’s RADIUS servers are operational.
Otherwise, clients will not be able to log in. There are several reasons the authentication server services might be
unavailable, here are two typical things to check:

Troubleshooting MeshMAX 5054 Series User Guide
Troubleshooting Concepts for Mesh and Access Point Module
241
• Make sure you have the proper RADIUS authentication server information setup configured in the AP. Check the
RADIUS Authentication Server’s Shared Secret and Destination Port number (default is 1812; for RADIUS
Accounting, the default is 1813).
• Make sure the RADIUS authentication server RAS setup matches the AP.
TFTP Server
The “Trivial File Transfer Protocol” (TFTP) server allows you to transfer files across a network. You can upload
configuration files from the AP for backup or copying, and you can download configuration files or new software images.
The TFTP software is located on the installation CD.
If a TFTP server is not configured and running, you will not be able to download and upload images and configuration
files to/from the AP. Remember that the TFTP server does not have to be local, so long as you have a valid TFTP IP
address. Note that you do not need a TFTP server running unless you want to transfer files to or from the AP.
After the TFTP server is installed:
• Check to see that TFTP is configured to point to the directory containing the AP Image.
• Make sure you have the proper TFTP server IP Address, the proper AP Image file name, and that the TFTP server is
connected.
• Make sure the TFTP server is configured to both Transmit and Receive files (on the TFTP server’s Security tab), with
no automatic shutdown or time-out (on the Auto Close tab).

MeshMAX 5054 Series User Guide
242
A
Country Codes for Subscriber Module
In the CLI and MIB browser, the country code is set using the string code, as shown in the following example.
Example: To set Taiwan as the country:
set syscountrycode TW
NOTE: The country code must be entered in capital letters.

Country Codes for Subscriber Module MeshMAX 5054 Series User Guide
Channels/Frequencies by Country
243
Channels/Frequencies by Country
Country (Code) Frequency
Bands
DFS Allowed Channels (Center Freq)
20 MHz 10 MHz 5 MHz
All Channels - 5
GHz (A5)
All 5 GHz bands No All 20 MHz channels. All 10 MHz channels. All 5 MHz channels.
Argentina (AR) 5.25 - 5.35 GHz and
5.725 - 5.825 GHz
No 56 (5280), 60 (5300),
64 (5320), 149 (5745),
153 (5765), 157 (5785),
161 (5805)
56 (5280), 58 (5290),
60 (5300), 62 (5310),
64 (5320), 149 (5745),
151 (5755), 153 (5765),
155 (5775), 157 (5785),
159 (5795), 161 (5805)
56 (5280), 57 (5285), 58 (5290), 59 (5295),
60 (5300), 61 (5305), 62 (5310), 63 (5315),
64 (5320), 149 (5745), 150 (5750), 151 (5755),
152 (5760), 153 (5765), 154 (5770), 155 (5775),
156 (5780), 157 (5785), 158 (5790), 159 (5795),
160 (5800), 161 (5805)
Australia (AU) 5.725 - 5.85 GHz No 149 (5745), 153 (5765),
157 (5785), 161 (5805),
165 (5825)
147 (5735), 149 (5745),
151 (5755), 153 (5765),
155 (5775), 157 (5785),
159 (5795), 161 (5805),
163 (5815), 165 (5825),
167 (5835)
147 (5735), 148 (5740), 149 (5745), 150 (5750),
151 (5755), 152 (5760), 153 (5765), 154 (5770),
155 (5775), 156 (5780), 157 (5785), 158 (5790),
159 (5795), 160 (5800), 161 (5805), 162 (5810),
163 (5815), 164 (5820), 165 (5825), 166 (5830),
167 (5835)
Austria (AT) 5.47 - 5.725 GHz Yes 100 (5500), 104 (5520),
108 (5540), 112 (5560),
116 (5580), 120 (5600),
124 (5620), 128 (5640),
132 (5660), 136 (5680),
140 (5700)
98 (5490), 100 (5500),
102 (5510), 104 (5520),
106 (5530), 108 (5540),
110 (5550), 112 (5560),
114 (5570), 116 (5580),
118 (5590), 120 (5600),
122 (5610), 124 (5620),
126 (5630), 128 (5640),
130 (5650), 132 (5660),
134 (5670), 136 (5680),
138 (5690), 140 (5700),
142 (5710)
97 (5485), 98 (5490), 99 (5495), 100 (5500),
101 (5505), 102 (5510), 103 (5515), 104 (5520),
105 (5525), 106 (5530), 107 (5535), 108 (5540),
109 (5545), 110 (5550), 111 (5555), 112 (5560),
113 (5565), 114 (5570), 115 (5575), 116 (5580),
117 (5585), 118 (5590), 119 (5595), 120 (5600),
121 (5605), 122 (5610), 123 (5615), 124 (5620),
125 (5625), 126 (5630), 127 (5635), 128 (5640),
129 (5645), 130 (5650), 131 (5655), 132 (5660),
133 (5665), 134 (5670), 135 (5675), 136 (5680),
137 (5685), 138 (5690), 139 (5695), 140 (5700),
141 (5705), 142 (5710)
Belgium (BE) 5.47 - 5.725 GHz Yes 100 (5500), 104 (5520),
108 (5540), 112 (5560),
116 (5580), 120 (5600),
124 (5620), 128 (5640),
132 (5660), 136 (5680),
140 (5700)
98 (5490), 100 (5500),
102 (5510), 104 (5520),
106 (5530), 108 (5540),
110 (5550), 112 (5560),
114 (5570), 116 (5580),
118 (5590), 120 (5600),
122 (5610), 124 (5620),
126 (5630), 128 (5640),
130 (5650), 132 (5660),
134 (5670), 136 (5680),
138 (5690), 140 (5700),
142 (5710)
97 (5485), 98 (5490), 99 (5495), 100 (5500),
101 (5505), 102 (5510), 103 (5515), 104 (5520),
105 (5525), 106 (5530), 107 (5535), 108 (5540),
109 (5545), 110 (5550), 111 (5555), 112 (5560),
113 (5565), 114 (5570), 115 (5575), 116 (5580),
117 (5585), 118 (5590), 119 (5595), 120 (5600),
121 (5605), 122 (5610), 123 (5615), 124 (5620),
125 (5625), 126 (5630), 127 (5635), 128 (5640),
129 (5645), 130 (5650), 131 (5655), 132 (5660),
133 (5665), 134 (5670), 135 (5675), 136 (5680),
137 (5685), 138 (5690), 139 (5695), 140 (5700),
141 (5705), 142 (5710)
Belize (BZ) 5.725 - 5.85 GHz No 149 (5745), 153 (5765),
157 (5785), 161 (5805),
165 (5825)
149 (5745), 151 (5755),
153 (5765), 155 (5775),
157 (5785), 159 (5795),
161 (5805), 163 (5815),
165 (5825), 167 (5835)
149 (5745), 150 (5750), 151 (5755), 152 (5760),
153 (5765), 154 (5770), 155 (5775), 156 (5780),
157 (5785), 158 (5790), 159 (5795), 160 (5800),
161 (5805), 162 (5810), 163 (5815), 164 (5820),
165 (5825), 166 (5830), 167 (5835)

Country Codes for Subscriber Module MeshMAX 5054 Series User Guide
Channels/Frequencies by Country
244
Bolivia (BO) 5.725 - 5.85 GHz No 149 (5745), 153 (5765),
157 (5785), 161 (5805),
165 (5825)
149 (5745), 151 (5755),
153 (5765), 155 (5775),
157 (5785), 159 (5795),
161 (5805), 163 (5815),
165 (5825), 167 (5835)
149 (5745), 150 (5750), 151 (5755), 152 (5760),
153 (5765), 154 (5770), 155 (5775), 156 (5780),
157 (5785), 158 (5790), 159 (5795), 160 (5800),
161 (5805), 162 (5810), 163 (5815), 164 (5820),
165 (5825), 166 (5830), 167 (5835)
Brazil (BR) 5.47 - 5.725 GHz Yes 100 (5500), 104 (5520),
108 (5540), 112 (5560),
116 (5580), 120 (5600),
124 (5620), 128 (5640),
132 (5660), 136 (5680),
140 (5700)
98 (5490), 100 (5500),
102 (5510), 104 (5520),
106 (5530), 108 (5540),
110 (5550), 112 (5560),
114 (5570), 116 (5580),
118 (5590), 120 (5600),
122 (5610), 124 (5620),
126 (5630), 128 (5640),
130 (5650), 132 (5660),
134 (5670), 136 (5680),
138 (5690), 140 (5700),
142 (5710)
97 (5485), 98 (5490), 99 (5495), 100 (5500),
101 (5505), 102 (5510), 103 (5515), 104 (5520),
105 (5525), 106 (5530), 107 (5535), 108 (5540),
109 (5545), 110 (5550), 111 (5555), 112 (5560),
113 (5565), 114 (5570), 115 (5575), 116 (5580),
117 (5585), 118 (5590), 119 (5595), 120 (5600),
121 (5605), 122 (5610), 123 (5615), 124 (5620),
125 (5625), 126 (5630), 127 (5635), 128 (5640),
129 (5645), 130 (5650), 131 (5655), 132 (5660),
133 (5665), 134 (5670), 135 (5675), 136 (5680),
137 (5685), 138 (5690), 139 (5695), 140 (5700),
141 (5705), 142 (5710)
Brazil 5.8 GHz (B1) 5.725 - 5.85 GHz No 149 (5745), 153 (5765),
157 (5785), 161 (5805),
165 (5825)
149 (5745), 151 (5755),
153 (5765), 155 (5775),
157 (5785), 159 (5795),
161 (5805), 163 (5815),
165 (5825), 167 (5835)
149 (5745), 150 (5750), 151 (5755), 152 (5760),
153 (5765), 154 (5770), 155 (5775), 156 (5780),
157 (5785), 158 (5790), 159 (5795), 160 (5800),
161 (5805), 162 (5810), 163 (5815), 164 (5820),
165 (5825), 166 (5830), 167 (5835)
Brunei
Darussalam (BN)
5.725 - 5.85 GHz No 149 (5745), 153 (5765),
157 (5785), 161 (5805),
165 (5825)
149 (5745), 151 (5755),
153 (5765), 155 (5775),
157 (5785), 159 (5795),
161 (5805), 163 (5815),
165 (5825), 167 (5835)
149 (5745), 150 (5750), 151 (5755), 152 (5760),
153 (5765), 154 (5770), 155 (5775), 156 (5780),
157 (5785), 158 (5790), 159 (5795), 160 (5800),
161 (5805), 162 (5810), 163 (5815), 164 (5820),
165 (5825), 166 (5830), 167 (5835)
Bulgaria (BG) 5.47 - 5.725 GHz Yes 100 (5500), 104 (5520),
108 (5540), 112 (5560),
116 (5580), 120 (5600),
124 (5620), 128 (5640),
132 (5660), 136 (5680),
140 (5700)
98 (5490), 100 (5500),
102 (5510), 104 (5520),
106 (5530), 108 (5540),
110 (5550), 112 (5560),
114 (5570), 116 (5580),
118 (5590), 120 (5600),
122 (5610), 124 (5620),
126 (5630), 128 (5640),
130 (5650), 132 (5660),
134 (5670), 136 (5680),
138 (5690), 140 (5700),
142 (5710)
97 (5485), 98 (5490), 99 (5495), 100 (5500),
101 (5505), 102 (5510), 103 (5515), 104 (5520),
105 (5525), 106 (5530), 107 (5535), 108 (5540),
109 (5545), 110 (5550), 111 (5555), 112 (5560),
113 (5565), 114 (5570), 115 (5575), 116 (5580),
117 (5585), 118 (5590), 119 (5595), 120 (5600),
121 (5605), 122 (5610), 123 (5615), 124 (5620),
125 (5625), 126 (5630), 127 (5635), 128 (5640),
129 (5645), 130 (5650), 131 (5655), 132 (5660),
133 (5665), 134 (5670), 135 (5675), 136 (5680),
137 (5685), 138 (5690), 139 (5695), 140 (5700),
141 (5705), 142 (5710)
Canada (CA) 5.725 - 5.85 GHz No 149 (5745), 153 (5765),
157 (5785), 161 (5805),
165 (5825)
147 (5735), 149 (5745),
151 (5755), 153 (5765),
155 (5775), 157 (5785),
159 (5795), 161 (5805),
163 (5815), 165 (5825),
167 (5835)
147 (5735), 148 (5740), 149 (5745), 150 (5750),
151 (5755), 152 (5760), 153 (5765), 154 (5770),
155 (5775), 156 (5780), 157 (5785), 158 (5790),
159 (5795), 160 (5800), 161 (5805), 162 (5810),
163 (5815), 164 (5820), 165 (5825), 166 (5830),
167 (5835)
Country (Code) Frequency
Bands
DFS Allowed Channels (Center Freq)
20 MHz 10 MHz 5 MHz

Country Codes for Subscriber Module MeshMAX 5054 Series User Guide
Channels/Frequencies by Country
245
Canada DFS (C1) 5.25 - 5.35 GHz and
5.47 - 5.725 GHz
Yes 56 (5280), 60 (5300),
64 (5320), 100 (5500),
104 (5520), 108 (5540),
112 (5560), 116 (5580),
120 (5600), 124 (5620),
128 (5640), 132 (5660),
136 (5680), 140 (5700)
54 (5270), 56 (5280),
58 (5290), 60 (5300),
62 (5310), 64 (5320),
66 (5330), 98 (5490),
100 (5500), 102 (5510),
104 (5520), 106 (5530),
108 (5540), 110 (5550),
112 (5560), 114 (5570),
116 (5580), 118 (5590),
120 (5600), 122 (5610),
124 (5620), 126 (5630),
128 (5640), 130 (5650),
132 (5660), 134 (5670),
136 (5680), 138 (5690),
140 (5700), 142 (5710)
53 (5265), 54 (5270), 55 (5275), 56 (5280),
57 (5285), 58 (5290), 59 (5295), 60 (5300),
61 (5305), 62 (5310), 63 (5315), 64 (5320),
65 (5325), 66 (5330), 67 (5335), 97 (5485),
98 (5490), 99 (5495), 100 (5500), 101 (5505),
102 (5510), 103 (5515), 104 (5520), 105 (5525),
106 (5530), 107 (5535), 108 (5540), 109 (5545),
110 (5550), 111 (5555), 112 (5560), 113 (5565),
114 (5570), 115 (5575), 116 (5580), 117 (5585),
118 (5590), 119 (5595), 120 (5600), 121 (5605),
122 (5610), 123 (5615), 124 (5620), 125 (5625),
126 (5630), 127 (5635), 128 (5640), 129 (5645),
130 (5650), 131 (5655), 132 (5660), 133 (5665),
134 (5670), 135 (5675), 136 (5680), 137 (5685),
138 (5690), 139 (5695), 140 (5700), 141 (5705),
142 (5710)
China (CN) 5.725 - 5.85 GHz No 149 (5745), 153 (5765),
157 (5785), 161 (5805),
165 (5825)
149 (5745), 151 (5755),
153 (5765), 155 (5775),
157 (5785), 159 (5795),
161 (5805), 163 (5815),
165 (5825), 167 (5835)
149 (5745), 150 (5750), 151 (5755), 152 (5760),
153 (5765), 154 (5770), 155 (5775), 156 (5780),
157 (5785), 158 (5790), 159 (5795), 160 (5800),
161 (5805), 162 (5810), 163 (5815), 164 (5820),
165 (5825), 166 (5830), 167 (5835)
Colombia (CO) 5.25 - 5.35 GHz and
5.725 - 5.85 GHz
No 56 (5280), 60 (5300),
64 (5320), 149 (5745),
153 (5765), 157 (5785),
161 (5805), 165 (5825)
54 (5270), 56 (5280),
58 (5290), 60 (5300),
62 (5310), 64 (5320),
66 (5330), 147 (5735),
149 (5745), 151 (5755),
153 (5765), 155 (5775),
157 (5785), 159 (5795),
161 (5805), 163 (5815),
165 (5825), 167 (5835)
53 (5265), 54 (5270), 55 (5275), 56 (5280),
57 (5285), 58 (5290), 59 (5295), 60 (5300),
61 (5305), 62 (5310), 63 (5315), 64 (5320),
65 (5325), 66 (5330), 67 (5335), 147 (5735),
148 (5740), 149 (5745), 150 (5750), 151 (5755),
152 (5760), 153 (5765), 154 (5770), 155 (5775),
156 (5780), 157 (5785), 158 (5790), 159 (5795),
160 (5800), 161 (5805), 162 (5810), 163 (5815),
164 (5820), 165 (5825), 166 (5830), 167 (5835)
Cyprus (CY) 5.47 - 5.725 GHz Yes 100 (5500), 104 (5520),
108 (5540), 112 (5560),
116 (5580), 120 (5600),
124 (5620), 128 (5640),
132 (5660), 136 (5680),
140 (5700)
98 (5490), 100 (5500),
102 (5510), 104 (5520),
106 (5530), 108 (5540),
110 (5550), 112 (5560),
114 (5570), 116 (5580),
118 (5590), 120 (5600),
122 (5610), 124 (5620),
126 (5630), 128 (5640),
130 (5650), 132 (5660),
134 (5670), 136 (5680),
138 (5690), 140 (5700),
142 (5710)
97 (5485), 98 (5490), 99 (5495), 100 (5500),
101 (5505), 102 (5510), 103 (5515), 104 (5520),
105 (5525), 106 (5530), 107 (5535), 108 (5540),
109 (5545), 110 (5550), 111 (5555), 112 (5560),
113 (5565), 114 (5570), 115 (5575), 116 (5580),
117 (5585), 118 (5590), 119 (5595), 120 (5600),
121 (5605), 122 (5610), 123 (5615), 124 (5620),
125 (5625), 126 (5630), 127 (5635), 128 (5640),
129 (5645), 130 (5650), 131 (5655), 132 (5660),
133 (5665), 134 (5670), 135 (5675), 136 (5680),
137 (5685), 138 (5690), 139 (5695), 140 (5700),
141 (5705), 142 (5710)
Country (Code) Frequency
Bands
DFS Allowed Channels (Center Freq)
20 MHz 10 MHz 5 MHz

Country Codes for Subscriber Module MeshMAX 5054 Series User Guide
Channels/Frequencies by Country
246
Czech Republic 5.47 - 5.725 GHz Yes 100 (5500), 104 (5520),
108 (5540), 112 (5560),
116 (5580), 120 (5600),
124 (5620), 128 (5640),
132 (5660), 136 (5680),
140 (5700)
98 (5490), 100 (5500),
102 (5510), 104 (5520),
106 (5530), 108 (5540),
110 (5550), 112 (5560),
114 (5570), 116 (5580),
118 (5590), 120 (5600),
122 (5610), 124 (5620),
126 (5630), 128 (5640),
130 (5650), 132 (5660),
134 (5670), 136 (5680),
138 (5690), 140 (5700),
142 (5710)
97 (5485), 98 (5490), 99 (5495), 100 (5500),
101 (5505), 102 (5510), 103 (5515), 104 (5520),
105 (5525), 106 (5530), 107 (5535), 108 (5540),
109 (5545), 110 (5550), 111 (5555), 112 (5560),
113 (5565), 114 (5570), 115 (5575), 116 (5580),
117 (5585), 118 (5590), 119 (5595), 120 (5600),
121 (5605), 122 (5610), 123 (5615), 124 (5620),
125 (5625), 126 (5630), 127 (5635), 128 (5640),
129 (5645), 130 (5650), 131 (5655), 132 (5660),
133 (5665), 134 (5670), 135 (5675), 136 (5680),
137 (5685), 138 (5690), 139 (5695), 140 (5700),
141 (5705), 142 (5710)
Denmark (DK) 5.47 - 5.725 GHz Yes 100 (5500), 104 (5520),
108 (5540), 112 (5560),
116 (5580), 120 (5600),
124 (5620), 128 (5640),
132 (5660), 136 (5680),
140 (5700)
98 (5490), 100 (5500),
102 (5510), 104 (5520),
106 (5530), 108 (5540),
110 (5550), 112 (5560),
114 (5570), 116 (5580),
118 (5590), 120 (5600),
122 (5610), 124 (5620),
126 (5630), 128 (5640),
130 (5650), 132 (5660),
134 (5670), 136 (5680),
138 (5690), 140 (5700),
142 (5710)
97 (5485), 98 (5490), 99 (5495), 100 (5500),
101 (5505), 102 (5510), 103 (5515), 104 (5520),
105 (5525), 106 (5530), 107 (5535), 108 (5540),
109 (5545), 110 (5550), 111 (5555), 112 (5560),
113 (5565), 114 (5570), 115 (5575), 116 (5580),
117 (5585), 118 (5590), 119 (5595), 120 (5600),
121 (5605), 122 (5610), 123 (5615), 124 (5620),
125 (5625), 126 (5630), 127 (5635), 128 (5640),
129 (5645), 130 (5650), 131 (5655), 132 (5660),
133 (5665), 134 (5670), 135 (5675), 136 (5680),
137 (5685), 138 (5690), 139 (5695), 140 (5700),
141 (5705), 142 (5710)
Dominican
Republic (DO)
5.25 - 5.35 GHz and
5.725 - 5.85 GHz
No 56 (5280), 60 (5300),
64 (5320), 149 (5745),
153 (5765), 157 (5785),
161 (5805), 165 (5825)
54 (5270), 56 (5280),
58 (5290), 60 (5300),
62 (5310), 64 (5320),
66 (5330), 147 (5735),
149 (5745), 151 (5755),
153 (5765), 155 (5775),
157 (5785), 159 (5795),
161 (5805), 163 (5815),
165 (5825), 167 (5835)
53 (5265), 54 (5270), 55 (5275), 56 (5280),
57 (5285), 58 (5290), 59 (5295), 60 (5300),
61 (5305), 62 (5310), 63 (5315), 64 (5320),
65 (5325), 66 (5330), 67 (5335), 147 (5735),
148 (5740), 149 (5745), 150 (5750), 151 (5755),
152 (5760), 153 (5765), 154 (5770), 155 (5775),
156 (5780), 157 (5785), 158 (5790), 159 (5795),
160 (5800), 161 (5805), 162 (5810), 163 (5815),
164 (5820), 165 (5825), 166 (5830), 167 (5835)
Estonia (EE) 5.47 - 5.725 GHz Yes 100 (5500), 104 (5520),
108 (5540), 112 (5560),
116 (5580), 120 (5600),
124 (5620), 128 (5640),
132 (5660), 136 (5680),
140 (5700)
98 (5490), 100 (5500),
102 (5510), 104 (5520),
106 (5530), 108 (5540),
110 (5550), 112 (5560),
114 (5570), 116 (5580),
118 (5590), 120 (5600),
122 (5610), 124 (5620),
126 (5630), 128 (5640),
130 (5650), 132 (5660),
134 (5670), 136 (5680),
138 (5690), 140 (5700),
142 (5710)
97 (5485), 98 (5490), 99 (5495), 100 (5500),
101 (5505), 102 (5510), 103 (5515), 104 (5520),
105 (5525), 106 (5530), 107 (5535), 108 (5540),
109 (5545), 110 (5550), 111 (5555), 112 (5560),
113 (5565), 114 (5570), 115 (5575), 116 (5580),
117 (5585), 118 (5590), 119 (5595), 120 (5600),
121 (5605), 122 (5610), 123 (5615), 124 (5620),
125 (5625), 126 (5630), 127 (5635), 128 (5640),
129 (5645), 130 (5650), 131 (5655), 132 (5660),
133 (5665), 134 (5670), 135 (5675), 136 (5680),
137 (5685), 138 (5690), 139 (5695), 140 (5700),
141 (5705), 142 (5710)
Country (Code) Frequency
Bands
DFS Allowed Channels (Center Freq)
20 MHz 10 MHz 5 MHz

Country Codes for Subscriber Module MeshMAX 5054 Series User Guide
Channels/Frequencies by Country
247
Finland (FI) 5.47 - 5.725 GHz Yes 100 (5500), 104 (5520),
108 (5540), 112 (5560),
116 (5580), 120 (5600),
124 (5620), 128 (5640),
132 (5660), 136 (5680),
140 (5700)
98 (5490), 100 (5500),
102 (5510), 104 (5520),
106 (5530), 108 (5540),
110 (5550), 112 (5560),
114 (5570), 116 (5580),
118 (5590), 120 (5600),
122 (5610), 124 (5620),
126 (5630), 128 (5640),
130 (5650), 132 (5660),
134 (5670), 136 (5680),
138 (5690), 140 (5700),
142 (5710)
97 (5485), 98 (5490), 99 (5495), 100 (5500),
101 (5505), 102 (5510), 103 (5515), 104 (5520),
105 (5525), 106 (5530), 107 (5535), 108 (5540),
109 (5545), 110 (5550), 111 (5555), 112 (5560),
113 (5565), 114 (5570), 115 (5575), 116 (5580),
117 (5585), 118 (5590), 119 (5595), 120 (5600),
121 (5605), 122 (5610), 123 (5615), 124 (5620),
125 (5625), 126 (5630), 127 (5635), 128 (5640),
129 (5645), 130 (5650), 131 (5655), 132 (5660),
133 (5665), 134 (5670), 135 (5675), 136 (5680),
137 (5685), 138 (5690), 139 (5695), 140 (5700),
141 (5705), 142 (5710)
France (FR) 5.47 - 5.725 GHz Yes 100 (5500), 104 (5520),
108 (5540), 112 (5560),
116 (5580), 120 (5600),
124 (5620), 128 (5640),
132 (5660), 136 (5680),
140 (5700)
98 (5490), 100 (5500),
102 (5510), 104 (5520),
106 (5530), 108 (5540),
110 (5550), 112 (5560),
114 (5570), 116 (5580),
118 (5590), 120 (5600),
122 (5610), 124 (5620),
126 (5630), 128 (5640),
130 (5650), 132 (5660),
134 (5670), 136 (5680),
138 (5690), 140 (5700),
142 (5710)
97 (5485), 98 (5490), 99 (5495), 100 (5500),
101 (5505), 102 (5510), 103 (5515), 104 (5520),
105 (5525), 106 (5530), 107 (5535), 108 (5540),
109 (5545), 110 (5550), 111 (5555), 112 (5560),
113 (5565), 114 (5570), 115 (5575), 116 (5580),
117 (5585), 118 (5590), 119 (5595), 120 (5600),
121 (5605), 122 (5610), 123 (5615), 124 (5620),
125 (5625), 126 (5630), 127 (5635), 128 (5640),
129 (5645), 130 (5650), 131 (5655), 132 (5660),
133 (5665), 134 (5670), 135 (5675), 136 (5680),
137 (5685), 138 (5690), 139 (5695), 140 (5700),
141 (5705), 142 (5710)
Germany (DE) 5.47 - 5.725 GHz Yes 100 (5500), 104 (5520),
108 (5540), 112 (5560),
116 (5580), 120 (5600),
124 (5620), 128 (5640),
132 (5660), 136 (5680),
140 (5700)
98 (5490), 100 (5500),
102 (5510), 104 (5520),
106 (5530), 108 (5540),
110 (5550), 112 (5560),
114 (5570), 116 (5580),
118 (5590), 120 (5600),
122 (5610), 124 (5620),
126 (5630), 128 (5640),
130 (5650), 132 (5660),
134 (5670), 136 (5680),
138 (5690), 140 (5700),
142 (5710)
97 (5485), 98 (5490), 99 (5495), 100 (5500),
101 (5505), 102 (5510), 103 (5515), 104 (5520),
105 (5525), 106 (5530), 107 (5535), 108 (5540),
109 (5545), 110 (5550), 111 (5555), 112 (5560),
113 (5565), 114 (5570), 115 (5575), 116 (5580),
117 (5585), 118 (5590), 119 (5595), 120 (5600),
121 (5605), 122 (5610), 123 (5615), 124 (5620),
125 (5625), 126 (5630), 127 (5635), 128 (5640),
129 (5645), 130 (5650), 131 (5655), 132 (5660),
133 (5665), 134 (5670), 135 (5675), 136 (5680),
137 (5685), 138 (5690), 139 (5695), 140 (5700),
141 (5705), 142 (5710)
Greece (GR) 5.47 - 5.725 GHz Yes 100 (5500), 104 (5520),
108 (5540), 112 (5560),
116 (5580), 120 (5600),
124 (5620), 128 (5640),
132 (5660), 136 (5680),
140 (5700)
98 (5490), 100 (5500),
102 (5510), 104 (5520),
106 (5530), 108 (5540),
110 (5550), 112 (5560),
114 (5570), 116 (5580),
118 (5590), 120 (5600),
122 (5610), 124 (5620),
126 (5630), 128 (5640),
130 (5650), 132 (5660),
134 (5670), 136 (5680),
138 (5690), 140 (5700),
142 (5710)
97 (5485), 98 (5490), 99 (5495), 100 (5500),
101 (5505), 102 (5510), 103 (5515), 104 (5520),
105 (5525), 106 (5530), 107 (5535), 108 (5540),
109 (5545), 110 (5550), 111 (5555), 112 (5560),
113 (5565), 114 (5570), 115 (5575), 116 (5580),
117 (5585), 118 (5590), 119 (5595), 120 (5600),
121 (5605), 122 (5610), 123 (5615), 124 (5620),
125 (5625), 126 (5630), 127 (5635), 128 (5640),
129 (5645), 130 (5650), 131 (5655), 132 (5660),
133 (5665), 134 (5670), 135 (5675), 136 (5680),
137 (5685), 138 (5690), 139 (5695), 140 (5700),
141 (5705), 142 (5710)
Country (Code) Frequency
Bands
DFS Allowed Channels (Center Freq)
20 MHz 10 MHz 5 MHz

Country Codes for Subscriber Module MeshMAX 5054 Series User Guide
Channels/Frequencies by Country
248
Guatemala (GT) 5.25 - 5.35 GHz and
5.725 - 5.85 GHz
No 56 (5280), 60 (5300),
64 (5320), 149 (5745),
153 (5765), 157 (5785),
161 (5805), 165 (5825)
54 (5270), 56 (5280),
58 (5290), 60 (5300),
62 (5310), 64 (5320),
66 (5330), 147 (5735),
149 (5745), 151 (5755),
153 (5765), 155 (5775),
157 (5785), 159 (5795),
161 (5805), 163 (5815),
165 (5825), 167 (5835)
53 (5265), 54 (5270), 55 (5275), 56 (5280),
57 (5285), 58 (5290), 59 (5295), 60 (5300),
61 (5305), 62 (5310), 63 (5315), 64 (5320),
65 (5325), 66 (5330), 67 (5335), 147 (5735),
148 (5740), 149 (5745), 150 (5750), 151 (5755),
152 (5760), 153 (5765), 154 (5770), 155 (5775),
156 (5780), 157 (5785), 158 (5790), 159 (5795),
160 (5800), 161 (5805), 162 (5810), 163 (5815),
164 (5820), 165 (5825), 166 (5830), 167 (5835)
Hong Kong (HK) 5.725 - 5.85 GHz No 149 (5745), 153 (5765),
157 (5785), 161 (5805),
165 (5825)
147 (5735), 149 (5745),
151 (5755), 153 (5765),
155 (5775), 157 (5785),
159 (5795), 161 (5805),
163 (5815), 165 (5825),
167 (5835)
147 (5735), 148 (5740), 149 (5745), 150 (5750),
151 (5755), 152 (5760), 153 (5765), 154 (5770),
155 (5775), 156 (5780), 157 (5785), 158 (5790),
159 (5795), 160 (5800), 161 (5805), 162 (5810),
163 (5815), 164 (5820), 165 (5825), 166 (5830),
167 (5835)
Hungary (HU) 5.47 - 5.725 GHz Yes 100 (5500), 104 (5520),
108 (5540), 112 (5560),
116 (5580), 120 (5600),
124 (5620), 128 (5640),
132 (5660), 136 (5680),
140 (5700)
98 (5490), 100 (5500),
102 (5510), 104 (5520),
106 (5530), 108 (5540),
110 (5550), 112 (5560),
114 (5570), 116 (5580),
118 (5590), 120 (5600),
122 (5610), 124 (5620),
126 (5630), 128 (5640),
130 (5650), 132 (5660),
134 (5670), 136 (5680),
138 (5690), 140 (5700),
142 (5710)
97 (5485), 98 (5490), 99 (5495), 100 (5500),
101 (5505), 102 (5510), 103 (5515), 104 (5520),
105 (5525), 106 (5530), 107 (5535), 108 (5540),
109 (5545), 110 (5550), 111 (5555), 112 (5560),
113 (5565), 114 (5570), 115 (5575), 116 (5580),
117 (5585), 118 (5590), 119 (5595), 120 (5600),
121 (5605), 122 (5610), 123 (5615), 124 (5620),
125 (5625), 126 (5630), 127 (5635), 128 (5640),
129 (5645), 130 (5650), 131 (5655), 132 (5660),
133 (5665), 134 (5670), 135 (5675), 136 (5680),
137 (5685), 138 (5690), 139 (5695), 140 (5700),
141 (5705), 142 (5710)
Iceland (IS) 5.47 - 5.725 GHz Yes 100 (5500), 104 (5520),
108 (5540), 112 (5560),
116 (5580), 120 (5600),
124 (5620), 128 (5640),
132 (5660), 136 (5680),
140 (5700)
98 (5490), 100 (5500),
102 (5510), 104 (5520),
106 (5530), 108 (5540),
110 (5550), 112 (5560),
114 (5570), 116 (5580),
118 (5590), 120 (5600),
122 (5610), 124 (5620),
126 (5630), 128 (5640),
130 (5650), 132 (5660),
134 (5670), 136 (5680),
138 (5690), 140 (5700),
142 (5710)
97 (5485), 98 (5490), 99 (5495), 100 (5500),
101 (5505), 102 (5510), 103 (5515), 104 (5520),
105 (5525), 106 (5530), 107 (5535), 108 (5540),
109 (5545), 110 (5550), 111 (5555), 112 (5560),
113 (5565), 114 (5570), 115 (5575), 116 (5580),
117 (5585), 118 (5590), 119 (5595), 120 (5600),
121 (5605), 122 (5610), 123 (5615), 124 (5620),
125 (5625), 126 (5630), 127 (5635), 128 (5640),
129 (5645), 130 (5650), 131 (5655), 132 (5660),
133 (5665), 134 (5670), 135 (5675), 136 (5680),
137 (5685), 138 (5690), 139 (5695), 140 (5700),
141 (5705), 142 (5710)
Country (Code) Frequency
Bands
DFS Allowed Channels (Center Freq)
20 MHz 10 MHz 5 MHz

Country Codes for Subscriber Module MeshMAX 5054 Series User Guide
Channels/Frequencies by Country
249
India (IN) 5.15 - 5.35 GHz and
5.725 - 5.870 GHz
No 36 (5180), 40 (5200),
44 (5220), 48 (5240),
52 (5260), 56 (5280),
60 (5300), 64 (5320),
149 (5745), 153 (5765),
157 (5785), 161 (5805),
165 (5825), 169 (5845),
173 (5865)
36 (5180), 38 (5190),
40 (5200), 42 (5210),
44 (5220), 46 (5230),
48 (5240), 50 (5250),
52 (5260), 54 (5270),
56 (5280), 58 (5290),
60 (5300), 62 (5310),
64 (5320), 66 (5330),
147 (5735), 149 (5745),
151 (5755), 153 (5765),
155 (5775), 157 (5785),
159 (5795), 161 (5805),
163 (5815), 165 (5825),
167 (5835), 169 (5845),
171 (5855), 173 (5865)
36 (5180), 37 (5185), 38 (5190), 39 (5195),
40 (5200), 41 (5205), 42 (5210), 43 (5215),
44 (5220), 45 (5225), 46 (5230), 47 (5235),
48 (5240), 49 (5245), 50 (5250), 51 (5255),
52 (5260), 53 (5265), 54 (5270), 55 (5275),
56 (5280), 57 (5285), 58 (5290), 59 (5295),
60 (5300), 61 (5305), 62 (5310), 63 (5315),
64 (5320), 65 (5325), 66 (5330), 67 (5335),
147 (5735), 148 (5740), 149 (5745), 150 (5750),
151 (5755), 152 (5760), 153 (5765), 154 (5770),
155 (5775), 156 (5780), 157 (5785), 158 (5790),
159 (5795), 160 (5800), 161 (5805), 162 (5810),
163 (5815), 164 (5820), 165 (5825), 166 (5830),
167 (5835), 168 (5840), 169 (5845), 170 (5850),
171 (5855), 172 (5860), 173 (5865), 174 (5870)
Iran (IR) 5.725 - 5.85 GHz No 149 (5745), 153 (5765),
157 (5785), 161 (5805),
165 (5825)
149 (5745), 151 (5755),
153 (5765), 155 (5775),
157 (5785), 159 (5795),
161 (5805), 163 (5815),
165 (5825), 167 (5835)
149 (5745), 150 (5750), 151 (5755), 152 (5760),
153 (5765), 154 (5770), 155 (5775), 156 (5780),
157 (5785), 158 (5790), 159 (5795), 160 (5800),
161 (5805), 162 (5810), 163 (5815), 164 (5820),
165 (5825), 166 (5830), 167 (5835)
Ireland (IE) 5.47 - 5.725 GHz Yes 100 (5500), 104 (5520),
108 (5540), 112 (5560),
116 (5580), 120 (5600),
124 (5620), 128 (5640),
132 (5660), 136 (5680),
140 (5700)
98 (5490), 100 (5500),
102 (5510), 104 (5520),
106 (5530), 108 (5540),
110 (5550), 112 (5560),
114 (5570), 116 (5580),
118 (5590), 120 (5600),
122 (5610), 124 (5620),
126 (5630), 128 (5640),
130 (5650), 132 (5660),
134 (5670), 136 (5680),
138 (5690), 140 (5700),
142 (5710)
97 (5485), 98 (5490), 99 (5495), 100 (5500),
101 (5505), 102 (5510), 103 (5515), 104 (5520),
105 (5525), 106 (5530), 107 (5535), 108 (5540),
109 (5545), 110 (5550), 111 (5555), 112 (5560),
113 (5565), 114 (5570), 115 (5575), 116 (5580),
117 (5585), 118 (5590), 119 (5595), 120 (5600),
121 (5605), 122 (5610), 123 (5615), 124 (5620),
125 (5625), 126 (5630), 127 (5635), 128 (5640),
129 (5645), 130 (5650), 131 (5655), 132 (5660),
133 (5665), 134 (5670), 135 (5675), 136 (5680),
137 (5685), 138 (5690), 139 (5695), 140 (5700),
141 (5705), 142 (5710)
Ireland 5.8 GHz (I1) 5.725 - 5.85 GHz Yes 147 (5735), 151 (5755),
155 (5775), 167 (5835)
145 (5725), 147 (5735),
149 (5745), 151 (5755),
153 (5765), 155 (5775),
157 (5785), 163 (5815),
165 (5825), 167 (5835),
169 (5845)
145 (5725), 146 (5730), 147 (5735), 148 (5740),
149 (5745), 150 (5750), 151 (5755), 152 (5760),
153 (5765), 154 (5770), 155 (5775), 156 (5780),
157 (5785), 158 (5790), 159 (5795), 163 (5815),
164 (5820), 165 (5825), 166 (5830), 167 (5835),
168 (5840), 169 (5845), 170 (5850)
Country (Code) Frequency
Bands
DFS Allowed Channels (Center Freq)
20 MHz 10 MHz 5 MHz

Country Codes for Subscriber Module MeshMAX 5054 Series User Guide
Channels/Frequencies by Country
250
Italy (IT) 5.47 GHz Yes 100 (5500), 104 (5520),
108 (5540), 112 (5560),
116 (5580), 120 (5600),
124 (5620), 128 (5640),
132 (5660), 136 (5680),
140 (5700)
98 (5490), 100 (5500),
102 (5510), 104 (5520),
106 (5530), 108 (5540),
110 (5550), 112 (5560),
114 (5570), 116 (5580),
118 (5590), 120 (5600),
122 (5610), 124 (5620),
126 (5630), 128 (5640),
130 (5650), 132 (5660),
134 (5670), 136 (5680),
138 (5690), 140 (5700),
142 (5710)
97 (5485), 98 (5490), 99 (5495), 100 (5500),
101 (5505), 102 (5510), 103 (5515), 104 (5520),
105 (5525), 106 (5530), 107 (5535), 108 (5540),
109 (5545), 110 (5550), 111 (5555), 112 (5560),
113 (5565), 114 (5570), 115 (5575), 116 (5580),
117 (5585), 118 (5590), 119 (5595), 120 (5600),
121 (5605), 122 (5610), 123 (5615), 124 (5620),
125 (5625), 126 (5630), 127 (5635), 128 (5640),
129 (5645), 130 (5650), 131 (5655), 132 (5660),
133 (5665), 134 (5670), 135 (5675), 136 (5680),
137 (5685), 138 (5690), 139 (5695), 140 (5700),
141 (5705), 142 (5710)
Japan (JP) 5.25 - 5.35 GHz Yes 56 (5280), 60 (5300),
64 (5320)
54 (5270), 56 (5280),
58 (5290), 60 (5300),
62 (5310), 64 (5320),
66 (5330)
53 (5265), 54 (5270), 55 (5275), 56 (5280),
57 (5285), 58 (5290), 59 (5295), 60 (5300),
61 (5305), 62 (5310), 63 (5315), 64 (5320),
65 (5325), 66 (5330), 67 (5335)
Japan2 (J2) 5.15 - 5.25 GHz No 34 (5170), 38 (5190),
42 (5210), 46 (5230)
32 (5160),34 (5170),
36 (5180), 38 (5190),
40 (5200), 42 (5210),
44 (5220), 46 (5230),
32 (5160), 33 (5165), 34 (5170), 35 (5175),
36 (5180), 37 (5185), 38 (5190), 39 (5195),
40 (5200), 41 (5205), 42 (5210), 43 (5215),
44 (5220), 45 (5225), 46 (5230)
Korea
Republic (KR)
5.725 - 5.825 GHz No 149 (5745), 153 (5765),
157 (5785), 161 (5805)
147 (5735), 149 (5745),
151 (5755), 153 (5765),
155 (5775), 157 (5785),
159 (5795), 161 (5805),
163 (5815)
147 (5735), 148 (5740), 149 (5745), 150 (5750),
151 (5755), 152 (5760), 153 (5765), 154 (5770),
155 (5775), 156 (5780), 157 (5785), 158 (5790),
159 (5795), 160 (5800), 161 (5805), 162 (5810),
163 (5815)
Korea
Republic2 (K2)
5.725 - 5.825 GHz No 149 (5745), 153 (5765),
157 (5785), 161 (5805)
147 (5735), 149 (5745),
151 (5755), 153 (5765),
155 (5775), 157 (5785),
159 (5795), 161 (5805),
163 (5815)
147 (5735), 148 (5740), 149 (5745), 150 (5750),
151 (5755), 152 (5760), 153 (5765), 154 (5770),
155 (5775), 156 (5780), 157 (5785), 158 (5790),
159 (5795), 160 (5800), 161 (5805), 162 (5810),
163 (5815)
Latvia (LV) 5.47 - 5.725 GHz Yes 100 (5500), 104 (5520),
108 (5540), 112 (5560),
116 (5580), 120 (5600),
124 (5620), 128 (5640),
132 (5660), 136 (5680),
140 (5700)
98 (5490), 100 (5500),
102 (5510), 104 (5520),
106 (5530), 108 (5540),
110 (5550), 112 (5560),
114 (5570), 116 (5580),
118 (5590), 120 (5600),
122 (5610), 124 (5620),
126 (5630), 128 (5640),
130 (5650), 132 (5660),
134 (5670), 136 (5680),
138 (5690), 140 (5700),
142 (5710)
97 (5485), 98 (5490), 99 (5495), 100 (5500),
101 (5505), 102 (5510), 103 (5515), 104 (5520),
105 (5525), 106 (5530), 107 (5535), 108 (5540),
109 (5545), 110 (5550), 111 (5555), 112 (5560),
113 (5565), 114 (5570), 115 (5575), 116 (5580),
117 (5585), 118 (5590), 119 (5595), 120 (5600),
121 (5605), 122 (5610), 123 (5615), 124 (5620),
125 (5625), 126 (5630), 127 (5635), 128 (5640),
129 (5645), 130 (5650), 131 (5655), 132 (5660),
133 (5665), 134 (5670), 135 (5675), 136 (5680),
137 (5685), 138 (5690), 139 (5695), 140 (5700),
141 (5705), 142 (5710)
Country (Code) Frequency
Bands
DFS Allowed Channels (Center Freq)
20 MHz 10 MHz 5 MHz

Country Codes for Subscriber Module MeshMAX 5054 Series User Guide
Channels/Frequencies by Country
251
Liechtenstein (LI) 5.47 - 5.725 GHz Yes 100 (5500), 104 (5520),
108 (5540), 112 (5560),
116 (5580), 120 (5600),
124 (5620), 128 (5640),
132 (5660), 136 (5680),
140 (5700)
98 (5490), 100 (5500),
102 (5510), 104 (5520),
106 (5530), 108 (5540),
110 (5550), 112 (5560),
114 (5570), 116 (5580),
118 (5590), 120 (5600),
122 (5610), 124 (5620),
126 (5630), 128 (5640),
130 (5650), 132 (5660),
134 (5670), 136 (5680),
138 (5690), 140 (5700),
142 (5710)
97 (5485), 98 (5490), 99 (5495), 100 (5500),
101 (5505), 102 (5510), 103 (5515), 104 (5520),
105 (5525), 106 (5530), 107 (5535), 108 (5540),
109 (5545), 110 (5550), 111 (5555), 112 (5560),
113 (5565), 114 (5570), 115 (5575), 116 (5580),
117 (5585), 118 (5590), 119 (5595), 120 (5600),
121 (5605), 122 (5610), 123 (5615), 124 (5620),
125 (5625), 126 (5630), 127 (5635), 128 (5640),
129 (5645), 130 (5650), 131 (5655), 132 (5660),
133 (5665), 134 (5670), 135 (5675), 136 (5680),
137 (5685), 138 (5690), 139 (5695), 140 (5700),
141 (5705), 142 (5710)
Lithuania (LT) 5.47 - 5.725 GHz Yes 100 (5500), 104 (5520),
108 (5540), 112 (5560),
116 (5580), 120 (5600),
124 (5620), 128 (5640),
132 (5660), 136 (5680),
140 (5700)
98 (5490), 100 (5500),
102 (5510), 104 (5520),
106 (5530), 108 (5540),
110 (5550), 112 (5560),
114 (5570), 116 (5580),
118 (5590), 120 (5600),
122 (5610), 124 (5620),
126 (5630), 128 (5640),
130 (5650), 132 (5660),
134 (5670), 136 (5680),
138 (5690), 140 (5700),
142 (5710)
97 (5485), 98 (5490), 99 (5495), 100 (5500),
101 (5505), 102 (5510), 103 (5515), 104 (5520),
105 (5525), 106 (5530), 107 (5535), 108 (5540),
109 (5545), 110 (5550), 111 (5555), 112 (5560),
113 (5565), 114 (5570), 115 (5575), 116 (5580),
117 (5585), 118 (5590), 119 (5595), 120 (5600),
121 (5605), 122 (5610), 123 (5615), 124 (5620),
125 (5625), 126 (5630), 127 (5635), 128 (5640),
129 (5645), 130 (5650), 131 (5655), 132 (5660),
133 (5665), 134 (5670), 135 (5675), 136 (5680),
137 (5685), 138 (5690), 139 (5695), 140 (5700),
141 (5705), 142 (5710)
Luxembourg (LU) 5.47 - 5.725 GHz Yes 100 (5500), 104 (5520),
108 (5540), 112 (5560),
116 (5580), 120 (5600),
124 (5620), 128 (5640),
132 (5660), 136 (5680),
140 (5700)
98 (5490), 100 (5500),
102 (5510), 104 (5520),
106 (5530), 108 (5540),
110 (5550), 112 (5560),
114 (5570), 116 (5580),
118 (5590), 120 (5600),
122 (5610), 124 (5620),
126 (5630), 128 (5640),
130 (5650), 132 (5660),
134 (5670), 136 (5680),
138 (5690), 140 (5700),
142 (5710)
97 (5485), 98 (5490), 99 (5495), 100 (5500),
101 (5505), 102 (5510), 103 (5515), 104 (5520),
105 (5525), 106 (5530), 107 (5535), 108 (5540),
109 (5545), 110 (5550), 111 (5555), 112 (5560),
113 (5565), 114 (5570), 115 (5575), 116 (5580),
117 (5585), 118 (5590), 119 (5595), 120 (5600),
121 (5605), 122 (5610), 123 (5615), 124 (5620),
125 (5625), 126 (5630), 127 (5635), 128 (5640),
129 (5645), 130 (5650), 131 (5655), 132 (5660),
133 (5665), 134 (5670), 135 (5675), 136 (5680),
137 (5685), 138 (5690), 139 (5695), 140 (5700),
141 (5705), 142 (5710)
Macau (MO) 5.725 - 5.85 GHz No 149 (5745), 153 (5765),
157 (5785), 161 (5805),
165 (5825)
147 (5735), 149 (5745),
151 (5755), 153 (5765),
155 (5775), 157 (5785),
159 (5795), 161 (5805),
163 (5815), 165 (5825),
167 (5835)
147 (5735), 148 (5740), 149 (5745), 150 (5750),
151 (5755), 152 (5760), 153 (5765), 154 (5770),
155 (5775), 156 (5780), 157 (5785), 158 (5790),
159 (5795), 160 (5800), 161 (5805), 162 (5810),
163 (5815), 164 (5820), 165 (5825), 166 (5830),
167 (5835)
Country (Code) Frequency
Bands
DFS Allowed Channels (Center Freq)
20 MHz 10 MHz 5 MHz

Country Codes for Subscriber Module MeshMAX 5054 Series User Guide
Channels/Frequencies by Country
252
Malaysia (MY) 5.25 - 5.35 GHz and
5.725 - 5.85 GHz
No 56 (5280), 60 (5300),
64 (5320), 149 (5745),
153 (5765), 157 (5785),
161 (5805), 165 (5825)
54 (5270), 56 (5280),
58 (5290), 60 (5300),
62 (5310), 64 (5320),
66 (5330), 147 (5735),
149 (5745), 151 (5755),
153 (5765), 155 (5775),
157 (5785), 159 (5795),
161 (5805), 163 (5815),
165 (5825), 167 (5835)
53 (5265), 54 (5270), 55 (5275), 56 (5280),
57 (5285), 58 (5290), 59 (5295), 60 (5300),
61 (5305), 62 (5310), 63 (5315), 64 (5320),
65 (5325), 66 (5330), 67 (5335), 147 (5735),
148 (5740), 149 (5745), 150 (5750), 151 (5755),
152 (5760), 153 (5765), 154 (5770), 155 (5775),
156 (5780), 157 (5785), 158 (5790), 159 (5795),
160 (5800), 161 (5805), 162 (5810), 163 (5815),
164 (5820), 165 (5825), 166 (5830), 167 (5835)
Malta (MT) 5.47 - 5.725 GHz Yes 100 (5500), 104 (5520),
108 (5540), 112 (5560),
116 (5580), 120 (5600),
124 (5620), 128 (5640),
132 (5660), 136 (5680),
140 (5700)
98 (5490), 100 (5500),
102 (5510), 104 (5520),
106 (5530), 108 (5540),
110 (5550), 112 (5560),
114 (5570), 116 (5580),
118 (5590), 120 (5600),
122 (5610), 124 (5620),
126 (5630), 128 (5640),
130 (5650), 132 (5660),
134 (5670), 136 (5680),
138 (5690), 140 (5700),
142 (5710)
97 (5485), 98 (5490), 99 (5495), 100 (5500),
101 (5505), 102 (5510), 103 (5515), 104 (5520),
105 (5525), 106 (5530), 107 (5535), 108 (5540),
109 (5545), 110 (5550), 111 (5555), 112 (5560),
113 (5565), 114 (5570), 115 (5575), 116 (5580),
117 (5585), 118 (5590), 119 (5595), 120 (5600),
121 (5605), 122 (5610), 123 (5615), 124 (5620),
125 (5625), 126 (5630), 127 (5635), 128 (5640),
129 (5645), 130 (5650), 131 (5655), 132 (5660),
133 (5665), 134 (5670), 135 (5675), 136 (5680),
137 (5685), 138 (5690), 139 (5695), 140 (5700),
141 (5705), 142 (5710)
Mexico (MX) 5.725 - 5.85 GHz No 149 (5745), 153 (5765),
157 (5785), 161 (5805),
165 (5825)
147 (5735), 149 (5745),
151 (5755), 153 (5765),
155 (5775), 157 (5785),
159 (5795), 161 (5805),
163 (5815), 165 (5825),
167 (5835)
147 (5735), 148 (5740), 149 (5745), 150 (5750),
151 (5755), 152 (5760), 153 (5765), 154 (5770),
155 (5775), 156 (5780), 157 (5785), 158 (5790),
159 (5795), 160 (5800), 161 (5805), 162 (5810),
163 (5815), 164 (5820), 165 (5825), 166 (5830),
167 (5835)
Netherlands (NL) 5.47 - 5.725 GHz Yes 100 (5500), 104 (5520),
108 (5540), 112 (5560),
116 (5580), 120 (5600),
124 (5620), 128 (5640),
132 (5660), 136 (5680),
140 (5700)
98 (5490), 100 (5500),
102 (5510), 104 (5520),
106 (5530), 108 (5540),
110 (5550), 112 (5560),
114 (5570), 116 (5580),
118 (5590), 120 (5600),
122 (5610), 124 (5620),
126 (5630), 128 (5640),
130 (5650), 132 (5660),
134 (5670), 136 (5680),
138 (5690), 140 (5700),
142 (5710)
97 (5485), 98 (5490), 99 (5495), 100 (5500),
101 (5505), 102 (5510), 103 (5515), 104 (5520),
105 (5525), 106 (5530), 107 (5535), 108 (5540),
109 (5545), 110 (5550), 111 (5555), 112 (5560),
113 (5565), 114 (5570), 115 (5575), 116 (5580),
117 (5585), 118 (5590), 119 (5595), 120 (5600),
121 (5605), 122 (5610), 123 (5615), 124 (5620),
125 (5625), 126 (5630), 127 (5635), 128 (5640),
129 (5645), 130 (5650), 131 (5655), 132 (5660),
133 (5665), 134 (5670), 135 (5675), 136 (5680),
137 (5685), 138 (5690), 139 (5695), 140 (5700),
141 (5705), 142 (5710)
New Zealand (NZ) 5.725 - 5.85 GHz No 149 (5745), 153 (5765),
157 (5785), 161 (5805),
165 (5825)
147 (5735), 149 (5745),
151 (5755), 153 (5765),
155 (5775), 157 (5785),
159 (5795), 161 (5805),
163 (5815), 165 (5825),
167 (5835)
147 (5735), 148 (5740), 149 (5745), 150 (5750),
151 (5755), 152 (5760), 153 (5765), 154 (5770),
155 (5775), 156 (5780), 157 (5785), 158 (5790),
159 (5795), 160 (5800), 161 (5805), 162 (5810),
163 (5815), 164 (5820), 165 (5825), 166 (5830),
167 (5835)
Country (Code) Frequency
Bands
DFS Allowed Channels (Center Freq)
20 MHz 10 MHz 5 MHz

Country Codes for Subscriber Module MeshMAX 5054 Series User Guide
Channels/Frequencies by Country
253
North Korea (KP) 5.725 - 5.825 GHz No 149 (5745), 153 (5765),
157 (5785), 161 (5805)
147 (5735), 149 (5745),
151 (5755), 153 (5765),
155 (5775), 157 (5785),
159 (5795), 161 (5805),
163 (5815)
147 (5735), 148 (5740), 149 (5745), 150 (5750),
151 (5755), 152 (5760), 153 (5765), 154 (5770),
155 (5775), 156 (5780), 157 (5785), 158 (5790),
159 (5795), 160 (5800), 161 (5805), 162 (5810),
163 (5815)
Norway (NO) 5.47 - 5.725 GHz Yes 100 (5500), 104 (5520),
108 (5540), 112 (5560),
116 (5580), 120 (5600),
124 (5620), 128 (5640),
132 (5660), 136 (5680),
140 (5700)
98 (5490), 100 (5500),
102 (5510), 104 (5520),
106 (5530), 108 (5540),
110 (5550), 112 (5560),
114 (5570), 116 (5580),
118 (5590), 120 (5600),
122 (5610), 124 (5620),
126 (5630), 128 (5640),
130 (5650), 132 (5660),
134 (5670), 136 (5680),
138 (5690), 140 (5700),
142 (5710)
97 (5485), 98 (5490), 99 (5495), 100 (5500),
101 (5505), 102 (5510), 103 (5515), 104 (5520),
105 (5525), 106 (5530), 107 (5535), 108 (5540),
109 (5545), 110 (5550), 111 (5555), 112 (5560),
113 (5565), 114 (5570), 115 (5575), 116 (5580),
117 (5585), 118 (5590), 119 (5595), 120 (5600),
121 (5605), 122 (5610), 123 (5615), 124 (5620),
125 (5625), 126 (5630), 127 (5635), 128 (5640),
129 (5645), 130 (5650), 131 (5655), 132 (5660),
133 (5665), 134 (5670), 135 (5675), 136 (5680),
137 (5685), 138 (5690), 139 (5695), 140 (5700),
141 (5705), 142 (5710)
Panama (PA) 5.25 - 5.35 GHz and
5.725 - 5.85 GHz
No 56 (5280), 60 (5300),
64 (5320), 149 (5745),
153 (5765), 157 (5785),
161 (5805), 165 (5825)
54 (5270), 56 (5280),
58 (5290), 60 (5300),
62 (5310), 64 (5320),
66 (5330), 147 (5735),
149 (5745), 151 (5755),
153 (5765), 155 (5775),
157 (5785), 159 (5795),
161 (5805), 163 (5815),
165 (5825), 167 (5835)
53 (5265), 54 (5270), 55 (5275), 56 (5280),
57 (5285), 58 (5290), 59 (5295), 60 (5300),
61 (5305), 62 (5310), 63 (5315), 64 (5320),
65 (5325), 66 (5330), 67 (5335), 147 (5735),
148 (5740), 149 (5745), 150 (5750), 151 (5755),
152 (5760), 153 (5765), 154 (5770), 155 (5775),
156 (5780), 157 (5785), 158 (5790), 159 (5795),
160 (5800), 161 (5805), 162 (5810), 163 (5815),
164 (5820), 165 (5825), 166 (5830), 167 (5835)
Philippines (PH) 5.25 - 5.35 GHz and
5.725 - 5.85 GHz
No 56 (5280), 60 (5300),
64 (5320), 149 (5745),
153 (5765), 157 (5785),
161 (5805), 165 (5825)
54 (5270), 56 (5280),
58 (5290), 60 (5300),
62 (5310), 64 (5320),
66 (5330), 147 (5735),
149 (5745), 151 (5755),
153 (5765), 155 (5775),
157 (5785), 159 (5795),
161 (5805), 163 (5815),
165 (5825), 167 (5835)
53 (5265), 54 (5270), 55 (5275), 56 (5280),
57 (5285), 58 (5290), 59 (5295), 60 (5300),
61 (5305), 62 (5310), 63 (5315), 64 (5320),
65 (5325), 66 (5330), 67 (5335), 147 (5735),
148 (5740), 149 (5745), 150 (5750), 151 (5755),
152 (5760), 153 (5765), 154 (5770), 155 (5775),
156 (5780), 157 (5785), 158 (5790), 159 (5795),
160 (5800), 161 (5805), 162 (5810), 163 (5815),
164 (5820), 165 (5825), 166 (5830), 167 (5835)
Poland (PL) 5.47 - 5.725 GHz Yes 100 (5500), 104 (5520),
108 (5540), 112 (5560),
116 (5580), 120 (5600),
124 (5620), 128 (5640),
132 (5660), 136 (5680),
140 (5700)
98 (5490), 100 (5500),
102 (5510), 104 (5520),
106 (5530), 108 (5540),
110 (5550), 112 (5560),
114 (5570), 116 (5580),
118 (5590), 120 (5600),
122 (5610), 124 (5620),
126 (5630), 128 (5640),
130 (5650), 132 (5660),
134 (5670), 136 (5680),
138 (5690), 140 (5700),
142 (5710)
97 (5485), 98 (5490), 99 (5495), 100 (5500),
101 (5505), 102 (5510), 103 (5515), 104 (5520),
105 (5525), 106 (5530), 107 (5535), 108 (5540),
109 (5545), 110 (5550), 111 (5555), 112 (5560),
113 (5565), 114 (5570), 115 (5575), 116 (5580),
117 (5585), 118 (5590), 119 (5595), 120 (5600),
121 (5605), 122 (5610), 123 (5615), 124 (5620),
125 (5625), 126 (5630), 127 (5635), 128 (5640),
129 (5645), 130 (5650), 131 (5655), 132 (5660),
133 (5665), 134 (5670), 135 (5675), 136 (5680),
137 (5685), 138 (5690), 139 (5695), 140 (5700),
141 (5705), 142 (5710)
Country (Code) Frequency
Bands
DFS Allowed Channels (Center Freq)
20 MHz 10 MHz 5 MHz

Country Codes for Subscriber Module MeshMAX 5054 Series User Guide
Channels/Frequencies by Country
254
Portugal (PT) 5.47 - 5.725 GHz Yes 100 (5500), 104 (5520),
108 (5540), 112 (5560),
116 (5580), 120 (5600),
124 (5620), 128 (5640),
132 (5660), 136 (5680),
140 (5700)
98 (5490), 100 (5500),
102 (5510), 104 (5520),
106 (5530), 108 (5540),
110 (5550), 112 (5560),
114 (5570), 116 (5580),
118 (5590), 120 (5600),
122 (5610), 124 (5620),
126 (5630), 128 (5640),
130 (5650), 132 (5660),
134 (5670), 136 (5680),
138 (5690), 140 (5700),
142 (5710)
97 (5485), 98 (5490), 99 (5495), 100 (5500),
101 (5505), 102 (5510), 103 (5515), 104 (5520),
105 (5525), 106 (5530), 107 (5535), 108 (5540),
109 (5545), 110 (5550), 111 (5555), 112 (5560),
113 (5565), 114 (5570), 115 (5575), 116 (5580),
117 (5585), 118 (5590), 119 (5595), 120 (5600),
121 (5605), 122 (5610), 123 (5615), 124 (5620),
125 (5625), 126 (5630), 127 (5635), 128 (5640),
129 (5645), 130 (5650), 131 (5655), 132 (5660),
133 (5665), 134 (5670), 135 (5675), 136 (5680),
137 (5685), 138 (5690), 139 (5695), 140 (5700),
141 (5705), 142 (5710)
Puerto Rico (PR) 5.25 - 5.35 GHz and
5.725 - 5.85 GHz
No 56 (5280), 60 (5300),
64 (5320), 149 (5745),
153 (5765), 157 (5785),
161 (5805), 165 (5825)
54 (5270), 56 (5280),
58 (5290), 60 (5300),
62 (5310), 64 (5320),
66 (5330), 147 (5735),
149 (5745), 151 (5755),
153 (5765), 155 (5775),
157 (5785), 159 (5795),
161 (5805), 163 (5815),
165 (5825), 167 (5835)
53 (5265), 54 (5270), 55 (5275), 56 (5280),
57 (5285), 58 (5290), 59 (5295), 60 (5300),
61 (5305), 62 (5310), 63 (5315), 64 (5320),
65 (5325), 66 (5330), 67 (5335), 147 (5735),
148 (5740), 149 (5745), 150 (5750), 151 (5755),
152 (5760), 153 (5765), 154 (5770), 155 (5775),
156 (5780), 157 (5785), 158 (5790), 159 (5795),
160 (5800), 161 (5805), 162 (5810), 163 (5815),
164 (5820), 165 (5825), 166 (5830), 167 (5835)
Country (Code) Frequency
Bands
DFS Allowed Channels (Center Freq)
20 MHz 10 MHz 5 MHz

Country Codes for Subscriber Module MeshMAX 5054 Series User Guide
Channels/Frequencies by Country
255
Russia (RU) 5.15 - 6.08 GHz No 30 (5150), 34 (5170),
38 (5190), 42 (5210),
46 (5230), 50 (5250),
54 (5270), 58 (5290),
62 (5310), 66 (5330),
70 (5350), 74 (5370),
78 (5390), 82 (5410),
86 (5430), 90 (5450),
94 (5470), 98 (5490),
102 (5510), 106 (5530),
110 (5550), 114 (5570),
118 (5590), 122 (5610),
126 (5630), 130 (5650),
134 (5670), 138 (5690),
142 (5710), 146 (5730),
150 (5750), 154 (5770),
158 (5790), 162 (5810),
166 (5830), 170 (5850),
174 (5870), 178 (5890),
182 (5910), 186 (5930),
190 (5950), 194 (5970),
198 (5990), 202 (6010),
206 (6030), 210 (6060),
214 (6070)
30 (5150), 32 (5160),
34 (5170), 36 (5180)
38 (5190), 40 (5200),
42 (5210), 44 (5220),
46 (5230), 48 (5240),
50 (5250), 52 (5260),
54 (5270), 56 (5280),
58 (5290), 60 (5300),
62 (5310), 64 (5320),
66 (5330), 68 (5340),
70 (5350), 72 (5360),
74 (5370), 76 (5380),
78 (5390), 80 (5400),
82 (5410), 84 (5420),
86 (5430), 88 (5440),
90 (5450), 92 (5460),
94 (5470), 96 (5480),
98 (5490), 100 (5500),
102 (5510), 104 (5520),
106 (5530), 108 (5540),
110 (5550), 112 (5560),
114 (5570), 116 (5580),
118 (5590), 120 (5600),
122 (5610), 124 (5620),
126 (5630), 128 (5640),
130 (5650), 132 (5660),
134 (5670), 136 (5680),
138 (5690), 140 (5700),
142 (5710), 144 (5720),
146 (5730), 148 (5740),
150 (5750), 152 (5760),
154 (5770), 156 (5780),
158 (5790), 160 (5800),
162 (5810), 164 (5820),
166 (5830), 168 (5840),
170 (5850), 172 (5860),
174 (5870), 176 (5880)
178 (5890), 180 (5900),
182 (5910), 184 (5920),
186 (5930), 188 (5940),
190 (5950), 192 (5960),
194 (5970), 196 (5980),
198 (5990), 200 (6000),
202 (6010), 204 (6020),
206 (6030), 208 (6040),
210 (6050), 212 (6060),
214 (6070)
30 (5150), 31 (5155), 32 (5160), 33 (5165),
34 (5170), 35 (5175), 36 (5180), 37 (5185),
38 (5190), 39 (5195), 40 (5200), 41 (5205),
42 (5210), 43 (5215), 44 (5220), 45 (5225),
46 (5230), 47 (5235), 48 (5240), 49 (5245),
50 (5250), 51 (5255), 52 (5260), 53 (5265),
54 (5270), 55 (5275), 56 (5280), 57 (5285),
58 (5290), 59 (5295), 60 (5300), 61 (5305),
62 (5310), 63 (5315), 64 (5320), 65 (5325),
66 (5330), 67 (5335), 68 (5340), 69 (5345),
70 (5350), 71 (5355), 72 (5360), 73 (5365),
74 (5370), 75 (5375), 76 (5380), 77 (5385),
78 (5390), 79 (5395), 80 (5400), 81 (5405),
82 (5410), 83 (5415), 84 (5420), 85 (5425),
86 (5430), 87 (5435), 88 (5440), 89 (5445),
90 (5450), 91 (5455), 92 (5460), 93 (5465),
94 (5470), 95 (5475), 96 (5480), 97 (5485),
98 (5490), 99 (5495), 100 (5500), 101 (5505),
102 (5510), 103 (5515), 104 (5520), 105 (5525),
106 (5530), 107 (5535), 108 (5540), 109 (5545),
110 (5550), 111 (5555), 112 (5560), 113 (5565),
114 (5570), 115 (5575), 116 (5580), 117 (5585),
118 (5590), 119 (5595), 120 (5600), 121 (5605),
122 (5610), 123 (5615), 124 (5620), 125 (5625),
126 (5630), 127 (5635), 128 (5640), 129 (5645),
130 (5650), 131 (5655), 132 (5660), 133 (5665),
134 (5670), 135 (5675), 136 (5680), 137 (5685),
138 (5690), 139 (5695), 140 (5700), 141 (5705),
142 (5710), 143 (5715), 144 (5720), 145 (5725),
146 (5730), 147 (5735), 148 (5740), 149 (5745),
150 (5750), 151 (5755), 152 (5760), 153 (5765),
154 (5770), 155 (5775), 156 (5780), 157 (5785),
158 (5790), 159 (5795), 160 (5800), 161 (5805),
162 (5810), 163 (5815), 164 (5820), 165 (5825),
166 (5830), 167 (5835), 168 (5840), 169 (5845),
170 (5850), 164 (5820), 165 (5825), 166 (5830),
167 (5835), 168 (5840), 169 (5845), 170 (5850),
171 (5855), 172 (5860), 173 (5865), 174 (5870),
175 (5875), 176 (5880), 177 (5885), 178 (5890),
179 (5895), 180 (5900), 181 (5905), 182 (5910),
183 (5915), 184 (5920), 185 (5925), 186 (5930),
187 (5935), 188 (5940), 189 (5945), 190 (5950),
191 (5955), 192 (5960), 193 (5965), 194 (5970),
195 (5975), 196 (5980), 197 (5855), 198 (5990),
199 (5995), 200 (6000), 201 (6005), 202 (6010),
203 (6015), 204 (6020), 205 (6025), 206 (6030),
207 (6035), 208 (6040), 209 (6045), 210 (6050),
211 (6055), 212 (6060), 213 (6065), 214 (6070)
215 (6075)
Country (Code) Frequency
Bands
DFS Allowed Channels (Center Freq)
20 MHz 10 MHz 5 MHz

Country Codes for Subscriber Module MeshMAX 5054 Series User Guide
Channels/Frequencies by Country
256
Saudi Arabia (SA) 5.15 - 5.35 GHz and
5.725 - 5.825 GHz
No 36 (5180), 40 (5200),
44 (5220), 48 (5240),
52 (5260), 56 (5280),
60 (5300), 64 (5320),
149 (5745), 153 (5765),
157 (5785), 161 (5805)
36 (5180), 38 (5190),
40 (5200), 42 (5210),
44 (5220), 46 (5230),
48 (5240), 50 (5250),
52 (5260), 54 (5270),
56 (5280), 58 (5290),
60 (5300), 62 (5310),
64 (5320), 66 (5330),
147 (5735), 149 (5745),
151 (5755), 153 (5765),
155 (5775), 157 (5785),
159 (5795), 161 (5805),
163 (5815)
36 (5180), 37 (5185), 38 (5190), 39 (5195),
40 (5200), 41 (5205), 42 (5210), 43 (5215),
44 (5220), 45 (5225), 46 (5230), 47 (5235),
48 (5240), 49 (5245), 50 (5250), 51 (5255),
52 (5260), 53 (5265), 54 (5270), 55 (5275),
56 (5280), 57 (5285), 58 (5290), 59 (5295),
60 (5300), 61 (5305), 62 (5310), 63 (5315),
64 (5320), 65 (5325), 66 (5330), 67 (5335),
147 (5735), 148 (5740), 149 (5745), 150 (5750),
151 (5755), 152 (5760), 153 (5765), 154 (5770),
155 (5775), 156 (5780), 157 (5785), 158 (5790),
159 (5795), 160 (5800), 161 (5805), 162 (5810),
163 (5815)
Singapore (SG) 5.15 - 5.25 GHz and
5.725 - 5.85 GHz
No 36 (5180), 40 (5200),
44 (5220), 48 (5240),
149 (5745), 153 (5765),
157 (5785), 161 (5805),
165 (5825)
36 (5180), 38 (5190),
40 (5200), 42 (5210),
44 (5220), 46 (5230),
48 (5240), 147 (5735),
149 (5745), 151 (5755),
153 (5765), 155 (5775),
157 (5785), 159 (5795),
161 (5805), 163 (5815),
165 (5825), 167 (5835)
36 (5180), 37 (5185), 38 (5190), 39 (5195),
40 (5200), 41 (5205), 42 (5210), 43 (5215),
44 (5220), 45 (5225), 46 (5230), 47 (5235),
48 (5240), 147 (5735), 148 (5740), 149 (5745),
150 (5750), 151 (5755), 152 (5760), 153 (5765),
154 (5770), 155 (5775), 156 (5780), 157 (5785),
158 (5790), 159 (5795), 160 (5800), 161 (5805),
162 (5810), 163 (5815), 164 (5820), 165 (5825),
166 (5830), 167 (5835)
Slovak
Republic (SK)
5.47 - 5.725 GHz Yes 100 (5500), 104 (5520),
108 (5540), 112 (5560),
116 (5580), 120 (5600),
124 (5620), 128 (5640),
132 (5660), 136 (5680),
140 (5700)
98 (5490), 100 (5500),
102 (5510), 104 (5520),
106 (5530), 108 (5540),
110 (5550), 112 (5560),
114 (5570), 116 (5580),
118 (5590), 120 (5600),
122 (5610), 124 (5620),
126 (5630), 128 (5640),
130 (5650), 132 (5660),
134 (5670), 136 (5680),
138 (5690), 140 (5700),
142 (5710)
97 (5485), 98 (5490), 99 (5495), 100 (5500),
101 (5505), 102 (5510), 103 (5515), 104 (5520),
105 (5525), 106 (5530), 107 (5535), 108 (5540),
109 (5545), 110 (5550), 111 (5555), 112 (5560),
113 (5565), 114 (5570), 115 (5575), 116 (5580),
117 (5585), 118 (5590), 119 (5595), 120 (5600),
121 (5605), 122 (5610), 123 (5615), 124 (5620),
125 (5625), 126 (5630), 127 (5635), 128 (5640),
129 (5645), 130 (5650), 131 (5655), 132 (5660),
133 (5665), 134 (5670), 135 (5675), 136 (5680),
137 (5685), 138 (5690), 139 (5695), 140 (5700),
141 (5705), 142 (5710)
Slovenia (SI) 5.47 - 5.725 GHz Yes 100 (5500), 104 (5520),
108 (5540), 112 (5560),
116 (5580), 120 (5600),
124 (5620), 128 (5640),
132 (5660), 136 (5680),
140 (5700)
98 (5490), 100 (5500),
102 (5510), 104 (5520),
106 (5530), 108 (5540),
110 (5550), 112 (5560),
114 (5570), 116 (5580),
118 (5590), 120 (5600),
122 (5610), 124 (5620),
126 (5630), 128 (5640),
130 (5650), 132 (5660),
134 (5670), 136 (5680),
138 (5690), 140 (5700),
142 (5710)
97 (5485), 98 (5490), 99 (5495), 100 (5500),
101 (5505), 102 (5510), 103 (5515), 104 (5520),
105 (5525), 106 (5530), 107 (5535), 108 (5540),
109 (5545), 110 (5550), 111 (5555), 112 (5560),
113 (5565), 114 (5570), 115 (5575), 116 (5580),
117 (5585), 118 (5590), 119 (5595), 120 (5600),
121 (5605), 122 (5610), 123 (5615), 124 (5620),
125 (5625), 126 (5630), 127 (5635), 128 (5640),
129 (5645), 130 (5650), 131 (5655), 132 (5660),
133 (5665), 134 (5670), 135 (5675), 136 (5680),
137 (5685), 138 (5690), 139 (5695), 140 (5700),
141 (5705), 142 (5710)
Country (Code) Frequency
Bands
DFS Allowed Channels (Center Freq)
20 MHz 10 MHz 5 MHz

Country Codes for Subscriber Module MeshMAX 5054 Series User Guide
Channels/Frequencies by Country
257
South Africa (ZA) 5.47 - 5.725 GHz Yes 100 (5500), 104 (5520),
108 (5540), 112 (5560),
116 (5580), 120 (5600),
124 (5620), 128 (5640),
132 (5660), 136 (5680),
140 (5700)
98 (5490), 100 (5500),
102 (5510), 104 (5520),
106 (5530), 108 (5540),
110 (5550), 112 (5560),
114 (5570), 116 (5580),
118 (5590), 120 (5600),
122 (5610), 124 (5620),
126 (5630), 128 (5640),
130 (5650), 132 (5660),
134 (5670), 136 (5680),
138 (5690), 140 (5700),
142 (5710)
97 (5485), 98 (5490), 99 (5495), 100 (5500),
101 (5505), 102 (5510), 103 (5515), 104 (5520),
105 (5525), 106 (5530), 107 (5535), 108 (5540),
109 (5545), 110 (5550), 111 (5555), 112 (5560),
113 (5565), 114 (5570), 115 (5575), 116 (5580),
117 (5585), 118 (5590), 119 (5595), 120 (5600),
121 (5605), 122 (5610), 123 (5615), 124 (5620),
125 (5625), 126 (5630), 127 (5635), 128 (5640),
129 (5645), 130 (5650), 131 (5655), 132 (5660),
133 (5665), 134 (5670), 135 (5675), 136 (5680),
137 (5685), 138 (5690), 139 (5695), 140 (5700),
141 (5705), 142 (5710)
Spain (ES) 5.47 - 5.725 GHz Yes 100 (5500), 104 (5520),
108 (5540), 112 (5560),
116 (5580), 120 (5600),
124 (5620), 128 (5640),
132 (5660), 136 (5680),
140 (5700)
98 (5490), 100 (5500),
102 (5510), 104 (5520),
106 (5530), 108 (5540),
110 (5550), 112 (5560),
114 (5570), 116 (5580),
118 (5590), 120 (5600),
122 (5610), 124 (5620),
126 (5630), 128 (5640),
130 (5650), 132 (5660),
134 (5670), 136 (5680),
138 (5690), 140 (5700),
142 (5710)
97 (5485), 98 (5490), 99 (5495), 100 (5500),
101 (5505), 102 (5510), 103 (5515), 104 (5520),
105 (5525), 106 (5530), 107 (5535), 108 (5540),
109 (5545), 110 (5550), 111 (5555), 112 (5560),
113 (5565), 114 (5570), 115 (5575), 116 (5580),
117 (5585), 118 (5590), 119 (5595), 120 (5600),
121 (5605), 122 (5610), 123 (5615), 124 (5620),
125 (5625), 126 (5630), 127 (5635), 128 (5640),
129 (5645), 130 (5650), 131 (5655), 132 (5660),
133 (5665), 134 (5670), 135 (5675), 136 (5680),
137 (5685), 138 (5690), 139 (5695), 140 (5700),
141 (5705), 142 (5710)
Sweden (SE) 5.47 - 5.725 GHz Yes 100 (5500), 104 (5520),
108 (5540), 112 (5560),
116 (5580), 120 (5600),
124 (5620), 128 (5640),
132 (5660), 136 (5680),
140 (5700)
98 (5490), 100 (5500),
102 (5510), 104 (5520),
106 (5530), 108 (5540),
110 (5550), 112 (5560),
114 (5570), 116 (5580),
118 (5590), 120 (5600),
122 (5610), 124 (5620),
126 (5630), 128 (5640),
130 (5650), 132 (5660),
134 (5670), 136 (5680),
138 (5690), 140 (5700),
142 (5710)
97 (5485), 98 (5490), 99 (5495), 100 (5500),
101 (5505), 102 (5510), 103 (5515), 104 (5520),
105 (5525), 106 (5530), 107 (5535), 108 (5540),
109 (5545), 110 (5550), 111 (5555), 112 (5560),
113 (5565), 114 (5570), 115 (5575), 116 (5580),
117 (5585), 118 (5590), 119 (5595), 120 (5600),
121 (5605), 122 (5610), 123 (5615), 124 (5620),
125 (5625), 126 (5630), 127 (5635), 128 (5640),
129 (5645), 130 (5650), 131 (5655), 132 (5660),
133 (5665), 134 (5670), 135 (5675), 136 (5680),
137 (5685), 138 (5690), 139 (5695), 140 (5700),
141 (5705), 142 (5710)
Switzerland (CH) 5.47 - 5.725 GHz Yes 100 (5500), 104 (5520),
108 (5540), 112 (5560),
116 (5580), 120 (5600),
124 (5620), 128 (5640),
132 (5660), 136 (5680),
140 (5700)
98 (5490), 100 (5500),
102 (5510), 104 (5520),
106 (5530), 108 (5540),
110 (5550), 112 (5560),
114 (5570), 116 (5580),
118 (5590), 120 (5600),
122 (5610), 124 (5620),
126 (5630), 128 (5640),
130 (5650), 132 (5660),
134 (5670), 136 (5680),
138 (5690), 140 (5700),
142 (5710)
97 (5485), 98 (5490), 99 (5495), 100 (5500),
101 (5505), 102 (5510), 103 (5515), 104 (5520),
105 (5525), 106 (5530), 107 (5535), 108 (5540),
109 (5545), 110 (5550), 111 (5555), 112 (5560),
113 (5565), 114 (5570), 115 (5575), 116 (5580),
117 (5585), 118 (5590), 119 (5595), 120 (5600),
121 (5605), 122 (5610), 123 (5615), 124 (5620),
125 (5625), 126 (5630), 127 (5635), 128 (5640),
129 (5645), 130 (5650), 131 (5655), 132 (5660),
133 (5665), 134 (5670), 135 (5675), 136 (5680),
137 (5685), 138 (5690), 139 (5695), 140 (5700),
141 (5705), 142 (5710)
Country (Code) Frequency
Bands
DFS Allowed Channels (Center Freq)
20 MHz 10 MHz 5 MHz

Country Codes for Subscriber Module MeshMAX 5054 Series User Guide
Channels/Frequencies by Country
258
Taiwan (158) 5.25 - 5.35 GHz and
5.725 - 5.825 GHz
No 56 (5280), 60 (5300),
64 (5320), 149 (5745),
153 (5765), 157 (5785),
161 (5805)
54 (5270), 56 (5280),
58 (5290), 60 (5300),
62 (5310), 64 (5320),
66 (5330), 147 (5735),
149 (5745), 151 (5755),
153 (5765), 155 (5775),
157 (5785), 159 (5795),
161 (5805), 163 (5815)
53 (5265), 54 (5270), 55 (5275), 56 (5280),
57 (5285), 58 (5290), 59 (5295), 60 (5300),
61 (5305), 62 (5310), 63 (5315), 64 (5320),
65 (5325), 66 (5330), 67 (5335), 147 (5735),
148 (5740), 149 (5745), 150 (5750), 151 (5755),
152 (5760), 153 (5765), 154 (5770), 155 (5775),
156 (5780), 157 (5785), 158 (5790), 159 (5795),
160 (5800), 161 (5805), 162 (5810), 163 (5815)
Thailand (TH) 5.725 - 5.825 GHz No 149 (5745), 153 (5765),
157 (5785), 161 (5805)
147 (5735), 149 (5745),
151 (5755), 153 (5765),
155 (5775), 157 (5785),
159 (5795), 161 (5805),
163 (5815)
147 (5735), 148 (5740), 149 (5745), 150 (5750),
151 (5755), 152 (5760), 153 (5765), 154 (5770),
155 (5775), 156 (5780), 157 (5785), 158 (5790),
159 (5795), 160 (5800), 161 (5805), 162 (5810),
163 (5815)
United
Kingdom (GB)
5.47 - 5.725 GHz Yes 100 (5500), 104 (5520),
108 (5540), 112 (5560),
116 (5580), 120 (5600),
124 (5620), 128 (5640),
132 (5660), 136 (5680),
140 (5700)
98 (5490), 100 (5500),
102 (5510), 104 (5520),
106 (5530), 108 (5540),
110 (5550), 112 (5560),
114 (5570), 116 (5580),
118 (5590), 120 (5600),
122 (5610), 124 (5620),
126 (5630), 128 (5640),
130 (5650), 132 (5660),
134 (5670), 136 (5680),
138 (5690), 140 (5700),
142 (5710)
97 (5485), 98 (5490), 99 (5495), 100 (5500),
101 (5505), 102 (5510), 103 (5515), 104 (5520),
105 (5525), 106 (5530), 107 (5535), 108 (5540),
109 (5545), 110 (5550), 111 (5555), 112 (5560),
113 (5565), 114 (5570), 115 (5575), 116 (5580),
117 (5585), 118 (5590), 119 (5595), 120 (5600),
121 (5605), 122 (5610), 123 (5615), 124 (5620),
125 (5625), 126 (5630), 127 (5635), 128 (5640),
129 (5645), 130 (5650), 131 (5655), 132 (5660),
133 (5665), 134 (5670), 135 (5675), 136 (5680),
137 (5685), 138 (5690), 139 (5695), 140 (5700),
141 (5705), 142 (5710)
United Kingdom 5.8
GHz (G1)
5.725 - 5.85 GHz Yes 147 (5735), 151 (5755),
155 (5775), 167 (5835)
145 (5725), 147 (5735),
149 (5745), 151 (5755),
153 (5765), 155 (5775),
157 (5785), 163 (5815),
165 (5825), 167 (5835),
169 (5845)
145 (5725), 146 (5730), 147 (5735), 148 (5740),
149 (5745), 150 (5750), 151 (5755), 152 (5760),
153 (5765), 154 (5770), 155 (5775), 156 (5780),
157 (5785), 158 (5790), 159 (5795), 163 (5815),
164 (5820), 165 (5825), 166 (5830), 167 (5835),
168 (5840), 169 (5845), 170 (5850)
United States (US) 5.725 - 5.85 GHz No 149 (5745), 153 (5765),
157 (5785), 161 (5805),
165 (5825)
147 (5735), 149 (5745),
151 (5755), 153 (5765),
155 (5775), 157 (5785),
159 (5795), 161 (5805),
163 (5815), 165 (5825),
167 (5835)
147 (5735), 148 (5740), 149 (5745), 150 (5750),
151 (5755), 152 (5760), 153 (5765), 154 (5770),
155 (5775), 156 (5780), 157 (5785), 158 (5790),
159 (5795), 160 (5800), 161 (5805), 162 (5810),
163 (5815), 164 (5820), 165 (5825), 166 (5830),
167 (5835)
Country (Code) Frequency
Bands
DFS Allowed Channels (Center Freq)
20 MHz 10 MHz 5 MHz

Country Codes for Subscriber Module MeshMAX 5054 Series User Guide
Channels/Frequencies by Country
259
United States
DFS (U1)
5.25 - 5.35 GHz and
5.47 - 5.725 GHz
Yes 56 (5280), 60 (5300),
64 (5320), 100 (5500),
104 (5520), 108 (5540),
112 (5560), 116 (5580),
120 (5600), 124 (5620),
128 (5640), 132 (5660),
136 (5680), 140 (5700)
54 (5270), 56 (5280),
58 (5290), 60 (5300),
62 (5310), 64 (5320),
66 (5330), 98 (5490),
100 (5500), 102 (5510),
104 (5520), 106 (5530),
108 (5540), 110 (5550),
112 (5560), 114 (5570),
116 (5580), 118 (5590),
120 (5600), 122 (5610),
124 (5620), 126 (5630),
128 (5640), 130 (5650),
132 (5660), 134 (5670),
136 (5680), 138 (5690),
140 (5700), 142 (5710)
NA
Uruguay (UY) 5.725 - 5.825 GHz No 149 (5745), 153 (5765),
157 (5785), 161 (5805)
147 (5735), 149 (5745),
151 (5755), 153 (5765),
155 (5775), 157 (5785),
159 (5795), 161 (5805),
163 (5815)
147 (5735), 148 (5740), 149 (5745), 150 (5750),
151 (5755), 152 (5760), 153 (5765), 154 (5770),
155 (5775), 156 (5780), 157 (5785), 158 (5790),
159 (5795), 160 (5800), 161 (5805), 162 (5810),
163 (5815)
Venezuela (VE) 5.725 - 5.825 GHz No 149 (5745), 153 (5765),
157 (5785), 161 (5805)
147 (5735), 149 (5745),
151 (5755), 153 (5765),
155 (5775), 157 (5785),
159 (5795), 161 (5805),
163 (5815)
147 (5735), 148 (5740), 149 (5745), 150 (5750),
151 (5755), 152 (5760), 153 (5765), 154 (5770),
155 (5775), 156 (5780), 157 (5785), 158 (5790),
159 (5795), 160 (5800), 161 (5805), 162 (5810),
163 (5815)
Country (Code) Frequency
Bands
DFS Allowed Channels (Center Freq)
20 MHz 10 MHz 5 MHz

260
MeshMAX 5054 Series User Guide
B
CLI for Mesh and Access Point Module
This section discusses the following:
•General Notes
•Command Line Interface (CLI) Variations
•CLI Command Types
•Using Tables and Strings
•Configuring the AP using CLI commands
•CLI Monitoring Parameters
•Parameter Tables
•CLI Batch File
CLI commands can be used to initialize, configure, and manage the Access Point.
• CLI commands may be entered in real time through a keyboard or submitted with CLI scripts.
•A CLI Batch file is a user-editable configuration file that provides a user-friendly way to change the AP configuration
through a file upload. The CLI Batch file is an ASCII file that facilitates Auto Configuration because it does not require
the user to access one of the AP’s management interfaces to make configuration changes as is required with the
proprietary LTV format configuration file.
• The CLI is available through both the Serial Port interface and over the Ethernet interface using Telnet.
NOTE: All CLI commands and parameters are case-sensitive.

CLI for Mesh and Access Point Module MeshMAX 5054 Series User Guide
User Guide
261
General Notes
Prerequisite Skills and Knowledge
To use this document effectively, you should have a working knowledge of Local Area Networking (LAN) concepts,
network access infrastructures, and client-server relationships. In addition, you should be familiar with software setup
procedures for typical network operating systems and servers.
Notation Conventions
• Computer prompts are shown as constant width type. For example: [Device-Name]>
• Information that you input as shown is displayed in bold constant width type. For example:
[Device name]> set ipaddr 10.0.0.12
• The names of keyboard keys, software buttons, and field names are displayed in bold type. For example: Click the
Configure button.
• Screen names are displayed in bold italics. For example, the System Status screen.
Important Terminology
• Configuration Files - Database files containing the current Access Point configuration. Configuration items include the
IP Address and other network-specific values. Config files may be downloaded to the Access Point or uploaded for
backup or troubleshooting.
• Download vs. Upload - Downloads transfer files to the Access Point. Uploads transfer files from the Access Point. The
TFTP server performs file transfers in both directions.
• Group - A logical collection of network parameter information. For example, the System Group is composed of several
related parameters. Groups can also contain Tables. All items for a given Group can be displayed with a show
<Group> CLI Command.
• Image File - The Access Point software executed from RAM. To update an Access Point you typically download a new
Image File. This file is often referred to as the “AP Image”.
• Parameter - A fundamental network value that can be displayed and may be changeable. For example, the Access
Point must have a unique IP Address and the Wireless interface must be assigned an SSID. Change parameters with
the CLI set Command, and view them with the CLI show Command.
• Table - Tables hold parameters for several related items. For example, you can add several potential managers to the
SNMP Table. All items for a given Table can be displayed with a show <Table> CLI Command.
• TFTP - Refers to the TFTP Server, used for file transfers.
Navigation and Special Keys
This CLI supports the following navigation and special key functions to move the cursor along the prompt line.
Key Combination Operation
Delete or Backspace Delete previous character
Ctrl-A Move cursor to beginning of line
Ctrl-E Move cursor to end of line
Ctrl-F Move cursor forward one character
Ctrl-B Move cursor back one character
Ctrl-D Delete the character the cursor is on
Ctrl-U Delete all text to left of cursor
Ctrl-P Go to the previous line in the history buffer
Ctrl-N Go to the next line in the history buffer
Ctrl-W Delete the previous word

CLI for Mesh and Access Point Module MeshMAX 5054 Series User Guide
User Guide
262
CLI Error Messages
The following table describes the error messages associated with improper inputs or expected CLI behavior.
Tab Complete the command line
? List available commands
Error Message Description
Syntax Error Invalid syntax entered at the command prompt.
Invalid Command A non-existent command has been entered at the command prompt.
Invalid Parameter Name An invalid parameter name has been entered at the command prompt.
Invalid Parameter Value An invalid parameter value has been entered at the command prompt.
Invalid Table Index An invalid table index has been entered at the command prompt.
Invalid Table Parameter An invalid table parameter has been entered at the command prompt.
Invalid Table Parameter Value An invalid table parameter value has been entered at the command prompt.
Read Only Parameter User is attempting to configure a read-only parameter.
Incorrect Password An incorrect password has been entered in the CLI login prompt.
Download Unsuccessful The download operation has failed due to incorrect TFTP server IP Address or file
name.
Upload Unsuccessful The upload operation has failed due to incorrect TFTP server IP Address or file
name.
Key Combination Operation
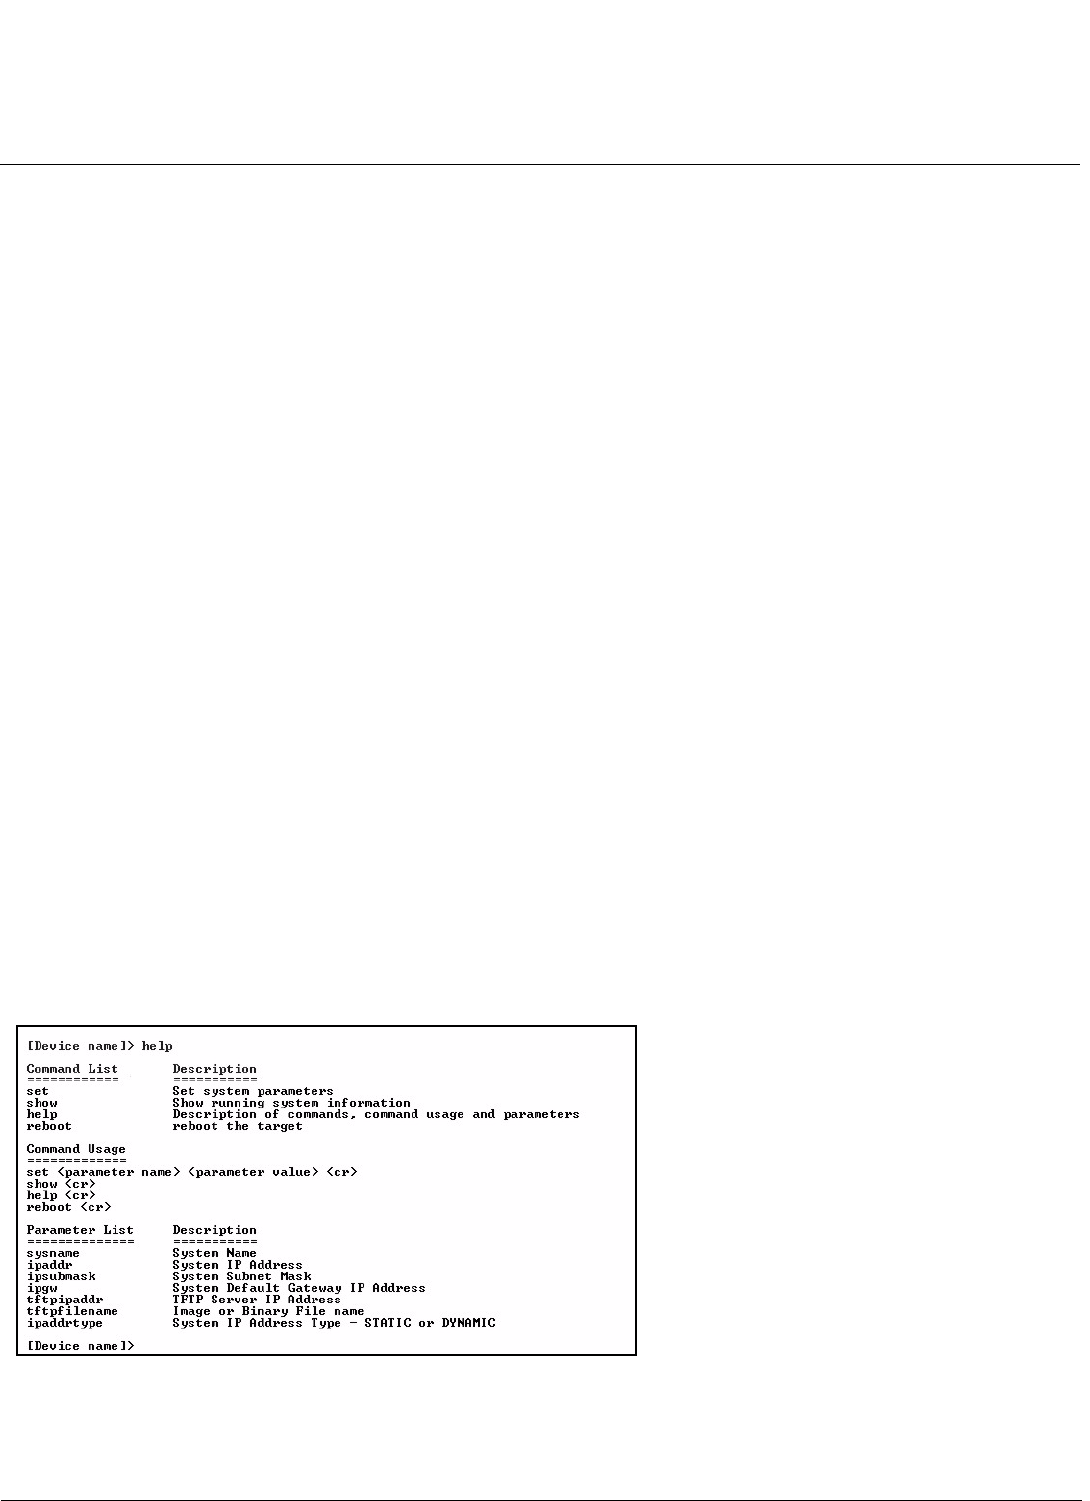
CLI for Mesh and Access Point Module MeshMAX 5054 Series User Guide
User Guide
263
Command Line Interface (CLI) Variations
Administrators use the CLI to control Access Point operation and monitor network statistics. The AP supports two types
of CLI: the Bootloader CLI and the normal CLI. The Bootloader CLI provides a limited command set, and is used when
the current AP Image is bad or missing. The Bootloader CLI allows you to assign an IP Address and download a new
image. Once the image is downloaded and running, the Access Point uses the normal CLI. This guide covers the normal
CLI unless otherwise specified.
Bootloader CLI
The Bootloader CLI is a minimal subset of the normal CLI used to perform initial configuration of the AP. This interface is
only accessible via the serial interface if the AP does not contain a software image or a download image command over
TFTP has failed.
The Bootloader CLI provides you with the ability to configure the initial setup parameters as well as download a software
image to the device.
The following functions are supported by the Bootloader CLI:
• configuration of initial device parameters using the set command
•show command to view the device’s configuration parameters
•help command to provide additional information on all commands supported by the Bootloader CLI
•reboot command to reboot the device
The parameters supported by the Bootloader CLI (for viewing and modifying) are:
• System Name
• IP Address Assignment Type
• IP Address
•IP Mask
• Gateway IP Address
• TFTP Server IP Address
• Image File Name (including the file extension)
The following lists display the results of using the help command in the Bootloader CLI:
Figure B-1 Results of “help” bootloader CLI command
The following lists display the results of using the show command in the Bootloader CLI:

CLI for Mesh and Access Point Module MeshMAX 5054 Series User Guide
User Guide
264
Figure B-2 Results of “show” bootloader CLI command

CLI for Mesh and Access Point Module MeshMAX 5054 Series User Guide
User Guide
265
CLI Command Types
This guide divides CLI Commands into two categories: Operational and Parameter Controls.
Operational CLI Commands
These commands affect Access Point behavior, such as downloading, rebooting, and so on. After entering commands
(and parameters, if any) press the Enter key to execute the Command Line.
Operational commands include:
•?: Typing a question mark lists CLI Commands or parameters, depending on usage (you do not need to type Enter
after typing this command)
•done, exit, quit: Terminates the CLI session
•download: Uses a TFTP server to download “image” files, “config” files, “bootloader upgrade” files, a “license” file,
“SSL certificates”, “SSL private keys”, “SSH public keys”, “SSH private keys”, or “CLI Batch Files” to the Access Point
•help: Displays general CLI help information or command help information, such as command usage and syntax
•history: Remembers commands to help avoid re-entering complex statements
•passwd: Sets the Access Point’s CLI password
•reboot: Reboots the Access Point in the specified time
•search: Lists the parameters in a specified Table
•upload: Uses TFTP server to upload “config” files from Access Point to TFTP default directory or specified path
? (List Commands)
This command can be used in a number of ways to display available commands and parameters.
The following table lists each operation and provides a basic example. Following the table are detailed examples and
display results for each operation.
Example 1. Display Command list
To display the Command List, enter ?.
[Device-Name]>?
Figure B-3 Result of “?” CLI command
Operation Basic Example
Display the Command List (Example 1) [Device-Name]>?
Display commands that start with specified letters
(Example 2)
[Device-Name]>s?
Display parameters for set and show Commands
(Examples 3a and 3b)
[Device-Name]>set ?
[Device-Name]>show ipa?
Prompt to enter successive parameters for
Commands (Example 4)
[Device-Name]>download ?
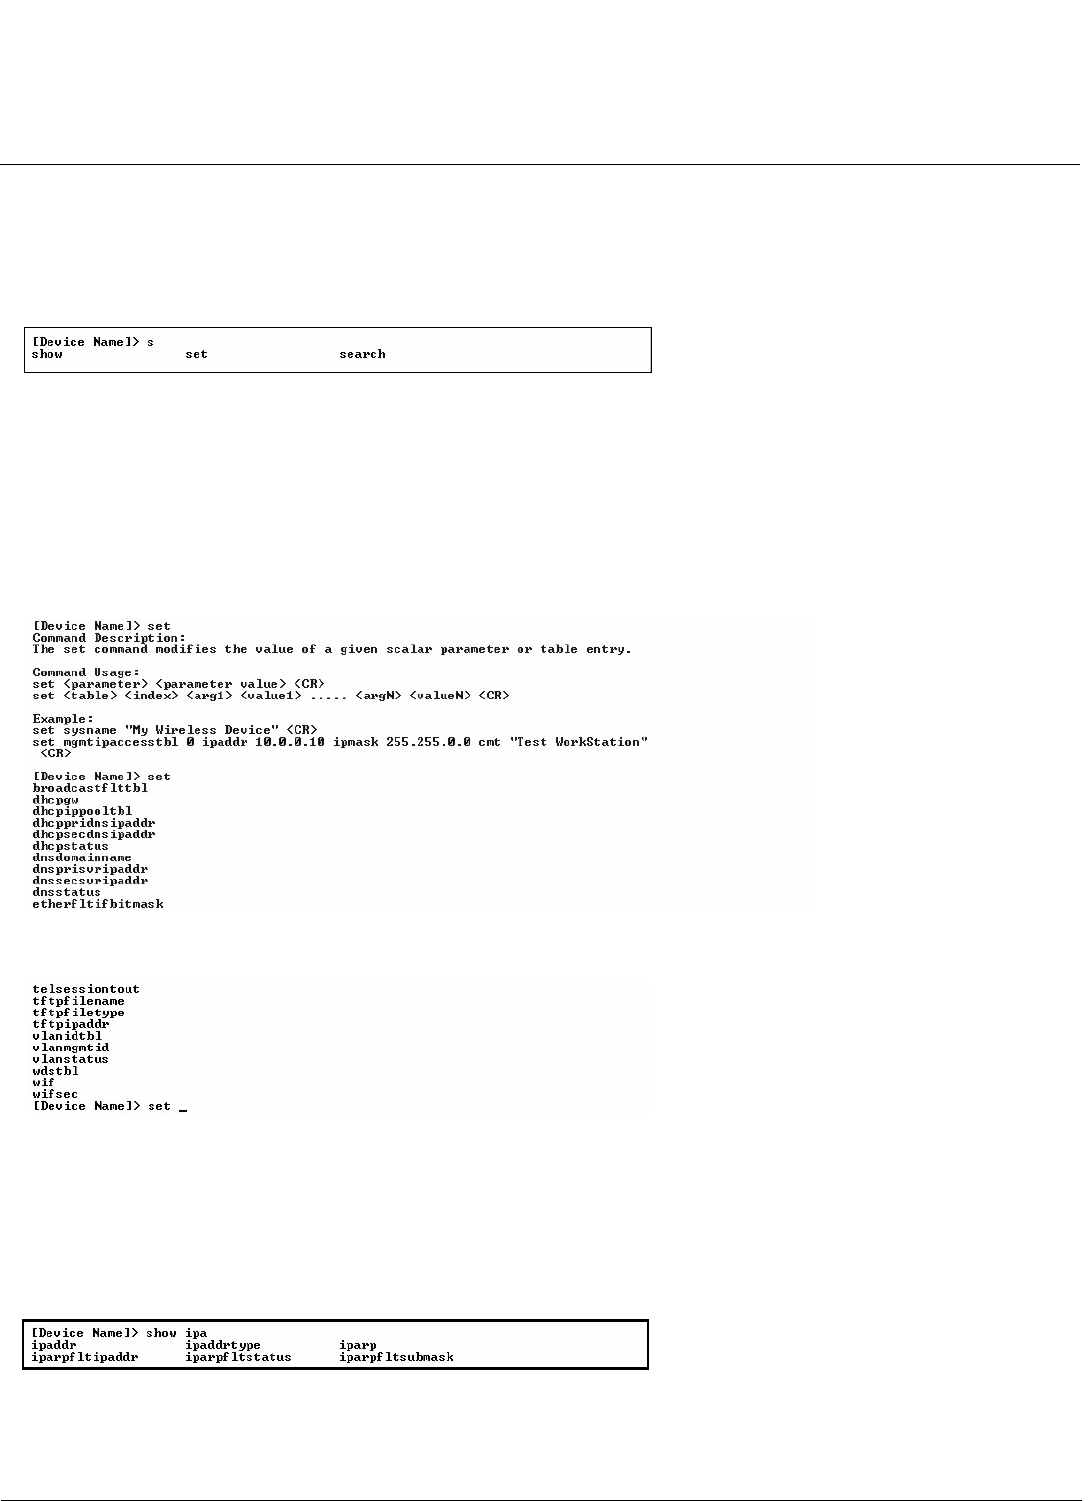
CLI for Mesh and Access Point Module MeshMAX 5054 Series User Guide
User Guide
266
Example 2. Display specific Commands
To show all commands that start with specified letters, enter one or more letters, then ? with no space between letters
and ?.
[Device-Name]>s?
Figure B-4 Result of “s?” CLI command
Example 3. Display parameters for set and show
Example 3a allows you to see every possible parameter for the set (or show) commands. Notice from example 3a that
the list is very long. Example 3b shows how to display a subset of the parameters based on initial parameter letters.
Example 3a. Display every parameter that can be changed
[Device-Name]>set ?
Figure B-5 Result of “set ?” CLI command
Example 3b. Display parameters based on letter sequence
This example shows entries for parameters that start with the letter “i”. The more letters you enter, the fewer the results
returned. Notice that there is no space between the letters and the question mark.
[Device-Name]> show ipa?
Figure B-6 Result of “show ipa?” CLI command
[Device-Name]> show iparp?
.
.
.
.

CLI for Mesh and Access Point Module MeshMAX 5054 Series User Guide
User Guide
267
Figure B-7 Result of “show iparp?” CLI command
Example 4. Display Prompts for Successive Parameters
Enter the command, a space, and then ?. Then, when the parameter prompt appears, enter the parameter value. The
parameter is changed and a new CLI line is echoed with the new value (in the first part of the following example, the
value is the IP Address of the TFTP server).
After entering one parameter, you may add another ? to the new CLI line to see the next parameter prompt, and so on
until you have entered all of the required parameters. The following example shows how this is used for the download
Command. The last part of the example shows the completed download Command ready for execution.
[Device-Name]> download ?
<TFTP IP Address>
[Device-Name]> download 192.168.0.101 ?
<File Name>
[Device-Name]> download 192.168.0.101 apimage ?
<file type (config/img/bootloader)>
[Device-Name]> download 192.168.0.101 apimage img <CR>
done, exit, quit
Each of the following commands ends a CLI session:
[Device-Name]> done
[Device-Name]> exit
[Device-Name]> quit
download
Downloads the specified file from a TFTP server to the Access Point. Executing download in combination with the
asterisks character (“*”) will make use of the previously set TFTP parameters. Executing download without parameters
will display command help and usage information.
1. Syntax to download a file:
[Device-Name]>download <tftp server address> <path and filename> <file type>
Example:
[Device-Name]>download 192.168.1.100 APImage2 img
2. Syntax to display help and usage information:
[Device-Name]>download
3. Syntax to execute the download Command using previously set (stored) TFTP Parameters:
[Device-Name]>download *
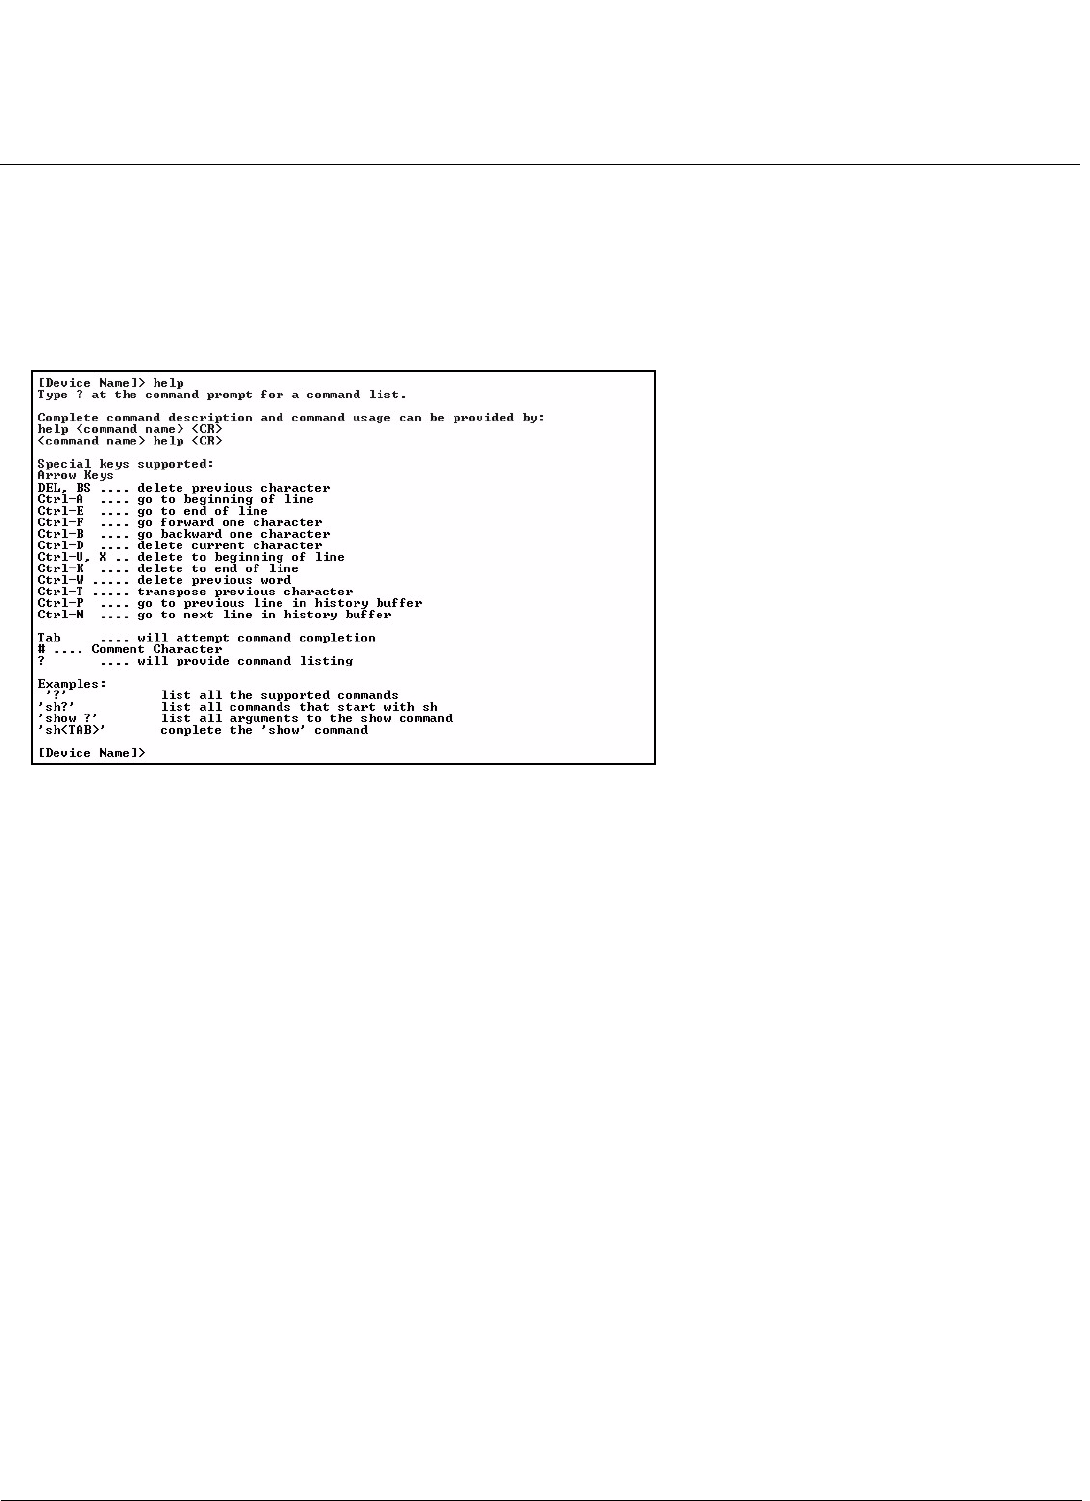
CLI for Mesh and Access Point Module MeshMAX 5054 Series User Guide
User Guide
268
help
Displays instructions on using control-key sequences for navigating a Command Line and displays command information
and examples.
1. Using help as the only argument:
[Device-Name]>help
Figure B-8 Results of “help” CLI command
2. Complete command description and command usage can be provided by:
[Device-Name]>help <command name>
[Device-Name]><command name> help
history
Shows content of Command History Buffer. The Command History Buffer stores command statements entered in the
current session. To avoid re-entering long command statements, use the keyboard “up arrow” (Ctrl-P) and “down arrow”
(Ctrl-N) keys to recall previous statements from the Command History Buffer. When the desired statement reappears,
press the Enter key to execute, or you may edit the statement before executing it.
[Device-Name]> history
passwd
Changes the CLI Password.
[Device-Name]> passwd oldpassword newpassword newpassword
reboot
Reboots Access Point after specified number of seconds. Specify a value of 0 (zero) for immediate reboot.
[Device-Name]> reboot 0
[Device-Name]> reboot 30
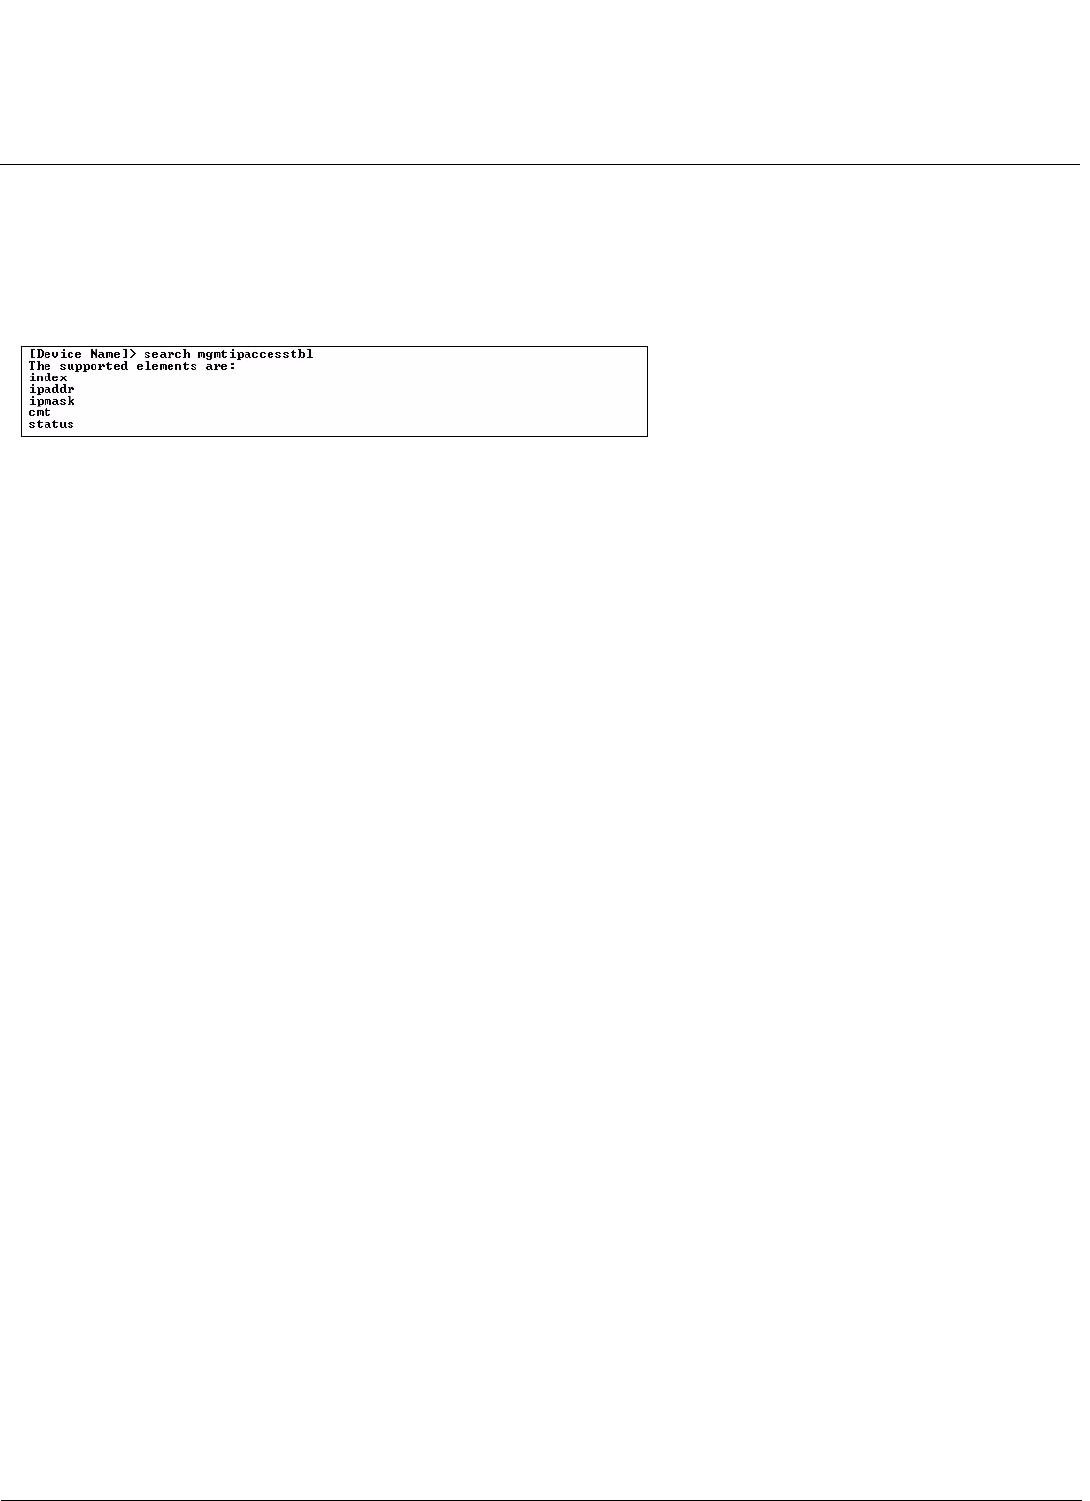
CLI for Mesh and Access Point Module MeshMAX 5054 Series User Guide
User Guide
269
search
Lists the parameters supported by the specified table. This list corresponds to the table information displayed in the
HTTP interface. In this example, the CLI returns the list of parameters that make up an entry in the IP Access Table.
[Device-Name]> search mgmtipaccesstbl
Figure B-9 Results of “search mgmtipaccesstbl” CLI command
upload
Uploads a text-based configuration file from the AP to the TFTP Server. Executing upload with the asterisk character
(“*”) will make use of the previously set/stored TFTP parameters. Executing upload without parameters will display
command help and usage information.
1. Syntax to upload a file:
[Device-Name]>upload <tftp server address> <path and filename> <filetype>
Example:
[Device-Name]>upload 192.168.1.100 APconfig.sys config
2. Syntax to display help and usage information:
[Device-Name]>help upload
3. Syntax to execute the upload command using previously set (stored) TFTP Parameters:
[Device-Name]>upload *
Parameter Control Commands
The following sections cover the two Parameter Control Commands (show and set) and include several tables showing
parameter properties. These commands allow you to view (show) all parameters and statistics and to change (set)
parameters.
•show: To see any Parameter or Statistic value, you can specify a single parameter, a Group, or a Table.
•set: Use this CLI Command to change parameter values. You can use a single CLI statement to modify Tables, or you
can modify each parameter separately.
“show” CLI Command
Displays the value of the specified parameter, or displays all parameter values of a specified group (parameter table).
Groups contain Parameters and Tables. Tables contain parameters for a series of similar entities.
To see a definition and syntax example, type only show and then press the Enter key. To see a list of available
parameters, enter a question mark (?) after show (example: show ?).
Syntax:
[Device-Name]>show <parameter>
[Device-Name]>show <group>
[Device-Name]>show <table>
Examples:
[Device-Name]>show ipaddr

CLI for Mesh and Access Point Module MeshMAX 5054 Series User Guide
User Guide
270
[Device-Name]>show network
[Device-Name]>show mgmtipaccesstbl
“set” CLI Command
Sets (modifies) the value of the specified parameter. To see a definition and syntax example, type only set and then press
the Enter key. To see a list of available parameters, enter a space, then a question mark (?) after set (example: set?).
Syntax:
[Device-Name]>set <parameter> <value>
[Device-Name]>set <table> <index> <argument 1> <value 1> ... <argument N> <value N>
Example:
[Device-Name]>set sysloc “Main Lobby”
[Device-Name]>set mgmtipaccesstbl 0 ipaddr 10.0.0.10 ipmask 255.255.0.0
Configuring Objects that Require Reboot
Certain objects supported by the Access Point require a device reboot in order for the changes to take effect. In order to
inform the end-user of this behavior, the CLI provides informational messages when the user has configured an object
that requires a reboot. The following messages are displayed as a result of the configuring such object or objects.
Example 1: Configuring objects that require the device to be rebooted
The following message is displayed every time the user has configured an object that requires the device to be rebooted.
[Device-Name]>set ipaddr 135.114.73.10
The following elements require reboot
ipaddr
Example 2: Executing the “exit”, “quit”, or “done” commands when an object that requires reboot has been
configured
In addition to the above informational message, the CLI also provides a message as a result of the exit,quit, or done
command if changes have been made to objects that require reboot. If you make changes to objects that require reboot
and execute the exit command the following message is displayed:
[Device-Name]>exit<CR> OR quit<CR> OR done<CR>
Modifications have been made to parameters that require the device to be rebooted. These changes will only take effect after the next reboot.
“set” and “show” Command Examples
In general, you will use the CLI show Command to view current parameter values and use the CLI set Command to
change parameter values. As shown in the following examples, parameters may be set individually or all parameters for a
given table can be set with a single statement.
Example 1 - Set the Access Point IP Address Parameter
Syntax:
[Device-Name]>set <parameter name> <parameter value>
Example:
[Device-Name]> set ipaddr 10.0.0.12
IP Address will be changed when you reboot the Access Point. The CLI reminds you when rebooting is required for a
change to take effect. To reboot immediately, enter reboot 0 (zero) at the CLI prompt.

CLI for Mesh and Access Point Module MeshMAX 5054 Series User Guide
User Guide
271
Example 2 - Create a table entry or row
Use 0 (zero) as the index to a table when creating an entry. When creating a table row, only the mandatory table elements
are required (comment is usually an optional table element). For optional table elements, the default value is generally
applied if you do not specify a value.
Syntax:
[Device-Name]>set <table name> <table index> <element 1> <value 1> …
<element n> <value n>
Example:
[Device-Name]> set mgmtipaccesstbl 0 ipaddr 10.0.0.10 ipmask 255.255.0.0
A new table entry is created for IP address 10.0.0.10 with a 255.255.0.0 subnet mask.
Example 3 - Modify a table entry or row
Use the index to be modified and the table elements you would like to modify. For example, suppose the IP Access Table
has one entry and you wanted to modify the IP address:
[Device-Name]>set mgmtipaccesstbl 1 ipaddr 10.0.0.11
You can also modify several elements in the table entry. Enter the index number and specific table elements you would
like to modify. (Hint: Use the search Command to see the elements that belong to the table.)
[Device-Name]>set mgmtipaccesstbl 1 ipaddr 10.0.0.12 ipmask 255.255.255.248
cmt “First Row”
Example 4 - Enable, Disable, or Delete a table entry or row
The following example illustrates how to manage the second entry in a table.
Syntax:
[Device-Name]>set <Table> index status <enable, disable, delete>
[Device-Name]>set <Table> index status <1=enable, 2=disable, 3=delete>
Example:
[Device-Name]>set mgmtipaccesstbl 2 status enable
[Device-Name]>set mgmtipaccesstbl 2 status disable
[Device-Name]>set mgmtipaccesstbl 2 status delete
[Device-Name]>set mgmtipaccesstbl 2 status 2
NOTE: You may need to enable a disabled table entry before you can change the entry’s elements.
Example 5 - Show the Group Parameters
This example illustrates how to view all elements of a group or table.
Syntax:
[Device-Name]> show <group name>
Example:
[Device-Name]>show network
The CLI displays network group parameters. Note show network and show ip return the same data.
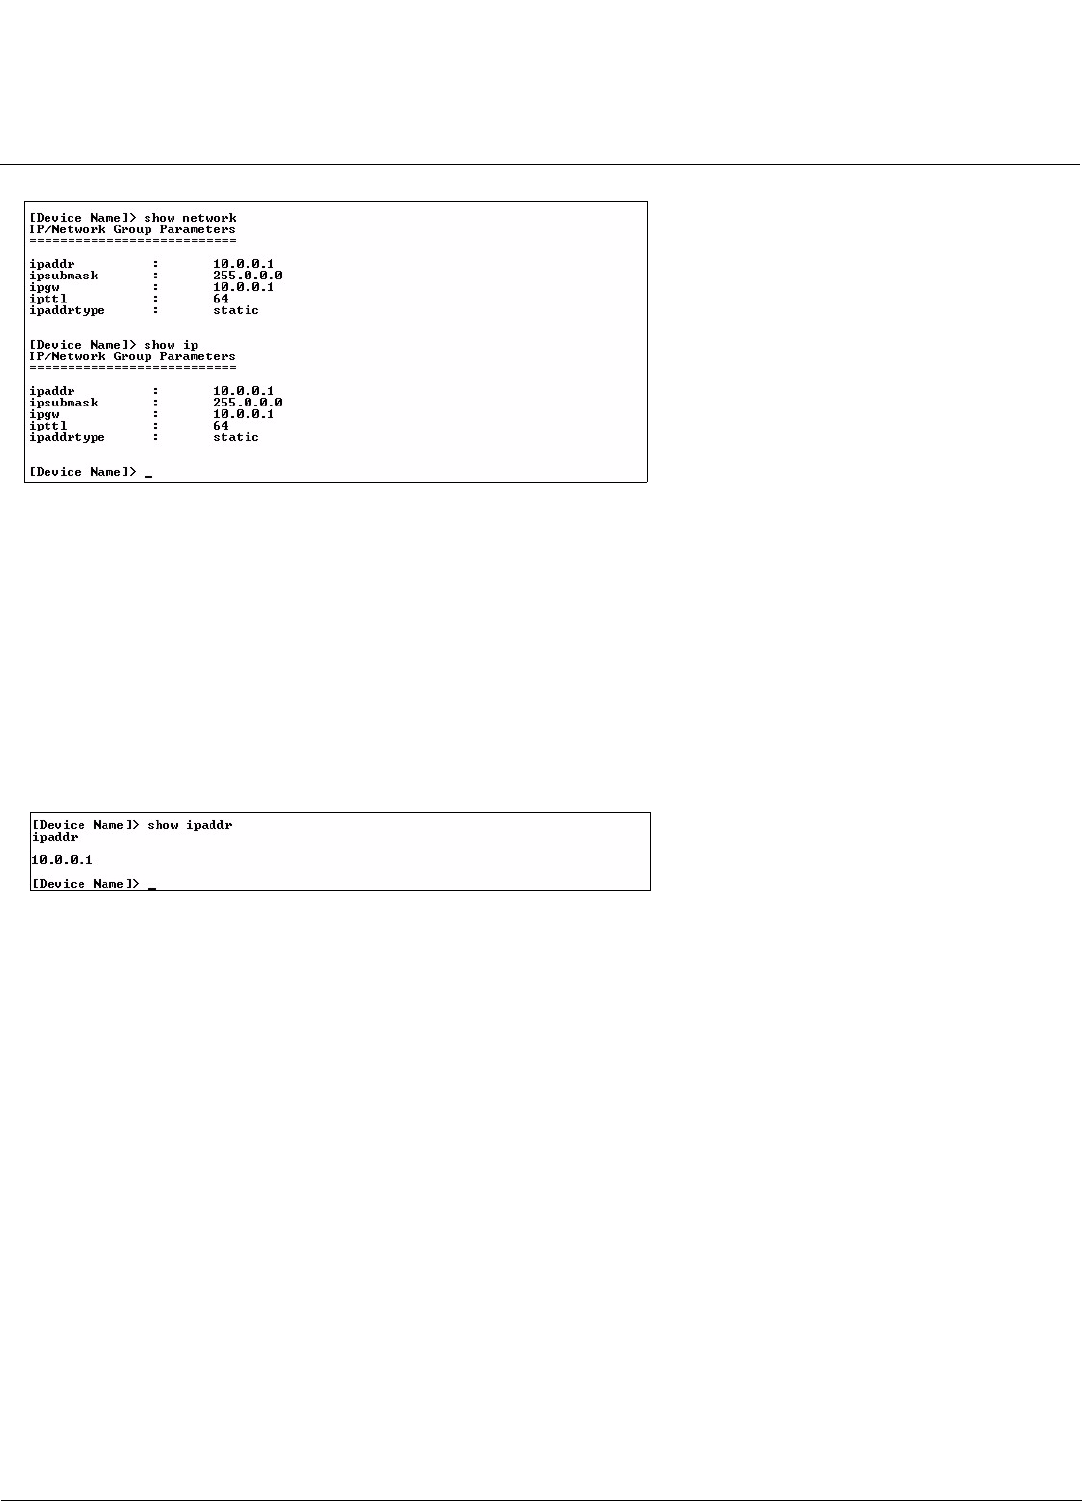
CLI for Mesh and Access Point Module MeshMAX 5054 Series User Guide
User Guide
272
Figure B-10 Results of “show network” and “show ip” CLI Commands
Example 6 - Show Individual and Table Parameters
1. View a single parameter.
Syntax:
[Device-Name]>show <parameter name>
Example:
[Device-Name]> show ipaddr
Displays the Access Point IP address.
Figure B-11 Result of “show ipaddr” CLI Command
2. View all parameters in a table.
Syntax:
[Device-Name]> show <table name>
Example: [Device-Name]> show mgmtipaccesstbl
The CLI displays the IP Access Table and its entries.

CLI for Mesh and Access Point Module MeshMAX 5054 Series User Guide
User Guide
273
Using Tables and Strings
Working with Tables
Each table element (or parameter) must be specified, as in the example below.
[Device-Name]>set mgmtipaccesstbl 0 ipaddr 10.0.0.10 ipmask 255.255.0.0
Below are the rules for creating, modifying, enabling/disabling, and deleting table entries.
•Creation
– The table name is required.
– The table index is required – for table entry/instance creation the index is always zero (0).
– The order in which the table arguments or objects are entered in not important.
– Parameters that are not required can be omitted, in which case they will be assigned the default value.
• Modification
– The table name is required.
– The table index is required – to modify the table, “index” must be the index of the entry to be modified.
– Only the table objects that are to be modified need to be specified. Not all the table objects are required.
– If multiple table objects are to be modified the order in which they are entered is not important.
– If the entire table entry is to be modified, all the table objects have to be specified.
• Enabling/Disabling
– The table name is required.
– The table index is required – for table enabling/disabling the index should be the index of the entry to be
enabled/disabled.
– The entry’s new state (either “enable” or “disable”) is required.
• Deletion
– The table name is required.
– The table index is required – for table deletion the index should be the index of the entry to be deleted.
– The word “delete” is required.
Using Strings
Since there are several string objects supported by the AP, a string delimiter is required for the strings to be interpreted
correctly by the command line parser. For this CLI implementation, the single quote or double quote character can be
used at the beginning and at the end of the string.
For example:
[Device-Name]> set sysloc Lobby - Does not need quote marks
[Device-Name]> set sysloc “Front Lobby” - Requires quote marks.
The scenarios supported by this CLI are:
“My Desk in the office” Double Quotes
‘My Desk in the office’ Single Quotes
“My ‘Desk’ in the office” Single Quotes within Double Quotes
‘My “Desk” in the office’ Double Quotes within Single Quotes
“Daniel’s Desk in the office” One Single Quote within Double Quotes
‘Daniel”s Desk in the office’ One Double Quote within Single Quotes

CLI for Mesh and Access Point Module MeshMAX 5054 Series User Guide
User Guide
274
The string delimiter does not have to be used for every string object. The single quote or double quote only has to be
used for string objects that contain blank space characters. If the string object being used does not contain blank spaces,
then the string delimiters, single or double quotes, mentioned in this section are not required.

CLI for Mesh and Access Point Module MeshMAX 5054 Series User Guide
User Guide
275
Configuring the AP using CLI commands
Log into the AP using HyperTerminal
1. Open your terminal emulation program (like HyperTerminal) and set the following connection properties:
• Com Port: <COM1, COM2, etc., depending on your computer>
• Baud rate: 9600
• Data Bits: 8
• Stop bits: 1
• Flow Control: None
• Parity: None
2. Under File > Properties > Settings > ASCII Setup, enable the Send line ends with line feeds option.
HyperTerminal sends a line return at the end of each line of code.
3. Enter the CLI password (default is public).
NOTE: Proxim recommends changing your default passwords immediately. To perform this operation using CLI
commands, see Change Passwords.
Log into the AP using Telnet
The CLI commands can be used to access, configure, and manage the AP using Telnet. Follow these steps:
1. Confirm that your computer’s IP address is in the same IP subnet as the AP.
NOTE: If you have not previously configured the Access Point’s IP address and do not have a DHCP server on
the network, the Access Point will default to an IP address of 169.254.128.132.
2. Go to the DOS command prompt on your computer.
3. Type telnet <IP Address of the unit>.
4. Enter the CLI password (default is public).
NOTE: Proxim recommends changing your default passwords immediately. To perform this operation using CLI
commands, see Change Passwords.
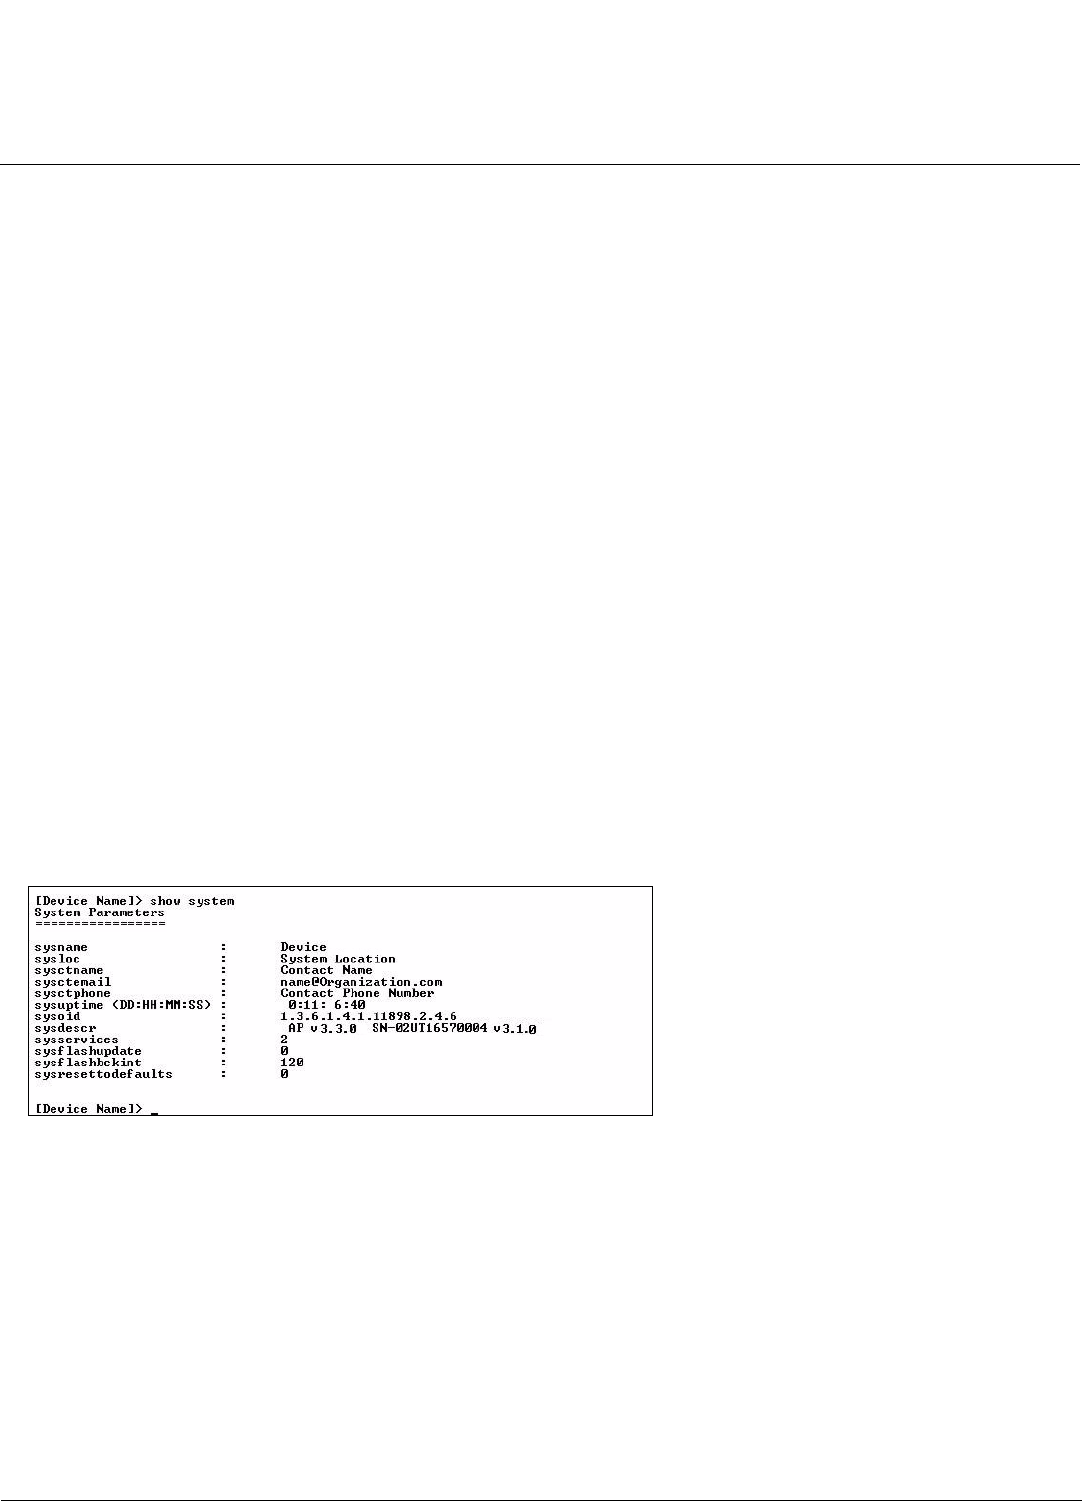
CLI for Mesh and Access Point Module MeshMAX 5054 Series User Guide
User Guide
276
Set Basic Configuration Parameters using CLI Commands
There are a few basic configuration parameters that you may want to setup right away when you receive the AP. For
example:
•Set System Name, Location and Contact Information
•Set Static IP Address for the AP
•Download an AP Configuration File from your TFTP Server
•Set up Auto Configuration
•Set Network Names for the Wireless Interface
•Enable 802.11d Support and Set the Country Code
•Enable and Configure TX Power Control for the Wireless Interface(s)
•Configure SSIDs (Network Names), VLANs, and Profiles
•Download an AP Configuration File from your TFTP Server
•Backup your AP Configuration File
Set System Name, Location and Contact Information
NOTE: System name must:
•Contain only letters, numbers, and hyphens.
•Be limited to 31 characters.
•Not begin with a number or hyphen.
•Not contain blank spaces.
[Device-Name]>set sysname <Name> sysloc <Unit Location>
[Device-Name]>set sysctname <Contact Name>
[Device-Name]>set sysctphone <Contact Phone Number> sysctemail <Contact E-mail address>
[Device-Name]>show system
Figure B-12 Result of “show system” CLI Command
Set Static IP Address for the AP
NOTE: The IP Subnet Mask of the AP must match your network’s Subnet Mask.
[Device-Name]>set ipaddrtype static
[Device-Name]>set ipaddr <fixed IP address of unit>
[Device-Name]>set ipsubmask <IP Mask>
[Device-Name]>set ipgw <gateway IP address>
[Device-Name]>show network
Change Passwords
[Device-Name]>passwd <Old Password> <New Password> <Confirm Password> (CLI password)
[Device-Name]>set httppasswd <New Password> (HTTP interface password)
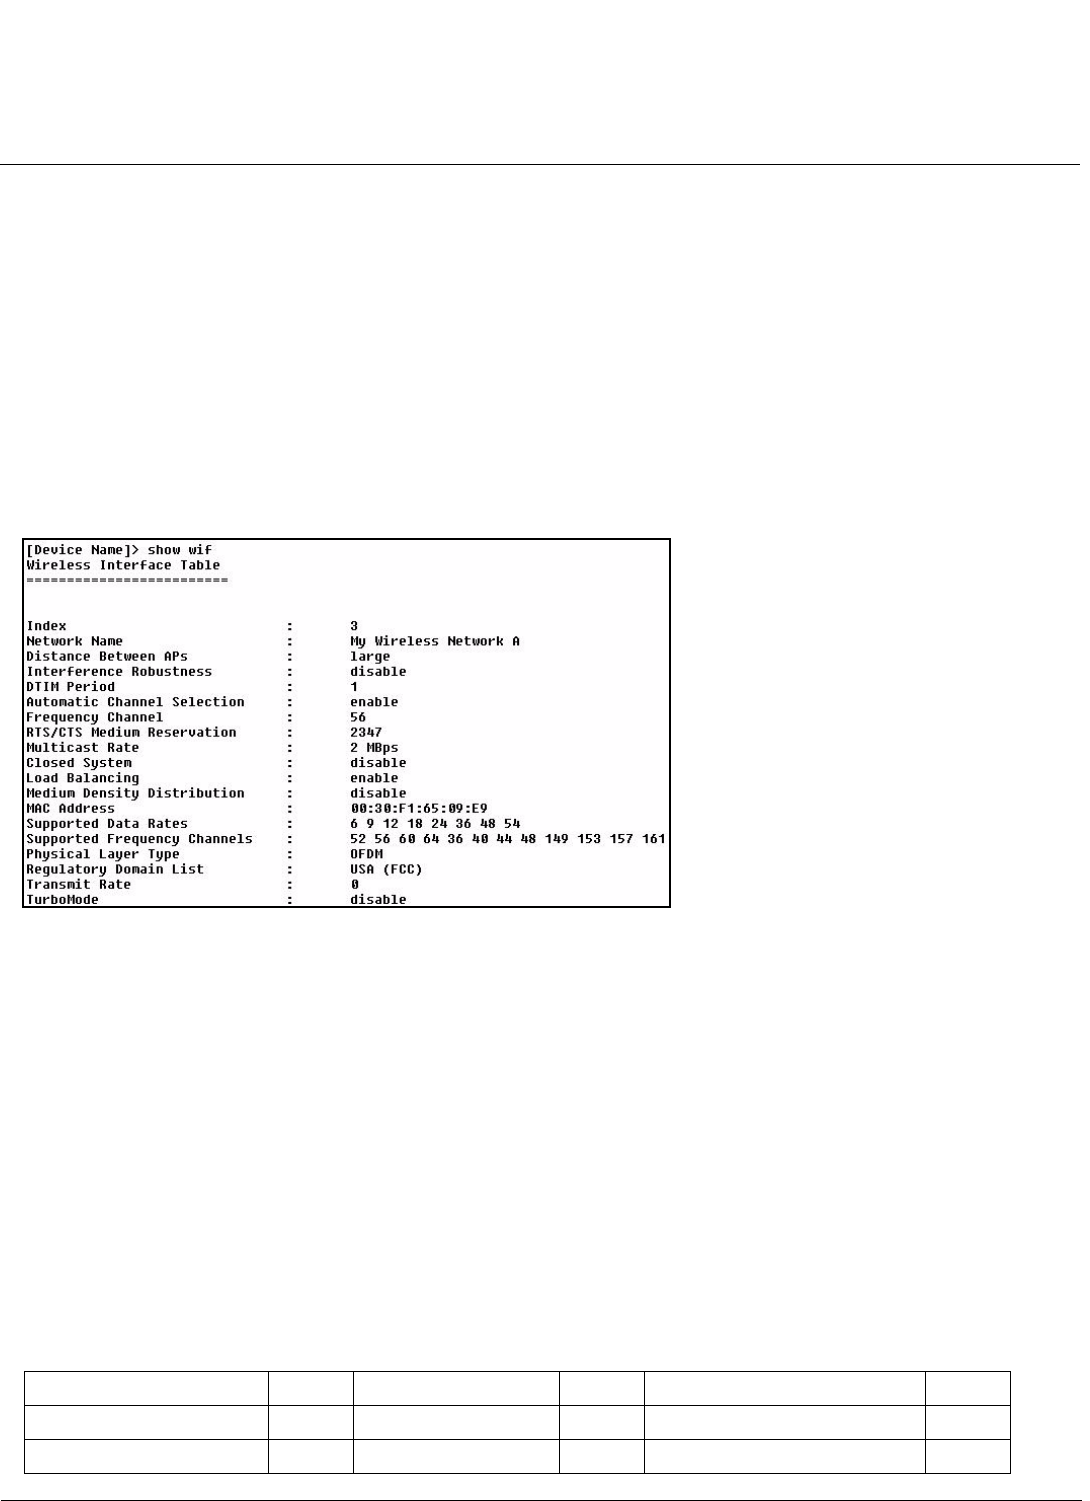
CLI for Mesh and Access Point Module MeshMAX 5054 Series User Guide
User Guide
277
[Device-Name]>set snmprpasswd <New Password> (SNMP read password)
[Device-Name]>set snmprwpasswd <New Password> (SNMP read/write)
[Device-Name]>set snmpv3authpasswd <New Password> (SNMPv3 authentication password)
[Device-Name]>set snmpv3privpasswd <New Password> (SNMPv3 privacy password)
[Device-Name]>reboot 0
CAUTION: Proxim strongly urges you to change the default passwords to restrict access to your network devices to
authorized personnel. If you lose or forget your password settings, you can always perform the Soft Reset to
Factory Defaults.
Set Network Names for the Wireless Interface
[Device-Name]>set wif <3 (Wireless Interface A) or 4 (Wireless Interface B)> netname
<Network Name (SSID) for wireless interface>
[Device-Name]>show wif
Figure B-13 Results of “show wif” CLI command for an AP
Enable 802.11d Support and Set the Country Code
NOTE: On APs with model numbers ending in -WD, these commands are not available.
Perform the following command to enable 802.11d IEEE 802.11d support for additional regulatory domains.
[Device-Name]>set wif <3 (Wireless Interface A) or 4 (Wireless Interface B)> dot11dstatus
<enable/disable>
Perform the following command to set a country code:
[Device-Name]>set syscountrycode <country code>
Select a country code from the following table, derived from ISO 3166. Available countries will vary based on regulatory
domain. Refer to the ISO/IEC 3166-1 CountryCode drop-down menu on the Configure > Interfaces > Operational
Mode page; this menu contains a list of all the available countries in your regulatory domain.
NOTE: If you select a country code that is not supported in your regulatory domain, clients may attempt to connect to a
channel that is not supported by your AP.
Country Code Country Code Country Code
Algeria DZ Honduras HN Panama PA
Albania AL Hong Kong HK Papua New Guinea PG

CLI for Mesh and Access Point Module MeshMAX 5054 Series User Guide
User Guide
278
Argentina AR Hungary HU Peru PE
Armenia AM Iceland IS Philippines PH
Australia AU India IN Poland PL
Austria AT Indonesia ID Portugal PT
Azerbaijan AZ Ireland 5.8 GHz I1 Puerto Rico PR
Bahrain BH Israel IL Qatar QA
Belarus BY Italy IT Romania RO
Belgium BE Jamaica JM Russia RU
Belize BZ Japan JP Samoa WS
Bolivia BO Japan2 J2 Saudi Arabia SA
Brazil BR Jordan JO Singapore SG
Brunei Darussalam BN Kazakhstan KZ Slovak Republic SK
Bulgaria BG North Korea KP Slovenia SI
Canada CA Korea Republic KR South Africa ZA
Chile CL Korea Republic2 K2 South Korea KR
China CN Kuwait KW Spain ES
Colombia CO Latvia LV Sweden SE
Costa Rica CR Lebanon LB Switzerland CH
Croatia HR Liechtenstein LI Syria SY
Cyprus CY Lithuania LT Taiwan TW
Czech Republic CZ Luxembourg LU Thailand TH
Denmark DK Macau MO Turkey TR
Dominican Republic DO Macedonia MK Ukraine UA
Ecuador EC Malaysia MY United Arab Emirates AE
Egypt EG Malta MT United Kingdom GB
El Salvador SV Mexico MX United Kingdom 5.8 GHz G1
Estonia EE Monaco MC United States US
Finland FI Morocco MA United States World UW
France FR Netherlands NL United States DFS U1
Georgia GE New Zealand NZ Uruguay UY
Germany DE Nicaragua NI Venezuela VE
Greece GR Norway NO Vietnam VN
Guam GU Oman OM
Guatemala GT Pakistan PK
Country Code Country Code Country Code

CLI for Mesh and Access Point Module MeshMAX 5054 Series User Guide
User Guide
279
Enable and Configure TX Power Control for the Wireless Interface(s)
The TX Power Control feature lets the user configure the transmit power level of the card in the AP.
Perform the following commands to enable TX Power Control and set the transmit power level:
[Device-Name]>set txpowercontrol enable
[Device-Name]>set wif <interface number> currentbackofftpcvalue <0-9 dBm1-35 dBm>
Configure SSIDs (Network Names), VLANs, and Profiles
Perform the following command to configure SSIDs and VLANS, and to assign Security and RADIUS Profiles.
[Device-Name]>set wifssidtbl <Wireless Interface Index.SSID Index> ssid <Network Name>
vlanid <-1 to 1094> ssidauth <enable/disable> acctstatus <enable/disable> secprofile
<Security Profile Nmuber> radmacprofile <MAC Authentication Profile Name> radeapprofile
<EAP Authentication Profile Name> radacctprofile <Accounting Profile Name>
radmacauthstatus <enable/disable> aclstatus <enable/disable>
Examples:
[Device-Name]>set wifssidtbl 3.1 ssid accesspt1 vlanid 22 ssidauth enable acctstatus
enable secprofile 1 radmacprofile "MAC Authentication" radeapprofile "EAP Authentication"
radacctprofile "Accounting" radmacauthstatus enable aclstatus enable
[Device-Name]>set wifssidtbl 4.1 ssid accesspt1 vlanid 22 ssidauth enable acctstatus
enable secprofile 1 radmacprofile "MAC Authentication" radeapprofile "EAP Authentication"
radacctprofile "Accounting" radmacauthstatus enable aclstatus enable
Download an AP Configuration File from your TFTP Server
Start the Solarwinds TFTP program (available on the installation CD), and click on the Security tab to verify that the TFTP
server is configured to both transmit and receive files. (Note that TFTP programs other than Solarwinds may also require
this setting.) Then enter the following commands:
[Device-Name]>set tftpfilename <file name> tftpfiletype config
tftpipaddr <IP address of your TFTP server>
[Device-Name]>show tftp (to ensure the filename, file type, and the IP address are correct)
[Device-Name]>download *
[Device-Name]>reboot 0
After following the complete process (above) once, you can download a file of the same name (so long as all the other
parameters are the same), with the following command:
[Device-Name]>download *
Backup your AP Configuration File
Start the Solarwinds TFTP program (available on the installation CD), and click on the Security tab to verify that the TFTP
server is configured to both transmit and receive files. (Note that TFTP programs other than Solarwinds may also require
this setting.) Then enter the following commands:
[Device-Name]>upload <TFTP Server IP address> <tftpfilename (such as “config.sys”)> config
[Device-Name]>show tftp (to ensure the filename, file type, and the IP address are correct)
After setting the TFTP parameters, you can backup your current file (so long as all the other parameters are the same),
with the following command:
[Device-Name]>upload *

CLI for Mesh and Access Point Module MeshMAX 5054 Series User Guide
User Guide
280
Set up Auto Configuration
The Auto Configuration feature which allows an AP to be automatically configured by downloading a specific
configuration file from a TFTP server during the boot up process.
Perform the following commands to enable and set up automatic configuration:
NOTE: The configuration filename and TFTP server IP address are configured only when the AP is configured for Static
IP. If the AP is configured for Dynamic IP these parameters are not used and obtained from DHCP.
The default filename is “config”. The default TFTP IP address is “169.254.128.133”.
[Device-Name]>set autoconfigstatus <enable/disable>
[Device-Name]>set autoconfigfilename <configuration file name>
[Device-Name]>set autoconfigTFTPaddr <TFTP IP address>

CLI for Mesh and Access Point Module MeshMAX 5054 Series User Guide
User Guide
281
Other Network Settings
There are other configuration settings that you may want to set for the AP. Some of them are listed below.
•Configure the AP as a DHCP Server
•Configure the DNS Client
•Configure DHCP Relay and Configure DHCP Relay Servers
•Maintain Client Connections using Link Integrity
•Change Wireless Interface Settings
•Set Ethernet Speed and Transmission Mode
•Set Interface Management Services
•Configure Wireless Distribution System
•Configure MAC Access Control
•Set RADIUS Parameters
•Set Rogue Scan Parameters
•Set Hardware Configuration Reset Parameters
•Set VLAN/SSID Parameters
•Set Security Profile Parameters
NOTE: See Advanced Configuration for more information on these settings.
Configure the AP as a DHCP Server
NOTE: You must have at least one entry in the DHCP Server IP Address Pool Table before you can set the DHCP
Server Status to Enable.
[Device-Name]>set dhcpstatus disable
[Device-Name]>set dhcpippooltbl 0 startipaddr <start ip address>
endipaddr <end ip address>
[Device-Name]>set dhcpgw <gateway ip address>
[Device-Name]>set dhcppridnsipaddr <primary dns ip address>
[Device-Name]>set dhcpsecdnsipaddr <secondary dns ip address>
[Device-Name]>set dhcpstatus enable
[Device-Name]>reboot 0
CAUTION: Before enabling this feature, confirm that the IP address pools you have configured are valid addresses on
the network and do not overlap the addresses assigned by any other DHCP server on the network. Enabling
this feature with incorrect address pools will cause problems on your network.
Configure the DNS Client
[Device-Name]>set dnsstatus enable
[Device-Name]>set dnsprisvripaddr <IP address of primary DNS server>
[Device-Name]>set dnssecsvripaddr <IP address of secondary DNS server>
[Device-Name]>set dnsdomainname <default domain name>
[Device-Name]>show dns
Figure B-14 Results of “show dns” CLI command

CLI for Mesh and Access Point Module MeshMAX 5054 Series User Guide
User Guide
282
Configure DHCP Relay
Perform the following command to enable or disable DHCP Relay Agent Status.
NOTE: You must have at least one entry in the DHCP Relay Server Table before you can set the DHCP Relay Status to
Enable.
[Device-Name]>set dhcprelaystatus enable
Configure DHCP Relay Servers
Perform the following command to configure and enable a DHCP Relay Server. The AP allows the configuration of a
maximum of 10 server settings in the DHCP Relay Agents server table.
[Device-Name]>set dhcprlyindex 1 dhcprlyipaddr <ip address> dhcprlycmt <comment>
dhcprlystatus 1 (1 to enable, 2 to disable, 3 to delete, 4 to create)
Maintain Client Connections using Link Integrity
[Device-Name]>show linkinttbl (this shows the current links)
[Device-Name]>set linkinttbl <1–5 (depending on what table row you wish to address)>
ipaddr <ip address of the host computer you want to check>
[Device-Name]>set linkintpollint <the interval between link integrity checks>
[Device-Name]>set linkintpollretx <number of times to retransmit before considering the
link down>
[Device-Name]>set linkintstatus enable
[Device-Name]>show linkinttbl (to confirm new settings)
[Device-Name]>reboot 0
Change Wireless Interface Settings
See Interfaces for information on the parameters listed below. The AP uses index 3 for Wireless Interface A (802.11a
radio or 4.9 GHz radio) and index 4 for Wireless Interface B (802.11b/g radio).
Operational Mode
[Device-Name]>set wif <index> mode <see table>
Autochannel Select (ACS)
ACS is enabled by default. Reboot after disabling or enabling ACS.
[Device-Name]>set wif <index> autochannel <enable/disable>
[Device-Name]>reboot 0
Mode Operational Mode
1 dot11b-only
2 dot11g-only
3 dot11bg
4 dot11a-only
5 dot11g-wifi
6 publicsafety

CLI for Mesh and Access Point Module MeshMAX 5054 Series User Guide
User Guide
283
Enable/Disable Closed System
[Device-Name]>set wif <index> closedsys <enable/disable>
Shutdown/Resume Wireless Service
[Device-Name]>set wif <index> wssstatus <1 (resume)/2 (shutdown)>
Set Load Balancing Maximum Number of Clients
[Device-Name]>set wif <index> lbmaxclients <1–63>
Set the Multicast Rate (802.11a or 4.9 GHz)
[Device-Name]>set wif 3 multrate <6, 12, 24 (Mbits/sec)>
Set the Multicast Rate (802.11b/g)
[Device-Name]>set wif 4 multrate <1, 2, 5.5, 11 (Mbits/sec)>
Enable/Disable Super Mode (802.11a/g only)
[Device-Name]>set wif <index> supermode <enable/disable>
Set the Distance Between APs
[Device-Name]>set wif <index> distaps <1–5> (see below)
[Device-Name]>reboot 0
Set Ethernet Speed and Transmission Mode
[Device-Name]>set etherspeed <value> (see below)
[Device-Name]>reboot 0
Value Distance Between APs
1 Large
2Medium
3Small
4Mini
5Micro
Ethernet Speed and
Transmission Mode
Value
10 Mbits/sec - half duplex 10halfduplex
10 Mbits/sec - full duplex 10fullduplex
10 Mbits/sec - auto duplex 10autoduplex

CLI for Mesh and Access Point Module MeshMAX 5054 Series User Guide
User Guide
284
Set Interface Management Services
Edit Management IP Access Table
[Device-Name]>set mgmtipaccesstbl <index> ipaddr <IP address> ipmask <subnet mask>
Configure Management Ports
[Device-Name]>set snmpifbitmask <(see below)>
[Device-Name]>set httpifbitmask <(see below)>
[Device-Name]>set telifbitmask <(see below)>
Choose from the following values:
Set Communication Ports
[Device-Name]>set httpport <HTTP port number (default is 80)>
[Device-Name]>set telport <Telnet port number (default is 23)>
Configure Secure Socket Layer (HTTPS)
Enabling SSL and configuring a passphrase allows encrypted Secure Socket Layer communications to the AP through
the HTTPS interface.
[Device-Name]>set sslstatus <enable/disable>
The user must change the SSL passphrase when uploading a new certificate/private key pair, which will have a
corresponding passphrase.
[Device-Name]>set sslpassphrase <SSL certificate passphrase>
[Device-Name]>show http (to view all HTTP configuration information including SSL.)
Set Telnet Session Timeouts
[Device-Name]>set tellogintout <time in seconds between 1 and 300 (default is 30)>
[Device-Name]>set telsessiontout <time in seconds between 1 and 36000 (default is 900)>
100 Mbits/sec - half duplex 100halfduplex
100 Mbits/sec - full duplex 100fullduplex
Auto Speed - half duplex autohalfduplex
Auto Speed - auto duplex autoautoduplex (default)
Interface Bitmask Description
0 or 2 = Disable (all interfaces) All management channels disabled
1 or 3 = Ethernet only Ethernet only enabled
4 or 6 = Wireless A only Wireless A only enabled
8 or 10 = Wireless B only Wireless B only enabled
12 = Wireless A and Wireless B Wireless A and Wireless B enabled
13 or 15 = Enable all interfaces All management channels enabled
Ethernet Speed and
Transmission Mode
Value

CLI for Mesh and Access Point Module MeshMAX 5054 Series User Guide
User Guide
285
Configure Serial Port Interface
NOTE: To avoid unexpected performance issues, leave Flow Control at the default setting (none) unless you are sure
what this setting should be.
[Device-Name]>set serbaudrate <2400, 4800, 9600, 19200, 38400, 57600>
[Device-Name]>set serflowctrl <none, xonxoff>
[Device-Name]>show serial
Figure B-15 Result of “show serial” CLI Command
Configure Syslog
[Device-Name]>set syslogpriority <1–7 (default is 6)>
[Device-Name]>set syslogstatus <enable/disable>
[Device-Name]>set sysloghbstatus <enable/disable> (default is disable)
[Device-Name]>set sysloghbinterval <1–604800> (default is 900 seconds)
[Device-Name]>set sysloghosttbl <index> ipaddr <ipaddress> cmt <comment> status
<enable/disable>
Configure Intra BSS
[Device-Name]>set intrabssoptype <passthru (default)/block)>
Configure Wireless Distribution System
Create/Enable WDS
[Device-Name]>set wdstbl <Index> partnermacaddr <MAC Address> status enable
Enable/Disable WDS
[Device-Name]>set wdstbl <Index> status <enable/disable>
NOTE: <Index> is 3.1–3.6 (Wireless A) or 4.1–4.6 (Wireless B). To determine the index, type show wdstbl at the
prompt.
NOTE: When WDS is enabled, spanning tree protocol is automatically enabled. It may be manually disabled. If Spanning
Tree protocol is enabled by WDS and WDS is subsequently disabled, Spanning tree will remain enabled until it is
manually disabled. See Spanning Tree Parameters.
Configure MAC Access Control
Setup MAC (Address) Access Control
[Device-Name]>set wifssidtbl <index> aclstatus enable/disable
[Device-Name]>set macacloptype <passthru, block>
[Device-Name]>reboot 0
Add an Entry to the MAC Access Control Table
[Device-Name]>set macacltbl 0 macaddr <MAC Address> status enable
[Device-Name]>show macacltbl

CLI for Mesh and Access Point Module MeshMAX 5054 Series User Guide
User Guide
286
Disable or Delete an Entry in the MAC Access Control Table
[Device-Name]>set macacltbl <index> status <disable/delete>
[Device-Name]>show macacltbl
NOTE: For larger networks that include multiple Access Points, you may prefer to maintain this list on a centralized
location using the RADIUS parameters (see Set RADIUS Parameters).
Set RADIUS Parameters
Configure RADIUS Authentication servers
Perform the following command to configure a RADIUS Server and assign it to a VLAN. The RADIUS Server Profile
index is specified by the index parameter and the subindex parameter specifies whether you are configuring a primary or
secondary RADIUS server.
[Device-Name]>set radiustbl <Index> profname <Profile Name> seraddrfmt <1 - IP Address 2
- Name> sernameorip <IP Address or Name> port <value> ssecret <value> responsetm <value>
maxretx <value> acctupdtintrvl <value> macaddrfmt <value> authlifetm <value>
radaccinactivetmr <value> vlanid <vlan id -1 to 4094> status enable
NOTE: To create a new RADIUS profile, use 0 for <Index>.
Examples of Configuring Primary and Secondary RADIUS Servers and Displaying the RADIUS Configuration
Primary server configuration:
[Device-Name]>set radiustbl 1.1 profname "MAC Authentication" seraddrfmt 1 sernameorip
20.0.0.20 port 1812 ssecret public responsetm 3 maxretx 3 acctupdtintrvl 0 macaddrfmt 1
authlifetm 900 radaccinactivetmr 5 vlanid 22 status enable
Secondary server configuration:
[Device-Name]>set radiustbl 1.2 profname "MAC Authentication" seraddrfmt 1 sernameorip
20.0.0.30 port 1812 ssecret public responsetm 3 maxretx 3 acctupdtintrvl 0 macaddrfmt 1
authlifetm 900 radaccinactivetmr 5 vlanid 33 status enable
[Device-Name]>show radiustbl
Index : 1
Primary/Backup : Primary
Profile Name : MAC Authentication
Server Status : notReady
Server Addressing Format : ipaddr
IP Address/Host Name : 0.0.0.0
Destination Port : 1812
VLAN Identifier : -1
MAC Address Format : dashdelimited
Response Time : 3
Maximum Retransmission : 3
Authorization Lifetime : 0
Accounting Update Interval : 0
Accounting Inactivity Timer : 5
Index : 1
Primary/Backup : Backup
Profile Name : MAC Authentication

CLI for Mesh and Access Point Module MeshMAX 5054 Series User Guide
User Guide
287
Server Status : notReady
Server Addressing Format : ipaddr
IP Address/Host Name : 0.0.0.0
Destination Port : 1812
VLAN Identifier : -1
MAC Address Format : dashdelimited
Response Time : 3
Maximum Retransmission : 3
.
.
.
Index : 4
Primary/Backup : Backup
Profile Name : Management Access
Server Status : notReady
Server Addressing Format : ipaddr
IP Address/Host Name : 0.0.0.0
Destination Port : 1812
VLAN Identifier : -1
MAC Address Format : dashdelimited
Response Time : 3
Maximum Retransmission : 3
Authorization Lifetime : 0
Accounting Update Interval : 0
Accounting Inactivity Timer : 5
Figure B-16 Result of “showradiustbl” CLI Command
Set Rogue Scan Parameters
Perform the following command to enable or disable Rogue Scan on a wireless interface and configure the scanning
parameters.
The cycletime parameter is only configured for background scanning mode.
[Device-Name]>set rscantbl <3 or 4> mode <1 for background scanning, 2 for continuous
scanning> cycletime <cycletime from 1–1440 minutes> status <enable/disable>
NOTE: Rogue Scan cannot be enabled on a wireless interface when the Wireless Service Status on that interface is
shutdown. First, resume service on the wireless interface.
Set Hardware Configuration Reset Parameters
The Hardware Configuration Reset commands allows you to enable or disable the hardware reset functionality and to
change the password to be used for configuration reset during boot up.
To disable hardware configuration reset, enter:
[Device-Name]>set hwconfigresetstatus disable
To enable hardware configuration reset, enter:
[Device-Name]>set hwconfigresetstatus enable
To define the Configuration Reset Password to be used for configuration reset during boot up, enter the following
command
[Device-Name]>set configresetpasswd <password>

CLI for Mesh and Access Point Module MeshMAX 5054 Series User Guide
User Guide
288
It is important to safely store the
NOTE: It is important to safely store the configuration reset password. If a user forgets the configuration reset password,
the user will be unable to reset the AP to factory default configuration if the AP becomes inaccessible and the
hardware configuration reset functionality is disable.
Set VLAN/SSID Parameters
Enable VLAN Management
[Device-Name]>set vlanstatus enable
[Device-Name]>set vlanmgmtid <1–4094>
[Device-Name]>show wifssidtbl (to review your settings)
[Device-Name]>reboot 0
Disable VLAN Management
[Device-Name]>set vlanstatus disable or
[Device-Name]>set vlanmgmtid -1
[Device-Name]>reboot 0
Add a Entry to the WIFSSID Table
[Device-Name]>set wifssidtbl <index> ssid <Network Name> vlanid <-1 (untagged) or 1–4094>
status enable
Set Security Profile Parameters
Configure a Security Profile with Non Secure Security Mode
[Device-Name]>set secprofiletbl <index> secmode nonsecure status enable
Example:
[Device-Name]>set secprofiletbl 2 secmode nonsecure status enable
Configure a Security Profile with WEP Security Mode
[Device-Name]>set secprofiletbl <index> secmode wep encryptkey<0-3> <value>
encryptkeylength <value> encryptkeytx <value> status enable
Example:
[Device-Name]>set secprofiletbl 3 secmode wep encryptkey0 12345 encryptkeylength 1
encryptkeytx 0 status enable
Configure a Security Profile with 802.1x Security Mode
[Device-Name]>set secprofiletbl <index> secmode 802.1x encryptkeylength <value> status
enable
Example:
[Device-Name]>set secprofiletbl 4 secmode 802.1x encryptkeylength 1 status enable
Configure a Security Profile with WPA Security Mode
[Device-Name]>set secprofiletbl <index> secmode wpa status enable
Example:
[Device-Name]>set secprofiletbl 5 secmode wpa status enable

CLI for Mesh and Access Point Module MeshMAX 5054 Series User Guide
User Guide
289
Configure a Security Profile with WPA-PSK Security Mode
[Device-Name]>set secprofiletbl <index> secmode wpa-psk passphrase <value> status enable
Example:
[Device-Name]>set secprofiletbl 6 secmode wpa-psk passphrase 12345678 status enable
Configure a Security Profile with 802.11i Security Mode
[Device-Name]>set secprofiletbl <index> secmode 802.11i status enable
Example:
[Device-Name]>set secprofiletbl 7 secmode 802.11i status enable
Configure a Security Profile with 802.11i-PSK Security Mode
[Device-Name]>set secprofiletbl <index> secmode 802.11i-psk passphrase <value> status
enable
Example:
[Device-Name]>set secprofiletbl 8 secmode 802.11i-psk passphrase 12345678 status enable

CLI for Mesh and Access Point Module MeshMAX 5054 Series User Guide
User Guide
290
CLI Monitoring Parameters
Using the show command with the following table parameters will display operating statistics for the AP (these are the
same statistics that are described in the Monitoring section).
•staticmp: Displays the ICMP statistics.
•statarptbl: Displays the IP ARP Table statistics.
•statbridgetbl: Displays the Learn Table.
•statiapp: Displays the IAPP statistics.
•statradius: Displays the RADIUS Authentication statistics.
•statif: Displays information and statistics about the Ethernet and wireless interfaces.
•stat802.11: Displays additional statistics for the wireless interfaces.
•statethernet: Displays additional statistics for the Ethernet interface.
•statmss: Displays station statistics and Wireless Distribution System links.
•statmesh: Displays statistics about the Mesh network.

CLI for Mesh and Access Point Module MeshMAX 5054 Series User Guide
User Guide
291
Parameter Tables
Objects contain groups that contain both parameters and parameter tables. Use the following Tables to configure the
Access Point. Columns used on the tables include:
• Name - Parameter, Group, or Table Name
• Type - Data type
• Value - Value range, and default value, if any
• Access = access type, R = Read Only (show), RW = Read-Write (can be “set”), W = Write Only
• CLI Parameter - Parameter name as used in the Access Point
Access Point network objects are associated with Groups. The network objects are listed below and associated
parameters are described in the following Parameter Tables:
•System Parameters - Access Point system information
–Inventory Management Information - Hardware, firmware, and software version information
•Network Parameters - IP and Network Settings
–IP Configuration Parameters - Configure the Access Point’s IP settings
•DNS Client for RADIUS Name Resolution - Configure the Access Point as a DNS client
–DHCP Server Parameters - Enable or disable dynamic host configuration
–SNTP Parameters - Configure
–Link Integrity Parameters - Monitor link status
•Interface Parameters - Configure Wireless and Ethernet settings
–Wireless Interface Parameters
•Wireless Distribution System (WDS) Parameters - Configure the WDS partnerships
–Wireless Interface SSID/VLAN/Profile Parameters - Configure the SSIDs, VLANs, and security modes for each
interface. Up to 16 SSIDs per wireless interface are supported; different security settings can be applied to each
SSID, and a unique VLAN can be configured per SSID.
–Ethernet Interface Parameters - Set the speed and duplex of the Ethernet port.
–Mesh Parameters - Configure the Mesh network.
•Management Parameters - Control access to the AP’s management interfaces
–SNMP Parameters - Set read and read/write passwords
–HTTP Parameters - Set up the graphical web browser interface. If required, enable SSL and configure the SSL
certificate passphrase.
–Telnet Parameters - Telnet Port setup
–Serial Port Parameters - Serial Port setup
–RADIUS Based Management Access Parameters - Configure RADIUS Based Management Access for HTTP and
Telnet access.
–SSH Parameters - Enable SSH and configure the host key.
–TFTP Server Parameters - Set up for file transfers; specify IP Address, file name, and file type
–IP Access Table Parameters - Configure range of IP addresses that can access the AP
–Auto Configuration Parameters - Configure the Auto Configuration feature which allows an AP to be automatically
configured by downloading a configuration file from a TFTP server during boot up.
•Filtering Parameters
–Ethernet Protocol Filtering Parameters - Control network traffic based on protocol type
–Static MAC Address Filter Table - Enable and disable specific addresses
–Proxy ARP Parameters - Enable or disable proxy ARP for wireless clients
–IP ARP Filtering Parameters - Control which ARP messages are sent to wireless clients based on IP settings

CLI for Mesh and Access Point Module MeshMAX 5054 Series User Guide
User Guide
292
–Broadcast Filtering Table - Control the type of broadcast packets forwarded to the wireless network
–TCP/UDP Port Filtering - Filter IP packets based on TCP/UDP port
•Alarms Parameters
–SNMP Table Host Table Parameters - Enter the list of IP addresses that will receive alarms from the AP
–Syslog Parameters - Configure the AP to send Syslog information to network servers
•Bridge Parameters
–Spanning Tree Parameters - Used to help prevent network loops
–Storm Threshold Parameters - Set threshold for number of broadcast packets
–Intra BSS Subscriber Blocking - Enable or disable peer to peer traffic on the same AP
–Packet Forwarding Parameters - Redirect traffic from wireless clients to a specified MAC address
•RADIUS Parameters
–Set RADIUS Parameters - Configure RADIUS Servers and assign them to VLANs.
•Security Parameters - Access Point security settings
–MAC Access Control Parameters - Control wireless access based on MAC address
–Rogue Scan Configuration Table - Enable and configure Rogue Scan to detect Rogue APs and clients.
–802.1x Parameters - Configure 802.1X Supplicant Timeout parameter
–Hardware Configuration Reset - Disable or enable hardware configuration reset and configure a configuration
reset password.
–Other Parameters - Configure Security Profiles that define allowed security modes (wireless clients), and
encryption and authentication mechanisms.
•VLAN/SSID Parameters - Enable the configuration of multiple subnetworks based on VLAN ID and SSID.
•Other Parameters
–IAPP Parameters - Enable or disable the Inter-Access Point Protocol
–Wireless Multimedia Enhancements (WME)/Quality of Service (QoS) parameters - Enable and configure Wireless
Multimedia Enhancement/Quality of Service parameters, QoS policies, mapping priorities, and EDCA parameters.
Apply a configured QoS policy to a particular SSID.

CLI for Mesh and Access Point Module MeshMAX 5054 Series User Guide
User Guide
293
System Parameters
* Available only on APs with model numbers ending in -WD. When available, this object must be configured before any interface parameters
can be set.
Country Identifiers
NOTE: All countries may not be available on your AP.
Name Type Value Access CLI Parameter
System Group N/A R system
Name DisplayString User Defined RW sysname
Location DisplayString User Defined RW sysloc
Country Identifier* DisplayString See Country Identifiers
below
RW sysworldcountrycode
Contact Name DisplayString User Defined RW sysctname
Contact E-mail DisplayString User Defined RW sysctemail
Contact Phone DisplayString User Defined
max 254 characters
RW sysctphone
FLASH Backup Interval Integer 0 - 65535 seconds RW sysflashbckint
Flash Update 0
1
RW sysflashupdate
System OID DisplayString N/A R sysoid
Descriptor DisplayString System Name, flash
version, S/N, bootloader
version
R sysdescr
Up Time Integer dd:hh:mm:ss
dd - days
hh - hours
mm - minutes
ss - seconds
Rsysuptime
System Security ID DisplayString Retrieved from flash ID R sysinvmgmtsecurityid
Emergency Restore to
defaults
Resets all parameters to
default factory values
RW sysresettodefaults
Note: You must enter the
following command twice to
reset to defaults:
set sysresettodefaults 1
Country Indoor/Outdoor Identifier
Austria Indoor AT1
Outdoor AT2
Belgium Indoor BE1
Outdoor BE2
Cyprus Indoor CY1
Outdoor CY2
Czech Republic Indoor CZ1
Outdoor CZ2
Denmark Indoor DK1
Outdoor DK2
Estonia Indoor EE1
Outdoor EE2

CLI for Mesh and Access Point Module MeshMAX 5054 Series User Guide
User Guide
294
Finland Indoor FI1
Outdoor FI2
France Indoor FR1
Outdoor FR2
Germany Indoor DE1
Outdoor DE2
Greece Indoor GR1
Outdoor GR2
Hungary Indoor HU1
Outdoor HU2
Ireland Indoor IE1
Outdoor IE2
Italy Indoor IT1
Outdoor IT2
Latvia Indoor LV1
Outdoor LV2
Lithuania Indoor LT1
Outdoor LT2
Luxembourg Indoor LU1
Outdoor LU2
Malta Indoor MT1
Outdoor MT2
Netherlands Indoor NL1
Outdoor NL2
Norway Indoor NO1
Outdoor NO2
Poland Indoor PL1
Outdoor PL2
Portugal Indoor PT1
Outdoor PT2
Puerto Rico Indoor PR1
Outdoor PR2
Russia Indoor/Outdoor RU
Spain Indoor ES1
Outdoor ES2
Sweden Indoor SE1
Outdoor SE2
Switzerland Indoor CH1
Outdoor CH2
United Kingdom/
Great Britain
Indoor GB1
Outdoor GB2
Country Indoor/Outdoor Identifier

CLI for Mesh and Access Point Module MeshMAX 5054 Series User Guide
User Guide
295
Inventory Management Information
The inventory management commands display advanced information about the AP’s installed components. You may be
asked to report this information to a representative if you contact customer support.
Network Parameters
IP Configuration Parameters
NOTE: The IP Address Assignment Type (ipaddrtype) must be set to static before the IP Address (ipaddr), IP Mask
(ipmask) or Default Gateway IP Address (ipgw) values can be entered.
Name Type Value Access CLI Parameter
System Inventory
Management
Subgroup N/A R sysinvmgmt
Component Table Subgroup N/A R sysinvmgmtcmptbl
Component Interface
Table
Subgroup N/A R sysinvmgmtcmpiftbl
Name Type Value Access CLI Parameter
Network Group N/A R network
IP Configuration Group N/A R ip (Note: The network and
ip parameters display the
same information)
IP Address IpAddress User Defined RW ipaddr
IP Mask IpAddress User Defined RW ipmask
Default Router IP
Address
IpAddress User Defined RW ipgw
Default TTL Integer User Defined (seconds)
0 - 255, 64 (default)
RW ipttl
Address Type Integer static
dynamic (default)
RW ipaddrtype

CLI for Mesh and Access Point Module MeshMAX 5054 Series User Guide
User Guide
296
DNS Client for RADIUS Name Resolution
DHCP Server Parameters
* The DHCP Server (dhcpstatus) can only be enabled after a DHCP IP Pool table entry has been created.
DHCP Server table for IP pools
* IP addresses must be from within the same subnet as the AP.
† Set End IP Address or Width, but not both.
Name Type Value Access CLI Parameter
DNS Client Group N/A R dns
DNS Client status Integer enable
disable (default)
RW dnsstatus
Primary DNS Server IP
Address
IpAddress User Defined RW dnspridnsipaddr
Secondary DNS Server
IP Address
IpAddress User Defined RW dnssecdnsipaddr
Default Domain Name Integer32 User Defined (up to 254
characters)
RW dnsdomainname
Name Type Value Access CLI Parameter
DHCP Server Group N/A R dhcp
DHCP Server Status* Integer enable (1) (default)
disable (2)
delete (3)
RW dhcpstatus
Gateway IP Address IpAddress User Defined RW dhcpgw
Primary DNS IP Address IpAddress User Defined RW dhcppridnsipaddr
Secondary DNS IP
Address
IpAddress User Defined RW dhcpsecdnsipaddr
Number of IP Pool Table
Entries
Integer32 N/A R dhcpippooltblent
Name Type Value Access CLI Parameter
DHCP Server IP Address
Pool Table
Table N/A R dhcpippooltbl
Table Index Integer User Defined N/A index
Start IP Address* IpAddress User Defined RW startipaddr
End IP Address*†IpAddress User Defined RW endipaddr
Width†Integer User Defined RW width
Default Lease Time
(optional)
Integer32 3600 - 86400 sec
(default)
RW defleasetm
Maximum Lease Time
(optional)
Integer32 3600 - 86400 sec
(default)
RW maxleasetm
Comment (optional) DisplayString User Defined RW cmt
Status (optional) Integer enable (1)
disable (2)
delete (3)
RW status

CLI for Mesh and Access Point Module MeshMAX 5054 Series User Guide
User Guide
297
DHCP Relay Group
The DHCP Relay Group allows you to enable or disable DHCP Relay Agent Status.
DHCP Relay Server Table
The DHCP Relay Server Table contains the commands to set the table entries. The AP supports the configuration of a
maximum of 10 server settings in the DHCP Relay Agents server table.
Name Type Value Access CLI Parameter
DHCP Relay Group Group N/A R dhcprelay
Status Integer enable
disable
RW dhcprelaystatus
DHCP Relay Server
Table
Table N/A R dhcprelaytbl
Name Type Value Access CLI Parameter
DHCP Relay Server
Table
Table N/A R dhcprelaytbl
DHCP Relay Server
Table Entry Index
Integer32 1 - 10 R dhcprlyindex
DHCP Relay Server
Table Entry IP Address
IpAddress User Defined RW dhcprlyipaddr
DHCP Relay Server
Table Entry Comment
DisplayString User Defined RW dhcprlycmt
DHCP Relay Server
Table Entry Status
Integer enable (1)
disable (2)
delete (3)
create (4)
RW dhcprlystatus

CLI for Mesh and Access Point Module MeshMAX 5054 Series User Guide
User Guide
298
SNTP Parameters
Link Integrity Parameters
* Link integrity cannot be configured when the AP is configured to function as a Mesh AP.
Link Integrity IP Target Table
Name Type Value Access CLI Parameter
SNTP Group Group N/A R sntp
SNTP Status Integer enable
disable
RW sntpstatus
Primary Server Name or
IP Address
DisplayString 0 - 255 characters RW sntpprisvr
Secondary Server Name
or IP Address
DisplayString 0 - 255 characters RW sntpsecsvr
Time Zone Integer See MIB for
requirements
RW sntptimezone
Daylight Savings Time Integer -2
-1
0
+1
+2
RW sntpdaylightsaving
Year Integer32 N/A RW sntpyear
Month Integer32 1 - 12 RW sntpmonth
Day Integer32 1 - 31 RW sntpday
Hour Integer32 0 - 23 RW sntphour
Minutes Integer32 0 - 59 RW sntpmins
Seconds Integer32 0 - 59 RW sntpsecs
Addressing Format Integer ipaddress
name
RW sntpaddrfmt
Name Type Value Access CLI Parameter
Link Integrity Group N/A R linkint
Link Integrity Status* Integer enable
disable (default)
RW linkintstatus
Link Integrity Poll Interval Integer 500 - 15000 ms
(in increments of 500ms)
500 ms (default)
RW linkintpollint
Link Integrity Poll
Retransmissions
Integer 0 - 255
5 (default)
RW linkintpollretx
Name Type Value Access CLI Parameter
Link Integrity IP Target Table Table N/A R linkinttbl
Table Index Integer 1 - 5 N/A index
Target IP Address IpAddress User Defined RW ipaddr
Comment (optional) DisplayString User Defined (up to 254
characters)
RW cmt
Status (optional) Integer enable
disable (default)
delete
RW status

CLI for Mesh and Access Point Module MeshMAX 5054 Series User Guide
User Guide
299
Interface Parameters
Wireless Interface Parameters
The wireless interface group parameter is wif. Wireless Interface A (802.11a radio or 4.9 GHz radio) uses table index 3
and Wireless Interface B (802.11b/g radio) uses table index 4.
Common Parameters to 802.11a, 4.9 GHz, and 802.11b/g
* For 802.11a APs certified in the ETSI and TELEC regulatory domains and operating in the middle frequency band, disabling Auto Channel
Select will limit the available channels to those in the lower frequency band.
†Wireless Service Status cannot be shut down on an interface where Rogue Scan is enabled.
‡Distance Between APs allows the AP to perform better in high noise environments by increasing the receive sensitivity and transmit defer
threshold, as follows:
Name Type Value Access CLI Parameter
Wireless Interfaces Group N/A R wif
Table Index Integer 3 (Wireless Interface A) or 4
(Wireless Interface B)
R index
Operational Mode Integer 1 = dot11b-only
2 = dot11g-only
3 = dot11bg
4 = dot11a
5 = dot11g-wifi
6 = publicsafety
RW mode
Supported Channel
Bandwidth
DisplayString Depends on Operational Mode R supportedchannelband
width
Channel Bandwidth Integer32 10
20
RW channelbandwidth
Network Name DisplayString 1 - 32 characters
My Wireless Network (default)
RW netname
Auto Channel Select
(ACS)*
Integer enable (default)
disable
RW autochannel
DTIM Period Integer 1 - 255
1 = default
RW dtimperiod
RTS/CTS Medium
Reservation
Integer 0 - 2347
Default is 2347 (off)
RW medres
MAC Address PhyAddress 12 hex digits R macaddr
Wireless Service Status†Integer 1 = resume
2 = shutdown
RW wssstatus
Supported Frequency
Channels
Octet String Depends on Regulatory Domain R suppchannels
Load Balancing Max
Clients
Integer 1 - 63 RW lbmaxclients
Distance Between APs‡Integer 1 (large) (default)
2 (medium)
3 (small)
4 (minicell)
5 (microcell)
RW distaps
AP Link Length** Integer 200 - 45000 RW aplinklength
Transmit Power Control Integer enable
disable
RW txpowercontrol
Transmit Power Control
Back-Off
Integer 0 - 9 (dBm) RW currentbackofftpcvalue

CLI for Mesh and Access Point Module MeshMAX 5054 Series User Guide
User Guide
300
** Each 802.11 packet is acknowledged by the receiving station. On links longer than about 100m, the time that it takes for the ACK to get back
to the sending station is long enough to cause the sending station to believe that the packet was not properly received. This problem can be
corrected by adjusting the AP Link Length parameter to a value that is larger than the length in meters of the longest link being serviced by
that AP.
Distance Between
APs
Receive Sensitivity
Threshold (dBm)
Transmit Defer Threshold
(dBm)
Large -96 -62
Medium -86 -62
Small -78 -52
Mini -70 -42
Micro -62 -36

CLI for Mesh and Access Point Module MeshMAX 5054 Series User Guide
User Guide
301
4.9 GHz Specific Parameters
802.11a Specific Parameters
Name Type Value Access CLI Parameter
Operating Frequency
Channel
Integer Varies by regulatory
domain and country. See
Available Channels
RW channel
Supported Data Rates Octet String See Transmit Rate,
below
R suppdatarates
Transmit Rate Integer32 10 MHz:
0 (Auto Fallback)
3 Mbits/s
4.5 Mbits/s
6 Mbits/s
9 Mbits/s
12 Mbits/s
18 Mbits/s
24 Mbits/s
27 Mbits/s.
20 MHz:
0 (Auto Fallback)
6 Mbits/sec
9 Mbits/sec
12 Mbits/sec
18 Mbits/sec
24 Mbits/sec
36 Mbits/sec
48 Mbits/sec
54 Mbits/sec
RW txrate
Physical Layer Type Integer ofdm (orthogonal
frequency division
multiplexing)
Rphytype
Super Mode Integer enable
disable (default)
RW supermode
Name Type Value Access CLI Parameter
Operating Frequency
Channel
Integer Varies by regulatory domain and
country. See Available Channels
RW channel
Supported Data Rates Octet String See Transmit Rate, below R suppdatarates
Transmit Rate Integer32 0 (Auto Fallback)
6 Mbits/sec
9 Mbits/sec
12 Mbits/sec
18 Mbits/sec
24 Mbits/sec
36 Mbits/sec
48 Mbits/sec
54 Mbits/sec
RW txrate
Physical Layer Type Integer ofdm (orthogonal frequency division
multiplexing)
Rphytype

CLI for Mesh and Access Point Module MeshMAX 5054 Series User Guide
User Guide
302
Regulatory Domain List DisplayString Varies by regulatory domain:
USA -- FCC
Hong Kong -- HK
Australia -- AU
Europe -- ETSI
Russia -- RU
Japan -- TELEC
Singapore -- IDA
Taiwan -- TW
China -- CN
Asia
Brazil
Argentina
Saudi Arabia
World Mode -- WO
Undefined
R regdomain
Super Mode Integer enable
disable (default)
RW supermode
Name Type Value Access CLI Parameter

CLI for Mesh and Access Point Module MeshMAX 5054 Series User Guide
User Guide
303
802.11b Specific Parameters
802.11b/g Specific Parameters
Name Type Value Access CLI Parameter
Operating Frequency
Channel
Integer 1 - 14; available channels vary by
regulatory domain/country; see
Available Channels
RW channel
Multicast Rate Integer 1 Mbits/sec (1)
2 Mbits/sec (2) (default)
5.5 Mbits/sec (3)
11 Mbits/sec (4)
RW multrate
Closed Wireless System Integer enable
disable (default)
RW closedsys
MAC Address PhyAddress 12 hex digits R macaddr
Supported Data Rates Octet String 1 Mbits/sec
2 Mbits/sec
5.5 Mbits/sec
11 Mbits/sec
R suppdatarates
Transmit Rate Integer32 0 (auto fallback; default)
1 Mbits/sec
2 Mbits/sec
5.5 Mbits/sec
11 Mbits/sec
RW txrate
Physical Layer Type Integer dsss (direct sequence spread
spectrum) for 802.11b
Rphytype
Regulatory Domain List DisplayString Varies by regulatory domain:
U.S./Canada -- FCC
Europe -- ETSI
Japan -- TELEC
R regdomain
Name Type Value Access CLI Parameter
Operating Frequency
Channel
Integer 1 - 14; available channels vary by
regulatory domain/country; see
Available Channels
RW channel
Supported Data Rates Octet String See Transmit Rate, below R suppdatarates

CLI for Mesh and Access Point Module MeshMAX 5054 Series User Guide
User Guide
304
* Also for 802.11g-wifi mode. 802.11g-wifi has been defined for Wi-Fi testing purposes; it is not recommended for use in your wireless network
environment.
† Available in 802.11b/g or 802.11g modes only.
Transmit Rate Integer32 For 802.11b-only mode:
0 (auto fallback; default)
1 Mbits/sec
2 Mbits/sec
5.5 Mbits/sec
11 Mbits/sec
For 802.11g-only mode:*
0 (auto fallback; default)
6 Mbits/sec
9 Mbits/sec
12 Mbits/sec
18 Mbits/sec
24 Mbits/sec
36 Mbits/sec
48 Mbits/sec
54 Mbits/sec
For 802.11b/g mode:
0 (auto fallback; default)
1 Mbits/sec
2 Mbits/sec
5.5 Mbits/sec
11 Mbits/sec
6 Mbits/sec
9 Mbits/sec
12 Mbits/sec
18 Mbits/sec
24 Mbits/sec
36 Mbits/sec
48 Mbits/sec
54 Mbits/sec
RW txrate
Physical Layer Type Integer ERP (Extended Rate Protocol) R phytype
Regulatory Domain List DisplayString Varies by regulatory domain:
USA -- FCC
Europe -- ETSI
Russia -- RU
Japan -- TELEC
Brazil
Argentina
Saudi Arabia
Israel -- IL
World Mode -- WO
Undefined
R regdomain
Super Mode†Integer enable
disable (default)
RW supermode
Name Type Value Access CLI Parameter

CLI for Mesh and Access Point Module MeshMAX 5054 Series User Guide
User Guide
305
Wireless Distribution System (WDS) Parameters
Wireless Distribution System (WDS) Security Table Parameters
The WDS Security Table manages WDS related security objects.
Wireless Interface SSID/VLAN/Profile Parameters
The Wireless Interface SSID table manages the SSIDs, VLANs, Security Profiles, and RADIUS Profiles associated to
each SSID.
For configuration examples, see Configure SSIDs (Network Names), VLANs, and Profiles.
Name Type Value Access CLI Parameter
WDS Table Table N/A R wdstbl
Port Index Integer 3.1 - 3.6 (Wireless) R portindex
Status Integer enable, disable RW status
Partner MAC Address PhysAddress User Defined RW partnermacaddr
Name Type Value Access CLI Parameter
WDS Security Table Table N/A R wdssectbl
Table Index Integer Primary wireless
interface = 3
Secondary wireless
interface = 4
R index
Security Mode Integer 1 or none
2 or wep
3 or aes
RW secmode
Shared Secret DisplayString 6–32 characters W sharedsecret
Encryption Key 0 WEPKeyType N/A W encryptkey0
Name Type Value Access CLI Parameter
Wireless Interface SSID
Table
Table N/A R wifssidtbl
Table Index Integer Primary wireless
interface = 3
Secondary wireless
interface = 4
R index
SSID Table Index Integer32 1 - 16 (SSID index) R ssidindex
SSID DisplayString 2 - 32 characters RW ssid
Broadcast Unique
Beacon
Integer enable
disable
RW bcastbeacon
Closed System Integer enable,
disable
RW denybcastprobereq
VLAN ID VlanId -1 - 4094 or untagged RW vlanid
Rekeying Interval Integer32 0 (disabled)
300 - 65535
Default = 900
RW reykeyint
Table Row Status RowStatus enable
disable
delete
RW status
SSID Authorization
Status per VLAN
Integer enable
disable
RW ssidauth

CLI for Mesh and Access Point Module MeshMAX 5054 Series User Guide
User Guide
306
Ethernet Interface Parameters
Mesh Parameters
.
RADIUS Accounting
Status per VLAN
Integer enable
disable
RW acctstatus
MAC ACL Status per
VLAN
Integer enable
disable
RW aclstatus
Security Profile Integer32 User defined RW secprofile
RADIUS MAC Profile DisplayString User defined RW radmacprofile
RADIUS EAP Profile DisplayString User defined RW radeapprofile
RADIUS Accounting
Profile
DisplayString User defined RW radacctprofile
QoS Policy Integer32 User defined RW qospolicy
Name Type Value Access CLI Parameter
Ethernet Interface Group N/A R ethernet
Speed Integer 1 (10halfduplex)
2 (10fullduplex)
3 (10autoduplex)
4 (100halfduplex)
5 (100fullduplex)
6 (autohalfduplex)
7 (autoautoduplex)
(default)
RW etherspeed
MAC Address PhyAddress N/A R ethermacaddr
Name Type Value Access CLI Parameter
Mesh Group Group N/A R mesh
Mesh Mode Integer 1 or disable (default)
2 or meshportal
3 or meshap
RW meshmode
Mesh Interface Number Integer32 3 (Wireless Interface A;
802.11a radio or 4.9 GHz
radio)
4 (Wireless Interface B;
802.11b/g radio)
RW meshwif
Mesh SSID DisplayString 1–16 characters RW meshssid
Security Mode Integer 1 or none
2 or aes (default)
RW meshsecurity
Shared Secret DisplayString 6–32 characters
Default: public
W meshsecret
Maximum Active Mesh
Links
Integer32 1–32
Default: 6 for Mesh AP;
32 for Mesh Portal
RW meshmaxlinks
Roaming Threshold* Integer32 0–100 RW meshroamingthreshold
Beacon on Uplink ObjStatus 1 or enable
2 or disable
RW meshbeacononuplink
Hop Factor Integer32 0–10 RW meshhopfactor
Signal Strength Factor Integer32 0–10 RW meshsignalstrengthfactor
Name Type Value Access CLI Parameter

CLI for Mesh and Access Point Module MeshMAX 5054 Series User Guide
User Guide
307
* Higher roaming threshold value creates a more static Mesh environment. Lower roaming threshold value creates a more dynamic Mesh
environment.
† A QoS profile corresponding to this index number must exist.
‡ This command resets the following parameters to their default values: Maximum Active Mesh Links, Maximum Hops to Portal, Hop Factor,
RSSI Factor, Medium Occupancy Factor, Receive Signal Strength Cut-off, and Roaming Threshold.
Medium Occupancy
Factor
Integer32 0–10 RW meshmedocfactor
Signal Strength Cutoff Integer32 0–26 RW meshsignalstrengthcutoff
Max Hops to Portal Integer32 1–4 RW meshmaxhops
Mesh Mobility Mode
(Mesh AP only)
Integer 1 (static)
2 (roaming)
RW meshmobility
Reset Mesh Parameters
to Defaults‡Integer32 1 or 2 RW meshadvresettodefault
Mesh QoS Profile Integer32 1–10†RW meshqosprofile
Mesh Link Only (no client
access on Mesh radio)
Integer 1 (enable)
2 (disable)
RW meshlinkonly
Mesh Auto Switch Mode
(Mesh Portal only)
Integer 1 (enable)
2 (disable)
RW meshautoswitchmode
Current Mesh Mode Integer 1 (Disabled) (default)
2 (Mesh Portal)
3 (Mesh AP)
R meshcurrentmode
Name Type Value Access CLI Parameter

CLI for Mesh and Access Point Module MeshMAX 5054 Series User Guide
User Guide
308
Management Parameters
Secure Management Parameters
SNMP Parameters
HTTP Parameters
* The help link must be set to an HTTP address. Use the forward slash character ("/") rather than the backslash character ("\") when configuring
the Help Link location.
Name Type Value Access CLI Parameter
Secure Management Integer 1 (enable)
2 (disable)
RW securemgmtstatus
Name Type Value Access CLI Parameter
SNMP Group N/A R snmp
SNMP Management
Interface Bitmask
Interface Bitmask 0 or 2 = No interfaces
(disable)
1 or 3 = Ethernet
4 or 6 = Wireless A
8 or 10 = Wireless B
12 = Wireless A & B
13 or 15 = All interfaces
(default is 15)
RW snmpifbitmask
Read Password DisplayString User Defined
public (default)
6 - 32 characters
W snmprpasswd
Read/Write Password DisplayString User Defined
public (default)
6 - 32 characters
W snmprwpasswd
SNMPv3 Authentication
Password
DisplayString User Defined
public (default)
6 - 32 characters
W snmpv3authpasswd
SNMPv3 Privacy
Password
DisplayString User Defined
public (default)
6 - 32 characters
W snmpv3privpasswd
Name Type Value Access CLI Parameter
HTTP Group N/A R http
HTTP Management
Interface Bitmask
Interface Bitmask 0 or 2 = No interfaces
(disable)
1 or 3 = Ethernet
4 or 6 = Wireless A
8 or 10 = Wireless B
12 = Wireless A & B
13 or 15 = All interfaces
(default is 15)
RW httpifbitmask
HTTP Password DisplayString User Defined (6 - 32
characters)
W httppasswd
HTTP Port Integer User Defined
Default = 80
RW httpport
Help Link* DisplayString User Defined RW httphelplink
SSL Status Integer enable/disable RW sslstatus
SSL Certificate
Passphrase
DisplayString User Defined W sslpassphrase

CLI for Mesh and Access Point Module MeshMAX 5054 Series User Guide
User Guide
309
Telnet Parameters
Serial Port Parameters
RADIUS Based Management Access Parameters
The RADIUS Based Management Access parameters allow you to enable HTTP or Telnet Radius Management Access,
enable or disable local user access, and configure the local user password.
The default local user ID is root and the default local user password is public. “Root” cannot be configured as a valid
user for RADIUS based management access when local user access is enabled.
Name Type Value Access CLI Parameter
Telnet Group N/A R telnet
Telnet Management
Interface Bitmask
Interface Bitmask 0 or 2 = No interfaces
(disable)
1 or 3 = Ethernet
4 or 6 = Wireless A
8 or 10 = Wireless B
12 = Wireless A & B
13 or 15 = All interfaces
(default is 15)
RW telifbitmask
Telnet Port Integer User Defined
23 (default)
RW telport
Telnet Login Inactivity
Time-out
Integer 30 - 300 seconds
60 sec (default)
RW tellogintout
Telnet Session Idle
Time-out
Integer 60 - 36000 seconds
900 sec (default)
RW telsessiontout
Name Type Value Access CLI Parameter
Serial Group N/A R serial
Baud Rate Integer 2400, 4800,9600
(default), 19200, 38400,
57600
RW serbaudrate
Data Bits Integer 8 R serdatabits
Parity Integer none R serparity
Stop Bits Integer 1 R serstopbits
Flow Control Value none (default)
xonxoff
RW serflowctrl
Name Type Value Access CLI Parameter
Radius Local User Status Integer enable
disable
RW radlocaluserstatus
Radius Local User
Password
DisplayString User Defined RW radlocaluserpasswd
HTTP Radius
Management Access
Integer enable
disable
RW httpradiusmgmtaccess
Telnet Radius
Management Access
Integer enable
disable
RW telradiusmgmtaccess

CLI for Mesh and Access Point Module MeshMAX 5054 Series User Guide
User Guide
310
SSH Parameters
The following commands enable or disable SSH and set the SSH host key.
The AP SSH feature, open-SSH, confirms to the SSH protocol, and supports SSH version 2. The following SSH clients
have been verified to interoperate with the AP’s server. The following table lists the clients, version number, and the
website of the client.
For key generation, only the OpenSSH client has been verified.
Auto Configuration Parameters
These parameters relate to the Auto Configuration feature which allows an AP to be automatically configured by
downloading a specific configuration file from a TFTP server during the boot up process.
TFTP Server Parameters
These parameters relate to upload and download commands.
When you execute an upload and/or download Command, the specified arguments are stored in TFTP parameters for
future use. If nothing is specified in the command line when issuing subsequent upload and/or download commands, the
stored arguments are used.
Name Type Value Access CLI Parameter
SSH Status Integer enable
disable
RW sshstatus
SSH Public Host Key
Fingerprint
DisplayString AP Generated RW sshkeyfprint
SSH Host Key Status Integer create
delete
RW sshkeystatus
Clients Version Website
OpenSSH V3.4-2 http://www.openssh.com
Putty Rel 0.53b http://www.chiark.greenend.org.uk
Zoc 5.00 http://www.emtec.com
Axessh V2.5 http://www.labf.com
Name Type Value Access CLI Parameter
Auto Configuration Group N/A R autoconfig
Auto Configuration Status Integer enable (default)
disable
RW autoconfigstatus
Auto Config File Name DisplayString User Defined RW autoconfigfilename
Auto Config TFTP Server
IP Address
IpAddress User Defined RW autoconfigTFTPaddr
Name Type Value Access CLI Parameter
TFTP Group N/A R tftp
TFTP Server IP Address IpAddress User Defined RW tftpipaddr
TFTP File Name DisplayString User Defined RW tftpfilename

CLI for Mesh and Access Point Module MeshMAX 5054 Series User Guide
User Guide
311
IP Access Table Parameters
When creating table entries, you may either specify the argument name followed by argument value or simply enter the
argument value. When only the argument value is specified, then enter the values in the order depicted by the following
table. CLI applies default values to the omitted arguments. Due to the nature of the information, the only argument that
can be omitted is the “comment” argument.
Filtering Parameters
Ethernet Protocol Filtering Parameters
Ethernet Filtering Table
Identify the different filters by using the table index.
TFTP File Type Integer img
config
bootloader
sslcertificate
sslprivatekey
sshprivatekey
sshpublickey
clibatchfile (CLI Batch
File)
cbflog (CLI Batch Error
Log)
RW tftpfiletype
Name Type Value Access CLI Parameter
IP Access Table Table N/A R mgmtipaccesstbl
Table Index Integer User Defined N/A index
IP Address IpAddress User Defined RW ipaddr
IP Mask IpAddress User Defined RW ipmask
Comment (optional) DisplayString User Defined RW cmt
Status (optional) Integer enable (default)
disable
delete
RW status
Name Type Value Access CLI Parameter
Ethernet Filtering Group N/A R etherflt
Filtering Interface
Bitmask
Interface Bitmask 0 or 2 = No interfaces
(disable)
1 or 3 = Ethernet
4 or 6 = Wireless A
8 or 10 = Wireless B
12 = Wireless A & B
13 or 15 = All interfaces
(default is 15)
RW etherfltifbitmask
Operation Type passthru
block
RW etherfltoptype
Name Type Value Access CLI Parameter
Ethernet Filtering Table Table N/A R etherflttbl
Table Index N/A N/A R index
Name Type Value Access CLI Parameter

CLI for Mesh and Access Point Module MeshMAX 5054 Series User Guide
User Guide
312
NOTE: The filter Operation Type (passthru or block) applies only to the protocol filters that are enabled in this table.
Static MAC Address Filter Table
Protocol Number Octet String N/A RW protonumber
Protocol Name (optional) DisplayString RW protoname
Status (optional) Integer enable (1)
disable (2)
delete (3)
RW status
Name Type Value Access CLI Parameter
Static MAC Address Filter
Table
Table N/A R staticmactbl
Table Index N/A N/A R index
Static MAC Address on
Wired Network
PhysAddress User Defined RW wiredmacaddr
Static MAC Address
Mask on Wired Network
PhysAddress User Defined RW wiredmask
Static MAC Address on
Wireless Network
PhysAddress User Defined RW wirelessmacaddr
Static MAC Address
Mask on Wireless
Network
PhysAddress User Defined RW wirelessmask
Comment (optional) DisplayString max 255 characters RW cmt
Status (optional) Integer enable (default)
disable
delete
RW status
Name Type Value Access CLI Parameter

CLI for Mesh and Access Point Module MeshMAX 5054 Series User Guide
User Guide
313
Proxy ARP Parameters
IP ARP Filtering Parameters
Broadcast Filtering Table
TCP/UDP Port Filtering
The following parameters are used to enable/disable the Port filter feature.
TCP/UDP Port Filtering Table
The following parameters are used to configure TCP/UDP Port filters.
Name Type Value Access CLI Parameter
Proxy ARP Group N/A R parp
Status Integer enable
disable (default)
RW parpstatus
Name Type Value Access CLI Parameter
IP ARP Filtering Group N/A R iparp
Status Integer enable
disable (default)
RW iparpfltstatus
IP Address IpAddress User Defined RW iparpfltipaddr
Subnet Mask IpAddress User Defined RW iparpfltsubmask
Name Type Value Access CLI Parameter
Broadcast Filtering Table Table N/A R broadcastflttbl
Index Integer 1 - 5 N/A index
Protocol Name DisplayString N/A R protoname
Direction Integer ethertowireless
wirelesstoether
both (default)
RW direction
Status Integer enable
disable (default)
RW status
Name Type Value Access CLI Parameter
Port Filtering Group N/A R portflt
Port Filter Status Integer enable (default)
disable
RW portfltstatus
Name Type Value Access CLI Parameter
Port Filtering Table Table N/A R portflttbl
Table Index N/A User Defined
(there are also 4
pre-defined indices, see
Port Number below for
more information)
R index
Port Type Octet String tcp
udp
tcp/udp
RW porttype

CLI for Mesh and Access Point Module MeshMAX 5054 Series User Guide
User Guide
314
Alarms Parameters
SNMP Table Host Table Parameters
When creating table entries, you may either specifying the argument name followed by argument value. CLI applies
default values to the omitted arguments. Due to the nature of the information, the only argument that can be omitted is
the “comment” argument.
Port Number Octet String User Defined
(there are also 4
pre-defined protocols:
Index 1: NetBios Name
Service - 137, Index 2:
NetBios Datagram
Service - 138, Index 3:
NetBios Session Service
- 139, Index 4: SNMP
Service - 161)
RW portnum
Protocol Name DisplayString User Defined
(there are also 4
pre-defined protocols,
see Port Number above)
RW protoname
Interface Bitmask Integer32 0 or 2 = No interfaces
(disable)
1 or 3 = Ethernet
4 or 6 = Wireless A
8 or 10 = Wireless B
12 = Wireless A & B
13 or 15 = All interfaces
(default is 15)
RW ifbitmask
Status (optional) Integer enable (default for new
entries)
disable (default for
pre-defined entries)
delete
RW status
Name Type Value Access CLI Parameter
SNMP Trap Host Table Table N/A R snmptraphosttbl
Table Index Integer User Defined N/A index
IP Address IpAddress User Defined RW ipaddr
Password DisplayString User Defined (up to 64
characters)
Wpasswd
Comment (optional) DisplayString User Defined (up to 254
characters)
RW cmt
Status (optional) Integer enable (default)
disable
delete
RW status
Name Type Value Access CLI Parameter

CLI for Mesh and Access Point Module MeshMAX 5054 Series User Guide
User Guide
315
Syslog Parameters
The following parameters configure the Syslog settings.
NOTE: When Heartbeat is enabled, the AP periodically sends a message to the Syslog server to indicate that it is active.
The frequency with which the heartbeat message is sent depends upon the setting of the Heartbeat Interval.
Syslog Host Table
The table described below configures the Syslog hosts that will receive message from the AP. You can configure up to ten
Syslog hosts.
Name Type Value Access CLI Parameter
Syslog Group N/A R syslog
Syslog Status Integer enable
disable (default)
RW syslogstatus
Syslog Port Octet String 514 R syslogport
Syslog Lowest Priority
Logged
Integer 1 = LOG_ALERT
2 = LOG_CRIT
3 = LOG_ERR
4 = LOG_WARNING
5 = LOG_NOTICE
6 = LOG_INFO (default)
7 = LOG_DEBUG
RW syslogpritolog
Heartbeat Status Integer enable (1)
disable (2) (default)
RW sysloghbstatus
Heartbeat Interval
(seconds)
Integer 1 - 604800 seconds;
900 sec. (default)
RW sysloghbinterval
Name Type Value Access CLI Parameter
Syslog Host Table Table N/A R sysloghosttbl
Table Index Integer 1 - 10 N/A index
IP Address IpAddress User Defined RW ipaddr
Comment (optional) DisplayString User Defined RW cmt
Status (optional) Integer enable
disable
delete
RW status

CLI for Mesh and Access Point Module MeshMAX 5054 Series User Guide
User Guide
316
Bridge Parameters
Spanning Tree Parameters
Spanning Tree Priority and Path Cost Table
Storm Threshold Parameters
Name Type Value Access CLI Parameter
Spanning Tree Group N/A R stp
Spanning Tree Status Integer enable
disable (default)
RW stpstatus
Bridge Priority Integer 0 - 65535
32768 (default)
RW stppriority
Maximum Age Integer 600 - 4000
(in 0.01 sec intervals;
i.e., 6 to 40 seconds)
2000 (default)
RW stpmaxage
Hello Time Integer 100 - 1000 (1/100
second; i.e., 1 to 10
seconds); enter values in
increments of 100
200 (default)
RW stphellotime
Forward Delay Integer 400 - 3000
(in 0.01 sec intervals;
i.e., 4 to 30 seconds)
1500 (default)
RW stpfwddelay
Name Type Value Access CLI Parameter
Spanning Tree Table Table N/A R stpbl
Table Index (Port) N/A 1 - 15 R index
Priority Integer 0 - 255
128 (default)
RW priority
Path Cost Integer 1 - 65535
100 (default)
RW pathcost
State Integer disable
blocking
listening
learning
forwarding
broken
R state
Status Integer enable
disable
RW status
Name Type Value Access CLI Parameter
Storm Threshold Group N/A (see below) N/A stmthres
Broadcast Threshold Integer 0 - 255 packets/sec
(default is 0)
RW stmbrdthres
Multicast Threshold Integer 0 - 255 packets/sec
(default is 0)
RW stmmultithres

CLI for Mesh and Access Point Module MeshMAX 5054 Series User Guide
User Guide
317
Storm Threshold Table
Intra BSS Subscriber Blocking
The following parameters control the Intra BSS traffic feature, which prevent wireless clients that are associated with the
same AP from communicating with each other:
Packet Forwarding Parameters
The following parameters control the Packet Forwarding feature, which redirects wireless traffic to a specific MAC
address:
Name Type Value Access CLI Parameter
Storm Threshold Table Table N/A R stmthrestbl
Table Index Integer 1 = Ethernet
3 = Wireless
R index
Broadcast Threshold Integer 0 - 255 packets/sec
(default is 0)
RW bcast
Multicast Threshold Integer 0 - 255 packets/sec
(default is 0)
RW mcast
Name Type Value Access CLI Parameter
Intra BSS Traffic Group N/A R intrabss
Intra BSS Traffic
Operation
Integer passthru (default)
block
RW intrabssoptype
Name Type Value Access CLI Parameter
Packet Forwarding MAC
Address
Group N/A R pktfwd
Packet Forwarding MAC
Address
MacAddress User Defined RW pktfwdmacaddr
Packet Forwarding Status Integer enable
disable (default)
RW pktfwdstatus
Packet Forwarding
Interface Port
Integer 0 (any) (default)
1 (Ethernet)
2 (WDS 1)
3 (WDS 2)
4 (WDS 3)
5 (WDS 4)
6 (WDS 5)
7 (WDS 6)
RW pktfwdif

CLI for Mesh and Access Point Module MeshMAX 5054 Series User Guide
User Guide
318
RADIUS Parameters
General RADIUS Parameters
RADIUS Server Configuration Parameters
NOTE: Use a server name only if you have enabled the DNS Client functionality. See DNS Client for RADIUS Name
Resolution.
Name Type Value Access CLI Parameter
RADIUS Group N/A R radius
Client Invalid Server
Address
Counter32 N/A R radcliinvsvradd
Name Type Value Access CLI Parameter
RADIUS Authentication Table N/A R radiustbl
Table Index (Profile
Index)
Integer N/A R index
Primary/Secondary Index Integer Primary (1)
Secondary (2)
R subindex
Status Integer enable
disable
RW status
Server Address Format Integer Ipaddr
Name
RW seraddrfmt
Server IP Address or
Name
IpAddress
DisplayString
User defined (enter an IP
address if seraddrfmt is
ipaddr or a name if set to
name; up to 254
characters if using a
name)
RW ipaddr
Port (optional) Integer User Defined
1812 (default)
RW port
Shared Secret DisplayString User Defined
6 - 32 characters
W ssecret
Response Time (optional) Integer 1 - 10 seconds
3 (default)
RW responsetm
Maximum
Retransmissions
(optional)
Integer 0 - 4
3 (default)
RW maxretx
RADIUS MAC Address
Format
Integer dashdelimited
colondelimited
singledashdelimited
nodelimiter
RW radmacaddrformat
RADIUS Accounting
Inactivity Timer
Integer32 1 - 60 minutes RW radaccinactivetmr
Authorization Lifetime Integer32 900 - 43200 seconds W radauthlifetm
RADIUS Accounting
Update Interval
Integer32 10 - 3600 minutes RW radacctupdinterval
VLAN ID vlanID -1 (untagged)
1 - 4094
RW radvlanid

CLI for Mesh and Access Point Module MeshMAX 5054 Series User Guide
User Guide
319
Security Parameters
MAC Access Control Parameters
MAC Access Control Table
Rogue Scan Configuration Table
The Rogue Scan Configuration Table allows you to enable or disable Rogue Scan and configure the scanning
parameters.
802.1x Parameters
Hardware Configuration Reset
The Hardware Configuration Reset commands allows you to enable or disable the feature and to change the password to
be used for configuration reset during boot up.
Name Type Value Access CLI Parameter
MAC Address Control Group N/A R macacl
Status Integer enable
disable (default)
RW aclstatus
Operation Type Integer passthru (default)
block
RW macacloptype
Name Type Value Access CLI Parameter
MAC Address Control
Table
Table N/A R macacltbl
Table Index N/A N/A R index
MAC Address PhysAddress User Defined RW macaddr
Comment (optional) DisplayString User Defined
max 254 characters
RW cmt
Status (optional) Integer enable (default)
disable
delete
RW status
Name Type Value Access CLI Parameter
Rogue Scan
Configuration Table
Table N/A R rscantbl
Rogue Scan Mode Integer Bkscan (1)
Contscan (2)
RW mode
Rogue Scan Cycle Time Integer 1 - 1440 RW cycletime
Rogue Scan
Configuration Table Index
Integer 3 or 4 RW index
Rogue Scan Status Integer enable
disable
RW status
Name Type Value Access CLI Parameter
802.1x Group Group N/A R dot1xauthcfg
802.1x Supplicant
Timeout
Integer32 3 - 60 seconds
(recommended range)
RW dot1xsupptimeout

CLI for Mesh and Access Point Module MeshMAX 5054 Series User Guide
User Guide
320
Security Profile Table
The Security Profile Table allows you to configure security profiles. A maximum of 16 security profiles are supported per
wireless interface.
Each security profile can contain one or more enabled security modes (Non-secure station, WEP station, 802.1x station,
WPA station, WPA-PSK station, 802.11i, 802.11i-PSK). The WEP/PSK parameters are separately configurable for each
security mode. See the command examples in Set Security Profile Parameters.
Name Type Value Access CLI Parameter
Hardware Configuration
Reset Status
Integer enable (1)
disable (2)
R hwconfigresetstatus
Configuration Reset
Password
DisplayString User Defined RW configresetpasswd
Name Type Value Access CLI Parameter
Security Profile Table Table N/A R secprofiletbl
Table Index Integer 1 - 16 (up to 16 per
interface)
RW index
Security Mode Integer nonsecure
wep
802.1x
wpa
wpa-psk
802.11i
802.11i-psk
RW secmode
Authentication Mode Integer none
802.1x
psk
R authmode
Cipher Integer none
wep
tkip
aes
R ciphersuite
Encryption Key 0 Integer See Encryption Key
Format
Wencryptkey0
Encryption Key 1 Integer See Encryption Key
Format
Wencryptkey1
Encryption Key 2 Integer See Encryption Key
Format
Wencryptkey2
Encryption Key 3 Integer See Encryption Key
Format
Wencryptkey3
Encryption Transmit Key Integer 0 - 3 RW encryptkeytx
Encryption Key Length Integer 1 (64 bits)
2 (128 bits)
3 (152 bits)
RW encryptkeylength
PSK Passphrase Integer 8 - 64 characters W passphrase

CLI for Mesh and Access Point Module MeshMAX 5054 Series User Guide
User Guide
321
Encryption Key Format
If WEP security mode is configured, then the appropriate key size must be configured. The AP supports 63-, 128-, and
152-bit encryption keys. Encryption keys may be configured using either hexadecimal or ASCII values, as described in
the following table.
Each ASCII character corresponds to two hexadecimal digits. See ASCII Character Chart for ASCII/Hexadecimal
correspondence.
VLAN/SSID Parameters
Other Parameters
IAPP Parameters
NOTE: These parameters configure the Inter Access Point Protocol (IAPP) for roaming. Leave these settings at their
default value unless a technical representative asks you to change them.
Key Length Hexadecimal ASCII
64-bit 10 characters (0 - F) 5 alphanumeric characters
128-bit 26 characters (0 - F) 13 alphanumeric characters
152-bit 32 characters (0 - F) 16 alphanumeric characters
Name Type Value Access CLI Parameter
VLAN Group N/A R vlan
Status Integer enable
disable (default)
RW vlanstatus
Management ID VlanId -1 (untagged)
or 1 - 4094
RW vlanmgmtid
Name Type Value Access CLI Parameter
IAPP Group N/A R iapp
IAPP Status Integer enable (default)
disable
RW iappstatus
Periodic Announce
Interval (seconds)
Integer 80
120 (default)
160
200
RW iappannint
Announce Response
Time
Integer 2 seconds R iappannresp
Handover Time-out Integer 410 ms
512 ms (default)
614 ms
717 ms
819 ms
RW iapphandtout
Max. Handover
Retransmissions
Integer 1 - 4 (default 4) RW iapphandretx
Send Announce Request
on Startup
Integer enable (default)
disable
RW iappannreqstart

CLI for Mesh and Access Point Module MeshMAX 5054 Series User Guide
User Guide
322
Wireless Multimedia Enhancements (WME)/Quality of Service (QoS) parameters
The Wireless Multimedia Enhancements commands enable and configure Wireless Multimedia Enhancement/Quality of
Service parameters per wireless interface. The following two commands are part of the Wireless Interface Properties
table.
Enabling QoS
Configuring QoS Policies
The QoS group manages the QoS policies:
* QoS must be enabled on a wireless interface before spectralink can be enabled.
† A priority mapping needs to be specified for a QoS Policy. The priority mapping depends on the type of policy configured. For Layer 2 policy
types (inbound or outbound) a mapping index from the 802.1p to 802.1D table should be specified. For Layer 3 policy types (inbound or out-
bound) a mapping index from the IP DSCP to 802.1D table should be specified. The mapping index, in both cases, depends on the number of
mappings configured by the user. For SpectraLink policy type a mapping is not required.
Specifying the Mapping between 802.1p and 802.1D Priorities
The QoS 802.1p to 802.1D Mapping Table specifies the mapping between 802.1P and 802.1D priorities.
Name Type Value Access CLI Parameter
QoS Status Object Status enable
disable (default)
RW qosstatus
QoS Maximum Medium
Threshold
Integer 50 - 90 RW qosmaximummediumthresh
old
Name Type Value Access CLI Parameter
QoS Group Group N/A N/A qos
QoS Policy Table Table N/A N/A qospolicytbl
Table Primary Index Integer N/A R index
Table Secondary Index Integer N/A R secindex
Policy Name Display String 0 - 32 characters RW policyname
Policy Type Integer inlayer2,
inlayer3,
outlayer2,
outlayer3,
spectralink*
RW type
Priority Mapping Index†Integer See Note
†. RW mapindex
Apply QoS Marking Object Status enable
disable
RW markstatus
Table Row Status Row Status enable
disable
delete
RW status
Name Type Value Access CLI Parameter
QoS 802.1p to 802.1D
Mapping Table
Table N/A N/A qos1pto1dtbl
Table Index (Primary
Index)
Integer 0 - 7 R index
802.1D Priority
(Secondary Index)
Integer 0 - 7 R 1dpriority
802.1p Priority Integer 0 - 7 RW 1ppriority

CLI for Mesh and Access Point Module MeshMAX 5054 Series User Guide
User Guide
323
Specifying the Mapping between IP Precedence/DSCP Ranges and 802.1D Priorities
The QoS IP DSCP to 802.1D Mapping Table specifies the mapping between IP Precedence/DSCP Ranges and 802.1D
priorities.
QoS Enhanced Distributed Channel Access (EDCA) Parameters
The following commands configure the client (STA) and AP Enhanced Distributed Channel Access (EDCA) parameters.
You can modify the EDCA values for both Wireless A and Wireless B.
The EDCA parameter set provides information needed by the client stations for proper QoS operation during the wireless
contention period. These parameters are used by the QoS enabled AP to establish policy, to change policies when
accepting new stations or new traffic, or to adapt to changes in the offered load. The EDCA parameters assign priorities
to traffic types where higher priority packets gain access to the wireless medium more frequently than lower priority
packets.
NOTE: We have defined default recommended values for EDCA parameters; we recommend not modifying EDCA
parameters unless strictly necessary.
Table Row Status Row Status enable
disable
delete
RW status
Name Type Value Access CLI Parameter
QoS IP DSCP to 802.1D
Mapping Table
Table N/A N/A qosdscpto1dtbl
Table Index (Primary
Index)
Integer 0 - 7 R index
802.1D Priority Integer 0 - 7 R 1dpriority
IP DSCP Lower Limit Integer 0 - 62 RW dscplower
IP DSCP Upper Limit Integer 1 - 63 RW dscpupper
Table Row Status Row Status enable
disable
delete
RW status
Name Type Value Access CLI Parameter
STA EDCA Table Table N/A N/A qosedcatbl
Table Index Integer 3 (Wireless A)
4 (Wireless B)
R—
QoS Access Category Integer 1 (Best Effort)
2 (Background)
3 (Video)
4 (Voice)
R—
CWmin Integer 0 - 255 RW cwmin
CWmax Integer 0 - 65535 RW cwmax
AIFSN Integer 2 - 15 RW aifsn
Tx OP Limit Integer 0 - 65535 RW txoplimit
MSDU Lifetime Integer 0 - 500 RW msdulifetime
AC Mandatory Truth Value 1 (Enable)
2 (Disable)
RW acmandatory
AP EDCA Table Table N/A N/A qosqapedcatbl
Name Type Value Access CLI Parameter

CLI for Mesh and Access Point Module MeshMAX 5054 Series User Guide
User Guide
324
Examples:
show qosedcatbl (or qosqapedcatbl)
set qosedcatbl (or qosqapedcatbl) <Index>.<Access Category> <EDCA parameter> <value>
For example: set qosedcatbl 3.1 cwmin 15
Defining the QoS Policy used for a Wireless Interface SSID
The QoS Policy object configures the QoS policy to be used per wireless interface SSID. This object is part of the
Wireless Interface SSID Table; the CLI command for this table is “wifssidtbl.”
* A QoS Policy number needs to be specified in the SSID table. This depends on the QoS policies configured by the user. Once the user has
configured QoS policies, the user should specify the policy to be used for that SSID.
Table Index Integer 3 (Wireless A)
4 (Wireless B)
R—
QoS Access Category Integer 1 (Best Effort)
2 (Background)
3 (Video)
4 (Voice)
R—
CWmin Integer 0 - 255 RW cwmin
CWmax Integer 0 - 65535 RW cwmax
AIFSN Integer 2 - 15 RW aifsn
Tx OP Limit Integer 0 - 65535 RW txoplimit
MSDU Lifetime Integer 0 - 500 RW msdulifetime
AC Mandatory Truth Value true
false
RW acmandatory
Name Type Value Access CLI Parameter
QoS Policy Integer See Note* RW qospolicy
Name Type Value Access CLI Parameter

CLI for Mesh and Access Point Module MeshMAX 5054 Series User Guide
User Guide
325
CLI Batch File
A CLI Batch file is a user-editable file that lists a series of CLI set commands, that can be uploaded to the Access Point to
change its configuration. The Access Point executes the CLI commands specified in the CLI Batch file after upload and
the configuration gets changed accordingly. A CLI Batch file can also be used for Auto Configuration.
The CLI Batch file does not replace the existing LTV format configuration file, which continues to define the configuration
of the AP.
The CLI Batch file contains a list of CLI commands that the AP will execute. The AP performs the commands in the file
immediately after the file is uploaded to the AP manually or during Auto Configuration. The AP parses the file and
executes the CLI commands. Commands that do not require a reboot take effect immediately, while commands that
require a reboot (typically commands affecting a wireless interface) will take effect after reboot.
Auto Configuration and the CLI Batch File
The Auto Configuration feature allows download of the LTV format configuration file or the CLI Batch file. The AP detects
whether the file uploaded is LTV format or a CLI Batch file. If the AP detects a CLI Batch file (a file with extension .cli), the
AP executes the file immediately.
The AP will reboot after executing the CLI Batch file. Auto Configuration will not result in repeated reboots if the CLI Batch
file contains rebootable parameters.
CLI Batch File Format and Syntax
The CLI Batch file must be named with a .cli extension to be recognized by the AP. The maximum file size allowed is 100
Kbytes, and files with larger sizes cannot be uploaded to the AP. The CLI commands supported in the CLI Batch File are
a subset of the legal AP CLI commands.
The follow commands are supported:
• Set commands
• Reboot command (the reboot command ignores the argument (time)
Each command must be separated by a new line.
NOTE: The following commands are not supported: Show command, Debug command, Undebug command, Upload
command, Download command, Passwd command, Kill command, and the Exit, Quit, and Done commands.
Sample CLI Batch File
The following is a sample CLI Batch File:
set sysname system1
set sysloc sunnyvale
set sysctname contact1
set sysctphone 1234567890
set sysctemail email@domain.com
set ipaddr 11.0.0.66
set ipaddrtype static
set ipsubmask 255.255.255.0
set ipgw 11.0.0.1
set wif 3 autochannel disable
set wif 3 mode 1
set syslogstatus enable
set sysloghbstatus enable
set sysloghbinterval 5
set wif 3 netname london
reboot

CLI for Mesh and Access Point Module MeshMAX 5054 Series User Guide
User Guide
326
Reboot Behavior
When a CLI Batch file contains a reboot command, the reboot will occur only after the entire CLI Batch file has been
executed.
There are two methods of uploading the CLI Batch File:
• Upload
• Upload and reboot (this option is to be used for a CLI Batch file containing the configuration parameters that require a
reboot)
CLI Batch File Error Log
If there is any error during the execution of the CLI Batch file, the AP will stop executing the file. The AP generates traps
for all errors and each trap contains the following information:
• Start of execution
• Original filename of the uploaded file
• End of execution (along with the status of execution)
• Line number and description of failures that occurred during execution
The AP logs all the errors during execution and stores them in the Flash memory in a CLI Batch File Error Log named
“CBFERR.LOG”. The CLI Batch File Error Log can be downloaded though TFTP, HTTP, or CLI file transfer to a specified
host.

327
MeshMAX 5054 Series User Guide
C
ASCII Chart for Mesh and Access Point Module
You can configure WEP Encryption Keys in either Hexadecimal or ASCII format. Hexadecimal digits are 0-9 and A-F (not
case sensitive). ASCII characters are 0-9, A-F, a-f (case sensitive), and punctuation marks. Each ASCII character
corresponds to two hexadecimal digits.
The table below lists the ASCII characters that you can use to configure WEP Encryption Keys. It also lists the
Hexadecimal equivalent for each ASCII character.
ASCII
Charact
er
Hex
Equival
ent
ASCII
Charact
er
Hex
Equival
ent
ASCII
Charact
er
Hex
Equival
ent
ASCII
Charact
er
Hex
Equival
ent
!21
939Q51i69
"22
:3AR52j6A
#23
;3BS53k6B
$24
<3CT54l6C
%25
=3DU55m6D
&26
>3EV56n6E
'27
?3FW57o6F
(28
@40X58p70
)29
A41Y59q71
*2A
B42Z5Ar72
+2B
C43[5Bs73
,2C
D44\5Ct74
-2D
E45]5Du75
.2E
F46^5Ev76
/2F
G47_5Fw77
030
H48`60x78
131
I49a61y79
232
J4Ab62z7A
333
K4Bc63{7B
434
L4Cd64|7C
535
M4De65}7D
636
N4Ef66~7E
737
O4Fg67
838P50h68

MeshMAX 5054 Series User Guide
328
D
Technical Specifications
See the following:
•Part Numbers
•Regulatory Approval and Frequency Ranges
•Radio and Transmission Specifications
•Receive Sensitivity
•Maximum Throughput
•Transmit Power Settings
•Software Features
•Mesh and Wi-Fi Features
•LEDs
•Interfaces
•Other Specifications
•Electrical
•Physical and Environmental Specifications
•MTBF and Warranty

Technical Specifications MeshMAX 5054 Series User Guide
Part Numbers
329
Part Numbers
MeshMAX 5054 Series
Part Number Description
9200-xx MeshMAX 5054WM Tri-radio, WiMAAX subscriber and Wi-Fi Mesh access point
9201-xx MeshMAX 5054W Tri-radio, WiMAX subscriber and WiFi access point
Regulatory Approval and Frequency Ranges
Region/Country Country GHz Number of Channels
5 MHz 10 MHz 20 MHz
North America USA 5.25 - 5.35 NA Up to 30 Up to 14
5.47 - 5.725 NA Up to 30 Up to 14
5.725 - 5.85 Up to 21 Up to 11 Up to 5
Canada 5.25 - 5.35 Up to 61 Up to 30 Up to 14
5.47 - 5.725 Up to 61 Up to 30 Up to 14
5.725 - 5.85 Up to 21 Up to 11 Up to 5
Mexico 5.725 - 5.85 Up to 21 Up to 11 Up to 5
EU Countries Austria 5.47 - 5.70 Up to 46 Up to 23 Up to 11
Belgium 5.47 - 5.70 Up to 46 Up to 23 Up to 11
Cyprus 5.47 - 5.70 Up to 46 Up to 23 Up to 11
Czech Republic 5.47 - 5.70 Up to 46 Up to 23 Up to 11
Denmark 5.47 - 5.70 Up to 46 Up to 23 Up to 11
Estonia 5.47 - 5.70 Up to 46 Up to 23 Up to 11
Finland 5.47 - 5.70 Up to 46 Up to 23 Up to 11
France 5.47 - 5.70 Up to 46 Up to 23 Up to 11
Germany 5.47 - 5.70 Up to 46 Up to 23 Up to 11
Greece 5.47 - 5.70 Up to 46 Up to 23 Up to 11
Hungary 5.47 - 5.70 Up to 46 Up to 23 Up to 11
Ireland 5.47 - 5.70 Up to 46 Up to 23 Up to 11
5.725 - 5.85 Up to 23 Up to 11 Up to 4
Italy 5.47 - 5.70 Up to 46 Up to 23 Up to 11
Latvia 5.47 - 5.70 Up to 46 Up to 23 Up to 11
Lithuania 5.47 - 5.70 Up to 46 Up to 23 Up to 11
Luxemburg 5.47 - 5.70 Up to 46 Up to 23 Up to 11
Malta 5.47 - 5.70 Up to 46 Up to 23 Up to 11
Netherlands 5.47 - 5.70 Up to 46 Up to 23 Up to 11
Poland 5.47 - 5.70 Up to 46 Up to 23 Up to 11
Portugal 5.47 - 5.70 Up to 46 Up to 23 Up to 11
Slovakia 5.47 - 5.70 Up to 46 Up to 23 Up to 11
Slovenia 5.47 - 5.70 Up to 46 Up to 23 Up to 11
Spain 5.47 - 5.70 Up to 46 Up to 23 Up to 11
Sweden 5.47 - 5.70 Up to 46 Up to 23 Up to 11
United Kingdom 5.47 - 5.70 Up to 46 Up to 23 Up to 11
5.725 - 5.85 Up to 23 Up to 11 Up to 4

Technical Specifications MeshMAX 5054 Series User Guide
Radio and Transmission Specifications
330
* FCC DFS in process.
† IC DFS in process.
Radio and Transmission Specifications
Receive Sensitivity
Maximum Throughput
NOTE: Actual throughput performance in the field may vary.
Other European
Countries
Iceland 5.47 - 5.70 Up to 46 Up to 23 Up to 11
Liechtenstein 5.47 - 5.70 Up to 46 Up to 23 Up to 11
Norway 5.47 - 5.70 Up to 46 Up to 23 Up to 11
Russia 5.15 - 6.08 Up to 193 Up to 93 Up to 47
Switzerland 5.47 - 5.70 Up to 46 Up to 23 Up to 11
South America Argentina 5.25 - 5.35 Up to 9 Up to 5 Up to 3
5.725 - 5.85 Up to 19 Up to 10 Up to 5
Brazil 5.47 - 5.70 Up to 46 Up to 23 Up to 11
5.725 - 5.85 Up to 19 Up to 10 Up to 5
Colombia 5.25 - 5.35 Up to 15 Up to 7 Up to 3
5.725 - 5.85 Up to 21 Up to 11 Up to 5
APAC Australia 5.725 - 5.85 Up to 21 Up to 11 Up to 5
China 5.725 - 5.85 Up to 17 Up to 9 Up to 5
Hong Kong 5.725 - 5.85 Up to 21 Up to 11 Up to 5
India 5.15 - 5.35 Up to 32 Up to 16 Up to 8
5.725 - 5.85 Up to 28 Up to 14 Up to 7
New Zealand 5.725 - 5.85 Up to 21 Up to 11 Up to 5
S. Korea 5.725 - 5.85 Up to 17 Up to 9 Up to 5
Singapore 5.15 - 5.25 Up to 13 Up to 7 Up to 4
5.725 - 5.85 Up to 17 Up to 9 Up to 5
Taiwan 5.25 - 5.35 Up to 15 Up to 7 Up to 3
5.725 - 5.85 Up to 17 Up to 9 Up to 5
Category Specification
Modulation Method OFDM
Radio Speed 54, 48, 36, 18, 12, 9, 6
Modulation 5 GHz band 2.4 GHz band
64-QAM 48 and 54 Mbps 48 and 54 Mbps
16-QAM 24 and 36 Mbps 12 and 18 Mbps
QPSK 12 and 18 Mbps 12 and 18 Mbps
BPSK 6 and 9 Mbps 6 and 9 Mbps
Regulatory Approval and Frequency Ranges (continued)
Region/Country Country GHz Number of Channels
5 MHz 10 MHz 20 MHz

Technical Specifications MeshMAX 5054 Series User Guide
Receive Sensitivity
331
Transmit Power Settings
• 5.0GHz: +18dBm
• 2.4GHz: +20dBm
• Output Power Attenuation: 0 - 12 dB, in 1 dB steps
• Output Power Values will have a tolerance of +- 1.5 dB
Software Features
Category Specification
Key Features • WORP protocol
• Dynamic Data Rate Selection
• Transmit Power Control
• Antenna Alignment
• Integrity Check for Software Upload
• 5, 10 and 20 MHz channels
Satellite Density • Dynamic Frequency Selection
Filtering • Ethernet protocol (Ethertype)
• Static MAC
• Storm threshold
• IP address
• Broadcast protocol
Services • DHCP Server (RFC 2131)
• DHCP Client (RFC 2131)
• DHCP Relay (RFC 2131)
• NAT (RFC 3022)
• Bi-Directional Bandwidth Control
VLAN • 802.1Q VLAN tagging and filtering protocol
• Transparent passing of 802.1Q-compliant VLAN tagged frame
Security Features • MAC Authentication
• RADIUS MAC Access Control
• RADIUS (RFC 2138)
• WEP/AES-OCB encryption
Redundancy • Spanning Tree (802.1D)
Bridging and Routing • Bridge (802.1d)
• IP/RIPv1 (RFC 1058)
• IP/RIPv2 (RFC 1388)
• CIDR (RFC 1519)
• IP (RFC 791)
• ARP(RFC 826)
QoS • Asymmetric bandwidth support
• Packet Classification capabilties - 801.1D/802.1Q/802.1p priority; IPTOS;VLAN ID; IP
Source/Destination
• Addess;source/Destination port; Ethernet Source Destination Address; IP Protocol and
Ethertype
• Scheduling - Best Effort; Universal Grant Services; per srvice flow scheduling; priority,
jitter and latency control for voice, video and data; min/max bandwidth enabling
Mobility • Subscriber Roaming
Local Monitoring • Serial CLI

Technical Specifications MeshMAX 5054 Series User Guide
Receive Sensitivity
332
Mesh and Wi-Fi Features
Remote Monitoring • Telnet CLI
• HTTP
•TFTP
• SNMPv1, SNMPv2
• MIB-II, Proxim MIBs, Bridge MIB, RIPv2 MIB, Etherlike MIB
Category Specification
Authentication • 802.1X support including PEAP, EAP-TLs, EAP-TTLS, EAP-SIM, and other EAP
methods that conform to RFC 3748 to yield mutual authentication and dynamic per-user,
per-session encryption keys
• RADIUS-based MAC address authentication
• Dynamic MAC address conrol list, automatically updated without rebooting AP
Encryption • 802.11i support for CCMP/AES keys of 128 bits (WPA2)
• TKIP encryption
• WEP keys of 64 and 128 bits
• AES encryption
Message Authentication • 802.11i AES message authenitication with 128 bits keys
• TKIP with 128 bit Michael Message Integrity Check
Intrusion Detection • Rogue AP and client detection
• Detect switch port of rogue access point when used in conjuction with ProximVisionTM
802.11 MAC Level
Functionality
• Multiple SSID and BSSID
• Auto Channel Selection
• Dynamic Frequency Selection (DFS)
• 802.1d support
• Transmit power control
• Qo support for mesh backhaul and access
• Closed system
• Channel Blacklist
• Turbo mode
• Super mode
Bridging and Filtering • IEEE 802.1d Bridging
• VLAN Support
• WDS Relay
• Protocol Filtering
• Modified Proxy ARP Support
• Multicast/Broadcast Storm Filtering
• TCP/UDP Port Filtering
• Intra-BSS Clients blocking
• Packet Forwarding
• VPN filtering
Category Specification

Technical Specifications MeshMAX 5054 Series User Guide
Receive Sensitivity
333
LEDs
Network Layer • DHCP Client
• DHCP Server
• DHCP Relay Agent
• Inter Access Point Protocol (IAPP)
• Link Integrity
•Syslog
• RADIUS Autheication
• RADIUD Accounting Support
• DNS Client
•SNTP
• TFTP Client
• Telnet Server
• HTTP Server
• SNMPv1/SNMPv2/SNMPv3
• Scan and Change
Remote Management • SNMPv1; SNMPv2c and SNMPv3
• MIBs Supported; ORiNOCO-Mesh; ORiNOCO-Subscriber; rfc 1213; rfc 1643; 802.11i-
D3; IANAifType-MIB; MIB802
• DHCP
•Telnet
• HTTP
•TFTP
•BootP
Secure Configuration
Support
•SNMPv3
• HTTPS
• SSH
• RADIUS Based Management Access authentication
• Encrypted storage for security and management parameters
Category Specification
Types • Power
• Mesh Activity
• Ethernet Activity
Category Specification

Technical Specifications MeshMAX 5054 Series User Guide
Receive Sensitivity
334
Interfaces
Other Specifications
Electrical
Physical and Environmental Specifications
MTBF and Warranty
Category Specification
Wired Ethernet • Auto-sensing 10/100BASE-TX ethernet
Antenna Connector • 1 Standard Type-N female 5 GHz Mesh and Wi-Fi Radio
• 1 Standard Type-N female 5 GHz WiMAX Radio
• 1 Standard Type-N female 2.4 GHz Wi-Fi Radio
Category Specification
Wireless Protocol • WORP (Wireless Outdoor Routing Protocol) for Subscriber
backaul
• 802.11a, 802.11b and 802.11g for Wi-Fi Access
• Proxim ORiNOCO Mesh CreationProtocol (OMCP) for
mesh backhaul extension
Bands Supported • 5.15-6.08 GHz for WORP radio
• 5.15-5.85 GHz and 2.412-2.472 GHz mesh backhaul
extension
Channel Bandwidth • 5,10 and 20 MHz for WORP radio
• 20MHz for Mesh bacjhaul and Wi-Fi Access Infrastructure
Category Specification
PoE Power Injector • Custom Power over Ethernet (802.3af compatible)
• Input: Voltage 110 to 250 VAC (47-63 Hz)
• Output: 48V@420mA MAX (injected into the Cat-5 cable)
• Pin for reset to factory defaults
AC Power Support 110/240 VAC light pole power tap (purchased separately)
Category Specification
Physical
Dimensions (W x D x H) • Packaged: 14.57 x 13.70 x 8.19 in (370 x 348 x 208 mm)
• Unpackaged: 10.5 x 10.5 x 3.25 in (267 x 267 x 83mm)
Weight • Packaged: 12 Ibs (5.44 Kg)
• Unpackaged: 5.5 Ibs (2.49 Kg)
Environmental
Storage Temperature -55°C to 80°C (-41° to 176° Fahrenheit)
Operating Temperature -35°C to 60°C
Humidity Max 100% relative humidity (non-condensing)
Wind Loading 125 mph
Water and Dust proof NEMA4E
Category Specification
MTBF 100,000 hours

Technical Specifications MeshMAX 5054 Series User Guide
Receive Sensitivity
335
Warranty 1 year parts and labor
Extended Warranty and enchanced Service and Support
options available with Servpak
Category Specification

336
MeshMAX 5054 Series User Guide
E
Specifications for Mesh and Access Point Module
•Software Features
•Available Channels

Specifications for Mesh and Access Point Module MeshMAX 5054 Series User Guide
337
Software Features
The tables below list the software features available on the Mesh and Access Point Module.
•Number of Stations per BSS
•Management Functions
•Advanced Bridging Functions
•Medium Access Control (MAC) Functions
•Security Functions
•Network Functions
Number of Stations per BSS
* Number may vary based on combination of security methods used.
Feature Supported by Mesh and Access
Point Module
Without security 124
With security* 120

Specifications for Mesh and Access Point Module MeshMAX 5054 Series User Guide
338
Management Functions
Advanced Bridging Functions
Medium Access Control (MAC) Functions
Feature Supported by Mesh and Access
Point Module
Web User Interface 3
Telnet / CLI 3
SNMP Agent 3
Serial CLI 3
Secure Management 3
SSH 3
RADIUS Based Management Access 3
Feature Supported by Mesh and Access
Point Module
IEEE 802.1d Bridging 3
WDS Relay 3
Roaming 3
Protocol Filtering 3
Multicast/Broadcast Storm Filtering 3
Proxy ARP 3
TCP/UDP Port Filtering 3
Blocking Intra BSS Clients 3
Packet Forwarding 3
Feature Supported by Mesh and Access
Point Module
Automatic Channel Selection (ACS) 3
Dynamic Frequency Selection (DFS)/Radar Detection
(RD)*
3
Wireless Service Shutdown 3
802.11d Support 3
TX Power Control 3
Wireless Multimedia Enhancements/Quality of Service
(QoS)
3
Channel Blacklist 3
Closed System 3

Specifications for Mesh and Access Point Module MeshMAX 5054 Series User Guide
339
* DFS is required for 802.11a APs certified in the ETSI, TELEC, FCC, and IC regulatory domains and operating in the middle frequency band.
When ACS is disabled, available channels are limited to those in the lower frequency band.
Security Functions
*Key lengths supported by 802.11a/4.9 GHz: 64-bit, 128-bit, and 152-bit.
Key lengths supported by 802.11b: 64-bit and 128-bit.
Key lengths supported by 802.11b/g: 64-bit, 128-bit, and 152-bit.
† EAP-MD5, EAP-TLS, EAP-TTLS, and PEAP client supplicant supported.
‡ Support is provided for a primary and backup RADIUS authentication server for both MAC-based authentication and 802.1x authentication per
VLAN.
§ Use in conjunction with WPA or 802.1x Authentication.
Broadcast Unique Beacon 3
Super Mode Support 3
Feature Supported by Mesh and Access
Point Module
Security Profiles per VLAN 3
RADIUS Profiles per VLAN 3
IEEE 802.11 WEP* 3
MAC Access Control 3
RADIUS MAC-based Access Control 3
IEEE 802.1x Authentication†3
Multiple Authentication Server Support per VLAN‡3
Rogue Scanning to Detect Rogue Access Points and
Clients
3
Per User Per Session (PUPS) Encryption §3
Wi-Fi Protected Access (WPA)/802.11i (WPA2) 3
Hardware Configuration Reset Disable 3

Specifications for Mesh and Access Point Module MeshMAX 5054 Series User Guide
340
Network Functions
* Includes Fallback to Primary RADIUS Server, RADIUS Session Timeout, RADIUS Multiple MAC Address Formats, RADIUS DNS Host Name
Support, RADIUS Start/Stop Accounting.
† DHCP client requests and IP lease renewals are sent on the Ethernet interface only, not on Mesh links.
Feature Supported by Mesh and Access
Point Module
DHCP Client 3†
DHCP Server 3†
DHCP Relay Agent and IP Lease Renewal 3
Inter Access Point Protocol (IAPP) 3
Link Integrity 3
System Logging (Syslog) 3
RADIUS Accounting Support* 3
DNS Client 3
TCP/IP Protocol Support 3
Virtual LAN Support Up to 16 SSID/VLAN pairs per
wireless interface, with specific
Security and RADIUS profiles. For
more information, see the Advanced
Configuration chapter.
Mesh Networking 3

Specifications for Mesh and Access Point Module MeshMAX 5054 Series User Guide
341
Available Channels
2.4 GHz (802.11b/g) Frequencies and Bandwidths
5.0 GHz (802.11a) Frequencies and Bandwidhs
Channel Center Frequency (MHz) 20 MHz
1 2412 3
2 2417 3
3 2422 3
4 2427 3
5 2432 3
6 2437 3
7 2442 3
8 2447 3
9 2452 3
10 2457 3
11 2462 3
Channel Center Frequency (MHz) 20 MHz
149 5745 3
153 5765 3
157 5785 3
161 5805 3
165 5825 3

342
MeshMAX 5054 Series User Guide
F
Technical Services and Support
See the following sections:
•Obtaining Technical Services and Support
•Support Options
–Proxim eService Web Site Support
–Telephone Support
–ServPak Support

Technical Services and Support MeshMAX 5054 Series User Guide
Obtaining Technical Services and Support
343
Obtaining Technical Services and Support
If you are having trouble utilizing your Proxim product, please review this manual and the additional documentation
provided with your product.
If you require additional support and would like to use Proxim’s free Technical Service to help resolve your issue, please
be ready to provide the following information before you contact Proxim’s Technical Services:
• Product information
– Part number of suspected faulty unit
– Serial number of suspected faulty unit
• Trouble/error information:
– Trouble/symptom being experienced
– Activities completed to confirm fault
– Network information (what kind of network are you using?)
– Circumstances that preceded or led up to the error
– Message or alarms viewed
– Steps taken to reproduce the problem
• Servpak information (if a Servpak customer):
– Servpak account number
• Registration information:
– If the product is not registered, date when you purchased the product
– If the product is not registered, location where you purchased the product
NOTE: If you would like to register your product now, visit the Proxim eService Web Site at http://support.proxim.com
and click on New Product Registration.

Technical Services and Support MeshMAX 5054 Series User Guide
Support Options
344
Support Options
Proxim eService Web Site Support
The Proxim eService Web site is available 7x24x365 at http://support.proxim.com.
On the Proxim eService Web Site, you can access the following services:
•New Product Registration: Register your product for free support.
•Open a Ticket or RMA: Open a ticket or RMA and receive an immediate reply.
•Search Knowledgebase: Locate white papers, software upgrades, and technical information.
•ServPak (Service Packages): Receive Advanced Replacement, Extended Warranty, 7x24x365 Technical Support,
Priority Queuing, and On-Site Support.
•Your Stuff: Track status of your tickets or RMAs and receive product update notifications.
•Provide Feedback: Submit suggestions or other types of feedback.
•Customer Survey: Submit an On-Line Customer Survey response.
•Repair Tune-Up: Have your existing Proxim equipment inspected, tested, and upgraded to current S/W and H/W
revisions, and extend your warranty for another year.
Telephone Support
Contact technical support via telephone as follows:
•US-Canada: 408-383-7700, 866-674-6626 (Toll Free)
Hours of Operations: 8:00 AM - 6:00 PM
•APAC Countries: 040-23115490
Hours of Operations: 9:00 AM - 6:00 PM
•International: 408-383-7700
Hours of Operations: 8:00 AM - 6:00 PM
ServPak Support
Proxim understands that service and support requirements vary from customer to customer. It is our mission to offer
service and support options that go above-and-beyond normal warranties to allow you the flexibility to provide the quality
of service that your networks demand.
In recognition of these varying requirements we have developed a support program called ServPak. ServPak is a
program of Enhanced Service Options that can be purchased individually or in combinations to meet your needs.
•Advanced Replacement: This service offers customers an advance replacement of refurbished or new hardware.
(Available in the U.S., Canada, and select countries. Please inquire with your authorized Proxim distributor for
availability in your country.)
•Extended Warranty: This service provides unlimited repair of your Proxim hardware for the life of the service
contract.
•7x24x365 Technical Support: This service provides unlimited, direct access to Proxim’s world-class technical
support 24 hours a day, 7 days a week, 365 days a year.
•Priority Queuing: This service allows your product issue to be routed to the next available Customer Service
Engineer.
To purchase ServPak support services, please contact your authorized Proxim distributor. To receive more information
or for questions on any of the available ServPak support options, please call Proxim Support at 408-383-7700 or send an
email to servpak@proxim.com.

345
MeshMAX 5054 Series User Guide
G
Statement of Warranty
Warranty Coverage
Proxim Wireless Corporation warrants that its Products are manufactured solely from new parts, conform substantially to
specifications, and will be free of defects in material and workmanship for a Warranty Period of 1 year from the date of
purchase.
Repair or Replacement
In the event a Product fails to perform in accordance with its specification during the Warranty Period, Proxim offers
return-to-factory repair or replacement, with a thirty (30) business-day turnaround from the date of receipt of the
defective Product at a Proxim Wireless Corporation Repair Center. When Proxim Wireless has reasonably determined
that a returned Product is defective and is still under Warranty, Proxim Wireless shall, at its option, either: (a) repair the
defective Product; (b) replace the defective Product with a refurbished Product that is equivalent to the original; or (c)
where repair or replacement cannot be accomplished, refund the price paid for the defective Product. The Warranty
Period for repaired or replacement Products shall be ninety (90) days or the remainder of the original Warranty Period,
whichever is longer. This constitutes Buyer’s sole and exclusive remedy and Proxim Wireless’s sole and exclusive
liability under this Warranty.
Limitations of Warranty
The express warranties set forth in this Agreement will not apply to defects in a Product caused; (i) through no fault of
Proxim Wireless during shipment to or from Buyer, (ii) by the use of software other than that provided with or installed in
the Product, (iii) by the use or operation of the Product in an application or environment other than that intended or
recommended by Proxim Wireless, (iv) by modifications, alterations, or repairs made to the Product by any party other
than Proxim Wireless or Proxim Wireless’s authorized repair partners, (v) by the Product being subjected to unusual
physical or electrical stress, or (vii) by failure of Buyer to comply with any of the return procedures specified in this
Statement of Warranty.
Support Procedures
Buyer should return defective LAN Products within the first 30 days to the merchant from which the Products were
purchased. Buyer can contact a Proxim Wireless Customer Service Center either by telephone or via web. Calls for
support for Products that are near the end of their warranty period should be made not longer than seven (7) days after
expiration of warranty. Repair of Products that are out of warranty will be subject to a repair fee. Contact information is
shown below. Additional support information can be found at Proxim Wireless’s web site at http://support.proxim.com.
Telephone Support
Contact technical support via telephone as follows:
•US-Canada: 408-383-7700, 866-674-6626 (Toll Free)
Hours of Operations: 8:00 AM - 6:00 PM
•APAC Countries: 040-23115490
Hours of Operations: 9:00 AM - 6:00 PM
•International: 408-383-7700
Hours of Operations: 8:00 AM - 6:00 PM
When contacting the Customer Service for support, Buyer should be prepared to provide the Product description and
serial number and a description of the problem. The serial number should be on the product.

Statement of Warranty MeshMAX 5054 Series User Guide
Other Information
346
In the event the Customer Service Center determines that the problem can be corrected with a software update, Buyer
might be instructed to download the update from Proxim Wireless’s web site or, if that’s not possible, the update will be
sent to Buyer. In the event the Customer Service Center instructs Buyer to return the Product to Proxim Wireless for
repair or replacement, the Customer Service Center will provide Buyer a Return Material Authorization (“RMA”) number
and shipping instructions. Buyer must return the defective Product to Proxim Wireless, properly packaged to prevent
damage, shipping prepaid, with the RMA number prominently displayed on the outside of the container.
Calls to the Customer Service Center for reasons other than Product failure will not be accepted unless Buyer has
purchased a Proxim Wireless Service Contract or the call is made within the first thirty (30) days of the Product’s invoice
date. Calls that are outside of the 30-day free support time will be charged a fee of $25.00 (US Dollars) per Support Call.
If Proxim Wireless reasonably determines that a returned Product is not defective or is not covered by the terms
of this Warranty, Buyer shall be charged a service charge and return shipping charges.
Other Information
Search Knowledgebase
Proxim Wireless stores all resolved problems in a solution database at the following URL: http://support.proxim.com.
Ask a Question or Open an Issue
Submit a question or open an issue to Proxim Wireless technical support staff at the following URL:
http://support.proxim.com/cgi-bin/proxim.cfg/php/enduser/ask.php.
Other Adapter Cards
Proxim Wireless does not support internal mini-PCI devices that are built into laptop computers, even if identified as
"ORiNOCO" devices. Customers having such devices should contact the laptop vendor's technical support for
assistance.
For support for a PCMCIA card carrying a brand name other than Proxim, ORiNOCO, Lucent, Wavelan, or Skyline,
Customer should contact the brand vendor's technical support for assistance.