Quanta Computer 9550015318 Mini-PCI Wireless LAN card in Notebook Computer User Manual Solo9550
Quanta Computer Inc Mini-PCI Wireless LAN card in Notebook Computer Solo9550
Contents
Manual Part 2

49
4
www.gateway.com
Getting Help
This chapter tells you about additional information resources available to help
you use your computer. It includes the following topics:
■HelpSpot™
■Online help
■Gateway Web site
Tips & Tricks To access the contents of this manual while you are
traveling, download an electronic copy from
www.gateway.com/support/manlib/.
Solo9550.book Page 49 Tuesday, June 19, 2001 3:18 PM
50
Chapter 4: Getting Help
www.gateway.com
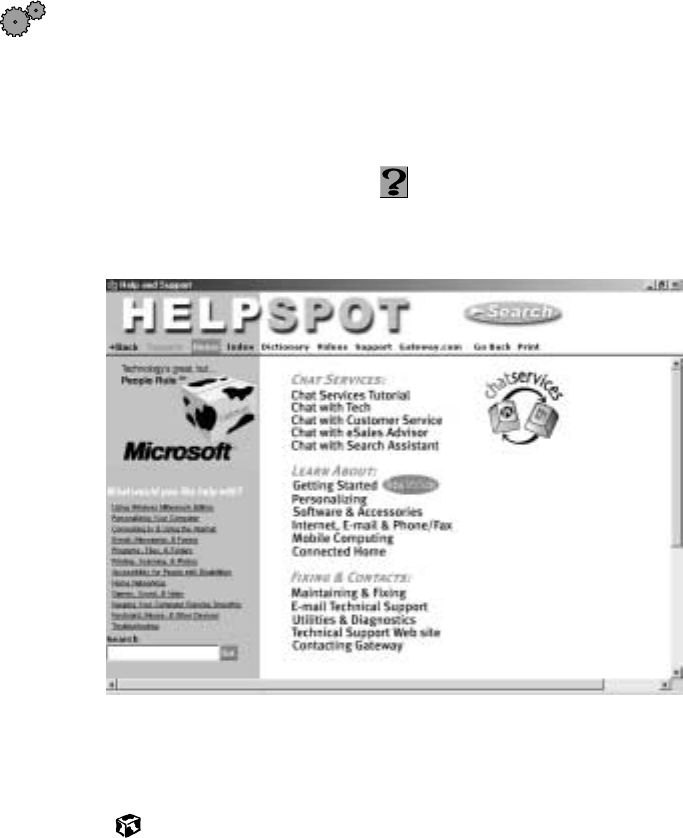
HelpSpot
Your notebook may include HelpSpot, an easily accessible collection of Help
information, troubleshooters, instructional videos, and automated support.
Use HelpSpot to answer questions about Windows and to help you quickly
discover and use the many features of your Gateway computer.
To start HelpSpot:
■Click Start, then select Help.
-OR-
Double-click the Gateway Help and Support desktop icon.
HelpSpot opens.
If this is the first time you have started HelpSpot on your computer, you
will experience a brief wait while HelpSpot builds the help database, then
HelpSpot will display an introductory video.
Solo9550.book Page 50 Tuesday, June 19, 2001 3:18 PM
51
HelpSpot
www.gateway.com
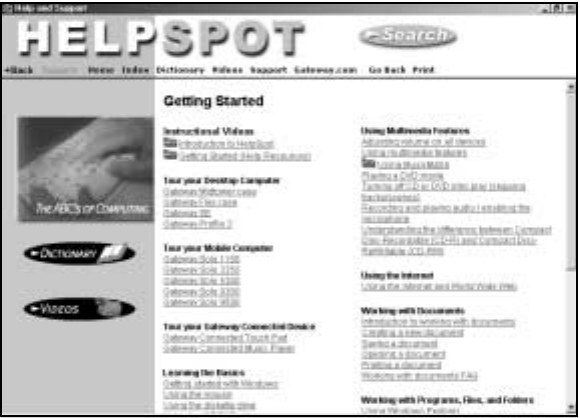
You can find help information by clicking a link, performing a search, or
browsing the index. To learn about how to work with documents and
programs, use your mouse, and other topics, click the Getting Started link on
the HelpSpot main page.
Solo9550.book Page 51 Tuesday, June 19, 2001 3:18 PM
52
Chapter 4: Getting Help
www.gateway.com
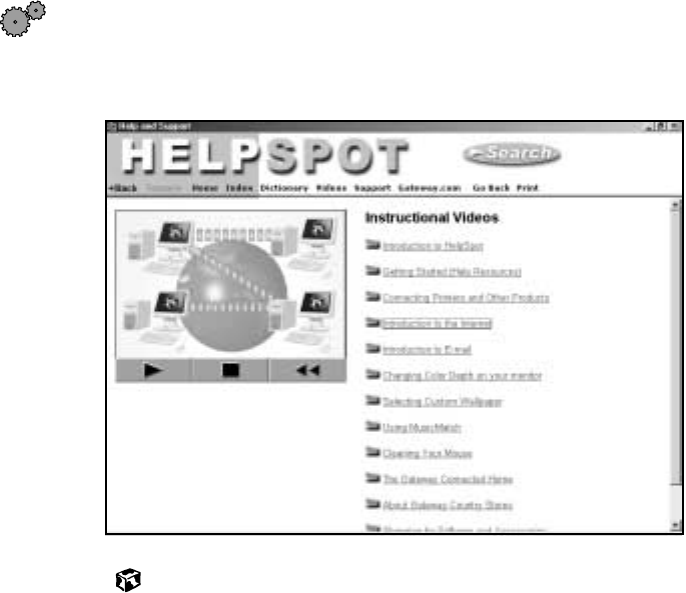
HelpSpot Videos
HelpSpot contains several short videos to help introduce you to new concepts
or show you how to perform various tasks.
To play a HelpSpot video:
■To play a video in HelpSpot, click Videos on the HelpSpot navigation bar,
then click a video title. The video plays.
Solo9550.book Page 52 Tuesday, June 19, 2001 3:18 PM
53
Online help
www.gateway.com
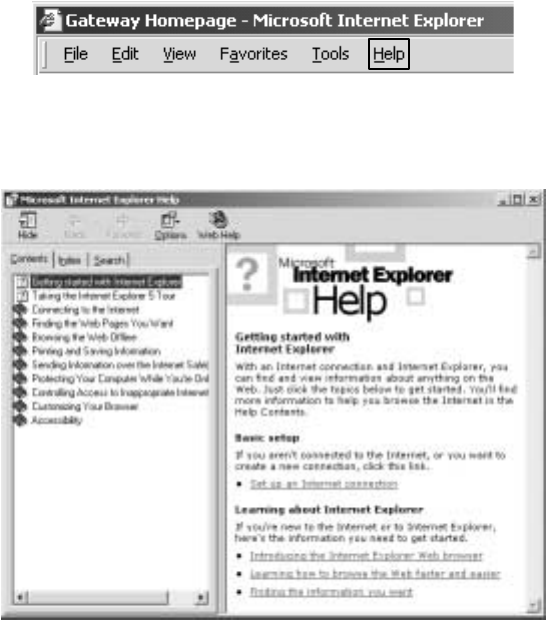
Online help
Many programs provide information online so you can research a topic or
learn how to perform a task while you are using the program. Most online
help information can be accessed by selecting a topic from a Help menu or
by clicking a Help button.
You can search for information by viewing the help contents, checking the
index, searching for a topic or keyword, or browsing through the online help.
Solo9550.book Page 53 Tuesday, June 19, 2001 3:18 PM
54
Chapter 4: Getting Help
www.gateway.com
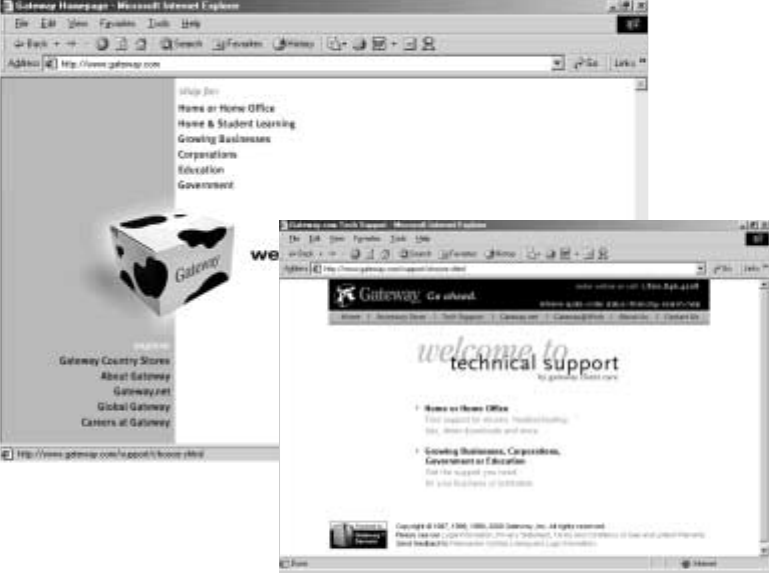
Gateway Web site
Gateway provides a variety of information on its Web site to help you use
your computer.
Visit the Gateway Web site at www.gateway.com for:
■Technical documentation and product manuals
■Technical tips and support
■Hardware drivers
■A glossary of computer terms
■Frequently asked questions (FAQs)
For more information about connecting to the Internet, see “Learning about
the Internet” on page 88.
Solo9550.book Page 54 Tuesday, June 19, 2001 3:18 PM

55
Gateway Web site
www.gateway.com
You can access the following resources through the Gateway Web site or
through HelpSpot:
Resource Service description Location
Gateway
Update Utility This utility automatically finds, downloads, and
installs the latest drivers for your
Gateway-supplied hardware.
www.gateway.com/
support/index.shtml
Chat with
Gateway
CoPilot
Use this remote-help utility that allows Gateway
to deliver live person-to-person computer
support to you. Any time you engage in a live
chat session, a Gateway support representative
has the ability to resolve your in-warranty
technical issue in real time. This is done by
simultaneously viewing your desktop,
controlling the mouse and keyboard, and
chatting with you.
www.gateway.com/
support/index.shtml
-OR-
HelpSpot
Chat with
Search
Assistant
Engage in a live Internet chat session to help
you find data on the Gateway.com Technical
Support Web site. If the assistants cannot direct
you to the solution on the Technical Support
site, they will refer you to the area or department
that can.
www.gateway.com/
support/index.shtml
-OR-
HelpSpot
Email Tech
Support Get the answers to your technical inquiries by
e-mail from a Gateway Technical Support
representative.
www.gateway.com/
support/index.shtml
Frequently
Asked
Questions
Get the answers to many of our most common
customer service-related questions. www.gateway.com/
support/index.shtml
Chat with
Customer
Service
Engage in a live Internet chat session with a
Gateway Customer Service Assistant about a
non-technical issue.
www.gateway.com/
support/index.shtml
-OR-
HelpSpot
E-mail
Customer
Service
Get the answers to your non-technical inquiries
by e-mail from a Gateway Customer Service
Assistant.
www.gateway.com/
support/index.shtml
Solo9550.book Page 55 Tuesday, June 19, 2001 3:18 PM

56
Chapter 4: Getting Help
www.gateway.com
Chat with
eSales Advisor Get a personalized look at what system is best
suited for your own individual needs. To use this
service, fill out the eSales Advisor
Questionnaire. The eSales Advisor will contact
you by telephone and discuss the Gateway
solution that best fits your needs.
www.gateway.com
-OR-
HelpSpot
Order Status Get information on whether your order has been
received, is in production, or has been shipped.
You will also be given an estimated or actual
shipping date, depending on the status. This
information is updated daily and is available 24
to 36 hours after an order is placed.
www.gateway.com
Resource Service description Location
Solo9550.book Page 56 Tuesday, June 19, 2001 3:18 PM

57
5
www.gateway.com
Windows
Basics
Read this chapter to get basic information on how to:
■Work on the Windows desktop
■Manage files and folders
■Work with documents
■Use shortcuts
■Transfer software from your old computer
HelpSpot For more information on using Windows, double-click the
HelpSpot icon on your desktop.
Solo9550.book Page 57 Tuesday, June 19, 2001 3:18 PM
58
Chapter 5: Windows Basics
www.gateway.com
About the Windows environment
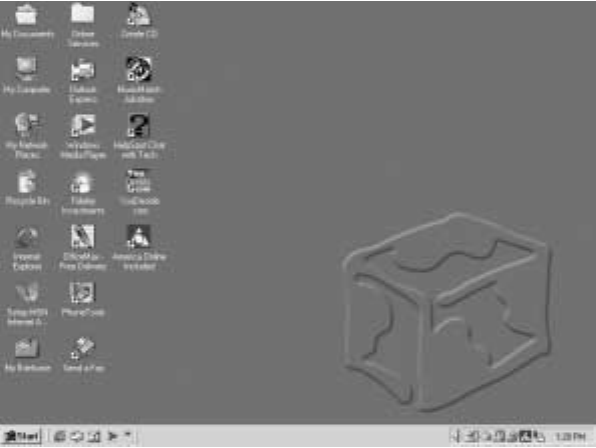
After your computer starts, the first screen you see is the Windows desktop.
The desktop is like the top of a real desk. Think of the desktop as your
personalized work space where you open programs and perform other tasks.
Your desktop may be different from the example shown below, depending on
how your computer is set up.
Solo9550.book Page 58 Tuesday, June 19, 2001 3:18 PM
59
About the Windows environment
www.gateway.com
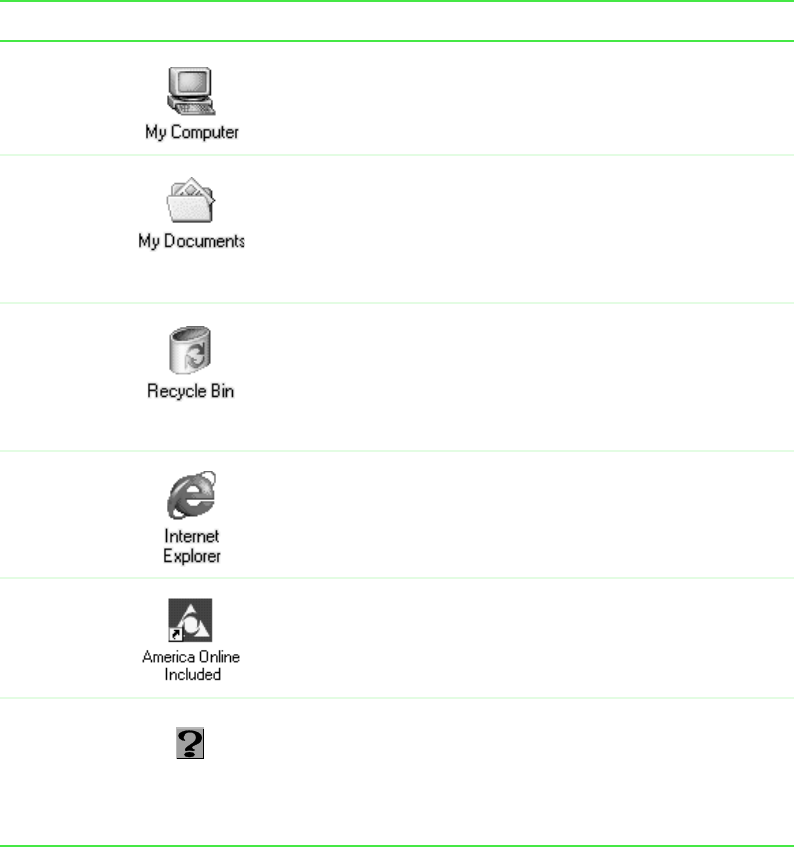
Desktop items
Icons are graphic representations of objects on the desktop that you select and
open, such as a drive, folder, file, or program. Buttons are graphic
representations of controls that you use to open windows or apply changes.
Desktop icons, buttons, and elements Description
The My Computer icon provides access to drives
and other computer controls. Double-click the My
Computer icon to view the drives and folders on
your computer.
My Documents is a folder where you store your
personal files. You can create other folders to
save files in, but My Documents is easy to find
because it is on the desktop. Double-click the My
Documents icon to view your personal files and
folders.
The Recycle Bin is where files, folders, and
programs that you discarded are stored. You
must empty the Recycle Bin to permanently
delete them from your computer. For instructions
on how to use the Recycle Bin, see “Deleting files
and folders” on page 68.
Microsoft Internet Explorer is a program called a
browser that lets you view Web sites and Web
pages on the Internet. Double-click the Internet
Explorer icon to open the browser.
The America Online Included icon lets you
connect to the America Online ISP (Internet
Service Provider). Double-click the America
Online Included icon to dial the service.
Gateway may have included an easily accessible
interactive guide called HelpSpot. This guide is
designed to provide help information and let you
quickly discover and use the features of your
computer. Double-click the HelpSpot icon to
begin.
Solo9550.book Page 59 Tuesday, June 19, 2001 3:18 PM
60
Chapter 5: Windows Basics
www.gateway.com
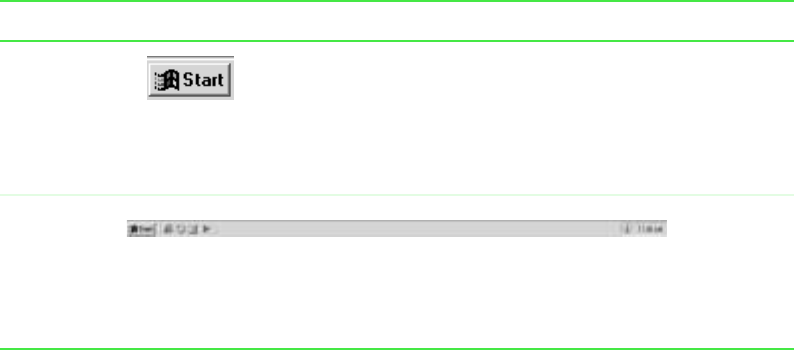
The Start button provides access to programs,
files, help for Windows and other programs, and
computer tools and utilities.
Click the Start button, then open a file or program
by clicking (selecting) an item on the menu that
opens.
The taskbar is the bar at the bottom of the screen. It contains the Start button on the left and a
clock on the right. Other buttons on the taskbar represent programs that are running.
Click a program’s button on the taskbar to activate the program’s window.
Desktop icons, buttons, and elements Description
Solo9550.book Page 60 Tuesday, June 19, 2001 3:18 PM
61
About the Windows environment
www.gateway.com
Window items
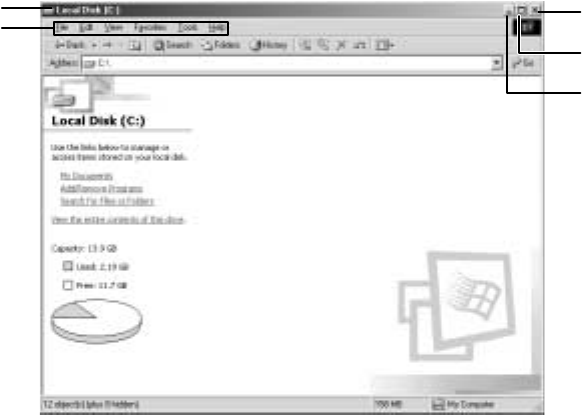
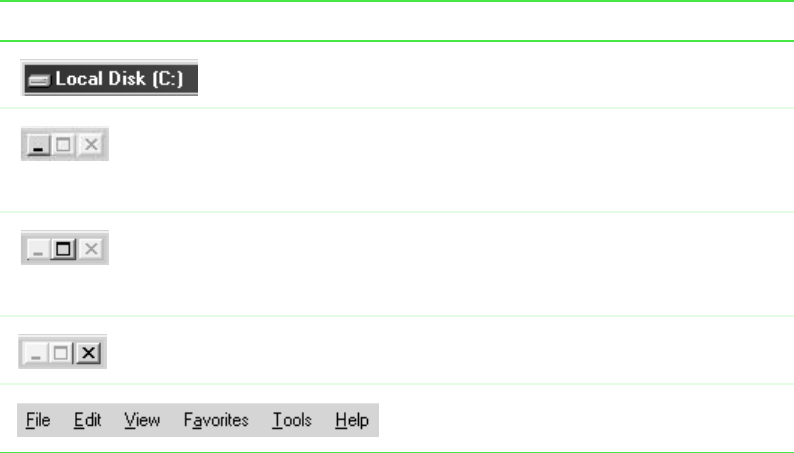
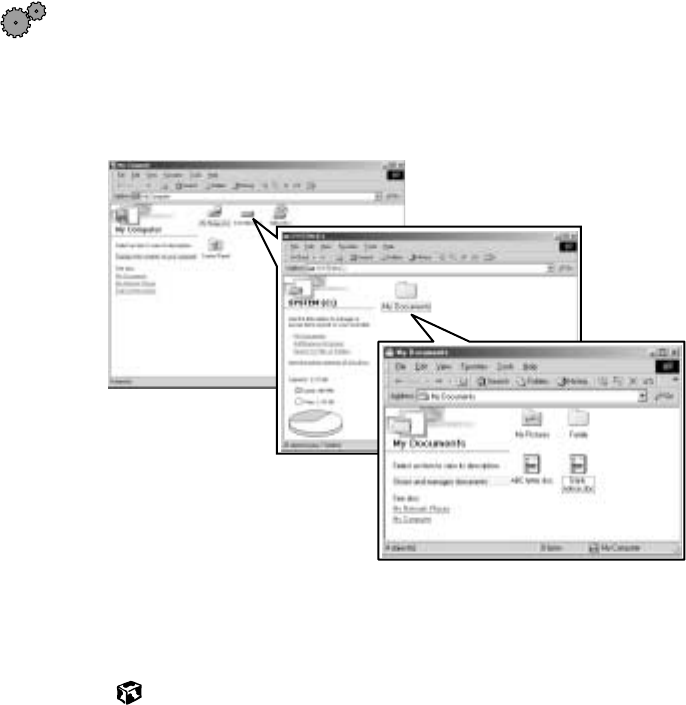
When you double-click the icon for a drive, folder, file, or program, a window
opens on the desktop. This example shows the Local Disk (C:) window, which
opens after double-clicking the Local Disk (C:) icon in the My Computer
window.
Minimize
button
Maximize
button
Close
button
Title bar
Menu bar
Solo9550.book Page 61 Tuesday, June 19, 2001 3:18 PM
62
Chapter 5: Windows Basics
www.gateway.com
Every program window looks a little different because each has its own menus,
icons, and controls. Most windows include these items:
Window item Description
The title bar is the horizontal bar at the top of
a window that shows the name of the program.
Clicking the minimize button reduces the active
window to a button on the taskbar. Clicking the
program button in the taskbar opens the
window again.
Clicking the maximize button expands the
active window to fit the entire screen. Clicking
the maximize button again restores the window
to its former size.
Clicking the close button closes the active
window or program.
Clicking an item on the menu bar starts an
action such as Print or Save.
Solo9550.book Page 62 Tuesday, June 19, 2001 3:18 PM
63
Using the Start menu
www.gateway.com
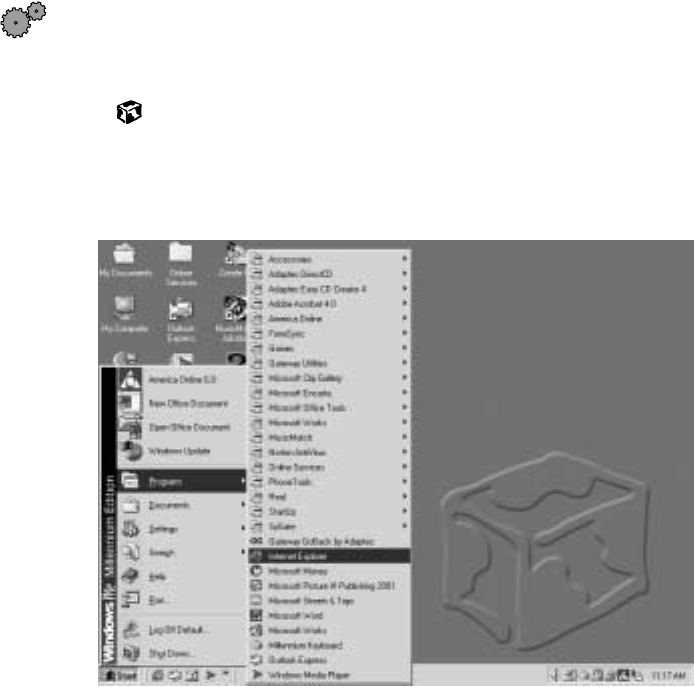
Using the Start menu
You can start programs, open files, customize your system, get help, search
for files and folders, and more using the Start menu.
To open the Start menu:
■Click the Start button on the lower left of the Windows desktop. The Start
menu opens showing you the first level of menu items.
When you move the mouse pointer over any menu item that has an arrow
next to it, another menu, or submenu, opens and reveals related files,
programs, or commands. Click a file or program to open it.
Solo9550.book Page 63 Tuesday, June 19, 2001 3:18 PM
64
Chapter 5: Windows Basics
www.gateway.com
Working with files and folders
You can organize your files and programs to suit your preferences much like
you would store information in a file cabinet. You can store these files in
folders and copy, move, and delete the information just as you would
reorganize and throw away information in a file cabinet.
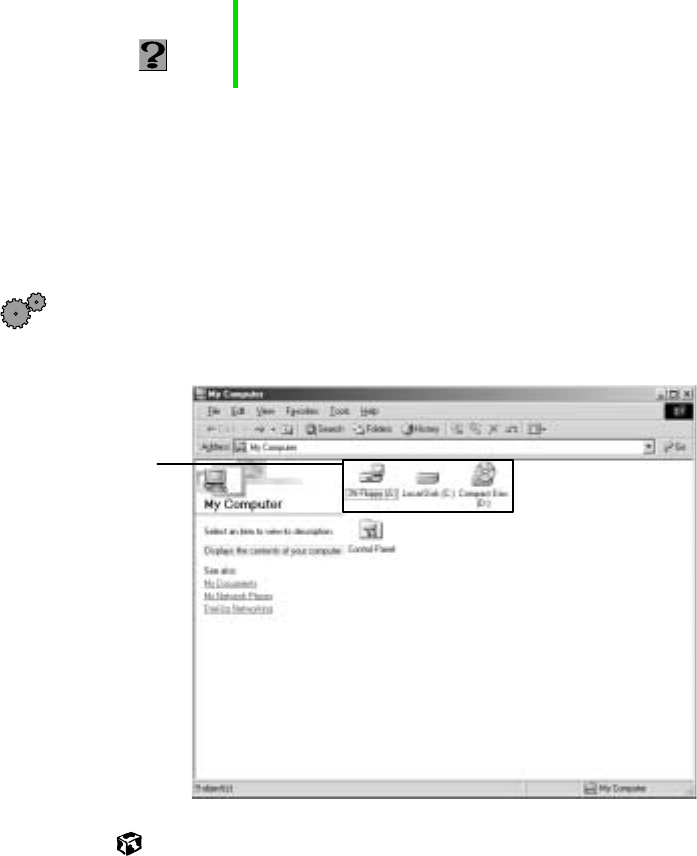
About drives
Drives are like file cabinets because they hold files and folders. A computer
almost always has more than one drive. Each drive has a letter, usually Local
Disk (C:) for the hard drive and 3½ Floppy (A:) for the diskette drive. You may
also have more drives such as a CD/DVD drive.
To view the drives on your computer:
■Double-click the My Computer icon on your desktop.
HelpSpot For more information on working with files and folders,
double-click the HelpSpot icon on your desktop.
Drives
Solo9550.book Page 64 Tuesday, June 19, 2001 3:18 PM
65
Working with files and folders
www.gateway.com
To see the files and folders on a drive:
■Double-click the drive icon. If you do not see the contents of a drive after
you double-click its icon, click View the entire contents of this drive.
Solo9550.book Page 65 Tuesday, June 19, 2001 3:18 PM

66
Chapter 5: Windows Basics
www.gateway.com
About folders and files
Folders are much like the folders in a file cabinet. They contain files and other
folders.
Files are much like paper documents—letters, spreadsheets, and pictures—that
you keep on your computer. In fact, all information on a computer is stored
in files.
To create a folder:
1Double-click the My Computer icon on the desktop. The My Computer
window opens.
2Double-click the drive or folder, for example 3½ Floppy (A:) or Local
Disk (C:), where you want to put the new folder.
The drive or folder window opens. If you do not see the contents of the
drive or folder, click View the entire contents of [this drive or this folder].
3Select File, then New, then Folder. The new folder is created.
4Type a name for the folder, then press ENTER. The new folder name
appears under the folder.
Folders
Files
Solo9550.book Page 66 Tuesday, June 19, 2001 3:18 PM
67
Working with files and folders
www.gateway.com
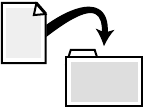
Copying and moving files and folders
The skills you need to copy and move files are copying, cutting, and pasting.
When you copy and paste a selection, you place a copy of the file you selected
on the Windows clipboard, which stores it. Then, when you decide what folder
you want the copy to go in (the destination folder), you paste it there.
When you cut and paste a selection, you remove the file from its folder and
place the file on the Windows clipboard. When you decide where you want
the file to go, you paste it there.
To copy a file or folder to another folder:
1Right-click the file or folder that you want to copy. A pop-up menu opens
on the desktop.
2Select Copy from the pop-up menu.
3Open the destination folder.
4With the pointer inside the destination folder, press the right mouse
button.
5Select Paste. A copy of the file or folder appears in the new location.
Important The clipboard stores whatever you cut or copy until you
cut or copy again. Then the clipboard contains the new
information only. Therefore, you can paste copies of a file
into more than one place, but as soon as you copy or cut
a file again, the old file is deleted from the clipboard.
Solo9550.book Page 67 Tuesday, June 19, 2001 3:18 PM

68
Chapter 5: Windows Basics
www.gateway.com
To move a file or folder to another folder:
1Right-click the file or folder that you want to move. A pop-up menu opens
on the desktop.
2Select Cut from the pop-up menu.
3Open the destination folder.
4With the pointer inside the destination folder, press the right mouse
button.
5Select Paste. The file or folder you moved appears in its new location and
is removed from its old location.
Deleting files and folders
When you throw away paper files and folders, you take them from the file
cabinet and put them in a trash can. Eventually the trash can is emptied.
In Windows, you throw away files and folders by first moving them to
Windows trash can, the Recycle Bin, where they remain until you decide to
empty the bin.
You can recover any file in the Recycle Bin as long as the bin has not been
emptied.
To delete files or folders:
1In My Computer or Windows Explorer, select the files or folders that you
want to delete. For instructions on how to select multiple files and folders,
see “Shortcuts” on page 81.
2Select File, then Delete. Windows moves the files and folders to the
Recycle Bin.
Solo9550.book Page 68 Tuesday, June 19, 2001 3:18 PM
69
Working with files and folders
www.gateway.com
To recover files or folders from the Recycle Bin:
1Double-click the Recycle Bin icon. The Recycle Bin window opens listing
the files and folders you have thrown away since you last emptied it.
2Select the files or folders that you want to restore. For instructions on
how to select multiple files and folders, see “Shortcuts” on page 81.
3Select File, then Restore. Windows returns the deleted files or folders to
their original locations.
To empty the Recycle Bin:
1Double-click the Recycle Bin icon on the desktop. The Recycle Bin window
opens.
2Select File, then Empty Recycle Bin. Windows asks you if you are sure that
you want to empty the bin.
3Click Yes. Windows permanently deletes all the files in the Recycle Bin.
Caution Emptying the Recycle Bin permanently erases any files or
folders in the bin. These files cannot be restored.
Solo9550.book Page 69 Tuesday, June 19, 2001 3:18 PM
70
Chapter 5: Windows Basics
www.gateway.com
Browsing for files and folders
A file or folder that you need is rarely right on top of your Windows desktop.
It is usually on a drive inside a folder that may be inside yet another folder,
and so on.
Windows drives, folders, and files are organized in the same way as a real file
cabinet in that they may have many levels (usually many more levels than
a file cabinet, in fact). So you usually will have to search through levels of
folders to find the file or folder that you need. This is called browsing.
To browse for a file:
1Double-click the My Computer icon on the desktop.
2Double-click the drive or folder that you think contains the file or folder
that you want to find.
3Continue double-clicking folders and their subfolders until you find the
file or folder you want. (If you do not see the contents of a folder, click
View the entire contents of this folder.)
Solo9550.book Page 70 Tuesday, June 19, 2001 3:18 PM
71
Searching for files
www.gateway.com
Searching for files
If you are looking for a particular file or folder or a set of files or folders that
have characteristics in common, but you do not remember where they are
stored on your hard drive, you can use the Search utility in Windows Me and
Windows 2000, or the Find utility in Windows 98 to search by:
■Name or part of a name
■Creation date
■Modification date
■File type
■Text contained in the file
■Time period in which it was created or modified
You can also combine search criteria to refine searches.
Files and folders found using these utilities can be opened, copied, cut,
renamed, or deleted directly from the list in the results window.
Solo9550.book Page 71 Tuesday, June 19, 2001 3:18 PM
72
Chapter 5: Windows Basics
www.gateway.com
Using the Windows Me or Windows 2000
Search utility
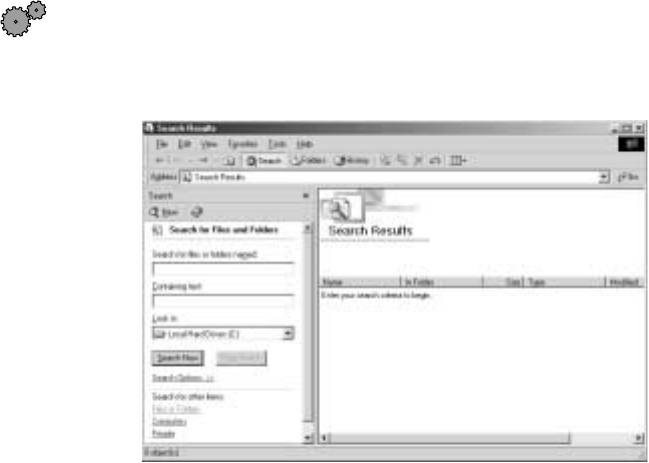
To find files and folders using the Search utility:
1Click Start, then select Search, then For Files or Folders. The search dialog
box opens.
2If you want to search by file or folder name, type in all or part of the
file or folder name in the Search for files or folders named box in the left
pane of the window.
■If you type all of the name, Search will list all files and folders of
that name.
■If you type part of the name, Search will list all of the file and folder
names containing the letters you typed.
Solo9550.book Page 72 Tuesday, June 19, 2001 3:18 PM
73
Searching for files
www.gateway.com
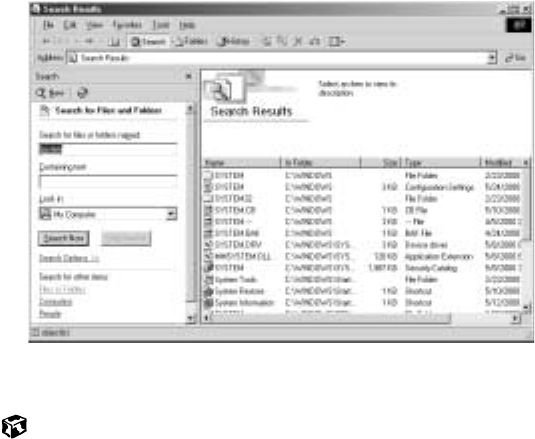
3Click Search Now. When the search is completed, Windows lists the files
and folders whose names contain the text that you searched for.
4Open a file, folder, or program by double-clicking the name in the list.
Using advanced search options
Search can find files meeting more criteria than file name. You can select
options to narrow your search by clicking Search Options and selecting the
options that you want:
■Date searches for files that were created or modified on a specific date or
during a specific period.
■Size searches for files of a specific size.
■Type searches for files of a specific type, such as a program or a text
document.
■Advanced Options give you access to further search options.
Solo9550.book Page 73 Tuesday, June 19, 2001 3:18 PM
74
Chapter 5: Windows Basics
www.gateway.com
Using the Windows 98 Find utility
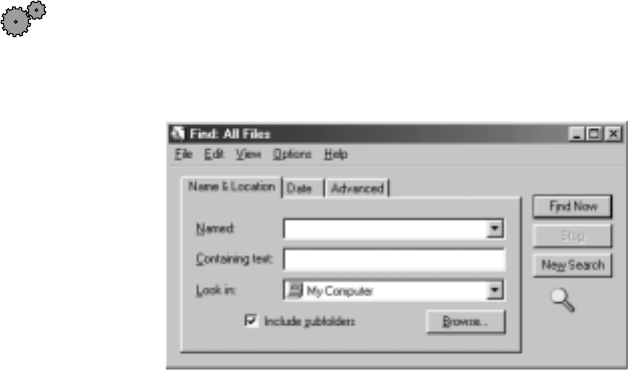
To find files and folders using the Find utility:
1Click Start, then select Find, then Files or Folders. The Find: All Files dialog
box opens.
2If you want to search by file or folder name, click the Name & Location
tab, then type in all or part of the file or folder name in the Named text
box.
■If you type all of the name, Find will list all files and folders of
that name.
■If you type part of the name, Find will list all of the file and folder
names containing the letters you typed.
Solo9550.book Page 74 Tuesday, June 19, 2001 3:18 PM
75
Searching for files
www.gateway.com
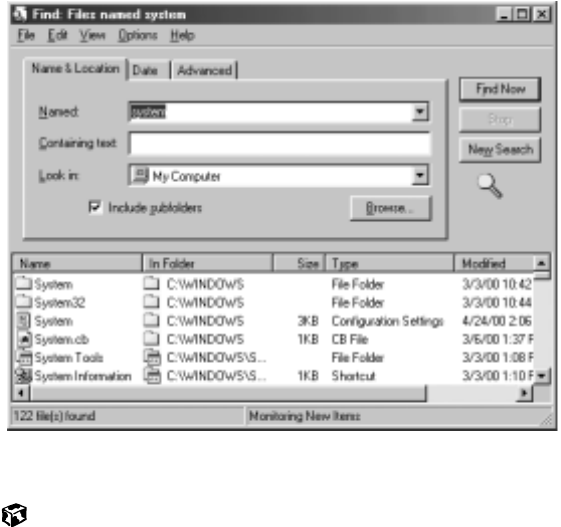
3Click Find Now. When the search is completed, Windows lists the files
and folders whose names contain the text that you searched for.
4Open a file, folder, or program by double-clicking the name in the list.
Using advanced search options
You can find files meeting more criteria than file name. You can select options
to narrow your search by clicking the Date or Advanced tabs and selecting the
options that you want:
■Date searches for files that were created or modified on a specific date or
during a specific period.
■Size searches for files of a specific size.
■Type searches for files of a specific type, such as a program or a text
document.
Solo9550.book Page 75 Tuesday, June 19, 2001 3:18 PM
76
Chapter 5: Windows Basics
www.gateway.com
Working with documents
Documents are commonly word processing files, spreadsheet files, or other
similar files. The basic methods of creating, saving, opening, and printing a
document apply to most of these types of files.
The following examples illustrate the concepts for creating, saving, opening,
and printing a document in Microsoft® Word. Though these examples use
Microsoft Word, similar procedures apply to other programs such as Microsoft
Excel, Microsoft Works, and Microsoft Publisher.
For more information about using a program, select Help on the menu bar.
Solo9550.book Page 76 Tuesday, June 19, 2001 3:18 PM
77
Working with documents
www.gateway.com
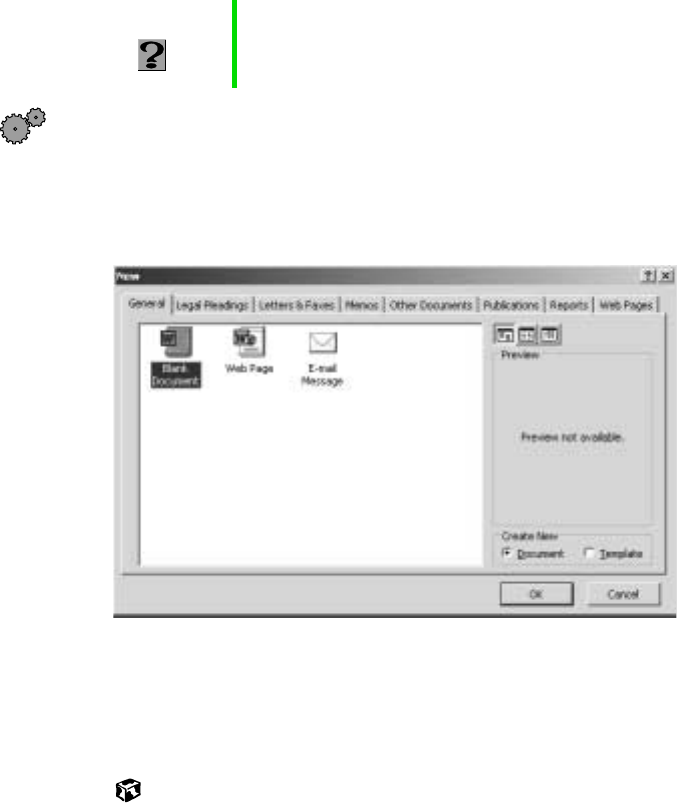
Creating a new document
To create a new document:
1Click Start, then select Programs, then Microsoft Word. Microsoft Word
starts and a blank document opens.
2Select File, then select New. The New dialog box opens.
3Click a tab for the type of document you want to create, select a
document template style, then click OK. The document template opens.
4Begin composing your document. Use the menus and toolbar buttons at
the top of the window to format the document.
HelpSpot For more information on creating a document, double-click
the HelpSpot icon on your desktop.
Solo9550.book Page 77 Tuesday, June 19, 2001 3:18 PM

78
Chapter 5: Windows Basics
www.gateway.com
Saving a document
After you create a document, you need to save it if you want to use it later.
To save a document in Microsoft Word:
1Select File, then Save. The Save As dialog box opens.
2Select the folder in which you plan to save the file from the Save in list.
3Type the new file name.
4Click Save.
HelpSpot For more information on saving a document, double-click
the HelpSpot icon on your desktop.
File
folder
File
name
Solo9550.book Page 78 Tuesday, June 19, 2001 3:18 PM
79
Working with documents
www.gateway.com
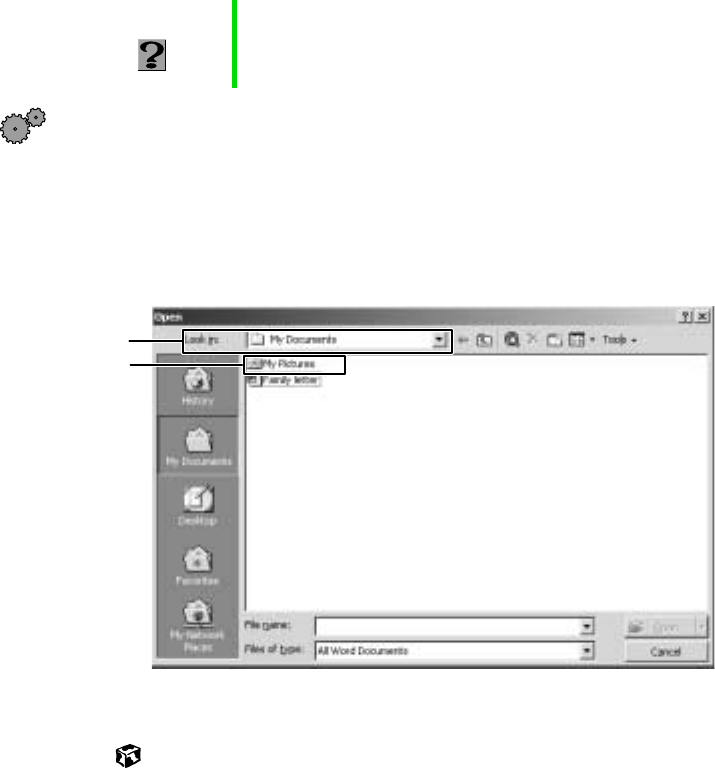
Opening a document
To view, revise, or print an existing document, you need to open it. Open
the document in the program it was created in.
To open a document in Microsoft Word:
1Click Start, then select Programs, then Microsoft Word. Microsoft Word
starts and a blank document opens.
2Select File, then Open.
3Find the folder that contains the file you want to open in the Look in list.
4Double-click the document file name. The document opens.
HelpSpot For more information on opening a document, double-click
the HelpSpot icon on your desktop.
File
folder
File
name
Solo9550.book Page 79 Tuesday, June 19, 2001 3:18 PM

80
Chapter 5: Windows Basics
www.gateway.com
Printing a document
To print a document, you must have a printer connected to your computer
or have access to a network printer. For more information about installing or
using your printer, refer to the printer documentation.
To print a document in Microsoft Word:
1Make sure that the printer is turned on and loaded with paper.
2Start Microsoft Word and open a document.
3Select File, then Print. The Print dialog box opens.
4Select the print options, then click OK. The document prints.
HelpSpot For more information on printing a document, double-click
the HelpSpot icon on your desktop.
Solo9550.book Page 80 Tuesday, June 19, 2001 3:18 PM

81
Working with documents
www.gateway.com
Shortcuts
The following table shows a few shortcuts that you can use in Windows and
almost all programs that run in Windows. For more information on Windows
shortcuts, see your Windows or program documentation.
To... Do this...
Copy a file, folder, text, or graphic Select the item, then press CTRL +C.
Cut a file, folder, text, or graphic Select the item, then press CTRL +X.
Paste a file, folder, text, or graphic Select the item, then press CTRL +V.
Select multiple icons on the desktop Click the first icon, press and hold down the CTRL key,
then click each of the remaining icons that you want to
select.
Select multiple items in a list or in an
Explorer window Click the first item, press and hold down the CTRL key,
then click each of the remaining items.
Select multiple adjacent items in a list Click the first item in the list, press and hold down the
SHIFT key, then click the last item in the list.
Permanently delete a file or folder Click the file or folder, then press SHIFT +DELETE. The
file is permanently deleted and is not stored in the
Recycle Bin.
Rename a file or folder Select the file or folder, press F2, type the new name,
then press ENTER.
Close the active window or program Press ALT +F4.
Switch to a different file, folder, or
running program Press ALT +TAB.
Solo9550.book Page 81 Tuesday, June 19, 2001 3:18 PM
82
Chapter 5: Windows Basics
www.gateway.com
Transferring software and hardware
from your old computer
If your new computer is replacing an old computer, you may have personal
data files, Internet settings, a printer or other peripheral devices, and other
unique computer settings that you want to move from your old computer to
your new one.
Gateway Data Mover Plus kit
If both your old and new computers have USB ports, you can use the
Gateway Data Mover Plus kit to automatically transfer customized computer
settings, such as Desktop settings, sound schemes, Internet and e-mail
settings, as well as personal data files, such as documents, spreadsheets, and
photographs. This program, with its special USB cable, helps you do this
quickly and efficiently. To order the Gateway Data Mover Plus kit, visit the
Gateway Accessory Store at www.gateway.com.
Transferring files
You can manually transfer your personal data files by
copying them to removable media, such as a diskette, CD,
or Zip disk, or by using a home network. For more
information, see “Networking Your Computer” on
page 199.
Finding your files
Many programs automatically save your personal data files in the
My Documents folder. Look in your old computer’s My Documents folder for
personal data files. Use Windows Find or Search to locate other personal data
files.
Solo9550.book Page 82 Tuesday, June 19, 2001 3:18 PM
83
Transferring software and hardware from your old computer
www.gateway.com
To find files in the My Documents folder:
1Double-click the My Computer icon on your desktop. The My Computer
window opens.
2Double-click the C:\ drive icon. The C:\ window opens.
3Double-click the My Documents folder. The My Documents window opens
and displays many of your saved personal data files.
You can often identify different data file types by looking at the file’s extension
(the part of the file name following the last period). For example, a document
file might have a .DOC extension and a spreadsheet file might have an .XLS
extension.
To find files using Find or Search:
1Click Start, then select Find or Search, then Files or Folders or For Files or
Folders. The Search Results window opens.
2Use Windows Find or Search to locate data files by file name or file type.
For help on finding files, click Help, then select Help Topics.
File type File usually ends in...
Documents .DOC, .TXT, .RTF, .HTM, .HTML, .DOT
Spreadsheets .XLS, .XLT, .TXT
Pictures .JPG, .BMP, .GIF, .PDF, .PCT, .TIF, .PNG
Movies .MPEG, .MPG, .AVI, .GIF, .MOV
Sound and Music .WAV, .CDA, .MP3, .MID, .MIDI
Solo9550.book Page 83 Tuesday, June 19, 2001 3:18 PM
84
Chapter 5: Windows Basics
www.gateway.com
Transferring Internet settings
You can use different methods to transfer your Internet
account from your old computer to your new one.
Setting up your ISP
■If your current Internet Service Provider (ISP) software came preinstalled
on your new computer, run that setup program. If it asks to set up a new
account or an existing one, choose to reconnect to an existing account.
■If your current ISP software is not preinstalled on your new computer,
locate the original Internet setup program provided by your local ISP, or
contact your ISP to see if they have an updated version of their software,
and install it on your new computer.
■If you use MSN as your ISP, or if you know your ISP settings, use the
Windows Internet Connection Wizard.
To use the Internet Connection Wizard:
1Click Start, then select Programs, Accessories, Communications, then
Internet Connection Wizard. The Internet Connection Wizard window
opens.
2Configure your Internet settings by following the on-screen instructions.
Transferring your e-mail and address book
Refer to your old e-mail program’s online help for information on exporting
and importing e-mail messages and the address book. You can often export all
of your old e-mail messages or address book to a diskette, then import them
from the diskette into your new computer’s e-mail program. Alternatively, you
may want to consider simply printing the old information or e-mailing it to
yourself.
Transferring your Internet shortcuts
You can export and import your old bookmarks (Netscape Navigator) or
favorites (Microsoft Internet Explorer). For more information, refer to your
Internet browser program’s online help.
Solo9550.book Page 84 Tuesday, June 19, 2001 3:18 PM
85
Transferring software and hardware from your old computer
www.gateway.com
Reinstalling your old printer or scanner
Older printers, scanners, or other peripheral devices may
have Windows support integrated (built in), which means
you do not need any additional software. Newer devices,
however, usually require your original software
installation CDs or diskettes.
Reinstalling a USB printer or scanner
USB devices may have special installation instructions. Refer to your USB
device’s installation guide.
Reinstalling a parallel port printer
You can usually install parallel port printers by following these steps.
To reinstall your old printer:
1Exit Windows and turn off your computer.
2Connect your parallel port printer.
3Turn on your printer, then your computer.
4If Windows detects your printer, install your printer by following the
on-screen instructions. You are finished.
- OR -
If Windows does not detect the printer, go to the next step.
5Click Start, then select Settings, then Printers. The Printers window opens.
6Double-click the Add Printer icon. The Add Printer Wizard window opens.
7Install your printer by following the on-screen instructions.
Refer to your peripheral device’s user guide for installation information and
tips. Because most installation software is periodically updated, you should
also check the publisher’s Web site for driver updates.
Solo9550.book Page 85 Tuesday, June 19, 2001 3:18 PM
86
Chapter 5: Windows Basics
www.gateway.com
Reinstalling your old programs
You probably use some programs that did not come
installed on your new computer, such as personal finance
software, graphics programs, or games.
Spend some time going through your old computer’s Start and Programs
menus, making note of any programs you want to install on your new
computer. Locate your original program installation CDs and installation
guides. Your original CDs and guides should contain any serial numbers or
product ID keys that may be required for program installation and
registration. Remember to check the publisher’s Web site for important
program updates.
Tips & Tricks If your new computer comes with a newer version of a
program, it is usually best to use the newer version than
to reinstall the old one.
Solo9550.book Page 86 Tuesday, June 19, 2001 3:18 PM

87
6
www.gateway.com
Using the
Internet
This chapter provides information about the Internet and the World Wide
Web, and tells you how to set up the America Online® Internet service so that
you can send and receive e-mail and access other Internet resources.
Solo9550.book Page 87 Tuesday, June 19, 2001 3:18 PM
88
Chapter 6: Using the Internet
www.gateway.com
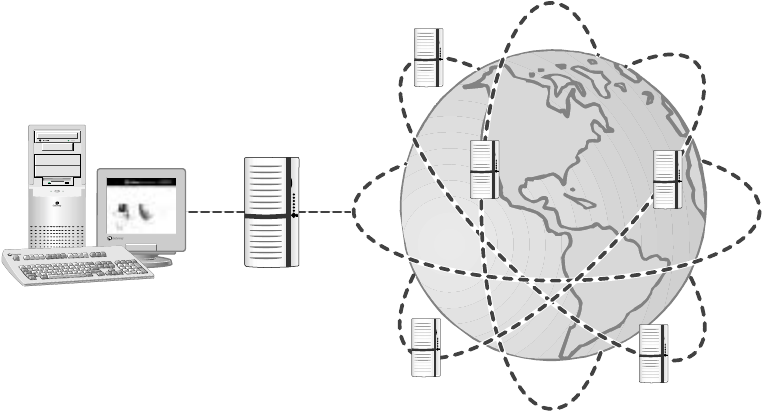
Learning about the Internet
The Internet is a worldwide network of computers linked together to provide
information to people everywhere. The two most popular services on the
Internet are e-mail and the World Wide Web. You can access this network by
connecting your computer to a telephone, DSL, or cable line and signing up
with an Internet Service Provider (ISP).
If you want to access the Internet you need:
■A modem – a device that connects your computer, using a telephone,
DSL, or cable line, to other computers or servers.
■An Internet Service Provider – a company that provides access to the
Internet through an ISP server. When you connect to an ISP, the ISP server
lets you access the Internet and your e-mail messages.
■A Web browser – a program that displays information from the World
Wide Web.
■An e-mail program – a program that lets you create, send, and receive
e-mail messages over the Internet.
Your computer
connects to the
Internet through
an ISP.
ISP Servers
let you connect to
the Internet and
access your e-mail
messages.
Internet Servers
store information so other
computers can access it
from the Internet.
Solo9550.book Page 88 Tuesday, June 19, 2001 3:18 PM