Quanta Computer 9550015318 Mini-PCI Wireless LAN card in Notebook Computer User Manual Solo9550
Quanta Computer Inc Mini-PCI Wireless LAN card in Notebook Computer Solo9550
Contents
Manual Part 5
191
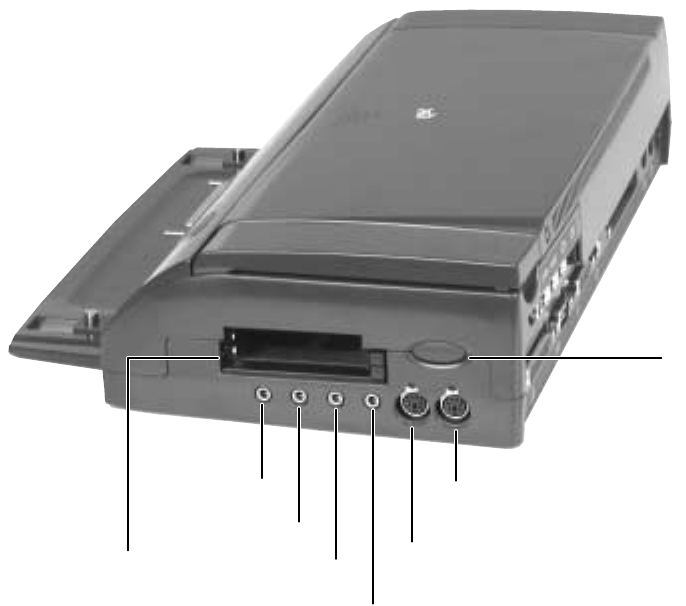
Checking out the docking station
www.gateway.com
Right side
PC Card slots
Headphone
jack
Power
button
Microphone jack
Line in jack
Line out jack
PS/2 mouse port
PS/2 keyboard port
Solo9550.book Page 191 Tuesday, June 19, 2001 3:18 PM
192
Chapter 13: Using the Port Replicator and Docking Station
www.gateway.com
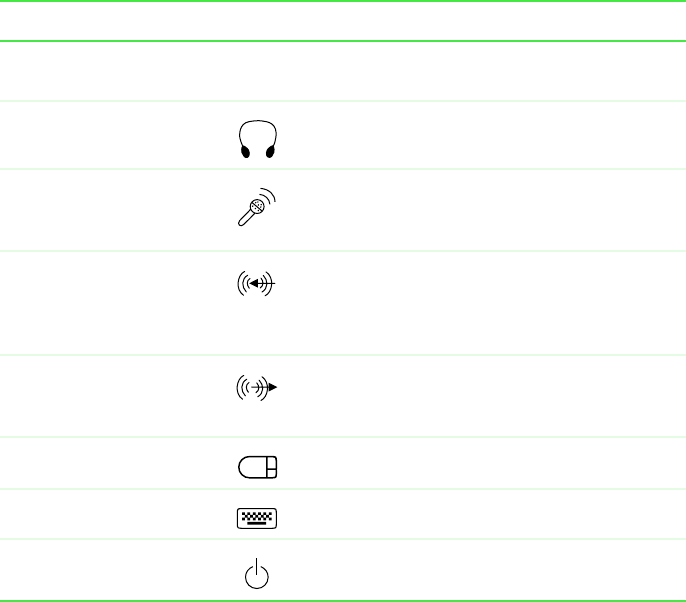
Component Icon Description
PC Card slots Insert Type I, II, and III PC Cards into these
slots.
Headphone jack Plug amplified speakers or headphones into
this jack.
Microphone jack Plug a microphone into this jack. While the
external microphone is connected, the built-in
microphone is turned off.
Line in jack Connect an external audio source (such as a
stereo) to this jack so you can record sound
on your notebook or play sound through the
notebook speakers.
Line out jack Connect an amplified external audio device
(such as a stereo) to this jack so you can play
your notebook audio through that device.
PS/2 mouse port Plug a PS/2 mouse into this port.
PS/2 keyboard port Plug a PS/2 keyboard into this port.
Power button Use this as an alternate power button.
Solo9550.book Page 192 Tuesday, June 19, 2001 3:18 PM
193
Connecting to the docking station
www.gateway.com
Connecting to the docking station
You can attach your notebook to the docking station while your notebook is
off, on, or in Standby/Suspend mode.
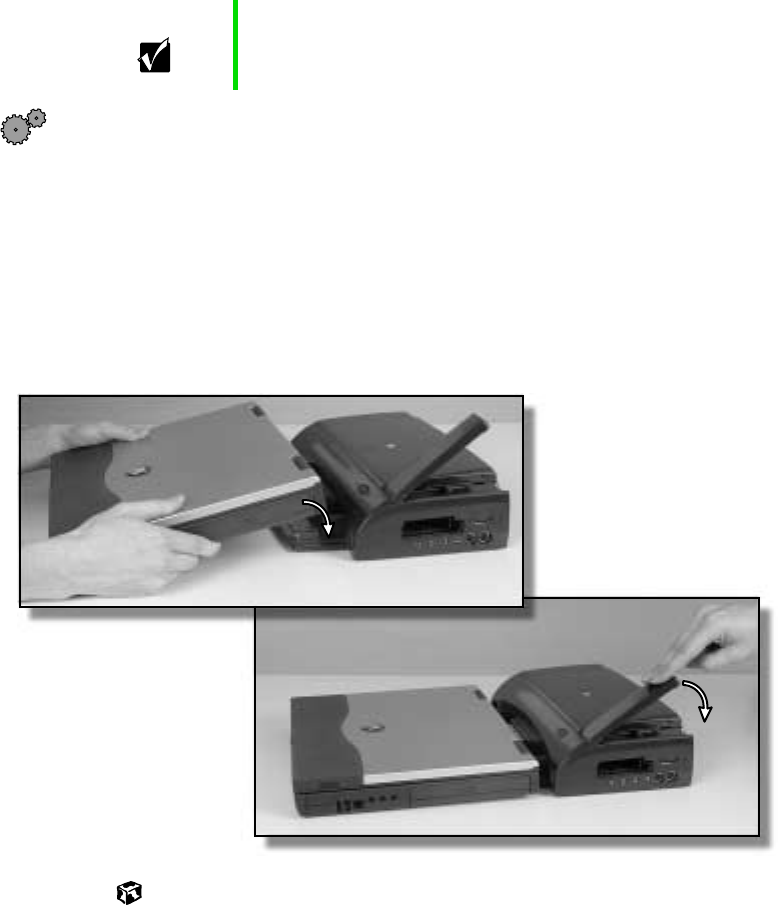
To dock your notebook:
1Refer to the docking station’s packing materials for first-time setup
instructions.
2Connect external devices to the docking station.
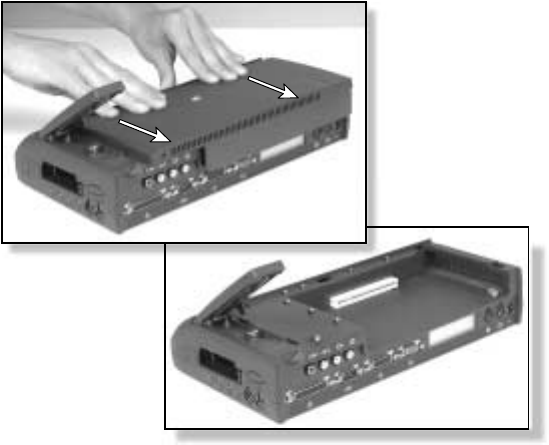
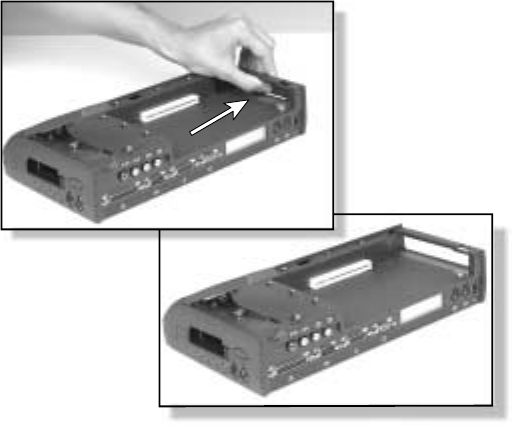
3Lift the release latch on the docking station.
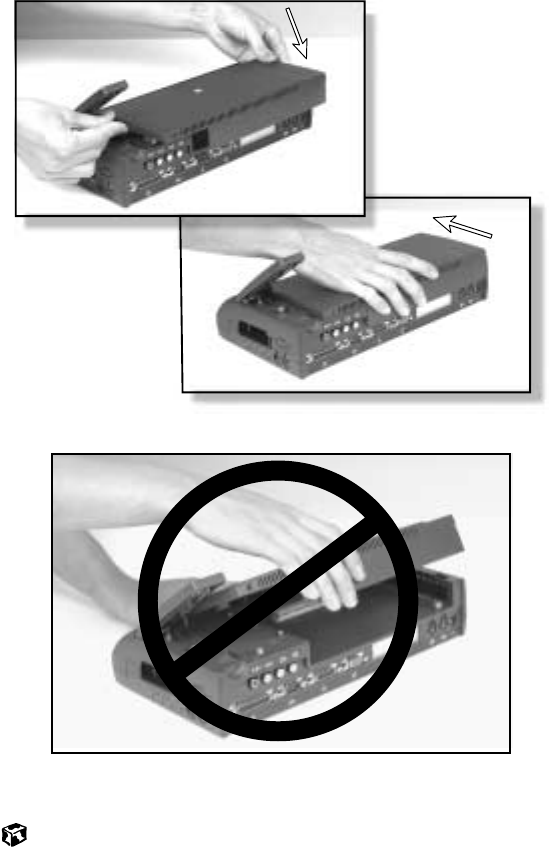
4Align the connector holes on the bottom of your notebook with the
connector posts on the docking station, then press down on the release
latch until it snaps into place.
Important When the notebook is docked, the docking station must be
connected to AC power to function properly.
Solo9550.book Page 193 Tuesday, June 19, 2001 3:18 PM

194
Chapter 13: Using the Port Replicator and Docking Station
www.gateway.com
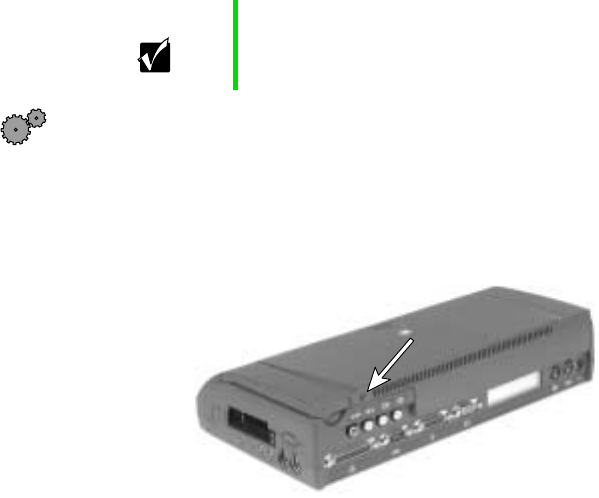
To undock your notebook:
1Click Start, then select Eject PC or press the Docking Eject button on the
front of the docking station. The Eject PC menu item appears in the Start
menu only while the notebook is docked.
2Lift the release latch on the docking station until the notebook is
disconnected.
3Lift the notebook off of the docking posts.
Adjusting audio settings
Your notebook is configured to use only its internal audio jacks and speakers,
even while docked. To turn on the docking station’s external speakers and
audio jacks, if you have Windows Me, you must change audio settings (the
settings are changed automatically in Windows NT and Windows 2000). You
can also configure the notebook’s internal speakers (analog audio) to pass
through the digital audio jack to the docking station.
To turn on the docking station’s external speakers and audio jacks in
Windows Me:
1Double-click the speaker icon on the taskbar. The Volume Control dialog
box opens.
2Click Advanced. The Advanced Controls for Volume Control dialog box
opens.
3Click Docked Speakers for analog audio. The docking station audio jacks
are turned on.
- OR -
Click Enable S/PDIF for digital audio. The docking station digital audio
jack is turned on.
Solo9550.book Page 194 Tuesday, June 19, 2001 3:18 PM
195
Installing a PCI card in the docking station
www.gateway.com
Installing a PCI card in the docking
station
You can install one standard half-length PCI card in your docking station.
To install a PCI card:
1Remove your notebook from the docking station.
2Unplug all cables, including the power cord.
3Remove the screw on the back of the docking station.
Important The PCI card bay cover is locked when the release latch
is down and the docking station is secured using the
Kensington lock slot.
Solo9550.book Page 195 Tuesday, June 19, 2001 3:18 PM
196
Chapter 13: Using the Port Replicator and Docking Station
www.gateway.com
4Lift the release latch on the docking station, then slide the cover straight
back and lift it off.
Solo9550.book Page 196 Tuesday, June 19, 2001 3:18 PM
197
Installing a PCI card in the docking station
www.gateway.com
5If your card requires access for cables, push out the side panel cover and
store it in a safe place.
6Remove the retaining screw from the card bracket in the card bay.
7Install the PCI card in the card slot.
8Secure the card by replacing the retaining screw.
Solo9550.book Page 197 Tuesday, June 19, 2001 3:18 PM
198
Chapter 13: Using the Port Replicator and Docking Station
www.gateway.com
9Replace the cover by setting it flat on the docking station and sliding it
forward into place. Do not tilt the cover.
10 Replace the screw that secures the cover to the docking station.
Solo9550.book Page 198 Tuesday, June 19, 2001 3:18 PM

199
14
www.gateway.com
Networking
Your Computer
Connecting your home, small office, or home office computers lets you share
drives, printers, and a single Internet connection among the connected
computers.
This chapter contains information about:
■Benefits of a home, small office, or home office network
■The Gateway Connected Home
■Network connection types
■Your networking shopping list
Solo9550.book Page 199 Tuesday, June 19, 2001 3:18 PM

200
Chapter 14: Networking Your Computer
www.gateway.com
Using a network
A network lets you:
■Share a single Internet connection
■Share computer drives
■Share peripherals
■Stream audio and video files
■Play multi-player games
Sharing a single Internet connection
A network makes sharing the Internet easy. Each computer or Internet
appliance that is connected to the network can share the same modem and
telephone line or broadband connection and access the Internet at the same
time. This saves on the cost of installing another telephone line for your
second computer and paying for a second Internet Service Provider (ISP)
account.
Sharing drives
With a network, you can copy files from computer to computer by copying
and pasting or dragging and dropping. You will no longer waste your time
transferring files by using diskettes. In addition, you can map a drive from a
computer on the network to a drive on another computer, and access the file
as if it were located on the hard drive of the computer you are using.
Important Most ISPs allow multiple users at the same time.
If you use America Online as your ISP, you can:
■Log onto America Online through one of your screen names
and the other computers can access the Internet using an
Internet browser.
■Upgrade your service to AOL for Home Networks. This
service allows more than one of your screen names to be
online through your home network at one time.
Solo9550.book Page 200 Tuesday, June 19, 2001 3:18 PM
201
Using a network
www.gateway.com
Sharing peripherals
Each computer that is connected to the network can share the same
peripherals, such as a printer. Select print from the computer you are currently
using and your file is automatically printed on your printer no matter where
it is located on your network.
Streaming audio and video files
With a network, you can store audio files (such as the popular .MP3 files) and
video files on any networked computer, then play them on any of the other
computers or devices connected to your network, a process called streaming.
Add a digital music player such as the Gateway Connected Music Player, and
you can integrate your stereo system into your network as well.
Playing multi-player games
With a home network, you can play multi-player games. Load a game like
Microsoft Midtown Madness 2 on your computers, and in minutes, you and your
friends can race in competing cars through the streets of San Francisco.
Solo9550.book Page 201 Tuesday, June 19, 2001 3:18 PM
202
Chapter 14: Networking Your Computer
www.gateway.com
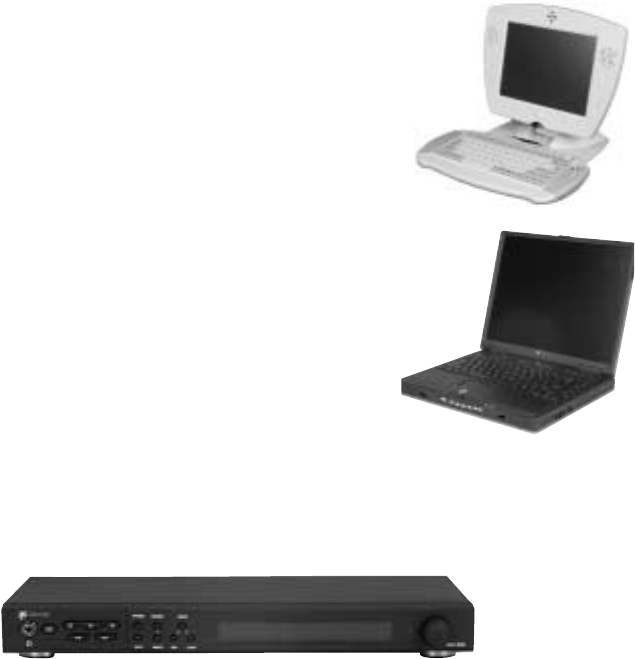
Introducing the Gateway Connected
Home
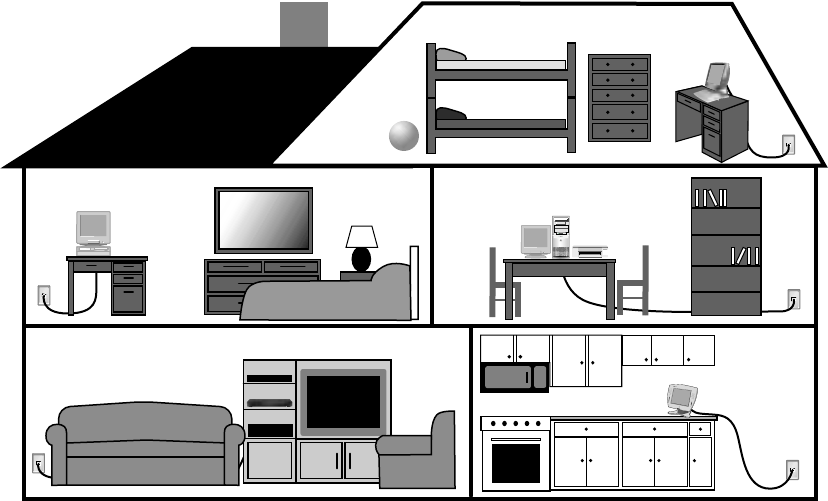
The Gateway Connected Home connects all your computers and other devices
so that you can share files, programs, peripherals, and much more from any
computer in your house. The picture below shows an example Gateway
Connected Home.
Solo9550.book Page 202 Tuesday, June 19, 2001 3:18 PM
203
Introducing the Gateway Connected Home
www.gateway.com
Components of a Gateway Connected Home
The Gateway Connected Home begins with two computers and a connection.
From there, you can add computers and devices to fit your specific needs. You
can connect:
■Any or all of your connected computers to your Internet connection
simultaneously.
■A Gateway Connected Touchpad to your
connected home so that more than one screen
name can log onto America Online
simultaneously.
■Your notebook computer to your connected
home so you can share files and print at home.
■A Gateway Connected Music Player to your connected home to play
audio files, located on any connected computer, anywhere in your home,
either through your stereo system or through powered speakers.
Solo9550.book Page 203 Tuesday, June 19, 2001 3:18 PM

204
Chapter 14: Networking Your Computer
www.gateway.com
Selecting a network connection
One of the biggest decisions you will need to make when creating your
network is what type of connection you will use. Gateway supports both wired
and wireless connections.
Wired connections
HPNA (Home Phoneline Networking Alliance) and Ethernet are two popular
types of wired networks.
HPNA
Creating an HPNA network is as easy as knowing where your telephone jacks
and computers are located. HPNA uses your home's standard telephone lines
and telephone jacks instead of special cabling to connect computers. You can
use your networked computers at the same time as you connect to your ISP,
send a fax, or talk on your telephone. For the best performance, your
computers or Internet appliances should have HPNA 2.0 network cards or
jacks for connecting to your network.
Ethernet or Fast Ethernet
Ethernet is a type of connection commonly used in offices around the world.
This type of connection can also be used to build small computer networks
in the home. Ethernet is available at two different speeds: standard Ethernet,
which runs at the same speed as HPNA 2.0, and Fast Ethernet, which runs
up to ten times faster. To create an Ethernet network, you or your electrician
must install special cables in your home or office. Your computers or Internet
appliances must have Ethernet cards or jacks for connecting to a 10 or 10/100
Ethernet switch or hub. If you are connecting just two computers, you can
eliminate the switch or hub and use a special crossover cable.
Important If you have more than one telephone line in your home or
office, make sure that all the computers in your network are
connected to jacks that share the same telephone number.
Important Check local code requirements before installing Ethernet
cable or other wiring in your home or office. Your municipality
may require you to obtain a permit and hire a licensed installer.
Solo9550.book Page 204 Tuesday, June 19, 2001 3:18 PM

205
Selecting a network connection
www.gateway.com
Broadband Internet connections
You can use your computer’s Ethernet or USB jack for more than just
networking. Many broadband Internet connections, such as cable modems
and DSL modems, connect to your computer’s Ethernet or USB jack. Typically,
if one computer is connected to the Internet, other networked computers also
access the Internet through the shared Internet connection. A broadband,
versus dial-up, connection adds speed and an “always on” connection to your
home network.
Wireless Connections
Instead of connecting your computers with wires, you can consider two types
of wireless networks.
Wireless Ethernet
A wireless Ethernet network (also known as IEEE 802.11b or WiFi) exceeds
the speed of either HPNA 2.0 or standard Ethernet. In addition, this type of
network allows you the freedom to move about your home or office with your
computer. For example, you can take your notebook computer from your
home office to your patio without having a telephone or Ethernet jack
available. Although you save on the cost of wiring, the higher cost of wireless
Ethernet equipment may result in a wireless network costing more than a
wired one.
Important Radio frequency wireless communication can interfere
with equipment on commercial aircraft. Current aviation
regulations require wireless devices to be turned off while
traveling in an airplane. Bluetooth and IEEE 802.11b (also
known as wireless Ethernet or WiFi) communication
devices are examples of devices that provide wireless
communication.
Important If your system came equipped with an internal radio
frequency wireless device, see “Safety, Regulatory, and
Legal Information” on page 281 for general wireless
regulatory and safety guidelines. To find out if your system
has an internal wireless device, check the label (see
“Identifying your model” on page 23).
Solo9550.book Page 205 Tuesday, June 19, 2001 3:18 PM
206
Chapter 14: Networking Your Computer
www.gateway.com
Bluetooth
Bluetooth is a short-range wireless method for creating a network. Like
wireless Ethernet, Bluetooth allows your computer to send and receive data
without wiring. However, unlike the wireless Ethernet, the range and speed
of the Bluetooth connection are greatly reduced. Bluetooth is an ideal method
for connecting a notebook computer, PDA, pager, cellular telephone, and
printer that are all in close proximity.
Assessing your connection needs
To select the type of network that will work best for you, consider how you
will use your network.
HPNA
An HPNA network is appropriate if:
■Your home, small office, or home office has a telephone jack with the
same telephone number in each room that has a device you want to
connect
■You have several Windows-based computers that are used for drive
sharing, printing to a single printer, or surfing the Internet
■Your notebook computer has one of the following:
■An HPNA jack for connecting to a telephone jack
■A USB port to connect to a HPNA adapter
■Cost savings is more important than network speed
■Your connection speed needs are less than 10000 Kbps (see “Comparing
data transfer speed” on page 208)
Ethernet
An Ethernet or Fast Ethernet network is appropriate if:
■You are building a new home, or your existing home already has Ethernet
cable installed in each room that has a device you want to connect
■You are creating a network in an office or business
■Network speed is more important than cost savings
Solo9550.book Page 206 Tuesday, June 19, 2001 3:18 PM
207
Selecting a network connection
www.gateway.com
■You have a combination of Windows-based computers and
non-Windows-based computers that are used for drive sharing, printing
to a single printer, or surfing the Internet
■Your notebook computer has an Ethernet jack for connecting to the
network
Wireless Ethernet (IEEE 802.11b, WiFi)
A wireless Ethernet network is appropriate if:
■You are looking for an alternative to using your telephone line or
installing cable for connectivity
■Network speed and the ability to move about with your computer are
more important than cost savings
■You have several Windows-based computers that are used for drive
sharing, printing to a single printer, or surfing the Internet
■Your notebook computer has wireless Ethernet (IEEE 802.11b) for
networking
■Your connection speed needs are less than 11000 Kbps (see “Comparing
data transfer speed” on page 208)
Bluetooth
A Bluetooth network is appropriate if:
■You are looking for an alternative to using your telephone line or
installing cable for connectivity
■Your PDA, pager, cellular telephone, or printer has Bluetooth for
networking
■Your connection needs are less than 1000 Kbps (see “Comparing data
transfer speed” on page 208)
Solo9550.book Page 207 Tuesday, June 19, 2001 3:18 PM

208
Chapter 14: Networking Your Computer
www.gateway.com
Comparing data transfer speed
When deciding between connection types, compare the different data transfer
speeds provided by each to the programs you plan to run on your network.
The following table shows types of programs that you may run in your home
or small office and the connection speed each requires.
The following table shows the Gateway-supported network type and the
maximum speed of each.
Type of Program Speed Required
Voice over IP (VoIP) 5-20 Kbps
Multiplayer Game 20-80 Kbps
Dial-up Internet 24-56 Kbps
MP3 Audio Streaming 80-200 Kbps
Printer Sharing 80-200 Kbps
Broadband Internet 100-1000 Kbps
File Sharing 300-40000 Kbps
MPEG Video Streaming 4000-8000 Kbps
Connection Type Rated Maximum Speed
Bluetooth Wireless 1000 Kbps
HPNA 2.0 Wired 10000 Kbps
Ethernet Wired 10000 Kbps
Wireless Ethernet
(IEEE 802.11b or
WiFi)
Wireless 11000 Kbps
Fast Ethernet Wired 100,000 Kbps
Solo9550.book Page 208 Tuesday, June 19, 2001 3:18 PM
209
Selecting a network connection
www.gateway.com
When comparing the speed at which your network will need to run to the
speed you can get from the connection type, you should consider which
programs may run at the same time on your network.
For example, you have stored several MP3 audio files on your network. You
typically play music on your Gateway Connected Music Player, and at the
same time your teenager may play music on another computer. Playing two
MP3 audio files simultaneously requires 200 Kbps + 200 Kbps = 400 Kbps. If
at the same time you are playing two MP3 audio files, you also print a file
to your printer, the speed required increases to
200Kbps+200Kbps+200Kbps=600Kbps.
A comparison of the two tables on the previous page shows that HPNA 2.0,
Ethernet, and wireless Ethernet can handle most programs on a network. If
you anticipate using a combination of programs that regularly exceed
10000 Kbps, you should consider installing Fast Ethernet for your connection.
Solo9550.book Page 209 Tuesday, June 19, 2001 3:18 PM
210
Chapter 14: Networking Your Computer
www.gateway.com
Network shopping list
Use the following shopping lists when purchasing equipment for your
network.
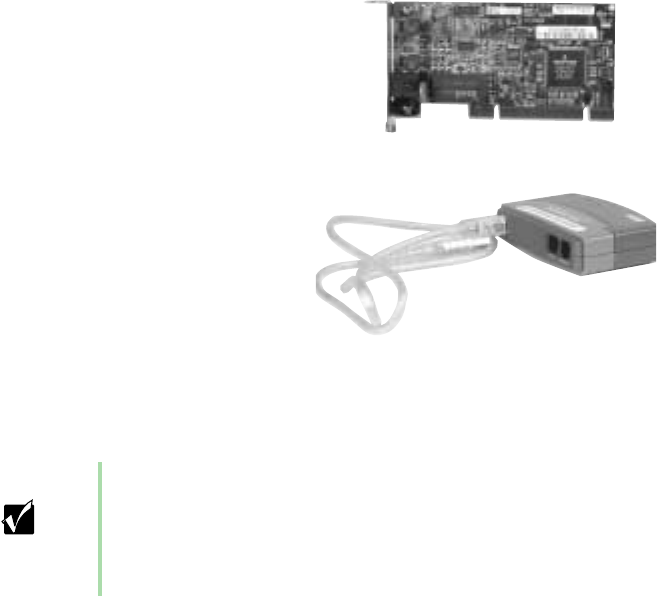
HPNA
For an HPNA network you need:
■An HPNA card installed in each
desktop computer
- OR -
An HPNA/V.90 combination card
installed in each desktop computer
- OR -
A USB HPNA adapter attached to
each desktop or notebook
computer
- OR -
A HPNA PC card installed in each notebook computer
■Telephone cable going from each computer to the closest telephone jack
Important Your Gateway computer may already have a factory installed
HPNA/V.90 combination card.
All HPNA components should be HPNA 2.0. A mixture of
HPNA 1.0 and HPNA 2.0 components will result in your
network running at a slower speed.
HPNA card
USB HPNA adapter
Solo9550.book Page 210 Tuesday, June 19, 2001 3:18 PM
211
Network shopping list
www.gateway.com
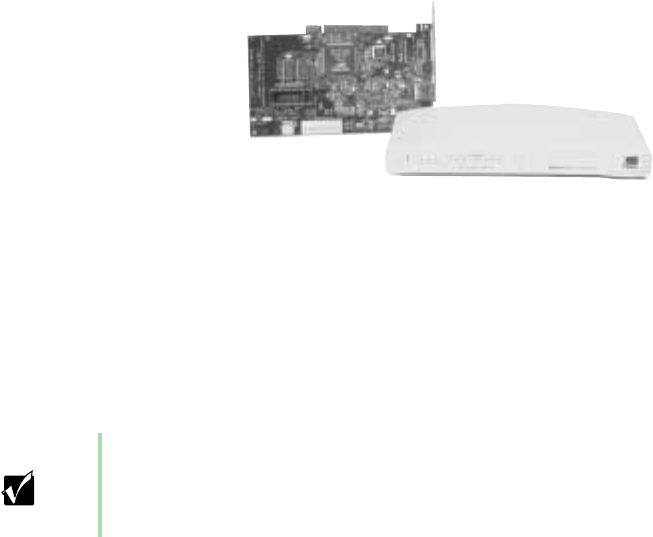
Ethernet
For an Ethernet network you need:
■An Ethernet card installed
in each desktop computer
- OR -
An Ethernet jack on each
desktop and notebook
computer
- OR -
An Ethernet PC card installed in each notebook computer
■An Ethernet hub or switch with enough ports for each computer and
device in the network (hubs are slightly cheaper than switches but may
run slower than switches)
■Ethernet cable going from each computer to the hub or switch
Important All Ethernet components should be either standard Ethernet
(10 Mbps) or Fast Ethernet (100 Mbps). A mixture of Ethernet
and Fast Ethernet components will result in your network
running at the slower speed.
Ethernet card and hub
Solo9550.book Page 211 Tuesday, June 19, 2001 3:18 PM
212
Chapter 14: Networking Your Computer
www.gateway.com
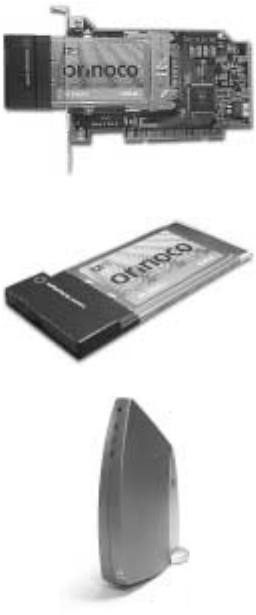
Wireless Ethernet
For a wireless Ethernet network you need:
■A wireless Ethernet (IEEE 802.11b) PCI
card installed in each desktop
computer
- OR -
A wireless Ethernet (IEEE 802.11b) PC
card installed in each notebook
computer that does not have wireless
Ethernet built-in
■A wireless Ethernet (IEEE 802.11b)
Access Point if you want to connect
your wireless Ethernet to the Internet
Bluetooth
For a Bluetooth network you need:
■A Bluetooth PCI card installed in each
desktop computer
- OR -
A Bluetooth PC card installed in each
notebook computer that does not have
Bluetooth built-in
■Devices with Bluetooth, such as PDAs,
pagers, cellular telephones, and
printers
Wireless Ethernet PCI card
Wireless Ethernet PC card
Wireless Ethernet Access Point
Solo9550.book Page 212 Tuesday, June 19, 2001 3:18 PM
213
For more information
www.gateway.com
For more information
For more information about the Gateway Connected Home or networking an
office, discuss your particular needs with your Gateway Country Store
representative. In addition, several books and Internet sites are dedicated to
networking. Refer to these sources for more information about networking
your home or office with HPNA, Ethernet, Wireless Ethernet, or Bluetooth.
Solo9550.book Page 213 Tuesday, June 19, 2001 3:18 PM
214
Chapter 14: Networking Your Computer
www.gateway.com
Solo9550.book Page 214 Tuesday, June 19, 2001 3:18 PM

215
15
www.gateway.com
Maintaining
Your Computer
This chapter provides basic information about maintaining your computer
hardware and software.
Caring for your computer
Here are ways to extend the life of your system:
■Be careful not to bump or drop your computer, and do not put any objects
on top of it. The case, although strong, is not made to support extra
weight.
■When transporting your computer, we recommend that you put it in a
carrying case.
■Keep diskettes, modular drives, and your computer away from magnetic
fields. Magnetic fields can erase data on both diskettes and hard drives.
■Never turn off your computer when the hard drive light is on because
data on the hard drive could be lost or corrupted.
■Avoid subjecting your computer to extreme temperature changes. The
case and LCD panel can become very brittle and easy to break in cold
temperatures and can melt or warp in high temperatures. Damage due
to either extreme is not covered by your warranty. As a general rule, your
computer is safest at temperatures that are comfortable for you.
■Keep all liquids away from your computer. Almost any liquid can result
in extremely expensive repairs that are not covered under your warranty.
Solo9550.book Page 215 Tuesday, June 19, 2001 3:18 PM

216
Chapter 15: Maintaining Your Computer
www.gateway.com
■Avoid dusty or dirty work environments. Dust and dirt can clog the
internal mechanisms.
■Set up a regular maintenance schedule according to the table below to
keep your computer running at its best.
Maintenance task Immediately
after purchase Monthly When needed See...
Create an emergency diskette X page 217
Check for viruses X X page 219
Manage hard drive space X page 221
Clean up hard drives X X page 222
Scan hard drive for errors X X page 223
Defragment hard drive X X page 225
Back up files X X page 227
Recalibrate the battery X page 229
Clean computer case X page 230
Clean keyboard X page 231
Clean screen X page 231
Clean mouse X page 231
Solo9550.book Page 216 Tuesday, June 19, 2001 3:18 PM
217
Creating an emergency startup diskette
www.gateway.com
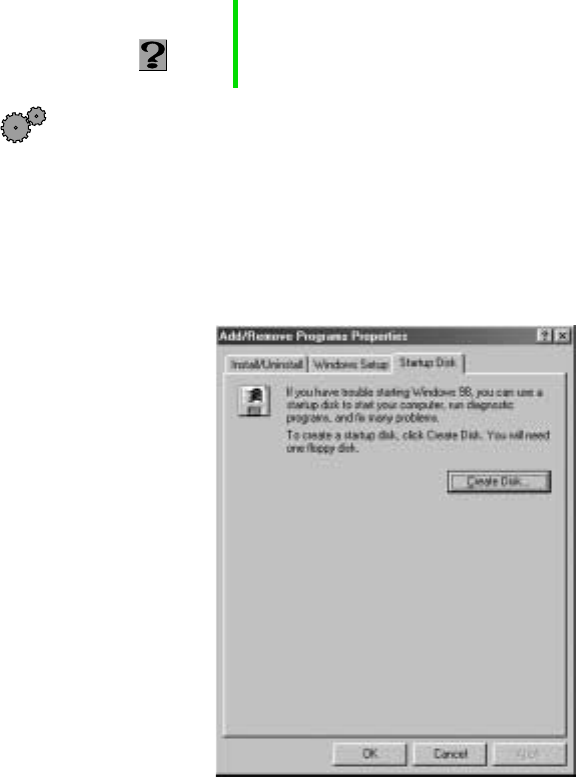
Creating an emergency startup
diskette
An emergency startup diskette is a diskette that contains critical information that
you need to start your computer if Windows fails to start. You should create
a startup diskette as soon as you get your computer.
To create an emergency startup diskette:
1Click Start, then select Settings, then Control Panel. The Control Panel
window opens.
2Click/Double-click the Add/Remove Programs icon. The Add/Remove
Programs Properties dialog box opens.
3Click the Startup Disk tab.
HelpSpot For more information on creating an emergency startup
diskette, double-click the HelpSpot icon on your desktop.
Solo9550.book Page 217 Tuesday, June 19, 2001 3:18 PM
218
Chapter 15: Maintaining Your Computer
www.gateway.com
4Click Create Disk. A message tells you to label a new diskette and insert
it into the diskette drive.
5Place a new, labeled diskette into the diskette drive.
6Click OK. Windows copies files to the emergency startup diskette.
7When Windows finishes copying files, remove the diskette from the
diskette drive.
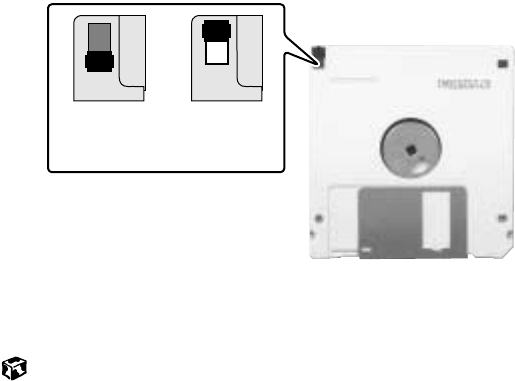
8You should write-protect the diskette, which will prevent the diskette
from being erased or infected by viruses, by sliding the tab that is at the
top of the diskette to the up position.
9Store your emergency startup diskette in a safe place with your other
backup software media.
Not write-
protected Write-
protected
Solo9550.book Page 218 Tuesday, June 19, 2001 3:18 PM
219
Protecting your computer from viruses
www.gateway.com
Protecting your computer from
viruses
A virus is a program that attaches itself to a file on a computer, then spreads
from one computer to another. Viruses can damage data or cause your
computer to malfunction. Some viruses go undetected for a period of time,
because they are activated on a certain date.
Protect your computer from a virus by:
■Using your Norton® AntiVirus program to check files and programs that
are on diskettes, attached to e-mail messages, or downloaded from the
Internet.
■Checking all programs for viruses before installing them.
■Disabling macros on suspicious Microsoft Word and Excel files. These
programs will warn you if a document that you are opening contains a
macro that might have a virus.
To scan for viruses:
1Click Start, then select Programs, Norton AntiVirus, then Norton AntiVirus.
Norton AntiVirus opens.
2Click Scan for Viruses.
3Select the type of scan you want to make in the Scan area, then click
Run Scan Now.
HelpSpot For more information on protecting your computer from
viruses, double-click the HelpSpot icon on your desktop.
Solo9550.book Page 219 Tuesday, June 19, 2001 3:18 PM

220
Chapter 15: Maintaining Your Computer
www.gateway.com
To remove a virus:
1Find and remove the virus immediately using Norton AntiVirus.
2Turn off your computer and leave it off for at least 30 seconds.
3Turn on the computer and rescan for the virus.
You should periodically update your Norton AntiVirus program to protect
against the latest viruses.
To update Norton AntiVirus:
1Click Start, then select Programs, Norton AntiVirus, then LiveUpdate - Norton
AntiVirus. The LiveUpdate wizard opens.
2Follow the on-screen instructions to update your Norton AntiVirus
program with the latest virus protection files.
3When the program is done updating, click Finish.
Solo9550.book Page 220 Tuesday, June 19, 2001 3:18 PM

221
Managing hard drive space
www.gateway.com
Managing hard drive space
Windows provides several utilities you can use to manage your hard drive
space and keep your hard drive running efficiently.
Checking hard drive space
In Windows, you can see a chart of the available hard drive space.
To check hard drive space:
1Double-click the My Computer icon. The My Computer window opens.
2Right-click the drive that you want to check for available file space, then
select Properties. Drive space information appears.
HelpSpot For more information on checking hard drive space,
double-click the HelpSpot icon on your desktop.
Solo9550.book Page 221 Tuesday, June 19, 2001 3:18 PM

222
Chapter 15: Maintaining Your Computer
www.gateway.com
Using Disk Cleanup
Delete unneeded files, such as temporary Windows files, to free hard drive
space.
To use Windows Disk Cleanup program:
1Double-click the My Computer icon. The My Computer window opens.
2Right-click the hard drive that you want to delete files from, then select
Properties. The System Properties dialog box opens at the General tab.
3Click Disk Cleanup. The Disk Cleanup dialog box opens.
4Select the check box beside each file type you want to delete. For more
information about file types you can delete, read the descriptions in the
Disk Cleanup dialog box.
5Click OK, then click Yes.
HelpSpot For more information on using Disk Cleanup, double-click
the HelpSpot icon on your desktop.
Solo9550.book Page 222 Tuesday, June 19, 2001 3:18 PM
223
Managing hard drive space
www.gateway.com
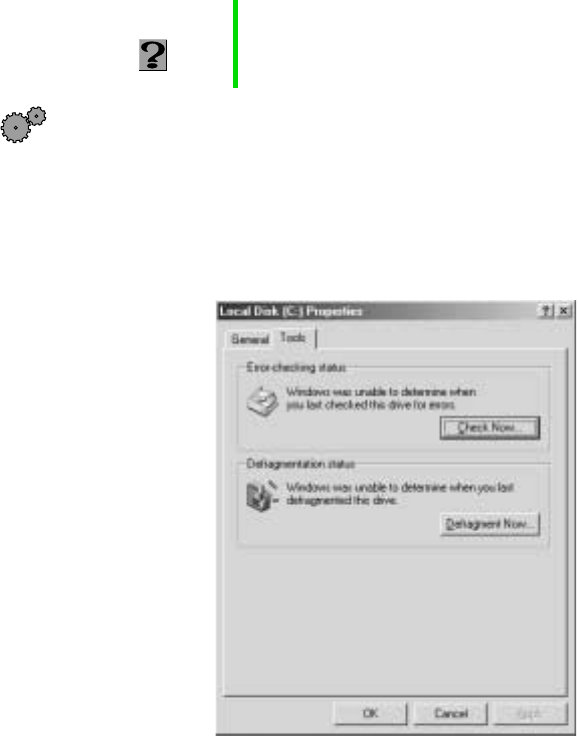
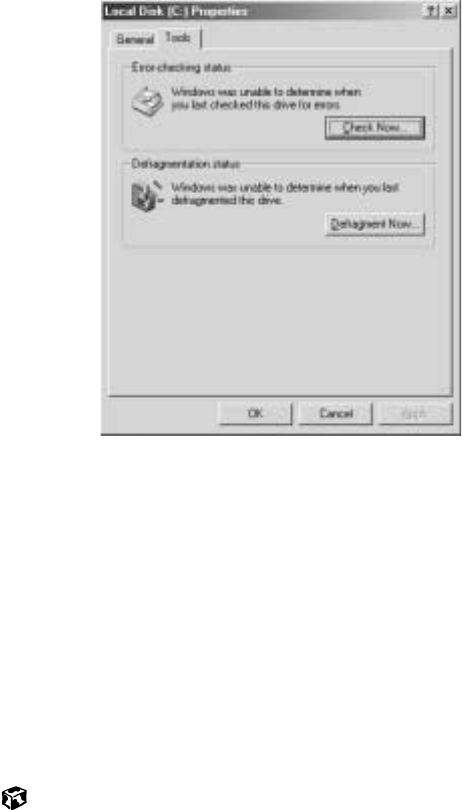
Scanning the hard drive for errors
The ScanDisk program examines the hard drive for surface errors and file and
folder problems. ScanDisk corrects these problems so that Windows and other
programs run efficiently.
If you use your computer several hours every day, you probably want to run
ScanDisk once a week. On the other hand, if you use your computer less
frequently, once a month may be adequate. Also use ScanDisk if you
encounter hard drive problems.
To run ScanDisk:
1Double-click the My Computer icon. The My Computer window opens.
2Right-click the hard drive that you want to check for errors, then select
Properties. The System Properties dialog box opens.
3Click the Tools tab.
HelpSpot For more information on using ScanDisk, double-click the
HelpSpot icon on your desktop.
Solo9550.book Page 223 Tuesday, June 19, 2001 3:18 PM

224
Chapter 15: Maintaining Your Computer
www.gateway.com
4Click Check Now. The ScanDisk dialog box opens.
5Select the options to use, then click Start. For help, press F1. ScanDisk
checks the drive for errors. This process may take several minutes.
6Correct any problems that are found by following the on-screen
instructions. After ScanDisk has finished checking the drive for errors, it
provides a summary of the problems that it found.
7Click Close.
Solo9550.book Page 224 Tuesday, June 19, 2001 3:18 PM

225
Managing hard drive space
www.gateway.com
Defragmenting the hard drive
When working with files, sometimes Windows divides the file information
into pieces and stores them in different places on the hard drive. This is called
fragmentation, and it is normal. In order for the computer to use a file,
Windows must search for the pieces of the file and put them back together.
This process slows the hard drive performance.
The Disk Defragmenter program organizes the data on the drive so that each
file is stored as one unit rather than multiple pieces scattered across different
areas of the drive. Defragmenting the information stored on the drive can
improve hard drive performance.
While the Disk Defragmenter program is running, do not use your keyboard
or mouse because using them may stop and restart the defragmenting process.
Also, if you are connected to a network, log off before starting Disk
Defragmenter. Network communication may stop the defragmentation
process and cause it to start over.
To run Disk Defragmenter:
1Double-click the My Computer icon. The My Computer window opens.
2Right-click the hard drive that you want to defragment, then select
Properties. The System Properties dialog box opens.
HelpSpot For more information on defragmenting your hard drive,
double-click the HelpSpot icon on your desktop.
Solo9550.book Page 225 Tuesday, June 19, 2001 3:18 PM
226
Chapter 15: Maintaining Your Computer
www.gateway.com
3Click the Tools tab.
4Click Defragment Now.
5If Disk Defragmenter does not start automatically, click Start or
Defragment.
Disk Defragmenter shows its progress on the screen. When finished, Disk
Defragmenter asks if you want to quit the program.
6If you want to defragment another drive, click No then follow the
on-screen instructions.
- OR -
If you do not want to defragment another drive, click Yes.
Solo9550.book Page 226 Tuesday, June 19, 2001 3:18 PM
227
Managing hard drive space
www.gateway.com
Backing up files
Backing up files and removing them from the hard drive frees space for new
files on the hard drive. It also protects you from losing important information
if the hard drive fails or you accidentally delete files.
You should back up your files regularly to diskettes or a writable CD, if you
have a CD-R or CD-RW drive. Use diskettes or writable CDs to do partial
backups of selected files or folders. Use a backup device such as a CD-R,
CD-RW, or Zip drive, or other high-capacity backup device to do a complete
hard drive backup. If you do not have a high-capacity backup device and you
want to purchase one, you can contact Gateway’s Add-on Sales department
or visit our Web site at www.gateway.com.
Solo9550.book Page 227 Tuesday, June 19, 2001 3:18 PM
228
Chapter 15: Maintaining Your Computer
www.gateway.com
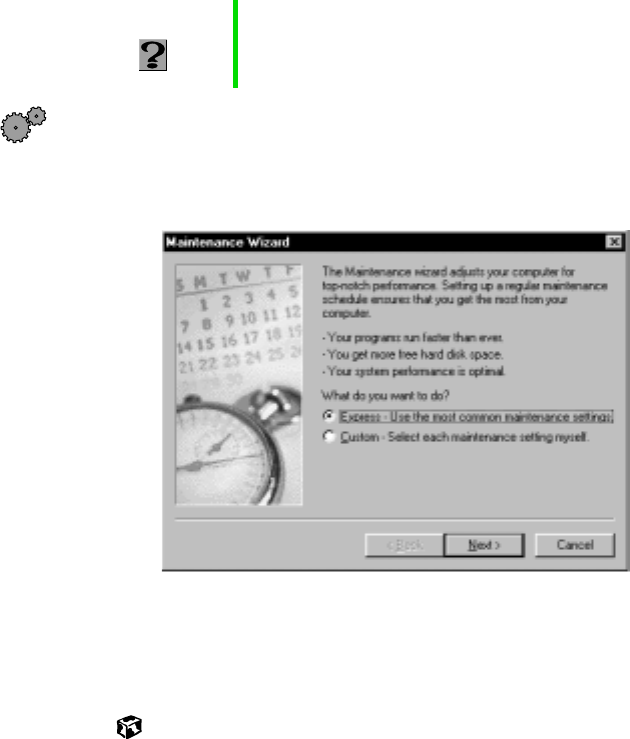
Using Maintenance Wizard
The Maintenance Wizard lets you schedule maintenance tasks such as running
Disk Defragmenter and ScanDisk and deleting unnecessary files.
To start the Maintenance Wizard:
1Click Start, then select Programs, Accessories, System Tools, then
Maintenance Wizard. The Maintenance Wizard opens.
2Select the Maintenance Wizard options that suit your preferences.
Remember that your computer must be on during scheduled
maintenance tasks.
HelpSpot For more information on using the Maintenance Wizard,
double-click the HelpSpot icon on your desktop.
Solo9550.book Page 228 Tuesday, June 19, 2001 3:18 PM

229
Recalibrating the battery
www.gateway.com
Recalibrating the battery
If your notebook unexpectedly goes into Standby mode while you are using
it but the battery charge is not low, you may need to recalibrate your battery.
You should also recalibrate the battery once a year to maintain the accuracy
of the battery gauge.
To recalibrate the battery:
1Connect the AC adapter, then turn on your notebook.
2As soon as it starts and you see a startup screen, press F2. The BIOS Setup
program opens.
3Open the Advanced menu.
4Highlight Battery Auto Learning, then select Enabled by pressing the
spacebar.
5Open the Exit menu, then highlight Exit Saving Changes and press ENTER.
6Select Yes, then press ENTER.
The battery learning process begins and a screen opens showing you the
progress. The entire process will take several hours.
When the recalibration is done, the message “Press [Esc} key to exit”
appears.
7Press ESC. The battery meter now displays the accurate battery charge.
If the battery meters do not show an accurate charge, contact Gateway
Technical Support.
Important Do not interrupt the battery recalibration process. If
recalibration is interrupted, you must start the process over
again.
Solo9550.book Page 229 Tuesday, June 19, 2001 3:18 PM

230
Chapter 15: Maintaining Your Computer
www.gateway.com
Cleaning your computer
Keeping your computer clean and the vents free from dust helps keep your
system performing at its best. You may want to gather these items and put
together a computer cleaning kit:
■A soft cloth
■An aerosol can of air that has a narrow, straw-like extension
■Isopropyl alcohol
■Cotton swabs
■A CD/DVD drive cleaning kit
Cleaning the exterior
Always turn off the computer and other peripherals and remove the battery
before cleaning any components.
Use a damp, lint-free cloth to clean the computer and other parts of your
system. Do not use abrasive or solvent cleaners because they can damage the
finish on your components.
Your computer is cooled by air drawn in through the vents on the case, so
keep the vents free of dust. With the computer turned off and unplugged,
brush the dust away from the vents with a damp cloth. Be careful not to drip
any water into the vents. Do not attempt to clean dust from the inside of
computer.
Warning When you shut down your computer, the power turns off,
but some electrical current still flows through the computer.
To avoid possible injury from electrical shock, unplug the
power cord and modem cable from the wall outlets.
Solo9550.book Page 230 Tuesday, June 19, 2001 3:18 PM
231
Cleaning your computer
www.gateway.com
Cleaning the keyboard
You should clean the keyboard occasionally to free it of dust and lint trapped
under the keys. The easiest way to do this is to blow dirt from under the keys
using an aerosol can of air with a narrow, straw-like extension.
If you spill liquid on the keyboard, turn off the computer and turn the unit
upside down. Let the liquid drain, then let the keyboard dry before trying to
use it again. If the keyboard does not work after it dries, you may need to
replace it.
Cleaning the screen
Use a soft cloth and water to clean the screen. Squirt a little water on the
cloth (never directly on the screen), and wipe the screen with the cloth.
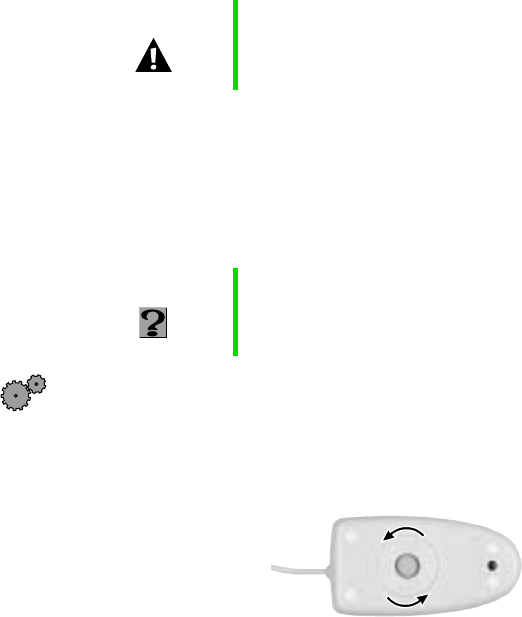
Cleaning the mouse
If you have a mouse and the mouse pointer begins moving erratically across
the screen or becomes difficult to control precisely, then cleaning the mouse
will likely improve its accuracy.
To clean your mouse:
1Turn the mouse upside down.
2Rotate the retaining ring on the bottom of the mouse counter-clockwise.
Caution An LCD screen is made of specially coated glass and can
be scratched or damaged by abrasive or ammonia-based
window cleaners.
HelpSpot For a video demonstration on cleaning the mouse,
double-click the HelpSpot icon on your desktop.
Solo9550.book Page 231 Tuesday, June 19, 2001 3:18 PM
232
Chapter 15: Maintaining Your Computer
www.gateway.com
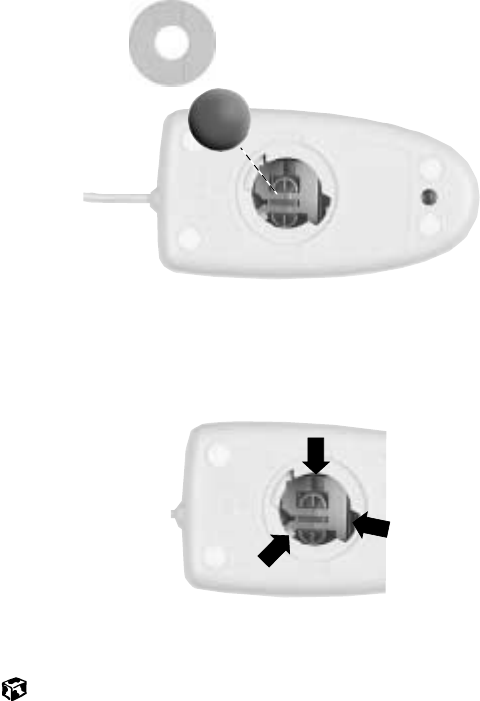
3Remove the retaining ring and mouse ball.
4Remove any dust, lint, or dirt from the mouse ball with a soft cloth.
5Clean the mouse rollers with a cotton swab dipped in isopropyl alcohol.
6Replace the mouse ball and lock the retaining ring into place.
Solo9550.book Page 232 Tuesday, June 19, 2001 3:18 PM

233
16
www.gateway.com
Reinstalling
Device Drivers
Device drivers are programs that control devices such as monitors, CD/DVD
drives, and modems. Drivers translate information between computer devices
and programs.
Drivers for your original computer hardware are installed at Gateway. If you
install a new device, you need to install the drivers provided by the device
manufacturer.
You should reinstall device drivers:
■If directed to do so while troubleshooting
■If you have reinstalled Windows NT 4.0
■If you see a message indicating that there is a problem with a device driver
This chapter provides instructions for reinstalling device drivers in
Windows 98, Windows Me, Windows 2000, and Windows NT 4.0. If you are
not comfortable with the procedures covered in this chapter, seek help from
a more experienced computer user or a computer service technician.
Solo9550.book Page 233 Tuesday, June 19, 2001 3:18 PM

234
Chapter 16: Reinstalling Device Drivers
www.gateway.com
Reinstalling device drivers in
Windows 98, Windows Me, or
Windows 2000
If you just reinstalled Windows 98, Windows Me, or Windows 2000, the
device drivers were automatically reinstalled. However, you need to reinstall
device drivers if directed to do so while troubleshooting or if a message tells
you that there is a problem with a device driver.
To reinstall Windows 98, Windows Me, or Windows 2000 device drivers:
1Place Disc 1 of the System Restoration Kit into your CD/DVD drive. The
System Restoration Kit program starts. Go to Step 5.
- OR -
If the program does not start automatically, go to Step 2.
2Click Start, then select Run. The Run dialog box opens.
3In the Open text box, type D:\RUNMENU.EXE (where D is the drive letter
of your CD/DVD drive).
4Click OK. The System Restoration Kit program starts.
5If the Welcome to the System Restoration Kit window opens, close it by
clicking OK.
6Click the Reinstall tab.
HelpSpot For more information on reinstalling device drivers,
double-click the HelpSpot icon on your desktop.
Solo9550.book Page 234 Tuesday, June 19, 2001 3:18 PM

235
Reinstalling device drivers in Windows 98, Windows Me, or Windows 2000
www.gateway.com
7Click Automatic Installation, then select multiple device drivers to reinstall.
- OR -
Click Manual Installation, then select a single device driver to reinstall.
8Click Install.
9Follow any additional on-screen instructions. Depending on the driver
you are reinstalling, you may only need to restart your computer to
complete the installation. However, if a setup wizard opens when you
restart your computer, follow the on-screen instructions.
Solo9550.book Page 235 Tuesday, June 19, 2001 3:18 PM

236
Chapter 16: Reinstalling Device Drivers
www.gateway.com
Updating device drivers in
Windows 98, Windows Me, or
Windows 2000
The Gateway System Restoration Kit contains a device driver update utility that
works over the Internet. If you do not have an Internet Service Provider, the
update utility works by direct dialing the device driver update service.
To update Windows 98, Windows Me, or Windows 2000 device drivers:
1Place Disc 1 of the System Restoration Kit into your CD/DVD drive. The
System Restoration Kit program starts. Go to Step 5.
- OR -
If the program does not start automatically, go to Step 2.
2Click Start, then select Run. The Run dialog box opens.
3In the Open text box, type D:\RUNMENU.EXE (where D is the drive letter
of your CD/DVD drive).
4Click OK. The System Restoration Kit program starts.
5If the Welcome to the System Restoration Kit window opens, close it by
clicking OK.
6Click the Update tab.
HelpSpot For more information on updating device drivers,
double-click the HelpSpot icon on your desktop.
Important If your system came equipped with a wireless device, only
use the drivers approved for the country the device will be
used in. See the Gateway System Restoration Kit or the
Gateway Technical Support Web site.
If your system came equipped with an internal embedded
wireless device, see “Safety, Regulatory, and Legal
Information” on page 281 for general wireless regulatory
and safety guidelines.To find out if your system has an
internal wireless device, check the label (see “Identifying
your model” on page 23).
Solo9550.book Page 236 Tuesday, June 19, 2001 3:18 PM

237
Updating device drivers in Windows 98, Windows Me, or Windows 2000
www.gateway.com
7Click Check Now. The Connect window opens.
8Install available updated device drivers by following the on-screen
instructions. Depending on the driver you are updating, you may only
need to restart your computer to complete the installation. However, if
a setup wizard opens when you restart your computer, follow the
on-screen instructions.
Solo9550.book Page 237 Tuesday, June 19, 2001 3:18 PM

238
Chapter 16: Reinstalling Device Drivers
www.gateway.com
Reinstalling Windows NT 4.0 device
drivers
The Windows NT Driver Locator utility is a tool that lets you locate device
drivers on Disc 1 of the System Restoration Kit. If you have problems with a
hardware device or you have reinstalled Windows NT 4.0, use the CD and the
procedures in this section to reinstall your computer hardware device drivers.
The process for reinstalling the Windows NT 4.0 device drivers includes:
■Finding the locations of the device drivers. For more information, see
“Locating Windows NT 4.0 drivers” on page 238.
■Reinstalling the device drivers. For more information, see “Reinstalling
Windows NT 4.0 video device drivers” on page 240.
■Reinstalling the Windows NT Service Pack. For more information, see
“Reinstalling the Windows NT Service Pack” on page 250.
Locating Windows NT 4.0 drivers
Use the Windows NT 4.0 Driver Locator utility to find the device drivers you
need to reinstall. The utility is located on Disc 1 of the System Restoration Kit.
To locate the Windows NT drivers:
1Place Disc 1 of the System Restoration Kit into your CD/DVD drive, then
restart your computer. The Gateway Boot Menu opens.
2Select 2 Boot from CD-ROM. The Main Menu opens.
3Select NT 4.0 Driver Locator, then press ENTER. The Windows NT 4.0 Driver
Locator utility opens and detects the hardware drivers.
Solo9550.book Page 238 Tuesday, June 19, 2001 3:18 PM
239
Reinstalling Windows NT 4.0 device drivers
www.gateway.com
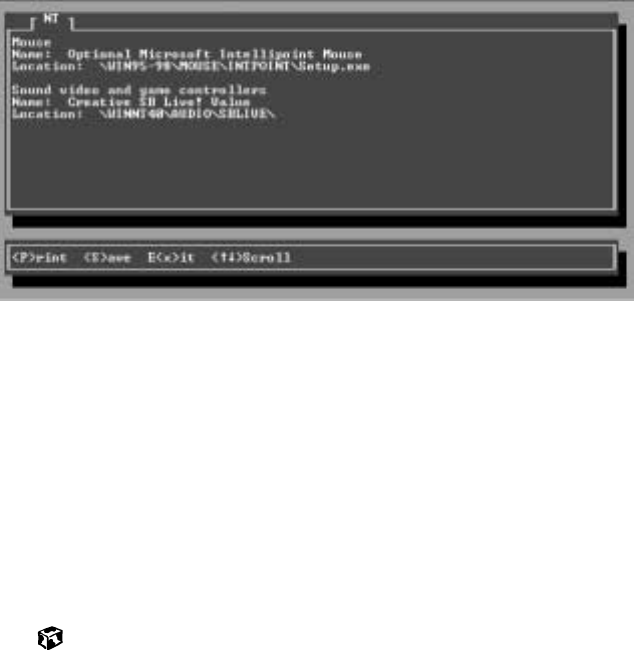
4When prompted to do so, press any key to continue. The
Windows NT 4.0 Drivers List screen appears. The list shows the devices
in your computer with the names and locations of each driver.
5If you want to print the Windows NT 4.0 Drivers List (parallel port printers
only), press P. Make sure your printer is connected and turned on.
- OR -
If you do not want to print the Windows NT 4.0 Drivers List, write down
the contents of each device’s Name and Location fields.
6Exit the program by pressing X.
7Remove Disc 1 of the System Restoration Kit, then restart your computer.
8Go to the next section for instructions to reinstall the drivers.
Solo9550.book Page 239 Tuesday, June 19, 2001 3:18 PM

240
Chapter 16: Reinstalling Device Drivers
www.gateway.com
Reinstalling Windows NT 4.0 video device
drivers
Use the instructions in this section to reinstall the drivers that support the
video devices in your computer.
To reinstall the Windows NT 4.0 video device driver:
1Make sure you ran the Windows NT 4.0 Locator utility to find the video
driver. For more information, see “Locating Windows NT 4.0 drivers” on
page 238.
2Place Disc 1 of the System Restoration Kit into your CD/DVD drive.
3If the CD starts automatically, close the CD window.
4If the driver location information for the video driver ends with a file
name (for example, setup.exe), go to Step 5.
- OR -
If the driver location information for your video card driver ends with
a backslash (\), go to Step 10.
5Click Start, then select Run. The Run dialog box opens.
6In the Open text box, type the drive letter (usually D:\ where D is the
drive letter of your CD/DVD drive), then type the driver location
(directory path) you found using the procedure in “Locating
Windows NT 4.0 drivers” on page 238.
7Click OK.
8Reinstall your video driver by following the on-screen instructions. You
have completed the driver reinstallation.
9If required, go to “Reinstalling Windows NT 4.0 audio device drivers” on
page 243. Otherwise, go to “Reinstalling the Windows NT Service Pack”
on page 250.
10 Click Start, then select Settings, then Control Panel. The Control Panel
window opens.
Solo9550.book Page 240 Tuesday, June 19, 2001 3:18 PM
241
Reinstalling Windows NT 4.0 device drivers
www.gateway.com
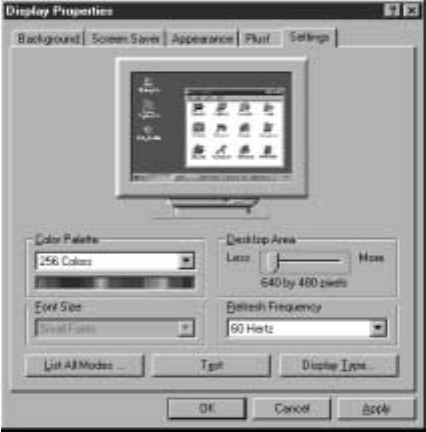
11 Double-click the Display icon. The Display Properties dialog box opens.
12 Click the Settings tab.
13 Click Display Type. The Display Type dialog box opens.
14 Click Change. The Change Display dialog box opens.
15 Click Have Disk. The Install From Disk dialog box opens.
16 Select the CD/DVD drive letter (usually drive D:\ where D is the letter
of the CD/DVD drive) in the Copy manufacturer’s file from list.
17 Click Browse, then select the directory that contains the video driver file
name you found when you ran the Windows NT 4.0 Locator utility.
18 Click the driver file name, select Open, then click OK. The Change Display
dialog box opens and shows the name of the display driver.
19 Click OK, then click Yes. The files copy to the hard drive and a message
tells you that the driver was successfully reinstalled and that you must
restart your computer.
20 Click OK.
Solo9550.book Page 241 Tuesday, June 19, 2001 3:18 PM

242
Chapter 16: Reinstalling Device Drivers
www.gateway.com
21 Remove Disc 1 of the System Restoration Kit, then click Yes. After the
computer starts, a message asks you to change the display resolution
settings.
22 Click OK. The Display Properties dialog box opens.
23 Select the desired color pallet from the Color palette list.
24 Slide the Desktop area slider to adjust display resolution to your preferred
setting.
25 Click Test, then click OK to make sure your settings work properly.
26 If the test screen showed properly, click Yes.
- OR -
If the test screen did not show properly, click No and make changes to
the settings, then test again.
27 Click OK.
28 If required, go to “Reinstalling Windows NT 4.0 audio device drivers” on
page 243. Otherwise, go to “Reinstalling the Windows NT Service Pack”
on page 250.
Solo9550.book Page 242 Tuesday, June 19, 2001 3:18 PM