Quanta Computer 9550015318 Mini-PCI Wireless LAN card in Notebook Computer User Manual Solo9550
Quanta Computer Inc Mini-PCI Wireless LAN card in Notebook Computer Solo9550
Contents
Manual Part 4
139
Extending battery life
www.gateway.com
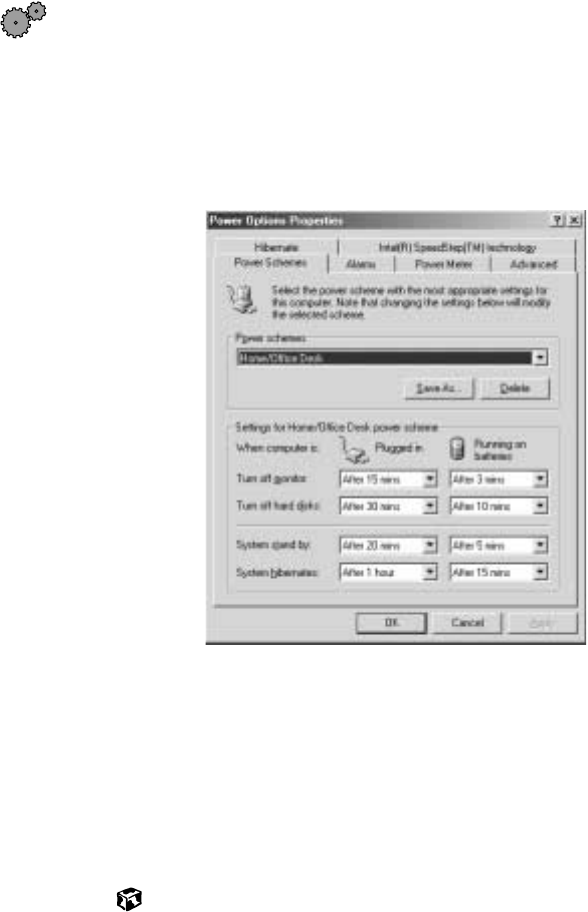
To change the power scheme
1Click Start, then select Settings, then Control Panel. The Control Panel
window opens. If you do not see the Power Options or Power Management
icon, click view all Control Panel options.
2Double-click the Power Options or Power Management icon. The Power
Options Properties dialog box opens.
3Select a power scheme from the Power Schemes list.
- OR -
Set the timers for System stand by, System hibernate, Turn off monitor, and
Turn off hard disks, then save your custom power scheme by clicking
Save As and typing a name for the scheme.
4Save the changes by clicking OK.
Solo9550.book Page 139 Tuesday, June 19, 2001 3:18 PM
140
Chapter 9: Managing Power
www.gateway.com
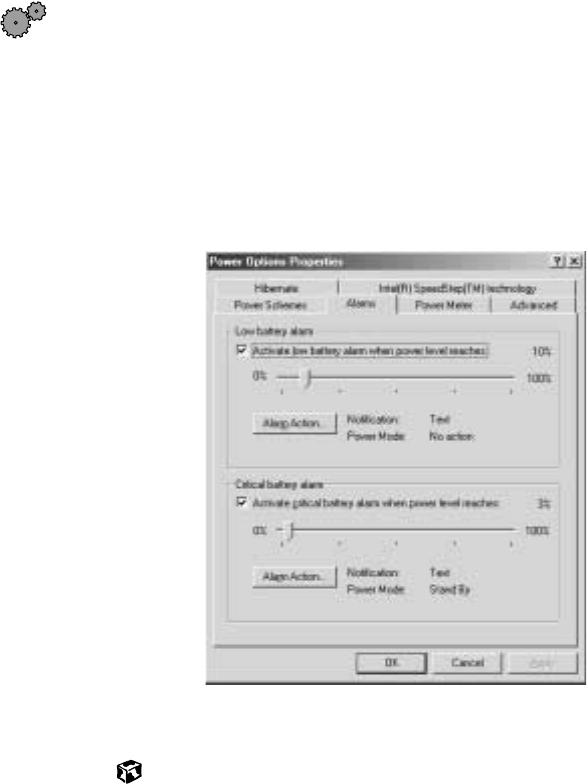
To change the alarm options:
1Click Start, then select Settings, then Control Panel. The Control Panel
window opens. If you do not see the Power Options or Power Management
icon, click view all Control Panel options.
2Double-click the Power Options or Power Management icon. The Power
Options Properties dialog box opens.
3Click the Alarms tab.
4Adjust the alarm settings, then save the changes by clicking OK.
Solo9550.book Page 140 Tuesday, June 19, 2001 3:18 PM
141
Extending battery life
www.gateway.com
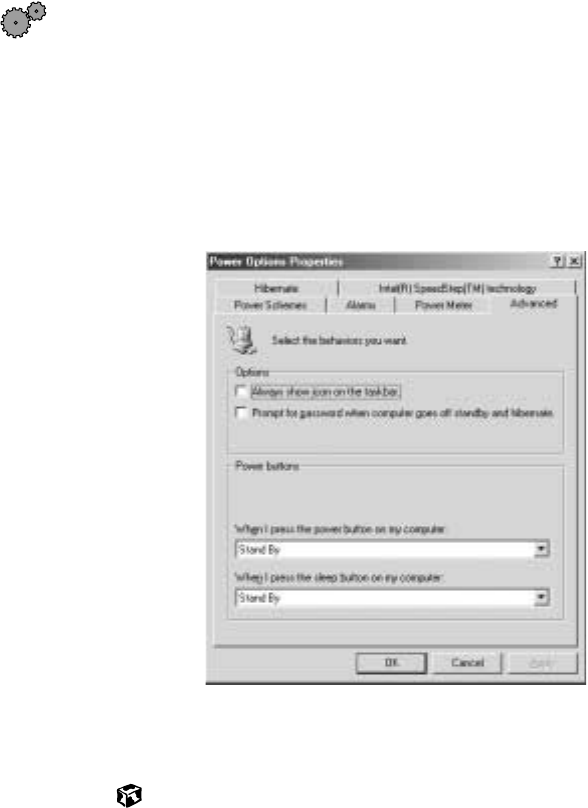
To change advanced power management settings:
1Click Start, then select Settings, then Control Panel. The Control Panel
window opens. If you do not see the Power Options or Power Management
icon, click view all Control Panel options.
2Double-click the Power Options or Power Management icon. The Power
Options Properties dialog box opens.
3Click the Advanced tab.
4Select a power savings mode to be activated by the power button, then
save the changes by clicking OK.
Solo9550.book Page 141 Tuesday, June 19, 2001 3:18 PM

142
Chapter 9: Managing Power
www.gateway.com
To use Hibernate mode:
1Click Start, then select Settings, then Control Panel. The Control Panel
window opens. If you do not see the Power Options or Power Management
icon, click view all Control Panel options.
2Double-click the Power Options or Power Management icon. The Power
Options Properties dialog box opens.
3Click the Hibernate tab.
4Select the Enable hibernate support check box, then click Apply. Hibernate
mode is now an option you can select on the Advanced tab and in the
Shut Down menu.
5To use Hibernate as a power savings mode, click the Advanced tab, select
Hibernate as one of the advanced power settings, then save the changes
by clicking OK.
6To manually activate Hibernate mode, click Start, then select Shut Down,
then Hibernate, then click OK.
Solo9550.book Page 142 Tuesday, June 19, 2001 3:18 PM

143
Extending battery life
www.gateway.com
Changing power settings in Windows NT
In Windows NT, you can monitor the remaining battery charge and set low
battery warnings.
To monitor the remaining battery charge:
1Double-click the battery icon or power cord icon on the taskbar. The
APM for NT dialog box opens.
2Click the Power Status tab. The current battery charge and estimated
working time remaining appear.
3Click OK.
To set the low battery warning:
1Double-click the battery icon or power cord icon on the taskbar. The
APM for NT dialog box opens.
2Click the Settings tab, then select the Enable Low Battery Warning check
box.
3Click OK. When the battery charge is very low, you see a warning message.
Solo9550.book Page 143 Tuesday, June 19, 2001 3:18 PM
144
Chapter 9: Managing Power
www.gateway.com
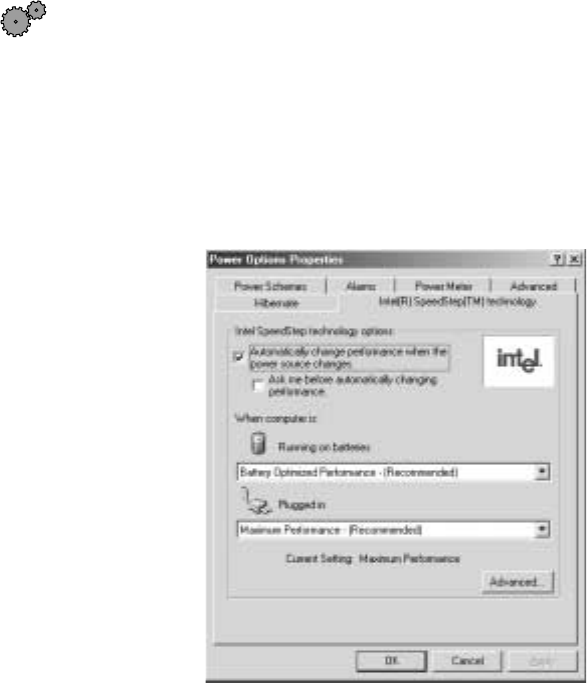
Changing SpeedStep settings
The processor installed in your notebook may use Intel® SpeedStep™
technology to conserve battery power. A SpeedStep-equipped processor can
change its operating speed according to the power source. Your notebook’s
default settings operate the processor at full speed while connected to
AC power and at reduced speed (which uses less power) while using battery
power.
To change SpeedStep settings:
1Click Start, then select Settings, then Control Panel. The Control Panel
window opens. If you do not see the Power Options or Power Management
icon, click view all Control Panel options.
2Double-click the Power Options or Power Management icon. The Power
Options Properties dialog box opens.
3Click the Intel SpeedStep technology tab.
Solo9550.book Page 144 Tuesday, June 19, 2001 3:18 PM

145
Extending battery life
www.gateway.com
4Change any of the following settings:
■To run the processor at full speed regardless of the power source,
change the Running on batteries setting to Maximum Performance.
■To run the processor at reduced speed (using less power) regardless
of the power source, change the Plugged in setting to Battery
Optimized Performance.
■To turn off SpeedStep technology control, click Advanced, select the
Disable Intel SpeedStep technology control check box, then click OK.
■To remove the SpeedStep icon from the taskbar, click Advanced,
select the Remove icon from taskbar check box, then click OK.
5Click OK.
Solo9550.book Page 145 Tuesday, June 19, 2001 3:18 PM
146
Chapter 9: Managing Power
www.gateway.com
Solo9550.book Page 146 Tuesday, June 19, 2001 3:18 PM

147
10
www.gateway.com
Travel Tips
These tips can make traveling with your notebook more convenient and
trouble-free. This chapter provides information on:
■Using the modem
■Using your radio frequency wireless connections
■Transferring files
■Protecting your notebook from loss and theft
■Managing your notebook’s power efficiently
Tips & Tricks To access the contents of this manual while you are
traveling, download an electronic copy from
www.gateway.com/support/manlib/.
Solo9550.book Page 147 Tuesday, June 19, 2001 3:18 PM
148
Chapter 10: Travel Tips
www.gateway.com
Modem
■Take a telephone cord to connect the modem to telephone jacks. If you
are traveling internationally, take telephone jack adapters or an acoustic
handset coupler.
■Take a telephone line protector.
■Take a telephone line tester to check for unsafe lines, especially if you
are traveling internationally.
■Take remote access information with you so you can connect to your ISP
while outside of your usual calling area. A list of country dialing codes
may be especially useful if you are traveling internationally.
■Download entire Web sites that you frequently visit for off-line viewing
if you will be traveling for extended periods without access to an Internet
connection.
Radio frequency wireless
connections
■Every country has different restrictions on the use of wireless devices. If
your system is equipped with a wireless device, when traveling between
countries with your system, check with the local Radio Approval
authorities prior to your trip for any restrictions on the use of a wireless
device in the destination country.
■If your system came equipped with an internal embedded wireless device,
see “Safety, Regulatory, and Legal Information” on page 281 for general
wireless regulatory guidelines.
■Wireless communication can interfere with equipment on commercial
aircraft. Current aviation regulations require wireless devices to be turned
off while traveling in an airplane. Bluetooth and IEEE 802.11B (also
known as wireless Ethernet or WiFi) communication devices are examples
of devices which use wireless to communicate.
Solo9550.book Page 148 Tuesday, June 19, 2001 3:18 PM

149
Files
www.gateway.com
Files
■Copy your working files from your desktop computer to your notebook
before you travel.
■If you need to access your desktop computer files from your notebook
while traveling, set up the desktop computer for remote access.
■Take extra diskettes for transferring files between computers and backing
up files.
Security
■Get a locking cable for your notebook so you can attach a cable lock and
leave the notebook in your hotel room while you are away.
■Always keep your notebook with you while waiting in airports, train
stations, or bus terminals. Be ready to claim your notebook as soon as it
passes through the x-ray machine in security checkpoints.
■Write down your notebook model number and serial number (available
on the system label) in case of theft or loss, and keep the information
in a safe place. Also, tape your business card or an address label to your
notebook and accessories.
■Whoever sits next to you or behind you can see your notebook display.
Avoid working with confidential files until you can be sure of privacy.
■Use a startup password to restrict access to your notebook.
Important Use a password that you can remember, but that is difficult
for someone else to guess. The password feature is very
secure, with no easy way to recover a forgotten password.
If you forget your password, you must return your notebook
to Gateway for service. Call Gateway Technical Support for
instructions.
Solo9550.book Page 149 Tuesday, June 19, 2001 3:18 PM

150
Chapter 10: Travel Tips
www.gateway.com
To create a startup password:
1Restart your notebook. As soon as you see a startup screen, press F2.
The BIOS Setup utility opens.
2Open the Security menu, then highlight Password on boot and press
ENTER.
3Highlight Enabled, then press ENTER.
4Highlight Set Supervisor Password, then press ENTER and follow the
instructions. You must set the supervisor password in order to set
the user (startup) password.
5Highlight Set User Password, then press ENTER and follow the
instructions. This is the password you need to enter at startup.
6Exit the BIOS Setup utility by opening the Exit menu, then selecting
Exit Saving Changes. When you start your computer, you are
prompted to enter the user password you set in Step 5.
Power
To get the best performance from your notebook, avoid using the battery
whenever possible, monitor the battery charge, and use the most efficient
power management settings.
■For information on conserving battery power, see “Conserving battery
power” on page 136.
■For information on using alternate power sources, see “Using alternate
power sources” on page 136.
■For information on monitoring the battery charge, see “Monitoring the
battery charge” on page 130.
Solo9550.book Page 150 Tuesday, June 19, 2001 3:18 PM

151
11
www.gateway.com
Customizing
Your Notebook
This chapter provides information about customizing your computer by
changing settings in Windows.
You can:
■Change screen and display settings
■Change the background and screen saver
■Adjust the touchpad settings
■Program the multi-function buttons on the keyboard
Solo9550.book Page 151 Tuesday, June 19, 2001 3:18 PM

152
Chapter 11: Customizing Your Notebook
www.gateway.com
Adjusting the screen and desktop
settings
Adjusting the color depth and screen area are two of the most basic display
settings you may need to change. You can also adjust settings such as the
screen background and screen saver.
Adjusting the color depth
Color depth is the number of colors your LCD displays. Various image types
require various color depths for optimum appearance on your LCD. For
example, simple color drawings may appear adequately in 256 colors while
color photographs need millions of colors to be displayed with optimum
quality.
Windows lets you choose from several color depth settings for your LCD. We
recommend that the 16-bit High Color setting be used at all times.
If the color in your images seems “false” or “jumpy,” especially after you have
played a game or run a video-intensive program, check the color depth setting
and return it to 16-bit High Color, if necessary.
HelpSpot For more information on adjusting the color depth,
double-click the HelpSpot icon on your desktop.
Solo9550.book Page 152 Tuesday, June 19, 2001 3:18 PM
153
Adjusting the screen and desktop settings
www.gateway.com
To change the color depth:
1Click Start, then select Settings, then Control Panel. The Control Panel
window opens.
2Click/Double-click the Display icon. The Display Properties window
opens.
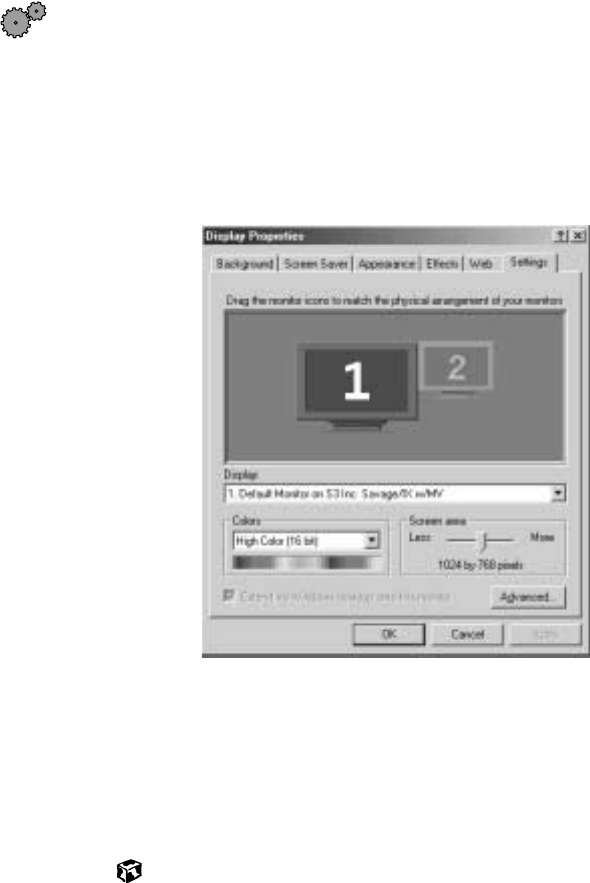
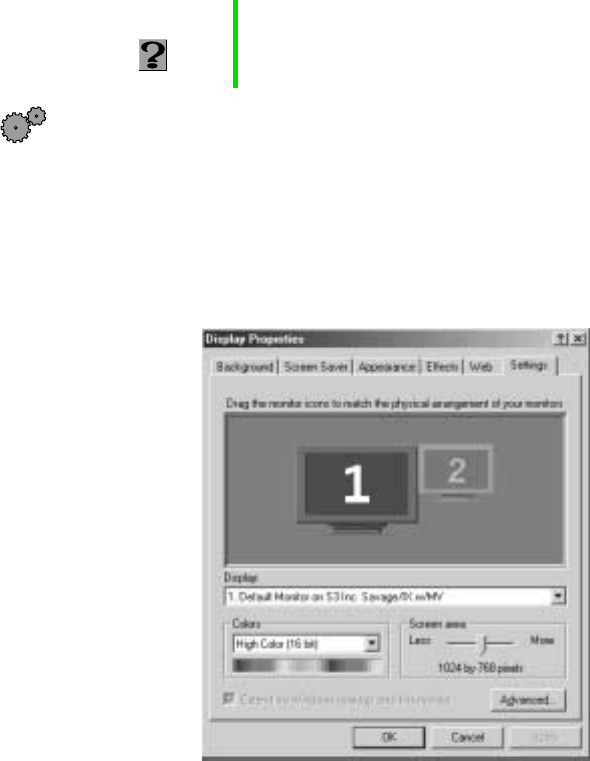
3Click the Settings tab.
4Select a setting from the Colors list. For most purposes, the color depth
should be 16-bit High Color.
5If you want to save your changes, click OK. Windows tells you it will apply
your changes when you click OK again.
6Click OK.
Solo9550.book Page 153 Tuesday, June 19, 2001 3:18 PM
154
Chapter 11: Customizing Your Notebook
www.gateway.com
Adjusting the screen area
You can change the screen area to a size you prefer. For example, you can
increase the screen area to fit more icons on your desktop, or you can decrease
the screen area to make reading and identifying objects on the display easier.
The larger the screen area, the smaller individual components of the screen,
such as icons and menu bars, appear.
To change the screen area:
1Click Start, then select Settings, then Control Panel. The Control Panel
window opens.
2Click/Double-click the Display icon. The Display Properties window
opens.
3Click the Settings tab.
4Drag the Screen area slider to the size you prefer.
HelpSpot For more information on adjusting the screen area,
double-click the HelpSpot icon on your desktop.
Solo9550.book Page 154 Tuesday, June 19, 2001 3:18 PM

155
Adjusting the screen and desktop settings
www.gateway.com
5If you want to save your changes, click OK. Windows tells you it will apply
your changes when you click OK again.
6Click OK.
Applying a color scheme
A color scheme is a set of colors that you can apply to your Windows
environment. For example, you can change the appearance of such things as
the desktop, windows, and dialog boxes. You can select an existing scheme
or create your own.
To select a color scheme:
1Click Start, then select Settings, then Control Panel. The Control Panel
window opens.
2Click/Double-click the Display icon. The Display Properties window
opens.
HelpSpot For more information on applying a color scheme,
double-click the HelpSpot icon on your desktop.
Solo9550.book Page 155 Tuesday, June 19, 2001 3:18 PM
156
Chapter 11: Customizing Your Notebook
www.gateway.com
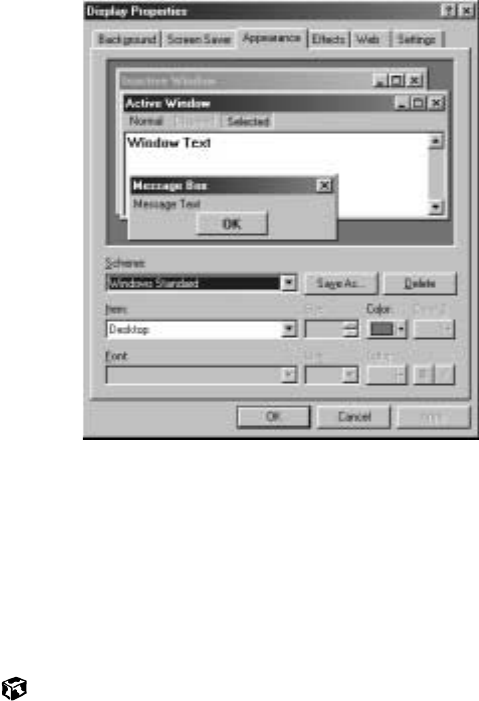
3Click the Appearance tab. If you want to apply one of Windows’ color
schemes, go to Step 6.
4If you want to create a new scheme, select various items from the Item
list and change their settings.
5Click Save As, type a name for the new scheme, and then click OK.
6Select a color scheme from the Scheme list. An example of the scheme
appears in the window above the list.
7Click OK.
Solo9550.book Page 156 Tuesday, June 19, 2001 3:18 PM

157
Adjusting the screen and desktop settings
www.gateway.com
Changing the desktop background
The Windows desktop background can be changed to either a picture or HTML
document. Windows provides several background pictures. You can also use
pictures or HTML documents that you have created or retrieved from other
sources.
To change the desktop background:
1Click Start, then select Settings, then Control Panel. The Control Panel
window opens.
2Click/Double-click the Display icon. The Display Properties dialog box
opens.
Important If Active Desktop is turned on and you have chosen to
display Web content, the standard desktop background will
be partially or completely hidden, so you may not be able
to see changes you have made in the background. For
more information about Active Desktop, see HelpSpot.
HelpSpot For more information on changing the desktop
background, double-click the HelpSpot icon on your
desktop.
Solo9550.book Page 157 Tuesday, June 19, 2001 3:18 PM
158
Chapter 11: Customizing Your Notebook
www.gateway.com
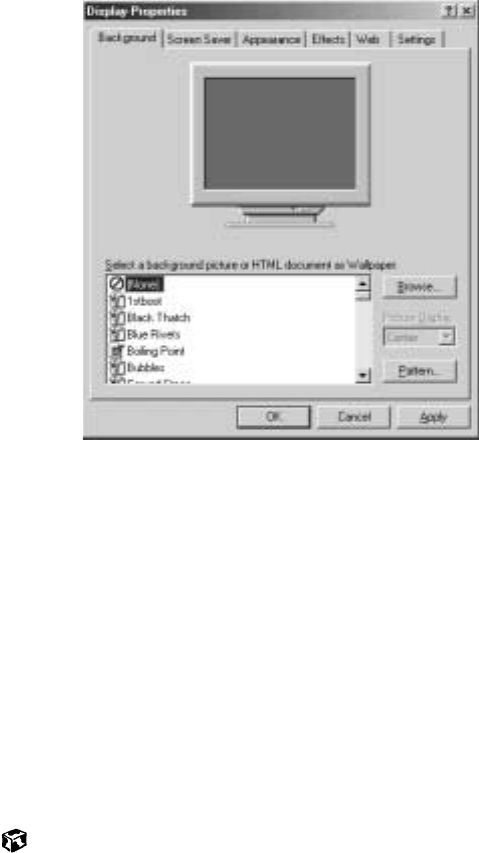
3Click the Background tab.
4Select a background picture from the Select a background picture or HTML
document as Wallpaper list.
- OR -
Select a background picture from another location by clicking Browse.
5If you want the picture you chose to cover the entire screen, select Tile
from the Picture Display list.
6If the picture you chose does not cover the entire screen and you did
not choose to tile the image in Step 5, you can change the solid color
behind the picture by clicking Pattern, selecting a pattern from the Pattern
list, then clicking OK.
7Click OK.
Solo9550.book Page 158 Tuesday, June 19, 2001 3:18 PM

159
Adjusting the screen and desktop settings
www.gateway.com
Selecting a screen saver
You can use a screen saver to keep others from viewing your screen while you
are away from your computer. Windows supplies a variety of screen savers
that you can choose from, and many more are available from the Internet
and as commercial products.
To select a screen saver:
1Click Start, then select Settings, then Control Panel. The Control Panel
window opens.
2Click/Double-click the Display icon. The Display Properties dialog box
opens.
HelpSpot For more information on changing the screen saver,
double-click the HelpSpot icon on your desktop.
Solo9550.book Page 159 Tuesday, June 19, 2001 3:18 PM
160
Chapter 11: Customizing Your Notebook
www.gateway.com
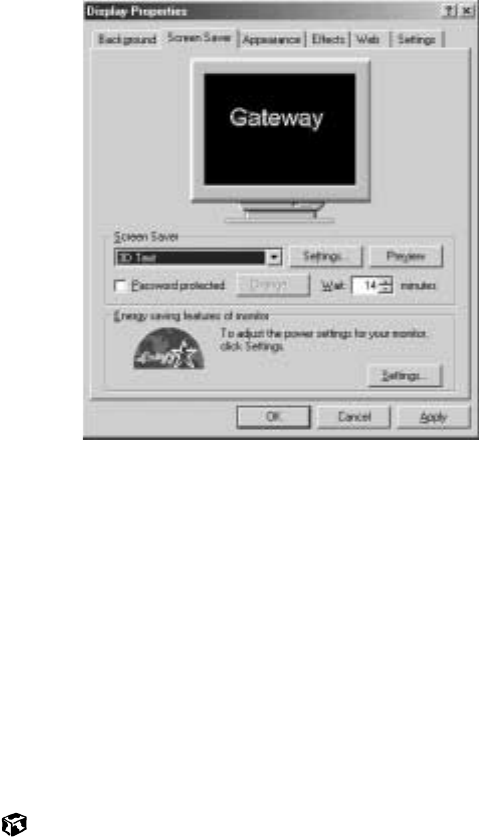
3Click the Screen Saver tab.
4Select a screen saver from the Screen Saver list. Windows previews the
screen saver.
5If you want to customize the screen saver, click Settings and then make
your changes. If the Settings button is not available, you cannot
customize the screen saver you selected.
6If you want to password protect your screen saver, select the
Password protected checkbox, click Change, type your password, confirm
it, then click OK.
7If you want to change the time before the screen saver is activated, click
the up or down arrows next to the Wait box.
8Click OK.
Solo9550.book Page 160 Tuesday, June 19, 2001 3:18 PM
161
Changing the touchpad settings
www.gateway.com
Changing the touchpad settings
You can adjust the double-click speed, pointer speed, left-hand or right-hand
configuration, and other touchpad settings.
To change your touchpad settings:
1Click Start, then select Settings, then Control Panel. The Control Panel
window opens. If you do not see the Mouse icon, click view all Control
Panel options.
2Double-click the Mouse icon. The Mouse Properties dialog box opens.
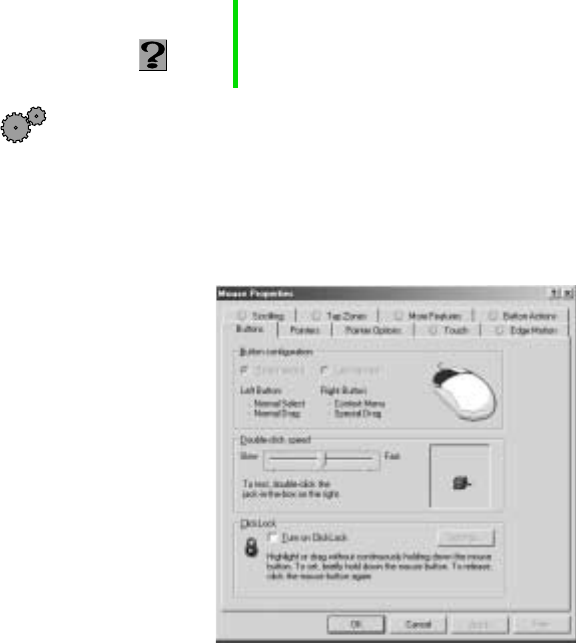
3Click one of the tabs to change your touchpad settings:
■Buttons lets you change the button configuration and the
double-click speed.
■Pointers lets you customize the appearance of your cursor and
pointer.
■Pointer Options lets you set your pointer speed and pointer trails.
HelpSpot For more information on changing the mouse settings,
double-click the HelpSpot icon on your desktop.
Solo9550.book Page 161 Tuesday, June 19, 2001 3:18 PM
162
Chapter 11: Customizing Your Notebook
www.gateway.com
■Touch lets you customize the tap response and sensitivity of the
touchpad.
■Edge Motion lets you customize the long distance pointer motion
of the touchpad.
■Scrolling lets you customize the virtual scrolling capabilities of the
touchpad.
■Tap Zones lets you assign specific actions to zones on the touchpad.
■More Features lets you control special features of the touchpad.
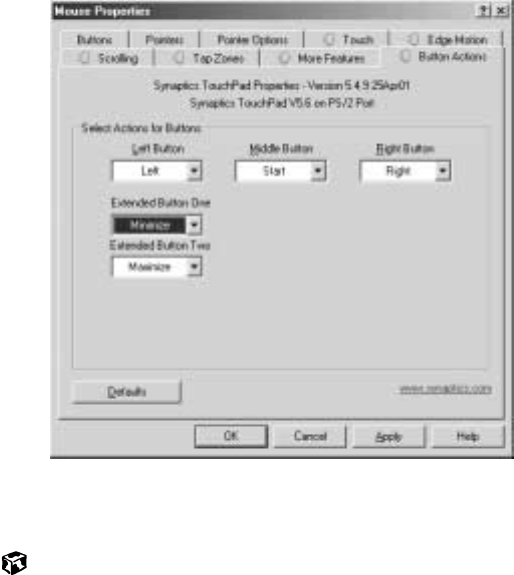
■Button Actions lets you assign specific actions to the touchpad
buttons.
4To assign a function to the rocker switch on the Solo 9550, click the Button
Actions tab. Select the function for the Extended Button One (for the top
rocker button) and Extended Button Two (for the bottom rocker button)
from the lists.
5Click OK to save changes. For more information on the touchpad settings,
click Help.
Solo9550.book Page 162 Tuesday, June 19, 2001 3:18 PM
163
Programming the multi-function buttons
www.gateway.com
Programming the multi-function
buttons
The Multi-function Keyboard Utility lets you change the actions of some of
the multi-function buttons.
To program the multi-function buttons:
1Click Start, then select Settings, then Control Panel. The Control Panel
window opens. If you do not see the Multi-function Keyboard icon, click
view all Control Panel options.
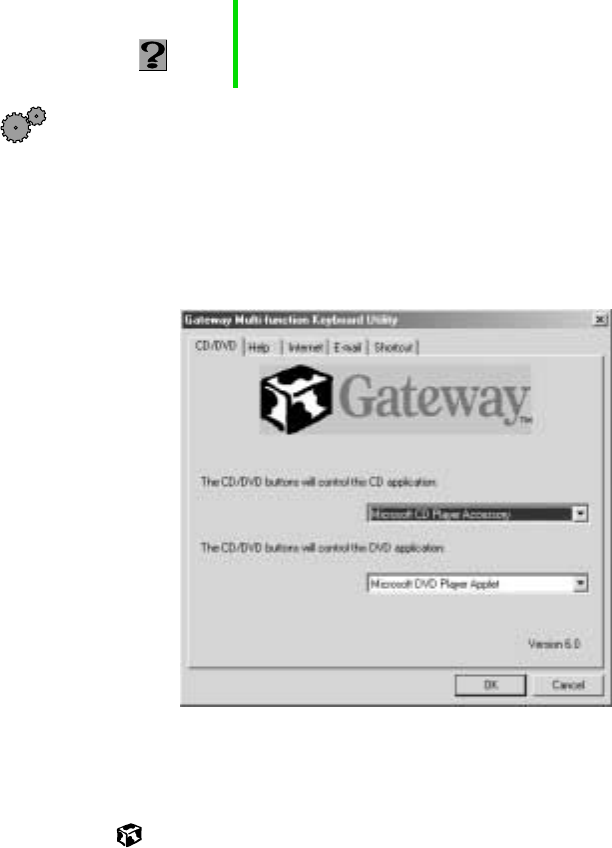
2Double-click the Multi-function Keyboard icon. The Gateway
Multi-function Keyboard Utility dialog box opens.
3Click the tab corresponding to the multi-function button to make
changes to its function, then click OK. To see which button each tab
corresponds to, see “Multi-function buttons” on page 40.
HelpSpot For more information on programming the multi-function
buttons, double-click the HelpSpot icon on your desktop.
Solo9550.book Page 163 Tuesday, June 19, 2001 3:18 PM
164
Chapter 11: Customizing Your Notebook
www.gateway.com
Solo9550.book Page 164 Tuesday, June 19, 2001 3:18 PM

165
12
www.gateway.com
Upgrading Your
Notebook
This chapter provides information about adding hardware devices to your
notebook. Topics include:
■Adding PC Cards
■Changing bay modules
■Replacing memory
■Replacing the hard drive
Solo9550.book Page 165 Tuesday, June 19, 2001 3:18 PM
166
Chapter 12: Upgrading Your Notebook
www.gateway.com
Adding PC Cards
Your notebook has two PC Card slots (also known as PCMCIA card slots).
These slots accept Type I, II, and III PC Cards.
You do not need to restart your notebook when changing most cards because
your notebook supports hot-swapping. Hot-swapping means that you can
insert a PC Card while your notebook is running. If your PC Card does not
work after hot-swapping, refer to the PC Card manufacturer’s documentation
for further information.
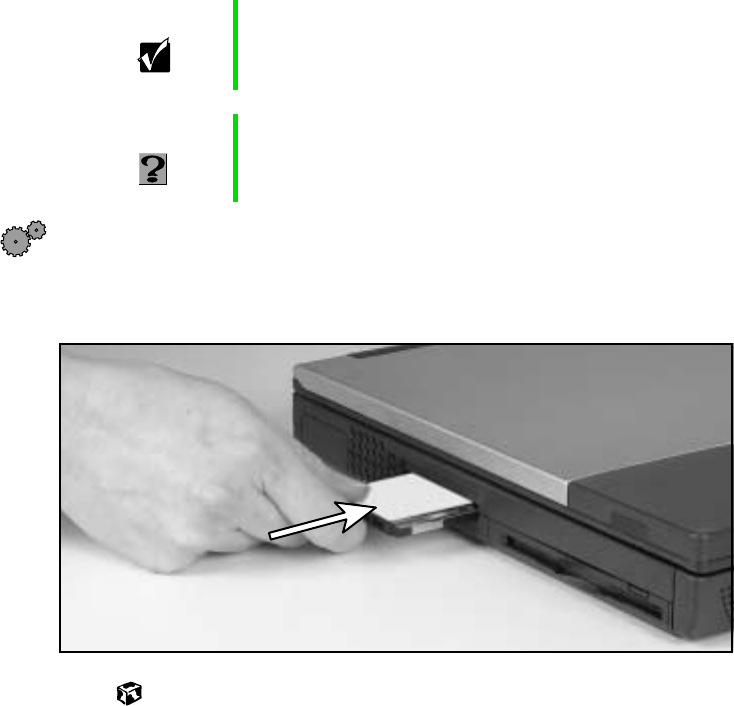
To insert a PC Card:
■Push the card firmly into the PC Card slot label-side up until the outer
edge of the card is flush with the side of the notebook.
Important The Solo 9500 also supports Zoom Video PC Cards. If you
are using a Zoom Video PC Card, it must be inserted into
the bottom slot.
HelpSpot For more information on adding PC Cards, double-click the
HelpSpot icon on your desktop.
Solo9550.book Page 166 Tuesday, June 19, 2001 3:18 PM
167
Adding PC Cards
www.gateway.com
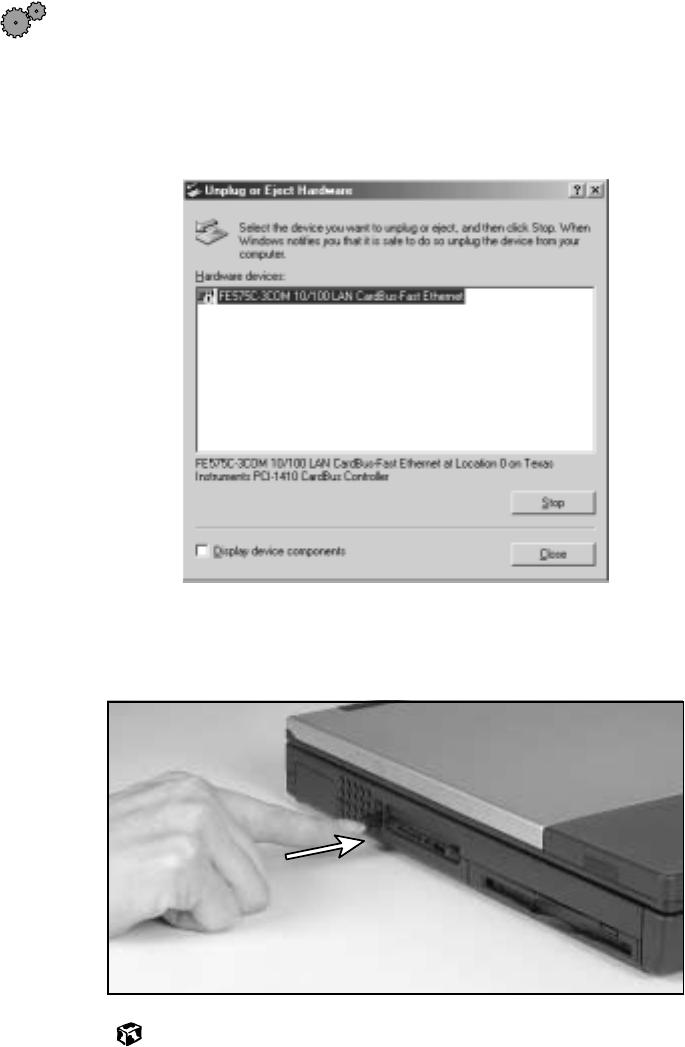
To remove a PC Card:
1Click the PC Card eject icon on the task bar (Windows Me and
Windows 2000 only).
2Select the name of the card you want to remove, then click the Stop
button (Windows Me and Windows 2000 only).
3Release the eject button by pressing the PC Card eject button once.
4Eject the PC Card by pressing the eject button again.
Solo9550.book Page 167 Tuesday, June 19, 2001 3:18 PM
168
Chapter 12: Upgrading Your Notebook
www.gateway.com
Changing bay modules
Your notebook’s modular bays support different bay modules, such as a
CD/DVD drive, a second hard drive, a diskette drive, or a second battery.
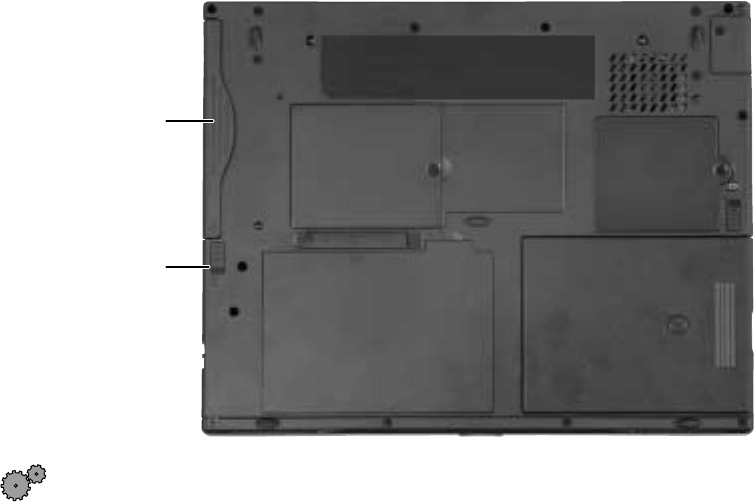
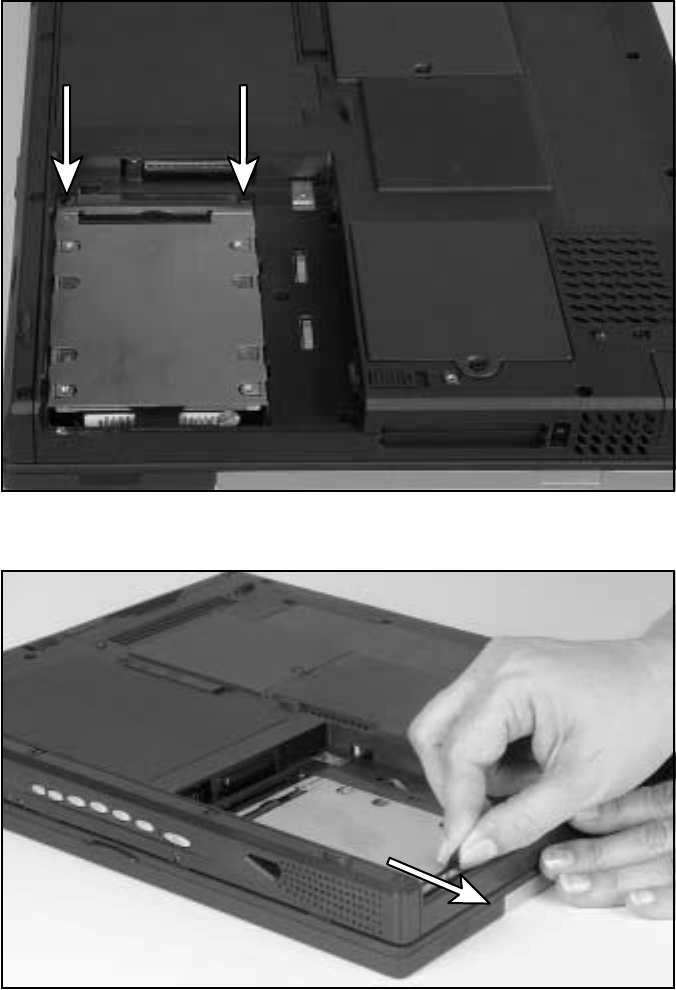
Changing 5.25” bay modules
To change 5.25” bay modules:
1Make sure your notebook is on or off (not in Standby or Hibernate mode).
2If your notebook is on, left-click the BaySwap icon in the taskbar, then
click Change drives in Swappable Bay. The hot-swap indicator turns green
when it is safe to pull the module out of the bay. If your notebook is
off, skip this step.
3Close the cover and turn your notebook over.
5.25” modular
bay release
latch
5.25” modular
bay
Solo9550.book Page 168 Tuesday, June 19, 2001 3:18 PM
169
Changing bay modules
www.gateway.com
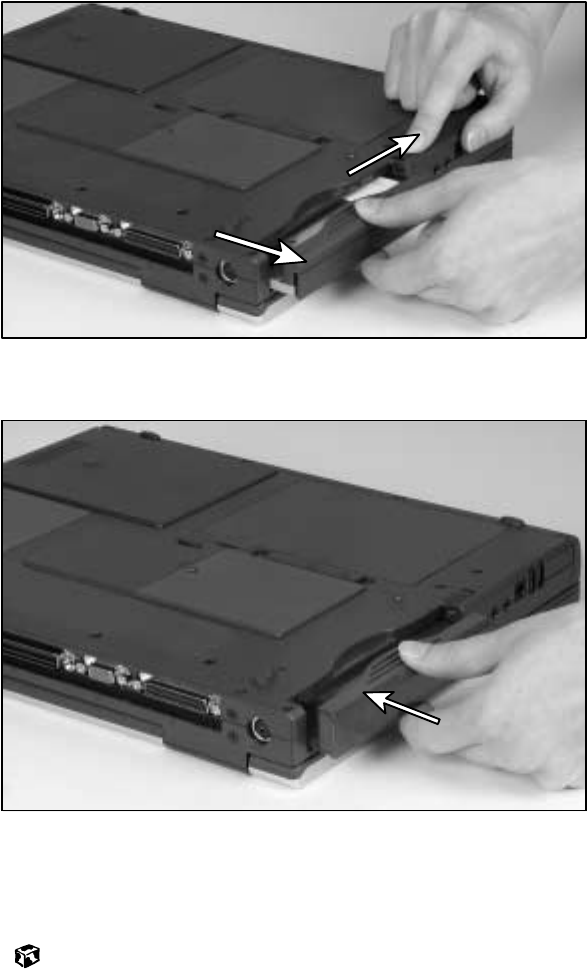
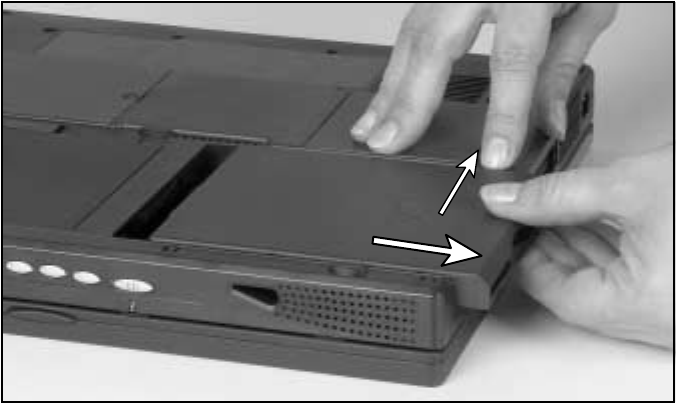
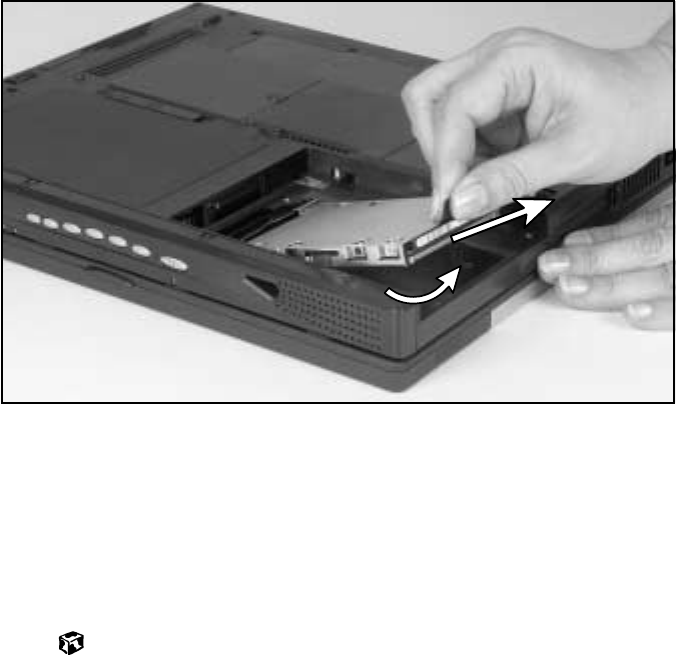
4Slide and hold the release latch, then pull the module straight out and
away from your notebook.
5Push the new module straight into the bay until it clicks into place.
6Open the notebook.
7If your notebook is on, click the OK button in the BaySwap dialog box.
If your notebook is off, turn it on.
Solo9550.book Page 169 Tuesday, June 19, 2001 3:18 PM

170
Chapter 12: Upgrading Your Notebook
www.gateway.com
Changing 3.5” bay modules
To change 3.5” bay modules:
1Turn off the notebook (do not go to Hibernate mode), close the cover,
and turn the notebook over.
2Remove the security screw. (Solo 9500 only.)
3Slide and hold the release latch, then pull the module straight out and
away from your notebook.
4Push the new module straight into the bay until it clicks into place.
5Replace the security screw. (Solo 9500 only.)
6Turn on your notebook and resume your work.
Security screw
(Solo 9500 only)
3.5” modular
bay release
latch
3.5” modular
bay
Solo9550.book Page 170 Tuesday, June 19, 2001 3:18 PM

171
Preventing static electricity discharge
www.gateway.com
Preventing static electricity discharge
The components inside your computer are extremely sensitive to static
electricity, also known as electrostatic discharge (ESD).
Before installing memory or replacing the hard drive, follow these guidelines:
■Turn off the computer power.
■Wear a grounding wrist strap (available at most electronics stores) and
attach it to a bare metal part of the computer.
■Touch a bare metal surface on the back of the computer.
■Unplug the power cord and modem cable.
■Remove the main battery (and secondary battery, if installed).
Before working with computer components, follow these guidelines:
■Avoid static-causing surfaces such as carpeted floors, plastic, and packing
foam.
■Remove components from their antistatic bags only when you are ready
to use them. Do not lay components on the outside of antistatic bags
because only the inside of the bags provide electrostatic protection.
■Always hold expansion cards by their edges or their metal mounting
brackets. Avoid touching the edge connectors and components on the
cards. Never slide expansion cards or components over any surface.
Caution ESD can permanently damage electrostatic discharge
sensitive components in the computer. Prevent ESD
damage by following ESD guidelines every time you open
the computer case.
Warning To avoid exposure to dangerous electrical voltages and
moving parts, turn off your computer and unplug the power
cord and modem cable before opening the case.
Warning To prevent risk of electric shock, do not insert any object
into the vent holes of the notebook.
Solo9550.book Page 171 Tuesday, June 19, 2001 3:18 PM
172
Chapter 12: Upgrading Your Notebook
www.gateway.com
Installing memory
Your portable computer uses memory modules called SO-DIMMs (Small
Outline Dual Inline Memory Modules). The modules are available in various
capacities and any module can be placed in any available slot. Use only PC133
memory modules for upgrading your memory.
To add or replace memory modules:
1Follow the instructions under “Preventing static electricity discharge” on
page 171.
2Turn off the notebook (do not go to Hibernate mode) and close the cover.
3Disconnect the power and modem cables.
4Turn the notebook over, then remove the main battery (and second
battery, if installed). For more information, see “Changing the main
battery” on page 132 and “Installing a second battery” on page 134.
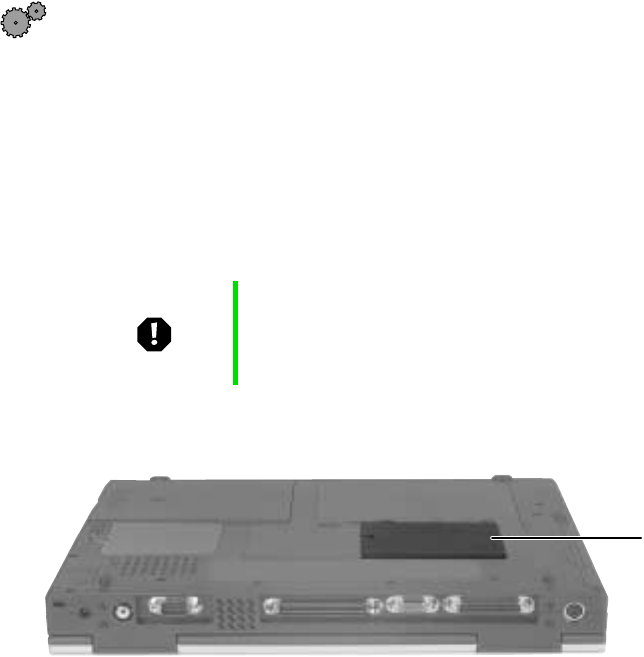
5Remove the memory bay cover screw, then remove the memory bay
cover.
Warning Disconnect the power supply cord, remove the battery, and
disconnect the modem cable before you remove the
memory bay cover. Replace the cover before you restore
power or reconnect the modem cable.
Memory bay
cover
Solo9550.book Page 172 Tuesday, June 19, 2001 3:18 PM
173
Installing memory
www.gateway.com
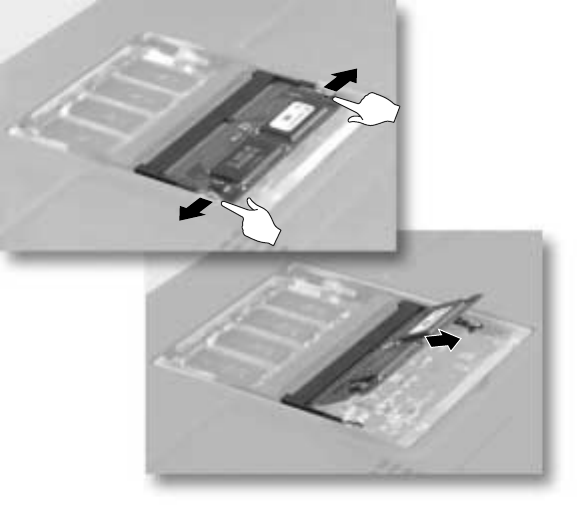
6If you are removing a memory module, gently press outward on both
clips at either end of the memory module until the module tilts upward.
(The illustration below may look different from your computer.)
7Pull the memory module out of the slot
Solo9550.book Page 173 Tuesday, June 19, 2001 3:18 PM
174
Chapter 12: Upgrading Your Notebook
www.gateway.com
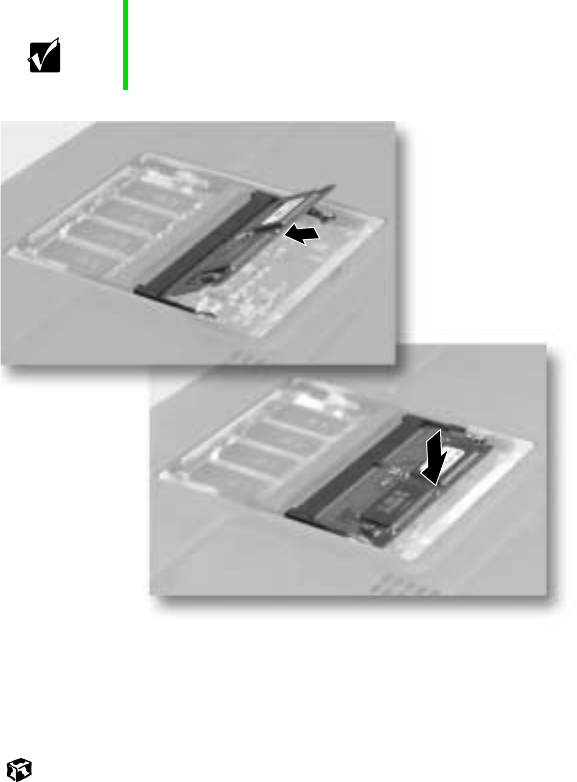
8Hold the new or replacement module at a 30-degree angle and press it
into the empty memory slot. This module is keyed so that it can only
be inserted in one direction. If the module does not fit, make sure the
slot in the module lines up with the tab in the memory bay. (The
illustration below may look different from your computer.)
9Gently push the module down until it clicks in place.
10 Replace the memory bay cover and cover screw, insert the battery,
connect the AC adapter, and turn on your notebook.
Important Use only PC133 (133 MHz) memory modules.
Solo9550.book Page 174 Tuesday, June 19, 2001 3:18 PM

175
Replacing the main hard drive
www.gateway.com
Replacing the main hard drive
If you would like more hard drive capacity, you can install a second hard drive
or replace your original drive with a higher-capacity drive. To replace the drive,
follow the instructions below.
To replace the main hard drive:
1Follow the instructions under “Preventing static electricity discharge” on
page 171 for important precautions.
2Turn off the notebook (do not go to Hibernate mode) and close the cover.
3Disconnect the power and modem cables.
4Turn the notebook over, then remove the main battery (and second
battery, if installed). For more information, see “Changing the main
battery” on page 132 and “Installing a second battery” on page 134.
5Remove the security screw. (Solo 9500 only.)
Warning Disconnect the power supply cord, remove the battery, and
disconnect the modem cable before you remove the hard
drive. Replace the hard drive before you restore power or
reconnect the modem cable.
Solo9550.book Page 175 Tuesday, June 19, 2001 3:18 PM
176
Chapter 12: Upgrading Your Notebook
www.gateway.com
6Slide and hold the release latch, then pull the 3.5” module straight out
and away from your notebook. The main hard drive is located beneath
the 3.5” module.
Solo9550.book Page 176 Tuesday, June 19, 2001 3:18 PM
177
Replacing the main hard drive
www.gateway.com
7Remove the two screws that secure the hard drive kit to the notebook.
8Slide the hard drive kit away from the connector.
Solo9550.book Page 177 Tuesday, June 19, 2001 3:18 PM
178
Chapter 12: Upgrading Your Notebook
www.gateway.com
9Lift the end of the hard drive kit furthest from the connector, then
remove the kit from the bay.
10 Place the new hard drive kit in the bay and slide it into the connector.
11 Replace the two screws to secure the hard drive kit to the notebook.
12 Reinstall the 3.5” module.
13 Reinstall the security screw (Solo 9500 only).
14 Reinstall the battery and connect the power.
Solo9550.book Page 178 Tuesday, June 19, 2001 3:18 PM

179
13
www.gateway.com
Using the Port
Replicator and
Docking Station
Checking out the port replicator
The optional port replicator gives you a convenient way to attach external
devices such as a monitor, a full-size keyboard, or an AC adapter.
Although devices can be attached directly to the ports on the notebook, the
port replicator lets you make all of those connections in one step. The port
replicator also gives you access to additional ports not found on the notebook.
Solo9550.book Page 179 Tuesday, June 19, 2001 3:18 PM
180
Chapter 13: Using the Port Replicator and Docking Station
www.gateway.com
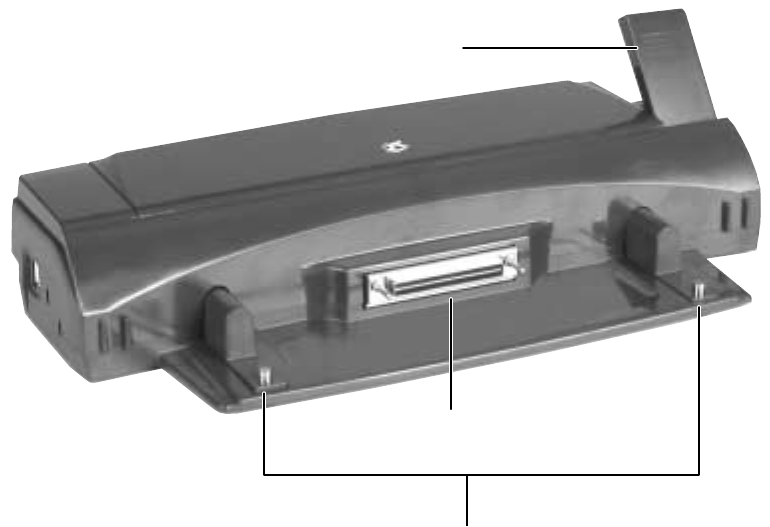
Front
Release latch
Docking port
Docking posts
Solo9550.book Page 180 Tuesday, June 19, 2001 3:18 PM
181
Checking out the port replicator
www.gateway.com
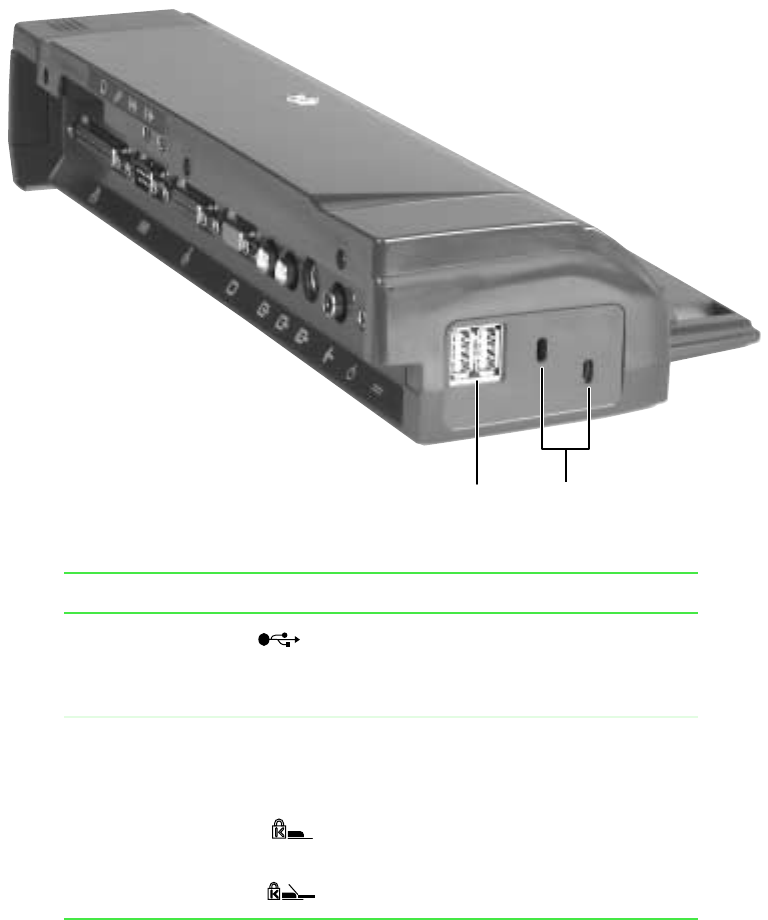
Left side
Component Icon Description
USB ports Plug a USB device (such as a USB scanner)
into one of these ports. When the notebook
is docked, only the USB ports on the port
replicator are available.
Dual-mode
Kensington lock
slots
Secure your notebook and port replicator to
an object by connecting a Kensington cable
lock to these slots.
Connect the lock here to secure only the port
replicator (left slot).
Connect the lock here to secure both the port
replicator and the notebook (right slot).
USB ports Dual-mode
Kensington lock slots
Solo9550.book Page 181 Tuesday, June 19, 2001 3:18 PM
182
Chapter 13: Using the Port Replicator and Docking Station
www.gateway.com
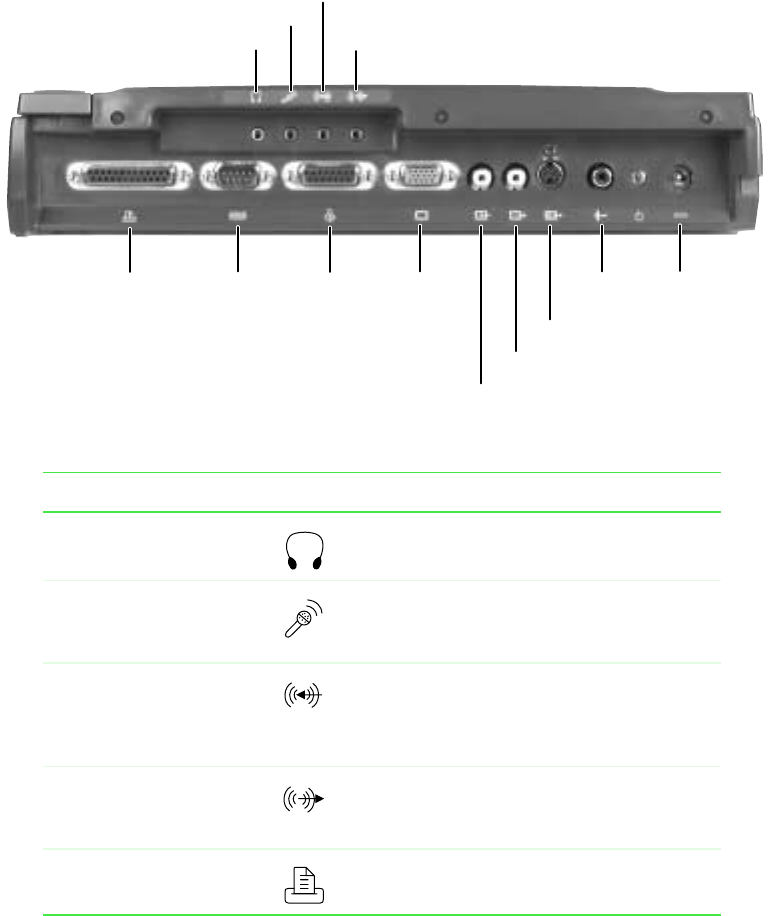
Back
Component Icon Description
Headphone jack Plug amplified speakers or headphones into
this jack.
Microphone jack Plug a microphone into this jack. While the
external microphone is connected, the built-in
microphone is turned off.
Line in jack Connect an external audio device (such as a
stereo) to this jack so you can record sound
on your notebook or play sound through the
notebook speakers.
Line out jack Connect an external audio device (such as a
stereo) to this jack so you can play your
notebook audio through that device.
Parallel port Plug a parallel device (such as a printer) into
this port.
Headphone jack
Microphone jack
Line in jack
Line out jack
Parallel port Serial port Joystick/
MIDI port Monitor
port
TV in jack
TV out jack
S-Video out jack
S/PDIF
jack Power
connector
Serial port
Solo9550.book Page 182 Tuesday, June 19, 2001 3:18 PM
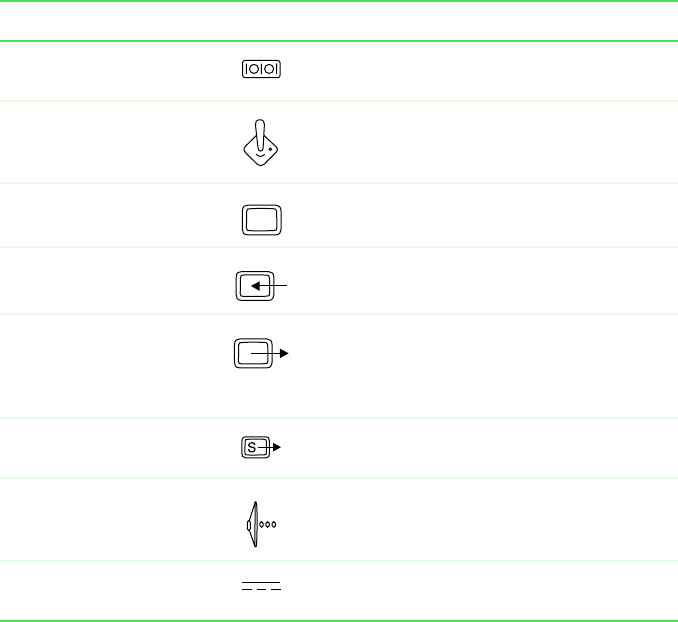
183
Checking out the port replicator
www.gateway.com
Serial port Plug a serial device (such as a serial camera)
into this port.
Joystick/MIDI port Plug a game joystick or an electronic MIDI
musical instrument into this port. This port
provides both MIDI in and out capabilities.
Monitor port Plug an external VGA monitor into this port.
TV in jack Not functional with your notebook.
TV out jack Plug a standard RCA cable into this jack and
the jack on a TV or VCR so you can view your
notebook display on a TV using NTSC/PAL
Composite Video.
S-Video out jack Plug a standard S-Video cable into this jack
and the jack on an S-Video device.
S/PDIF jack Plug a standard RCA cable into this jack and
the jack on a digital audio device.
Power connector Plug the AC adapter into this connector. Use
only the AC adapter for your particular model.
Component Icon Description
Solo9550.book Page 183 Tuesday, June 19, 2001 3:18 PM
184
Chapter 13: Using the Port Replicator and Docking Station
www.gateway.com
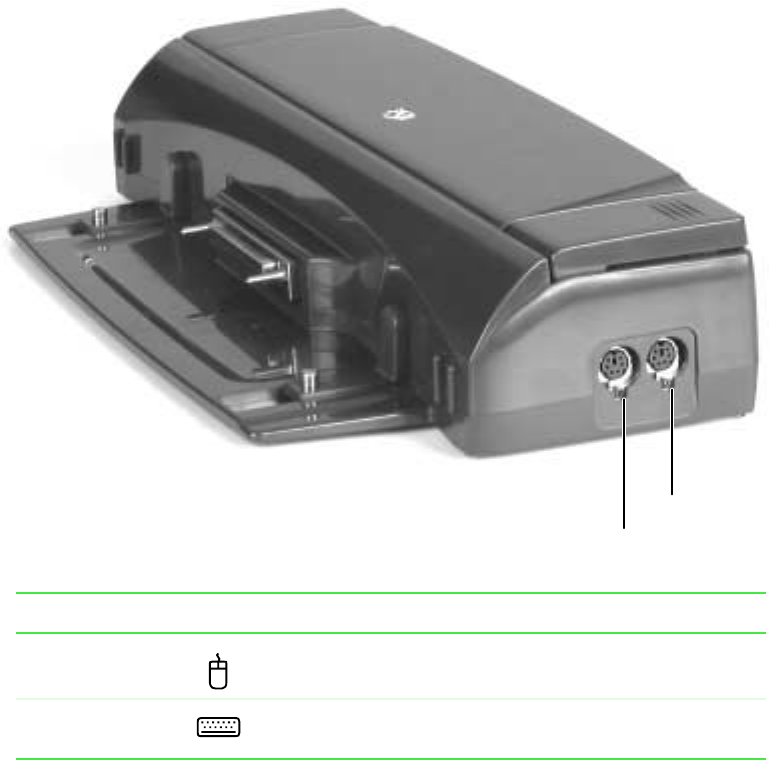
Right side
Component Icon Description
PS/2 mouse port Plug a PS/2 mouse into this port.
PS/2 keyboard
port Plug a PS/2 keyboard into this port.
PS/2 mouse port
PS/2
keyboard port
Solo9550.book Page 184 Tuesday, June 19, 2001 3:18 PM
185
Connecting to the port replicator
www.gateway.com
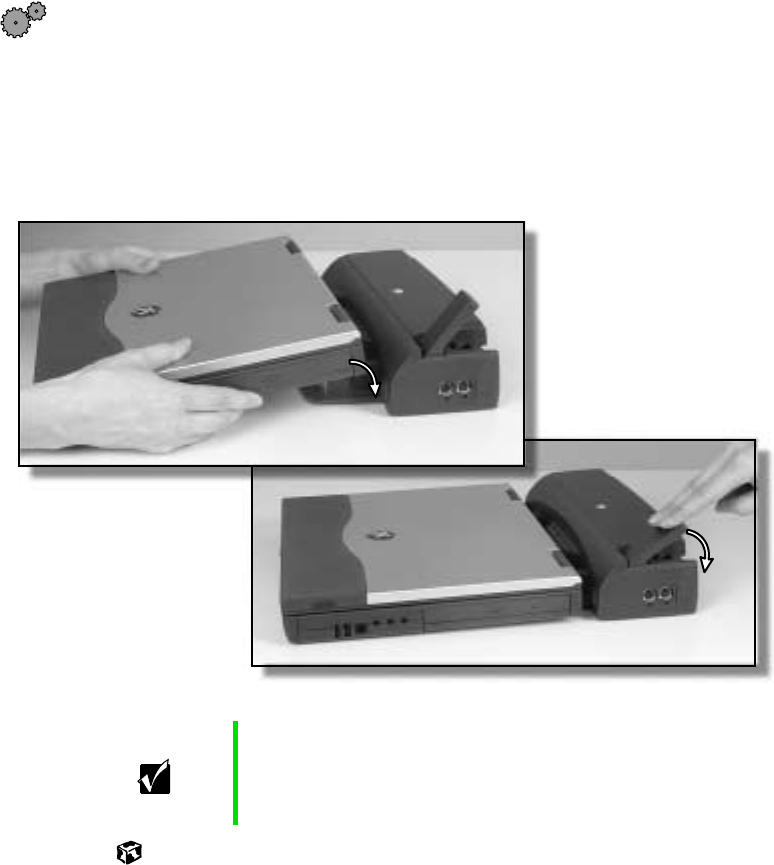
Connecting to the port replicator
You can attach your notebook to the port replicator while your notebook is
off, on, or in Standby/Suspend mode.
To attach your notebook to the port replicator:
1Connect external devices to the ports on the port replicator.
2Lift the release latch on the port replicator.
3Align the connector holes on the bottom of your notebook with the
docking posts on the port replicator, then press down on the release latch
until it snaps into place.
Important The notebook may detect additional devices and add
drivers after being attached to the port replicator. This
process must be completed for components to work
properly. Follow any on-screen instructions, if necessary.
Solo9550.book Page 185 Tuesday, June 19, 2001 3:18 PM

186
Chapter 13: Using the Port Replicator and Docking Station
www.gateway.com
To separate the notebook from the port replicator:
1Click Start, then select Eject PC. The Eject PC menu item appears in the
Start menu only while the notebook is docked.
2Lift the release latch on the port replicator until the notebook is
disconnected, then lift the notebook away from the docking posts.
Solo9550.book Page 186 Tuesday, June 19, 2001 3:18 PM
187
Checking out the docking station
www.gateway.com
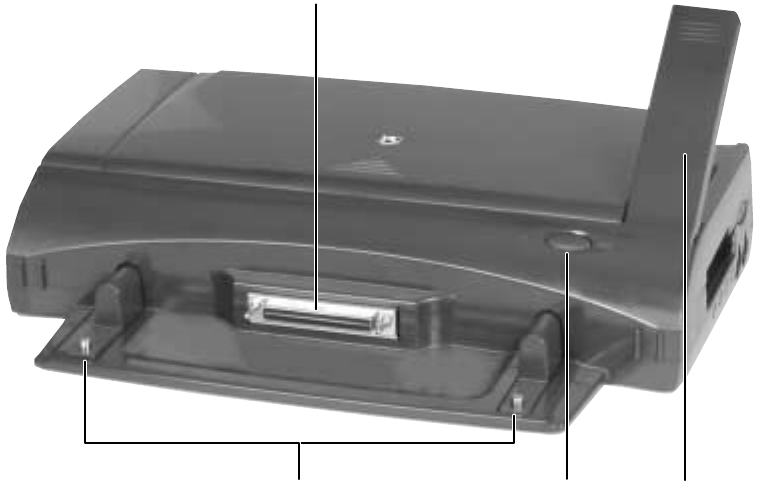
Checking out the docking station
The optional docking station gives you a convenient way to attach external
devices such as a monitor, a full-size keyboard, or an external pointing device.
Although devices can be attached directly to ports on the notebook, the
docking station lets you make all of those connections in one step. It also
provides additional ports and other expansion features.
Front
Docking port
Docking posts Docking eject
button Release latch
Solo9550.book Page 187 Tuesday, June 19, 2001 3:18 PM
188
Chapter 13: Using the Port Replicator and Docking Station
www.gateway.com
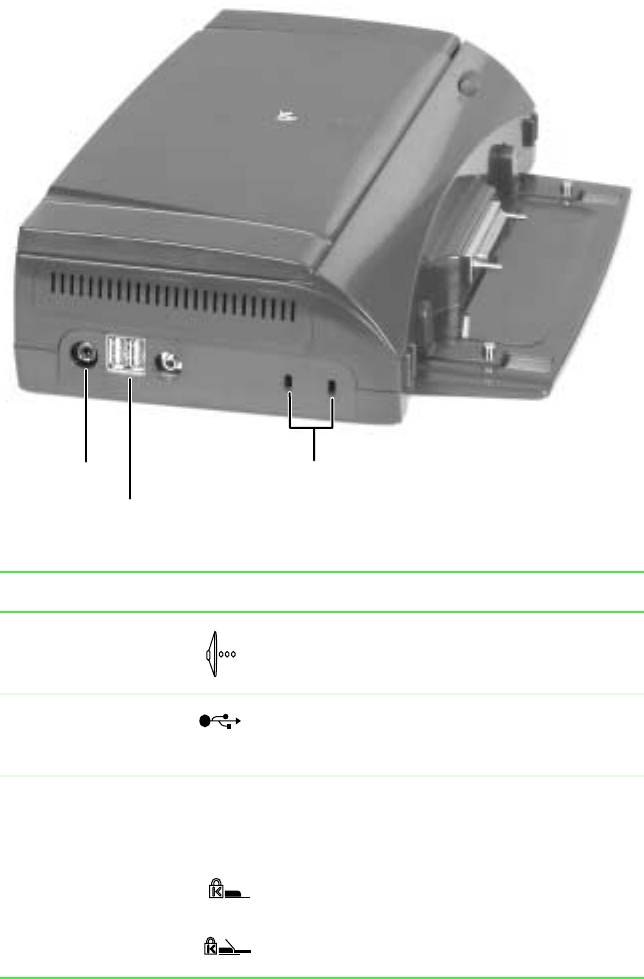
Left side
Component Icon Description
S/PDIF jack Plug a standard RCA cable into this digital
audio output jack and the jack on a digital
audio device.
USB ports Plug a USB device into one of these ports.
These ports and the notebook USB ports can
be used at the same time.
Dual-mode
Kensington lock
slots
Secure your notebook and docking station to
an object by connecting a Kensington cable
lock to these slots.
Connect the lock here to secure only the
docking station (left slot).
Connect the lock here to secure both the
docking station and the notebook (right slot).
S/PDIF jack
USB ports
Dual-mode
Kensington lock slots
Solo9550.book Page 188 Tuesday, June 19, 2001 3:18 PM
189
Checking out the docking station
www.gateway.com
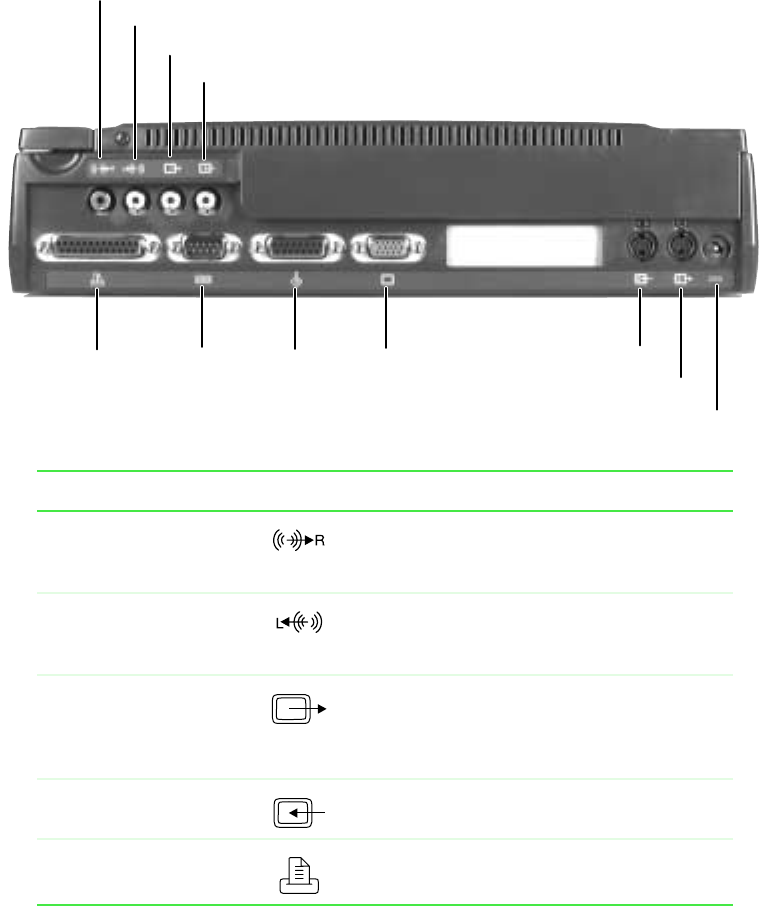
Back
Component Icon Description
Right channel analog
audio out jack Plug a standard RCA cable into this jack for a
right stereo channel audio connection to an
audio device.
Left channel analog audio
out jack Plug a standard RCA cable into this jack for a
left stereo channel audio connection to an audio
device.
TV out (Composite
Video) jack Plug a standard RCA cable into this jack and
the jack on a TV or VCR so you can view your
notebook display on a TV using NTSC/PAL
Composite Video.
TV in (Composite Video)
jack Not functional with your notebook.
Parallel port Plug a parallel device (such as a printer) into
this port.
Right channel analog audio out jack
Left channel analog audio out jack
TV out (Composite Video) jack
TV in (Composite Video) jack
Parallel
port Serial
port Joystick/
MIDI port Monitor port S-Video in jack
S-Video out jack
Power connector
Solo9550.book Page 189 Tuesday, June 19, 2001 3:18 PM

190
Chapter 13: Using the Port Replicator and Docking Station
www.gateway.com
Serial port Plug a serial device (such as a serial camera)
into this port.
Joystick/MIDI port Plug a game joystick or an electronic MIDI
musical instrument into this port. This port
provides both MIDI in and out capabilities.
Monitor port Plug an external VGA monitor into this port.
S-Video in jack Not functional with your notebook.
S-Video out jack Plug a standard S-Video cable into this jack and
the jack on an S-Video device.
Power connector Plug the AC adapter into this connector. Use
only the AC adapter for your particular model.
Component Icon Description
Solo9550.book Page 190 Tuesday, June 19, 2001 3:18 PM