Quanta Computer 9550015318 Mini-PCI Wireless LAN card in Notebook Computer User Manual Solo9550
Quanta Computer Inc Mini-PCI Wireless LAN card in Notebook Computer Solo9550
Contents
Manual Part 3
89
Setting up an Internet account
www.gateway.com
Setting up an Internet account
Before you can view the information on the World Wide Web, you need to
set up an Internet account with an Internet Service Provider (ISP). If you have
chosen America Online as an ISP, follow these instructions to set up and
connect to your account. To establish a different ISP service, or to transfer an
existing account to this computer, contact the ISP directly.
If you set up an account with America Online, an Internet e-mail address is
created for you. After completing the setup you are ready to access the
Internet.
To set up an Internet account with America Online:
1Double-click the America Online Included icon. If the icon is not on the
Windows desktop, look for the America Online Included icon located in the
Online Services folder on the Windows desktop.
2Follow the on-screen instructions. After setting up your account, you can
connect to the Internet and access your e-mail services.
HelpSpot For more information on setting up an Internet account,
double-click the HelpSpot icon on your desktop.
Solo9550.book Page 89 Tuesday, June 19, 2001 3:18 PM
90
Chapter 6: Using the Internet
www.gateway.com
Accessing your Internet account
To connect to your America Online Internet account:
1Double-click the America Online Included icon. The Connect dialog box
opens.
2Complete the member name and password information, then click
Connect. The computer dials the Internet account telephone number.
If you are using a service other than America Online, check with your ISP for
the correct procedure for connecting.
After connecting, the Web browser window opens. For information about the
Web and the Web browser, see “Using the World Wide Web” on page 91.
To disconnect from your America Online Internet account:
■Click X in the top right corner of the America Online program. Your
computer disconnects from the Internet.
If you are using a service other than America Online, check with your ISP for
the correct procedure for disconnecting.
HelpSpot For more information on accessing your Internet account,
double-click the HelpSpot icon on your desktop.
Important Make sure that your computer disconnects correctly from
your Internet account. If you do not have an “unlimited
hours” ISP account, you may have to pay for the time that
you are connected, even if you are not at the computer.
Solo9550.book Page 90 Tuesday, June 19, 2001 3:18 PM
91
Using the World Wide Web
www.gateway.com
Using the World Wide Web
The World Wide Web is a multimedia window to the Internet that gives you
access to millions of information sources.
Information on the Web comes to you on Web pages, which are electronic
documents that you view using a Web page display program called a browser.
You can use any of the commercially available Web browsers, like Microsoft
Internet Explorer, which comes installed on your new computer.
Web pages can contain not only text, but animations, music, and other
multimedia features.
A group of related Web pages is called a Web site. You can access Web sites to
shop, track investments, read the news, download programs, and much more.
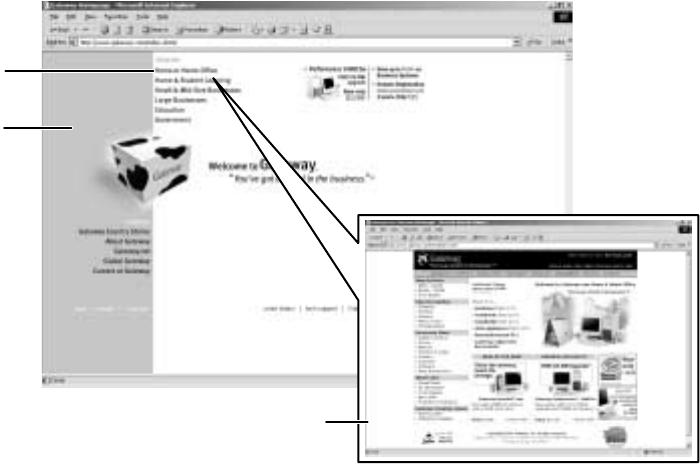
You can explore a Web site or visit other Web sites by clicking areas on the
Web page called links, or hyperlinks. A link may be colored or underlined text,
a picture, or an animated image. You can identify a link by moving the mouse
pointer over it. If the pointer changes to a hand, the item is a link.
To learn more about using the Web browser features, select Help in the menu
bar.
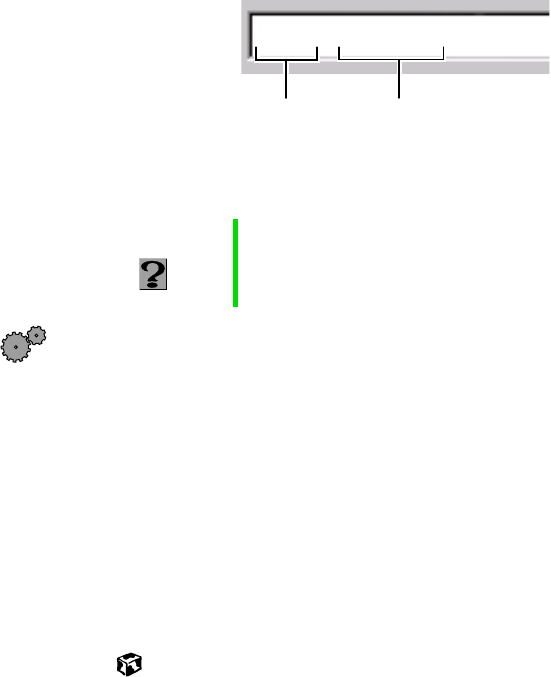
Web
page
Link
Linked Web page
Solo9550.book Page 91 Tuesday, June 19, 2001 3:18 PM
92
Chapter 6: Using the Internet
www.gateway.com
Connecting to a Web site
After you set up an account with an Internet Service Provider (ISP) such as
America Online, you can access the many information sources on the World
Wide Web.
To connect to a Web site:
1Connect to your Internet account. After the computer connects, a default
opening page or welcome screen opens.
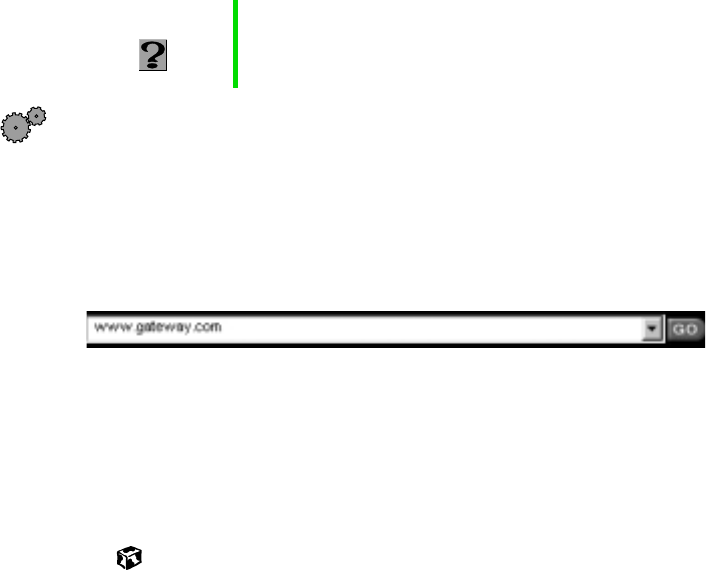
2To go to a different Web site, type the address (called a URL for “Universal
Resource Locator”) in the browser address bar (for example
www.gateway.com) then click GO on the browser address bar.
- OR -
On the current Web page, click a link to a Web site.
The Web browser locates the server computer on the Internet, downloads
(transfers) data to your computer, and displays the page on the site that
you requested.
Sometimes Web pages display slowly. The speed that a Web page displays on
your screen depends on the complexity of the Web page and other Internet
conditions. Additionally, the speed of your connection will determine how
fast Web pages display.
HelpSpot For more information on connecting to a Web site,
double-click the HelpSpot icon on your desktop.
Solo9550.book Page 92 Tuesday, June 19, 2001 3:18 PM
93
Using the World Wide Web
www.gateway.com
Downloading files
Downloading is the process of transferring files from a computer on the
Internet to your computer.
To protect your computer against viruses, make sure that you scan the files
you download. For more information, see “Protecting your computer from
viruses” on page 219.
To download files or programs from a Web site:
1Connect to your Internet account.
2In the address bar, type the address of the Web site that contains the file
or program you want to download, then click GO on the browser address
bar.
- OR -
Click a link on a Web page to navigate to the Web site containing the
file that you want to download.
3Create or locate the folder where you want to store the file on your
computer.
4Click the link on the Web page for the file that you want to download.
5Follow the on-screen instructions for saving the file in the folder that
you created.
A copy of the file is downloaded to your computer. The time that it takes
to transfer the file to your computer depends on file size and Internet
conditions.
6Open the folder that you created.
7Install or view the downloaded file by double-clicking it. If applicable,
follow the instructions provided on the Web site to run or install the
program.
HelpSpot For more information on downloading files, double-click the
HelpSpot icon on your desktop.
Solo9550.book Page 93 Tuesday, June 19, 2001 3:18 PM
94
Chapter 6: Using the Internet
www.gateway.com
Using e-mail
E-mail (electronic mail) lets you send messages to anyone who has an Internet
connection and e-mail address. E-mail is usually a free service of your Internet
account.
The Internet never closes, so you can send e-mail messages at any time. Your
e-mail messages arrive at most e-mail addresses in minutes.
An e-mail address consists of a user name, the @ symbol, and the Internet
domain name of the Internet Service Provider (ISP) or company that “hosts”
that user. Your e-mail address is assigned when you sign up for an account
with an ISP. For example, a person with an account with America Online
might have an e-mail address that is similar to this one:
Sending e-mail
To send e-mail using America Online:
1Connect to your America Online account.
2Click Write.
3Type the e-mail address of the recipient you want to send e-mail to in
the Send To box.
4Type the subject of your e-mail in the Subject box.
5Type the e-mail message.
6When finished, click Send Now. Your e-mail is sent over the Internet to
the e-mail address you specified.
HelpSpot For more information on sending e-mail, double-click the
HelpSpot icon on your desktop.
jdoe@aol.com
User name Internet domain name
Solo9550.book Page 94 Tuesday, June 19, 2001 3:18 PM
95
Using e-mail
www.gateway.com
Checking your e-mail
To check your e-mail using America Online:
1Connect to your America Online account.
2Click Read.
For more information about managing and organizing your e-mail messages,
see the online help in your e-mail program.
HelpSpot For more information on checking your e-mail, double-click
the HelpSpot icon on your desktop.
Solo9550.book Page 95 Tuesday, June 19, 2001 3:18 PM
96
Chapter 6: Using the Internet
www.gateway.com
Solo9550.book Page 96 Tuesday, June 19, 2001 3:18 PM

97
7
www.gateway.com
Using
Multimedia
This chapter provides information on using the multimedia capabilities of
your notebook. Read this chapter to learn how to:
■Use the diskette drive
■Use the CD/DVD drive
■Play CDs and DVDs
■Use Audio DJ (Solo 9550 only)
■Record and play audio files
■Use Windows Media Player
■Use MusicMatch
■View the display on a television
■Capture video using the IEEE 1394 (Firewire) port
Solo9550.book Page 97 Tuesday, June 19, 2001 3:18 PM
98
Chapter 7: Using Multimedia
www.gateway.com
Using drives
This section explains how to use the diskette, CD, and DVD drives.
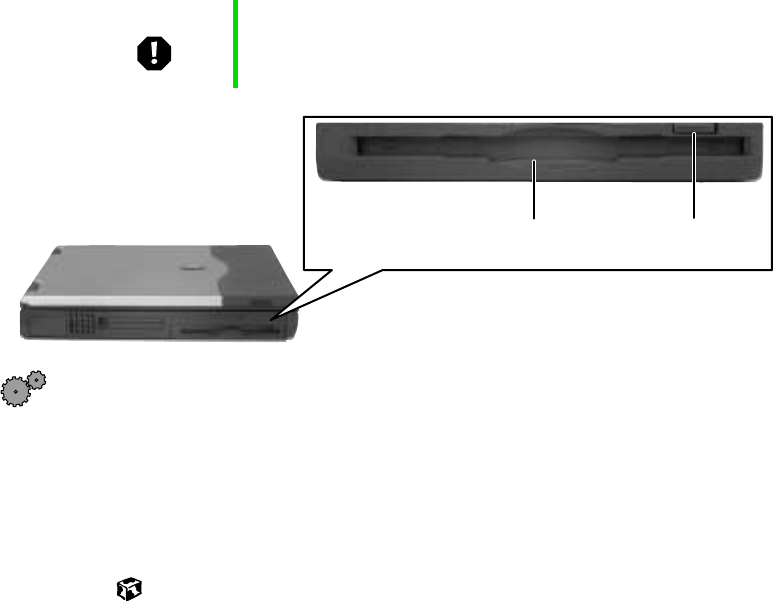
Using diskettes
The diskette drive uses 3.5-inch diskettes (sometimes called floppy disks).
Diskettes are useful for storing files or transferring files to another computer.
To use a diskette:
1Insert the diskette into the diskette drive with the label facing up.
2To access a file on the diskette, double-click the My Computer icon, the
drive letter, then the file.
3To remove the diskette, make sure the drive activity light is off, then press
the diskette eject button.
Warning Do not expose diskettes to water or magnetic fields.
Exposure could damage the data on the diskette.
Diskette slot Diskette eject
button
Solo9550.book Page 98 Tuesday, June 19, 2001 3:18 PM
99
Using drives
www.gateway.com
Using the CD/DVD drive
You can use your computer to enjoy a wide variety of multimedia features,
such as making recordings, listening to audio CDs, and watching DVD movies.
To insert a CD/DVD:
1Press the eject button on the CD/DVD drive, then pull the disc tray
completely open.
2Place the CD or DVD in the tray with the label up, then press down
carefully on the disc until it snaps into place.
3Push the tray in until it is closed.
Important When you place a single-sided disc in the tray, make sure
that the label side is facing up. If the disc has two playable
sides, place the disc so that the name of the side you want
to play is facing up.
CD/DVD
tray
Activity
light
Eject
button
Manual
eject hole
Solo9550.book Page 99 Tuesday, June 19, 2001 3:18 PM
100
Chapter 7: Using Multimedia
www.gateway.com
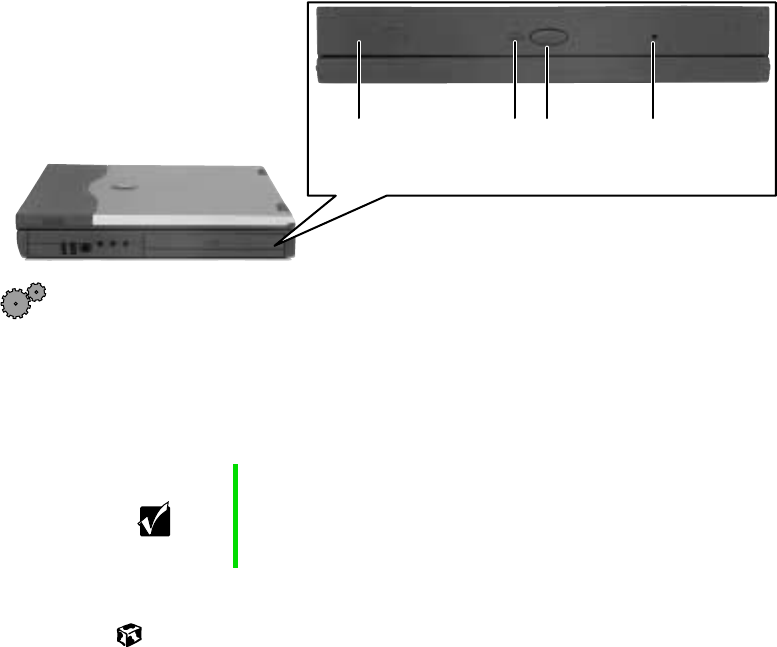
Using Audio DJ on the Solo 9550
You can play CDs on your Solo 9550 without turning on the notebook. You
control Audio DJ by using the buttons on the front of the notebook.
Component Description
Power indicator Indicates the current Audio DJ status:
■LED green - Audio DJ is turned on and playing.
■LED amber - Audio DJ is turned on and play is stopped.
■LED off - Audio DJ is turned off.
Power slider Slide to the right to turn on the Audio DJ and slide to the left to turn off the
Audio DJ. This switch works only when the Solo 9550 is turned off.
Back Skip back one song.
Play/Pause Select play to start playing your CD or pause to pause playing.
Stop Stop playing
Back
Play/
Pause
Stop
Next
Volume
Power
slider
Power indicator
Solo9550.book Page 100 Tuesday, June 19, 2001 3:18 PM

101
Using Audio DJ on the Solo 9550
www.gateway.com
To play a CD using Audio DJ:
1Slide the power slider to the right.
2Complete the steps in “Using the CD/DVD drive” on page 99.
3Press the play button.
Next Skip ahead one song.
Volume Press the left button to increase the volume and the right button to decrease
the volume.
Component Description
Solo9550.book Page 101 Tuesday, June 19, 2001 3:18 PM
102
Chapter 7: Using Multimedia
www.gateway.com
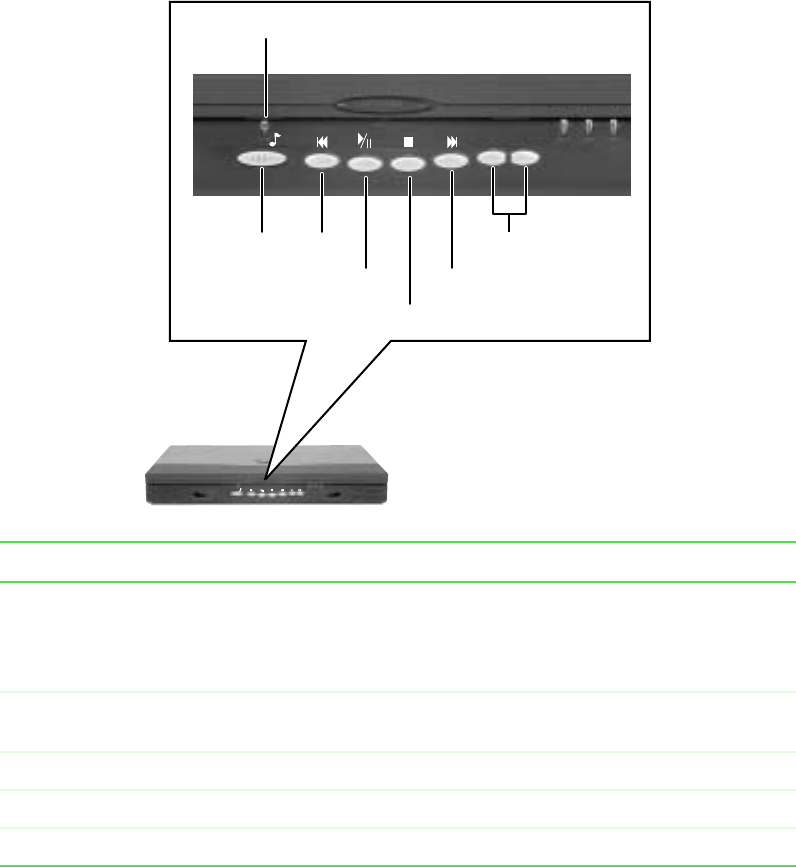
Adjusting the volume
You can use the volume controls to adjust the overall volume and the volume
of specific sound devices in your computer.
To adjust overall volume level:
■Click the speaker icon on the taskbar, then drag the slider to change the
volume or click to select the Mute check box.
-OR-
On the keyboard, press the volume buttons to change the volume,
or press the mute button to turn off all sound. See “Using the
keyboard” on page 36 for the location of the volume control buttons.
HelpSpot For more information on adjusting volume, double-click the
HelpSpot icon on your desktop.
Solo9550.book Page 102 Tuesday, June 19, 2001 3:18 PM
103
Adjusting the volume
www.gateway.com
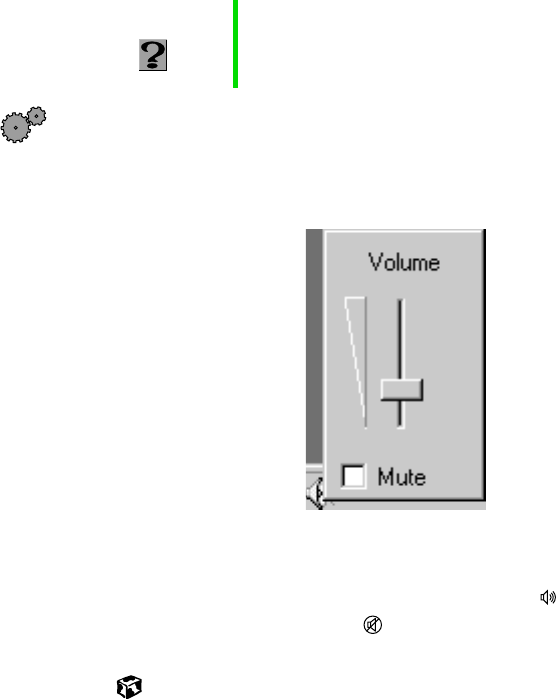
To adjust specific volume levels:
1Double-click the speaker icon on the taskbar. The Volume Control dialog
box opens.
If the device you want to adjust does not appear in the Volume Control
dialog box, select Options, then Properties. Select the audio device you
want to adjust, then click OK.
2Drag the volume level and balance sliders for the device you want to
adjust, then close the window. For more information about the volume
controls, select Help in the Volume Control dialog box.
Solo9550.book Page 103 Tuesday, June 19, 2001 3:18 PM

104
Chapter 7: Using Multimedia
www.gateway.com
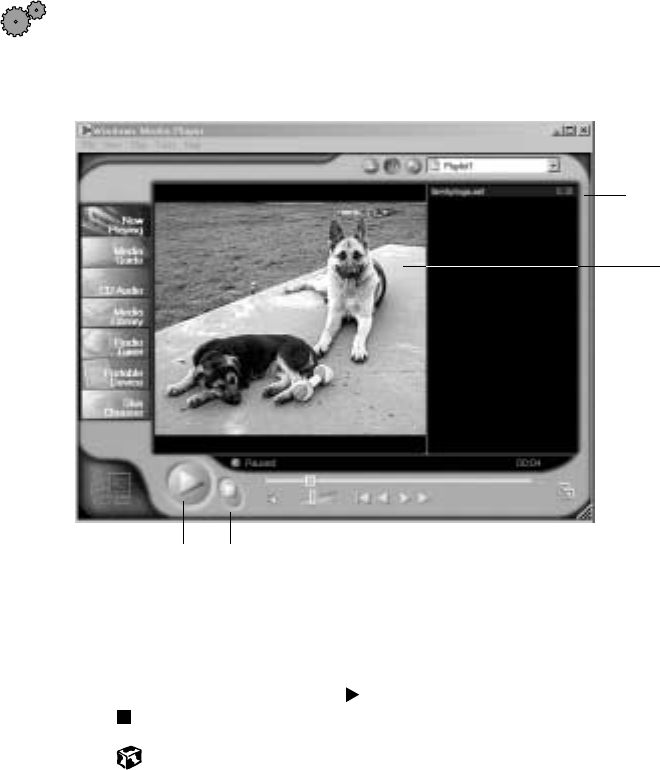
Listening to CDs in Windows Me
The Windows Media Player turns your computer into a multimedia center.
Use the player to listen to Internet radio stations, play and copy your CDs,
look for Internet movies, and create lists of all media on your computer. For
more information about the using the Windows Media Player, select Help.
To listen to a CD in the Windows Media Player:
■Insert a CD into the CD/DVD drive. The Windows Media Player opens
and the CD plays.
If the Windows Media Player does not open automatically when you
insert the CD, open it from the Start menu by clicking Start, then selecting
Programs, then Windows Media Player. When the media player opens, click
(play).
Play/
Pause Stop Sound
Controls Track
Controls
Solo9550.book Page 104 Tuesday, June 19, 2001 3:18 PM
105
Listening to CDs in Windows 98
www.gateway.com
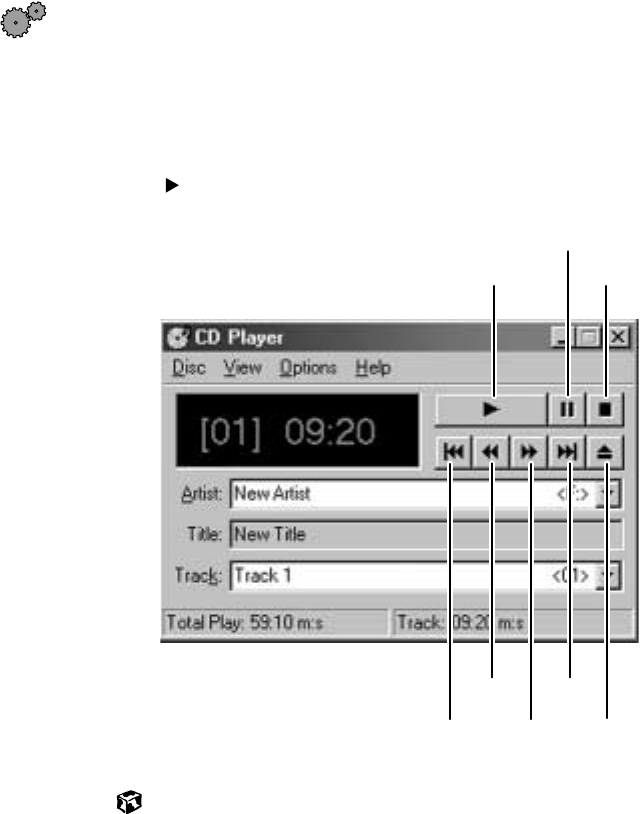
Listening to CDs in Windows 98
Use the CD/DVD drive and the Windows CD Player to play an audio CD.
To play a CD:
■Insert a CD into the CD/DVD drive. The CD Player opens and the CD
plays.
If the CD Player does not open automatically when you insert the CD,
open it from the Start menu by clicking Start, then selecting Programs,
Accessories, Entertainment, then CD Player. When the CD Player opens,
click (play).
If you do not hear audio or you want to change the volume, see “Adjusting
the volume” on page 102.
Play
Pause
Stop
Previous
Track
Rewind
Skip
Forward Eject
CD
Next
Track
Solo9550.book Page 105 Tuesday, June 19, 2001 3:18 PM
106
Chapter 7: Using Multimedia
www.gateway.com
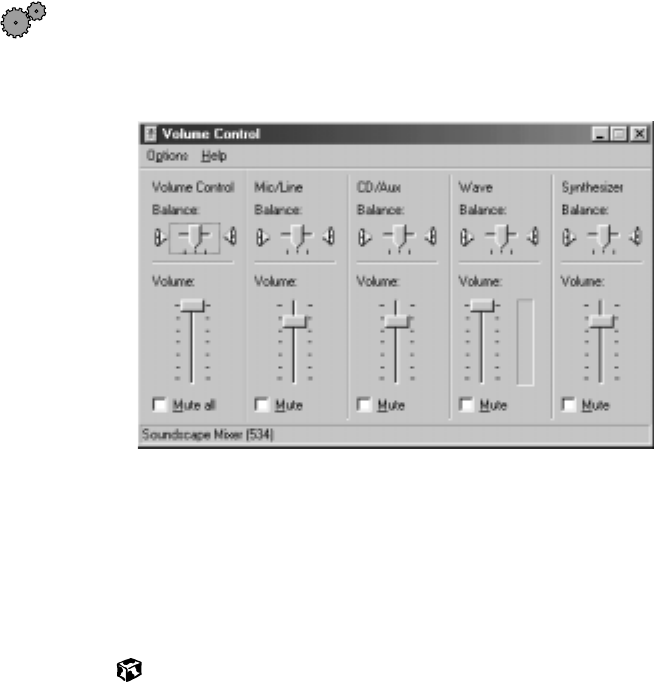
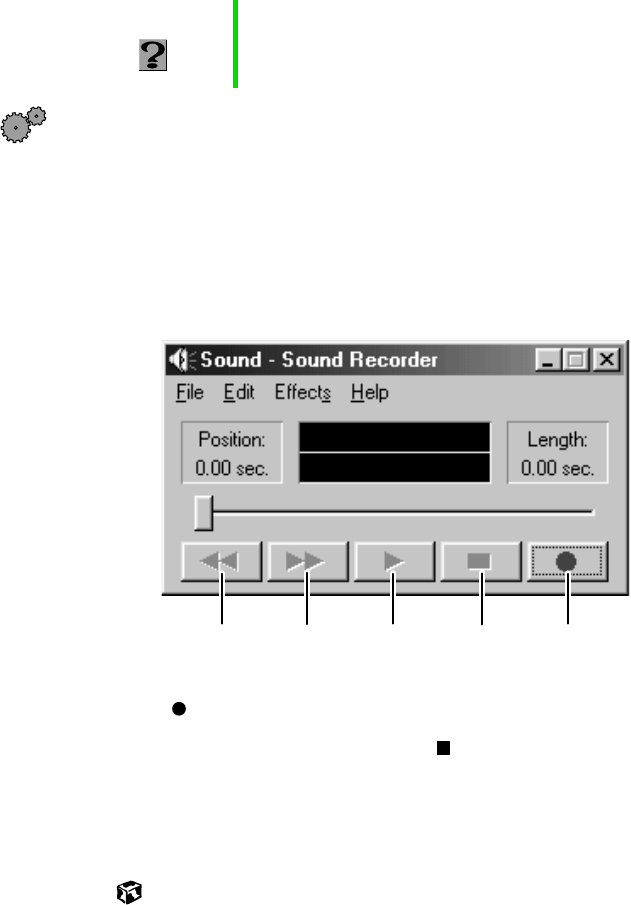
Recording and playing audio
Use the instructions below to make an audio recording by speaking into the
microphone.
To make an audio recording:
1Plug a microphone into the external Microphone jack.
- OR -
Use the built-in microphone.
2Click Start, then select Programs, Accessories, Entertainment, then Sound
Recorder. The Sound Recorder opens.
3Click (record), then speak into the microphone.
4When you finish recording, click (stop).
5Select File, then Save As. The Save As dialog box opens.
6Name the recording, specify the path, then click Save. The recording is
saved.
HelpSpot For more information on recording and playing audio,
double-click the HelpSpot icon on your desktop.
Rewind Fast
Forward Play Stop Record
Solo9550.book Page 106 Tuesday, June 19, 2001 3:18 PM

107
Recording and playing audio
www.gateway.com
To play an audio recording in Sound Recorder:
1Open the Sound Recorder.
2Select File, then Open. The Open dialog box opens.
3Select the file you want to play, then click Open.
4Play the file by clicking (play), then stop playing the file by clicking
(stop).
Solo9550.book Page 107 Tuesday, June 19, 2001 3:18 PM
108
Chapter 7: Using Multimedia
www.gateway.com
Playing audio and video files with
Windows Media Player
The Windows Media Player can play several types of audio and video files,
including WAV, MIDI, MP3, AU, AVI, and MPEG formats. For more
information about using the Windows Media Player, select Help.
To play a file using the Windows Media Player:
1Click Start, then select Programs, Accessories, Entertainment, then
Windows Media Player. The Windows Media Player opens.
2Select File, then Open. The Open dialog box opens.
3Select the file you want to play, then click Open.
4Play the file by clicking (play), then stop playing the file by clicking
(stop).
For more information about the Windows Media Player, select Help.
Video file
information
Video
screen
Play/Pause Stop
Solo9550.book Page 108 Tuesday, June 19, 2001 3:18 PM

109
Playing a DVD
www.gateway.com
Playing a DVD
A Digital Versatile Disc (DVD) is similar to a standard CD but has greater data
capacity. Because of this increased capacity, full-length movies, several albums
of music, or several gigabytes of data can fit on a single disc. If your computer
has a DVD drive, you can play DVDs with the DVD Player program. See the
DVD help for more information about using the DVD player.
To play a DVD:
1Make sure that the speakers are turned on or headphones are plugged in
and that the volume is turned up.
2Turn off your system screen saver and standby timers.
3Click Start, then select Programs, DVD Player, then DVD Player. The
DVD Player video screen and control panel open.
4Insert a DVD into the DVD drive, then click (play). The DVD plays.
5To control the DVD or adjust the volume, use the controls in the
DVD player. For more information on using the DVD player, see its
online help.
Solo9550.book Page 109 Tuesday, June 19, 2001 3:18 PM
110
Chapter 7: Using Multimedia
www.gateway.com
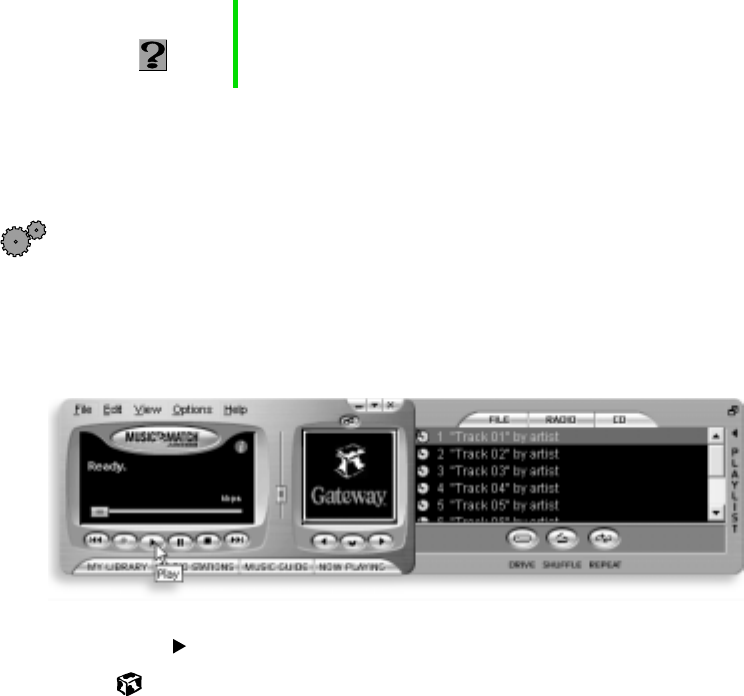
Using MusicMatch
Using the MusicMatch™ program, you can:
■Play music CDs
■Create MP3 music files from your music CDs
■Use your music files to build a music library
■Enter music track information
■Listen to Internet Radio
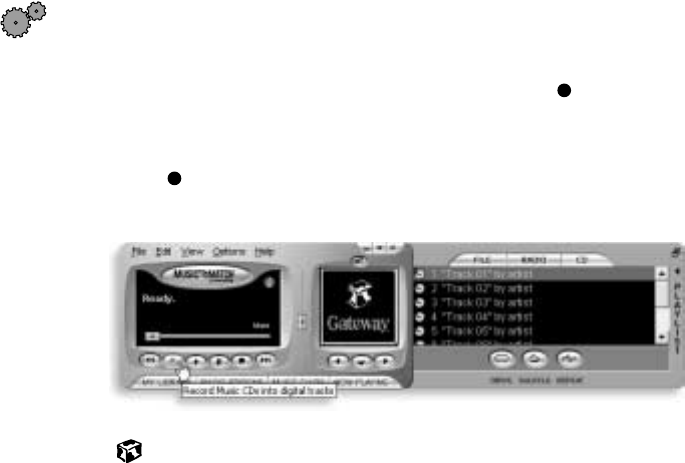
Playing CDs
You can use the MusicMatch program to play music CDs.
To play a music CD:
1Double-click the musicmatch JUKEBOX icon on your desktop. MusicMatch
opens.
2Insert the music CD into the CD/DVD drive on your computer, then click
the CD tab. The names of the music tracks appear in the playlist area.
3Click (play).
HelpSpot For more information on using MusicMatch, double-click
the HelpSpot icon on your desktop.
Solo9550.book Page 110 Tuesday, June 19, 2001 3:18 PM
111
Using MusicMatch
www.gateway.com
Creating music files
Using MusicMatch, you can copy the tracks from a music CD to your
computer’s hard drive as MP3 files.
Here are some terms that you need to know before you get started:
■Bit rate is the number of bits required to store one second of music.
CD quality is 128 kilobits per second. A high bit rate gives you better
sound quality but the file size is also larger. For information about
changing the sound quality settings, see the online help in MusicMatch.
■MP3 (MPEG Layer 3) is a standard for digitally compressing high-fidelity
music into compact files without noticeably sacrificing quality. MP3 files
end in the file extension .MP3.
■Ripping is the process of copying a music track from a music CD and
storing it on your computer’s hard drive.
To create (rip) MP3 files:
1Double-click the musicmatch JUKEBOX icon.
2Insert a CD into the CD/DVD drive, then click (record). The Recorder
window opens.
3In the Recorder window, select the tracks you want to record, then
click (record). The tracks that you selected are copied as MP3 files to
your computer’s hard drive.
Solo9550.book Page 111 Tuesday, June 19, 2001 3:18 PM
112
Chapter 7: Using Multimedia
www.gateway.com
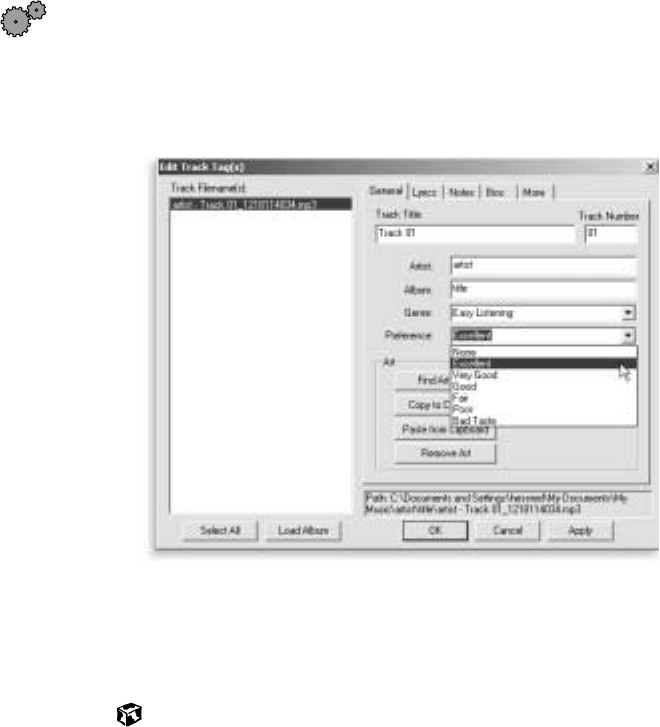
Editing track information
After you add a CD track as an MP3 file to your music library, you can edit
the track’s information.
To edit track information:
1In MusicMatch, click Music Library. The Music Library window opens.
2In the Music Library window, right-click the file, then select Edit Track
Tag. The Edit Track Tag dialog box opens.
3Enter information such as track title, lead artist, album, and genre.
4Click OK. The new track information is displayed in the MusicMatch
playlist, music library, and recorder.
Solo9550.book Page 112 Tuesday, June 19, 2001 3:18 PM
113
Using MusicMatch
www.gateway.com
Building a music library
Use MusicMatch to build a music library. You can organize your music tracks
by categories, find a track quickly by using the sort features, and add
information to a music file.
You can add music tracks to your music library by:
■Creating MP3 files – When you create MP3 files from the tracks on your
music CD, MusicMatch automatically adds these files to your music
library.
■Dragging and Dropping – Drag and drop files from Windows Explorer
or your desktop to the music library.
■Downloading files from the Internet – When you are connected to the
Internet, MP3 files that you download are automatically added to your
music library.
Solo9550.book Page 113 Tuesday, June 19, 2001 3:18 PM
114
Chapter 7: Using Multimedia
www.gateway.com
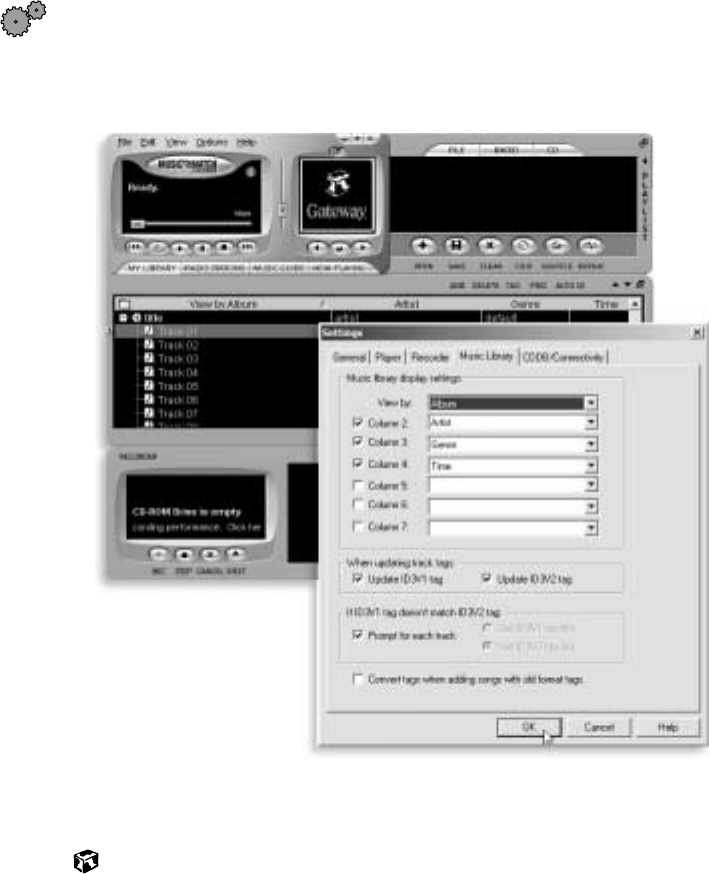
Changing the music library display settings
To change the music library display settings:
1In MusicMatch, select Options, then Settings. The Settings window opens.
2Click the Music Library tab.
3Select the categories that you want to display in the columns, then
click OK.
Solo9550.book Page 114 Tuesday, June 19, 2001 3:18 PM
115
Using MusicMatch
www.gateway.com
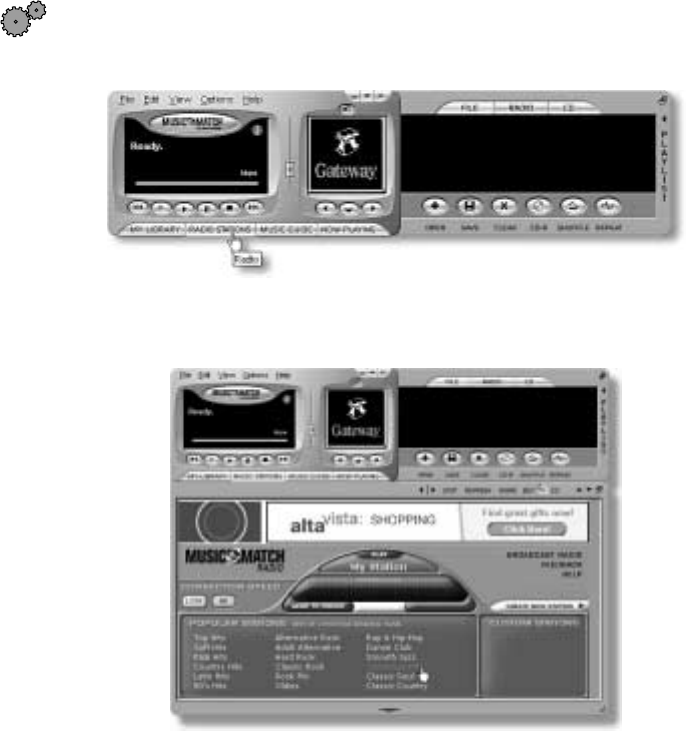
Listening to Internet radio
Use the Radio feature in MusicMatch to listen to Internet Radio stations.
To listen to an Internet radio station:
1Connect to the Internet, then in MusicMatch, click Radio Stations.
The Radio window opens.
Solo9550.book Page 115 Tuesday, June 19, 2001 3:18 PM
116
Chapter 7: Using Multimedia
www.gateway.com
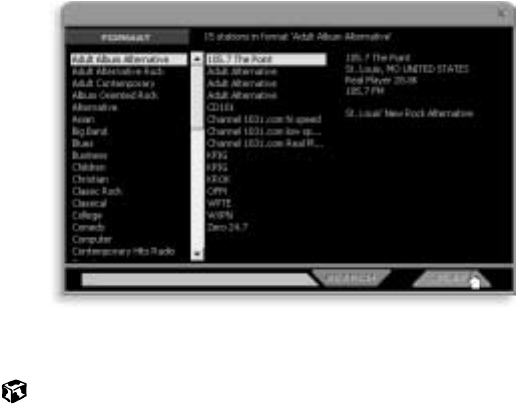
2To select one of the MusicMatch Internet radio stations, select one of the
Popular Stations. You can also choose another Internet radio station by
clicking Broadcast Radio. A window opens that lists radio stations by
music format, city, or country.
3Select a radio station, then click Play. MusicMatch connects to the station.
Using advanced features
You can also use MusicMatch to create your own music CDs and to download
MP3 files to your portable MP3 player. See the online help that came with
MusicMatch.
Solo9550.book Page 116 Tuesday, June 19, 2001 3:18 PM
117
Viewing the display on a television
www.gateway.com
Viewing the display on a television
The TV out (NTSC/PAL Composite Video) jack on your notebook, port
replicator, or docking station lets you view your notebook display on a
television screen using a standard RCA video cable. The S-Video out jack on
your port replicator or docking station lets you view your notebook display
on a television screen using a standard S-Video cable.
To view your notebook display on a television:
1Connect one end of a standard RCA video cable to the TV out (Composite
Video) jack on your notebook, port replicator, or docking station.
-OR-
Connect one end of a standard S-Video cable to the S-Video out jack on
your port replicator or docking station.
2Connect the other end of the cable to the Video in jack on your television
or VCR.
3Click Start, then select Settings, then Control Panel. The Control Panel
window opens.
4Click/Double-click the Display icon. The Display Properties window
opens.
Important To turn on external video by default, connect the television
(or other external video device) before starting your
notebook.
Important DVD playback to a VCR will be scrambled by copyright
protection technology.
Solo9550.book Page 117 Tuesday, June 19, 2001 3:18 PM
118
Chapter 7: Using Multimedia
www.gateway.com
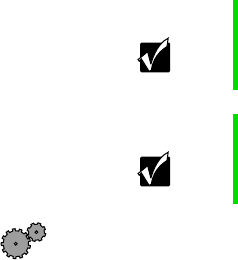
5Click the Settings tab.
6Reset your display screen area setting to 640 ×480 with large text fonts
for best viewing. For more information on customizing screen settings,
see “Adjusting the screen and desktop settings” on page 152.
7Click the Advanced button. The ATI Mobility M4 Properties dialog box
opens.
Solo9550.book Page 118 Tuesday, June 19, 2001 3:18 PM
119
Viewing the display on a television
www.gateway.com
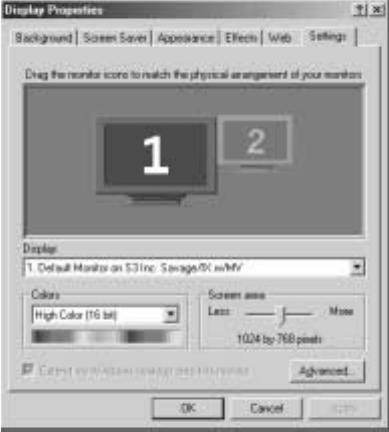
8Click the Displays tab.
9Click the tab in the upper left corner of the TV option. TV is now selected
as your primary display.
10 Click OK.
Click here
Solo9550.book Page 119 Tuesday, June 19, 2001 3:18 PM

120
Chapter 7: Using Multimedia
www.gateway.com
Capturing video
MGI VideoWave IV is a video capture program that lets you capture and edit
full-motion video, single images, and audio through the IEEE 1394 (Firewire)
port. If your notebook has the IEEE 1394 port installed, MGI VideoWave IV
has already been installed on your system.
To use MGI VideoWave:
1Connect the Video out jack of your external source, such as a video
camera, to the IEEE 1394 port (if available) on the side of your notebook.
2Click Start, then select Programs, then MGI VideoWave IV. The program
starts. For more information on using MGI VideoWave, see its online
Help.
Solo9550.book Page 120 Tuesday, June 19, 2001 3:18 PM

121
8
www.gateway.com
Sending and
Receiving
Faxes
PhoneTools lets you send and receive faxes using the modem.
After you have created a document using a spreadsheet, word processor, or
graphics program, you can send it as a fax. You can also receive faxes on your
notebook. This chapter shows you how to:
■Set up a fax cover page
■Create and send a new fax
■Fax a document you created in another program
■Receive, view, and print a fax
Solo9550.book Page 121 Tuesday, June 19, 2001 3:18 PM
122
Chapter 8: Sending and Receiving Faxes
www.gateway.com
Setting up your cover page
Before you send your first fax, you need to set up your user information. Your
fax cover sheets and fax headers will contain this information, which is
required by law.
To set up your fax cover page:
1If PhoneTools is not open, click Start, then select Programs, PhoneTools,
then PhoneTools.
2Select Setup, then select General Setup. The General Setup dialog box
opens.
3Click the Customize tab, then type your personal information in the User
boxes.
HelpSpot For more information on setting up a fax cover page,
double-click the HelpSpot icon on your desktop.
Solo9550.book Page 122 Tuesday, June 19, 2001 3:18 PM
123
Setting up your cover page
www.gateway.com
4Click the Fax tab, then enter your name and fax number in the Fax
identifier text box. This identifier information is required by law. You can
enter up to 20 characters in the text box. We suggest using eight
characters for your identifier name, followed by 12 characters for your
telephone number.
5Click OK.
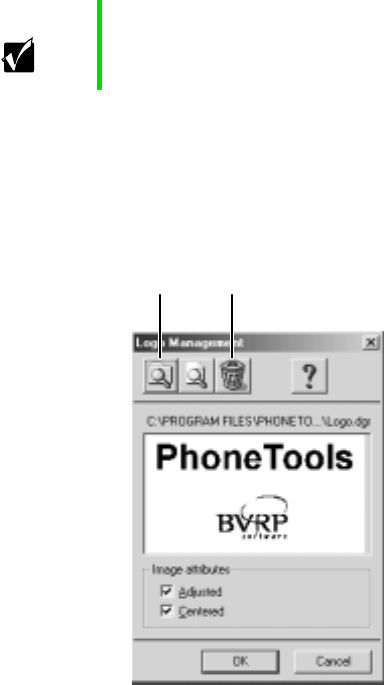
6If you want to change the logo that appears on the cover page, select
Setup, then select Logo Management. The Logo Management dialog box
opens.
Important Some fax machines cannot use special characters such
as hyphens. We suggest using spaces instead of hyphens
in telephone and fax numbers.
Import
button Clear
button
Solo9550.book Page 123 Tuesday, June 19, 2001 3:18 PM

124
Chapter 8: Sending and Receiving Faxes
www.gateway.com
7If you do not want the PhoneTools logo on your cover page, click the
picture then click the clear button.
- OR -
If you want to replace the PhoneTools logo with one of your own, click
the import button then select a picture for the logo. The picture must
be saved in a supported format (.BMP, .DGR, .GIF, .JPG, .PCX, .T31, or
.TIF) and be small enough to fit in the logo box.
8Click OK.
Solo9550.book Page 124 Tuesday, June 19, 2001 3:18 PM
125
Sending a fax
www.gateway.com
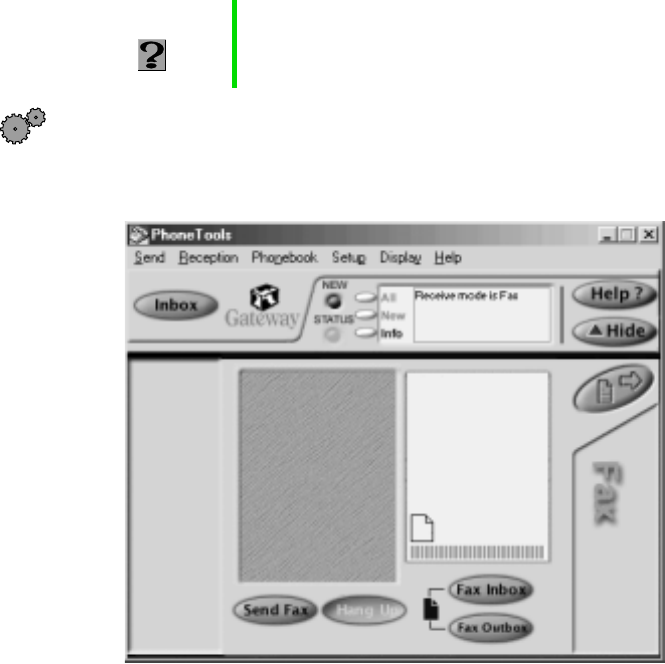
Sending a fax
To send a fax:
1If PhoneTools is not open, click Start, then select Programs, PhoneTools,
then PhoneTools.
2Click Send Fax. The Send Fax Wizard opens.
HelpSpot For more information on sending a fax, double-click the
HelpSpot icon on your desktop.
Solo9550.book Page 125 Tuesday, June 19, 2001 3:18 PM
126
Chapter 8: Sending and Receiving Faxes
www.gateway.com
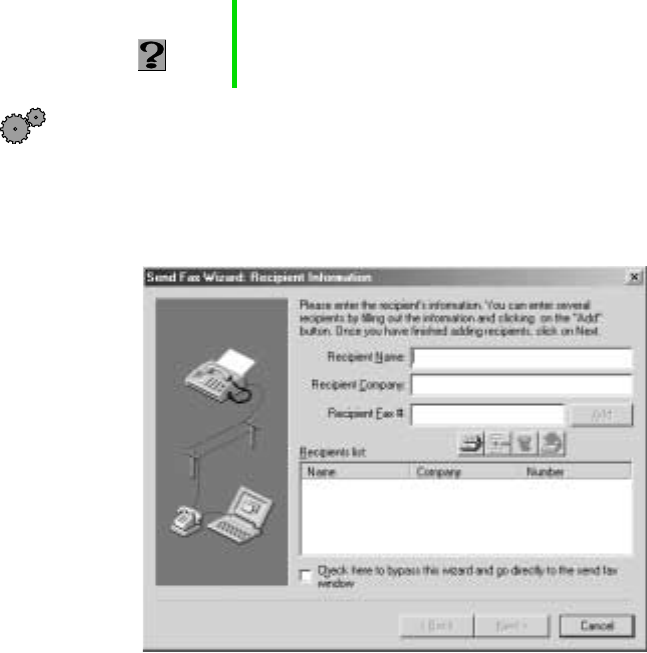
3Enter the recipient’s name, company (if applicable), and fax number, then
click Next.
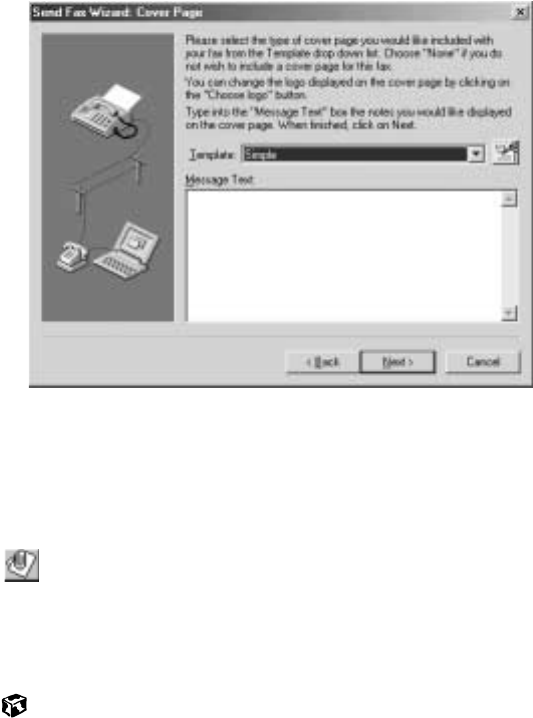
4Type the message text in the Message Text area.
5Select a cover page template from the Template list, then click Next. If you
typed a message in the Message Text area, you must select a cover page.
6If you want to attach a file, make sure the file is not open, then click
(browse), select the file, then click Open.
7Click Next, then click Finish. The Confirm Transmissions dialog box
opens.
8Click Send. PhoneTools dials the fax number and sends your fax.
Solo9550.book Page 126 Tuesday, June 19, 2001 3:18 PM
127
Faxing from programs
www.gateway.com
Faxing from programs
To fax a document directly from most programs:
1In the program with the document open, select File, then select Print. The
Print dialog box opens.
2Select the printer CAPTURE FAX BVRP, then click OK. The Send Fax Wizard
opens.
3Complete the wizard as instructed in “Sending a fax” on page 125.
HelpSpot For more information on sending a fax directly from a
program, double-click the HelpSpot icon on your desktop.
Solo9550.book Page 127 Tuesday, June 19, 2001 3:18 PM
128
Chapter 8: Sending and Receiving Faxes
www.gateway.com
Receiving and viewing a fax
To receive and view a fax:
1If PhoneTools is not open, click Start, then select Programs, PhoneTools,
then PhoneTools.
When PhoneTools is open, it detects incoming faxes and stores them in
the In Box.
2To view a fax, click Fax Inbox, then double-click the fax you want to view.
The fax viewer opens, where you can view and print the fax.
HelpSpot For more information on receiving a fax, double-click the
HelpSpot icon on your desktop.
Important Your notebook cannot detect incoming faxes while in the
Standby power-saving mode. For information on changing
power savings settings, see “Changing automatic power
settings in Windows Me, Windows 98, or Windows 2000”
on page 138.
Solo9550.book Page 128 Tuesday, June 19, 2001 3:18 PM

129
9
www.gateway.com
Managing
Power
While your notebook is running on battery power, you should manage power
consumption to get the most use out of the battery. This chapter shows you
how to:
■Check and recharge the battery
■Change batteries
■Extend the life of the battery by conserving battery power and using
alternate power sources
■Change power-saving settings
Solo9550.book Page 129 Tuesday, June 19, 2001 3:18 PM
130
Chapter 9: Managing Power
www.gateway.com
Monitoring the battery charge
Closely monitor the battery charge. When the battery charge gets low, change
the battery or connect to AC power immediately to prevent losing any
unsaved work.
Monitor the battery charge by:
■Positioning the cursor over the power cord icon or battery icon in the
taskbar. A battery status window opens. Move the cursor away from the
icon to close the window.
■Pressing FN+STATUS to view the Status display, which opens in the upper
left corner of the screen. The Status display shows the current battery
charge. (Available on the Solo 9500 only.)
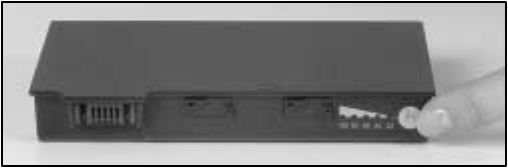
■Removing the main battery and optional second battery, then pressing
the battery meter buttons. The battery meter lights indicate the
percentage of battery charge remaining.
■Waiting for these other low battery warnings:
■Three beeps
■A red “X” appearing on the battery icon in the taskbar
■A Low Battery message
If your battery charge indicators display what looks like an inaccurate charge,
you may need to recalibrate the battery. For more information, see
“Recalibrating the battery” on page 229.
Solo9550.book Page 130 Tuesday, June 19, 2001 3:18 PM
131
Recharging the battery
www.gateway.com
Recharging the battery
Both the main and the optional secondary batteries recharge while they are
installed and your notebook is connected to AC power. While the batteries
are recharging, the battery indicator appears orange.
Solo9550.book Page 131 Tuesday, June 19, 2001 3:18 PM
132
Chapter 9: Managing Power
www.gateway.com
Changing the main battery
Your notebook must be turned off while changing the main battery.
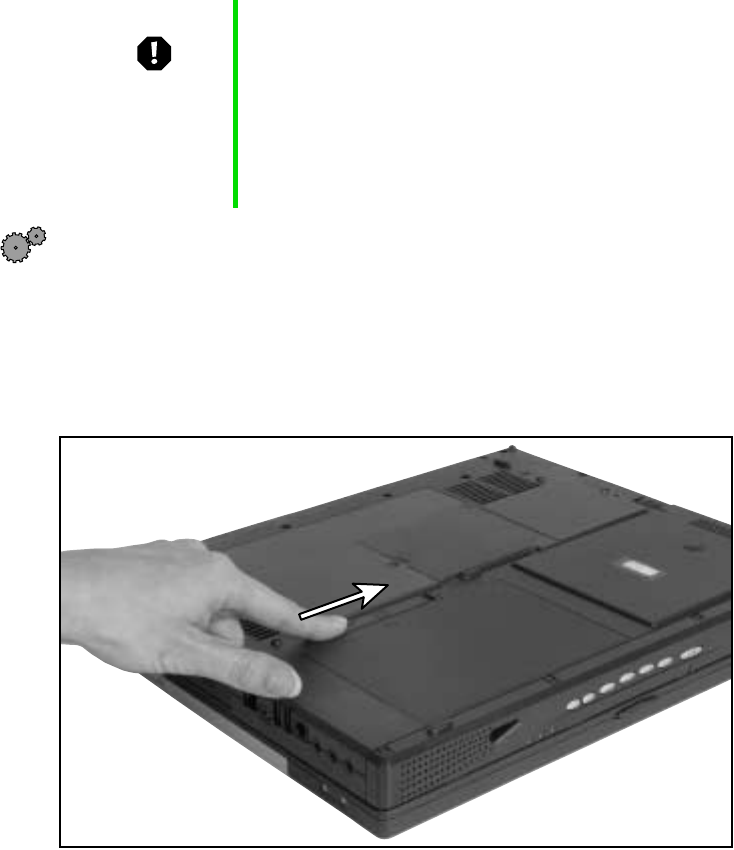
To replace the main battery:
1If your notebook is on, save all work and turn the power off.
2Close the cover.
3Turn your notebook over.
4Slide the battery release latch to release the battery.
Warning Danger of explosion if battery is incorrectly replaced.
Replace only with the Gateway Li-Ion battery designed for
your specific model. Discard used batteries according to
the manufacturer’s instructions.
The battery used in this device may present a fire or
chemical burn hazard if mishandled. Do not disassemble,
heat above 212°F (100°C), or incinerate. Dispose of used
battery promptly. Keep away from children.
Solo9550.book Page 132 Tuesday, June 19, 2001 3:18 PM
133
Changing the main battery
www.gateway.com
5Lift the battery out of the bay.
6Place a recharged battery into the bay and press down until it snaps into
place.
7Open the notebook and press the power button.
Solo9550.book Page 133 Tuesday, June 19, 2001 3:18 PM
134
Chapter 9: Managing Power
www.gateway.com
Installing a second battery
Your notebook has a modular bay that accepts a second battery. When a
second battery is installed, the system uses power from the second battery
when the main battery’s charge is exhausted. Both batteries recharge when
the notebook is connected to AC power.
To install a second battery:
1If your notebook is on, save all work and turn off your computer.
2Close the cover.
3Turn your notebook over.
Warning Danger of explosion if battery is incorrectly replaced.
Replace only with the Gateway Li-Ion battery designed for
your specific model. Discard used batteries according to
the manufacturer’s instructions.
The battery used in this device may present a fire or
chemical burn hazard if mishandled. Do not disassemble,
heat above 100°C (212°F) or incinerate. Dispose of used
battery promptly. Keep away from children.
Important On the Solo 9500, the second battery is installed in the
5.25” module bay. On the Solo 9550, the second battery
is installed in the 3.5” module bay.
Solo9550.book Page 134 Tuesday, June 19, 2001 3:18 PM

135
Installing a second battery
www.gateway.com
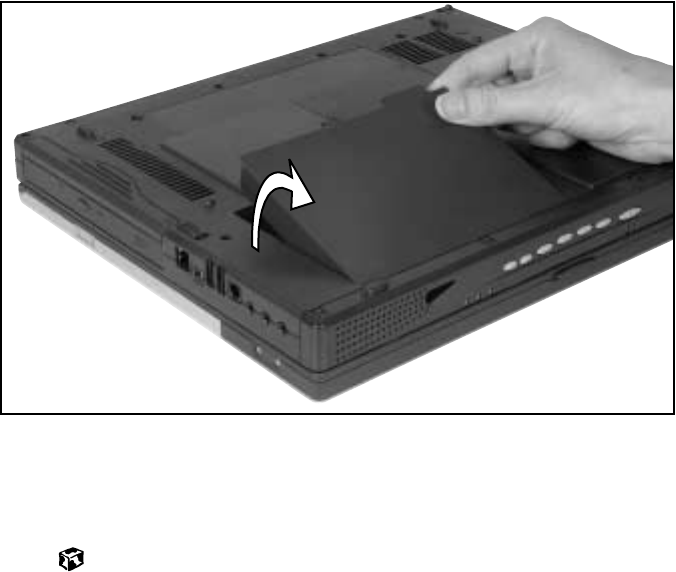
4Slide the bay module latch and pull the bay module straight out.
5Firmly push the second battery straight into the bay until the latch clicks
into place.
6Open your notebook and press the power button.
Solo9550.book Page 135 Tuesday, June 19, 2001 3:18 PM
136
Chapter 9: Managing Power
www.gateway.com
Extending battery life
Conserving battery power
While using the battery to power your notebook, conserve power by:
■Dimming the display as low as is comfortable.
■Removing PC Cards when you do not need them. Many PC Cards use a
small amount of power while inserted, even if they are not being used.
■Modifying the Power Management settings for maximum power savings.
For more information, see “Changing automatic power settings in
Windows Me, Windows 98, or Windows 2000” on page 138 or
“Changing power settings in Windows NT” on page 143.
■Closing the display panel to turn off the display while you are not using
your notebook. The display stays off until you open the panel again.
■Using Hibernate mode for maximum power savings while the notebook
is not in use. For more information, see “To use Hibernate mode:” on
page 142.
■Using the CD/DVD drive only when necessary. CD and DVD drives use
a large amount of power.
■Recharge the battery often, take an extra battery, and fully recharge the
batteries before traveling. For more information, see “Recharging the
battery” on page 131 and “Changing the main battery” on page 132.
Using alternate power sources
To extend battery life, use alternate power sources whenever possible.
■If traveling internationally, take electrical adapters. Save the battery for
times when you cannot use an AC adapter. If you plan on taking your
AC adapter, also take a single-plug power surge protector.
■If you will have access to an EmPower™ in-flight power receptacle or an
automobile cigarette lighter, use an airplane/automobile power adapter.
Save the battery for times when you cannot use a power adapter.
■To find AC power outlets in airports, look for them next to support pillars,
in large areas such as boarding gates, and under banks of telephones.
Solo9550.book Page 136 Tuesday, June 19, 2001 3:18 PM

137
Extending battery life
www.gateway.com
Changing power modes
You can use the following power modes to lengthen the life of your notebook’s
battery:
■Standby - while your notebook is on standby, it switches to a low power
state where devices, such as the LCD screen and drives, turn off.
■Hibernate - (also called save to disk) writes all current memory (RAM)
information to the hard drive, then turns your notebook completely off.
The next time you turn on the notebook, it reads the memory
information from the hard drive and opens the programs and documents
that were open when you activated Hibernate. For more information on
using Hibernate mode, see “To use Hibernate mode:” on page 142.
Using Standby mode
Always save your work before using the Standby mode. Once in Standby, your
computer reduces or turns the power off to most devices except memory.
However, the information in the memory is not saved to the hard drive. If
power is interrupted, the information is lost.
The table below shows how to use Standby mode.
If your
computer is... ...and you
want to... ...then
Off Start up Press the power button.
On Enter
Standby mode Press FN+STANDBY.
In
Standby mode Leave
Standby mode Press the power button.
On Shut down Click Start, then select Shut Down,
Shut down, then click OK.
Solo9550.book Page 137 Tuesday, June 19, 2001 3:18 PM

138
Chapter 9: Managing Power
www.gateway.com
Changing automatic power settings in
Windows Me, Windows 98, or Windows 2000
You can change the function of the power button, Standby key, and
power-saving timers by changing power settings on your notebook.
You can customize power settings from the Windows Control Panel by
selecting power schemes, setting power alarms, adjusting advanced power
settings, and turning on Hibernate mode.
Power schemes (groups of power settings) let you change power saving options
such as when the monitor or hard drive is automatically turned off. You can
select one of the defined power schemes or create a custom power scheme.
Alarms can alert you when the battery charge is low.
Advanced power settings let you assign different power saving modes to the
power button and Standby key. You can also select which power saving mode
is activated when you close the LCD panel.
HelpSpot For more information on changing power settings,
double-click the HelpSpot icon on your desktop.
Solo9550.book Page 138 Tuesday, June 19, 2001 3:18 PM