Ricoh 500SEW1 Digital Camera with WLAN User Manual Manual 9
Ricoh Company, Ltd. Digital Camera with WLAN Manual 9
Ricoh >
Contents
Manual 9
211
10
Using the Wireless LAN Function (Only for Caplio 500SE-W)
7
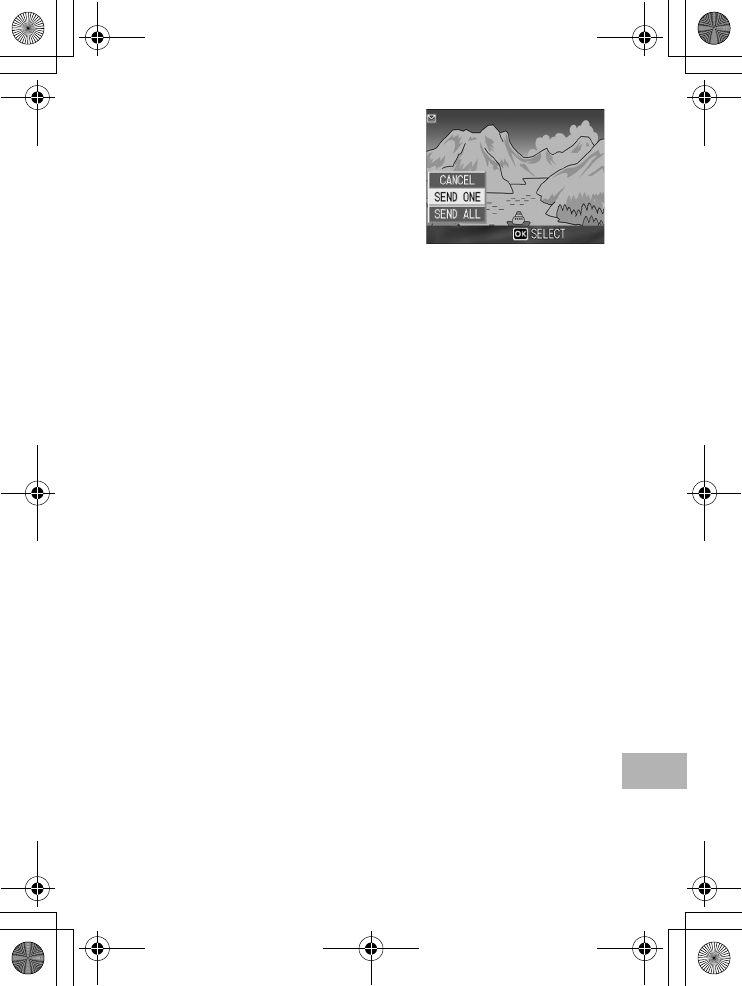
Press the !" button and
[SEND ONE] to send one file or
[SEND ALL] to send all files,
and then press the MENU/OK
button.
• Transfer of the files to the destination
device begins and the progress is
displayed. Pressing the DISP. button
cancels the operation. Pressing the 6 (Playback) button or shutter
release button also cancels the operation.
• If an error message appears during file transfer, follow the message
instructions and resend the files. For details about the error messages,
see P.223.
• Once the file transfer is completed, a message indicating this appears.
8
Press the MENU/OK button.
• The display returns to the playback screen.
L7360874_En_00_0_bookfile.book Page 211 Friday, October 13, 2006 12:56 PM
212
10
Using the Wireless LAN Function (Only for Caplio 500SE-W)
1
Check that the destination device (computer) is turned
on.
2
Press the 6 (Playback) button.
• Check that [CHANGE COM] is set to [W-LAN] on the Expanded
Settings menu. (GP.193)
3
Press the 9 (Thumbnail Display) button twice.
• The screen is divided into 12 frames and thumbnails are displayed.
4
Press the MENU/OK button.
• The Playback Setting menu appears.
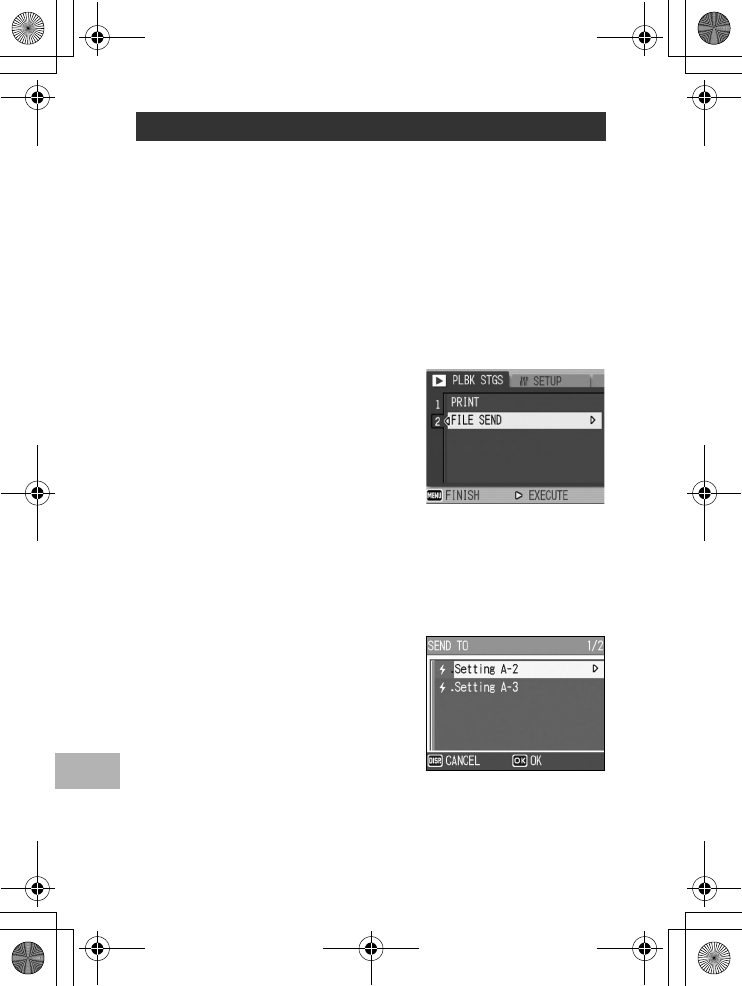
5
Press the " button to select
[FILE SEND], and then press
the $ button.
• If [SEND CONDITION] is set to [ON],
the [SEND TO] screen appears.
• If [SEND CONDITION] is set to [OFF]
(GP.219), go to Step 7.
• If the communication list has not been
transferred, or if [SEND CONDITION]
is set to [OFF] (GP.219) and the destination setting is incorrect, an
error message appears and the display returns to the Playback Setting
menu.
• If the camera is connected using a serial connection, a screen appears
confirming whether to disconnect the serial connection. Select [YES]
and press the MENU/OK button.
6
Press the !" buttons to select
the desired destination device
and then press the MENU/OK
button.
Sending Several Files
L7360874_En_00_0_bookfile.book Page 212 Friday, October 13, 2006 12:56 PM
213
10
Using the Wireless LAN Function (Only for Caplio 500SE-W)
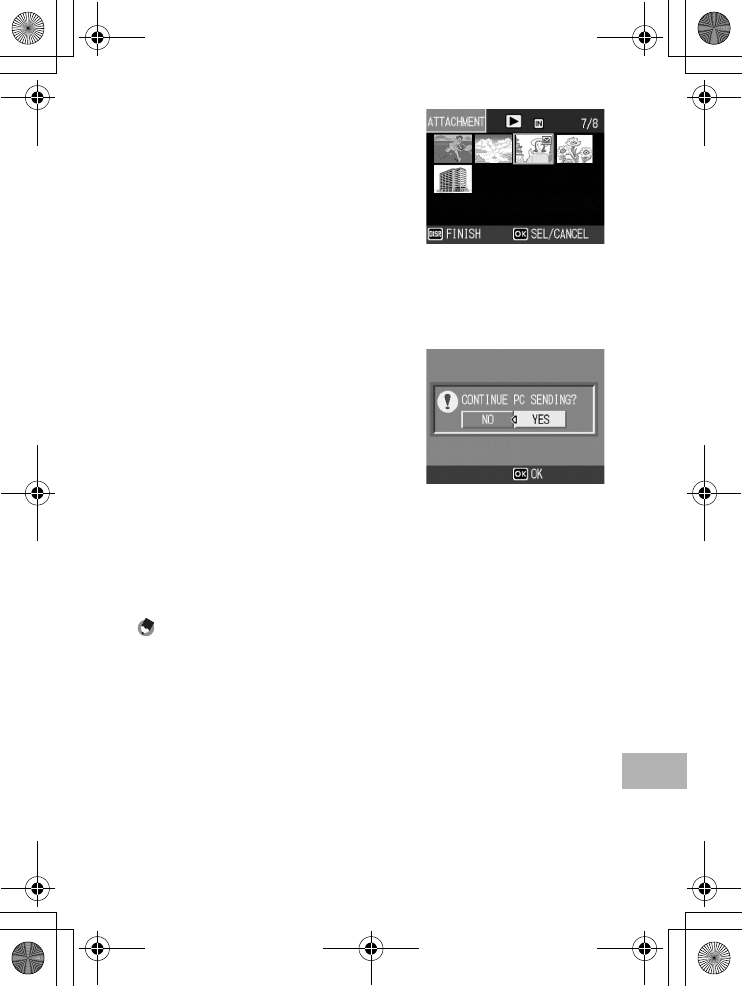
7
Press the !"#$ button to
select the file to send, and then
press the MENU/OK button.
• The envelope icon appears on the
screen.
8
Repeat Step 7 to select all the
files you want to send.
• If you selected a file by mistake, you
can deselect it by selecting the file and pressing the MENU/OK button
again.
9
Press the DISP. button.
• A screen appears confirming whether to send the selected files.
10
Press the $ button to select
[YES], and then press the
MENU/OK button.
• Transfer of the files to the destination
device begins and the progress is
displayed. Pressing the DISP. button
cancels the operation. Pressing the 6
(Playback) button or shutter release
button also cancels the operation.
• If an error message appears during file transfer, follow the message
instructions and resend the files. For details about the error messages,
see P.223.
• Once the file transfer is completed, a message indicating this appears.
11
Press the MENU/OK button.
• The display returns to the playback screen.
Note ----------------------------------------------------------------------------------------------
•When the [Does not send a file whose name already exists.] box is checked on the
[FTP Send] tab in the advanced settings of the communication list (GP.198), a file
whose name already exists is not sent to the Send via FTP inbox folder. After the files
whose names do not exist already are sent, a screen appears confirming whether to
rename and send or overwrite the files whose names already exist in the inbox. Select
[YES] or [NO], and press the MENU/OK button. If a communication error message
appears while overwriting the file, press the MENU/OK button. A message appears
again, confirming whether to overwrite the file. Press the $ button to select [YES] or
[NO], and then press the MENU/OK button.
•When the [Does not send a file whose name already exists.] box is not checked on
the [FTP Send] tab in the advanced settings of the communication list (GP.198),
the file whose name already exists in the Send via FTP inbox folder is overwritten.
•You can set the camera to automatically delete a file from the camera after it has been
sent. (GP.179)
L7360874_En_00_0_bookfile.book Page 213 Friday, October 13, 2006 12:56 PM
214
10
Using the Wireless LAN Function (Only for Caplio 500SE-W)
Immediately after you shoot an image, you can send the image file
to another device. This is convenient if you want to send images to
a predetermined device.
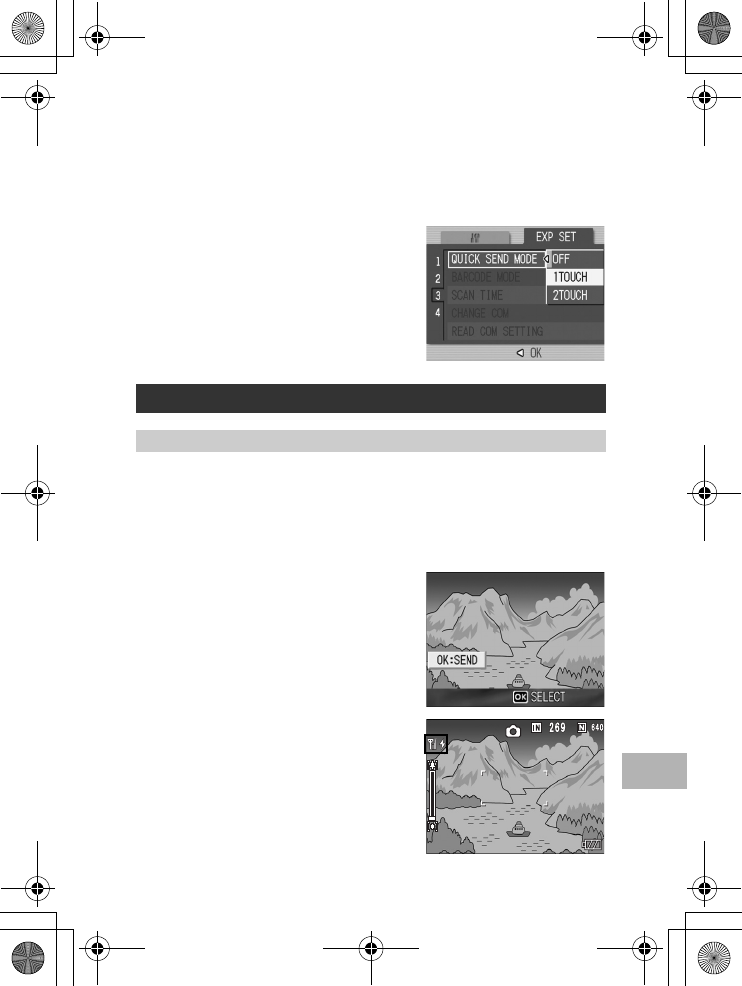
You need to set [QUICK SEND MODE] on the Expanded Settings
menu beforehand.
Caution------------------------------------------------------------------------------------------
Before sending files, create a communication list on the computer and transfer it to the
camera. (GP.202)
Note ----------------------------------------------------------------------------------------------
For information about setting your computer to receive images, see the documentation
that came with the computer.
Sending Files in Shooting Mode
(Quick Review Send)
Setting Up Quick Review Send
(QUICK SEND MODE)
Available Settings
OFF *Default setting Files are not sent in shooting mode.
1TOUCH Files are sent by pressing the MENU/OK button after shooting
while the file is displayed (GP.116).
You can use this function to send only still images (.JPG). If there
are still images with sounds (.JPG and .WAV), only still images
(.JPG) are sent.
You must use the Expanded Settings menu to specify the
destination beforehand. (GP.220)
2TOUCH Files are sent by pressing the MENU/OK button after shooting
during quick review display (GP.46). You can use this function
to send still images (.JPG), text (.TIF), and still images with
sound (.JPG and .WAV).
When sending files, you can use the [SEND TO] screen
displayed at the time of sending the files to specify the
destination, or you can also use the Expanded Settings menu to
specify the destination beforehand. (GP.219)
L7360874_En_00_0_bookfile.book Page 214 Friday, October 13, 2006 12:56 PM
215
10
Using the Wireless LAN Function (Only for Caplio 500SE-W)
1
Display the Expanded Settings menu.
• For the operating procedure, see P.155.
• Check that [CHANGE COM] is set to [W-LAN]. (P.193)
2
Press the " button to select [QUICK SEND MODE] and
press the $ button.
3
Press the !" buttons to select
[1TOUCH] or [2TOUCH].
4
Press the MENU/OK button, or
press the # button and then
the MENU/OK button.
1
Check that the destination device (computer) is turned
on.
2
Turn the mode dial to 5/K and shoot the picture.
• While the image is displayed after shooting, a screen appears
confirming whether to send the file. (GP.116)
3
Press the MENU/OK button.
• Transfer of the image to the
destination (GP.220) specified in
[SEND TO] on the Expanded Settings
menu begins.
• Once the transfer is completed, the
camera returns to shooting mode and
remains connected to the destination
device. You can change to playback
mode or voice memo mode or remain
connected to the destination device
until the camera is turned off. The
wireless LAN antenna icon appears
on the LCD monitor while the camera
is connected.
Using Quick Review Send
When [QUICK SEND MODE] is set to [1TOUCH]
L7360874_En_00_0_bookfile.book Page 215 Friday, October 13, 2006 12:56 PM
216
10
Using the Wireless LAN Function (Only for Caplio 500SE-W)
Note ----------------------------------------------------------------------------------------------
•In the following cases, you cannot use Quick Review Send to send files to a device
even when [QUICK SEND MODE] is set to [1TOUCH].
•When a communication list has not been transferred to the camera (GP.202)
•When the destination setting is incorrect
•When [Server Name] is not set on the Detailed Setups [FTP Send] tab
(GP.198)
•When [E-mail Address] is not set on the Detailed Setups [Address Book] tab
(GP.198)
•When [LCD CONFIRM.] is set to [OFF] (GP.116)
•During scene mode (GP.40)
•During S-CONT or M-CONT (GP.69)
•During Bluetooth® connection, you cannot use Quick Review Send to send still
images even when [QUICK SEND MODE] is set to [1TOUCH]. Before you can use
Quick Review Send to send still images, you must first disconnect the Bluetooth®
connection. (GP.174, P.182, P.184)
•When image with sound is set to [ON] (GP.76), after pressing the MENU/OK button
in Step 3, the send button remains displayed until sending is started.
•The image size set with [IMAGE FILE SIZE] (GP.178) does not apply.
•The [SEND TO] screen does not appear even when [SEND CONDITION] is set to
[ON].
•You can set the camera to automatically delete a file from the camera after it has been
sent. (GP.179)
L7360874_En_00_0_bookfile.book Page 216 Friday, October 13, 2006 12:56 PM
217
10
Using the Wireless LAN Function (Only for Caplio 500SE-W)
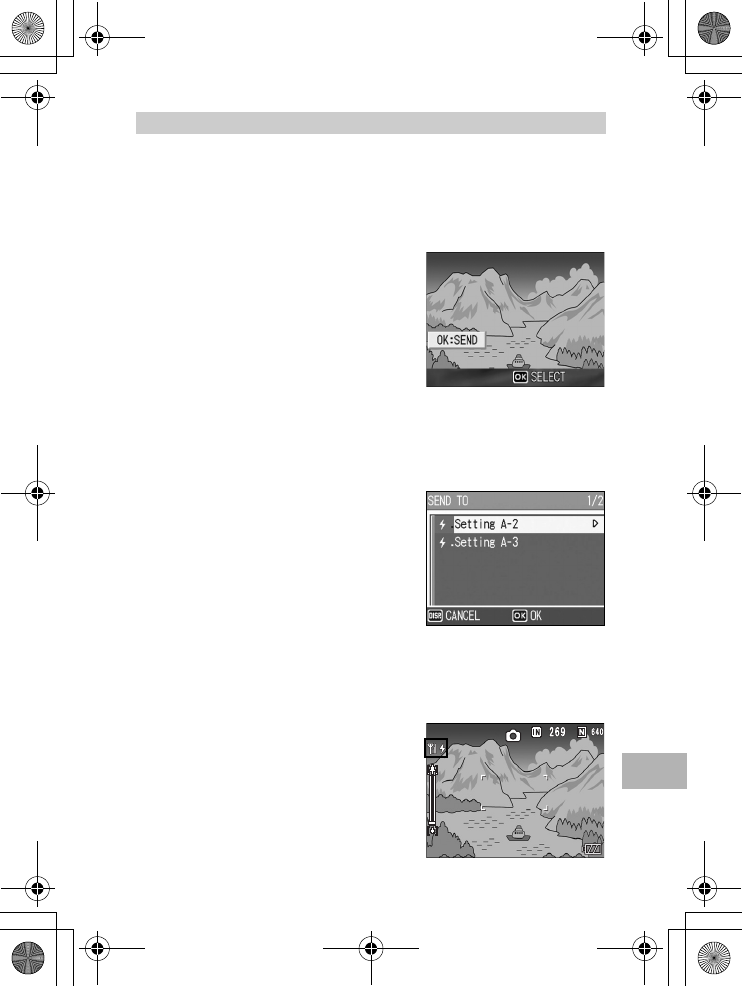
1
Check that the destination device (computer) is turned on.
2
Turn the mode dial to 5/K and shoot the picture.
3
Press the Q (Quick Review) button.
• A screen appears confirming whether to send the file.
4
Press the MENU/OK button.
• If [SEND CONDITION] is set to [ON],
the [SEND TO] screen appears.
•
If [SEND CONDITION] is set to [OFF]
(
G
P.219), sending to the destination
selected in [SEND TO] (
G
P.220)
begins, and the progress is displayed.
•
If the communication list has not been
transferred, or if [SEND CONDITION] is
set to [OFF] (
G
P.219) and the destination setting is incorrect, an error
message appears and the display returns to the Playback Setting menu.
• If the camera is connected with a Bluetooth®-enabled device, a screen
appears confirming whether to disconnect the connection. Select
[YES] and press the MENU/OK button. (GP.174, P.182, P.184)
5
Press the !" buttons to select
the desired destination device
and then press the MENU/OK
button.
• Transfer of the files to the destination
device begins and the progress is
displayed. Pressing the DISP. button
cancels the operation. Pressing the
6 (Playback) button or shutter
release button or turning the mode dial also cancels the operation.
• If an error message appears during transfer, follow the message
instructions and resend the files. For details about the error messages,
see P.223.
• Once the connection is established,
the camera returns to shooting mode
and remains connected to the
destination device. You can change to
playback mode or voice memo mode
or remain connected to the destination
device until the camera is turned off.
The wireless LAN antenna icon
appears on the LCD monitor while the
camera is connected.
When [QUICK SEND MODE] is set to [2TOUCH]
L7360874_En_00_0_bookfile.book Page 217 Friday, October 13, 2006 12:56 PM
218
10
Using the Wireless LAN Function (Only for Caplio 500SE-W)
Note ----------------------------------------------------------------------------------------------
•During manual focus (GP.65), you cannot use Quick Review Send to send files to
a device even when [QUICK SEND MODE] is set to [2TOUCH].
•When the [Does not send a file whose name already exists.] box is checked on the
[FTP Send] tab in the advanced settings of the communication list (GP.198), a file
whose name already exists is not sent to the Send via FTP inbox folder. After the files
whose names do not exist already are sent, a screen appears confirming whether to
rename and send or overwrite the files whose names already exist in the inbox. Select
[YES] or [NO], and press the MENU/OK button. If an error message appears while
overwriting the file, press the MENU/OK button. A message appears again, confirming
whether to overwrite the file. Press the $ button to select [YES] or [NO], and then
press the MENU/OK button.
•When the [Does not send a file whose name already exists.] box is not checked on
the [FTP Send] tab in the advanced settings of the communication list (GP.198),
the file whose name already exists in the Send via FTP inbox folder is overwritten.
•The size of the image files to be sent can be set beforehand. (GP.178)
•You can set the camera to automatically delete a file from the camera after it has been
sent. (GP.179)
To disconnect after Quick Review Send --------------------------------------------
Once Quick Review Send is completed, the camera returns to shooting mode and
remains connected to the destination device. Switch to playback mode or voice memo
mode, or turn the camera off to disconnect.
L7360874_En_00_0_bookfile.book Page 218 Friday, October 13, 2006 12:56 PM
219
10
Using the Wireless LAN Function (Only for Caplio 500SE-W)
When sending files, you can use the [SEND TO] screen displayed
at the time of sending the files to specify the destination, or, you can
choose not to display the [SEND TO] screen and specify the
destination beforehand. This is useful when sending files to the
same destination each time.
1
Display the Expanded Settings menu.
• For the operating procedure, see P.155.
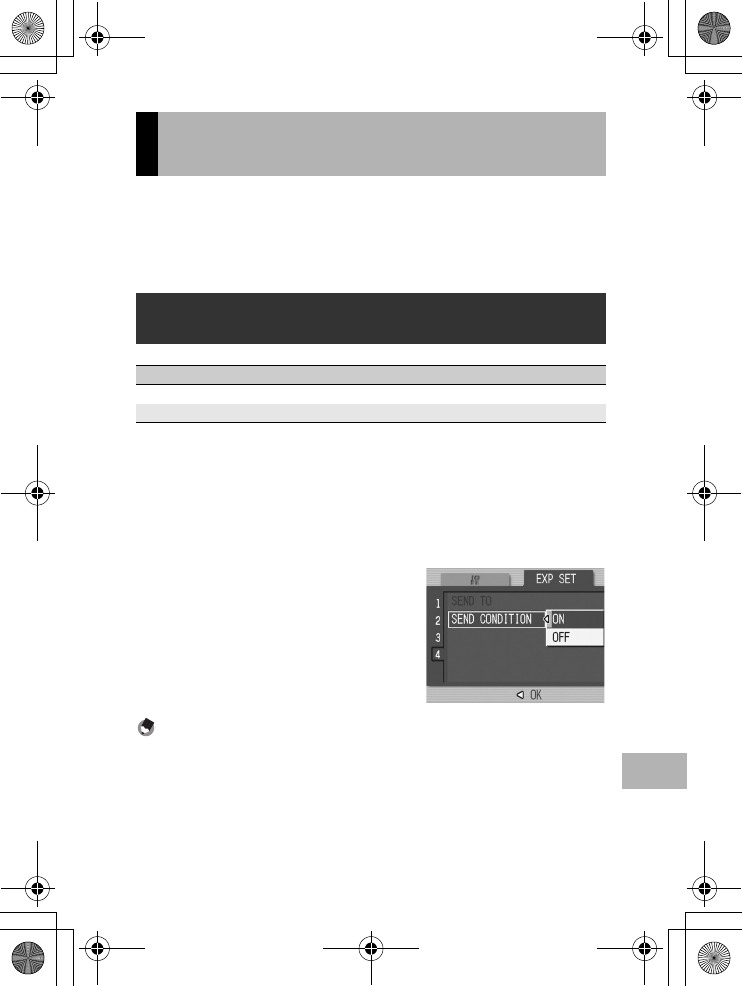
2
Press the " button to select [SEND CONDITION] and
press the $ button.
3
Press the " button to select [OFF].
4
Press the MENU/OK button, or
press the # button and then
the MENU/OK button.
Note ----------------------------------------------------------------------------------------------
When [SEND CONDITION] is set to [ON], each time you send a file, the [SEND TO]
screen appears, and you can specify the destination.
Specifying a Destination on the
Camera Beforehand
Hiding the [SEND TO] Screen
(SEND CONDITION)
Available Settings
OFF (Hides the [SEND TO] screen)
ON (Displays the [SEND TO] screen) *Default setting
L7360874_En_00_0_bookfile.book Page 219 Friday, October 13, 2006 12:56 PM

220
10
Using the Wireless LAN Function (Only for Caplio 500SE-W)
1
Display the Expanded Settings menu.
• For the operating procedure, see P.155.
2
Press the " button to select
[SEND TO] and press the $
button.
• A screen appears with a list of
destinations set on the communication
list.
3
Press the !" buttons to select
a destination to which to
connect.
• You can also confirm and edit the
destination setting on the camera.
(GP.207)
4
Press the MENU/OK button.
• The destination is set and the display
returns to the Expanded Settings menu.
5
Press the MENU/OK button.
Note ----------------------------------------------------------------------------------------------
If a destination is not specified with [SEND TO], the destination at the top of the [SEND
TO] list is selected. When [SEND CONDITION] is set to [OFF], or when [QUICK SEND
MODE] is set to [1 TOUCH] to use Quick Review Send, the file is sent to the destination
at the top of the list.
Specifying a Destination (SEND TO)
L7360874_En_00_0_bookfile.book Page 220 Friday, October 13, 2006 12:56 PM
221
11
Appendices
11 Appendices
If an error message is displayed on the screen, take the
corresponding action.
Troubleshooting
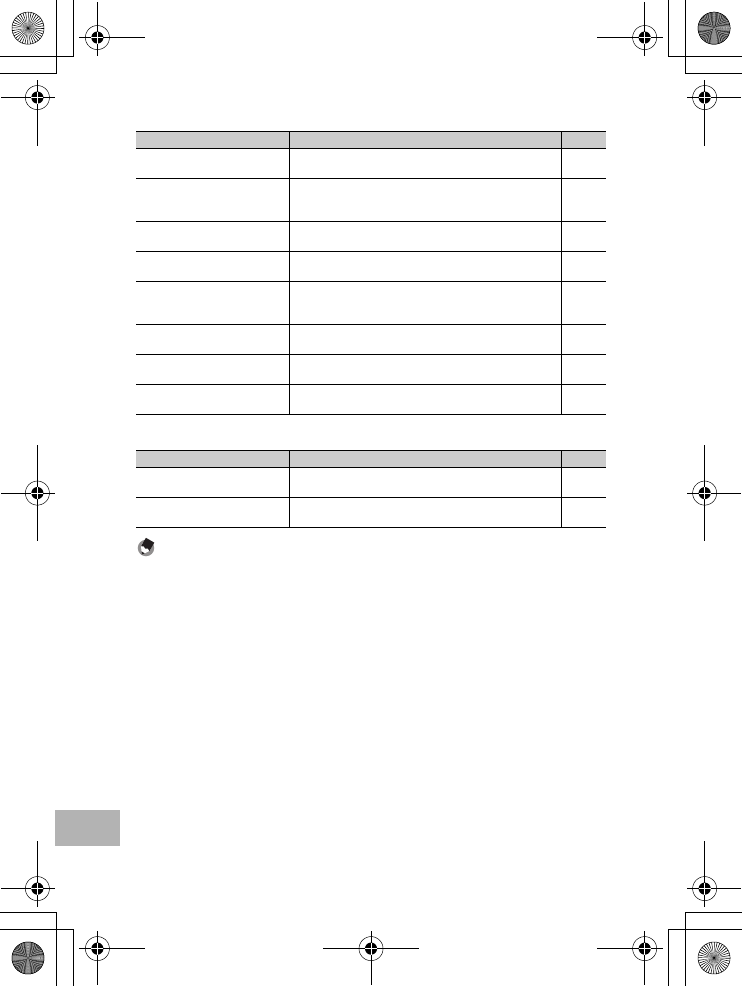
Error Messages
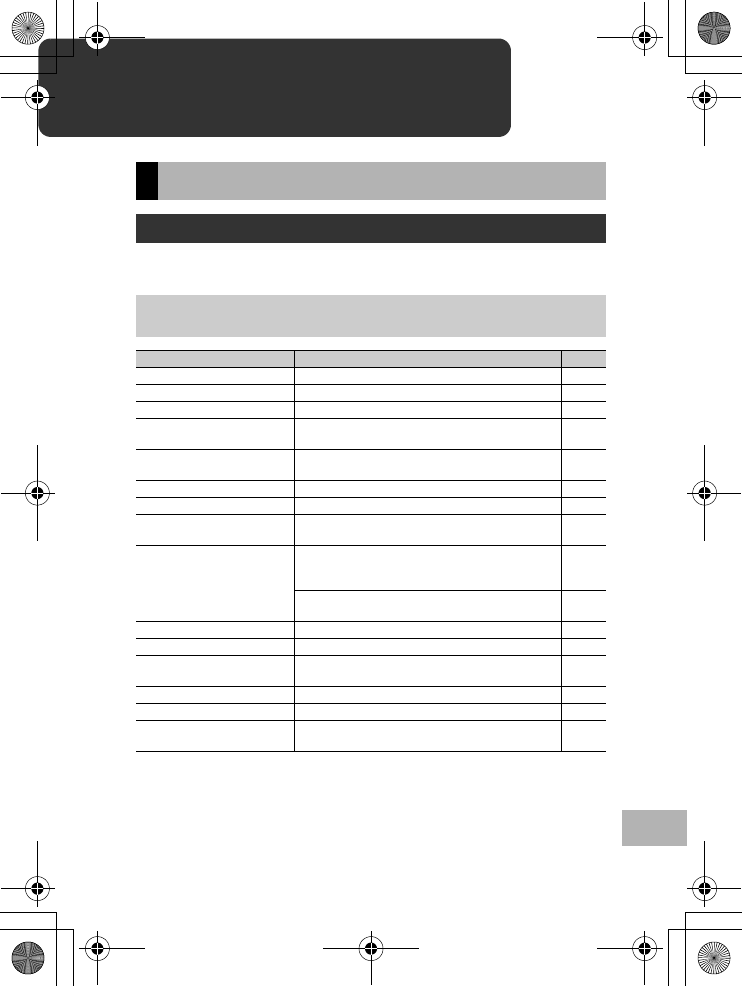
Non-Bluetooth® or Wireless LAN related error
messages
Error Message Cause and Action Refer to
INSERT CARD No card is loaded. Insert a card. P.25
SET DATE. The date is not set. Set the date. P.119
FILE NUMBER OVER LIMIT The file number limit has been exceeded. Use another card. P.117
UNMATCHED FILE The camera cannot display this file. Check the file contents
on your computer, and then delete the file.
-
INSUFFICIENT MEMORY.
CONTINUE?
Because there is not sufficient capacity on the card, all the
files cannot be copied. Use another card.
P.22
PROTECTED You are trying to delete a protected file. P.90
CARD IS WRITE-PROTECTED. The card is “Locked (write-protected)”. Unlock the card. P.22
PRINT SETTINGS CANNOT BE
SET FOR THIS FILE.
This file (movie or other file) cannot be selected for printing. -
INSUFFICIENT MEMORY Files cannot be stored. Make sure there is enough free
space or delete unwanted files.
P.51
P.109
P.110
The image print number limit has been exceeded. Select an
image and set the number to 0.
-
FORMAT INTERNAL MEMORY You must format the internal memory. P.110
FORMAT CARD The card is not formatted. Format the card with this camera. P.109
CARD ERROR Reformat the card. If, after doing so, the error message still
appears, the card may be faulty. Do not use the card.
P.109
WRITING TO CARD Writing file to memory. Wait until writing finishes. -
NO FILE There are no files that can be played back. -
CANNOT RECORD The number of remaining shots is 0. Switch to another card
or the internal memory.
P.22
L7360874_En_00_0_bookfile.book Page 221 Friday, October 13, 2006 12:56 PM
222
11
Appendices
Bluetooth® related error messages
Error Message Cause and Action Refer to
REQUESTED FILE CANNOT
PRINT.
You attempted to send an image other than still ones (.JPG).
Only still images (.JPG) can be sent.
P.154
REQUESTED FILE CANNOT BE
SENT.
You attempted to send an image other than still ones (.JPG).
Only still images (.JPG) can be sent.
P.154
VERIFYING FAILED. The input passkey did not match the destination device.
Enter the correct passkey.
-
The passkey was not entered within the time limit. Enter the
passkey again within the time limit.
P.162
CANNOT CONNECT. At the start of transfer, the destination device could not be
connected due to one of the following causes. Check the
device status and start again from the beginning.
•Signal no longer reach the destination device.
•The destination device does not exist nearby (about
10 m).
•The destination device is not active because the power is
off or due to other causes.
•The destination device does not support the Bluetooth®
Profiles required for communication with this camera.
•Inappropriate device was selected for the destination.
P.154
PRINTING FAILED. Printing failed during transfer due to one of the causes
below. Check the device status and start again from the
beginning.
•Signal no longer reach the destination device.
•The destination device is not ready to print.
• There is insufficient space on the destination device.
-
CANNOT SEND. Transfer was interrupted by one of the following causes.
Check the device status and start again from the beginning.
•Signal no longer reach the destination device.
•The destination device can no longer receive a signal.
• There is insufficient space on the destination device.
-
L7360874_En_00_0_bookfile.book Page 222 Friday, October 13, 2006 12:56 PM
223
11
Appendices
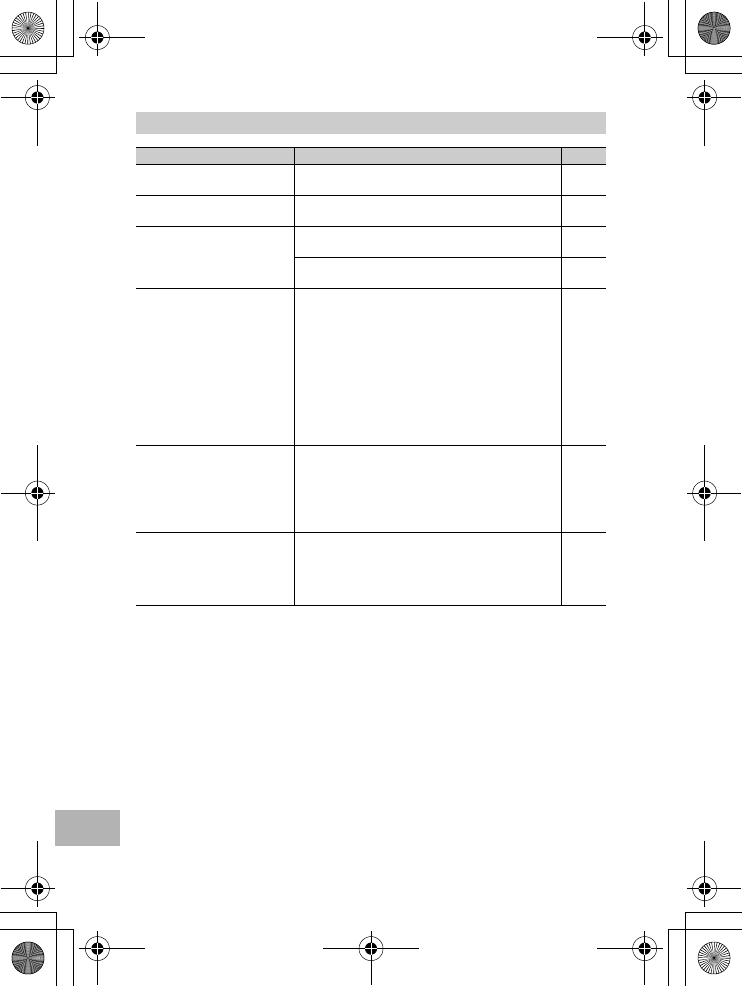
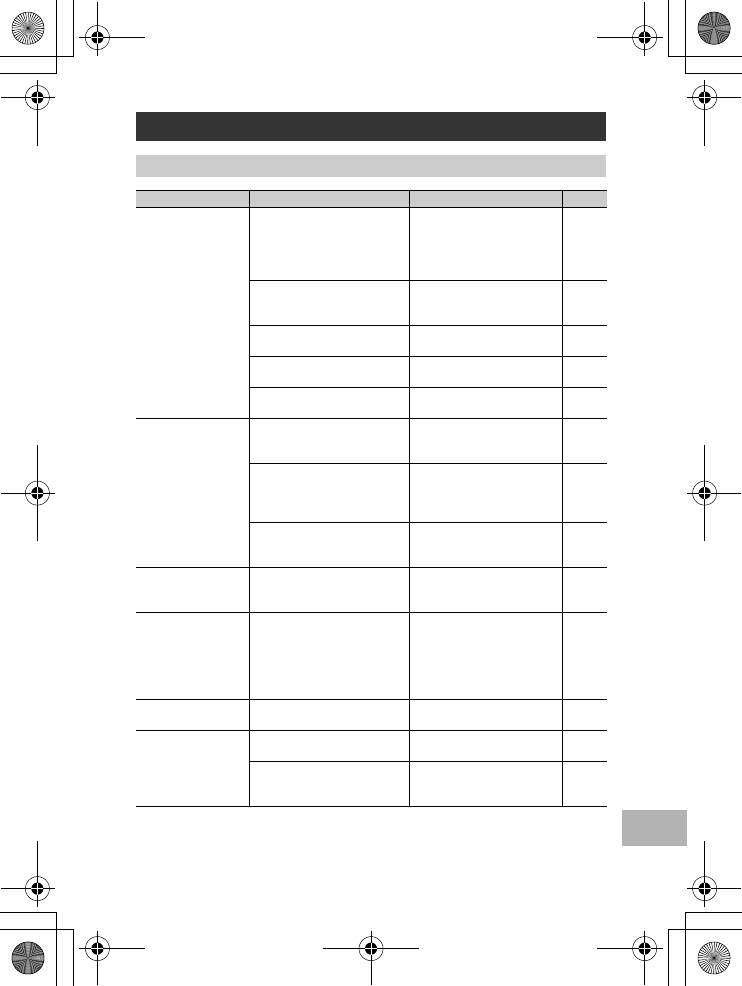
Communication and send setting errors
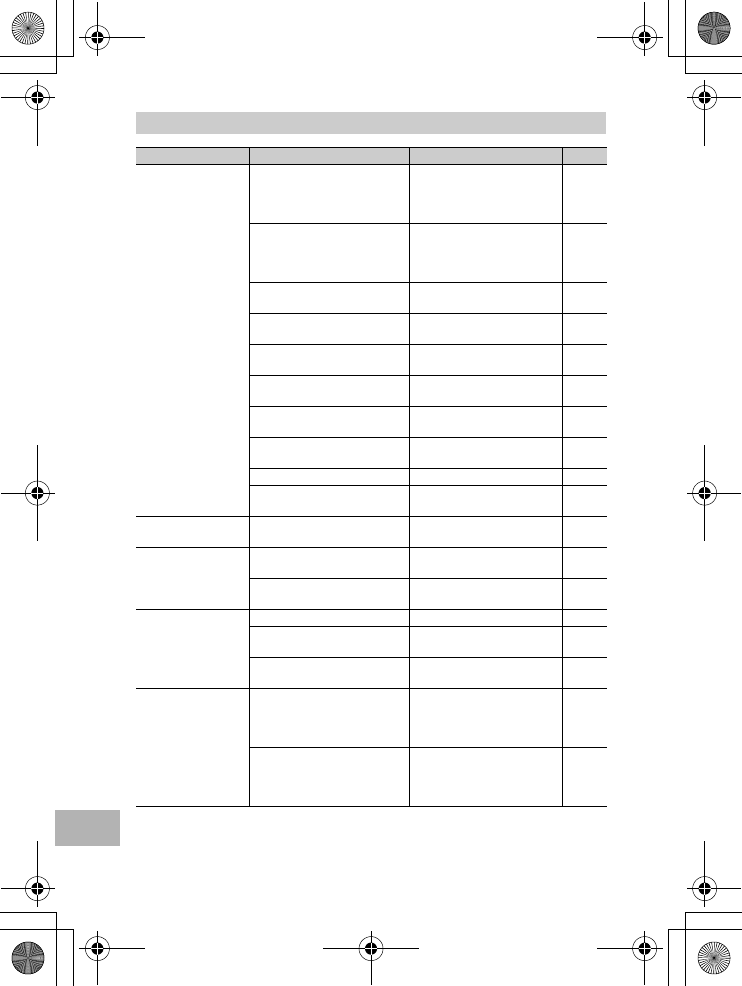
FTP send setting errors
Wireless LAN related error messages
(Only for Caplio 500SE-W)
Error Message Cause and Action Refer to
CONNECTION ERROR The camera is unable to establish a connection for some
reason. Check the communication settings.
P.194
P.202
SEND METHOD MUST BE
SELECTED
The [Send Method] setting is not selected in the communication
settings. Select [Send via FTP] or [Send via Mail].
P.202
NO SEND TO ADDRESS The [To Address] setting is not selected in the communication
settings. Select the [To Address] setting.
P.202
CANNOT CONNECT TO
ACCESS POINT
The destination access point is off or otherwise not operating.
Check the access point.
-
Incorrect communication settings. Check the send settings. P.202
THE IP ADDRESS IS ALREADY
IN USE
The same IP address as the camera exists in the destination
network. Check the [IP address] in the Detailed Setups
[Networks] tab.
P.196
CONFLICTING LAN SETTING The first destination sent to after turning the camera on and
the setting in the Detailed Settings [Network] tab or [Wireless
LAN] tab is different. To send to a destination different from
the setting in the [Network] or [Wireless LAN] tab, change the
destination in advance and restart the camera.
P.196
P.219
DESTINATION NOT
REGISTERED
The communication list has not been imported by the camera.
Import the communication list into the camera and try again.
P.202
INVALID KEY SIZE. When [Cryptography/Authentication] in [W/LESS LAN] is
changed on the camera, check the network key.
•If [Cryptography/Authentication] is set to [WEP/OPEN] or
[WEP/SHARED], enter the [Network Key] as below.
[String]: Five characters or 13 characters
[Hex]: Ten characters or 26 characters
•If [Cryptography/Authentication] is set to [AES/WPA-PSK],
[AES/WPA2-PSK], [TKIP/WPA-PSK], or [TKIP/WPA2-
PSK], enter an 8 to 63 character network key.
For details, refer to [Network Key] on P.197
P.197
P.207
Error Message Cause and Action Refer to
NO UPLOAD SERVER NAME
SETTING
[Server Name] for the destination is not set in the Detailed
Setups [FTP Send] tab. Set the [Server Name] setting.
P.198
CANNOT DETECT IP ADDRESS Unable to acquire the IP address of the destination server.
Set the correct [Server Name] setting in the Detailed Setups
[FTP Send] tab.
P.198
NO RESPONSE FROM SERVER The destination server does not respond. Check the
advanced settings on the [FTP Send] tab.
P.198
CANNOT CONNECT TO
SERVER
Unable to connect to the destination server. Check the
advanced settings on the [FTP Send] tab.
P.198
SETTING ERROR EITHER IN
USER NAME OR PASSWORD
Incorrect [User Name] or [Password] setting. Set the correct
[User Name] and [Password] settings in the Detailed Setups
[FTP Send] tab.
P.198
THE FOLDER DOES NOT
EXIST.
The specified inbox folder does not exist on the destination.
Set the correct [Folder Name] setting in the Detailed Setups
[FTP Send] tab.
P.198
CANNOT SEND Unable to send files for some reason. Check the advanced
settings on the [FTP Send] tab.
P.198
SERVER ERROR An error is received from the server after connecting to the
server. Try resending the file.
-
L7360874_En_00_0_bookfile.book Page 223 Friday, October 13, 2006 12:56 PM
224
11
Appendices
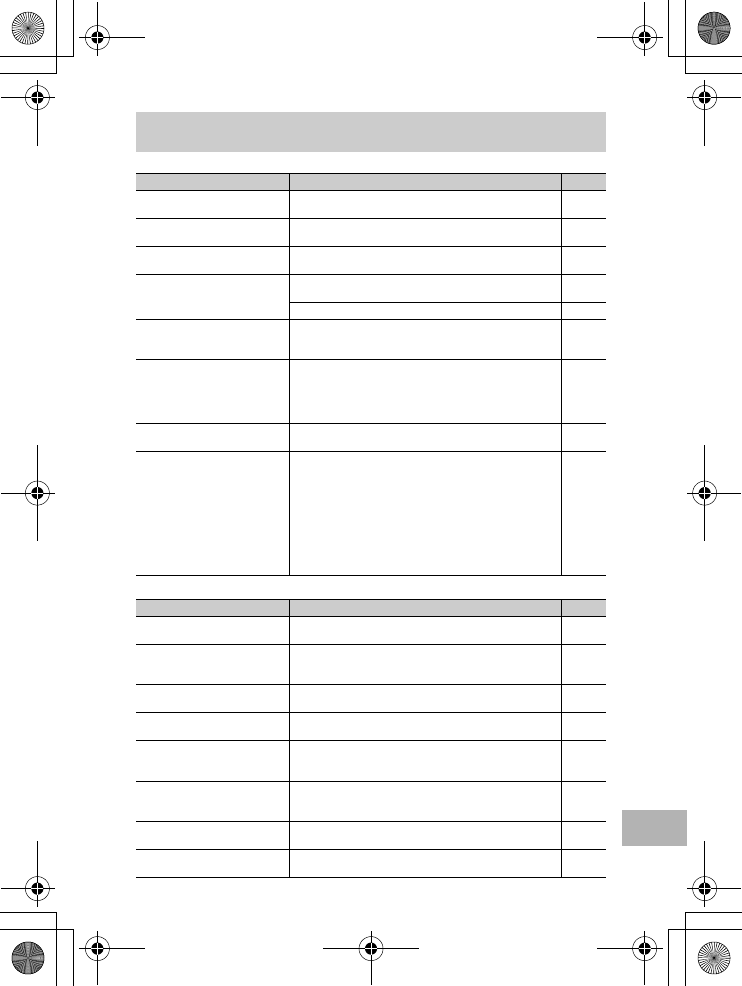
Mail send setting errors
Other errors
Note ----------------------------------------------------------------------------------------------
If you cannot solve the problem using the solutions above, contact a Ricoh office or your
local authorized Ricoh dealer.
Error Message Cause and Action Refer to
NO UPLOAD SERVER NAME
SETTING
The [Server Name] is not set in the Detailed Setups [Mail
Config.] tab. Set the [Server Name] setting.
P.198
CANNOT DETECT IP ADDRESS Unable to acquire the IP address of the SMTP server. Set the
correct [Server Name] setting in the Detailed Setups [Mail
Config.] tab.
P.198
NO RESPONSE FROM SERVER The SMTP server does not respond. Check the advanced
settings on the [Mail Config.] tab.
P.198
CANNOT CONNECT TO
SERVER
An error is received from the server after connecting to the
server. Try resending the file.
-
SETTING ERROR EITHER IN
USER NAME OR PASSWORD
Incorrect [User Name] or [Password] setting. Set the correct
[User Name] and [Password] settings in the Detailed Setups
[Mail Config.] tab.
P.198
FILE SIZE IS TOO LARGE TO
SEND
The image was not sent because the image file size is too
large. Reduce the file size and try resending the image.
P.178
CANNOT SEND Unable to send files for some reason. Wait a moment, and
then try reconnecting.
-
SERVER ERROR An error is received from the server after connecting to the
server. Wait a moment, and then try reconnecting.
-
Error Message Cause and Action Refer to
CANNOT PRINT VIA
WIRELESS LAN.
You cannot use the wireless LAN function to send files to a
printer. To send files to a printer, use the Bluetooth® function.
P.157
NO FILE SELECTED FOR
DIRECT UPLOAD
The files to be sent are not selected in the thumbnail display.
Select the files and click the MENU/OK button.
P.212
L7360874_En_00_0_bookfile.book Page 224 Friday, October 13, 2006 12:56 PM
225
11
Appendices
Camera Troubleshooting
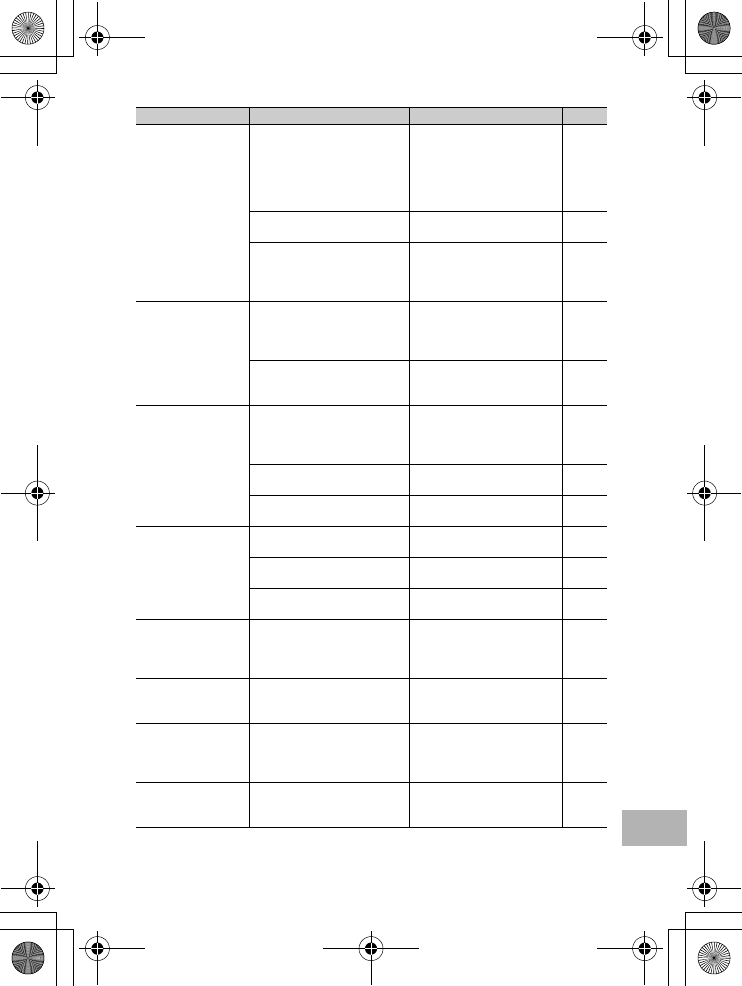
Power Supply
Problem Cause Solution Refer to
The camera does not
turn on.
Battery is not loaded or is
exhausted.
Load the rechargeable battery
correctly or charge the battery as
required. Use the AC adapter as
required. Replace the alkaline
batteries with new batteries.
P.24
P.25
P.27
A (manganese dry cell or other)
unacceptable battery is used.
Use the dedicated rechargeable
battery or alkaline batteries.
Never use any other batteries.
P.20
The AC adapter is not connected
correctly.
Reconnect it properly. P.27
The camera is automatically turned
off by auto power off.
Turn the camera back on. P.29
The battery is loaded in wrong
direction.
Load correctly. P.25
The camera turns off
during use.
The camera was left unattended
and unused, so auto power off
turned it off.
Turn the camera back on. P.29
Battery is running low. Charge the rechargeable battery
or use the AC adapter. Replace
the alkaline batteries with new
batteries.
P.24
P.27
P.25
A (manganese dry cell or other)
unacceptable battery is used.
Use the dedicated rechargeable
battery or alkaline batteries.
Never use any other batteries.
P.20
The camera does not
turn off.
Camera malfunction. Remove the battery and load it
again. Reconnect the AC adapter
cable properly, if using.
P.25
P.27
The battery has been
fully charged, but:
•The battery mark is
displayed, indicating
a low battery level.
•The camera turns off.
A (manganese dry cell or other)
unacceptable battery is used.
Use the dedicated rechargeable
battery or alkaline batteries.
Never use any other batteries.
P.20
Cannot charge the
battery.
Battery has reached the end of its
useful life.
Replace with a new battery. P.25
Battery runs out quickly. It is being used at extreme high or
low temperatures.
--
Many shots are being taken in dark
places or other location requiring
extensive use of flash.
--
L7360874_En_00_0_bookfile.book Page 225 Friday, October 13, 2006 12:56 PM
226
11
Appendices
Shooting
Problem Cause Solution Refer to
The camera does not
shoot even if you press
the shutter release
button.
Battery is exhausted. Charge the rechargeable battery
or use the AC adapter. Replace
the alkaline batteries with new
batteries.
P.24
P.27
P.25
The camera is not on or it is not in
the shooting mode.
Turn on the camera, and turn the
mode dial to the shooting mode.
Press the 6 (Playback) button
to select the shooting mode.
P.16
P.29
The camera is in playback mode. Press the 6 (Playback) button
to select the shooting mode.
P.47
The shutter release button is not
pressed all the way.
Press the shutter release button
all the way.
P.34
P.35
The SD memory card is not
formatted.
Format the card. P.109
The SD memory card is full. Load a new card, or delete
unwanted files.
P.25
P.51
The SD memory card has reached
the end of its useful life.
Load a new SD memory card. P.25
The flash is charging. Wait until the auto focus/flash
lamp stops blinking.
P.39
The SD memory card is locked. Unlock the card. P.22
The contact surface of the SD
memory card is dirty.
Wipe with a soft, dry cloth. -
Unable to view the shot
image.
The image confirmation time is too
short.
Lengthen the image confirmation
time.
P.116
Images do not appear
on the LCD monitor.
The camera is not on or the LCD
monitor is dark.
Turn the camera on or adjust the
brightness of the LCD monitor.
P.29
P.111
The screen display is in
synchro-monitor mode.
Press the DISP. button to change
the display.
P.54
Although the camera is
set to auto focus, it is
unable to focus.
The lens or AF window is dirty. Wipe clean with a soft, dry cloth. P.14
The subject is not in the center of
the shooting range.
Shoot with focus lock. P.35
It is a hard-to-focus subject. Shoot with focus lock or manual
focus.
P.35
P.65
The picture is blurred. You moved the camera when
pressing the shutter release button.
Hold the camera with your elbows
pressed against your body.
Use a tripod.
Use the antiblur function.
P.32
P.63
When shooting in a dark place
(such as indoors), the shutter
speed slows down and pictures
become easily blurred.
Use the flash.
Raise the ISO setting.
Use the antiblur function.
P.39
P.81
P.63
L7360874_En_00_0_bookfile.book Page 226 Friday, October 13, 2006 12:56 PM
227
11
Appendices
The flash does not fire or
the flash cannot charge.
The flash cannot be used in the
following cases:
•In multi-shot mode
•In movie mode
In scene modes, the flash is
disabled by default.
To shoot with the flash, change
the settings or mode.
P.39
P.69
P.83
P.240
The flash is set to flash off. Use the F (Flash) button to
cancel flash off.
P.39
Battery is running low. Charge the rechargeable battery
or use the AC adapter. Replace
the alkaline batteries with new
batteries.
P.24
P.27
P.25
Even though the flash
fired, the picture is dark.
The distance to the subject is
greater than 6.5 meters in
telephoto or greater than 10 meters
in wide-angle.
Get closer to your subject and
shoot.
P.39
The subject is dark. Correct the exposure. (Exposure
compensation also changes the
light intensity of the flash.)
P.78
The image is too bright. The light intensity of the flash is not
appropriate.
Move a little away from the
subject or illuminate the subject
with another light source instead
of using the flash.
P.39
Subject is overexposed. Correct the exposure.
Cancel exposure time.
P.78
P.73
The brightness of the LCD monitor
is not appropriate.
Adjust the brightness of the LCD
monitor.
P.111
The image is too dark. The shot was taken in a dark place
while set to flash off.
Use the F (Flash) button to
cancel flash off.
P.39
The subject is underexposed. Correct the exposure.
Set to long exposure time.
P.78
P.73
The brightness of the LCD monitor
is not appropriate.
Adjust the brightness of the LCD
monitor.
P.111
The image lacks natural
color.
The picture was shot in conditions
that made it difficult for auto white
balance to adjust the white
balance.
Add a white object to the
composition or use a white
balance setting other than auto.
P.79
The date or recording
information does not
appear on the screen.
The screen display function is set
to no display.
Press the DISP. button to change
the display.
P.54
The brightness of the
LCD monitor changes
during AF.
You are using AF in a dark place or
when the auto focus range and
surrounding brightness are
different.
This is normal. -
There is a vertical smear
on the image.
This is a phenomenon that occurs
when a bright subject is shot. It is
called the smear phenomenon.
This is normal. -
Problem Cause Solution Refer to
L7360874_En_00_0_bookfile.book Page 227 Friday, October 13, 2006 12:56 PM
228
11
Appendices
Playback/Deleting
Problem Cause Solution Refer to
Cannot play back, or the
playback screen does
not appear.
The camera is not in playback
mode.
Press the 6 (Playback) button. P.47
The contents of the SD
memory card cannot be
played back, or the
playback screen does
not appear.
No SD memory card is loaded, or
an SD memory card with no stored
images is loaded.
Load a card with stored images. P.25
You played back an SD memory
card that was not formatted with
this device.
Load a card that was formatted
and recorded with this device.
P.25
P.109
You played back an SD memory
card that was not recorded
normally.
Load a normally recorded card. -
The contact surface of the SD
memory card is dirty.
Wipe with a soft, dry cloth. -
There is something wrong with the
SD memory card.
Play back images from another
card and if there is nothing wrong
with the card, the camera is okay.
There may be something wrong
with the card, so do not use it.
-
The LCD monitor turned
off.
Battery is running low. Charge the rechargeable battery
or use the AC adapter. Replace
the alkaline batteries with new
batteries.
P.24
P.27
P.25
The camera was left unattended
and unused, so auto power off
turned it off.
Turn the camera back on. P.29
A file cannot be deleted. The file is protected. Unprotect the file. P.90
The SD memory card is locked. Unlock the card. P.22
Cannot format the SD
memory card.
The SD memory card is locked. Unlock the card. P.22
L7360874_En_00_0_bookfile.book Page 228 Friday, October 13, 2006 12:56 PM
229
11
Appendices
Other Problems
Problem Cause Solution Refer to
Cannot load the SD
memory card.
The card is facing the wrong way. Load correctly. P.25
The camera does not
operate even when the
buttons are pressed.
Battery is running low. Charge the rechargeable battery
or use the AC adapter. Replace
the alkaline batteries with new
batteries.
P.24
P.27
P.25
Camera malfunction. Press the power button to turn the
camera off, and then press the
power button to turn the camera
on again.
P.29
Remove the battery and load it
again. Reconnect the AC adapter
cable properly, if using.
P.25
P.27
The date is incorrect. The correct date/time are not set. Set the correct date/time. P.119
The set date disappeared. The battery was removed. If the battery is removed for about
one week, the date setting will be
lost. Make the settings again.
P.119
Auto power off does not
work.
Auto power off is set to [OFF]. Set the time for auto power off. P.113
The beep sound cannot
be heard.
The beep sound volume is turned
off.
Use [VOL. SETTINGS] to set the
volume to a setting other than
mute.
P.115
L7360874_En_00_0_bookfile.book Page 229 Friday, October 13, 2006 12:56 PM
230
11
Appendices
For details about the software, refer to the “Software User Guide”
(PDF file).
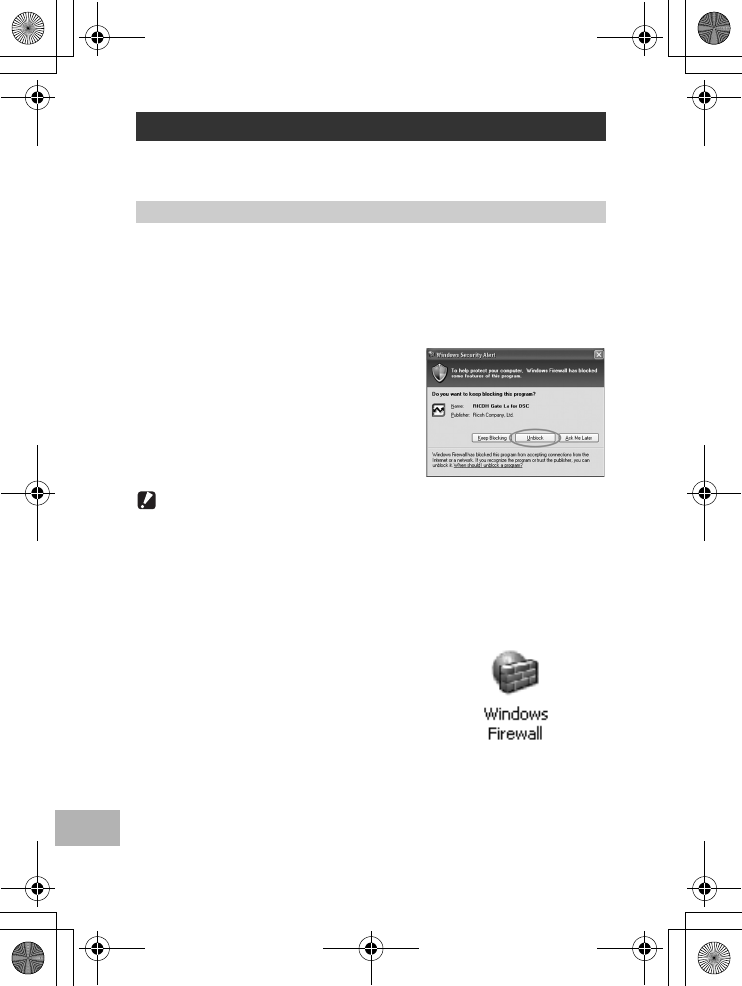
When software for your Ricoh digital camera is used on a computer
with Windows XP Service Pack 2 installed, the following warning
message may appear at software activation or USB connection.
With this in mind, refer to the following:
When this warning message is displayed:
1
Check the information
provided on the message
screen to make sure that it
comes from a reputable
source, and then click the
[Unblock] button.
Caution------------------------------------------------------------------------------------------
If you do not recognize the program, you should block it because it may be a virus. Click
the [Keep Blocking] button to prevent the program from connecting to the Internet.
If you clicked the [Keep Blocking] button:
Follow the steps below to check the Windows Firewall settings.
1
Click [Start] and then [Control Panel].
2
Double-click [Windows
Firewall].
• If [Windows Firewall] is not displayed,
click [Switch to Classic View] at the top
left of the window.
Software and Computer Troubleshooting
Warning Messages Under Windows XP Service Pack 2
L7360874_En_00_0_bookfile.book Page 230 Friday, October 13, 2006 12:56 PM
231
11
Appendices
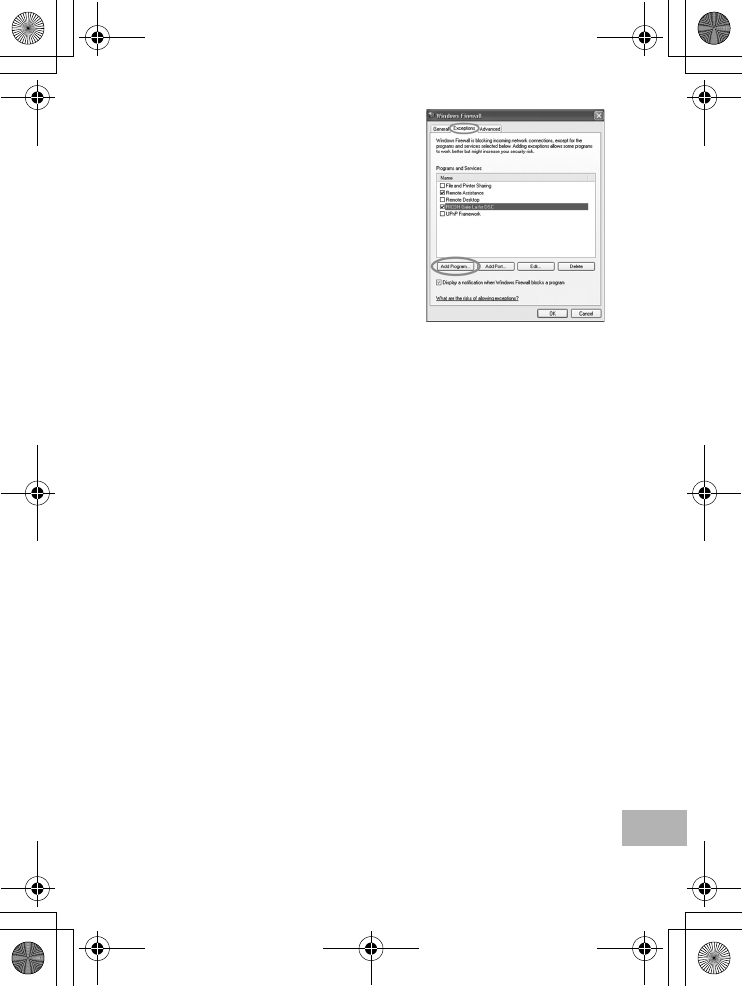
3
Click the [Exceptions] tab.
4
Check that the software is in
[Programs and Services].
5
Click the [Add Program] button
to add software that uses the
network.
If you clicked the [Ask Me Later] button:
Each time the program is activated, the [Windows Security Alert]
dialog box appears. Then you can select [Unblock].
L7360874_En_00_0_bookfile.book Page 231 Friday, October 13, 2006 12:56 PM

232
11
Appendices
General
Camera Parts
Specifications
Power Source Voltage Rechargeable Battery DB-43 (3.7 V) × 1
External (AC adapter): 3.8 V
AA Dry Alkaline Battery, Nickel-Hydrogen Battery × 2
External Dimensions 133.0 mm (W) × 74.0 mm (H) × 78.5 mm (D) (excluding projecting parts)
Weight Camera: Approximately 430 g (excluding battery, strap)
Accessories: Approximately 50 g (battery, strap)
Tripod Hole Shape 1/4-20UNC
Operating Temperature Range -10 °C to 40 °C
Operating Humidity Range 85% or less
Storage Temperature Range -20 °C to 60 °C
Water Resistance JIS protection grade 7, IEC IP67
Dust Resistance JIS protection grade 6, IEC IP67
Image Pickup Element Total 8.30 million pixels (effective pixels 8.13 million), 1/1.8" primary-color
CCD
Lens
Lens 3.0 × Optical Zoom
Aperture: F2.5 (Wide-angle) to 4.3 (Telephoto)
Focal Length 5.8 to 17.4 mm (equivalent to 28 to 85 mm on a 35mm camera)
Shooting Distance Approximately 0.3 m to A (Wide-angle) or 1.0 m to A (Telephoto)
Macro Shooting Distance
(from the very front of the
camera)
Approximately 0.005 m to A (Wide-angle), 0.1 m to A (Telephoto) or
0.005 m to A (Zoom macro mode)
Digital Zoom 4.0 times
Monitor Display Parts
Screen Size 2.5"
Type Transparent Amorphous Silicon TFT LCD
Pixel Count Approx. 150,000
White Balance AUTO/Fixed (OUTDOORS, CLOUDY, INCAND., INCAND.2, FLUORES.,
MANUAL)
Exposure Adjustment
Light Metering Sensitivity
Distribution
Multi Light Metering (256 segments), Center-weighted Light Metering, Spot
Metering
Exposure Compensation Manual exposure compensation +/-2.0EV (1/3EV Steps)
Metering Method TTL-CCD Metering Method
Flash AE Yes (In Daylight Synchro: On)
Shutter Still image: 8, 4, 2, 1 to 1/2000 seconds; Movie: 1/30 to 1/2000 seconds
ISO Sensitivity AUTO, ISO 64, ISO 100, ISO 200, ISO 400, ISO 800, ISO 1600
L7360874_En_00_0_bookfile.book Page 232 Friday, October 13, 2006 12:56 PM
233
11
Appendices
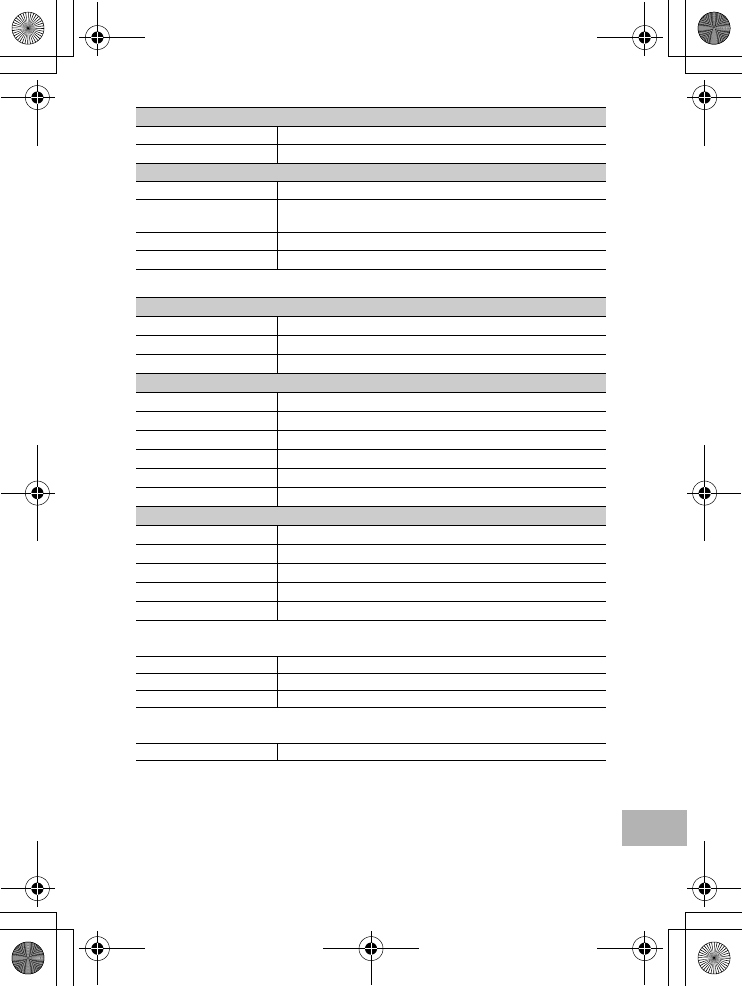
Image Data Record/Playback Part
I/O Terminals
Memory Cards for Recording and Playback
Distance Control
AF Method Normal Shooting: External Passive/CCD method Macro: CCD method
AF Measurement Range Normal: approx. 0.3 m to A, Macro: approx. 0.005 m to A
Internal Flash
Method External modulated light sensor and pre-flash method
Shooting Distance Approx. 0.2 to 10 m (Wide-angle), Approx. 0.2 to 6.5 m (Telephoto) (ISO:
AUTO)
Operating Modes Flash Off/Auto/Red-eye reduction/Forced flash/Flash synchro
Date Maintain Time Approx. 1 week
Pixels
Still Image 3264 × 2448, 2592 × 1944, 2048 × 1536, 1280 × 960, 640 × 480
Text 3264 × 2448, 2048 × 1536
Movie 320 × 240, 160 × 120
File Formats
Still Image JPEG (Exif Ver.2.21)
Text TIFF (MMR Method ITU-T.6)
Movie AVI (Open DML Motion JPEG Format Compliant)
Sound WAV (Exif Ver.2.21 µ law)
Camera File System Standard DCF (“Design rule for Camera File system”, a JEITA standard)
Compression Format JPEG Baseline Format Compliant (Still image, movie)
Image Size
3264 ×2448 N: approx. 1665 KB/Screen, F: approx. 2894 KB/Screen
2592 ×1944 N: approx. 1060 KB/Screen
2048 ×1536 N: approx. 672 KB/Screen
1280 ×960 N: approx. 356 KB/Screen, F: approx. 686 KB/Screen
640 ×480 N: approx. 83 KB/Screen
DC In 3.8 V (AC adapter)
USB Terminal USB2.0 High-Speed (mini-USB)
AUX Terminal Proprietary specifications
Memory Type SD memory card, multi media card
L7360874_En_00_0_bookfile.book Page 233 Friday, October 13, 2006 12:56 PM
234
11
Appendices
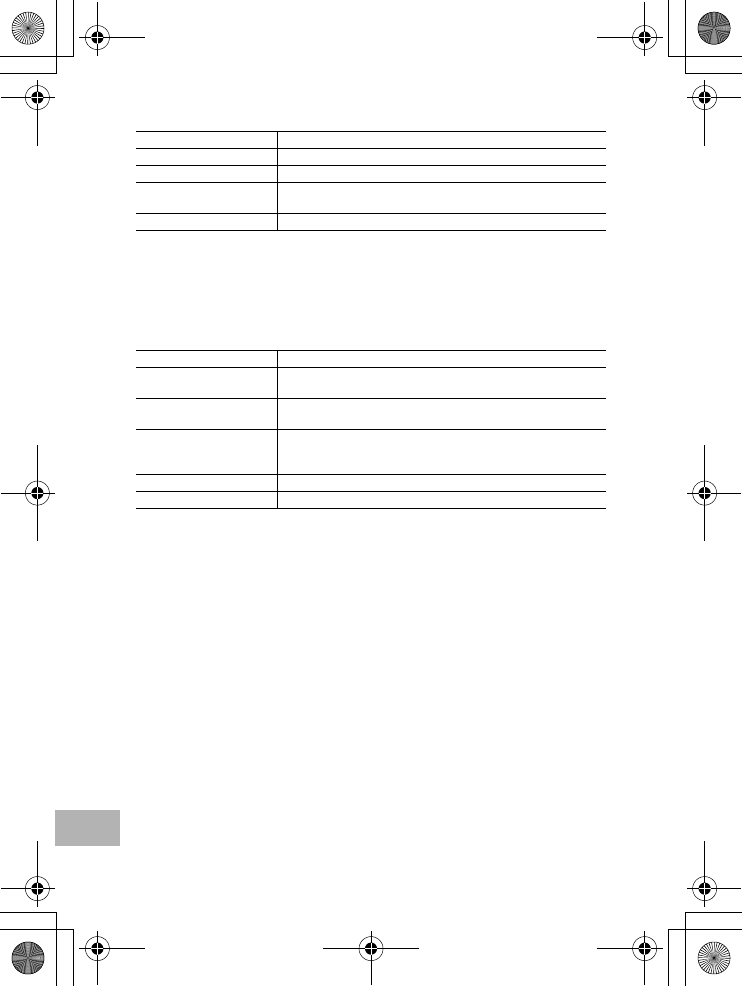
Bluetooth® Communication Port
*1 The communication range may vary depending on obstructions between the two devices, signal strength,
software or operating system in use, and other factors.
*2 These are specifications according to the intended use of the Bluetooth®-enabled devices and are
predetermined by Bluetooth® standards.
Wireless LAN Communication Port (Only for Caplio
500SE-W)
*1 The data transfer speeds are the maximum theoretical values based on the wireless LAN standard and may
differ from the actual data transfer speed.
*2 The communication range may vary depending on obstructions between the two devices, signal strength,
location of the devices, usage environment, software or operating system in use, and other factors.
Communication Method Bluetooth® standard Ver. 2.0 + EDR
Output Bluetooth® standard Power Class 2
Communication Range*1 Approx. 10 m (line of sight)
Supported Bluetooth®
Profiles*2 BIP, OPP, SPP
Frequency Band 2.4 GHz (2.4 GHz – 2.4835 GHz)
Compliance Standard IEEE802.11b/g
Transmission Method IEEE802.11g: OFDM
IEEE802.11b: DSSS, DQPSK, DBPSK
Data Transfer Speed*1 IEEE802.11g: 54M/48M/36M/24M/18M/12M/9M/6M (bps)
IEEE802.11b: 11M/5.5M/2M/1M (bps)
Communication Range*2 Approx. 30 m
This varies depending on the location of the devices, usage environment,
and usage conditions.
Security Protocol WEP (64/128bit), WPA-PSK (TKIP/AES), WPA2-PSK (TKIP/AES)
Frequency Band 2.4 GHz (2.412 - 2.462 GHz)
L7360874_En_00_0_bookfile.book Page 234 Friday, October 13, 2006 12:56 PM
235
11
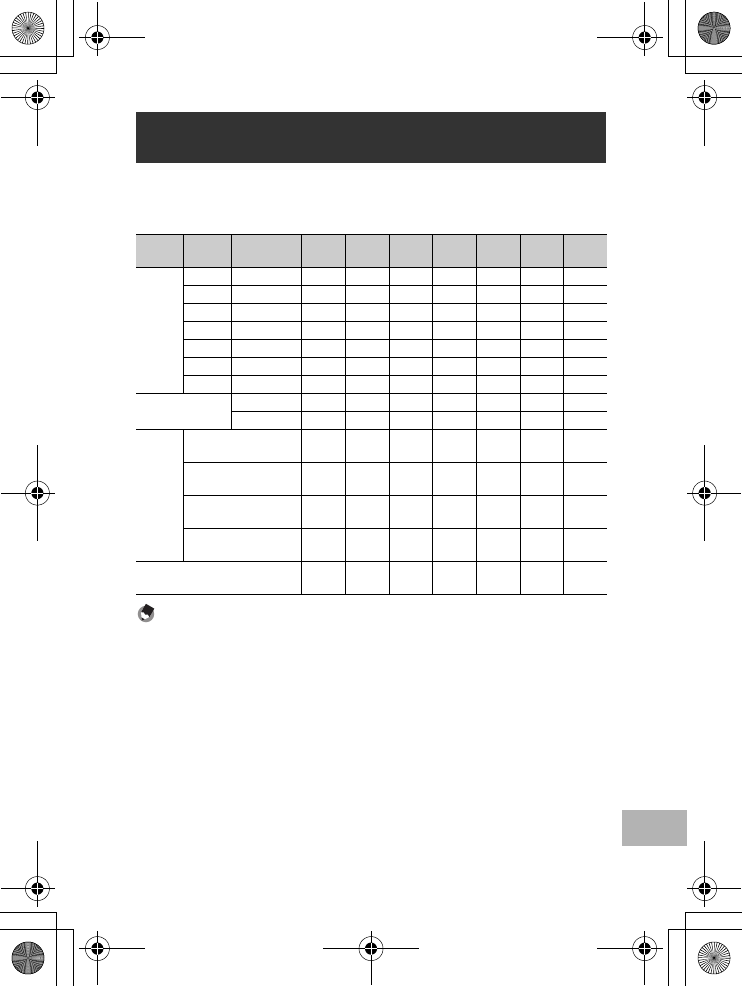
Appendices
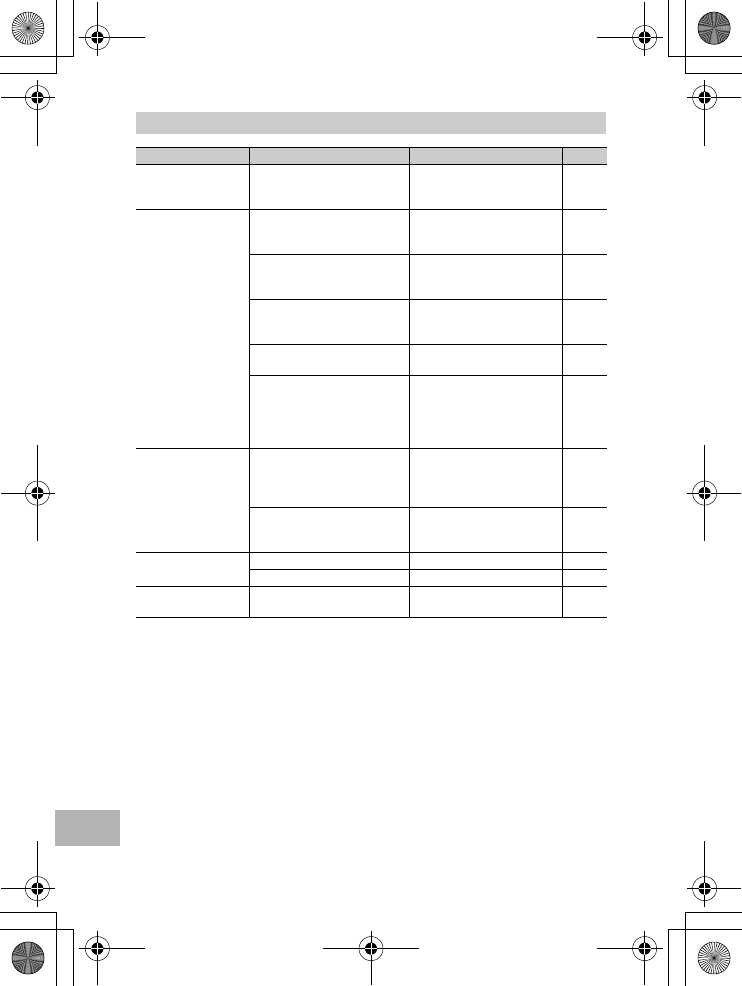
The following table shows the approximate number of images that
can be recorded in the internal memory and onto an SD memory
card at various image size and picture quality settings.
Note ----------------------------------------------------------------------------------------------
•The number of remaining shots displayed on the LCD monitor may differ from the
actual number of shots, depending on the subject.
•Movie and sound recording time and the maximum number of still pictures may vary
depending on the capacity of the recording destination (internal memory or SD
memory card), shooting conditions, and the type and manufacturer of the SD memory
card.
Number of Images That Can be Stored in
Internal Memory/SD Memory Card
Mode Picture
Quality Image Size
Internal
Memory
32 MB 64 MB
128 MB 256 MB 512 MB
1 GB
Still
Image
F 3264 × 2448 8 9 19 39 78 158 305
N 3264 × 2448 14 16 33 68 136 275 530
N 2592 × 1944 22 25 53 107 213 430 828
N 2048 × 1536 36 41 84 170 339 683 1314
F 1280 × 960 33 38 79 159 318 641 1233
N 1280 × 960 63 72 148 301 600 1209 2324
N640 × 480 277 315 645 1304 2599 5237 10072
TEXT MODE 3264 × 2448 51 59 121 244 487 982 1889
2048 × 1536 87 99 203 412 821 1654 3181
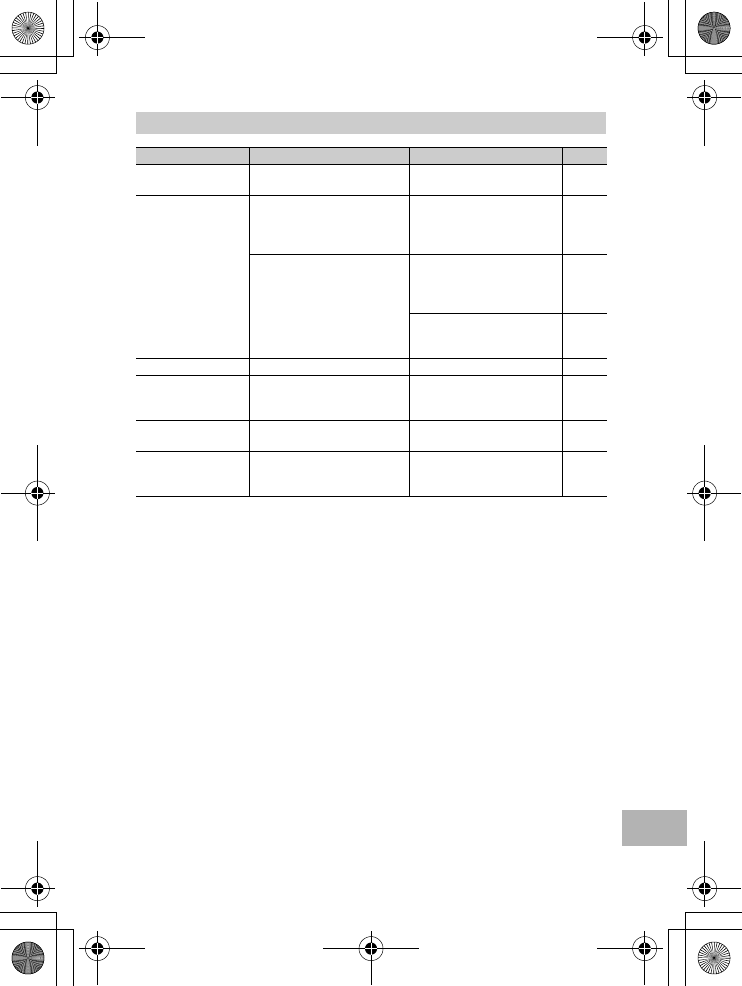
Movie 320 × 240
15FPS
1 min
17 s
1 min
27 s
2 min
59 s
6 min
3 s
12 min
4 s
24 min
19 s
46 min
47 s
320 × 240
30FPS
39 s44 s1 min
31 s
3 min
4 s
6 min
7 s
12 min
19 s
23 min
42 s
160 × 120
15FPS
4 min
38 s
5 min
16 s
10 min
47 s
21 min
49 s
43 min
29 s
87 min
37 s
168 min
30 s
160 × 120
30FPS
2 min
26 s
2 min
46 s
5 min
40 s
11 min
27 s
22 min
50 s
46 min
1 s
88 min
31 s
Sound 56 min
45 s
64 min
36 s
132 min
11 s
267 min
15 s
532 min
36 s
1073 min
0 s
2063 min
25 s
L7360874_En_00_0_bookfile.book Page 235 Friday, October 13, 2006 12:56 PM