Ricoh 500SEW1 Digital Camera with WLAN User Manual Manual 9
Ricoh Company, Ltd. Digital Camera with WLAN Manual 9
UserManual.wiki
>
Ricoh
>
500SEW1 User Manual
>
Manual 9
Contents
1.
Manual 1
2.
Manual 2
3.
Manual 3
4.
Manual 5
5.
Manual 6
6.
Manual 7
7.
Manual 8
8.
Manual 9
9.
Manual 10
10.
Manual 4
Manual 9
Navigation menu
Upload a User Manual
Namespaces
Wiki Guide
HTML
PDF
Info
Views
User Manual
Discussion / Help
Navigation
![21110Using the Wireless LAN Function (Only for Caplio 500SE-W)7Press the !" button and [SEND ONE] to send one file or [SEND ALL] to send all files, and then press the MENU/OK button.• Transfer of the files to the destination device begins and the progress is displayed. Pressing the DISP. button cancels the operation. Pressing the 6 (Playback) button or shutter release button also cancels the operation.• If an error message appears during file transfer, follow the message instructions and resend the files. For details about the error messages, see P.223.• Once the file transfer is completed, a message indicating this appears.8Press the MENU/OK button.• The display returns to the playback screen.L7360874_En_00_0_bookfile.book Page 211 Friday, October 13, 2006 12:56 PM](https://usermanual.wiki/Ricoh/500SEW1.Manual-9/User-Guide-729156-Page-1.png)
![21210Using the Wireless LAN Function (Only for Caplio 500SE-W)1Check that the destination device (computer) is turned on.2Press the 6 (Playback) button.• Check that [CHANGE COM] is set to [W-LAN] on the Expanded Settings menu. (GP.193)3Press the 9 (Thumbnail Display) button twice.• The screen is divided into 12 frames and thumbnails are displayed.4Press the MENU/OK button.• The Playback Setting menu appears.5Press the " button to select [FILE SEND], and then press the $ button.• If [SEND CONDITION] is set to [ON], the [SEND TO] screen appears.• If [SEND CONDITION] is set to [OFF] (GP.219), go to Step 7.• If the communication list has not been transferred, or if [SEND CONDITION] is set to [OFF] (GP.219) and the destination setting is incorrect, an error message appears and the display returns to the Playback Setting menu.• If the camera is connected using a serial connection, a screen appears confirming whether to disconnect the serial connection. Select [YES] and press the MENU/OK button.6Press the !" buttons to select the desired destination device and then press the MENU/OK button.Sending Several FilesL7360874_En_00_0_bookfile.book Page 212 Friday, October 13, 2006 12:56 PM](https://usermanual.wiki/Ricoh/500SEW1.Manual-9/User-Guide-729156-Page-2.png)
![21310Using the Wireless LAN Function (Only for Caplio 500SE-W)7Press the !"#$ button to select the file to send, and then press the MENU/OK button.• The envelope icon appears on the screen.8Repeat Step 7 to select all the files you want to send.• If you selected a file by mistake, you can deselect it by selecting the file and pressing the MENU/OK button again.9Press the DISP. button.• A screen appears confirming whether to send the selected files.10Press the $ button to select [YES], and then press the MENU/OK button.• Transfer of the files to the destination device begins and the progress is displayed. Pressing the DISP. button cancels the operation. Pressing the 6 (Playback) button or shutter release button also cancels the operation.• If an error message appears during file transfer, follow the message instructions and resend the files. For details about the error messages, see P.223.• Once the file transfer is completed, a message indicating this appears.11Press the MENU/OK button.• The display returns to the playback screen.Note ----------------------------------------------------------------------------------------------•When the [Does not send a file whose name already exists.] box is checked on the [FTP Send] tab in the advanced settings of the communication list (GP.198), a file whose name already exists is not sent to the Send via FTP inbox folder. After the files whose names do not exist already are sent, a screen appears confirming whether to rename and send or overwrite the files whose names already exist in the inbox. Select [YES] or [NO], and press the MENU/OK button. If a communication error message appears while overwriting the file, press the MENU/OK button. A message appears again, confirming whether to overwrite the file. Press the $ button to select [YES] or [NO], and then press the MENU/OK button.•When the [Does not send a file whose name already exists.] box is not checked on the [FTP Send] tab in the advanced settings of the communication list (GP.198), the file whose name already exists in the Send via FTP inbox folder is overwritten.•You can set the camera to automatically delete a file from the camera after it has been sent. (GP.179)L7360874_En_00_0_bookfile.book Page 213 Friday, October 13, 2006 12:56 PM](https://usermanual.wiki/Ricoh/500SEW1.Manual-9/User-Guide-729156-Page-3.png)
![21410Using the Wireless LAN Function (Only for Caplio 500SE-W)Immediately after you shoot an image, you can send the image file to another device. This is convenient if you want to send images to a predetermined device.You need to set [QUICK SEND MODE] on the Expanded Settings menu beforehand.Caution------------------------------------------------------------------------------------------Before sending files, create a communication list on the computer and transfer it to the camera. (GP.202)Note ----------------------------------------------------------------------------------------------For information about setting your computer to receive images, see the documentation that came with the computer.Sending Files in Shooting Mode (Quick Review Send)Setting Up Quick Review Send (QUICK SEND MODE)Available SettingsOFF *Default setting Files are not sent in shooting mode.1TOUCH Files are sent by pressing the MENU/OK button after shooting while the file is displayed (GP.116).You can use this function to send only still images (.JPG). If there are still images with sounds (.JPG and .WAV), only still images (.JPG) are sent.You must use the Expanded Settings menu to specify the destination beforehand. (GP.220)2TOUCH Files are sent by pressing the MENU/OK button after shooting during quick review display (GP.46). You can use this function to send still images (.JPG), text (.TIF), and still images with sound (.JPG and .WAV).When sending files, you can use the [SEND TO] screen displayed at the time of sending the files to specify the destination, or you can also use the Expanded Settings menu to specify the destination beforehand. (GP.219)L7360874_En_00_0_bookfile.book Page 214 Friday, October 13, 2006 12:56 PM](https://usermanual.wiki/Ricoh/500SEW1.Manual-9/User-Guide-729156-Page-4.png)
![21510Using the Wireless LAN Function (Only for Caplio 500SE-W)1Display the Expanded Settings menu.• For the operating procedure, see P.155.• Check that [CHANGE COM] is set to [W-LAN]. (P.193)2Press the " button to select [QUICK SEND MODE] and press the $ button.3Press the !" buttons to select [1TOUCH] or [2TOUCH].4Press the MENU/OK button, or press the # button and then the MENU/OK button.1Check that the destination device (computer) is turned on.2Turn the mode dial to 5/K and shoot the picture.• While the image is displayed after shooting, a screen appears confirming whether to send the file. (GP.116)3Press the MENU/OK button.• Transfer of the image to the destination (GP.220) specified in [SEND TO] on the Expanded Settings menu begins.• Once the transfer is completed, the camera returns to shooting mode and remains connected to the destination device. You can change to playback mode or voice memo mode or remain connected to the destination device until the camera is turned off. The wireless LAN antenna icon appears on the LCD monitor while the camera is connected.Using Quick Review SendWhen [QUICK SEND MODE] is set to [1TOUCH]L7360874_En_00_0_bookfile.book Page 215 Friday, October 13, 2006 12:56 PM](https://usermanual.wiki/Ricoh/500SEW1.Manual-9/User-Guide-729156-Page-5.png)
![21610Using the Wireless LAN Function (Only for Caplio 500SE-W)Note ----------------------------------------------------------------------------------------------•In the following cases, you cannot use Quick Review Send to send files to a device even when [QUICK SEND MODE] is set to [1TOUCH].•When a communication list has not been transferred to the camera (GP.202)•When the destination setting is incorrect•When [Server Name] is not set on the Detailed Setups [FTP Send] tab (GP.198)•When [E-mail Address] is not set on the Detailed Setups [Address Book] tab (GP.198)•When [LCD CONFIRM.] is set to [OFF] (GP.116)•During scene mode (GP.40)•During S-CONT or M-CONT (GP.69)•During Bluetooth® connection, you cannot use Quick Review Send to send still images even when [QUICK SEND MODE] is set to [1TOUCH]. Before you can use Quick Review Send to send still images, you must first disconnect the Bluetooth® connection. (GP.174, P.182, P.184)•When image with sound is set to [ON] (GP.76), after pressing the MENU/OK button in Step 3, the send button remains displayed until sending is started.•The image size set with [IMAGE FILE SIZE] (GP.178) does not apply.•The [SEND TO] screen does not appear even when [SEND CONDITION] is set to [ON].•You can set the camera to automatically delete a file from the camera after it has been sent. (GP.179)L7360874_En_00_0_bookfile.book Page 216 Friday, October 13, 2006 12:56 PM](https://usermanual.wiki/Ricoh/500SEW1.Manual-9/User-Guide-729156-Page-6.png)
![21710Using the Wireless LAN Function (Only for Caplio 500SE-W)1Check that the destination device (computer) is turned on.2Turn the mode dial to 5/K and shoot the picture.3Press the Q (Quick Review) button.• A screen appears confirming whether to send the file.4Press the MENU/OK button.• If [SEND CONDITION] is set to [ON], the [SEND TO] screen appears.•If [SEND CONDITION] is set to [OFF] (GP.219), sending to the destination selected in [SEND TO] (GP.220) begins, and the progress is displayed.•If the communication list has not been transferred, or if [SEND CONDITION] is set to [OFF] (GP.219) and the destination setting is incorrect, an error message appears and the display returns to the Playback Setting menu.• If the camera is connected with a Bluetooth®-enabled device, a screen appears confirming whether to disconnect the connection. Select [YES] and press the MENU/OK button. (GP.174, P.182, P.184)5Press the !" buttons to select the desired destination device and then press the MENU/OK button.• Transfer of the files to the destination device begins and the progress is displayed. Pressing the DISP. button cancels the operation. Pressing the 6 (Playback) button or shutter release button or turning the mode dial also cancels the operation.• If an error message appears during transfer, follow the message instructions and resend the files. For details about the error messages, see P.223.• Once the connection is established, the camera returns to shooting mode and remains connected to the destination device. You can change to playback mode or voice memo mode or remain connected to the destination device until the camera is turned off. The wireless LAN antenna icon appears on the LCD monitor while the camera is connected.When [QUICK SEND MODE] is set to [2TOUCH]L7360874_En_00_0_bookfile.book Page 217 Friday, October 13, 2006 12:56 PM](https://usermanual.wiki/Ricoh/500SEW1.Manual-9/User-Guide-729156-Page-7.png)
![21810Using the Wireless LAN Function (Only for Caplio 500SE-W)Note ----------------------------------------------------------------------------------------------•During manual focus (GP.65), you cannot use Quick Review Send to send files to a device even when [QUICK SEND MODE] is set to [2TOUCH].•When the [Does not send a file whose name already exists.] box is checked on the [FTP Send] tab in the advanced settings of the communication list (GP.198), a file whose name already exists is not sent to the Send via FTP inbox folder. After the files whose names do not exist already are sent, a screen appears confirming whether to rename and send or overwrite the files whose names already exist in the inbox. Select [YES] or [NO], and press the MENU/OK button. If an error message appears while overwriting the file, press the MENU/OK button. A message appears again, confirming whether to overwrite the file. Press the $ button to select [YES] or [NO], and then press the MENU/OK button.•When the [Does not send a file whose name already exists.] box is not checked on the [FTP Send] tab in the advanced settings of the communication list (GP.198), the file whose name already exists in the Send via FTP inbox folder is overwritten.•The size of the image files to be sent can be set beforehand. (GP.178)•You can set the camera to automatically delete a file from the camera after it has been sent. (GP.179)To disconnect after Quick Review Send --------------------------------------------Once Quick Review Send is completed, the camera returns to shooting mode and remains connected to the destination device. Switch to playback mode or voice memo mode, or turn the camera off to disconnect.L7360874_En_00_0_bookfile.book Page 218 Friday, October 13, 2006 12:56 PM](https://usermanual.wiki/Ricoh/500SEW1.Manual-9/User-Guide-729156-Page-8.png)
![21910Using the Wireless LAN Function (Only for Caplio 500SE-W)When sending files, you can use the [SEND TO] screen displayed at the time of sending the files to specify the destination, or, you can choose not to display the [SEND TO] screen and specify the destination beforehand. This is useful when sending files to the same destination each time.1Display the Expanded Settings menu.• For the operating procedure, see P.155.2Press the " button to select [SEND CONDITION] and press the $ button.3Press the " button to select [OFF].4Press the MENU/OK button, or press the # button and then the MENU/OK button.Note ----------------------------------------------------------------------------------------------When [SEND CONDITION] is set to [ON], each time you send a file, the [SEND TO] screen appears, and you can specify the destination.Specifying a Destination on the Camera BeforehandHiding the [SEND TO] Screen (SEND CONDITION)Available SettingsOFF (Hides the [SEND TO] screen)ON (Displays the [SEND TO] screen) *Default settingL7360874_En_00_0_bookfile.book Page 219 Friday, October 13, 2006 12:56 PM](https://usermanual.wiki/Ricoh/500SEW1.Manual-9/User-Guide-729156-Page-9.png)
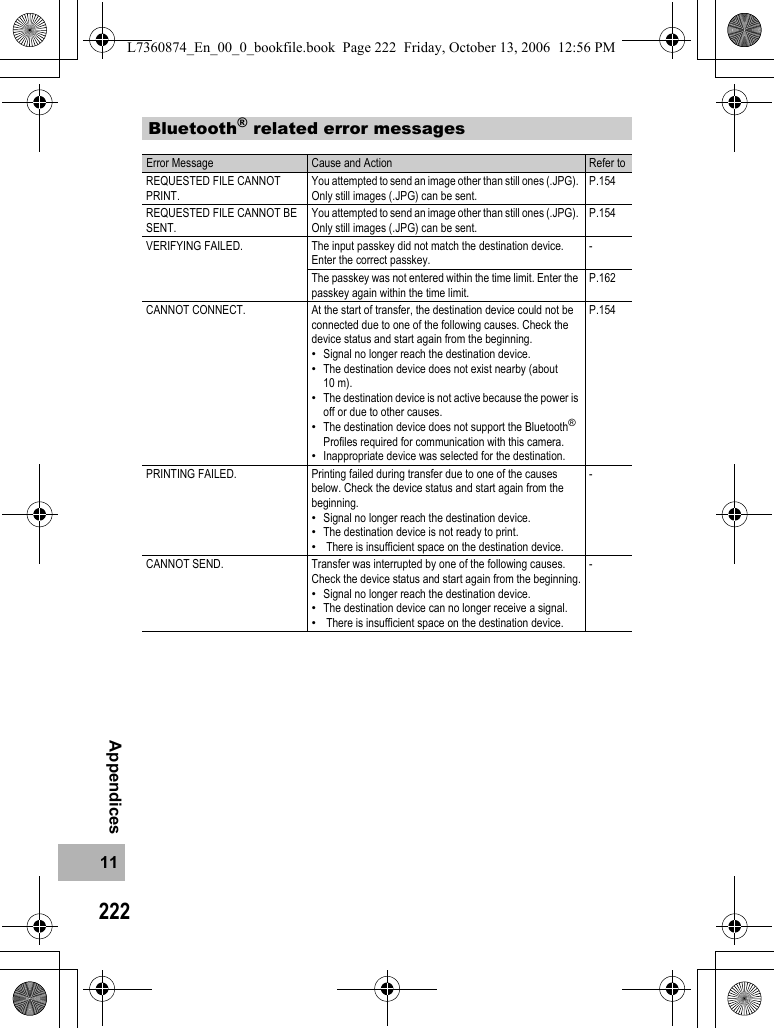
![22010Using the Wireless LAN Function (Only for Caplio 500SE-W)1Display the Expanded Settings menu.• For the operating procedure, see P.155.2Press the " button to select [SEND TO] and press the $ button.• A screen appears with a list of destinations set on the communication list.3Press the !" buttons to select a destination to which to connect.• You can also confirm and edit the destination setting on the camera. (GP.207)4Press the MENU/OK button.• The destination is set and the display returns to the Expanded Settings menu.5Press the MENU/OK button.Note ----------------------------------------------------------------------------------------------If a destination is not specified with [SEND TO], the destination at the top of the [SEND TO] list is selected. When [SEND CONDITION] is set to [OFF], or when [QUICK SEND MODE] is set to [1 TOUCH] to use Quick Review Send, the file is sent to the destination at the top of the list.Specifying a Destination (SEND TO)L7360874_En_00_0_bookfile.book Page 220 Friday, October 13, 2006 12:56 PM](https://usermanual.wiki/Ricoh/500SEW1.Manual-9/User-Guide-729156-Page-10.png)

![22311AppendicesCommunication and send setting errorsFTP send setting errorsWireless LAN related error messages (Only for Caplio 500SE-W)Error Message Cause and Action Refer toCONNECTION ERROR The camera is unable to establish a connection for some reason. Check the communication settings.P.194P.202SEND METHOD MUST BE SELECTEDThe [Send Method] setting is not selected in the communication settings. Select [Send via FTP] or [Send via Mail].P.202NO SEND TO ADDRESS The [To Address] setting is not selected in the communication settings. Select the [To Address] setting.P.202CANNOT CONNECT TO ACCESS POINTThe destination access point is off or otherwise not operating. Check the access point.-Incorrect communication settings. Check the send settings. P.202THE IP ADDRESS IS ALREADY IN USEThe same IP address as the camera exists in the destination network. Check the [IP address] in the Detailed Setups [Networks] tab.P.196CONFLICTING LAN SETTING The first destination sent to after turning the camera on and the setting in the Detailed Settings [Network] tab or [Wireless LAN] tab is different. To send to a destination different from the setting in the [Network] or [Wireless LAN] tab, change the destination in advance and restart the camera.P.196P.219DESTINATION NOT REGISTEREDThe communication list has not been imported by the camera. Import the communication list into the camera and try again.P.202INVALID KEY SIZE. When [Cryptography/Authentication] in [W/LESS LAN] is changed on the camera, check the network key.•If [Cryptography/Authentication] is set to [WEP/OPEN] or [WEP/SHARED], enter the [Network Key] as below.[String]: Five characters or 13 characters[Hex]: Ten characters or 26 characters•If [Cryptography/Authentication] is set to [AES/WPA-PSK], [AES/WPA2-PSK], [TKIP/WPA-PSK], or [TKIP/WPA2-PSK], enter an 8 to 63 character network key.For details, refer to [Network Key] on P.197P.197P.207Error Message Cause and Action Refer toNO UPLOAD SERVER NAME SETTING[Server Name] for the destination is not set in the Detailed Setups [FTP Send] tab. Set the [Server Name] setting.P.198CANNOT DETECT IP ADDRESS Unable to acquire the IP address of the destination server. Set the correct [Server Name] setting in the Detailed Setups [FTP Send] tab.P.198NO RESPONSE FROM SERVER The destination server does not respond. Check the advanced settings on the [FTP Send] tab.P.198CANNOT CONNECT TO SERVERUnable to connect to the destination server. Check the advanced settings on the [FTP Send] tab.P.198SETTING ERROR EITHER IN USER NAME OR PASSWORDIncorrect [User Name] or [Password] setting. Set the correct [User Name] and [Password] settings in the Detailed Setups [FTP Send] tab.P.198THE FOLDER DOES NOT EXIST.The specified inbox folder does not exist on the destination. Set the correct [Folder Name] setting in the Detailed Setups [FTP Send] tab.P.198CANNOT SEND Unable to send files for some reason. Check the advanced settings on the [FTP Send] tab.P.198SERVER ERROR An error is received from the server after connecting to the server. Try resending the file.-L7360874_En_00_0_bookfile.book Page 223 Friday, October 13, 2006 12:56 PM](https://usermanual.wiki/Ricoh/500SEW1.Manual-9/User-Guide-729156-Page-13.png)
![22411AppendicesMail send setting errorsOther errorsNote ----------------------------------------------------------------------------------------------If you cannot solve the problem using the solutions above, contact a Ricoh office or your local authorized Ricoh dealer.Error Message Cause and Action Refer toNO UPLOAD SERVER NAME SETTINGThe [Server Name] is not set in the Detailed Setups [Mail Config.] tab. Set the [Server Name] setting.P.198CANNOT DETECT IP ADDRESS Unable to acquire the IP address of the SMTP server. Set the correct [Server Name] setting in the Detailed Setups [Mail Config.] tab.P.198NO RESPONSE FROM SERVER The SMTP server does not respond. Check the advanced settings on the [Mail Config.] tab.P.198CANNOT CONNECT TO SERVERAn error is received from the server after connecting to the server. Try resending the file.-SETTING ERROR EITHER IN USER NAME OR PASSWORDIncorrect [User Name] or [Password] setting. Set the correct [User Name] and [Password] settings in the Detailed Setups [Mail Config.] tab.P.198FILE SIZE IS TOO LARGE TO SENDThe image was not sent because the image file size is too large. Reduce the file size and try resending the image.P.178CANNOT SEND Unable to send files for some reason. Wait a moment, and then try reconnecting.-SERVER ERROR An error is received from the server after connecting to the server. Wait a moment, and then try reconnecting.-Error Message Cause and Action Refer toCANNOT PRINT VIA WIRELESS LAN.You cannot use the wireless LAN function to send files to a printer. To send files to a printer, use the Bluetooth® function.P.157NO FILE SELECTED FOR DIRECT UPLOADThe files to be sent are not selected in the thumbnail display. Select the files and click the MENU/OK button.P.212L7360874_En_00_0_bookfile.book Page 224 Friday, October 13, 2006 12:56 PM](https://usermanual.wiki/Ricoh/500SEW1.Manual-9/User-Guide-729156-Page-14.png)
![22911AppendicesOther ProblemsProblem Cause Solution Refer toCannot load the SD memory card.The card is facing the wrong way. Load correctly. P.25The camera does not operate even when the buttons are pressed.Battery is running low. Charge the rechargeable battery or use the AC adapter. Replace the alkaline batteries with new batteries.P.24P.27P.25Camera malfunction. Press the power button to turn the camera off, and then press the power button to turn the camera on again.P.29Remove the battery and load it again. Reconnect the AC adapter cable properly, if using.P.25P.27The date is incorrect. The correct date/time are not set. Set the correct date/time. P.119The set date disappeared. The battery was removed. If the battery is removed for about one week, the date setting will be lost. Make the settings again.P.119Auto power off does not work.Auto power off is set to [OFF]. Set the time for auto power off. P.113The beep sound cannot be heard.The beep sound volume is turned off.Use [VOL. SETTINGS] to set the volume to a setting other than mute.P.115L7360874_En_00_0_bookfile.book Page 229 Friday, October 13, 2006 12:56 PM](https://usermanual.wiki/Ricoh/500SEW1.Manual-9/User-Guide-729156-Page-19.png)
![23011AppendicesFor details about the software, refer to the “Software User Guide” (PDF file).When software for your Ricoh digital camera is used on a computer with Windows XP Service Pack 2 installed, the following warning message may appear at software activation or USB connection. With this in mind, refer to the following:When this warning message is displayed:1Check the information provided on the message screen to make sure that it comes from a reputable source, and then click the [Unblock] button.Caution------------------------------------------------------------------------------------------If you do not recognize the program, you should block it because it may be a virus. Click the [Keep Blocking] button to prevent the program from connecting to the Internet.If you clicked the [Keep Blocking] button:Follow the steps below to check the Windows Firewall settings.1Click [Start] and then [Control Panel].2Double-click [Windows Firewall].• If [Windows Firewall] is not displayed, click [Switch to Classic View] at the top left of the window.Software and Computer TroubleshootingWarning Messages Under Windows XP Service Pack 2L7360874_En_00_0_bookfile.book Page 230 Friday, October 13, 2006 12:56 PM](https://usermanual.wiki/Ricoh/500SEW1.Manual-9/User-Guide-729156-Page-20.png)
![23111Appendices3Click the [Exceptions] tab.4Check that the software is in [Programs and Services].5Click the [Add Program] button to add software that uses the network.If you clicked the [Ask Me Later] button:Each time the program is activated, the [Windows Security Alert] dialog box appears. Then you can select [Unblock].L7360874_En_00_0_bookfile.book Page 231 Friday, October 13, 2006 12:56 PM](https://usermanual.wiki/Ricoh/500SEW1.Manual-9/User-Guide-729156-Page-21.png)