Ricoh 500SEW1 Digital Camera with WLAN User Manual Manual 6
Ricoh Company, Ltd. Digital Camera with WLAN Manual 6
UserManual.wiki
>
Ricoh
>
500SEW1 User Manual
>
Manual 6
Contents
1.
Manual 1
2.
Manual 2
3.
Manual 3
4.
Manual 5
5.
Manual 6
6.
Manual 7
7.
Manual 8
8.
Manual 9
9.
Manual 10
10.
Manual 4
Manual 6
Navigation menu
Upload a User Manual
Namespaces
Wiki Guide
HTML
PDF
Info
Views
User Manual
Discussion / Help
Navigation
![121Changing Camera Settings6Step zooming is the setting of the focal length with optical zooming, which can be fixed to any of four levels (28, 35, 50, 85 mm, equivalent to that on a 35mm camera).To set step zooming, follow the steps below.1Display the SETUP menu.• For the operating procedure, see P.107.2Press the " button to select [STEP ZOOM] and press the $ button.3Press the !" buttons to select the desired setting.4Press the MENU/OK button, or # button and press the MENU/OK button.Changing the Step Zooming Setting (STEP ZOOM)Available SettingsON (Use step zooming)OFF (Do not use step zooming) *Default settingL7360874_En_00_0_bookfile.book Page 121 Friday, October 13, 2006 12:56 PM](https://usermanual.wiki/Ricoh/500SEW1.Manual-6/User-Guide-729153-Page-1.png)
![122Changing Camera Settings6If the initial settings are changed for the following functions, you can set the camera to have the icon of that function blink and to display a warning message about the function with the changed setting for a few seconds when the camera is turned on.White balance, Focus, ISO setting, Exposure compensation, Time exposureIf you operate a camera button while an icon is blinking, the icon stops blinking and lights steadily. If you operate a camera button while the warning message is displayed, the message disappears.To set change warning, follow the steps below.1Display the SETUP menu.• For the operating procedure, see P.107.2Press the " button to select [SHTG STGS WARNG.] and press the $ button.3Press the !" buttons to select the desired setting.4Press the MENU/OK button, or # button and press the MENU/OK button.Displaying a Settings Change Warning (SHTG STGS WARNG.)Available SettingsON (Enable warnings) *Default settingOFF (Disable warnings)L7360874_En_00_0_bookfile.book Page 122 Friday, October 13, 2006 12:56 PM](https://usermanual.wiki/Ricoh/500SEW1.Manual-6/User-Guide-729153-Page-2.png)
![123Changing Camera Settings6By setting [USB CONNECTION] to [MASS STR] on the SETUP menu, you can view files in the camera and transfer files from the camera to your computer using the USB cable without installing the supplied software or USB driver.Usually, set [USB CONNECTION] to [ORIGINAL]. You can transfer images to your computer using the supplied RICOH Gate La software.Changing the USB Setting (USB CONNECTION)USB CONNECTION ModeMASS STR ORIGINALDownloading data The SD memory card or internal memory of the camera can be operated directly as an external drive for file processing.RICOH Gate La allows automatic transfer of camera data to your computer. Use the Caplio Mounter to transfer camera data to your computer. (Mac OS)Installation from Caplio Software CD-ROMNot required RequiredSupported Operating SystemsWindows 98/98SE × OWindows 2000 ProfessionalOOWindows Me O OWindows XP Home Edition OOWindows XP Professional O OMac OS 8.6 ×OMac OS 9.0 to 9.2.2 O OMac OS X 10.1.2 to 10.4.6 OOFor those: •Familiar with OS file operations•Not willing to install a USB driver or other programs•Willing to automate downloading to a computer•Using Windows 98/98SE•Using Mac OS 8.6L7360874_En_00_0_bookfile.book Page 123 Friday, October 13, 2006 12:56 PM](https://usermanual.wiki/Ricoh/500SEW1.Manual-6/User-Guide-729153-Page-3.png)
![124Changing Camera Settings6Caution------------------------------------------------------------------------------------------•When [USB CONNECTION] is set to [MASS STR], you cannot use RICOH Gate La to transfer camera data.•When [USB CONNECTION] is set to [MASS STR], files can only be read from the camera and cannot be written to or deleted from the camera.•When [USB CONNECTION] is set to [MASS STR], Direct Print may not be available for some printers. In such cases, select [ORIGINAL] instead.To change the USB setting, follow the steps below.1Display the SETUP menu.• For the operating procedure, see P.107.2Press the " button to select [USB CONNECTION] and press the $ button.3Press the !" buttons to select the desired setting.4Press the MENU/OK button, or # button and press the MENU/OK button.Note ----------------------------------------------------------------------------------------------For how to download images from the camera to a computer using the USB cable, see P.149-153.L7360874_En_00_0_bookfile.book Page 124 Friday, October 13, 2006 12:56 PM](https://usermanual.wiki/Ricoh/500SEW1.Manual-6/User-Guide-729153-Page-4.png)
![125Changing Camera Settings6You can enlarge the icons displayed on the screen during shooting.The following icons are enlarged:Flash, Macro Shooting, Self-timer, White balance, Focus, Exposure compensation, ISO settingWhen the icons are enlarged, the following items are not displayed:Zoom bar/Focus bar, Date imprint, Sharpness, Color depthTo enlarge the icons on the screen, follow the steps below.1Display the SETUP menu.• For the operating procedure, see P.107.2Press the " button to select [ENLGE PHOTO ICON] and press the $ button.3Press the !" buttons to select the desired setting.4Press the MENU/OK button, or # button and press the MENU/OK button.Enlarging Icon Display (ENLGE PHOTO ICON)L7360874_En_00_0_bookfile.book Page 125 Friday, October 13, 2006 12:56 PM](https://usermanual.wiki/Ricoh/500SEW1.Manual-6/User-Guide-729153-Page-5.png)
![126Changing Camera Settings6The My Setting function allows you to make your desired settings to be used at power-on. For example, when a digital camera is used in common by multiple persons, you can use the camera without regard to the settings made by the person who used the camera previously because the camera settings are restored to your settings each time the camera is turned on.Two types of My Settings can be registered.To register the current camera settings as My Settings, follow the steps below.1Change the camera settings to the settings to be registered as My Settings.2Display the SETUP menu.• For the operating procedure, see P.107.3Press the " button to select [REG. MY SETTINGS] and press the $ button.• A confirmation message appears.4Select [SETTING1] or [SETTING2] and press the MENU/OK button.• The current camera settings will be registered and the display returns to the SETUP menu.• If you do not want to register them, press the DISP. button.5Press the MENU/OK button.Registering the Power-on Settings (REG. MY SETTINGS)L7360874_En_00_0_bookfile.book Page 126 Friday, October 13, 2006 12:56 PM](https://usermanual.wiki/Ricoh/500SEW1.Manual-6/User-Guide-729153-Page-6.png)
![127Changing Camera Settings6You can use the settings registered in [REG. MY SETTINGS] for the startup settings.1Display the SETUP menu.• For the operating procedure, see P.107.2Press the " button to select [START SETTINGS] and press the $ button.3Select [SETTING1] or [SETTING2] and press the MENU/OK button, or # button and press the MENU/OK button.• If you do not use the my setting function, select [OFF].4Turn your camera off.• The settings to be used at the next power-on will be changed.Note ----------------------------------------------------------------------------------------------•When [START SETTINGS] is set to [OFF], settings are retained as usual.•When [START SETTINGS] is set to [SETTING1] or [SETTING2], the camera settings made with [REG. MY SETTINGS] are used at power-on even if [RESTORE DEFAULTS] is selected.Settings Saved by My Setting FunctionChanging the Startup Settings (START SETTINGS)PIC QUALITY/SIZE DATE IMPRINTANTIBLUR WHITE BALANCEFOCUS ISO SETTINGFocal distance used in Manual Zoom positionPHOTOMETRY MacroSHARPNESS FlashCONT. MODE Scene ModeCOLOR DEPTH DISP. ModeEXPOSURE COMP. DENSITYTIME EXPOSURE FRAME RATEIMAGE WITH SOUND ENLGE PHOTO ICONL7360874_En_00_0_bookfile.book Page 127 Friday, October 13, 2006 12:56 PM](https://usermanual.wiki/Ricoh/500SEW1.Manual-6/User-Guide-729153-Page-7.png)
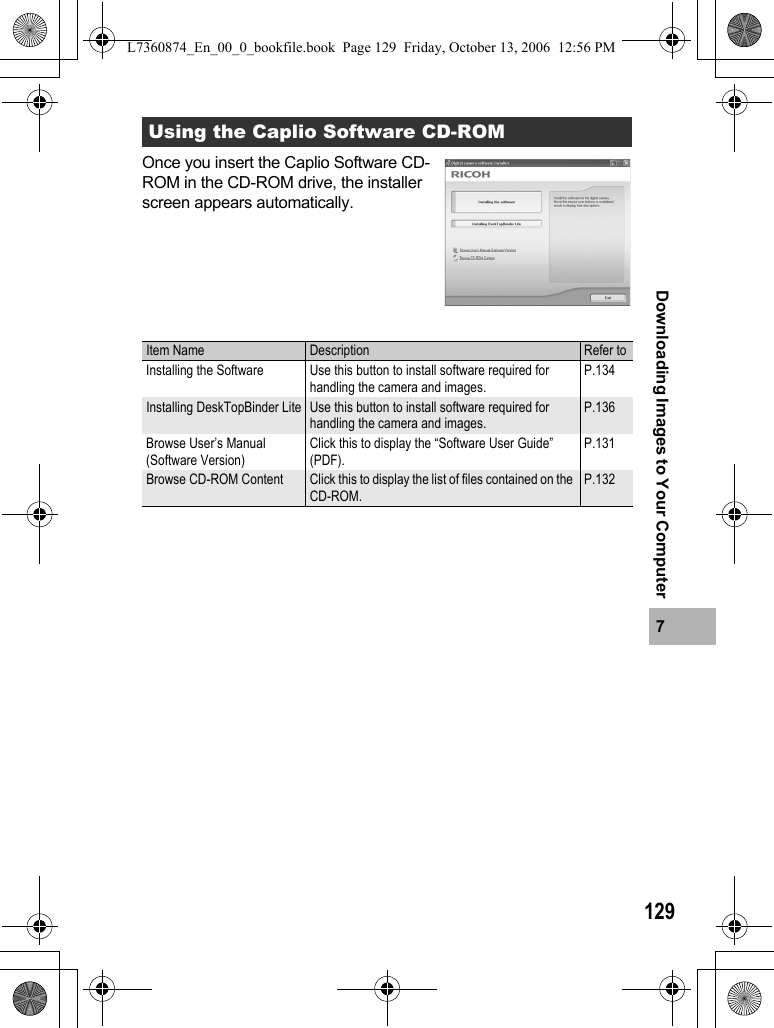
![1287Downloading Images to Your Computer7 Downloading Images to Your ComputerRefer to P.142 for Macintosh.You need to install software for transferring images to your computer before you can download images from the camera.Software installation is necessary for automatic image downloading from the camera to your computer.Caution------------------------------------------------------------------------------------------Be sure to install the software before you connect the camera to your computer. (GP.134)Note ----------------------------------------------------------------------------------------------•When [MASS STR] is selected for [USB CONNECTION] of the camera’s SETUP menu, you can view the files in the camera without installing the supplied software or USB driver (GP.151). At the time of purchase, [ORIGINAL] is selected.•For how to download images from the camera to your computer, see the “Software User Guide” available from the Caplio Software CD-ROM. For how to display the “Software User Guide”, see P.131.The screen images shown here may differ from the images displayed on your computer depending on your computer OS.For WindowsL7360874_En_00_0_bookfile.book Page 128 Friday, October 13, 2006 12:56 PM](https://usermanual.wiki/Ricoh/500SEW1.Manual-6/User-Guide-729153-Page-8.png)
![1307Downloading Images to Your ComputerWhen [Installing the software] is clicked: (GP.134)The following software will be installed:XP: Windows XP98: Windows 98/98SE/Me/2000* Only for Caplio 500SE-WNote ----------------------------------------------------------------------------------------------•The camera is provided with ImageMixer software that allows you to display and edit images from your computer. For how to use ImageMixer, click the [?] button on the ImageMixer window and see the displayed manual. For the latest information about ImageMixer, access the Web page of Pixela Co., Ltd. (http://www.imagemixer.com). •The WinASPI installer starts during installation of ImageMixer. WinASPI is required when creating a Video CD using ImageMixer.Software Windows DescriptionXP 98Caplio SoftwareRICOH Gate La OODownloads images collectively.List Editor OOUsed to create a camera memo list.Caplio Setting* OOUsed to make wireless LAN-related settings.Caplio Server* OOUsed to set your computer as a Caplio-only FTP server.ImageMixer O O Shot images can be displayed or edited and video CDs can be created.DirectX (GP.139) is necessary for handling movies.USB Driver OOUsed to connect the camera to the computer.WIA Driver O-Used to download images.L7360874_En_00_0_bookfile.book Page 130 Friday, October 13, 2006 12:56 PM](https://usermanual.wiki/Ricoh/500SEW1.Manual-6/User-Guide-729153-Page-10.png)
![1317Downloading Images to Your ComputerWhen [Installing DeskTopBinder Lite] is clicked: (GP.136)The following software will be installed:XP: Windows XP98: Windows 98/98SE/Me/2000Caution------------------------------------------------------------------------------------------DeskTopBinder Lite is compatible with Windows 98SE but not Windows 98.Note ----------------------------------------------------------------------------------------------•For details about the DeskTopBinder Lite, refer to the Introduction Guide (PDF file), Setup Guide (PDF file), Auto Document Link Guide (PDF file), and Help supplied with the DeskTopBinder Lite.•For details about the Auto Document Link, refer to the Auto Document Link Guide (PDF file). When [Browse User’s Manual (Software Version)] is clicked:The “Software User Guide” (PDF file) on the Caplio Software CD-ROM is displayed on your computer screen.If you have Acrobat Reader installed on your computer, simply click [Browse User’s Manual (Software Version)]. Acrobat Reader must be installed to view the PDF file. (GP.138)Software Windows DescriptionXP 98DeskTopBinder Lite OOSoftware used to manage business documents.Images in the camera can be downloaded to DeskTopBinder Lite using the Auto Document Link that monitors document updating. USB Driver O O Used to connect the camera to the computer.WIA Driver O-Used to download images.L7360874_En_00_0_bookfile.book Page 131 Friday, October 13, 2006 12:56 PM](https://usermanual.wiki/Ricoh/500SEW1.Manual-6/User-Guide-729153-Page-11.png)
![1327Downloading Images to Your ComputerWhen [Browse CD-ROM Content] is clicked:You can check folders and files on the CD-ROM. The CD-ROM contains not only the software installed by clicking [Installing the software] but also the following software. These software products run on Windows.For the installation of each software product, see the reference page in the table below.Note ----------------------------------------------------------------------------------------------•For details about Acrobat Reader, see Help for Acrobat Reader.•To install ImageMixer alone, double-click “setup.exe” in the ImageMixer folder.Software Description Refer toAcrobat Reader Required for viewing the “Software User Guide”. P.138DirectX Required for playing movies by the ImageMixer. P.139L7360874_En_00_0_bookfile.book Page 132 Friday, October 13, 2006 12:56 PM](https://usermanual.wiki/Ricoh/500SEW1.Manual-6/User-Guide-729153-Page-12.png)
![1347Downloading Images to Your ComputerInstall the required software on your computer from the CD-ROM before connecting the camera.Caution------------------------------------------------------------------------------------------•Do not install the software when the camera is connected to your computer with a USB cable.•If you happened to connect your camera to the computer (resulting in the [Add New Hardware Wizard] screen appearing on your computer screen), simply click [Cancel], and after disconnecting your camera, install the software on your computer.•If software is already installed from a Caplio Software CD-ROM from a previous model, a message stating that the old software must be uninstalled before installing the new one is displayed. Follow the message instructions and uninstall the old software before installing the new software. Functions of the old model can still be used as before.If DU-10 is installed, it will be replaced by Caplio Viewer (an upgraded version of DU-10). If the old software is uninstalled before the message is displayed, Caplio Viewer is not installed even if the new software is installed. (For how to uninstall the software, GP.140.)•For Windows XP or Windows 2000, administrator privileges are required to install the software.Here is an example of the Windows XP screen.1Start your computer and insert the Caplio Software CD-ROM in the CD-ROM drive.• The installer screen appears automatically.2Click [Installing the software].• After a while, the [Choose Setup Language] screen appears.3Confirm the language, and then click [OK].• The [Welcome to the InstallShield Wizard for Caplio Software] screen appears.Installing the Software Required for Handling the Camera and Images on Your ComputerL7360874_En_00_0_bookfile.book Page 134 Friday, October 13, 2006 12:56 PM](https://usermanual.wiki/Ricoh/500SEW1.Manual-6/User-Guide-729153-Page-14.png)
![1357Downloading Images to Your Computer4Click [Next].• The [Choose Destination Location] screen appears.5Confirm where you want to install and then click [Next].• The [Select Program Folder] screen appears.6Confirm the [Select Program Folder] and then click [Next].• The ImageMixer installer starts. Install ImageMixer following the messages displayed on the screen.• When installation of ImageMixer is completed, a dialog box appears, indicating that all software applications have been installed. 7Click [Finish].8Restart your computer.Note ----------------------------------------------------------------------------------------------You can remove (uninstall) the software. (GP.140)L7360874_En_00_0_bookfile.book Page 135 Friday, October 13, 2006 12:56 PM](https://usermanual.wiki/Ricoh/500SEW1.Manual-6/User-Guide-729153-Page-15.png)
![1367Downloading Images to Your ComputerDeskTopBinder Lite is used for managing business documents. As well as still images captured with a digital camera, you can manage a variety of documents, including documents input by scanner, documents created with various applications and image files. You can also store files with different formats in a single document.Images downloaded from the camera can be saved to DeskTopBinder Lite using the Auto Document Link for monitoring document updating.Note ----------------------------------------------------------------------------------------------For how to use DeskTopBinder Lite, refer to the Introduction Guide, the Setup Guide, andthe DeskTopBinder Lite - Auto Document Link Guide (all PDF files) that are installed withDeskTopBinder Lite.Caution------------------------------------------------------------------------------------------•If you happened to connect your camera to the computer (resulting in the [Add New Hardware Wizard] screen appearing on your computer screen), simply click [Cancel], and after disconnecting your camera, install the software on your computer.•For Windows XP or Windows 2000, administrator privileges are required to install the software.•To download images from the camera using the Auto Document Link of DeskTopBinder Lite, install the Caplio Software before installing DeskTopBinder Lite.(GP.134) The driver included in the Caplio Software is required to use the Auto Document Link.•If [Caplio Digital Camera] is set as the monitoring destination of the Auto Document Link, select [ORIGINAL] for [USB CONNECTION] on the camera menu.(GP.123)Here is an example of the Windows XP screen.1Start your computer and insert the Caplio Software CD-ROM in the CD-ROM drive.• The installer screen appears automatically.Installing the DeskTopBinder LiteL7360874_En_00_0_bookfile.book Page 136 Friday, October 13, 2006 12:56 PM](https://usermanual.wiki/Ricoh/500SEW1.Manual-6/User-Guide-729153-Page-16.png)
![1377Downloading Images to Your Computer2Click [Installing DeskTopBinder Lite].• After a few moments, the [Welcome to the InstallShield Wizard for Caplio Software S] screen appears.3Click [Next].• After a few moments, the [Choose Destination Location] screen appears.4Confirm where you want to install and then click [Next].• The [Select Program Folder] screen appears.5Confirm the [Select Program Folder] and then click [Next].6Click [OK].7Click [DeskTopBinder Lite].• The DeskTopBinder Lite installer starts.• Install DeskTopBinder Lite following the messages displayed on the screen.• When the screen where you verify digital ID is displayed, click [OK].Caution------------------------------------------------------------------------------------------•DeskTopBinder Lite cannot coexist with a different version of DeskTopBinder Lite, DeskTopBinder Professional, or Job Binding. Before installing DeskTopBinder Lite, uninstall these applications. The data used in the previous application can be saved and inherited by DeskTopBinder Lite. However, when the previous application is DeskTopBinder Professional, some functions will no longer be available.•When capturing images from the camera using the Auto Document Link of the DeskTopBinder Lite, deselect the [Saves automatically when connected to USB] check box in the [Option settings] dialog box displayed by selecting [Option settings] on the [RICOH Gate La Settings] menu. (Refer to the “Software User Guide”.) Before capturing images from the camera, set the date and time using the [DATE SETTINGS] option of the camera. (GP.119)•If you turned the camera off and then on again while connected to the computer with DeskTopBinder Lite open, reboot the computer with the camera connected.L7360874_En_00_0_bookfile.book Page 137 Friday, October 13, 2006 12:56 PM](https://usermanual.wiki/Ricoh/500SEW1.Manual-6/User-Guide-729153-Page-17.png)
![1387Downloading Images to Your ComputerCaution------------------------------------------------------------------------------------------•Do not install the software when the camera is connected to your computer with a USB cable.•For Windows XP or Windows 2000, administrator privileges are required to install the software.Acrobat Reader is required to display the operation manual (PDF file).If the computer is running under Windows, Acrobat Reader can be installed. Acrobat Reader need not be installed if already installed on your computer.1Start your computer, and insert the included Caplio Software CD-ROM into the CD-ROM drive.• The installer screen appears automatically.2Click [Browse CD-ROM Content].• The files on the CD-ROM are listed.3Double-click the [Acrobat] folder.4Double-click the [English] folder.5Double-click [ar500enu] (ar500enu.exe).6Install Acrobat Reader by following the messages displayed.Installing Other Software on Your ComputerAcrobat ReaderL7360874_En_00_0_bookfile.book Page 138 Friday, October 13, 2006 12:56 PM](https://usermanual.wiki/Ricoh/500SEW1.Manual-6/User-Guide-729153-Page-18.png)
![1397Downloading Images to Your ComputerDirectX is used to play movie files with ImageMixer.This camera requires DirectX 8.1 or later to play movie files in Windows. If you have an earlier version installed, please install the updated version available on the accompanying CD-ROM. For Windows XP, installation of DirectX is not needed because the updated version is already installed.1Start your computer, and insert the included Caplio Software CD-ROM into the CD-ROM drive.2Click [Browse CD-ROM Content].3Double-click the [DirectX] folder.4Double-click the [English] folder.5Double-click the following file:DirectXWindows 98/98SE/Me [DX81xxx.exe] in the [Win98Me] folder Windows 2000 [DX81NTxxx.exe] in the [Win2000] folderL7360874_En_00_0_bookfile.book Page 139 Friday, October 13, 2006 12:56 PM](https://usermanual.wiki/Ricoh/500SEW1.Manual-6/User-Guide-729153-Page-19.png)
![1407Downloading Images to Your ComputerCaution------------------------------------------------------------------------------------------•For Windows 2000/XP, administrator privileges are required to uninstall the software.•If any other program is active or unsaved data remains, save the data and terminate the program before uninstalling.•If you install both ImageMixer and the DeskTopBinder Lite and then uninstall either one, camera connection to the computer may fail. In this case, uninstall both [Caplio Software] and [Caplio Software S] and then install only the required one.1Click [Start] on the Windows task bar.2Select [Settings]-[Control Panel] ([Control Panel] for XP).3Double-click the [Add/Remove Programs] icon (or the [Add or Remove Programs] icon in Windows XP).4Select [Caplio Software] (select [Caplio Software S] if you have installed the DeskTopBinder Lite), and then click the [Change/Remove] button. 5Confirm file deletion and click [OK].• The [Shared File Detected] dialog box appears.6Select the [Don’t display this message again.] check box, and then click [Yes].• The uninstallation process begins. When it is finished, close the displayed window.Uninstalling the SoftwareCaplio SoftwareL7360874_En_00_0_bookfile.book Page 140 Friday, October 13, 2006 12:56 PM](https://usermanual.wiki/Ricoh/500SEW1.Manual-6/User-Guide-729153-Page-20.png)
![1417Downloading Images to Your Computer1Click [Start] on the Windows task bar.2Select [Settings]-[Control Panel] ([Control Panel] for XP).3Double-click the [Add/Remove Programs] icon (or the [Add or Remove Programs] icon in Windows XP).4Select [ImageMixer] and then click [Change/Remove].5Confirm file deletion and click [OK].• The uninstallation process begins. When it is finished, close the displayed window.6Restart your computer.ImageMixerL7360874_En_00_0_bookfile.book Page 141 Friday, October 13, 2006 12:56 PM](https://usermanual.wiki/Ricoh/500SEW1.Manual-6/User-Guide-729153-Page-21.png)
![1437Downloading Images to Your ComputerFor Mac OS 8.6 to 9.2.2, double-clicking the [Installer] icon displays the [Digital camera software installer] window.Note ----------------------------------------------------------------------------------------------The “Digital camera software installer” window is not displayed in Mac OS X 10.1.2 to 10.4.6. (GP.146)When [Installing the software] is clicked (GP.145, P.146):The software will be installed.When [Browse User’s Manual (Software Version)] is clicked:The “Software User Guide” (PDF file) on the Caplio Software CD-ROM can be displayed on your computer screen.Acrobat Reader must be installed to view the PDF file.Item Name DescriptionInstalling the Software Use this button to install software required for handling the camera and images.Browse User’s Manual (Software Version)Use this button to display the “Software User Guide” (PDF).L7360874_En_00_0_bookfile.book Page 143 Friday, October 13, 2006 12:56 PM](https://usermanual.wiki/Ricoh/500SEW1.Manual-6/User-Guide-729153-Page-23.png)

![1457Downloading Images to Your ComputerInstall the required software on your computer from the CD-ROM before connecting the camera.Caution------------------------------------------------------------------------------------------Do not install the software when the camera is connected to your computer with a USB cable.1Turn on your Macintosh and insert the Caplio Software CD-ROM in the CD-ROM drive.2Double-click the [Caplio Software] icon.3Double-click the [MacOS9] folder.• The [Installer] icon appears.4Double-click [Installer].• The [Digital camera software installer] window opens.5Click [Installing the software].6Click [OK] to update.7Click [Install].• When installation finishes, a message appears to inform you that it is necessary to restart your Macintosh.8Click [Continue].• The software is installed and after a while the Installation Complete message appears.9Click [Restart].• Your Macintosh restarts.Installing the Software Required for Handling the Camera and Images on Your Computer (Mac OS 8.6 to 9.2.2)L7360874_En_00_0_bookfile.book Page 145 Friday, October 13, 2006 12:56 PM](https://usermanual.wiki/Ricoh/500SEW1.Manual-6/User-Guide-729153-Page-25.png)
![1467Downloading Images to Your ComputerInstall the required software on your computer from the CD-ROM before connecting the camera.Caution------------------------------------------------------------------------------------------Do not install the software when the camera is connected to your computer with a USB cable.1Turn on your Macintosh and insert the Caplio Software CD-ROM in the CD-ROM drive.2Double-click the [Caplio Software] icon.3Open the [Mac OS X] folder.• Folders named [Mac OS X 10.1 - 10.3] and [Mac OS X 10.4] appear.4Click the folder for your OS.• Double click [Mac OS X 10.1 - 10.3] if you are using Mac OS X 10.3 or earlier. Double click [Mac OS X 10.4] if you are using Mac OS X 10.4 or later. The [Caplio Mounter] icon appears.5Double-click [Caplio Mounter].• The [Install Caplio Mounter] screen appears.• The [Caplio Mounter] in the [Mac OS X 10.4] folder cannot be installed in Mac OS X 10.1 to 10.3.6Click [Continue].• The installation Readme file appears. Click [Continue].7Click [Continue].• The screen to select the destination disk appears.Installing the Software Required for Handling the Camera and Images on Your Computer (Mac OS X 10.1.2 to 10.4.6)L7360874_En_00_0_bookfile.book Page 146 Friday, October 13, 2006 12:56 PM](https://usermanual.wiki/Ricoh/500SEW1.Manual-6/User-Guide-729153-Page-26.png)
![1477Downloading Images to Your Computer8Click the destination disk you want, and then click [Continue].9Click [Install].• Click [Upgrade] to update the software.• A screen appears prompting you to enter the administrator’s password.10Enter the administrator’s name and password, and then click [OK].• A message appears to inform you that it is necessary to restart your Macintosh when installation finishes.11Click [Continue Installation].• The software is installed, and after a while an Installation Complete message appears.12Click [Restart].• Your Macintosh restarts.L7360874_En_00_0_bookfile.book Page 147 Friday, October 13, 2006 12:56 PM](https://usermanual.wiki/Ricoh/500SEW1.Manual-6/User-Guide-729153-Page-27.png)
![1487Downloading Images to Your ComputerCaution------------------------------------------------------------------------------------------If any other program is active or unsaved data remains, save the data and terminate theprogram before uninstalling.Mac OS 8.6 to 9.2.21Delete the following files in the System Folder from your Macintosh.Mac OS X 10.1.2 to 10.4.61Start [Caplio Mounter] in [Applications] folder.2Select [Uninstall] in [File] menu.• The uninstallation process begins.Uninstalling the SoftwareFile Name Folder NameRICOH Gate La Control PanelsRICOH Gate La Prefs PreferencesCaplio Mounter ExtensionsCaplio Mounter Prefs PreferencesCaplio USB Driver ExtensionsCaplio LIB ExtensionsL7360874_En_00_0_bookfile.book Page 148 Friday, October 13, 2006 12:56 PM](https://usermanual.wiki/Ricoh/500SEW1.Manual-6/User-Guide-729153-Page-28.png)
![1497Downloading Images to Your ComputerAfter installing the software on your computer, connect your camera to the computer.The following explanation is provided assuming that [ORIGINAL] (default) is selected at [USB CONNECTION] of the camera’s SETUP menu. (GP.123) If [MASS STR] is selected, change it to [ORIGINAL]. You can also download images in mass storage mode (GP.151).1Make sure the camera power is off.2Connect the USB cable to the USB port of your computer.3Connect the USB cable to the USB terminal of your camera.• Your camera turns on.• In Windows the first time you connect your camera to the computer using a USB cable, the [Found New Hardware Wizard] screen will appear. (GP.150)• When using Macintosh or when connecting the camera to a Windows computer that you have connected the camera to already, RICOH Gate La starts and image transfer begins automatically.Caution------------------------------------------------------------------------------------------Before opening or closing the battery/card cover or terminal cover, be sure to remove any water, sand or mud adhering to the camera, and avoid opening and closing the cover in places where such contaminants may get inside the camera.Connecting the Camera to Your ComputerL7360874_En_00_0_bookfile.book Page 149 Friday, October 13, 2006 12:56 PM](https://usermanual.wiki/Ricoh/500SEW1.Manual-6/User-Guide-729153-Page-29.png)
![1507Downloading Images to Your ComputerIn Windows the first time you connect your camera to the computer using a USB cable, the [Found New Hardware Wizard] screen will appear. (Does not appear on Macintosh.) Here is an example of the Windows XP screen.1Select [Install the software automatically (Recommended)].2Insert the Caplio Software CD-ROM into the CD-ROM drive on your computer.• Installation of the WIA driver automatically starts. If the CD-ROM is already on your computer when the [Found New Hardware Wizard] screen is displayed, simply click [Next] to start installation.Note ----------------------------------------------------------------------------------------------By default, the WIA driver is installed in the following location:Specify the folder if the CD-ROM is not available.3Select [RICOH Gate La], check [Always use this program for this action] check box, and then click [OK].Using the Caplio Software to Download ImagesMy ComputerLocal DiskProgram FilesCaplio SoftwareWIA driverL7360874_En_00_0_bookfile.book Page 150 Friday, October 13, 2006 12:56 PM](https://usermanual.wiki/Ricoh/500SEW1.Manual-6/User-Guide-729153-Page-30.png)