Ricoh 500SEW1 Digital Camera with WLAN User Manual Manual 2
Ricoh Company, Ltd. Digital Camera with WLAN Manual 2
UserManual.wiki
>
Ricoh
>
500SEW1 User Manual
>
Manual 2
Contents
1.
Manual 1
2.
Manual 2
3.
Manual 3
4.
Manual 5
5.
Manual 6
6.
Manual 7
7.
Manual 8
8.
Manual 9
9.
Manual 10
10.
Manual 4
Manual 2
Navigation menu
Upload a User Manual
Namespaces
Wiki Guide
HTML
PDF
Info
Views
User Manual
Discussion / Help
Navigation
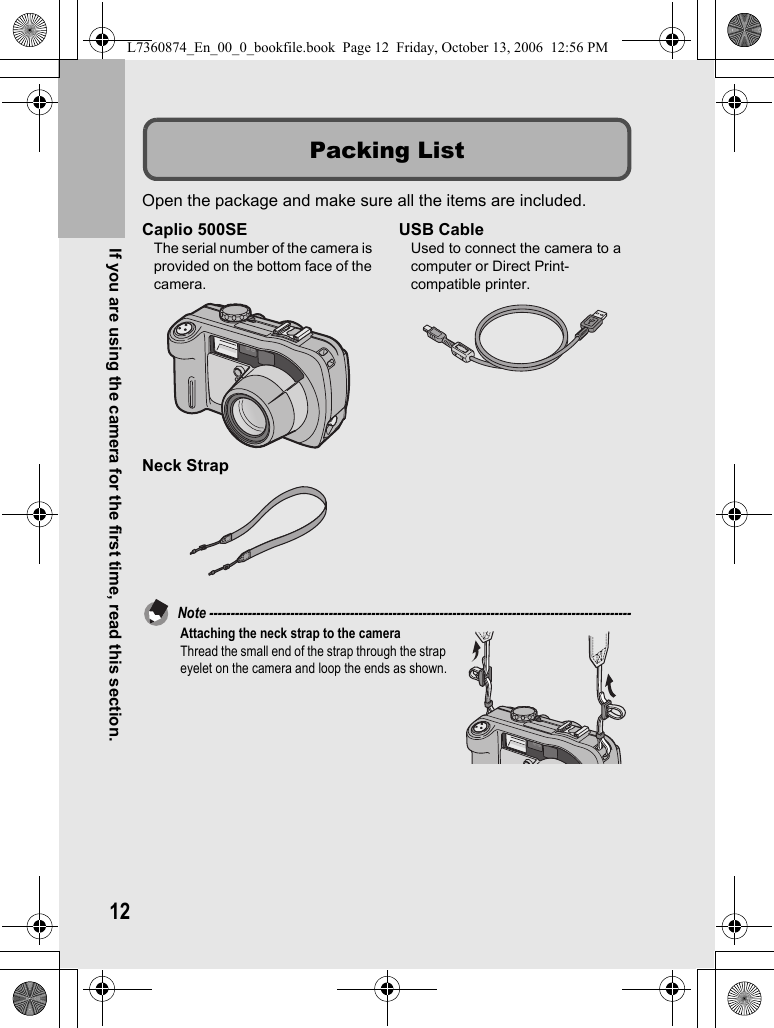
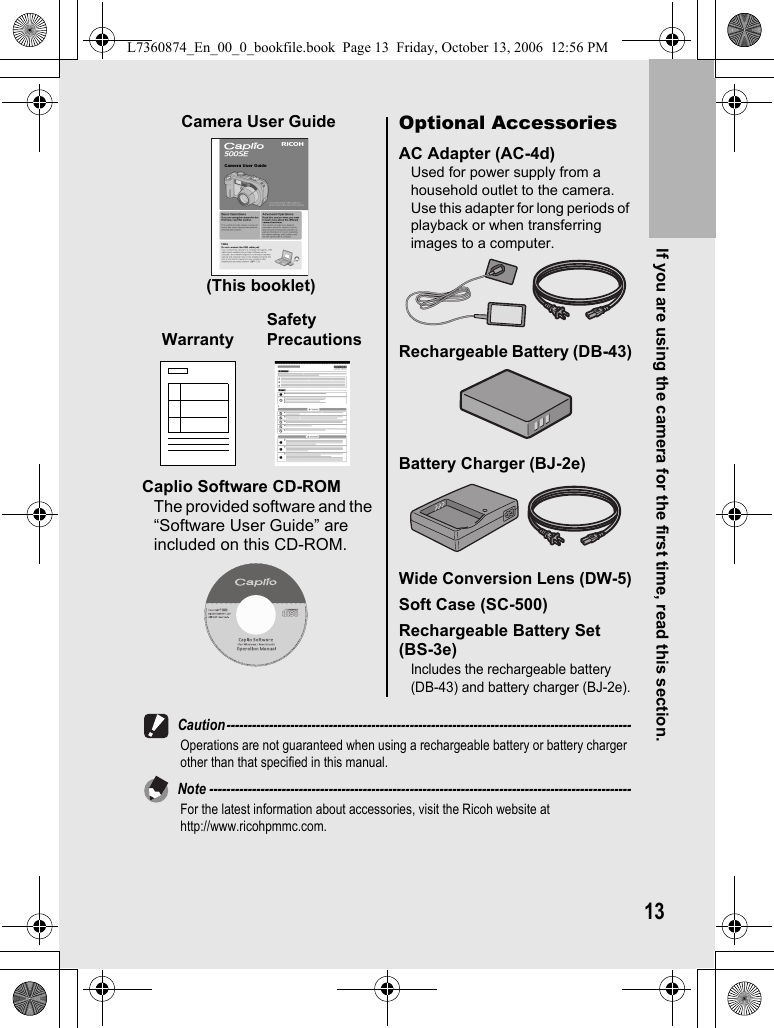
![1The following two manuals are included with your Caplio 500SE.The camera is provided with the ImageMixer software that allows you to display and edit images on your computer. For details on how to use ImageMixer, click the [?] button on the ImageMixer window and see the displayed manual.For more information on ImageMixer, contact the Customer Support Center below.North America (Los Angeles) TEL: +1-213-341-0163Europe (U.K.) TEL: +44-1489-564-764Asia (Philippines) TEL: +63-2-438-0090China TEL: +86-21-5450-0391Business hours: 9:00 AM to 5:00 PM“Camera User Guide” (This booklet)This guide explains the usage and functions of the camera. It also explains how to install the provided software on your computer.* The “Camera User Guide” (English edition) is available from the provided CD-ROM as a PDF file.“Software User Guide” (PDF file)This guide explains how to download images from the camera to your computer and display and edit them on your computer.* The “Software User Guide” is available in the following folders on the provided CD-ROM.Using the Manuals“Camera User Guide” (English edition) (PDF file)Each language has its own “Software User Guide” in the respective folder.To copy the Software User Guide onto your hard disk, copy the PDF file from the above folder directly to your hard disk.L7360874_En_00_0_bookfile.book Page 1 Friday, October 13, 2006 12:56 PM](https://usermanual.wiki/Ricoh/500SEW1.Manual-2/User-Guide-729137-Page-1.png)
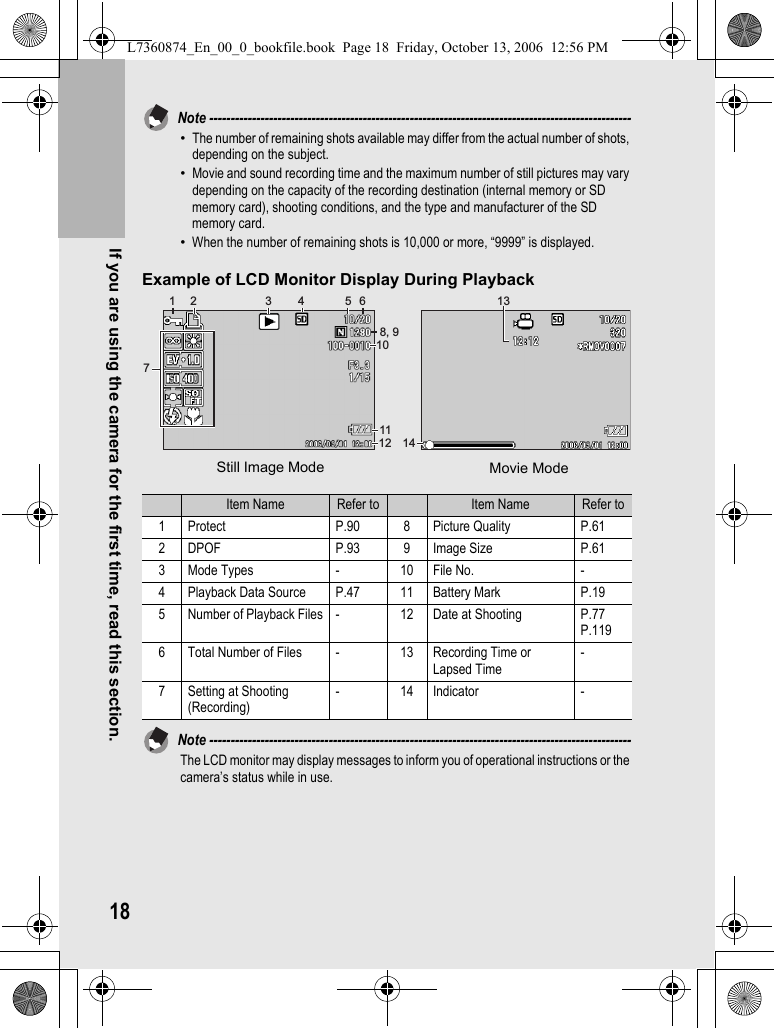
![74 Other Playback Functions 88Playback Setting Menu................................................................ 88Using the Menu.......................................................................................88Displaying Photos in Order Automatically (SLIDE SHOW) ......... 89Write-protecting Files (PROTECT).............................................. 90Protecting a File ......................................................................................90Protecting All Files ..................................................................................91Protecting Multiple Files at Once ............................................................92Using a Printing Service (DPOF)................................................. 93Setting DPOF for the Displayed Still Image ............................................93Setting DPOF for All Still Images ............................................................94Setting DPOF for Multiple Still Images....................................................95Changing the Image Size (RESIZE)............................................ 96Copying the Contents of the Internal Memory to an SD Memory Card (COPY TO CARD) ................................. 975 Direct Printing 98Direct Print Function.................................................................... 98Connecting the Camera to a Printer............................................ 99Printing Still Images................................................................... 100Printing One or All Still Images .............................................................100Printing Several Still Images .................................................................102Printing Reports ....................................................................................104Printing a Camera Memo on a Report ..................................................1056 Changing Camera Settings 106SETUP Menu ............................................................................ 106Using the SETUP Menu........................................................................107Preparing the SD Memory Card (FORMAT [CARD]) ................ 109Formatting the Internal Memory (FORMAT [INT. MEM.]).......... 110Adjusting the Brightness of the LCD Monitor (LCD BRIGHTNESS)............................................................. 111Assigning a Function to the ADJ. Button (ADJ BTN. SET.)....... 112Changing the Auto Power Off Setting (AUTO POWER OFF) ... 113Changing the Beep Sound Setting (BEEP SOUND) ................. 114Changing the Beep Sound Volume (VOL. SETTINGS)............. 115Changing Image Confirmation Time (LCD CONFIRM.) ............ 116Changing File Name Settings (SEQUENTIAL NO.) .................. 117Setting the Date and Time (DATE SETTINGS)......................... 119Changing the Display Language (LANGUAGE/N) ............... 120Changing the Step Zooming Setting (STEP ZOOM)................. 121L7360874_En_00_0_bookfile.book Page 7 Friday, October 13, 2006 12:56 PM](https://usermanual.wiki/Ricoh/500SEW1.Manual-2/User-Guide-729137-Page-7.png)
![10Specifying a Destination on the Camera Beforehand ............... 219Hiding the [SEND TO] Screen (SEND CONDITION)............................219Specifying a Destination (SEND TO) ....................................................22011 Appendices 221Troubleshooting......................................................................... 221Error Messages.....................................................................................221Camera Troubleshooting ......................................................................225Software and Computer Troubleshooting .............................................230Specifications ............................................................................ 232Number of Images That Can be Stored in Internal Memory/SD Memory Card..............................................................................235Optional Accessories................................................................. 236Using a Wide Conversion Lens.............................................................236Using the External Flash ........................................................... 237Functions Whose Defaults are Restored When Camera is Turned Off.......................................................................... 238About Scene Mode.................................................................... 240Shooting Setting Menu Items by Scene Mode......................................240Using Your Camera Abroad ...................................................... 241Cautions on Use........................................................................ 242Care and Storage ...................................................................... 244Warranty and Servicing ............................................................. 246Index ......................................................................................... 250L7360874_En_00_0_bookfile.book Page 10 Friday, October 13, 2006 12:56 PM](https://usermanual.wiki/Ricoh/500SEW1.Manual-2/User-Guide-729137-Page-10.png)
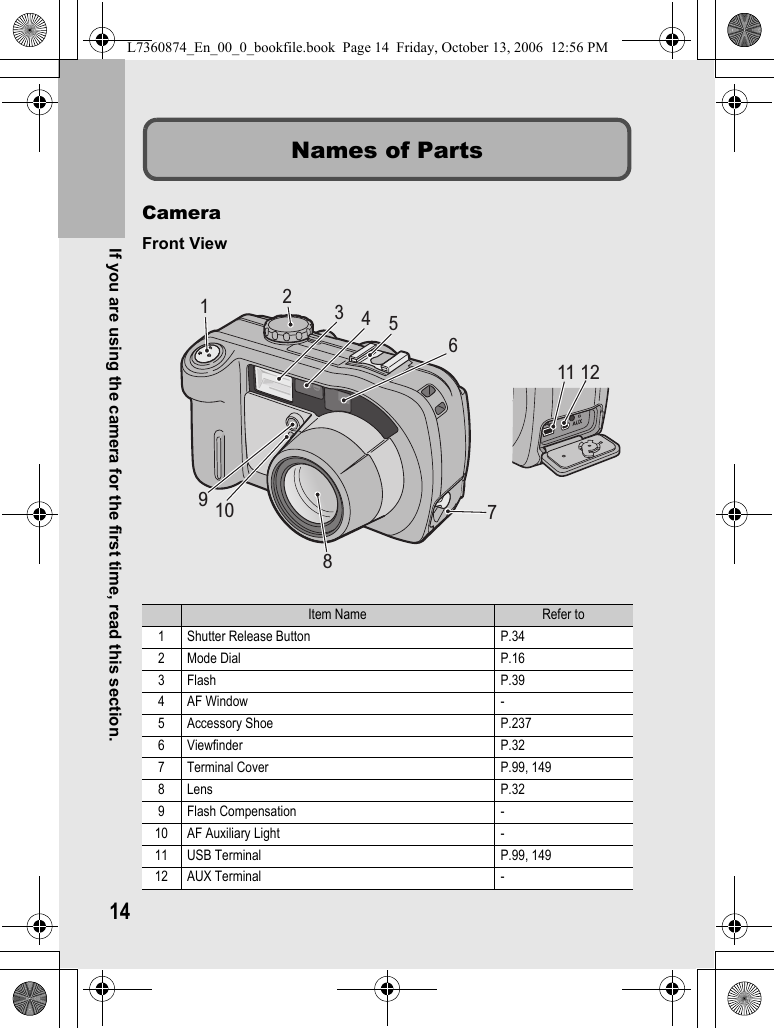
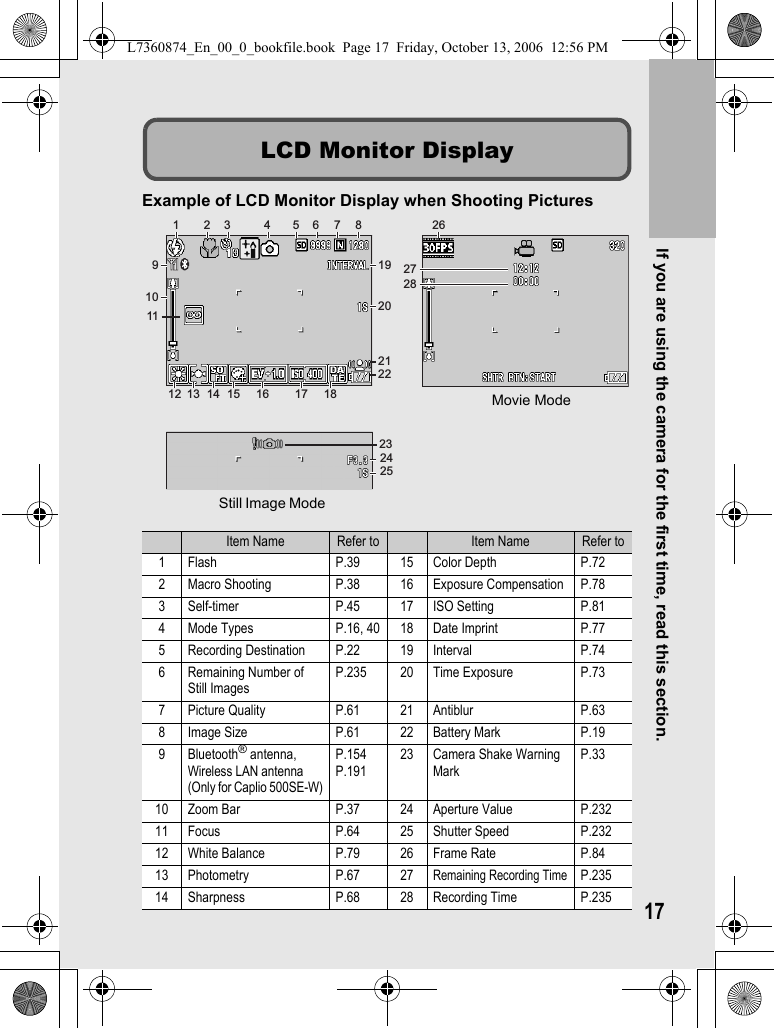
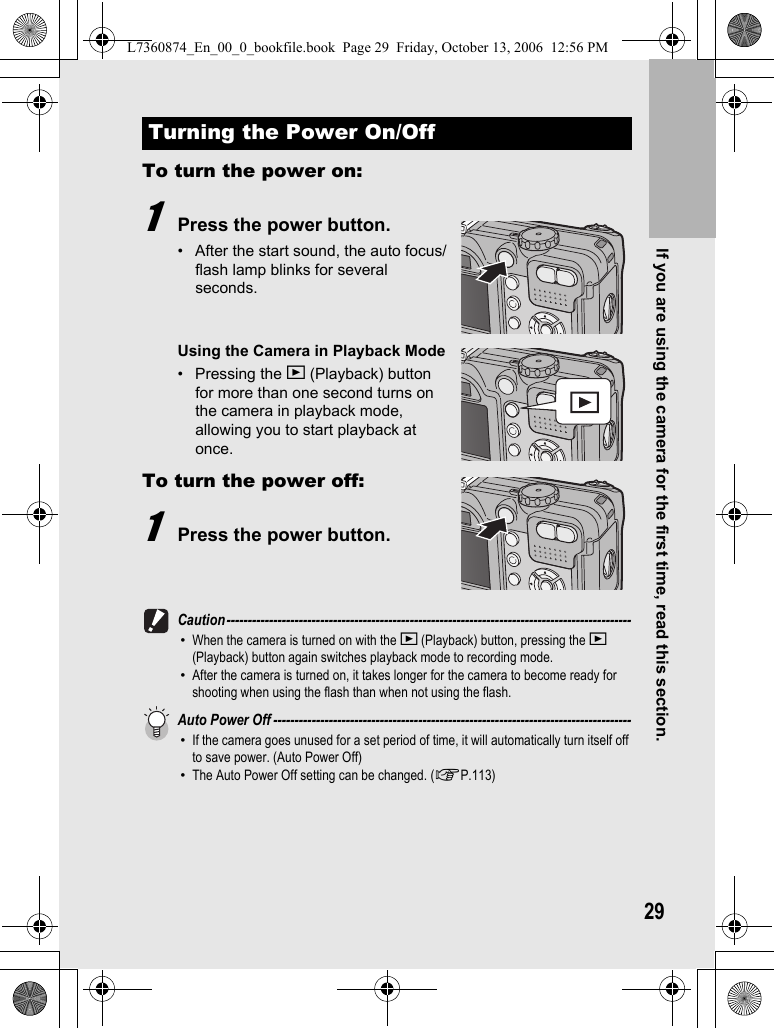
![16If you are using the camera for the first time, read this section.Turn the mode dial to the desired mode before shooting or recording.1Turn the mode dial to the symbol of the function you want to use.Mode Dial Symbols and DescriptionsSymbol Function Description5Still Image Mode Allows you to shoot still images.KCALS Mode Fixes [PIC QUALITY/SIZE] to [N1280] when shooting construction images.3Movie Mode Allows you to shoot movies with sound.2Voice Memo Mode Allows you to record sounds.How to Use the Mode DialCALSL7360874_En_00_0_bookfile.book Page 16 Friday, October 13, 2006 12:56 PM](https://usermanual.wiki/Ricoh/500SEW1.Manual-2/User-Guide-729137-Page-16.png)