Ricoh 500SEW1 Digital Camera with WLAN User Manual Manual 7
Ricoh Company, Ltd. Digital Camera with WLAN Manual 7
UserManual.wiki
>
Ricoh
>
500SEW1 User Manual
>
Manual 7
Contents
1.
Manual 1
2.
Manual 2
3.
Manual 3
4.
Manual 5
5.
Manual 6
6.
Manual 7
7.
Manual 8
8.
Manual 9
9.
Manual 10
10.
Manual 4
Manual 7
Navigation menu
Upload a User Manual
Namespaces
Wiki Guide
HTML
PDF
Info
Views
User Manual
Discussion / Help
Navigation
![1517Downloading Images to Your Computer• To load images from the camera with assistance from the Windows XP “Scanner and Camera Wizard”, select [Microsoft Scanner and Camera Wizard].• Leaving the [Always use this program for this action] check box unchecked will cause the [Caplio 500SE] screen to be displayed each time you transfer images from the camera, thereby allowing you to choose whether to use [RICOH Gate La] or the [Microsoft Scanner and Camera Wizard] for image transfers.• If your PC is installed with Windows XP Service Pack 2 and a warning message is displayed, see P.230.Note ----------------------------------------------------------------------------------------------•If the computer does not recognize the camera, uninstall the software (GP.140) and install it again.•When downloading images from your camera, load a battery with adequate remaining power in the camera. Use of the AC adapter (sold separately) is recommended.•When transferring images to a computer using RICOH Gate La, the file being transferred is renamed and saved.You can download images from the camera to a computer without having to use software.1Change [USB CONNECTION] to [MASS STR] on the SETUP menu.• For more details, see P.123. At the time of purchase, [ORIGINAL] is selected.2Make sure that the camera power is off.3Connect the accessory USB cable to a USB port of your computer.4Connect the USB cable to the USB terminal of your camera.• Your camera turns on.• Your computer automatically reads a file necessary for recognizing the camera as a drive. • After this preparation, the camera is displayed as a drive at [My Computer] (Windows) or Desktop (Macintosh).Downloading Images in Mass Storage ModeExample of the display in Windows XPL7360874_En_00_0_bookfile.book Page 151 Friday, October 13, 2006 12:56 PM](https://usermanual.wiki/Ricoh/500SEW1.Manual-7/User-Guide-729154-Page-1.png)
![1527Downloading Images to Your Computer5From the displayed drive, copy a file to the desired location.• The figure at right shows the folder configuration in the drive.• When the contents of the internal memory are displayed, the drive name is [RICOHDCI].Caution------------------------------------------------------------------------------------------•Mass storage mode is not available on this camera if you are using Windows 98/98 SE or Mac OS 8.6.•Do not turn off the camera or disconnect the USB cable during image transfer.•If a file with the same name already exists at the destination, it is overwritten. If you do not want the file to be overwritten, rename the file or transfer data to another folder.Note ----------------------------------------------------------------------------------------------When an SD memory card is loaded, its files are displayed. Otherwise, files in the internal memory are displayed.Downloading images from an SD memory card ----------------------------------It is possible to download images from an SD memory card to the computer via a PC card slot or card reader. Depending on the type of PC card slot or card reader, a memory card adapter may be required when using an SD memory card. If the SD memory card can be used in the PC card slot, no memory card adapter is required.•Images are stored in an SD memory card in the hierarchy shown below.Example of the display in Windows XPImage filesExample of the display in Windows XPL7360874_En_00_0_bookfile.book Page 152 Friday, October 13, 2006 12:56 PM](https://usermanual.wiki/Ricoh/500SEW1.Manual-7/User-Guide-729154-Page-2.png)
![1537Downloading Images to Your ComputerCard ReaderThis is a device connected to a computer to read the contents of cards. In addition to the memory card adapter-type, there are card readers compatible with various types of cards, into which you can directly load an SD memory card.For WindowsIf images are downloaded using RICOH Gate La or the [Scanner and Camera Wizard], turn the camera off after downloading images and disconnect the USB cable.Perform the following operations if images are downloaded using mass storage mode. (The display is an example of Windows XP. The terms are different for other operating systems but the operations are the same.)1Double-click the [Safely Remove Hardware] icon at the right end of the task bar.2Select [USB Mass Storage Device] and click [Stop].3Check that [USB Mass Storage Device] is selected and click [OK].4Click [Close].5Disconnect the USB cable.For Macintosh1Drag and drop the displayed drive or the volume icon to the “Trash”.• If a screen appears prompting you to enter the administrator’s password, enter the password.2Disconnect the USB cable.Note ----------------------------------------------------------------------------------------------You can also click [Eject] on the [Special] menu in Mac OS 9 or the [File] menu in Mac OS X to cancel the connection.Disconnecting the Camera from Your Computer L7360874_En_00_0_bookfile.book Page 153 Friday, October 13, 2006 12:56 PM](https://usermanual.wiki/Ricoh/500SEW1.Manual-7/User-Guide-729154-Page-3.png)
![1548Using the Bluetooth® Function8 Using the Bluetooth® FunctionThe Bluetooth® function enables the camera to wirelessly connect to a Bluetooth®-enabled computer, printer or other peripheral device. Bluetooth®-enabled devices can be wirelessly connected without cables. This technology is a popular method for sending and receiving data among various types of devices, such as computers, peripheral devices, and home appliances.This camera has a Bluetooth® function that enables you to easily connect to a Bluetooth®-enabled printer, computer or other device to send images taken with the camera.There are two ways to send image data using the Bluetooth® function.• Send still images to a printer to have them printed (GP.157)• Send and save still images to a computer (GP.166)Caution------------------------------------------------------------------------------------------•Bluetooth®-enabled devices can connect at a maximum range of about 10 meters (33 feet). Keep the line-of-sight distance between the destination Bluetooth® device and the camera within about 10 meters (33 feet).•The destination Bluetooth® device must support the following Bluetooth® Profiles. Please consult the manual that came with your Bluetooth® device.•BIP (Basic Imaging Profile)•OPP (Object Push Profile)•SPP (Serial Port Profile)•You can only use the Bluetooth® function to send still images (.JPG). You cannot send movies (.AVI) or text (.TIF). If there are still images with sounds (.JPG and .WAV), only still images (.JPG) are sent.•For Caplio 500SE-W, before sending an image, set [CHANGE COM] to [BT] on the Expanded Settings menu on the camera. (GP.193)Note ----------------------------------------------------------------------------------------------Be careful not to obstruct the Bluetooth® antenna with your fingers when communicating.About the Bluetooth® FunctionBluetooth® antennaL7360874_En_00_0_bookfile.book Page 154 Friday, October 13, 2006 12:56 PM](https://usermanual.wiki/Ricoh/500SEW1.Manual-7/User-Guide-729154-Page-4.png)
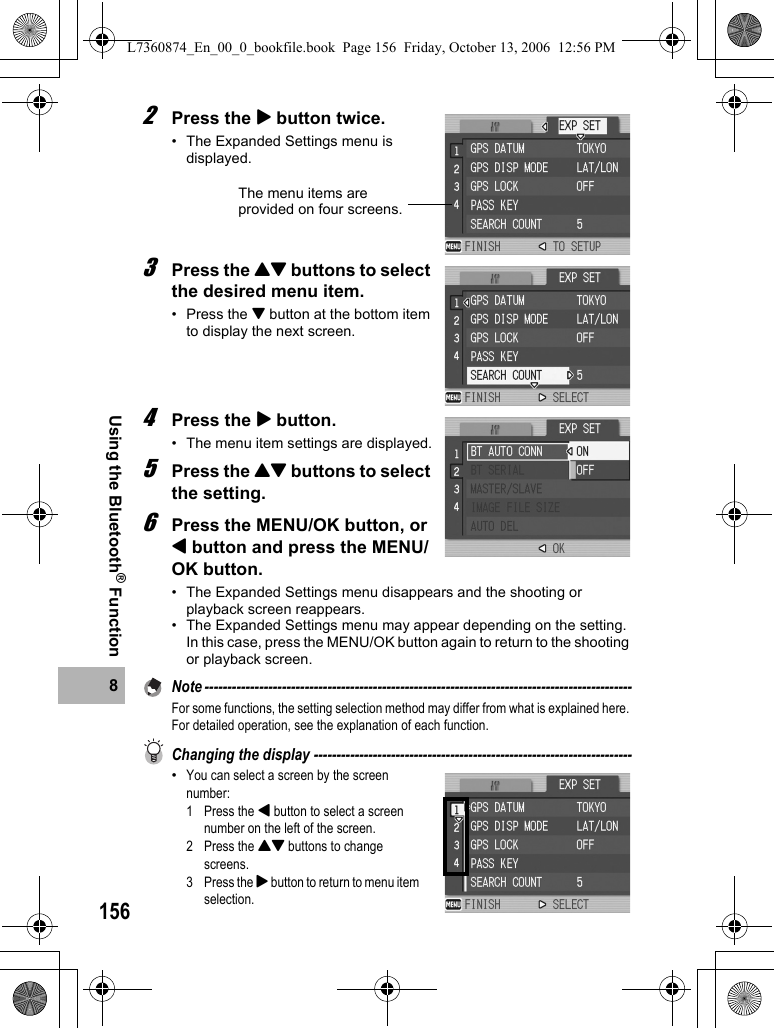
![1558Using the Bluetooth® FunctionYou can set the Bluetooth® function, GPS information, or wireless LAN (only for Caplio 500SE-W) by displaying the Expanded Settings menu from the Shooting Setting menu (GP.59) or Playback Setting menu (GP.88).The Expanded Settings menu enables you to set the items listed in the table below.(*1) You can import 1D barcode data and register it as a camera memo. Use this when using camera memos. (G “Software User Guide”)(*2) Only for Caplio 500SE-WThis explains how to make the settings.Use the !"$ buttons and MENU/OK button to select and set an item.1Press the MENU/OK button.• The Shooting Setting menu (or the Playback Setting menu) appears.Expanded Settings MenuSetting Options [Default Settings] Refer toGPS DATUM TOKYO, [WGS-84] P.188GPS DISP MODE [LAT/LON], UTM, MGRS, ALL P.189GPS LOCK [OFF], ON P.190PASS KEY -P.175SEARCH COUNT 1, 2, 3, 4, [5], 6, 7, 8, 9, 10 P.176BT AUTO CONN ON, [OFF] P.183BT SERIAL - P.181MASTER/SLAVE MASTER, [SLAVE] P.177IMAGE FILE SIZE NO CHANGE, 1280, [640], 320, 160 P.178AUTO DEL ON, [OFF] P.179QUICK SEND MODE [OFF], 1TOUCH, 2TOUCH P.171BARCODE MODE(*1) [MODE1], MODE2“Software User Guide”SCAN TIME(*1) [3 SEC.], 6 SEC., 9 SEC., 12 SEC., 15 SEC., 18 SEC., 21 SEC., 24 SEC., 27 SEC., 30 SEC.“Software User Guide”CHANGE COM(*2) [W-LAN], BT P.193READ COM SETTING(*2) -P.205SEND TO(*2) -P.207, 220SEND CONDITION(*2) [ON], OFF P.219Using the Expanded Settings MenuL7360874_En_00_0_bookfile.book Page 155 Friday, October 13, 2006 12:56 PM](https://usermanual.wiki/Ricoh/500SEW1.Manual-7/User-Guide-729154-Page-5.png)
![1578Using the Bluetooth® FunctionYou can send still images from the camera to a Bluetooth®-enabled printer to have them printed.Images are sent from the internal memory when no SD memory card is loaded or from an SD memory card when installed.There are three ways to send images to a printer.• Send one image (GP.157)• Send all images from the camera (GP.157)• Select and send several images (GP.159)Caution------------------------------------------------------------------------------------------•You can only use the Bluetooth® function to send still images (.JPG). You cannot send movies (.AVI) or text (.TIF). If there are still images with sounds (.JPG and .WAV), only still images (.JPG) are sent.•If the printer supports both BIP and OPP profiles, the BIP profile is selected.•When sending images using a BIP profile, the maximum image size that can be handled by the destination device is automatically obtained. If the size of the image to be sent is too large, then it is resized before being sent.1Check that the destination device (printer) is ready for printing.2Press the 6 (Playback) button.• For Caplio 500SE-W, check that [CHANGE COM] is set to [BT] on the Expanded Settings menu. (GP.193)• To send all still images, go to Step 4.3Press the #$ buttons to select an image to send.4Press the MENU/OK button.• The Playback Setting menu appears.Sending Still Images to a Printer (PRINT)Printing One or All Still ImagesL7360874_En_00_0_bookfile.book Page 157 Friday, October 13, 2006 12:56 PM](https://usermanual.wiki/Ricoh/500SEW1.Manual-7/User-Guide-729154-Page-7.png)
![1588Using the Bluetooth® Function5Press the " button to select [PRINT], and then press the $ button.• When the Bluetooth® function is used for the first time, a screen appears confirming whether to search for a destination device.• If you have already searched for a destination device, a list of destination devices appears. Go to Step 7.• If the camera is connected using a serial connection, a screen appears confirming whether to disconnect the serial connection. Select [YES] and press the MENU/OK button, and go to Step 7.6Press the $ button to select [YES] and then press the MENU/OK button.• The camera begins searching for a destination device and a list of destination devices appears when the search is completed.• By default, up to five devices can be discovered, but you can change this to search for any number of devices between one and ten. (GP.176)7Press the !" buttons to select the desired destination device and then press the MENU/OK button.• If the desired destination device is not listed, press the ADJ. button to search again for destination devices.• Select a destination device and press the $ button to display information about the destination device.• To delete a destination device from the list, select the device and press the D (Delete) button.L7360874_En_00_0_bookfile.book Page 158 Friday, October 13, 2006 12:56 PM](https://usermanual.wiki/Ricoh/500SEW1.Manual-7/User-Guide-729154-Page-8.png)
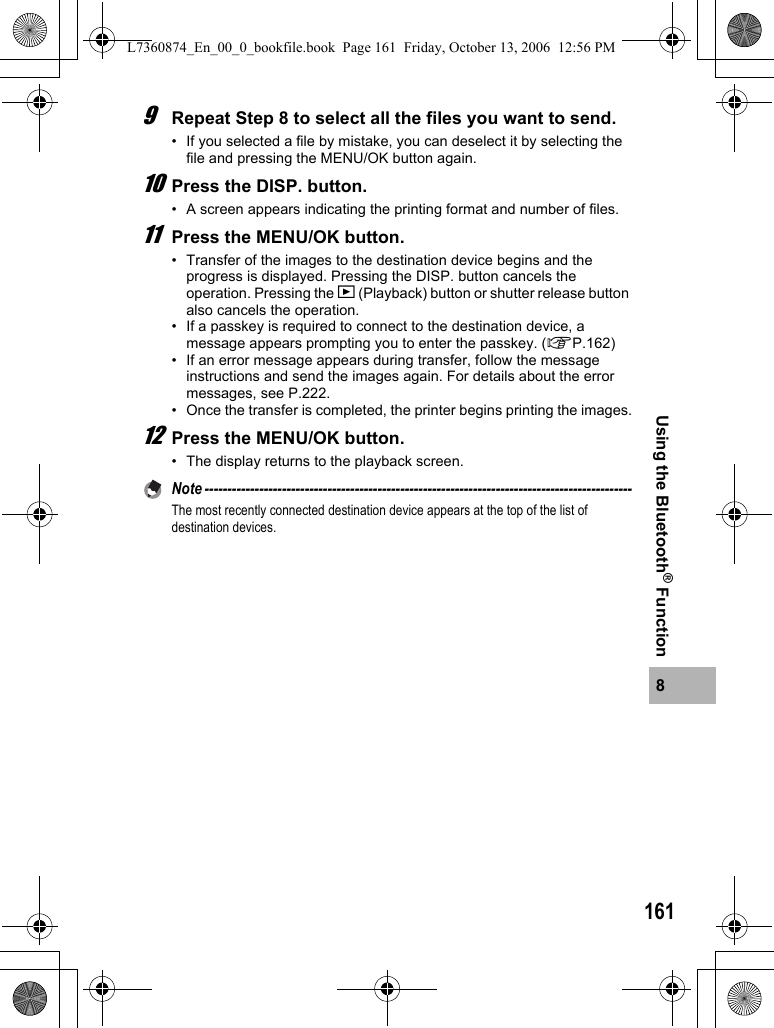
![1598Using the Bluetooth® Function8Press the !" button and [SEND ONE] to send one image or [SEND ALL] to send all images, and then press the MENU/OK button.• Transfer of the images to the destination device begins and the progress is displayed. Pressing the DISP. button cancels the operation. Pressing the 6 (Playback) button or shutter release button also cancels the operation.• If a passkey is required to connect to the destination device, a message appears prompting you to enter the passkey. (GP.162)• If an error message appears during transfer, follow the message instructions and send the images again. For details about the error messages, see P.222.• Once the transfer is completed, the printer begins printing the images.9Press the MENU/OK button.• The display returns to the playback screen.Note ----------------------------------------------------------------------------------------------The most recently connected destination device appears at the top of the list of destination devices. 1Check that the destination device (printer) is ready for printing.2Press the 6 (Playback) button.• For Caplio 500SE-W, check that [CHANGE COM] is set to [BT] on the Expanded Settings menu. (GP.193)3Press the 9 (Thumbnail Display) button twice.• The screen is divided into 12 frames and thumbnails of the still images are displayed.4Press the MENU/OK button.• The Playback Setting menu appears.Printing Several Still ImagesL7360874_En_00_0_bookfile.book Page 159 Friday, October 13, 2006 12:56 PM](https://usermanual.wiki/Ricoh/500SEW1.Manual-7/User-Guide-729154-Page-9.png)
![1608Using the Bluetooth® Function5Press the " button to select [PRINT], and then press the $ button.• When the Bluetooth® function is used for the first time, a screen appears confirming whether to search for a destination device.• If you have already searched for a destination device, a list of destination devices appears. Go to Step 7.• If the camera is connected using a serial connection, a screen appears confirming whether to disconnect the serial connection. Select [YES] and press the MENU/OK button, and go to Step 7.6Press the $ button to select [YES] and then press the MENU/OK button.• The camera begins searching for a destination device and a list of destination devices appears when the search is completed.• By default, up to five devices can be discovered, but you can change this to search for any number of devices between one and ten. (GP.176)7Press the !" buttons to select the desired destination device and then press the MENU/OK button.• If the desired destination device is not listed, press the ADJ. button to search again for destination devices.• Select a destination device and press the $ button to display information about the destination device.• To delete a destination device from the list, select the device and press the D (Delete) button.8Press the !"#$ buttons to select the still images to send and then press the MENU/OK button.• The printer icon appears on the screen.L7360874_En_00_0_bookfile.book Page 160 Friday, October 13, 2006 12:56 PM](https://usermanual.wiki/Ricoh/500SEW1.Manual-7/User-Guide-729154-Page-10.png)
![1648Using the Bluetooth® FunctionEntering a space1Press the !"#$ buttons to select [SPACE].2Press the ADJ./MEMO button.Inserting a character1Press the !"#$ buttons to select one of the characters at the top of the keyboard.2Press the ! button.• The cursor moves to the right of the input characters.3Press the #$ buttons to position the cursor to the right of the point where you want to insert a character.4Press the " button to return the cursor to the keyboard.5Press the !"#$ buttons to select an input character.6Press the ADJ./MEMO button.L7360874_En_00_0_bookfile.book Page 164 Friday, October 13, 2006 12:56 PM](https://usermanual.wiki/Ricoh/500SEW1.Manual-7/User-Guide-729154-Page-14.png)
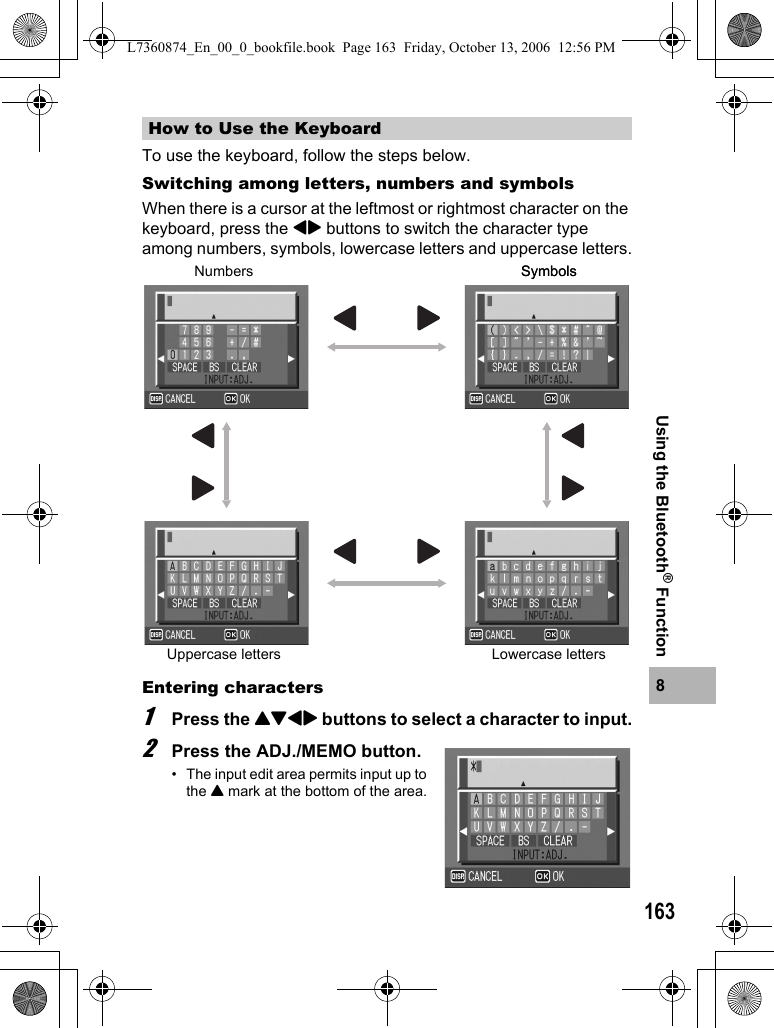
![1658Using the Bluetooth® FunctionDeleting a character1Press the !"#$ buttons to select one of the characters at the top of the keyboard.2Press the ! button.• The cursor moves to the right of the input characters.3Press the #$ buttons to position the cursor to the right of the character you want to delete.4Press the " button to return the cursor to the keyboard.5Press the !"#$ buttons to select [BS], and then press the ADJ./MEMO button.Deleting all input characters1Press the !"#$ buttons to select [CLEAR].2Press the ADJ./MEMO button.L7360874_En_00_0_bookfile.book Page 165 Friday, October 13, 2006 12:56 PM](https://usermanual.wiki/Ricoh/500SEW1.Manual-7/User-Guide-729154-Page-15.png)

![1678Using the Bluetooth® Function1Check that the destination device (computer) is turned on.2Press the 6 (Playback) button.• For Caplio 500SE-W, check that [CHANGE COM] is set to [BT] on the Expanded Settings menu. (GP.193)• To send all still images, go to Step 4.3Press the #$ buttons to select an image to send.4Press the MENU/OK button.• The Playback Setting menu appears.5Press the " button to select [FILE SEND] and press the $ button.• When the Bluetooth® function is used for the first time, a screen appears confirming whether to search for a destination device.• If you have already searched for a destination device, a list of destination devices appears. Go to Step 7.• If the camera is connected using a serial connection, a screen appears confirming whether to disconnect the serial connection. Select [YES] and press the MENU/OK button, and go to Step 7.6Press the $ button to select [YES] and then press the MENU/OK button.• The camera begins searching for a destination device and a list of destination devices appears when the search is completed.• By default, up to five devices can be discovered, but you can change this to search for any number of devices between one and ten. (GP.176)Sending One or All Still ImagesL7360874_En_00_0_bookfile.book Page 167 Friday, October 13, 2006 12:56 PM](https://usermanual.wiki/Ricoh/500SEW1.Manual-7/User-Guide-729154-Page-17.png)
![1688Using the Bluetooth® Function7Press the !" buttons to select the desired destination device and then press the MENU/OK button.• If the desired destination device is not listed, press the ADJ. button to search again for destination devices.• Select a destination device and press the $ button to display information about the destination device.• To delete a destination device from the list, select the device and press the D (Delete) button.8Press the " button and [SEND ONE] to send one image or [SEND ALL] to send all images, and then press the MENU/OK button.• Transfer of the images to the destination device begins and the progress is displayed. Pressing the DISP. button cancels the operation. Pressing the 6 (Playback) button or shutter release button also cancels the operation.• If a passkey is required to connect to the destination device, a message appears prompting you to enter the passkey. (GP.162)• If an error message appears during transfer, follow the message instructions and send the images again. For details about the error messages, see P.222.• Once the transfer is completed, a message indicating this appears.9Press the MENU/OK button.• The display returns to the playback screen.Note ----------------------------------------------------------------------------------------------The most recently connected destination device appears at the top of the list of destination devices.L7360874_En_00_0_bookfile.book Page 168 Friday, October 13, 2006 12:56 PM](https://usermanual.wiki/Ricoh/500SEW1.Manual-7/User-Guide-729154-Page-18.png)
![1698Using the Bluetooth® Function 1Check that the destination device (computer) is turned on.2Press the 6 (Playback) button.• For Caplio 500SE-W, check that [CHANGE COM] is set to [BT] on the Expanded Settings menu. (GP.193)3Press the 9 (Thumbnail Display) button twice.• The screen is divided into 12 frames and thumbnails of the still images are displayed.4Press the MENU/OK button.• The Playback Setting menu appears.5Press the " button to select [FILE SEND] and then press the $ button.• When the Bluetooth® function is used for the first time, a screen appears confirming whether to search for a destination device.• If you have already searched for a destination device, a list of destination devices appears. Go to Step 7.• If the camera is connected using a serial connection, a screen appears confirming whether to disconnect the serial connection. Select [YES] and press the MENU/OK button, and go to Step 7.6Press the $ button to select [YES] and then press the MENU/OK button.• The camera begins searching for a destination device and a list of destination devices appears when the search is completed.• By default, up to five devices can be discovered, but you can change this to search for any number of devices between one and ten. (GP.176)Sending Several Still ImagesL7360874_En_00_0_bookfile.book Page 169 Friday, October 13, 2006 12:56 PM](https://usermanual.wiki/Ricoh/500SEW1.Manual-7/User-Guide-729154-Page-19.png)
![1708Using the Bluetooth® Function7Press the !" buttons to select the desired destination device and then press the MENU/OK button.• If the desired destination device is not listed, press the ADJ. button to search again for destination devices.• Select a destination device and press the $ button to display information about the destination device.• To delete a destination device from the list, select the device and press the D (Delete) button.8Press the !"#$ buttons to select the still images to send and then press the MENU/OK button.•The envelope icon appears on the screen.9Repeat Step 8 to select all the files you want to send.• If you selected a file by mistake, you can deselect it by selecting the file and pressing the MENU/OK button again.10Press the DISP. button.• A screen appears confirming whether to send the selected images to the computer.11Press the $ button to select [YES] and then press the MENU/OK button.• Transfer of the images to the destination device begins and the progress is displayed. Pressing the DISP. button cancels the operation. Pressing the 6 (Playback) button or shutter release button also cancels the operation.• If a passkey is required to connect to the destination device, a message appears prompting you to enter the passkey. (GP.162)• If an error message appears during transfer, follow the message instructions and send the images again. For details about the error messages, see P.222.•Once the transfer is completed, a message indicating this appears.12Press the MENU/OK button.• The display returns to the playback screen.Note ----------------------------------------------------------------------------------------------The most recently connected destination device appears at the top of the list of destination devices. L7360874_En_00_0_bookfile.book Page 170 Friday, October 13, 2006 12:56 PM](https://usermanual.wiki/Ricoh/500SEW1.Manual-7/User-Guide-729154-Page-20.png)
![1718Using the Bluetooth® FunctionImmediately after you shoot a still image, you can send that image to another device. This is convenient if you want to send images to a predetermined device.You need to set [QUICK SEND MODE] on the Expanded Settings menu beforehand.Caution------------------------------------------------------------------------------------------You can only use the Bluetooth® function to send still images (.JPG). You cannot send movies (.AVI) or text (.TIF). If there are still images with sounds (.JPG and .WAV), only still images (.JPG) are sent.1Display the Expanded Settings menu.• For the operating procedure, see P.155.• For Caplio 500SE-W, check that [CHANGE COM] is set to [BT] on the Expanded Settings menu. (GP.193)2Press the " button to select [QUICK SEND MODE] and press the $ button.3Press the !" buttons to select [1TOUCH] or [2TOUCH].4Press the MENU/OK button, or # button and press the MENU/OK button.Sending Images in Shooting Mode (QUICK SEND MODE)Setting Up Quick Review Send (QUICK SEND MODE)Available SettingsOFF *Default setting Images are not sent in shooting mode.1TOUCH If images have previously been sent, you can automatically send an image to the same destination device by pressing the MENU/OK button after shooting while the image is displayed (GP.116).You cannot use Quick Review Send when connecting to a Bluetooth®-enabled device for the first time, using a serial connection, or using a wireless LAN connection (only for Caplio 500SE-W).2TOUCH If images have previously been sent, you can automatically send an image to the same destination device by pressing the MENU/OK button after shooting during quick review display (GP.46).When connecting to a Bluetooth® device for the first time, the image is sent after discovering the destination device.L7360874_En_00_0_bookfile.book Page 171 Friday, October 13, 2006 12:56 PM](https://usermanual.wiki/Ricoh/500SEW1.Manual-7/User-Guide-729154-Page-21.png)
![1728Using the Bluetooth® Function1Check that the destination device is turned on.2Turn the mode dial to 5/K and shoot the picture.• While the image is displayed after shooting, a screen appears confirming whether to send the image. (GP.116) 3Press the MENU/OK button.• Transfer of the image to the previous destination device begins.•Once the transfer is completed, the camera returns to shooting mode and remains connected to the destination device. You can change to playback mode or voice memo mode or remain connected to the destination device until the camera is turned off. The Bluetooth® antenna icon appears on the LCD monitor while the camera is connected.Note ----------------------------------------------------------------------------------------------•You cannot use Quick Review Send to send still images when connecting to a Bluetooth®-enabled device for the first time even when [QUICK SEND MODE] is set to [1TOUCH]. Before you can use Quick Review Send to send still images, you must first use [PRINT] (GP.157) or [FILE SEND] (GP.166) in playback mode to send a still image to a Bluetooth®-enabled device.•If the camera is connected using a serial connection or wireless LAN connection (only for Caplio 500SE-W), you cannot use Quick Review Send to send still images even when [1TOUCH] is set. Before you can use Quick Review Send to send still images, you must first disconnect the serial connection or wireless LAN connection. (GP.182, P.184, P.218)•In the following cases, you cannot use Quick Review Send to send still images to a device even when [QUICK SEND MODE] is set to [1TOUCH].•When [LCD CONFIRM.] is set to [OFF] (GP.116)•During scene mode (GP.40)•During S-CONT or M-CONT (GP.69)•When image with sound is set to [ON] (GP.76), after pressing the MENU/OK button in Step 3, the send button remains displayed until sending is started.•The image size set with [IMAGE FILE SIZE] (GP.178) does not apply.Using Quick Review SendWhen [QUICK SEND MODE] is set to [1TOUCH]L7360874_En_00_0_bookfile.book Page 172 Friday, October 13, 2006 12:56 PM](https://usermanual.wiki/Ricoh/500SEW1.Manual-7/User-Guide-729154-Page-22.png)
![1738Using the Bluetooth® Function1Check that the destination device is turned on.2Turn the mode dial to 5/K and shoot the picture.3Press the Q (Quick Review) button.• A screen appears confirming whether to send the image.4Press the MENU/OK button.• When the Bluetooth® function is used for the first time, a screen appears confirming whether to search for a destination device.• If you have already searched for a destination device, a list of destination devices appears. Go to Step 6.• If the camera is connected using a serial connection, a screen appears confirming whether to disconnect the serial connection. Select [YES] and press the MENU/OK button and go to Step 6.• If the camera is connected using a wireless LAN connection, a screen appears confirming whether to disconnect the wireless LAN connection. Select [YES] and press the MENU/OK button, and go to Step 5 or Step 6. (Only for Caplio 500SE-W)5Press the $ button to select [YES] and then press the MENU/OK button.• The camera begins searching for a destination device and a list of destination devices appears when the search is completed.• By default, up to five devices can be discovered, but you can change this to search for any number of devices between one and ten. (GP.176)6Press the !" buttons to select the desired destination device.• If the desired destination device is not listed, press the ADJ. button to search again for destination devices.• Select a destination device and press the $ button to display information about the destination device.• To delete a destination device from the list, select the device and press the D (Delete) button.When [QUICK SEND MODE] is set to [2TOUCH]L7360874_En_00_0_bookfile.book Page 173 Friday, October 13, 2006 12:56 PM](https://usermanual.wiki/Ricoh/500SEW1.Manual-7/User-Guide-729154-Page-23.png)
![1748Using the Bluetooth® Function7Press the MENU/OK button.• Transfer of the images to the destination device begins and the progress is displayed. Pressing the DISP. button cancels the operation. Pressing the 6 (Playback) button or shutter release button or turning the mode dial also cancels the operation.• If a passkey is required to connect to the destination device, a message appears prompting you to enter the passkey. (GP.162)• If an error message appears during transfer, follow the message instructions and send the images again. For details about the error messages, see P.222.• Once the transfer is completed, the camera returns to shooting mode and remains connected to the destination device. You can change to playback mode or voice memo mode or remain connected to the destination device until the camera is turned off. The Bluetooth® antenna icon appears on the LCD monitor while the camera is connected.Note ----------------------------------------------------------------------------------------------•If an image is sent to a Bluetooth®-enabled device using [PRINT] (GP.157) or [FILE SEND] (GP.166) in playback mode before Quick Review Send, destination devices are not searched for again even if the camera is turned off and then on again. Transfer of images to the previous destination device begins. When the transfer is completed, the camera returns to shooting mode and remains connected to the destination device.•Once Quick Review Send is performed to a Bluetooth®-enabled device in shooting mode and, thereafter, the camera is connected to a destination device, the camera does not search for destination devices again. Transfer of images to the previous destination device begins. When the transfer is completed, the camera returns to shooting mode and remains connected to the destination device.•During manual focus (GP.65), you cannot use Quick Review Send to send still images to a device even when [QUICK SEND MODE] is set to [2TOUCH].•The size of the images to be sent can be set beforehand. (GP.178)To disconnect after Quick Review Send --------------------------------------------Once Quick Review Send is completed, the camera returns to shooting mode and remains connected to the destination device. To disconnect, switch to playback mode or voice memo mode, or turn the camera off.L7360874_En_00_0_bookfile.book Page 174 Friday, October 13, 2006 12:56 PM](https://usermanual.wiki/Ricoh/500SEW1.Manual-7/User-Guide-729154-Page-24.png)
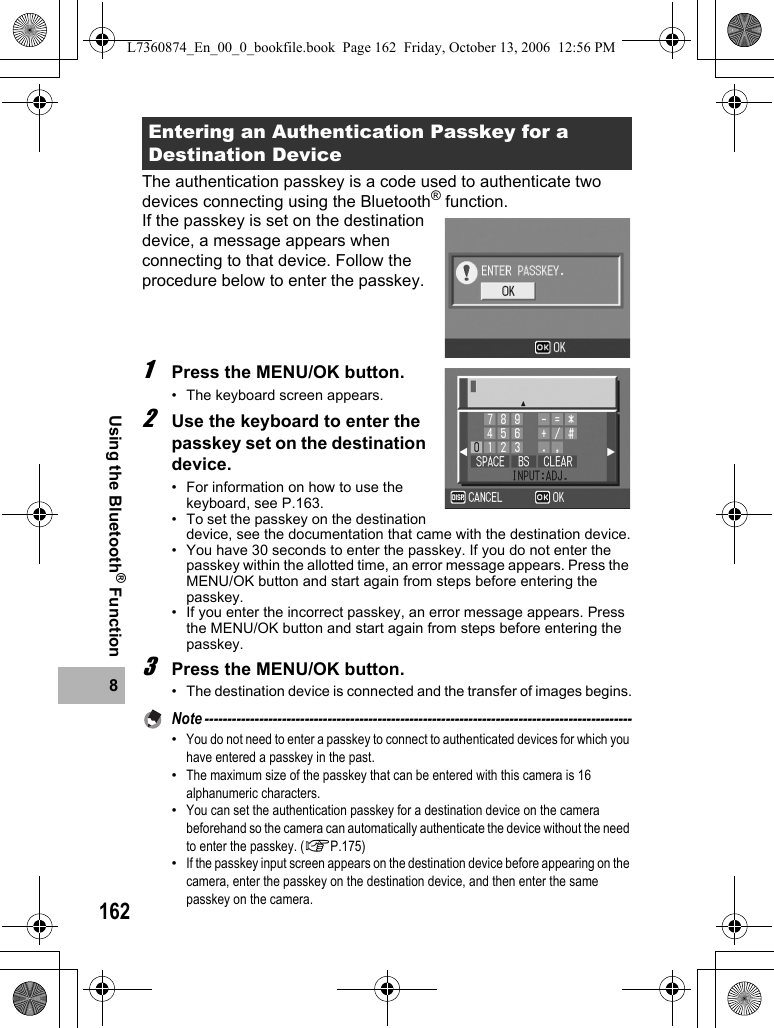
![1758Using the Bluetooth® FunctionThe authentication passkey is a code used to authenticate two devices connecting using the Bluetooth® function.If a passkey is required to connect to a destination device, the authentication passkey can be registered in the camera beforehand so that the passkey can be authenticated automatically when connecting to the device.1Display the Expanded Settings menu.• For the operating procedure, see P.155.2Press the " button to select [PASS KEY] and press the $ button.• The keyboard screen appears.3Use the keyboard to enter the passkey set on the destination device.• For information on how to use the keyboard, see P.163.• To set the passkey on the destination device, see the documentation that came with the destination device.4Press the MENU/OK button.Note ----------------------------------------------------------------------------------------------•The maximum size of the passkey that can be entered with this camera is 16 alphanumeric characters.•If no authentication passkey is registered, the passkey must be entered when connecting the camera to the destination device. (GP.162)•Only one authentication passkey (for one destination device) can be registered. To connect to several devices at the same time (GP.177), the authentication passkey must be the same on all connecting devices.•To change a registered authentication passkey, enter a new passkey in Step 3 and press the MENU/OK button.Making Advanced Bluetooth® SettingsRegistering an Authentication Passkey for a Device (PASS KEY)L7360874_En_00_0_bookfile.book Page 175 Friday, October 13, 2006 12:56 PM](https://usermanual.wiki/Ricoh/500SEW1.Manual-7/User-Guide-729154-Page-25.png)
![1768Using the Bluetooth® FunctionYou can set the maximum number of Bluetooth® devices that can be discovered each time a search is performed. Select between one and ten devices. The default setting is [5].1Display the Expanded Settings menu.• For the operating procedure, see P.155.2Press the " button to select [SEARCH COUNT] and press the $ button.3Press the !" buttons to select the desired setting.4Press the MENU/OK button, or # button and press the MENU/OK button.Changing the Number of Discoverable Devices (SEARCH COUNT)L7360874_En_00_0_bookfile.book Page 176 Friday, October 13, 2006 12:56 PM](https://usermanual.wiki/Ricoh/500SEW1.Manual-7/User-Guide-729154-Page-26.png)
![1778Using the Bluetooth® FunctionYou can connect the camera to one Bluetooth® device or multiple devices at the same time.1Display the Expanded Settings menu.• For the operating procedure, see P.155.2Press the " button to select [MASTER/SLAVE] and press the $ button.3Press the !" buttons to select the desired setting.4Press the MENU/OK button, or # button and press the MENU/OK button.Note ----------------------------------------------------------------------------------------------When the camera is connected to multiple devices at the same time, images can only be sent using the SPP profile. Connecting to Several Devices at the Same Time (MASTER/SLAVE)Available SettingsMASTER (Connect to several devices at the same time)SLAVE (Connect to one device) *Default settingL7360874_En_00_0_bookfile.book Page 177 Friday, October 13, 2006 12:56 PM](https://usermanual.wiki/Ricoh/500SEW1.Manual-7/User-Guide-729154-Page-27.png)
![1788Using the Bluetooth® FunctionYou can select the size of still images to be sent.1Display the Expanded Settings menu.• For the operating procedure, see P.155.2Press the " button to select [IMAGE FILE SIZE] and press the $ button.3Press the !" buttons to select the desired setting.4Press the MENU/OK button, or # button and press the MENU/OK button.Caution------------------------------------------------------------------------------------------•When sending images with Bluetooth®, the image size set with [IMAGE FILE SIZE] is only applied when sending images with an OPP profile.•When [QUICK SEND MODE] is set to [1TOUCH], the image size set with [IMAGE FILE SIZE] does not apply.•When sending images using a BIP profile, the maximum image size that can be handled by the destination device is automatically obtained. If the size of the image to be sent is too large, then it is resized before being sent.Selecting the Size of Images to Be Sent (IMAGE FILE SIZE)Available SettingsNO ALTER (Do not change the image size)1280640 *Default setting320160L7360874_En_00_0_bookfile.book Page 178 Friday, October 13, 2006 12:56 PM](https://usermanual.wiki/Ricoh/500SEW1.Manual-7/User-Guide-729154-Page-28.png)
![1798Using the Bluetooth® FunctionYou can set the camera to automatically delete a file from the camera after it has been sent to a computer or a printer.1Display the Expanded Settings menu.• For the operating procedure, see P.155.2Press the " button to select [AUTO DEL] and press the $ button.3Press the !" buttons to select the desired setting.4Press the MENU/OK button, or # button and press the MENU/OK button.Automatically Deleting Sent Images (AUTO DEL)Available SettingsON (Automatically delete a still image after it has been sent)OFF (Do not delete a still image after it has been sent) *Default settingL7360874_En_00_0_bookfile.book Page 179 Friday, October 13, 2006 12:56 PM](https://usermanual.wiki/Ricoh/500SEW1.Manual-7/User-Guide-729154-Page-29.png)
