Ricoh 500SEW1 Digital Camera with WLAN User Manual Manual 4
Ricoh Company, Ltd. Digital Camera with WLAN Manual 4
UserManual.wiki
>
Ricoh
>
500SEW1 User Manual
>
Manual 4
Contents
1.
Manual 1
2.
Manual 2
3.
Manual 3
4.
Manual 5
5.
Manual 6
6.
Manual 7
7.
Manual 8
8.
Manual 9
9.
Manual 10
10.
Manual 4
Manual 4
Navigation menu
Upload a User Manual
Namespaces
Wiki Guide
HTML
PDF
Info
Views
User Manual
Discussion / Help
Navigation
![61Various Shooting Functions1The file size of a shot still image depends on the picture quality mode and image size settings. For movies, choose the movie size. Figures inside the bold frame indicate those shown on the screen.Still Images• In CALS mode, the image size is fixed to [N1280(1M)].• When scene mode is set to [SKEW COR MODE], you can select 1280 × 960 or 640 × 480.• When scene mode is set to [TEXT MODE], you can select 3264 × 2448 or 2048 × 1536.Movies• You can also choose the number of frames for movies. (GP.84)Choosing Picture Quality Mode/Image Size (PIC QUALITY/SIZE)Image Size Picture Quality ModePIC QUALITY/SIZERemarks3264 ×2448 F(Fine)N(Normal)F3264(8M)N3264(8M)•For downloading and editing images on your computer.•For creating large prints.2592 ×1944 N(Normal) N2592(5M)2048 ×1536 N(Normal) N2048(3M) •For creating large prints.1280 ×960 F(Fine)N(Normal)F1280(1M)N1280(1M)•For taking pictures of public works for submission.640 ×480 N(Normal) N640(VGA) •For shooting a large number of pictures.•For attaching to e-mail.•For posting on a website.Image Size Movie Size320 ×240 320160 ×120 160L7360874_En_00_0_bookfile.book Page 61 Friday, October 13, 2006 12:56 PM](https://usermanual.wiki/Ricoh/500SEW1.Manual-4/User-Guide-729158-Page-1.png)
![62Various Shooting Functions1Note ----------------------------------------------------------------------------------------------•For picture quality mode, select normal mode (N) or fine mode (F), depending on the desired compression ratio.Normal mode: The compression ratio is high, resulting in a small file. Normally, shooting is done in this mode.Fine mode: The compression ratio is low, resulting in a large file, but the picture quality is better than in Normal.•The number of images that can be stored in the internal memory or SD memory card depends on the [PIC QUALITY/SIZE] setting. (GP.235)1Turn the mode dial to 5/3.2Press the MENU/OK button.• The Shooting Setting menu is displayed.3Press the " button to select [PIC QUALITY/SIZE] and press the $ button.4Press the !" buttons to select the desired setting.5Press the MENU/OK button, or # button and press the MENU/OK button.• The setting appears on the screen.Still ImagesMoviesL7360874_En_00_0_bookfile.book Page 62 Friday, October 13, 2006 12:56 PM](https://usermanual.wiki/Ricoh/500SEW1.Manual-4/User-Guide-729158-Page-2.png)
![63Various Shooting Functions1This function minimizes camera shake and blurring during shooting.1Turn the mode dial to 5/K.2Press the MENU/OK button.• The Shooting Setting menu is displayed.3Press the " button to select [ANTIBLUR] and press the $ button.4Press the !" buttons to select [ON].5Press the MENU/OK button, or # button and press the MENU/OK button.• The antiblur symbol appears on the screen.Caution------------------------------------------------------------------------------------------•The antiblur function does not work when the ISO setting is set to a setting other than [AUTO] or the time exposure is set to a setting other than [OFF]. Set the ISO setting to [AUTO] (GP.81) and set the time exposure to [OFF]. (GP.73)•The antiblur function may not prevent blurring when shooting in dark places or when the subject is moving.Note ----------------------------------------------------------------------------------------------The J mark appears when blurring is likely to occur. (GP.33)Shooting with the Antiblur Function (ANTIBLUR)L7360874_En_00_0_bookfile.book Page 63 Friday, October 13, 2006 12:56 PM](https://usermanual.wiki/Ricoh/500SEW1.Manual-4/User-Guide-729158-Page-3.png)
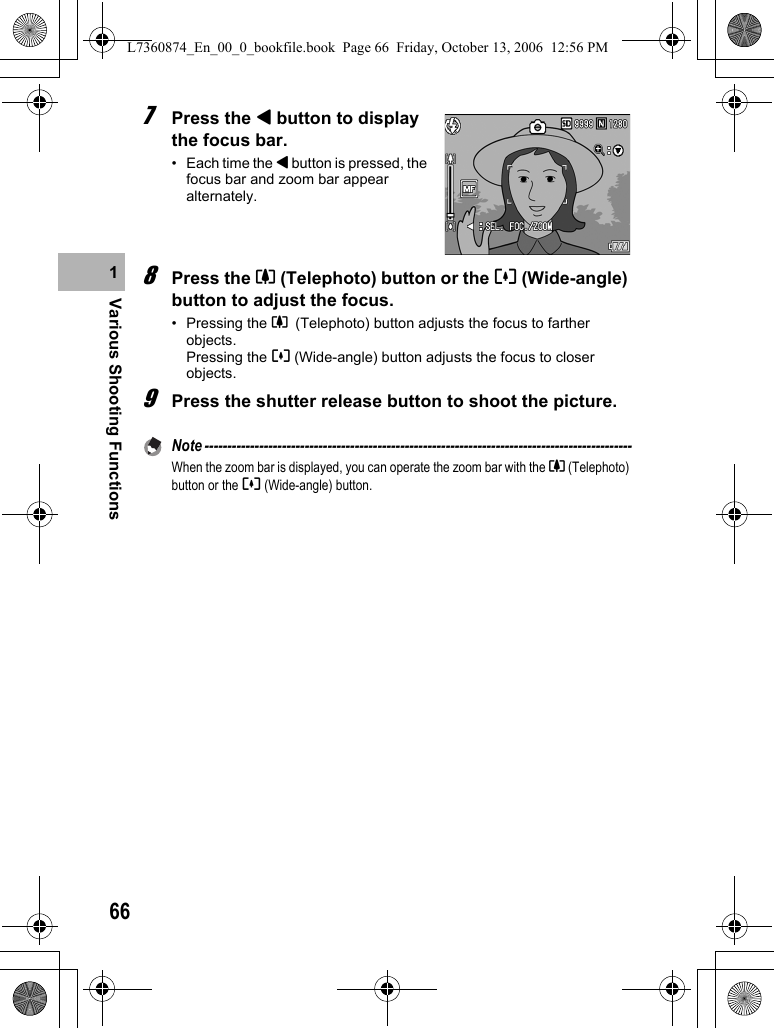
![64Various Shooting Functions1If you shoot the subject in the default focusing mode, the camera focuses automatically with Auto Focus (AF).Choose from the following five focusing modes.Focusing Modes1Turn the mode dial to 5/K/3.2Press the MENU/OK button.• The Shooting Setting menu is displayed.3Press the " button to select [FOCUS] and press the $ button.4Press the !" buttons to select the desired setting.5Press the MENU/OK button, or # button and press the MENU/OK button. Changing the Focusing Mode (FOCUS)Symbol Mode DescriptionNone MULTI AF Automatically measures the distances to a maximum of five AF areas from among 17 AF areas and focuses to the nearest AF area. This prevents the center of the LCD monitor from becoming out of focus and enables you to shoot with a minimum number of out-of-focus pictures.None SPOT AF Selects one AF area at the center of the picture to allow the camera to focus on this area automatically.MF (Manual Focus) Enables you to adjust the focus manually.SNAP Fixes the shooting distance to a short distance (about 2.5 m (8.2 ft.)).A (Infinity) Fixes the shooting distance to infinity.Infinity is useful for shooting distant scenes.L7360874_En_00_0_bookfile.book Page 64 Friday, October 13, 2006 12:56 PM](https://usermanual.wiki/Ricoh/500SEW1.Manual-4/User-Guide-729158-Page-4.png)
![65Various Shooting Functions1If the camera fails to focus automatically, you can focus manually (MF: Manual Focus).Manual focus enables shooting at a fixed distance.Note ----------------------------------------------------------------------------------------------•In scene mode, manual focus can be used only when [ZOOM MACRO] or [SKEW COR MODE] is selected.•You can also use manual focus to focus on objects within the macro shooting range.1Turn the mode dial to 5/K/3.2Press the MENU/OK button.• The Shooting Setting menu is displayed.3Press the " button to select [FOCUS] and press the $ button.4Press the !" buttons to select [MF].5Press the MENU/OK button.• [MF] is displayed on the screen.6Press the " button as required.• Pressing the " button enlarges the display for easy focusing.Manual Focus Shooting (MF)L7360874_En_00_0_bookfile.book Page 65 Friday, October 13, 2006 12:56 PM](https://usermanual.wiki/Ricoh/500SEW1.Manual-4/User-Guide-729158-Page-5.png)
![67Various Shooting Functions1You can change the metering method (the range to use for metering) used to determine the exposure value.There are three light metering modes.Light Metering Modes1Turn the mode dial to 5/K.2Press the MENU/OK button.• The Shooting Setting menu is displayed.3Press the " button to select [PHOTOMETRY] and press the $ button.4Press the !" buttons to select the desired setting.5Press the MENU/OK button, or # button and press the MENU/OK button.• The symbol appears on the screen.Changing the Light Metering (PHOTOMETRY)Symbol Mode DescriptionNone MULTI The entire shooting range is divided into 256 partitions, and each is metered to determine the overall exposure value.CENTER The entire image is metered, with emphasis on the center, to determine the exposure value.Use this when the brightness of the center and surroundings are different.SPOTOnly the center of the image is metered to determine the exposure value.Use this setting when you want to use the brightness at the center. This is useful if there is a marked difference in contrast or backlighting.L7360874_En_00_0_bookfile.book Page 67 Friday, October 13, 2006 12:56 PM](https://usermanual.wiki/Ricoh/500SEW1.Manual-4/User-Guide-729158-Page-7.png)
![68Various Shooting Functions1You can change the edge quality of your still images to either sharp or soft.1Turn the mode dial to 5/K.2Press the MENU/OK button.• The Shooting Setting menu is displayed.3Press the " button to select [SHARPNESS] and press the $ button.4Press the !" buttons to select the desired setting.5Press the MENU/OK button, or # button and press the MENU/OK button.• The symbol appears on the screen.Changing the Edge Quality of Still Images (SHARPNESS)L7360874_En_00_0_bookfile.book Page 68 Friday, October 13, 2006 12:56 PM](https://usermanual.wiki/Ricoh/500SEW1.Manual-4/User-Guide-729158-Page-8.png)
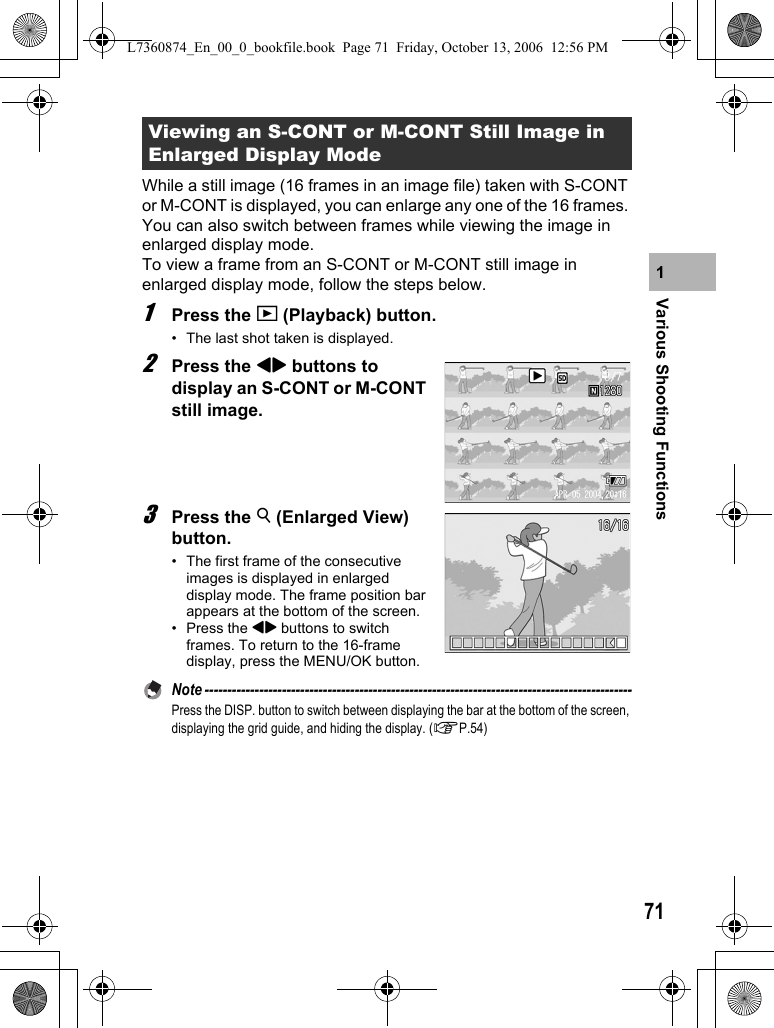
![69Various Shooting Functions1With Multi-shot, you can shoot consecutive images.Multi-shot has the following two modes:S (Stream)-CONTWith just one full-press of the shutter release button, you can take 16 consecutive shots at intervals of 1/7.5 seconds in about 2 seconds.The 16 still images are grouped together as a set and are recorded as one image file (3264 × 2448 pixels).M (Memory-reversal)-CONTThe camera memorizes the scene while you hold down the shutter release button, and once you release it, the previous 2 seconds of shots are recorded.The 16 still images are grouped together as a set and are recorded as one image file (3264 × 2448 pixels).Note ----------------------------------------------------------------------------------------------When shooting with S-CONT or M-CONT, the ISO setting is fixed at [AUTO] even if it is set to [ISO 64] or [ISO 100].1Turn the mode dial to 5/K.2Press the MENU/OK button.• The Shooting Setting menu is displayed.Shooting with Multi-Shot (S-CONT/M-CONT)(1) If you release the shutter release button here...(2) The camera records for about 2 seconds aheadL7360874_En_00_0_bookfile.book Page 69 Friday, October 13, 2006 12:56 PM](https://usermanual.wiki/Ricoh/500SEW1.Manual-4/User-Guide-729158-Page-9.png)
![70Various Shooting Functions13Press the " button to select [CONT. MODE] and press the $ button.4Press the !" buttons to select [S-CONT], or [M-CONT].5Press the MENU/OK button, or # button and press the MENU/OK button.• The symbol appears on the screen. S-CONT (S Multi-Shot)6Compose your picture and then press the shutter release button.• 16 pictures are taken automatically. M-CONT (M Multi-Shot)6Compose your picture and then press and hold the shutter release button.• The camera memorizes the scene while you hold down the shutter release button.7Release your finger from the shutter release button.• The camera stops shooting and the 16 still images (in the previous 2 seconds) are recorded as one still image.Note ----------------------------------------------------------------------------------------------•To return to normal single-image shooting, follow Steps 1 to 3, select [OFF] in Step 4, and press the MENU/OK button.•In M-CONT mode, if you release the shutter release button within 2 seconds from the time you first pressed it, the shots from the time you pressed the shutter until you released it will be recorded and the number of consecutive shots will be less than 16.•The flash is turned off.•During Multi-shot mode, the LCD monitor is turned off.L7360874_En_00_0_bookfile.book Page 70 Friday, October 13, 2006 12:56 PM](https://usermanual.wiki/Ricoh/500SEW1.Manual-4/User-Guide-729158-Page-10.png)
![72Various Shooting Functions1You can set the color depth of still images to [VIVID], [NORMAL], [NEUTRAL], or [B&W].1Turn the mode dial to 5/K.2Press the MENU/OK button.• The Shooting Setting menu is displayed.3Press the " button to select [COLOR DEPTH] and press the $ button.4Press the !" buttons to select the desired setting.5Press the MENU/OK button, or # button and press the MENU/OK button.• If you selected a setting other than [NORMAL], the symbol appears on the screen.Setting the Color Depth (COLOR DEPTH)L7360874_En_00_0_bookfile.book Page 72 Friday, October 13, 2006 12:56 PM](https://usermanual.wiki/Ricoh/500SEW1.Manual-4/User-Guide-729158-Page-12.png)
![73Various Shooting Functions1You can select [1 SEC.], [2 SEC.], [4 SEC.], or [8 SEC.] for time exposure.By using long time exposure, you can capture the movement of moving subjects such as the trail of fireworks and car lights when shooting a night scene.1Turn the mode dial to 5/K.2Press the MENU/OK button.• The Shooting Setting menu is displayed.3Press the " button to select [TIME EXPOSURE] and press the $ button.4Press the !" buttons to select the desired setting.5Press the MENU/OK button, or # button and press the MENU/OK button.• The setting appears on the screen.Note ----------------------------------------------------------------------------------------------•When using long time exposure, the shutter speed may slow down and images may be blurred. Hold the camera steady by using a tripod when shooting.•The antiblur function only works when long time exposure is set to [OFF].•While shooting with long time exposure, the LCD monitor turns off.Using Long Time Exposure (TIME EXPOSURE)L7360874_En_00_0_bookfile.book Page 73 Friday, October 13, 2006 12:56 PM](https://usermanual.wiki/Ricoh/500SEW1.Manual-4/User-Guide-729158-Page-13.png)
![74Various Shooting Functions1You can set the camera to automatically take pictures at fixed intervals.You can set the shooting interval from 30 seconds to 3 hours in increments of 30 seconds.1Turn the mode dial to 5/K.2Press the MENU/OK button.• The Shooting Setting menu is displayed.3Press the " button to select [INTERVAL] and press the $ button.4Press the !" buttons to set the hours.5Press the $ button to move to the minutes setting, then use the !" buttons to set the minutes.• You can press and hold either the !" buttons to quickly raise or lower the minute setting.6Press the $ button to move to the seconds setting, then use the !" buttons to set the seconds.7Press the MENU/OK button.• [INTERVAL] appears on the screen.8Press the shutter release button to shoot the picture.• A picture is taken every time the fixed interval elapses.9To stop shooting, press the MENU/OK button.Shooting Pictures Automatically at Set Intervals (INTERVAL)L7360874_En_00_0_bookfile.book Page 74 Friday, October 13, 2006 12:56 PM](https://usermanual.wiki/Ricoh/500SEW1.Manual-4/User-Guide-729158-Page-14.png)
![75Various Shooting Functions1Caution------------------------------------------------------------------------------------------•The interval shooting setting is cleared when the camera is turned off.•The time until the next picture can be taken according to the shooting menu setting may be longer than the time set for interval shooting. In this case, the shooting interval becomes longer than the set time.Note ----------------------------------------------------------------------------------------------•Depending on the remaining battery level, the battery may become depleted during interval shooting. Use of the AC adapter (sold separately) is recommended.•If you press the shutter release button during interval shooting, the camera will shoot as usual. However, the interval shooting setting is unaffected. After shooting, once the time specified in interval shooting elapses, the next shot is taken.•When interval shooting is turned on, Multi-shot is automatically set to [OFF] even if it had been set to [M-CONT].L7360874_En_00_0_bookfile.book Page 75 Friday, October 13, 2006 12:56 PM](https://usermanual.wiki/Ricoh/500SEW1.Manual-4/User-Guide-729158-Page-15.png)
![76Various Shooting Functions1You can shoot a still image with a voice memo of up to eight seconds.1Turn the mode dial to 5/K.2Press the MENU/OK button.• The Shooting Setting menu is displayed.3Press the " button to select [IMAGE WITH SOUND] and press the $ button.4Press the !" buttons to select [ON].5Press the MENU/OK button, or # button and press the MENU/OK button.• The symbol appears on the screen.6Press the shutter release button to shoot the picture.• The camera starts recording after shooting.7Press the shutter release button to finish recording.• Even if the shutter release button is not pressed, recording automatically stops after 8 seconds.Note ----------------------------------------------------------------------------------------------•To play back a still image with sound, display the still image in the same way as a still image without sound (GP.47) and press the ADJ. button to play back the sound.•Press the !" buttons during sound playback to display the volume adjustment bar. You can adjust the volume with the !" buttons.Shooting a Still Image with Sound (IMAGE WITH SOUND)L7360874_En_00_0_bookfile.book Page 76 Friday, October 13, 2006 12:56 PM](https://usermanual.wiki/Ricoh/500SEW1.Manual-4/User-Guide-729158-Page-16.png)
![77Various Shooting Functions1You can insert the date (YY/MM/DD) or the date and time (YY/MM/DD hh:mm) at the lower right of a still image.1Turn the mode dial to 5/K.2Press the MENU/OK button.• The Shooting Setting menu is displayed.3Press the " button to select [DATE IMPRINT] and press the $ button.4Press the !" buttons to select the desired setting.5Press the MENU/OK button, or # button and press the MENU/OK button.• The symbol appears on the screen.Note ----------------------------------------------------------------------------------------------•If the date and time have not been set, [DATE IMPRINT] cannot be used. First make the date and time settings (GP.119).•[DATE IMPRINT] cannot be used with movies.Inserting the Date into a Still Image (DATE IMPRINT)L7360874_En_00_0_bookfile.book Page 77 Friday, October 13, 2006 12:56 PM](https://usermanual.wiki/Ricoh/500SEW1.Manual-4/User-Guide-729158-Page-17.png)
![78Various Shooting Functions1The exposure setting enables you to select the brightness level for your picture. Normally, if your subject is centered, backlight compensation is automatically activated, and you can shoot with the correct exposure.In the following cases, or when you intentionally want to change the exposure, you can adjust the exposure setting. Exposure can be specified in the range from -2.0 to +2.0. Setting the level higher (+) makes the picture brighter and lower (-) makes the picture darker.For backlightingWhen the background is particularly bright, the subject will appear dark (underexposed). In this case, set the exposure level higher (+).When your subject is whitishThe entire picture will turn out dark (underexposed). Set the exposure level higher (+).When your subject is darkishThe entire picture will turn out bright (overexposed). Set the exposure level lower (-).The same happens when you take a photo of a subject in a spotlight.1Turn the mode dial to 5/K.2Press the ADJ. button and then press the #$ buttons until the exposure compensation bar appears.3Press the !" buttons to set the exposure setting.• You can also press the shutter release button to shoot the picture.4Press the MENU/OK button.• The setting appears on the screen.Note ----------------------------------------------------------------------------------------------When shooting in particularly bright places, you may not be able to correct the exposure level. In that case, the [!AE] symbol will appear on the screen. Changing the Exposure (EXPOSURE COMP.)To change the setting, use the Shooting Setting menu or the ADJ. button. This section explains easy ways to change the exposure setting with the ADJ. button.To use the Shooting Setting menu, see “Using the Menu” (GP.60).L7360874_En_00_0_bookfile.book Page 78 Friday, October 13, 2006 12:56 PM](https://usermanual.wiki/Ricoh/500SEW1.Manual-4/User-Guide-729158-Page-18.png)
![79Various Shooting Functions1Adjust the white balance so that a white subject will appear white.At purchase, the white balance is set to [AUTO]. Normally you do not need to change the setting, but if the camera is having difficulty determining the white balance when shooting an object of a single color or when shooting under multiple light sources, you can change the setting.White Balance Modes1Turn the mode dial to 5/K/3.2Press the ADJ. button and then press the #$ buttons until the white balance menu appears.3Press the !" buttons to select a setting other than [M].• You can also press the shutter release button to shoot the picture.4Press the MENU/OK button.• The symbol appears on the screen.Using Natural and Artificial Lighting (WHITE BALANCE)Symbol Mode DescriptionAUTO AUTO Adjusts the white balance automatically.OUTDOORS Select this when shooting outdoors (sunny) and white balance fails to adjust properly.CLOUDY Select this when shooting in cloudy weather or shade and the white balance fails to adjust properly.INCANDESCENT LAMPSelect this when shooting under incandescent light and white balance fails to adjust properly.INCANDESCENT LAMP2Select this when shooting under incandescent light (more reddish, compared with [INCANDESCENT LAMP]).FLUORESCENT LAMPSelect this when shooting under fluorescent light and white balance fails to adjust properly.MANUAL SETTINGSAdjust the white balance manually.To change the setting, use the Shooting Setting menu or the ADJ. button. This section explains easy ways to change the white balance setting with the ADJ. button.To use the Shooting Setting menu, see “Using the Menu” (GP.60).L7360874_En_00_0_bookfile.book Page 79 Friday, October 13, 2006 12:56 PM](https://usermanual.wiki/Ricoh/500SEW1.Manual-4/User-Guide-729158-Page-19.png)
![80Various Shooting Functions1Note ----------------------------------------------------------------------------------------------•The white balance may not be adjusted correctly for a subject that is mostly dark. In this case, add something white to the subject.•When shooting with the flash, the white balance may not be adjusted correctly if [AUTO] is not selected. In this case, switch to [AUTO] to shoot with flash.1Turn the mode dial to 5/K/3.2Press the ADJ. button.3Press the #$ buttons until the white balance menu appears.4Press the !" buttons to select [M].5Point the camera at a piece of paper or something white under the lighting conditions for your picture.6Press the DISP. button.• The white balance is set.7Press the MENU/OK button.• The symbol appears on the screen.• The screen is displayed with the white balance set in Step 6. If the result is not as expected, repeat Steps 5 and 6 to change the settings as many times as required.Note ----------------------------------------------------------------------------------------------To cancel [MANUAL SETTINGS], select a setting other than [M] in Step 4.Setting the White Balance Manually (MANUAL SETTINGS)L7360874_En_00_0_bookfile.book Page 80 Friday, October 13, 2006 12:56 PM](https://usermanual.wiki/Ricoh/500SEW1.Manual-4/User-Guide-729158-Page-20.png)
![81Various Shooting Functions1ISO sensitivity indicates how sensitive film is to light. A greater value means higher sensitivity. High sensitivity is suitable for shooting an object in a dark place or a fast-moving object while minimizing blurring.You can choose from the following ISO settings:AUTO, ISO 64, ISO 100, ISO 200, ISO 400, ISO 800, and ISO 1600.When ISO setting is set to [AUTO], the camera automatically changes the sensitivity according to the distance, brightness, zoom, macro and picture quality/size settings. Usually, use the camera in the [AUTO] mode.If you do not want to allow the camera to change the ISO sensitivity, select an ISO setting other than [AUTO].1Turn the mode dial to 5/K.2Press the MENU/OK button.• The Shooting Setting menu is displayed.3Press the " button to select [ISO SETTING] and press the $ button.4Press the !" buttons to select the desired setting.5Press the MENU/OK button, or # button and press the MENU/OK button.• The setting appears on the screen.Note ----------------------------------------------------------------------------------------------•At the wide-angle zoom setting, when the ISO setting is set to [AUTO], the sensitivity is ISO 125 to 800 with flash or ISO 64 to 351 without flash.•The antiblur function does not work when the ISO setting is set to a setting other than [AUTO].•Images shot with a higher sensitivity may appear grainy.Changing the Sensitivity (ISO SETTING)L7360874_En_00_0_bookfile.book Page 81 Friday, October 13, 2006 12:56 PM](https://usermanual.wiki/Ricoh/500SEW1.Manual-4/User-Guide-729158-Page-21.png)
![82Various Shooting Functions1To return the Shooting Setting menu settings to their defaults, follow the steps below.1Turn the mode dial to 5/K.2Press the MENU/OK button.• The Shooting Setting menu is displayed.3Press the !" buttons to select [RESTORE DEFAULTS] and press the $ button.• A confirmation message appears.4Make sure that [YES] is selected, and then press the MENU/OK button.• The display indicates the camera is restoring the initial settings. Once it is finished, the display returns to the shooting mode screen.Note ----------------------------------------------------------------------------------------------For a list of functions whose settings are saved when the camera is turned off, see “Appendices”. (GP.238)Returning the Shooting Setting Menu Settings to their Defaults (RESTORE DEFAULTS)L7360874_En_00_0_bookfile.book Page 82 Friday, October 13, 2006 12:56 PM](https://usermanual.wiki/Ricoh/500SEW1.Manual-4/User-Guide-729158-Page-22.png)
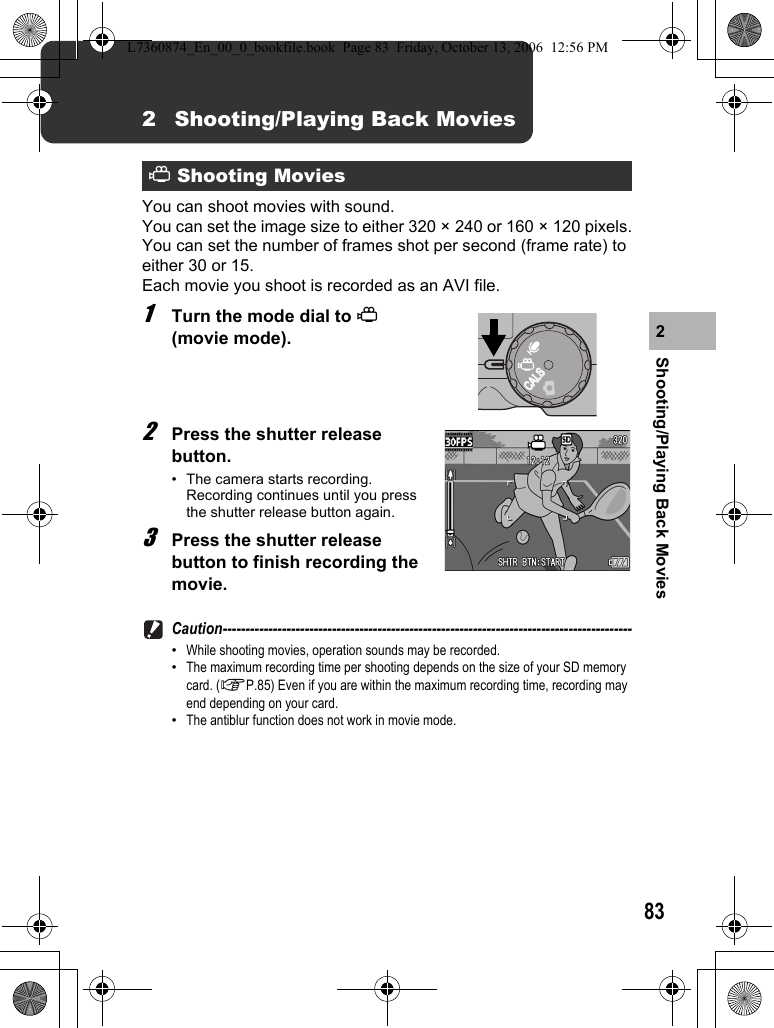
![84Shooting/Playing Back Movies2Note ----------------------------------------------------------------------------------------------•The flash cannot be used.•While shooting movies, only digital zoom can be used. (GP.37)•When the shutter release button is pressed in Step 2, the camera focuses on the subject.•The remaining recording time may not change uniformly because it is recalculated from the remaining memory capacity during movie recording.•Use the Shooting Setting menu to set the image size (GP.61) and frame rate (GP.84) of movies.•The Shooting Setting menu items for movie mode differ from those in still image mode. (GP.59)You can select the number of shot frames per second (frame rate) in movie mode.1Turn the mode dial to 3.2Press the MENU/OK button.• The Shooting Setting menu is displayed.3Press the " button to select [FRAME RATE] and press the $ button.4Press the !" buttons to select [30FPS] or [15FPS].5Press the MENU/OK button, or # button and press the MENU/OK button.• The setting appears on the screen.Movie Frames---------------------------------------------------------------------------------Movies consist of many frames whose images appear to be moving when displayed at high speed.Setting the Frame Rate (FRAME RATE)L7360874_En_00_0_bookfile.book Page 84 Friday, October 13, 2006 12:56 PM](https://usermanual.wiki/Ricoh/500SEW1.Manual-4/User-Guide-729158-Page-24.png)
![89Other Playback Functions4You can display the recorded still images, movies, and sound files sequentially on the screen. This is called a slide show. To view a slide show, follow the steps below.1Press the 6 (Playback) button.• The last shot taken is displayed.2Press the MENU/OK button.• The Playback Setting menu appears.3Press the " button to select [SLIDE SHOW] and press the $ button.• The slide show starts and files are played back in order.• If you want to stop the slide show in progress, press any button on the camera. The slide show will repeat itself until stopped.Note ----------------------------------------------------------------------------------------------•Each still image is displayed for three seconds.•For movies, not just one frame, but the entire movie you shot is played back.•Sound files are also played back.Displaying Photos in Order Automatically (SLIDE SHOW)L7360874_En_00_0_bookfile.book Page 89 Friday, October 13, 2006 12:56 PM](https://usermanual.wiki/Ricoh/500SEW1.Manual-4/User-Guide-729158-Page-29.png)
![90Other Playback Functions4You can protect files from being accidentally deleted.Caution------------------------------------------------------------------------------------------Protected files cannot be deleted normally. However, they will be deleted if you format the memory where the files are stored.1Press the 6 (Playback) button.• The last shot taken is displayed.2Press the #$ buttons to display the file you want to protect.3Press the MENU/OK button.• The Playback Setting menu appears.4Press the " button to select [PROTECT] and press the $ button.5Make sure that [1 FILE] is selected, and then press the MENU/OK button.• The selected file is protected and the symbol appears on the screen.Note ----------------------------------------------------------------------------------------------To unprotect a file, display the file you want to unprotect and perform Steps 3 to 5.Write-protecting Files (PROTECT)Protecting a FileL7360874_En_00_0_bookfile.book Page 90 Friday, October 13, 2006 12:56 PM](https://usermanual.wiki/Ricoh/500SEW1.Manual-4/User-Guide-729158-Page-30.png)