Ricoh 500SEW1 Digital Camera with WLAN User Manual Manual 8
Ricoh Company, Ltd. Digital Camera with WLAN Manual 8
UserManual.wiki
>
Ricoh
>
500SEW1 User Manual
>
Manual 8
Contents
1.
Manual 1
2.
Manual 2
3.
Manual 3
4.
Manual 5
5.
Manual 6
6.
Manual 7
7.
Manual 8
8.
Manual 9
9.
Manual 10
10.
Manual 4
Manual 8
Navigation menu
Upload a User Manual
Namespaces
Wiki Guide
HTML
PDF
Info
Views
User Manual
Discussion / Help
Navigation
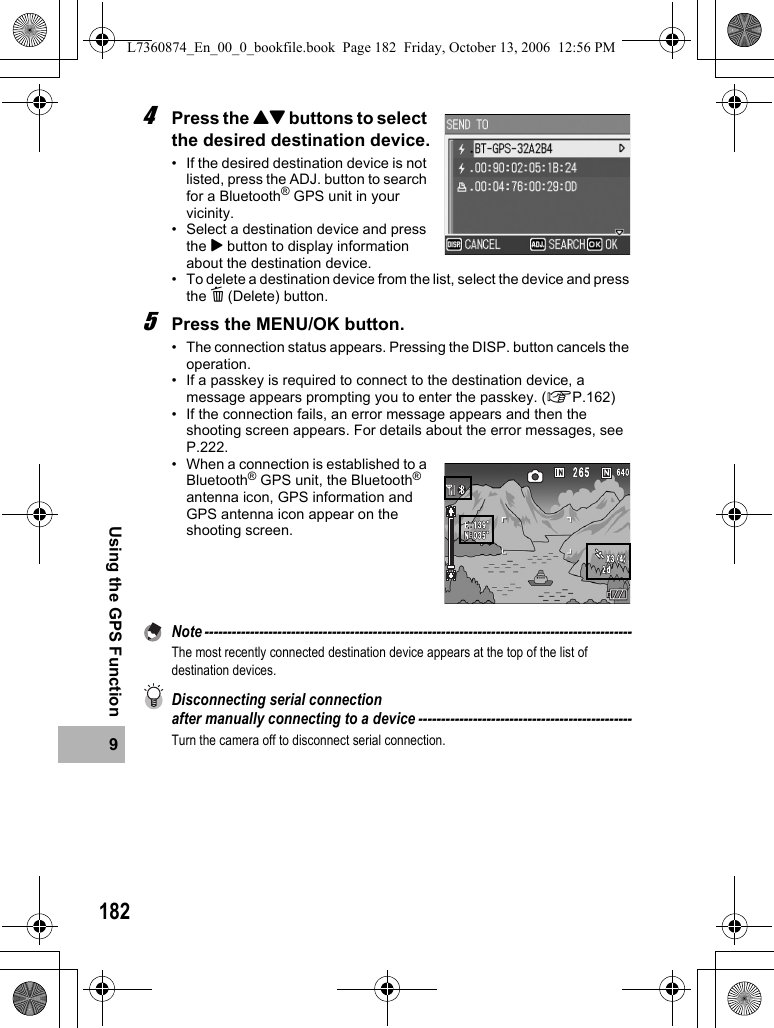
![1819Using the GPS FunctionThis section explains how to connect the camera to the Bluetooth® GPS unit to receive GPS information using a SPP.There are two ways to connect the devices.• Manually connect to a device (GP.181)• Automatically connect to a previously connected device (GP.183)1Display the Expanded Settings menu.• For the operating procedure, see P.155.2Press the " button to select [BT SERIAL] and press the $ button.• When the Bluetooth® function is used for the first time, a screen appears confirming whether to search for a destination device.• If you have already searched for a destination device, a list of destination devices appears. Go to Step 4.• If the camera is connected using a wireless LAN connection, a screen appears confirming whether to disconnect the wireless LAN connection. Select [YES] and press the MENU/OK button, and go to Step 3 or Step 4. (Only for Caplio 500SE-W)3Press the #$ buttons to select [YES] and then press the MENU/OK button.• The camera begins searching for a Bluetooth® GPS unit and a list of destination devices appears when the search is completed.• By default, up to five devices can be discovered, but you can change this to search for any number of devices between one and ten. (GP.176)Obtaining GPS InformationManually Connecting to a Device (BT SERIAL)L7360874_En_00_0_bookfile.book Page 181 Friday, October 13, 2006 12:56 PM](https://usermanual.wiki/Ricoh/500SEW1.Manual-8/User-Guide-729155-Page-1.png)
![1839Using the GPS FunctionWhen [BT AUTO CONN] on the Expanded Settings menu is set to [ON], the next time the camera is turned on, the camera automatically searches for and connects to the previously connected Bluetooth® GPS unit. This is convenient if you want to use the same Bluetooth® GPS unit to which your camera previously connected.1Display the Expanded Settings menu.• For the operating procedure, see P.155.• For Caplio 500SE-W, check that [CHANGE COM] is set to [BT] on the Expanded Settings menu. (GP.193)2Press the " button to select [BT AUTO CONN] and press the $ button.3Press the !" buttons to select [ON].4Press the MENU/OK button, or # button and press the MENU/OK button.Note ----------------------------------------------------------------------------------------------•To automatically connect to a previously connected device after setting this function, turn off the camera and then turn it on again. The camera automatically connects to the previously connected Bluetooth® GPS unit.•If the previously connected device is not detected (GP.154) or [CHANGE COM] is set to [W-LAN] (only for Caplio 500SE-W) (GP.193), no connection is established even if [BT AUTO CONN] is set to [ON].•Use this function for a Bluetooth® GPS unit only.Automatically Connecting to a Previously Connected Device (BT AUTO CONN)Set [BT AUTO CONN] to [ON].L7360874_En_00_0_bookfile.book Page 183 Friday, October 13, 2006 12:56 PM](https://usermanual.wiki/Ricoh/500SEW1.Manual-8/User-Guide-729155-Page-3.png)
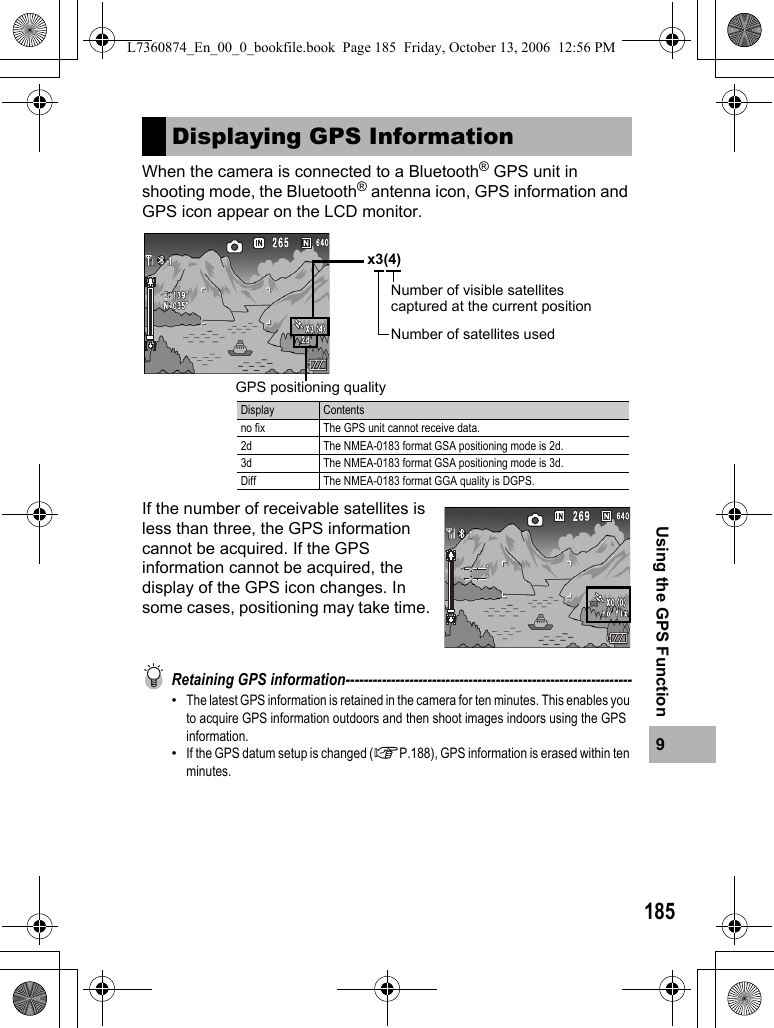
![1849Using the GPS Function1Check that the Bluetooth® GPS unit is turned on.2Turn the camera power on.• The camera attempts to automatically connect to the device and the connection status appears. Pressing the DISP. button cancels the operation.• If a passkey is required to connect to the destination device, a message appears prompting you to enter the passkey. (GP.162)• If the connection fails, an error message appears and then the shooting screen appears. For details about the error messages, see P.222.• When a connection is established to a Bluetooth® GPS unit, the Bluetooth® antenna icon, GPS information and GPS antenna icon appear on the shooting screen.Disconnecting serial connection after automatically connecting to a device ------------------------------------------------In the Expanded Settings menu, set [BT AUTO CONN] to [OFF] (GP.183) and turn off to disconnect serial connection. Automatic connection will not be performed when the camera is turned on again.Note ----------------------------------------------------------------------------------------------To send files while connected to a Bluetooth® GPS unit, you must disconnect the serial connection.Select [PRINT] (GP.157) or [FILE SEND] (GP.166, P.209) on the Playback Setting menu to display the screen confirming whether to disconnect the serial connection. Select [YES] and press the MENU/OK button to disconnect the serial connection.Automatically Establishing a ConnectionL7360874_En_00_0_bookfile.book Page 184 Friday, October 13, 2006 12:56 PM](https://usermanual.wiki/Ricoh/500SEW1.Manual-8/User-Guide-729155-Page-4.png)
![1889Using the GPS FunctionYou can set the GPS information datum.1Display the Expanded Settings menu.• For the operating procedure, see P.155.2Press the " button to select [GPS DATUM] and press the $ button.3Press the !" buttons to select the desired setting.4Press the MENU/OK button, or # button and press the MENU/OK button.Advanced GPS Information SettingsSetting the Datum (GPS DATUM)Available SettingsTOKYO (Standard datum used in Japan)WGS-84 (World geodetic system) *Default settingL7360874_En_00_0_bookfile.book Page 188 Friday, October 13, 2006 12:56 PM](https://usermanual.wiki/Ricoh/500SEW1.Manual-8/User-Guide-729155-Page-8.png)
![1899Using the GPS FunctionYou can set the standard of the GPS information displayed on the monitor.1Display the Expanded Settings menu.• For the operating procedure, see P.155.2Press the " button to select [GPS DISP MODE] and press the $ button.3Press the !" buttons to select the desired setting.4Press the MENU/OK button, or # button and press the MENU/OK button.Setting the Display Standard (GPS DISP MODE)Available SettingsLAT/LON (Displays latitude and longitude) *Default settingUTM (Displays Universal Transverse Mercator Projection (UTM) coordinates.)MGRS (Displays Military Grid Reference System (MGRS) coordinates.)ALL (Displays all information above)L7360874_En_00_0_bookfile.book Page 189 Friday, October 13, 2006 12:56 PM](https://usermanual.wiki/Ricoh/500SEW1.Manual-8/User-Guide-729155-Page-9.png)
![1909Using the GPS FunctionYou can set up the Q (Quick Review) button to use when locking GPS information.When GPS information is locked, new GPS information cannot be acquired.1Display the Expanded Settings menu.• For the operating procedure, see P.155.2Press the " button to select [GPS LOCK] and press the $ button.3Press the !" buttons to select [ON].4Press the MENU/OK button, or # button and press the MENU/OK button.Note ----------------------------------------------------------------------------------------------•When this function is set to [ON], you cannot use the Q (Quick Review) button for the quick review function.•Once this function is set to [ON], press the Q (Quick Review) button on the shooting screen to lock the GPS information. A symbol appears on the screen.Locking the GPS Information (GPS LOCK)Available SettingsOFF (Q button cannot be used to lock GPS information.) *Default settingON (Q button can be used to lock GPS information.)L7360874_En_00_0_bookfile.book Page 190 Friday, October 13, 2006 12:56 PM](https://usermanual.wiki/Ricoh/500SEW1.Manual-8/User-Guide-729155-Page-10.png)
![19210Using the Wireless LAN Function (Only for Caplio 500SE-W)Overview of Transfer Process via a Wireless LAN1Make advanced file transfer settings. (GP.194)Use the provided Caplio Setting software to make advanced settings for sending files via wireless LAN.If no FTP server is available, set up your computer to be the Caplio server before making the advanced settings. (Only for sending via FTP) (GP.199)2Create a communication list. (GP.202)Create a communication list combining the desired settings made in Step 1.3Transfer the communication list from the camera to the computer. (GP.202)Connect the computer to the camera using the provided USB cable and transfer the communication list to the internal memory of the camera. You can also use the SD memory card to import the communication list to the camera. (GP.205)You can also correct the destination setting on the camera. (GP.207)4Send files.Use the Expanded Settings menu on the camera to set the communication method to wireless LAN (GP.193), and send the files from the camera. There are two ways to send files.• FILE SEND (GP.209)Select and send files in playback mode.• QUICK SEND MODE (GP.214)Immediately after you shoot a still image, you can send that file to another device.When sending files, you can use the [SEND TO] screen displayed at the time of sending the files to specify the destination, or you can use the Expanded Settings menu to specify the destination beforehand. (GP.219)Computer settings using the provided Caplio Setting softwareL7360874_En_00_0_bookfile.book Page 192 Friday, October 13, 2006 12:56 PM](https://usermanual.wiki/Ricoh/500SEW1.Manual-8/User-Guide-729155-Page-12.png)
![19310Using the Wireless LAN Function (Only for Caplio 500SE-W)Before sending files from the camera, set whether to connect the camera to the destination by wireless LAN or Bluetooth®.1Display the Expanded Settings menu.• For the operating procedure, see P.155.2Press the " button to select [CHANGE COM] and press the $ button.3Press the !" buttons to select the desired setting.4Press the MENU/OK button, or press the # button and then the MENU/OK button.Selecting the Communication Method (CHANGE COM)Available SettingsW-LAN (connect via wireless LAN) *Default settingBT (connect via Bluetooth®)L7360874_En_00_0_bookfile.book Page 193 Friday, October 13, 2006 12:56 PM](https://usermanual.wiki/Ricoh/500SEW1.Manual-8/User-Guide-729155-Page-13.png)
![19410Using the Wireless LAN Function (Only for Caplio 500SE-W)To send files by wireless LAN, you must use the computer to create a communication list registering the advanced settings for sending files, and then transfer the communication list to the camera. Use the provided Caplio Setting software to make the settings.1Install Caplio Setting from the provided Caplio Software CD-ROM.• For the operating procedure, see P.134.2On the [Start] menu, point to [All Programs] or [Programs], point to [Caplio Software], and then click [Caplio Setting].• Caplio Setting is activated and the [Caplio Setting] screen appears.3Click the [All Detailed Setups] button.• The [Detailed Setups for selections] screen appears.4Click the tab with the settings you want to make.Making Advanced Wireless LAN Settings for Sending FilesL7360874_En_00_0_bookfile.book Page 194 Friday, October 13, 2006 12:56 PM](https://usermanual.wiki/Ricoh/500SEW1.Manual-8/User-Guide-729155-Page-14.png)
![19510Using the Wireless LAN Function (Only for Caplio 500SE-W)• The settings for the Detailed Setups tabs are as shown below.Note ----------------------------------------------------------------------------------------------•If there is no FTP server, you can set your computer as a Caplio server and specify the destination for sending via FTP. (GP.199)•You can also make the advanced settings for each individual setting by clicking the [Detail] button to the right of the setting on the [Caplio Setting] screen.5Click the [Add] button under the [Setup Name] list.• The [New Name for the Setup] dialog box appears.6Enter a setting name, and then click [OK].7Make the advanced settings.• For the available advanced settings, see P.196.• To delete a setting, select the setting you want to delete, and click the [Delete] button.• To rename a setting, select the setting you want to rename, click the [Rename] button, and enter the new setting name in the [New Name for the Setup] dialog box.8To make other advanced settings, click the tab with the setting you want to make, and repeat Steps 5 to 7 above.9Click [OK].• The display returns to the [Caplio Setting] screen.Caution------------------------------------------------------------------------------------------For details about the settings, consult your system administrator.Note ----------------------------------------------------------------------------------------------When [Apply] is clicked, the current setting is registered.Detailed Setups tab SettingsNetwork IP address and other settings (Send via Mail, Send via FTP)Wireless LAN Wireless LAN settings (Send via Mail, Send via FTP)Dial-up This camera is not configured for a dial-up connection, so this setting is not required.FTP Send Destination FTP server name and other settings (Send via FTP)Mail Config. Destination SMTP server name and other settings (Send via Mail)Address Book Destination mail address settings (Send via Mail)L7360874_En_00_0_bookfile.book Page 195 Friday, October 13, 2006 12:56 PM](https://usermanual.wiki/Ricoh/500SEW1.Manual-8/User-Guide-729155-Page-15.png)
![19610Using the Wireless LAN Function (Only for Caplio 500SE-W)[Network] tab[Wireless LAN] tabDetailed Setups Tab SettingsItem Name DescriptionHost SetupHost NameCamera PasswordThese settings are not required when using this camera.Automatically retrieves its IP addressSelect this to retrieve an IP address automatically for the camera.Use the following IP addressIP addressSubnet MaskDefault GatewaySelect this to use a fixed IP address, and then enter the information below.[IP address]Fixed IP address for the camera[Subnet Mask]Usually enter 255.255.255.0.[Default Gateway]IP address of an Internet-connected computerAutomatically retrieves the address from the DNS serverSelect this to retrieve the address automatically from the DNS server.Use the following DNS server addressesPrimary DNS ServerSecondary DNS ServerSelect this to use a fixed DNS server address, and then enter the information below.[Primary DNS Server]Primary DNS server address of your Internet service provider[Secondary DNS Server]Secondary DNS server address of your Internet service providerItem Name DescriptionConnection Method Select from the following connection methods.[Infrastructure]Connection method for communication through routers and access points[AdHoc]Connection method for communication between slave devicesESS-ID A wireless LAN enables communication between a master device and a slave device having the same ESS-ID. Enter the same ESS-ID as the master device.L7360874_En_00_0_bookfile.book Page 196 Friday, October 13, 2006 12:56 PM](https://usermanual.wiki/Ricoh/500SEW1.Manual-8/User-Guide-729155-Page-16.png)
![19710Using the Wireless LAN Function (Only for Caplio 500SE-W)Communication Channel When several access points are in use, a channel is set to each access point. Select the channel of the access point.[Auto]Select this if [Connection Method] is set to [Infrastructure] and there is only one access point.[1-13]If [Connection Method] is set to [Infrastructure] and there are several access points or if [Connection Method] is set to [AdHoc], select the channel you want to use.Cryptography Select from the following encryption methods.[None]No encryption is used.[WEP]This can be selected when [Connection Method] is set to either [Infrastructure] or [AdHoc].[AES]This can be selected only when [Connection Method] is set to [Infrastructure].[TKIP]This can be selected only when [Connection Method] is set to [Infrastructure].Network Key Enter the security key. Select a key type from [String] and [Hex] and enter an encryption key in the box.[String]When [Cryptography] is set to [WEP]: Enter an encryption key of 5 or 13 characters. Entering a 5-character string uses 40-bit encryption, and entering a 13-character string uses 128-bit encryption.When [Cryptography] is set to [AES] or [TKIP]: Enter an encryption key from 8 to 63 characters.[Hex]This can be selected only when [Cryptography] is set to [WEP]. Enter an encryption key with 10 or 26 digits. Entering a 10-digit string uses 40-bit encryption, and entering a 26-digit string uses 128-bit encryption.Authentication [Open System]This can be selected only when [Cryptography] is set to [None] or [WEP]. This authentication does not use WEP keys.[Shared Key]This can be selected only when [Cryptography] is set to [None] or [WEP]. This authentication compares the WEP keys of different devices.[WPA-PSK]This can be selected only when [Cryptography] is set to [AES] or [TKIP].[WPA2-PSK]This can be selected only when [Cryptography] is set to [AES] or [TKIP].Item Name DescriptionL7360874_En_00_0_bookfile.book Page 197 Friday, October 13, 2006 12:56 PM](https://usermanual.wiki/Ricoh/500SEW1.Manual-8/User-Guide-729155-Page-17.png)
![19810Using the Wireless LAN Function (Only for Caplio 500SE-W)[FTP Send] tab[Mail Config.] tab[Address Book] tabNote ----------------------------------------------------------------------------------------------This camera is not configured for dial-up connection, so settings in the [Dial-up] tab are not required.Item Name DescriptionServer Name Set the name and IP address of the destination FTP server to which to send files. If your computer is set as a Caplio server (GP.199), set the IP address of your computer.User Name and Password Set the user name (user ID) and password necessary for connecting to an FTP server. If your computer is set as a Caplio server (GP.199), this setting is not required.Specify Folder Set the destination folder name (inbox folder in the FTP server).Does not send a file whose name already exists.Check this box to not send files with the same name to the destination folder.Do not check this box to send files with the same name to the destination folder.This setting is disabled when using a Caplio server (GP.199). In this case, files with the same name are renamed and saved to the destination folder. (GP.201)Item Name DescriptionServer Name Set the name of the SMTP server (outgoing mail server) of your Internet service provider.User Name and Password Set the user name (user ID) and password necessary for connecting to your Internet service provider.From Address Enter the mail-from (your) address.Item Name DescriptionE-mail Address Enter the destination address.L7360874_En_00_0_bookfile.book Page 198 Friday, October 13, 2006 12:56 PM](https://usermanual.wiki/Ricoh/500SEW1.Manual-8/User-Guide-729155-Page-18.png)
![19910Using the Wireless LAN Function (Only for Caplio 500SE-W)If you do not have access to an FTP server, you can use the provided Caplio Server software to set up your computer as a Caplio server (Caplio-only FTP server).This setup is not necessary to send files to an FTP server already configured on your computer.Caution------------------------------------------------------------------------------------------•The FTP server set by using Caplio Server permits FTP connection from this camera only. Other FTP clients cannot access this server.•Files cannot be sent from the FTP server to the camera.1Install Caplio Setting from the provided Caplio Software CD-ROM.• For the operating procedure, see P.134.2On the [Start] menu, point to [All Programs] or [Programs], point to [Caplio Software], and then click [Caplio Server].• Caplio Server is activated and the [Caplio Server] screen appears.3Select an inbox folder specification method in the [Specify] field.Setting Up a Caplio-only FTP ServerItem Name DescriptionServer Specify the inbox folder in [Folder name] box.Server+Camera The following are inbox folders.Camera Specify the inbox folder on the camera.(*)Folder specified by [Folder name]Folder specified with the camera(*)L7360874_En_00_0_bookfile.book Page 199 Friday, October 13, 2006 12:56 PM](https://usermanual.wiki/Ricoh/500SEW1.Manual-8/User-Guide-729155-Page-19.png)
![20010Using the Wireless LAN Function (Only for Caplio 500SE-W)(*)The folder set in [Specify Folder] on the [FTP Send] tab (GP.198) is the inbox folder.Note ----------------------------------------------------------------------------------------------The inbox folder is not created automatically. Create a folder with the same name as the specified folder.4When [Server] or [Server+Camera] is selected in Step 3, specify the inbox folder in the [Folder name] box.• Click the folder icon to display a dialog box. You can select and specify a folder here.5When necessary, specify a log file name in the [Log file name] box.• If a log file name is specified, a connection status log file is created. If not, no log file is created.• Specify a full path for the log file name.• Click the folder icon to display a dialog box. You can select and specify the folder name here.6Click [Apply].• This completes the setup.7Click [Quit].• Caplio Server closes.L7360874_En_00_0_bookfile.book Page 200 Friday, October 13, 2006 12:56 PM](https://usermanual.wiki/Ricoh/500SEW1.Manual-8/User-Guide-729155-Page-20.png)
![20110Using the Wireless LAN Function (Only for Caplio 500SE-W)To send files from the camera to an FTP server, you must register the set FTP server to the communication list, and then transfer the communication list to the camera (GP.202).When using a Caplio server, after sending the communication list to the camera, follow the procedure below to use the FTP server.1On the [Start] menu, point to [All Programs] or [Programs], point to [Caplio Software], and then click [Caplio Server].• Caplio Server is activated and the [Caplio Server] screen appears.2Click [Start].• The FTP server is activated and becomes ready to receive images from the camera.• To hide the [Caplio Server] screen, click the [Hide] button. The screen is hidden and its icon is displayed on the taskbar. To display the screen again, click the icon on the taskbar.3Send files from the camera.• For the procedure for sending files, see P.209 or P.214.• The [Caplio Server] screen displays the communication status in the [Connections] box.• The files are saved in the specified inbox folder (GP.199).Note ----------------------------------------------------------------------------------------------If the inbox folder already has a file of the same file name, the file being sent is renamed by appending a serial number from 001 to 999 and saved to the inbox folder. If the same file number with a serial number from 001 to 999 already exists in the inbox folder, the file is overwritten.Using the Caplio ServerL7360874_En_00_0_bookfile.book Page 201 Friday, October 13, 2006 12:56 PM](https://usermanual.wiki/Ricoh/500SEW1.Manual-8/User-Guide-729155-Page-21.png)
![20210Using the Wireless LAN Function (Only for Caplio 500SE-W)After completing the advanced settings on the [Detailed Setups for selections] screen, create a communication list combining the desired settings and transfer it to the camera via the supplied USB cable.Caution------------------------------------------------------------------------------------------[USB CONNECTION] must be set to [ORIGINAL] on the camera's SETUP menu. (GP.123)Note ----------------------------------------------------------------------------------------------You can also save the communication list on the computer, copy it to an SD memory card, and import it into the camera. (GP.205)1If Caplio Setting is not active, on the [Start] menu, point to [All Programs] or [Programs], point to [Caplio Software], and then click [Caplio Setting].• Caplio Setting is activated and the [Caplio Setting] screen appears.2Click the [Add] button under the [Setup Name] list.• The [New Name for the Setup] dialog box appears.3Enter a setting name, and then click [OK].4Select [Wireless LAN] in the [Connection Method] field, and then select the desired wireless LAN setting from the pull-down menu.• The settings registered on the Detailed Setups [Wireless LAN] tab are displayed.5Select the desired network setting from the [Network Setup] pull-down menu.• The settings registered on the Detailed Setups [Network] tab are displayed.Creating a Communication List and Transferring it to the CameraL7360874_En_00_0_bookfile.book Page 202 Friday, October 13, 2006 12:56 PM](https://usermanual.wiki/Ricoh/500SEW1.Manual-8/User-Guide-729155-Page-22.png)
![20310Using the Wireless LAN Function (Only for Caplio 500SE-W)6Select either [Send via FTP] or [Send via Mail] in the [Send Method] field.7Select the desired Send via FTP setting or Mail Config. setting from the pull-down menu.• The settings registered on the Detailed Setups [FTP Send] or [Mail Config.] tab are displayed.8If [Send via Mail] is selected in Step 6, select the desired address book setting from the [To Address] pull-down menu.• The settings registered on the Detailed Setups [Address Book] tab are displayed.9To create another communication setting, repeat Steps 2 to 8.• To delete a communication setting, select the setting you want to delete, and click the [Delete] button.• To rename a communication setting, select the setting you want to rename, click the [Rename] button, and enter the new setting name in the [New Name for the Setup] dialog box.• To edit a communication setting, select the setting you want to edit and edit the setting.10Click [Apply].11Make sure that the camera is off.12Connect the provided USB cable to a USB port on your computer.13Connect the USB cable to the USB terminal on your camera.• Your camera turns on.L7360874_En_00_0_bookfile.book Page 203 Friday, October 13, 2006 12:56 PM](https://usermanual.wiki/Ricoh/500SEW1.Manual-8/User-Guide-729155-Page-23.png)
![20410Using the Wireless LAN Function (Only for Caplio 500SE-W)14Click [Transfer to Camera].• A screen appears confirming whether to update the information set in the camera. Click [Yes] to update the information. Click [No] to cancel the update.• After Step 10, if [Transfer to Camera] is clicked without clicking [Apply], a message appears confirming whether to save the edited setting. Click [OK] to save the edited setting. Click [No] to cancel the transfer of the communication list.• Transfer of the communication list begins, and once the transfer is completed, a message indicating this appears.15Click [OK] on the message box.16Click [OK] on the [Caplio Setting] screen.• Caplio Setting closes.Note ------------------------------------------------------------------------------------The settings made on the [Caplio Setting] screen (Detailed Setups and Communication List settings) are saved regardless of whether or not they are transferred to the camera or saved on the computer. When Caplio Setting is restarted, the last settings used are displayed.17Turn off the camera and disconnect the USB cable from the camera and computer.• For disconnecting the USB cable, see P.153.L7360874_En_00_0_bookfile.book Page 204 Friday, October 13, 2006 12:56 PM](https://usermanual.wiki/Ricoh/500SEW1.Manual-8/User-Guide-729155-Page-24.png)
![20510Using the Wireless LAN Function (Only for Caplio 500SE-W)You can save the communication list on the computer, copy it to an SD memory card, and import it into the camera.Caution------------------------------------------------------------------------------------------Use an SD memory card formatted with this camera.1Create a communication list (GP.202 Steps 1 to 9), and click [Save in File].• The [Browse for Folder] dialog box appears.2Select the folder to which to save the communication list, and click [OK].• Once the communication list is saved, a message indicating this appears.• The communication list is saved with the file name “SYSTEM.PRM”.3Click [OK] on the message box.4Click [OK] on the [Caplio Setting] screen.• Caplio Setting closes.5Use a PC card slot or card reader to copy the communication list (“SYSTEM.PRM”) to the SYSTEM folder on the SD memory card.6Load the SD memory card with the copied communication list into the camera.7Turn on the camera to display the Expanded Settings menu.• For the operating procedure, see P.155.Importing a Communication List from an SD Memory Card (READ COM SETTING)L7360874_En_00_0_bookfile.book Page 205 Friday, October 13, 2006 12:56 PM](https://usermanual.wiki/Ricoh/500SEW1.Manual-8/User-Guide-729155-Page-25.png)
![20610Using the Wireless LAN Function (Only for Caplio 500SE-W)8Press the " button to select [READ COM SETTING], and then press the $ button.• A screen appears confirming whether to import the communication list.9Press the $ button to select [YES] and then press the MENU/OK button.• If a communication list has already been imported, a screen appears confirming whether to overwrite the communication list. To overwrite the communication list, select [Yes]. Selecting [No] cancels importing and returns to the Expanded Settings menu.• The communication list is imported from the SD memory card into the camera and the display returns to the Expanded Settings menu.10Press the MENU/OK button.Caution------------------------------------------------------------------------------------------Only one communication list can be imported from the SD memory card into the camera.Note ----------------------------------------------------------------------------------------------A communication list can also be transferred from the computer to the camera by using the USB cable. (GP.202)L7360874_En_00_0_bookfile.book Page 206 Friday, October 13, 2006 12:56 PM](https://usermanual.wiki/Ricoh/500SEW1.Manual-8/User-Guide-729155-Page-26.png)
![20710Using the Wireless LAN Function (Only for Caplio 500SE-W)You can use the camera to confirm and edit the settings of the communication list transferred to the camera.1Turn on the camera to display the Expanded Settings menu.• For the operating procedure, see P.155.2Press the " button to select [SEND TO] and press the $ button.• A screen appears with a list of destinations set on the communication list.3Press the !" buttons to select the destination with the setting you want to edit, and press the $ button.• The setup category of the selected destination is displayed.4Press the !" buttons to select the setup category with the setting you want to edit, and press the $ button.• The setting of the selected destination is displayed.5Press the !" buttons to select the setting you want to edit, and press the $ button.• The selection screen or keyboard screen appears.Confirming and Editing the Destination Setting on the CameraL7360874_En_00_0_bookfile.book Page 207 Friday, October 13, 2006 12:56 PM](https://usermanual.wiki/Ricoh/500SEW1.Manual-8/User-Guide-729155-Page-27.png)
![20810Using the Wireless LAN Function (Only for Caplio 500SE-W)6Change the setting.• Only alphanumeric characters can be entered with the keyboard screen. For information on how to use the keyboard, see P.163.7After completing changes, press the MENU/OK button.• The display returns to the settings display screen.• To edit other settings, repeat Steps 5 to 7.8Press the DISP. button.• The display returns to the setup category display screen.• To edit other setup categories, repeat Steps 4 to 8.9Press the DISP. button.• The display returns to the [SEND TO] screen.• To edit other destinations, repeat Steps 3 to 9.10After completing changes, press the MENU/OK button.• The display returns to the Expanded Settings menu.11Press the MENU/OK button.Caution------------------------------------------------------------------------------------------•In Caplio Setting, if the [Cryptography]/[Authentication] on the [Wireless LAN] tab are set as follows (GP.196), [Cryptography/Authentication] is automatically set to [OFF/OPEN] when [Connection Method] in [W/LESS LAN] is set to [AD-HOC].[AES]/[WPA-PSK], [AES]/[WPA2-PSK], [TKIP]/[WPA-PSK], [TKIP]/[WPA2-PSK]•When [Cryptography/Authentication] in [W/LESS LAN] is changed on the camera, check the network key. (GP.197)•If [Cryptography/Authentication] is set to [WEP/OPEN] or [WEP/SHARED], enter the [Network Key] as below.[String]: Five characters or 13 characters[Hex]: Ten characters or 26 characters•If [Cryptography/Authentication] is set to [AES/WPA-PSK], [AES/WPA2-PSK], [TKIP/WPA-PSK], or [TKIP/WPA2-PSK], enter an 8 to 63 character network key.L7360874_En_00_0_bookfile.book Page 208 Friday, October 13, 2006 12:56 PM](https://usermanual.wiki/Ricoh/500SEW1.Manual-8/User-Guide-729155-Page-28.png)
![20910Using the Wireless LAN Function (Only for Caplio 500SE-W)You can send still pictures (including text mode still images), movies, and sound files from the camera. The sent files are processed according to the computer settings.Files are sent from the internal memory when no SD memory card is loaded or from an SD memory card when installed.There are three ways to send files.• Send one file (GP.210)• Send all files from the camera (GP.210)• Select and send several files (GP.212)Caution------------------------------------------------------------------------------------------Before sending files, create a communication list on the computer and transfer it to the camera. (GP.202)Note ----------------------------------------------------------------------------------------------•You can set the file size of the image beforehand. (GP.178)•When sending files, you can use the [SEND TO] screen displayed at the time of sending the files to specify the destination, or you can also use the Expanded Settings menu to specify the destination beforehand. (GP.219)•For information about setting your computer to receive images, see the documentation that came with the computer.Sending Still Images, Movies, and Sound Files (FILE SEND)L7360874_En_00_0_bookfile.book Page 209 Friday, October 13, 2006 12:56 PM](https://usermanual.wiki/Ricoh/500SEW1.Manual-8/User-Guide-729155-Page-29.png)
![21010Using the Wireless LAN Function (Only for Caplio 500SE-W)1Check that the destination device (computer) is turned on.2Press the 6 (Playback) button.• Check that [CHANGE COM] is set to [W-LAN] on the Expanded Settings menu. (P.193)• To send all files, go to Step 4.3Press the #$ buttons to select a file to send.4Press the MENU/OK button.• The Playback Setting menu appears.5Press the " button to select [FILE SEND] and press the $ button.• If [SEND CONDITION] is set to [ON], the [SEND TO] screen appears.• If [SEND CONDITION] is set to [OFF] (GP.219), go to Step 7.• If the communication list has not been transferred, or if [SEND CONDITION] is set to [OFF] (GP.219) and the destination setting is incorrect, an error message appears and the display returns to the Playback Setting menu.• If the camera is connected using a serial connection, a screen appears confirming whether to disconnect the serial connection. Select [YES] and press the MENU/OK button.6Press the !" buttons to select the desired destination device and then press the MENU/OK button.Sending One or All FilesL7360874_En_00_0_bookfile.book Page 210 Friday, October 13, 2006 12:56 PM](https://usermanual.wiki/Ricoh/500SEW1.Manual-8/User-Guide-729155-Page-30.png)