Ricoh 500SEW1 Digital Camera with WLAN User Manual Manual 3
Ricoh Company, Ltd. Digital Camera with WLAN Manual 3
UserManual.wiki
>
Ricoh
>
500SEW1 User Manual
>
Manual 3
Contents
1.
Manual 1
2.
Manual 2
3.
Manual 3
4.
Manual 5
5.
Manual 6
6.
Manual 7
7.
Manual 8
8.
Manual 9
9.
Manual 10
10.
Manual 4
Manual 3
Navigation menu
Upload a User Manual
Namespaces
Wiki Guide
HTML
PDF
Info
Views
User Manual
Discussion / Help
Navigation
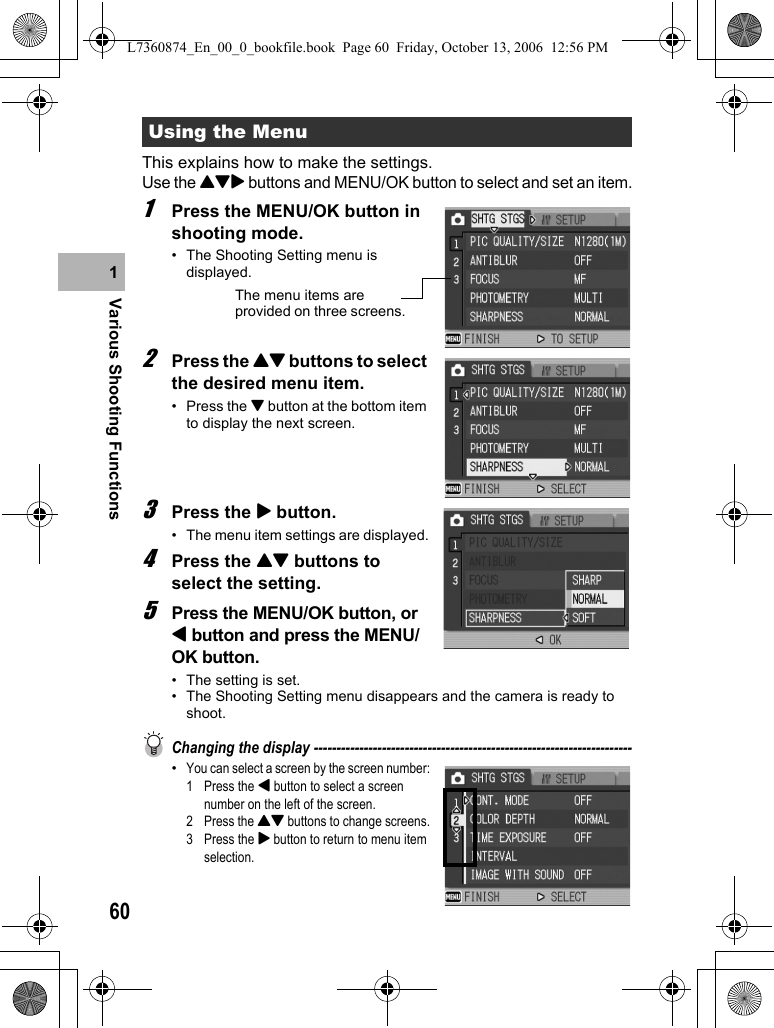
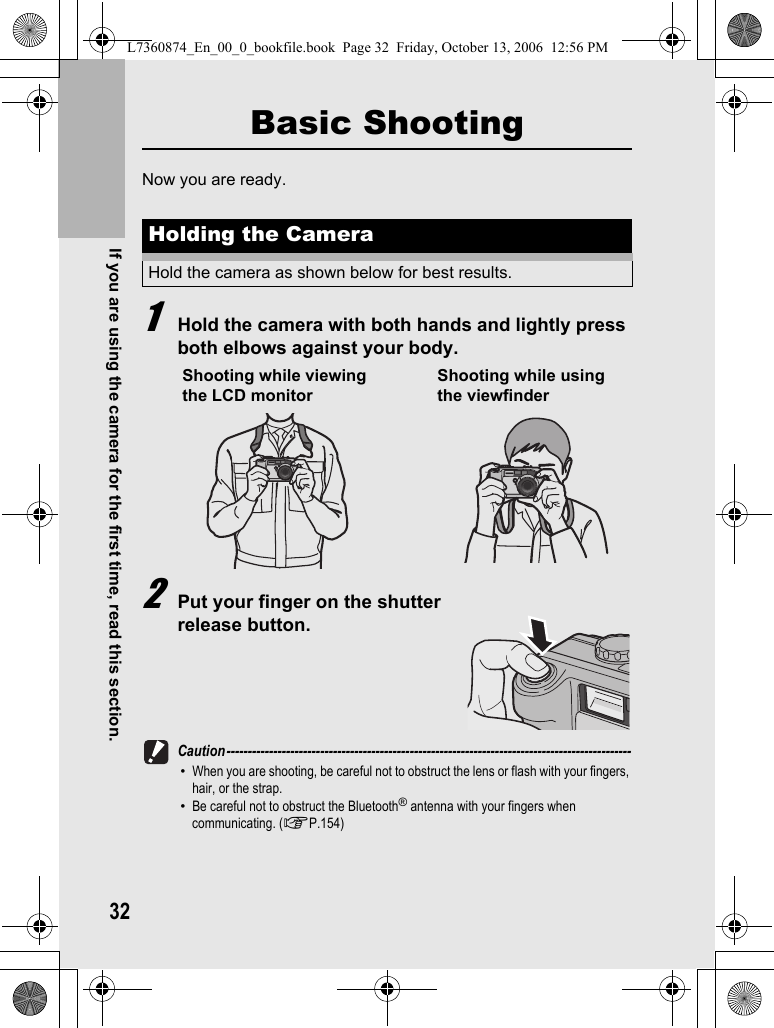
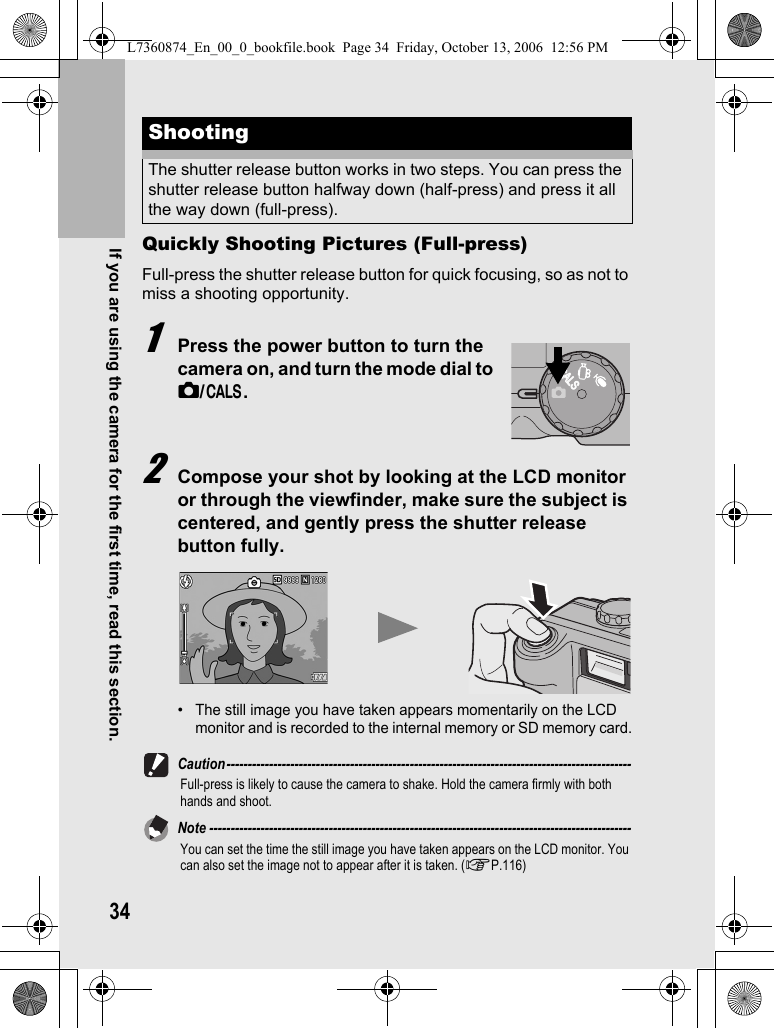
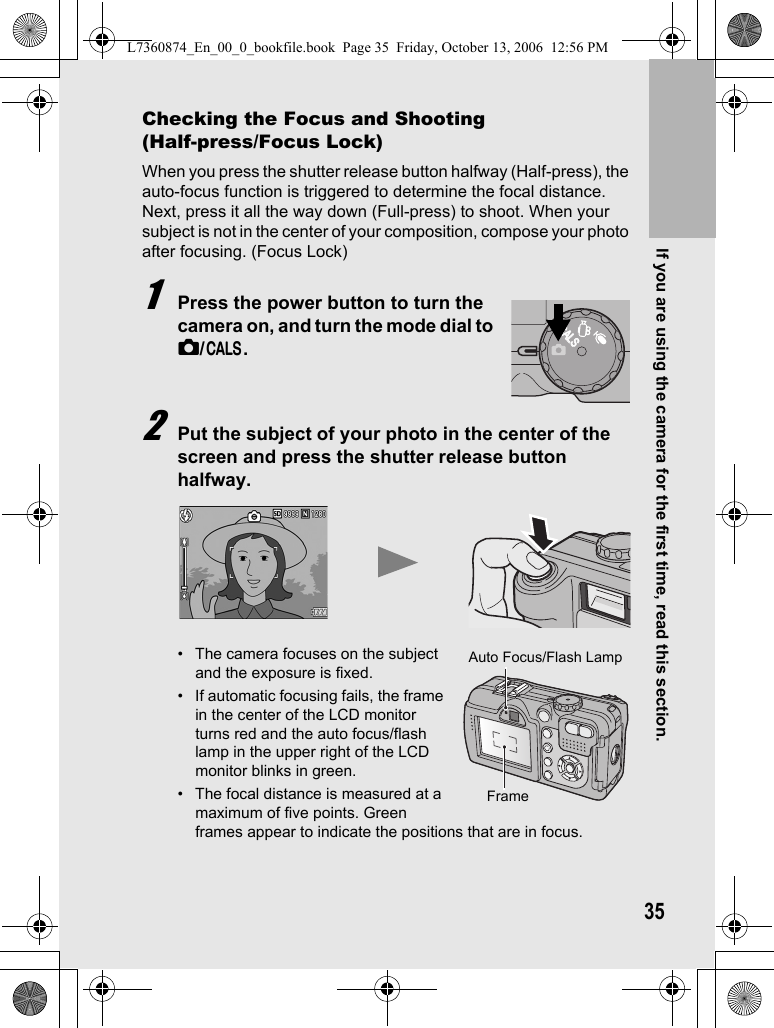
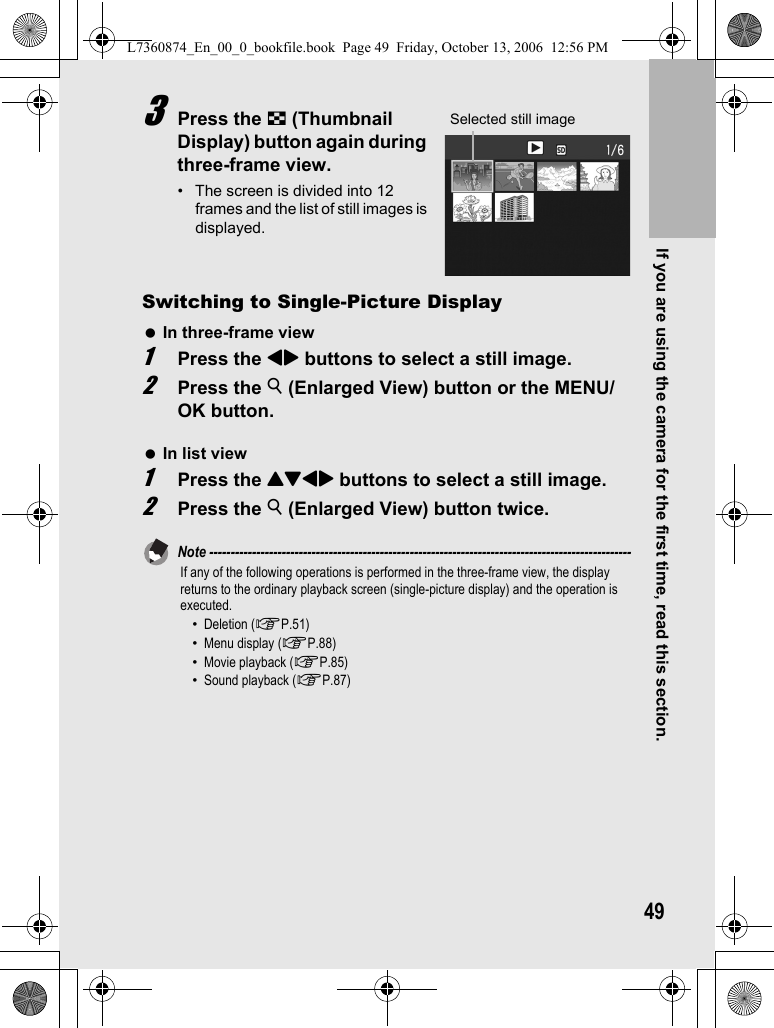
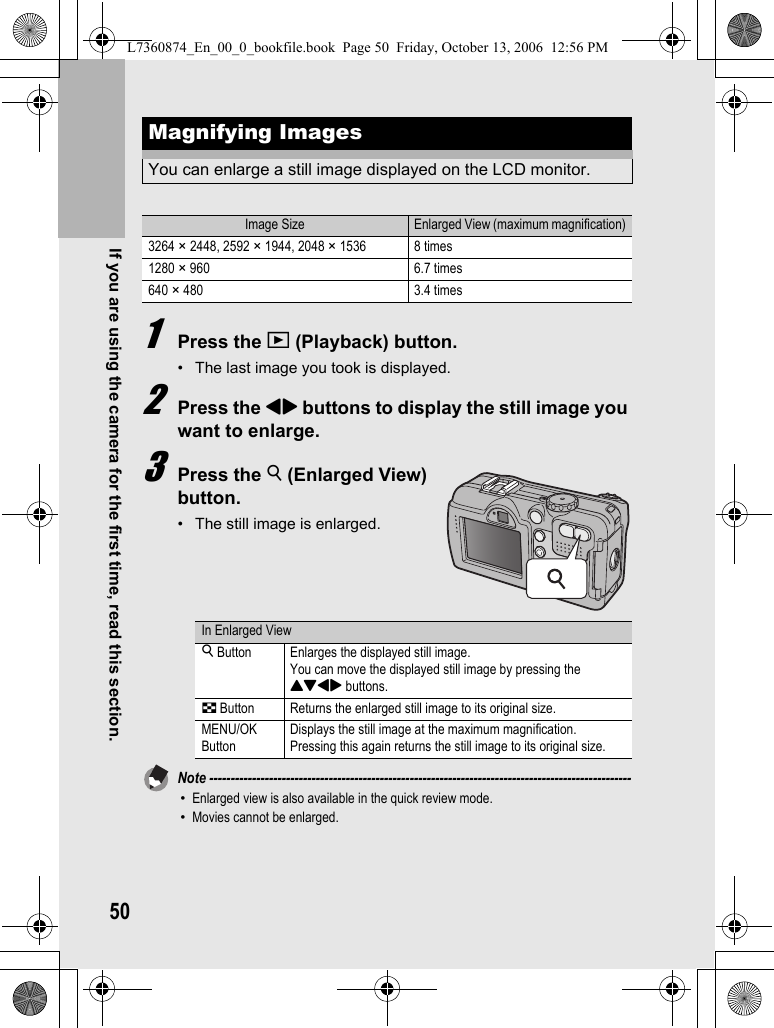
![If you are using the camera for the first time, read this section.311Press the !"#$ buttons to set the year, month, date and time.• Change the value with !" and move the frame with #$.2In [FORMAT], choose the date and time format.• Select the date and time format with !".3Check the display and then press the MENU/OK button.• The date is set.• Pressing the DISP. button on this screen allows you to cancel the setting.Note ---------------------------------------------------------------------------------------------------•If the battery is removed for more than one week, the date and time settings will be lost. These settings must be made again.•To retain the date and time settings, load a battery with adequate remaining power for more than two hours.•The set date and time can be changed later. (GP.119)•The date and time can be inserted into images. (GP.77)Setting the Date and TimeWhen the power is turned on for the first time, the date/time setting screen appears.Setting at shippingL7360874_En_00_0_bookfile.book Page 31 Friday, October 13, 2006 12:56 PM](https://usermanual.wiki/Ricoh/500SEW1.Manual-3/User-Guide-729138-Page-1.png)
![If you are using the camera for the first time, read this section.33Preventing Camera Shake---------------------------------------------------------------------If you move the camera when pressing the shutter release button, the still image might not come out clearly due to camera shake.Camera shake tends to occur in the following cases:•When shooting in a dark place without using the flash•When using the zoom function•When shooting using long time exposure (GP.73)When the J mark appears on the LCD monitor, this indicates that camera shake may occur. To prevent camera shake, try any of the following.•Using the antiblur function (GP.63)•Set the flash to [AUTO] or [FLASH ON]. (GP.39)•Raising the ISO setting (GP.81)•Using the self-timer (GP.45)L7360874_En_00_0_bookfile.book Page 33 Friday, October 13, 2006 12:56 PM](https://usermanual.wiki/Ricoh/500SEW1.Manual-3/User-Guide-729138-Page-3.png)
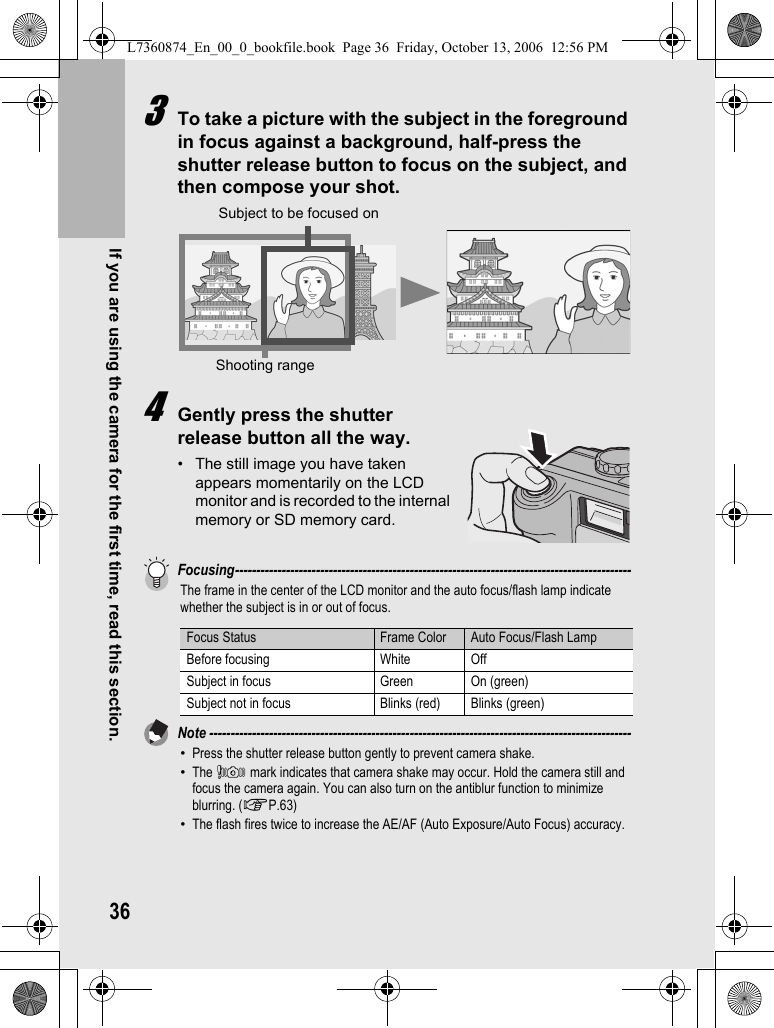
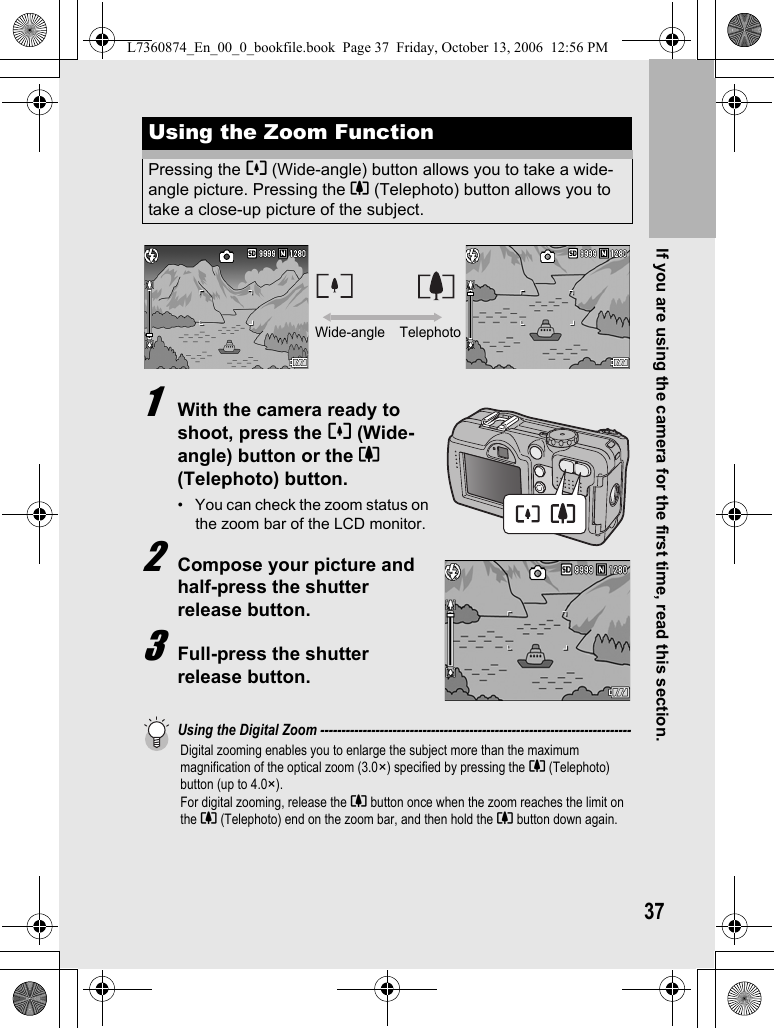
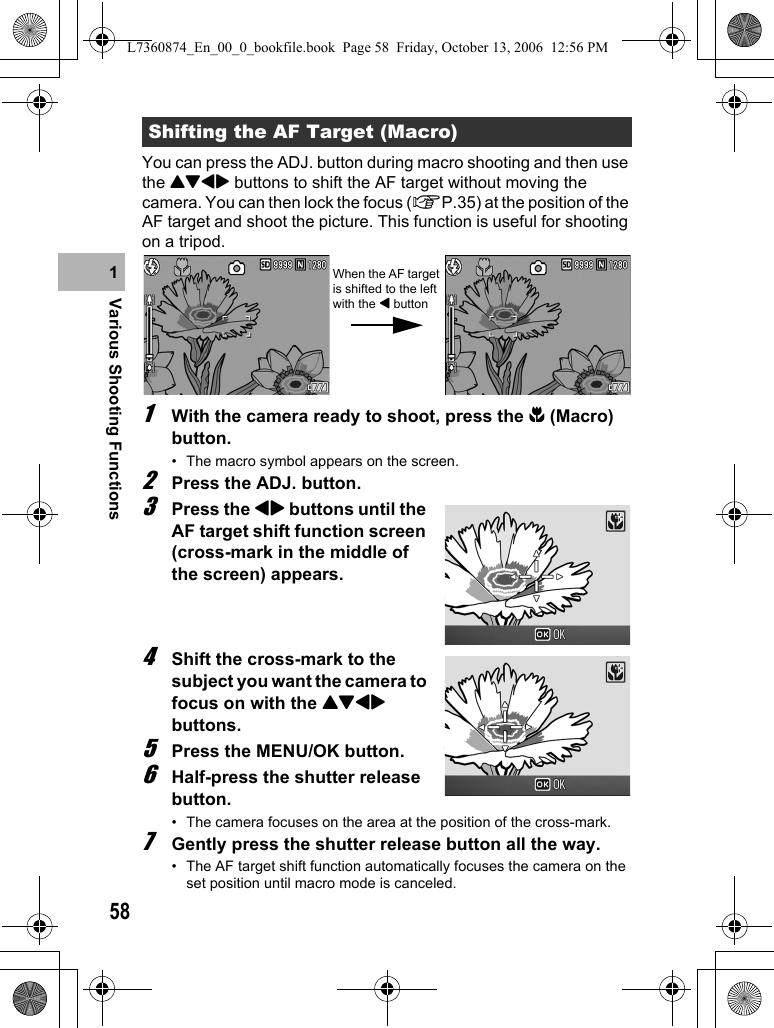
![38If you are using the camera for the first time, read this section.1With the camera ready to shoot, press the N (Macro) button.•N is displayed momentarily at the center of the LCD monitor and then a N is displayed at the top of the screen.2Compose your picture and half-press the shutter release button.3Full-press the shutter release button.• To cancel macro mode, press the N (Macro) button again.Note ---------------------------------------------------------------------------------------------------•When using the zoom, you can shoot close-ups within the following distances:•The AF target shift function enables you to lock the focus for macro shooting with the simple touch of a button without moving the camera. This function is useful for shooting on a tripod. (GP.58)•To take a further close-up picture during macro shooting, use [ZOOM MACRO] in scene mode. (GP.40)Shooting Close-Ups (Macro Shooting)Using the N (Macro) button allows you to take a tight close-up of the subject. (Macro shooting)This is good for shooting small subjects because you can shoot up to approximately 5 mm (0.2 in.) (from the very front of the camera) away.Distance Shooting rangeWide-Angle About 5 mm (from the very front of the camera)Approx. 27 mm × 20 mmTelephoto About 10 cm (from the very front of the camera)Approx. 51 mm × 38 mm(when digital zoom is not used)Approx. 12.8 mm × 9.5 mm (when 4.0× digital zoom is used)L7360874_En_00_0_bookfile.book Page 38 Friday, October 13, 2006 12:56 PM](https://usermanual.wiki/Ricoh/500SEW1.Manual-3/User-Guide-729138-Page-8.png)
![If you are using the camera for the first time, read this section.39Flash Modes1Turn the mode dial to 5/K.2Press the F (Flash) button to change the flash mode.• The flash mode mark is displayed momentarily at the center of the LCD monitor and then a smaller mark is displayed at the upper left of the screen.• The auto focus/flash lamp blinks while the flash charges. Once the flash is charged, the lamp turns off and the camera is ready to shoot.Note ---------------------------------------------------------------------------------------------------•The flash mode setting is saved until you press the F (Flash) button again.•The flash does not fire when shooting movies or in Multi-shot mode.•The flash fires a pre-flash to increase the AE/AF (Auto Exposure/Auto Focus) accuracy.•When shooting close-ups with the flash, there may be a shadow in the lower left part of the picture due to the convex lens.Using the FlashPress the F (Flash) button to change the flash mode. At the time of purchase, the camera is set to [FLASH OFF].From the front edge of the lens, the flash light reaches about 0.2 to 10.0 m (7.9 in. to 32.8 ft.) (Wide-angle) or about 0.2 to 6.5 m (7.9 in. to 21.3 ft.) (Telephoto) when the ISO setting is set to [AUTO].FLASH OFF The flash will not fire.AUTO The flash fires automatically when the subject is poorly lit or backlit.RED-EYE FLASH Reduces the red-eye phenomenon, in which people’s eyes appear red in pictures.FLASH ON The flash fires regardless of the lighting conditions.FLASH SYNCHRO. The flash fires with the shutter speed slowed. This is useful when taking portrait pictures in a nightscape. Camera shake may occur, so the use of a tripod is recommended.L7360874_En_00_0_bookfile.book Page 39 Friday, October 13, 2006 12:56 PM](https://usermanual.wiki/Ricoh/500SEW1.Manual-3/User-Guide-729138-Page-9.png)
![40If you are using the camera for the first time, read this section.Scene ModesNote ---------------------------------------------------------------------------------------------------For information on Shooting Setting menu items and function restrictions in scene mode, see “Appendices”. (GP.240)Shooting with Optimal Settings According to Shooting ConditionsYou can use scene mode to select from among five still image modes and shoot with settings automatically optimized for shooting conditions.HIGH SENSUse when taking pictures in dimly lit places. The LCD monitor also becomes brighter.FIREFIGHTINGUse to capture images under difficult conditions such as the scene of a fire. The focal length is fixed to 2.5 m, allowing you to take clear pictures in a situation where the auto focus would normally produce blurred images due to flames, smoke and water vapor. Increasing the ISO sensitivity extends the range of the flash, and prevents camera shake by controlling the shutter speed even when the flash is not used. The sharpness level is also increased in this mode and the LCD monitor becomes brighter and is suited for firefighting.SKEW COR MODEUse to straighten a rectangular object, such as a message board or business card, shot at an angle to make it look as if it were shot squarely. For detailed operations, see P.42.In skew correction mode, choose from [F1280], [N1280], and [N640] for [PIC QUALITY/SIZE]. (GP.61)TEXT MODEUse when capturing text images, for example notes written on a whiteboard at a meeting.You can also change the shading of text. (GP.57) You can set the image size to either 3264 × 2448 or 2048 × 1536 pixels. (GP.61)ZOOM MACROUse when taking a further close-up picture during macro shooting. Using the digital zoom allows you to take a larger close-up than with normal macro shooting. For detailed operations, see P.43.The optical zoom cannot be used in this mode.You can shoot close-ups within the following distances.When digital zoom is not used: About 5 mm from the very front of the camera(Shooting range: Approx. 27 mm × 20 mm)When 4.0× digital zoom is used: About 5 mm from the very front of the camera(Shooting range: Approx. 6.8 mm × 5 mm)L7360874_En_00_0_bookfile.book Page 40 Friday, October 13, 2006 12:56 PM](https://usermanual.wiki/Ricoh/500SEW1.Manual-3/User-Guide-729138-Page-10.png)
![If you are using the camera for the first time, read this section.411Turn the mode dial to 5.2Press the SCENE button.• The scene mode selection screen appears.3Press the !" buttons to select the scene mode.4Press the MENU/OK button.• The scene mode type is displayed at the top of the LCD monitor.5Press the shutter release button to shoot the picture.Changing Scene ModePress the SCENE button to display the scene mode selection screen, and select a different scene mode.Returning to Normal Shooting Mode1Press the SCENE button to display the scene mode selection screen.2Press the !" buttons to select [NRML SHT].3Press the MENU/OK button.4L7360874_En_00_0_bookfile.book Page 41 Friday, October 13, 2006 12:56 PM](https://usermanual.wiki/Ricoh/500SEW1.Manual-3/User-Guide-729138-Page-11.png)
![42If you are using the camera for the first time, read this section.Using the Skew Correction Mode1Turn the mode dial to 5.2Press the SCENE button.• The scene mode selection screen appears.3Press the !" buttons to select [SKEW COR MODE].4Press the MENU/OK button.5Press the shutter release button to shoot the picture.• The display indicates that the image is being corrected and the area recognized as the correction range is displayed with an orange frame. Up to five areas can be recognized.• If the target area cannot be detected, an error message appears. The image before correction remains recorded.• To select another correction area, move the orange frame to the target area by pressing the $ button.• To cancel skew correction, press the ! button. Even if you cancel skew correction, the image before skew correction remains recorded.6Press the MENU/OK button.• The display indicates that the image is being recorded and the corrected image is recorded. The image before correction is also recorded.Caution-----------------------------------------------------------------------------------------------When [SKEW COR MODE] is selected, note the following:•To shoot the subject as large as possible, position it so that the entire portion of the subject is visible on the LCD monitor.•The camera may fail to recognize the subject in the following cases:•When the image is out of focus•When four edges of the subject are not clearly visible•When it is hard to distinguish between the subject and background•When the background is complicated•Two images, one before correction and the other after correction, are recorded. If the number of remaining shots is less than two, you cannot shoot the subject.L7360874_En_00_0_bookfile.book Page 42 Friday, October 13, 2006 12:56 PM](https://usermanual.wiki/Ricoh/500SEW1.Manual-3/User-Guide-729138-Page-12.png)
![If you are using the camera for the first time, read this section.43Shooting in Zoom Macro Mode1Turn the mode dial to 5.2Press the SCENE button.• The scene mode selection screen appears.3Press the !" buttons to select [ZOOM MACRO].4Press the MENU/OK button.5Press the Z (Wide-angle) or z (Telephoto) button.• The zoom level appears on the LCD monitor.6Compose your picture and half-press the shutter release button.7Full-press the shutter release button.L7360874_En_00_0_bookfile.book Page 43 Friday, October 13, 2006 12:56 PM](https://usermanual.wiki/Ricoh/500SEW1.Manual-3/User-Guide-729138-Page-13.png)
![44If you are using the camera for the first time, read this section.1Turn the mode dial to K.• The symbol appears on the screen.2Press the shutter release button to shoot the picture.• Images are recorded with [PIC QUALITY/SIZE] set to [N1280].• When the mode dial is set to a mode other than K, [PIC QUALITY/SIZE] returns to the setting in the previous mode.Note ---------------------------------------------------------------------------------------------------When shooting with S-CONT or M-CONT in CALS mode, [PIC QUALITY/SIZE] is fixed at [N3264] (Normal 3264 × 2448).Shooting in CALS ModeIn CALS mode, [PIC QUALITY/SIZE] is fixed at [N1280] (Normal 1280 × 960) suitable to be submitted as official public works pictures (based on Japanese standards).With simple operation of the mode dial, you can shoot photos in a construction environment without being distracted by setting the picture quality mode or image size.CALSCALSL7360874_En_00_0_bookfile.book Page 44 Friday, October 13, 2006 12:56 PM](https://usermanual.wiki/Ricoh/500SEW1.Manual-3/User-Guide-729138-Page-14.png)
![If you are using the camera for the first time, read this section.451Turn the mode dial to 5/K.2Press the t (Self-timer) button.• The Self-timer symbol appears on the screen.• The [10] to the right of the symbol indicates the number of seconds. In this case, if you press the shutter release button, the camera will shoot after 10 seconds.• Each press of the t (Self-timer) button changes the self-timer setting in the following order: 10 sec, 2 sec, and Self-timer Off.3Press the shutter release button.• The focus is locked, and the AF auxiliary light blinks when the self-timer starts.Note ---------------------------------------------------------------------------------------------------•Once the picture is taken, the self-timer turns off.•When the self-timer is set to 2 seconds, the AF auxiliary light does not blink.t Using the Self-TimerYou can set the Self-timer to shoot after either two or ten seconds.A setting of two seconds is useful for preventing camera shake.L7360874_En_00_0_bookfile.book Page 45 Friday, October 13, 2006 12:56 PM](https://usermanual.wiki/Ricoh/500SEW1.Manual-3/User-Guide-729138-Page-15.png)
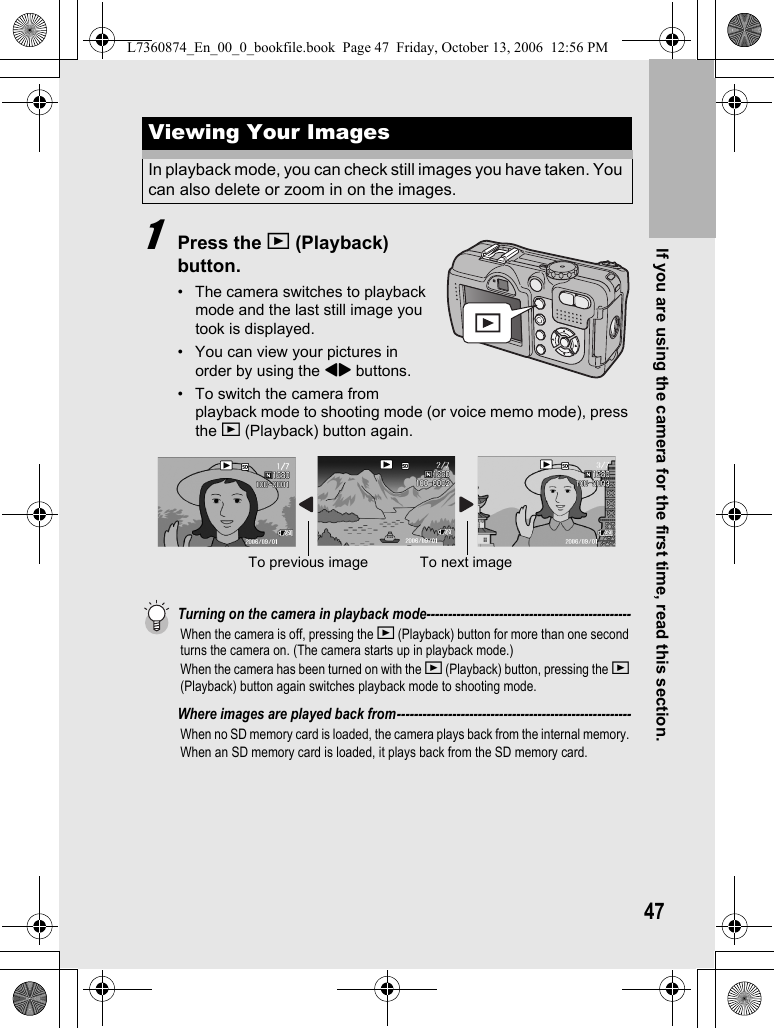
![46If you are using the camera for the first time, read this section.Playing Back Images1In shooting mode, press the Q (Quick Review) button.• The last image you took is displayed on the LCD monitor.Note ---------------------------------------------------------------------------------------------------•Once the power is turned off, the image you took cannot be displayed in still image mode even if you press the Q (Quick Review) button.•If you use Quick Review to view the image taken in [TEXT MODE] of scene mode (GP.40), the displayed image may have a slightly lower quality than the recorded one.Reviewing the Image You Just Took (Quick Review)You can view the image you just took on the LCD monitor. If you are not pleased with the way the photo came out, you can delete it then and there.In Quick ReviewQ Button Returns to shooting mode.8 Button Enlarges the displayed still image.You can move the displayed still image by pressing the !"#$ buttons.9 Button Reduces the displayed still image enlarged by pressing the 8button.MENU/OK ButtonEnlarges the displayed still image enlarged by pressing the 8button to the maximum available magnification.Pressing this again returns the still image to its original size.D Button Deletes the currently displayed file. When the D button is pressed, a warning message about deleting the file appears. Select [DELETE] and press the MENU/OK button.L7360874_En_00_0_bookfile.book Page 46 Friday, October 13, 2006 12:56 PM](https://usermanual.wiki/Ricoh/500SEW1.Manual-3/User-Guide-729138-Page-16.png)
![If you are using the camera for the first time, read this section.51Deleting FilesYou can delete unwanted or failed files from the SD memory card or internal memory.1Press the 6 (Playback) button.2Press the #$ buttons to display the file you want to delete.3Press the D (Delete) button.4Press the !" buttons to select [DELETE ONE].• You can change the image for deletion with the #$ buttons.5Press the MENU/OK button.• The display indicates that the files are being deleted; once finished, it returns to the screen in Step 4.1Press the 6 (Playback) button.2Press the D (Delete) button.Deleting a FileDeleting All FilesL7360874_En_00_0_bookfile.book Page 51 Friday, October 13, 2006 12:56 PM](https://usermanual.wiki/Ricoh/500SEW1.Manual-3/User-Guide-729138-Page-21.png)
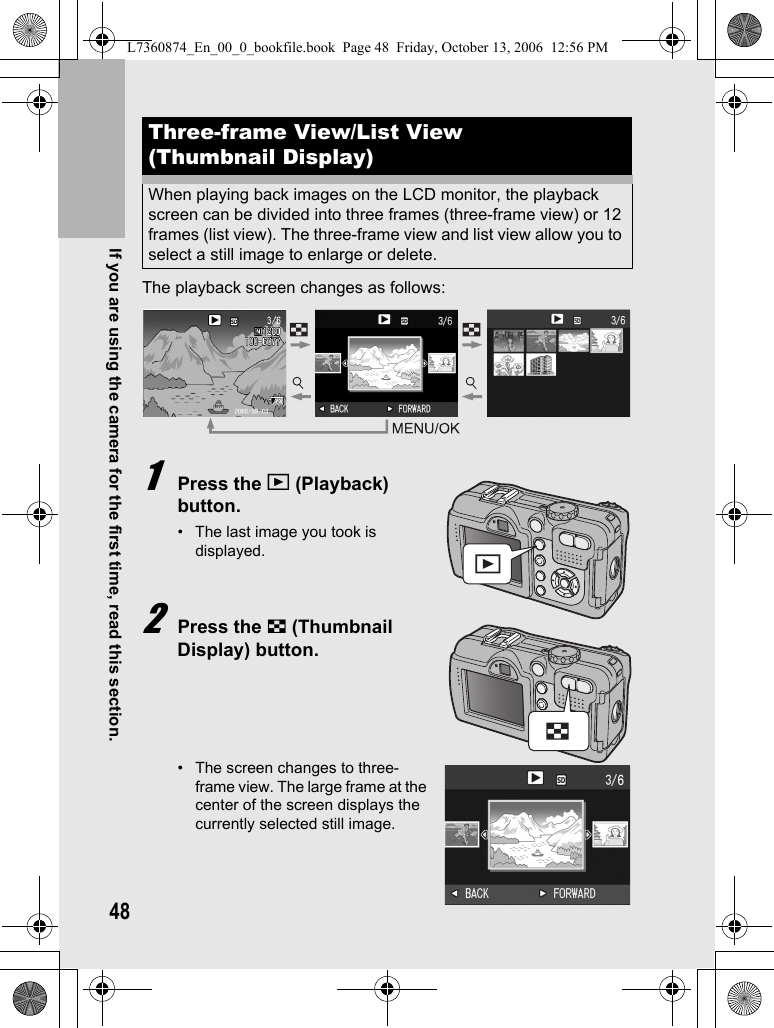
![52If you are using the camera for the first time, read this section.3Press the !" buttons to select [DELETE ALL].4Press the MENU/OK button.• You will be prompted to confirm that you want to delete all images. If so, press the $ button to select [YES], and then press the MENU/OK button.Note ---------------------------------------------------------------------------------------------------You can also delete files by pressing the D (Delete) button during three-frame view (GP.48).1Press the 6 (Playback) button.2Press the 9 (Thumbnail Display) button twice.• The screen is divided into 12 frames and thumbnails are displayed.3Press the !"#$ buttons to select the file you want to delete and press the D (Delete) button.• The trash symbol is displayed in the upper left corner of the file.4Repeat Step 3 to select all the files you want to delete.• If you selected a file by mistake, you can deselect it by selecting the file and pressing the D (Delete) button.5Press the MENU/OK button.Deleting Multiple Files at One TimeL7360874_En_00_0_bookfile.book Page 52 Friday, October 13, 2006 12:56 PM](https://usermanual.wiki/Ricoh/500SEW1.Manual-3/User-Guide-729138-Page-22.png)
![If you are using the camera for the first time, read this section.536Press the #$ buttons to select [YES] and then press the MENU/OK button.• The display indicates that the files are being deleted; once finished, it returns to the thumbnail display screen.L7360874_En_00_0_bookfile.book Page 53 Friday, October 13, 2006 12:56 PM](https://usermanual.wiki/Ricoh/500SEW1.Manual-3/User-Guide-729138-Page-23.png)
![54If you are using the camera for the first time, read this section.Changing the Display with the DISP. ButtonPressing the DISP. button allows you to change the screen display mode and toggle the information displayed on the LCD monitor.Each time you press the DISP. button, the display changes in the following order: Grid Guide, No Display, LCD Monitor Off, and Normal Symbol Display.Grid Guide ------------------------------------------------------------------------------------------This displays auxiliary lines on the LCD monitor to help you compose your picture. These lines are not recorded with images.Synchro-Monitor Mode -------------------------------------------------------------------------This turns the LCD monitor off except when the camera is operated. This mode is effective for saving power consumption. In this mode, pressing the shutter release button halfway turns the LCD monitor on. Subsequently, pressing the shutter release button fully displays the shot image on the LCD monitor and then turns the LCD monitor off.Hold the DISP. button down to maximize the display brightness.When the brightness is at the maximum setting, holding the DISP. button down returns the brightness to the level set in [LCD BRIGHTNESS] (GP.111).Maximizing the LCD Monitor BrightnessNormal Symbol DisplayNo DisplayGrid GuideLCD Monitor Off(Synchro-Monitor Mode)L7360874_En_00_0_bookfile.book Page 54 Friday, October 13, 2006 12:56 PM](https://usermanual.wiki/Ricoh/500SEW1.Manual-3/User-Guide-729138-Page-24.png)
![56Various Shooting Functions11 Various Shooting FunctionsYou can use the ADJ. button to adjust the exposure compensation, white balance, and other settings with fewer operations. Two functions other than exposure compensation and white balance can also be assigned to the ADJ. button. Use the SETUP menu to assign functions to the ADJ. button. (GP.112) By assigning a frequently used function to the ADJ. button, you can more easily set that function with fewer button operations.The settings that can be made with the ADJ. button differ among scene mode, movie mode and still image mode. The following settings can be made with the ADJ. button.Functions That Can Be Assigned to the ADJ. ButtonISO (ISO SETTING), QUALITY (PIC QUALITY/SIZE), FOCUS, SHARP (SHARPNESS), METERING (PHOTOMETERY), CONT MDE (CONT.MODE), ANTIBLUR (Default setting for [ADJ BTN.SET.1])Using the ADJ. ButtonSettings by ModeMode Available SettingsStill Image Mode Exposure compensation, white balance, functions assigned to the ADJ. buttonMovie Mode White balanceScene Mode ([TEXT MODE]) Text densityScene Mode (other than [TEXT MODE]) Exposure compensation, white balanceThe screenshots above are examples of the screen display when functions are assigned to [ADJ BTN. SET.1] and [ADJ BTN. SET.2]. Press the ADJ. button until the screen with the desired function appears. Adjust the settings with the !" buttons and press the MENU/OK button to set.Exposure Compensation Setting White Balance SettingADJ BTN. SET.2 ADJ BTN. SET.1L7360874_En_00_0_bookfile.book Page 56 Friday, October 13, 2006 12:56 PM](https://usermanual.wiki/Ricoh/500SEW1.Manual-3/User-Guide-729138-Page-26.png)
![57Various Shooting Functions1Note ----------------------------------------------------------------------------------------------When using a camera memo, the settings on P.56 cannot be set with the ADJ. button. (G “Software User Guide”)You can change the shading of text for shooting with [TEXT MODE] (GP.40) in scene mode.You can select from [DEEP], [NORMAL] and [LIGHT].1Turn the mode dial to 5.2Press the SCENE button.• The scene mode selection screen appears.3Press the !" buttons to select [TEXT MODE] and then press the MENU/OK button.4Press the ADJ. button.• The text density menu appears.5Press the !" buttons to select the desired density setting.• You can also press the shutter release button to shoot the picture.6Press the MENU/OK button.• The text density setting does not appear on the screen.Changing the Text Density (SCENE)To change the setting, use the Shooting Setting menu or the ADJ. button. This section explains easy ways to change the shading setting with the ADJ. button.To use the Shooting Setting menu, see “Using the Menu” (GP.60) and “Shooting Setting Menu Items by Scene Mode” (GP.240).L7360874_En_00_0_bookfile.book Page 57 Friday, October 13, 2006 12:56 PM](https://usermanual.wiki/Ricoh/500SEW1.Manual-3/User-Guide-729138-Page-27.png)
![59Various Shooting Functions1Press the MENU/OK button in shooting mode to display the Shooting Setting menu. The Shooting Setting menu can be used to set the following shooting settings.When Mode Dial is Set to 5/K• The settings that can be selected during scene mode are restricted. (GP.240).When Mode Dial is Set to 3Note ----------------------------------------------------------------------------------------------The SETUP menu (GP.106) and EXP SET menu (GP.155) can be accessed from within the Shooting Setting menu. Shooting Setting MenuSetting Options [Default Settings] Refer toPIC QUALITY/SIZE F3264(8M), N3264(8M), N2592(5M), N2048(3M), F1280(1M), [N1280(1M)], N640(VGA)P.61ANTIBLUR [OFF], ON P.63FOCUS [MULTI AF], SPOT AF, MF, SNAP, AP.64PHOTOMETRY [MULTI], CENTER, SPOT P.67SHARPNESS SHARP, [NORMAL], SOFT P.68CONT. MODE [OFF], S-CONT, M-CONT P.69COLOR DEPTH VIVID, [NORMAL], NEUTRAL, B&W P.72TIME EXPOSURE [OFF], 1 SEC., 2 SEC., 4 SEC., 8 SEC. P.73INTERVAL [0 s], 30 seconds to 3 hours P.74IMAGE WITH SOUND [OFF], ON P.76DATE IMPRINT [OFF], DATE, TIME P.77EXPOSURE COMP. -2.0 to +2.0 P.78WHITE BALANCE [AUTO], (OUTDOORS), (CLOUDY), (INCANDESCENT LAMP), (INCANDESCENT LAMP2), (FLUORESCENT LAMP), (MANUAL SETTINGS)P.79ISO SETTING [AUTO], ISO 64, ISO 100, ISO 200, ISO 400, ISO 800, ISO 1600P.81RESTORE DEFAULTS P.82Setting Options [Default Settings] Refer toMOVIE SIZE [320], 160 P.61FRAME RATE [30FPS], 15FPS P.84FOCUS [MULTI AF], SPOT AF, MF, SNAP, AP.64WHITE BALANCE [AUTO], (OUTDOORS), (CLOUDY), (INCANDESCENT LAMP), (INCANDESCENT LAMP2), (FLUORESCENT LAMP), (MANUAL SETTINGS)P.79L7360874_En_00_0_bookfile.book Page 59 Friday, October 13, 2006 12:56 PM](https://usermanual.wiki/Ricoh/500SEW1.Manual-3/User-Guide-729138-Page-29.png)