Samsung Electronics Co HMX-S16BN DIGITAL CAMCORDER User Manual 2 HMX S16BN
Samsung Electronics Co Ltd DIGITAL CAMCORDER 2 HMX S16BN
Contents
- 1. User manual 1 of 5
- 2. User manual 2 of 5
- 3. User manual 3 of 5
- 4. User manual 4 of 5
- 5. User manual 5 of 5
User manual 2 of 5
19
Photo play mode
PRECHECK!
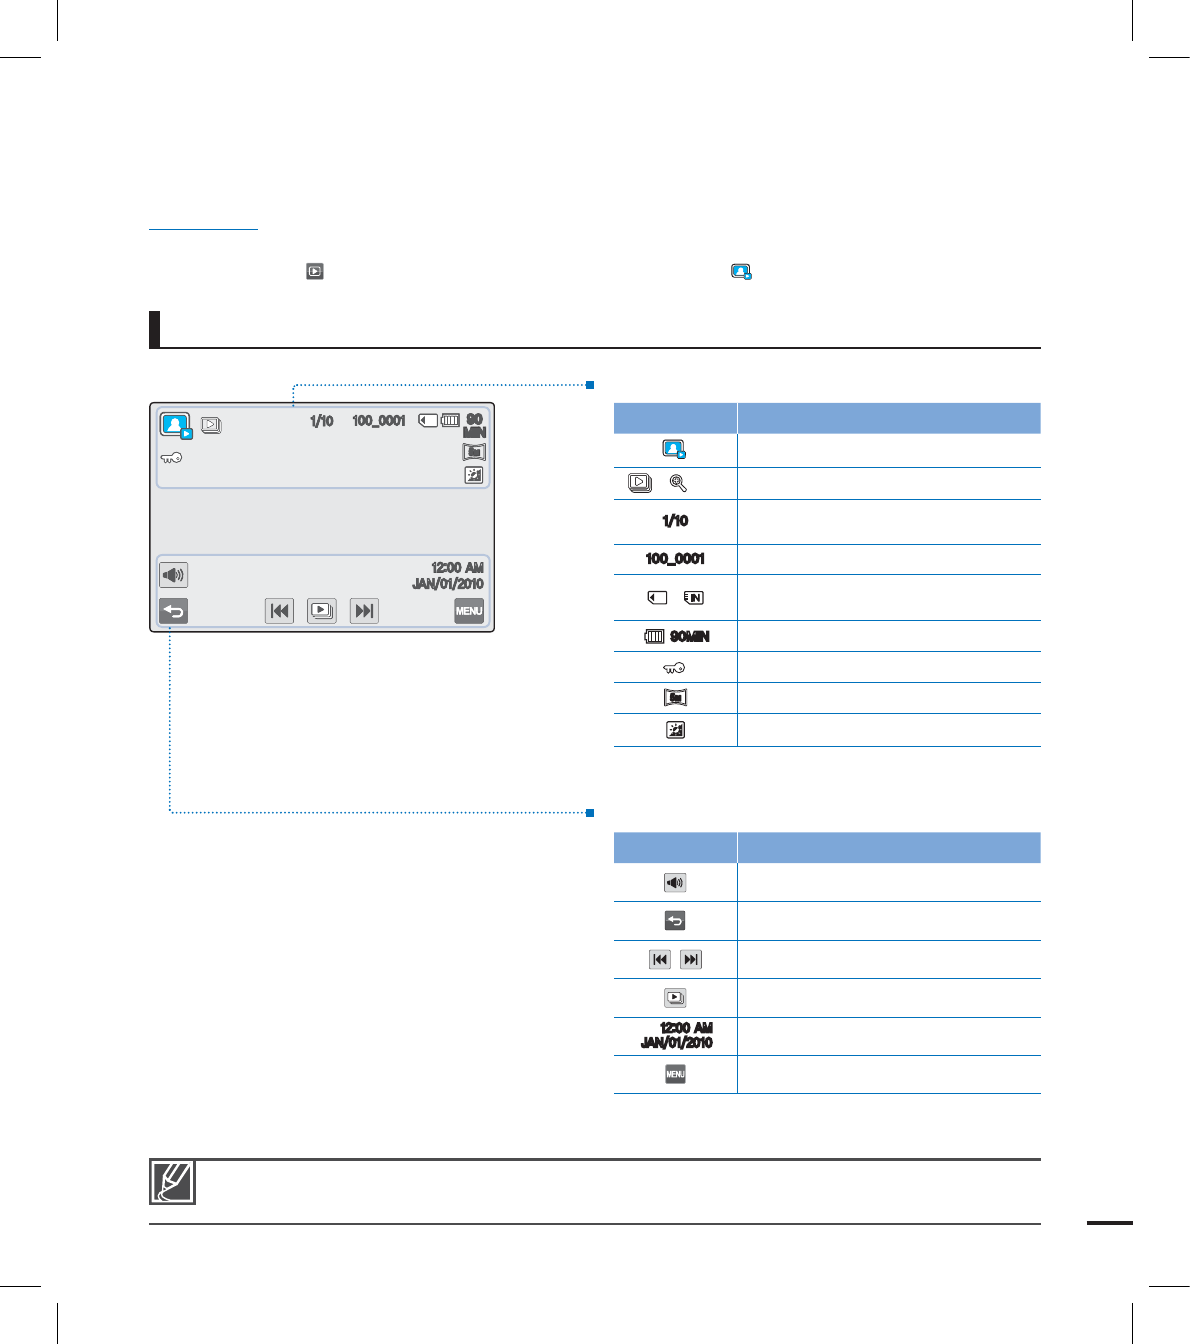
This On Screen Display (OSD) is shown in the Photo play mode only.
Select the Play ( ) tab on the LCD screen to select the Photo play ( ) mode. page ??
•
•
Top of the LCD screen
Indicator Meaning
Photo play mode
/ X1.1 Slide show / Playback zoom (X1.1~X8.0)
Photo image counter (current image /
total number of recorded images)
@ File name (fi le number)
/ Storage media (Memory card or internal
memory (HMX-S15/S16 only))
.*/ Battery info. (remaining battery level)
Erase protection
5
M
5
M
Photo resolution
LCD Enhancer
Bottom of the LCD screen
Indicator Meaning
Volume tab (when activating slide show)
Return tab
Previous image/Next image tab
Slide show start tab
".
+"/
Date/Time
Menu tab
The play control tabs appear briefl y. They reappear when touching anywhere on the screen.
.*/
@
".
+"/
5
M
5
M
.*/
.*/
@@
5
5
5
MM
M
".
".
+"/+"/
20
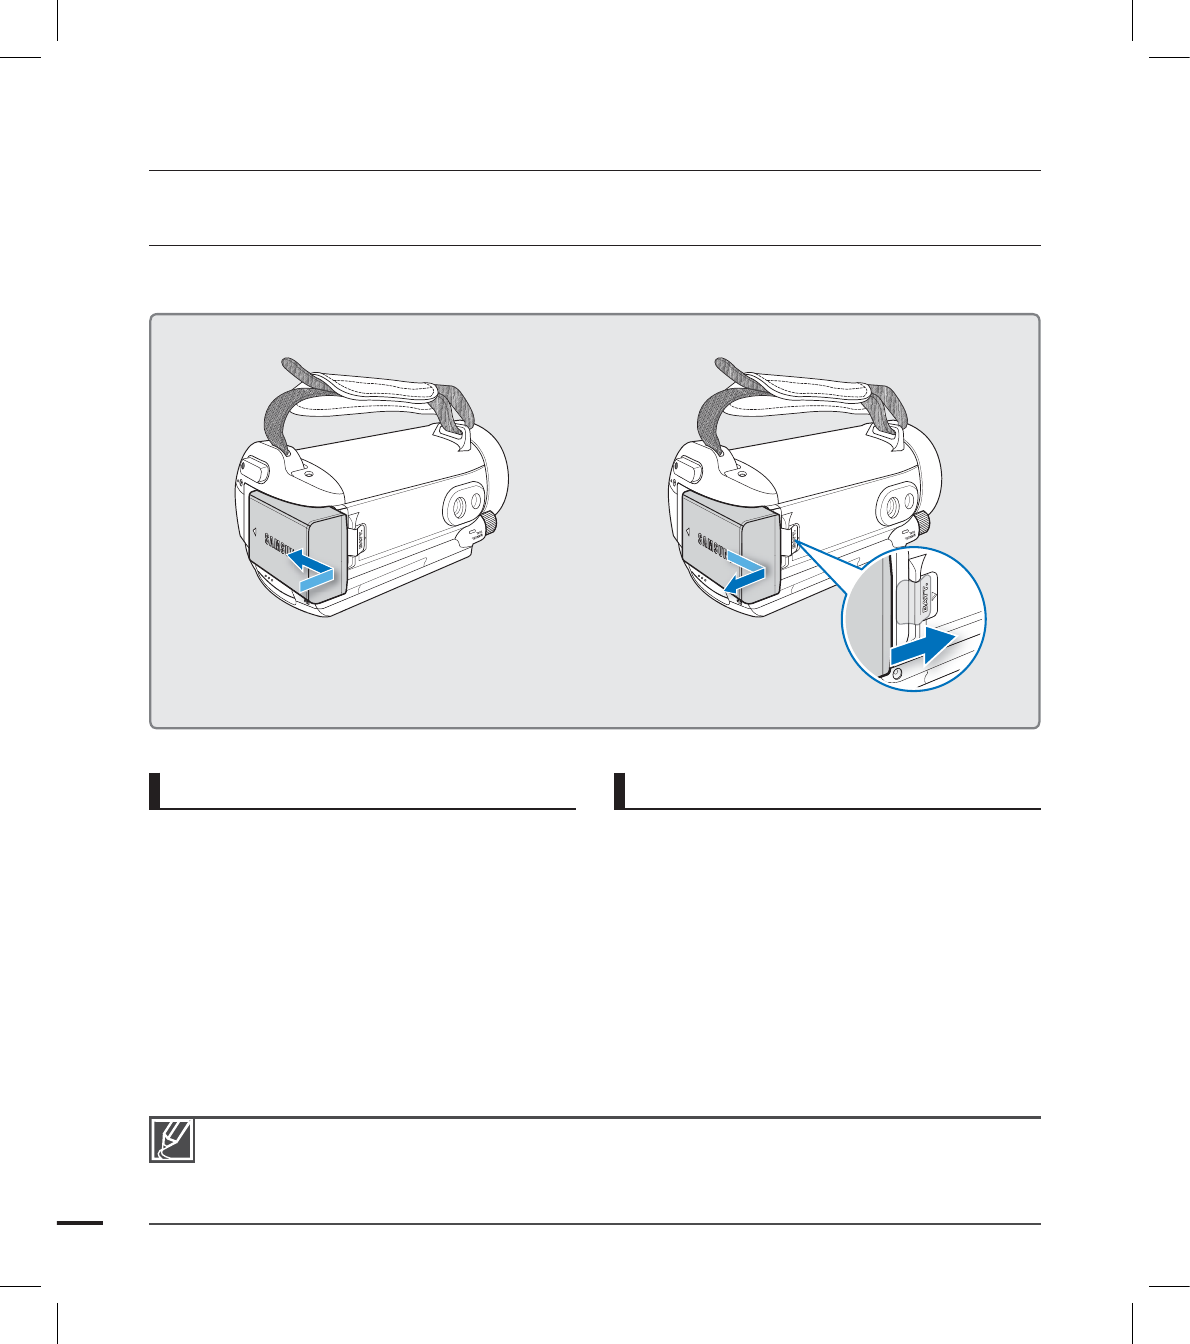
To attach the battery
Align the battery with the indicator (▲) on
the battery compartment, push the battery
toward the arrow direction.
To detach the battery
Slide the Battery release switch and pull out
the battery.
Gently slide the Battery release switch in
the direction as shown in the fi gure.
•
ATTACHING/DETACHING THE BATTERY
Purchase extra batteries to allow continuous use of your camcorder.
Use only Samsung-approved batteries. Do not use batteries from other manufacturers. Otherwise,
there is a danger of overheating, fi re or explosion.
Samsung is not responsible for problems occurring due to using unapproved batteries.
Detach the battery from the camcorder with care preventing from falling it.
•
•
•
getting started
21
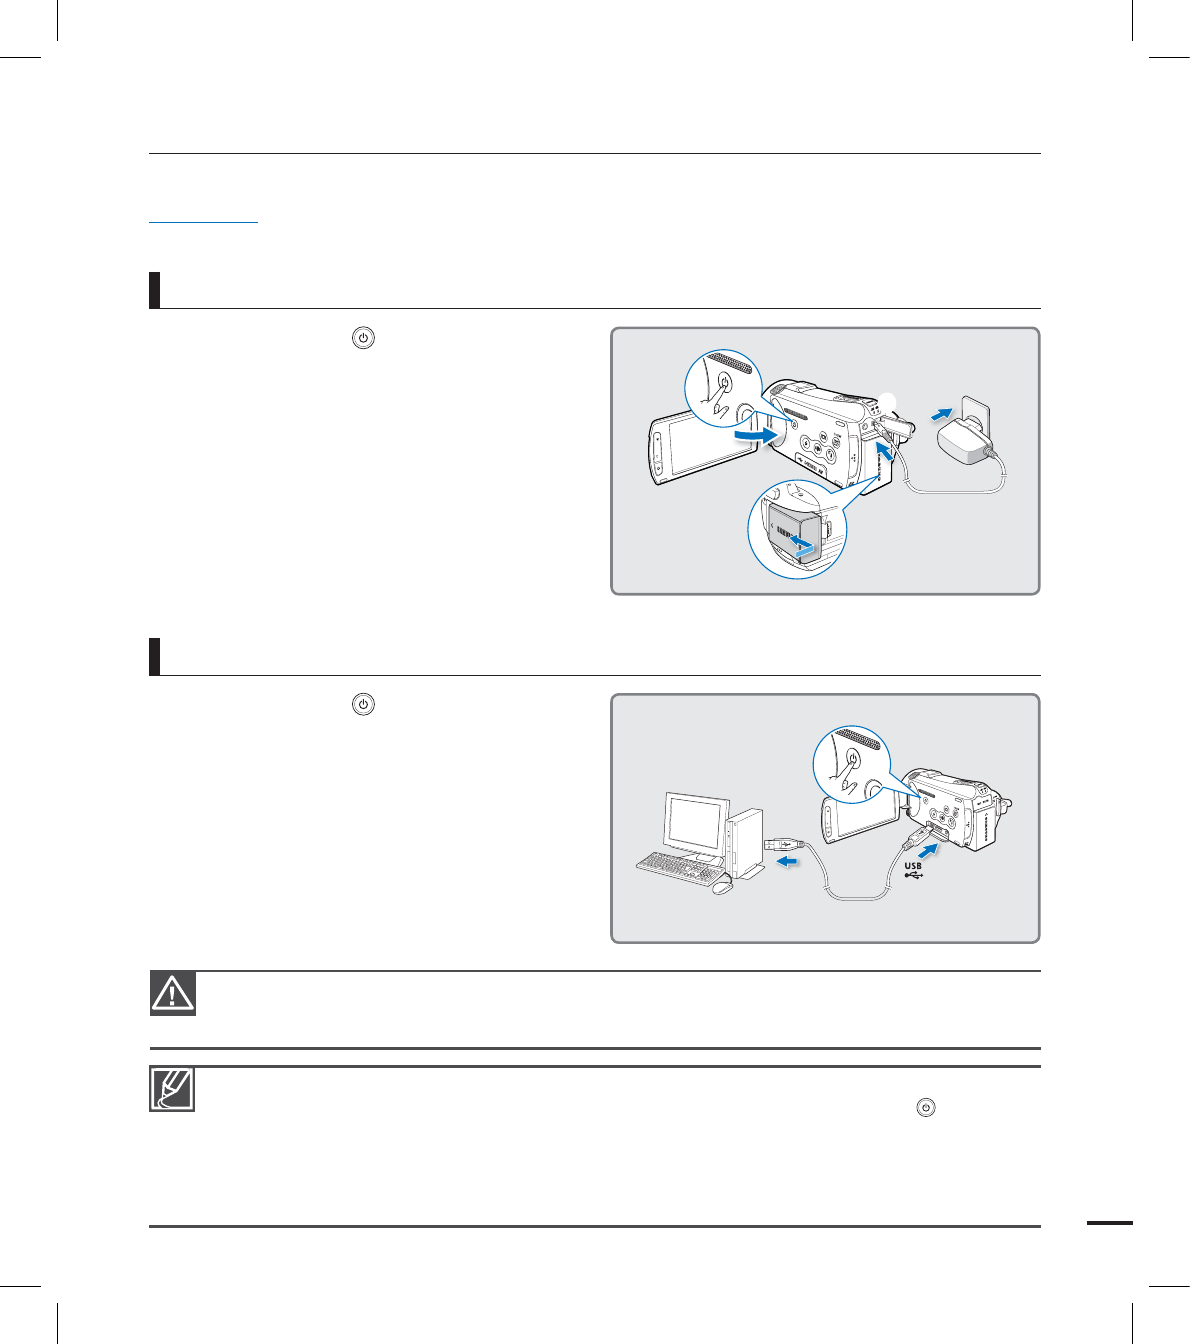
To charge the battery with the AC power adaptor
The battery is not charged during the power saving mode, which may keep the mode indicator on or
fl ashing. Start charging the battery after turning off the camcorder by pressing the Power ( ) button.
It is recommended you to have one or more additional batteries to allow continuous use of your camcorder.
It is recommended to charge the battery pack in a place with ambient temperature of 10°C ~ 30°C(50˚
F~86˚F).
When charging, if both the USB cable and AC power adaptor are connected, the AC power adaptor will
override the USB.
•
•
•
•
1. Press the Power ( ) button to turn off
the camcorder and then close the LCD
screen. page ??
2. Open the jack cover and connect the AC
power adaptor to the DC IN jack.
3. Connect the AC power adaptor to a wall
socket.
The charging (CHG) indicator lights up
and charging starts. After the battery
is fully charged, the charging (CHG)
indicator turns green.
•
Please make sure that there are no foreign substances in the plug and socket when you connect the AC
power supply to the camcorder.
Charging the battery at low temperature may take longer or fail to fully charge (green indicator will not turn on).
•
•
CHARGING THE BATTERY
You can charge the battery using the AC power adaptor or USB cable.
PRECHECK!
Before starting the following procedure, make sure that the battery is attached in your camcorder.
To charge the battery with the USB cable
1. Press the Power ( ) button to turn off
the camcorder. page ??
2. Open the jack cover.
3. Connect the USB cable to the camcorder
properly and connect the other end to a
USB port of a PC.
The charging (CHG) indicator lights up
and charging starts. After the battery
is fully charged, the charging (CHG)
indicator turns green.
•
22
getting started
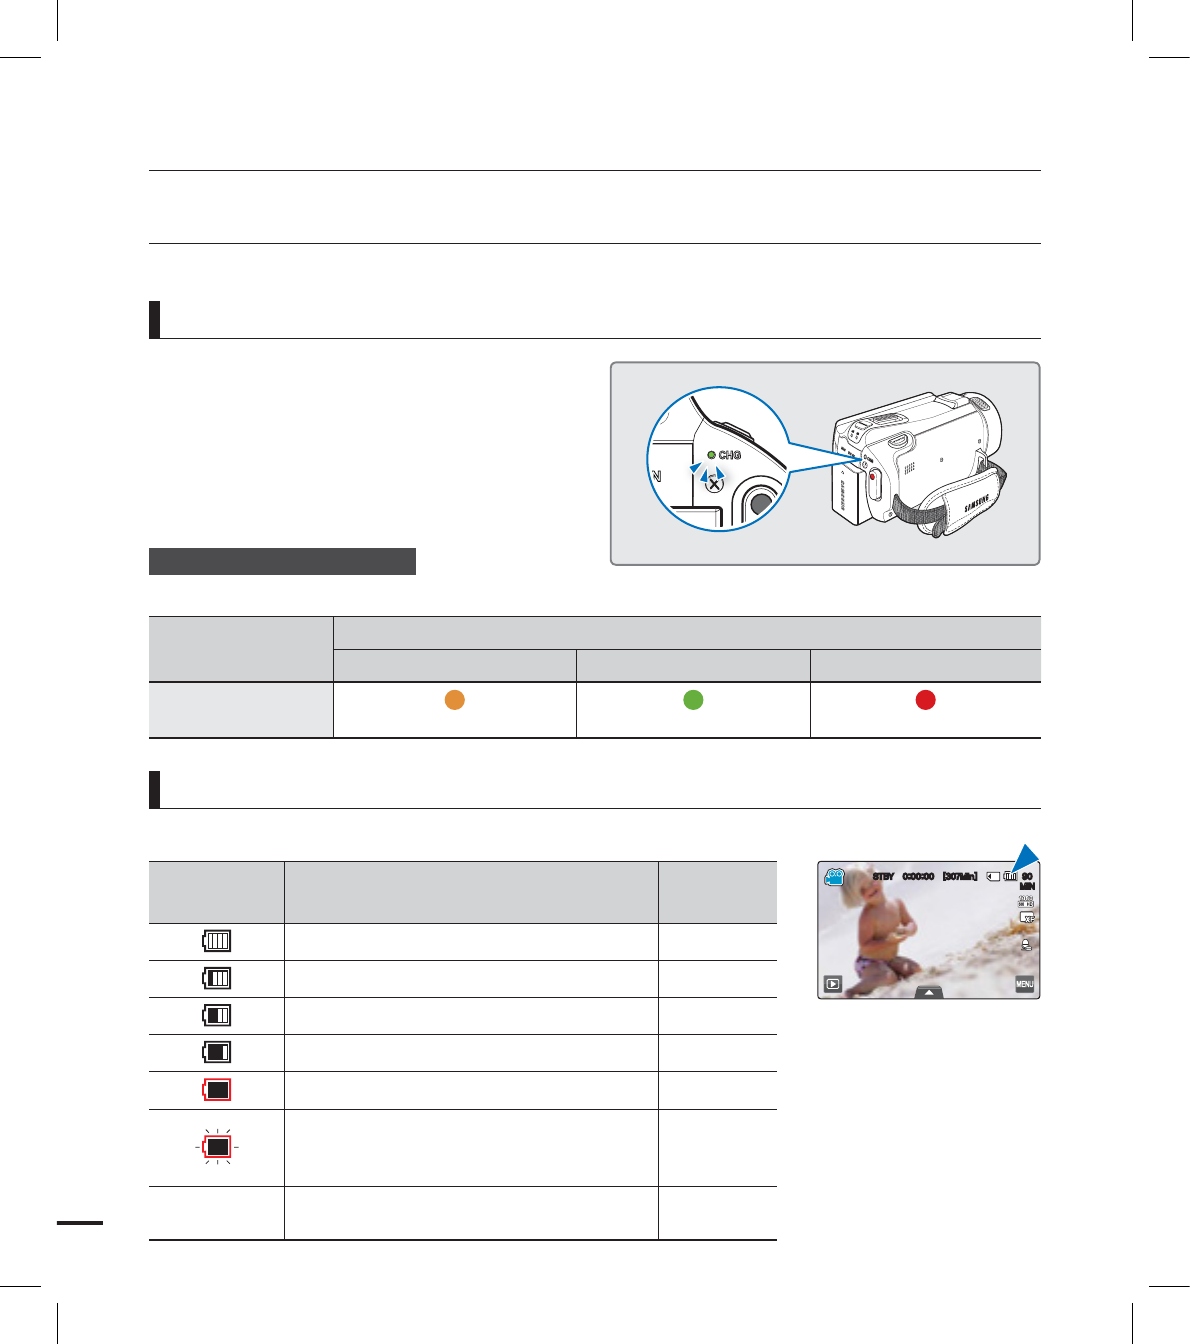
The battery level display shows the amount of battery power remaining in the battery.
Battery level
indicator State Message
Fully charged -
25~50% used -
50~75% used -
75~95% used -
95~98% used -
Exhausted (fl ickers):
The device will soon turn off.
Change the battery as soon as possible.
-
-The device will be forced to turn off
after 3 seconds.
“Low
Battery”
CHECKING THE BATTERY STATE
You can check the charging state and remaining battery capacity.
The color of the LED indicates the power or
charging state.
Charging (CHG) indicator
The color of the charging indicator shows the charging state.
Charging state Charging Fully charged Error
LED color (Orange) (Green) (Red/blink)
To check the charging state
Battery level display
45#: <.JO>
.*/
23
Above figures are based on a fully charged battery at a normal temperature.
Low ambient temperature may affect the use time.
Battery capacity decreases over time and through repeated use. Keep the camcorder turned off
while not operating it.
Store the battery separately when finished charging or when not using it for a long time. This will
help extend the life of the battery.
The battery is charged over 95% after about 2 hours, and the indicator color changes to green. It
takes about 2 hours and 40 minutes for the battery to charge 100%.
•
•
•
•
Available running time for the battery
Battery type IA-BP210E
Charging time Using the AC power adaptor: approx. 160 min.
Using the USB cable: approx. 390 min.
Video resolution HD SD
Continuous recording time Approx. 90min. Approx. 120min.
Playback time Approx. 110min. Approx. 130min.
Charging time: Approximate time (min.) required when you fully charge a completely exhausted battery.
Recording/Playback time: Approximate time (min.) available when you fully charged the battery. ‘HD’ stands
for high definition image quality, and ‘SD’ stands for standard image quality.
The time is only for reference. Figures shown above are measured under Samsung’s test environment, and
may differ according to user and condition.
The recording and playback time will be shorter when you use your camcorder in low temperatures.
We recommend using the AC power adaptor when using the Time Lapse REC function.
Continuous Recording (without zoom)
The continuous recording time of the camcorder in the table shows the available recording time when the
camcorder is in the recording mode without using any other function after recording starts. When actually
recording, the battery pack may discharge 2-3 times faster than this reference, since the record start/stop
and zoom functions are being operated, and playback is performed. Prepare additional charged battery
pack(s) to allow for the time you are planning to record on the camcorder.
About the battery
Battery Properties
A lithium-ion battery is small-sized and has a high capacity. The low ambient temperature (below 10 ) may
shorten its life-span and affect its function properly. In this case, put the battery into the pocket to make it
warm then install it in the camcorder.
Make sure to store the battery separately after use.
- A small amount of battery power is consumed when the battery is stored in the camcorder even if the
camcorder power is off.
•
•
•
•
•
•
•
The charging time will vary depending on the remaining battery level.
24
- If the battery is installed and left in the camcorder for a long time, the battery is discharged. The battery
can not be used even if charged.
- Keep the battery out of reach of children.
Prepare the extra battery when using the camcorder outdoors.
- The cold temperature may shorten the recordable time.
- Carry the supplied AC power adaptor to charge the battery while travelling.
Check whether the battery terminal is damaged when the battery is fallen down.
- If the battery with the damaged terminal is installed in the camcorder, the camcorder may be damaged.
Remove the battery and the memory card from the camcorder and disconnect the AC power
adaptor after use.
- Store the battery in a stable, cool and dry place.
(Recommended temperature : 15Cº~ 25Cº, Recommended humidity: 40%~ 60%)
- Too high or low temperature shortens the battery lifetime.
- The battery terminals can be rusty or malfunction if the battery is stored in a smoky or dusty place.
- Store the battery with fully discharged. When storing the battery for a long time, it is recommended to
charge the battery once a year and use the charged capacity of the battery fully before storing again.
Do not throw the battery into fire.
- Heating or burning the battery may cause a risk of explosion.
Throw away the dead battery into a recycling bin.
The battery lifetime is limited.
- The battery reaches the end of its lifetime if operation time is shortened after fully charged. Replace with
new one.
- The battery lifetime may depend on the storing, operation and use conditions. About the battery life
It is recommended that you use the AC power adaptor to power the camcorder from a
household AC outlet when you perform settings on it, play back, or edit images, or use it
indoors. Make the same connections as you do when charging the battery. page ??
•
•
•
•
•
•
getting started
Using an AC power source
Be sure to use the specified AC power adaptor to power the camcorder. Using other AC power
adaptors could cause electric shock or result in fire.
The AC power adaptor can be used around the world. An AC plug adaptor is required in some
foreign countries. If you need one, purchase it from your distributor.
•
•
Make sure to turn off the camcorder before disconnecting the AC power adaptor. Unless, the
storage media or data may be damaged.
Use a nearby wall outlet when using the AC power adaptor. Disconnect the AC power adaptor
from the wall outlet immediately if any malfunction occurs while using your camcorder.
Do not use the AC power adaptor placed in a narrow space, such as between a wall and furniture.
•
•
•
25
The camcorder operates the self-diagnosis function when powered on. If a warning message
appears, refer to ‘warning indicators and messages’ (pages ??~??) and take corrective action.
If you close the LCD screen when the power is on, the power saving mode activates.
•
•
basic operation of the camcorder
This chapter introduces you to the basic operation procedures of this camcorder, such as turning
the power on/off, switching modes, and setting on-screen indicators.
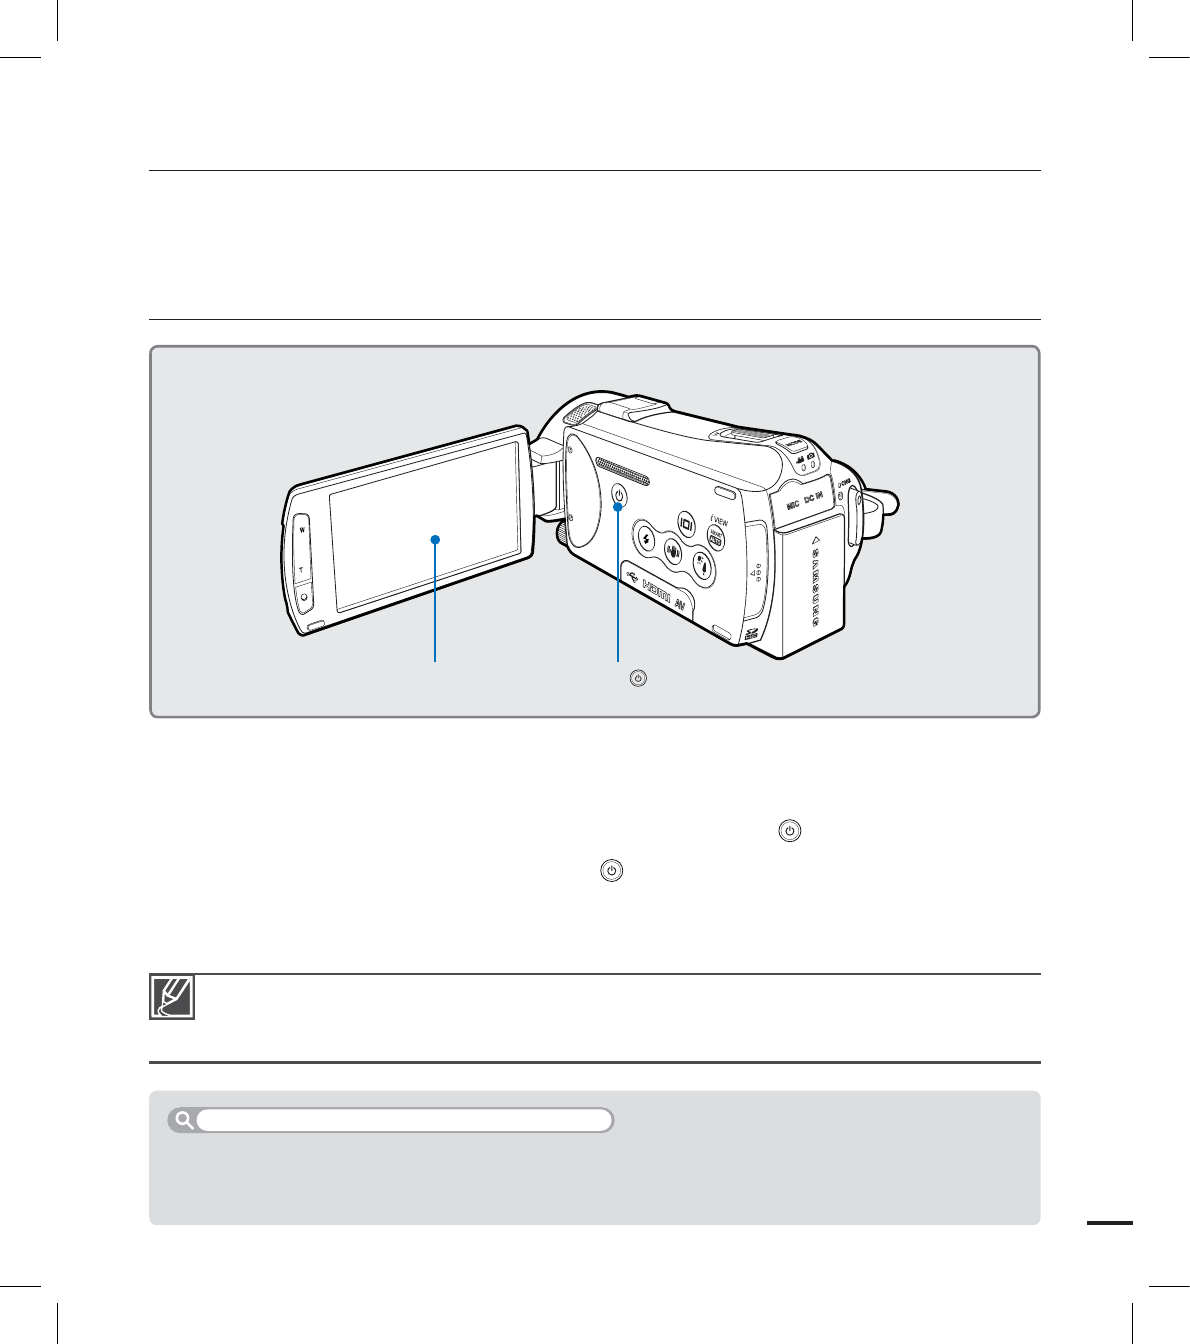
TURNING YOUR CAMCORDER ON/OFF
1. Open the LCD screen to turn on the camcorder.
Your camcorder turns on automatically when you open the LCD screen.
The lens opens automatically when the camcorder is powered on.
You can also turn the camcorder on by pressing the Power ( ) button.
2. To turn off the camcorder, press the Power ( ) button for about one second.
Closing the LCD screen will not turn off the camcorder.
Set the date and time when using your camcorder for the first time. page ??
•
•
•
•
•
When you use your camcorder for the first time or reset it, the time zone screen appears for the start-up
display. Select your geographical location and set the date and time. page ??
If you do not set the date and time, the time zone screen appears every time you turn on the camcorder.
When using this camcorder for the first time
LCD screen Power ( ) button

26
SWITCHING TO THE POWER SAVING MODE
If you need to use the camcorder for the extended time, the following functions enable you to
prevent unnecessary energy consumption.
Quick On STBY Mode in the STBY mode
The camcorder switches to "Quick On STBY" mode when the LCD screen is closed.
page ??
Sleep Mode in the play mode (includes the thumbnail index view)
The camcorder switches to the sleep mode when the LCD screen is closed, and then if idle
for more than 20 minutes, the camcorder turns off. However, if “Auto Power Off: 5 Min” is
set, the camcorder turns off in 5 minutes.
If you open the LCD screen or connect a cable to the camcorder during sleep mode, the
sleep mode ends and returns to the last used operation mode.
•
•
•
The power saving mode does not work in the following situations:
- When the camcorder has a cable connection. (Audio/Video, Mini HDMI, or AC power adaptor,
etc.)
- While recording, playback, or the slideshow is being operated.
- When the LCD screen is opened.
The camcorder consumes less battery power in the power saving mode. However, if you plan to
use the camcorder for an extended time, it is recommended to turn off the camcorder by pressing
the Power () button when not using it.
•
•
basic operation of the camcorder
<Sleep mode>
LCD screen is closed
<Power off>
After 20 minutes
27
SETTING THE OPERATION MODES
You can switch the operating mode in the
following order each time you press the
MODE button: Video mode ( ) ↕ Photo
mode ( ).
Each time the operation mode changes,
the respective mode indicator lights on.
Touching the Play ( ) tab in the record
mode switches the record mode into the
play mode.
•
•
Mode Mode indicators Functions
Video mode To record and play videos.
Photo mode To record and play photos.
USING THE DISPLAY( ) BUTTON
You can switch the on-screen information display mode.
Press the Display( ) button.
• The full and minimum display modes will alternate.
Switching the information display mode
Full display mode
The on-screen information is displayed on the
full screen.
Minimum display mode
Only operation status is displayed on the LCD
screen.
The Warning indicators and messages may appear depending on the recording conditions.
The Display ( ) button does not work in the menu or quick menu screen.
•
•
MODE button
Mode
indicators
45#: <.JO>
.*/
Play tab
45#: <.JO>
.*/
45#:
28
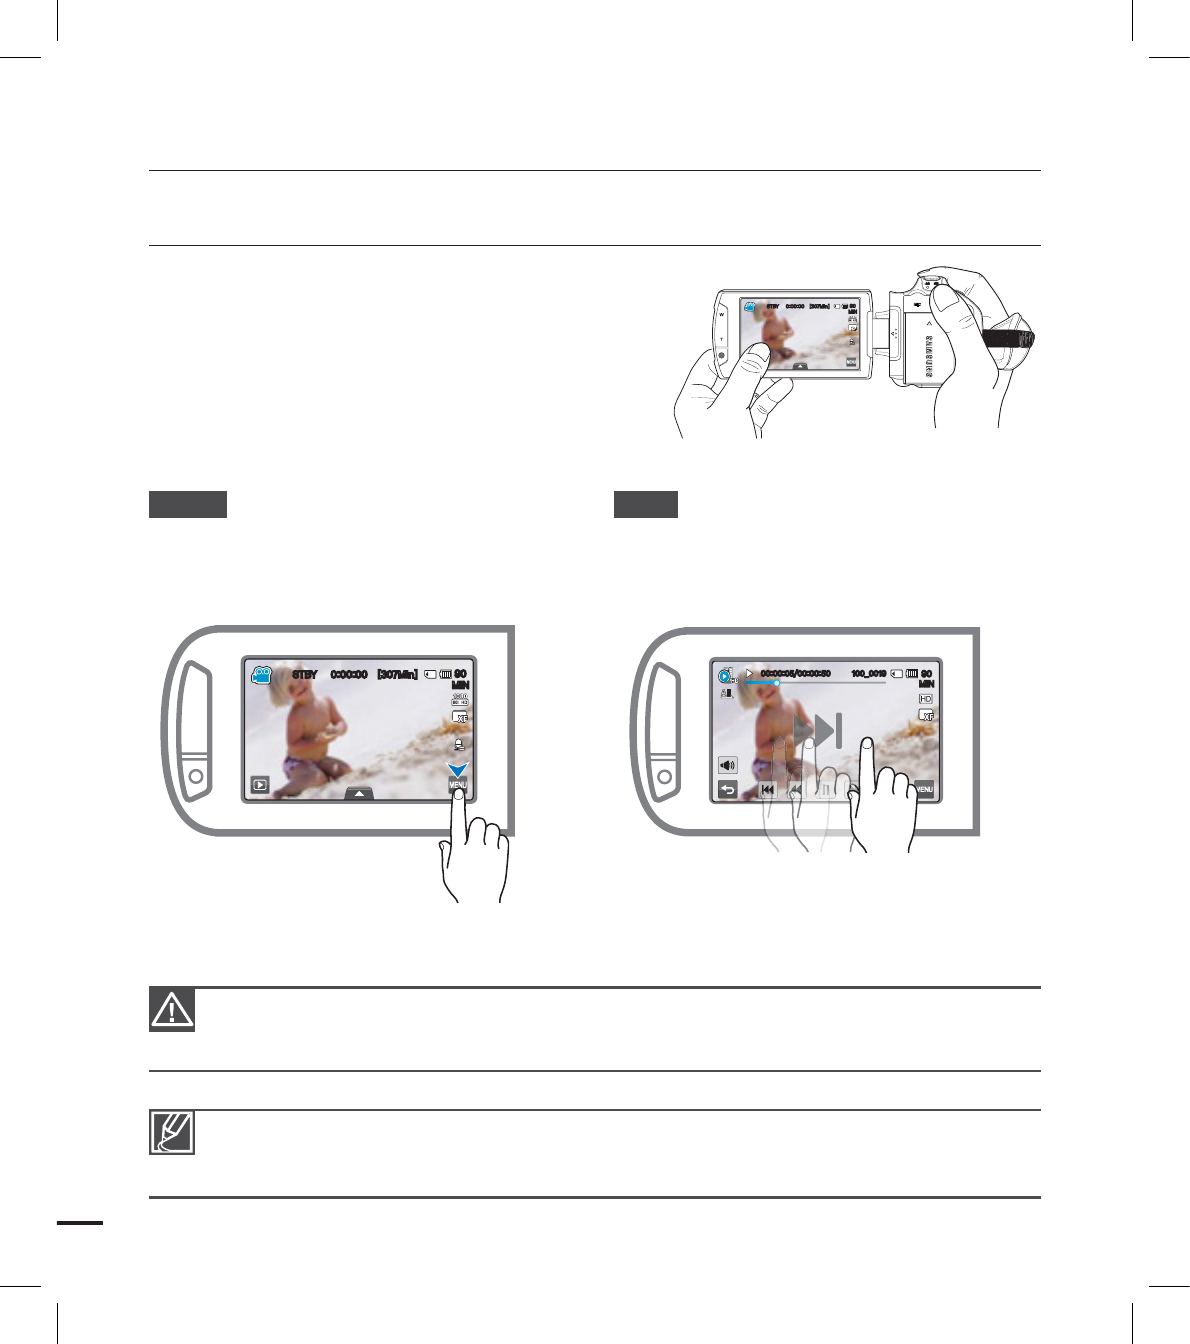
USING THE TOUCH PANEL
The touch panel allows you to enjoy playback and
recording with a simple touch of your fi nger. Place
your hand on the rear side of the LCD screen to
support it. Then, touch the items displayed on the
screen.
Do not place a protective fi lm on the LCD screen.
If a fi lm is applied for a long while, strong cohesion on the surface of the screen may cause a
malfunction of the touch panel.
•
•
Be careful not to accidentally press the buttons near the LCD panel while using the touch panel.
The tabs and indicators that appear on the LCD screen depend on the current recording/playback
status of your camcorder.
•
•
Touch
Slightly tap the items to select or execute with
your fi nger.
Drag
Drag the touch screen to left or right to select
the desired items or fi les.
basic operation of the camcorder
45#: <.JO>
.*/
45#: <.JO>
.*/
.*/
@
29
fi rst time settings
SETTING THE TIME ZONE AND DATE/TIME
FOR THE FIRST TIME
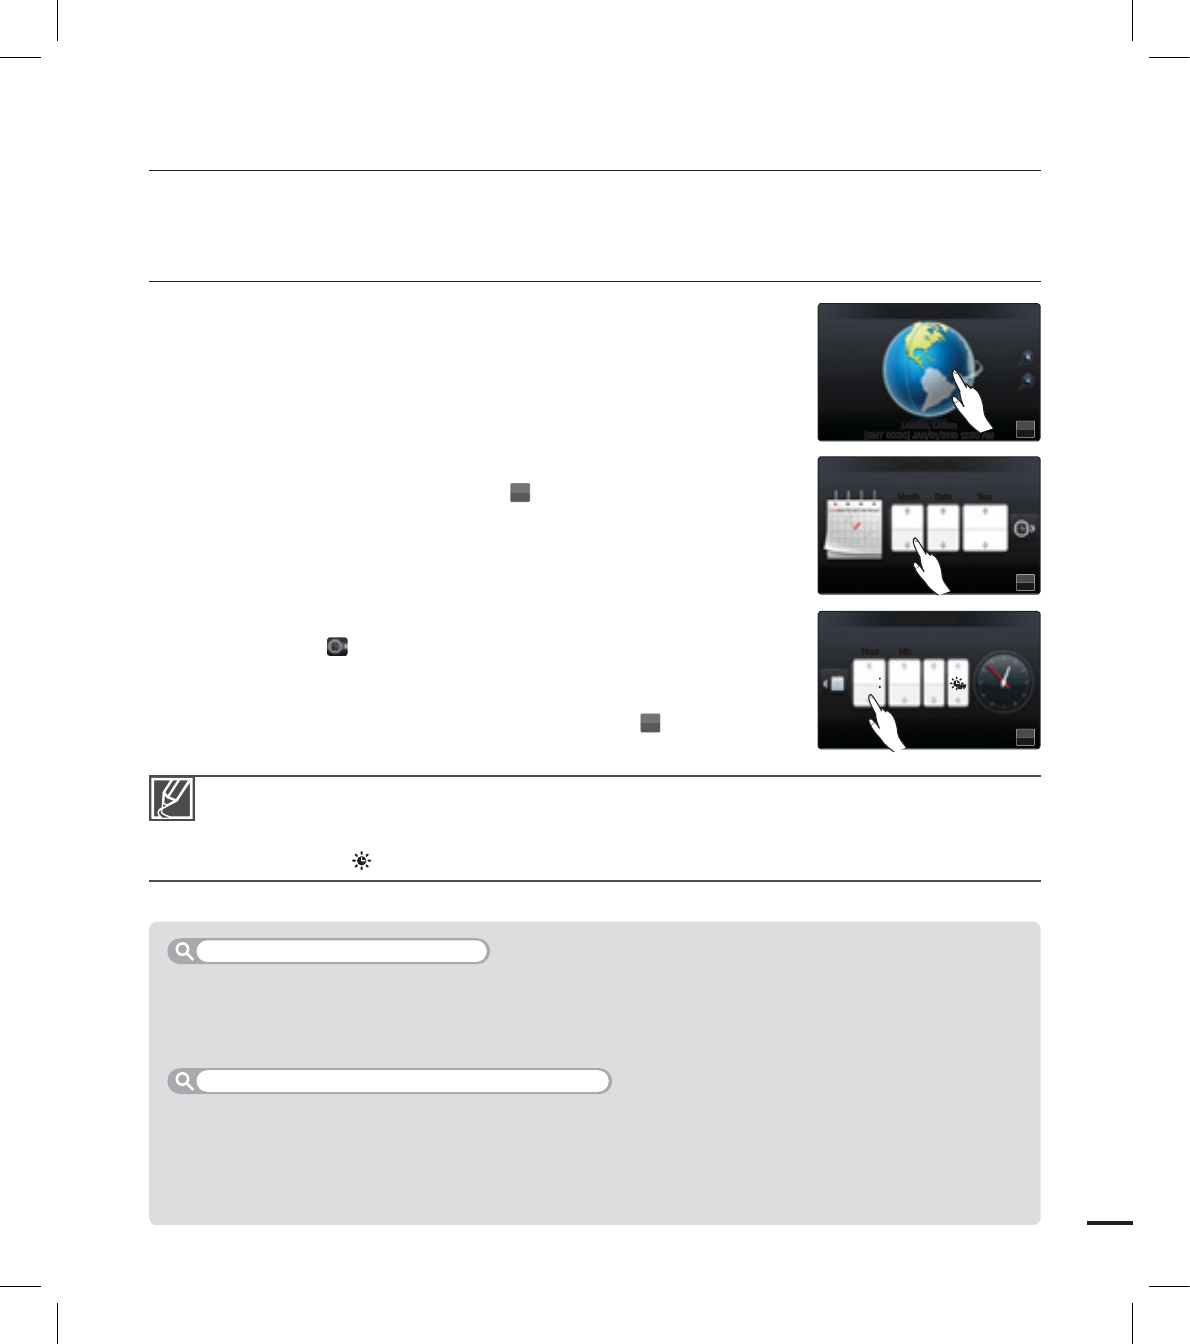
Set the date and time of your local area when turning on this camcorder for the
fi rst time.
1. Open the LCD screen to turn on the camcorder.
Your camcorder turns on automatically when you open the LCD
screen.
The time zone (“Home”) screen appears based on Lisbon, London
(Greenwich Mean Time).
2. Select the time zone, then touch the (
OK
) tab.
Select the time zone by dragging the globe to left or right on the
LCD screen.
3. Set the date.
Set the date by touching the corresponding item or dragging it up
or down.
4. Touch the time ( ) tab, then set the time.
Set the time by touching the corresponding item or dragging it up
or down.
5. Make sure the clock is correctly set, then touch the (
OK
) tab.
The message “Date/Time Set” appears.
•
•
•
•
•
•
The year can be set up to 2037, based on “Home” item.
Set “Date/Time Display” to On. page ??
You can change the time zone and date/time options in the setting menu. page ??
Activating the ( ) icon forwards the time by 1 hour.
•
•
•
•
Your camcorder includes a built-in rechargeable battery that retains the date and time settings even
after the power is turned off.
Once the battery is depleted, the previous date/time values are all reset to defaults, and you need to
recharge the built-in rechargeable battery. The date/time must be set again.
The built-in battery is always recharged while your camcorder is connected to the AC power or while
the battery is attached.
If the camcorder is not in use for about 2 weeks without connecting to the AC power or attaching the
battery, the built-in battery fully discharges. If this occurs, charge the built-in battery by connecting to
the supplied AC adaptor for 24 hours.
•
•
•
•
Built-in rechargeable battery
Charging the built-in rechargeable battery
OK
-POEPO-JTCPO
<(.5>+"/".
)PNF
OK
.POUI
%BUF5JNF4FU
%BUF :FBS
+"/
OK
)PVS
%BUF5JNF4FU
.JO
".
OFFOFF
30
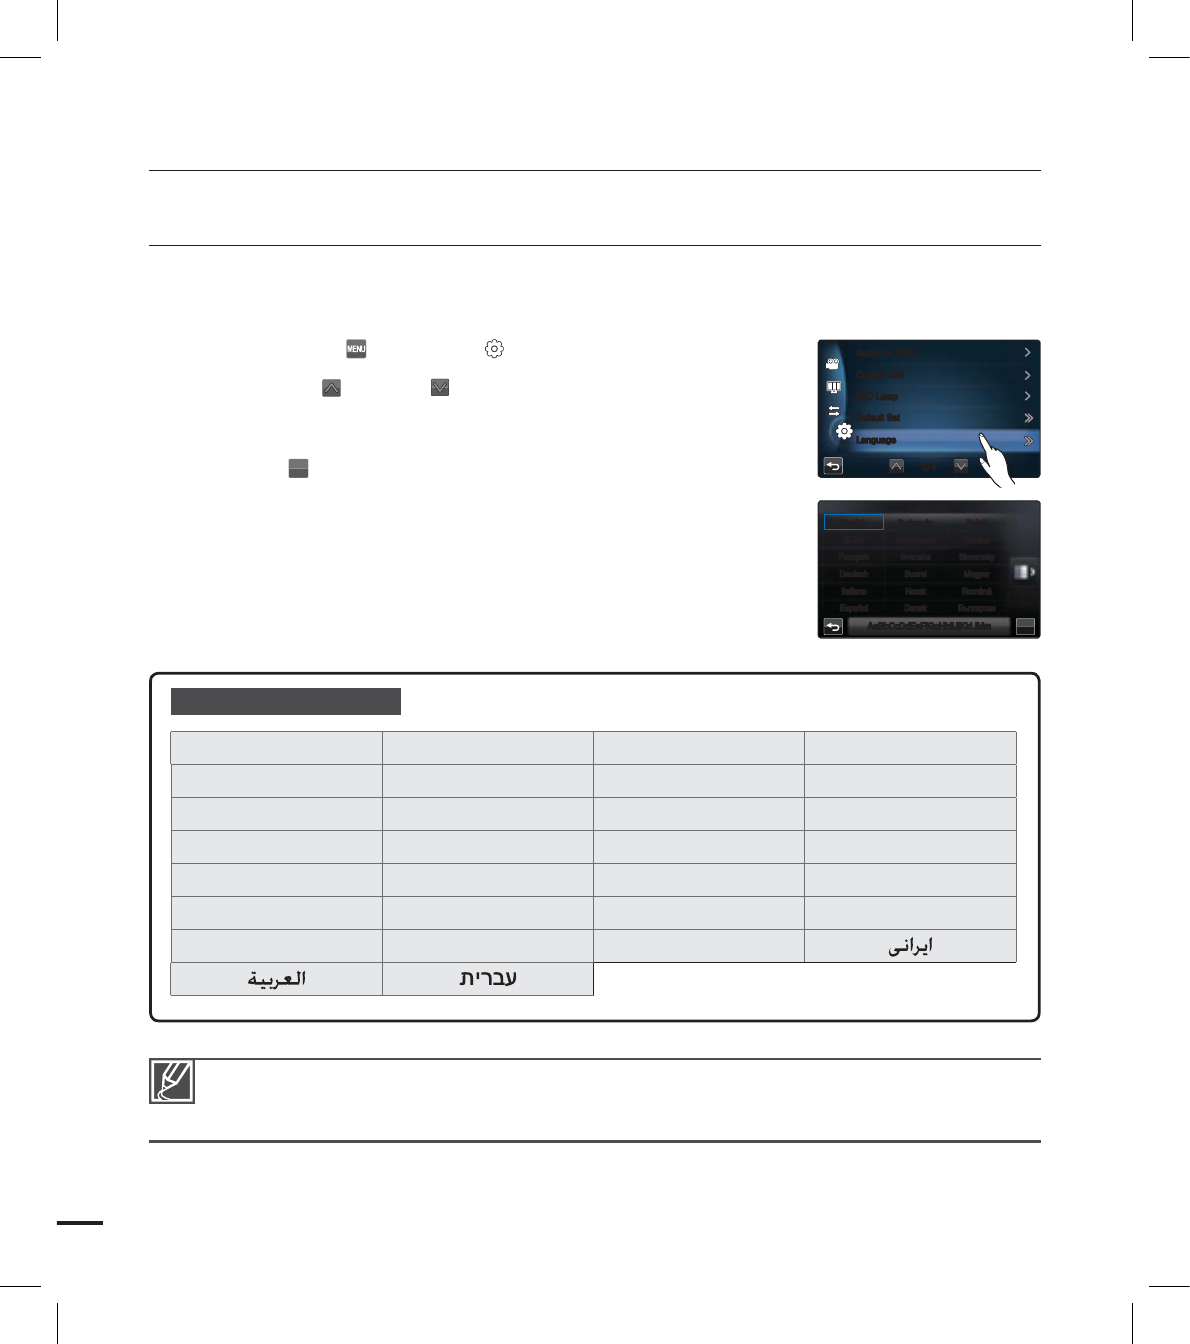
Supported languages
English ⦽ǎᨕ Français Deutsch
Italiano Español Português Nederlands
Svenska Suomi Norsk Dansk
Polski Čeština Slovensky Magyar
Română Български Ελληνικά Srpski
Hrvatski Українська Русский ፩ၭ
瀌煓铅
ไทย
Türkçe
SELECTING THE LANGUAGES
You can select the language to display the menu screen or messages.
The language setting is retained when the camcorder is powered off.
1. Touch the Menu ( ) Setting ( ) tab.
2. Touch the up ( )/down ( ) tab until “Language” is displayed.
3. Touch “Language,” then touch the desired OSD language.
4. Touch the (
OK
) tab to complete the setting.
The menu screen and messages are displayed in the selected
language.
•
“Language” options may be changed without prior notice.
Selected language is retained even without the battery or AC power adaptor.
The date and time format may change depending on the selected language.
•
•
•
fi rst time settings
OK
English
-BOHVBHF
"B#C$D%E&F'G(H)IMJ+K,L-M.N
Português Polski
⦽ǎᨕ Nederlands Čeština
Français Svenska Slovensky
Deutsch Suomi Magyar
Italiano Norsk Română
Español Dansk Български
$VTUPN%JBM
3&$-BNQ
%FGBVMU4FU
-BOHVBHF
2VJDL0O45#:
31
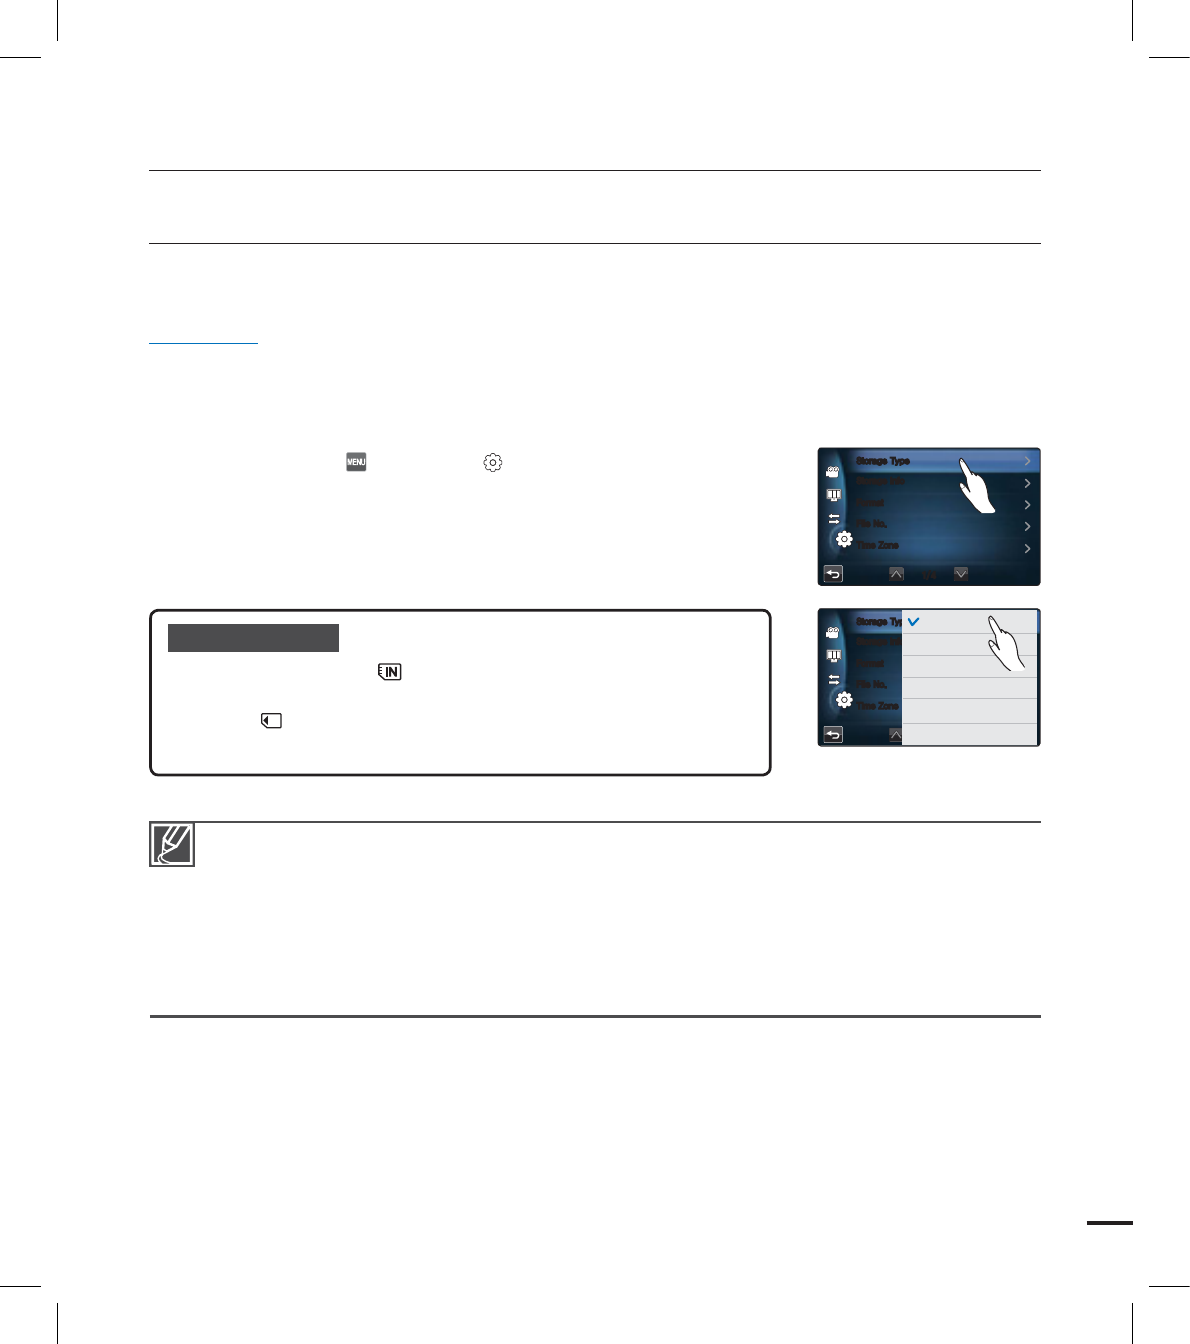
SELECTING THE STORAGE MEDIA (HMX-S15/S16 ONLY)
You can record videos and photos on the internal memory or a memory card, so you should
select the desired storage media before starting recording or playback.
PRECHECK!
You can use SD or SDHC cards on your camcorder. (Some cards are not compatible depending on the
memory card manufacturer and memory card type.)
Before inserting or ejecting the memory card, turn the camcorder off.
1. Touch the Menu ( ) Setting ( ) tab.
2. Touch “Storage Type.”
3. Touch the desired storage media.
•
•
getting ready to start recording
Do not format the storage media (internal memory or memory card) on a PC.
When you insert a memory card, the storage media setup screen appears. Touch “Yes” if you want
to use a memory card, or “No” if not.
Do not remove the power (battery or AC power adaptor) when accessing storage media for
recording, playback, format, delete, etc. The storage media and its data may be damaged.
Do not eject a memory card while it is being used in the camcorder. The memory card and its data
may be damaged.
SSD based on fl ash memory has been adopted as internal memory for the camcorder.
•
•
•
•
•
Submenu items
Internal Memory ( ): When using the internal memory
(SSD, Solid State Drive).
Card ( ): When using the memory card (SD or SDHC
card).
•
•
4UPSBHF*OGP
'PSNBU
'JMF/P
5JNF;POF
4UPSBHF5ZQF
4UPSBHF*OGP
'PSNBU
'JMF/P
5JNF;POF
4UPSBHF5ZQF *OUFSOBM.FNPSZ
$BSE
32
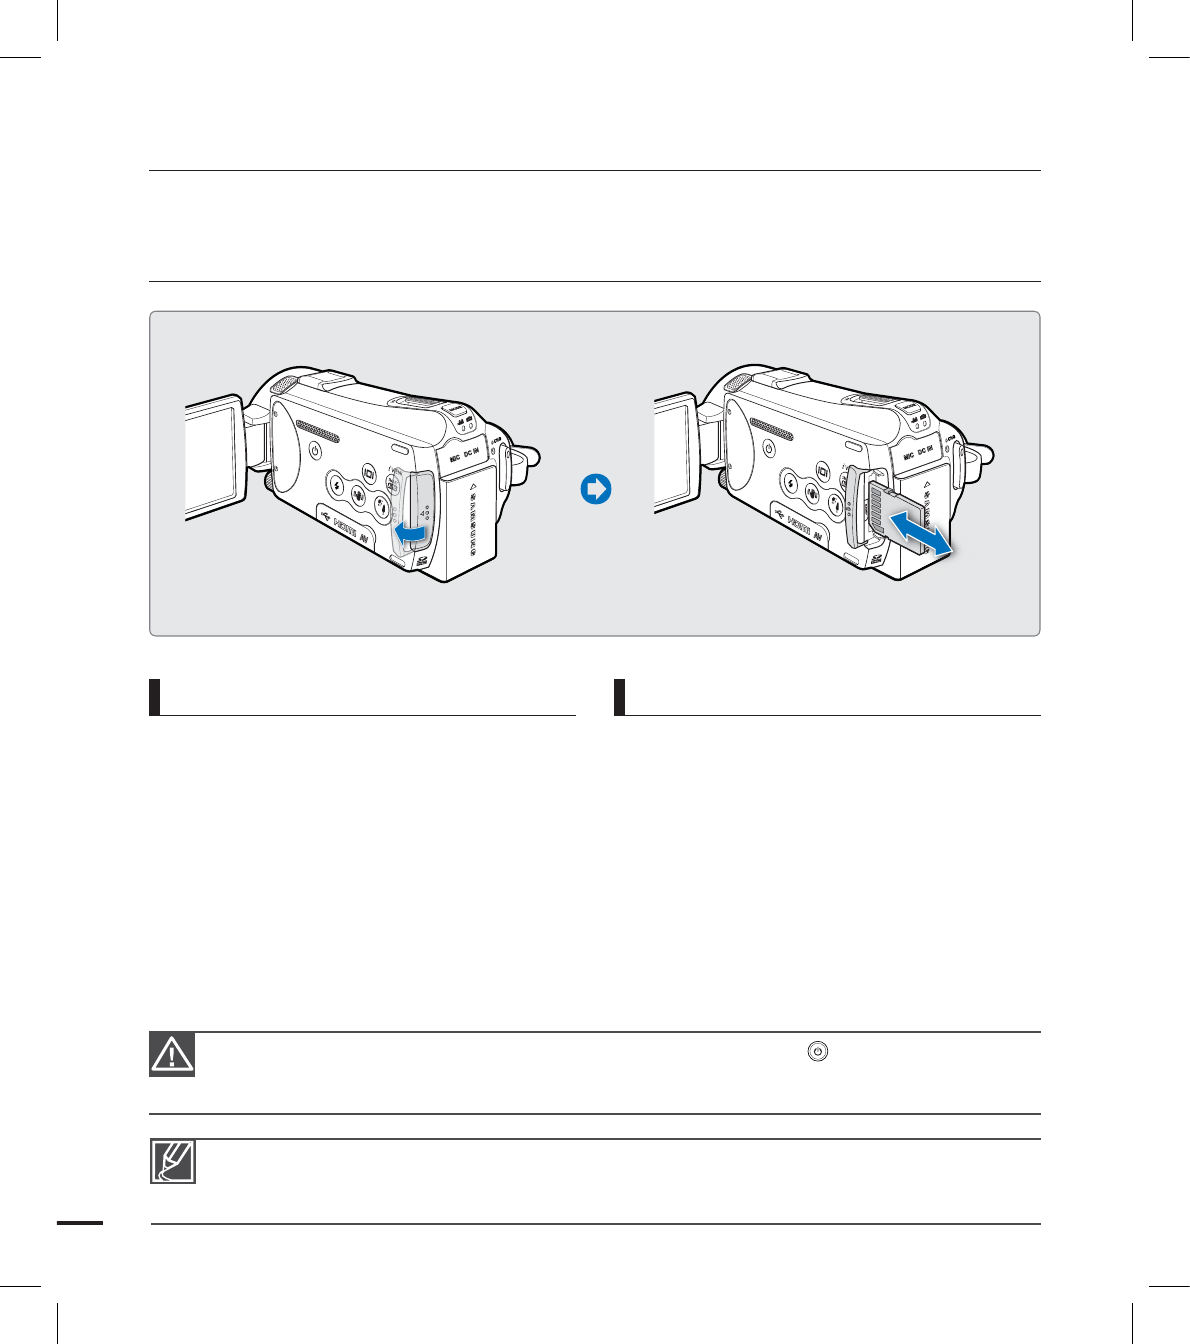
To insert a memory card
1. Open the memory card cover.
2. Insert the memory card into the card slot
until it softly clicks.
Make sure that the terminal portion is
facing left and the camcorder is placed
as shown in the fi gure.
3. Close the memory card cover.
•
To eject a memory card
1. Open the memory card cover.
2. Gently push the memory card to eject it.
3. Close the memory card cover.
INSERTING / EJECTING A MEMORY CARD
(NOT SUPPLIED)
To avoid the data loss, turn off the camcorder by pressing the Power ( ) button for one second
before inserting or ejecting the memory card.
Be careful not to push the memory card too hard. The memory card may suddenly pop out.
•
•
Your camcorder supports only SD (Secure Digital) and SDHC (Secure Digital High Capacity) cards.
The compatibility with the camcorder may vary depending on manufacturers and types of the memory
cards.
getting ready to start recording