Samsung Electronics Co SLM3065FW Multi Function Printer User Manual
Samsung Electronics Co Ltd Multi Function Printer
Contents
Users Manual Part 9

226
4. Special Features
Printing features
• For basic printing features, refer to the Basic Guide (see "Basic printing"
on page 51).
• This feature may not be available depending on model or optional goods
(see "Features by model" on page 7).
10
Changing the default print settings
1Click the Windows Start menu.
• For Windows 8, from the Charms, select Search > Settings.
2 For Windows XP/Server 2003, select Printer and Faxes.
• For Windows Server 2008/Vista, select Control Panel > Hardware
and Sound > Printers.
• For Windows Server 2008 R2, select Control Panel > Hardware >
Devices and Printers.
• For Windows 7/8, select Control Panel > Devices and Printers.
3 Right-click on your machine.
4 For Windows XP/Server 2003/Server 2008/Vista, select Printing
Preferences.
For Windows 7/8 or Windows Server 2008 R2, from context menus, select
Printing preferences.
If Printing preferences has a ►, you can select other printer drivers
connected to the selected printer.
5 Change the settings on each tab.
6 Click OK.
If you want to change the settings for each print job, change it in Printing
Preferences.
11
Setting your machine as a default machine
1Click the Windows Start menu.
• For Windows 8, from the Charms, select Search > Settings.
2 For Windows XP/Server 2003, select Printer and Faxes.
• For Windows Server 2008/Vista, select Control Panel > Hardware
and Sound > Printers.
• For Windows Server 2008 R2, select Control Panel > Hardware >
Devices and Printers.
• For Windows 7/8, select Control Panel > Devices and Printers.

Printing features
227
4. Special Features
3 Select your machine.
4 Right-click your machine and select Set as Default Printer.
For Windows 7 or Windows Server 2008 R2, if Set as default printer has a
►, you can select other printer drivers connected to the selected printer.
12
Using advanced print features
XPS printer driver: used to print XPS file format.
• See "Features by model" on page 7.
• The XPS printer driver can be installed only on Windows Vista OS or
higher.
• For models that provide XPS driver from the Samsung website, http://
www.samsung.com > find your product> Support or downloads.
Printing to a file (PRN)
You will sometimes need to save the print data as a file.
1Check the Print to file box in the Print window.
2 Click Print.
3 Type in the destination path and the file name, and then click OK.
For example, c:\Temp\file name.
If you type in only the file name, the file is automatically saved in My
Documents, Documents and Settings, or Users. The saved folder may
differ, depending on your operating system or the application you are
using.

Printing features
228
4. Special Features
Understanding special printer features
You can use advanced printing features when using your machine.
To take advantage of the printer features provided by your printer driver, click Properties or Preferences in the application’s Print window to change the print
settings. The machine name, that appears in the printer properties window may differ depending on the machine in use.
• Some menus may not appear on the display depending on options or models. If so, it is not applicable to your machine.
• Select the Help menu or click the button from the window or press F1 on your keyboard and click on any option you want to know about (see "Using help"
on page 54).
Item Description
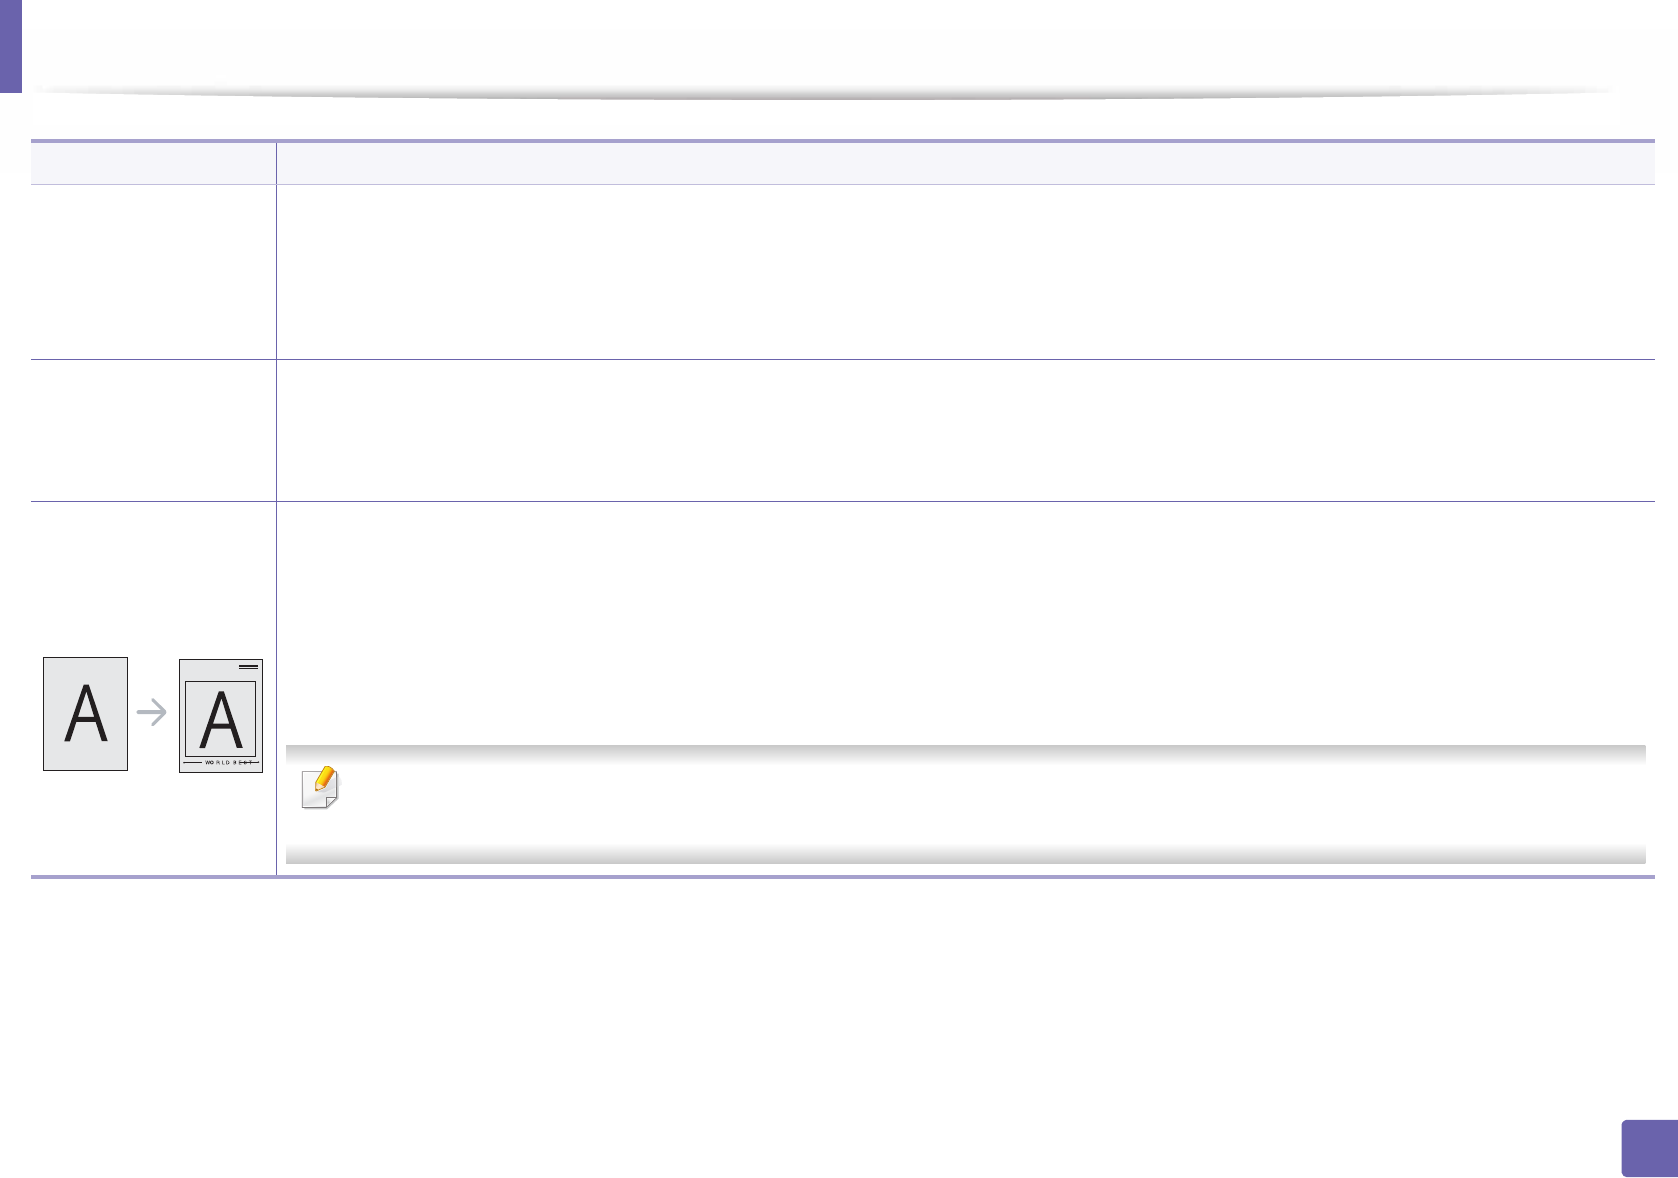
Multiple Pages per
Side
Selects the number of pages to print on a single sheet of paper. To print more than one page per sheet, the pages will be reduced in size and
arranged in the order you specify. You can print up to 16 pages on one sheet.
Poster Printing
Prints a single-page document onto 4 (Poster 2x2), 9 (Poster 3x3), or 16 (Poster 4x4) sheets of paper, for the purpose of pasting the sheets
together to form one poster-size document.
Select the Poster Overlap value. Specify Poster Overlap in millimeters or inches by selecting the radio button on the upper right of Basic tab
to make it easier to paste the sheets together.

Printing features
229
4. Special Features
Booklet Printinga
Prints your document on both sides of a sheet of paper and arranges the pages so that the paper can be folded in half after printing to produce
a booklet.
• If you want to make a booklet, you need to print on Letter, Legal, A4, US Folio, or Oficio sized print media.
• The Booklet Printing option is not available for all paper sizes. Select the available paper Size option under the Paper tab to see what
paper sizes are available.
• If you select an unavailable paper size, this option can be automatically canceled. Select only available paper (paper without or
mark).
•Double-sided
Printing
•Double-sided
Printing (Manual)a
Print on both sides of a sheet of paper (duplex). Before printing, decide how you want your document oriented.
• You can use this feature with Letter, Legal, A4, US Folio or Oficio sized paper
• If your machine does not have a duplex unit, you should complete the printing job manually. The machine prints every other page of
the document first. After that, a message appears on your computer.
•Skip Blank Pages feature does not work when you select the duplex option.
Item Description
8
9

Printing features
230
4. Special Features
•Double-sided
Printing
•Double-sided
Printing (Manual)a
•Off: Disables this feature.
•Long Edge: This option is the conventional layout used in bookbinding.
•Short Edge: This option is the conventional layout used in calendars.
Paper Options Changes the size of a document to appear larger or smaller on the printed page by entering in a percentage by which to enlarge or decrease the
document.
Watermark The watermark option allows you to print text over an existing document. For example, you use it when you want to have large gray letters
reading “DRAFT” or “CONFIDENTIAL” printed diagonally across the first page or all pages of a document.
Watermark
(Creating a
watermark)
a To change the print settings from your software application, access Printing Preferences.
b Click the Advanced tab, select Edit from the Watermark drop-down list. The Edit Watermarks window appears.
c Enter a text message in the Watermark Message box.
You can enter up to 256 characters. The message displays in the preview window.
Item Description
Printing features
231
4. Special Features
Watermark
(Editing a watermark)
a To change the print settings from your software application, access Printing Preferences.
b Click the Advanced tab, select Edit from the Watermark drop-down list. The Edit Watermarks window appears.
c Select the watermark you want to edit from the Current Watermarks list and change the watermark message and options.
d Click Update to save the changes.
e Click OK or Print until you exit the Print window.
Watermark
(Deleting a
watermark)
a To change the print settings from your software application, access Printing Preferences.
b Click the Advanced tab, select Edit from the Watermark drop-down list. The Edit Watermarks window appears.
c Select the watermark you want to delete from the Current Watermarks list and click Delete.
d Click OK or Print until you exit the Print window.
Overlaya
This option is available only when you use the PCL/SPL printer driver (see "Software" on page 7).
An overlay is text and/or images stored in the computer hard disk drive (HDD) as a special file format that can be printed on any document.
Overlays are often used to take the place of letterhead paper. Rather than using preprinted letterhead, you can create an overlay containing
exactly the same information that is currently on your letterhead. To print a letter with your company’s letterhead, you do not need to load
preprinted letterhead paper in the machine: just print the letterhead overlay on your document.
To use a page overlay, you must create a new page overlay containing your logo or image.
• The overlay document size must be the same as the document you print with the overlay. Do not create an overlay with a watermark.
• The resolution of the overlay document must be the same as that of the document you will print with the overlay.
Item Description

Printing features
232
4. Special Features
Overlaya
(Creating a new page
overlay)
a To save the document as an overlay, access Printing Preferences.
b Click the Advanced tab, and select Edit from the Text drop-down list. Edit Overlay window appears.
c In the Edit Overlay window, click Create.
d In the Save As window, type a name up to eight characters in the File name box. Select the destination path, if necessary (The default is
C:\FormOver).
e Click Save. The name appears on the Overlay List.
f Click OK or Print until you exit the Print window.
The file is not printed. Instead, it is stored on your computer hard disk drive.
Overlaya
(Using a page overlay)
a Click the Advanced tab.
b Select the desired overlay from the Text drop-down list.
c If the overlay file you want does not appear in the Text drop-down list, select Edit... from the list and click Load. Select the overlay file you
want to use.
If you have stored the overlay file you want to use in an external source, you can also load the file when you access the Open window.
After you select the file, click Open. The file appears in the Overlay List box and is available for printing. Select the overlay from the Overlay
List box.
d If necessary, check Confirm Page Overlay When Printing box. If this box is checked, a message window appears each time you submit a
document for printing, asking you to confirm printing an overlay on your document.
If this box is not checked and an overlay has been selected, the overlay automatically prints with your document.
e Click OK or Print until you exit the Print window.
Overlaya
(Deleting a page
overlay)
a In the Printing Preferences window, click the Advanced tab.
b Select Edit in the Text drop down list.
c Select the overlay you want to delete from the Overlay List box.
d Click Delete.
e When a confirming message window appears, click Yes.
f Click OK or Print until you exit the Print window. You can delete page overlays that you no longer use.
a. This option is not available when you use XPS driver.
Item Description
Printing features
233
4. Special Features
13
Using Direct Printing Utility
• Direct Printing Utility may not be available depending on model or
optional goods (see "Software" on page 7).
• Available for Windows OS users only.
What is Direct Printing Utility?
Direct Printing Utility is a program that sends the PDF files directly to your
machine to print without having to open the file.
To install this program:
Download the software from the Samsung website then unpack and install it:
(http://www.samsung.com > find your product > Support or Downloads).
• Optional memory Mass storage device (HDD) should be installed on your
machine, to print files using this program (see "Variety feature" on page
9).
• You cannot print PDF files that are restricted. Deactivate the printing
restriction feature and retry printing.
• You cannot print PDF files that are restricted by a password. Deactivate
the password feature, and retry printing.
• Whether or not a PDF file can be printed using the Direct Printing Utility
program depends on how the PDF file was created.
• The Direct Printing Utility program supports PDF version 1.7 and below.
For higher versions, you must open the file to print it.
Printing
There are several ways you can print using the Direct Printing Utility.
1From the Start menu select Programs or All Programs .
• For Windows 8, from Charms, select Search > Apps.
2 Find Samsung Printers > Direct Printing Utility.
3 Select your machine from the Select Printer drop-down list and click
Browse.
4 Select the file you wish to print and click Open.
The file is added in the Select Files section.
5 Customize the machine settings for your needs.
6 Click Print. The selected PDF file is sent to the machine.

Printing features
234
4. Special Features
Using the right-click menu
1Right-click on the PDF file to print and select Direct Printing.
The Direct Printing Utility window appears with the PDF file is added.
2 Select the machine to use.
3 Customize the machine settings.
4 Click Print. The selected PDF file is sent to the machine.
14
Mac printing
Some features may not be available depending on models or options. It
means that the features are not supported.
Printing a document
When you print with a Mac, you need to check the printer driver settings in each
application you use. Follow the steps below to print from a Mac:
1Open the document to print.
2 Open the File menu and click Page Setup (Document Setup in some
applications).
3 Choose your paper size, orientation, scaling, other options, and make
sure that your machine is selected. Click OK.
4 Open the File menu and click Print.
5 Choose the number of copies and indicate which pages to print.
6 Click Print.

Printing features
235
4. Special Features
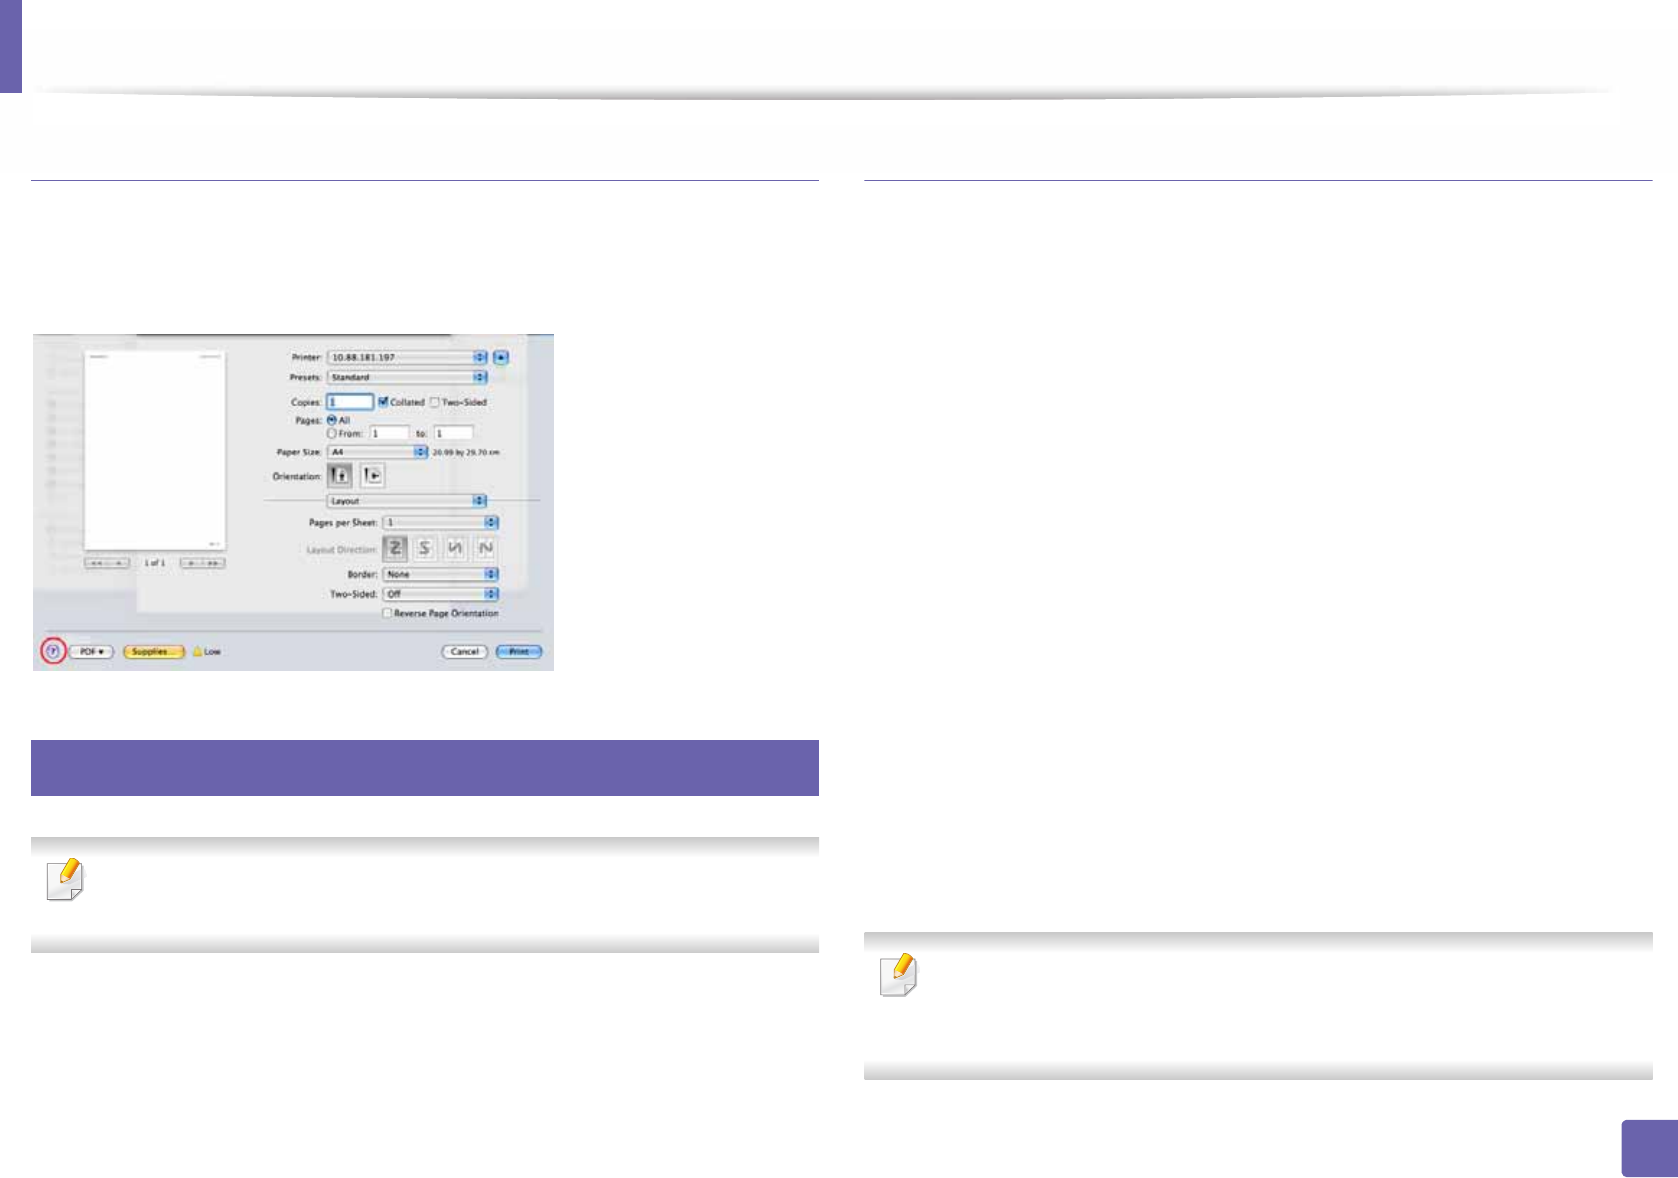
Changing printer settings
You can use advanced printing features when using your machine.
Open an application and select Print from the File menu. The machine name,
which appears in the printer properties window, may differ depending on the
machine in use. Except for the name, the composition of the printer properties
window is similar to the following.
Printing multiple pages on one sheet
You can print more than one page on a single sheet of paper. This feature
provides a cost-effective way to print draft copies.
1Open an application, and select Print from the File menu.
2 Select Layout from the drop-down list under Orientation. In the Pages
per Sheet drop-down list, select the number of pages you want to print
on one sheet of paper.
3 Select the other options to use.
4 Click Print.
The machine prints the selected number of pages to print on one sheet
of paper.
Printing on both sides of the paper
Some features may not be available depending on models or options. It
means that the features are not supported (see "Features by model" on
page 7).
Before printing in the duplex mode, decide on which edge you will be binding
your finished document. The binding options are, as follows:
•Long-Edge Binding: This option is the conventional layout used in book
binding.
•Short-Edge Binding: This option is the type often used with calendars.
1From your Mac application, select Print from the File menu.
2 Select Layout from the drop-down list under Orientation.
3 Select a binding orientation from the Two-Sided option.
4 Select the other options to use.
5 Click Print and the machine prints on both sides of the paper.
If you print more than 2 copies, the first copy and the second copy might
print on the same sheet of paper. Avoid printing on both sides of paper
when you are printing more than 1 copy.
Printing features
236
4. Special Features
Using help
Click the question mark on the bottom-left corner of the window and click on
the topic you want to know about. A pop-up window appears with information
about that option's feature, which is provided from the driver.
15
Linux printing
Some features may not be available depending on models or options. It
means that the features are not supported.
Printing from applications
There are a lot of Linux applications that allow you to print using Common UNIX
Printing System (CUPS). You can print on your machine from any such
application.
1Open the document to print.
2 Open the File menu and click Page Setup (Print Setup for some
applications).
3 Choose your paper size, orientation, and make
sure that your machine is selected. Click Apply.
4 Open the File menu and click Print.
5 Select your machine to print.
6 Choose the number of copies and indicate which pages to print.
7 Change other printing options in each tab, if necessary.
8 Click Print.
Automatic/manual duplex printing may not be available depending on
models. You can alternatively use the lpr printing system or other
applications for odd-even printing (see "Features by model" on page 7).
Printing features
237
4. Special Features
Printing files
You can print text, image, pdf files on your machine using the standard
CUPS directly from the command line interface. The CUPS lp or lpr utility allows
you to do that. You can print these files by using below command format.
"lp -d <printer name> -o <option> <file name>"
Please refer to lp or lpr man page on your system for more details.
Configuring Printer Properties
You can change the default printing options or connection type with Printing
utility supplied by the OS.
1Launch Printing utility(Go to System > Administration > Printing
menu or execute "system-config-printer" command in Terminal
program).
2 Select your printer and double-click it.
3 Change the default printing options or connection type.
4 Click the Apply button.
16
Unix printing
Some features may not be available depending on models or options. It
means that the features are not supported (see "Features by model" on
page 7).
Proceeding the print job
After installing the printer, choose any of the image, text, PS or HPGL files to
print.
1Execute “printui <file_name_to_print>” command.
For example, if you are printing “document1”
printui document1
This will open the UNIX Printer Driver Print Job Manager in which the
user can select various print options.
2 Select a printer that has been already added.
3 Select the printing options from the window such as Page Selection.
4 Select how many copies are needed in Number of Copies.

Printing features
238
4. Special Features
To take advantage of the printer features provided by your printer driver,
press Properties.
5 Press OK to start the print job.
Changing the machine settings
The UNIX printer driver Print Job Manager in which the user can select various
print options in printer Properties.
The following hot keys may also be used: “H” for Help, “O” for OK, “A” for Apply,
and “C” for Cancel.
General tab
•Paper Size: Set the paper size as A4, Letter, or other paper sizes, according
to your requirements.
•Paper Type: Choose the type of the paper. Options available in the list box
are Printer Default, Plain, and Thick.
•Paper Source: Select from which tray the paper is used. By default, it is Auto
Selection.
•Orientation: Select the direction in which information is printed on a page.
•Duplex: Print on both sides of paper to save paper
Automatic/manual duplex printing may not be available depending on
models. You can alternatively use the lpr printing system or other
applications for odd-even printing (see "Features by model" on page 7).
•Multiple pages: Print several pages on one side of the paper.
•Page Border: Choose any of the border styles (e.g., Single-line hairline,
Double-line hairline)
Image tab
In this tab, you can change the brightness, resolution, or image position of your
document.
Text tab
Set the character margin, line space, or the columns of the actual print output.
Margins tab
•Use Margins: Set the margins for the document. By default, margins are not
enabled. The user can change the margin settings by changing the values in
the respective fields. Set by default, these values depend on the page size
selected.
•Unit: Change the units to points, inches, or centimeters.

Printing features
239
4. Special Features
Printer-Specific Settings tab
Select various options in the JCL and General frames to customize various
settings. These options are specific to the printer and depend on the PPD file.

240
4. Special Features
Scan features
• For basic scanning features, refer to the Basic Guide (see "Basic scanning"
on page 62).
• This feature may not be available depending on model or optional goods
(see "Features by model" on page 7).
• The maximum resolution that can be achieved depends upon various
factors, including computer speed, available disk space, memory, the
size of the image being scanned, and bit depth settings. Thus,depending
on your system and what you are scanning, you may not be able to scan
at certain resolutions, especially using enhanced dpi.
17
Basic scanning method
This feature may not be available depending on model or optional goods
(see "Variety feature" on page 9).
You can scan the originals with your machine via a USB cable or the network. The
following methodoloqies can be used for scanning your documents:
•Scan to PC: Scan the originals from the control panel. Then, the scanned
data will be stored in the connected computers My Documents folder (see
"Basic Scanning" on page 62).
•TWAIN: TWAIN is one of the preset imaging applications. Scanning an
image launches the selected application, enabling you to control the
scanning process. This feature can be used via the local connection or the
network connection (see "Scanning from image editing program" on page
243).
•Samsung Easy Document Creator: You can use this program to scan
images or documents. We recommend using scan features with the
Samsung Easy Document Creator program provided in the supplied
sofware CD.
- See "Using Samsung Easy Document Creator" on page 264.
•WIA: WIA stands for Windows Images Acquisition. To use this feature, your
computer must be connected directly with the machine via an USB cable
(see "Scanning using the WIA driver" on page 244).
Scan features
241
4. Special Features
18
Setting the scan settings in the computer
This feature may not be available depending on model or optional goods
(see "Features by model" on page 7).
1Open Samsung Easy Printer Manager (see "Using Samsung Easy
Printer Manager" on page 265).
2 Select the appropriate machine from the Printer List.
3 Select Scan to PC Settings menu.
4 Select the option you want.
•Scan Activation: Determines whether or not scanning is enabled on
the device.
•Profile: Displays the scanning profiles saved on the selected device.
•Basic tab: Contains settings related to general scan and device
settings.
•Image tab: Contains settings related to image altering.
5 Press Save > OK.
19
Scanning from network connected machine
Make sure the printer driver is installed on your computer using the software CD,
since the printer driver includes the scan program (see "Installing the driver
locally" on page 26).
1Place a single document (see "Loading originals" on page 48).
2 Select (Scan) > Scan to PC > Network PC on the control panel.
Or select Scan to button > Scan to PC > Network PC on the control
panel.
If you see Not Available message, check the port connection.
Scan features
242
4. Special Features
3 Select your registered computer ID, and enter the Password if
necessary.
•ID is the same ID as the registered scan ID for Samsung Easy Printer
Manager > Switch to advanced mode > Scan to PC Settings.
•Password is the 4 digit number registered password for Samsung Easy
Printer Manager > Switch to advanced mode > Scan to PC
Settings.
4 Select the option you want and press OK.
5 Scanning begins.
Scanned image is saved in computer’s C:\Users\users
name\Pictures\folder. The saved folder may differ, depending on your
operating system or the application you are using.
20
Scanning to WSD
Scans the originals and saves the scanned data on a connected computer if the
computer supports the WSD (Web Service for Device) feature. To use the WSD
feature, you need to install the WSD printer driver on your computer. For
Windows 7, you can install the WSD driver by Control Panel > Devices and
Printers > Add a printer. Click Add a network printer from the wizard.
• The machine that does not support the network interface, it will not be
able to use this feature (see "Features by model" on page 7).
• The WSD feature works only with Windows Vista® or later version that are
the WSD-compliant computer.
• The following installation steps are based on Windows 7 computer.
Installing a WSD Printer Driver
1Select Start > Control Panel > Devices and Printers > Add a printer.
2 Click Add a network, wireless or Bluetooth printer from the wizard.
3 In the printers list, select the one you want to use, and then click Next.

Scan features
243
4. Special Features
• The IP address for WSD printer is http://IP address/ws/ (example: http://
111.111.111.111/ws/).
• If no WSD printer is displayed in the list, click The printer that I want
isn't listed > Add a printer using a TCP/IP address or hostname and
select Web Services Device from Device type. Then enter the printer's
IP address.
4 Follow the instructions in the installation window.
Scanning using the WSD feature
1Make sure that the machine is connected to your computer and
powered on.
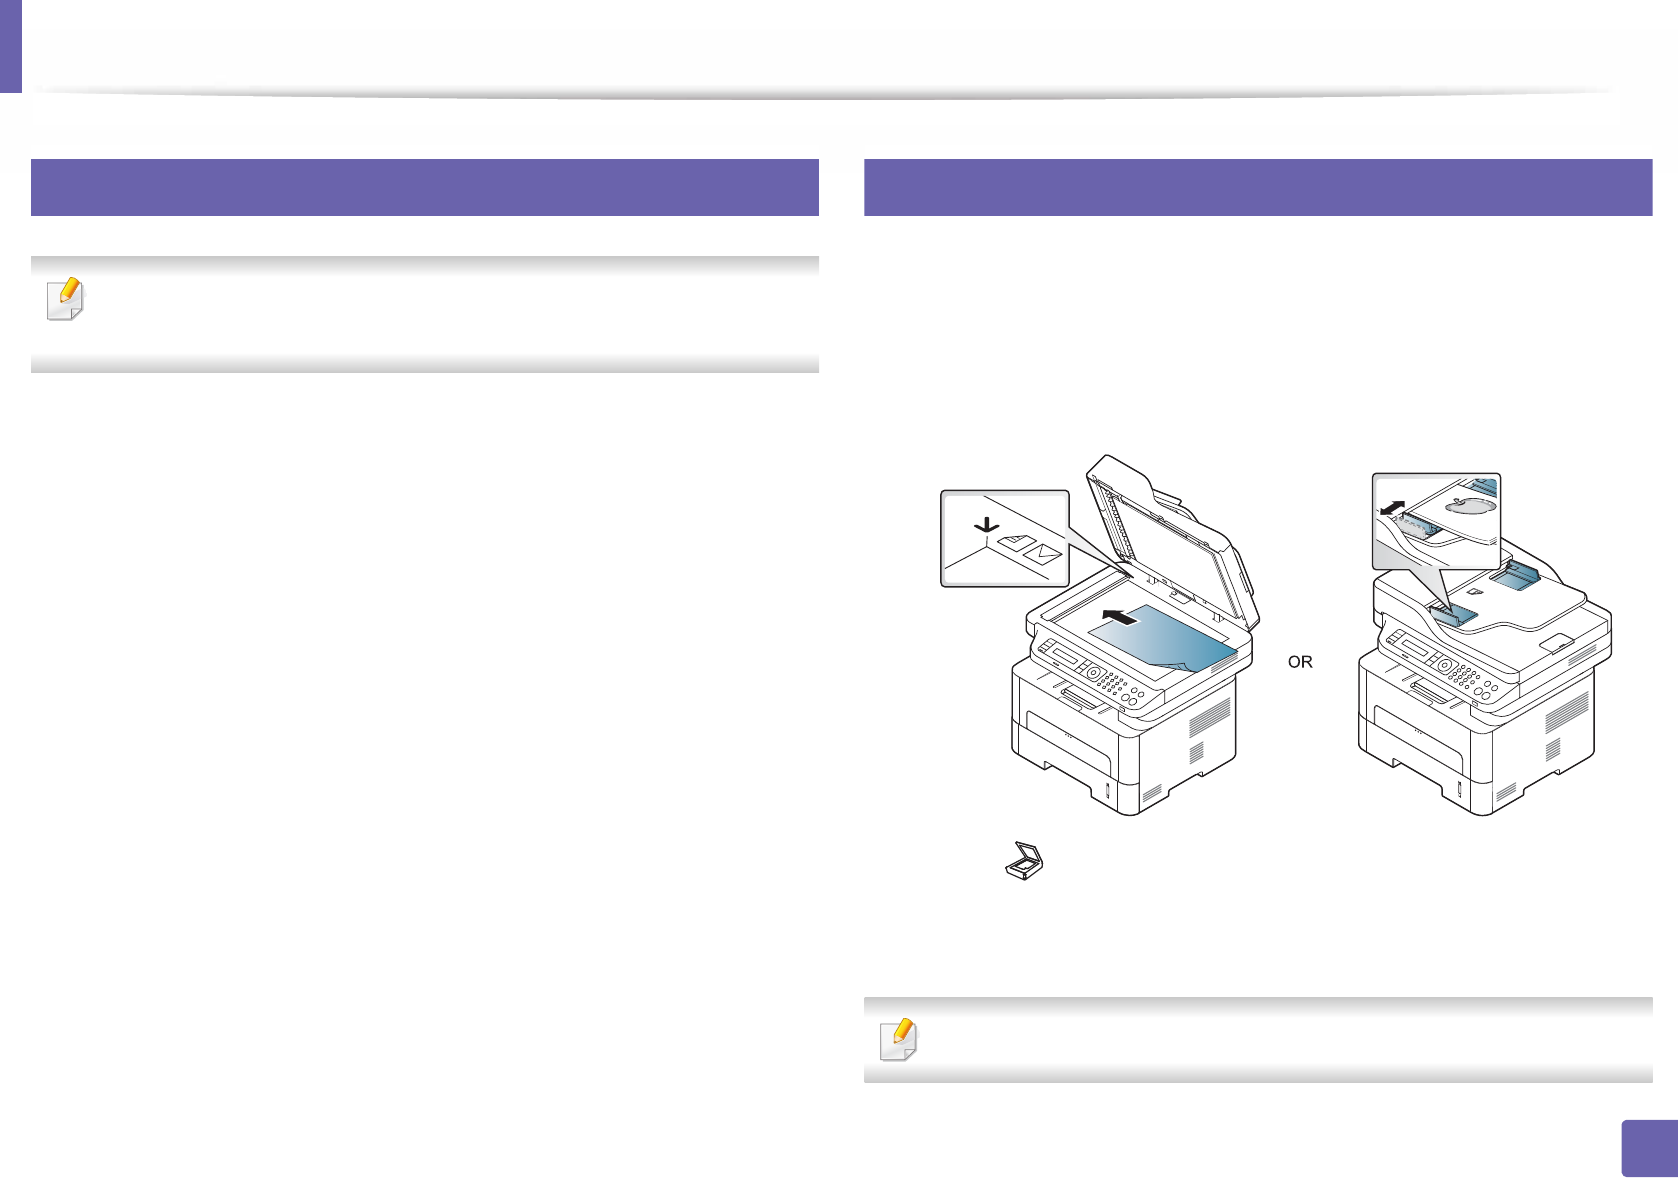
2 Place a single document face down on the document glass, or load the
documents face up into the document feeder (see Loading originals).
3 Select (Scan) > Scan to WSD on the control panel.
If you see Not Available message, check the port connection. Or check the
printer driver for WSD is correctly installed.
4 Select your computer name from Destination List.
5 Select the option you want and press OK.
6 Scanning begins.
21
Scanning from image editing program
You can scan and import documents in the image editing software or using
image editing software such as Adobe Photoshop, if the software is TWAIN-
compliant. Follow the steps below to scan with TWAIN-compliant software:
1Make sure that the machine is connected to your computer and
powered on.
2 Place a single document (see "Loading originals" on page 48).
3 Open an application, such as Adobe Photoshop.
Scan features
244
4. Special Features
4 Click File > Import, and select the scanner device.
5 Set the scan options.
6 Scan and save your scanned image.
22
Scanning using the WIA driver
Your machine supports the Windows Image Acquisition (WIA) driver for
scanning images. WIA is one of the standard components provided by Microsoft
Windows 7 and works with digital cameras and scanners. Unlike the TWAIN
driver, the WIA driver allows you to scan and easily adjust images without using
additional software:
The WIA driver works only on Windows OS with a USB port.
1Make sure that the machine is connected to your computer and
powered on.
2 Place a single document (see "Loading originals" on page 48).
3 Click Start > Control Panel > Hardware and Sound > Devices and
Printers.
4 Right-click on device driver icon in Printers and Faxes > Start Scan.
5 New Scan application appears.
6 Choose your scanning preferences and click Preview to see your
preferences affect the picture.
7 Scan and save your scanned image.

Scan features
245
4. Special Features
23
Mac scanning
Scanning from USB connected machine
1Make sure that the machine is connected to your computer and
powered on.
2 Place a single document face down on the document glass, or load the
documents face up into the document feeder (see "Loading originals" on
page 48).
3 Start Applications and click Image Capture.
If No Image Capture device connected message appears, disconnect the
USB cable and reconnect it. If the problem continues, refer to the Image
Capture’s help.
4 Select the option you want.
5 Scan and save your scanned image.
If scanning does not operate in Image Capture, update Mac OS to the latest
version.
Scanning from network connected machine
Network or wireless model only (see "Features by model" on page 7).
1Make sure that your machine is connected to a network.
2 Place a single document face down on the document glass, or load the
documents face up into the document feeder (see "Loading originals" on
page 48).
3 Start Applications and click Image Capture.
4 According to OS, follow steps below.
• For 10.5
-Click Devices > Browse Devices on Menu bar.
- Make sure that Connected checkbox is checked beside your
machine in Bonjour Devices.
• For 10.6-10.9, select your device below SHARED.
5 Set the scan options on this program.
6 Scan and save your scanned image.

Scan features
246
4. Special Features
• If scanning does not operate in Image Capture, update Mac OS to the
latest version.
• For more information, refer to the Image Capture’s help.
• You can also scan using TWAIN-compliant software, such as Adobe
Photoshop.
•You can scan using Samsung Scan Assistant software. Open the
Applications folder > Samsung folder > Samsung Scan Assistant.
24
Linux scanning
1Make sure that the machine is connected to your computer and
powered on.
2 Launch a scan application such as xsane or simple-scan(If it's not
installed, please install it manually to use scan features. For example, you
may use "yum install xsane" for rpm package systems and "apt-get install
xsane" for deb package systems to install xsane).
3 Select your device from the list and set the scan options to apply.
4 Click the Scan button.

247
4. Special Features
Fax features
• For basic faxing features, refer to the Basic Guide (see "Basic faxing" on
page 63).
25
Automatic redialing
When the number you have dialed is busy or there is no answer when you send
a fax, the machine automatically redials the number. The redial time depends on
the country's factory default setting.
When the display shows Retry Redial?, press (Start) button to redial the
number without waiting. To cancel the automatic redialing, press (Stop/
Clear).
To change the time interval between redials and the number of redial attempts.
1Press (fax) > (Menu)> Fax Setup > Sending on the control
panel.
2 Select Redial Times or Redial Term you want.
3 Select the option you want.
26
Redialing the fax number
1Press (Redial/Pause) button on the control panel.
2 Select the fax number you want.
Ten recently sent fax numbers with ten received Caller IDs are shown.
3 When an original is loaded in the document feeder, the machine
automatically begins to send.
If an original is placed on the scanner glass, select Yes to add another
page. Load another original and press OK. When you have finished,
select No when Another Page? appears.
27
Confirming a transmission
When the last page of your original has been sent successfully, the machine
beeps and returns to ready mode.
When something goes wrong while sending your fax, an error message appears
on the display. If you receive an error message, press (Stop/Clear) to clear
the message and try to send the fax again.
Fax features
248
4. Special Features
You can set your machine to print a confirmation report automatically each
time sending a fax is completed. Press (fax) > (Menu) > System
Setup > Report > Fax Confirm. on the control panel.
28
Sending a fax in the computer
This feature may not be available depending on model or optional goods
(see "Features by model" on page 7).
You can send a fax from your computer without going to the machine.
To send a fax from your computer, the Samsung Network PC Fax program
must be installed. This program will be installed when you installed the printer
driver.
1Open the document to be sent.
2 Select Print from the File menu.
The Print window will be displayed. It may look slightly different
depending on your application.
3 Select Samsung Network PC Fax from the Print window
4 Click Print or OK.
5 Enter the recipients’ numbers and select the option
Select the Help button from the window and click on any option you want
to know about.
6 Click Send.
29
Delaying a fax transmission
You can set your machine to send a fax at a later time when you will not be
present. You cannot send a color fax using this feature.
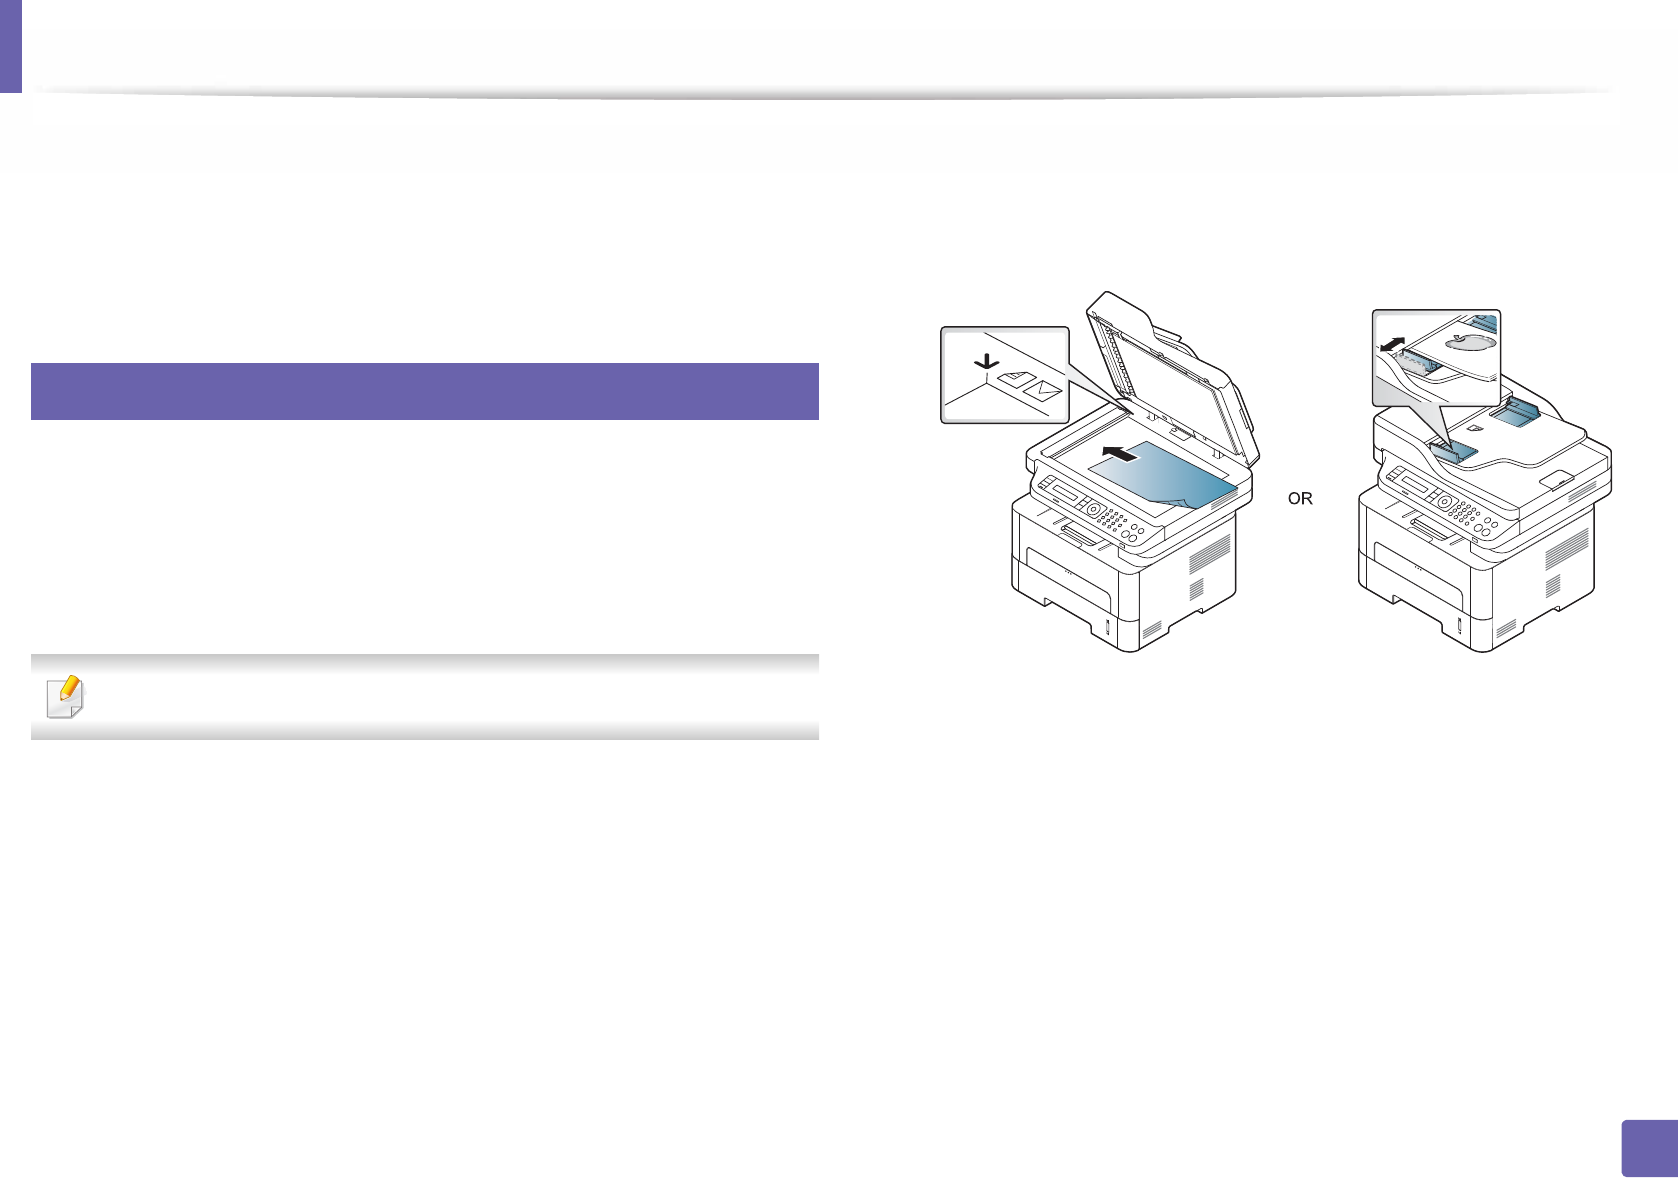
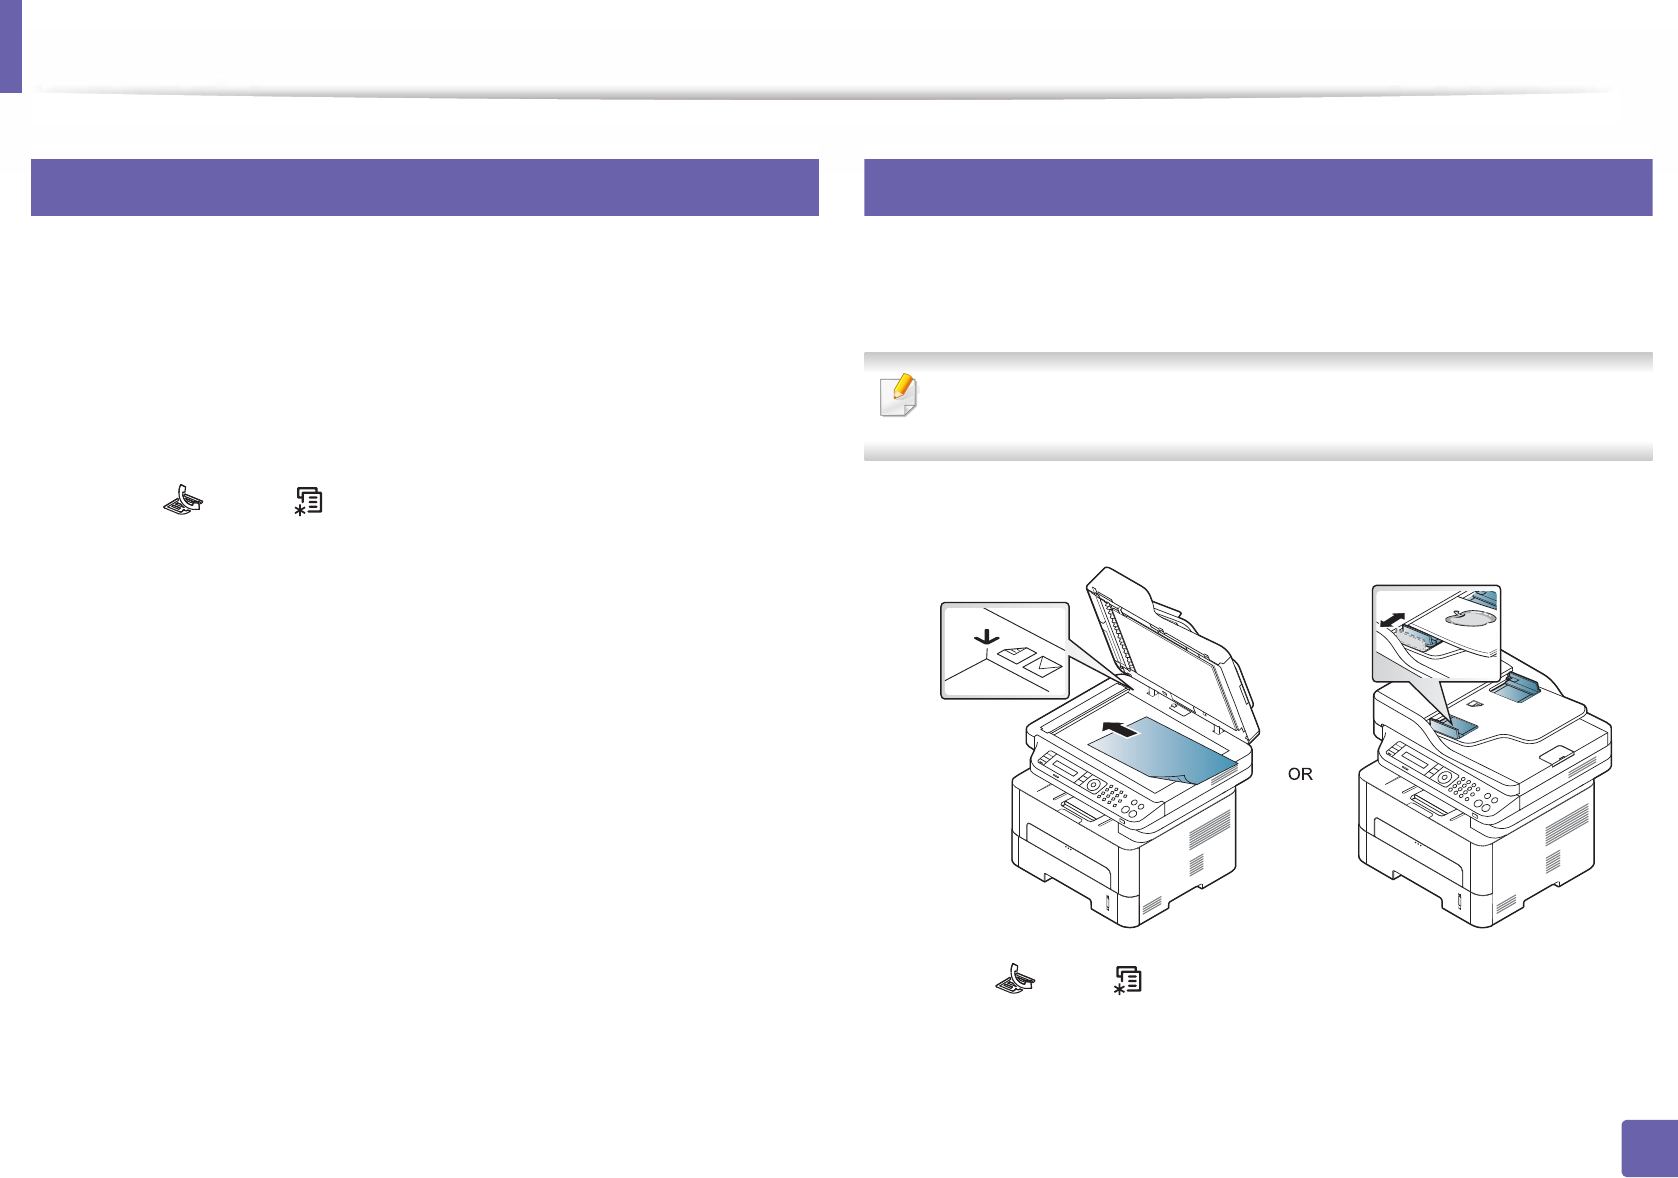
1Place a single document face down on the document glass, or load the
documents face up into the document feeder.
2 Press (fax) on the control panel.
3 Adjust the resolution and the darkness to suit your fax needs.
4 Press (Menu) > Fax Feature > Delay Send on the control panel.
5 Enter the number of the receiving fax machine and press OK.
6 The display asks you to enter another fax number to send the document.
Fax features
249
4. Special Features
7 To enter more fax numbers, press OK when Yes highlights and repeat
steps 5.
• You can add up to 10 destinations.
• Once you entered a group dial number, you cannot enter another group
dial numbers anymore.
8 Enter the job name and the time.
If you set a time earlier than the current time, the fax will be sent at that time
on the following day.
9 The original is scanned into memory before transmission.
The machine returns to ready mode. The display reminds you that you
are in ready mode and that a delayed fax is set.
You can check the list of delayed fax jobs.
Press (Menu) > System Setup > Report > Schduled Jobs on the
control panel.
Adding documents to a reserved fax
1Place a single document face down on the document glass, or load the
documents face up into the document feeder.
2 Press (fax) > (Menu) > Fax Feature > Add Pages on the control
panel.
3 Select the fax job and press OK.
When you have finished, select No when Another Page? appears. The
machine scans the original into memory.
4 Press (Stop/Clear) to return to ready mode.
Canceling a reserved fax job
1Press (fax) > (Menu) > Fax Feature > Cancel Job on the control
panel.
2 Select the fax job you want and press OK.
3 Press OK when Yes highlights.
The selected fax is deleted from memory.
4 Press (Stop/Clear) to return to ready mode.
Fax features
250
4. Special Features
30
Sending a priority fax
This function is used when a high priority fax need to be sent ahead of reserved
operations. The original is scanned into memory and immediately transmitted
when the current operation is finished.
1Place a single document face down on the document glass, or load the
documents face up into the document feeder.
2 Press (Fax) > (Menu) > Fax Feature > Priority Send on the
control panel.
3 Enter the destination fax number and press OK.
4 Enter the job name and press OK.
5 If an original is placed on the scanner glass, select Yes to add another
pages. Load another original and press OK.
When you have finished, select No when Another Page? appears.
The machine starts to scan and send a fax to destinations.
31
Forwarding a sent fax to another destination
You can set the machine to forward the sent fax to other destination by a fax. If
you are out of office but have to receive the fax, this feature may be useful.
• Though you sent or received a color fax, the data is forwarded in
grayscale.
1Place a single document (see "Loading originals" on page 48).
2 Press (fax) > (Menu) > Fax Feature > Send Forward > Forward
to Fax > On on the control panel.