Silex Technology SX10WAG SX-10WAG User Manual
Silex Technology, Inc. SX-10WAG
Contents
Manual 5

65
Copying Network Profiles to the Camera / Infrastructure Networks
Operating the WT-4 for Computer
9Enter the following information and click [Next].
•Network name (SSID): Enter a network name or choose from a
list of existing networks. Do not change the name if it is
supplied automatically.
•Network type: Select [Infrastructure (access point)].
•Authentication: Choose the authentication used on the
network. In infrastructure mode, the camera supports WPA-
PSK, WPA2-PSK, open system, and shared key
authentication.
•Encryption: Choose the encryption used on the network. The
options available depend on the authentication used:
Open: None, 64- or 128-bit WEP Shared: 64- or 128-bit WEP
WPA-PSK: TKIP, AES WPA2-PSK: AES
•Encryption key: If the network uses encryption, enter the
network key. The number of characters required depends
on the type of key used:
•Key Index: Set the key index when [WEP64] or [WEP128] is set
for [Encryption]. The default index is [1]. Setting the key
index is not necessary when [No encryption] was selected
for [Encryption].
WEP (64-bit) WEP (128-bit) TKIP, AES
Number of characters (ASCII) 5 13 8–63
Number of characters (hex) 10 26 64
$00_WT-4_En.book Page 65 Friday, August 10, 2007 2:02 PM

66
Copying Network Profiles to the Camera / Infrastructure Networks
Operating the WT-4 for Computer
$00_WT-4_En.book Page 66 Friday, August 10, 2007 2:02 PM
67
Copying Network Profiles to the Camera / Infrastructure Networks
Operating the WT-4 for Computer
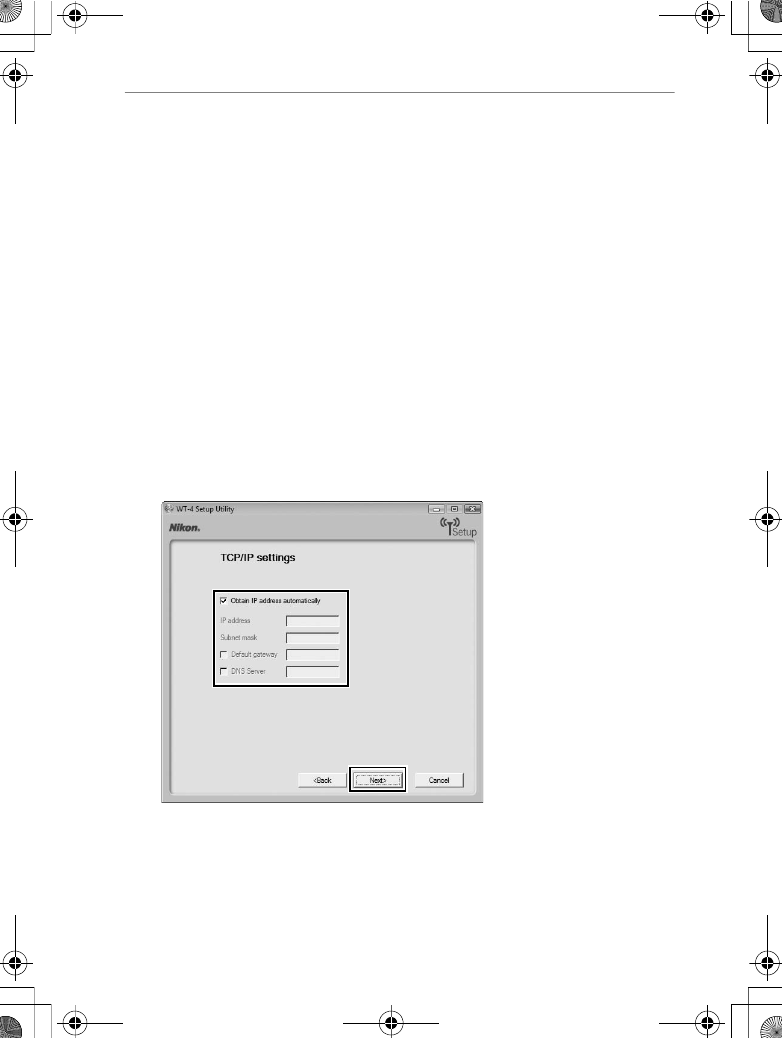
10
Select [Obtain IP address automatically] and click [Next].
•Obtain IP address automatically: Select this option if the network
is configured to supply IP addresses automatically. If the
network does not include a DHCP server, addresses will be
supplied by Auto IP (pg.180).
•IP address: If the network is configured for manual IP
addressing, enter an IP address for the WT-4.
•Subnet mask: If the network is configured for manual IP
addressing, enter a subnet mask for the WT-4.
•Default gateway: If the network requires a gateway address,
select this option and enter the address supplied by the
network administrator. This option applies only if [FTP
server] is selected for Profile type in Step 7.
•DNS server: If a Domain Name Server exists on the network,
select this option and enter the address supplied by the
network administrator. This option applies only if [FTP
server] is selected for Profile type in Step 7.
AConfiguring the IP Address
If a DHCP server exists within the network, select [Obtain IP address
automatically]. If a DHCP server does not exist within the network,
deselect [Obtain IP address automatically] (remove the check mark), and
enter an IP address different from the IP address configured for your
computer or wireless LAN access point.
$00_WT-4_En.book Page 67 Friday, August 10, 2007 2:02 PM
68
Copying Network Profiles to the Camera / Infrastructure Networks
Operating the WT-4 for Computer
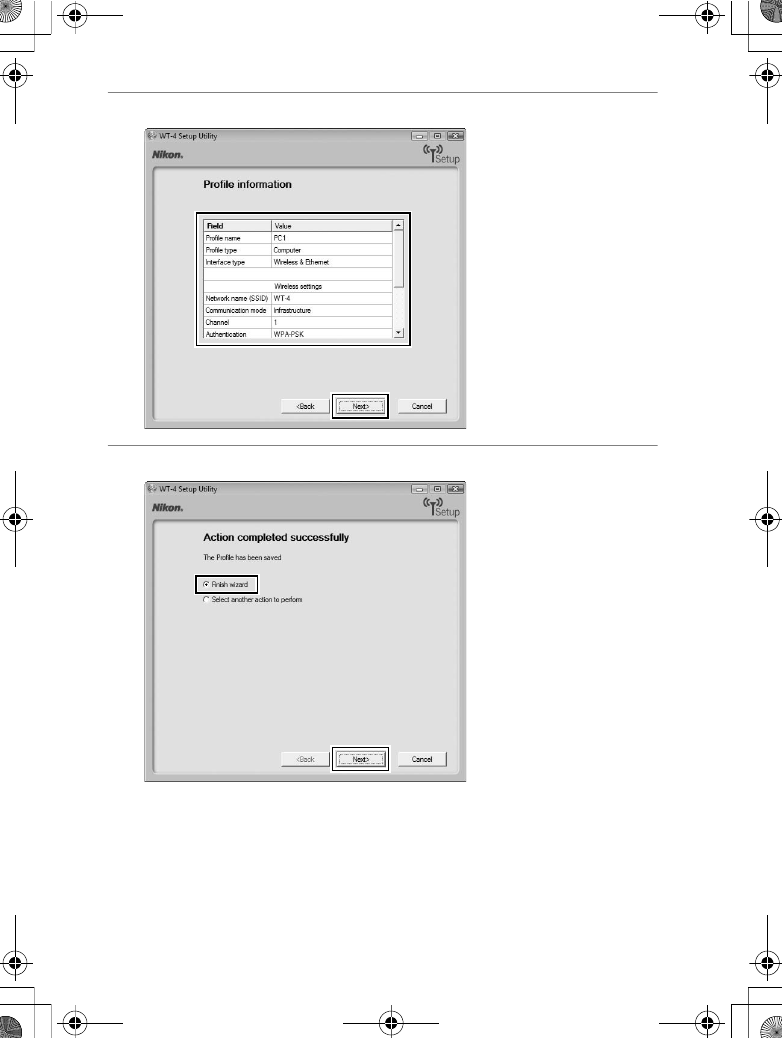
11
Confirm that settings are correct and click [Next].
12
Select [Finish wizard] and click [Next].
$00_WT-4_En.book Page 68 Friday, August 10, 2007 2:02 PM
69
Copying Network Profiles to the Camera / Infrastructure Networks
Operating the WT-4 for Computer
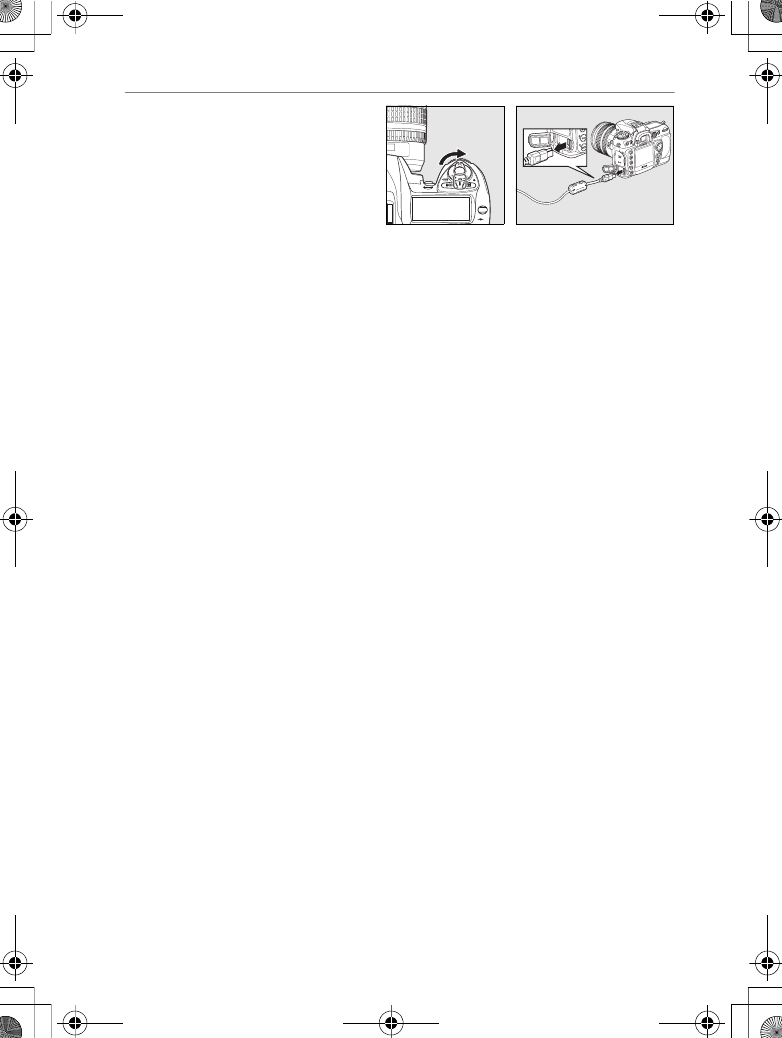
13
Turn the camera off and
disconnect the USB cable.
The network profile has now been copied to the camera. Proceed
to “Upload pictures to a host computer” (pg.70), “Thumbnail select
mode” (pg.79), “PC Mode” (pg.90), “Print Mode” (pg.97).
U
MMY
$00_WT-4_En.book Page 69 Friday, August 10, 2007 2:02 PM
70
Upload pictures to a host computer / Connecting the WT-4
Operating the WT-4 for Computer
Upload pictures to a host
computer
Connecting the WT-4
Before connecting the WT-4, select [MTP/PTP] for the [USB] option
in the camera setup menu (pg.7) and confirm that the computer
intended for network connection is started and the user is logged
in.
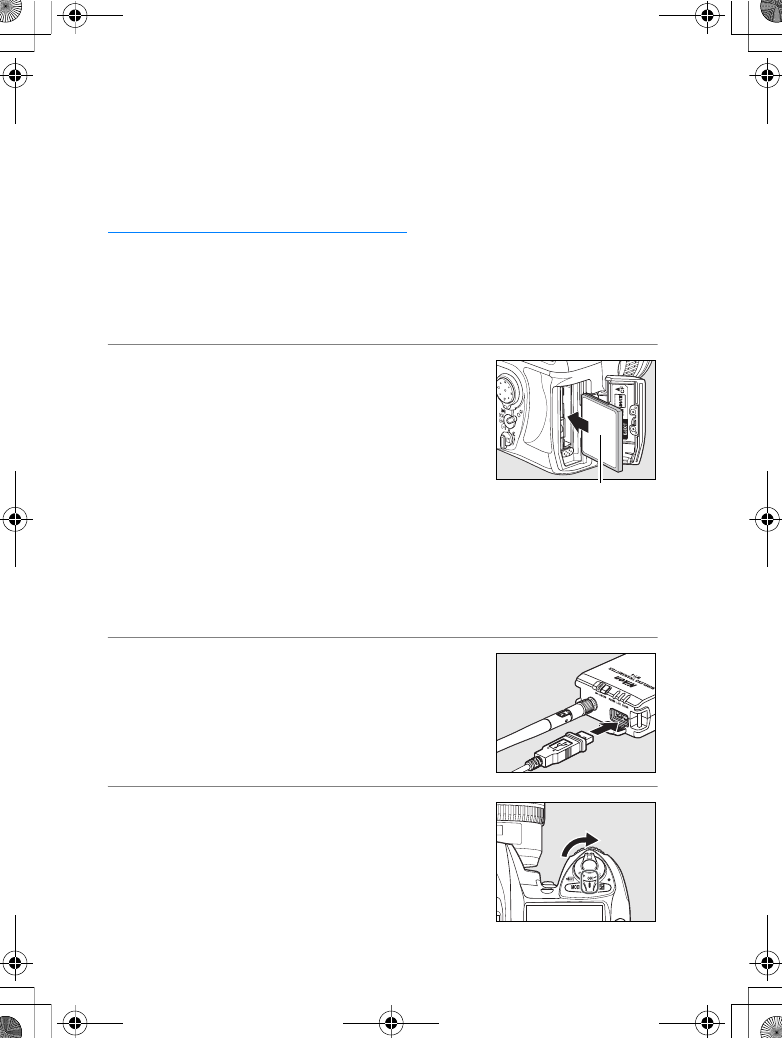
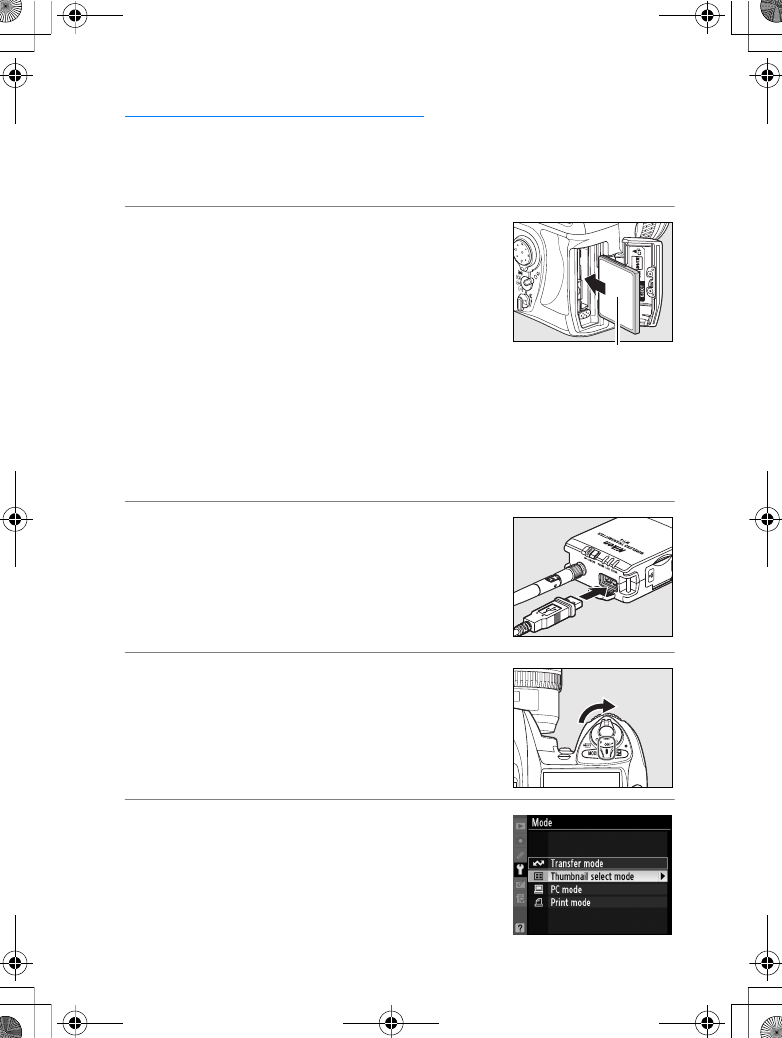
1Turn the camera off and insert the
memory card containing the pictures to
be sent.
•If there are multiple card slots, insert
the card into any slot.
To access the network via Ethernet, connect the Ethernet
cable (pg.2). Note that wireless transfer is disabled while an
Ethernet cable is connected. Disconnect the Ethernet cable
before accessing a wireless network. Turn the WT-4 off before
connecting or disconnecting the Ethernet cable.
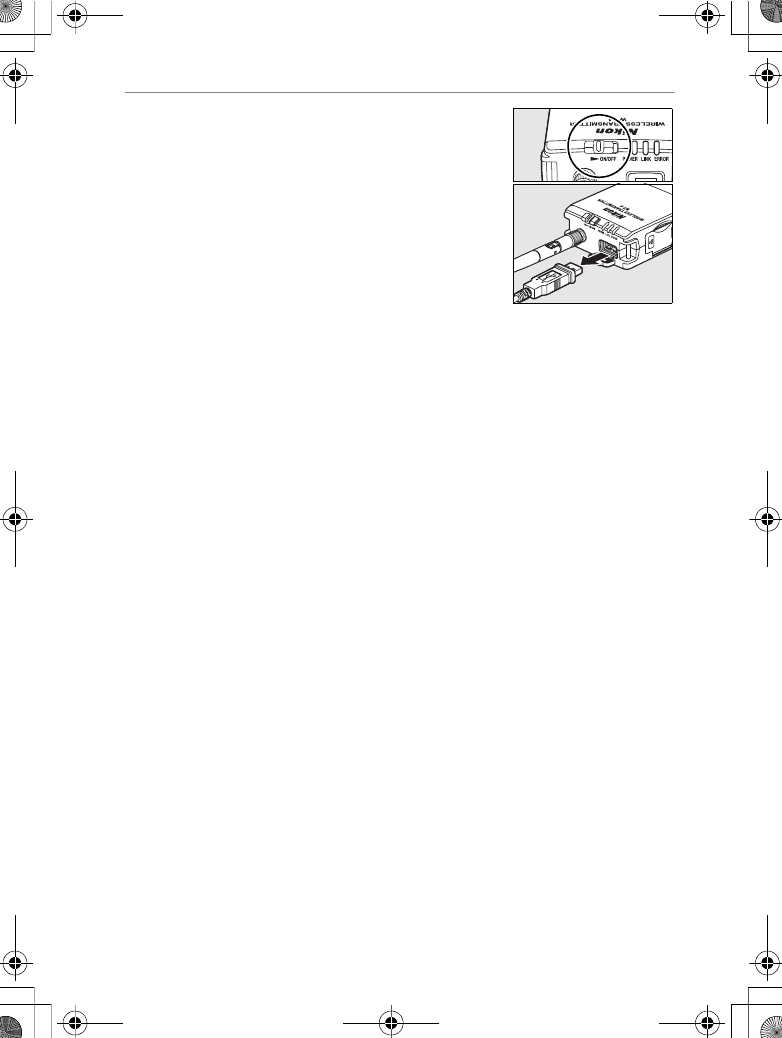
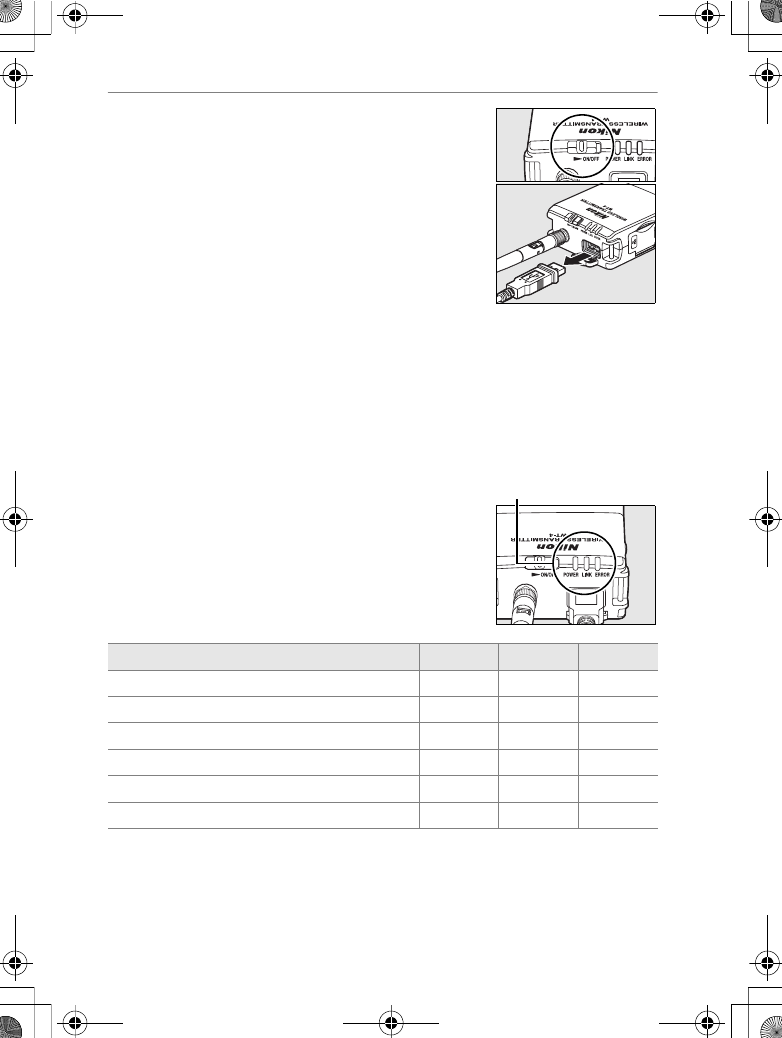
2Open the WT-4 USB connector cover and
connect the USB cable from the WT-4 to
the camera USB connector.
3Turn the camera on.
DUMMY
Front
U
MMY
$00_WT-4_En.book Page 70 Friday, August 10, 2007 2:02 PM
71
Upload pictures to a host computer / Connecting the WT-4
Operating the WT-4 for Computer
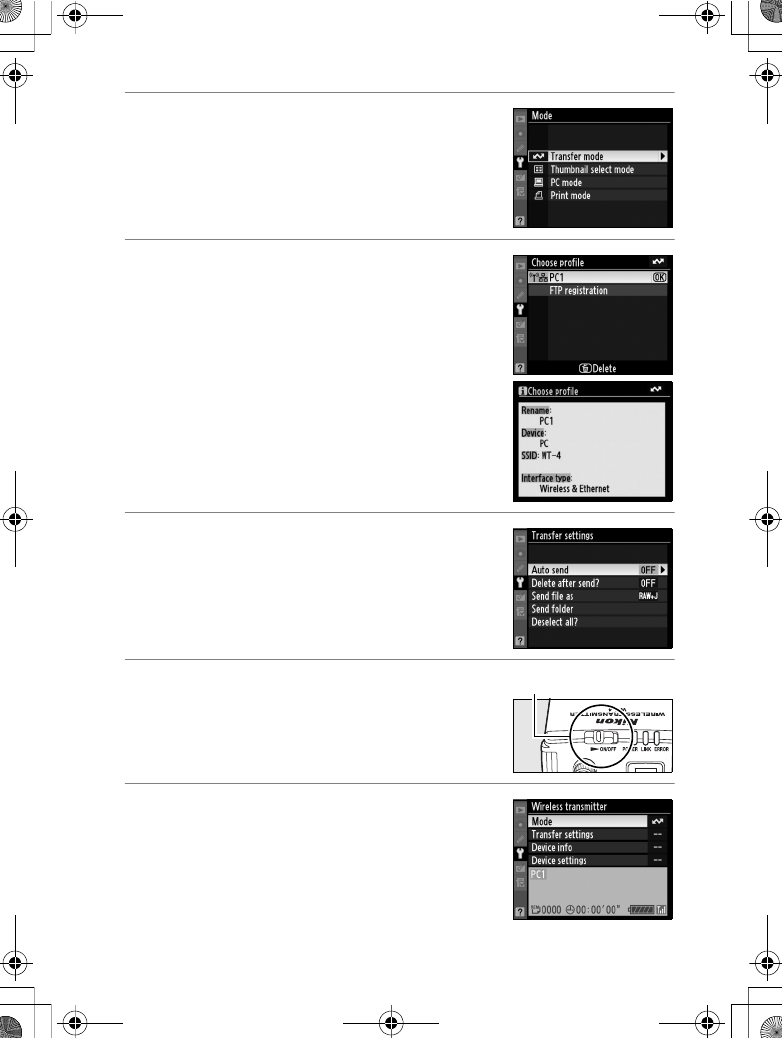
4Select [Transfer mode] for the [Wireless
transmitter] > [Mode] option in the
camera setup menu (pg.152).
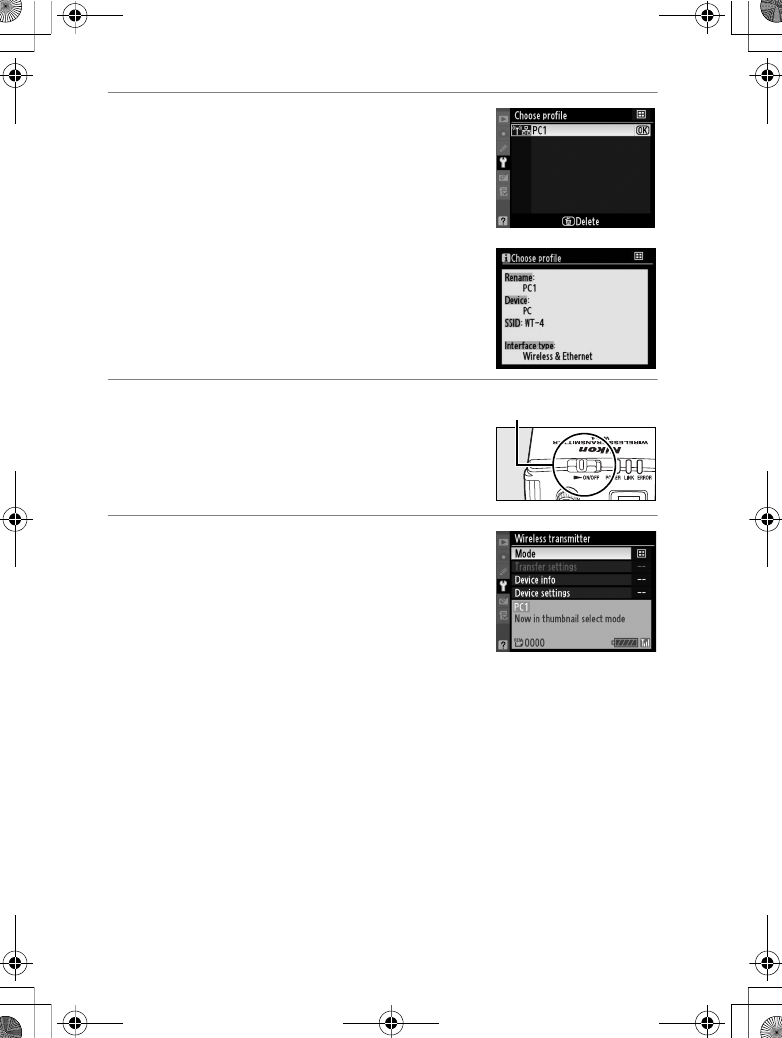
5A list of available connection profiles will
be displayed. Highlight the desired
profile and press J.
AViewing Profile Information
Press the camera L (?) button to view
information on the selected profile.
6Select [Wireless transmitter] > [Transfer
settings] and adjust settings as
described on pages pp.169–170.
7Turn on the WT-4.
8Confirm that the selected profile is
displayed in green in the top level of the
wireless transmitter menu. For
information on what to do if an error is
displayed, see “Troubleshooting”
(pg.178).
Power switch
$00_WT-4_En.book Page 71 Friday, August 10, 2007 2:02 PM
72
Upload pictures to a host computer / Connecting the WT-4
Operating the WT-4 for Computer
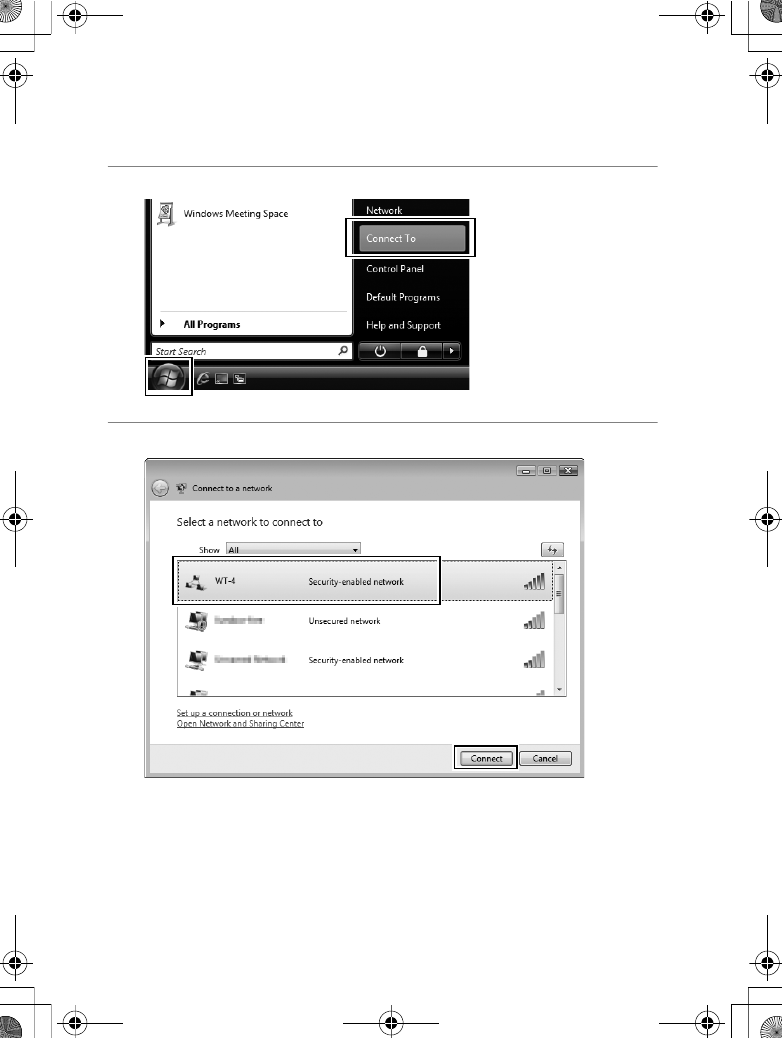
AUsing the Windows Vista Ad-hoc Connection
To use the Windows Vista ad-hoc connection, turn on the WT-4
and conduct the following steps on your computer.
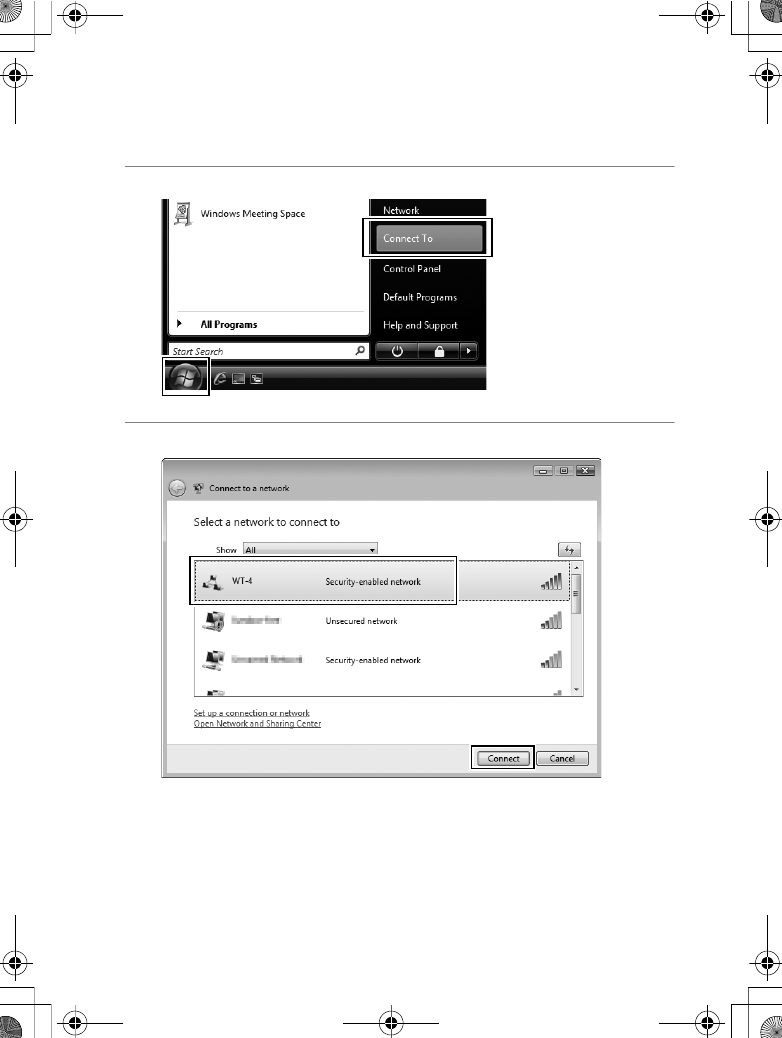
1Click the [Start] and select [Connect To].
2Select a preset network name and click [Connet].
$00_WT-4_En.book Page 72 Friday, August 10, 2007 2:02 PM
73
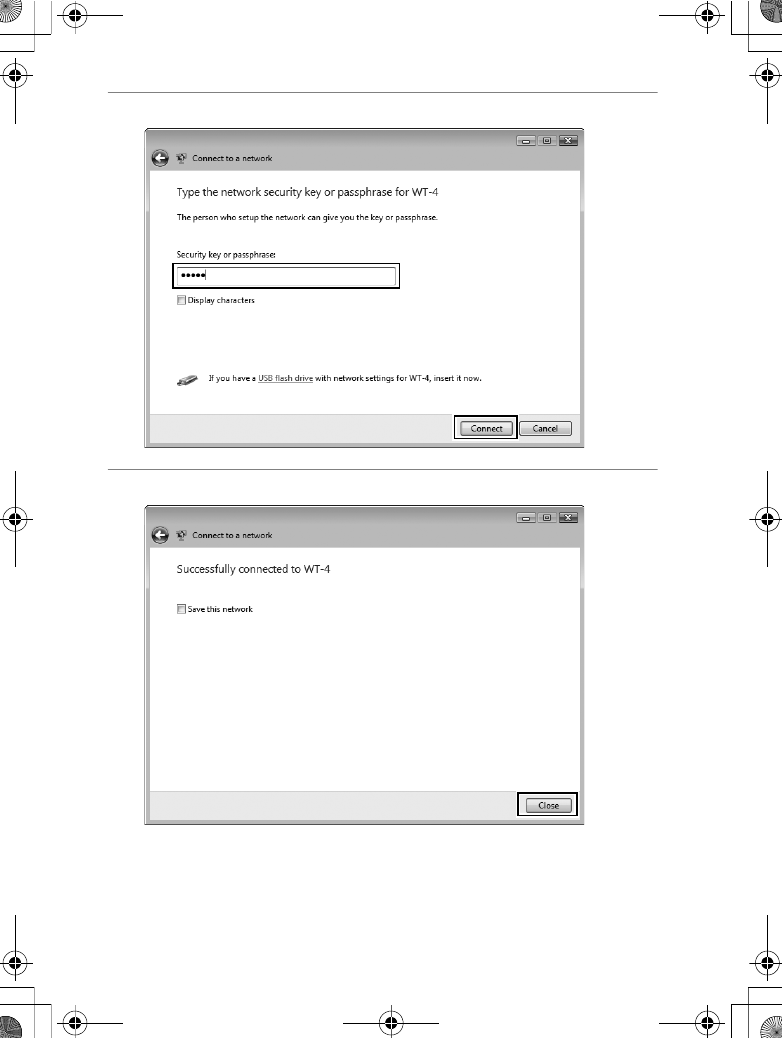
Upload pictures to a host computer / Connecting the WT-4
Operating the WT-4 for Computer
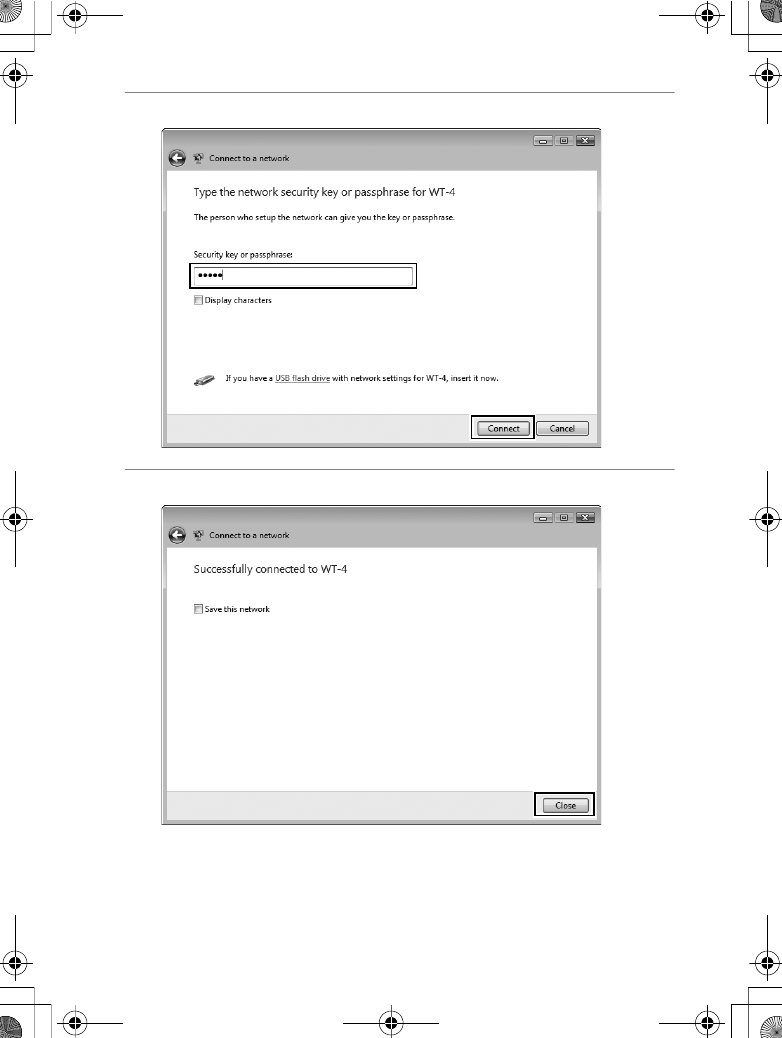
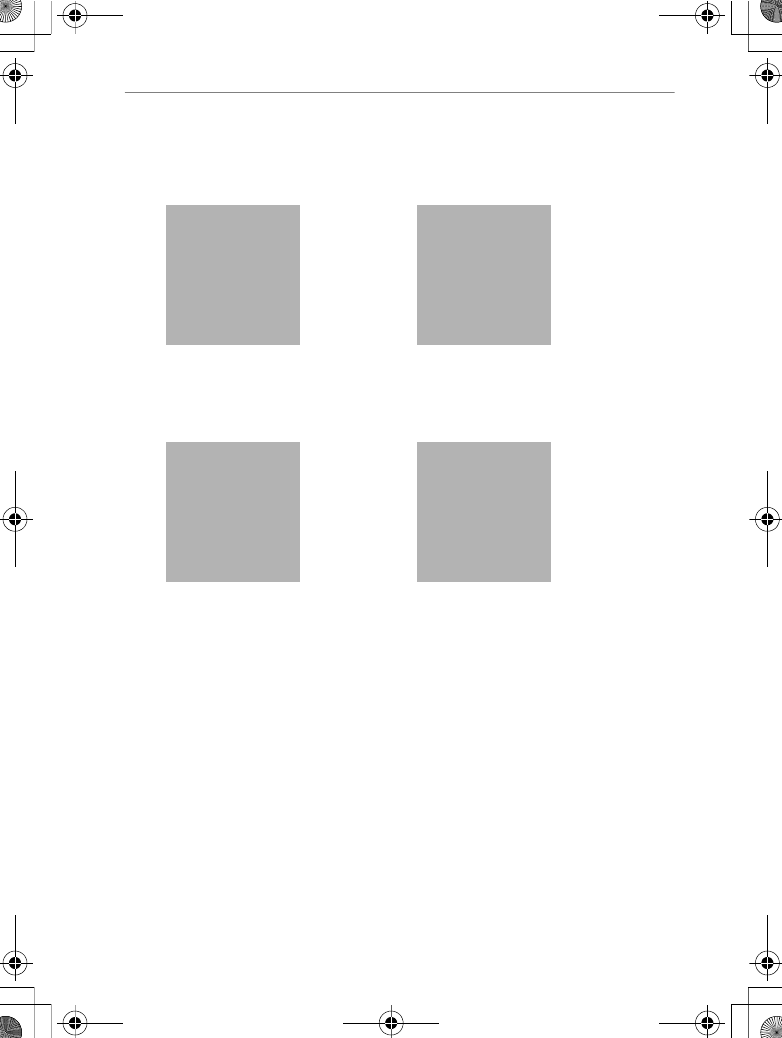
3Enter the network security key and click [Connect].
4Click [Close].
$00_WT-4_En.book Page 73 Friday, August 10, 2007 2:02 PM
74
Upload pictures to a host computer / Uploading Images
Operating the WT-4 for Computer
Uploading Images
1Press the K button to view pictures on the memory card.
Display the first picture to be sent in single-image playback or
highlight it in the thumbnail list.
2While pressing the N button, press the
center of the multi selector (D3) or the J
button (D300). The image will be
marked with a white “send” icon and
transmission will begin immediately.
During upload, images are marked with
a green “sending” icon. Repeat this process to send additional
images (pictures will be sent in the order selected).
Images that have been successfully
uploaded are marked with a blue “sent”
icon. Images can be resent by pressing
the center of the multi selector while
pressing the N button (D3) or the J
button (D300) to change the blue “sent”
icon to a white “send” icon.
ARestrictions to the D300 Retouch Menu
The Nikon D300 transfers selected images when the J button is pressed
during image playback (when the WT-4 is not connected, only transfer
settings are configured). For this reason, retouch menus such as [Side-by-
side comparison] operated by pressing the J button during image
playback cannot be used. To use [Side-by-side comparison], configure
[Mode] in [Wireless transmitter] to a setting other than [Transfer mode].
$00_WT-4_En.book Page 74 Friday, August 10, 2007 2:02 PM
75
Upload pictures to a host computer / Uploading Images
Operating the WT-4 for Computer
3Turn off the WT-4.
When the POWER LED (pg.3) changes
from green to yellow and then goes
out, detach the USB cable.
•When the connection between the
WT-4 and computer is terminated, the
folder to which images were
transferred automatically opens.
•To change the destination folder, use
the Setup Utility (pg.50).
❏Interrupting Transmission
To cancel transmission of images marked with a white “send” icon
or green “sending” icon, select the images during playback and
press the center of the multi selector while pressing the N button
(D3) or the J button (D300). The icon will be removed. Any of the
following actions will also interrupt transmission:
•Turning the camera or WT-4 off
•Selecting [Yes] for [Wireless transmitter] > [Transfer
settings] > [Deselect all]
DDuring Upload
Do not remove the memory card or disconnect the Ethernet cable during
upload.
AVoice Memos
Voice memos can not be uploaded separately, but will be included when
associated pictures are transmitted. Voice recordings can not be selected
for upload.
ALoss of Signal
Transmission may be interrupted if the signal is lost (pg.76). Transmission
can be resumed by turning the WT-4 off and then on again.
ATurning the Camera Off
“Send” marking will be saved if the camera or WT-4 is turned off while
transmission is in progress. Transmission of images marked with a “send”
icon will resume when the camera or WT-4 is turned on.
$00_WT-4_En.book Page 75 Friday, August 10, 2007 2:02 PM
76
Upload pictures to a host computer / Uploading Images
Operating the WT-4 for Computer
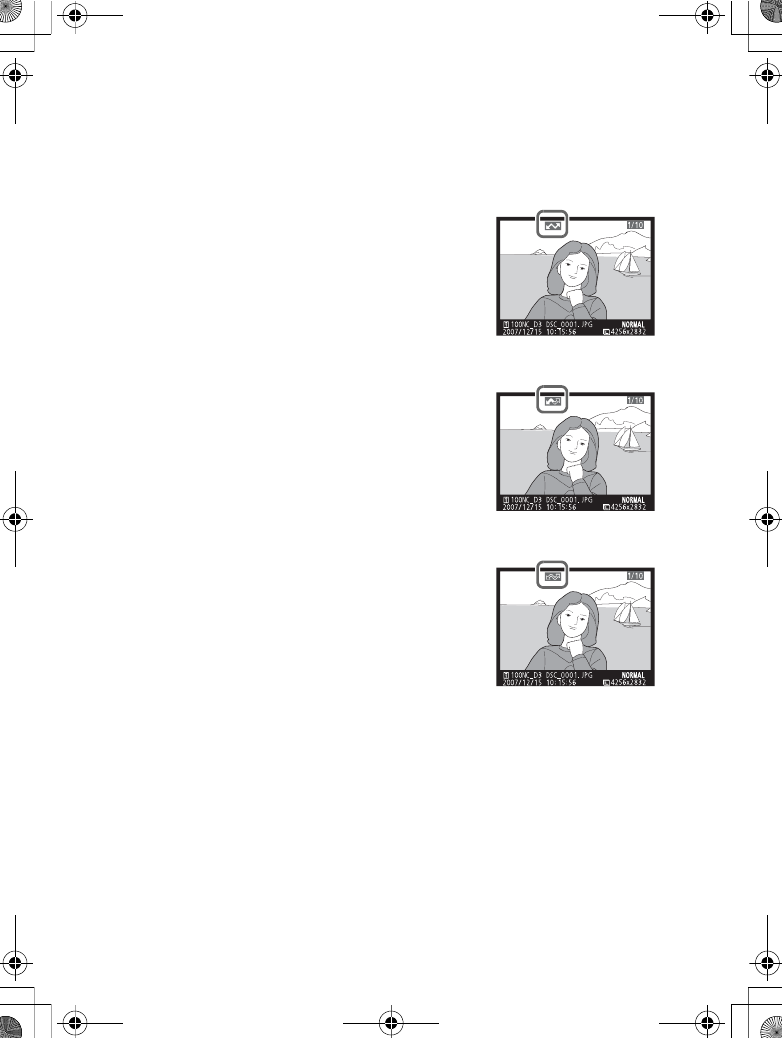
❏Transfer Status
During playback, the status of images selected for upload is shown
as follows:
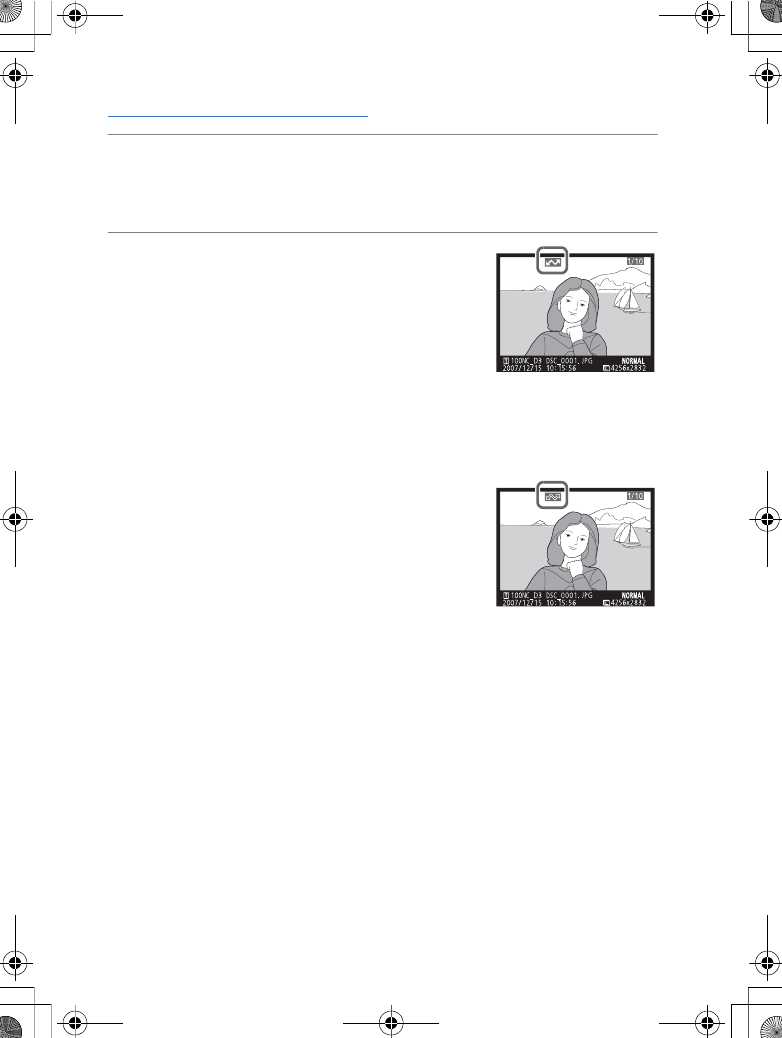
a: “Send”
Images that have been selected for upload
are marked with a white a icon.
b: “Sending”
A green b icon is displayed during upload.
c: “Sent”
Images that have been uploaded
successfully are marked with a blue c icon.
ARemoving the “Send,” “Sending,” and “Sent” Icons
“Send,” “sending,” and “sent” icons can be removed from all images by
selecting [Yes] for [Wireless transmitter] > [Transfer settings] > [Deselect
all?] (pg.170).
$00_WT-4_En.book Page 76 Friday, August 10, 2007 2:02 PM
77
Upload pictures to a host computer / Uploading Images
Operating the WT-4 for Computer
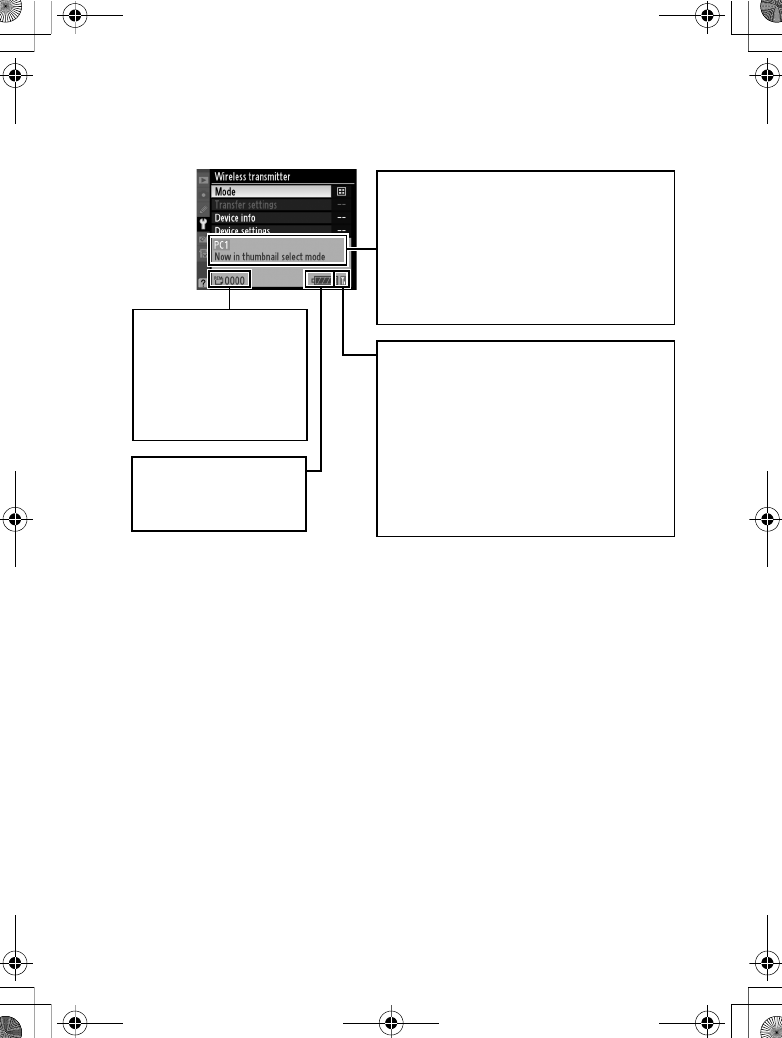
❏Network Status
The status of the link between the host and the WT-4 is shown by
the status LEDs and by the display in the top level of the wireless
transmitter menu.
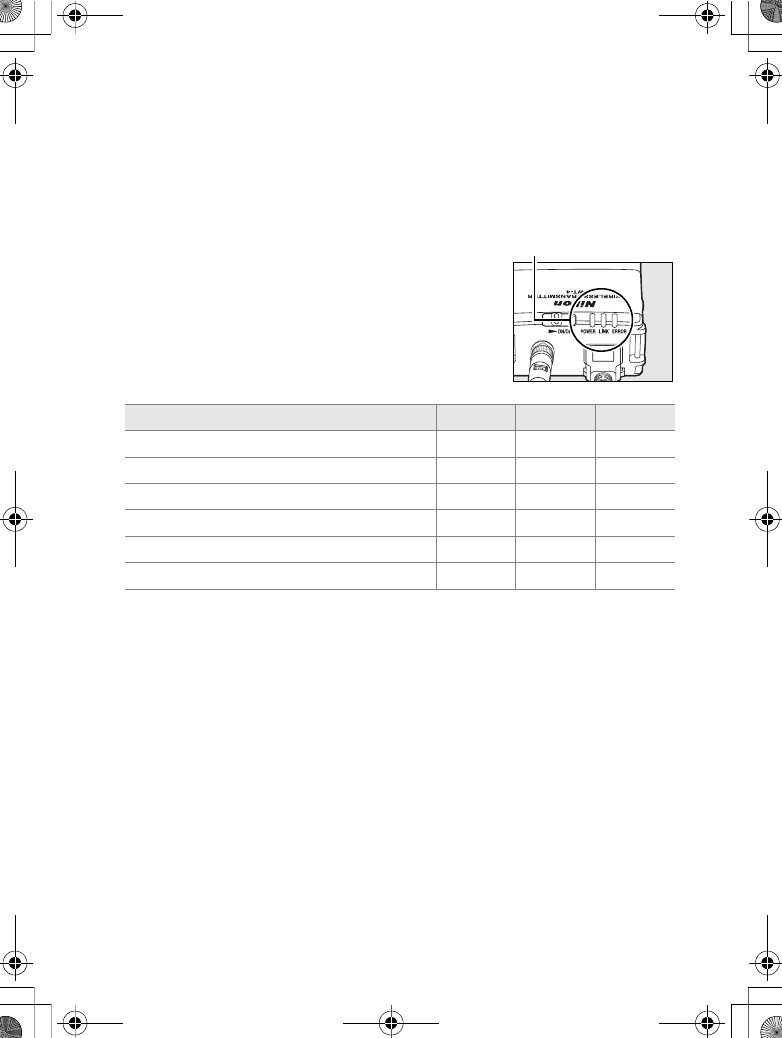
The Status LEDs
The POWER LED lights when the WT-4 is on.
Signal quality is shown by the LINK LED: the
faster the LED blinks, the better the signal
and the faster data can be transmitted. The
ERROR LED blinks to show that an error has
occurred.
Status POWER LINK ERROR
WT-4 off I (off) I (off) I (off)
USB cable not connected K (on) I (off) I (off)
Connecting to host K (on) K (on) I (off)
Waiting to send or sending data K (on) H (blinks) I (off)
Connection error H (blinks) I (off) H (blinks)
WT-4 hardware or battery malfunction H (blinks) H (blinks) H (blinks)
Status LEDs
$00_WT-4_En.book Page 77 Friday, August 10, 2007 2:02 PM
78
Upload pictures to a host computer / Uploading Images
Operating the WT-4 for Computer
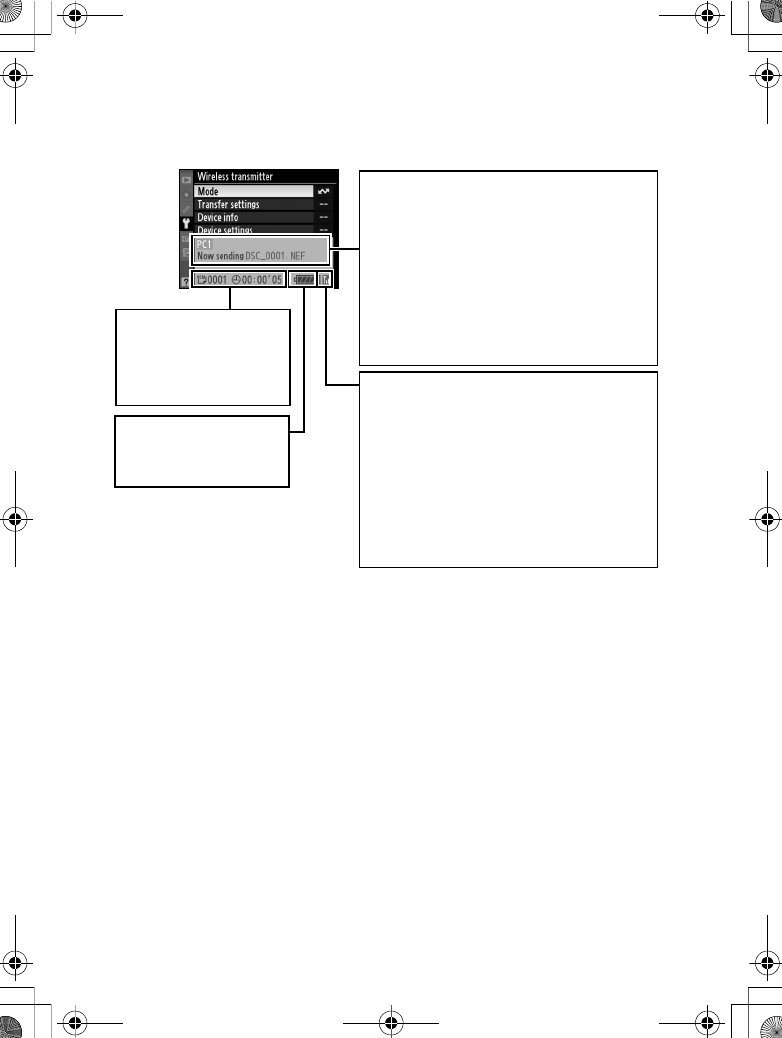
The Status Display
Network status can also be viewed in the top level of the wireless
transmitter menu.
Signal strength: This icon shows wireless
signal strength. It is displayed in red
when no signal can be detected. For
maximum signal strength, ensure a
clear line of sight between the WT-4
antenna and the wireless LAN adapter
or access point. A d icon is displayed
when the WT-4 is connected via
Ethernet.
Status area: The status of the
connection to the host. The host
name is displayed in green when a
connection is established. While files
are being transferred, the status
display shows “Now sending”
followed by the name of the file being
sent. Any errors that occur during
transfer are also displayed here.
e, f: The estimated
time required to
send the remaining
images.
Battery level: This icon
shows five level of
WT-4 battery level.
$00_WT-4_En.book Page 78 Friday, August 10, 2007 2:02 PM
79
Thumbnail select mode / Uploading Images
Operating the WT-4 for Computer
Thumbnail select mode
When shots are taken by selecting [Thumbnail select mode] in
[Mode], the recorded images are stored to both the camera’s
memory card and WT-4 internal memory. At the same time,
thumbnails (reduced images) of images stored to WT-4 internal
memory are uploaded to the computer and the supplied
Thumbnail Selector software lists them as previews. The computer
operator then selects required images from this list of thumbnail
previews for uploading.
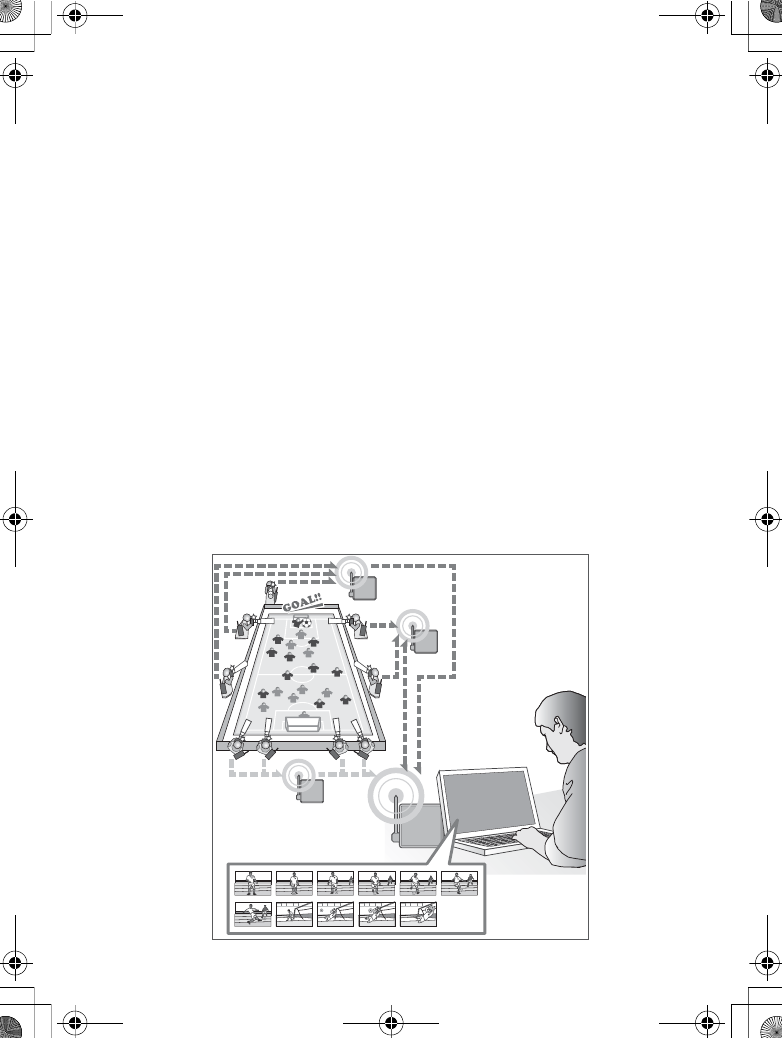
Example of Thumbnail Select Mode
Multiple cameramen using cameras connected to a wireless
network by way of the WT-4 are shooting images at a soccer game
from various angles. Thumbnails of these recorded images are
sent to a computer and are displayed in real-time using the
Thumbnail Selector software (displays images recorded by a
maximum of five cameras simultaneously). The computer operator
selects shots from the displayed thumbnails and downloads them
to the computer.
DUMMY
$00_WT-4_En.book Page 79 Friday, August 10, 2007 2:02 PM

80
Thumbnail select mode / Uploading Images
Operating the WT-4 for Computer
Principal Features of Thumbnail Selector
The principal features of Thumbnail Selector are as follows:
•Displays only a list of thumbnail previews (reduced images)
saved to WT-4 internal memory. This function allows the user to
immediately check the images, regardless of size of the original
images.
•Required images can be selected while viewing the displayed
thumbnails and downloaded to computer.
•If multiple cameras are connected to the wireless network,
images from a maximum of five cameras can be displayed
simultaneously. These images can also be downloaded.
See the online help for the Thumbnail Selector for details on how
to use the Thumbnail Selector.
AInternal Memory
•The WT-4 has an internal memory capacity of 1GB where the most recent
images are stored. When the memory capacity is exceeded, images are
successively overwritten starting from older images.
•Even if the camera's memory card is replaced, the images stored to WT-4
internal memory will be the same as those images stored in the camera's
former memory card. Therefore, if there is no more free space in a memory
card, you can replace the memory card without worrying whether or not you
have transferred all required images to computer.
•To delete images from internal memory, initialize the internal memory
(pg.173). Initializing the internal memory will delete all images stored to
internal memory.
•If a large number of shots are taken through continuous shooting, some time
may be required until the images are stored to WT-4 internal memory. After
shooting, select [Wireless transmitter] in the Setup Menu to confirm the
number of shots which have not yet been stored to internal memory.
•While images are being stored to WT-4 internal memory, the camera's access
indicator will light. While the memory card access lamp is lit, do not remove
the camera or WT-4 batteries, the AC adapter, or USB cable. Doing so may
cause the internal memory to malfunction. If the WT-4 power switch is
operated while images are being stored to WT-4 internal memory, the power
will turn Off after all images have been stored.
$00_WT-4_En.book Page 80 Friday, August 10, 2007 2:02 PM
81
Thumbnail select mode / Connecting the WT-4
Operating the WT-4 for Computer
Connecting the WT-4
Before connecting the WT-4, select [MTP/PTP] for the [USB] option
in the camera setup menu (pg.7) and confirm that the host
computer is running.
1Turn the camera off and insert the
memory card containing the pictures to
be sent.
•If there are multiple card slots, insert
the card into any slot.
To access the network via Ethernet, connect the Ethernet
cable (pg.2). Note that wireless transfer is disabled while an
Ethernet cable is connected. Disconnect the Ethernet cable
before accessing a wireless network. Turn the WT-4 off before
connecting or disconnecting the Ethernet cable.
2Open the WT-4 USB connector cover and
connect the USB cable from the WT-4 to
the camera USB connector.
3Turn the camera on.
4Select [Thumbnail Select mode] for the
[Wireless transmitter] > [Mode] option in
the camera setup menu (pg.152).
DUMMY
Front
U
MMY
$00_WT-4_En.book Page 81 Friday, August 10, 2007 2:02 PM
82
Thumbnail select mode / Connecting the WT-4
Operating the WT-4 for Computer
5A list of available connection profiles will
be displayed. Highlight the desired
profile and press J.
AViewing Profile Information
Press the camera L (?) button to view
information on the selected profile.
6Turn on the WT-4.
7Confirm that the selected profile is
displayed in green in the top level of the
wireless transmitter menu. For
information on what to do if an error is
displayed, see “Troubleshooting”
(pp.178).
Power switch
$00_WT-4_En.book Page 82 Friday, August 10, 2007 2:02 PM
83
Thumbnail select mode / Connecting the WT-4
Operating the WT-4 for Computer
AUsing the Windows Vista Ad-hoc Connection
To use the Windows Vista ad-hoc connection, turn on the WT-4
and conduct the following steps on your computer.
1Click the [Start] and select [Connect To].
2Select a preset network name and click [Connet].
$00_WT-4_En.book Page 83 Friday, August 10, 2007 2:02 PM
84
Thumbnail select mode / Connecting the WT-4
Operating the WT-4 for Computer
3Enter the network security key and click [Connect].
4Click [Close].
$00_WT-4_En.book Page 84 Friday, August 10, 2007 2:02 PM

85
Thumbnail select mode / Downloading Images Using Your Computer
Operating the WT-4 for Computer
Downloading Images Using Your Computer
1Start Thumbnail Selector
•Thumbnail Selector will start automatically once you
compete selecting [Thumbnail select mode] for [Wireless
transmitter] > [Mode] in the camera setup menu, and
connecting the camera to your computer.
2Choose which camera to transfer photos from
Click on the Source button in the [Source] panel. Thumbnails
of the images recorded to WT-4 internal memory are displayed
in the thumbnail area.
AManually launching Thumbnail Selector
Windows:
•Double-click the [Thumbnail Selector] shortcut on the desktop.
•Click [Start] and select [Thumbnail Selector] in the program list.
Macintosh:
•Click the [Thumbnail Selector] icon in the Dock (if abailable).
•Open the [Applications] > [Nikon Software] > [Thumbnail Selector]
folder and double-click the [Thumbnail Selector] icon.
DUMMY
$00_WT-4_En.book Page 85 Friday, August 10, 2007 2:02 PM

86
Thumbnail select mode / Downloading Images Using Your Computer
Operating the WT-4 for Computer
3Assign a Name and/or Label to each camera
Assign a camera name or label for the Source button. The
same label will appear for the thumbnails.
4Take photographs
Thumbnails of recorded images are displayed on your
computer.
5Click [Start Transfer]
When [Start Transfer] is selected, transfer is conducted as
thumbnails are selected.
After clicking the [Start Transfer] button, the button will
change to the [Stop Transfer] button.
AThe Camera Clock
When the [Start Transfer] button is selected (turned “on”), the internal date
and time of the camera connected to the same networks as the computer
will automatically synchronize with the date and time set in the computer.
If you do not want this to happen, deselect (remove the check mark from
the M icon next to) [Synchronize camera date and time tot computer
when camera is connected (supported cameras only)] option in the
[Perferences] panel.
DUMMY
DUMMY
DUMMY
$00_WT-4_En.book Page 86 Friday, August 10, 2007 2:02 PM
87
Thumbnail select mode / Downloading Images Using Your Computer
Operating the WT-4 for Computer
6Transferring images
Among the thumbnails displayed in the thumbnail area, click
the thumbnail of the photo that you want to transfer to the
computer.
The selected thumbnail will be highlighted.
Click the highlighted thumbnail again, or press the Space key
on the keyboard.
The transfer status icon on the highlighted thumbnail will be
displayed with a check mark that indicates that the photo of
the highlighted thumbnail is added in the transfer queue. At
the same time, the transfer process will begin automatically.
Default settings will transfer images to the [WT-4] folder in
[Pictures] (Windows Vista/Mac OSX) or [My Pictures] (Windows
XP).
See the online help for the Thumbnail Selector for details on
how to use the Thumbnail Selector.
2
DUMMY
2
DUMMY
$00_WT-4_En.book Page 87 Friday, August 10, 2007 2:02 PM
88
Thumbnail select mode / Downloading Images Using Your Computer
Operating the WT-4 for Computer
7Turn off the WT-4
After transfer ends, turn off the WT-4.
When the POWER LED (pg.3) changes
from green to yellow and then goes
out, detach the USB cable.
❏Network Status
The status of the link between the host and the WT-4 is shown by
the status LEDs and by the display in the top level of the wireless
transmitter menu.
The Status LEDs
The POWER LED lights when the WT-4 is on.
Signal quality is shown by the LINK LED: the
faster the LED blinks, the better the signal
and the faster data can be transmitted. The
ERROR LED blinks to show that an error has
occurred.
Status POWER LINK ERROR
WT-4 off I (off) I (off) I (off)
USB cable not connected K (on) I (off) I (off)
Connecting to host K (on) K (on) I (off )
Waiting to send or sending data K (on) H (blinks) I (off)
Connection error H (blinks) I (off) H (blinks)
WT-4 hardware or battery malfunction H (blinks) H (blinks) H (blinks)
Status LEDs
$00_WT-4_En.book Page 88 Friday, August 10, 2007 2:02 PM
89
Thumbnail select mode / Downloading Images Using Your Computer
Operating the WT-4 for Computer
The Status Display
Network status can also be viewed in the top level of the wireless
transmitter menu.
Signal strength: This icon shows wireless
signal strength. It is displayed in red
when no signal can be detected. For
maximum signal strength, ensure a
clear line of sight between the WT-4
antenna and the wireless LAN adapter
or access point. A d icon is displayed
when the WT-4 is connected via
Ethernet.
Status area: The status of the
connection to the host. The host
name is displayed in green when a
connection is established. Any errors
that prevent the camera from
connecting to the host are also
displayed here.
e: The number of
shots which have not
yet been stored to
WT-4 internal
memory are
indicated here.
Battery level: This icon
shows five level of
WT-4 battery level.
$00_WT-4_En.book Page 89 Friday, August 10, 2007 2:02 PM