Silex Technology SX10WAG SX-10WAG User Manual
Silex Technology, Inc. SX-10WAG
Contents
Manual 7
115
Creating an ftp Server / Windows XP
Operating the WT-4 for FTP
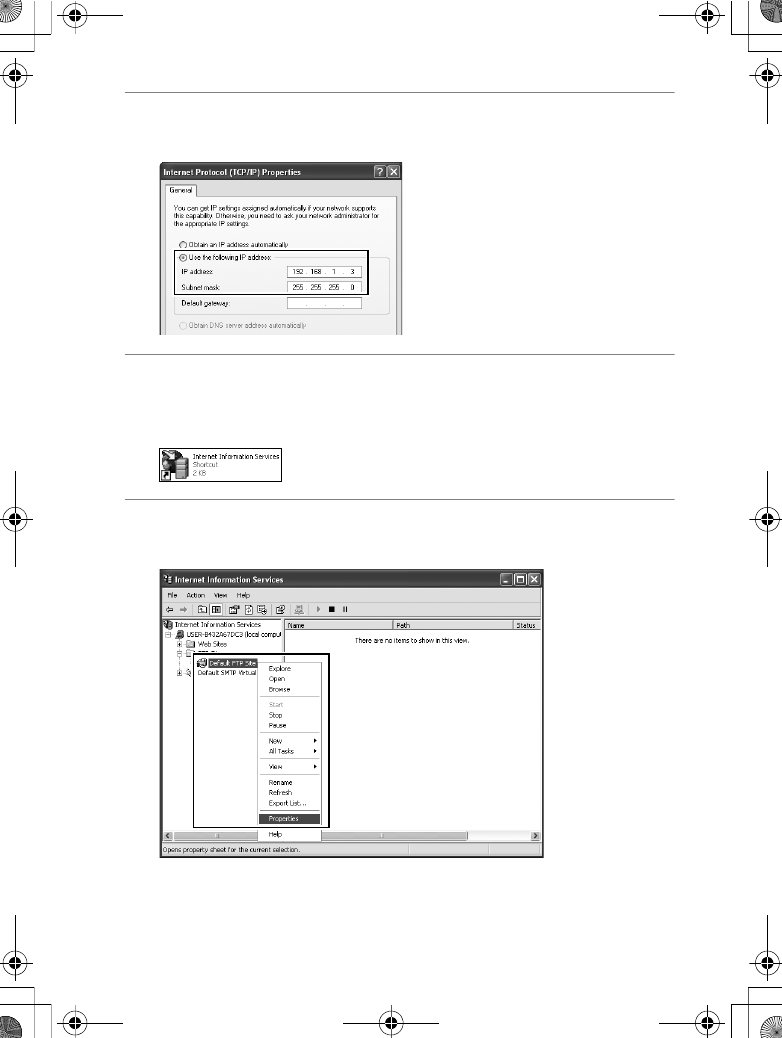
4Enter an IP address and sub-net mask for the ftp server and
click [OK].
5Go to the [System and Maintenance] > [Administrative Tools]
control panel and open the [Internet Information Services]
console.
6Right-click [Default FTP Site] and select [Properties] from the
menu that appears.
$00_WT-4_En.book Page 115 Friday, August 10, 2007 2:02 PM
116
Creating an ftp Server / Windows XP
Operating the WT-4 for FTP
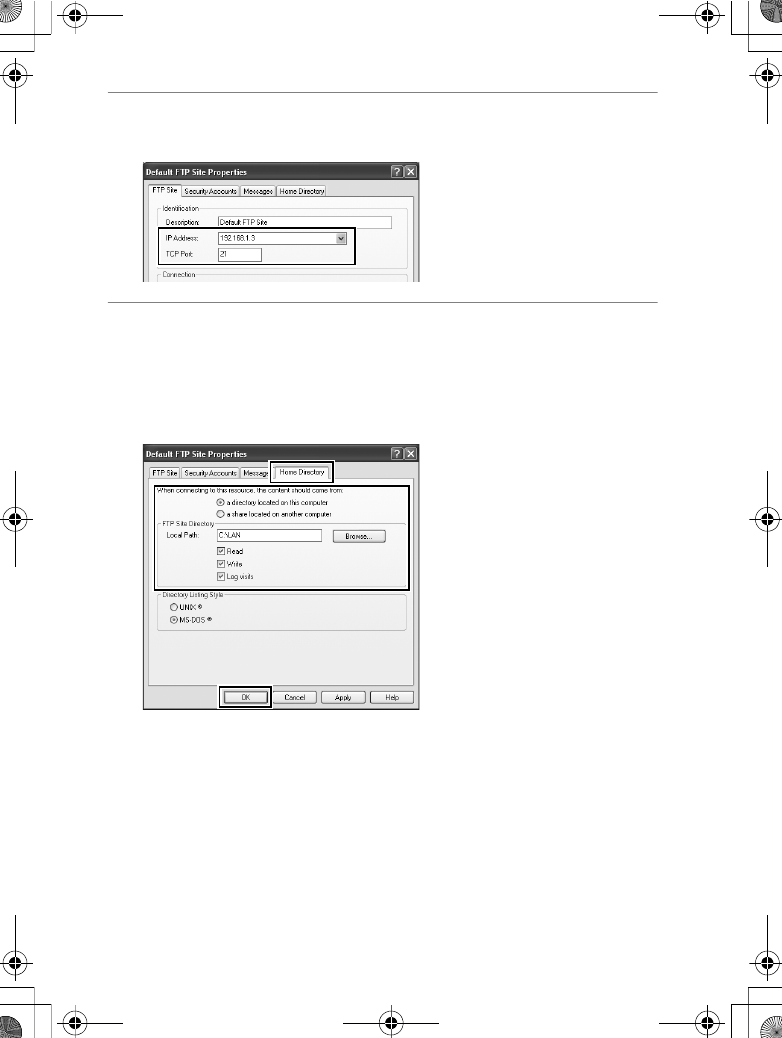
7Select the IP address entered in Step 4 and enter a [TCP Port]
number. The port number is normally 21.
8Open the [Home Directory] tab and select [a directory located
on this computer]. The root directory for images uploaded to
the ftp server is listed in the [Local Path] text box; choose a
folder and select [Read], [Write], and [Log visits]. Click [OK] to
close the properties dialog.
This completes ftp server setup. Proceed to “Copying Network
Profiles to the Camera” (pg.119).
$00_WT-4_En.book Page 116 Friday, August 10, 2007 2:02 PM
117
Creating an ftp Server / Macintosh
Operating the WT-4 for FTP
Macintosh
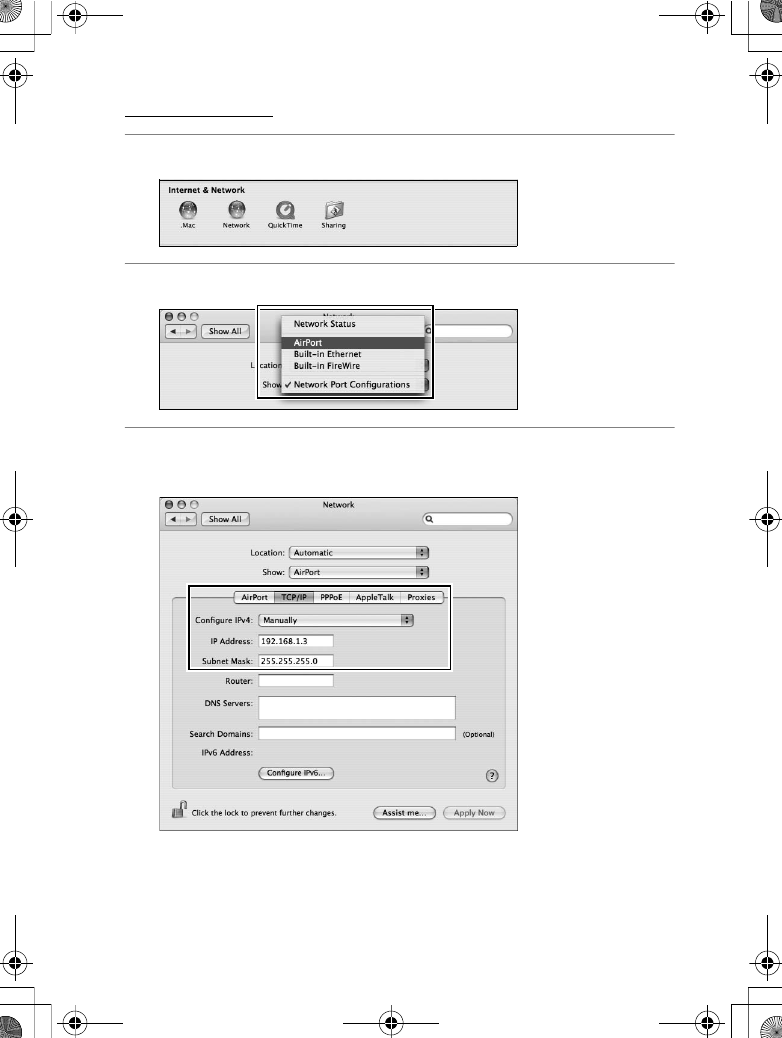
1Open [System Preferences] and click [Network].
2Select [AirPort] from the [Show] menu.
3Select [Manually] from the [Configure IPv4] menu and enter an
IP address and sub-net mask.
Make a note of this address. It will be needed to set up the
WT-4.
$00_WT-4_En.book Page 117 Friday, August 10, 2007 2:02 PM
118
Creating an ftp Server / Macintosh
Operating the WT-4 for FTP
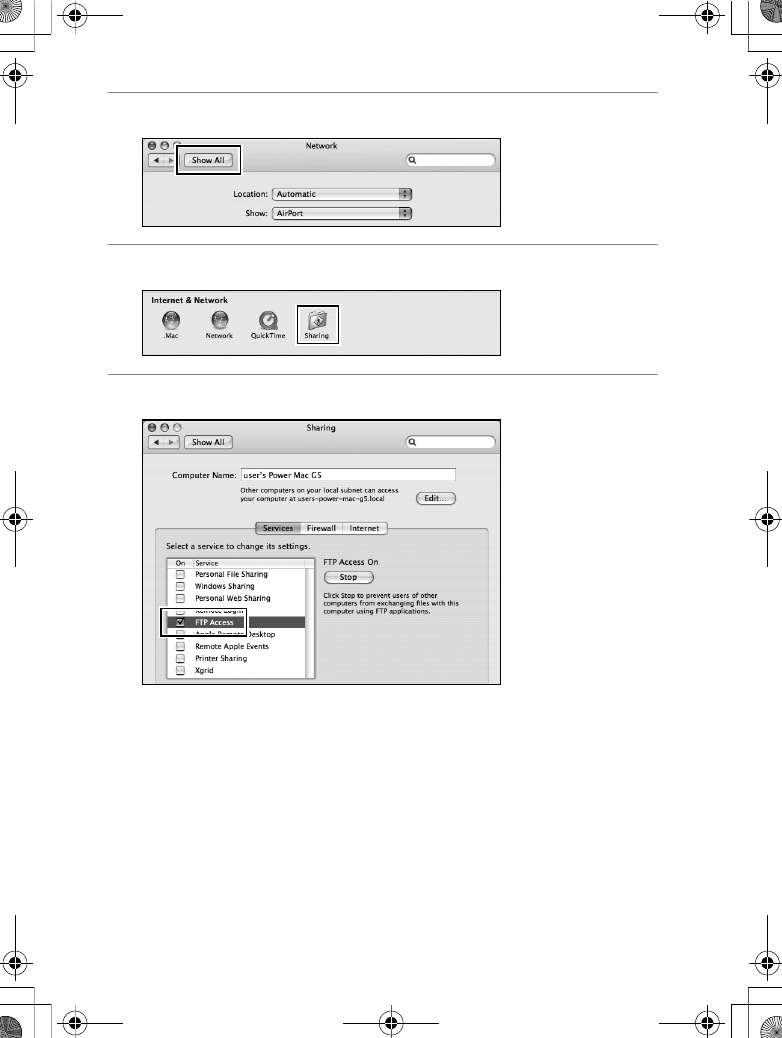
4Click [Show All] to return to the System Preferences dialog.
5Click [Sharing].
6Select [Services] and enable [FTP Access].
This completes ftp server setup. Proceed to “Copying Network
Profiles to the Camera” (pg.119).
$00_WT-4_En.book Page 118 Friday, August 10, 2007 2:02 PM
119
Copying Network Profiles to the Camera / Ad Hoc Networks
Operating the WT-4 for FTP
Copying Network Profiles to the
Camera
Ad Hoc Networks
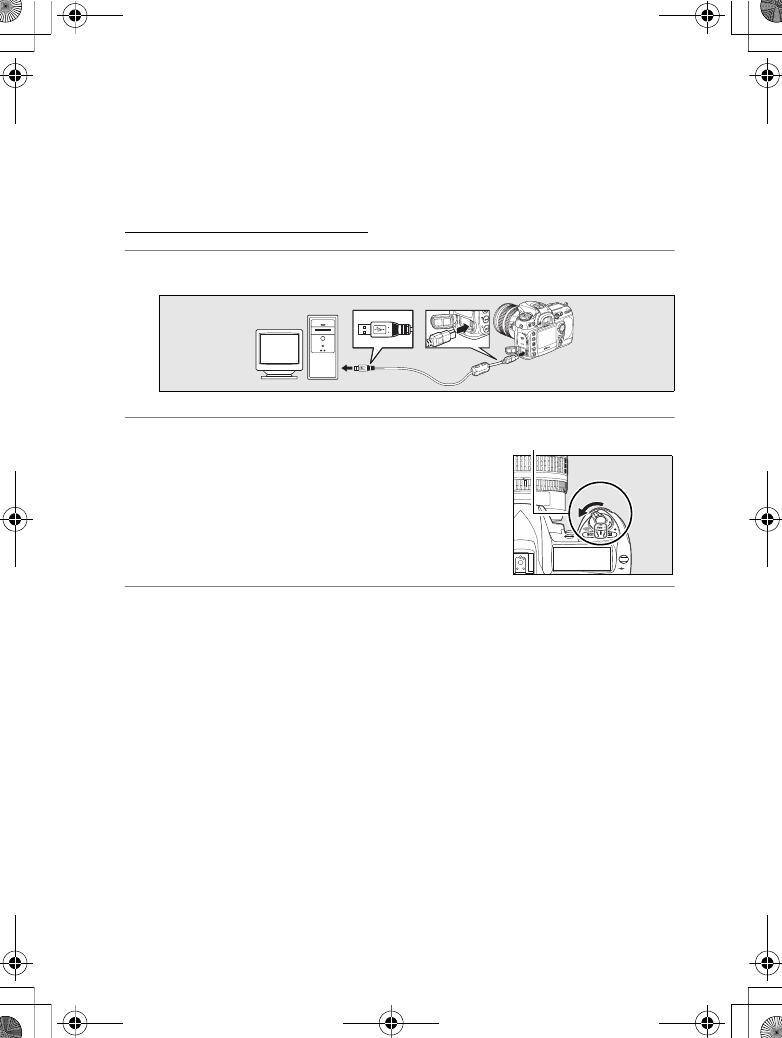
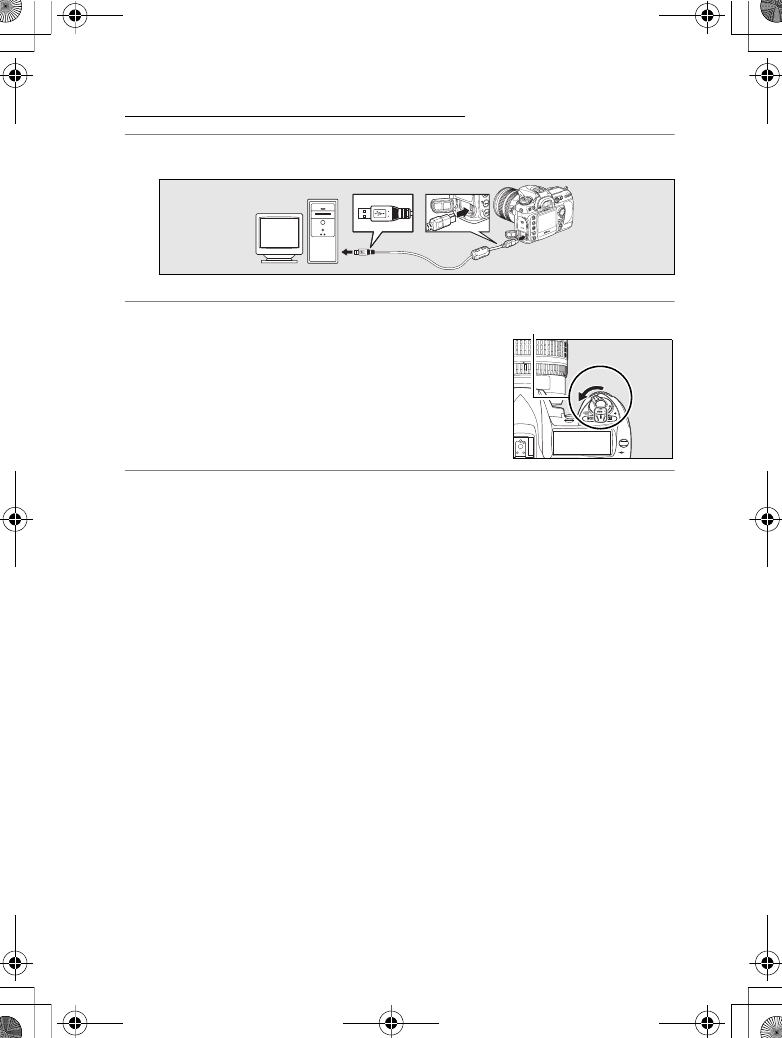
1Connect the UC-E4 as shown below.
2Turn the camera on.
3Turn the computer on and start the WT-4 Setup Utility.
•Windows: Double-click the [WT-4 Setup Utility] icon on the
desktop
•Macintosh: Click the [WT-4WirelessSetup] icon in the Dock.
MMY
Power switch
$00_WT-4_En.book Page 119 Friday, August 10, 2007 2:02 PM

120
Copying Network Profiles to the Camera / Ad Hoc Networks
Operating the WT-4 for FTP
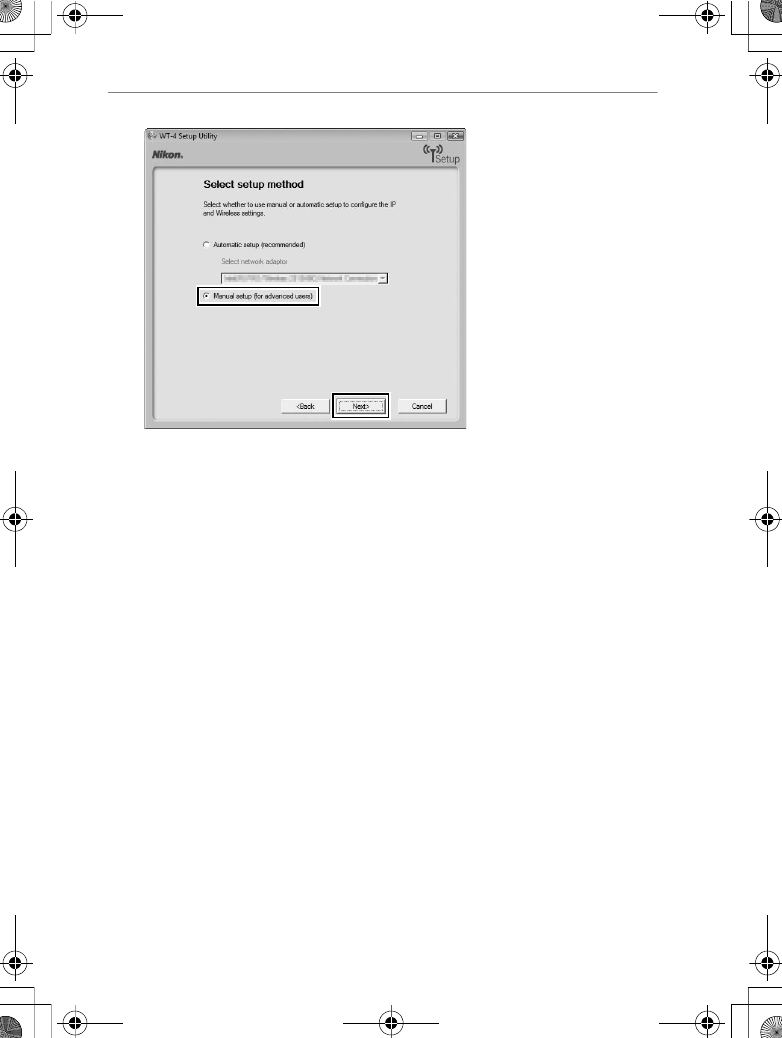
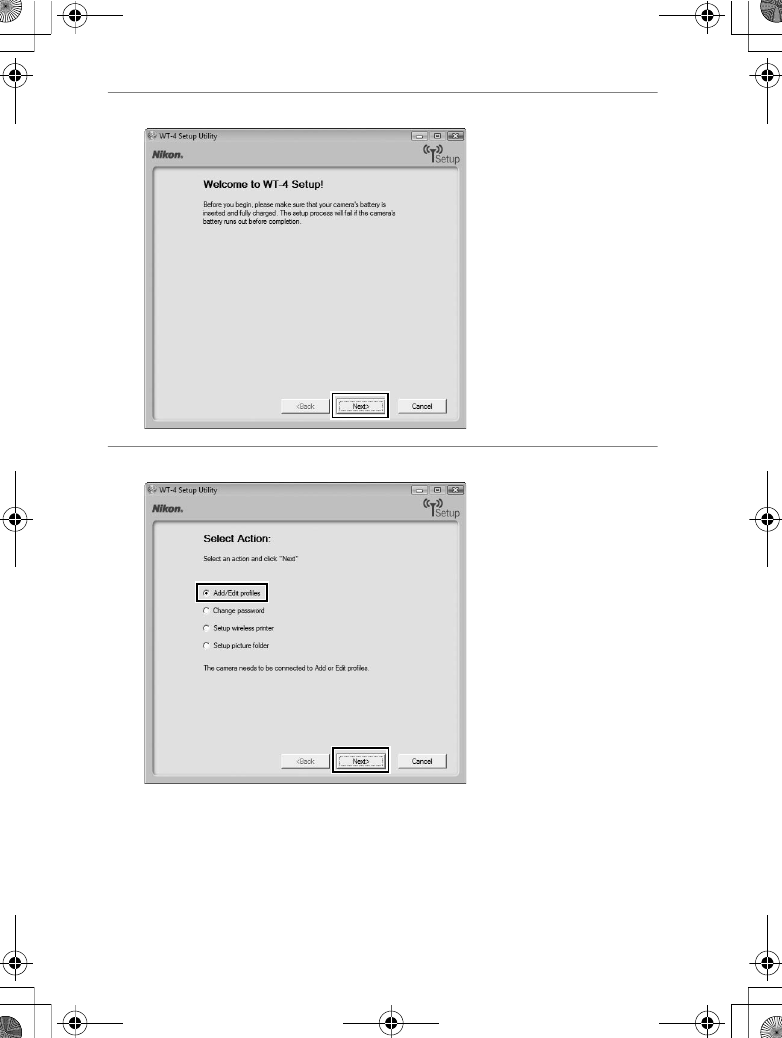
4The dialog shown below will be displayed; click [Next].
5Select [Add/Edit profiles] and click [Next].
$00_WT-4_En.book Page 120 Friday, August 10, 2007 2:02 PM

121
Copying Network Profiles to the Camera / Ad Hoc Networks
Operating the WT-4 for FTP
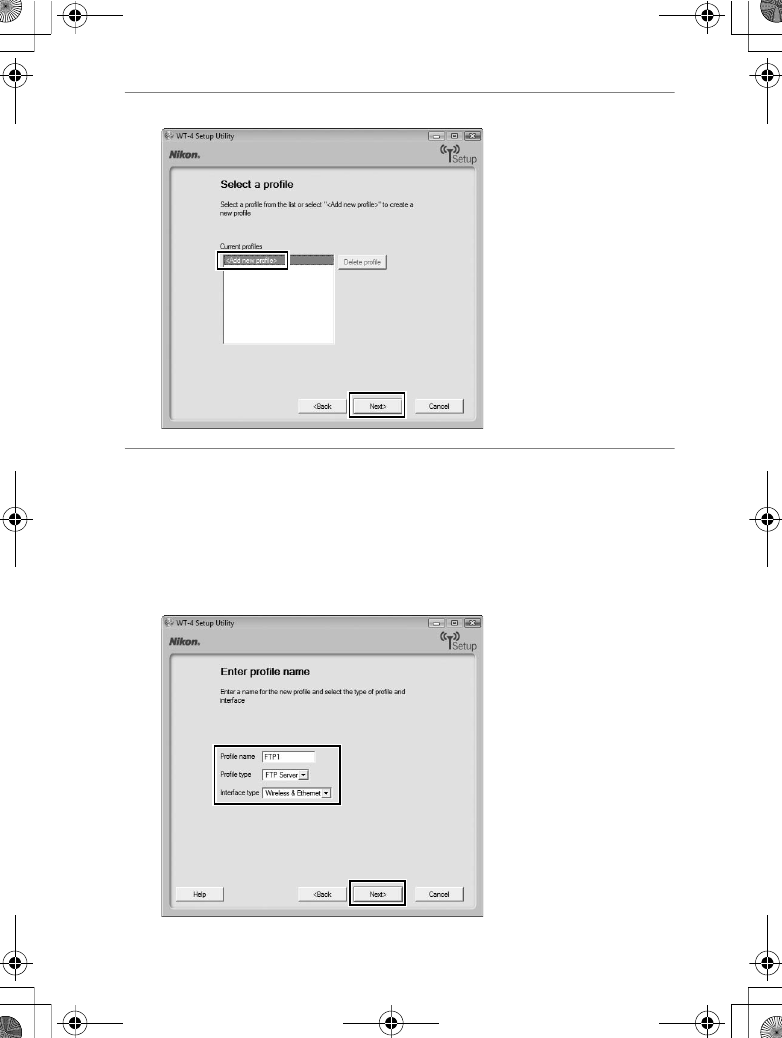
6Select [Add new profile] and click [Next].
7Enter the following information and click [Next]:
•Profile name: Enter a name of up to 16 characters.
•Profile type: Choose [FTP Server].
•Interface type: Choose [Wireless & Ethernet] for networks that
include wireless, or [Ethernet only] for Ethernet-only
networks.
$00_WT-4_En.book Page 121 Friday, August 10, 2007 2:02 PM
122
Copying Network Profiles to the Camera / Ad Hoc Networks
Operating the WT-4 for FTP
8Select [Manual setup] and click [Next].
$00_WT-4_En.book Page 122 Friday, August 10, 2007 2:02 PM

123
Copying Network Profiles to the Camera / Ad Hoc Networks
Operating the WT-4 for FTP
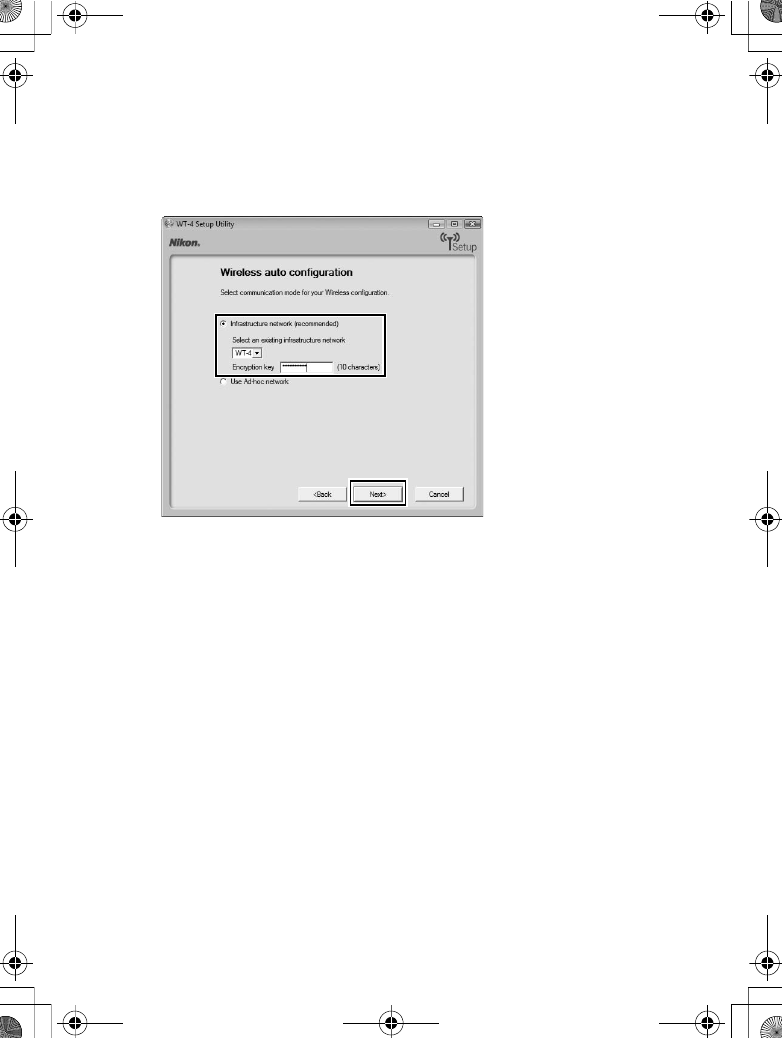
9Enter the following information and click [Next].
•Network name (SSID): Enter a network name or choose from a
list of existing networks. Do not change the name if it is
supplied automatically.
•Network type: Select [Ad hoc].
•Channel: Select a communication channel. However, if the
network name (SSID) is consistent, a predetermined channel
separate from the channel set here may be applied.
•Authentication: Choose the type of authentication used on the
network. In ad-hoc mode, the camera supports open system
and shared key authentication.
•Encryption: The type of encryption used on the network.
Choose from [None] (open networks only), 64-bit WEP, and
128-bit WEP.
•Encryption key: If the network uses encryption, enter the
network key. The number of characters required depends
on the type of key used:
•Key Index: Set the key index when [WEP64] or [WEP128] is set
for [Encryption]. The default index is [1]. Setting the key
index is not necessary when [No encryption] was selected
for [Encryption].
WEP (64-bit) WEP (128-bit)
Number of characters (ASCII) 513
Number of characters (hex) 10 26
$00_WT-4_En.book Page 123 Friday, August 10, 2007 2:02 PM
124
Copying Network Profiles to the Camera / Ad Hoc Networks
Operating the WT-4 for FTP
$00_WT-4_En.book Page 124 Friday, August 10, 2007 2:02 PM
125
Copying Network Profiles to the Camera / Ad Hoc Networks
Operating the WT-4 for FTP
10
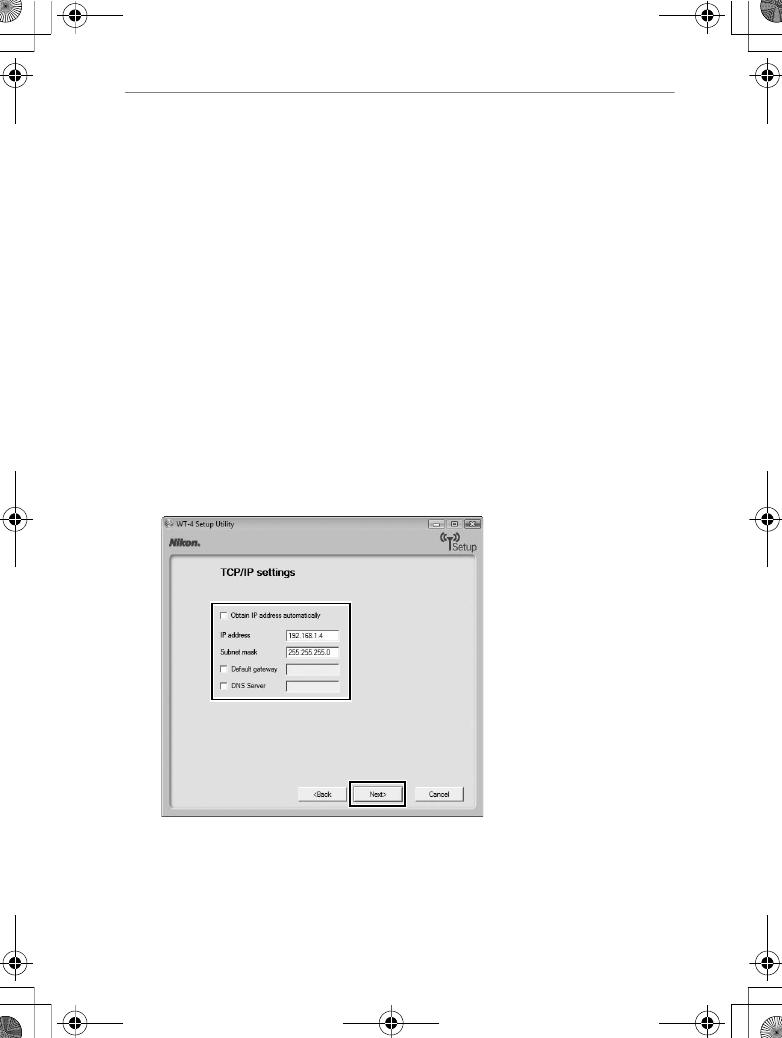
Enter the following information and click [Next].
•Obtain IP address automatically: Select this option if the network
is configured to supply IP addresses automatically. If the
network does not include a DHCP server, addresses will be
supplied by Auto IP (pg.180).
•IP address: If the network is configured for manual IP
addressing, enter an IP address for the WT-4.
•Subnet mask: If the network is configured for manual IP
addressing, enter a subnet mask for the WT-4.
•Default gateway: If the network requires a gateway address,
select this option and enter the address supplied by the
network administrator. This option applies only if [FTP
server] is selected for Profile type in Step 7.
•DNS Server: If a Domain Name Server exists on the network,
select this option and enter the address supplied by the
network administrator. This option applies only if [FTP
server] is selected for Profile type in Step 7.
$00_WT-4_En.book Page 125 Friday, August 10, 2007 2:02 PM

126
Copying Network Profiles to the Camera / Ad Hoc Networks
Operating the WT-4 for FTP
11
Enter ftp settings and click [Next].
•FTP server: Enter the URL or IP address of the ftp server.
•FTP server port: Enter the port number for the ftp server. The
default port is 21.
•FTP path: Choose the folder to which pictures will be
uploaded. If no path is specified, pictures will be uploaded
to the home directory.
•Anonymous login: Select this option for anonymous login, or
leave this option unchecked to supply a [User ID] and
[Password].
•Use proxy server: If a proxy server is required for ftp, select this
option and enter the server name and port number for the
proxy server.
•PASV mode: Select this option to use PASV mode.
$00_WT-4_En.book Page 126 Friday, August 10, 2007 2:02 PM
127
Copying Network Profiles to the Camera / Ad Hoc Networks
Operating the WT-4 for FTP
12
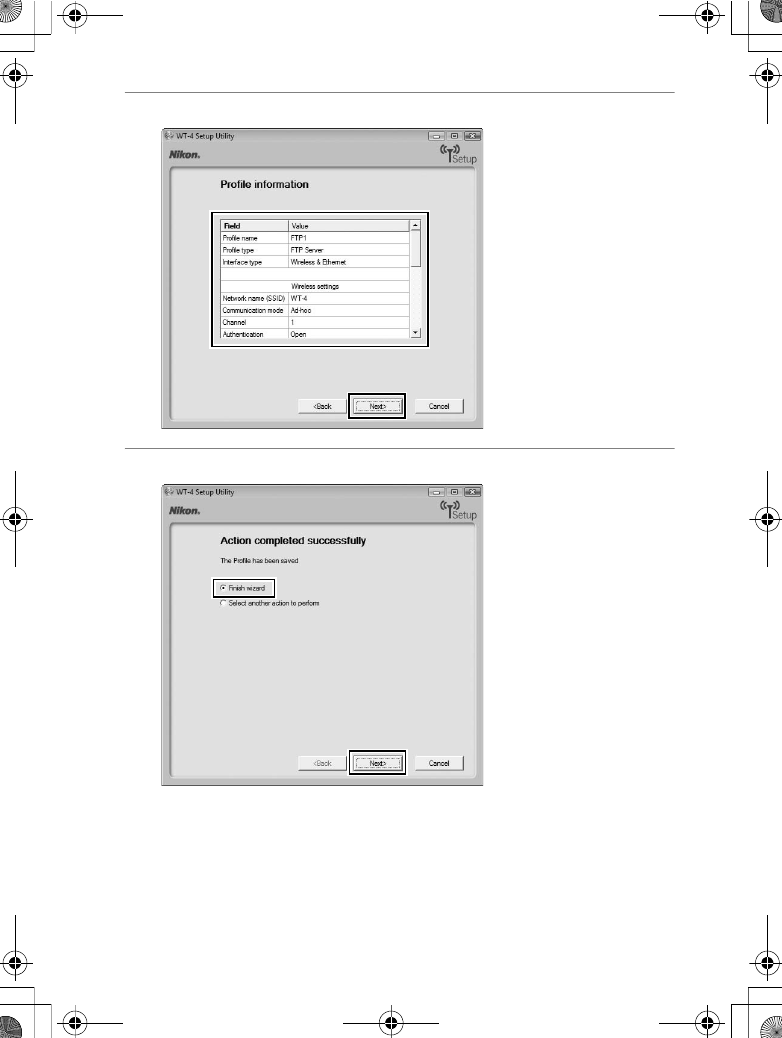
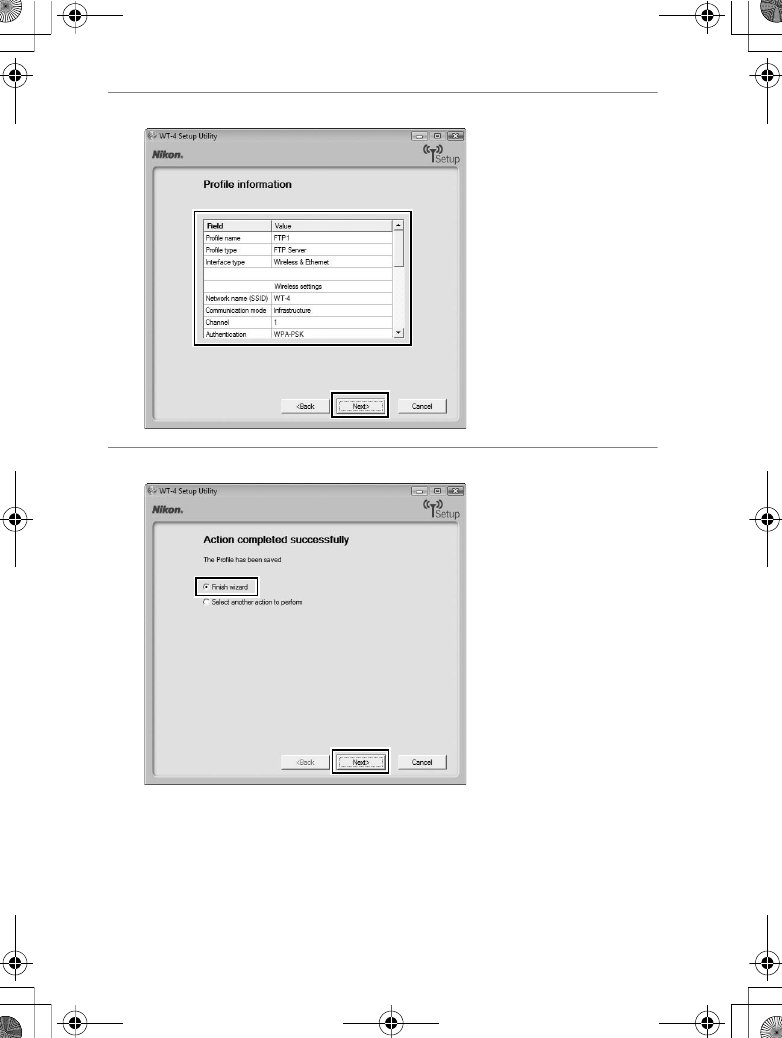
Confirm that settings are correct and click [Next].
13
Select [Finish wizard] and click [Next].
$00_WT-4_En.book Page 127 Friday, August 10, 2007 2:02 PM
128
Copying Network Profiles to the Camera / Ad Hoc Networks
Operating the WT-4 for FTP
14
Turn the camera off and
disconnect the USB cable.
The network profile has now been copied to the camera. Proceed
to “Connecting to the FTP Server” (pg.140).
U
MMY
$00_WT-4_En.book Page 128 Friday, August 10, 2007 2:02 PM
129
Copying Network Profiles to the Camera / Infrastructure Networks
Operating the WT-4 for FTP
Infrastructure Networks
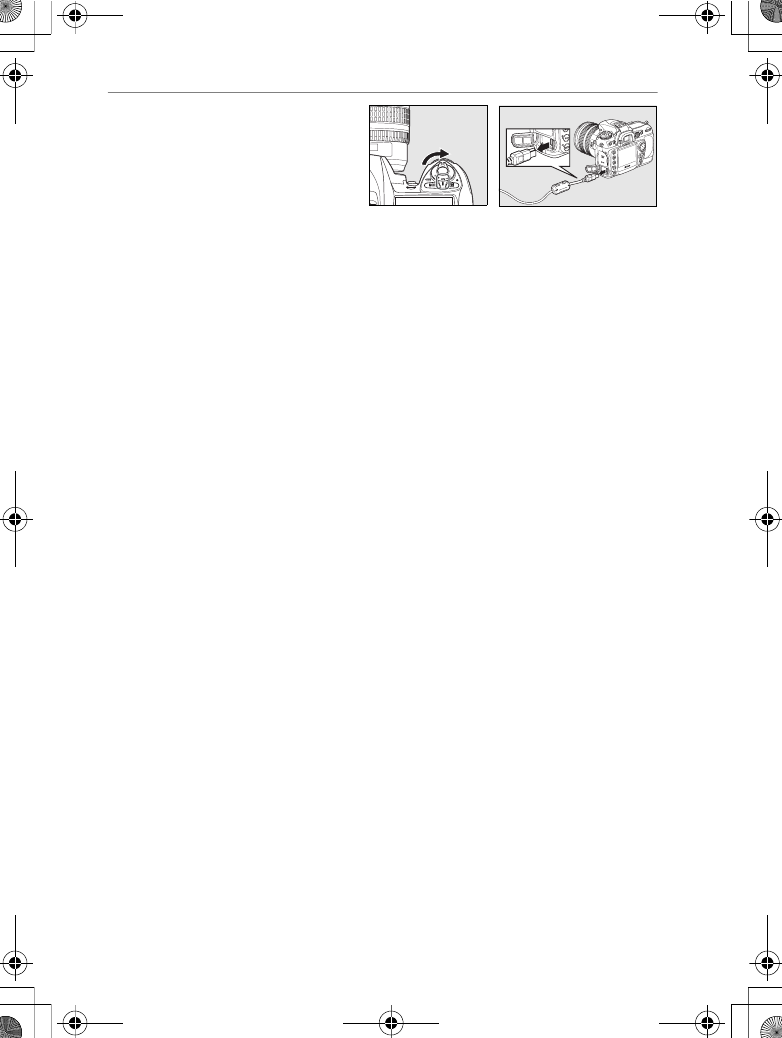
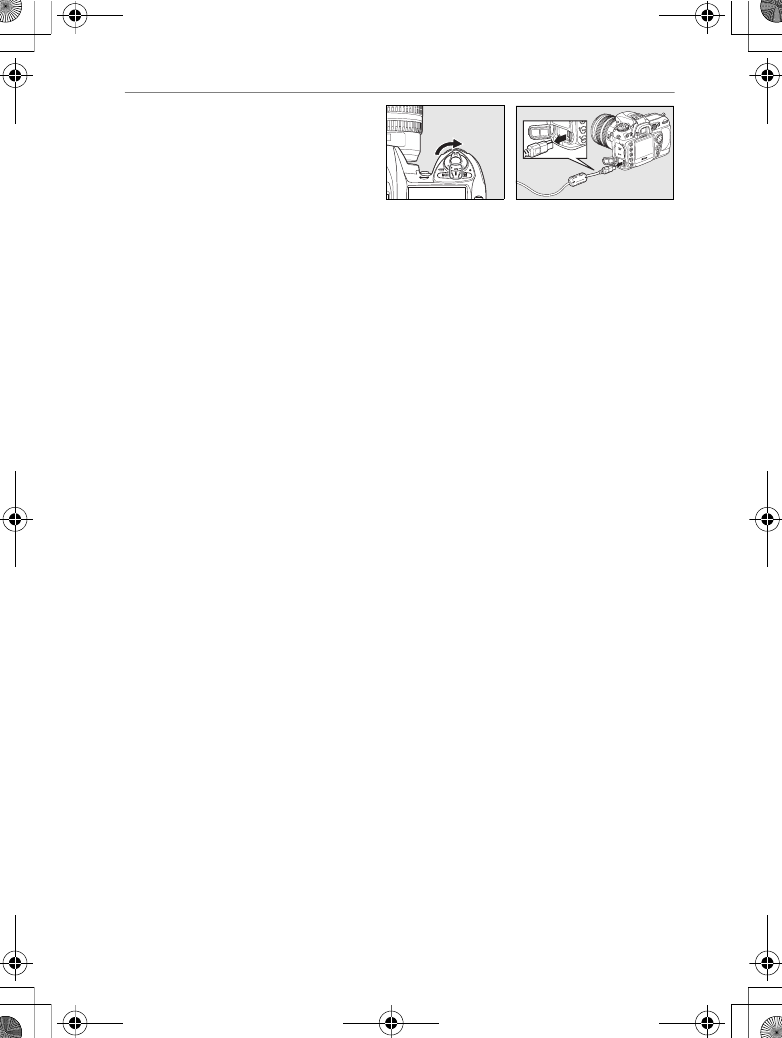
1Connect the UC-E4 as shown below.
2Turn the camera on.
3Turn the computer on and start the WT-4 Setup Utility.
•Windows: Double-click the [WT-4 Setup Utility] icon on the
desktop
•Macintosh: Click the [WT-4WirelessSetup] icon in the Dock.
MMY
Power switch
$00_WT-4_En.book Page 129 Friday, August 10, 2007 2:02 PM
130
Copying Network Profiles to the Camera / Infrastructure Networks
Operating the WT-4 for FTP
4The dialog shown below will be displayed; click [Next].
5Select [Add/Edit profile] and click [Next].
$00_WT-4_En.book Page 130 Friday, August 10, 2007 2:02 PM
131
Copying Network Profiles to the Camera / Infrastructure Networks
Operating the WT-4 for FTP
6Select [Add new profile] and click [Next].
7Enter the following information and click [Next]:
•Profile name: Enter a name of up to 16 characters.
•Profile type: Choose [FTP Server].
•Interface type: Choose [Wireless & Ethernet] for networks that
include wireless, or [Ethernet only] for Ethernet-only
networks.
$00_WT-4_En.book Page 131 Friday, August 10, 2007 2:02 PM

132
Copying Network Profiles to the Camera / Infrastructure Networks
Operating the WT-4 for FTP
8Select [Manual setup] and click [Next].
$00_WT-4_En.book Page 132 Friday, August 10, 2007 2:02 PM
133
Copying Network Profiles to the Camera / Infrastructure Networks
Operating the WT-4 for FTP
A“Automatic Setup”
Choose [Automatic setup (recommended)] when using a new
network for the first time. The following dialog will be displayed; if
multiple infrastructure networks have been setup, select a setting
which will be used for network connection and click [Next]. to
proceed to Step 11 (pg.137).
[Automatic setup] cannot be selected in the following cases:
•When editing a preset network
•When using a third party network adapter
•When the computer network is set to a static IP address
•When the OS is Windows XP SP1 or Mac OSX
$00_WT-4_En.book Page 133 Friday, August 10, 2007 2:02 PM

134
Copying Network Profiles to the Camera / Infrastructure Networks
Operating the WT-4 for FTP
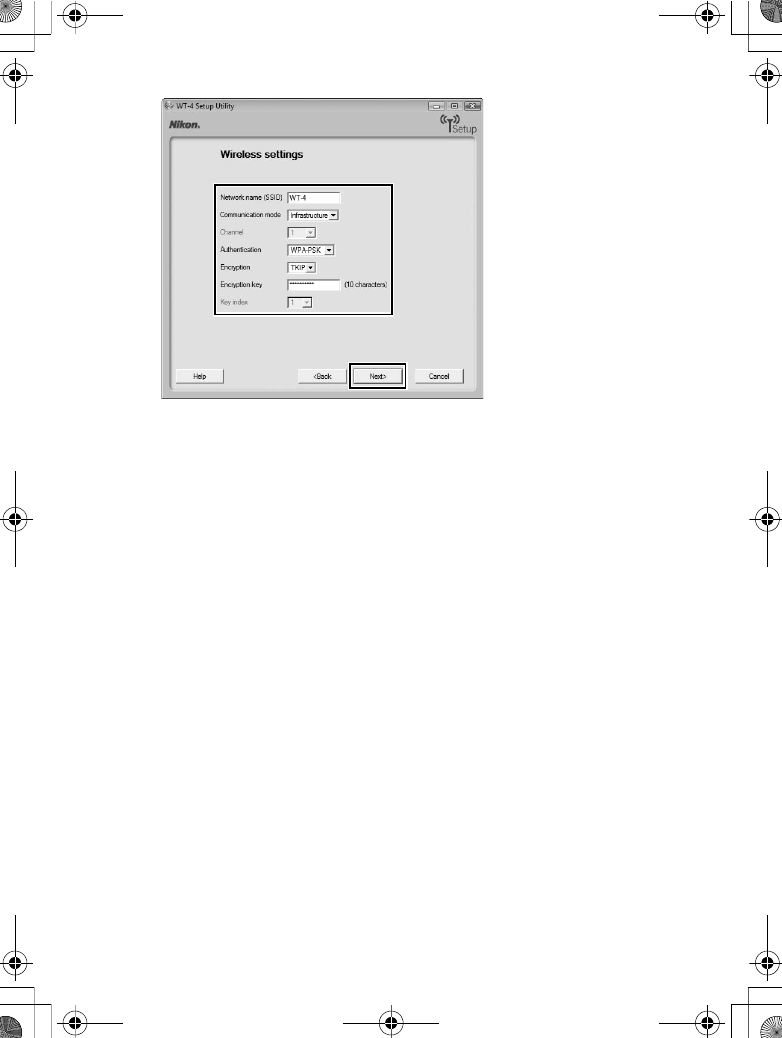
9Enter the following information and click [Next].
•Network name (SSID): Enter a network name or choose from a
list of existing networks. Do not change the name if it is
supplied automatically.
•Network type: Select [Infrastructure (access point)].
•Authentication: Choose the authentication used on the
network. In infrastructure mode, the camera supports WPA-
PSK, WPA2-PSK, open system, and shared key
authentication.
•Encryption: Choose the encryption used on the network. The
options available depend on the authentication used:
Open: None, 64- or 128-bit WEP Shared: 64- or 128-bit WEP
WPA-PSK: TKIP, AES WPA2-PSK: AES
•Encryption key: If the network uses encryption, enter the
network key. The number of characters required depends
on the type of key used:
•Key Index: Set the key index when [WEP64] or [WEP128] is set
for [Encryption]. The default index is [1]. Setting the key
index is not necessary when [No encryption] was selected
for [Encryption].
WEP (64-bit) WEP (128-bit) TKIP, AES
Number of characters (ASCII) 5 13 8–63
Number of characters (hex) 10 26 64
$00_WT-4_En.book Page 134 Friday, August 10, 2007 2:02 PM
135
Copying Network Profiles to the Camera / Infrastructure Networks
Operating the WT-4 for FTP
$00_WT-4_En.book Page 135 Friday, August 10, 2007 2:02 PM
136
Copying Network Profiles to the Camera / Infrastructure Networks
Operating the WT-4 for FTP
10
Enter the following information and click [Next].
•Obtain IP address automatically: Select this option if the network
is configured to supply IP addresses automatically. If the
network does not include a DHCP server, addresses will be
supplied by Auto IP (pg.180).
•IP address: If the network is configured for manual IP
addressing, enter an IP address for the WT-4.
•Subnet mask: If the network is configured for manual IP
addressing, enter a subnet mask for the WT-4.
•Default gateway: If the network requires a gateway address,
select this option and enter the address supplied by the
network administrator. This option applies only if [FTP
server] is selected for Profile type in Step 7.
•DNS Server: If a Domain Name Server exists on the network,
select this option and enter the address supplied by the
network administrator. This option applies only if [FTP
server] is selected for Profile type in Step 7.
$00_WT-4_En.book Page 136 Friday, August 10, 2007 2:02 PM
137
Copying Network Profiles to the Camera / Infrastructure Networks
Operating the WT-4 for FTP
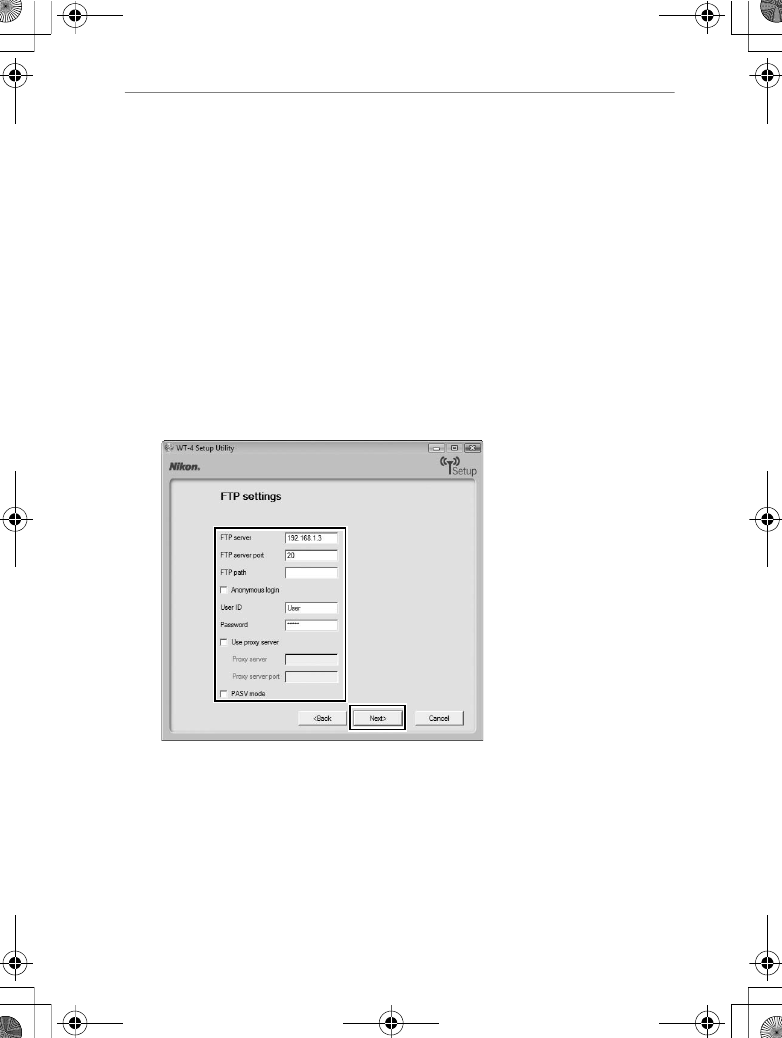
11
Enter ftp settings and click [Next].
•FTP server: Enter the URL or IP address of the ftp server.
•FTP server port: Enter the port number for the ftp server. The
default port is 21.
•FTP path: Choose the folder to which pictures will be
uploaded. If no path is specified, pictures will be uploaded
to the home directory.
•Anonymous login: Select this option for anonymous login, or
leave this option unchecked to supply a [User ID] and
[Password].
•Use proxy server: If a proxy server is required for ftp, select this
option and enter the server name and port number for the
proxy server.
•PASV mode: Select this option to use PASV mode.
$00_WT-4_En.book Page 137 Friday, August 10, 2007 2:02 PM
138
Copying Network Profiles to the Camera / Infrastructure Networks
Operating the WT-4 for FTP
12
Confirm that settings are correct and click [Next].
13
Select [Finish wizard] and click [Next].
$00_WT-4_En.book Page 138 Friday, August 10, 2007 2:02 PM
139
Copying Network Profiles to the Camera / Infrastructure Networks
Operating the WT-4 for FTP
14
Turn the camera off and
disconnect the USB cable.
The network profile has now been copied to the camera. Proceed
to “Connecting to the FTP Server” (pg.140).
U
MMY
$00_WT-4_En.book Page 139 Friday, August 10, 2007 2:02 PM