Thomson 2-8358AH 1.9DECT COLOR DISPLAY (128X128), HANDSFREE HANDSET PLUS CHARGER User Manual USERS MANUAL 5
Thomson Inc. 1.9DECT COLOR DISPLAY (128X128), HANDSFREE HANDSET PLUS CHARGER USERS MANUAL 5
Thomson >
Contents
- 1. USERS MANUAL 1
- 2. USERS MANUAL 2
- 3. USERS MANUAL 3
- 4. USERS MANUAL 4
- 5. USERS MANUAL 5
USERS MANUAL 5
84
Web Conguration
Security
Security secures or scrambles messages traveling through the air between
your wireless PCs and the gateway, so they can’t be observed by others.
The following minimum security setting changes to factory defaults are
recommended.
Change the default Network name of SSID•
EnablemacaddresslteringbyusingtheAccesscontrollistfeatures•
Choose WPA/WPA2 encryption•
See the 802.11b/g Security Web Page discussion below for details.
1. 802.11b/g Basic
Tosetthebasiccongurationforthewirelessfeatures,clickBasic from the
Wireless menu.
Note: These must match the settings you make on your wireless-equipped
PC on the LAN side.
The SSID is your Network Name.
Change the default to a name of your choice up to 32 characters •
long.
The wireless radio in your Gateway can be completely de-activated •
by changing Interface to Disabled).
Click the • Apply button to save your settings.
The Gateway WiFi radio frequently transmits a beacon signal which can
contain this network name (SSID).
The network Type is Open, so your SSID is included in that beacon, and is
therefore detectable by any nearby wireless equipped PCs in the area.
Administration
Status - Telephony - Router - Wireless EMTA-Settings
Gateway
Wireless
Basic
Security
Access Control
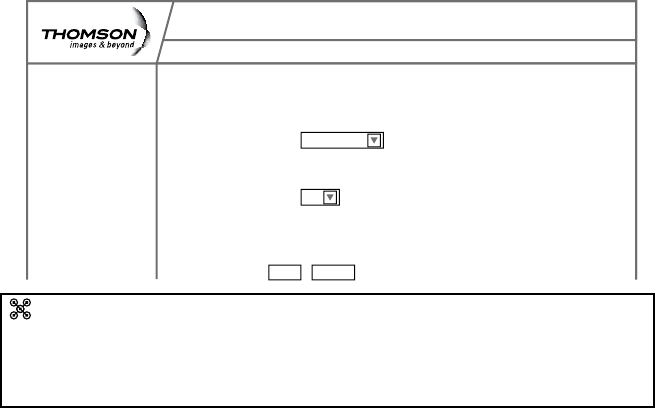
802.11b/g Basic : This page allows configuration of the Access Point parameters,
including the SSID and channel number.
Interface Enabled
Wireless MAC Address: 00:19:df:80:00:68
Network Name (SSID) ACG Welcome
New Channel 5
Current Channel 5
Data Encryption Mode: wpa2
WPA passphrase: ACGProtection
CancelApply

85
Web
Web Conguration
Setting Description Value List or
Range Default
Interface
Enable or disable
the wireless
interface.
Enabled,
Disabled Disabled
Wireless Mac
Address
The Mac address
of the wireless
card installed is
displayed
Network Name
(SSID)
Set the Network
Name (also
known as SSID)
of this network.
Up to
32-character
string containing
ASCII characters
with codes
between 0x20
and 0x7e
ACG-“last 4
digits of the
wireless card
Mac address”
New Channel
Select a
particular
channel on which
to operate.
1-13 11
Data Encryption
Mode
The data
encryption mode
currently used is
displayed
WPA-PSK
(TKIP)

86
Web Conguration
2. 802.11b/g Security
ThispageallowsyoutoconguretheNetworkAuthentication.
This page provides several different modes of wireless security.
You will have to enter proper information according to the mode you select.
A network encrypted with WPA/WPA2 is more secure than a network
encrypted with WEP, because WPA/WPA2 uses dynamic key encryption. To
protect the information as it traveling through the air, you should enable the
highest level of encryption supported by the ACG: WPA2-PSK (AES)
WPA2-PSK (AES)
To enable WPA2
(Make sure that your wireless client and client manager are compatible with
it.)
choose WPA2-PSK (AES) in the security drop down menu.
Select a passphrase: the passphrase is composed of more than 8
alphanumerical characters. Uper and lower case characters can be used.
Use a strong passphrase which combines letters and numbers.
(The alphanumeric character set consists of the numbers 0 to 9 and letters A
to Z.)
Administration
Status - Telephony - Router - Wireless EMTA-Settings
Gateway
Wireless
Basic
Security
Access Control
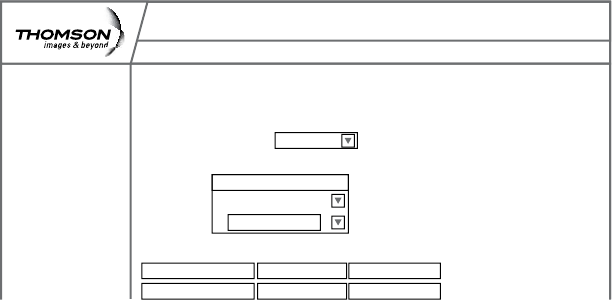
802.11b/g Security : This page allows configuration of the security, WEP key or
WPA passphrase.
Security WPA2-PSK(AES)
WPA Passphrase ACGProtection
Cancel
Apply
Click on apply
WPA2-PSK (AES) authentication and encryption
The authentication uses a 4-way handshake to check wether the Pre shared
Keys (PSKs) are identical.
Advanced Encryption Standard (AES) is the state of the art encryption
mechanism which provides the highest form of security for home users.

87
Web
Web Conguration
Other security modes available:
WPA-PSK (TKIP)
This is the default security mode.
Temporal Key Integrity Protocol (TKIP) is used for dynamic encryption of the
data.
WEP-Open and WEP-Shared
If one of these security modes is chosen, you have to enter a 128 bits
encryption key
Encryption Key 128 bits
The key used for WEP is a 128 bit hexadecimal ([0-9] [A-F]) key.
The key is composed of 26 hexadecimal characters.
88
Web Conguration
3. Access Control
This page allows you to ensure security by setting an access control to the
Access Point (AP). Access control is done on client’s mac addresses
MAC Restrict Mode: Click Disabled to welcome all of the clients on the
network (default setting).
Click Allow to permit only the clients on the list to access the cable modem.
Click Deny to prevent the clients on the list to access this device.
MAC Address: YourGatewayidentieswirelessPCsbytheirWiFi
MAC Address.
This address consists of a string of 6 pairs of numbers
0-9 and letters A-F, such as 00 90 4B F0 FF 50.
It is usually printed on the WiFi card of the device (e.g.
the PCMCIA card in a laptop).
Enter the MAC addresses of the connected clients
intotheelds,andthenclickApplytoaddthemto
the list for access control. A maximum of 9 MAC
addresses can be entered.
+ : Afterproperconguration,clickonthe+buttonto
invoke the settings.
Connected Clients: The information of currently connected clients will be
displayed here.
Administration
Status - Telephony - Router - Wireless EMTA-Settings
Gateway
Wireless
Basic
Security
Access Control
802.11b/g Access Control : This page allows configuration of Access Control
to the AP as well as status on the connected clients.
MAC Restrict Mode Allow
Connected Clients
Computer Home IP Address MAC Address
MAC Addresses
00:14:BF:9F:AB:B4
89
Web
Web Conguration
EMTA settings – Basic Web Page Group
This group of pages gives information on the hardware and the state of your
cable connection. The access to this groupof pages is protected by a static
password: no username, password:Thomson
1. Status
This page displays:
Basic LAN Status of This Device •
(including the downstream and upstream status)
Device Information•
Interface Parameters •
Administration
Status - Telephony - Router - Wireless EMTA-Settings
Gateway
Basic
Status
Status
CM Hardware
Event Log
CM State
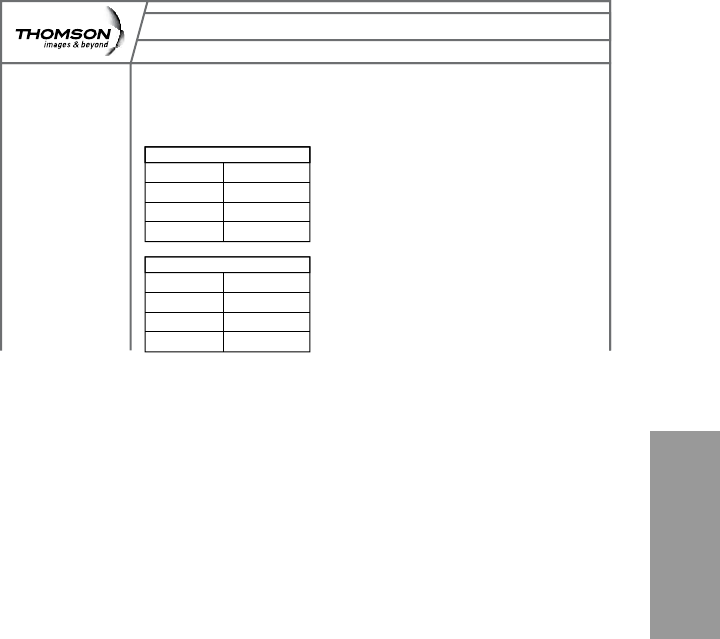
This page displays information on the status of the cable modem’s HFC and
IP connectivity.
RF Downstream
Frequency: 405.000 MHz
Power: 13.5 dBmV
SNR: 39.5 dB
Modulation: QAM-256
RF Upstream
Frequency: 33.000 MHz
Power: 43.8 dBmV
SNR: 2560Ksym/sec
Modulation: QPSK

90
Web Conguration
2. CM Hardware
The CM hardware is displayed on this page.
3. Event Log
The CM event log is displayed on this web page.
Administration
Status - Telephony - Router - Wireless EMTA-Settings
Gateway
Basic
Hardware
Status
CM Hardware
Event Log
CM State
This page displays the CM and MTa event logs.
CM Hardware
HW Revision: 0
Vendor: Thomson
BOOT Revision: 2.1.8o
SW Revision: 2.0.0alpha3
Model: ACG905
Product Type: ACG905
Flash Part:
Download Revision: (unknown)
Software Revision: 2.0.0alpha3
Serial number: 87003804790087
MTA Hardware
MTA Serial Number: 87003804790087
Administration
Status - Telephony - Router - Wireless EMTA-Settings
Gateway
Basic
Event Logs
Status
CM Hardware
Event Log
CM State
This page displays the CM and MTa event logs.
CM Event Log
Date/Tme Event Level Event ID Description
03/03/2008 19:23 Critical (3) D3.0 DHCP WARNING - Non-critical field invalid in response
01/01/2000 00:02 Critical (3) R2.0 No Ranging Respnonse received - T3 time-out
01/01/2000 00:02 Critical (3) T1.0 SYN Timing Synchronization failure - Failed to acquire QAM/QPSK

91
Appendix - Customizing Your Handset
4. CM State
This page shows the current state of the cable modem.
Administration
Status - Telephony - Router - Wireless EMTA-Settings
Gateway
Basic
CM State
Status
CM Hardware
Event Log
CM State
This page displays the state of the CM/MTA.
CM Hardware
CM State: Operational
Docsis-Downstream Scanning Done
Docsis-Ranging Done
Docsis-DHCP Done
Docsis-TFTP Done
Docsis-Data Reg Complete Done
Telephony-DHCP Completed
Telephony-Security Disabled
Telephony-TFTP Completed
Telephony-Reg with Call Server L1: Operational/L2: Operational

92
Appendix - Customizing Your Handset
Handset ID
Register Handset
Select Base
De-Register
Registration
Dialed Calls
Missed Calls
Received Calls
Call Lists
Ring Tone
Ring Tone
Ring Volume
Beep Tone
External Calls (choice of 5 ringtones)
Internal Calls (choice of 6 ringtones)
Key Beep (on/off)
Low Battery (on/off)
Out of Range (on/off)
Notifications (on/off)
Activate/Deactivate
Alarm Tone
Alarm
Time
Settings
System PIN t
Base IP address
Language
Ear Volume
Contrast
Auto Talk
Handset Update
Handset Settings
Base Settings
Default Settings
Phone
Settings
Customizing Your Handset
1. Charts of the Menus
By pressing the softkey menu from the idle screen you select the icon to
access the setting menu of the phone.
The menu structure is as follows:

93
Appendix - Customizing Your Handset
2. Ring Tone
a. Selecting a Ring Tone
In the idle screen, select “Menu” by pressing the softkey. •
Select the • (settings) icon and conrm.
Select “Ring Tone” and conrm. •
Select “Ringtone” and conrm.•
Select “External Calls” or “Internal Calls” and conrm.•
Select the ringtone you want and conrm by pressing the softkey for •
“Use”.
b. Adjusting the Ringer Volume
In the Idle screen, select “Menu” by pressing the softkey. •
Select the • (settings) icon and conrm.
Select “Ring Tone” and conrm.•
Select “Ring Volume” and conrm.•
Use the up and down key to adjust the volume then conrm.•
c. Changing the Beep Tones Settings
To turn beep tones on (or off):
Key Beep:
In the Idle screen, select “Menu” by pressing the softkey. •
Select the • (settings)iconandconrm.
Select“RingTone”andconrm.•
Select“BeepTones”andconrm.•
Select“KeyBeep”andconrm.•
Select“Off”or“On”andconrm.•
Low Battery:
In the Idle screen, select “Menu” by pressing the softkey.•
Select the • (settings)iconandconrm.
Select“RingTone”andconrm.•
Select“BeepTones”andconrm.•
Select“LowBattery”andconrm.•
Select“Off”or“On”andconrm.•
CONFIRM - When working in the screens on your handset, there are two
ways to conrm your selections. In most screens you will use a softkey for
“OK”; but, if that is not available, use the “Select” key located in the center of
the navigation key.

94
Appendix - Customizing Your Handset
Out of Range:
In the Idle screen, select “Menu” by pressing the softkey.•
Select the • (settings)iconandconrm.
Select“RingTone”andconrm.•
Select“BeepTones”andconrm.•
Select“OutOfRange”andconrm.•
Select“Off”or“On”andconrm.•
Notications:
In the Idle screen, select “Menu” by pressing the softkey. •
Select the • (settings)iconandconrm.
Select“RingTone”andconrm.•
Select“BeepTones”andconrm.•
Select“Notify”andconrm”.•
Select“Off”or“On”andconrm.•
3. Time
a. Customizing the Alarm Ringer
In the idle screen, select “Menu” by pressing the softkey. •
Select the • (settings) icon and conrm.
Select “Time Settings” and conrm.•
Select “Alarm” and conrm.•
Select “Alarm Tone” and conrm. •
Select the ringer type (radio or ringtone) and conrm. •
Note: If you select a radio channel that proves to be unavailable, a
ringtone will be played instead.

95
Appendix - Customizing Your Handset
4. Phone Settings
a. Changing the Display Contrast
In the idle screen, select “Menu” by pressing the softkey. •
Select the • (settings) icon and conrm.
Select “Handset” and conrm.•
Select “Contrast” and conrm. •
Use the up and down keys to adjust the contrast and conrm.•
b. Auto Talk
Auto Talk “ON”- If you pick up the handset from the dock when the
phone is ringing, the handset will automatically give you that ringing
line without the need to press the green (talk) button.
Auto Talk “OFF” - In the same situation, you will have to press the talk
button to answer the ringing phonecall.
In the idle screen, select “Menu” by pressing the softkey. •
Select the • (settings) icon and conrm.
Select “Handset” and conrm.•
Select “Auto Talk” and conrm.•
Select “Off” (or “On”) and conrm.•
c. Restoring the Default Settings
This option allows you to restore the Handset to its original default
settings. This procedure will reset the base PIN (0000 by default).
However, all the numbers stored in the phonebook, the call log and the
most recently-dialed numbers list will be retained.
In the welcome screen, select “Menu” by pressing the softkey.•
Select the • (settings) icon and conrm.
Select “Default Settings” and conrm. •
Enter the PIN • (0000 by default) and conrm.

96
Appendix - Customizing Your Handset
5. Call Lists
a. Understanding Caller Identication Data
If you subscribe to your network provider’s “Caller Identication”
(caller ID) service, you can see who is calling you before you take the
call.
If you subscribe to the “Call Waiting” service as well, the same
identicationprocessappliestocallsreceivedwhenyouarealready
on a call.
The last 50 calls made and received are logged automatically,
together with number, date and time.
The following messages may be displayed on-screen during the call:
Caller’s name and number - • if the caller’s number is forwarded by the
network,
“Withheld” if the caller is using the secrecy function, or “Unavailable” if •
the network does not forward the name or number,
“External Call” will display if you do not subscribe to the “Caller •
Identication” service.
b. Viewing the Call List
Ifyousubscribetoyournetworkprovider’s“CallerIdentication”
service, your TH58 Handset will store details of the last 50 calls made
and received, together with their date and time.
CONFIRM - When working in the screens on your handset, there are two
ways to conrm your selections. In most screens you will use a softkey for
“OK”; but, if that is not available, use the “Select” key located in the center of
the navigation key.

97
Appendix - Customizing Your Handset
6. Using Your Phone With Multiple Handsets
a. Registering/Re-Registering an Extra Handset
You can have up to 5 handsets registered to your ACG TH58 base.
Refer to page ?? to see how addtional Handsets may be purchased.
If you already have 5 handsets registered and you want to swap one
of them, you must remove that handset from your list of registered
phones (uninstall it) before installing the replacement handset.
On the base:
Switch the base to registration mode.•
On the handset:
Select “Menu” by pressing the softkey.•
Select the • (settings) icon and conrm.
Select “Registration” and conrm.•
Select “Register Handset” and conrm.•
Select the base to be associated with this handset • (1 to 4) and conrm.
Enter the system PIN • (0000 by default) and conrm.
Wait 3 to 4 minutes for the conrmation screen.•
Your Handset is now registered.•
b. Selecting a Base
Each Handset may be registered to 4 different ACG bases.
If you register your TH58 with a non-ACG base, you will not be able to
access the data functions.
To change base:
Select “Menu” by pressing the softkey.•
Select the • (settings) icon and conrm.
Select “Registration” and conrm.•
Select “Select Base” and conrm.•
Select the number of the base using the up and down • (navigation) keys
(1 to 4) and conrm.
The bases to which the handset is registered are identied by the [ ] •
symbol.

98
Appendix - Customizing Your Handset
c. Un-Registering a Handset
Handsets can only be un-registered from another Handset.
Select “Menu” by pressing the softkey.•
Select the • (settings) icon and conrm.
Select “Registration” and conrm.•
Select “De-Register” and conrm.•
Enter the secret system PIN • (0000 by default) and conrm.
Using the up and down (navigation) keys, select the Handset to be un-•
registered and conrm.
d. Making/Taking an Internal Call
Making an internal call
On the keypad, press the number of the internal Handset you want to •
call (1 to 5) then press the (green) talk key.
Taking an internal call
When you receive an internal call, the screen displays the number of
the calling Handset and “Internal Call”.
Press the number of the Handset displayed then press the• (green) talk
key to answer the call.
To hang up at the end of the call, press the number of the handset
displayed then press the (red) OFF key.
CONFIRM - When working in the screens on your handset, there are two
ways to conrm your selections. In most screens you will use a softkey for
“OK”; but, if that is not available, use the “Select” key located in the center of
the navigation key.
99
Appendix - More Info
Additional Information
Frequently Asked Questions
Q. What if I don’t subscribe to cable TV?
A. If cable TV is available in your area, data and voice service may be made
available with or without cable TV service. Contact your local cable
company for complete information on cable services, including high-
speed internet access.
Q. How do I get the system installed?
A. Professional installation from your cable provider is strongly
recommended. They will ensure proper cable connection to the modem
and your computer. However, your retailer may have offered a self
installation kit, including the necessary software to communicate with
your cable ISP.
Q. Once my Advanced Cable Gateway is connected, how do I get
access to the Internet?
A. Your local cable company provides your internet service, offering a wide
range of services including email, chat, news & information services and
a connection to the World Wide Web.
Q. Can I watch TV, surf the Internet, and talk to my friends through the
Advanced Cable Gateway at the same time?
A. Absolutely!
Q. What do you mean by “Broadband?”
A. Simply put, it means you’ll be getting information through a “bigger pipe,”
with more bandwidth, than a standard phone line can offer. A wider,
“broader” band means more information, more quickly.
Q. What is DOCSIS and what does it mean?
A. “DataOverCableServiceInterfaceSpecications”istheindustry
standard that most cable companies are adopting as they upgrade their
systems. Should you ever decide to move, the Advanced Cable Gateway
will work with all upgraded cable systems that are DOCSIS-compliant.
Q. What is PacketCable and what does it mean?
A. PacketCable is the industry standard for telephony services that most
cable companies are adopting as they upgrade their systems. Should
you ever decide to move, the Advanced Cable Gateway will work with all
upgraded cable systems that are PacketCable compliant.
100
Appendix - More Info
Q. What is Xpress Technology and what does it mean?
A. This is one of the popular performance-enhancing WiFi technologies,
designedtoimprovewirelessnetworkefciencyandboostthroughput.It
ismoreefcientinmixedenvironments,anditcanworkwith802.11a/b/g
networks. When Xpress is turned on, aggregate throughput (the sum
of the individual throughput speeds of each client on the network) can
improve by up to 27% in 802.11g-only networks, and up to 75% in mixed
networks comprised of 802.11g and 802.11b standard equipment. The
technology achieves higher throughput by re-packaging data, reducing
the number of overhead control packets, so that more useful data can be
sent during a given amount of time.
101
Appendix - Troubleshooting
Troubleshooting
You can correct most problems you have with your Gateway by consulting
the troubleshooting list that follows:
I can’t access the internet.
Check all of the connections to your Advanced Cable Gateway.
Your PC is connected to the USB port or your Ethernet card may
not be working. Check if each product’s documentation for more
information.
The Network Properties of your operating system may not be installed
correctly or the settings may be incorrect. Check with your ISP or
cable company.
All of the lights are ashing in sequence.
This means the Advanced Cable Gateway is automatically updating
its system software. Please wait for the lights to stop ashing. The
updating process typically lasts less than one minute.
Do not remove the power supply or reset the Advanced Cable
Gateway during this process.
I can’t get the modem to establish an Ethernet connection.
Even new computers don’t always have Ethernet capabilities – be
sure to verify that your computer has a properly installed Ethernet
card and the driver software to support it.
Check to see that you are using the right type of Ethernet cable.
The modem won’t register a cable connection.
If the modem is in Initialization Mode, the INTERNET light will be
ashing. Call your Cable Company if it has not completed this 5-step
process within 30 minutes, and note which step it is getting stuck on.
The modem should work with a standard RG-6 coaxial cable, but
if you are using a cable other than the one your Cable Company
recommends, or if the terminal connections are loose, it may not
work. Check with your Cable Company to determine whether you’re
using the correct cable.
102
Appendix - Troubleshooting
If you subscribe to video service over cable, the cable signal may not
be reaching the modem. Conrm that good quality cable television
pictures are available to the coaxial connector you are using by
connecting a television to it. If your cable outlet is “dead”, call your
Cable Company.
Verify that the Cable Modem service is DOCSIS compliant and
PacketCable compliant by calling your cable provider.
I don’t hear a dial tone when I use a telephone.
Telephone service is not activated. If the rightmost light on the
Advanced Cable Gateway stays on while others ash, check with your
TSP or cable company.
If the Advanced Cable Gateway is connected to existing house
telephone wiring, make sure that another telephone service is not
connected. The other service can normally be disconnected at the
Network Interface Device located on the outside of the house.
If using the second line on a two-line telephone, use a 2-line to 1-line
adapter cable.
103
Appendix - Fcc Information
FCC Declaration of Conformity and Industry Canada
Information
This device complies with Part 15 of the FCC Rules. Operation is subject
to the following two conditions: (1) this device may not cause harmful
interference, and (2) this device must accept any interference received,
including interference that may cause undesired operation.
Trade Name: Model: ACG905
EquipmentClassication: Computing Device Accessory
Responsible Party: Thomson Inc.
101 W. 103rd St.
Indianapolis, IN 46290 U.S.A.
This equipment has been tested and found to comply with the limits for a
Class B digital device, pursuant to Part 15 of the FCC Rules. These limits
are designed to provide reasonable protection against harmful interference
in a residential installation. This equipment generates, uses, and can radiate
radio frequency energy and, if not installed and used in accordance with
the instructions, may cause harmful interference to radio communications.
However there is no guarantee that interference will not occur in a particular
installation. If this equipment does cause harmful interference to radio or
television reception, which can be determined by turning the equipment off
and on, the user is encouraged to try and correct the interference by one or
more of the following measures:
Reorient or relocate the receiving antenna.•
Increase the separation between the equipment and receiver.•
Connect this equipment into an outlet on a circuit different from that •
to which the receiver is connected.
Consult the dealer or an experienced radio/TV technician for help.•
FCCregulationsstatethatunauthorizedchangesormodicationstothis
equipment may void the user’s authority to operate it.
This Class B digital apparatus meets all requirements of the Canadian
Interference Causing Equipment Regulations.
104
Appendix - Ordering
Additional Headsets
Follow these items to order additional headsets
105
Appendix - Service
Service Information
If you purchased or leased your Advanced Cable Gateway directly from your
cable company, then warranty service may be provided through your cable
provider or its authorized representative. For information on 1) Ordering
Service, 2) Obtaining Customer Support, or 3) Additional Service Information,
please contact your cable company. If you purchased your Advanced Cable
Gateway from a retailer, see the enclosed warranty card.
106
Appendix - Glossary
Glossary
10BaseT Unshielded, twisted pair cable with an RJ-45 connector,
used with Ethernet LAN (Local Area Network). “10” indicates
speed (10 Mbps), “Base” refers to baseband technology,
and “T” means twisted pair cable.
Authentication The process of verifying the identity of an entity on a
network.
DHCP - (Dynamic Host Control Protocol)
A protocol which allows a server to dynamically assign IP
addresses to workstations on the y.
Ethernet card A plug-in circuit board installed in an expansion slot of a
personal computer. The Ethernet card (sometimes called
a Network Interface Card or NIC) takes parallel data from
the computer, converts it to serial data, puts it into a packet
format, and sends it over the 10BaseT or 100BaseT LAN
cable.
DOCSIS - (Data Over Cable Service Interface Specications)
A project with the objective of developing a set of
necessary specications and operations support interface
specications for Cable Modems and associated equipment.
F Connector A type of coaxial connector, labeled CABLE IN on the rear of
the Advanced Cable Gateway that connects the modem to
the cable system.
HTTP - (HyperText Transfer Protocol)
Invisible to the user, HTTP is used by servers and clients to
communicate and display information on a client browser.
Hub A device used to connect multiple computers to the
Advanced Cable Gateway.
IP Address A unique, 32-bit address assigned to every device in a
network. An IP (Internet Protocol) address has two parts: a
network address and a host address. This modem receives
a new IP address from your cable operator via DHCP each
time it goes through Initialization Mode.
Key exchange The swapping of mathematical values between entities
on a network in order to allow encrypted communication
between them.
107
Appendix - Gossary
MAC Address The permanent “identity” for a device programmed into the
Media Access Control layer in the network architecture during the
modem’s manufacture.
Network Driver A le that is loaded on the computer to allow the computer to
recognize the Ethernet card or USB port.
NID - (Network Interface Device)
The interconnection between the internal house telephone wiring
and a conventional telephone service provider’s equipment.
These wiring connections are normally housed in a small
plastic box located on an outer wall of the house. It is the legal
demarcation between the subscriber’s property and the service
provider’s property.
PacketCable A project with the objective of developing a set of necessary
telephony specications and operations support interface
specications for Advanced Cable Gateways and associated
equipment used over the DOCSIS based cable network.
PSTN - (Public Switched Telephone Network)
The worldwide voice telephone network which provides dial tone,
ringing, full-duplex voice band audio and optional services using
standard telephones.
Provisioning The process of enabling the Media Terminal Adapter (MTA) to
register and provide services over the network.
TCP/IP - (Transmission Control Protocol/Internet Protocol)
A networking protocol that provides communication across
interconnected networks, between computers with diverse
hardware architectures and various operating systems.
TFTP - (Trivial File Transfer Protocol)
The system by which the Media Terminal Adapter’s conguration
data le is downloaded.
TSP - (Telephony Service Provider)
An organization that provides telephone services such as dial
tone, local service, long distance, billing and records, and
maintenance.
Universal Serial Bus - (USB)
USB is a “plug-and-play” interface between a computer and add-
on devices, such as an Advanced Cable Gateway.
108
Appendix - Glossary
Xpress Technology
One of the popular performance-enhancing WiFi
technologies, designed to improve wireless network
efciency and boost throughput. It is more efcient in mixed
environments, and it can work with 802.11a/b/g networks.
109
Index
A
Advanced Cable Cateway
log-in 35
Advanced Cable Gateway
battery install 15
front panel 13
how it works 22
introduction 10
rear panel 14
set-up
activation 28
ethernet 25
more than two computers 27
one computer 26
two computers 26
fax 27
internet account 24
self installation 31
services required 23
telephone 27
Wi-Fi 32
B
battery - handset
charging 18
rechargeable 19, 20
C
Cable Input
connector location 14
caller ID 97
call waiting 97
color ring 36
computer 11
requirements 11
CPU 11
ethernet 11
operating system 11
software 11
video 11
D
DC adapter 17
E
Entering Text 38
Ethernet
port locations 14
F
FCC 4
G
Gateway
battery insertion 15
reset 14
Green Key 36
H
Handset 16
add new 14
batteries install 19
care of 16
charging with dock 17
charging with Gateway 18
color ring 36
customization
call list
call waiting 97
customizing
beep tone 94
call list 93
caller ID 97
ID 93
multiple 98
register 98
un-register 99
phone setting 93
registration 93
ring tone 93, 94
ring volume 94
time setting 93
diagram of 36
dock 17
Earpiece 36
introduction 16
microphone 36
Page 14
safety 16
side key 36
technicalspecication20
Handset dock 17
I
internal call
receiving 99
sending 99
internet account 24
K
110
Keypad 36, 38
L
loudspeaker
care of 19
N
navigation key (Navkey) 36, 37
O
OFF key 36, 37
R
Red key 36, 37
S
safety
power source 3
technicalspecications4
warnings 3
Softkey 36, 37
T
Talk Key 36
Telephone
connector location 14
Type text - how to 36
lower case 36
special characters 38
upper case 38
U
USB
connector 14
W
webconguration34
Wi-Fi 32, 33