Thomson 2-8358AH 1.9DECT COLOR DISPLAY (128X128), HANDSFREE HANDSET PLUS CHARGER User Manual USERS MANUAL 2
Thomson Inc. 1.9DECT COLOR DISPLAY (128X128), HANDSFREE HANDSET PLUS CHARGER USERS MANUAL 2
Thomson >
Contents
- 1. USERS MANUAL 1
- 2. USERS MANUAL 2
- 3. USERS MANUAL 3
- 4. USERS MANUAL 4
- 5. USERS MANUAL 5
USERS MANUAL 2
36
Using the Handset
Start
M
en
u
Overview
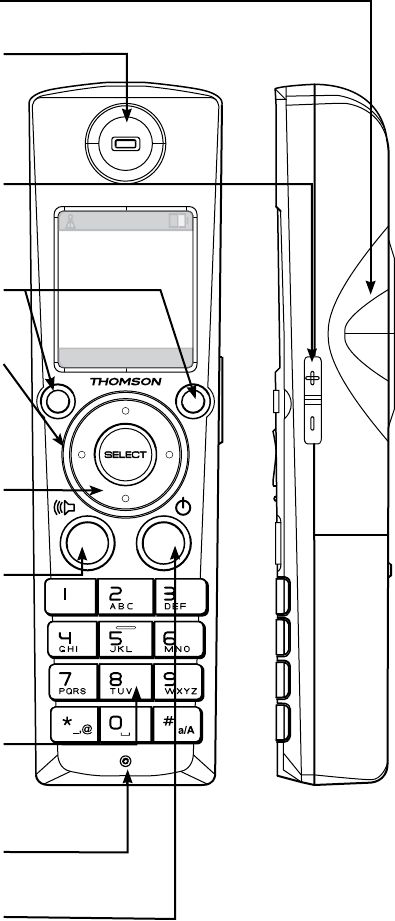
1. Handset Layout
Hands-Free Loudspeaker
Earpiece
Audio output for telephone calls.
Side Key
Use the up and down key of
the side button to increase or
decrease the listening volume
Left & Right Softkey
(described on next page)
Color Ring
(outside perimeter of NavKey)
Displays differing color lights
as incoming calls & messages
are received
NavKey
(Navigation Key)
(described on next page)
Talk Key (Green Key)
Press this key to get a dial tone.
After pre-dialing a number, press
to make a call.
Press to answer “call waiting”.
Press to activate the
Hands-Free function.
Keypad
These keys are used for dialing
phone numbers or entering text.
(See additional description on page ?
Microphone
Audio input for telephone calls
OFF (Red Key)
(described on next page)
37
Handset
Using the Handset
Login Menu
OFF Key
Softkeys
The Handset has two softkeys that
serve multiple functions.
The text shown above the softkey
indicates the current function of the
key.
If no text is shown, then the key has
no function.
NavKey (Navigation Key)
Use the NavKey to move around
(up, down, left, right) within the
menu screens
and
for positioning the cursor when
editing text.
Press the center of the NavKey to
select an option within the menu
screen (these are typically highlighted
items).
When on a phone call, use the
up or down NavKey to adjust the
volume.
OFF (Red Key)
When on a phone call, press this
key to end a call (hang up).
Return to the Idle Screen by
pressing the Red Key when within
any menu or submenu.
NavKey
SELECT
Press this
softkey
to select
this action
Press this softkey
to select
this action
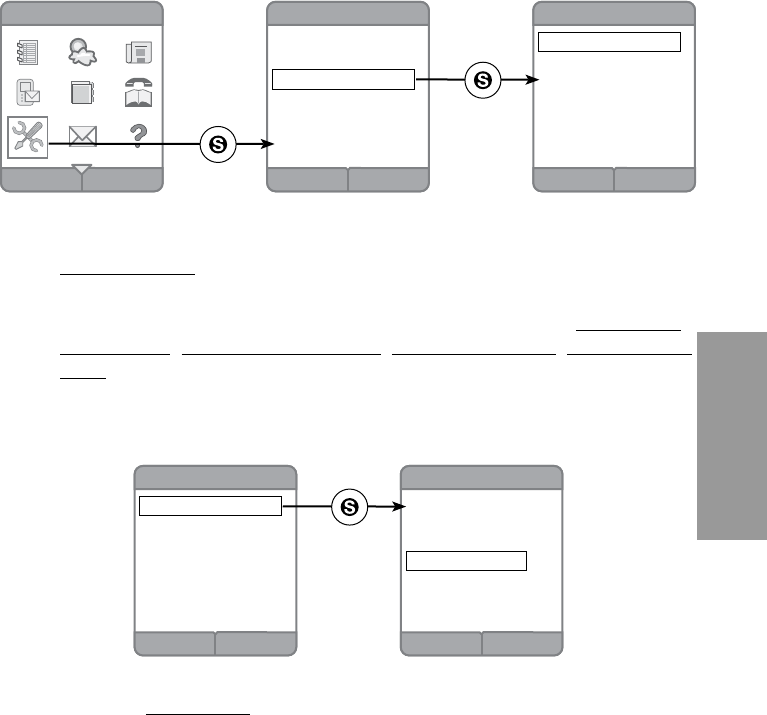
2. Using the Keys
Idle Screen
38
Using the Handset
DeleteOptions
Local Search ABC
Search for....
Pizza
Go
Or choose from....
Top Searches
All Directory Listings
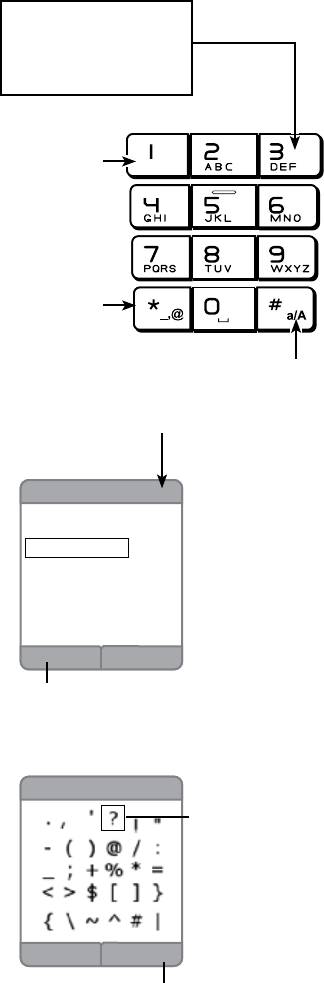
Entering Text
Use the keypad to enter characters
while in a text entry eld.
The rst key press will display the
rst character presented on the key
(refer to sample at left).
Pressing the key repeatedly will
cycle through the characters on the
key.
Text entry tips:
Pressing the # key in text entry
mode alternates among the
following:
lower case•
• upper case
numeric •
The upper right corner of the
screen will display which mode is
activated.
Press 1 to enter a space in lower or
upper case mode.
If in numeric mode, pressing 1 will
enter the number 1.
If a special character is needed,
press the Star key (the lower left
corner key) to view a screen of
these characters.
Use the navkey to highlight the
character that is needed. Push the
Yes softkey to place the character
into your line of text.
Sample of Text Entry:
1st press = D
2nd press = E
3rd press = F
4th press = D
cycle repeats
# Key
changes mode
Upper Case/ Lower Case / Numeric
Mode will display here
1 Key
enters a space
in text mode
(Of course, in
numeric mode
it enters 1)
Press for special
characters)
Anytime you are typing text the Delete
softkey will be available for edits
Highlighted
character
Press this softkey to type the
highlighted character.
BackYes
Special Charaters
39
Handset
Using the Handset
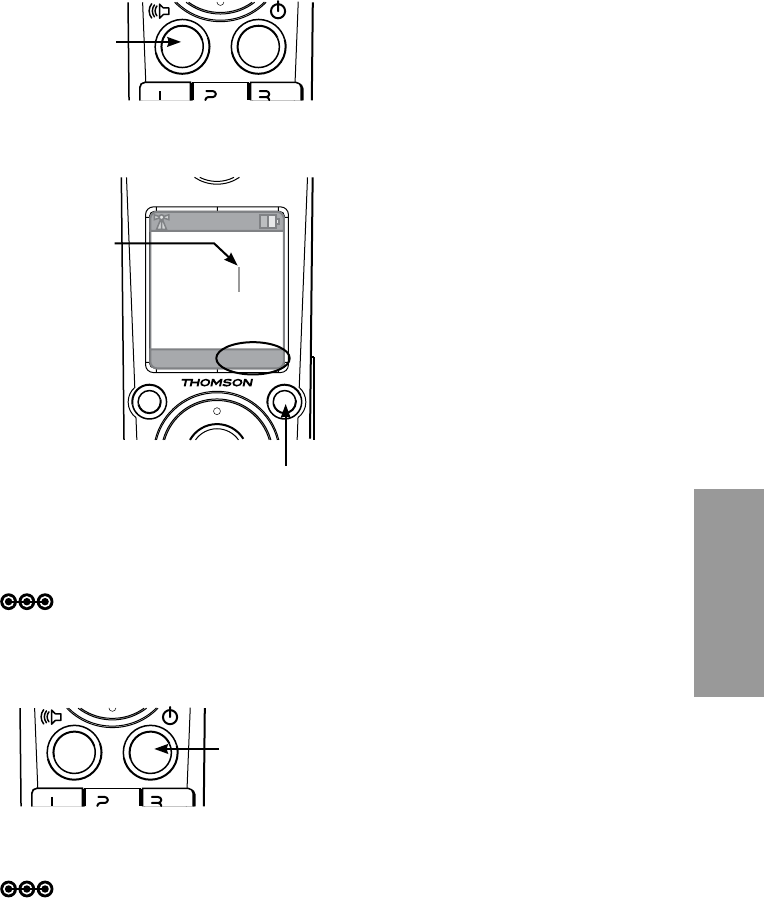
Note: The speakerphone provides you a hands-free option while on a call.
During a call, press the green key to alternate between speakerphone
and normal handset use.
Note: The screen displays the elapsed time of the call (in hours, minutes
and seconds) and the telephone number you dialed while you are on
a call. After a call ends, the call summary will be displayed, showing
the length of the call in hours, minutes and seconds.
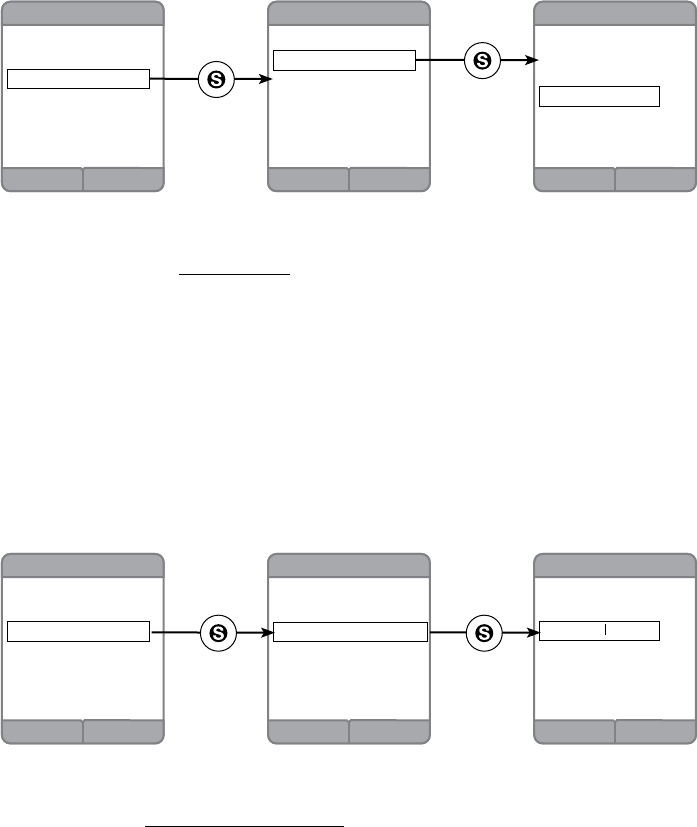
Day to Day Use
Making Calls
To make a standard telephone call,
press the green key (talk key) and then
dial the number. If you want to use
the speakerphone, press the green
key a second time and then dial the
number.
For pre-dialing, (preview numbers
before dialing)enterthenumbersrst.
If you make a mistake when dialing
use the NavKey (navigation key) to
place the cursor to the right of the
number you want to delete and press
the softkey remove to delete the
number. After entering the number,
press the green key.
Receiving Calls
When the telephone is ringing, press
the green key to answer the call.
Press a the green key a second
time if you want to answer using the
speakerphone.
Green key
Press once:
regular call
Press twice:
speakerphone
Back Remove
555 5855
Next, press the corresponding
“remove” softkey
To edit, place
cursor to right
of number to
be removed
Press Red Key:
OFF
Ending Calls
While you are on a call, press the red
key (OFF key) to end the call.

40
Using the Handset
Back Mute
Call Volume
You can adjust the listening volume
from the earpiece or speakerphone
during a call.
While on a call, press UP or DOWN
of the NavKey to adjust the volume of
the earpiece.
Mute
During a call, press the Mute softkey
to mute the microphone.
Press the UnMute softkey to resume
normal conversation.
For the Earpiece, press the UP Navkey to
raise volume
Press the DOWN Navkey to lower volume
Press the
Sidekey
UP or DOWN
to adjust the
Speakerphone
volume
Start
M
en
u
Note: The Mute function is used to silence the microphone during a
conversation. You will be able to hear the caller, but the caller will
not be able to hear you until you press the UnMute softkey to
resume the conversation. When you hang up the telephone, the
feature will be canceled.
Note: After adjustment, a volume bar will appear on the screen. It will only
be displayed for three seconds and the volume level will be saved
automatically.
Unmute Back
To raise or lower the sound level of the
speakerphone, press the UP/DOWN
button on the Sidekey.
41
Handset
Using the Handset
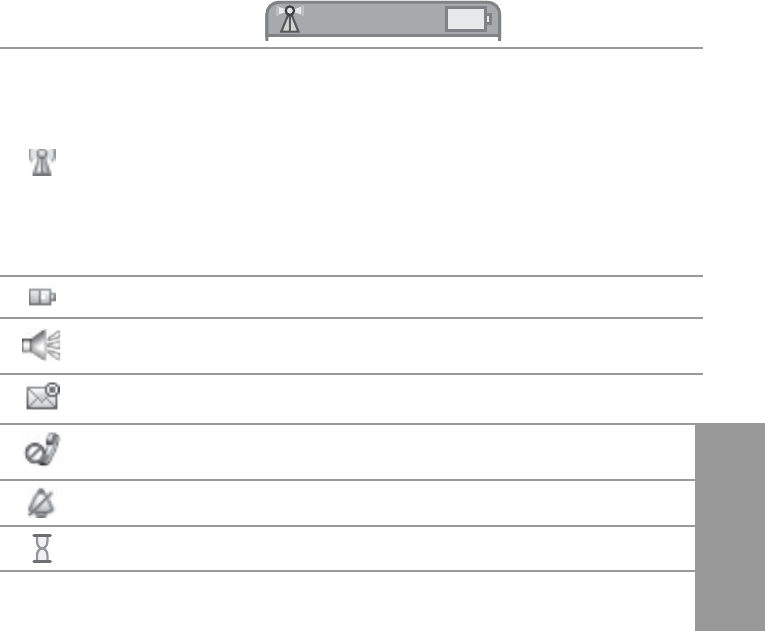
Handset Screen Icons
As you move from screen to screen, the icons at the top of the screen change
and display important information:
Top Bar Icons
Login Menu
The visibility and color of this icon tell you
the status of the phone’s connection
Green : the handset is registered to the ACG905 and
has a connection
Red : the handset is registered to the ACG905
but does not have a connection at this time
Not Visible : the handset you are using is
not registered
Battery Indicator : displays when the battery is charging.
Handsfree “Loudspeaker”
Email Alert
Mute
The ringer volume is off.
Busy/Waiting
42
Using the Handset
Idle Screen Icons
The“Idle”screenistypicallytherstscreenyouseewhenyouturnthephone
on. Here is a reference for the icons you see:
Menu Screen Icons
When the “Menu” screen is visible, the same icons you saw on the “Idle”
screen (above) will be available. Here is a reference for the new icons:
Note: As you update your equipment’s software, screen menus should be
expected to change.
Login Menu
A box around
an icon
means it is
highlighted
for selection
On this
screen, the
name of the
highlighted
menu item
is displayed
in the top
bar.
Voice mail
Refer to page ?? for more
information on this feature
Weather
Refer to page ?? for more
information on this feature
Address Book
Refer to page ?? for more
information on this feature
Yellow Pages
Refer to page ?? for more
information on this feature
Call Log
Refer to page ?? for more
information on this feature
Headlines
Refer to page ?? for more
information on this feature
Help
Refer to page ?? for more
information on this feature
Email
Refer to page ?? for more
information on this feature
Settings
Refer to page ?? for more
information on this feature
Back
Call Log
43
Handset
Using the Handset
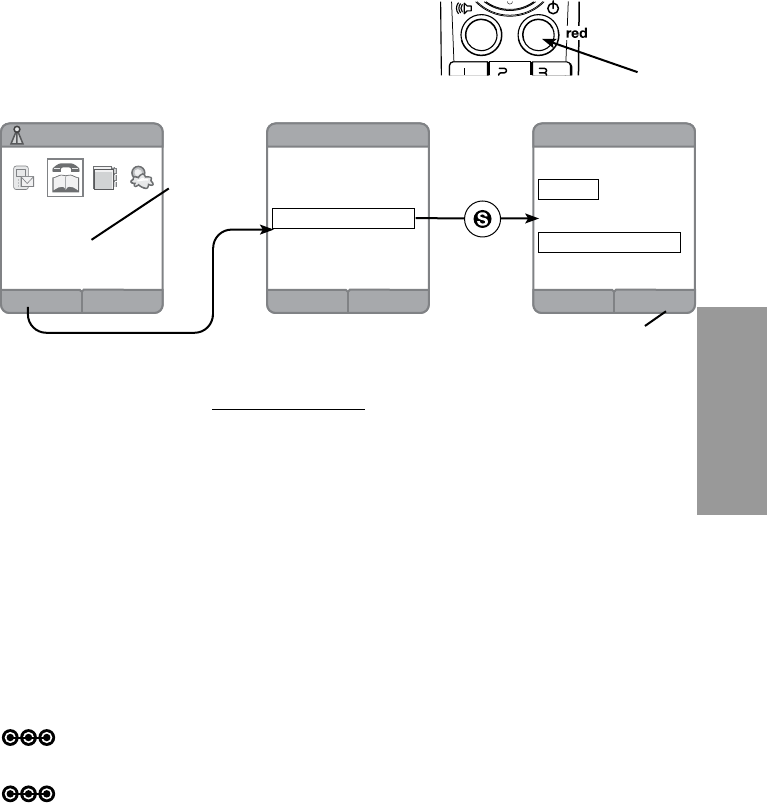
Online Services
Your TH58 Handset gives you easy access to a variety of Online Services:
Create User Prole
In order to take full advantage of all the features available when using
thehandset,itisimportanttorstcreateaUser Prole.
Thebeginningpointforcreatingyouruserproleisthe“Idle”screen.
Access the idle screen from any screen on the handset by pressing the
the Red (Off) key.
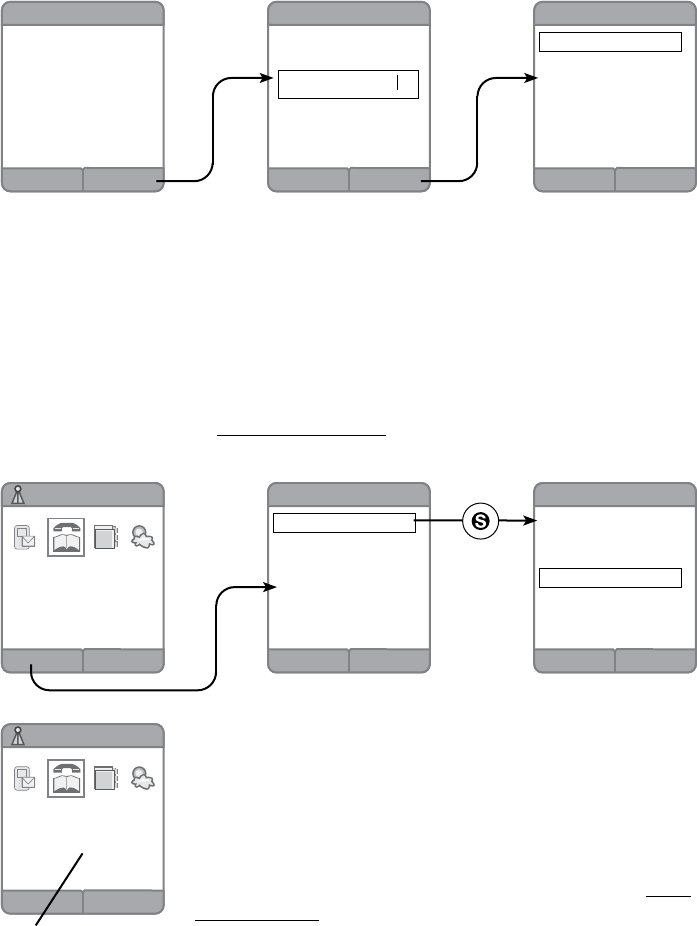
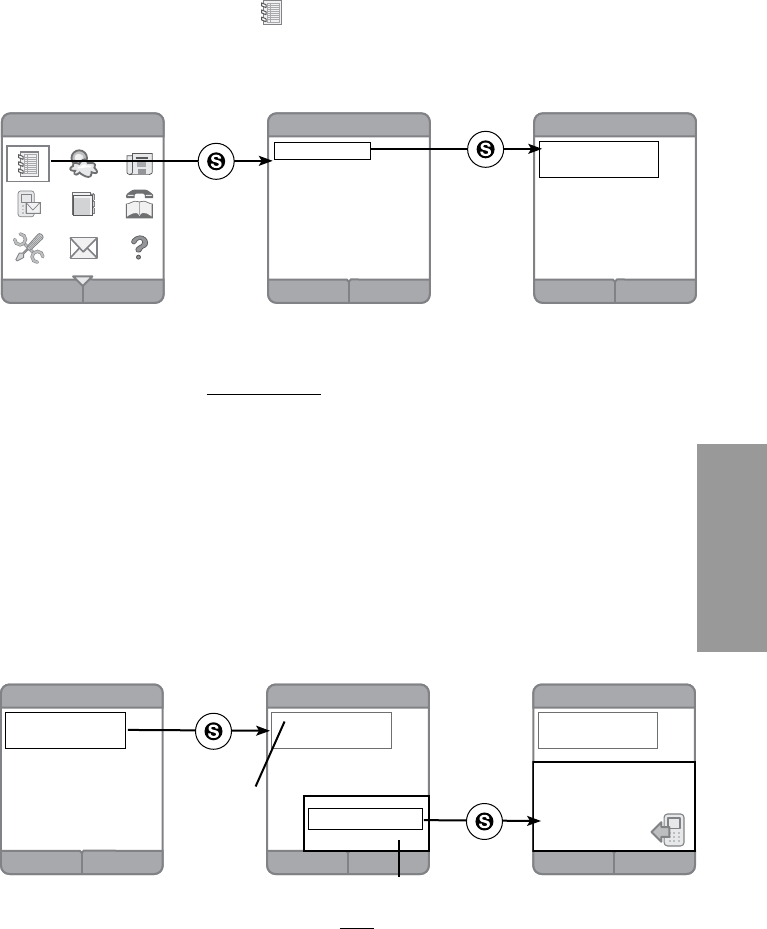
Login Menu
Back
Select User
Greg
Barbara
Tom
Create New User
DeleteOk
New User
Enter User Name:
Phil
*@comcast.net
Enter Password:
fillup *
no display
name is
here, so
you are not
logged in
press the softkey under Ok to conrm
this new user information
Press the Login softkey to begin the process. In the “Select User”
screen, highlight Create New User and press the Select key in the
center of the navkeytoconrmyourchoice.
The“NewUser”screenisusedforcreatingaprole(you must not
be logged in under a user prole to access this screen). There are two
boxesonthisscreenthatneedtobelledoutbyyouatthispoint.
Use the navkey to move around the screen and use the keypad to
enter text. Refer to page ?? for information on entering text using the
handset keypad. If needed, use the Delete softkey to edit text.
When you have completed this screen press the Ok softkey. In the next
screenyouwillseeaconrmationmessage.
Note: Password is case sensitive
Note: New Proles can only be created by a handset user who is not
logged into the system.
OFF Key
takes you to the idel screen
and hangs up the phone
44
Using the Handset
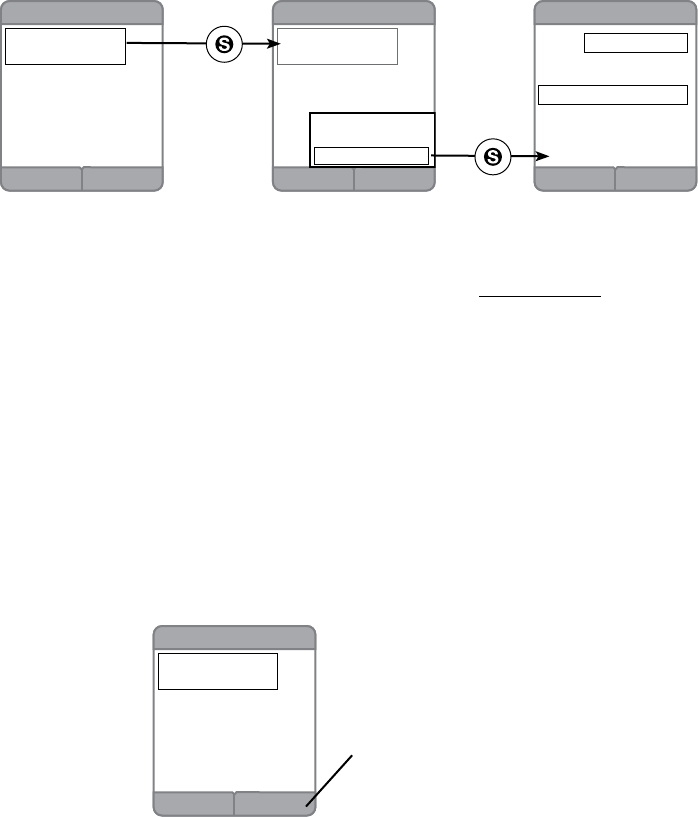
You will also be asked if you would like to change your display name.
Press the Yes softkey if you wish to make the change. A new box is
available for creating a new display name.
Login Menu
Back
Select User
Archie the Clown
Greg
Barbara
Tom
Create New User
DeleteOk
Archie the Clown
Enter Password:*
fillup
Logout Menu
Archie the Clown
Use the Delete softkey to remove text, if needed. Choose the No
softkey if that is not an option you want.
There can be up to seven different user proles in this system.
Login Using a User Prole
Nowthatyouhaveaprole,followthisproceduretologintothe
handsetunderyourpersonaluserprole:
While in the “Idle” screen press the Login softkey. In the “Select User”
screen, highlight Your Display Name using the navkey and press the
Select key in the center of the navkeytoconrmyourchoice.
The next screen will have your display name at the
top of the screen and will ask for you to enter your
password. Enter your password (which is case sensitive)
and use the Delete softkey to remove text, if needed.
Afteritisentered,conrmyourpasswordbypressing
the Ok softkey.
Now, when you return to the “Idle” screen you will know
you are logged in under youruserprolebecauseYour
Display Name will be prominently displayed.
display name of user that is
logged into the system
Back
Select User
Archie the Clown
Greg
Barbara
Tom
Create New User
No Yes
New User
New User Created
Successfully
Do you want to change
the display name?
DeleteYes
New User
Enter Display Name:
Archie the Clown
45
Handset
Using the Handset
Prole Settings
WhenchangesareneededwithintheUserProles,followthis
procedure:
From the “Menu” screen, highlight the Settings icon with the navkey.
Press the Select key in the middle of the navkeytoconrmyour
choice.
There are six setting choices in the “Settings” screen. Highlight the
ProleSettings with your navkeyandconrmbypressingtheSelect
key in the center of the navkey.
Inthe“ProleSettings”screentherewillbevechoices-Delete User;
Auto Logout; Change Display Name; Voicemail Settings; Change Time
Zone.Therstthreechoicesaredescribedbelow:
Delete User
Highlight Delete Userinthelistfor“ProleSettings”andconrmyour
choice by pressing the Select key in the center of the navkey. Using
the navkey, highlight the user’s display name that needs to be removed
and press the Select key again. The next screen will ask for you to
conrmthisiswhatyouwanttodo.PushtheYes softkey and you will
seeaconrmationscreenforthisaction.
Back
Settings
Ring Tone
Set Time
Profile Settings
Phone Settings
Registration
Handset 1
Back
Settings
Delete User
Auto Logout
Change Display Name
Voicemail Settings
Change Time Zone
Back
Settings
Back
Delete User
Archie the Clown
Greg
Barbara
Tom
Back
Settings
Delete User
Auto Logout
Change Display Name
Voicemail Settings
Change Time Zone
46
Using the Handset
Auto Logout
Highlight the Auto Logoutchoicefromthelistof“ProleSettings”
using the navkey.ConrmyourchoicebypressingtheSelect key in
the middle of the navkey. On the “Auto Logout” screen you will have
a long list to select from to customize how long your handset should
beidlebeforeyouruserproleisautomatically logged out. Pick
your preference with the navkeytohighlight;conrmbypushingthe
Select key in the middle of the navkey. If you do not want any of these
choices, press the Back softkey.
Change Display Name
Highlight Change Display Name from the list using the navkey and
conrmthatchoicebypressingtheSelect key in the middle of the
navkey. In the “Display Name” screen just type the new display name.
If you need to change the text entered, just use the Delete softkey.
Push the Ok softkeywhenyouarenished.
Back
Settings
Ring Tone
Set Time
Profile Settings
Phone Settings
Registration
Handset 1
DeleteOk
Display Name
Enter Display Name:
Thomas
Back
Settings
Delete User
Auto Logout
Change Display Name
VM Settings
Back
Settings
Delete User
Auto Logout
Change Display Name
VM Settings
Back
Settings
Ring Tone
Set Time
Profile Settings
Phone Settings
Registration
Handset 1
Back
Auto Logout
Never log me off
After 15 mts
After 30 mts
After 1 hour
After 2 hours
After 4 hours
After 8 hours
47
Handset
Using the Handset
Call Log
This feature allows you to track calls that have been answered, dialed, and
missed on the handset.
Highlight the Call Log iconfromthe“Menu”screen.Conrmyour
choice by pressing the Select key in the center of the navkey.
Missed Calls
Your handset keeps a log of calls that were not answered. You can
check the Call Log for records of those calls. While in the “Call Log”
screen highlight Missed Calls with the navkey.
Press the Select key in the middle of the navkey and the “Missed
Calls” screen will show those calls. If the call came from someone in
the Address Book, that contact’s name will be listed. Refer to page ??
for more information on the address book.
Use the navkey to highlight the missed call you want. By pressing the
Select key again, a new pop up menu will open on the handset screen.
You now have two choices for how you want to deal with the call you
missed - Call or Save Number.
Call - You can phone the missed call’s number.
Back
Call Log
Back
Call Log
Missed Calls
Answered Calls
Dialed Calls
Back Delete All
Missed Calls
260 999 9999
11/02/2009 13:30
Brenda Scott
555 555 5555
11/01/2009 08:32
260 999 9999
11/01/2009 07:15
Use the navkey to highlight the Calloptionandconrmyourchoiceby
pressing the Select key. The handset dials the number.
Back
Missed Calls
260 999 9999
11/02/2009 13:30
Brenda Scott
555 555 5555
260 999 9999
11/01/2009 07:15
Call
Save Number
Back Delete All
Missed Calls
260 999 9999
11/02/2009 13:30
Brenda Scott
555 555 5555
11/01/2009 08:32
260 999 9999
11/01/2009 07:15
Mute Flash
Missed Calls
260 999 9999
11/02/2009 13:30
Brenda Scott
11/01/2009 08:32
555 555 5555
260 999 9999
11/01/2009 07:15
Calling...
260 999 9999
Pop up Menu
Number
is still
visible
48
Using the Handset
Save Contact - You can save a missed call as a Contact in your
Address Book.
Highlight the missed call using the navkey in the “Missed Calls” screen.
Press the Select keytoconrmyourchoiceandaccesstheoptions
drop down list. Use the navkey to highlight the Save Number option
andconrmyourchoicebyagainpressingtheSelect key.
The next screen will be the “Save Contact” screen. The missed phone
number will appear in the line of text “Save (missed phone number)
as”. Use the navkey to highlight the catagory you would like to save the
phone number under (Home, Mobile or Work). Use the keypadtollin
the name for the contact. Refer to page ?? for information on how to
enter text using the keypad.Whennished,presstheDone softkey.
When a missed call is saved as a contact it is saved in the Shared
Address Book. (Refer to page ??)
Delete All - If wanted, all calls listed in the missed calls list can be
deleted at one time.
Back Delete All
Missed Calls
260 999 9999
11/02/2009 13:30
Brenda Scott
555 555 5555
11/01/2009 08:32
260 999 9999
11/01/2009 07:15
Back
Missed Calls
260 999 9999
11/02/2009 13:30
Brenda Scott
555 555 5555
260 999 9999
11/01/2009 07:15
Call
Save Number
Cancel Done
Save Contact
Name:
Save 260 999 9999 as
Mobile:
Home:
Work:
Highlight any missed call using the navkey in the “Missed Calls” screen
then press the Delete All softkey. You will recieve a message asking
youtoconrmthatyouwanttodothisaction.PresstheYes softkey to
conrm.
Back Delete All
Missed Calls
260 999 9999
11/02/2009 13:30
Brenda Scott
555 555 5555
11/01/2009 08:32
260 999 9999
11/01/2009 07:15
Use this softkey at any time
to delete all missed calls

49
Handset
Using the Handset
Missed Call Alert (pop up)
You will not want to keep checking the Call Log for missed calls. To
help alert you to the fact that you have missed a call, the screen will
display a pop up message that tells you how many calls you have
missed. This alert will appear anytime you press any key after the call
is logged into the phone.
If you press the View softkey, you will go straight to the “Missed
Calls” screen and you can complete any of the procedures available
for missed calls from that location. (Options - Call, Delete and Save
Contact). If you want to wait before you check out the missed call,
press the Back softkey. You can access the call via the Call Log
whenever you wish.
BackView
Betty Jones
You have 3 Missed
Calls
Back Delete All
Missed Calls
260 999 9999
11/02/2009 13:30
Brenda Scott
555 555 5555
11/01/2009 08:32
260 999 9999
11/01/2009 07:15

50
Using the Handset
Answered Calls and Dialed Calls
Your handset also keeps a log of calls that are answered and dialed.
You can check the Call Log for listings of these calls.
While in the “Call Log” screen highlight Answered Calls or Dialed Calls
with the navkey.
Press the Select key in the middle of the navkey toconrmyour
choice. The “Answered (or) Dialed Calls” screen will display a log of
those calls. If the call came from someone already in the Address
Book, that contact’s name will be listed.
Highlight the call you want to see with the navkey; press the Select key
to access the options available for this call.
For your convienience, all of the Call Log features are listed below.
Each feature, except of the Alert Automatic Pop up, works the same
way whether you are dealing with a missed, answered, or dialed
number.
Since each feature has been described in the preceding pages, please
refer to the page numbers listed in the Feature Description Location
Row.
Call Log
Features
Call
from Log
Save
Number to
Contacts
Delete All
from Log
Alert
Automatic
Pop up
Feature Description Location
(page No.) 83 84 85 85
Missed Call yes yes yes yes
Answered Call yes yes yes no
Dialed Call yes yes yes no