TransCore 76007 FHSS TRANSCEIVER MODULE User Manual 1
TransCore FHSS TRANSCEIVER MODULE 1
Contents
- 1. Users Manual
- 2. User Manual 1
- 3. User Manual 2
- 4. User Manual 3
- 5. User Manual 4
User Manual 1
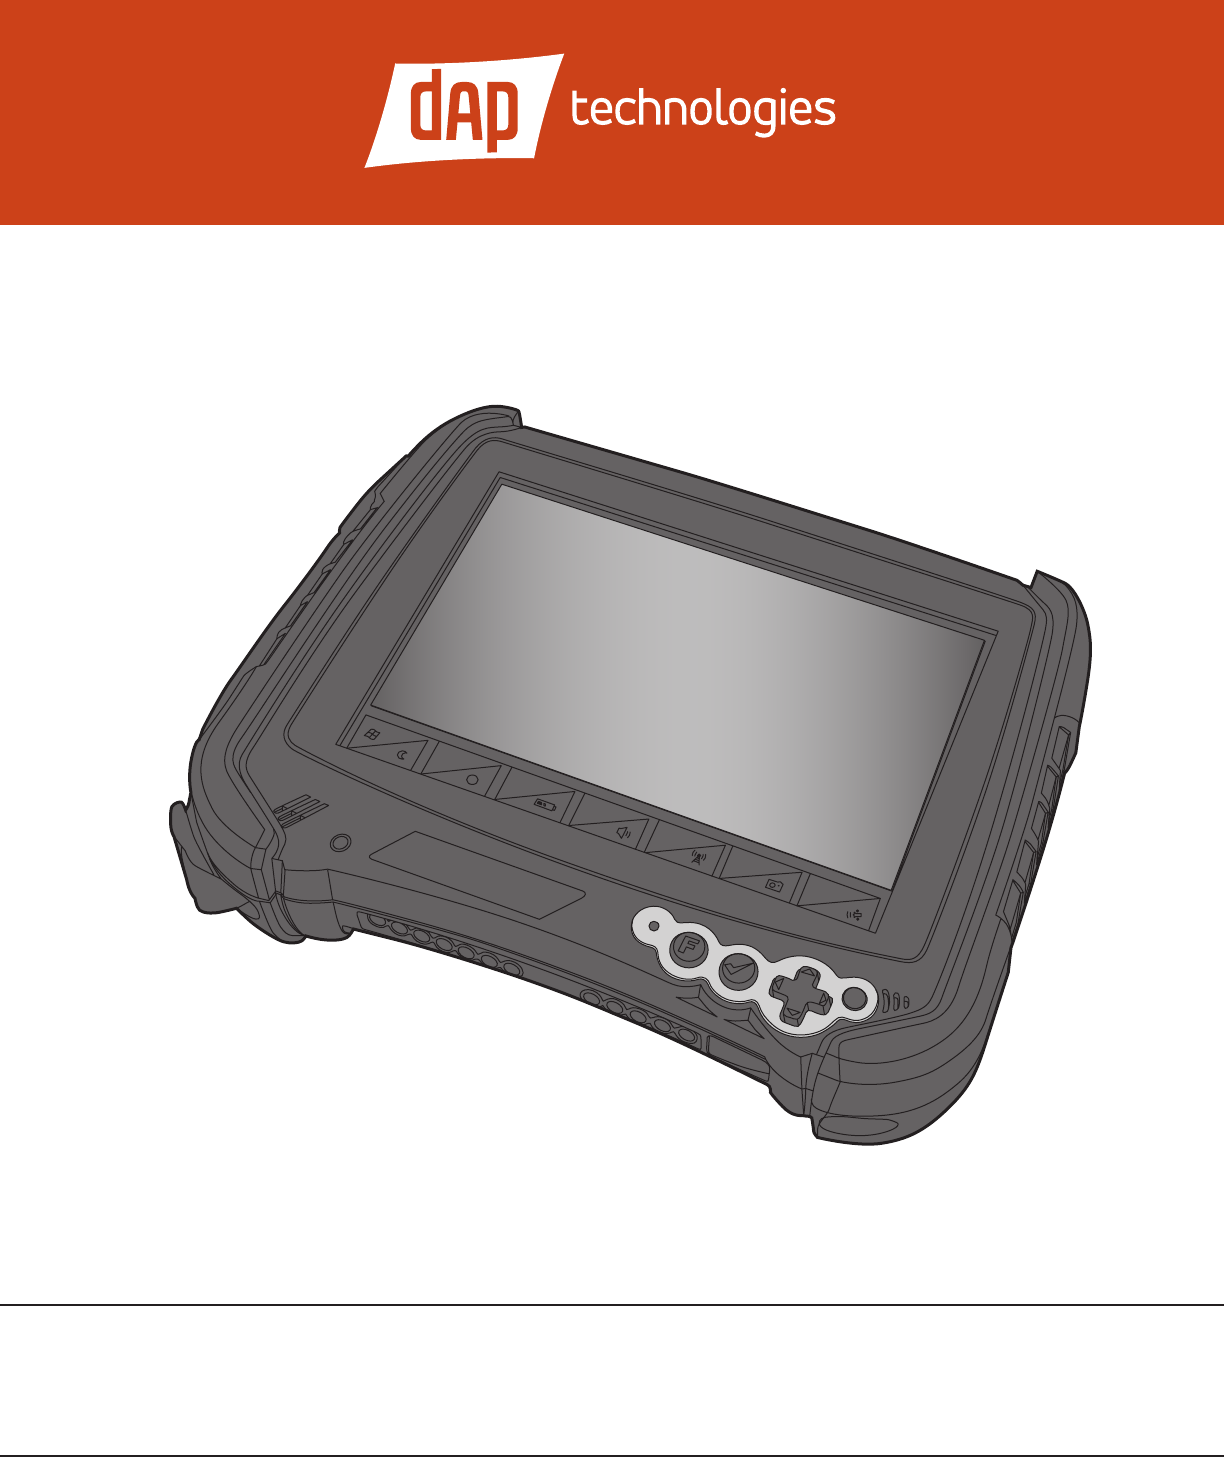
M9000
User’s Guide
F1
?
F2 F3
F4
F5 F6
PN: 769-00005 • May 2012
M9010 is a registered trademark of DAP Technologies. Microso and MS-DOS® are
registered trademarks of Microso Corporation.

3
Table of Contents
1.0 Introduction ................................... 7
1.1 User and Product Safety ................................7
1.2 LED and LASER Safety Information .................... 7
1.3 FCC Interference Statement............................ 7
1.4 Industry Canada Statement ............................ 7
1.5 Battery Safety ......................................... 7
1.6 Warranty Statements .................................. 8
1.7 Warranty and After Service ............................ 8
1.8 Europe – EU Declaration of Conformity ................ 8
1.9 European Union CE Marking and Compliance Notices .. 9
1.10 Specications......................................... 10
2.0 Getting Started...............................11
2.1 What’s In the Package .................................11
2.2 Installing Optional Memory Cards .....................11
2.3 Install the Battery .....................................13
2.4 Charge the Battery ....................................13
2.4.1 Plugging In ......................................13
2.4.2 LED Indicators...................................14
2.5 Operating the Unit.....................................15
2.5.1 Turning the Unit On ..............................15
2.5.2 Calibrating the Touchscreen .......................15
2.5.3 Launching an Application .........................16
2.5.3.1 Using the Stylus.........................16
2.5.3.2 Using the Nav Button ....................16
2.5.4 Entering Data ....................................17
2.5.5 Using the Function Button.........................17
2.5.5.1 Function Button Key Combinations .......17
2.5.5.2 Function Button with Function Keys ......17
2.5.6 Navigating the Display ............................18
2.5.6.1 e Task Bar............................18
2.5.6.2 e Onscreen Keyboard..................18
2.5.6.3 Entering the Data .......................18
2.6 DAP Conguration Center .............................19
2.6.1 System Info ......................................19
2.6.2 Display Options . . . . . . . . . . . . . . . . . . . . . . . . . . . . . . . . . .19
2.6.3 Tablet PC Settings ................................19
2.6.3.1 Display Tab – Congure .................19
2.6.3.2 Display Tab – Calibrate ..................19
2.6.3.3 Display Tab – Reset......................20
2.6.3.4 Other Tab – Handedness .................20
2.6.3.5 Other Tab – Pen and Touch...............20
2.6.3.5.1 Pen Options Tab –
Congure Double-Tap ........21
2.6.3.5.2 Pen Options Tab –
Congure Press and Hold .....21
2.6.3.5.3 Pen Options Tab –
Congure Start Tablet PC
Input Panel ..................22
2.6.3.5.4 Flicks Tab – Navigational ......23
2.6.3.5.5 Flicks Tab – Sensitivity ........23
2.6.3.5.6 Handwriting Tab .............24
2.6.3.5.7 Touch Tab...................24
2.6.3.6 Other Tab – Go to Input Panel Settings ....24
2.6.4 Power Options ...................................25
2.6.5 Charger Cong...................................25
2.6.6 Hotkey ..........................................25
2.7 Setting Up Wireless LAN ...............................26
2.8 Using the 1D Barcode Scanner .........................26
2.9 Setting Up Link One for Reading 1D Laser Barcodes ....26
2.9.1 Unload Button ...................................27
2.9.2 Hide Button .....................................27
2.9.3 Settings Button...................................27
2.9.4 Settings Window .................................27
2.9.4.1 Communication Tab.....................27
2.9.4.1.1 Port ........................28
2.9.4.1.2 DTR High / RTS High ........29
2.9.4.1.3 Hardware Pin Events..........29
2.9.4.2 Keyboard Tab...........................30
2.9.4.2.1 Interkey Delay ...............30
2.9.4.2.2 Key Settings .................30
2.9.4.2.3 Hot Keys ....................32
2.9.4.2.4 Keyboard Capture —
External USB Device..........36
2.9.4.2.5 Record Key Sequence .........39
2.9.4.3 Data Editing Tab ........................40
2.9.4.3.1 Wizard......................41
2.9.4.3.2 Edit Script...................43
2.9.4.3.3 Browse Script Folder..........43
2.9.4.4 Misc Tab ...............................43
2.9.4.4.1 Use Log File .................43
2.9.4.4.2 Set Password.................44
2.9.4.4.3 Settings Location.............44
2.10 Link*One Scripting ....................................45
2.10.1 Overview ........................................45
2.10.2 Lua Language ....................................45
2.10.3 Script Events .....................................45
2.10.4 Event Methods ...................................45
2.10.4.1 onStart() ...............................45
2.10.4.2 onEnd()................................45
2.10.4.3 onData(data, length).....................45
2.10.4.4 onHotKey(name)........................46
2.10.4.5 onKeyboardCapture(name, data)..........46
2.10.4.6 onExternalData(data, length) .............46
2.10.4.7 onTimer() ..............................46
2.10.4.8 onCTS(status) ..........................47
2.10.5 Script Methods...................................47
2.10.6 Output/User Feedback ............................48
2.10.6.1 beep(frequency, duration) ................48
2.10.6.2 blinkIcon(icon, duration) ................48
2.10.6.3 log(lename, message) ...................48
2.10.6.4 messageBox(title, message, type) ..........48
2.10.6.5 playSound(lename, options) .............49
2.10.6.6 playSystemSound(systemEvent, options) ...49
2.10.6.7 send(data) ..............................49
2.10.6.8 sendSerialData(data, length)..............50
2.10.6.9 sendSubscriberData(data, length) .........50
2.10.7 Windows ........................................51
2.10.7.1 enumWindows(handle) ..................51
2.10.7.2 ndWindow(title, class)..................51
2.10.7.3 getForegroundWindow().................51
2.10.7.4 getWindowClass(handle).................51
2.10.7.5 getWindowClass(handle).................52
2.10.7.6 getWindowText(handle)..................52
2.10.7.7 setForegroundWindow(handle)...........52
2.10.7.8 getWindowText(handle, text) .............52
2.10.7.9 windowOperation(handle, operation) .....53
2.10.8 Clipboard .......................................53
2.10.8.1 getClipboardData()......................53
2.10.8.2 setClipboardData(text)...................53
2.10.9 Application Launch...............................54
2.10.9.1 closeAppHandle(handle) .................54
2.10.9.2 isAppRunning(handle) ..................54

4
2.10.9.3 run(program, argument, delay) ...........54
2.10.10 Serial Port .......................................55
2.10.10.1 closePort() .............................55
2.10.10.2 getDTR()...............................55
2.10.10.3 getRTS() ...............................55
2.10.10.4 openPort() .............................55
2.10.10.5 setDTR(status)..........................56
2.10.10.6 setRTS(status) ..........................56
2.10.11 Miscellaneous....................................56
2.10.11.1 ean128(data, strict) ......................56
2.10.11.2 exit() ..................................56
2.10.11.3 exitWindows(options) ...................57
2.10.11.4 getProle() .............................57
2.10.11.5 getTickCount() .........................57
2.10.11.6 lockWorkStation().......................57
2.10.11.7 setProle(prole)........................58
2.10.11.8 setTimer(interval).......................58
2.10.11.9 sleep(duration)..........................58
2.10.12 Notication Area Icon ............................58
2.10.13 Migration guide WLinq 3.x to Link*One ............59
2.10.13.1 Duplicate String Filter ...................59
2.10.13.2 Case Setting ............................59
2.10.13.3 Character Translation ...................59
2.10.13.4 Send Pre- and Postx Keys ...............59
2.10.13.5 Lock Output Window....................59
2.10.13.6 Initialization String .....................59
2.10.13.7 Filter Unknown Data Strings .............59
2.10.13.8 Input Data Replacements.................60
2.10.13.9 Criteria ................................60
2.10.13.10 Data Format Output .....................60
2.10.14 Support for in Clients, Java Applications,
and Flash Applications ............................62
2.10.15 Lua Copyright ...................................62
2.10.16 Version History ..................................62
3.0 Operating the Unit ..........................63
3.1 GPS Instructions .......................................63
3.1.1 Requirements:....................................63
3.1.2 Set up to use the GPS..............................63
3.1.3 Integration to Windows 7..........................64
3.2 DAP-Imager Instructions ...............................64
3.2.1 What is DAP-Imager..............................64
3.2.2 Selecting the Right Mode ..........................64
3.2.3 Pictures .........................................64
3.2.3.1 How to Take a Picture ...................64
3.2.3.2 Flash ..................................64
3.2.3.3 Geotagging.............................65
3.2.3.3.1 How to enable the GPS........65
3.2.3.3.2 How to View Geotagging
Data........................65
3.2.3.4 How to Locate a Saved Picture ............65
3.2.3.5 General Options ........................65
3.2.4 Barcodes ........................................65
3.2.4.1 How to Scan Barcodes ...................66
3.2.4.1.1 Using ScannerManager........66
3.2.4.1.2 Using DAP-Imager as a
Stand-Alone Application ...... 66
3.2.4.2 Decoder Conguration ..................66
3.2.5 .INI Conguration File............................66
3.2.6 [General] . . . . . . . . . . . . . . . . . . . . . . . . . . . . . . . . . . . . . . . .67
3.2.6.1 TargetFolder = %PICTURES%\%YEAR%-
%MONTH%-%DAY% ...................67
3.2.6.2 FileNameTemplate =
%HOUR%h%MINUTE%m%SECOND%s..67
3.2.6.3 DefaultImagerMode = Portrait............67
3.2.6.4 FlashLightDurationMs = 10000...........67
3.2.6.5 Func1VirtualKey = 135 ..................67
3.2.6.6 Func2VirtualKey = 117 ..................67
3.2.6.7 Func1KeyModiers = 0 ..................67
3.2.6.8 Func2KeyModiers = 0 ..................67
3.2.6.9 Func1KeySystemWide = 1 ................67
3.2.6.10 Func2KeySystemWide = 0 ................67
3.2.7 [Camera] ........................................67
3.2.7.1 InactiveTimeBeforeStandbyLevel1 =
10000..................................67
3.2.7.2 ActivateDapImagerOnTrigger = OFF ......67
3.2.7.3 ShowImageNameOnPreview = OFF .......67
3.2.8 [Barcodes] . . . . . . . . . . . . . . . . . . . . . . . . . . . . . . . . . . . . . . .67
3.2.8.1 EnableAutoPreview = ON ................67
3.2.8.2 PreviewWndRect = 0 0 320 240 ...........67
3.2.8.3 UIPolicy = Legacy.......................67
3.2.8.4 DefaultFocus = 3733 .....................68
3.2.8.5 Aimer = ON ............................68
3.2.8.6 DecodeAerAutofocus = ON .............68
3.2.8.7 MaxNbrResults = 1......................68
3.2.8.8 DecodeTimeoutMs = 1500................68
3.2.8.9 MaxNbrAttempts = 1 ....................68
3.2.8.10 InactiveTimeBeforeStandbyLevel1 =
10000..................................68
3.2.8.11 InactiveTimeBeforeStandbyLevel2 =
10000..................................68
3.2.8.12 KbWedge = OFF ........................68
3.2.8.13 AddTab = OFF ..........................68
3.2.8.14 AddEnter = ON .........................68
3.2.8.15 Preamble = .............................68
3.2.8.16 Postamble = ............................68
3.2.8.17 InterCharDelay = 0 ......................68
3.2.8.18 MaxGainWithoutMVLight = 2500 ........68
3.2.8.19 MinGainWithMovieLight = 1000 .........68
3.2.8.20 MaxGain = 4000 . . . . . . . . . . . . . . . . . . . . . . . .68
3.2.8.21 GainStep = 200 .........................68
3.2.8.22 IdealGain = 2000........................68
3.2.8.23 FlashIntensityStep = 100 .................68
3.2.8.24 MaxFlashIntensity = 100 .................68
3.2.8.25 MaxShutter = 4000 ......................68
3.2.8.26 ShutterStep = 260 .......................68
3.2.8.27 IdealShutter = 575.......................68
3.2.8.28 AppendSymbology = OFF ................68
3.2.9 [OCR]...........................................68
3.2.10 [ImagerModes]...................................68
3.2.8.1 ModeList =
Portrait,Landscape,Macro,Barcode, .......68
3.2.11 [ImagerMode:XXXX] .............................68
3.2.11.1 ModeType = 0...........................68
3.2.11.2 IconID = 142 ...........................68
3.2.11.3 SelectionButtonImageFileName =
res\button-mode-portrait80.png ..........68
3.2.11.4 Enabled = ON ..........................69
3.2.11.5 AutoFlash = ON.........................69
3.2.11.6 GpsReportTypes = 1 .....................69
3.2.11.7 PreviewWidth = 640.....................69
3.2.11.8 PreviewHeight = 480 ....................69
3.2.11.9 StillWidth = 1600 .......................69
3.2.11.10 StillHeight = 1200 .......................69

5
3.2.11.11 ColorSpace = 16.........................69
3.2.11.12 FrameRate = 30.000000 ..................69
3.2.11.13 Shutter = 10000 .........................69
3.2.11.14 Brightness = 5000 .......................69
3.2.11.15 GlobalGain = 0 .........................69
3.2.11.16 Exposure = 5000 ........................69
3.2.11.17 FlipMode = 1 ...........................69
3.2.11.18 AutoExposure = ON.....................69
3.2.11.19 LightingMode = 0 .......................69
3.2.11.20 LightingPower = 0.......................69
3.2.11.21 Aimer = OFF ...........................69
3.2.11.22 Compression = ON ......................69
3.2.11.23 CompressionRatio = 13 ..................69
3.2.11.24 FocusPosition = 500 .....................69
3.2.11.25 Autofocus = ON.........................69
3.2.11.26 WhiteBalancePreset = 0..................69
3.2.11.27 ManualWhiteBalance = OFF .............69
3.2.11.28 WhiteBalanceKelvin = 8267 ..............69
3.2.11.29 PreviewToWindow = ON.................69
3.2.12 [Permissions] ....................................69
3.2.12.1 Option(More) = 3 .......................69
3.3 Command-Line Options ................................70
3.3.1 Syntax ..........................................70
4.0 Programming the Unit ....................71
4.1 Bar Code Parameter Menus ............................71
4.2 Bar Code Settings......................................74
4.2.1 Set Default Parameter .............................74
4.2.2 Beeper Volume ...................................74
4.2.3 Beeper Tone .....................................74
4.2.4 Beeper Frequency Adjustment .....................74
4.2.5 Laser On Time ...................................75
4.2.6 Aim Duration....................................75
4.2.7 Scan Angle ......................................75
4.2.8 Power Mode .....................................75
4.2.9 Triggering Modes.................................76
4.2.10 Time-out Between Same Symbol ...................76
4.2.11 Beep Aer Good Decode ..........................76
4.2.12 Transmit “No Read” Message ......................76
4.2.13 Parameter Scanning ..............................77
4.2.14 Linear Code Type Security Level ...................77
4.2.15 Bi-directional Redundancy ........................77
5.0 UPC Types .......................................78
5.1 UPC / EAN..............................................78
5.1.1 Enable/Disable UPC-A : Parameter # 0x01...........78
5.1.2 Enable/Disable UPC-E : Parameter # 0x02 ...........78
5.1.3 Enable/Disable UPC-E1 : Parameter # 0x0C .........78
5.1.4 Enable/Disable EAN-8 : Parameter # 0x04 ...........78
5.1.5 Enable/Disable EAN-13 : Parameter # 0x03 ..........78
5.1.6 Enable/Disable Bookland EAN : Parameter # 0x53....78
5.1.7 Decode UPC/EAN Supplementals :
Parameter # 0x10 .................................79
5.1.8 Decode UPC/EAN Supplemental Redundancy :
Parameter # 0x50 .................................79
5.1.9 Transmit UPC-A Check Digit : Parameter # 0x28.....80
5.1.10 Transmit UPC-E Check Digit : Parameter # 0x29 .....80
5.1.11 Transmit UPC-E1 Check Digit : Parameter # 0x2A ...80
5.1.12 UPC-A Preamble : Parameter # 0x22................80
5.1.13 UPC-E Preamble : Parameter # 0x23 ................80
5.1.14 UPC-E1 Preamble : Parameter # 0x24 ...............81
5.1.15 Convert UPC-E to UPC-A : Parameter # 0x25........81
5.1.16 Convert UPC-E1 to UPC-A : Parameter # 0x26.......81
5.1.17 EAN Zero Extend : Parameter # 0x27 ...............81
5.1.18 Convert EAN-8 to EAN-13 Type :
Parameter # 0xE0.................................81
5.1.19 UPC/EAN Security Level : Parameter # 0x4D . . . . . . . .82
5.1.20 UCC Coupon Extended Code : Parameter # 0x55.....82
5.2 Code 128 ..............................................82
5.2.1 Enable/Disable Code 128 : Parameter # 0x08 .........82
5.2.2 Enable/Disable UCC/EAN-128 :
Parameter # 0x0E.................................82
5.2.3 Enable/Disable ISBT 128 : Parameter # 0x54 .........83
5.2.4 Lengths for Code 128 .............................83
5.3 Code 39................................................83
5.3.1 Enable/Disable Code 39 : Parameter # 0x00 ..........83
5.3.2 Enable/Disable Trioptic Code 39 :
Parameter # 0x0D.................................83
5.3.3 Convert Code 39 to Code 32 (Italian Pharma
Code) : Parameter # 0x56 ..........................83
5.3.4 Code 32 Prex : Parameter # 0xE7 ..................83
5.3.5 Set Lengths for Code 39 :
Parameter # L1 = 0x12, L2 = 0x13...................83
5.3.6 Code 39 Check Digit Verication :
Parameter # 0x30 .................................84
5.3.7 Transmit Code 39 Check Digit :
Parameter # 0x2B.................................84
5.3.8 Enable/Disable Code 39 Full ASCII :
Parameter # 0x11 . . . . . . . . . . . . . . . . . . . . . . . . . . . . . . . . .84
5.4 Code 93................................................85
5.4.1 Enable/Disable Code 93 : Parameter # 0x00 ..........85
5.4.2 Set Lengths for Code 93 :
Parameter # L1 = 0x1A, L2 = 0x1B ..................85
5.5 Code 11................................................85
5.5.1 Enable/Disable Code 11 : Parameter # 0x0A..........85
5.5.2 Set Lengths for Code 11 :
Parameter # L1 = 0x1C, L2 = 0x1D..................85
5.5.3 Code 11 Check Digit Verication :
Parameter # 0x34 .................................86
5.5.4 Transmit Code 11 Check Digits :
Parameter # 0x2F.................................86
5.6 Interleaved 2 of 5......................................86
5.6.1 Enable/Disable Interleaved 2 of 5 :
Parameter # 0x06 .................................86
5.6.2 Set Lengths for Interleaved 2 of 5 :
Parameter # L1 = 0x16, L2 = 0x17...................86
5.6.3 Interleaved 2 of 5 Check Digit Verication :
Parameter # 0x31 .................................87
5.6.4 Transmit Interleaved 2 of 5 Check Digit :
Parameter # 0x2C ................................87
5.6.5 Convert Interleaved 2 of 5 to EAN-13 :
Parameter # 0x52 .................................87
5.7 Discrete 2 of 5 ........................................88
5.7.1 Enable/Disable Discrete 2 of 5 : Parameter # 0x05 ....88
5.7.2 Set Lengths for Discrete 2 of 5 :
Parameter # L1 = 0x14, L2 = 0x15...................88
5.8 Chinese 2 of 5 .........................................88
5.8.1 Enable/Disable Chinese 2 of 5 :
Parameter # 0xF0 0x98 ............................88
5.9 Codabar ...............................................88
5.9.1 Enable/Disable Codabar :
Parameter # 0x07 .................................88
5.9.2 Set Lengths for Codabar :
Parameter # L1 = 0x18, L2 = 0x19...................89

6
5.9.3 CLSI Editing : Parameter # 0x36....................89
5.9.4 NOTIS Editing : Parameter # 0x37..................89
5.10 MSI ....................................................89
5.10.1 Enable/Disable MSI : Parameter # 0x0B .............89
5.10.2 Set Lengths for MSI :
Parameter # L1 = 0x1E, L2 = 0x1F ..................90
5.10.3 MSI Check Digits : Parameter # 0x32................90
5.10.4 Transmit MSI Check Digit : Parameter # 0x2E .......90
5.10.5 MSI Check Digit Algorithm : Parameter # 0x33 ......90
5.11 RSS ....................................................91
5.11.1 Enable/Disable RSS-14 : Parameter # 0xF0 0x52 ......91
5.11.2 Enable/Disable RSS-Limited :
Parameter # 0xF0 0x53 ............................91
5.11.3 Enable/Disable RSS-Expanded :
Parameter # 0xF0 0x54 ............................91
5.12 Data Options ..........................................91
5.12.1 Transmit Code ID Character : Parameter # 0x2D .....91
5.12.2 Prex/Sux Values :
Parameter # P = 0x69, S1 = 0x68, S2 = 0x6A .......... 92
5.12.3 Scan Data Transmission Format :
Parameter # 0xEB ................................92
5.13 Serial Interface ........................................93
5.13.1 Baud Rate : Parameter # 0x9C ......................93
5.13.2 Parity : Parameter # 0x9E..........................93
5.13.3 Soware Handshaking : Parameter # 0x9F...........93
5.13.4 Decode Data Packet Format : Parameter # 0xEE......94
5.13.5 Host Serial Response Time-out : Parameter # 0x9B ...94
5.13.6 Stop Bit Select : Parameter # 0x9D ..................94
5.13.7 Intercharacter Delay : Parameter # 0x6E.............94
5.13.8 Host Character Time-out : Parameter # 0xEF ........94
5.14 Event Reporting .......................................95
5.14.1 Decode Event : Parameter # 0xF0 0x00 . . . . . . . . . . . . . .95
5.14.2 Boot Up Event : Parameter # 0xF0 0x02 .............95
5.14.3 Parameter Event : Parameter # 0xF0 0x03............95
5.15 Numeric Bar Codes.....................................95
5.15.1 Cancel ..........................................95
6.0 Summit Radio .................................96
6.1 Summit Client Utility ..................................96
6.1.1 Main Window ...................................96
6.1.2 Prole Window ..................................97
6.1.2.1 Radio Settings ..........................98
6.1.2.2 Preferred Band for 802.11a/g Radio ........98
6.1.2.3 Ad Hoc ................................98
6.1.2.4 Security Settings ........................99
6.1.2.5 Using Scan to Create a Prole.............99
6.1.2.6 EAP Credentials .......................101
6.1.2.7 Encryption ............................102
6.1.2.7.1 Cisco TKIP.................102
6.1.2.7.2 WPA Migration Mode and
WPA2 Mixed Mode..........102
6.1.2.8 irdPartyCong ......................102
6.1.2.9 EAP-FAST ............................102
6.1.3 Status Window..................................102
6.1.4 Diags Window ..................................103
6.1.5 Global Window .................................103
6.1.6 PMK Caching...................................106
7.0 BlueTooth.......................................107
7.1 Introduction ..........................................107
7.1.1 Bluetooth Functions .............................107
7.1.2 Main Window ..................................107
7.2 Basic Operations......................................108
7.2.1 Start BlueSoleil..................................108
7.2.2 Search for Other Bluetooth Enabled Devices . . . . . . . .108
7.2.3 Establish Connection...............................108
7.2.3.1 Start the Service........................108
7.2.3.2 Initiate the Connection .................108
7.2.4 Bluetooth Security...............................109
7.3 Getting Started .......................................109
7.3.1 AV Headphone ..................................109
7.3.2 Basic Imaging ...................................109
7.3.3 Dial-up Networking .............................109
7.3.4 FAX ...........................................110
7.3.5 File Transfer ....................................110
7.3.5.1 Connect to a Mobile Phone ..............110
7.3.5.2 Share a Folder on Your Computer
with other Bluetooth-Enabled Devices ....110
7.3.5.3 Access a Shared Folder on Another
Bluetooth Enabled Device . . . . . . . . . . . . . . .111
7.3.6 Headset ........................................111
7.3.7 Human Interface Device .........................111
7.3.8 LAN Access.....................................111
7.3.9 Object Push.....................................112
7.3.9.1 Push Objects to a Bluetooth-Enabled
Mobile Phone ..........................112
7.3.9.2 Receive Objects from a Bluetooth
Enabled Mobile Phone ..................112
7.3.10 Personal Area Networking........................112
7.3.10.1 Connecting the PAN User (PANU) .......113
7.3.10.2 Conguring the NAP/GN ...............113
7.3.11 Printer .........................................113
7.3.12 Serial Port ......................................114
7.3.13 Bluetooth Synchronization .......................114
7.4 BlueSoleil User Guides ................................115
7.4.1 BlueSoleil Environment ..........................115
7.4.1.1 Main Window .........................115
7.4.1.1.1 Local Bluetooth Device.......115
7.4.1.1.2 Remote Bluetooth Devices....115
7.4.1.1.3 Bluetooth Service Buttons
of Remote Device ...........115
7.4.1.2 Service Window........................115
7.4.1.3 Menus ................................116
7.4.2 Device Congurations 117
7.4.2.1 Hardware Conguration ................117
7.4.2.2 Properties Conguration................117
7.4.3 Security Conguration...........................117
7.4.3.1 Pair / Un-pair Devices ..................117
7.4.3.1.1 How to pair with another
device .....................117
7.4.3.1.2 How to un-pair with
another device ..............117
7.4.3.2 General Security .......................117
7.4.3.2.1 Security Level...............117
7.4.3.2.2 Bluetooth Passkey ...........118
7.4.3.2.3 Data Encryption ............118
7.4.3.3 Managing Device Pairings ..............118
7.4.3.4 Local Services Security..................118
7.4.3.4.1 Local Services: ..............118
Appendix A — EAP Types...................................119
Appendix B — Encryption Settings ...........................121
7
1.0 Introduction
1.1 User and Product Safety
• DonotstareintothelaserorLEDbeamdirectlyorshineitintoeyes.
• Neverusestrongpressureontothescreenorsubjectittosevereim-
pact, as the LCD panel could become cracked and possibility cause
personal injury. If the LCD panel is broken, never touch the liquid
inside because the liquid irritates the skin.
• AlthoughthePDThaspassedthetestofIP65standardforwaterand
dust resistance, avoid prolonged exposure to rain or other concentrat-
ed moisture. Such condition exceeds the IP65 standard, and could
result in water or other contaminants entering into the PDT.
• UseonlytheoriginalapprovedACAdapterwiththePDT.Useofan
unapproved AC Adapter could result in electrical problems, or even
cause a re or electrical shock to the user.
• DonotdisassemblethePDT.Servicingshouldbedonebysupplier
only. If the PDT or accessories gets damaged due to wrong handling
or unauthorized repair, warranty is void. In case the warranty seals
are broken, warranty is void too.
• Makeregularlyback-upofallimportantdata.
• Undernocircumstancewillsupplierbeliableforanydirect,indirect,
consequential or incidental damages baring out of the use or inability
to use the hardware and soware and/or any data loss, even if sup-
plier has been informed about the possibility of such damages.
• LASERRADIATION:DONOTSTAREINTOBEAMCLASS2LA-
SER PRODUCT.
1.2 LED and LASER Safety
Information
• M9000isaClassIILED/LaserProduct.
• DONOTSTAREattheLED/Laserorshineintoeyes.
• Donotallowyoungchildrentousetheproductwithoutadultsuper-
vision.
• Donotreplace/repairtheLED/Laser;thesearenotuserreplaceable.
• DonotshinetheLED/Laseronashinyreectivesurface.
1.3 FCC Interference Statement
is equipment has been tested and found to comply with the limits
for a Class B digital device, pursuant to Part 15 of the FCC Rules. ese
limits are designed to provide reasonable protection against harmful
interference in a residential installation. is equipment generates uses
and can radiate radio frequency energy and, if not installed and used
in accordance with the instructions, may cause harmful interference to
1.0 Introduction
–RADIATION EXPOSURE STATEMENT –
is equipment complies with FCC radiation exposure limits set
forth for an uncontrolled environment. End users must follow
the specic operating instructions for satisfying RF exposure
compliance. To maintain compliance with FCC RF exposure
compliance requirements, please follow operation instruction
as documented in this manual.
is transmitter must not be co-located or operating in con-
junction with any other antenna or transmitter.
e availability of some specic channels and/or operational
frequency bands are country dependent and are rmware pro-
grammed at the factory to match the intended destination. e
rmware setting is not accessible by the end user.
radio communications. However, there is no guarantee that interference
will not occur in a particular installation. If this equipment does cause
harmful interference to radio or television reception, which can be de-
termined by turning the equipment o and on, the user is encouraged to
try to correct the interference by one of the following measures:
- Reorient or relocate the receiving antenna.
- Increase the separation between the equipment and receiver.
- Connect the equipment into an outlet on a circuit dierent from that
to which the receiver is connected.
- Consult the dealer or an experienced radio/TV technician for help.
FCC Caution: Any changes or modications not expressly approved by
the party responsible for compliance could void the user’s authority to
operate this equipment. is device complies with Part 15 of the FCC
Rules. Operation is subject to the following two conditions: (1) is de-
vice may not cause harmful interference, and (2) this device must accept
any interference received, including interference that may cause unde-
sired operation.
Complies with 21 CFR 1040.10 and 1040.11 except for deviations pur-
suant to Laser Notice No. 50, dated June 24, 2007.
Specic Absorption Rate (SAR) Information
e SAR Limit of USA (FCC) is 1.6W/kg averaged over one gram of tissue.
e device has been tested against this SAR limit. e highest SAR value
reported under this standard during product certification for properly
worn on the body is 1.37W/kg. This device was tested for typical body-worn
operations with the back of the Tablet PC kept 0 cm from the body. Any
Changes or modications not expressly approved by the party responsible
for compliance could void the user’s authority to operate the equipment.
1.4 Industry Canada Statement
is Class B digital apparatus complies with Canadian ICES-003. Op-
eration is subject to the following two conditions:
1. is device may not cause interference and
2. is device must accept any interference, including interference that
may cause undesired operation of the device.
Le présent appareil est conforme aux CNR d’Industrie Can-
ada applicables aux appareils radio exempts de licence.
L’exploitation est autorisée aux deux conditions suivantes : (1)
l’appareil ne doit pas produire de brouillage, et (2) l’utilisateur
de l’appareil doit accepter tout brouillage radioélectrique
subi, même si le brouillage est susceptible d’en compromettre
le fonctionnement.
Cet appareil numérique de la classe [B] est conforme à la
norme NMB-003 du Canada.
1.5 Battery Safety
Lithium-ion battery packs might get hot, explode, ignite and/or cause
serious injury if exploded by abusive using. Please follow the safety
warnings listed as below:
• Donotthrowthebatterypackinre.Donotexposethebatteryto
high temperatures.
• Donotconnectthepositivebatterypackwithnegativebatterypack
to each other with any metal object (like wire).
–WARNING –
Risk of explosion if battery is replaced by an incorrect type. Dis-
pose of used batteries according to the instructions.

8
1.0 Introduction
• Donotcarryorstorebatterypacktogetherwithmetalobjects.
• Donotpiercethebatterypackwithnailsordrills,strikethebattery
pack with a hammer, step on the battery pack or otherwise expose it
to strong impacts, shocks or excessive force.
• Donotsolderontothebatterypack.
• Donotexposebatterypacktoliquidorallowthebatterycontactsto
get wet.
• Do notdisassembleor modify thebatterypack.e batterypack
contains safety and protection measures, which, if damaged, may
cause the battery pack to generate heat, explode or ignite.
• Donotdischargethebatterypackusinganydeviceexceptforthespec-
ied device. When it is used in devices other than the specied de-
vices, the battery pack can be damaged or its life expectancy reduced.
If the device causesany abnormalcurrent to ow, it may cause the
battery pack to become hot, explode or ignite and cause serious injury.
• Intheeventthebatterypackleaksandtheuidgetsintoone’seye,do
not rub the eye. Rinse well with water and immediately seek medical
care.Ifleuntreated,thebatteryuidcouldcausedamagetotheeye.
1.6 Warranty Statements
DAP Technologies makes no representation or warranty with respect to
the contents hereof and specically disclaims any implied warranties of
merchantability or tness for any particular purpose.
e information in this manual is subject to change. DAP Technologies
reserves the right to update and modify the M9000 Series, its accesso-
ries, and manuals without notice.
No part of this manual may be copied, distributed, transmitted, tran-
scribed, stored in a retrieval system, or translkated in any form or by
any means, whether electronically or manually, without the express
written consent of DAP Technologies.
As manufacturer, DAP Technologies will replace or repair, at its dis-
cretion, any products that prove to be defective in either materials or
workmanship, for a period of one year following the purchase date of
the M9000 Series unit and for a period of ninety (90) days following the
purchase date of the M9000 accessories sold by DAP Technologies. e
warranty only covers the materials and workmanship.
is warranty does not cover damages caused by misuse, abuse, or ne-
glect,oroccurringduringshippingorstorage;thewarrantydoesnot
also cover any modication or servicing by anyone other than a DAP
Technologies Authorized Service Center.
DAP Technologies cannot be held responsible for any damage caused by
the misuse fo the M9000 Series unit or by any other soware or hard-
ware added to the M9000.
e operating system, MS-DOS®, Windows CE, and all other soware
sold or supplied by DAP Technologies are provided as is, without any
warranty, either express or implied.
In no event shall DAP Technologies be liable for any direct damage, indi-
rect damage, or damage of any kind, including but not limited to damag-
es on account of the loss of present or prospective prots arising out of or
in connection with the use or failure of performance of this product. No
claim may be made against DAP Technologies under this head, whether
arising from contractual, extra-contractual, or statutory liability.
e warranty allowed hereby excludes all other legal warranties related
to the quality of this product or its capacities to fulll specic purposes,
including all warranties granted by the United States Convention on
Contracts for the International Sale of Goods, the applciation of such
Convention being expressly excluded.
M9000 Series is a registered trademark of DAP Technologies. Microso
and MS-DOS® are registered trademarks of Microso Corporation.
1.7 Warranty and After Service
Should this Device be malfunctioned, please contact the original retailer
providing information about the product name, the serial number, and
the details about the problem.
1.8 Europe – EU Declaration of
Conformity
is device complies with the essential requirements of the R&TTE Di-
rective 1999/5/EC. e following test methods have been applied in or-
der to prove presumption of conformity with the essential requirements
of the R&TTE Directive 1999/5/EC:
• EN60950-1:2006—SafetyofInformationTechnologyEquipment
• EN50371:(2002-03)—Genericstandardtodemonstratethecom-
pliance of low power electronic and electrical apparatus with the ba-
sic restrictions related to human exposure to electromagnetic elds
(10 MHz - 300 GHz) -- General public
• EN 300 440-1 V1.4.1: (2008-05) — Electromagnetic compatibil-
ity and Radio spectrum Matters (ERM); Short range devices; Ra-
dioequipmenttobeusedinthe1GHzto40GHzfrequencyrange;
Part1: Technical characteristics and test methods
• EN 300 440-2 V1.2.1: (2008-05) — Electromagnetic compatibility
andradiospectrummatters(ERM);Wirelessmicrophonesinthe25
MHzto3GHzfrequencyrange;
• EN 301 908-1 V3.2.1: (2007-05) — Electromagnetic compatibility
andRadiospectrumMatters(ERM);BaseStations(BS),Repeaters
and User Equipment (UE) for IMT-2000 ird-Generation cellular
networks;Part1:HarmonizedENforIMT-2000,introductionand
common requirements, covering essential requirements of article
3.2 of the R&TTE Directive
• EN 301 489-1 V1.8.1: (2008-04) — Electromagnetic compatibility
andRadioSpectrumMatters(ERM);ElectroMagneticCompatibil-
ity(EMC)standardforradioequipmentandservices;Part1:Com-
mon technical requirements
• EN 301 489-3 V1.4.1 (2002-08) — Electromagnetic compatibility
andRadioSpectrumMatters(ERM);ElectroMagneticCompatibili-
ty(EMC)standardforradioequipmentandservices;Part3:Specic
conditions for Short-Range Devices (SRD) operating on frequencies
between 9 kHz and 40 GHz
• EN301489-7V1.3.1(2005-11)—Electromagneticcompatibilityand
Radio spectrum Matters -(ERM); ElectroMagnetic Compatibility
(EMC)standardforradioequipmentandservices;Part7:Specic
conditions for mobile and portable radio and ancillary equipment of
digital cellular radio telecommunications systems (GSM and DCS)
• EN301489-17V1.3.2 (2007-06)—Electromagneticcompatibility
andRadiospectrumMatters(ERM);ElectroMagneticCompatibility
(EMC)standardforradioequipment;Part17:Specicconditionsfor
2,4 GHz wide-band transmission systems, 5 GHz high performance
RLAN equipment and 5,8 GHz broadband data transmitting systems
• EN 301 489-19 V1.2.1 (2002-11) — Electromagnetic compatibility
andRadiospectrumMatters(ERM);ElectroMagneticCompatibil-
ity(EMC)standardforradioequipmentandservices;Part19:Spe-
cic conditions for Receive-Only Mobile Earth Stations (ROMES)

9
1.0 Introduction
operating in the 1,5 GHz band providing data communication
• EN 301 489-24 V1.5.1 (2010-10) — Electromagnetic compatibility
andRadiospectrumMatters(ERM);ElectroMagneticCompatibil-
ity(EMC)standardforradioequipmentandservices;Part24:Spe-
cic conditions for IMT-2000 CDMA Direct Spread (UTRA and E-
UTRA) for Mobile and portable (UE) radio and ancillary equipment
• EN 301 489-33 V1.1.1 (2009-02) — Electromagnetic compatibility
andRadiospectrumMatters(ERM);ElectroMagneticCompatibility
(EMC)standardforradioequipmentandservices;Part33:Specic
conditions for Ultra-Wide-Band (UWB) communications devices
• EN302065V1.2.1(2010-07)—Electromagneticcompatibilityand
RadiospectrumMatters(ERM);Short-RangeDevices(SRD)using
Ultra- Wide-Band technology (UWB) for communications purpos-
es;HarmonisedENcoveringtheessentialrequirementsofArticle3.2
of the R&TTE Directive
• EN301511V9.0.2(2003-3)—GlobalSystemforMobilecommuni-
cations(GSM);HarmonisedENformobilestationsintheGSM900
and GSM 1800 bands covering essential requirements under Article
3.2 of the R&TTE Directive (1999/5/EC)
• EN301893V1.5.1(2008-12)—BroadbandRadioAccessNetworks
(BRAN);5GHzhighperformanceRLAN;HarmonisedENcovering
the essential requirements of Article 3.2 of the R&TTE Directive
• EN300328V1.7.1(2006-02)—Electromagneticcompatibilityand
Radio spectrumMatters(ERM);Wide-bandtransmissionsystems;
Data transmission equipment operating in the 2,4 GHz ISM band
andusingwide-bandmodulationtechniques;HarmonisedENcover-
ing essential requirements under Article 3.2 of the R&TTE Directive
• EN62311:2008—Assessmentofelectronicandelectricalequipment
related to human exposure restrictions for electromagnetic elds (0
Hz-300 GHz)
• EN 55022:2006/A1:2007 — Information technology equipment —
Radio disturbance characteristics — Limits and methods of mea-
surement
• EN 55024:1998/A2:2003 — Information technology equipment —
Immunity characteristics — Limits and methods of measurement
1.9 European Union CE Marking
and Compliance Notices
Statements of Compliance:
English — is product follows the provisions of the European
Directive 1999/5/EC.
Danish — Dette produkt er i overensstemmelse med det europæiske
direktiv 1999/5/EC.
Dutch — Dit product is in navolging van de bepalingen van Europees
Directief 1999/5/EC.
Finnish — Tämä tuote noudattaa EU-direktiivin 1999/5/EC määräyk-
siä.
French — Ce produit est conforme aux exigences de la Directive
Européenne 1999/5/EC.
German — Dieses Produkt entspricht den Bestimmungen der Eu-
ropäischen Richtlinie 1999/5/EC.
Greek — To προϊόν αυτό πληροί τις προβλέψεις της Ευρωπαϊκής
Οδηγίας 1999/5/EC.
Spanish — Este producto cumple las disposiciones de la Directiva
Europea 1999/5/CE.

10
1.0 Introduction
1.10 Specications
Operating Sys-
tem
Windows® Embedded Standard 7,
Windows® CE 6.0 Professional
Processor Intel® Atom™ E660T 1.3 GHz
Memory 1 GB DDR2 SDRAM (2 GB optional)
Storage 16 GB solid state drive (32 or 64 GB optional)
Display
Sunlight-viewable
Hardened touchscreen
Landscape or portrait orientation
Passive stylus or nger operation
7-inch WVGA (800 x 480)
550 nits
Sensors
Light sensor for auto backlight adjustment
Position sensor (accelerometer) for portrait or land-
scape screen orientation
Keypad /
Buttons
3-key keypad (enter, navigation, function)
7 programmable keys (touchscreen)
Adjustable keypad backlight
Programmable trigger on underside
Communications
WLAN — Summit 802.11 a/b/g/n
WWAN — Gobi™ 3000: (CDMA, EVDO, UMTS,
GSM, GPRS, EDGE, DTM, HSPA, 3G: 14.4 / 5.76
Mbps, DOrA: 3.1 /1.8 Mbps)
GPS — Gobi™ 3000 (Standalone, XTRA, AGPS)
Zigbee® — Building Automation (BA)
Home Automation (HA)
Smart Energy (SE)
Wireless USB — Video/data
Bluetooth® — v2.1 + EDR Class II (BlueSoleil stack)
Input / Output
Power jack
1x RS-232
1x USB 2.0
Via dock connector:
1x USB 2.0
1x Ethernet
Barcode
Scanning
Short range barcode: 1D laser
Camera:5-MPcolorcamerawithash
Expansion Slots
SD card slot (supports up to 32 GB)
Multi-I/O interface:
2x USB 2.0
1x CAN bus 2.0 (interface only)
1x SDVO (Serial Digital Video Out)
2x RS-232
Audio
Speaker
Intel® HD Audio
3.2 mm stereo headset jack
Software
Windows® Embedded 7:
IE8, IIS 7.0, .NET 3.5, Remote Desktop, SQL, Backup
and Restore, Boot from VHD or USB, Power Manage-
ment, EWF and FBWF
Windows® CE 6.0 Professional:
ActiveSync, FTP client/server, IE 6.0, Viewers for Mi-
croso® Oce and PDF les, Inbox, Windows Media
Player, Remote Desktop, Terminal Services ,Voice Re-
corder, Backup and Restore, Barcode Scanner Utility
Power
Primary internal:
Li-ion battery, 7.4 V, 3000 mAh
Secondary battery:
Li-ion battery pack, 7.4 V, 3000 mAh
Input:
10–20 VDC, 2 A
Dimensions &
Weight
9.0 (L) x 7.3 (W) x 2.3 (H) inches [230 x 185 x 60 mm]
2.96 lb. [1346 g]
Regulatory
FCC Class B
CE
RoHS
WEEE
Laser safety:
A21CFR1040.10
IEC/EN 60825-1
Environment
Operating temperature:
-4 to +122 °F [-20 to +50 °C]
Charging temperature:
32 to +104 °F [0 to +40 °C]
Storage temperature:
-22 to +158 °F [-30 to +70 °C]
Drop:
Multiple 6-foot (1.8-meter) drops to concrete
ESD:
15 kV air discharge, 8 kV direct discharge
Sealing:
IP67 certied
Humidity:
5%-95%, non-condensing
Vibration:
MIL-STD-810F
11
2.0 Getting Started
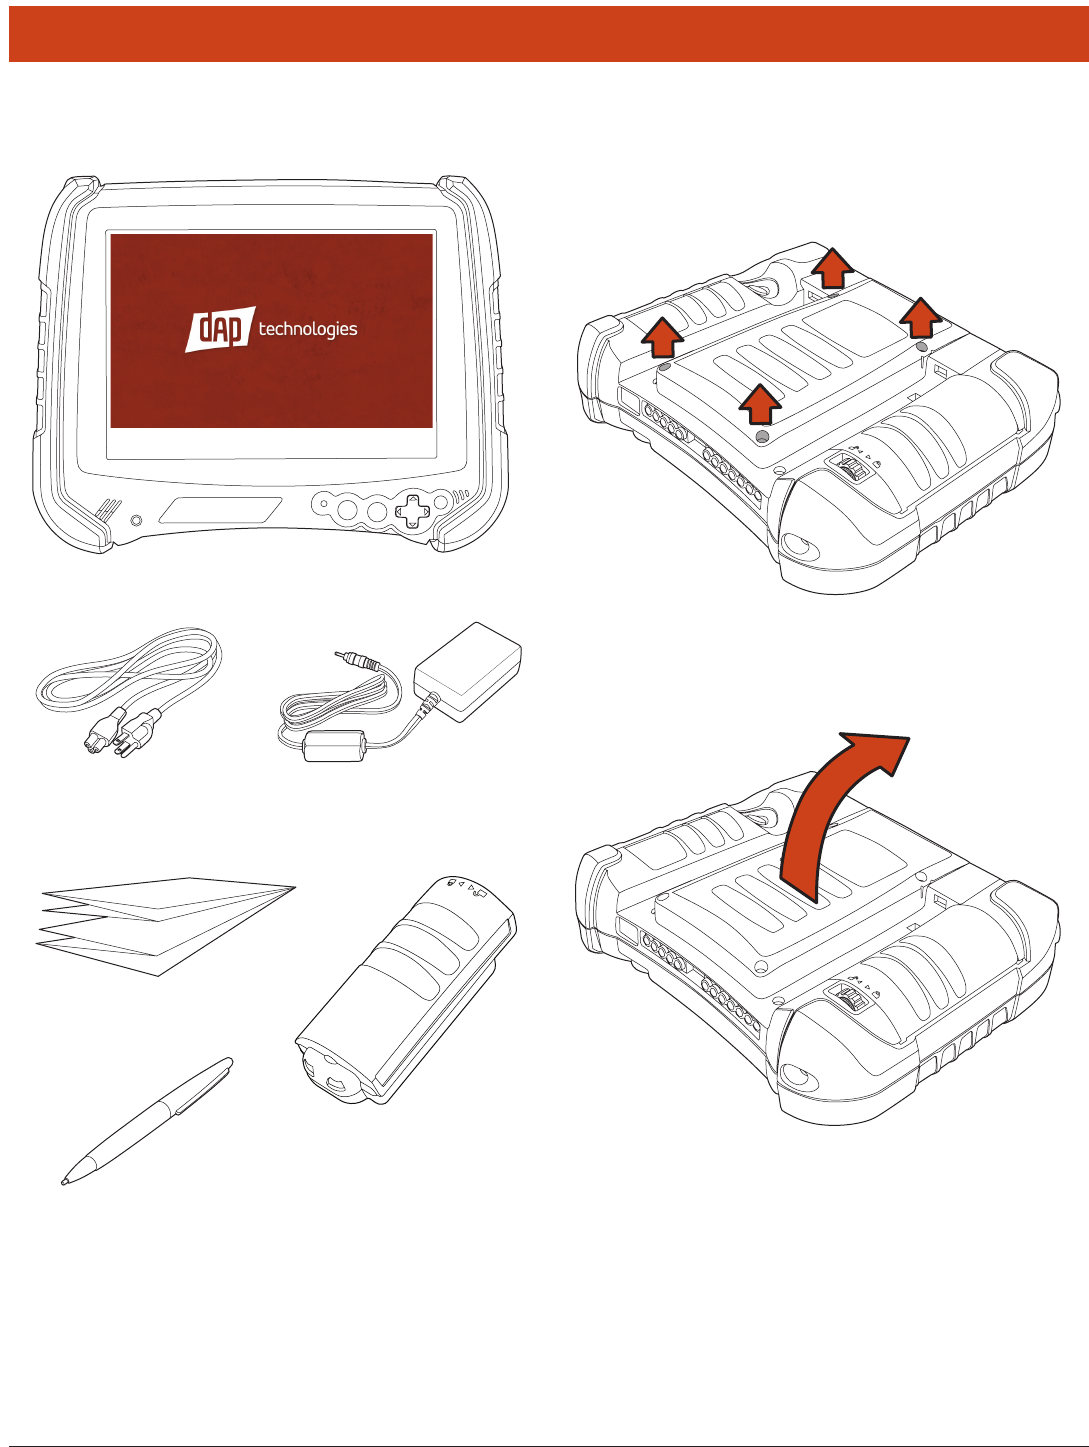
2.1 What’s In the Package
M9010
Power Cords (US, UK,
and EU)
Quick Start Guide
Stylus
AC Adapter
Battery Pack
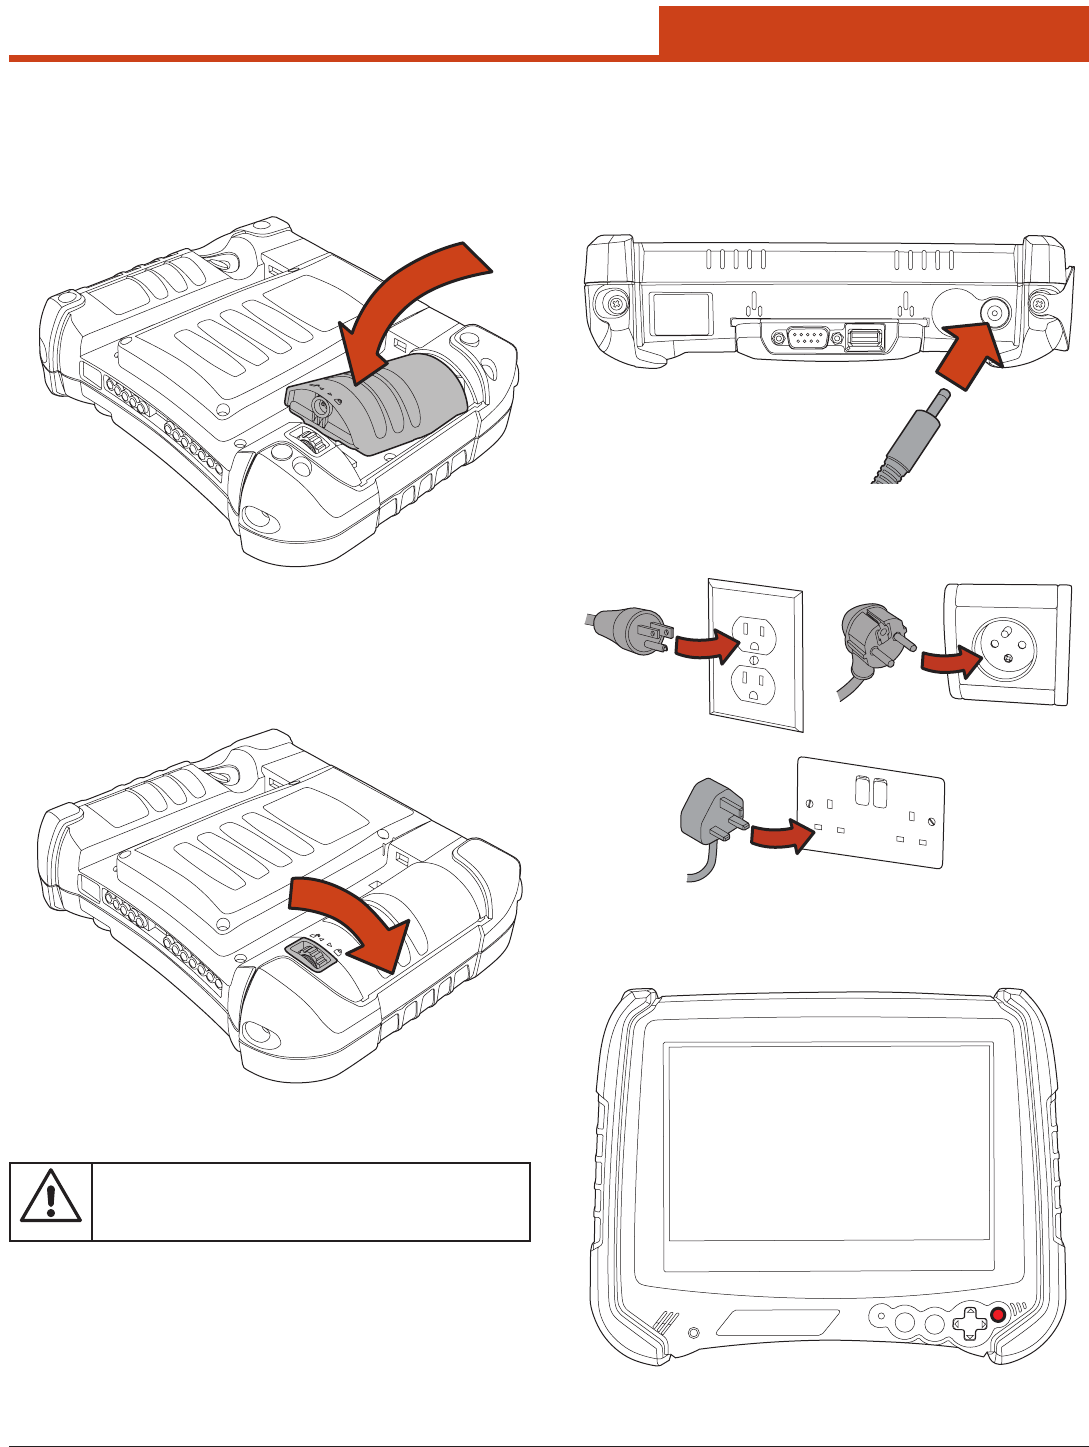
1. Usingaatheadscrewdriver,removethescrewsasshown.
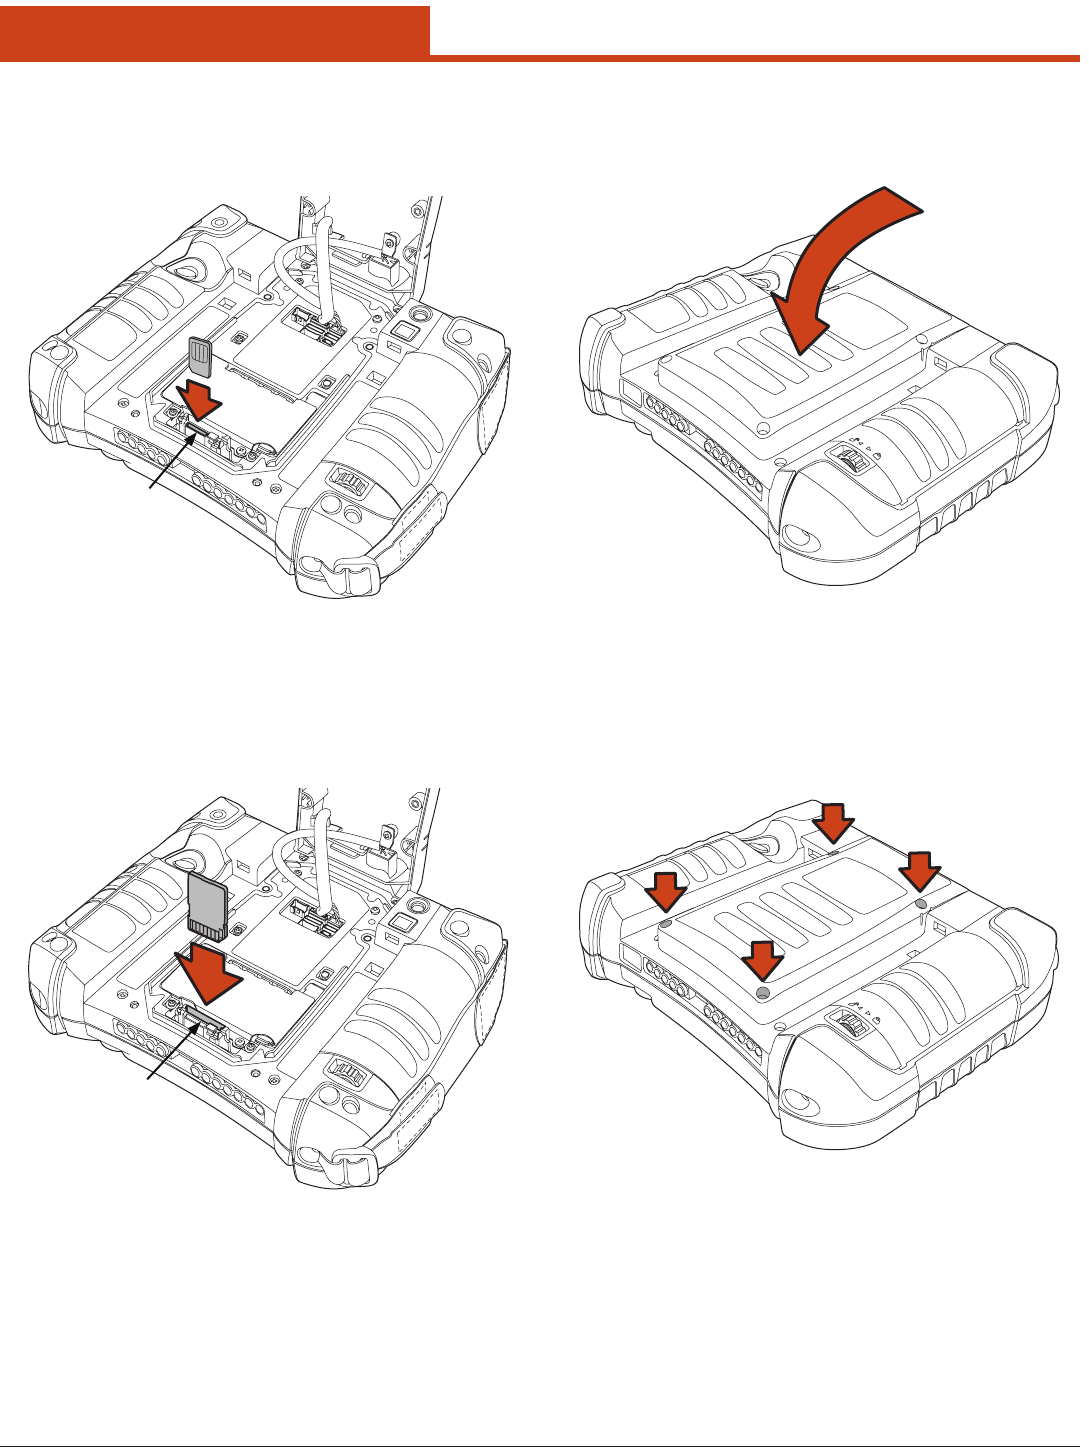
2.2 Installing Optional Memory
Cards
2.0 Getting Started
12
2.0 Getting Started
SD Card
Slot
2. Li the back cover o.
3. Insert the SIM Card into the small slot.
4. Insert the SD Card into the slot and press in until it locks in place.
5. Place the cover back on the unit.
6. Insertthescrewsintotheirholesandtightenusingaatheadscrew-
driver.
SIM Card
Slot
13
2.0 Getting Started
2. Insert the power cord into the wall outlet and charge the battery
for a minimum of 6 hours.
3. A red light will appear on the front of the unit while the unit is charg-
ing. It will turn green when charging is complete.
1. Insert the battery as shown to the right.
2.3 Install the Battery
2.4.1 Plugging In
1. Insert the AC adapter into the power input.
USA
UK
EU
2.4 Charge the Battery
2. Turn the battery lock wheel clockwise until the battery is locked in
place.
– WARNING –
If the battery is not properly locked into position, the unit WILL
NOT start.
14
2.0 Getting Started
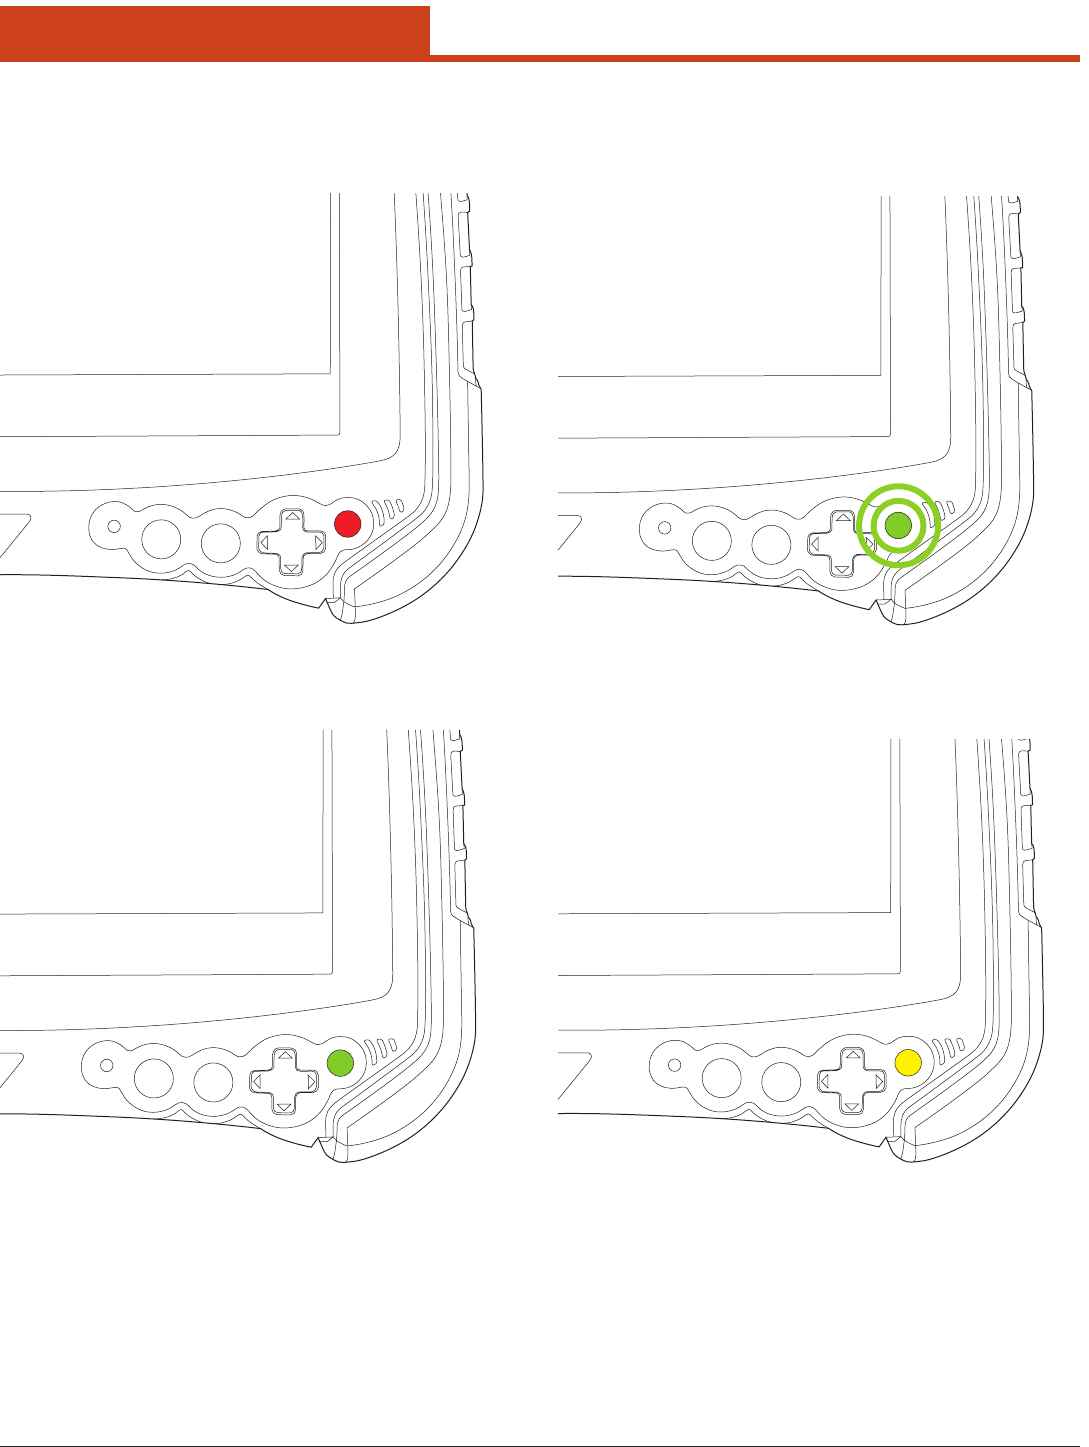
2.4.2 LED Indicators
Red LED
Indicates that batteries are charging.
Green LED
Indicates that batteries are charged
Flashing Green LED
Idicates that unit is booting, resuming, or hibernating.
Yellow LED
Indicates a battery error, including a missing one.
15
2.0 Getting Started
2.5 Operating the Unit
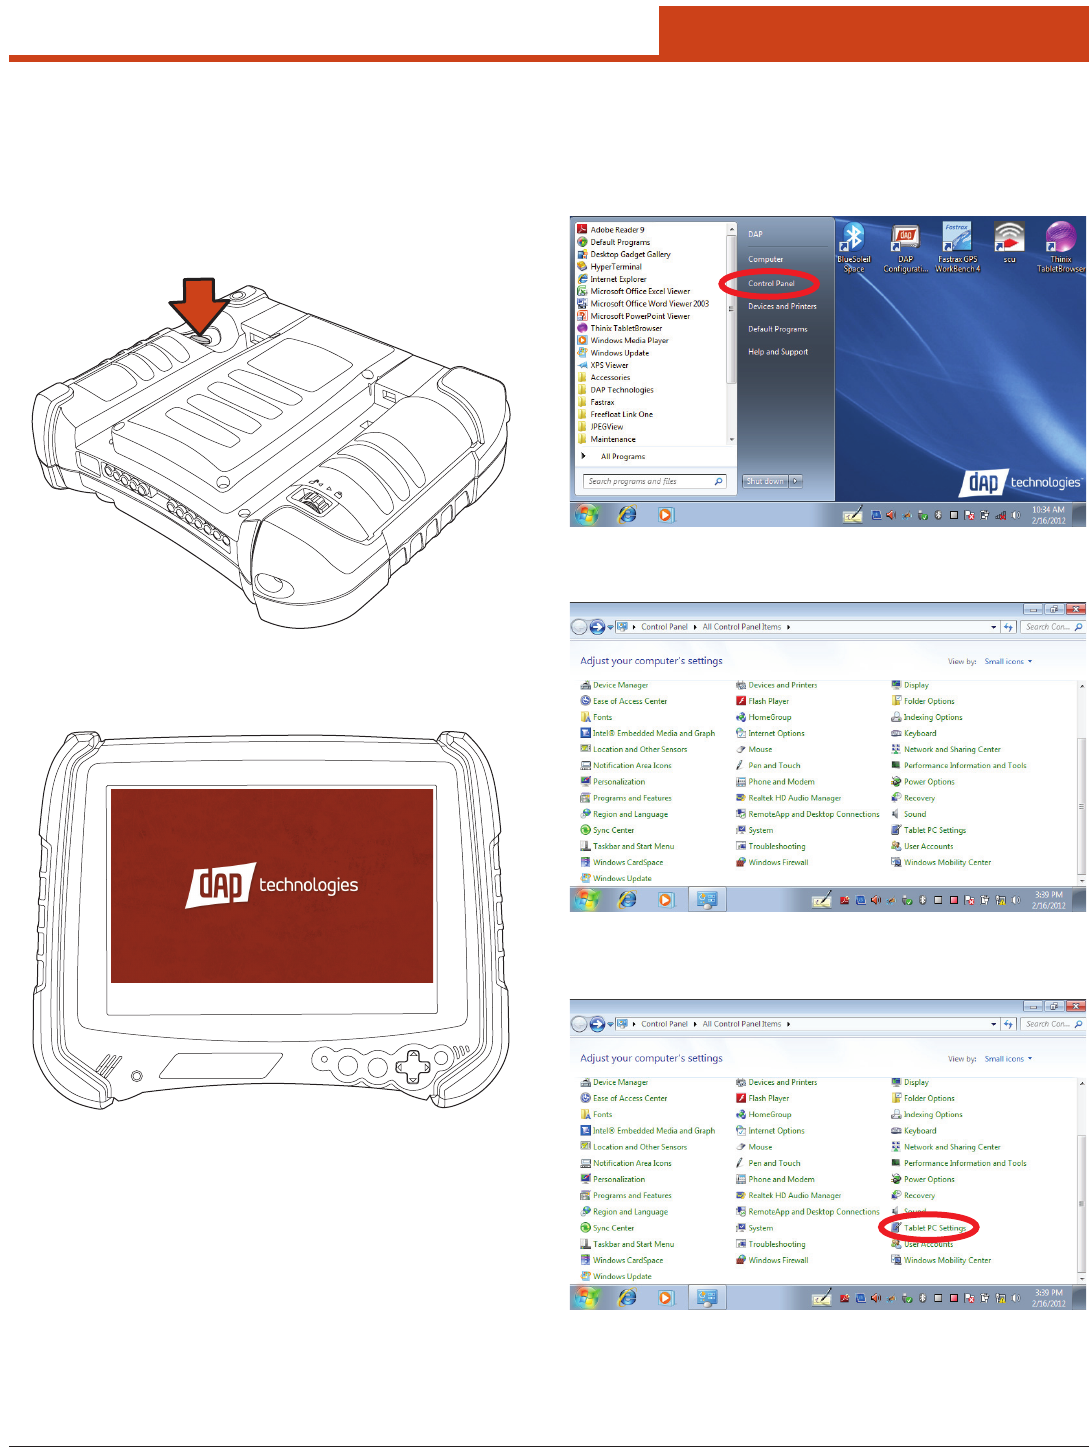
2.5.1 Turning the Unit On
1. Once the unit is charged, turn the unit on by pressing and releasing
the trigger on the back of the unit.
2. A DAP splash screen will appear while the OS is loading.
3. Once the OS has loaded, the desktop will appear.
4. e unit is ready for use.
Trigger/Scan Key
2.5.2 Calibrating the Touchscreen
etouchscreencomespre-calibratedfromthefactory;however,ifthe
screen ever needs to be re-calibrated, perform the following:
1. Open the Start Menu and tap on Control Panel.
2. A window entitled Adjust Your Computer’s Settings will open.
3. Tap the Tablet PC Settings icon.
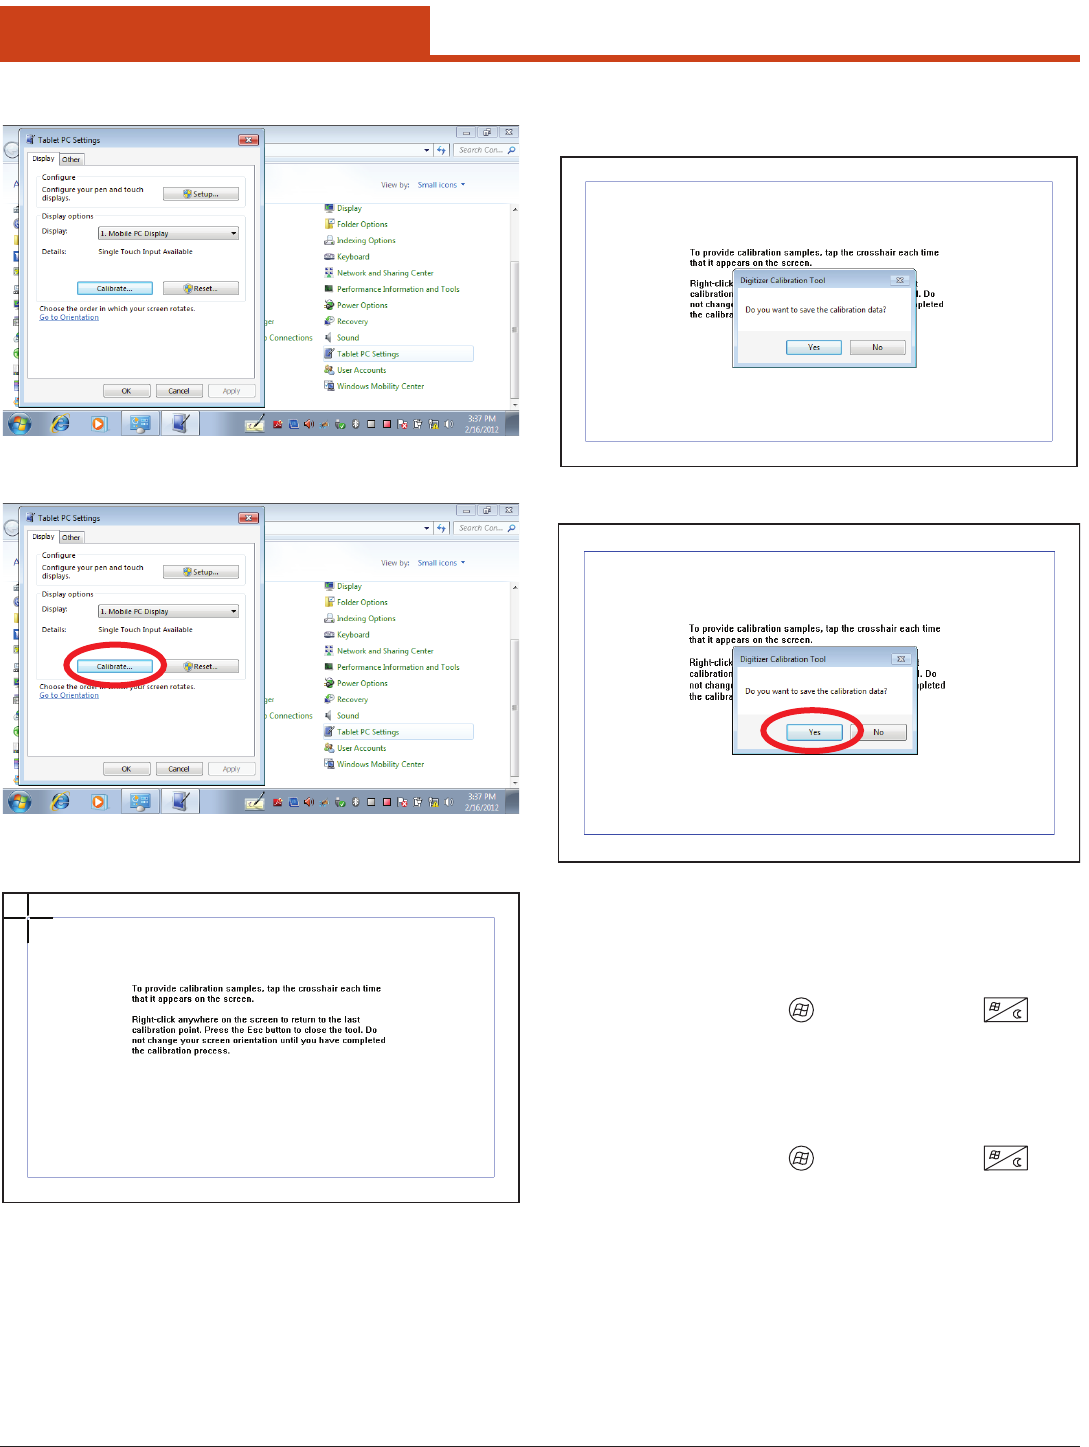
16
2.0 Getting Started
7. Follow the onscreen instructions and the Digitizer Calibration Tool
window will open asking to save the calibration data.
8. If the calibration was satisfactory, tap the Yes button.
8. e screen will return to the Tablet PC Settings window.
2.5.3 Launching an Application
2.5.3.1 Using the Stylus
1. Touch the Start Menu Icon or Start Menu Button with a
nger or the stylus.
2. When the Start aMenu appears, select an item to launch or navigate
with using a nger or stylus.
2.5.3.2 Using the Nav Button
1. Touch the Start Menu Icon or Start Menu Button with a
nger or a stylus.
2. Once the Start Menu appears, use the Nav Button to scroll the list of
items.
3. To select a sub-menu, press the right side of the Nav Button. Pressing
the le side of the Nav Button while in a sub-menu will take you to the
previous menu.
4. Once an item to be selected is highlighted, press the Enter Button to
launch the item.
4. e
Tablet PC Settings window will open.
5. Tap the Calibrate button.
6. e Calibration window will open.
17
2.0 Getting Started
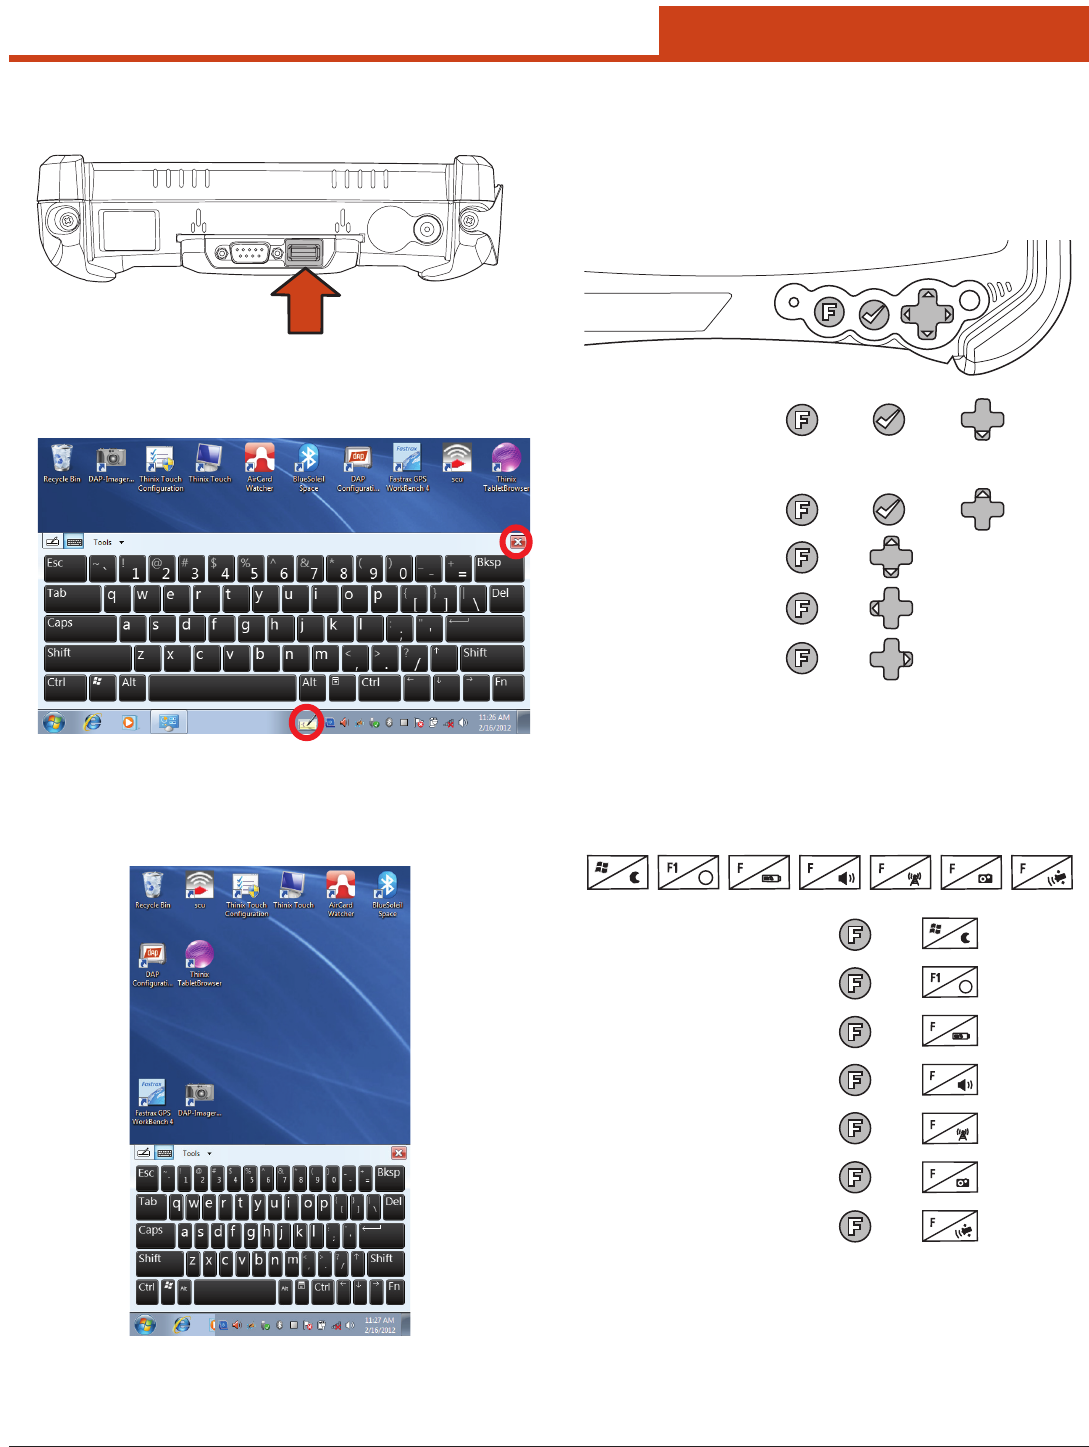
2.5.5 Using the Function Button
2.5.5.1 Function Button Key Combinations
is unit provides certain commands through function button combi-
nations. e combinations listed below provide access to the specic
options listed below:
2.5.5.2 Function Button with Function Keys
Each Function Key has two states. e rst is its programmable func-
tion. e second is indicated by an icon representing its function and is
activated as shown below:
2.5.4 Entering Data
1. Attach a keyboard to the USB connector on the top of the unit.
– OR –
2. Tap the Tablet PC Input Panel icon in the task bar at the bottom of
the screen and the Onscreen Keyboard will appear:
4. To close the Onscreen Keyboard, tap either the X or the Tablet PC
Input Panel icon a second time.
5. If the unit is rotated, the screen will go dark, then re-orient the desk-
top in the following manner:
Brightness:
Tab:
+
+
+
+
+
Space:
+
+
Reset:
(Hold until screen shuts o)
Shutdown:
Battery Status:
2
2
+
Volume:
3
3
+
Camera:
5
5
+
Radio Mgmt:
4
4
+
GPS:
6
6
+
Product Site: ?
?
+
Sleep: +