TransCore 76007 FHSS TRANSCEIVER MODULE User Manual 2
TransCore FHSS TRANSCEIVER MODULE 2
Contents
- 1. Users Manual
- 2. User Manual 1
- 3. User Manual 2
- 4. User Manual 3
- 5. User Manual 4
User Manual 2
18
2.0 Getting Started
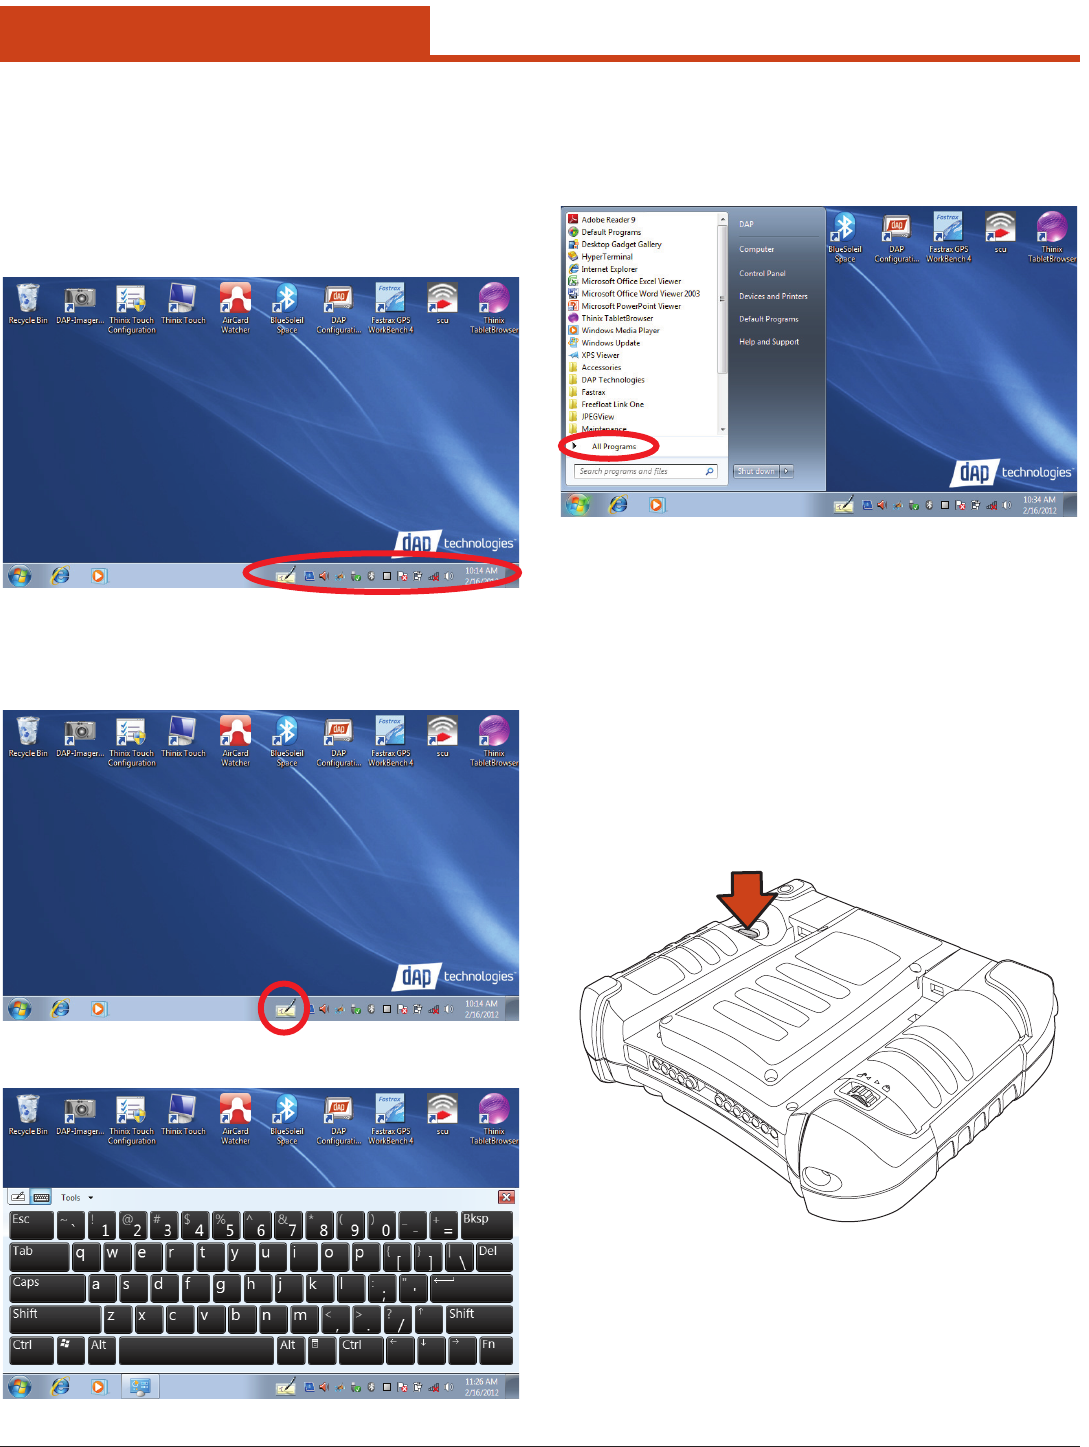
2.5.6 Navigating the Display
2.5.6.1 The Task Bar
e Task bar at the bottom of the screen displays the icon, an icon for the
active program, the current time, and system icons for utilities loaded in
memory. e Task bar includes menu names, buttons, and the keyboard
icon, which opens and closes the so input panel (SIP). e Task bar al-
lows the user to launch and close programs.
2.5.6.2 The Onscreen Keyboard
e Onscreen Keyboard can be used to enter data using the stylus.
1. Tap the Keyboard icon in the Task Bar.
2. e onscreen keyboard will appear.
2.5.6.3 Entering the Data
To select and open programs, tap Start > All Programs from the task
bar to open a list of available programs. Or if the program has an icon
on the desktop, double-tap it to open it.
ere are several ways to enter data on the unit once in an application:
• Usethestylusonthetouchscreen.
• Tohighlightthedesiredtext,dragthestylusacrossthedesiredtext,
or double-tap to select one word or triple-tap to select an entire line
or paragraph.
• Usethestyluswiththeonscreenkeyboard.Referto2.5.4 Enter-
ing Data.
• ConnectakeyboardtotheUSBportonthetopoftheunit.Referto
2.5.4 Entering Data.
• Usethebarcodescannertoenterdata.PresstheTrigger to initiate
a scan. e scanned data will enter the current application’s open
window. Refer to 2.7.5 Reading 1D laser barcodes.
For more information on factory installed applications, Refer toSection
3.0 Operating the Unit on page 63.
19
2.0 Getting Started
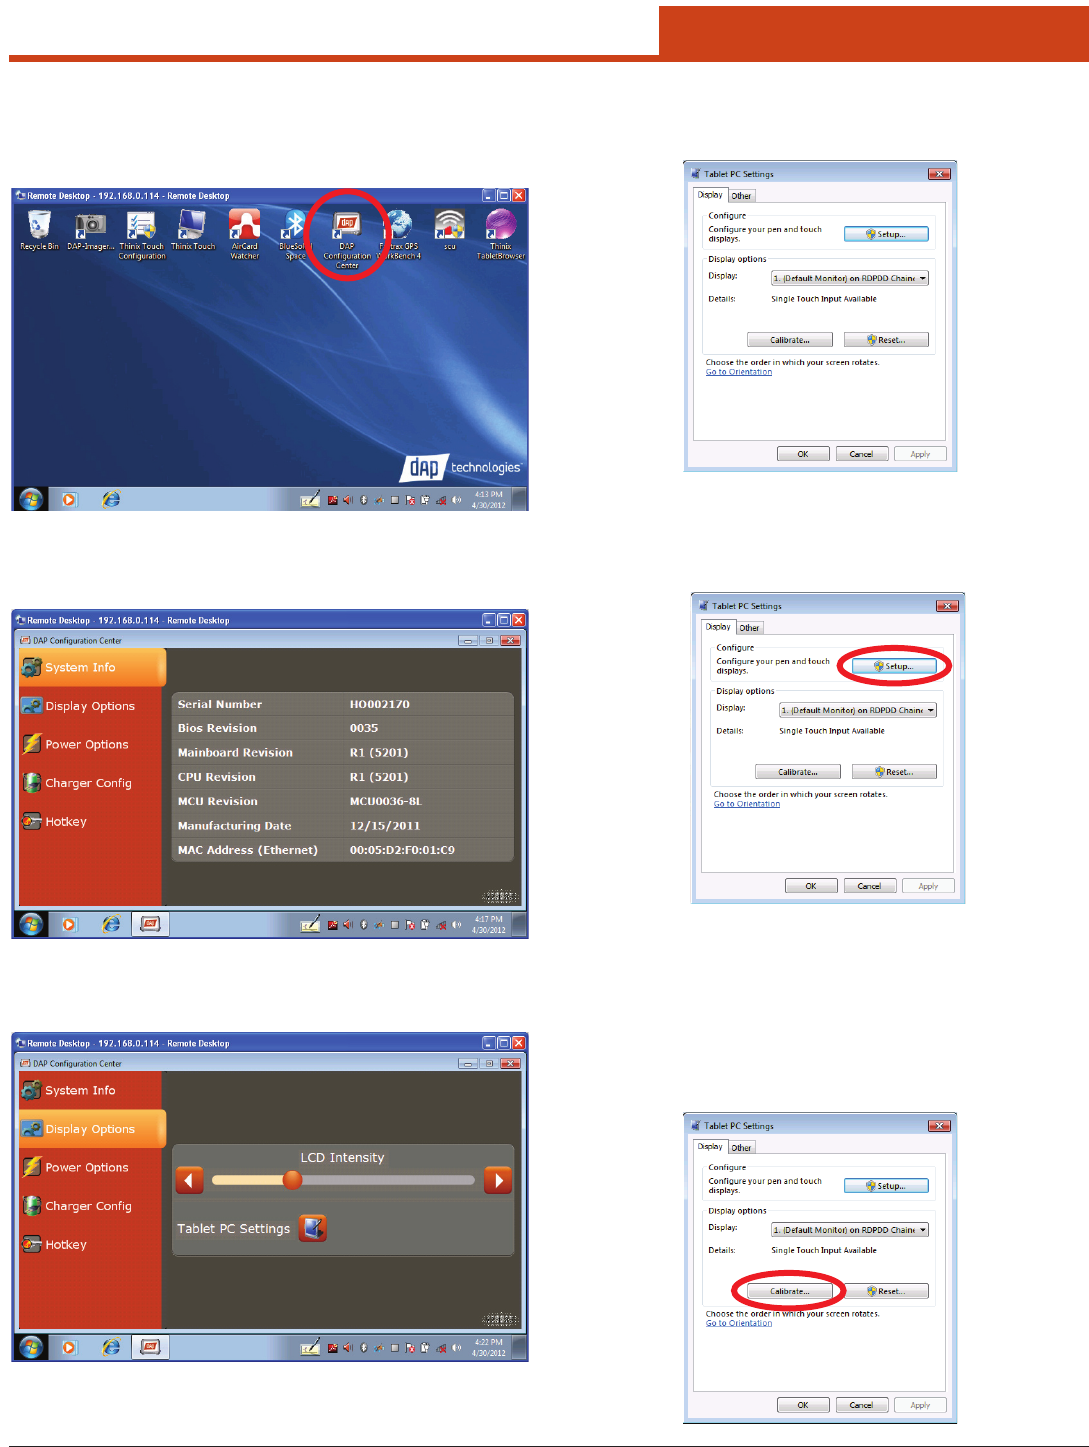
2.6 DAP Conguration Center
To launch the DAP Conguration Center, double-tap the desktop
icon:
2.6.1 System Info
is window provides all poertinent system information for the unit.
2.6.2 Display Options
Allows the user to adjust the screen brightness.
Tap the Tablet PC Settings button to congure the unit.
2.6.3 Tablet PC Settings
Allows the user to adjust, congure, and calibrate the unit’s display.
2.6.3.1 Display Tab – Congure
Allows the user to identify the unit’s screen as the touchscreen.
1. Tap the Setup button.
2. Tap the screen when prompted with “Touch this screen to identify it
as the touchscreen.”
3. Tap the OK button to save changes.
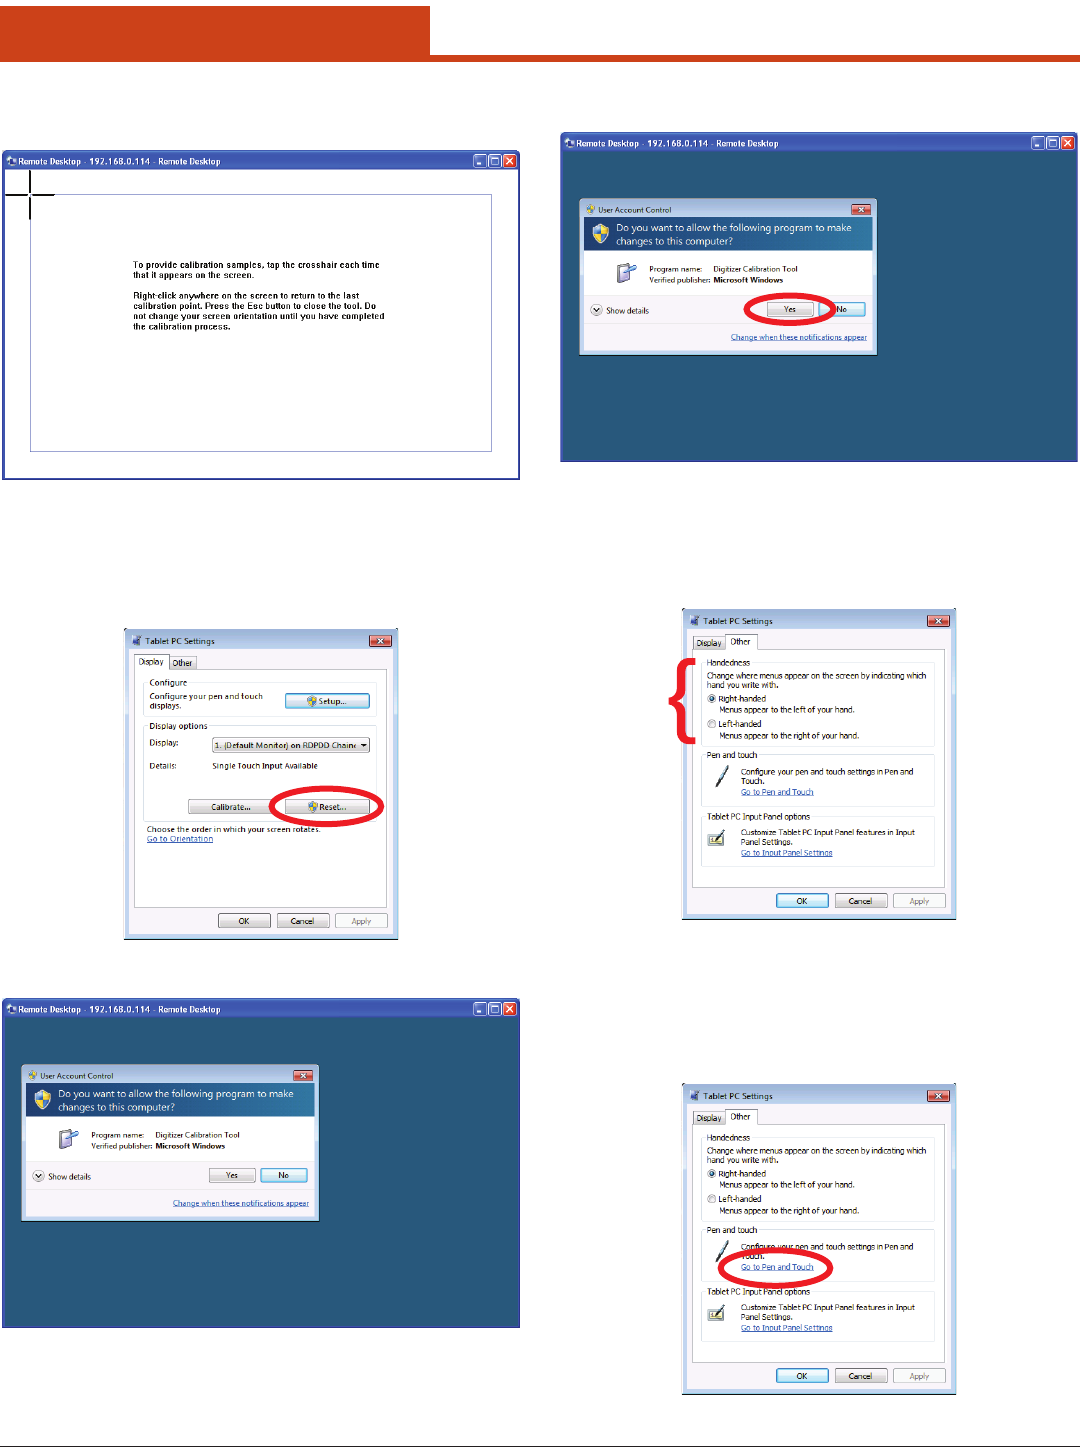
2.6.3.2 Display Tab – Calibrate
Allowsw user to calibrate the touchscreen.
1. Tap the Calibrate button.
20
2.0 Getting Started
2. Follow the onscreen instructions as shown below to complete the
screen calibration.
2.6.3.3 Display Tab – Reset
Allows the user to reset the unit’s Display Calibration to their fac-
tory settings.
1. Tap the Reset button.
2. e User Account Control window will open.
3. To reset the unit’s Display Calibration, tap the Yes button.
4. To exit the window without resetting the unit’s Display Calibra-
tion, tap the No button.
2.6.3.4 Other Tab – Handedness
Allows the user to select between right- and le-handed menus.
2.6.3.5 Other Tab – Pen and Touch
Allows the user to congure all pen and touch options. To access the
Pen and Touch window, tap the Go to Pen and Touch link. To con-
gure the pen and touch options:
1. Tap the Go to Pen and Touch link.

21
2.0 Getting Started
2. e Pen and Touch window will open.
2.6.3.5.1 Pen Options Tab – Congure Double-Tap
1. To congure Double-tap, tap the Double-tap pen action.
2. Tap the Settings button.
3. e Double-Tap Settings window will open.
4. Adjust the Speed and Spatial Tolerance settings, then tap the OK
button.
2.6.3.5.2 Pen Options Tab – Congure Press and Hold
1. To congure Press and hold, tap the Press and hold pen action.
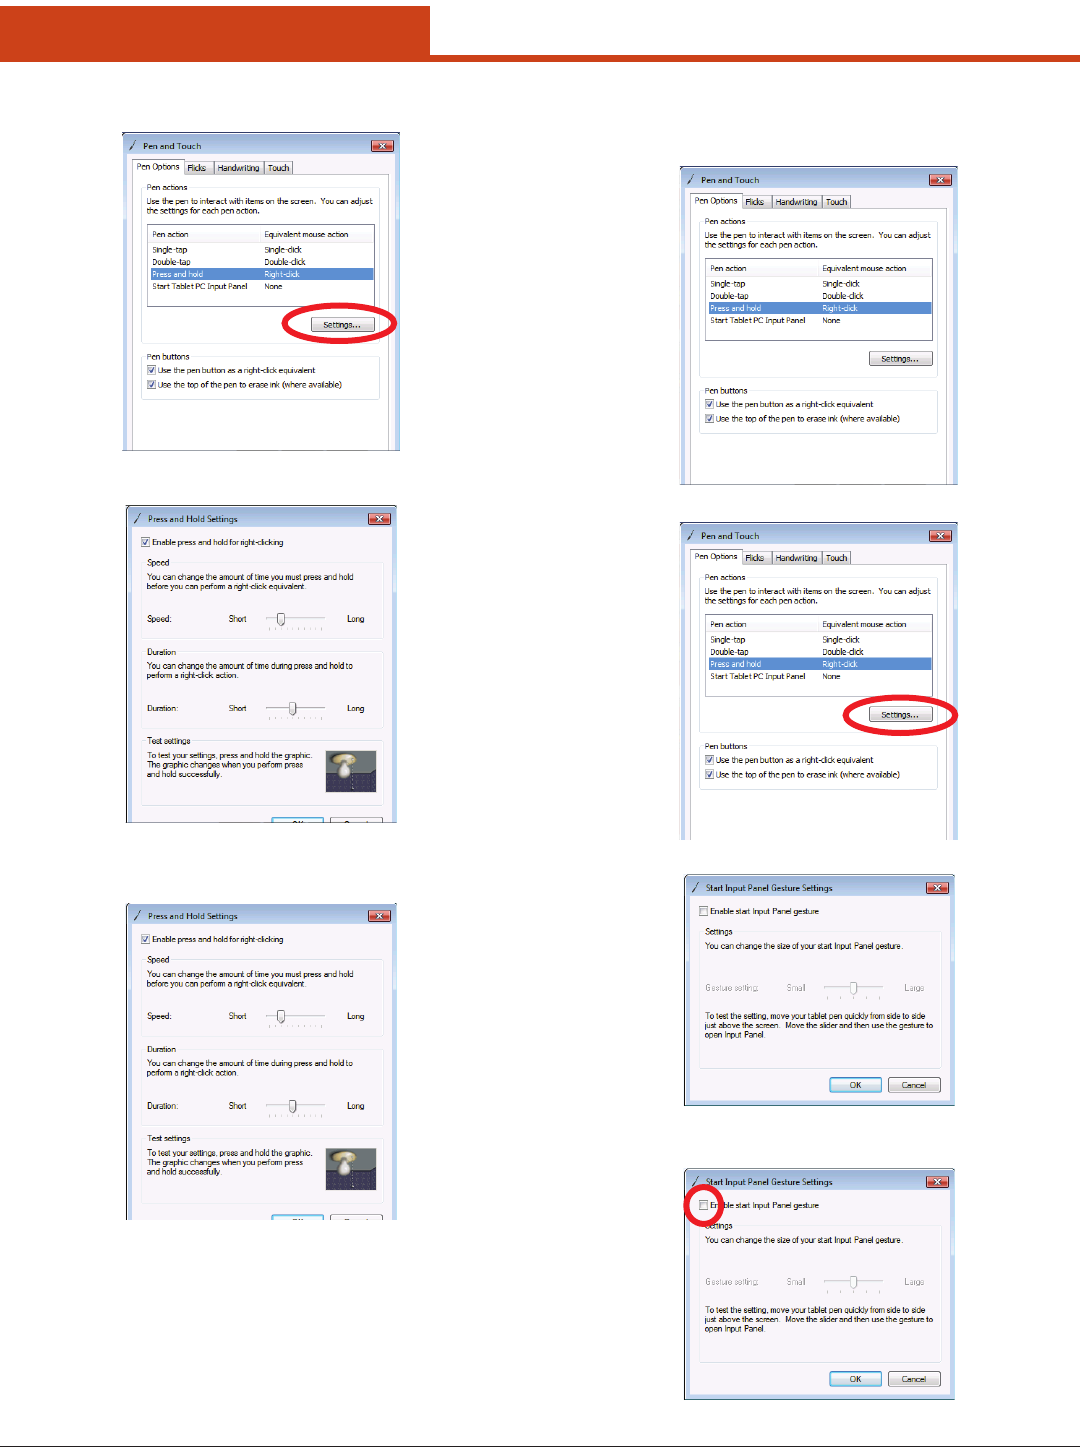
22
2.0 Getting Started
2. Tap the Settings button.
3. e
Press and Hold Settings window will open.
3. Adjust the Speed and Duration settings and test settings as shown
below, if desired.
4. Rotate the unit 90°, wait for the screen to refresh, then tap the OK
button to save the changes.
2.6.3.5.3 Pen Options Tab – Congure Start Tablet PC
Input Panel
1. To congure Double-tap, tap the Double-tap pen action.
2. Tap the Settings button.
3. e Start Input Panel Gesture Settings window will open.
3. Tap to place a checkmark in the Enable start Input Panel Ges-
ture check box.
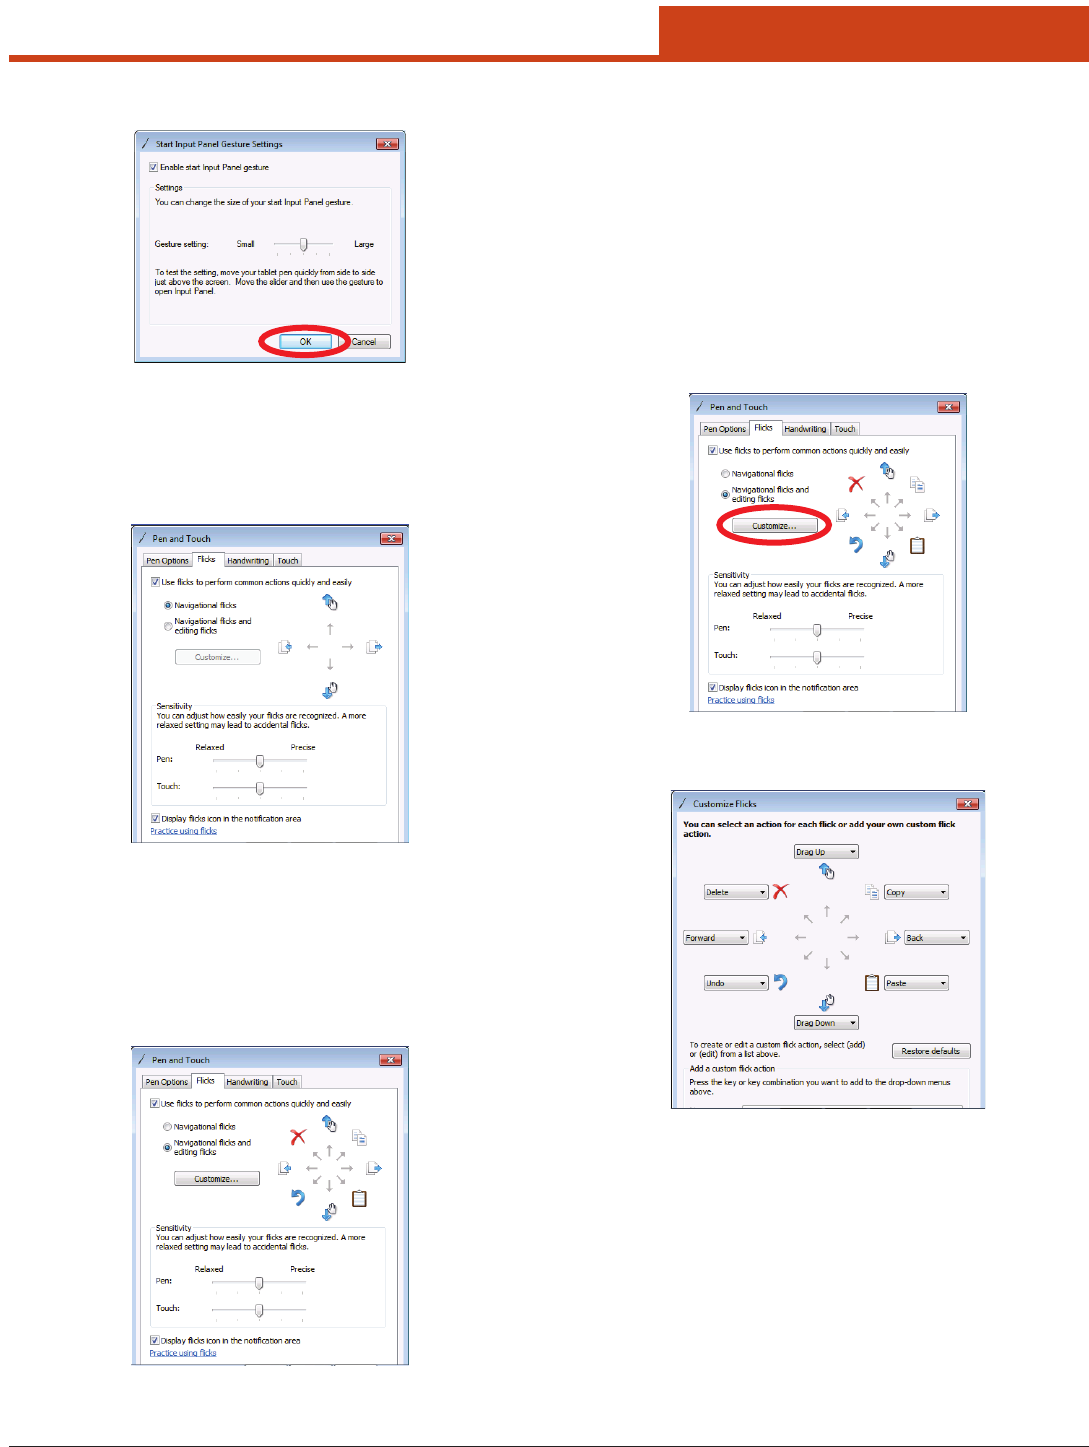
23
2.0 Getting Started
4. Adjust the Gesture Setting settings, then tap the OK button.
2.6.3.5.4 Flicks Tab – Navigational
Allowstheusertouseicksfothestylustoperformcommonactions
quickly and easily. e unit default is that this feature is active. ere
are three (3) options available:
• Navigational Flicks — includes four (4) functions:
1. Le — Forward
2. Right — Back
3. Up — Drag Up
4. Down — Drag Down
• Navigational Flicks and Editing Flicks — includes eight (8)
functions:
1. Le — Forward
2. Right — Back
3. Up — Drag Up
4. Down — Drag Down
5. Upper Le — Delete
6. Upper Right — Copy
7. Lower Right — Paste
8. Lower Le — Undo
• Customize Flicks — Allows the user to rearrange or customize ad-
ditional functions if the default functions are not desired.
1. Tap the Customize button.
2. Select the desired functions from each drop-down menu to assign
customfunctionstoeachickdirection.
3. Rotate the unit 90°, wait for the screen to refresh, then tap the OK
button.
2.6.3.5.5 Flicks Tab – Sensitivity
Allowstheusertoadjustthesensitivityofthestylusicks.Adjustthe
sliders, then rotate the unit 90°, wait for the screen to refresh, then tap
the OK button to save the changes.
24
2.0 Getting Started
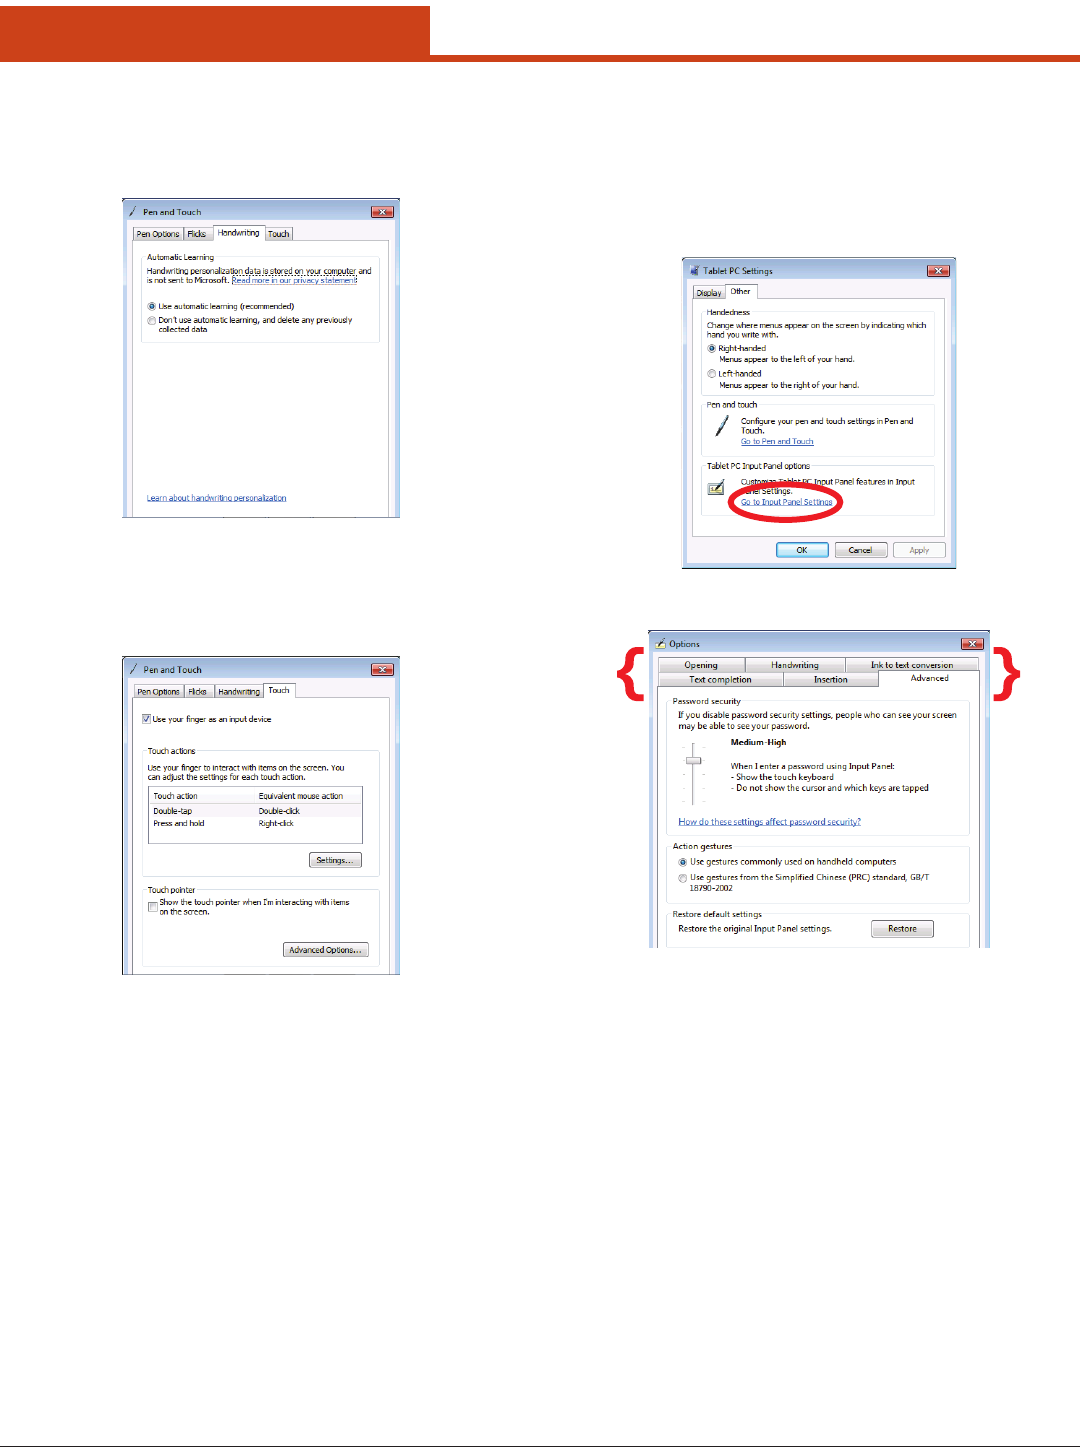
2.6.3.5.6 Handwriting Tab
Allows the user to choose whether to use Automatic Learning or
not. For more information, tap the Learn about handwriting per-
sonalization link at the bottom of the window.
To save the changes, rotate the unit 90°, wait for the screen to refresh,
then tap the OK button.
2.6.3.5.7 Touch Tab
Allows the user to activate the use of a nger as an input device.
See section 2.6.3.5.1 for instructions on setting the Double-Tap ac-
tion. See Section 2.6.3.5.2 for instructions on setting the Press and
Hold action.
Tap the Advanced Options button for additional features for the
Touch Pointer.
To save the changes, rotate the unit 90°, wait for the screen to refresh,
then tap the OK button.
2.6.3.6 Other Tab – Go to Input Panel Settings
Allows the user to congure the Input Panel Settings. ese settings in-
clude Handwriting options, Ink to text conversion options, Text
completion options, Insertion options, and Advanced options.
To congure these settings:
1. Tap the Go to Input Panel Settings link.
2. Tap the tab of the topic to be congured.
3. Make adjustments as desired.
4. Rotate the unit 90°, wait for the screen to refresh, then tap the OK
button to save the changes.
25
2.0 Getting Started
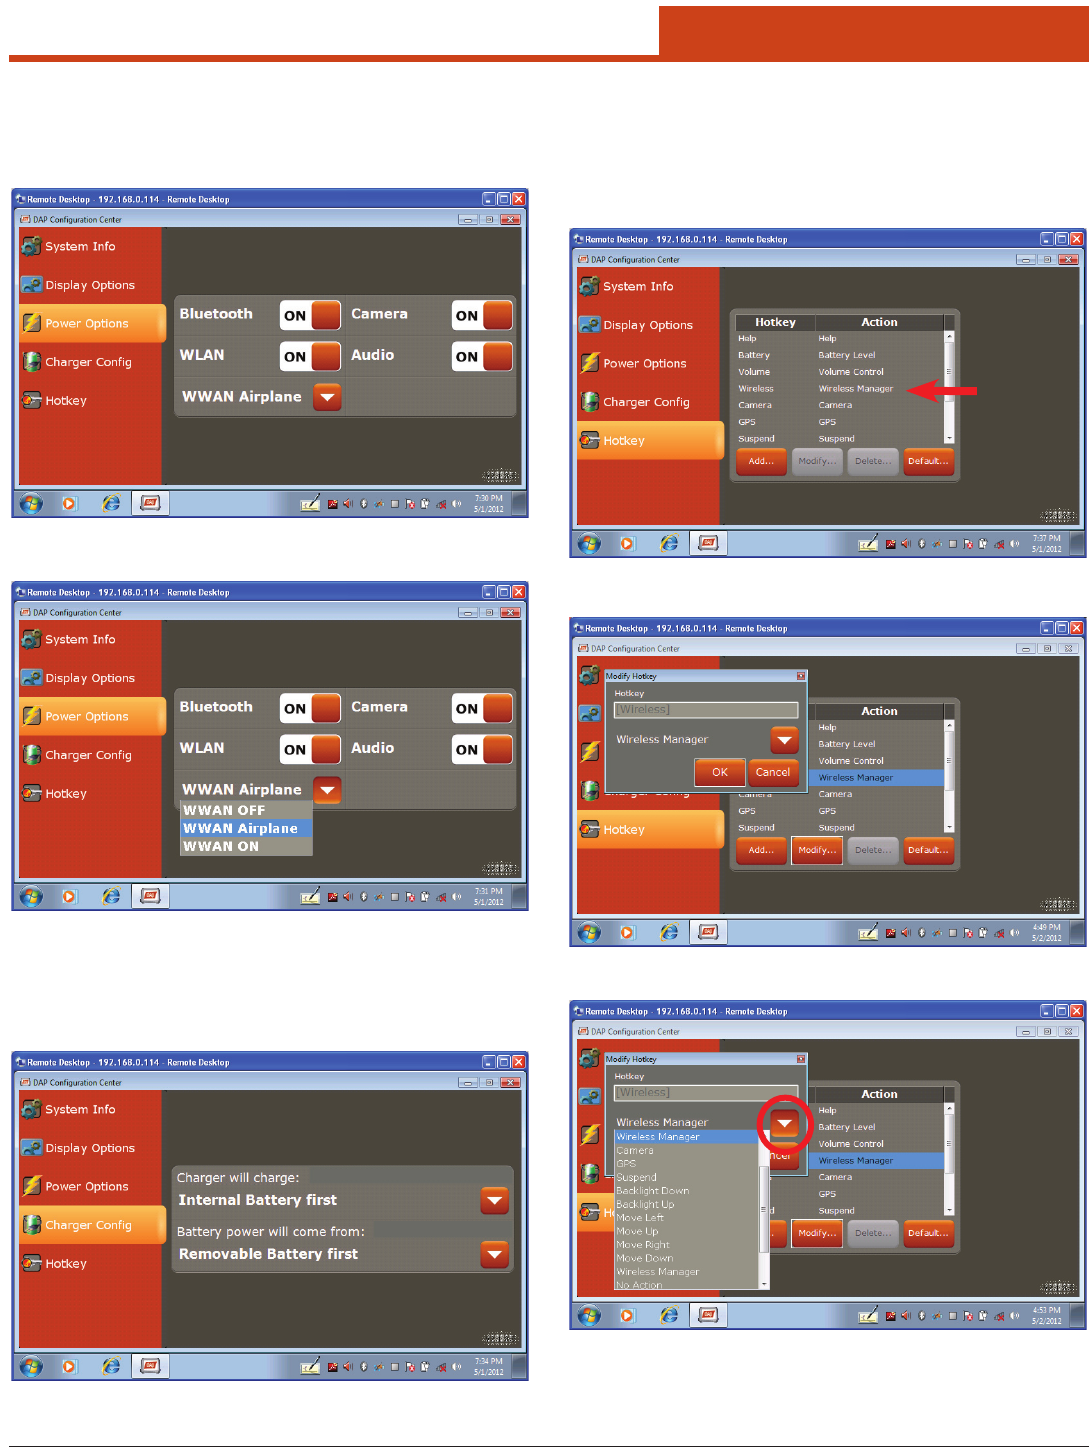
2.6.4 Power Options
Allows the user to turn each of the powered components of the unit O
or On.
Also allows the user to set the WWAN to Off, Airplane, or On:
2.6.5 Charger Cong
Allows the user to change the order of the battery order for charging and
and the battery order for usage.
2.6.6 Hotkey
Allows the user to modify, add, or delete Hotkeys.
To activate the Modify or Delete a Hotkey:
1. Tap a Hotkey.
2. Tap the Modify button and the Modify Hotkey window will open.
3. Tap the Down Arrow to select a new function for the key selected.
4. Tap the OK button to save the change.
5. Follow the steps 2–4 above, but tapping the Add button to add a new
Hotkey.
26
2.0 Getting Started
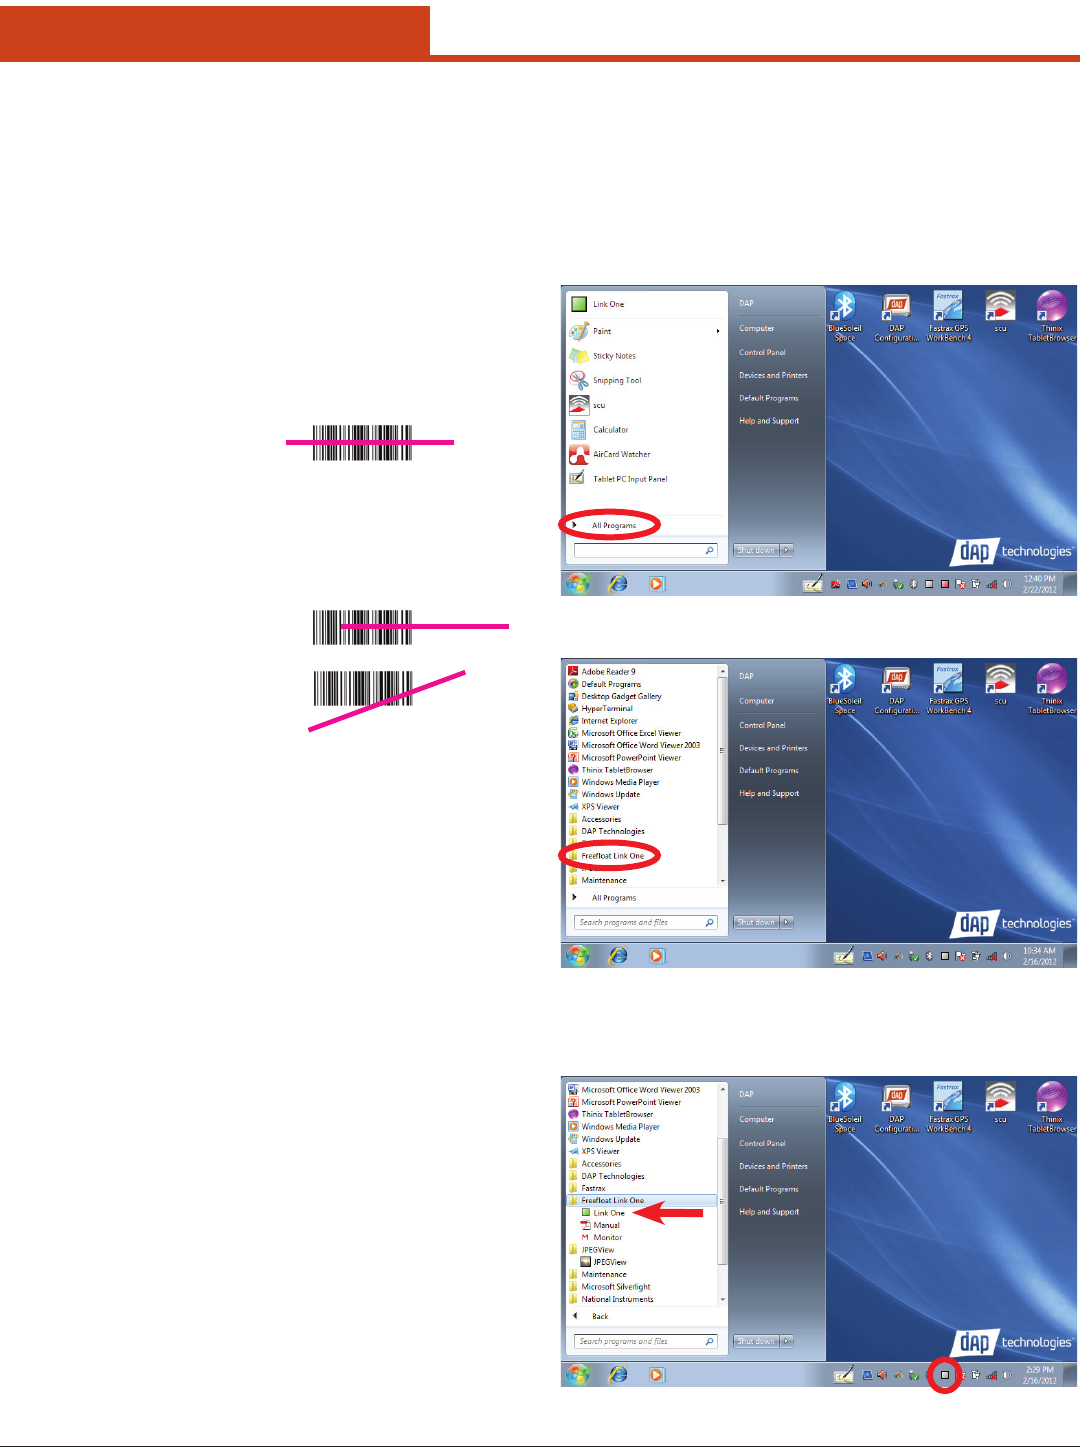
2.9 Setting Up Link One for Read-
ing 1D Laser Barcodes
To use the scanning function, complete the following steps:
1. If not already removed, remove the protective plastic lm from the
barcode reader.
2. Navigate to: Start Menu > All Programs
2. Tap on the Freeoat Link One folder.
3. Double-tap on the Link One icon. If Link*One is already active, a
small square will be located in the Task Bar at the bottom of the
window.
2.7 Setting Up Wireless LAN
e Summit Client Utility (SCU) is an application designed for end us-
ers and administrators of mobile devices that use a Summit radio mod-
ule. For more information about or to initialize SCU, see 6.0 Summit
Client Utility.
2.8 Using the 1D Barcode Scanner
1. Launch the data capture application.
2. Aim the 1D Barcode Scanner at the barcode.
3. Press the trigger and the laser reader will activate.
4. Pass the laser reader over the bar code as shown as Correct Scan
below:
5. When the laser reader accepts the code, a tone will sound, the reader
will deactivate, and the data will appear in the target window of the
application.
6. If the scan is performed incorrectly, as shown below:
or the bar code is otherwise unreadable by the scanner, the laser read-
er will remain active for 10 seconds and no tone will sound. At 10
seconds, the laser scanner automatically deactivates and no data will
have been accepted or entered.
Correct Scan:
Incorrect Scans:
27
2.0 Getting Started
2.9.3 Settings Button
1. Tap the Settings button.
6. e Settings window will open.
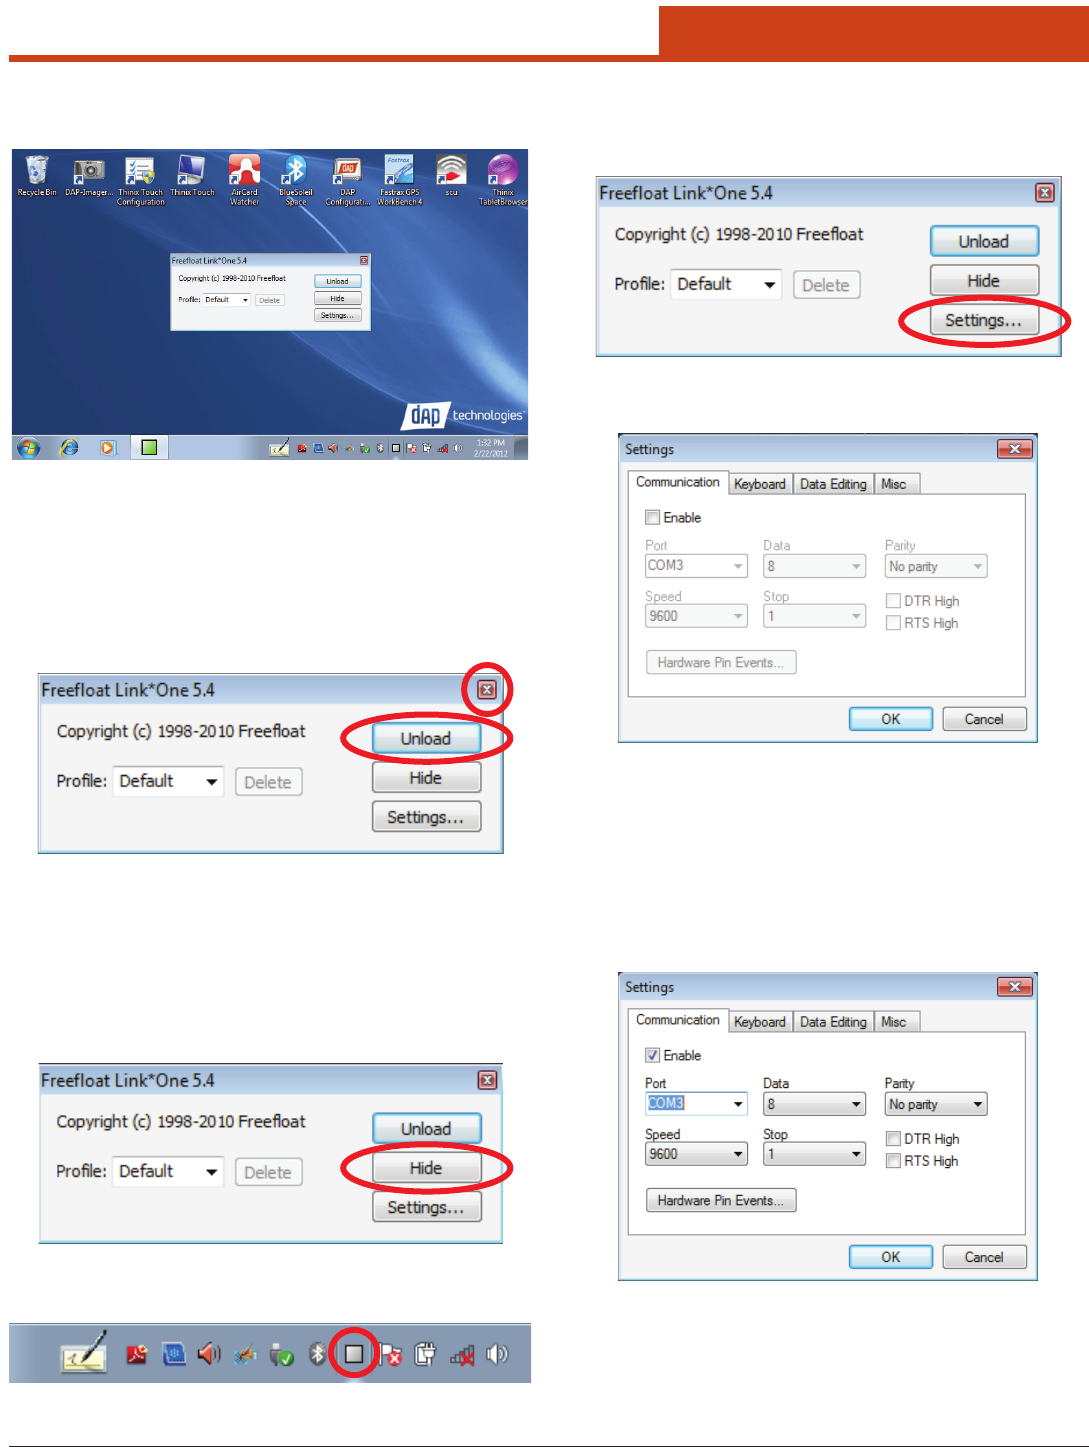
2.9.4 Settings Window
e main window allows the user to control Link*One by modifying
the settings, setting proles, and hiding or unloading the application.
2.9.4.1 Communication Tab
e Communication tab allows the user to select the communication
settings for the unit. e Port, Speed, Data, Stop, and Parity are the set-
tings for the serial port for Link*One to open and use.
4. e application will launch and the Freeoat Link One main win-
dow will open.
NOTE: e main window allows the user to control Link*One by mod-
ifying the settings, setting proles, and hiding or unloading the
application.
2.9.1 Unload Button
1. Tapping Unload quits the Link One application. Please note that
tapping the red X only minimizes the window to the task bar.
2. To check whether the application is running when the main window
is closed, look for the grey box in the task bar. is indicates that
Link One is active.
2.9.2 Hide Button
Tapping the Hide button closes the window and minimizes it to the
task bar.
Please note that tapping the red X also minimizes the window to the
task bar.
28
2.0 Getting Started
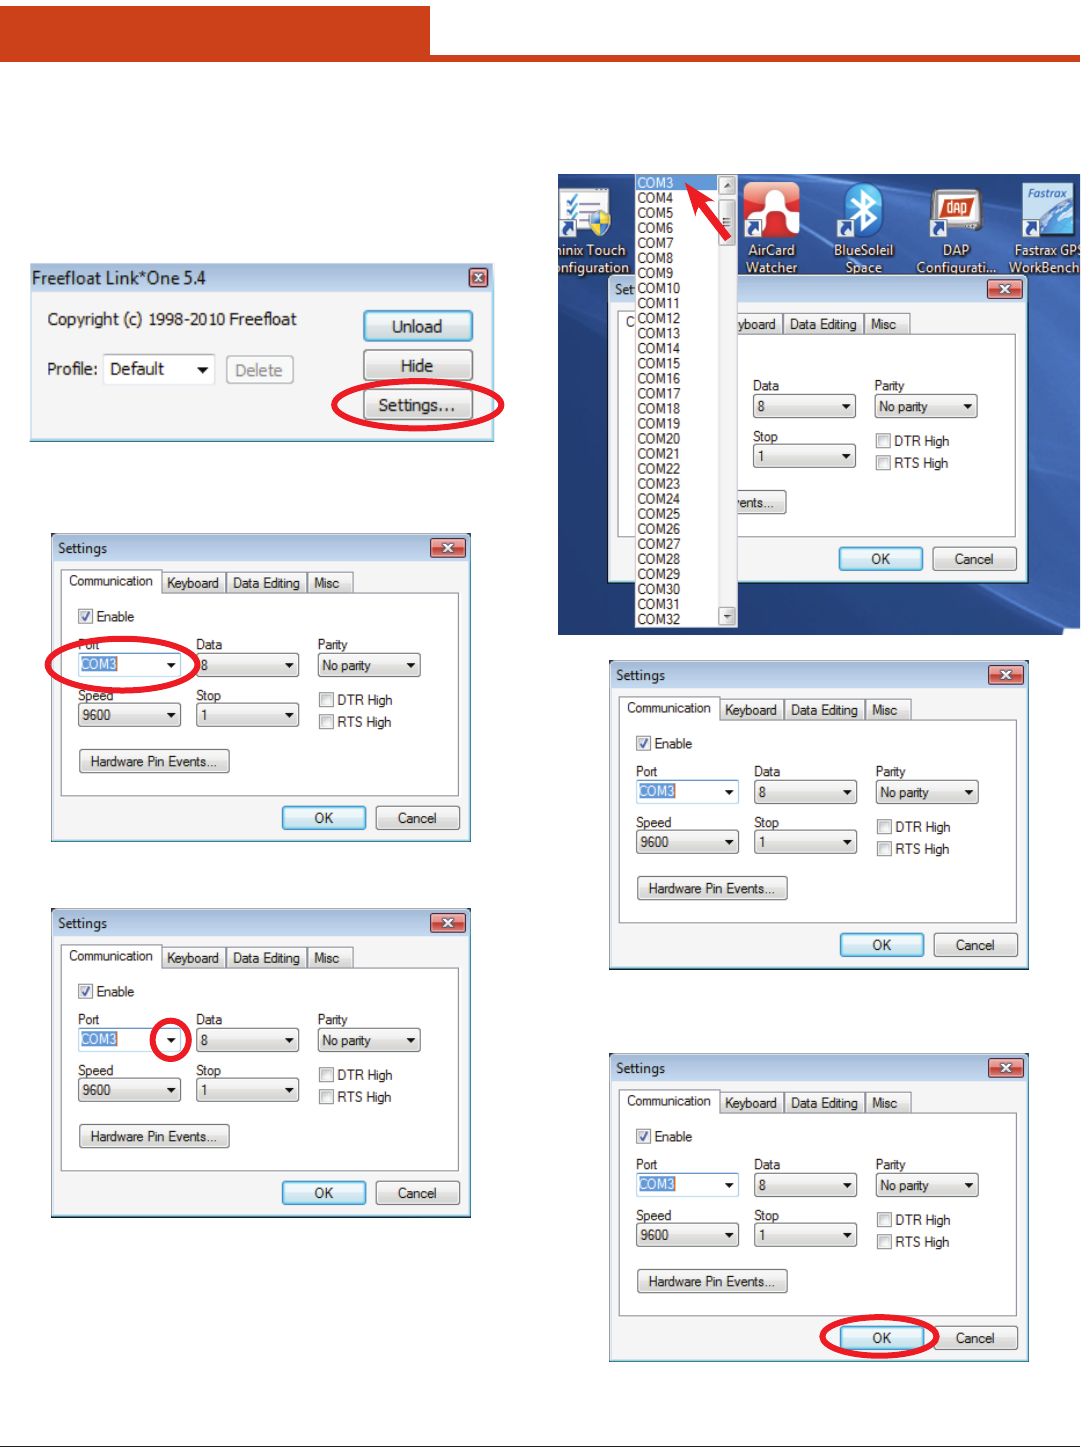
2.9.4.1.1 Port
Allows user to select the COM port for the unit. e ports COM1 to
COM256 are supported. If the user has a serial port that has a special
name, for example BSP2:, that name can be entered in the Port box.
Change a COM Port Name
1. Tap the Settings button to open the Link*One Settings window.
2. e Settings window will open. Note that the current COM setting is
highlighted when the Settings window opens.
2. Tap the Port box down arrow.
3. e COM Port number list will appear.
4. Tap the name of the desired COM Port number to select it and ther
Port COM list will close.
5. Tap the OK button to save the new setting and close the Settings
window.
29
2.0 Getting Started
Enter a Custom COM Port Name
1. Tap the Settings button to open the Link*One Settings window.
2. e Settings window will open. Note that the current COM setting is
highlighted when the Settings window opens.
3. Type the name of the custom COM port in the Port box.
4. Tap the OK button and the custom COM port name will be saved.
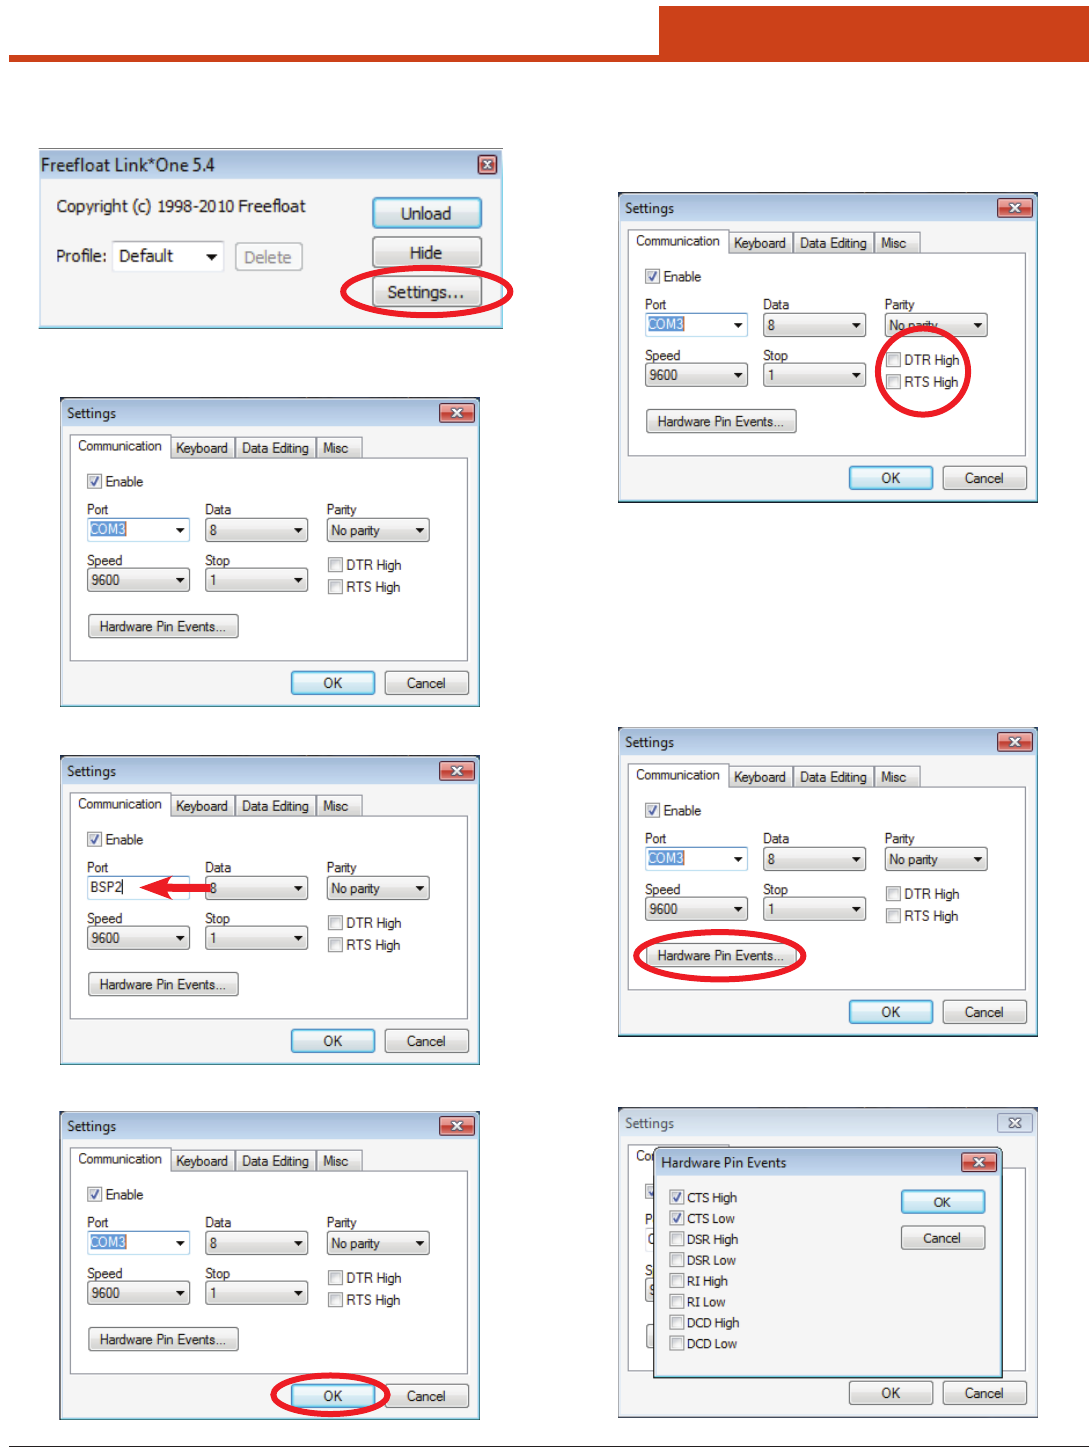
2.9.4.1.2 DTR High / RTS High
When DTR High or RTS High is checked, the corresponding handshake
signal of the serial port will be set. Some serial devices require these to
be set to enable communication.
NOTE: e DTR and RTS handshake signal can be controlled dynami-
cally from a script.
2.9.4.1.3 Hardware Pin Events
In a serial port there are four incoming signals called CTS, DSR, RI,
and DCD. Link*One can be set up to monitor these signals and generate
an event when a signal is changed. An event can be generated when the
signal goes high and/or when it goes low.
1. Tap the Hardware Pin Events button.
2. Place check marks next to the signals to be monitired by tapping
with the Stylus.
30
2.0 Getting Started
3. When nished, tap the OK button to apply the changes.
If the event is enabled in this dialog, a corresponding method in the
script will be called. e default implementations of these methods send
the signal name and its status (high or low):
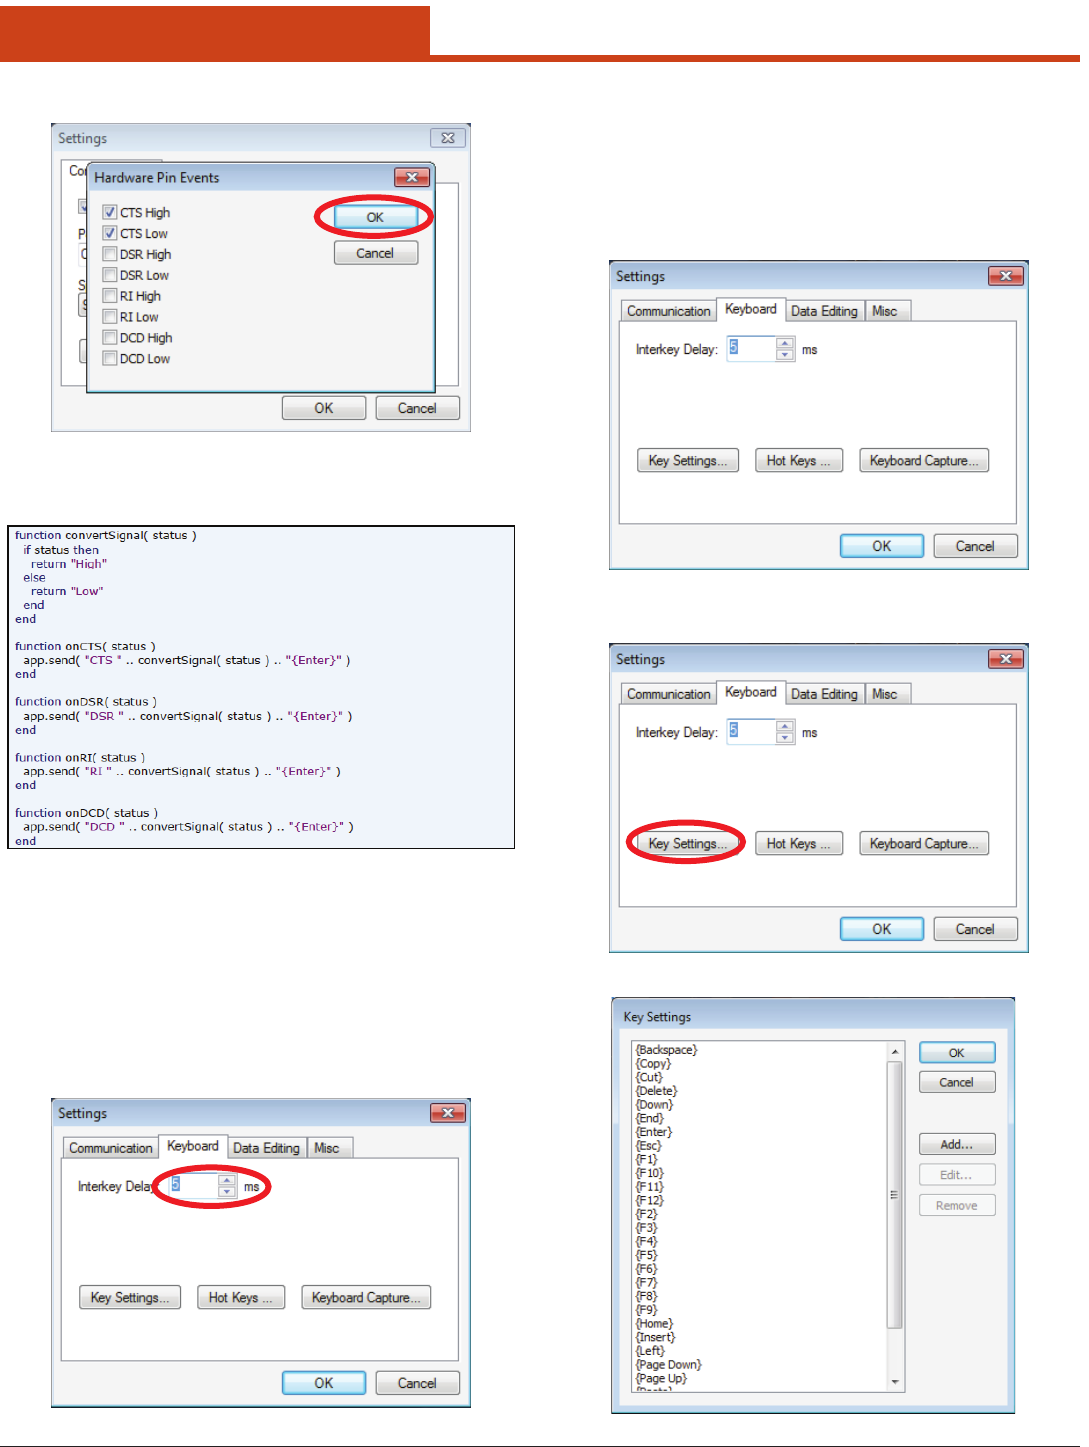
2.9.4.2 Keyboard Tab
Allows the user to customize keyboard settings.
2.9.4.2.1 Interkey Delay
e Interkey Delay species the delay to be used between each key press
when simulating keyboard data in an application. For example, Micro-
so’s Terminal Services client in full screen mode loses key presses if
this is set to zero. is is a global delay. A recorded key sequence may
contain additional delays between key presses.
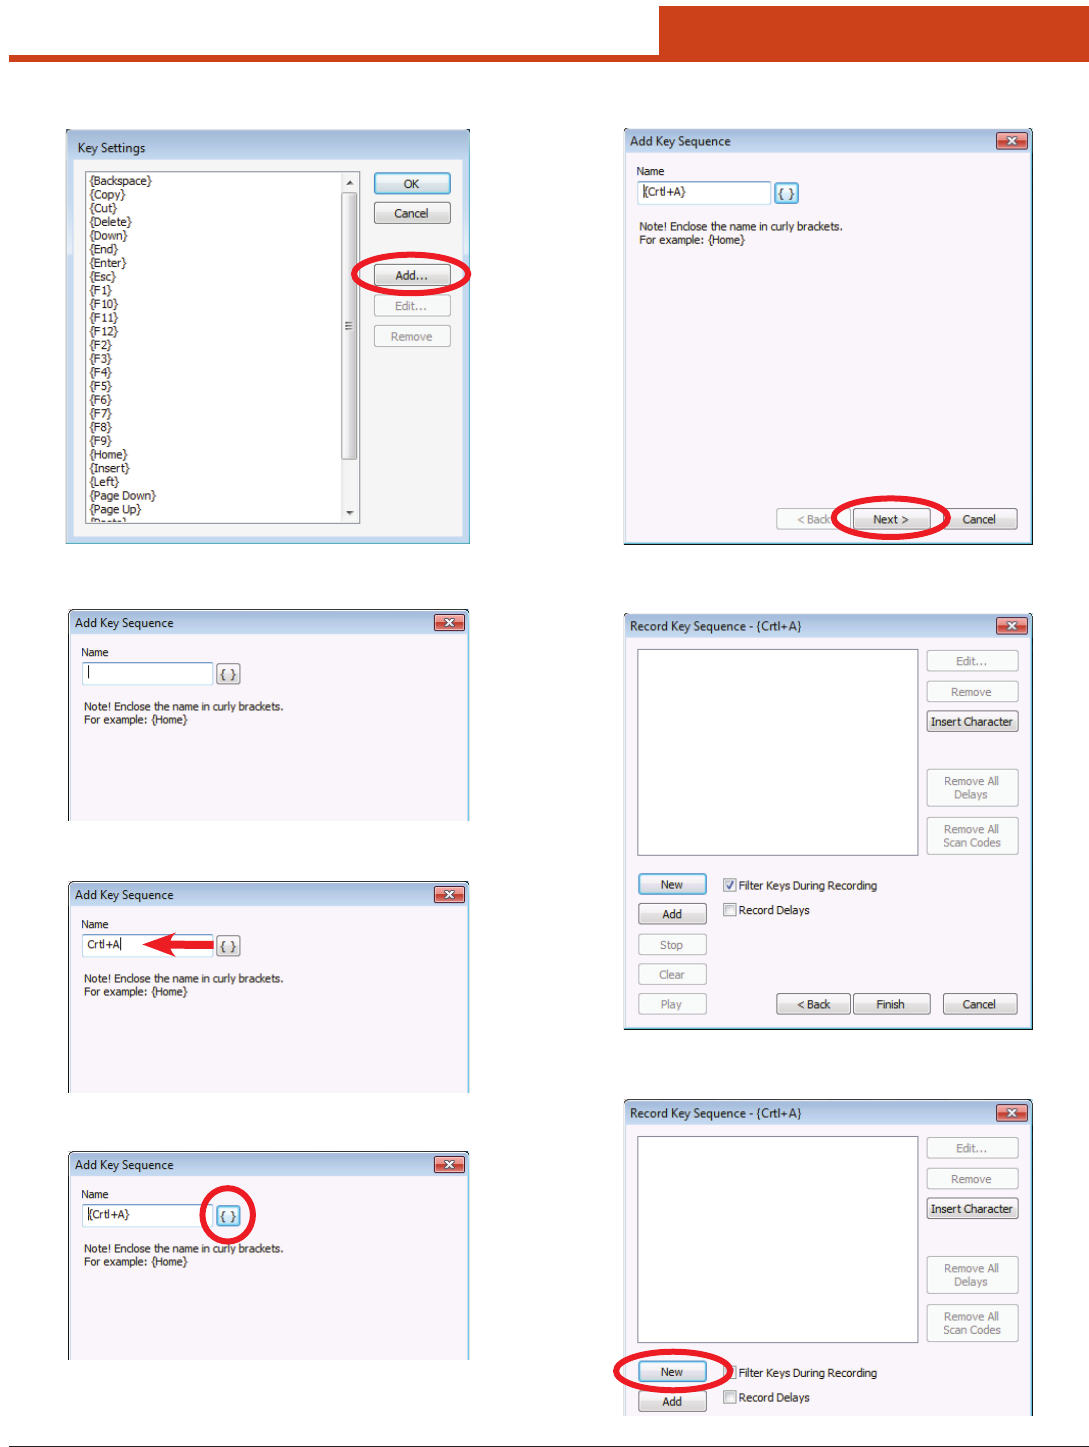
2.9.4.2.2 Key Settings
Allows the user to specify key denitions for the keyboard. A key de-
nition is a named key sequence. Key denitions are referred to in an ex-
pression passed to the app.send() method which replays the key presses
recorded in the key denition. By default, Link*One denes many of
the standard keys on the keyboard. A key denition can be added, ed-
ited, and removed.
To set a key denition:
1. Tap the Key Settings button.
2. e Key Settings window will appear.
31
2.0 Getting Started
3. To add a key sequence—for example, Ctrl+A—click the Add button.
4. e Add Key Sequence window will open.
5. Enter Ctrl+A in the Name box.
6. Tap the curly brackets button to enclose the the key sequence.
NOTE: All key names must be enclosed in curly brackets.
7. Tap the Next button.
8. e Recorded Key Sequence window will open.
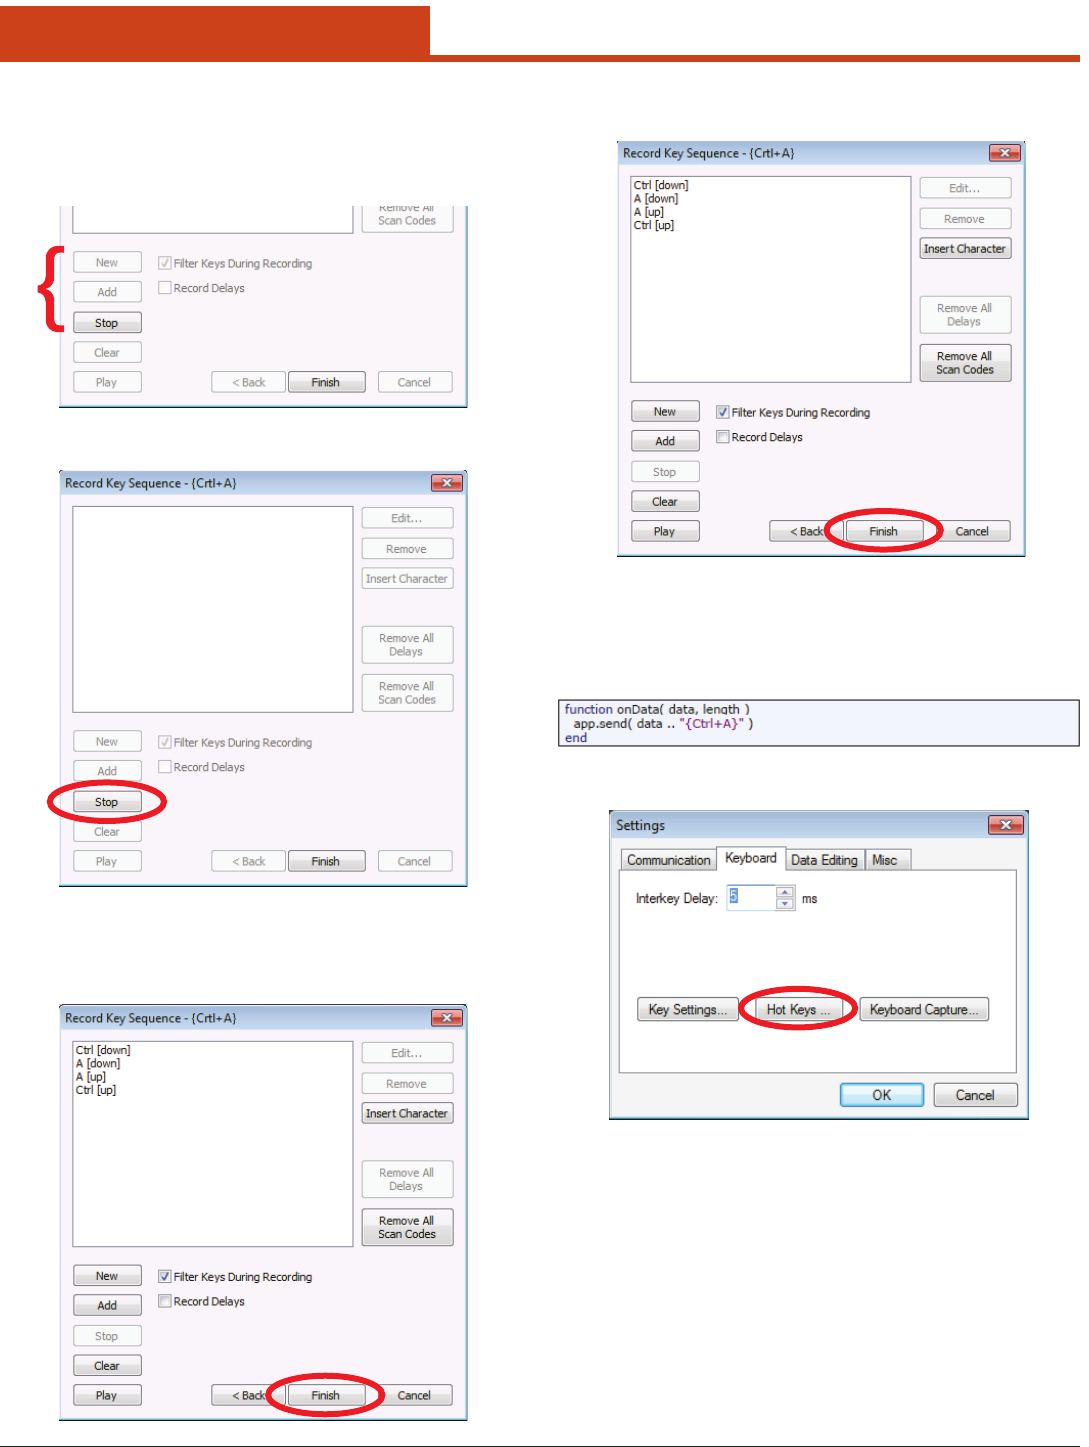
9. Tap the New button to record the key sequence.
32
2.0 Getting Started
9. Immediately hold down the Ctrl key and press the A key. Release
both keys and the sequence will be held in memory.
10. e New and Add buttons dim while the Stop button becomes
active.
11. Tap the Stop button.
12. e key recording will stop and the Record Key Sequence win-
dow dialog box will show the key strokes for the Ctrl+A action.
13. Tap the Finish button to complete the key denition and save it.
Key denitions are used with the method app.send() from a script. For
example:
For more information about app.send(), see Link*One Scripting.
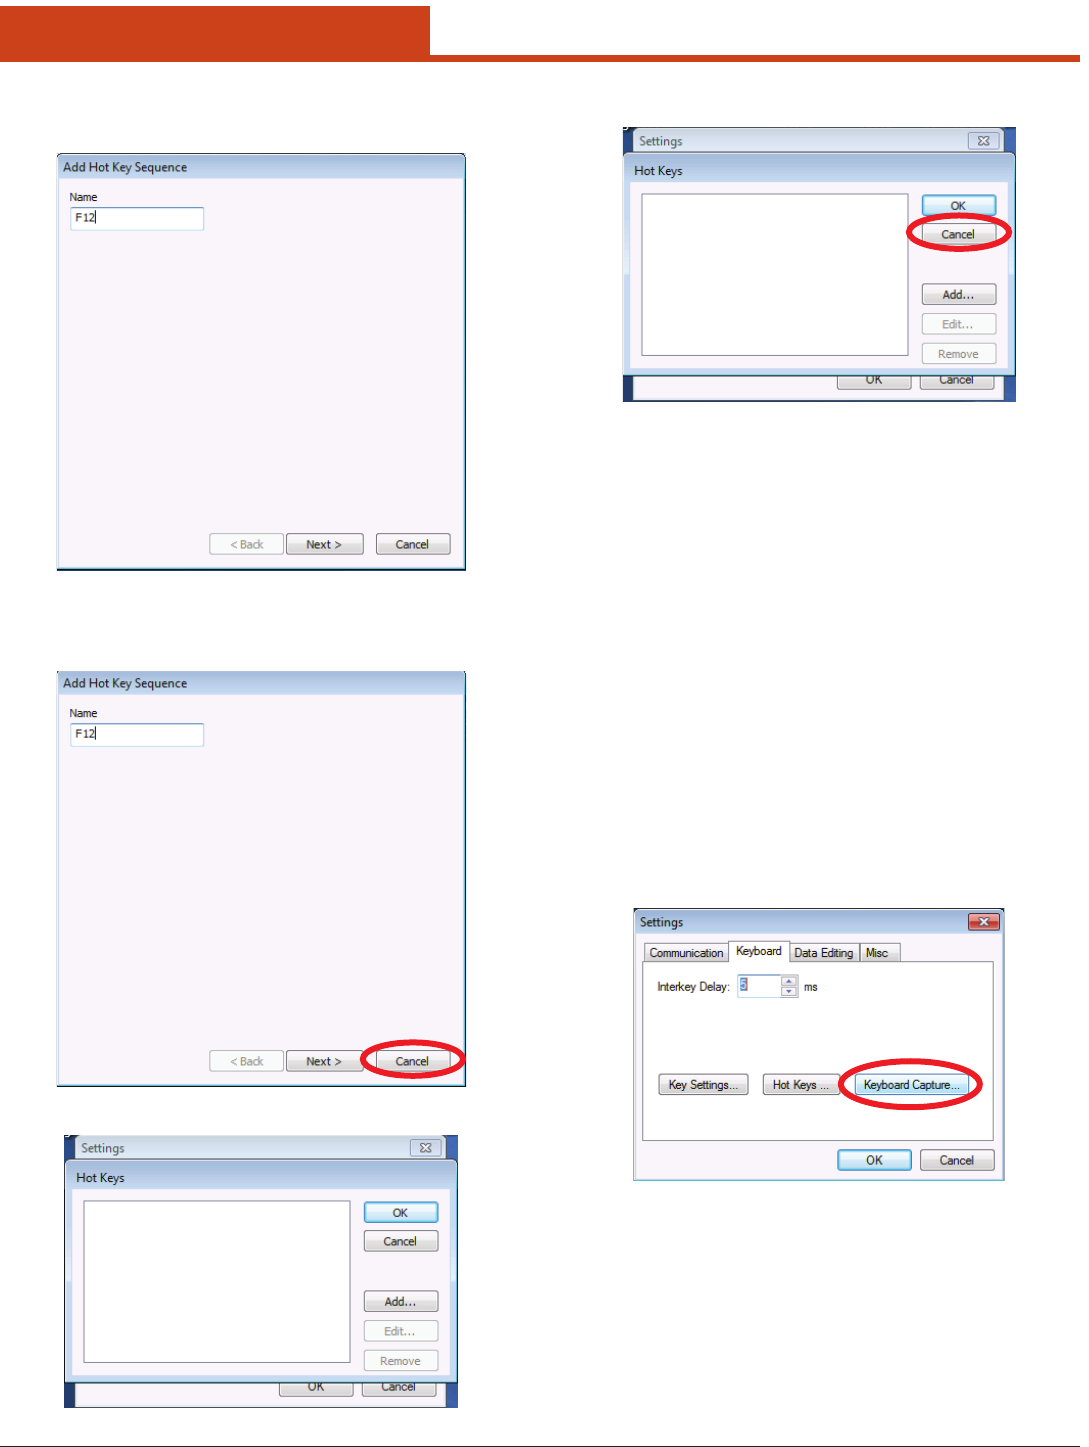
2.9.4.2.3 Hot Keys
A hot key is a key sequence that when pressed causes the script method
onHotKey() to be called.
1. Tap the Hot Keys button.
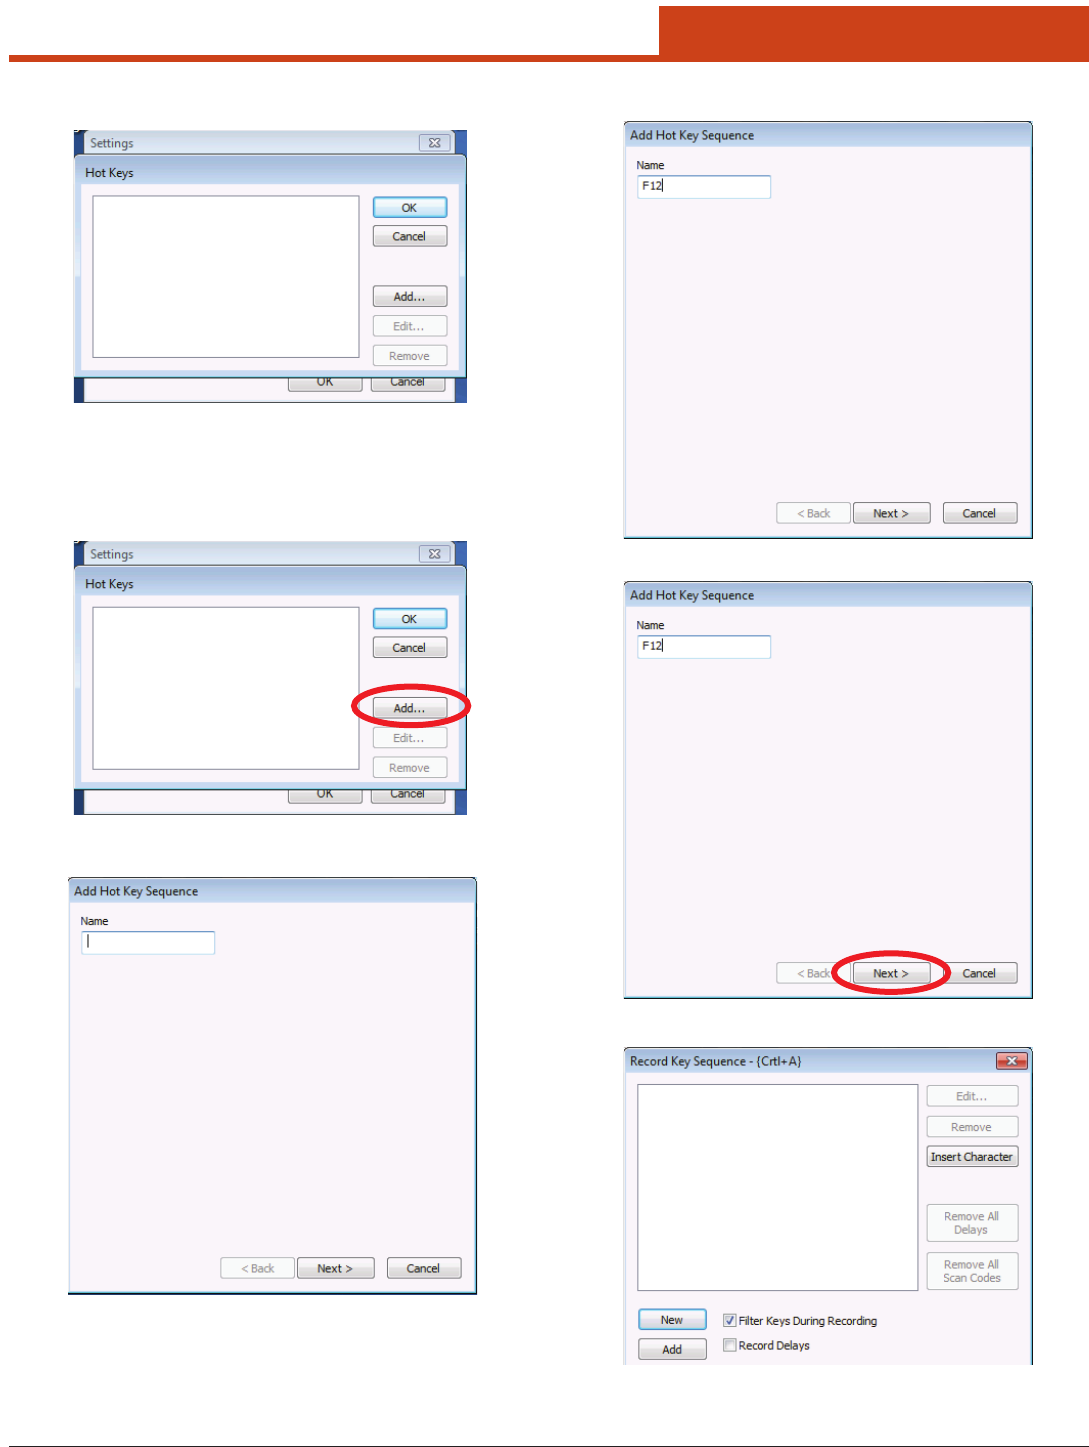
33
2.0 Getting Started
2. e Hot Keys window will open.
NOTE: By default, Link*One does not contain any hot key denitions.
In the above dialog you can add, edit and remove hot keys.
To Add a Hot Key
3. Tap on the Add button.
4. e Add Hot Key Sequence window will open.
5. Enter a name for the hot key in the Name box (example is F12).
6. Tap the Next button.
7. e Recorded Key Sequence window will open.
34
2.0 Getting Started
8. Tap the New button to record the key sequence.
9. Immediately press and release the F12 key, and the sequence will be
held in memory.
10. e New and Add buttons will dim while the Stop button be-
comes active.
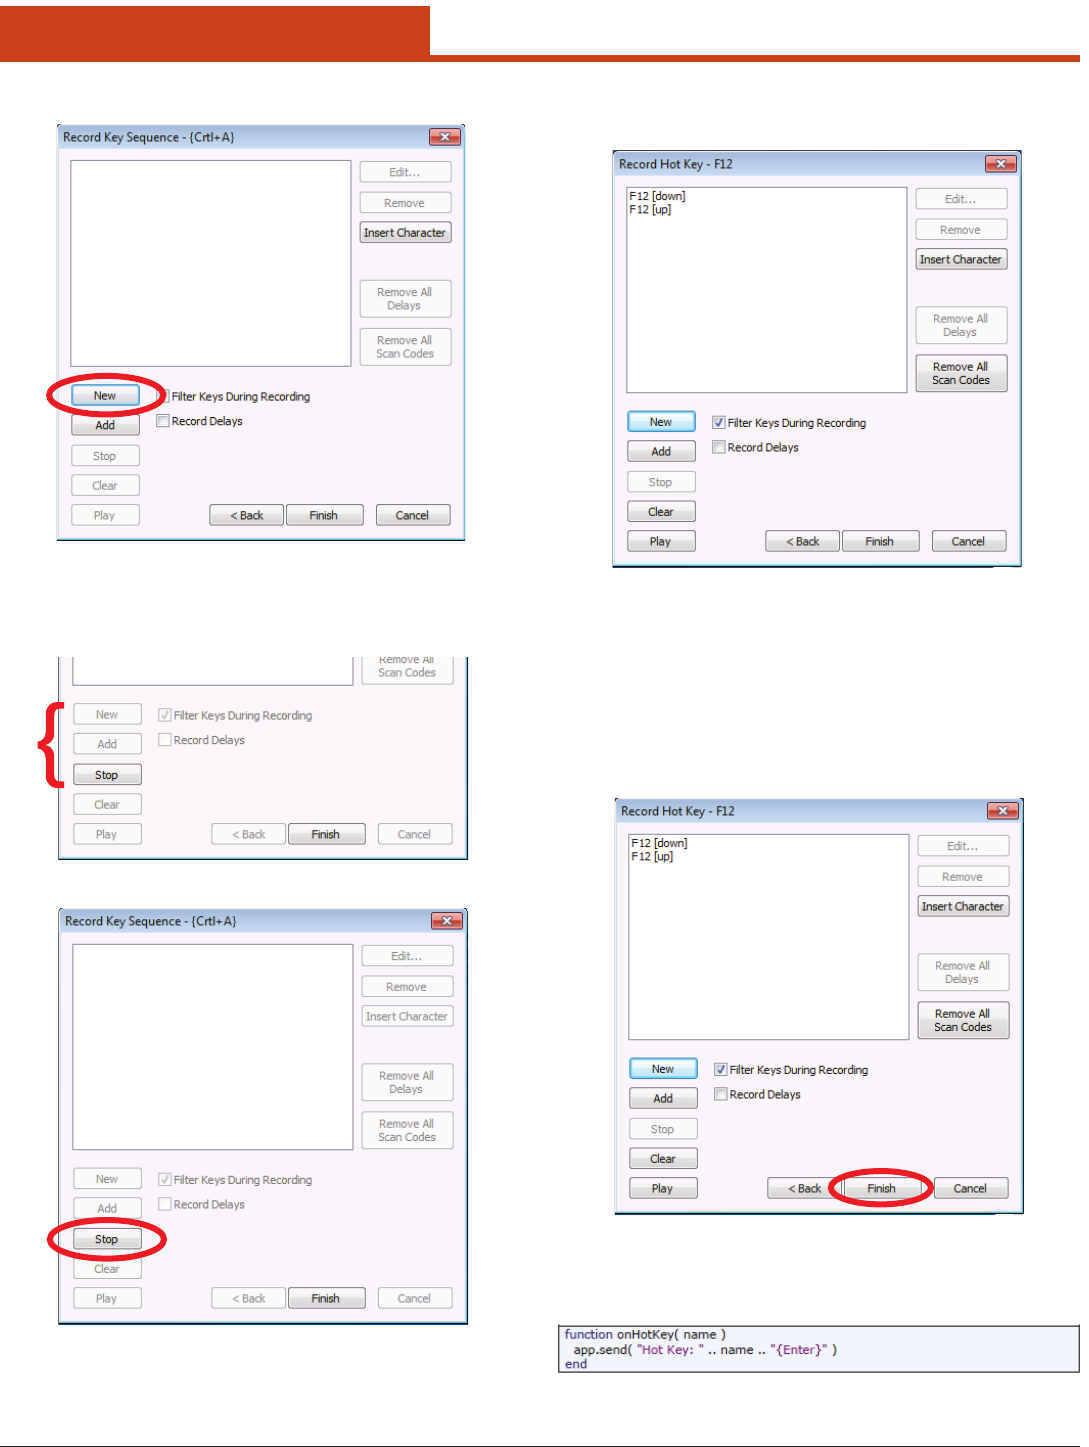
11. Tap the Stop button.
12. e key recording will stop and the Record Key Sequence win-
dow dialog box will show the key strokes for the F12 action.
NOTE: e hot key sequence above consists of both the F12 down
event and the F12 up event. You can remove the up event from
the key sequence to make the hot key feel more responsive but
remember that, if you do so, the F12 up event will be passed to
the application. is is not a problem because most application
reacts to key presses on the down event but it may cause prob-
lems in some special circumstances.
13. Tap the Finish button to complete the key denition and save it.
NOTE: A hot key sequence is global in Windows. In the above case, F12
is ltered out from all applications while Link*One is running.
e default implementation of the onHotKey() method looks like this:
It simply enters “Hot Key: <hot key name>”. Of course, hot keys can be
made to do more useful things.
35
2.0 Getting Started
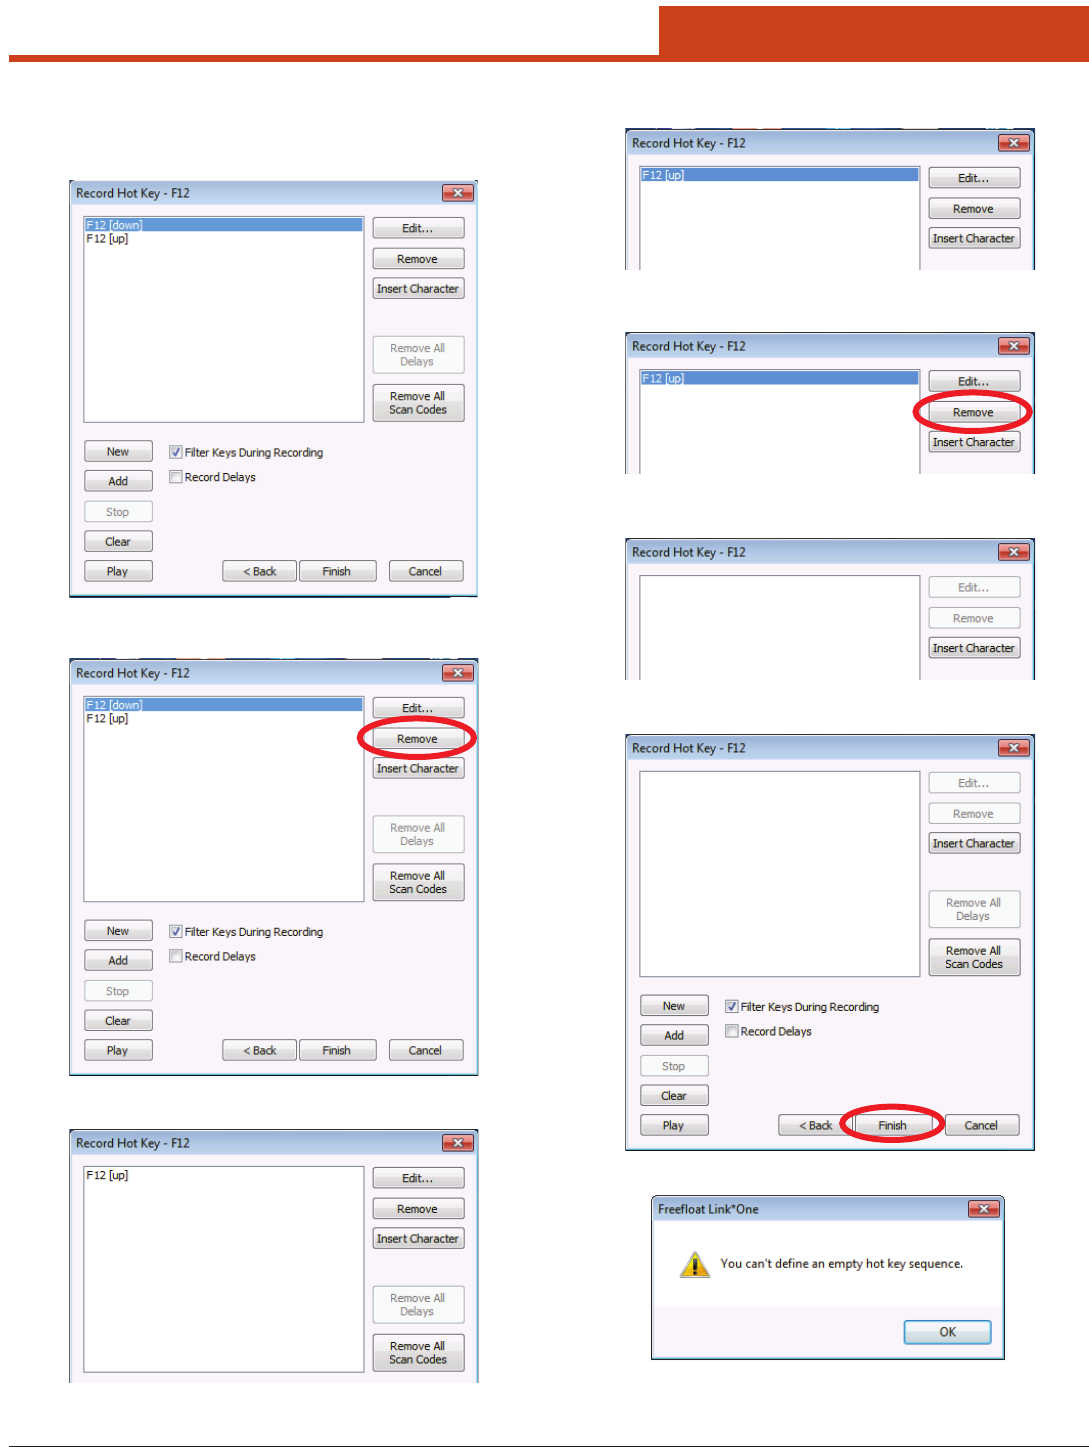
To Delete a Hot Key
1. Tap on a Hot Key sequence component to be deleted. In this ex-
ample, tap on F12[down] to highlight it.
2. Tap the Remove button.
3. F12[down] is removed.
4. Tap on F12[up] to highlight it.
5. Tap the Remove button.
6. e Record Hot Key window dialog box shall be empty.
7. Tap the Finish button to complete the Hot Key deletion.
8. e following warning will appear:
9. Tap OK and the warning will disappear.
36
2.0 Getting Started
10. e Add Hot Key window will reappear with the F12 text still in
the Name box.
11. Tap the Cancel button and the Add Hot Key Sequence window
will close. e F12 text will also disappear from the Add Hot Key
Sequence window’s Name box.
12. e Add Hot Key Sequence window will close.
13. Tap the Cancel button to close the Hot Keys window.
14. e F12 sequence is now removed from the Hot Keys list.
2.9.4.2.4 Keyboard Capture — External USB Device
Allows the unit to capture data strings from an external USB-HID de-
vice.
A keyboard capture consists of a name, a prex key sequence, and a
sux key sequence. It is used to capture data strings from a USB-HID
device (for example a USB connected barcode scanner).
For this to work, the USB device needs to be congured to send (1) a spe-
cial key sequence before the data string and (2) a key sequence that ter-
minates the data string. Please note that the prex sequence should be
chosen with care. All the keys in the keyboard capture’s prex sequence
will be ltered from regular keyboard input until a mismatch is found.
When a data string is captured by a keyboard capture, the script method
onKeyboardCapture() is called.
To perform a keyboard capture:
1. Attach a USB-HID device and plug it in.
2. Turn the USB-HID device on.
3. Tap the Keyboard Capture button.
37
2.0 Getting Started
4. e Keyboard Captures window will open.
NOTE: By default, Link*One does not contain any keyboard captures.
In the above dialog box, you can add, edit, and remove key-
board captures.
3. click on the Add button.
4. e Add Keyboard Capture window will open.
5. As an example, the name of a USB device is entered into the Name
box to begin the keyboard capture denition for that device.
6. Tap the Next button.
7. e
Record Keyboard Capture window will open.
38
2.0 Getting Started
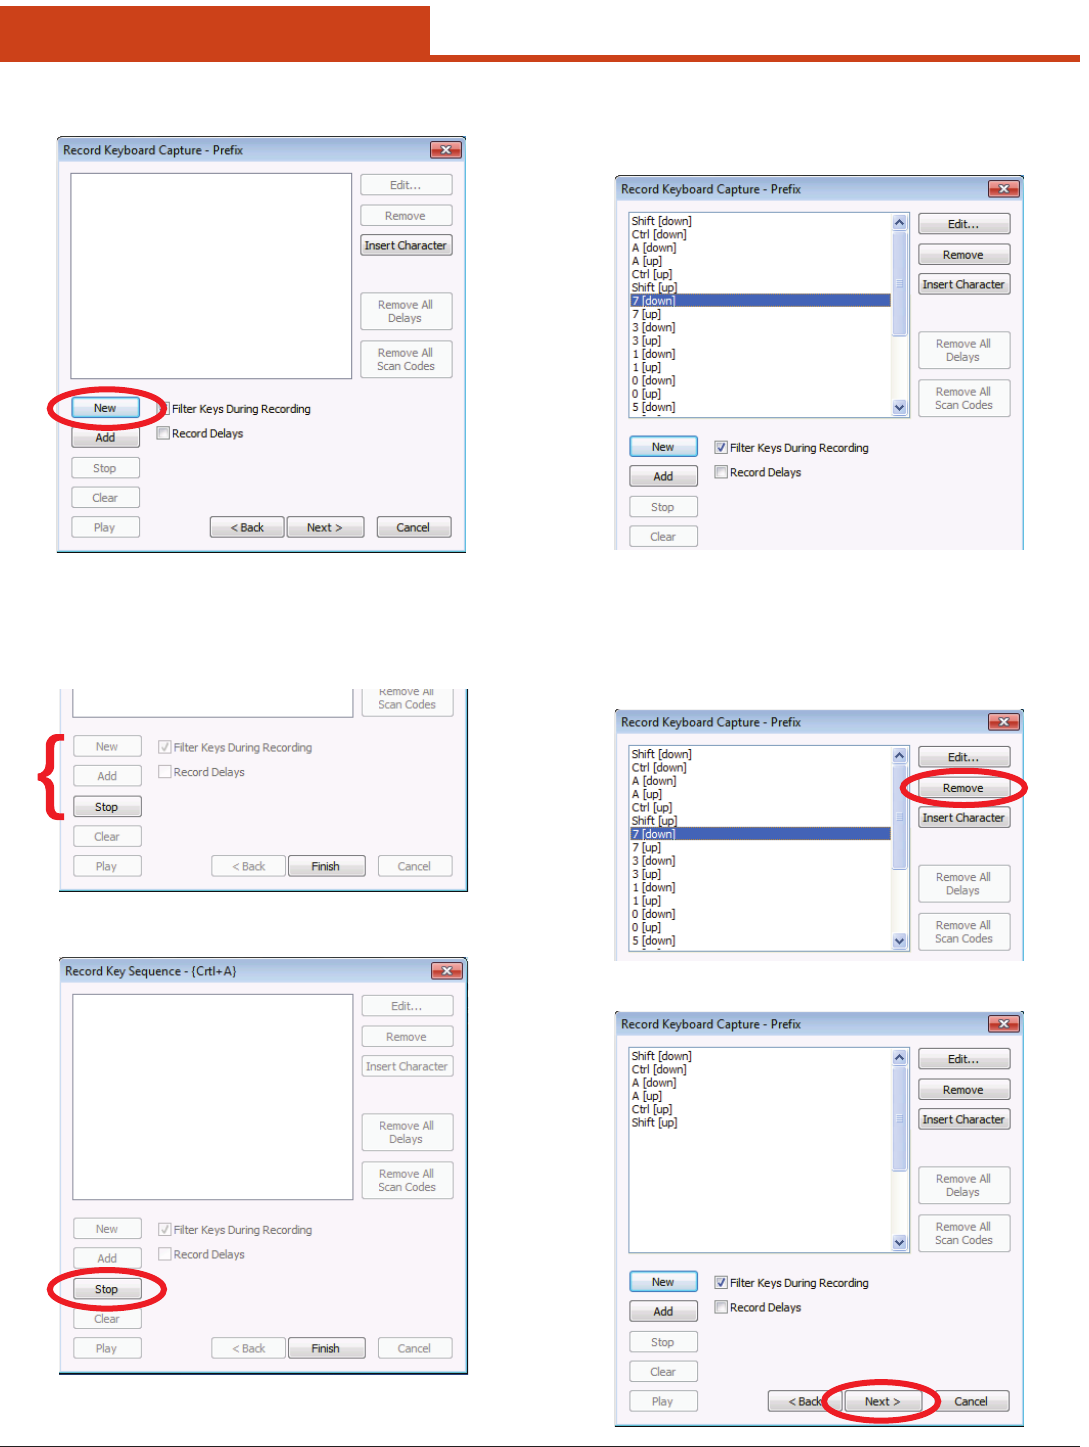
8. Tap the New button
9. Immediately press and release the Shift+Control+A keys on the
attached keyboard, and the sequence will be held in memory.
10. e New and Add buttons will dim while the Stop button will
become active.
11. Tap the Stop button.
12. e key recording will stop and the Record Keyboard Cap-
ture - Prex window dialog box will show the key strokes for the
Shift+Control+A action.
NOTE: All the key strokes the scanner generates when reading a bar-
code gets recorded: prex, barcode data, and sux. In the dia-
log above, the line directly aer the prex has been selected.
13. Tap the Remove button repeatedly to remove the key events for the
barcode data and sux from the list.
14. Tap the Next button.
39
2.0 Getting Started
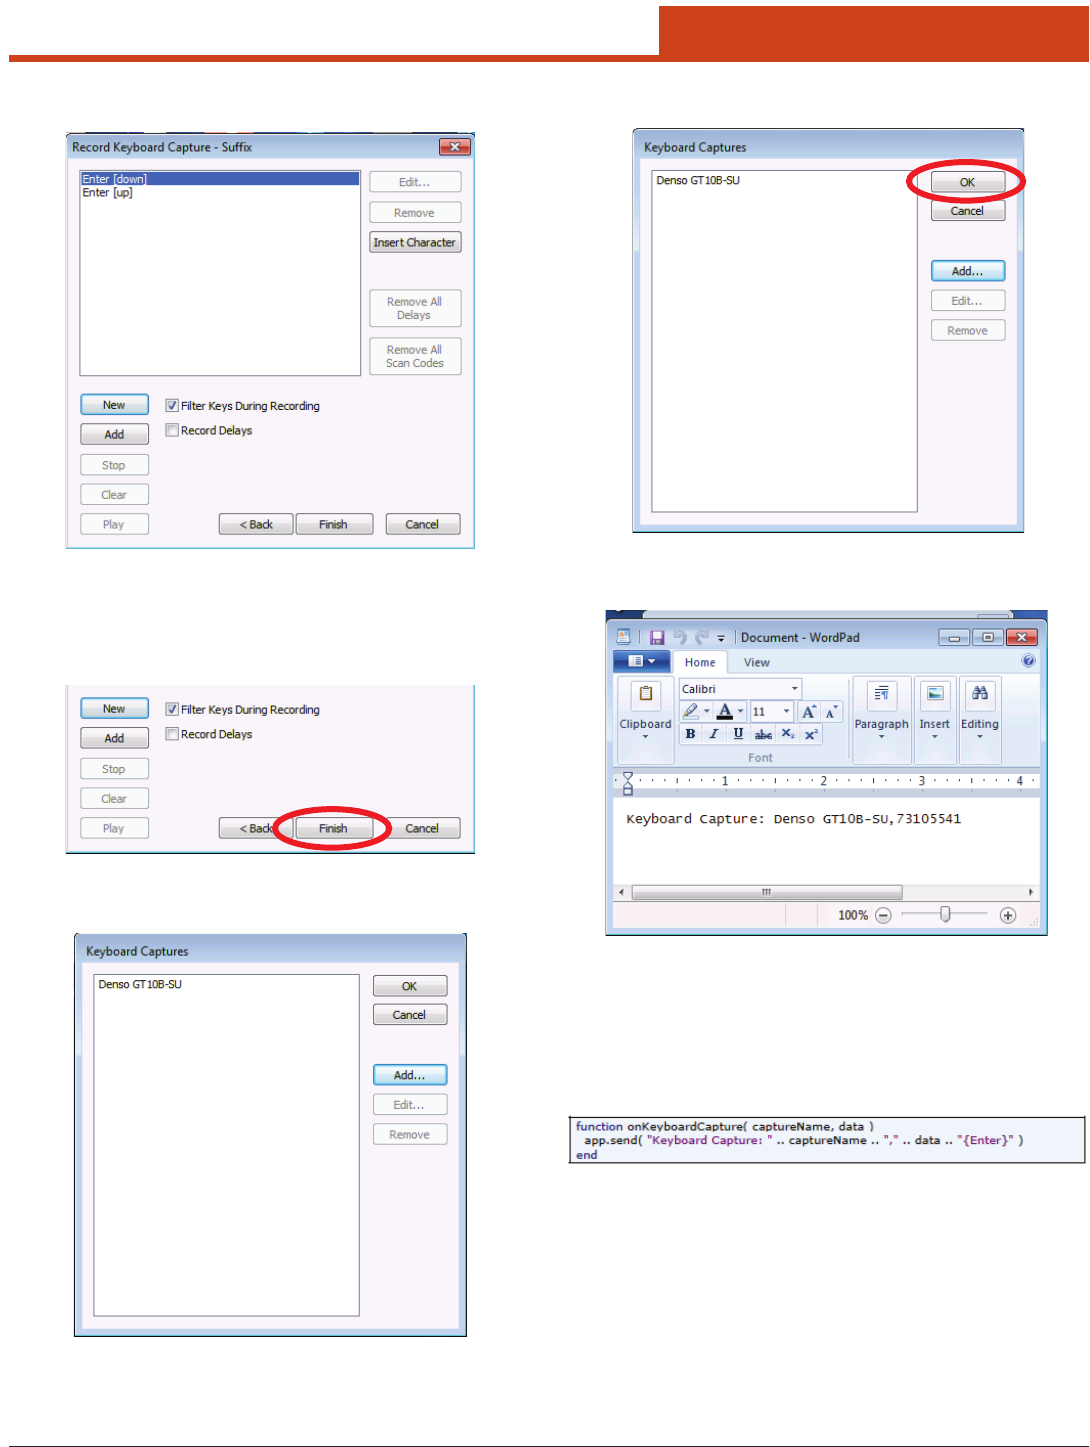
15. e Record Keyboard Capture - Sufx window will appear.
16. Repeat steps 8 through 13 making sure to delete the key events for the
barcode data and the prex data from the list leaving only the sux
data.
17. Tap the Finish button to complete the keyboard capture denition.
18. e Sufx window will close and the new Keyboard Captures ID
will be displayed in the Keyboard Captures window.
19. Tap the OK button to save the changes.
20. Open Notepad and test the keyboard capture.
NOTE: If you only get the barcode contents, the keyboard capture is
not working. is is probably because a mistake was made in
the setup of the scanner or the prex sequence.
If you don’t get anything and the keyboard seems to have
stopped working, then the sux sequence is probably wrong.
e default script method onKeyboardCapture() looks like this:
2.9.4.2.5 Record Key Sequence
e Record Key Sequence dialog is used for recording key deni-
tions, hot keys, and prex and sux of keyboard captures.
40
2.0 Getting Started
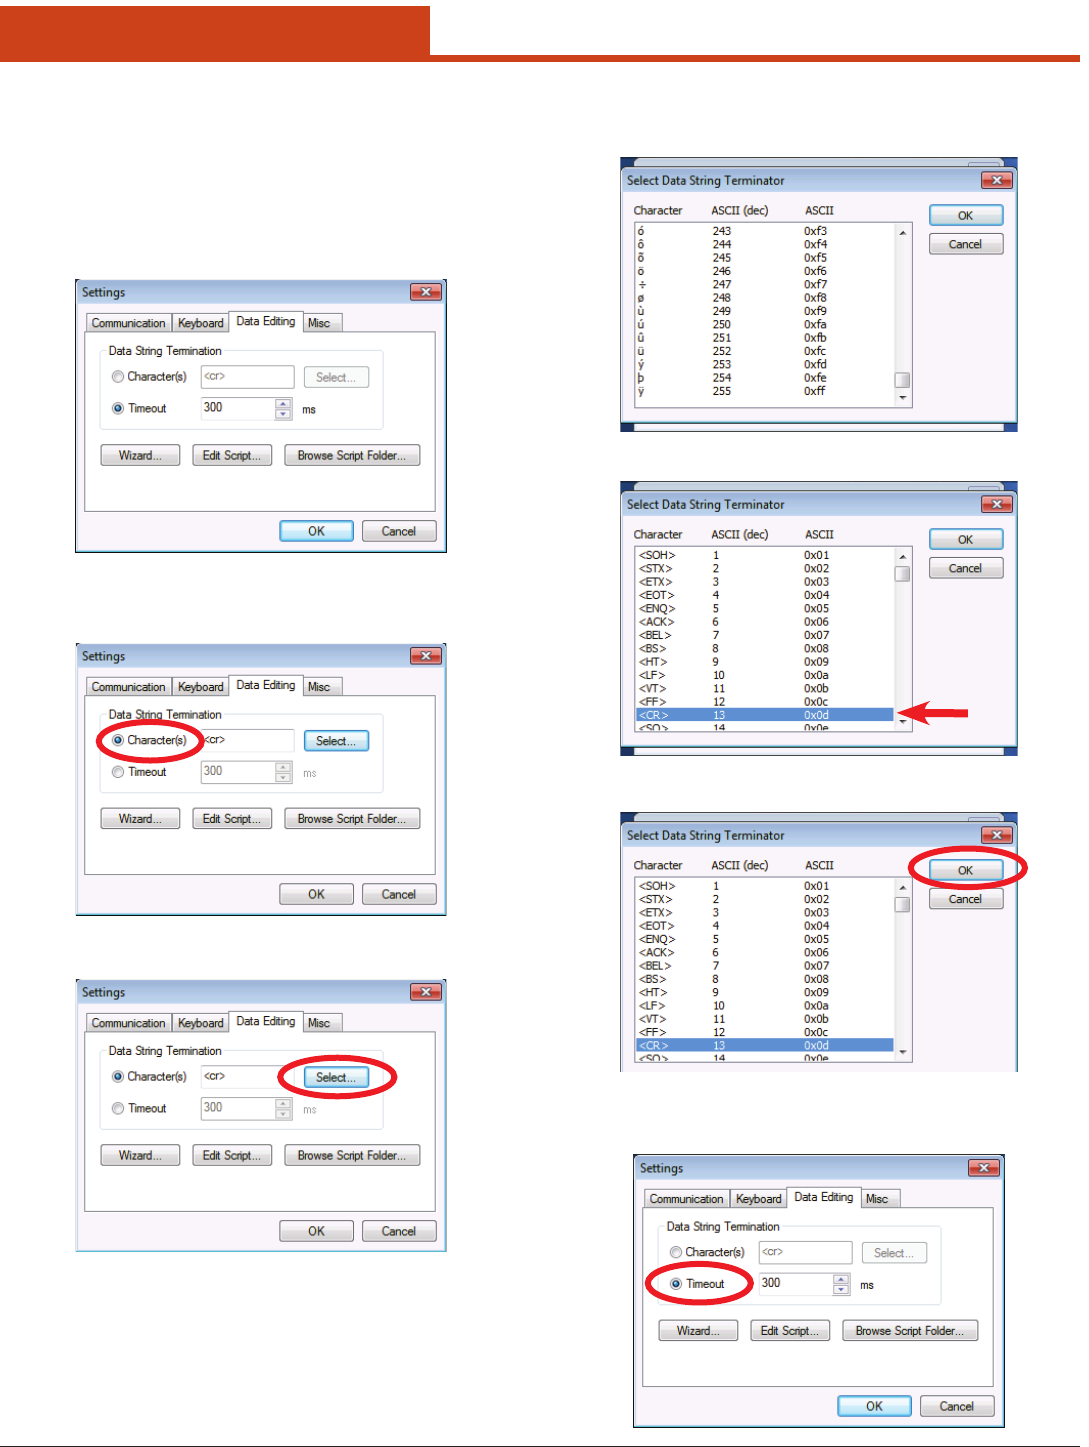
2.9.4.3 Data Editing Tab
Allows the user to add data string termination to data strings. e Data
String Termination setting tells Link*One which character or character
sequence terminates a data string received on the serial port. Alterna-
tively, you can use a timeout value as a terminator.
NOTE: If Timeout is set to 30 ms, Link*One will terminate an input
string when no data has been received for 30 ms.
To add a data string terminator
1. Under the Data Editing tab, tap the Character(s) radio button.
2. Tap the Select button.
3. e Select Data String Terminator window will open and dis-
play a library of terminator characters with their associated ASCII
codes in both decimal and hexidecimal notation.
4. Tap the desired terminator to highlight it.
5. Tap the OK button to select the desired terminator.
To change the millisecond delay for the terminator
6. Tap the Timeout radio button.