TransCore 76007 FHSS TRANSCEIVER MODULE User Manual 3
TransCore FHSS TRANSCEIVER MODULE 3
Contents
- 1. Users Manual
- 2. User Manual 1
- 3. User Manual 2
- 4. User Manual 3
- 5. User Manual 4
User Manual 3
41
2.0 Getting Started
7. e millisecond delay box will activate.
8. Set the desired millisecond delay by either using the up or down ar-
rows, or by entering a number directly in the box.
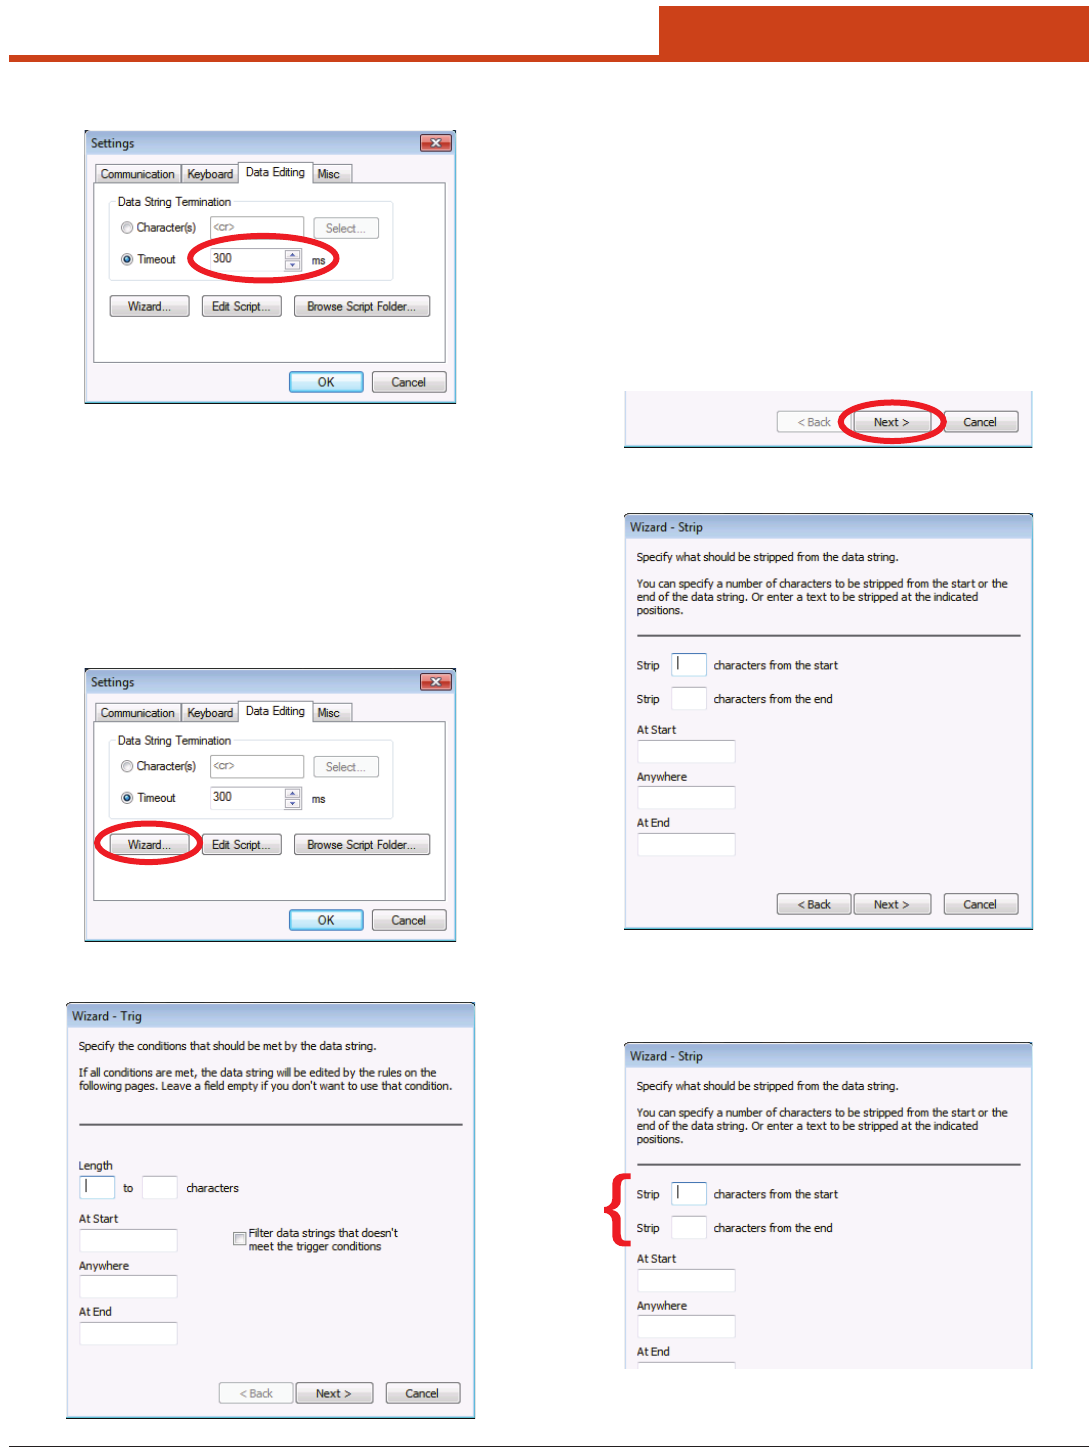
2.9.4.3.1 Wizard
Enable the user to dene a simple setup that matches and modies a
data string. e wizard consist of four dierent parts, Trig, Strip, Re-
place, and Add. It is only intended to be used for very simple tasks. For
more advanced tasks, you need to use the scripting language.
To start the wizard:
1. Tap on the Wizard button.
2. e Wizard – Trig window will open.
In this dialog you can specify zero or more conditions that should
be met for a data string before it is edited by the wizard rules. If a
data string doesn’t meet the conditions and the check box Filter Data
Strings is checked, the data string is ltered. If the check box is cleared,
the data string is sent to the receiving application unmodied.
If you specify a length condition, any data strings shorter or longer
will not be modied by the wizard rules.
You can enter texts that should be present in the data string. Entering
00 in the At Start eld will check for 00 in the beginning of the data
string. en any string that starts with something else will not meet
the condition.
3. Click the Next button when you are done.
4. e Wizard – Strip window will open.
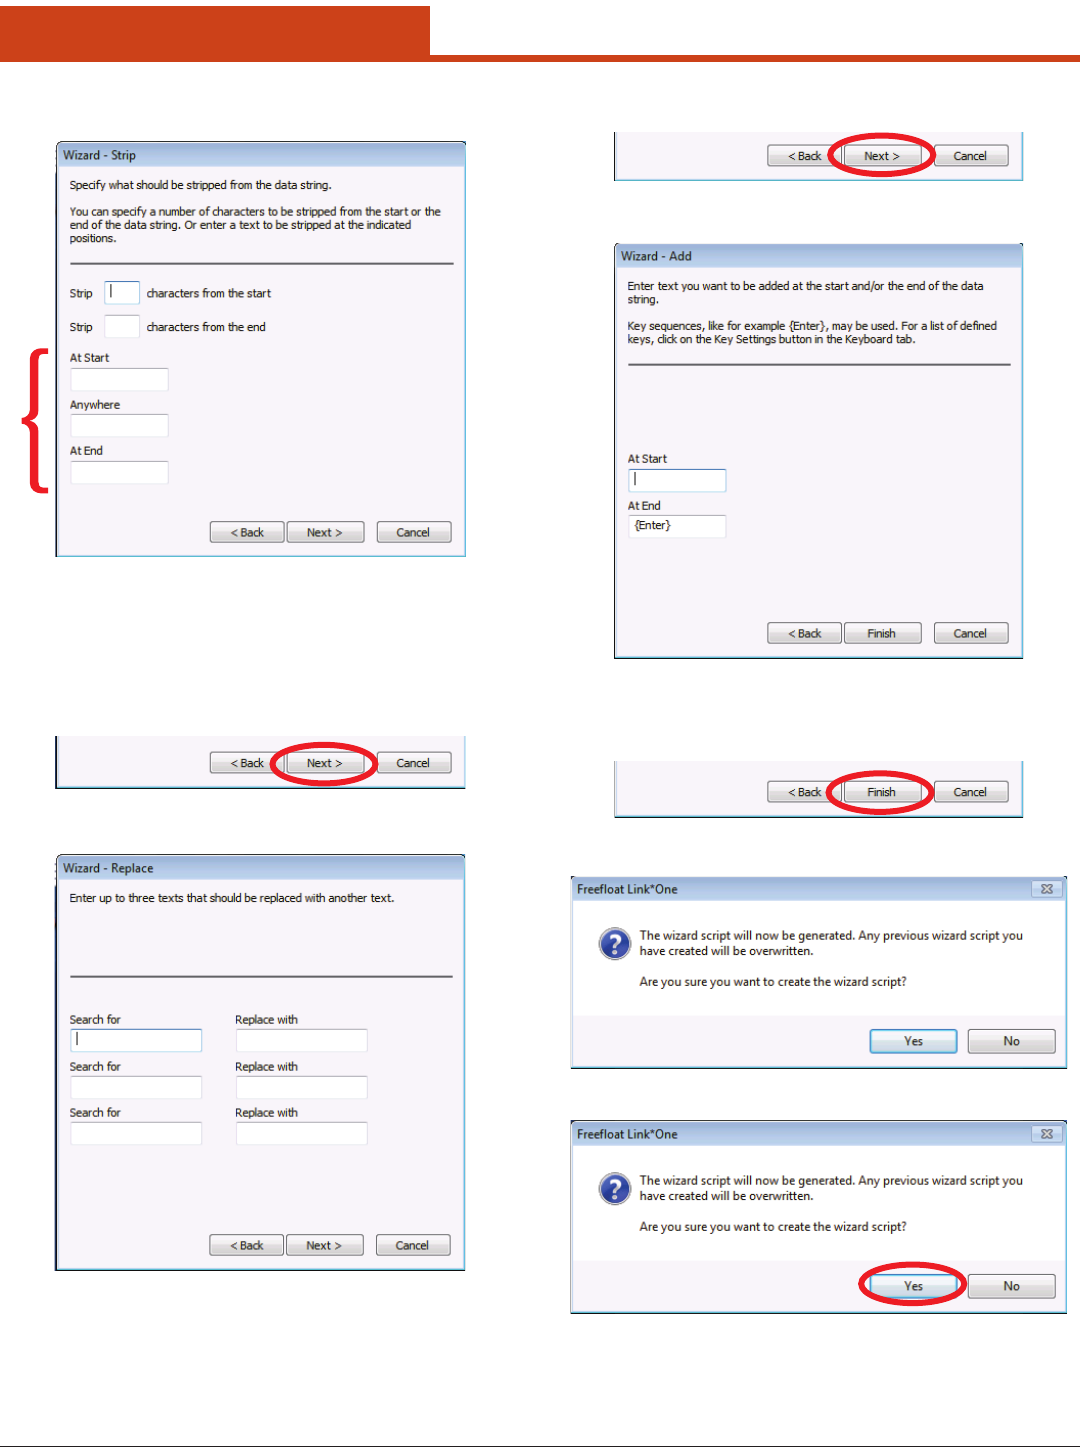
5. Select one of two choices:
• Strippingacertainnumberofcharactersatthestartand/orthe
end of the data string, or
42
2.0 Getting Started
• Removingoneormoretextsattheindicatedpositionsofthedata
string.
For example, if 00 is specied in the eld At Start and the data string
is 0012345, the resulting output will be 12345. However, if the data
string is 9912345, nothing will be removed from the start of the data
string.
If all elds are le empty, no text will be stripped from the data string.
6. Tap the Next button.
7. e Wizard - Replace window will open.
NOTE: is window allows the user to enter up to three text replace-
ments. Enter the text to be replaced in one of the Search for
elds, and then enter the text to replace it with in the corre-
sponding Replace with eld.
8. Tap the Next button.
9. e Wizard – Add window will open.
is window allows the user to enter texts that need to be added to
the data string at the start or the end.
10. When text entry is complete, click on the Finish button.
11. e Freeoat Link*One Wizard Script window will appear.
12. Tap the Yes button to conrm that a wizard script should be created.
e wizard script is a Lua script and can be modied manually af-
terwards if, for example, the need to add more advanced conditions
or modications arises.
NOTE: e wizard script is overwritten each time the wizard is run.
43
2.0 Getting Started
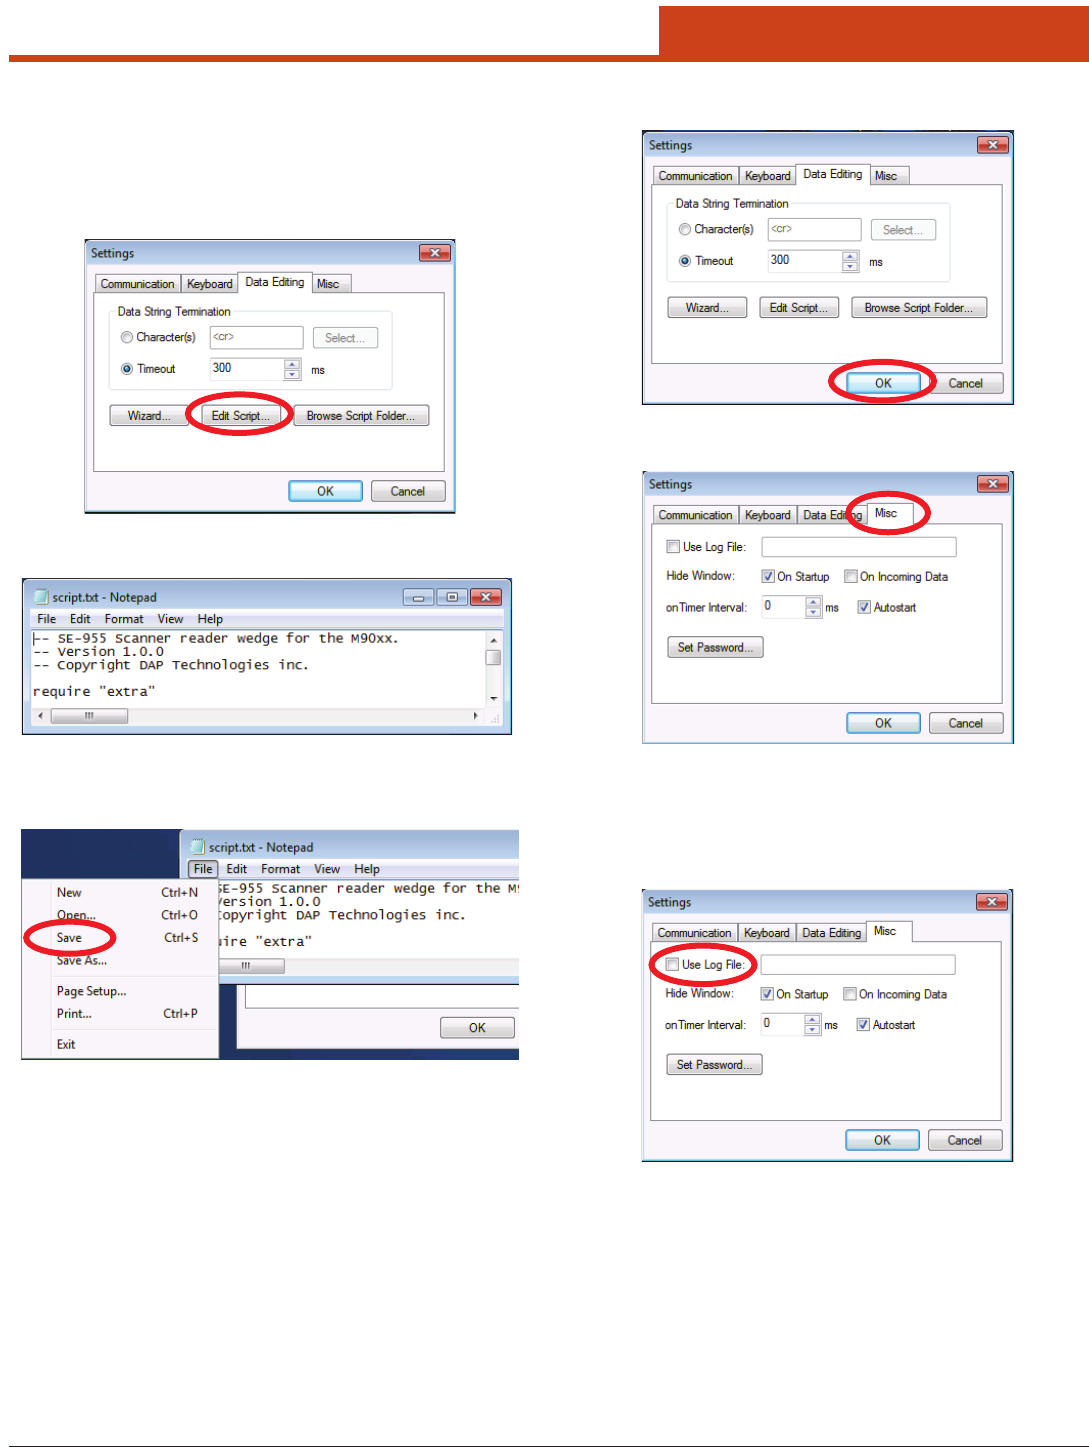
Tap the OK button to save all changes.
2.9.4.4 Misc Tab
2.9.4.4.1 Use Log File
If all the internal messages and events in Link*One are to be written to a
log, check the setting Use Log File, and enter a valid path and lename
in the edit box. e log le is mostly used for troubleshooting a script.
• TohideLink*One’smainwindowonstartup,checkOn Startup in
the Hide Window area.
• TohideLink*One’smainwindowwhenserialdataisreceived,check
On Incoming Data in the Hide Window area.
When a value greater than 0 is entered into onTimer Interval, the
script method onTimer() will be called once during the specied time
interval. For example: if you enter the value 3000, onTimer() will be
called once every third second. Please take care when choosing a value
here, if 1 ms is entered, onTimer() will be called 1000 times per sec-
2.9.4.3.2 Edit Script
Opens the Link*One script. e name of the script le is Script.txt
and it is opened in the associated program, normally Notepad.
To edit a script:
1. Tap the Edit Script button.
2. A Notepad window will open.
3. Edit the script as desired.
4. When nished, tap File > Save to save the script.
Alternatively, the text editor SciTE knows the syntax of Lua. It might be
useful when writing Link*One scripts.
2.9.4.3.3 Browse Script Folder
Opens Windows Explorer in the folder that contains the script, con-
guration, and the license le. For more information about scripting in
Link*One, see the topic Link*One Scripting.
44
2.0 Getting Started
ond. is could make a PC unresponsive. Of course this will be highly
dependant on what code the onTimer() method contains.
When the option Autostart is checked, Link*One will start automati-
cally when Windows is launched. Link*One will then be started with
the prole for which Autostart was activated . If there are two pro-
les—one serving COM1 and the other serving COM2—Autostart
can be checked for each of those proles. One instance of Link*One will
be started at login for every prole that has Autostart checked.
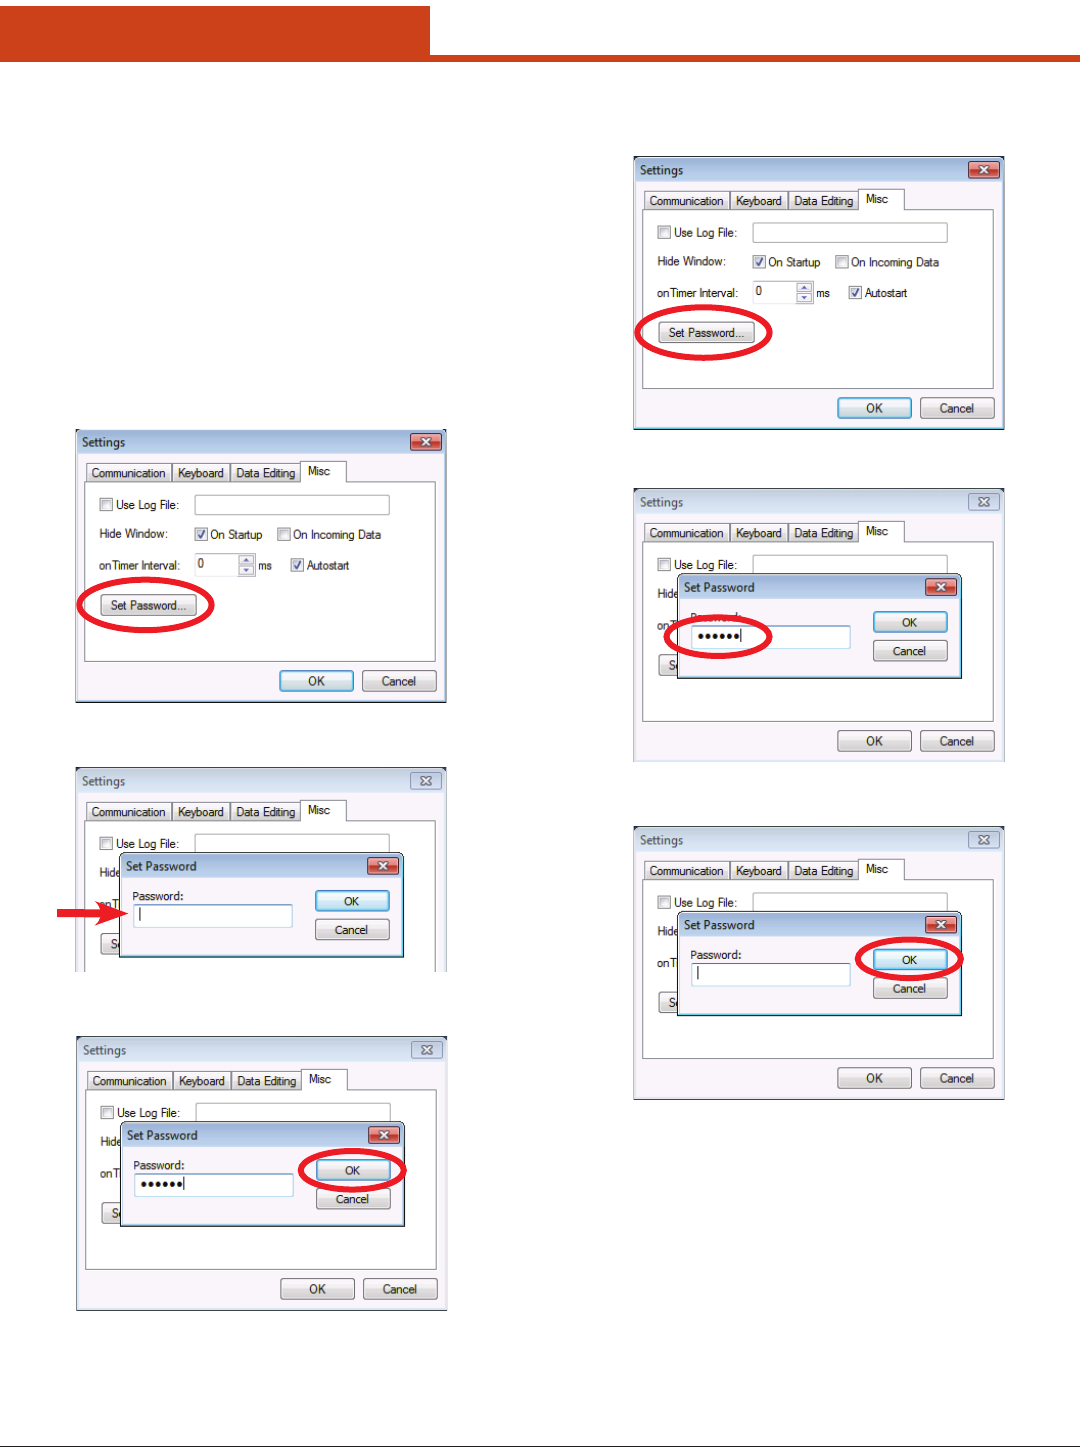
2.9.4.4.2 Set Password
Allows the user to set a password that is required when exiting Link*One
and when clicking on the Settings... button in the main window.
To set a password:
1. Tap the Set Password button.
2. Enter a password into the Password box.
3. Tap the OK button to save the password.
To remove a password:
1. Tap the Set Password button to open the Set Password window.
2. Delete the text in the Password box.
3. Tap the OK button.
2.9.4.4.3 Settings Location
A Link*One conguration consist of mainly two parts, the settings (se-
rial port conguration, hot keys, etc.) and the script le(s).
e settings are le-based to enable dierent users on the same PC to
share the same Link*One conguration. e conguration is stored in
the le Cong.dat. Do not edit this le manually.
To determine where script and conguration les are located, click on
the Browse Script Folder button in the Data Editing tab of the
Settings window.
45
2.0 Getting Started
2.10 Link*One Scripting
2.10.1 Overview
Link*One has an embedded script language called Lua. When Link*One
receives data from a device, a hot key is pressed etc. certain methods in
the script are called. e code in these scripts determines what action
is taken.
e name of the script le is Script.txt and is placed in the Link*One
application data folder. e location of this folder varies depending on
what operating system you are using. If you need to make a backup of
the script or copy it to another PC, click on the Browse Script Folder...
on the Misc tab in the Settings dialog. Windows Explorer is opened and
displays the contents of the script folder.
When you edit the script, remember to restart Link*One to recompile
the script or use the faster alternative of entering the Settings dialog and
then exiting it.
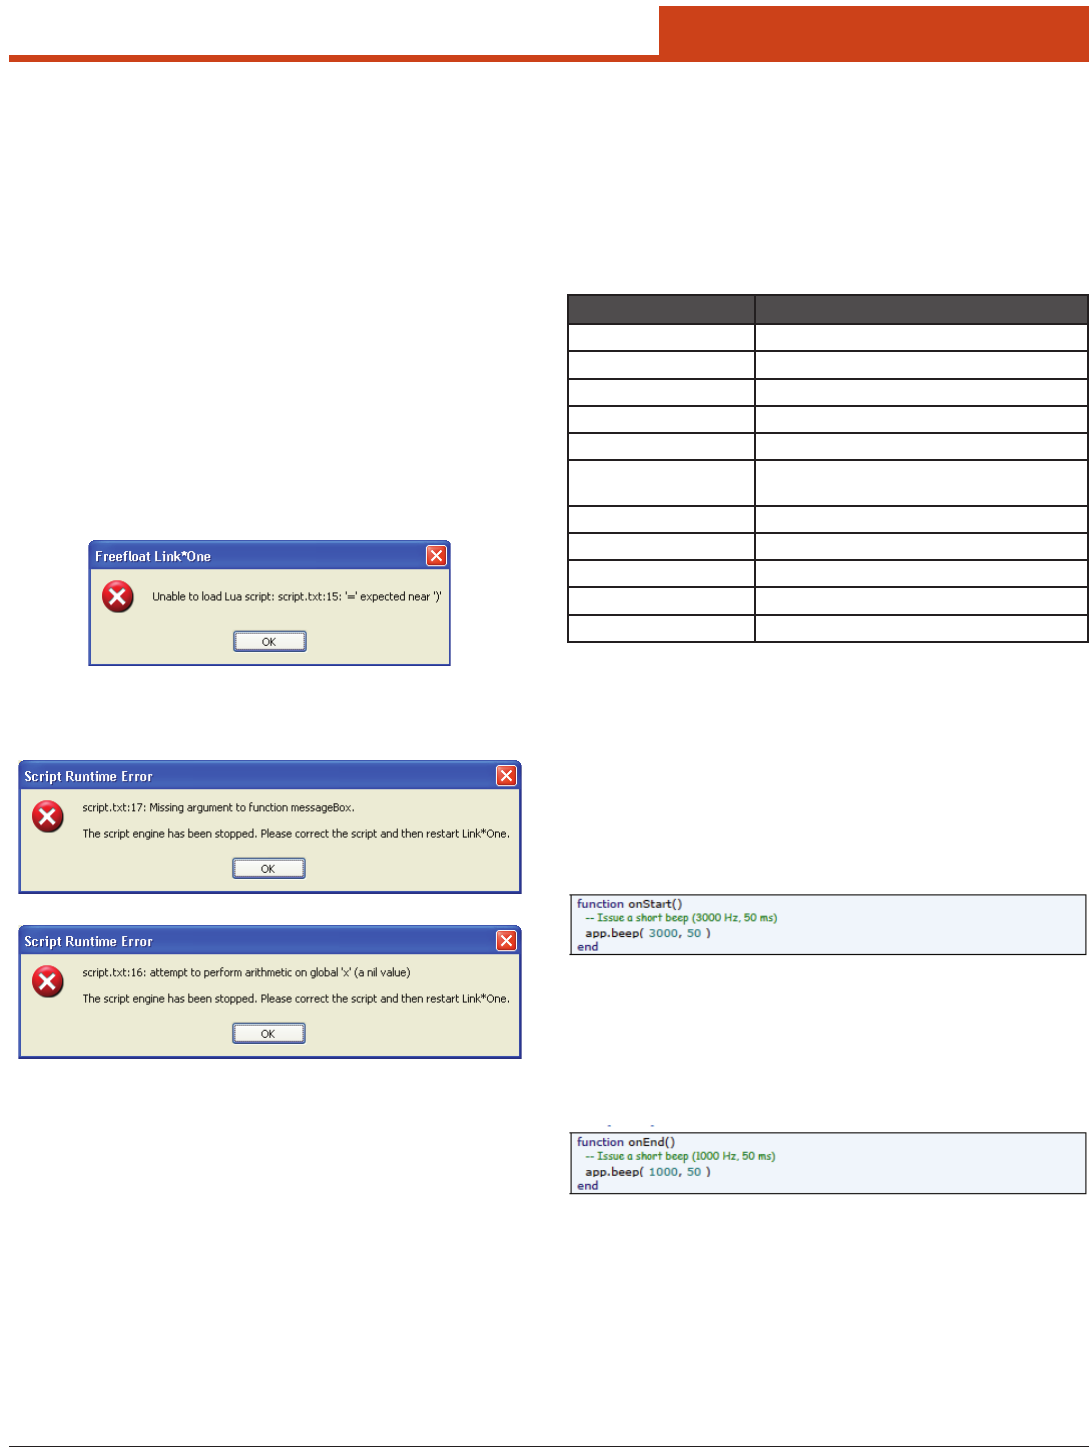
If you make a mistake, for example create a syntax error, an error mes-
sage is displayed when the script is compiled:
Also, some errors can appear when the script is running, so called run-
time errors. Here are a couple of examples:
2.10.2 Lua Language
From http://www.lua.org/about.html:
Lua is a powerful, fast, light-weight, embeddable scripting language.
Lua combines simple procedural syntax with powerful data description
constructs based on associative arrays and extensible semantics.
Putsimply,LuaiswhatmakesdataprocessinginLink*Oneveryexible
and powerful. e reference manual for Lua can be found at the Lua site:
http://www.lua.org/
ere is also a printed book on the Lua language, called Programming
in Lua, which is more accessible than the reference manual.
Apart from Lua and its built-in language, Link*One exposes a number
of useful methods to the script.
2.10.3 Script Events
When things happen in Link*One, for example a hot key or a data string
is received on the serial port, an event is generated. is results in a
script method being called. e methods called when events happen are
called event methods.
e table below is an overview and short description of all the dier-
ent event methods. For a more detailed explanation, see the topic Event
Methods below.
Event Handler When Called
onStart Link*One is started
onEnd Link*One is exited
onData A data string is received on the serial port
onHotKey A hot key is pressed
onKeyboardCapture A data string is received from a HID device
onExternalData A data string is received from an external
application
onTimer The timer interval has elapsed
onCTS Status change on CTS
onDSR Status change on DTR
onRI Status change on RI
onDCD Status change on DCD
2.10.4 Event Methods
In this topic all the event methods are explained in detail.
2.10.4.1 onStart( )
is method is called when Link*One is started. It is also called when
you exit the Settings dialog.
is method receives no arguments.
Example: Beep on start
2.10.4.2 onEnd()
Called when Link*One is exited. It is also called when you enter the
Settings dialog.
is method receives no arguments.
Example: Beep on exit
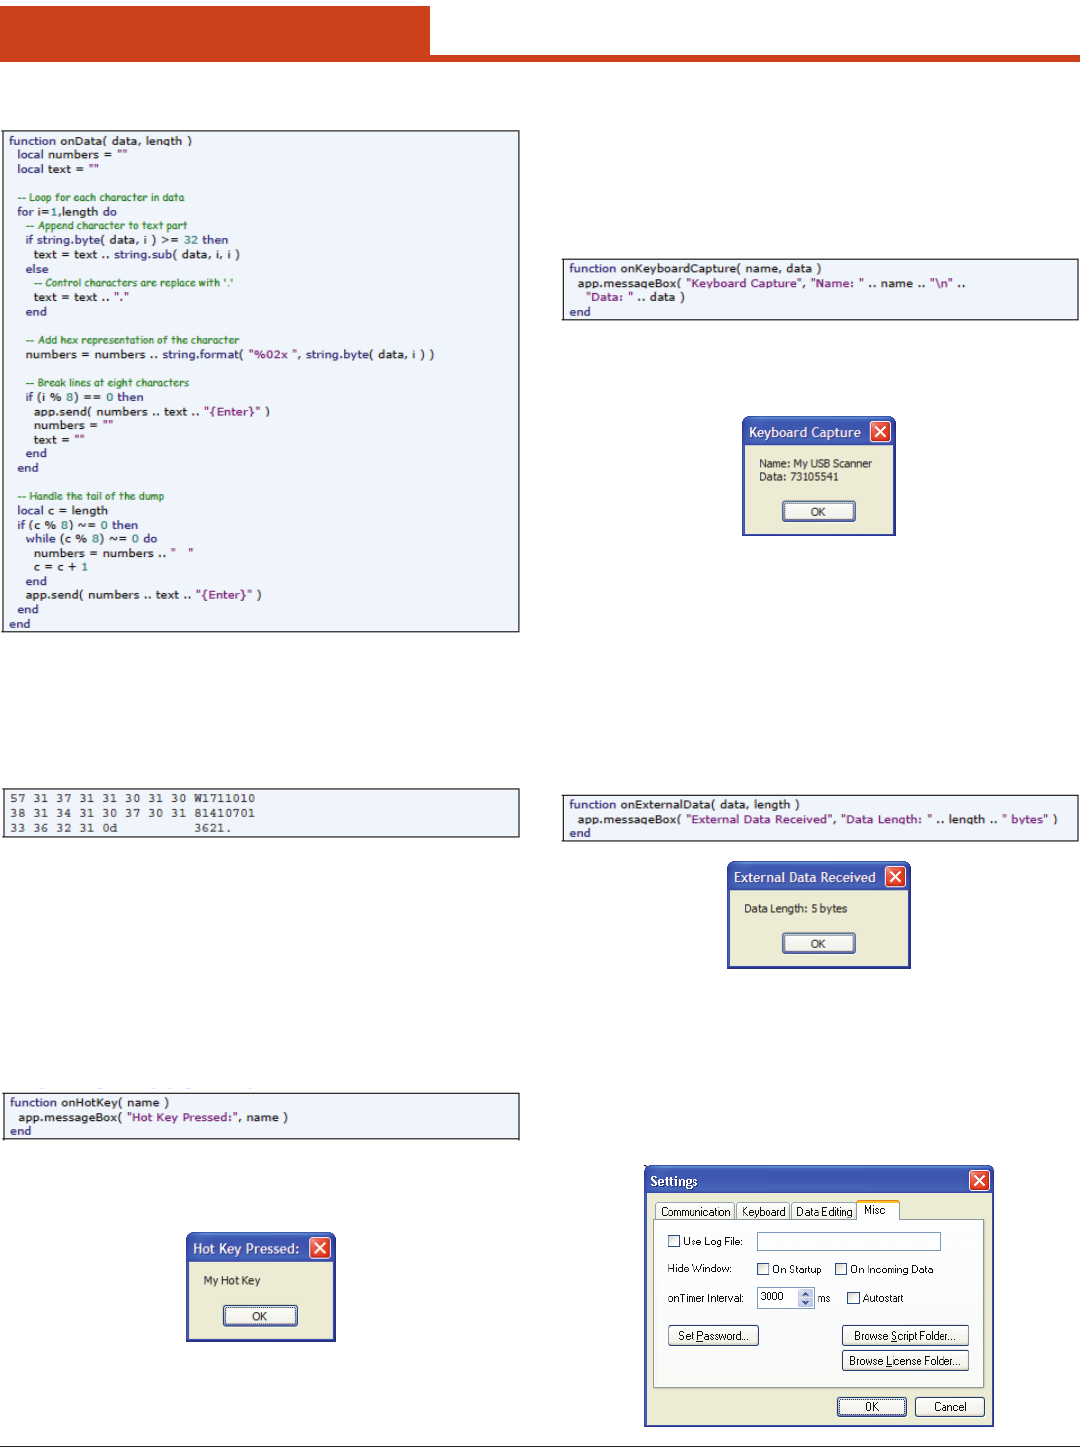
2.10.4.3 onData(data, length)
Called when a data string is received from the serial port.
is method receives the data string in data and the length of the string
in length.
Data may contain binary characters including the null character.
Please note that if the Data String Termination is set to be a charac-
ter and that character does not match the terminator used by the serial
device, this method is never called.
46
2.0 Getting Started
Example: Hex dump of serial data
To test the above example, copy and paste the code into the script re-
placing the default implementation of onData(). Use Timeout as the
Data String Terminator. Connect a serial device to the serial port and
make it generate some data. Below is the output when reading a barcode
containing “W1711010814107013621” using a serial barcode reader:
e last character 0d (hexadecimal) is the same as 13 in decimal nota-
tion. e ASCII character with code 13 is carriage return. is means
the barcode reader is using carriage return (<cr>) as its data string ter-
minator.
2.10.4.4 onHotKey(name)
is method is called when you press a hot key.
e argument to this method is the name of the hot key that was pressed.
Example: Message box displaying the hot key’s name
When executed, the above method will display a message box with the
name of the hot key:
2.10.4.5 onKeyboardCapture(name, data)
Called when a keyboard capture string has been received.
e arguments to this method are the name of the keyboard capture
and the data.
Example: Display the name and data of a keyboard cap-
ture event
If you have a keyboard captured dened called My USB Scanner and
it captures the string 73105541 the method in the above example will
display this dialog:
2.10.4.6 onExternalData(data, length)
Called when an external application sends data to Link*One.
e arguments are the received data and the length of it.
External applications can send data to Link*One. ey do it by nding
the window handle of Link*One’s window and then send a WM_COPY-
DATA message to the window.
Example: Display data and length sent to Link*One from
an external application
is feature makes it possible to create an application that integrates
tightly with Link*One. For example, the code in onExternalData() could
relay the data to a scanner to make it beep, initiate a scan, congure it etc.
2.10.4.7 onTimer()
Called periodically at the specied timer interval.
is method receives no arguments.
47
2.0 Getting Started
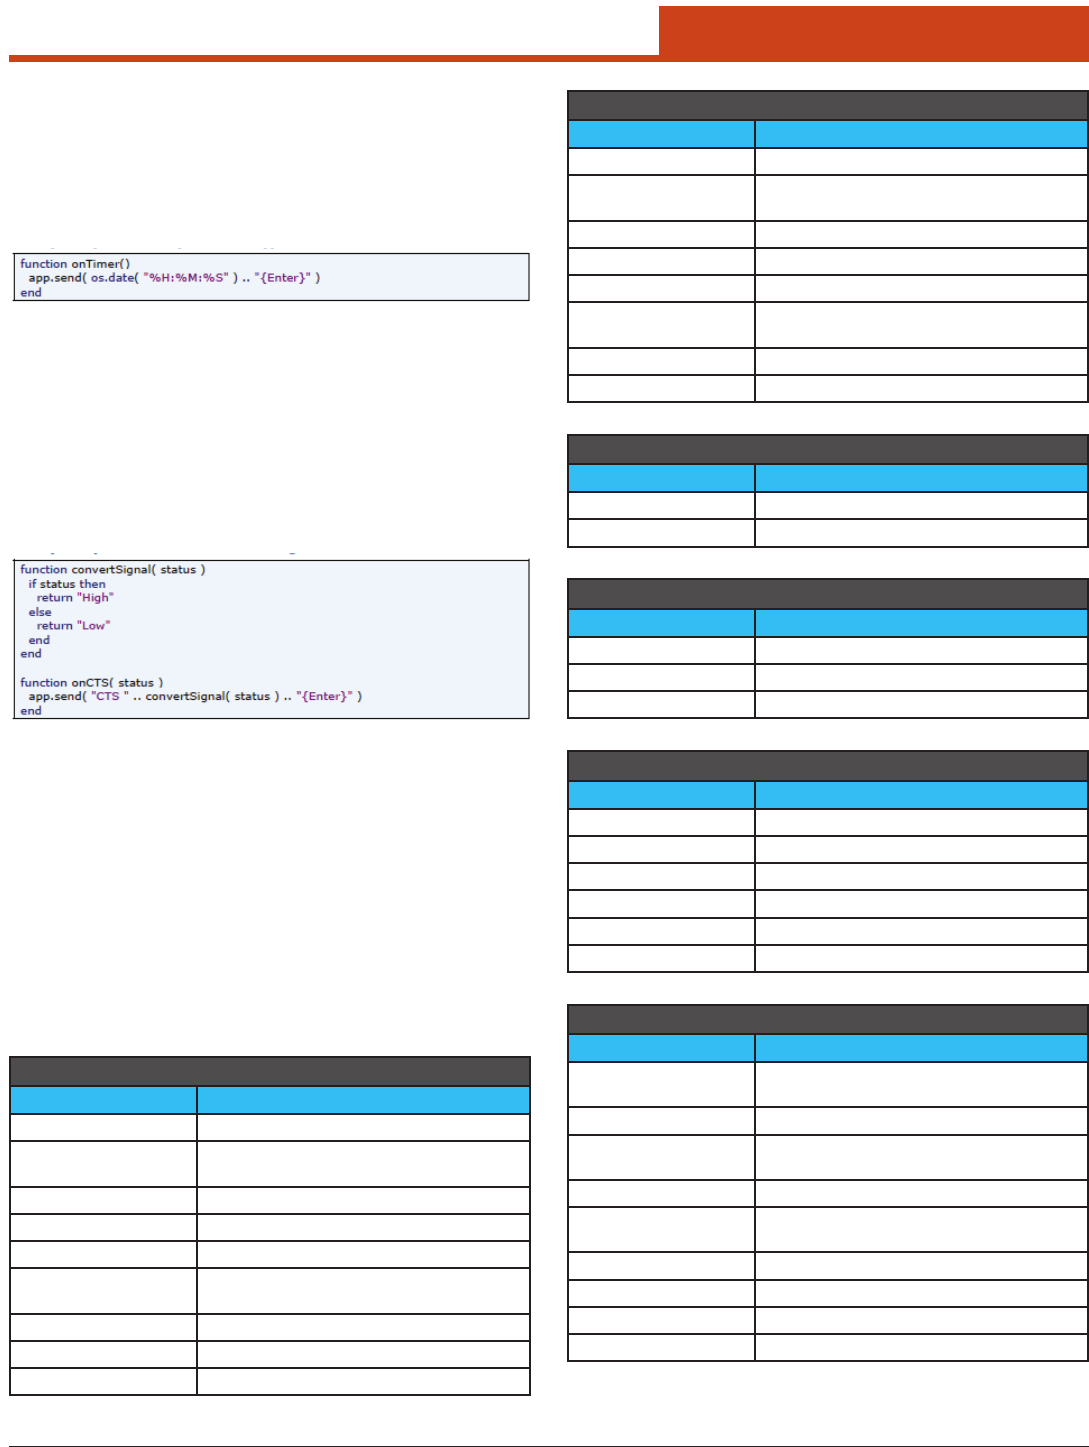
In the example above, the onTimer Interval has been set to 3000 mil-
liseconds (3 seconds). is means that the onTimer() script method will
be called once every three seconds.
is method can be used for adding timeout logic to a solution.
Example: Output a time stamp to the active application at
the onTimer interval
2.10.4.8 onCTS(status)
is method is called when the hardware handshake signal changes
state.
e argument status is true when the signal goes high and false when
the signal goes low.
is description also applies to onDSR, onRI, and onDCD.
Example: Outputs the state of CTS when it is changed
2.10.5 Script Methods
Lua is a generic script language and has methods to manipulate string,
tables, les, and so on. However, it does not contain any methods to re-
trieve the title of a window, simulate keys etc. So in order to activate an
application window, send key strokes and similar operations, a number
of internal methods in Link*One have been exposed to the embedded
Lua script engine.
e tables below oers an overview of the methods. e methods have
been grouped into areas of interest for easier reference. Below the tables
there is a reference section with a detailed description of each method.
When these methods are used in a script, you need to prex them with
“app.”, for example app.sleep( 100 ).
Output/User Feedback
Method Description
beep Beeps with the internal PC speaker
blinkIcon Changes the color of the notication area
icon
log Writes a text line to a log le
messageBox Displays a message box
playSound Plays a sound le
playSystemSound Plays a sound associated with a system
event
send Sends keyboard data
sendSerialData Sends serial data to the COM-port
sendSubscriberData Sends data to subscribers
Windows
Method Description
enumWindows Enumerates all windows
ndWindow Finds a window with the specied title and/
or class
getForegroundWindow Gets the handle of the foreground window
getWindowClass Gets the class name of a window
getWindowText Gets the title of a window
setForegroundWindow Sets a window to be the foreground win-
dow
setWindowText Sets the title of a window
windowOperation Executes a window operation
Clipboard
Method Description
getClipboardData Gets the text on the clipboard
setClipboardData Sets the text on the clipboard
Application Launch
Method Description
closeAppHandle Closes the application handle
isAppRunning Determines if an application is still running
run Starts a program
Serial Port
Method Description
closePort Closes the serial port
getDTR Gets the status of the DTR signal
getRTS Gets the status of the RTS signal
openPort Opens the serial port
setDTR Sets the status of the DTR signal
setRTS Sets the status of the RTS signal
Miscellaneous
Method Description
ean128 Parses the contents of a GS1-128/UCC/EAN-
128 code
exit Exits Link*One
exitWindows Either logs off the current user, shuts down
the PC, or shuts down and restarts the PC
getProle Gets the current Link*One prole
getTickCount Gets the number of milliseconds elapsed
since the system was started
lockWorkStation Locks Windows
setProle Sets the current prole
setTimer Sets the script timer
sleep Delays the script for some time
48
2.0 Getting Started
2.10.6 Output/User Feedback
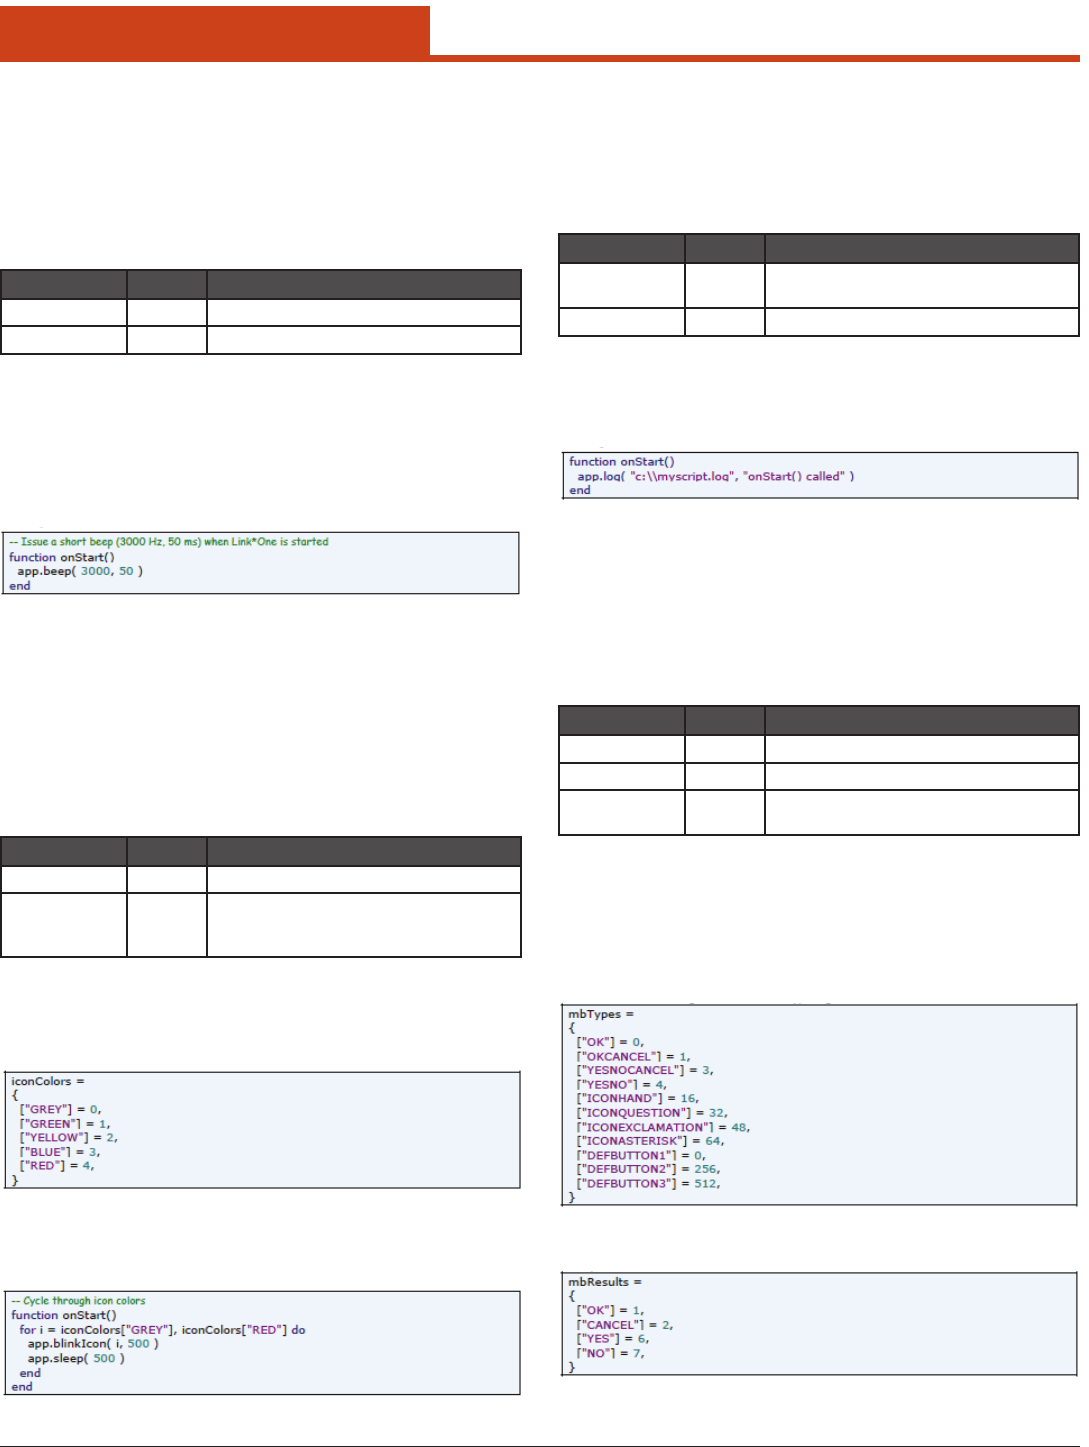
2.10.6.1 beep(frequency, duration)
2.10.6.1.1 Description
Makes the internal PC speaker beep with the specied frequency and
duration.
2.10.6.1.2 Arguments
Argument Type Description
frequency Number The frequency of the beep in Hertz.
duration Number The duration of the beep in milliseconds.
2.10.6.1.3 Returns
true if successful, false otherwise.
2.10.6.1.4 Constants
true if successful, false otherwise.
2.10.6.1.5 Example
2.10.6.2 blinkIcon(icon, duration)
2.10.6.2.1 Description
Changes the notication icon color for the specied duration. Aer the
duration has elapsed the icon will return to the default color grey.
e operation is asynchronous, in other words, if blinkIcon is called
again before the duration for the rst call has elapsed, the new icon is set
immediately by the second call.
2.10.6.2.2 Arguments
Argument Type Description
icon Number The icon color index.
duration Number The duration in milliseconds the color
should be displayed before restoring the
default color.
2.10.6.2.3 Returns
Nothing.
2.10.6.2.4 Constants
2.10.6.2.5 Example
Please note the delay in the loop is needed to display each icon color for
half a second.
2.10.6.3 log(lename, message)
2.10.6.3.1 Description
Writes the message to the specied log le. Note that logging with this
method from the script is separate from the built-in logging facility.
2.10.6.3.2 Arguments
Argument Type Description
lename String The path and name of the log le to
write to.
message String The log message to write.
2.10.6.3.3 Returns
Nothing.
2.10.6.3.4 Example
2.10.6.4 messageBox(title, message, type)
2.10.6.4.1 Description
Displays a message box with the specied title and message. e type
argument species the number and type of buttons used.
2.10.6.4.2 Arguments
Argument Type Description
title String The message box title.
message String The message to be displayed.
type Number,
optional
The type of buttons to use.
2.10.6.4.3 Returns
A value from the constants in mbResults (see below) indicating the but-
ton clicked.
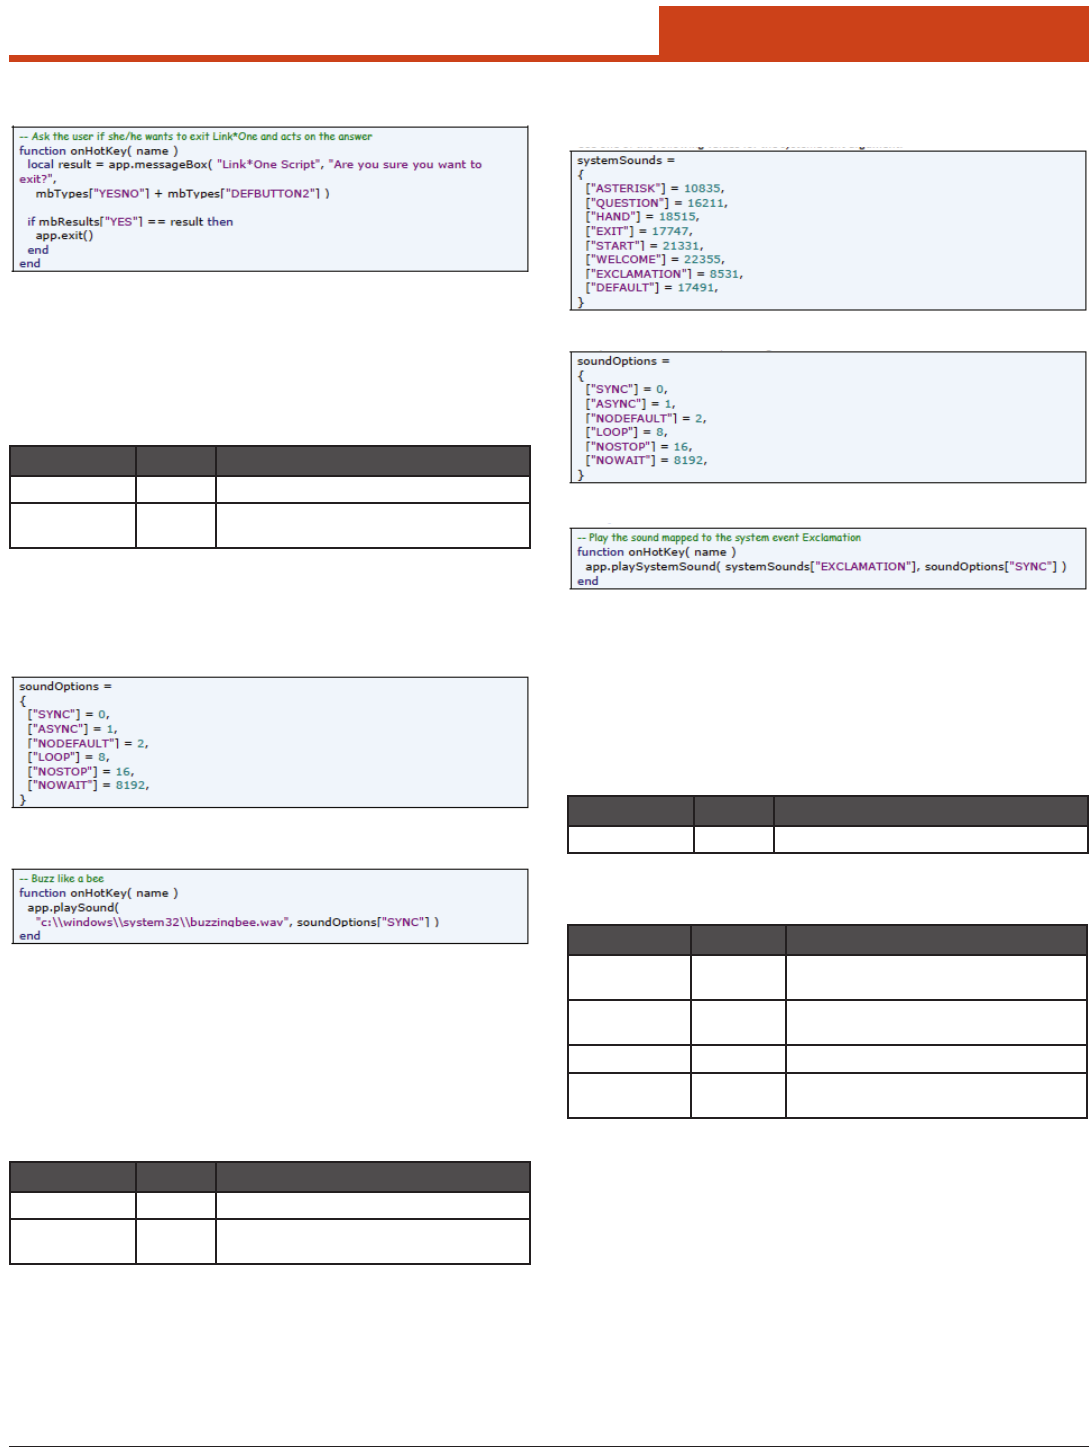
2.10.6.4.4 Constants
Use one of the following constants for the type argument:
e possible return values are:
49
2.0 Getting Started
2.10.6.4.5 Example
2.10.6.5 playSound(lename, options)
2.10.6.5.1 Description
Plays the sound specied by the lename argument.
2.10.6.5.2 Arguments
Argument Type Description
lename String The path and lename of the sound le.
options Number Species the behavior for the sound play-
back. Use the constants in soundOptions.
2.10.6.5.3 Returns
true if successful, false otherwise.
2.10.6.5.4 Constants
2.10.6.5.5 Example
2.10.6.6 playSystemSound(systemEvent, op-
tions)
2.10.6.6.1 Description
Plays the sound specied by the given system event. Dierent system
events can be mapped to sound les in the Control Panel.
2.10.6.6.2 Arguments
Argument Type Description
systemEvent Number The ID of the system event.
options Number Species the behavior for the sound play-
back. Use the constants in soundOptions.
2.10.6.6.3 Returns
true if successful, false otherwise.
2.10.6.6.4 Constants
Use one of the following values for the systemEvent argument:
e possible values of the options argument:
2.10.6.6.5 Example
2.10.6.7 send(data)
2.10.6.7.1 Description
Sends keyboard data.
2.10.6.7.2 Arguments
Argument Type Description
data String The data to send.
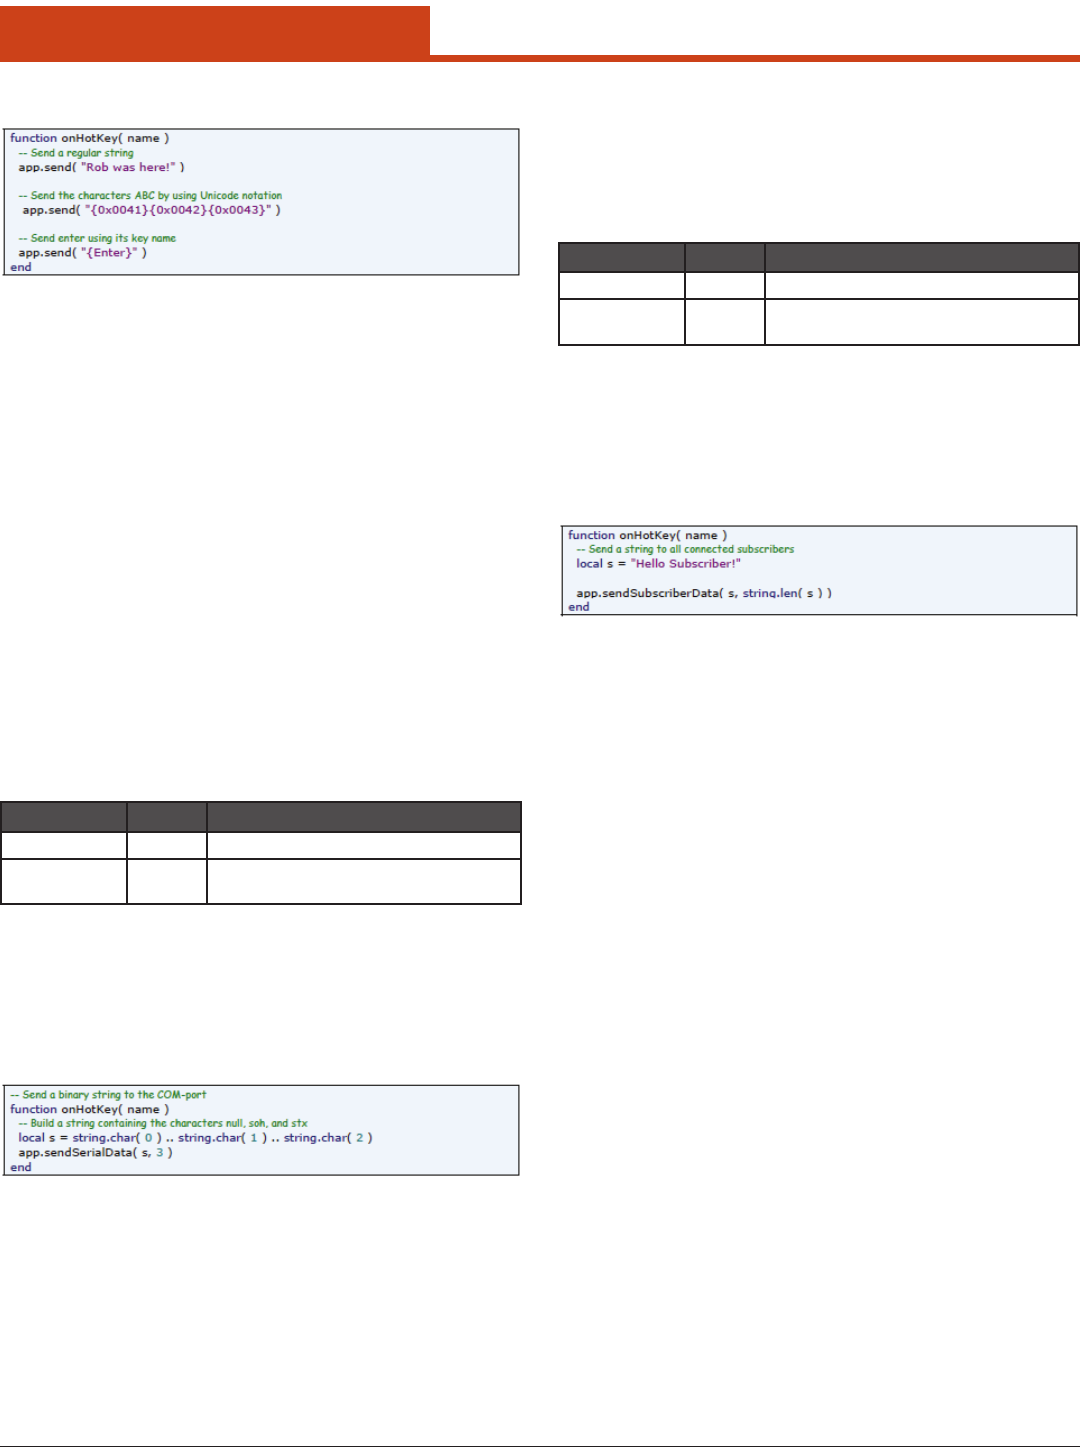
e argument data is a string consisting of text, key names, and Unicode
characters.
Argument Type Description
text “Rob was
here”
Regular characters.
Key Name “{Enter}” Key names corresponds to the keys
dened in the dialog Key Settings.
Unicode “{65}” Character in Unicode decimal notation.
Unicode “{0x0041}” Character in Unicode hexadecimal
notation.
2.10.6.7.3 Returns
Nothing.
2.10.6.7.4 Constants
None.
50
2.0 Getting Started
2.10.6.7.5 Example
Note:
• Whenyouwantsend()tosendthecharacters\ and{youneed
to escape those with a backslash. ere is a helper method called
escapeData() in the supplied le extra.lua.
• Ifyouspecifyakeynameforakeythatisnotdened,itwillbe
ignored.
• Whensendingdatatocertainapplicationstheymightmisskey
presses if the key events are sent too fast or too early. You may
need to increase the setting Interkey Delay and/or intersperse
calls to send() with calls to sleep() or ndWindow() depending on
the situation.
2.10.6.8 sendSerialData(data, length)
2.10.6.8.1 Description
Sends serial data to the COM-port.
Note that Link*One needs to be congured to use a COM-port for this
method to work.
2.10.6.8.2 Arguments
Argument Type Description
data String The data to send to the COM-port.
length Number The number of characters of data that
should be sent.
2.10.6.8.3 Returns
Nothing.
2.10.6.8.4 Constants
None.
2.10.6.8.5 Example
2.10.6.9 sendSubscriberData(data, length)
2.10.6.9.1 Description
Sends data to subscribers.
If there are no subscribers, calling this method has no eect.
2.10.6.9.2 Arguments
Argument Type Description
data String The data to send to the COM-port.
length Number The number of characters of data that
should be sent.
2.10.6.9.3 Returns
Nothing.
2.10.6.9.4 Constants
None.
2.10.6.9.5 Example
51
2.0 Getting Started
2.10.7 Windows
2.10.7.1 enumWindows(handle)
2.10.7.1.1 Description
Enumerates all windows.
2.10.7.1.2 Arguments
Argument Type Description
handle Number The handle to the window whose child
windows should be enumerated. Specify
null (0) to enumerate all top level win-
dows.
2.10.7.1.3 Returns
A table containing all the window handles of the enumerated windows.
2.10.7.1.4 Constants
None.
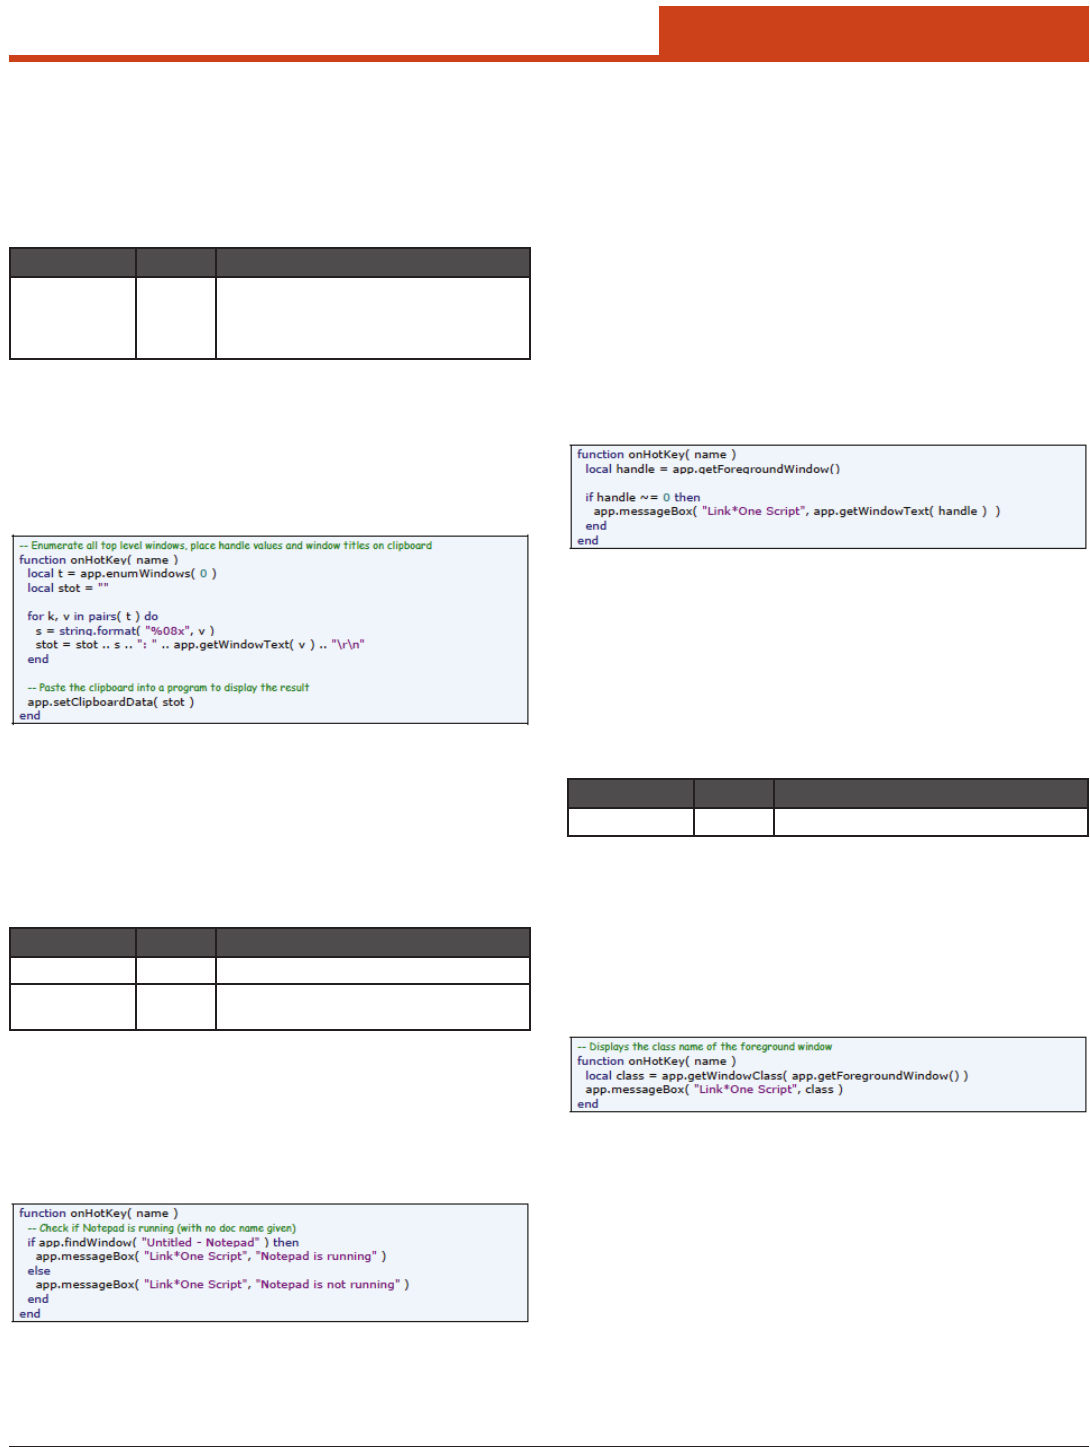
2.10.7.1.5 Example
2.10.7.2 ndWindow(title, class)
2.10.7.2.1 Description
Finds a window with the specied title and class.
2.10.7.2.2 Arguments
Argument Type Description
title String The title of the sought window.
class String,
optional
The window class of the sought window.
2.10.7.2.3 Returns
e window handle if the window is found or null otherwise.
2.10.7.2.4 Constants
None.
2.10.7.2.5 Example
2.10.7.3 getForegroundWindow()
2.10.7.3.1 Description
Gets the handle of the foreground window.
2.10.7.3.2 Arguments
None.
2.10.7.3.3 Returns
e window handle of the foreground window. In special circumstances
this can be null so you need to check the return value before further use
of it.
2.10.7.3.4 Constants
None.
2.10.7.3.5 Example
2.10.7.4 getWindowClass(handle)
2.10.7.4.1 Description
Gets the class name of the specied window.
2.10.7.4.2 Arguments
Argument Type Description
handle Number The handle of the window.
2.10.7.4.3 Returns
A string containing the class name of the window or an empty string if
the class name couldn’t be retrieved.
2.10.7.4.4 Constants
None.
2.10.7.4.5 Example
52
2.0 Getting Started
2.10.7.5 getWindowClass(handle)
2.10.7.5.1 Description
Gets the title of the specied window. is method also works on child
windows such as buttons, edit boxes, and similar controls.
2.10.7.5.2 Arguments
Argument Type Description
handle Number The handle of the window.
2.10.7.5.3 Returns
A string containing the window title of the window or an empty string
if the window text couldn’t be retrieved.
2.10.7.5.4 Constants
None.
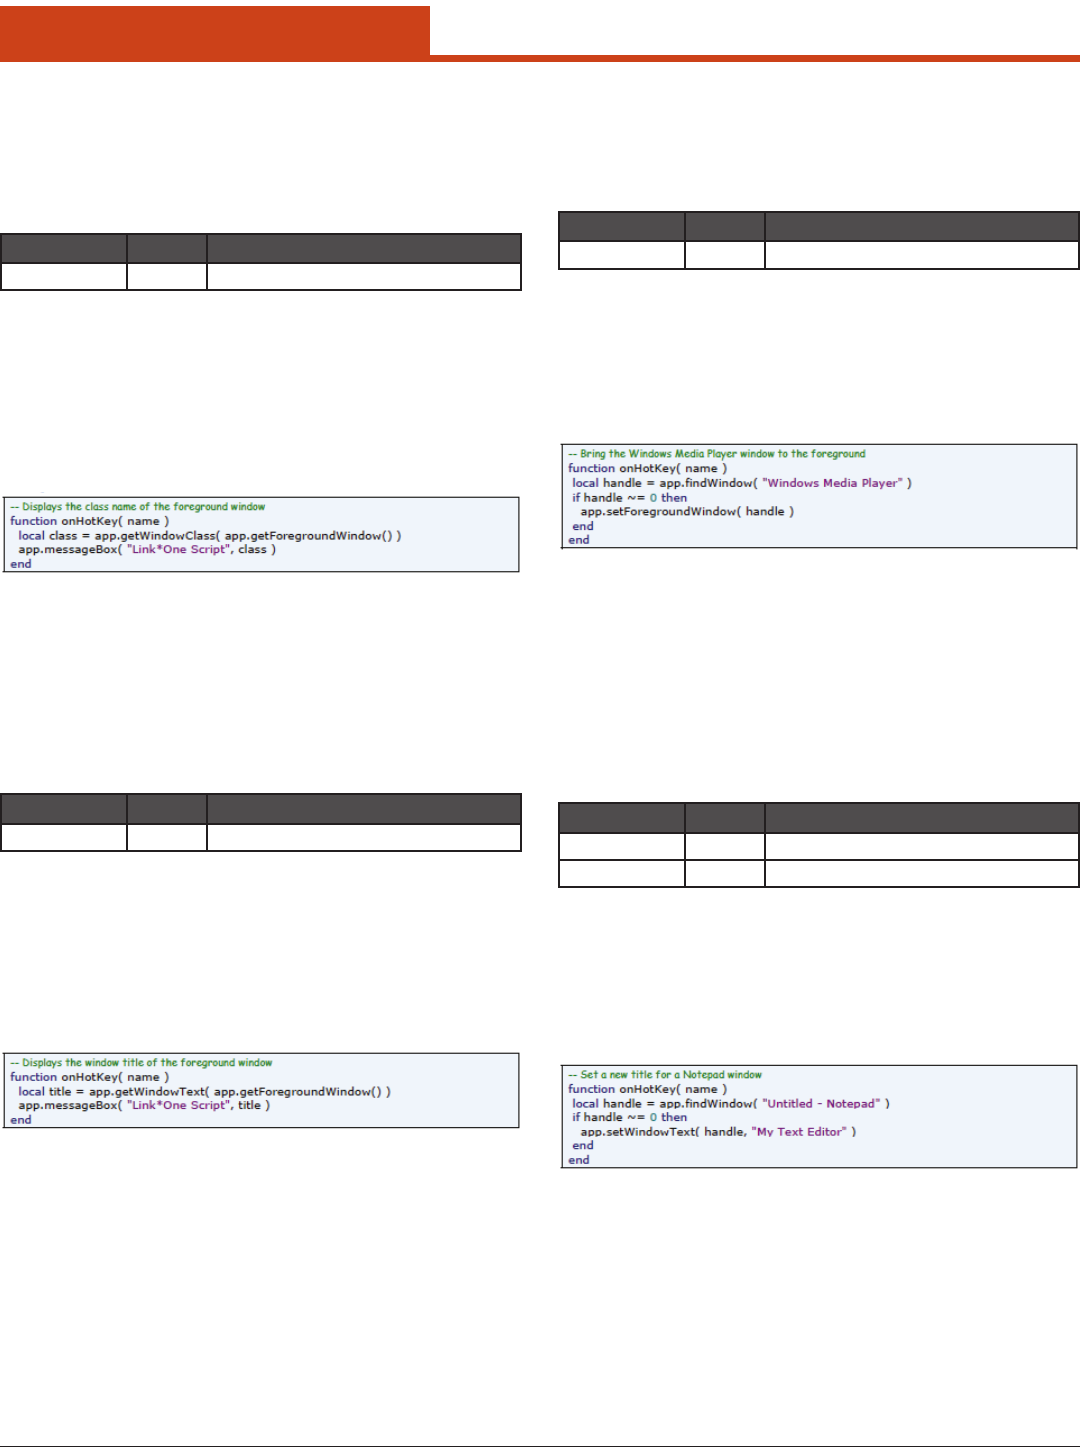
2.10.7.5.5 Example
2.10.7.6 getWindowText(handle)
2.10.7.6.1 Description
Gets the title of the specied window. is method also works on child
windows such as buttons, edit boxes, and similar controls.
2.10.7.6.2 Arguments
Argument Type Description
handle Number The handle of the window.
2.10.7.6.3 Returns
A string containing the window title of the window or an empty string
if the window text couldn’t be retrieved.
2.10.7.6.4 Constants
None.
2.10.7.6.5 Example
2.10.7.7 setForegroundWindow(handle)
2.10.7.7.1 Description
Sets the specied window to be the foreground window.
2.10.7.7.2 Arguments
Argument Type Description
handle Number The handle of the window.
2.10.7.7.3 Returns
Nothing.
2.10.7.7.4 Constants
None.
2.10.7.7.5 Example
2.10.7.8 getWindowText(handle, text)
2.10.7.8.1 Description
Sets the title of the specied window. is method also works on child
windows such as buttons, edit boxes, and similar controls.
2.10.7.8.2 Arguments
Argument Type Description
handle Number The handle of the window.
text String The title to set.
2.10.7.8.3 Returns
true if successful, false otherwise.
2.10.7.8.4 Constants
None.
2.10.7.8.5 Example
53
2.0 Getting Started
2.10.7.9 windowOperation(handle, operation)
2.10.7.9.1 Description
Executes a window operation.
2.10.7.9.2 Arguments
Argument Type Description
handle Number The handle of the window.
operation Number The operation to perform on the window.
2.10.7.9.3 Returns
Nothing.
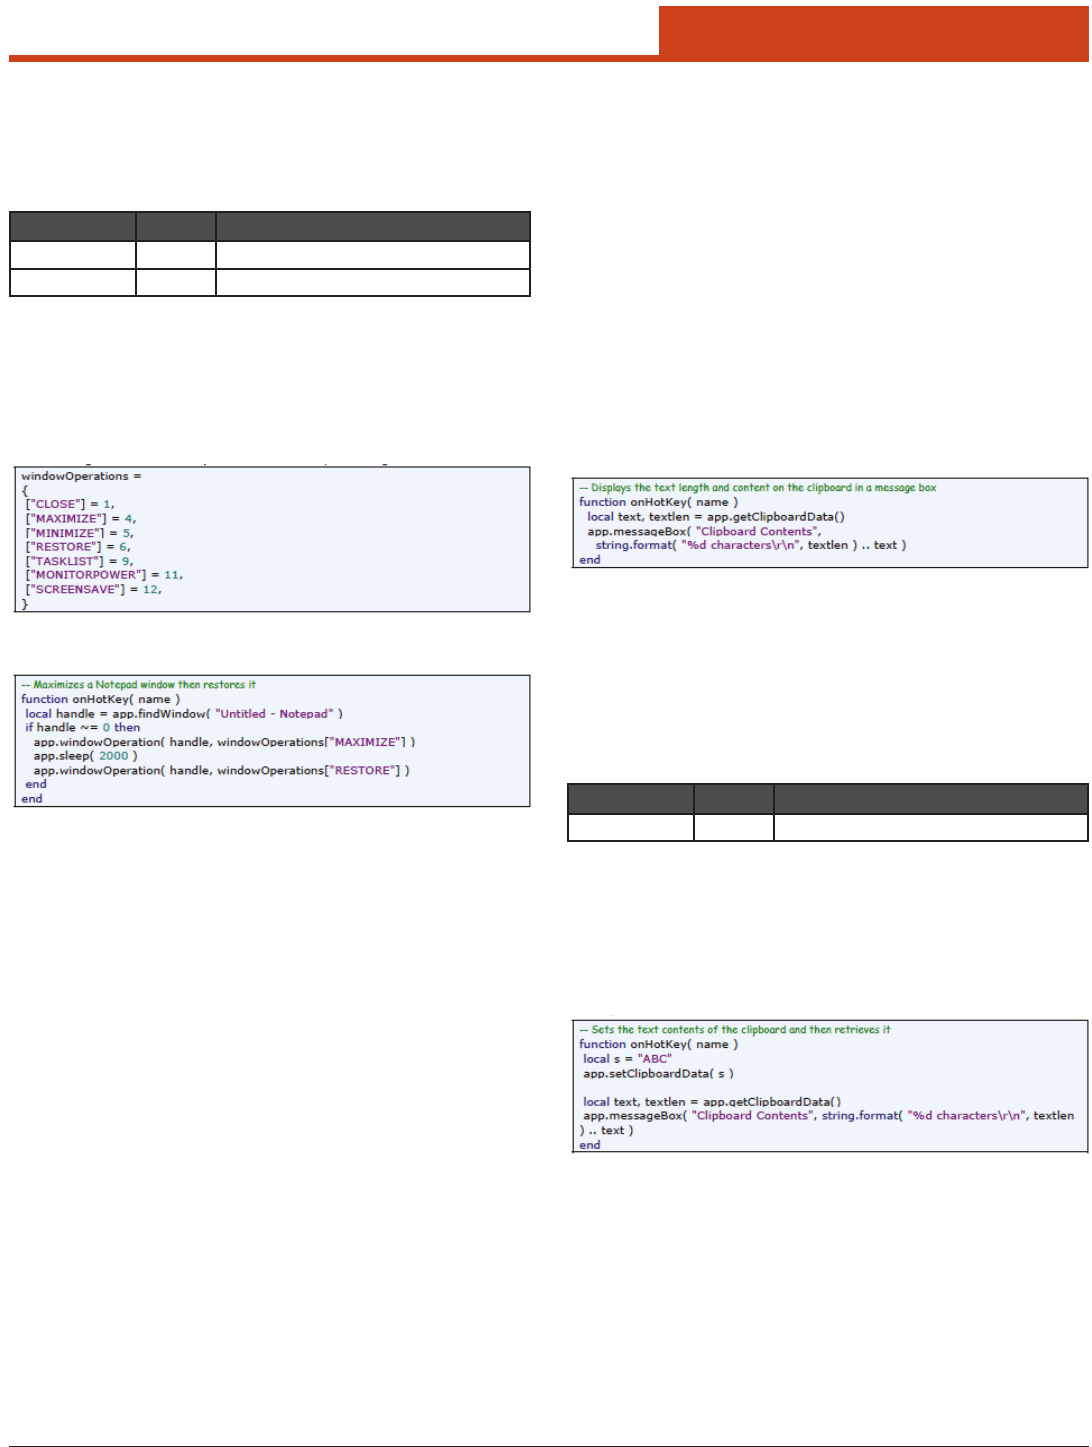
2.10.7.9.4 Constants
e following constants dene the possible values of the operation argu-
ment:
2.10.7.9.5 Example
2.10.8 Clipboard
2.10.8.1 getClipboardData( )
2.10.8.1.1 Description
Gets the text from the clipboard.
2.10.8.1.2 Arguments
None.
2.10.8.1.3 Returns
e text contents on the clipboard as a string and the length of the data.
If the call fails or the clipboard doesn’t have any text, an empty string
and zero length is returned. Note that the terminating null is counted.
2.10.8.1.4 Constants
None.
2.10.8.1.5 Example
2.10.8.2 setClipboardData(text)
2.10.8.2.1 Description
Sets the text on the clipboard.
2.10.8.2.2 Arguments
Argument Type Description
text String The text to set.
2.10.8.2.3 Returns
Nothing.
2.10.8.2.4 Constants
None.
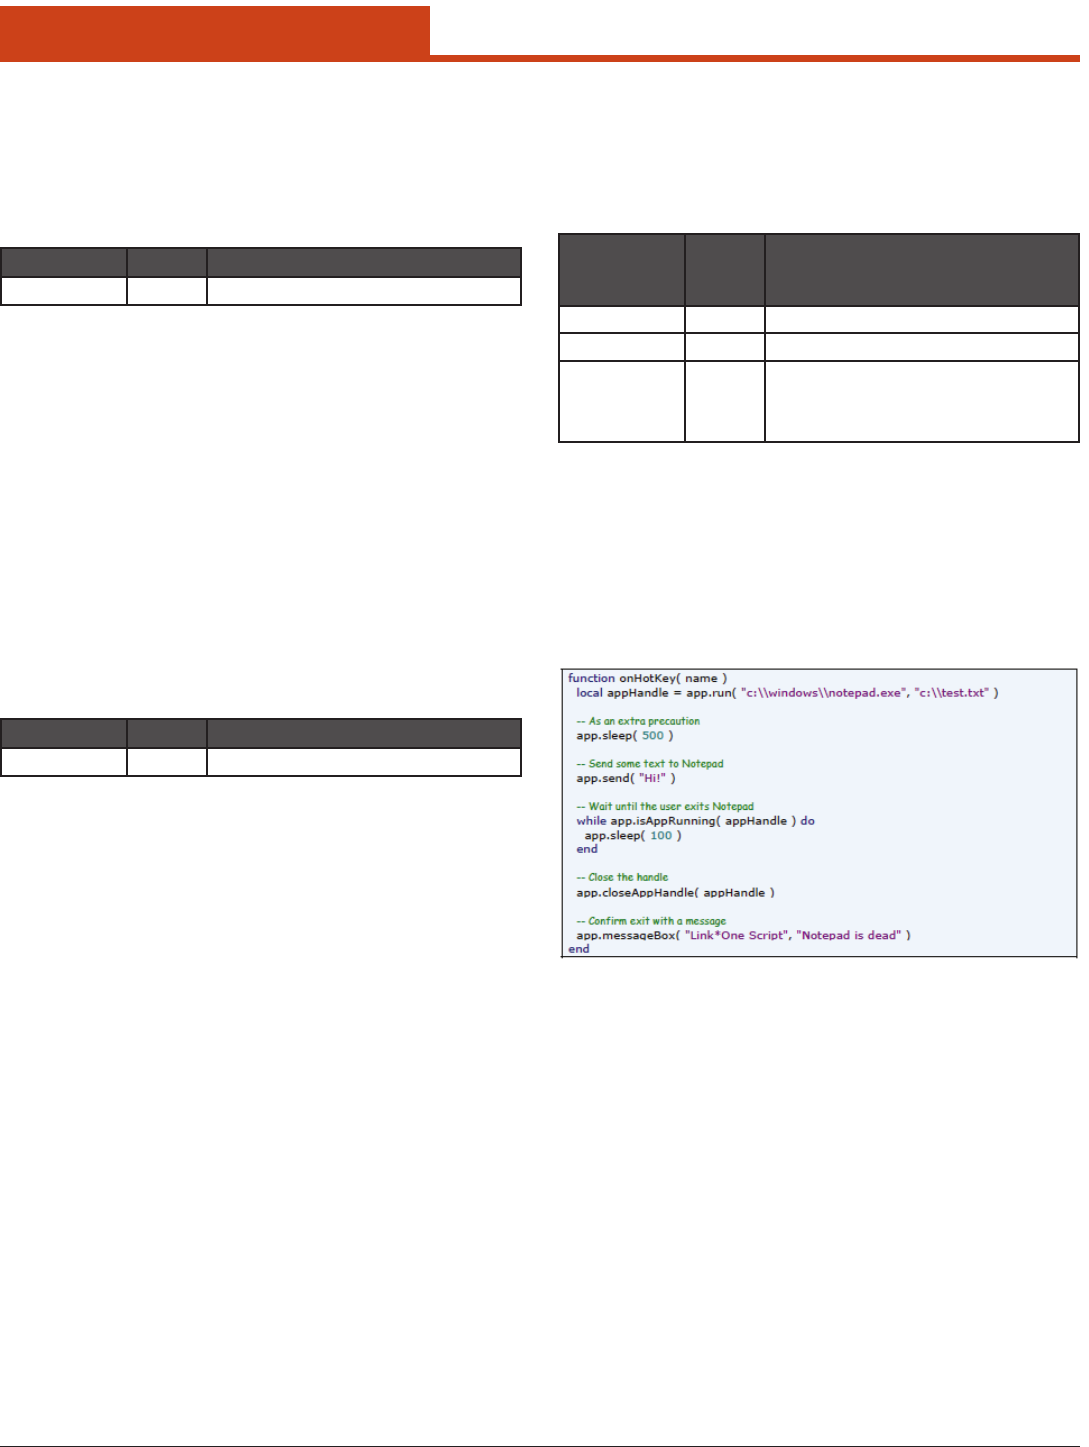
2.10.8.2.5 Example
54
2.0 Getting Started
2.10.9 Application Launch
2.10.9.1 closeAppHandle(handle)
2.10.9.1.1 Description
Closes the application handle.
2.10.9.1.2 Arguments
Argument Type Description
handle Number The application handle.
2.10.9.1.3 Returns
Nothing.
2.10.9.1.4 Constants
None.
2.10.9.1.5 Example
See the run() method.
2.10.9.2 isAppRunning(handle)
2.10.9.2.1 Description
Determines if an application is still running.
2.10.9.2.2 Arguments
Argument Type Description
handle Number The application handle.
2.10.9.2.3 Returns
Nothing.
2.10.9.2.4 Constants
true if the application is still running, false otherwise.
2.10.9.2.5 Example
See the run() method.
2.10.9.3 run(program, argument, delay)
2.10.9.3.1 Description
Displays a message box with the specied title and message. e type
argument species the number and type of buttons used.
2.10.9.3.2 Arguments
The full
path to the
executable.
Type Description
program String The full path to the executable.
argument String The command line argument string.
delay Number,
optional
The number of milliseconds to wait until
the started application is waiting for user
input. If this argument isn’t specied, the
default wait time is 10000 ms.
2.10.9.3.3 Returns
e application handle. Note that this handle needs to be closed with
the method closeAppHandle() to avoid memory leaks.
If the application couldn’t be started, a runtime error occurs.
2.10.9.3.4 Constants
None.
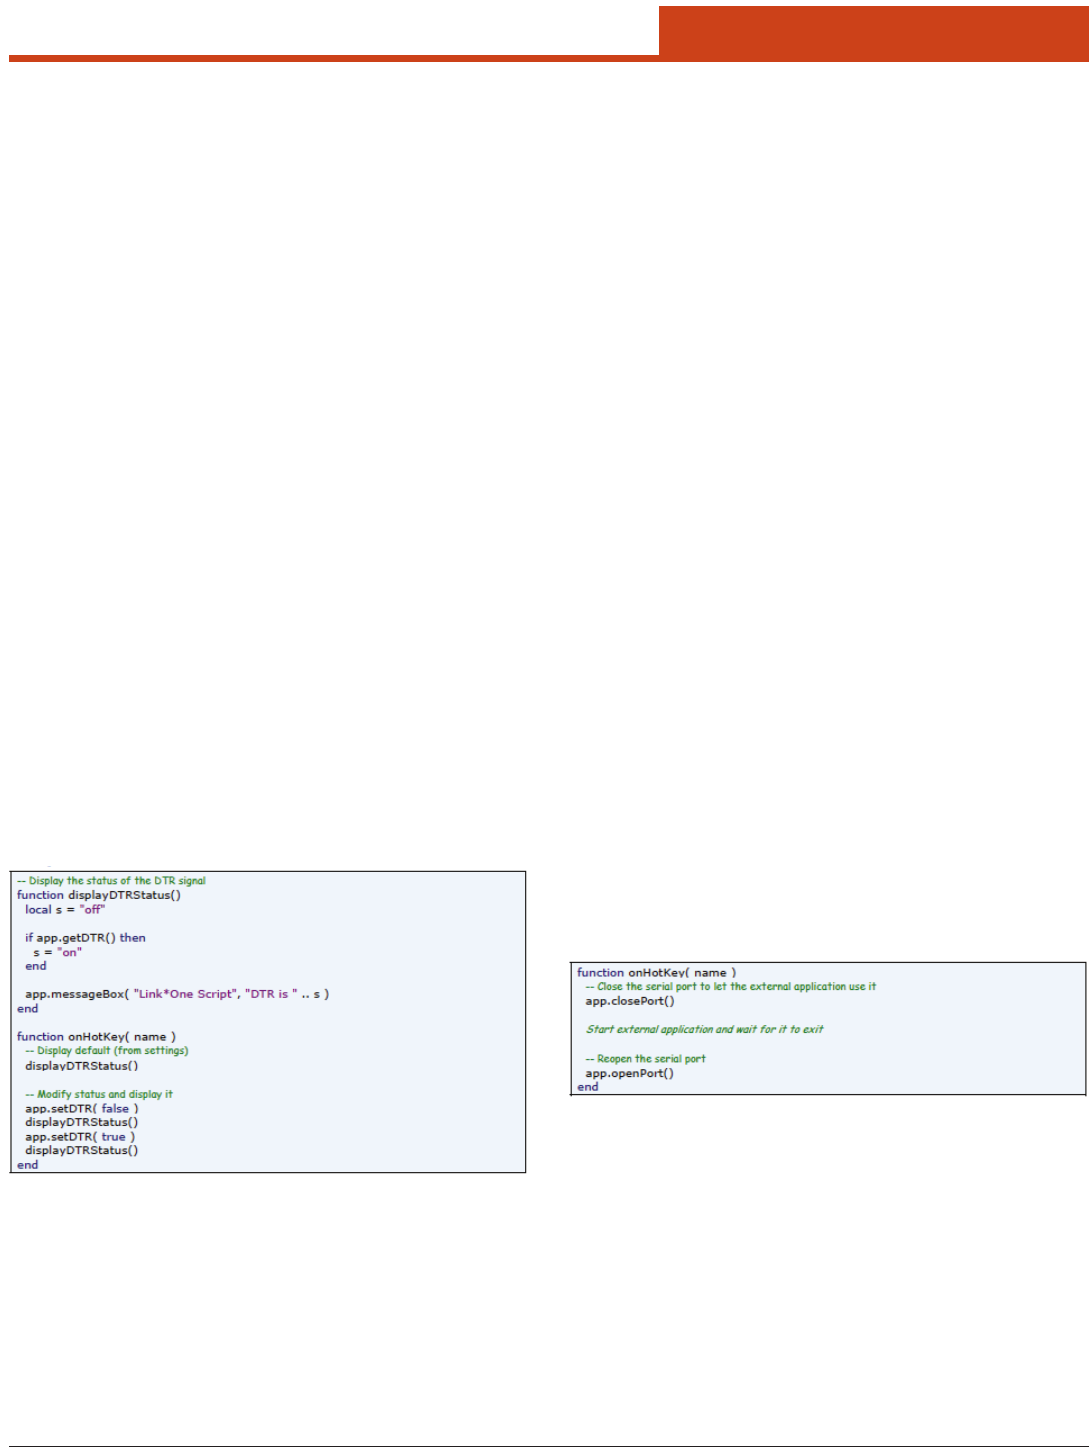
2.10.9.3.5 Example
55
2.0 Getting Started
2.10.10 Serial Port
2.10.10.1 closePor t( )
2.10.10.1.1 Description
Closes the serial port.
2.10.10.1.2 Arguments
None.
2.10.10.1.3 Returns
Nothing.
2.10.10.1.4 Constants
None.
2.10.10.1.5 Example
See the openPort() method.
2.10.10.2 getDTR( )
2.10.10.2.1 Description
Gets the status of the DTR signal of the serial port. DTR is an output
signal.
2.10.10.2.2 Arguments
None.
2.10.10.2.3 Returns
A boolean which indicates the DTR signal status (true = high, false
= low).
2.10.10.2.4 Constants
None.
2.10.10.2.5 Example
2.10.10.3 getRTS( )
2.10.10.3.1 Description
Gets the status of the RTS signal of the serial port. RTS is an output
signal.
2.10.10.3.2 Arguments
None.
2.10.10.3.3 Returns
A boolean which indicates the RTS signal status (true = high, false =
low).
2.10.10.3.4 Constants
None.
2.10.10.3.5 Example
See the getDTR() method.
2.10.10.4 openPor t( )
2.10.10.4.1 Description
Opens the serial port.
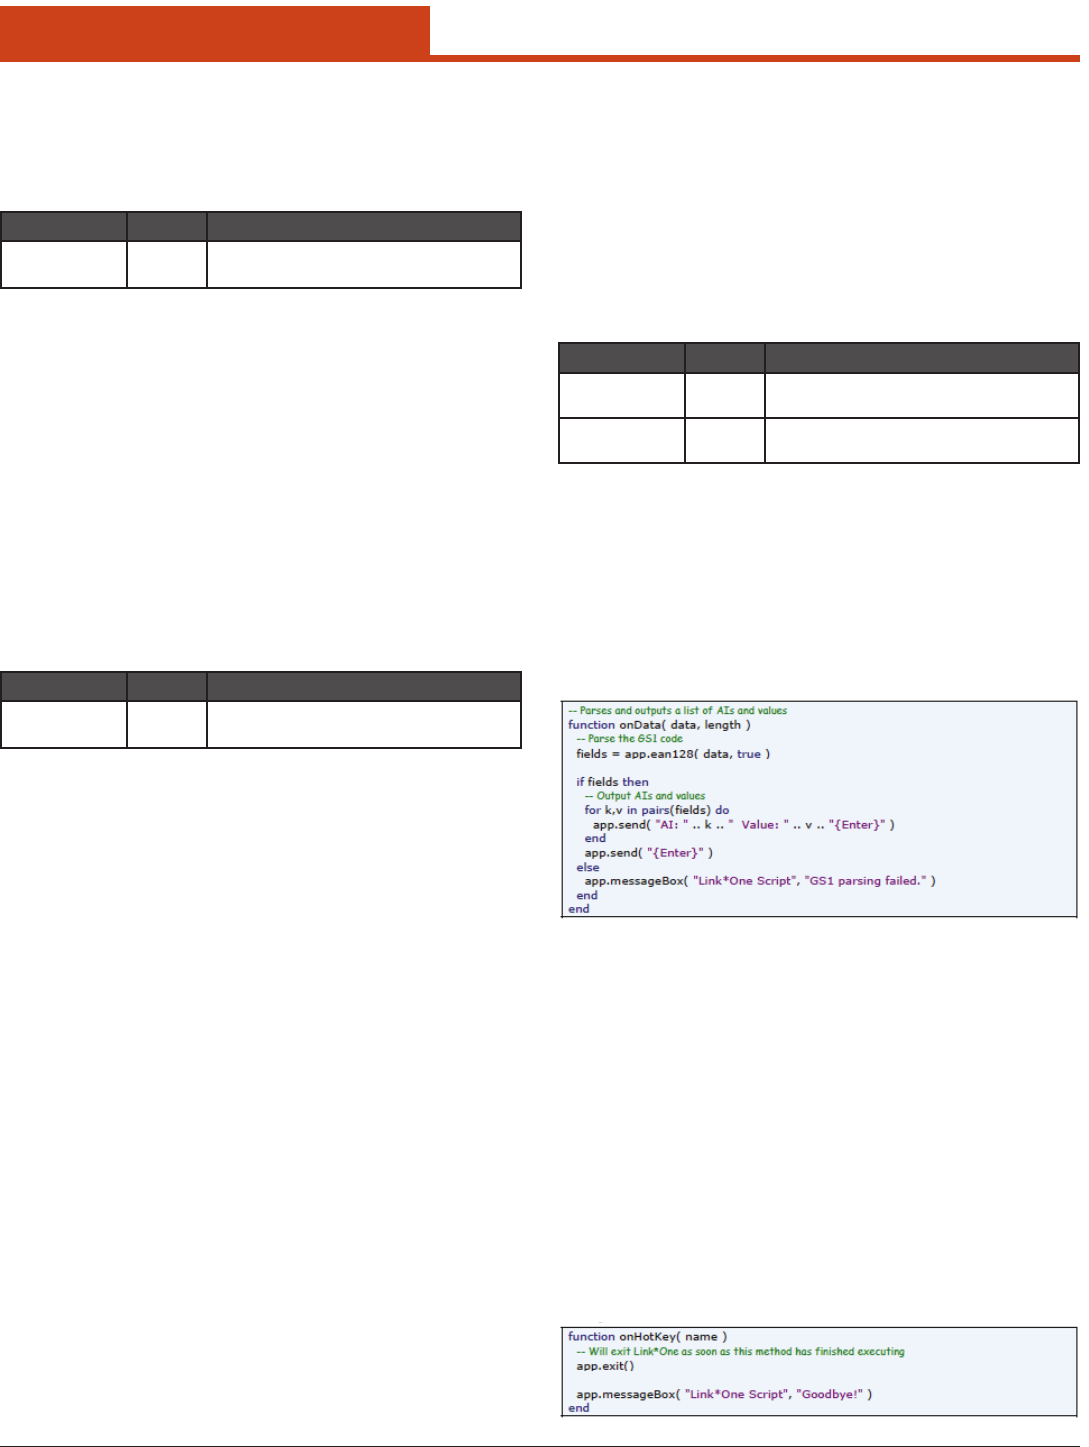
openPort() and closePort() can be used when you need to release
the serial port, start an application that uses the port for a while, and
then reopen the port.
2.10.10.4.2 Arguments
None.
2.10.10.4.3 Returns
A boolean indicating if the port could be opened. If the port is being
held open by another application a call to this method will return false.
2.10.10.4.4 Constants
None.
2.10.10.4.5 Example
Note: is is only a code fragment.
56
2.0 Getting Started
2.10.10.5 setDTR(status)
2.10.10.5.1 Description
Sets the status of the DTR signal. DTR is an output signal.
2.10.10.5.2 Arguments
Argument Type Description
status Boolean The status to set, (true = high, false =
low).
2.10.10.5.3 Returns
Nothing.
2.10.10.5.4 Constants
None.
2.10.10.5.5 Example
See the getDTR() method.
2.10.10.6 setRTS(statu s)
2.10.10.5.1 Description
Sets the status of the RTS signal. RTS is an output signal.
2.10.10.5.2 Arguments
Argument Type Description
status Boolean The status to set, (true = high, false =
low).
2.10.10.5.3 Returns
Nothing.
2.10.10.5.4 Constants
None.
2.10.10.5.5 Example
See the getRTS() method.
2.10.11 Miscellaneous
2.10.11.1 ean128(data, strict)
2.10.11.1.1 Description
Parses the contents of a GS1-128 code (earlier called UCC-128 or EAN-
128). For variable length elds followed by another eld, the data must
be delimited by a Group Separator (GS, ASCII 29, hex 1D).
Please refer to http://www.gs1.org for information about GS1 Ap-
plication Identiers.
2.10.11.1.2 Arguments
Argument Type Description
data String The GS1-128 data to be parsed and split
into separate elds.
strict Boolean In strict mode, spaces are not allowed in
alphanumeric elds.
2.10.11.1.3 Returns
A table where the keys are the Application Identiers (AIs) and the val-
ues are the contents of the elds. If the parsing fails, a nil value is re-
turned. e parsing can fail if the code is not a GS1 code or if the code
doesn’t follow the standard.
2.10.11.1.4 Constants
None.
2.10.11.1.5 Example
2.10.11. 2 exit( )
2.10.11.2.1 Description
Exits Link*One. Please note that the exit is not immediate, Link*One
will exit as soon as the current script has nished executing.
2.10.11.2.2 Arguments
None.
2.10.11.2.3 Returns
Nothing.
2.10.11.2.4 Constants
None.
2.10.11.2.5 Example
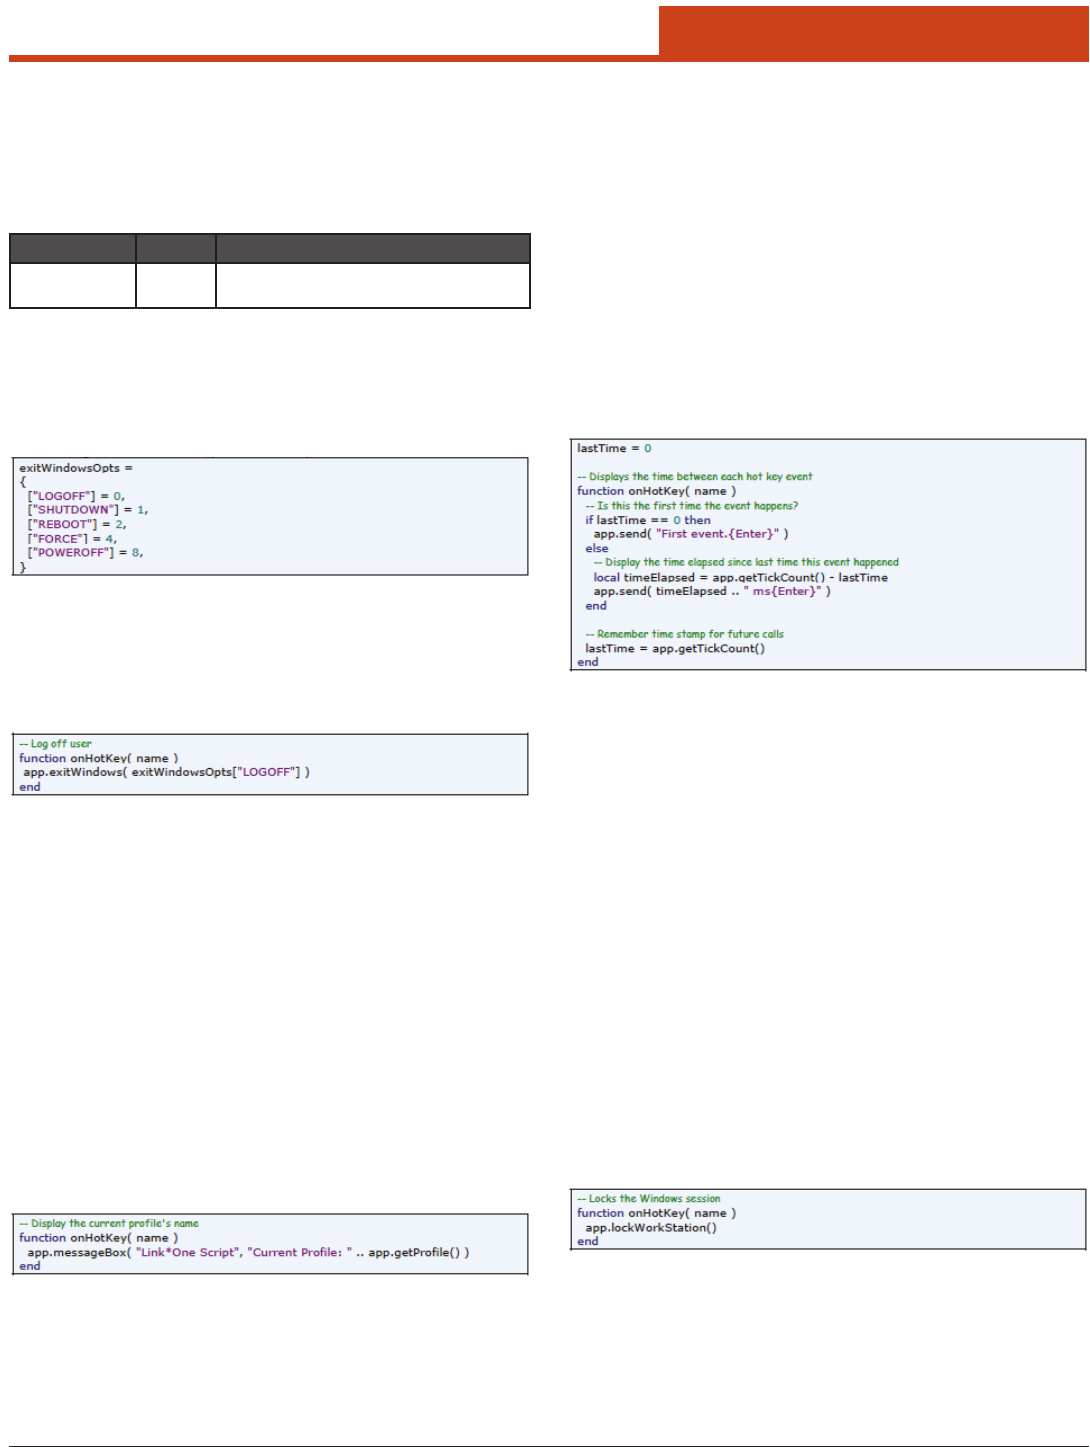
57
2.0 Getting Started
2.10.11.3 exitWindows(options)
2.10.11.3.1 Description
Either logs o the current user, shuts down the PC, or shuts down and
restarts the PC.
2.10.11.3.2 Arguments
Argument Type Description
options Number,
optional
Type of action to be performed.
2.10.11.3.3 Returns
Nothing.
2.10.11.3.4 Constants
e following constants dene the type of action to be performed:
Please note that the default value for options is Logo (0). e Force
(4) value must be used in combination with Logo (0), Shutdown (1),
Reboot (2), or Powero (8). Use Force (4) with care since it will end ap-
plications without asking the user to save data.
2.10.11.3.5 Example
2.10.11. 4 get Prole( )
2.10.11.4.1 Description
Gets the current Link*One prole.
2.10.11.4.2 Arguments
None.
2.10.11.4.3 Returns
A string containing the name of the current prole.
2.10.11.4.4 Constants
None.
2.10.11.4.5 Example
2.10.11.5 getTickCount( )
2.10.11.5.1 Description
Gets the number of milliseconds elapsed since the system was started.
is method can for example be used to take time between events in
Link*One.
2.10.11.5.2 Arguments
None.
2.10.11.5.3 Returns
e number of milliseconds elapsed since the system was started.
2.10.11.5.4 Constants
None.
2.10.11.5.5 Example
2.10.11.6 lockWorkStation()
2.10.11.6.1 Description
Locks Windows.
2.10.11.6.2 Arguments
None.
2.10.11.6.3 Returns
true if successful, false otherwise.
2.10.11.6.4 Constants
None.
2.10.11.6.5 Example
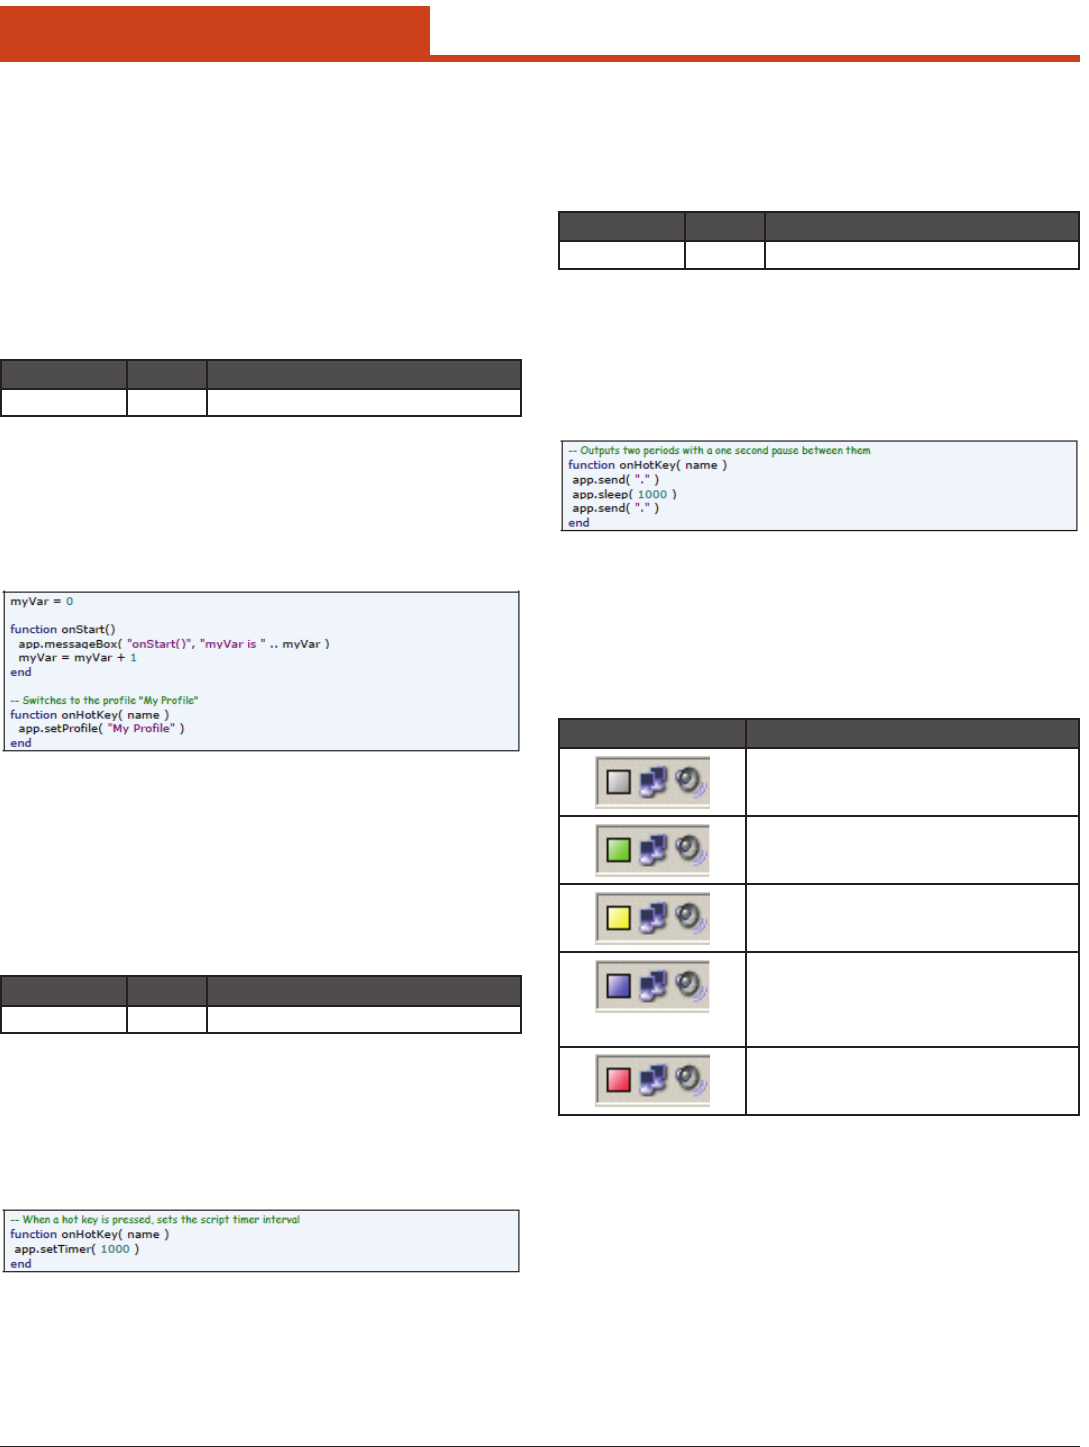
58
2.0 Getting Started
2.10.11.7 setProle(prole)
2.10.11.7.1 Description
Sets the current prole in Link*One.
Please note that a prole change reinitializes the Lua script engine and
because of this, any information held in global variables will be lost. If
you need any information to survive over a prole switch, you will need
to store it in a le.
e actual switch is delayed until the script has nished executing the
current method.
2.10.11.7.2 Arguments
Argument Type Description
prole String The name of the prole to switch to.
2.10.11.7.3 Returns
Nothing.
2.10.11.7.4 Constants
None.
2.10.11.7.5 Example
2.10.11.8 setTimer(interval)
2.10.11.8.1 Description
Sets the script timer to the specied interval. is is the same setting as
on the Misc tab in the Settings dialog. To turn o the timer, specify zero
as the interval.
2.10.11.8.2 Arguments
Argument Type Description
interval Number The timer interval to set.
2.10.11.8.3 Returns
Nothing.
2.10.11.8.4 Constants
None.
2.10.11.8.5 Example
2.10.11.9 sleep(duration)
2.10.11.9.1 Description
Delays the script for the specied time.
2.10.11.9.2 Arguments
Argument Type Description
duration Number The time to wait.
2.10.11.9.3 Returns
Nothing.
2.10.11.9.4 Constants
None.
2.10.11.9.5 Example
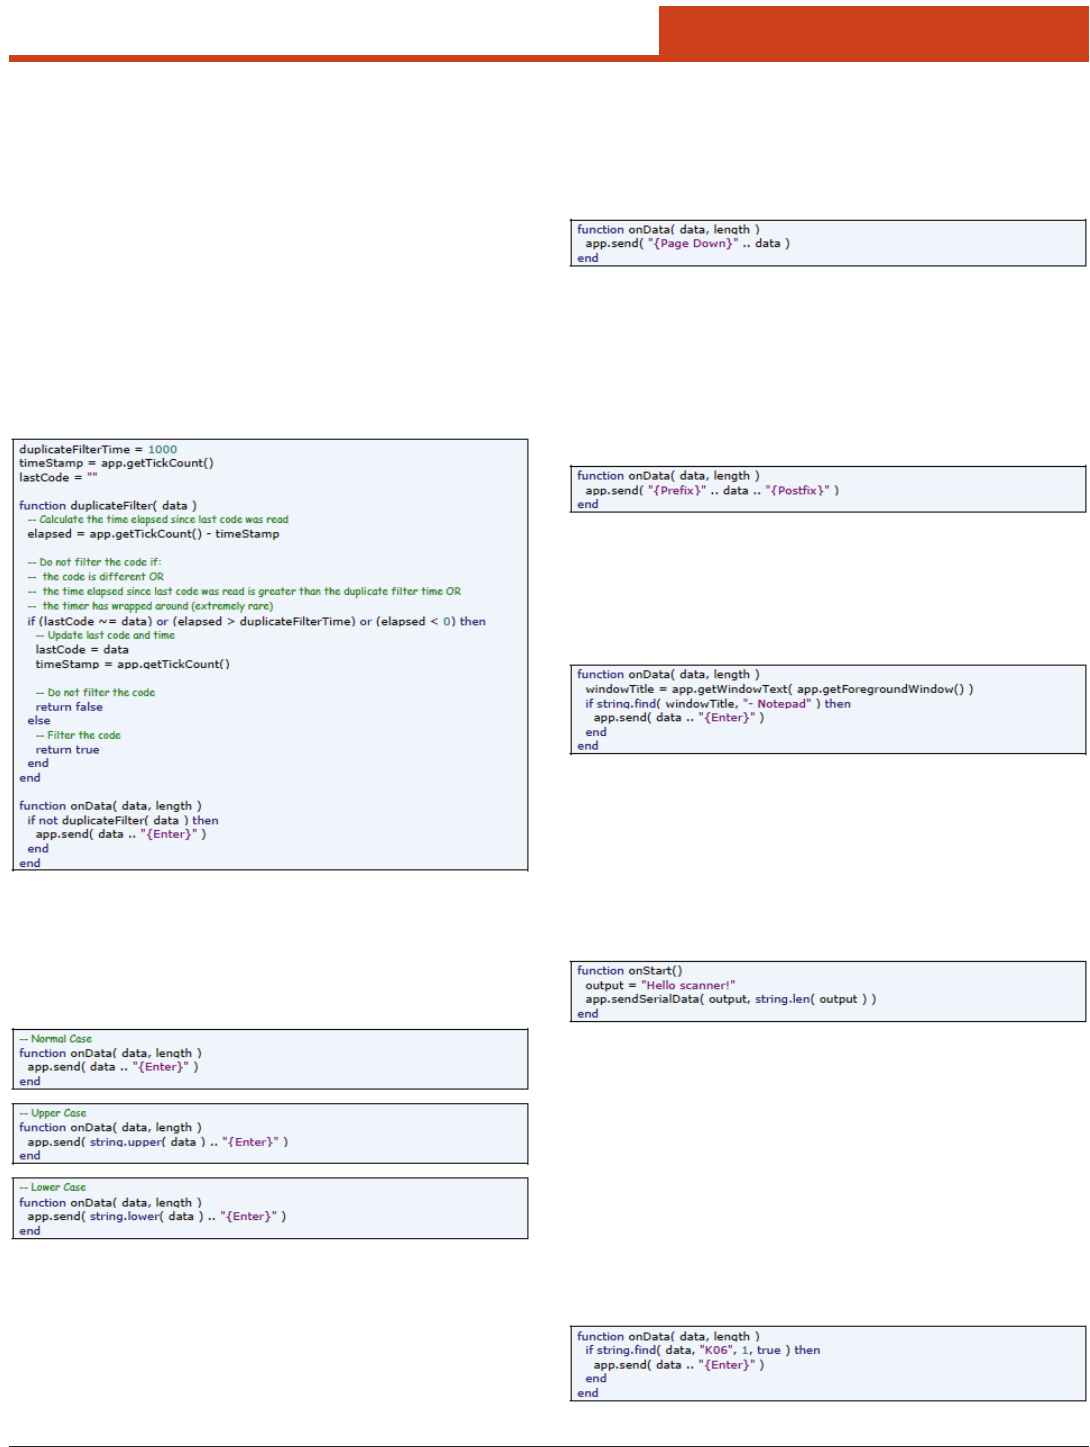
2.10.12 Notication Area Icon
When started, Link*One adds an icon to the notication area (also
called the Systray sometimes). It is used to indicate dierent states and
events. Please note that the icon can also be modied by a script.
Appearance Explanation
Link*One is idle.
Data was received from the serial port.
Data was sent to the serial port.
A serial hardware pin event was triggered.
OR
Data was received through a keyboard
capture denition.
The serial port specied in the prole could
not be opened.
59
2.0 Getting Started
2.10.13 Migration guide WLinq 3.x to
Link*One
Link*One is based on the earlier product called WLinq. Many functions
present in WLinq (3.x) has been removed in Link*One. e reason for
this is to simplify Link*One and to avoid confusion if there are more
than one way to achieve a task.
is guide is meant to ease the transition from WLinq 3.x data formats
to the new script based approach in Link*One. Other types of features
that has been aected are also explained in this chapter.
2.10.13.1 Duplicate String Filter
e Duplicate String Filter function has been removed from the
Communications tab in the Settings window. e equivalent
function can be achieved in a script:
2.10.13.2 Case Setting
e Case Setting function has been removed from the Keyboard
tab in the Settings window. To achieve the same in a script, use the
appropriate sample from below:
2.10.13.3 Character Translation
In WLinq 3.x, the only way to have WLinq press special keys like Home,
Page Down, and similar was awkward. First you had to choose a char-
acter position, then redene that position to map the character to for
example the Home key. en in the data output format, you had to use
that character in the output string, for example: Input() + “\x81”.
Link*One has no character translation table, instead you can record a
custom key sequence and give it a name. See Section 2.9.4.2.2 Key
Settings for instructions on creating a custom key sequence.
e key name can then be used as an expression in the string passed to
the send() method:
2.10.13.4 Send Pre- and Postx Keys
is feature mainly existed for the integration of WLinq to Freeoat
Access*One. When activated, the key sequence Ctrl + Alt + 1 was sent
before the data string and Ctrl + Alt + 2 was sent aer the data string. It
enabled Access*One to distinguish between keyboard and barcode data.
To achieve the same result, record the key sequences and given them the
names{Prex}and{Postx}andthenusetheminanexpression:
2.10.13.5 Lock Output Window
e Lock Output Window function can be implemented in a script.
e following script only sends data to a window who’s title contain the
text “- Notepad”:
2.10.13.6 Initialization String
e Initialization String can be used for sending a command to for
example a barcode scanner that needs some enabling or conguration
command at startup.
In Link*One, the following script could instead be used to send com-
mands to the equipment attached to the serial port:
Note: onStart() is called when a prole is activated. is happens
when Link*One starts but also when you click OK in the Set-
tings dialog. Similarly, onEnd() is called when Link*One is
exited and also when the Settings dialog is entered by clicking
the Settings button in the main window.
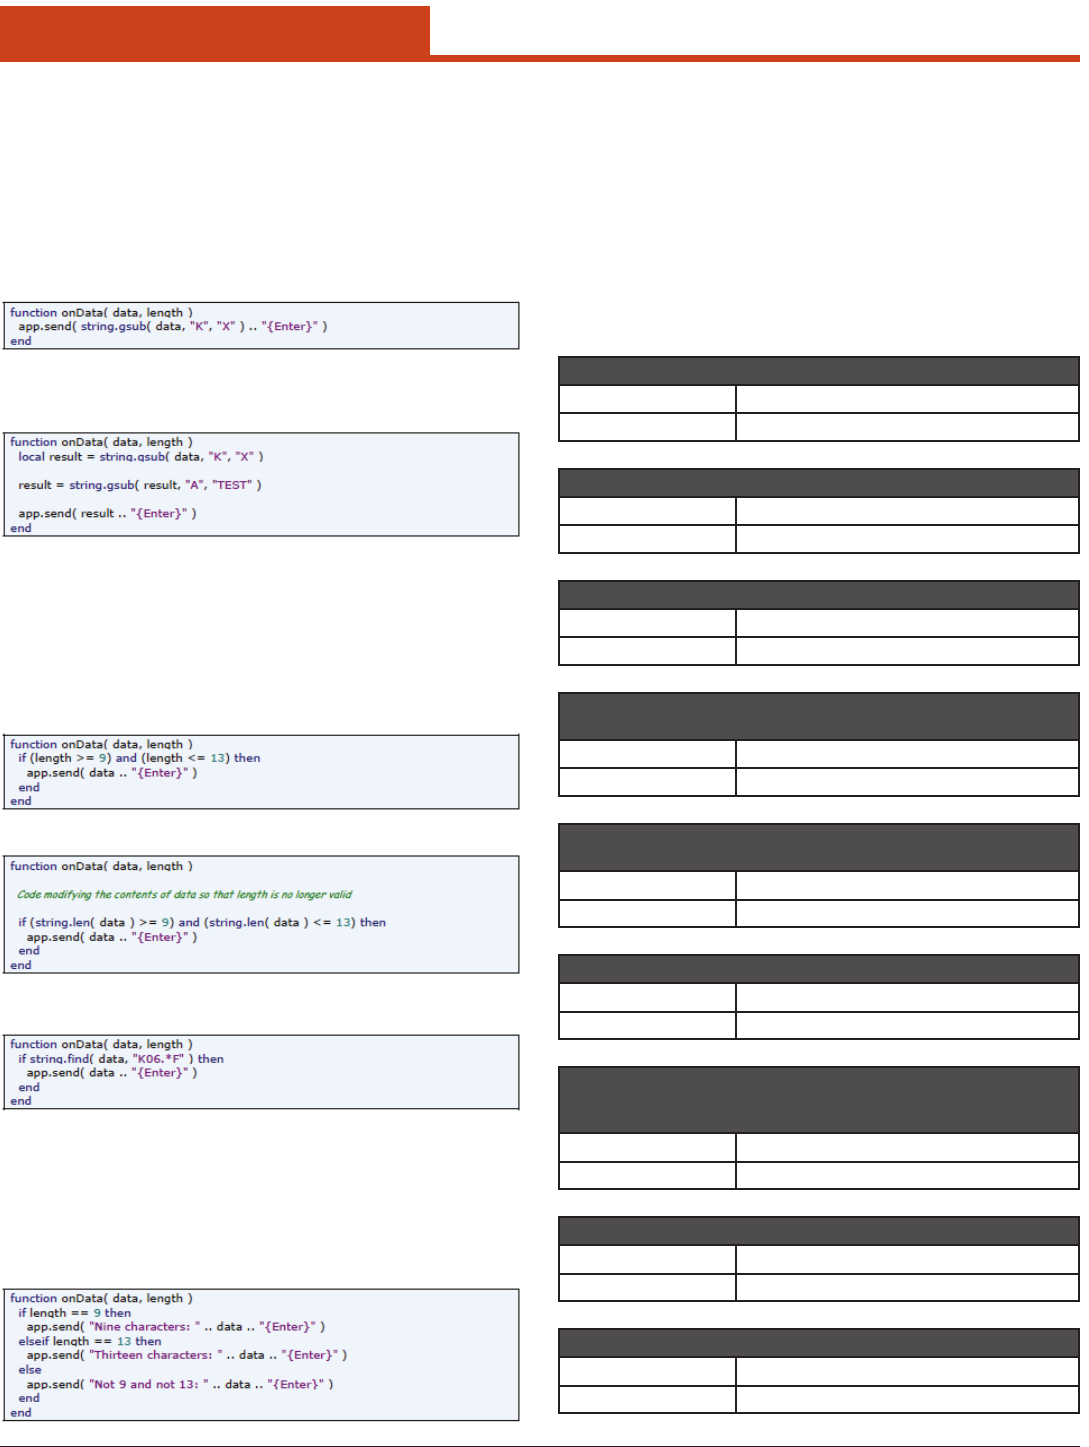
2.10.13.7 Filter Unknown Data Strings
In WLinq 3.x, if no data editing format matched the input data, the op-
tion Filter Unknown Data Strings determined whether the input data
should be discarded or let through unmodied. e same eect can eas-
ily be implemented in a Link*One script:.
60
2.0 Getting Started
e above script makes Link*One lter all input data that doesn’t start
with the characters K06.
2.10.13.8 Input Data Replacements
e replacement function in earlier WLinq versions was quite easy to
use.Butitlackedpowerandexibility.Belowisanexampleofasimple
substring replacement. It replaces all occurrences of the character K
with the character X.
Multiple replacements can be done by storing the result in a string vari-
able and repeat the process. Here K is replaced with X and A is replaced
with TEST.
2.10.13.9 Criteria
In the previous WLinq generation, a data format was activated for a data
string when the criteria of the data format matched. Two types of crite-
ria were supported, length and pattern.
In Link*One the same function as a length criteria is implemented using
an if-statement.
An alternative approach could be:
A pattern criteria like the one above could be implemented using the
string.nd() pattern matching method:
e format used for patterns in string.nd() and the format in WLinq
3.x is dierent. Please refer to the Lua documentation for the Lua pat-
tern format.
A big advantage with scripting in Link*One is that more complex deci-
sions can be made, for example mixing length and pattern matching,
something that was not possible in WLinq 3.x. Multiple criteria used in
WLinq 3.x can be implemented by chaining if-elseif-statements:
2.10.13.10 Data Format Out put
In a WLinq 3.x data format, expressions was entered into the data format
output edit box and combined with plus (+). In Link*One, all the string
operations are using the facilities of the embedded script language. To
make Link*One simulate a possibly modied string as keyboard output,
you need to pass the string to the method app.send().
Use the table below as a guide for converting expressions in WLinq 3.x
to Link*One. Most string operations in WLinq 3.x operated on the data
input string implicitly. In Link*One, the data string is an argument sent
to the script methods onData(), onKeyboardCapture(), and on-
ExternalData().
Constant String
WLinq 3.x Link*One
“ABC” “ABC”
Extract a substring from the start of the string
WLinq 3.x Link*One
Left( 3 ) string.sub( data, 1, 3 )
string.sub( data, -3 )
WLinq 3.x Link*One
Right( 3 ) string.sub( data, -3 )
Extract characters from position three up to position four.
Please note the difference in parameters!
WLinq 3.x Link*One
Mid( 3, 2 ) string.sub( data, 3, 4 )
From the rst A in the string, extract ve characters includ-
ing the A
WLinq 3.x Link*One
Mid( “A”, 5 ) string.gsub( data, “.*(A....).*”, “%1” )
Extracts characters from position six to the end of the string
WLinq 3.x Link*One
Mid( 6 ) string.sub( data, 6 )
Scans for the rst string and extracts all characters up to
the second string.
23 and CD is not included in the result.
WLinq 3.x Link*One
SubStr( “23”, “CD” ) string.gsub( data, “.*23(.*)CD.*”, “%1” )
The entire data string
WLinq 3.x Link*One
Input() data
Inserts the current date in the specied format
WLinq 3.x Link*One
Date( “%Y-%m-%d” ) os.date( “%Y-%m-%d” )
61
2.0 Getting Started
Inserts the current time in the specied format
WLinq 3.x Link*One
Time( “%H:%M” ) os.date( “%H:%M” )
Concatenations of expressions
WLinq 3.x Link*One
“X” + Left( 2 ) + Right(
2 )
“X” .. string.sub( data, 1, 2 ) .. string.sub(
data, -2 )
Control characters
WLinq 3.x Link*One
“<cr>< tab>” “{13}{9}”
“\x09” “{9}”
“\d013” “{13}
Combining text and key presses
WLinq 3.x Link*One
Input() + “<tab>1<cr>” data .. “{Tab}1{Enter}”
Reboot Windows
WLinq 3.x Link*One
Reboot() app.exitWindows( exitWindowsOpts[“REBOOT”] )
Reboot Windows (forced)
WLinq 3.x Link*One
RebootForced() app.exitWindows( exitWindowsOpts[“FORCE”] )
Starts the specied program
WLinq 3.x Link*One
RunApp( “notepad.
exe” )
h = app.run( “notepad.exe” )
closeAppHandle( h )
Please note that the Link*One sample code below more realistically
demonstrates what is needed when switching to another application. A
small delay is needed before sending input to the activated window or
characters may be lost. Also the example avoids an unnecessary delay
when the target window already is the foreground window.
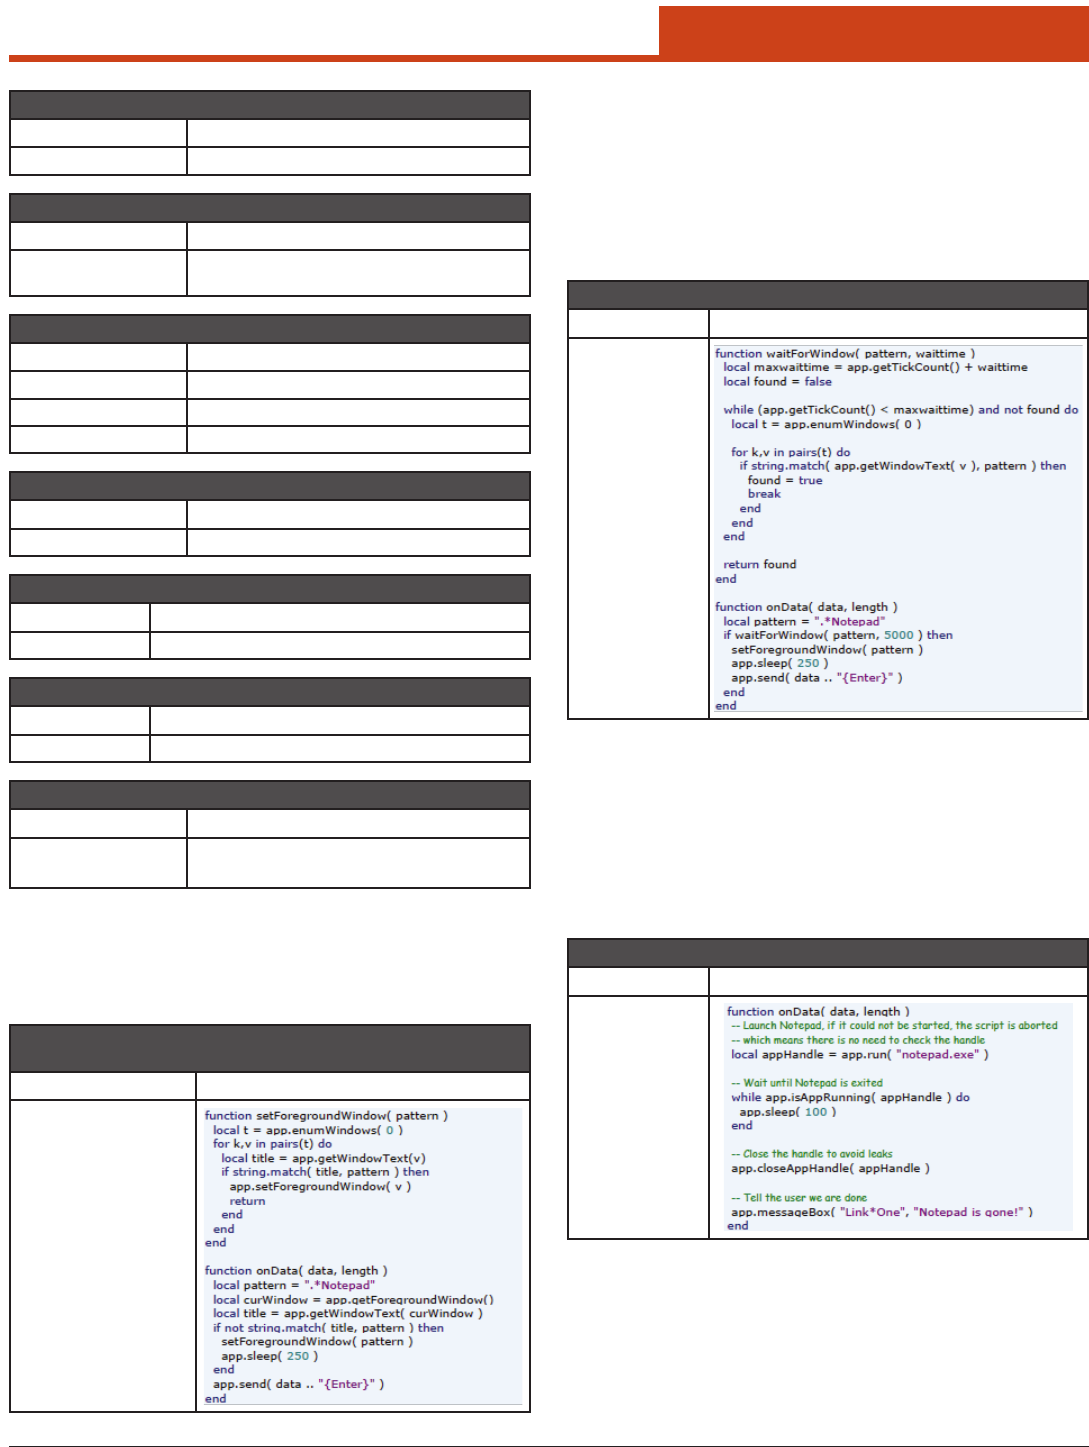
Activates the rst window that has a caption that matches
the window caption pattern
WLinq 3.x Link*One
SetFocus( “*Notepad” )
ere is no direct equivalent function for the WLinq 3.x WaitForWin-
dow. Below is a full example of a script which waits for a Notepad win-
dow to appear, activates the window, and aer a small delay sends the
data to the window.
Some common situations where you need to wait for a window are when
waiting for an Open dialog to appear (aer sending Ctrl+O) or when
you have launched an application with app.run() and need to wait for it
to be ready to receive input.
Wait for a window to appear
WLinq 3.x Link*One
WaitForWindow(
“*Notepad”,
3000 )
No direct equivalent function for WaitForAppExit() exists in Link*One.
e same result can be achieved by using app.isAppRunning().
Even though the sample below demonstrates a script that pauses until
you exits Notepad, Link*One is not intended to have a script that inter-
act with the user (except for app.messageBox()) since there may be side
eects.
app.isAppRunning() is intended to be used to synchronize the script
with an external application that does its job and then exits.
Wait for a window to appear
WLinq 3.x Link*One
WaitForAppExit(
30000 )
If a script calls app.closePort(), the script can start an external ap-
plication that uses the same serial port. When that external application
is exited, the script can re-open the serial port by calling app.open-
Port().
62
2.0 Getting Started
Open the serial port
WLinq 3.x Link*One
OpenPort() app.openPort()
Close the serial port
WLinq 3.x Link*One
ClosePort() app.closePort()
Send data to the serial port
WLinq 3.x Link*One
SendData( “abc” ) data = “abc”
app.sendSerialData( data, data:len() )
Note: e prole switch is performed when the script has nished its
execution.
Switch prole
WLinq 3.x Link*One
SetProle( “Prole2” ) app.setProle( “Prole2” )
2.10.14 Support for Thin Clients, Java
Applications, and Flash Applica-
tions
Normally, Link*One uses a Windows API function called SendInput to
simulate key presses to the active application. is API is recommended
by Microso because it takes care of dierences between dierent key-
board locales. For example, on a French keyboard, the letter A is posi-
tioned where the letter Q is on a US/UK keyboard layout.
However, this technique of simulating keys doesn’t work with all envi-
ronments and applications used on the Windows platform. So far, prob-
lems have been spotted with thin clients (Terminal Services or Citrix),
Java applications, and Flash applications.
To address this issue, key sequences for digits, lower case and upper case
letters has been recorded and is present in the default conguration of
Link*One. Script functions for translating digits and letters to key se-
quences are provided in extra.lua. Also, the function sendData in
the default script.txt contains information about how to activate this
feature.
Please note that the key sequences are tailored for the most common
keyboard layouts, QWERTY with non-shied keys for digits. You need
to modify some of these key sequences to make it work on for example
AZERTY (French) and QWERTZ (German) keyboard layouts.
2.10.15 Lua Copyright
Copyright © 1994-2008 Lua.org, PUC-Rio.
Permission is hereby granted, free of charge, to any person obtaining
a copy of this soware and associated documentation les (the “So-
ware”), to deal in the Soware without restriction, including without
limitation the rights to use, copy, modify, merge, publish, distribute,
sublicense, and/or sell copies of the Soware, and to permit persons to
whom the Soware is furnished to do so, subject to the following condi-
tions:
e above copyright notice and this permission notice shall be included
in all copies or substantial portions of the Soware.
THE SOFTWARE IS PROVIDED “AS IS”, WITHOUT WARRANTY
OF ANY KIND, EXPRESS OR IMPLIED, INCLUDING BUT NOT
LIMITED TO THE WARRANTIES OF MERCHANTABILITY, FIT-
NESS FOR A PARTICULAR PURPOSE AND NONINFRINGEMENT.
IN NO EVENT SHALL THE AUTHORS OR COPYRIGHT HOLDERS
BE LIABLE FOR ANY CLAIM, DAMAGES OR OTHER LIABILITY,
WHETHER IN AN ACTION OF CONTRACT, TORT OR OTHER-
WISE, ARISING FROM, OUT OF OR IN CONNECTION WITH THE
SOFTWARE OR THE USE OR OTHER DEALINGS IN THE SOFT-
WAR E.
2.10.16 Version History
Version Changes Date
5.0 Major upgrade, product name changed, and OEM
version created.
2008 -11-26
5.1 Changed name of Lua DLL le to make it compatible
with a Lua addon.
Fixed problem with empty hot key sequences.
2009-03-06
5.2 Added the wizard.
Updates to the manual.
2009-04-02
5.3 When“{65}”wasusedasacharacternotationthere
was a bug in the parser that sometimes made the
character disappear.
On slow systems with a single CPU core there could
be a race condition between the main program mod-
ule and the licenser module.
2009-10-29
5.4 Added 30-day trial period.
Added scan codes for all default key sequence deni-
tions. is was done to avoid problems sending Tab
and similar keys in a thin-client environment.
2010-10-05
5.5 OEM version released for testing. 2010-12-22
5.6 OEM version with extra tab in Settings dialog for
easier conguration of scanner key.
2011-05-05
5.7 Nowblockskeysequencesnamed{numbers}since
theywon’twork.ereasonisthatthesyntax{num-
ber}isusedasaformattospecifytheASCII/Unicode
code for characters in the string sent to app.send().
Added built-in support for applications/environ-
ments not supporting the way Link*One simulates
most keys. Added appendix that explains how this
feature is activated and how it works.
2011-05-10
5.8 Removed remnants of code for overlapped I/O that
wasn’t used. It made third-party serial drivers upset
and caused Link*One to hang. is problem was
noticed when trying to use Link*One together with
BlueSoleil Bluetooth soware.
2011-11-01
63
3.0 Operating the Unit3.0 Operating the Unit
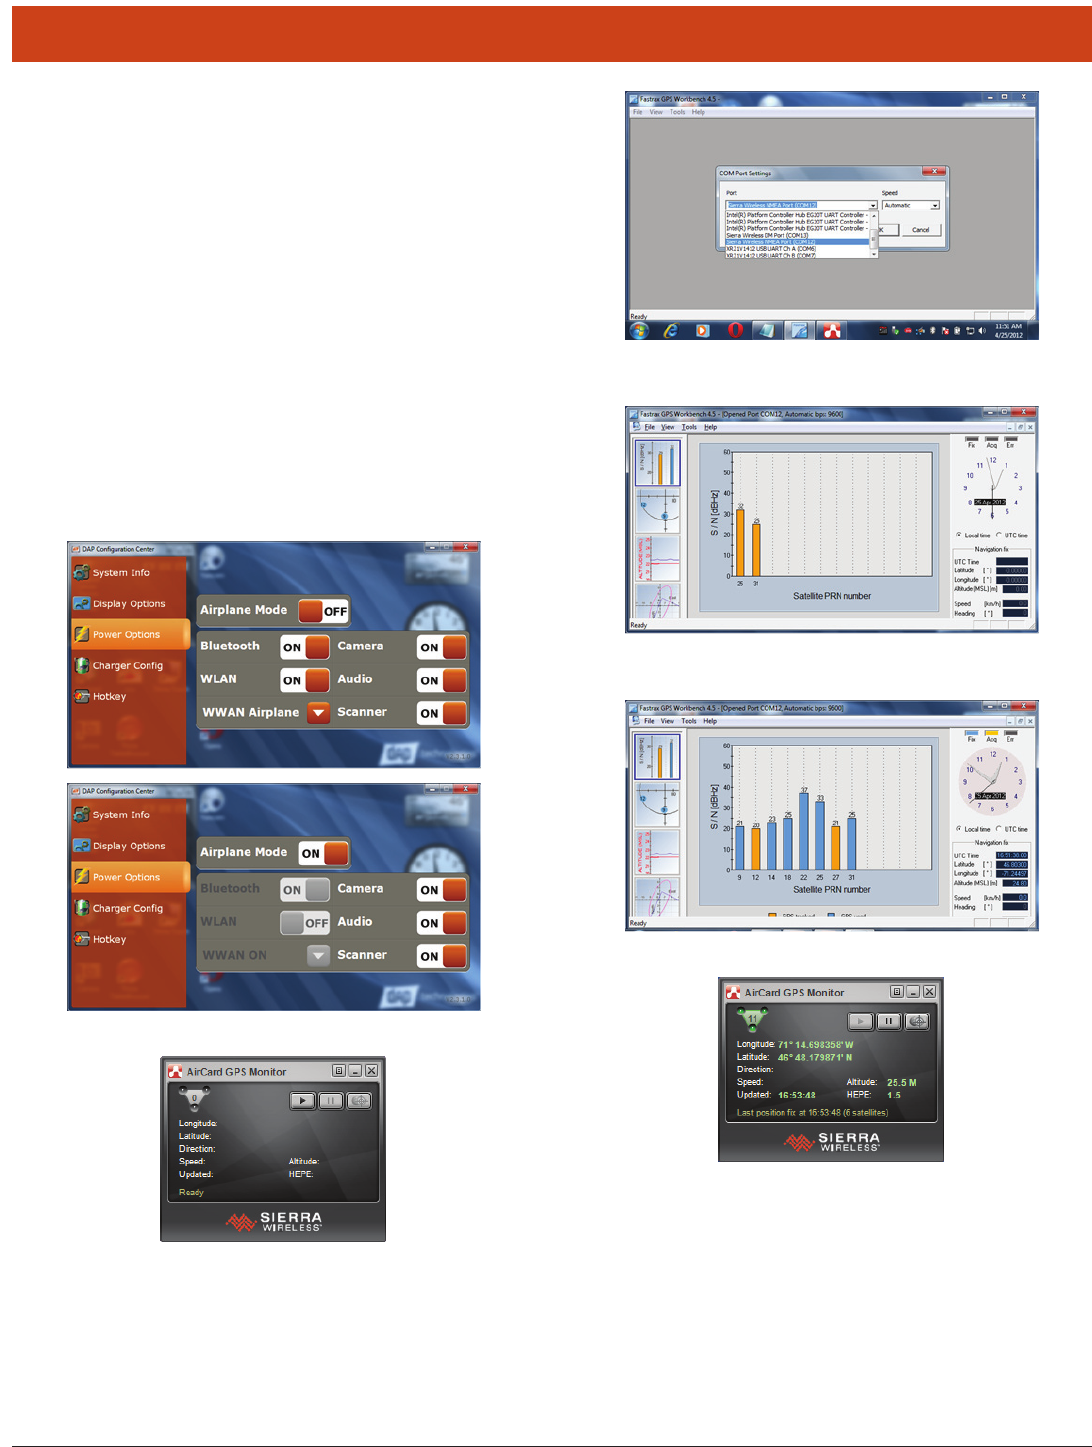
3.1 GPS Instructions
3.1.1 Requirements:
e WWAN module of the M9010 includes a GPS.
3.1.2 Set up to use the GPS
To use the GPS, the WWAN module must be either fully turned on, or
in airplane mode.
To ensure WWAN is ON or in Airplane Mode:
1. Open DAP Conguration Center
2. Select the Power Options tab
3. Ensure you are in one of the following combinations:
• GlobalairplanemodeisOFF and WWAN is ON or in Airplane
Mode
• Global airplane mode is ON and WWAN was either ON or in
Airplane Mode
Here are some acceptable settings:
4. Open the GPS monitor (Fn + F6), and click on the ‘play’ button:
You’ll get Session started, waiting for x…
5. To get more detailed information:
a. Run Fastrax GPS Workbench available from the desktop
b. Select
File > Connect:
6. Select Sierra Wireless NMEA Port (COM12), then OK. e fol-
lowing screenshot shows 2 satellites are detected (not enough):
Once the GPS is able to get a x (enough satellites), Fastrax shows
something like:
e GPS Monitor shows:
7. Clicking on the third button shows a map.
8. GPS is now ready.
64
3.0 Operating the Unit
3.1.3 Integration to Windows 7
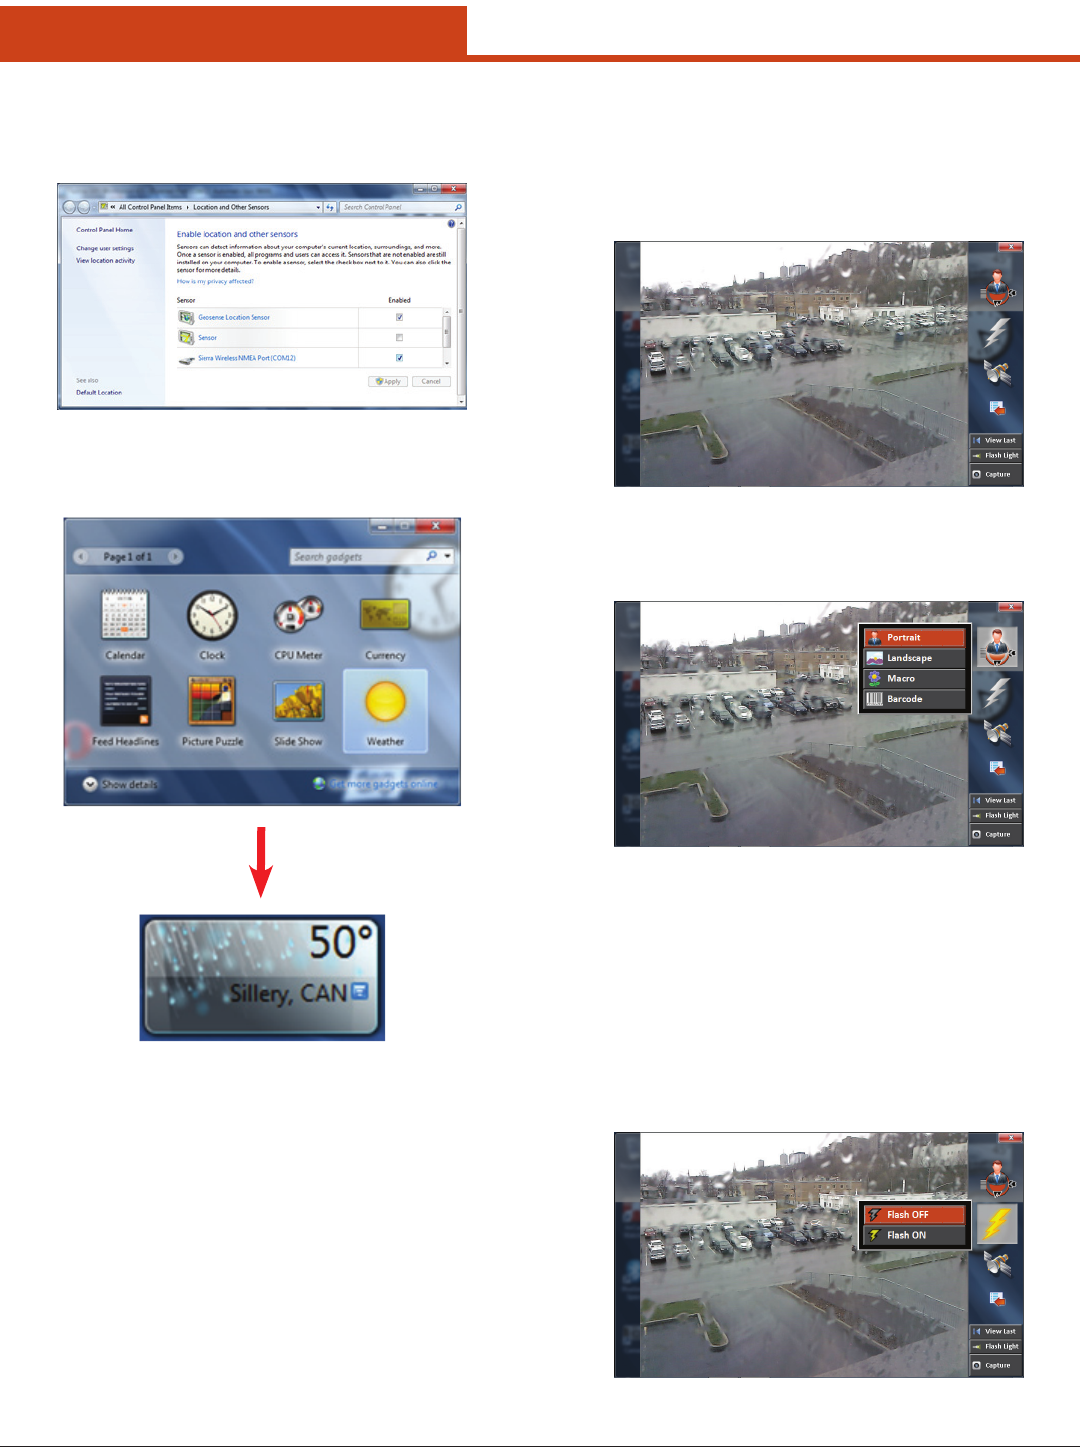
e GPS is handled as a standard sensor in Windows 7:
If the Weather gadget is opened, it will update with a city nearby.
DAP-Imager uses the same method to get the current position in order
to geotag images.
3.2 DAP-Imager Instructions
3.2.1 What is DAP-Imager
DAP-Imager allows taking pictures using the built-in camera. It also
features a barcode decoding engine to read 1D and 2D barcodes, usually
used with ScannerManager.
3.2.2 Selecting the Right Mode
e upper right icon (or lower le if unit is in portrait) is used to select
the mode:
e portrait, landscape and macro modes are used to take pictures,
whereas barcode mode is used to read barcodes. Mode settings are de-
ned in the INI le. Refer to that section for more details.
3.2.3 Pictures
3.2.3.1 How to Take a Picture
To take a picture, press and release the trigger button on the back of the
unit. Alternatively, you can click on Capture.
3.2.3.2 Flash
eashcanbeturnedonorousingtheashmenu.
Noautomaticashissupportedatthistime.
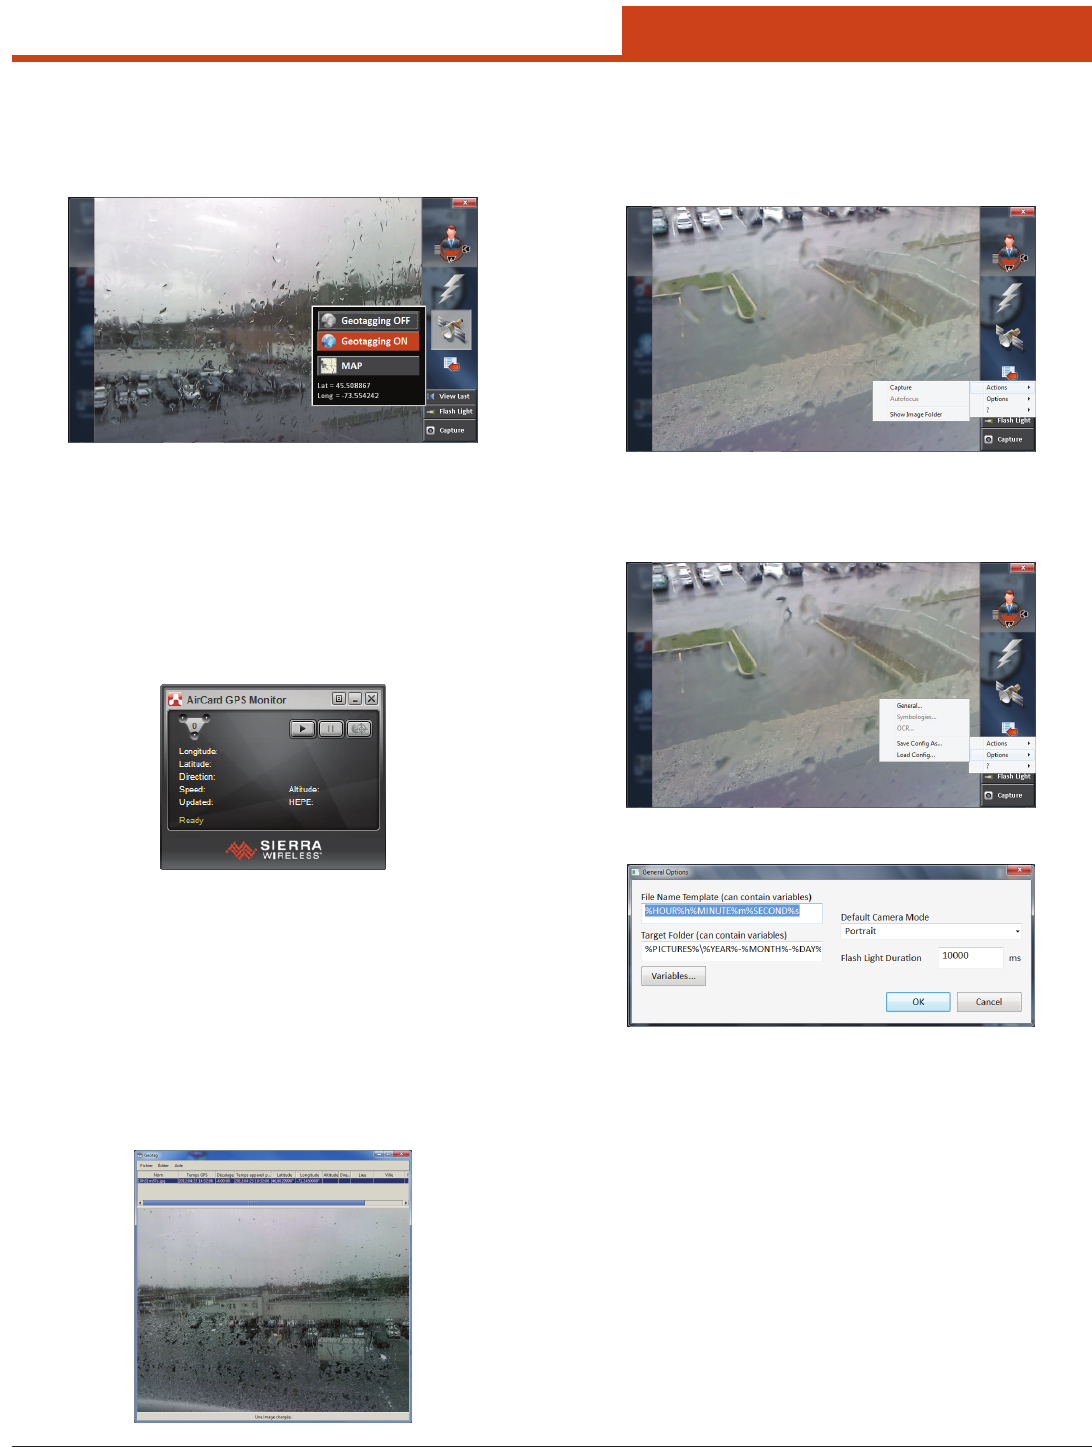
65
3.0 Operating the Unit
3.2.3.3 Geotagging
e geotagging menu allows enabling the feature and showing a map
centered on the current position. e current coordinates are written at
the bottom of the menu.
Once a picture has been taken, the current location is saved as an EXIF
metadata in the JPEG le (GPS sub-IFD).
3.2.3.3.1 How to enable the GPS
DAP-Imager has been built to work with the standard location sensors
supported by Windows 7. e WWAN module is equipped with a GPS,
which maps to “Sierra Wireless NMEA Port” in the “Location and Oth-
er Sensors” section of the control panel. You may also use the “Geosense
Location Sensor” that retrieves the current position by looking to the
WLAN used.
Refer to Section 3.1 GPS Instructions for more information.
Once a x is available, DAP-Imager should show the current position in
the geotagging menu.
Refer to the GPS section of the user’s manual for more information on
troubleshooting the GPS.
3.2.3.3.2 How to View Geotagging Data
To view the location where the picture has been taken, you may use any
geotagging soware. For example, the “geotag” soware is an open
source java program that can be run from the web (open http://geo-
tag.sourceforge.net, then click on “Run it now”).
e coordinates are shown on top aer having added the le to the list.
3.2.3.4 How to Locate a Saved Picture
To open the folder where images are saved, choose “Actions > Show Im-
age Folder” from the ‘more’ menu.
3.2.3.5 General Options
To access the general options, choose “Options > General…” from the
‘more’ menu:
Option screen:
e le name and target folder templates can be changed here. ey
dene where the image is to be saved. e list of variables can be found
in the TargetFolder option of the [General] section.
e default camera mode is the mode chosen when opening DAP-Im-
ager.
e ash light duration is the number of milliseconds the ash light
remains lit when pressing the <Flash Light> button.
3.2.4 Barcodes
DAP-Imager supports the following barcode symbologies:
1D: Code 11, Code 39 (+extended), Code 93, Interleaved 2 of 5,
Codabar, Code 128, EAN13, EAN8, PatzchCode, UPC-A and
UPC-E.
2D: PDF417, DataMatrix, QR Code and MicroQR Code
Postal: AustrialiaPost, IntelligentMail, Planet, Postnet and RM4SCC
66
3.0 Operating the Unit
DAP-Imager can be used as a standalone application, or used in con-
junction with ScannerManager. In both cases, you will probably want
to leave the application hidden to wedge barcodes.
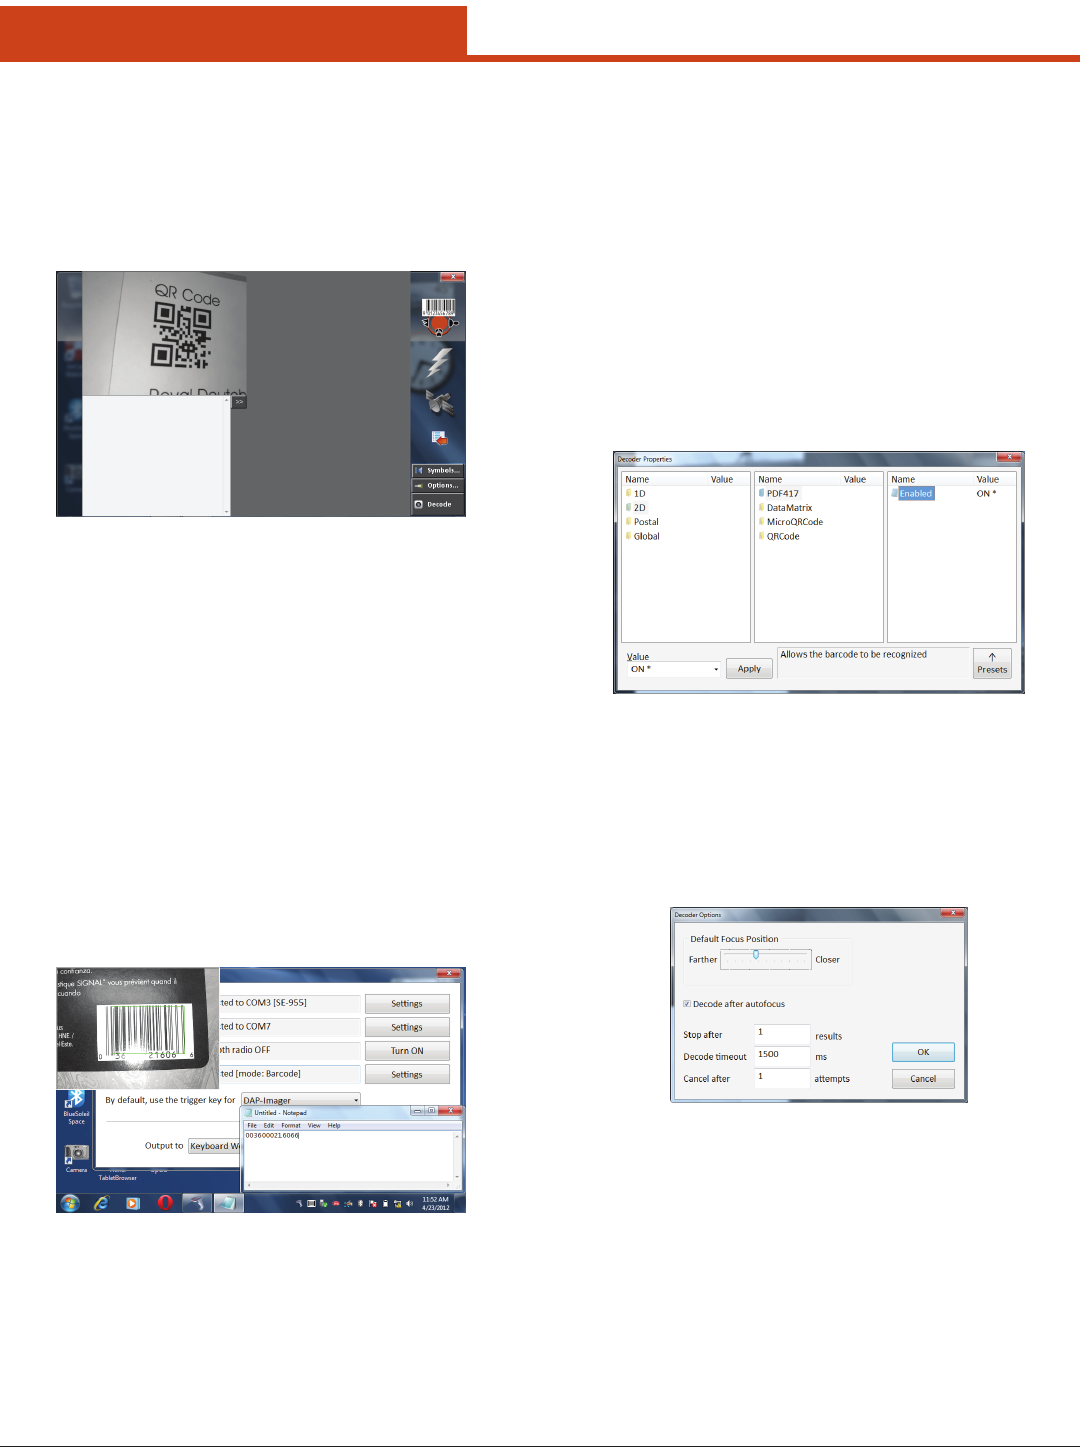
3.2.4.1 How to Scan Barcodes
To scan barcodes, rst ensure DAP-Imager is in barcode mode. To do
that, open the application (double click the icon in the notication area)
and select Barcode from the mode menu.
e main window shows a preview and a text box with the results
scanned. At this point we can start scanning to test the capabilities.
Steps:
• Pressandholdthetrigger.
• Movetheunitsothatitisalmostperpendiculartothebarcode.e
barcode should ll 30% to 75% of the preview window, depending on
the density of the barcode.
• Iftheimageisnotonfocus,moveunittoforceanautomaticfocus.
• Itusuallytakesaround1secondtodecodeabarcode.Onasuccessful
decode attempt, the barcode is surrounded by a green box and a single
beep is heard. Two beeps indicate failure.
Close DAP-Imager with the top right Xbutton;theprogramremainsin
background.
3.2.4.1.1 Using ScannerManager
Normally you will want to use ScannerManager, like in the following
screen:
ScannerManager congures DAP-Imager automatically and takes care
of the wedging.
When DAP-Imager is in background, it shows a live preview as long
as the trigger is held down. It helps ensuring the focus, position and
distance are correct. As soon as the barcode can be decoded, Scanner-
Manager receives the data and wedge it (if the output is set to Keyboard
Wedge).
3.2.4.1.2 Using DAP-Imager as a Stand-Alone Application
DAP-Imager can be used without ScannerManager. In that case, Scan-
nerManager must not be running, so that the trigger will be used exclu-
sively for DAP-Imager.
NOTE: If you have used ScannerManager before, the keyboard wedge
will have been disabled. To enable it, turn “KbWedge” ON in
the INI le. Check the “.INI Conguration File” section for
more information.
You can scan barcodes the same way it’s done in ScannerManager even
if using DAP-Imager separately.
3.2.4.2 Decoder Conguration
e Symbols button shows the decoder properties conguration
screen. It allows enabling or disabling specic barcode types and set-
ting advanced parameters.
Double click on an item to change its value. If it’s an ON/OFF value, the
change is applied immediately. For other value types, set the value in
the “Value” eld, and then click on Apply.
An asterisk (*) indicates default values.
Enabling all barcode types will make decoding slower. You may start
the conguration by selecting a preset (Presets button).
e Options button pops up the Decoder Options screen.
ese parameters should not be changed, except if suggested by a DAP
technical support representative.
3.2.5 .INI Conguration File
DAP-Imager uses a .INI conguration le located, by default, in
C:\ProgramData\DAP-Imager\DAP-Imager.ini
Before changing it, you must unload DAP-Imager by clicking its icon
in the notication area and choosing Quit. Otherwise, the program
rewrites the INI le when it quits.
If no DAP-Imager.ini le is found in the directory, a new one is auto-
matically created with default values.
67
3.0 Operating the Unit
3.2.6 [General]
3.2.6.1 TargetFolder = %PICTURES%\%YEAR%-
%MONTH%-%DAY%
To scan barcodes, rst ensure DAP-Imager is in barcode mode. To do
that, open the application (double click the icon in the notication area)
and select “Barcode” from the mode menu.
Species the path where the picture is to be taken.
Supported variables:
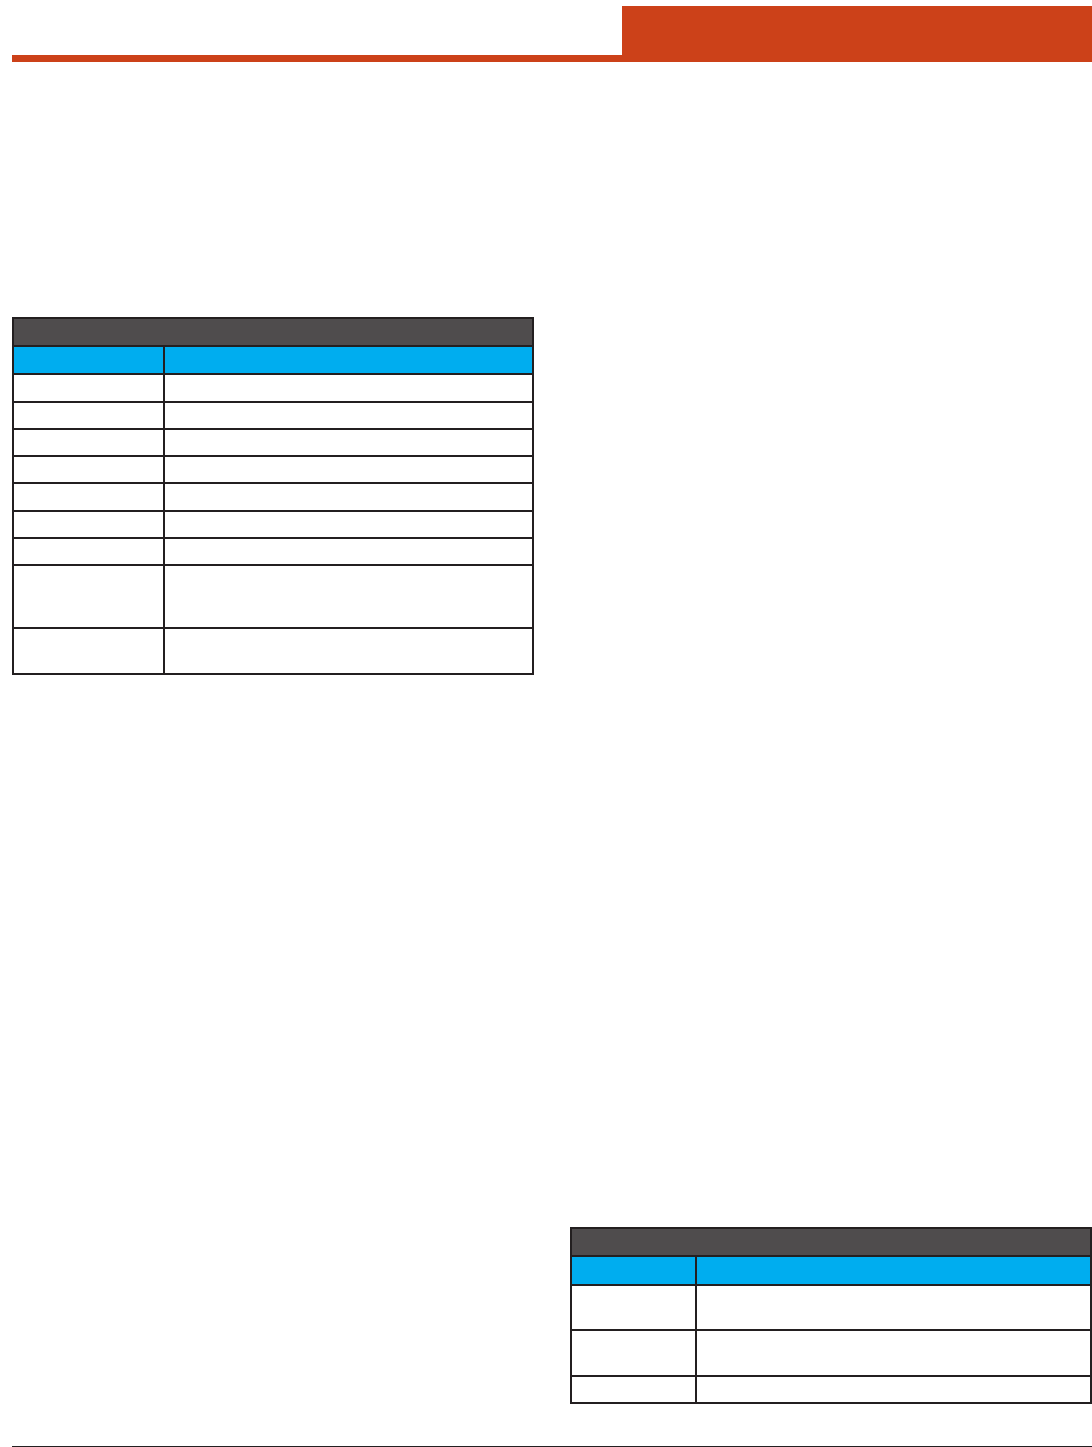
Variables
Name Description
%YEAR% 4-digit year
%MONTH% 2-digit month
%DAY% 2-digit day of month
%DAYOFWEEK% Name of the week day
%HOUR% Hour
%MINUTE% 2-digit minute
%SECOND% 2-digit second
%INDEX% Sequential index, incremented each time a
picture is taken. The number is saved in “C:\Pro-
gramData\DAP-Imager\NextImageIndex.txt”.
%PICTURE% Path of the default Windows folder to save pic-
tures (C:\Users\username\Pictures)
3.2.6.2 FileNameTemplate =
%HOUR%h%MINUTE%m%SECOND%s
Species the le name of images taken. Supports the same variables
than TargetFolder.
3.2.6.3 DefaultImagerMode = Portrait
Name of the imager mode to be selected when DAP-Imager starts. Notice
that if ScannerManager is present, it starts DAP-Imager in barcode mode.
Default supported values: Portrait, Landscape, Macro, Barcode
ey correspond to the name of the corresponding section
[ImagerMode:XXXX].
3.2.6.4 FlashLightDurationMs = 10000
Numberofmillisecondsthe ash light remainslitwhen itsbutton is
clicked(anycameramode).eashlightisautomaticallyturnedo
aer a delay to save power.
3.2.6.5 Func1VirtualKey = 135
Virtual key code used for the main trigger key. For the integration with
ScannerManager to work, you must use the default value (corresponds
to the trigger on back of the unit).
For other virtual-key codes, refer to the “Virtual-Key Codes” section of
the Windows Application UI Development guide. Notice that the codes
here are in DECIMAL.
3.2.6.6 Func2VirtualKey = 117
Sets the key used to force an autofocus.
For other virtual-key codes, refer to the “Virtual-Key Codes” section of
the Windows Application UI Development guide. Notice that the codes
here are in DECIMAL.
3.2.6.7 Func1KeyModiers = 0
Determines the key that must be pressed in combination with Func-
1VirtualKey.
3.2.6.8 Func2KeyModiers = 0
Determines the key that must be pressed in combination with Func-
2VirtualKey. Use the key modiers shown for Func1VirtualKey.
3.2.6.9 Func1KeySystemWide = 1
When set to 1, the main trigger key is registered as a global hotkey, so
that DAP-Imager captures it even if another application has the focus.
3.2.6.10 Func2KeySystemWide = 0
When set to 1, the second trigger key is registered as a global hotkey, so
that DAP-Imager captures it even if another application has the focus.
3.2.7 [Camera]
Options specic to the camera modes that take a picture.
3.2.7.1 InactiveTimeBeforeStandbyLevel1 =
10000
Number of milliseconds before the camera is stopped when the applica-
tion is in background. Waking up the camera takes a few seconds. If
you use the camera oen, you may want to increase this value. Decrease
it to save power.
3.2.7.2 ActivateDapImagerOnTrigger = OFF
When in a camera mode (portrait, landscape or macro), the trigger key
is never global, except if this option is set. If set and Func1KeySystem-
Wide is 1, pressing the trigger will show up DAP-Imager. Pressing an-
other time takes a picture.
3.2.7.3 ShowImageNameOnPreview = OFF
When ON, the image le path is written on the image when the picture
is taken.
3.2.8 [Barcodes]
Options specic to the barcode mode.
3.2.8.1 EnableAutoPreview = ON
When ON, DAP-Imager shows the camera preview in a top level win-
dow while the trigger key is pressed.
3.2.8.2 PreviewWndRect = 0 0 320 240
Size of the auto preview window. Should not be changed.
3.2.8.3 UIPolicy = Legacy
Sets the way the trigger key is handled. Only the “Legacy” UI policy
is ocially supported, but you may experiment with the other modes.
UIPolicy
Name Description
Legacy Works like a regular handheld scanner: press and
hold the trigger key to decode, release to cancel.
Standard Press and release the trigger key to decode. DAP-
Imager makes MaxNbrAttempts decoding attempts.
DecTrigUp Attempts to decode when the trigger key is released.

68
3.0 Operating the Unit
3.2.8.4 DefaultFocus = 3733
Not used in this version of DAP-Imager.
3.2.8.5 Aimer = ON
Not used in this version of DAP-Imager.
3.2.8.6 DecodeAfterAutofocus = ON
Not used in this version of DAP-Imager.
3.2.8.7 MaxNbrResults = 1
When several barcodes are visible in an image, the decoder can return
more than one result. Set this value to the maximum number of results
that are considered. If 1, the rst result is returned and the others are
discarded.
3.2.8.8 DecodeTimeoutMs = 1500
Maximum duration of a decode operation, in milliseconds. If the de-
code operation takes longer, it is cancelled. Using a small timeout won’t
allow decoding most barcodes. Using a higher value may have an im-
pact on the user interface responsiveness.
3.2.8.9 MaxNbrAttempts = 1
In the Standard or DecTrigUp UI policies, number of attempts DAP-
Imager tries to decode before returning NO READ.
3.2.8.10 InactiveTimeBeforeStandbyLevel1 =
10000
Numberofmillisecondsbeforetheashlightisturnedo.
3.2.8.11 InactiveTimeBeforeStandbyLevel2 =
10000
Number of milliseconds before the camera is stopped when the trigger
is not pressed. Waking up the camera takes a few seconds. If you scan
barcodes oen, you may want to increase this value. Decrease it to save
power.
3.2.8.12 KbWedge = OFF
Set this option to ON if you don’t use ScannerManager and want to
wedge barcodes.
3.2.8.13 AddTab = OFF
When KbWedge is ON and a barcode is wedged, simulates a TAB key
aer the barcode data.
3.2.8.14 AddEnter = ON
When KbWedge is ON and a barcode is wedged, simulates a RETURN
key aer the barcode data.
3.2.8.15 Preamble =
When KbWedge is ON and a barcode is wedged, this value is prexed
to the barcode data.
3.2.8.16 Postamble =
When KbWedge is ON and a barcode is wedged, this value is appended
to the barcode data.
3.2.8.17 InterCharDelay = 0
When KbWedge is ON and a barcode is wedged, sets the delay between
each key that is simulated, in milliseconds.
3.2.8.18 MaxGainWithoutMVLight = 2500
Not used in this version of DAP-Imager.
3.2.8.19 MinGainWithMovieLight = 1000
Not used in this version of DAP-Imager.
3.2.8.20 MaxGain = 4000
Not used in this version of DAP-Imager.
3.2.8.21 GainStep = 200
Not used in this version of DAP-Imager.
3.2.8.22 IdealGain = 2000
Not used in this version of DAP-Imager.
3.2.8.23 FlashIntensityStep = 100
Not used in this version of DAP-Imager.
3.2.8.24 MaxFlashIntensity = 100
Not used in this version of DAP-Imager.
3.2.8.25 MaxShutter = 4000
Not used in this version of DAP-Imager.
3.2.8.26 ShutterStep = 260
Not used in this version of DAP-Imager.
3.2.8.27 IdealShutter = 575
Not used in this version of DAP-Imager.
3.2.8.28 AppendSymbology = OFF
When ON, DAP-Imager will wedge the name of the symbology aer
the barcode data. It can be used to nd out the symbology of a barcode.
3.2.9 [OCR]
OCR not yet supported in this version of DAP-Imager.
3.2.10 [ImagerModes]
3.2.8.1 ModeList = Portrait,Landscape,Macro,B
arcode,
Lists the modes that appear in the camera mode menu. e modes spec-
ied here must be dened in the sections that follow.
3.2.11 [ImagerMode:XXXX]
is sections denes a given imager mode (XXXX), as listed in ModeL-
ist.Notallvaluesareused;itdependsontheModeTypeoption.
3.2.11.1 ModeType = 0
A value of 0 indicates that it’s a mode to take pictures.
A value of 1 is for barcode decoding.
3.2.11.2 IconID = 142
Resource ID of the icon to be shown in the mode menu. You can use a
resource editor to view the icons that are available (for example: http://
www.resedit.net/).
3.2.11.3 SelectionButtonImageFileName = res\
button-mode-portrait80.png
File path of the image shown when the mode is selected (mode button).
69
3.0 Operating the Unit
3.2.11.4 Enabled = ON
ON if the mode is enabled. If disabled, it will be grayed out in the mode
menu.
3.2.11.5 AutoFlash = ON
Not used in this version of DAP-Imager.
3.2.11.6 GpsReportTypes = 1
Set this option to 1 to enable geotagging, or 0 to disable it.
3.2.11.7 PreviewWidth = 640
Size of the image preview. Should not be changed.
3.2.11.8 PreviewHeight = 480
Size of the image preview. Should not be changed.
3.2.11.9 StillWidth = 1600
Width of the images captured (resolution).
3.2.11.10 StillHeight = 1200
Height of the images captured (resolution).
3.2.11.11 ColorSpace = 16
Not used, leave unchanged.
3.2.11.12 FrameRate = 30.000000
Not used, leave unchanged.
3.2.11.13 Shutter = 10000
Exposition duration, when AutoExposure is OFF. e value must be
between 0 and 10000.
3.2.11.14 Brightness = 5000
Brightness level. It shis pixel values so that the image is either lighter
or darker. e value must be between 0 and 10000 (higher is lighter).
3.2.11.15 GlobalGain = 0
Not yet supported by the camera.
3.2.11.16 Exposure = 5000
Not yet supported by the camera.
3.2.11.17 FlipMode = 1
Not supported.
3.2.11.18 AutoExposure = ON
When ON, the camera nds the best exposition and gain for the cur-
rent lighting conditions. Using OFF allows setting Shutter manually,
but since the camera doesn’t support the GlobalGain option, it should
not be used.
3.2.11.19 LightingMode = 0
0: Flash (light pulse)
1:Continuouslighting(ashlight)
3.2.11.20 LightingPower = 0
e lighting power must be 0 (turned o) or 100 (turned on).
3.2.11.21 Aimer = OFF
Not supported by the camera.
3.2.11.22 Compression = ON
Set to ON to preview in JPEG format, or OFF to preview in YUV format.
3.2.11.23 CompressionRatio = 13
Not supported by the camera.
3.2.11.24 FocusPosition = 500
Denes where to focus (0: innite, 10000: closest position). Not used
when Autofocus is ON.
3.2.11.25 Autofocus = ON
Enables or disables continuous autofocus. When the camera is moved,
it automatically tries to autofocus.
3.2.11.26 WhiteBalancePreset = 0
Denes how colors are balanced.
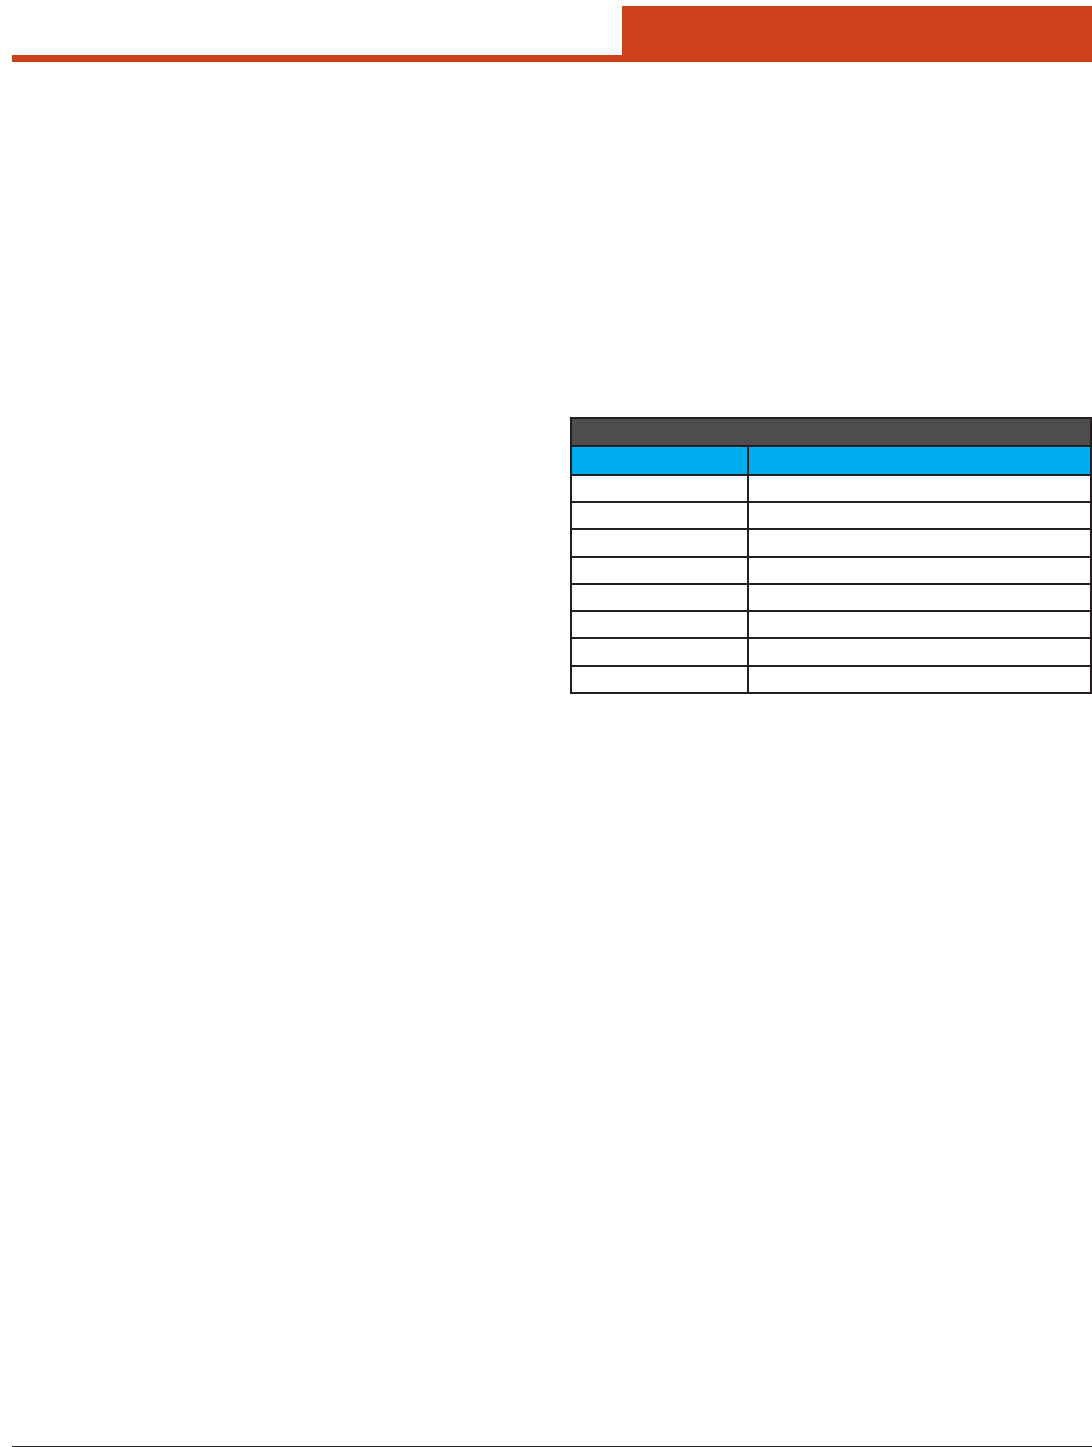
Variables
Name Description
0Automatic
1Fluorescent
2Incandescent
3Sunny
4Cloudy
5Movie Light
6Flash
7Hybrid
3.2.11.27 ManualWhiteBalance = OFF
Set to ON to use WhiteBalanceKelvin. Otherwise, WhiteBalancePreset
applies.
3.2.11.28 WhiteBalanceKelvin = 8267
Whitebalancevalue;0isthecoldest(bluish),10000isthewarmest.
3.2.11.29 PreviewToWindow = ON
Set to ON to have DirectShow paint the preview (improves performanc-
es). Should not be ON in barcode mode.
3.2.12 [Permissions]
3.2.12.1 Option(More) = 3
Set this value to 0 to prevent a user from accessing the “more” menu
aer the geotagging icon. When clicked, it simply shows the About box.
A value of 3 grants all permissions.
70
3.0 Operating the Unit
3.3 Command-Line Options
DAP-Imager includes several commands to control it from an external
application.
3.3.1 Syntax
DAP-Imager [congFilePath] [-b] [-q] [-NextImageFilePath FilePath]
[-OneShotCapture] [-SelectMode \”modeName\”] [-SetAutoFlash state]
[-WaitUntilWndClosed] [-SetTopMost]
Command-Line Arguments
Argument Description
congFilePath .ini le to load (optional; default path is C:\
ProgramData\DAP-Imager\DAP-Imager.ini).
-b Execute in background
-q Quit any instance already running
-NextImageFilePath Sets the path of the next image le saved
(one-shot). Normally used with “-OneShot-
Capture”.
-OneShotCapture Shows the preview, let the user press the
trigger and take a picture. When taken,
DAP-Imager hides. Can be used with “-Nex-
tImageFilePath” to allow a user taking a
picture that is then retrieved by an external
application.
-SelectMode The next parameter is the name of the
mode to select (Portrait, Landscape, Macro,
Barcode)
-ResetOptions: Ignores DAP-Imager.ini and use the default
settings
-WaitUntilWndClosed Shows DAP-Imager and do not return before
it’s hidden

71
4.1 Bar Code Parameter Menus
is chapter describes the programmable parameters, provides bar
codes for programming, and hexadecimal equivalents for host param-
eter programming through SSI.
Operational Parameters
e SE-955 is shipped with the factory default settings shown in Table
8-1 on page 8-5. ese factory default values are stored in non-volatile
memory and are preserved even when the scanner is powered down.
Changes to the factory default values can be stored as custom defaults.
ese values are also stored in non-volatile memory and are preserved
even when the scanner is powered down.
To change the parameter values:
• Scan the appropriate bar codes included in this chapter. e new
values replace the existing memory values. To set the new values as
Parameter Parameter Number (Hex) Factory Default Section Number
Set Factory Default All Defaults 4.2.1
Beeper Volume 0x8C Medium 4.2.2
Beeper Tone 0x91 Medium Frequency 4.2.3
Beeper Frequency Adjustment 0xF0 0x91 2500 Hz 4.2.4
Laser On Time 0x88 3.0 sec 4.2.5
Aim Duration 0xED 0.0 sec 4.2.6
Scan Angle 0xBF Medium (46°) 4.2.7
Power Mode 0x80 Low Power 4.2.8
Trigger Mode 0x8A Level 4.2.9
Time-out Between Same Symbol 0x89 1.0 sec 4.2.10
Beep Aer Good Decode 0x38 Enable 4.2.11
Transmit “No Read” Message 0x5E Disable 4.2.12
Parameter Scanning 0xEC Enable 4.2.13
Linear Code Type Security Levels 0x4E 14.2.14
Bi-directional Redundancy 0x43 Disable 4.2.15
UPC/EAN 5.1
UPC-A 0x01 Enable 5.1.1
UPC-E 0x02 Enable 5.1.2
UPC-E1 0x0C Disable 5.1.3
EAN-8 0x04 Enable 5.1.4
EAN-13 0x03 Enable 5.1.5
Bookland EAN 0x53 Disable 5.1.6
Decode UPC/EAN Supplementals 0x10 Ignore 5.1.7
Decode UPC/EAN Supplemental Redundancy 0x50 7 8-25 5.1.8
Transmit UPC-A Check Digit 0x28 Enable 5.1.9
Transmit UPC-E Check Digit 0x29 Enable 5.1.10
Transmit UPC-E1 Check Digit 0x2A Enable 5.1.11
UPC-A Preamble 0x22 System Character 5.1.12
UPC-E Preamble 0x23 System Character 5.1.13
UPC-E1 Preamble 0x24 System Character 5.1.14
custom defaults, scan the Write to Custom Defaults bar code. e fac-
tory default or custom default parameter values can be recalled by
scanning the SET FACTOR DEFAULT bar code or the RESTORE DE-
FAULTS bar code on page 8-10.
– or –
• Send the parameterthroughthe scanengine’sserial portusingthe
SSI command PARAM_SEND. Hexadecimal parameter numbers are
shown in this chapter below the parameter title, and options appear
in parenthesis beneath the accompanying bar codes. Instructions for
changing parameters using this method are found in Chapter 9, Sim-
ple Serial Interface.
e table below lists the factory defaults for all parameters. To change
any option, scan the appropriate bar code(s).
4.0 Programming the Unit

72
4.0 Programming the Unit
Parameter Parameter No. (Hex) Factory Default Page Number
Convert UPC-E to A 0x25 Disable 5.1.15
Convert UPC-E1 to A 0x26 Disable 5.1.16
EAN-8 Zero Extend 0x27 Disable 5.1.17
Convert EAN-8 to EAN-13 Type 0xE0 Type is EAN-13 5.1.18
UPC/EAN Security Level 0x4D 0 5.1.19
UCC Coupon Extended Code 0x55 Disable 5.1.20
Code 128 5.2
Code-128 0x08 Enable 5.2.1
UCC/EAN-128 0x0E Enable 5.2.2
ISBT 128 0x54 Enable 5.2.3
Code 39 5.3
Code 39 0x00 Enable 5.3.1
Trioptic Code 39 0x0D Disable 5.3.2
Convert Code 39 to Code 32 0x56 Disable 5.3.3
Code 32 Prex 0xE7 Disable 5.3.4
Set Length(s) for Code 39 0x12
0x13
2-55 5.3.5
Code 39 Check Digit Verication 0x30 Disable 5.3.6
Transmit Code 39 Check Digit 0x2B Disable 5.3.7
Code 39 Full ASCII Conversion 0x11 Disable 5.3.8
Code 93 5.4
Code 93 0x09 Disable 5.4.1
Set Length(s) for Code 93 0x1A
0x1B
4-55 5.4.2
Code 11 5.5
Code 11 0x0A Disable 5.5.1
Set Lengths for Code 11 0x1C
0x1D
4 to 55 5.5.2
Code 11 Check Digit Verication 0x34 Disable 5.5.3
Transmit Code 11 Check Digit(s) 0x2F Disable 5.5.4
Interleaved 2 of 5 5.6
Interleaved 2 of 5 0x06 Enable 5.6.1
Set Length(s) for I 2 of 5 0x16
0x17
14 5.6.2
Interleaved 2 of 5 Check Digit Verication 0x31 Disable 5.6.3
Transmit Interleaved 2 of 5 Check Digit 0x2C Disable 5.6.4
Convert Interleaved 2 of 5 to EAN 13 0x52 Disable 5.6.5
Discrete 2 of 5 5.7
Discrete 2 of 5 0x05 Disable 5.7.1
Set Length(s) for Discrete 2 of 5 0x14
0x15
12 5.7.2
Chinese 2 of 5 5.8
Chinese 2 of 5 0xF0 0x98 Disable 5.8.1

73
4.0 Programming the Unit
Parameter Parameter No. (Hex) Factory Default Page Number
Codabar 5.9
Codabar 0x07 Disable 5.9.1
Set Lengths for Codabar 0x18
0x19
5-55 5.9.2
CLSI Editing 0x36 Disable 5.9.3
NOTIS Editing 0x37 Disable 5.9.4
MSI 5.10
MSI 0x0B Disable 5.10.1
Set Length(s) for MSI 0x1E
0x1F
6-55 5.10.2
MSI Check Digits 0x32 One 5.10.3
Transmit MSI Check Digit 0x2E Disable 5.10.4
MSI Check Digit Algorithm 0x33 Mod 10/Mod 10 5.10.5
RSS 5.11
RSS-14 0xF0
0x52
Disable 5.11.1
RSS-Limited 0xF0
0x53
Disable 5.11.2
RSS-Expanded 0xF0
0x54
Disable 5.11.3
Data Options 5.12
Transmit Code ID Character 0x2D None 5.12.1
Prex/Sux Values
Prex
Sux 1
Sux 2
0x69
0x68
0x6A
NULL
LF
CR
5.12.2
Scan Data Transmission Format 0xEB Data as is 5.12.3
Serial Interface 5.13
Baud Rate 0x9C 9600 5.13.1
Parity 0x9E None 5.13.2
Soware Handshaking 0x9F Enable 5.13.3
Decode Data Packet Format 0xEE Unpacketed 5.13.4
Host Serial Response Time-out 0x9B 2 sec 5.13.5
Stop Bit Select 0x9D 1 5.13.6
Intercharacter Delay 0x6E 0 5.13.7
Host Character Time-out 0xEF 200 msec 5.13.8
Event Reporting* 5.14
Decode Event 0xF0 0x00 Disable 5.14.1
Boot Up Event 0xF0 0x02 Disable 5.14.2
Parameter Event 0xF0 0x03 Disable 5.14.3
Numeric Bar Codes 5.15
Cancel 5.15.1
*See Table 9-9 on page 9-20 for formatting of any parameter whose number is 0x100 or greater.
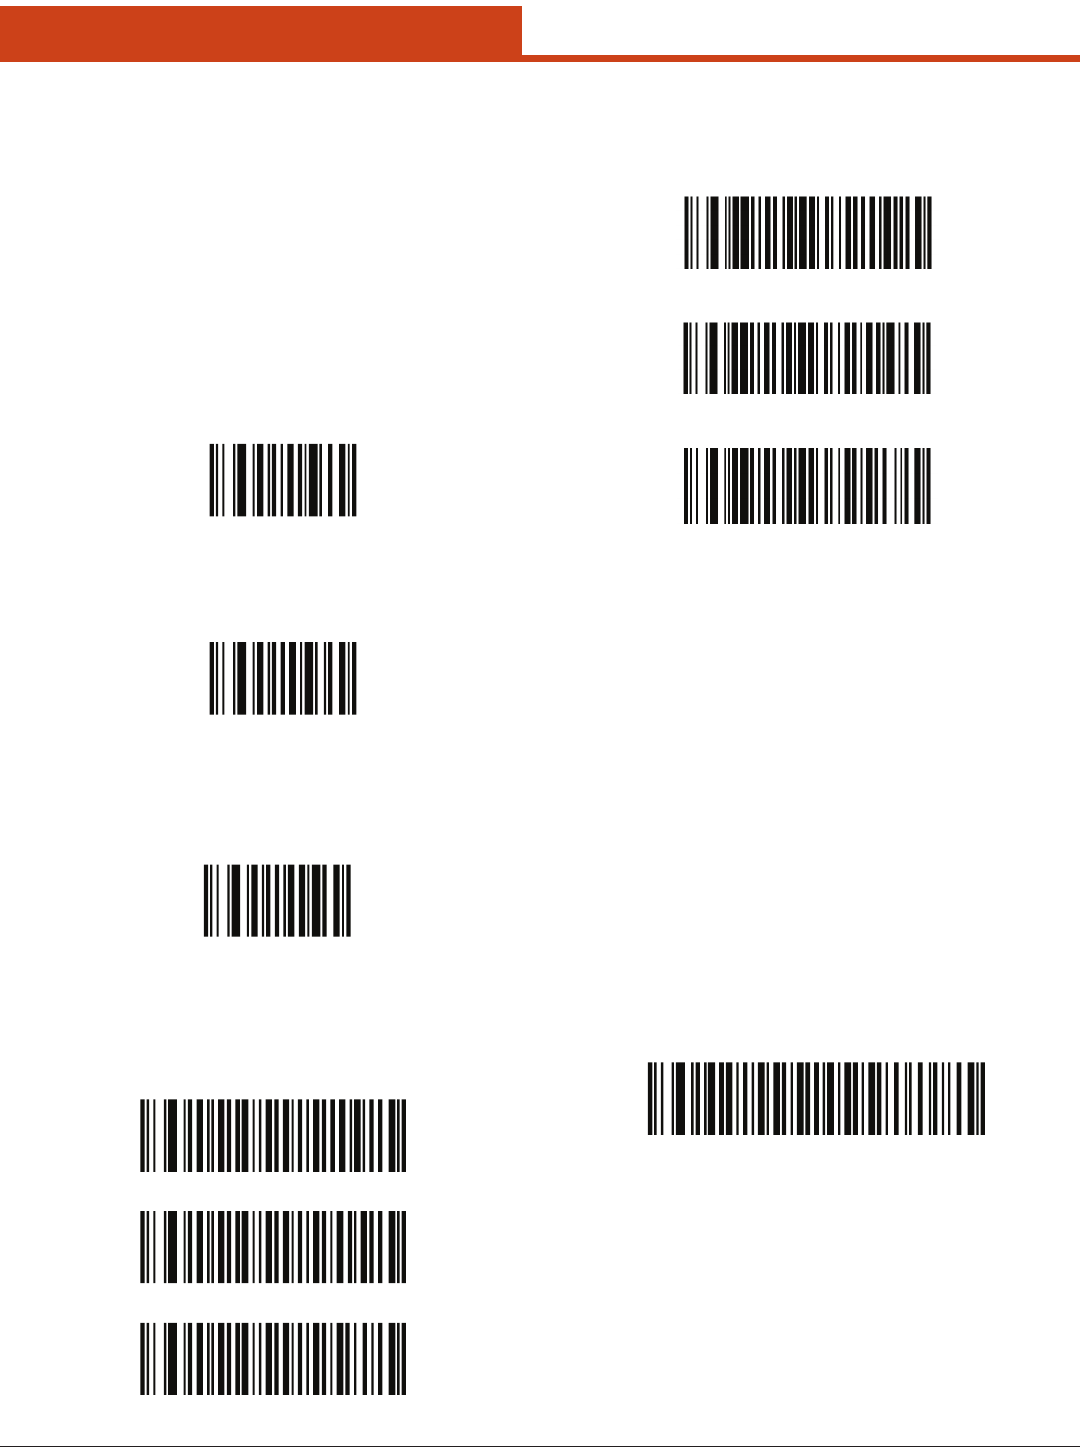
74
4.0 Programming the Unit
4.2 Bar Code Settings
4.2.1 Set Default Parameter
e SE-955 can be reset to two types of defaults: factory defaults or cus-
tom defaults. Scan the appropriate bar code below to reset the SE-955 to
its default settings and/or set the scanner’s current settings as the cus-
tom default.
• Restore Defaults - Scan this bar code to reset all default parameters
as follows.
– If custom defaults were set by scanning Write to Custom De-
faults, scan Restore Defaults to retrieve and restore the scan-
ner’s custom default settings.
– If no custom defaults were set, scan Restore Defaults to restore
the factory default values.
Restore Defaults
Set Factory Defaults
Write to Custom Defaults
Low (0x02)
*Medium (0x01)
High (0x00)
4.2.2 Beeper Volume
Parameter # 0x8C
To select a decode beep volume, scan the appropriate bar code.
• Set Factory Defaults - Scan this bar code to restore the factory de-
fault values. If custom defaults were set, they are eliminated.
• Write to Custom Defaults - Scan this bar code to store the current
scanner settings as custom defaults. Once custom default settings are
stored, they can be recovered at any time by scanning Restore De-
faults.
Low Frequency (0x02)
*Medium Frequency (0x01)
High Frequency (0x00)
4.2.3 Beeper Tone
Parameter # 0x91
To select a decode beep frequency (tone), scan the appropriate bar code.
Beeper Frequency Adjustment
(Default: 2500 Hz)
4.2.4 Beeper Frequency Adjustment
Parameter # 0xF0 0x91
is parameter adjusts the frequency of the high beeper tone from the
nominal 2500 Hz to another frequency matching the resonances of the
installation. It is programmable in 10 Hz increments from 1220 Hz to
3770 Hz.
To increase the frequency, scan the bar code below, then scan three
numeric bar codes in Section 5.5 on page 95 that correspond to the
desired frequency adjustment divided by 10. For example, to set the fre-
quency to 3000 Hz (an increase of 500 Hz), scan numeric bar codes 0, 5,
0, corresponding to 50, or (500/10).
To decrease the frequency, scan the bar code below, then scan three
numeric bar codes in Section 5.5 on page 95 that correspond to the
value (256 - desired adjustment/10). For example, to set the frequency
to 2000 Hz (a decrease of 500 Hz), scan numeric bar codes 2, 0, 6, cor-
responding to 206, or (256 - 500/10).
To change the selection or cancel an incorrect entry, scan the Cancel bar
code in Section 5.5.1 on page 95.
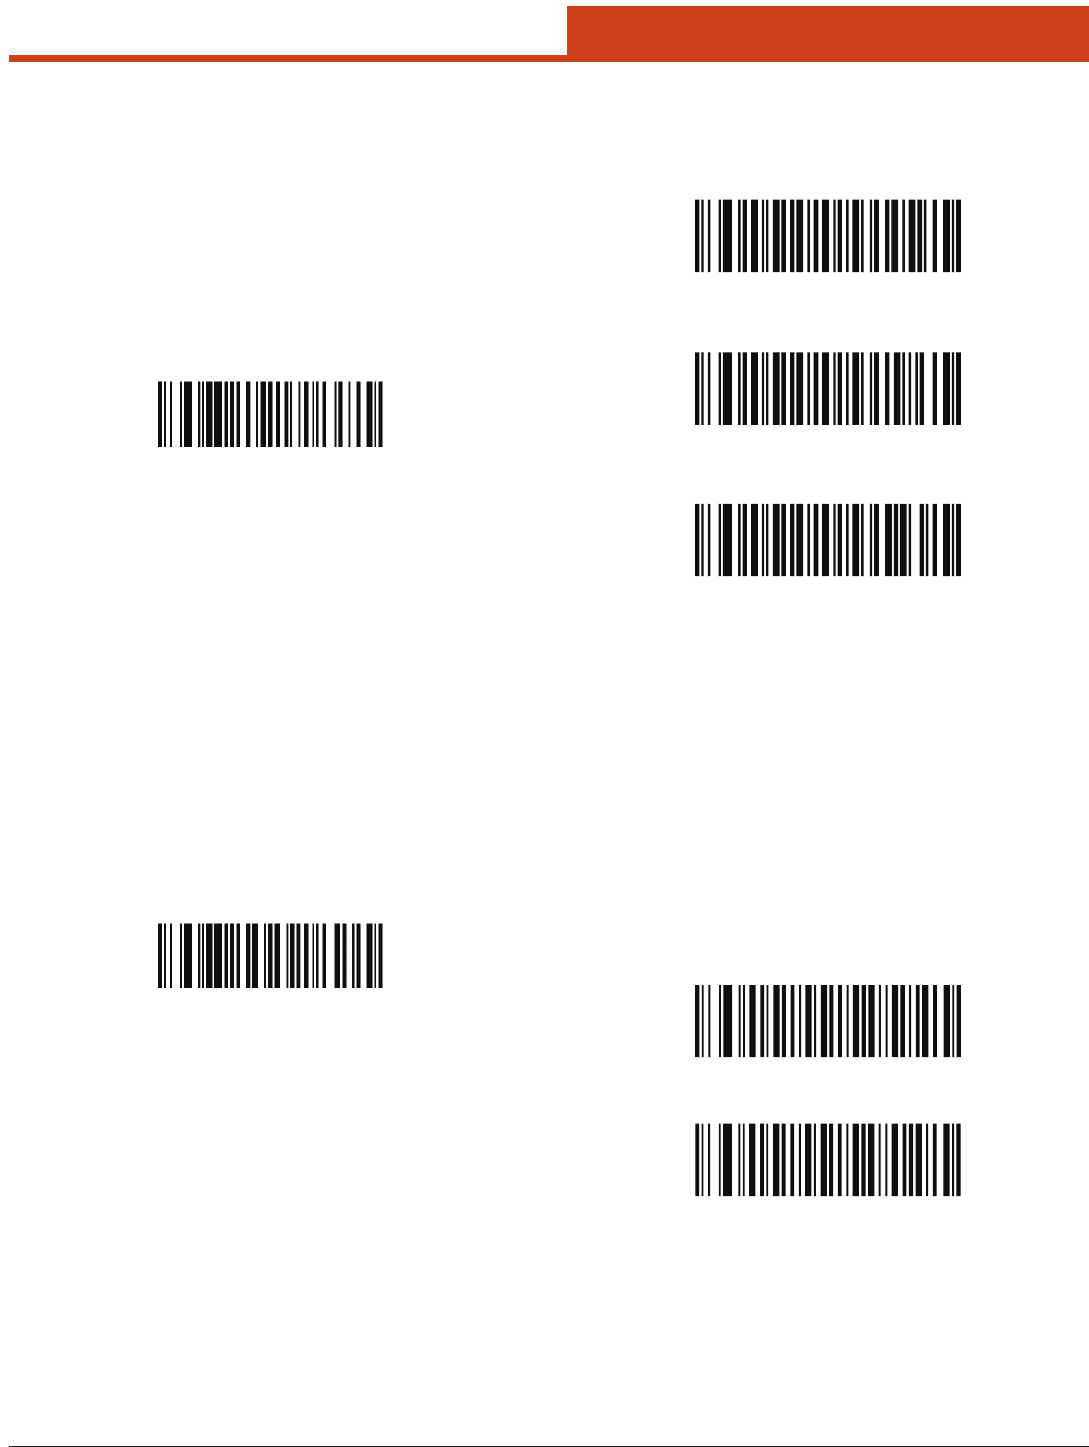
75
4.0 Programming the Unit
4.2.5 Laser On Time
Parameter # 0x88
is parameter sets the maximum time decode processing continues
during a scan attempt. It is programmable in 0.1 second increments
from 0.5 to 9.9 seconds.
To set a Laser On Time, scan the bar code below. Next scan two numeric
bar codes in Section 5.5 on page 95 that correspond to the desired on
time. Single digit numbers must have a leading zero. For example, to set
an on time of 0.5 seconds, scan the bar code below, then scan the “0” and
“5” bar codes. To change the selection or cancel an incorrect entry, scan
the Cancel bar code in Section 5.5.1 on page 95.
Laser On Time
(Default: 3.0 sec.)
4.2.6 Aim Duration
Parameter # 0xED
When a scanner with an aim mode (see Table 9-10 on page 9-22) is trig-
gered either by a trigger pull, or a START_DECODE command, this pa-
rameter sets the duration the aiming pattern is seen before a a scan attempt
begins. It does not apply to the aim signal or the AIM_ON command. It is
programmable in 0.1 second increments from 0.0 to 9.9 seconds. No aim
pattern is visible when the value is 0.0.
To set an aim duration, scan the bar code below. Next scan two numeric
bar codes beginning on page 8-71 that correspond to the desired aim
duration. Single digit numbers must have a leading zero. For example,
to set an aim duration of 0.5 seconds, scan the bar code below, then scan
the “0” and “5” bar codes. To change the selection or cancel an incorrect
entry, scan the Cancel bar code in Section 5.5 on page 95.
4.2.7 Scan Angle
Parameter # 0xBF
is parameter sets the scan angle to narrow, medium or wide.
Aim Duration
(Default: 0.0 sec.)
Narrow Angle (35°)
(0x05)
*Medium Angle (46°)
(0x06)
Wide Angle (53°)
(0x07)
4.2.8 Power Mode
Parameter # 0x80
is parameter determines the power mode of the engine.
In Low Power mode, the scanner enters into a low power consumption
Sleep power state whenever possible (provided all WAKEUP commands
have been released).
In Continuous Power mode, the scan engine remains in the Awake state
aer each decode attempt.
e Sleep and Awake commands can be used to change the power state
in either the Low Power mode or the Continuous Power mode.
Continuous Power (0x00)
Low Power (0x01)
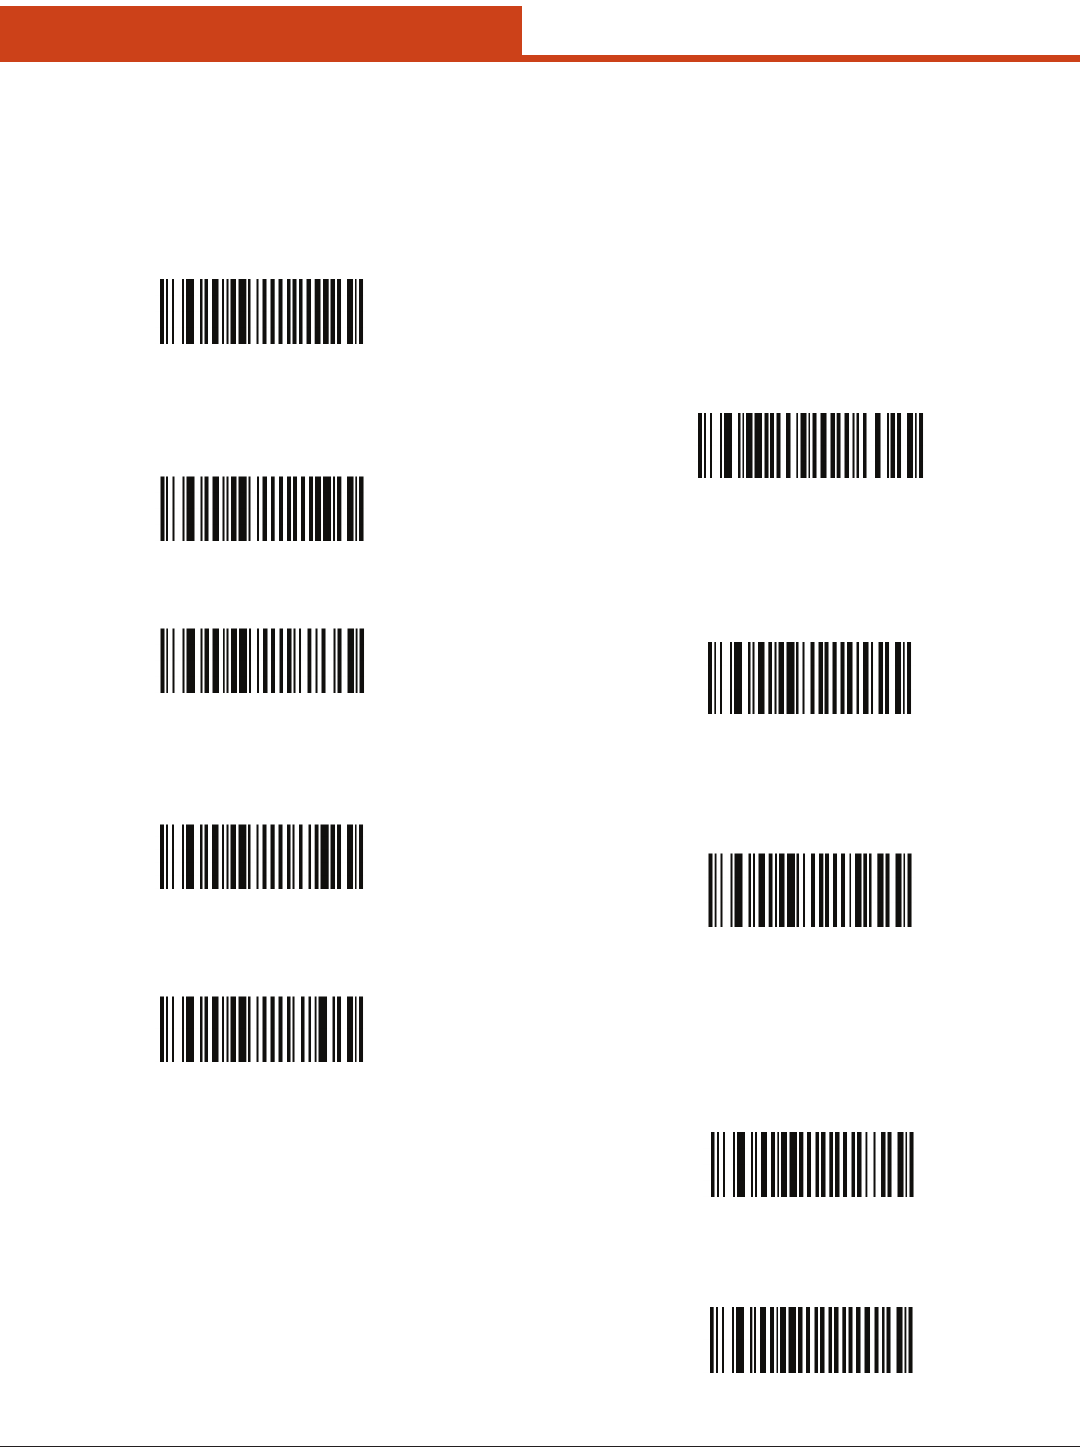
76
4.0 Programming the Unit
4.2.9 Triggering Modes
Parameter # 0x8A
Choose one of the options below to trigger the scan engine. Bar codes
and option numbers are on the following page.
• Scan (Level) - A trigger pull activates the laser and decode process-
ing. e laser remains on and decode processing continues until a
trigger release, a valid decode, or the Laser On Time-out is reached.
• Scan (Pulse) - A trigger pull activates the laser and decode process-
ing. e laser remains on and decode processing continues until a
valid decode or the Laser On Time-out is reached.
• Continuous - e laser is always on and decoding.
• Blink - is trigger mode is used for triggerless operation. Scanning
range is reduced in this mode. is mode cannot be used with scan-
ners that support an aim mode.
• Host - A host command issues the triggering signal. e scan engine
interprets an actual trigger pull as a Level triggering option.
*Level (0X00)
4.2.10 Time-out Between Same Symbol
Parameter # 0x89
When in Continuous triggering mode, this parameter sets the mini-
mum time that must elapse before the scanner decodes a second bar
code identical to one just decoded. is reduces the risk of accidently
scanning the same symbol twice. It is programmable in 0.1 second in-
crements from 0.0 to 9.9 seconds.
To set a time-out between same symbol, scan the bar code below. Next
scan two numeric bar codes beginning on page 8-71 that correspond to
the desired time-out. Single digit values must have a leading zero. For
example, to set a time-out of 0.5 seconds, scan the bar code below, then
scan the “0” and “5” bar codes. To change the selection or cancel an
incorrect entry, scan the Cancel bar code in Section 5.5.1 on page 95.
4.2.11 Beep After Good Decode
Parameter # 0x38
Scan this symbol to set the scanner to beep aer a good decode.
Scan this symbol to set the scanner not to beep aer a good decode. e
beeper still operates during parameter menu scanning and indicates er-
ror conditions.
Time-out Between Same Symbol
(Default: 1.0 sec.)
Do Not Beep After Good Decode
(0x00)
*Beep After Good Decode
(0x01)
4.2.12 Transmit “No Read” Message
Parameter # 0x5E
Enable this option to transmit “NR” if a symbol does not decode during
the timeout period or before the trigger is released. Any enabled prex
or suxes are appended around this message.
When disabled, and a symbol cannot be decoded, no message is sent to
the host.
*Disable No Read
(0x00)
Enable No Read
(0x01)
Pulse (0X02)
Continuous (0X04)
Host (0X08)
Blinking (0X07)
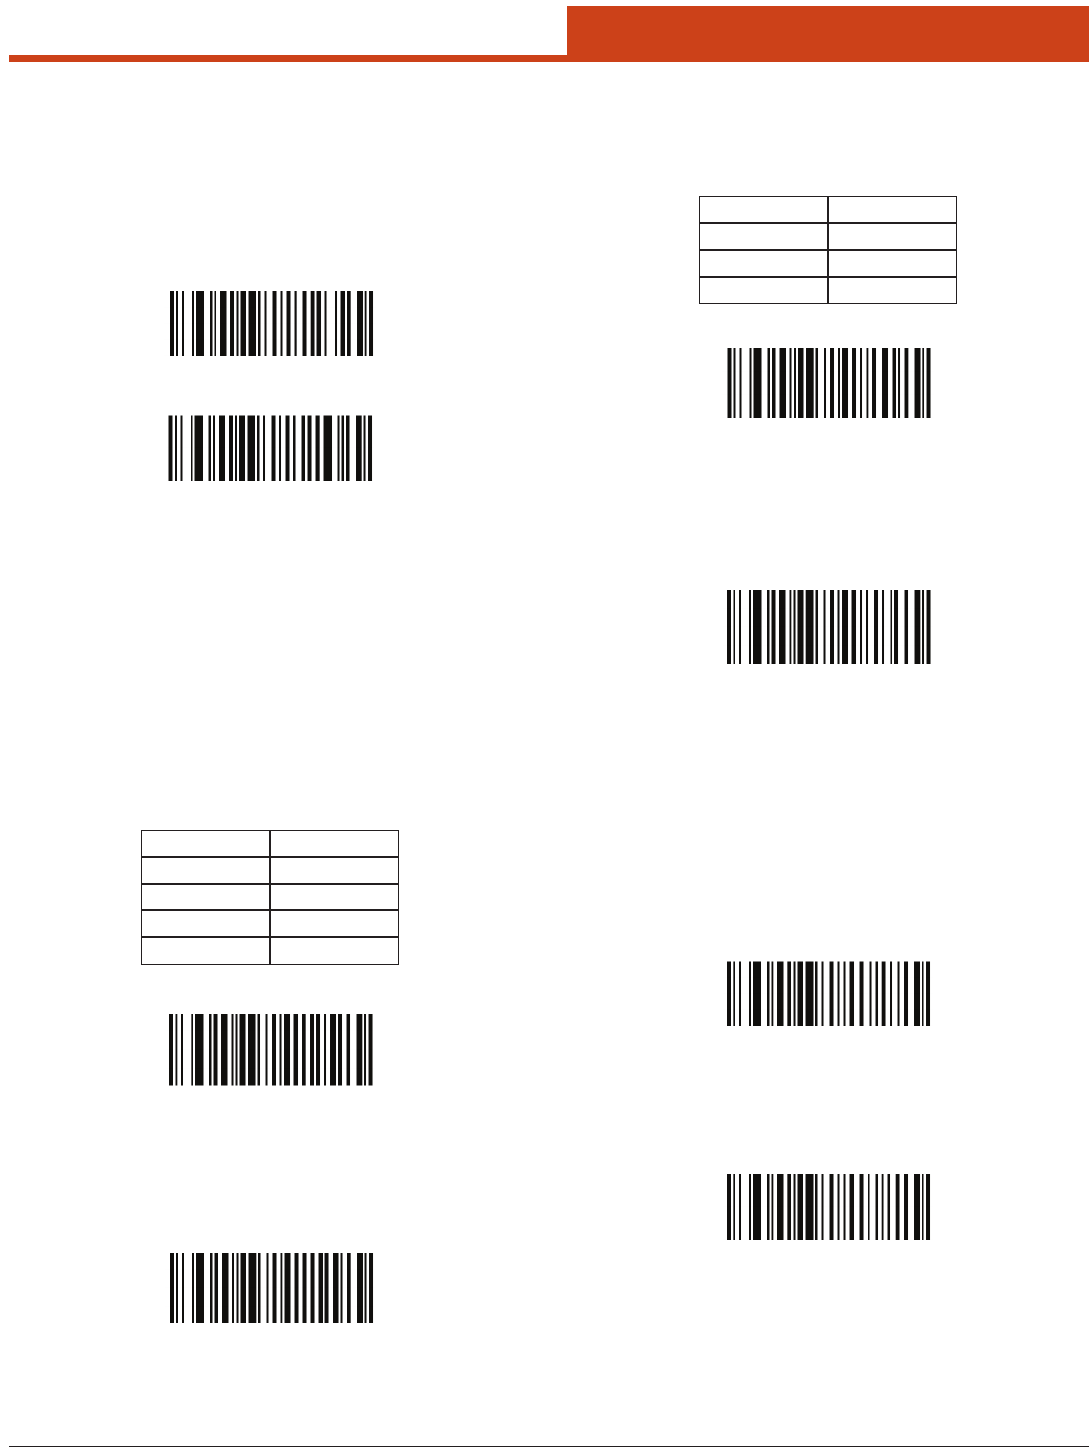
77
4.0 Programming the Unit
4.2.13 Parameter Scanning
Parameter # 0xEC
To disable decoding of parameter bar codes, scan the bar code below.
e Set Defaults parameter bar code can still be decoded. To enable de-
coding of parameter bar codes, either scan *Enable Parameter Scanning
(0x01), Set Factory Defaults or set this parameter to 0x01 via a serial
command.
*Enable Parameter Scanning
(0x01)
Disable Parameter Scanning
(0x00)
4.2.14 Linear Code Type Security Level
Parameter # 0x4E
e SE-955 oers four levels of decode security for linear code types (e.g.
Code 39, Interleaved 2 of 5). Select higher security levels for decreasing
levels of bar code quality. As security levels increase, the scanner’s ag-
gressiveness decreases. Select the security level appropriate for your bar
code quality.
Linear Security Level 1
e following code types must be successfully read twice before being
decoded:
*Linear Security Level 1
(0x01)
Linear Security Level 2
(0x02)
Linear Security Level 3
(0x03)
Linear Security Level 2
All code types must be successfully read twice before being decoded.
Linear Security Level 3
Code types other than the following must be successfully read twice
before being decoded. e following codes must be read three times:
Code Type Length
MSI 4 or less
D 2 of 5 8 or less
I 2 of 5 8 or less
Code Type Length
Codabar All
MSI 4 or less
D 2 of 5 8 or less
I 2 of 5 8 or less
Linear Security Level 4
(0x04)
Linear Security Level 4
All code types must be successfully read three times before being de-
coded.
4.2.15 Bi-directional Redundancy
Parameter # 0x43
Enable this option to transmit “NR” if a symbol does not decode during
the timeout period or before the trigger is released. Any enabled prex
or suxes are appended around this message.
When disabled, and a symbol cannot be decoded, no message is sent to
the host.
*Disable Bi-directional Redundancy
(0x00)
Enable Bi-directional Redundancy
(0x01)
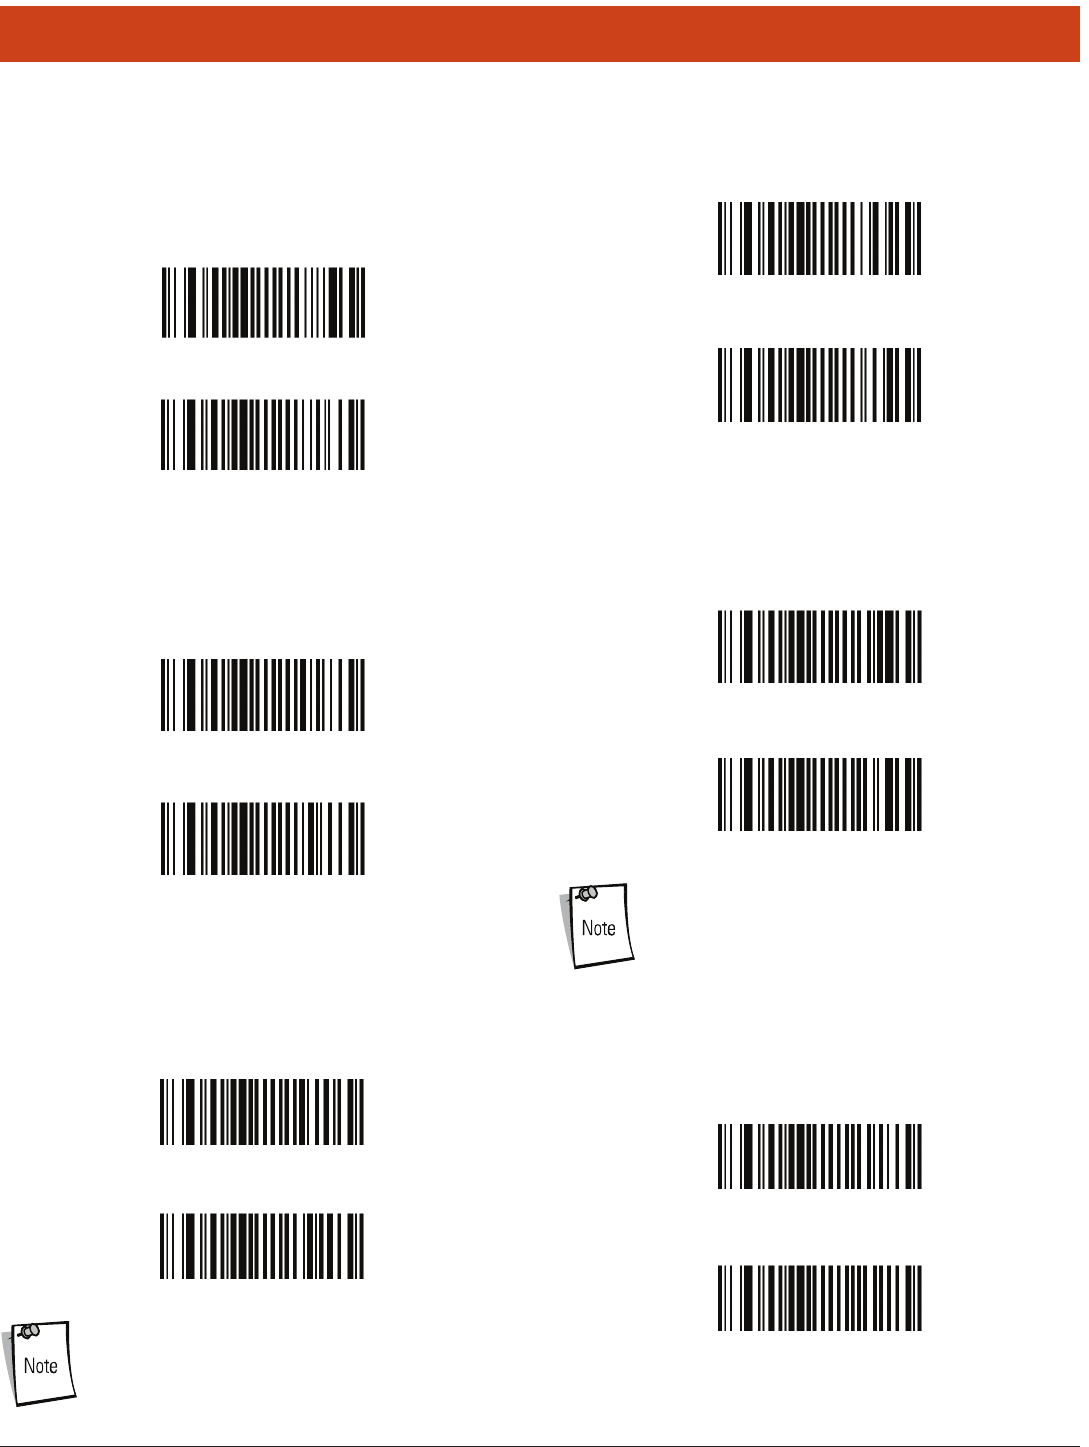
78
5.0 UPC Types
5.1 UPC / EAN
5.1.1 Enable/Disable UPC-A :
Parameter # 0x01
To enable or disable UPC-A, scan the appropriate bar code below.
5.1.2 Enable/Disable UPC-E :
Parameter # 0x02
To enable or disable UPC-E, scan the appropriate bar code below.
*Enable UPC-A
(0x01)
*Enable UPC-E
(0x01)
Disable UPC-A
(0x00)
Disable UPC-E
(0x00)
5.1.3 Enable/Disable UPC-E1 :
Parameter # 0x0C
To enable or disable UPC-E1, scan the appropriate bar code below.
Enable UPC-E1
(0x01)
*Disable UPC-E1
(0x00)
NOTE: UPC-E1 is not a UCC (Uniform Code Council) approved
symbology.
5.1.4 Enable/Disable EAN-8 :
Parameter # 0x04
To enable or disable EAN-8, scan the appropriate bar code below.
*Enable EAN-8
(0x01)
Disable EAN-8
(0x00)
5.1.5 Enable/Disable EAN-13 :
Parameter # 0x03
To enable or disable EAN-13, scan the appropriate bar code below.
*Enable EAN-13
(0x01)
Disable EAN-13
(0x00)
NOTE: UPC-E1 is not a UCC (Uniform Code Council) approved
symbology.
5.1.6 Enable/Disable Bookland EAN :
Parameter # 0x53
To enable or disable EAN Bookland, scan the appropriate bar code be-
low.
Enable Bookland EAN
(0x01)
*Disable Bookland EAN
(0x00)
5.0 UPC Types