TransCore 76007 FHSS TRANSCEIVER MODULE User Manual 3
TransCore FHSS TRANSCEIVER MODULE 3
UserManual.wiki
>
TransCore
>
76007 User Manual
>
User Manual 3
Contents
1.
Users Manual
2.
User Manual 1
3.
User Manual 2
4.
User Manual 3
5.
User Manual 4
User Manual 3
Navigation menu
Upload a User Manual
Namespaces
Wiki Guide
HTML
PDF
Info
Views
User Manual
Discussion / Help
Navigation
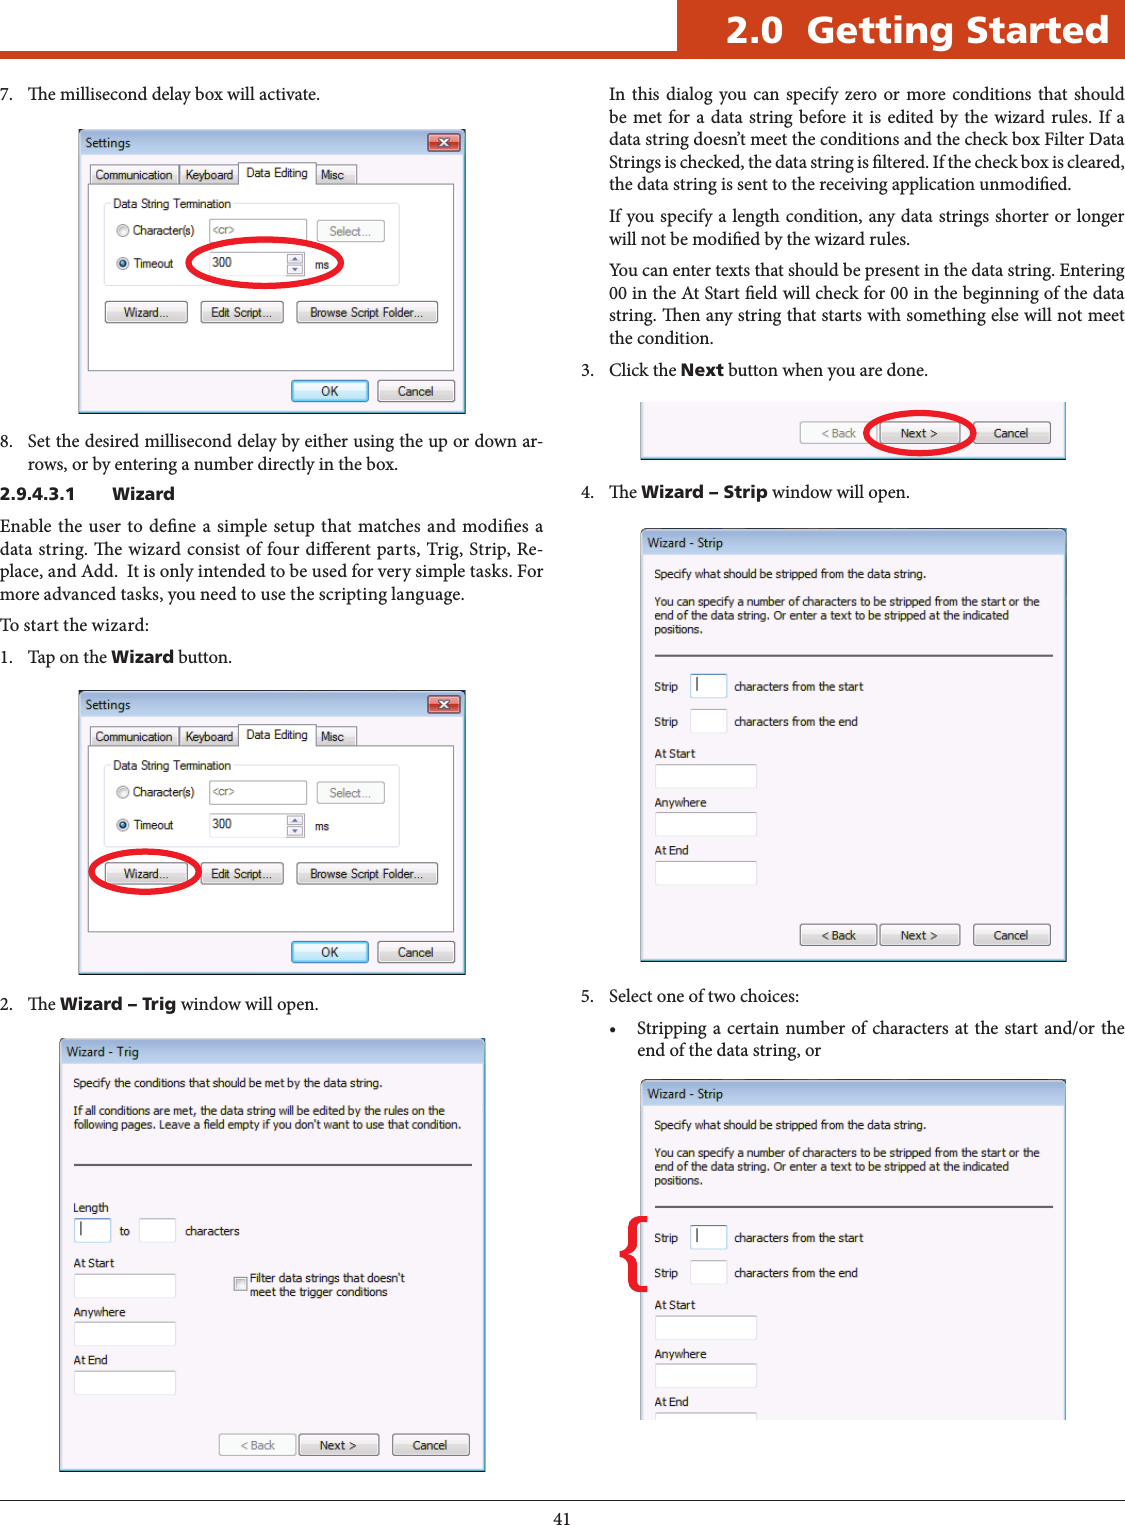
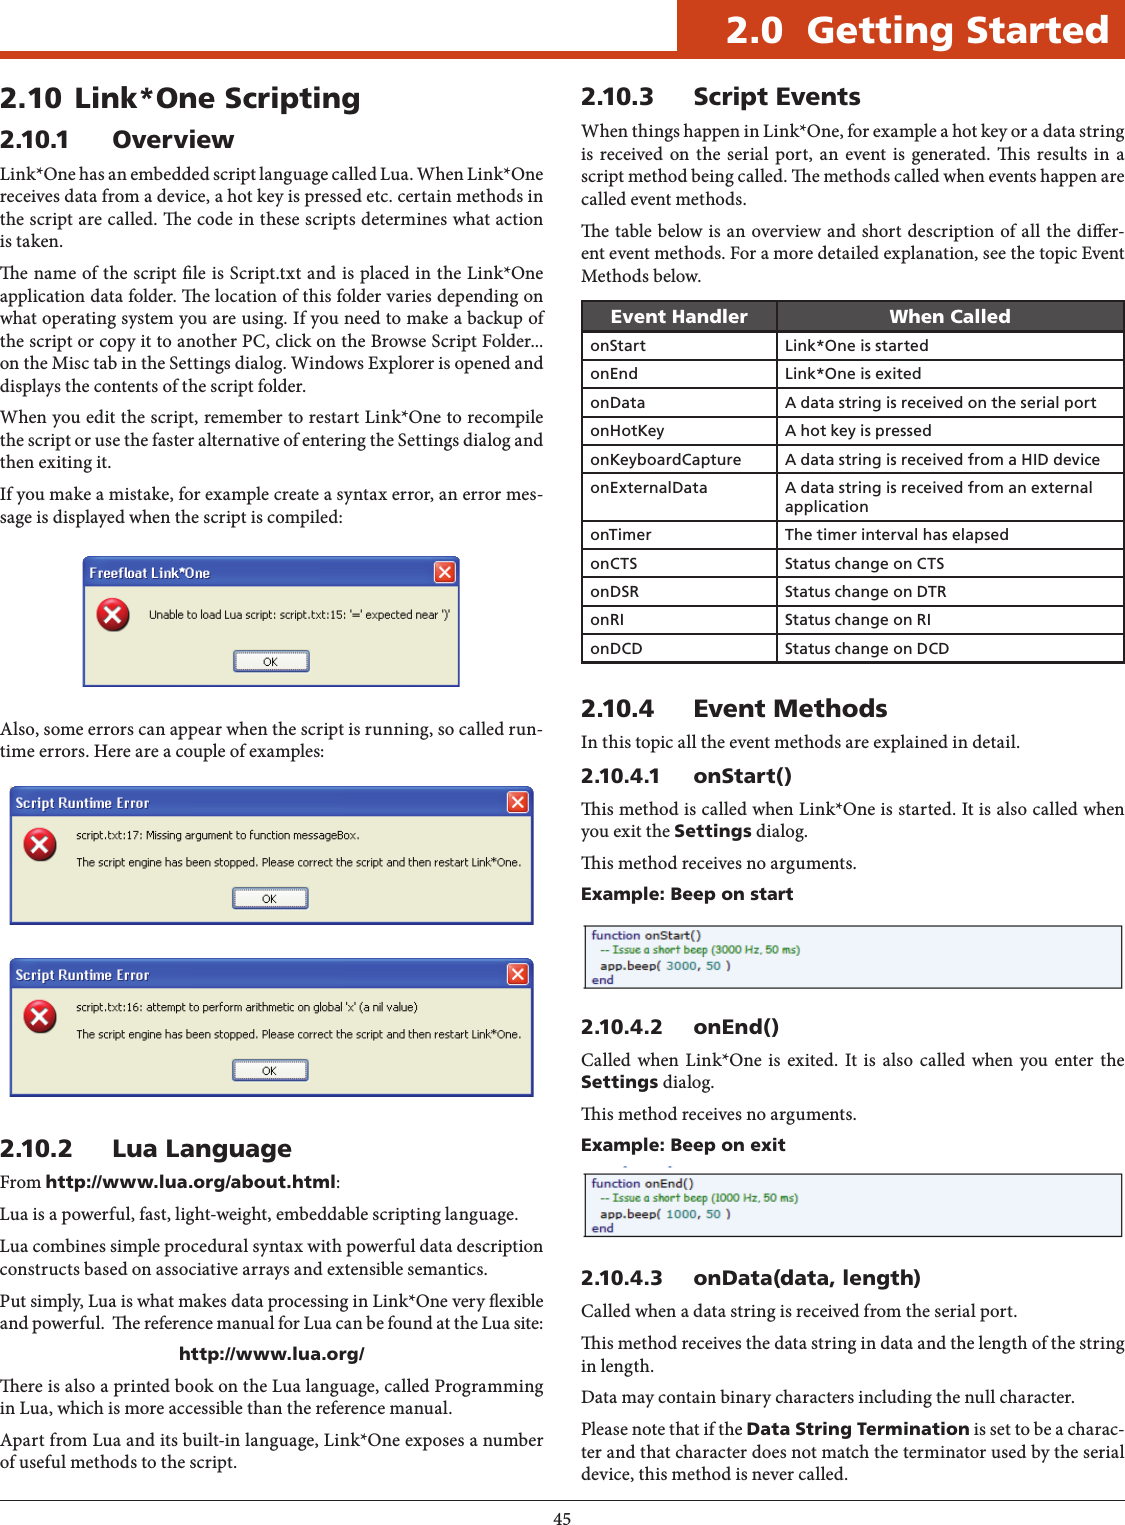


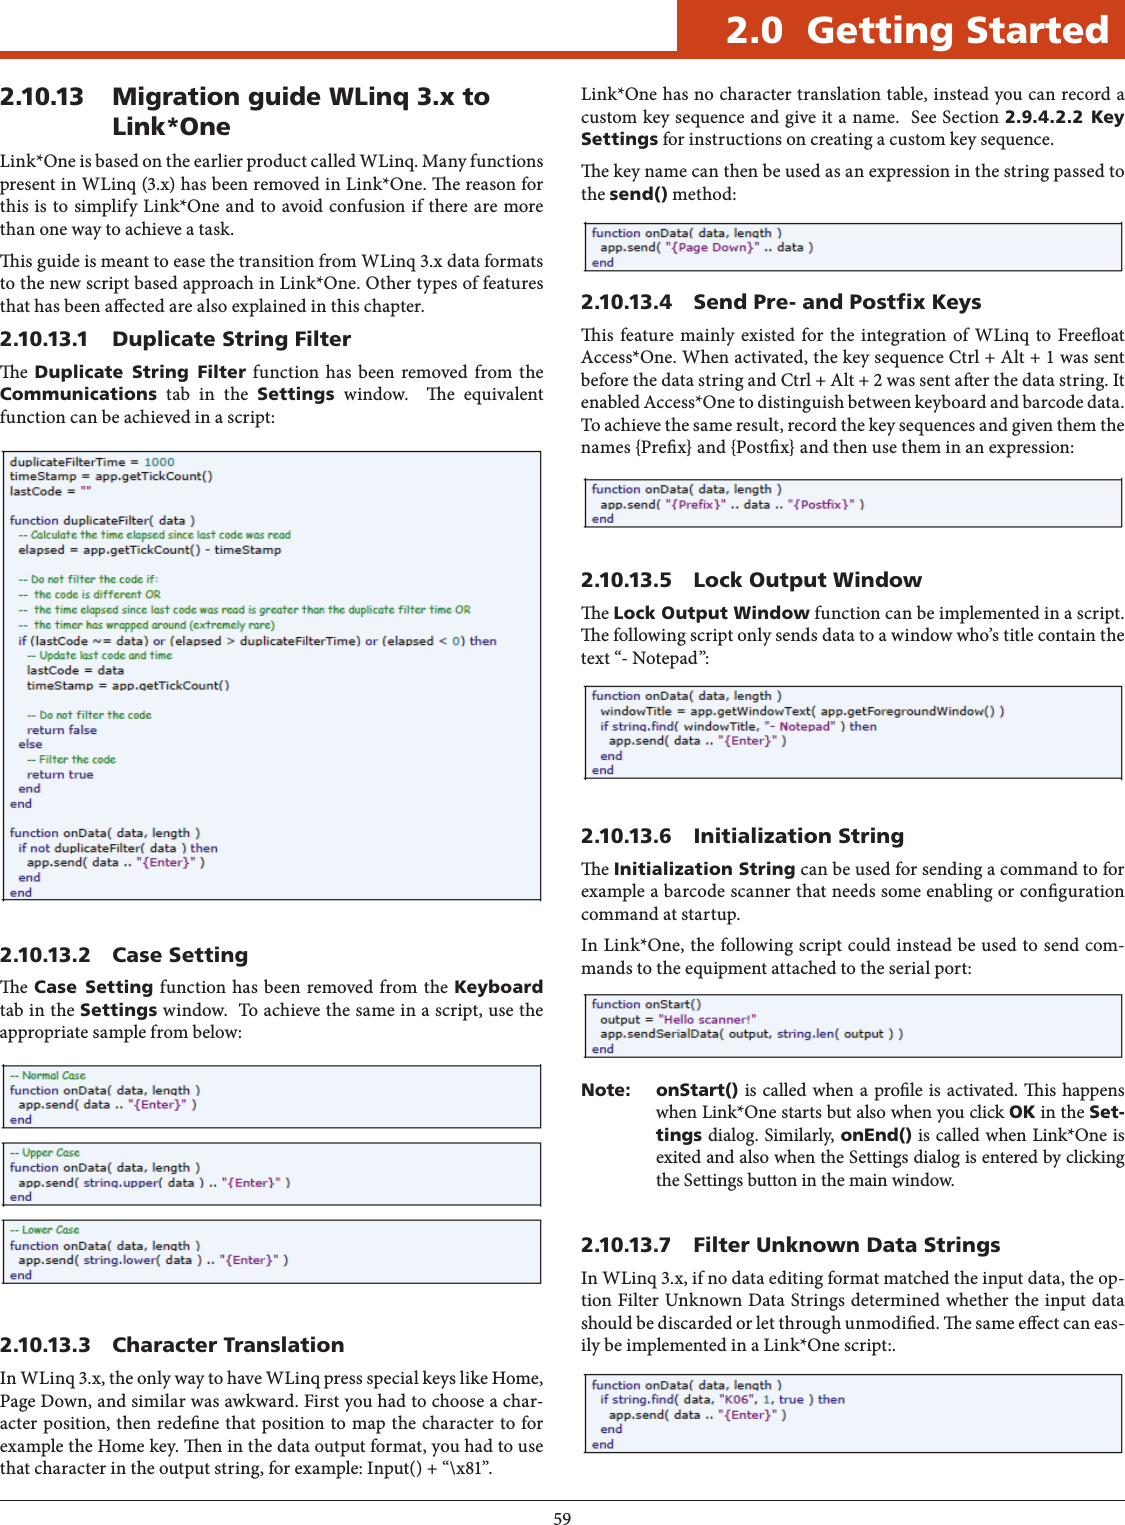

![612.0 Getting StartedInserts the current time in the specied formatWLinq 3.x Link*OneTime( “%H:%M” ) os.date( “%H:%M” )Concatenations of expressionsWLinq 3.x Link*One“X” + Left( 2 ) + Right( 2 )“X” .. string.sub( data, 1, 2 ) .. string.sub( data, -2 )Control charactersWLinq 3.x Link*One“<cr>< tab>” “{13}{9}”“\x09” “{9}”“\d013” “{13}Combining text and key pressesWLinq 3.x Link*OneInput() + “<tab>1<cr>” data .. “{Tab}1{Enter}”Reboot WindowsWLinq 3.x Link*OneReboot() app.exitWindows( exitWindowsOpts[“REBOOT”] )Reboot Windows (forced)WLinq 3.x Link*OneRebootForced() app.exitWindows( exitWindowsOpts[“FORCE”] )Starts the specied programWLinq 3.x Link*OneRunApp( “notepad.exe” )h = app.run( “notepad.exe” )closeAppHandle( h )Please note that the Link*One sample code below more realistically demonstrates what is needed when switching to another application. A small delay is needed before sending input to the activated window or characters may be lost. Also the example avoids an unnecessary delay when the target window already is the foreground window.Activates the rst window that has a caption that matches the window caption patternWLinq 3.x Link*OneSetFocus( “*Notepad” )ere is no direct equivalent function for the WLinq 3.x WaitForWin-dow. Below is a full example of a script which waits for a Notepad win-dow to appear, activates the window, and aer a small delay sends the data to the window.Some common situations where you need to wait for a window are when waiting for an Open dialog to appear (aer sending Ctrl+O) or when you have launched an application with app.run() and need to wait for it to be ready to receive input.Wait for a window to appearWLinq 3.x Link*OneWaitForWindow(“*Notepad”, 3000 )No direct equivalent function for WaitForAppExit() exists in Link*One. e same result can be achieved by using app.isAppRunning().Even though the sample below demonstrates a script that pauses until you exits Notepad, Link*One is not intended to have a script that inter-act with the user (except for app.messageBox()) since there may be side eects.app.isAppRunning() is intended to be used to synchronize the script with an external application that does its job and then exits.Wait for a window to appearWLinq 3.x Link*OneWaitForAppExit( 30000 )If a script calls app.closePort(), the script can start an external ap-plication that uses the same serial port. When that external application is exited, the script can re-open the serial port by calling app.open-Port().](https://usermanual.wiki/TransCore/76007.User-Manual-3/User-Guide-2266873-Page-21.png)
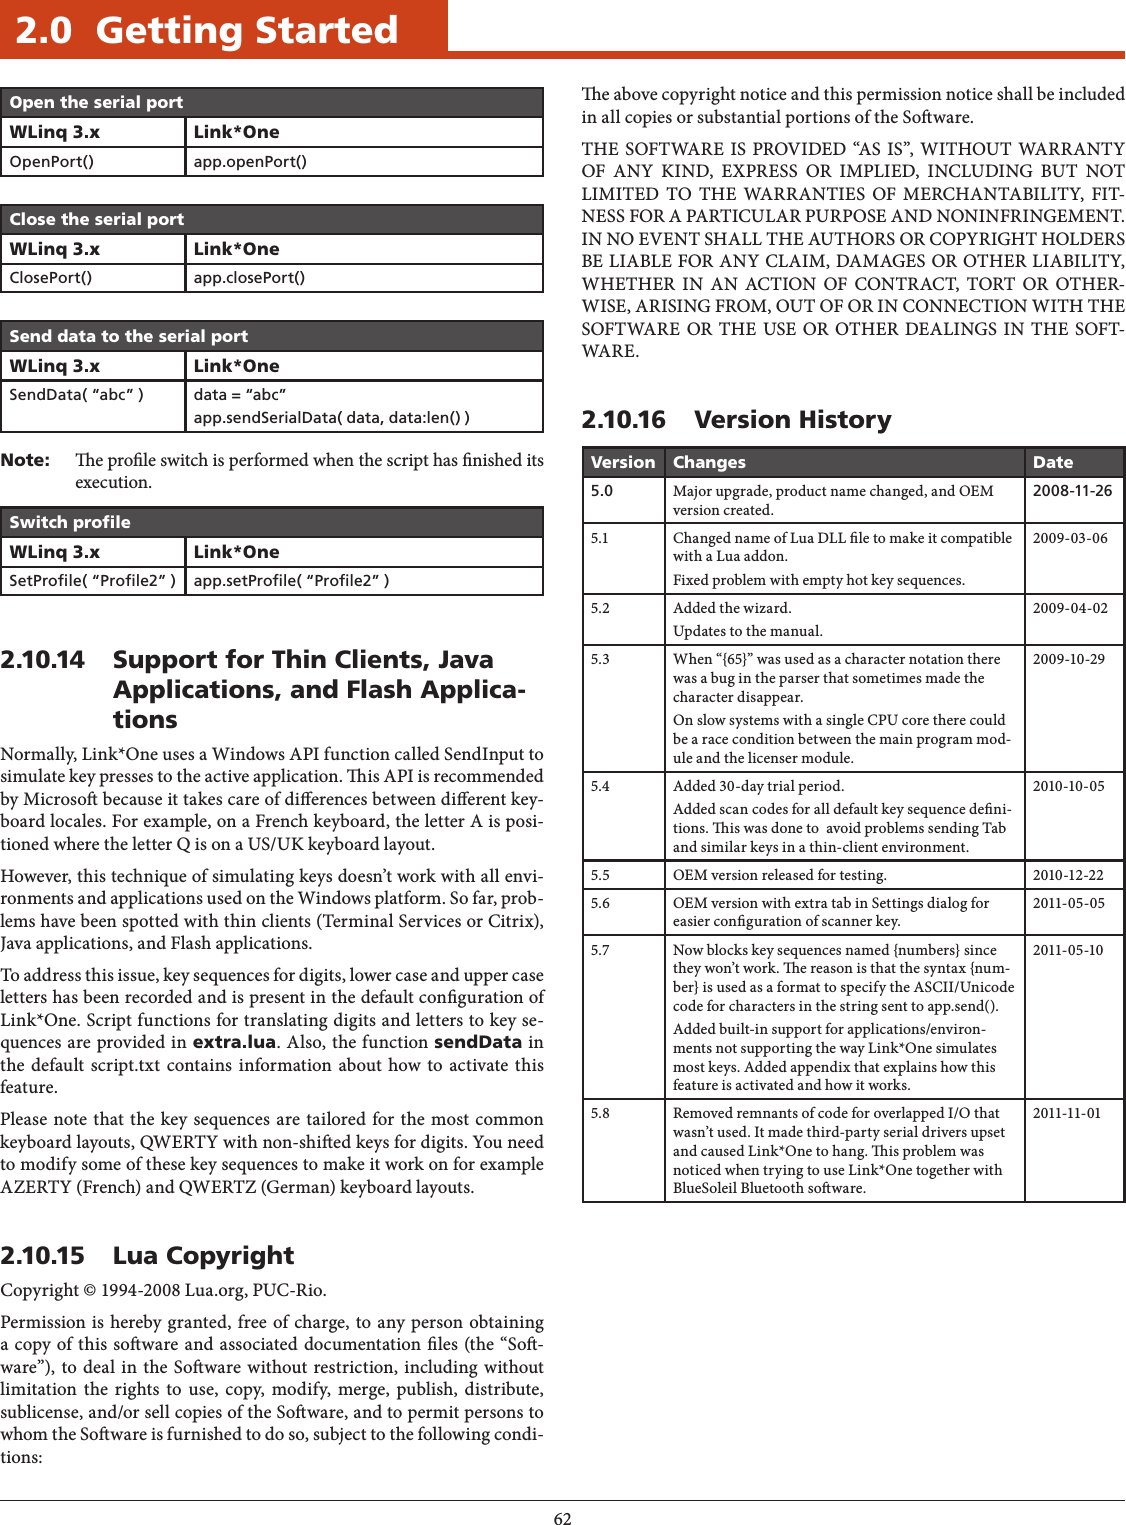
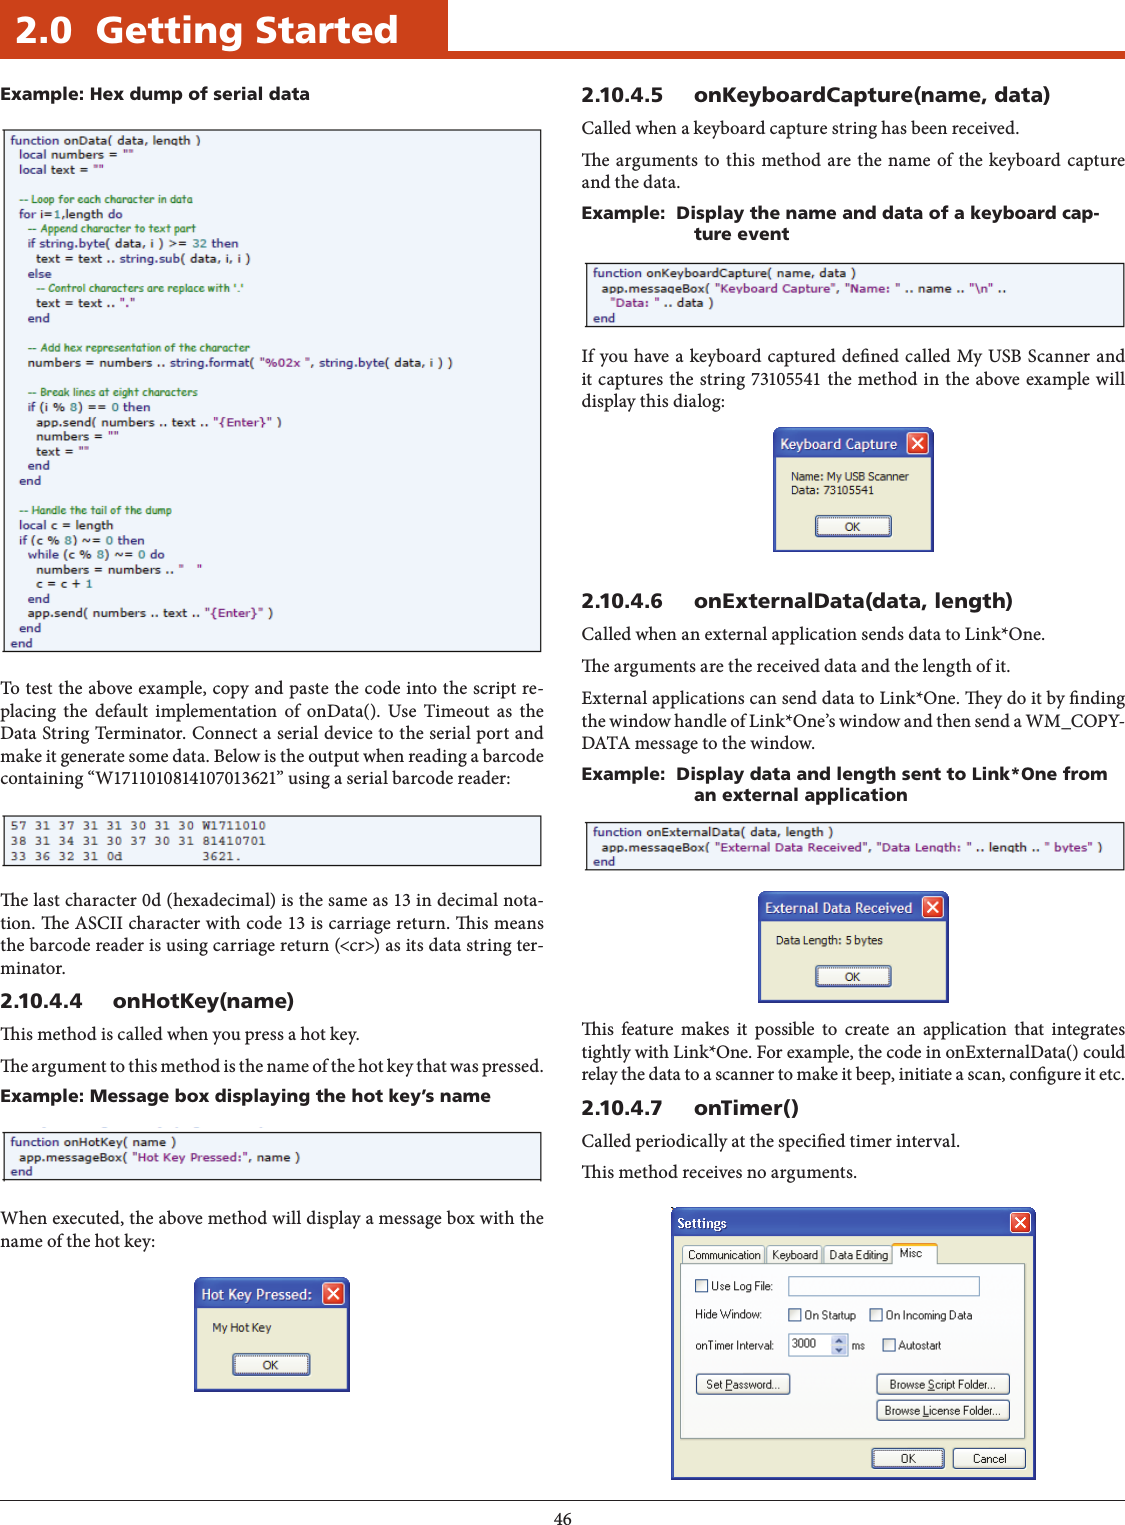
![653.0 Operating the Unit3.2.3.3 Geotagginge geotagging menu allows enabling the feature and showing a map centered on the current position. e current coordinates are written at the bottom of the menu.Once a picture has been taken, the current location is saved as an EXIF metadata in the JPEG le (GPS sub-IFD).3.2.3.3.1 How to enable the GPSDAP-Imager has been built to work with the standard location sensors supported by Windows 7. e WWAN module is equipped with a GPS, which maps to “Sierra Wireless NMEA Port” in the “Location and Oth-er Sensors” section of the control panel. You may also use the “Geosense Location Sensor” that retrieves the current position by looking to the WLAN used.Refer to Section 3.1 GPS Instructions for more information.Once a x is available, DAP-Imager should show the current position in the geotagging menu.Refer to the GPS section of the user’s manual for more information on troubleshooting the GPS.3.2.3.3.2 How to View Geotagging DataTo view the location where the picture has been taken, you may use any geotagging soware. For example, the “geotag” soware is an open source java program that can be run from the web (open http://geo-tag.sourceforge.net, then click on “Run it now”).e coordinates are shown on top aer having added the le to the list.3.2.3.4 How to Locate a Saved PictureTo open the folder where images are saved, choose “Actions > Show Im-age Folder” from the ‘more’ menu.3.2.3.5 General OptionsTo access the general options, choose “Options > General…” from the ‘more’ menu:Option screen:e le name and target folder templates can be changed here. ey dene where the image is to be saved. e list of variables can be found in the TargetFolder option of the [General] section.e default camera mode is the mode chosen when opening DAP-Im-ager.e ash light duration is the number of milliseconds the ash lightremains lit when pressing the <Flash Light> button.3.2.4 BarcodesDAP-Imager supports the following barcode symbologies:1D: Code 11, Code 39 (+extended), Code 93, Interleaved 2 of 5, Codabar, Code 128, EAN13, EAN8, PatzchCode, UPC-A and UPC-E.2D: PDF417, DataMatrix, QR Code and MicroQR CodePostal: AustrialiaPost, IntelligentMail, Planet, Postnet and RM4SCC](https://usermanual.wiki/TransCore/76007.User-Manual-3/User-Guide-2266873-Page-25.png)
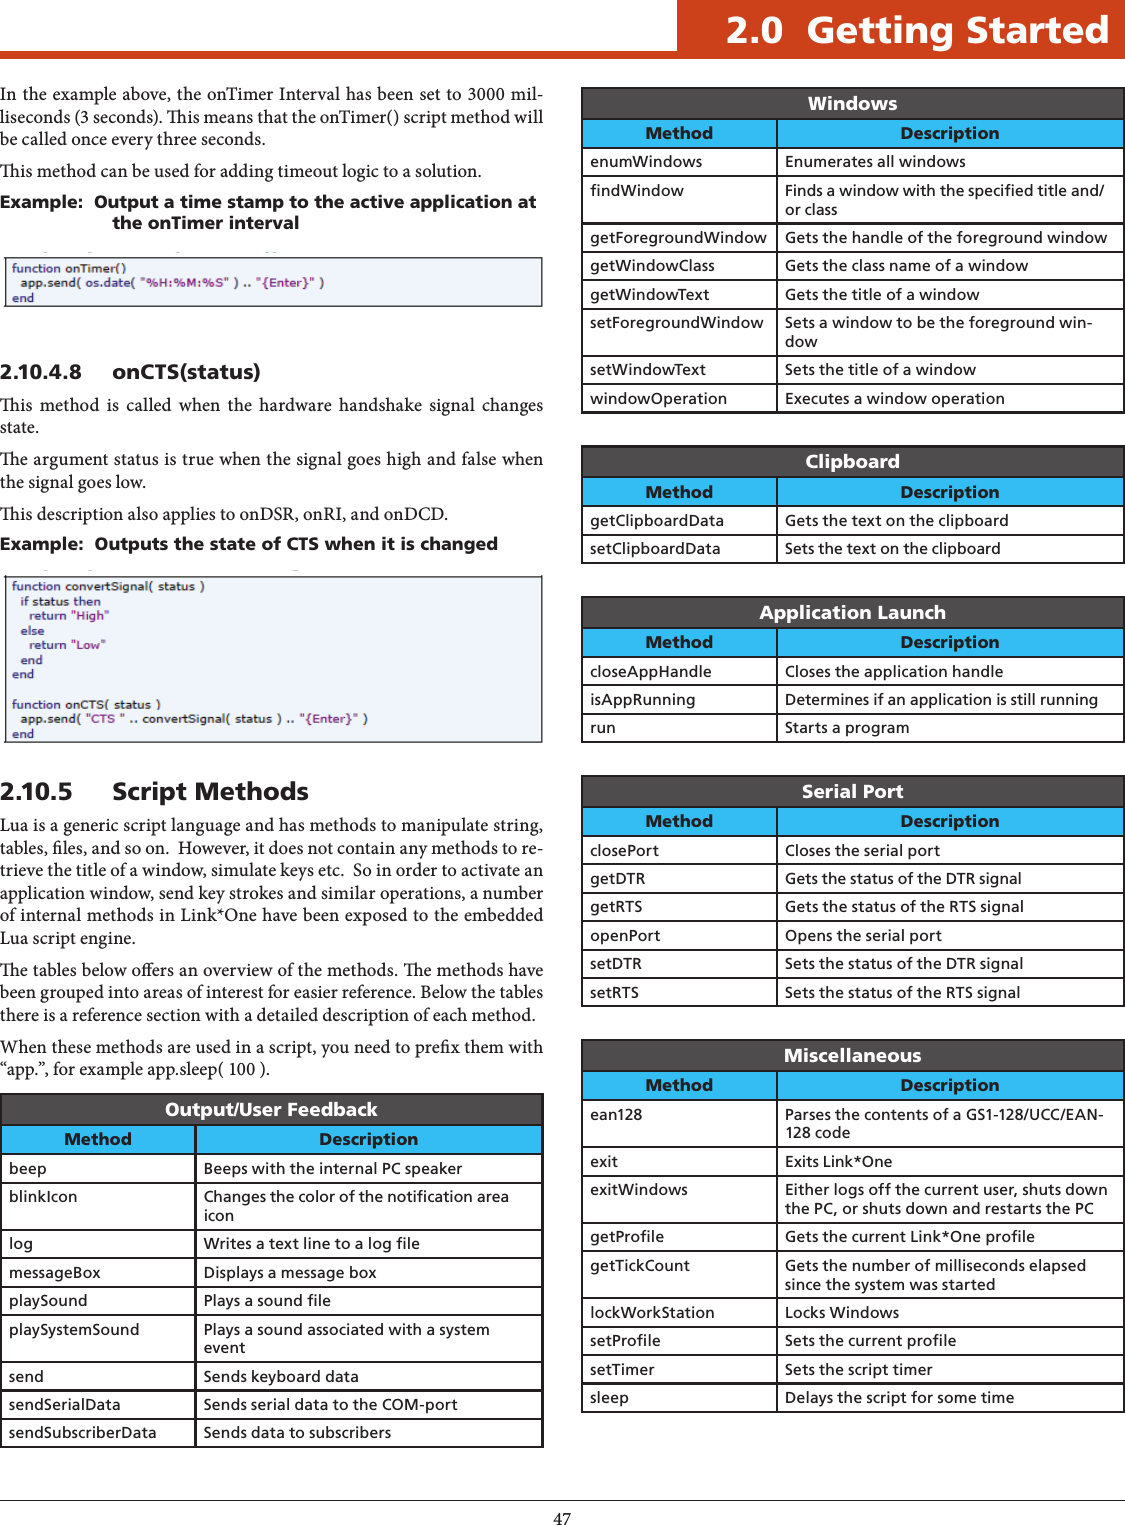
![673.0 Operating the Unit3.2.6 [General]3.2.6.1 TargetFolder = %PICTURES%\%YEAR%-%MONTH%-%DAY%To scan barcodes, rst ensure DAP-Imager is in barcode mode. To do that, open the application (double click the icon in the notication area) and select “Barcode” from the mode menu.Species the path where the picture is to be taken. Supported variables:VariablesName Description%YEAR% 4-digit year%MONTH% 2-digit month%DAY% 2-digit day of month%DAYOFWEEK% Name of the week day%HOUR% Hour%MINUTE% 2-digit minute%SECOND% 2-digit second%INDEX% Sequential index, incremented each time a picture is taken. The number is saved in “C:\Pro-gramData\DAP-Imager\NextImageIndex.txt”.%PICTURE% Path of the default Windows folder to save pic-tures (C:\Users\username\Pictures)3.2.6.2 FileNameTemplate = %HOUR%h%MINUTE%m%SECOND%sSpecies the le name of images taken. Supports the same variables than TargetFolder.3.2.6.3 DefaultImagerMode = PortraitName of the imager mode to be selected when DAP-Imager starts. Notice that if ScannerManager is present, it starts DAP-Imager in barcode mode.Default supported values: Portrait, Landscape, Macro, Barcodeey correspond to the name of the corresponding section [ImagerMode:XXXX].3.2.6.4 FlashLightDurationMs = 10000Numberofmillisecondsthe ash light remainslitwhen itsbutton isclicked(anycameramode).eashlightisautomaticallyturnedoaer a delay to save power.3.2.6.5 Func1VirtualKey = 135Virtual key code used for the main trigger key. For the integration with ScannerManager to work, you must use the default value (corresponds to the trigger on back of the unit).For other virtual-key codes, refer to the “Virtual-Key Codes” section of the Windows Application UI Development guide. Notice that the codes here are in DECIMAL.3.2.6.6 Func2VirtualKey = 117Sets the key used to force an autofocus.For other virtual-key codes, refer to the “Virtual-Key Codes” section of the Windows Application UI Development guide. Notice that the codes here are in DECIMAL.3.2.6.7 Func1KeyModiers = 0Determines the key that must be pressed in combination with Func-1VirtualKey.3.2.6.8 Func2KeyModiers = 0Determines the key that must be pressed in combination with Func-2VirtualKey. Use the key modiers shown for Func1VirtualKey.3.2.6.9 Func1KeySystemWide = 1When set to 1, the main trigger key is registered as a global hotkey, so that DAP-Imager captures it even if another application has the focus.3.2.6.10 Func2KeySystemWide = 0When set to 1, the second trigger key is registered as a global hotkey, so that DAP-Imager captures it even if another application has the focus.3.2.7 [Camera]Options specic to the camera modes that take a picture.3.2.7.1 InactiveTimeBeforeStandbyLevel1 = 10000Number of milliseconds before the camera is stopped when the applica-tion is in background. Waking up the camera takes a few seconds. If you use the camera oen, you may want to increase this value. Decrease it to save power.3.2.7.2 ActivateDapImagerOnTrigger = OFFWhen in a camera mode (portrait, landscape or macro), the trigger key is never global, except if this option is set. If set and Func1KeySystem-Wide is 1, pressing the trigger will show up DAP-Imager. Pressing an-other time takes a picture. 3.2.7.3 ShowImageNameOnPreview = OFFWhen ON, the image le path is written on the image when the picture is taken. 3.2.8 [Barcodes]Options specic to the barcode mode.3.2.8.1 EnableAutoPreview = ONWhen ON, DAP-Imager shows the camera preview in a top level win-dow while the trigger key is pressed. 3.2.8.2 PreviewWndRect = 0 0 320 240Size of the auto preview window. Should not be changed. 3.2.8.3 UIPolicy = LegacySets the way the trigger key is handled. Only the “Legacy” UI policy is ocially supported, but you may experiment with the other modes. UIPolicyName DescriptionLegacy Works like a regular handheld scanner: press and hold the trigger key to decode, release to cancel.Standard Press and release the trigger key to decode. DAP-Imager makes MaxNbrAttempts decoding attempts.DecTrigUp Attempts to decode when the trigger key is released.](https://usermanual.wiki/TransCore/76007.User-Manual-3/User-Guide-2266873-Page-27.png)
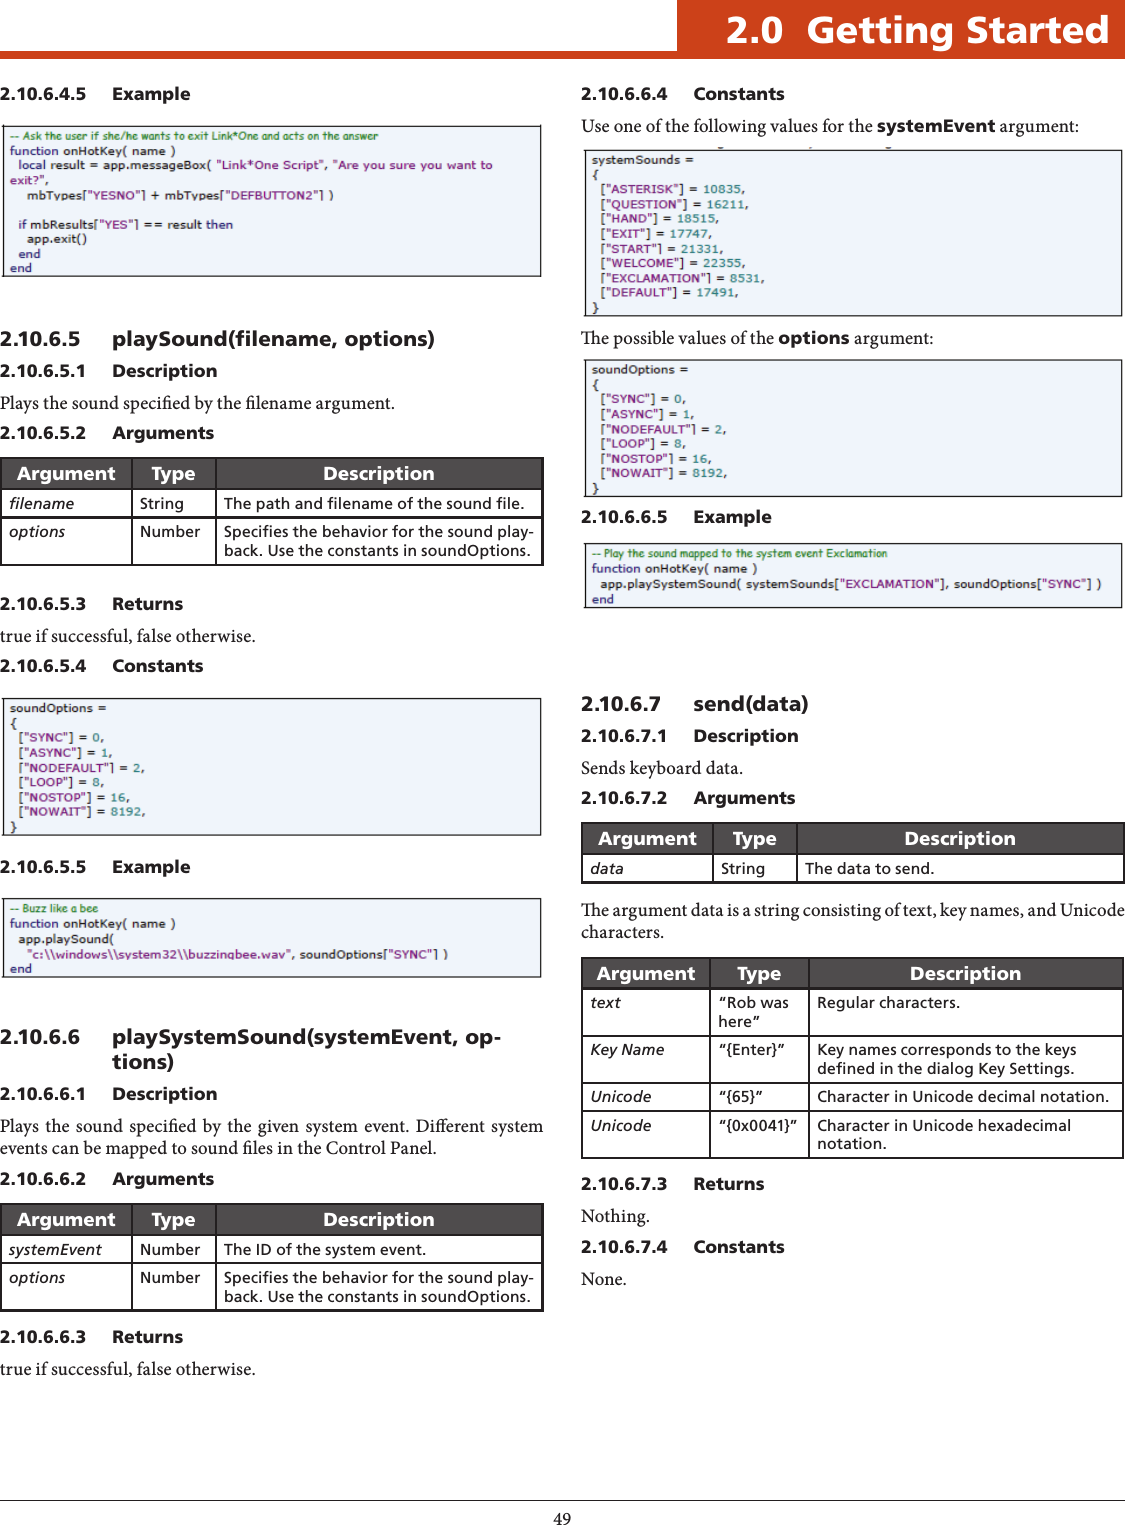
![683.0 Operating the Unit3.2.8.4 DefaultFocus = 3733Not used in this version of DAP-Imager. 3.2.8.5 Aimer = ONNot used in this version of DAP-Imager. 3.2.8.6 DecodeAfterAutofocus = ONNot used in this version of DAP-Imager. 3.2.8.7 MaxNbrResults = 1When several barcodes are visible in an image, the decoder can return more than one result. Set this value to the maximum number of results that are considered. If 1, the rst result is returned and the others are discarded. 3.2.8.8 DecodeTimeoutMs = 1500Maximum duration of a decode operation, in milliseconds. If the de-code operation takes longer, it is cancelled. Using a small timeout won’t allow decoding most barcodes. Using a higher value may have an im-pact on the user interface responsiveness. 3.2.8.9 MaxNbrAttempts = 1In the Standard or DecTrigUp UI policies, number of attempts DAP-Imager tries to decode before returning NO READ. 3.2.8.10 InactiveTimeBeforeStandbyLevel1 = 10000Numberofmillisecondsbeforetheashlightisturnedo.3.2.8.11 InactiveTimeBeforeStandbyLevel2 = 10000Number of milliseconds before the camera is stopped when the trigger is not pressed. Waking up the camera takes a few seconds. If you scan barcodes oen, you may want to increase this value. Decrease it to save power. 3.2.8.12 KbWedge = OFFSet this option to ON if you don’t use ScannerManager and want to wedge barcodes. 3.2.8.13 AddTab = OFFWhen KbWedge is ON and a barcode is wedged, simulates a TAB key aer the barcode data. 3.2.8.14 AddEnter = ONWhen KbWedge is ON and a barcode is wedged, simulates a RETURN key aer the barcode data. 3.2.8.15 Preamble = When KbWedge is ON and a barcode is wedged, this value is prexed to the barcode data. 3.2.8.16 Postamble = When KbWedge is ON and a barcode is wedged, this value is appended to the barcode data. 3.2.8.17 InterCharDelay = 0When KbWedge is ON and a barcode is wedged, sets the delay between each key that is simulated, in milliseconds. 3.2.8.18 MaxGainWithoutMVLight = 2500Not used in this version of DAP-Imager. 3.2.8.19 MinGainWithMovieLight = 1000Not used in this version of DAP-Imager. 3.2.8.20 MaxGain = 4000Not used in this version of DAP-Imager. 3.2.8.21 GainStep = 200Not used in this version of DAP-Imager. 3.2.8.22 IdealGain = 2000Not used in this version of DAP-Imager. 3.2.8.23 FlashIntensityStep = 100Not used in this version of DAP-Imager. 3.2.8.24 MaxFlashIntensity = 100Not used in this version of DAP-Imager. 3.2.8.25 MaxShutter = 4000Not used in this version of DAP-Imager. 3.2.8.26 ShutterStep = 260Not used in this version of DAP-Imager.3.2.8.27 IdealShutter = 575Not used in this version of DAP-Imager.3.2.8.28 AppendSymbology = OFFWhen ON, DAP-Imager will wedge the name of the symbology aer the barcode data. It can be used to nd out the symbology of a barcode.3.2.9 [OCR]OCR not yet supported in this version of DAP-Imager.3.2.10 [ImagerModes]3.2.8.1 ModeList = Portrait,Landscape,Macro,Barcode,Lists the modes that appear in the camera mode menu. e modes spec-ied here must be dened in the sections that follow.3.2.11 [ImagerMode:XXXX]is sections denes a given imager mode (XXXX), as listed in ModeL-ist.Notallvaluesareused;itdependsontheModeTypeoption.3.2.11.1 ModeType = 0A value of 0 indicates that it’s a mode to take pictures. A value of 1 is for barcode decoding.3.2.11.2 IconID = 142Resource ID of the icon to be shown in the mode menu. You can use a resource editor to view the icons that are available (for example: http://www.resedit.net/).3.2.11.3 SelectionButtonImageFileName = res\button-mode-portrait80.pngFile path of the image shown when the mode is selected (mode button).](https://usermanual.wiki/TransCore/76007.User-Manual-3/User-Guide-2266873-Page-28.png)
![693.0 Operating the Unit3.2.11.4 Enabled = ONON if the mode is enabled. If disabled, it will be grayed out in the mode menu.3.2.11.5 AutoFlash = ONNot used in this version of DAP-Imager.3.2.11.6 GpsReportTypes = 1Set this option to 1 to enable geotagging, or 0 to disable it.3.2.11.7 PreviewWidth = 640Size of the image preview. Should not be changed.3.2.11.8 PreviewHeight = 480Size of the image preview. Should not be changed.3.2.11.9 StillWidth = 1600Width of the images captured (resolution).3.2.11.10 StillHeight = 1200Height of the images captured (resolution).3.2.11.11 ColorSpace = 16Not used, leave unchanged.3.2.11.12 FrameRate = 30.000000Not used, leave unchanged.3.2.11.13 Shutter = 10000Exposition duration, when AutoExposure is OFF. e value must be between 0 and 10000.3.2.11.14 Brightness = 5000Brightness level. It shis pixel values so that the image is either lighter or darker. e value must be between 0 and 10000 (higher is lighter).3.2.11.15 GlobalGain = 0Not yet supported by the camera.3.2.11.16 Exposure = 5000Not yet supported by the camera.3.2.11.17 FlipMode = 1Not supported.3.2.11.18 AutoExposure = ONWhen ON, the camera nds the best exposition and gain for the cur-rent lighting conditions. Using OFF allows setting Shutter manually, but since the camera doesn’t support the GlobalGain option, it should not be used.3.2.11.19 LightingMode = 00: Flash (light pulse)1:Continuouslighting(ashlight)3.2.11.20 LightingPower = 0e lighting power must be 0 (turned o) or 100 (turned on).3.2.11.21 Aimer = OFFNot supported by the camera.3.2.11.22 Compression = ONSet to ON to preview in JPEG format, or OFF to preview in YUV format.3.2.11.23 CompressionRatio = 13Not supported by the camera.3.2.11.24 FocusPosition = 500Denes where to focus (0: innite, 10000: closest position). Not used when Autofocus is ON.3.2.11.25 Autofocus = ONEnables or disables continuous autofocus. When the camera is moved, it automatically tries to autofocus.3.2.11.26 WhiteBalancePreset = 0Denes how colors are balanced.VariablesName Description0Automatic1Fluorescent2Incandescent3Sunny4Cloudy5Movie Light6Flash7Hybrid3.2.11.27 ManualWhiteBalance = OFFSet to ON to use WhiteBalanceKelvin. Otherwise, WhiteBalancePreset applies.3.2.11.28 WhiteBalanceKelvin = 8267Whitebalancevalue;0isthecoldest(bluish),10000isthewarmest.3.2.11.29 PreviewToWindow = ONSet to ON to have DirectShow paint the preview (improves performanc-es). Should not be ON in barcode mode.3.2.12 [Permissions]3.2.12.1 Option(More) = 3Set this value to 0 to prevent a user from accessing the “more” menu aer the geotagging icon. When clicked, it simply shows the About box.A value of 3 grants all permissions.](https://usermanual.wiki/TransCore/76007.User-Manual-3/User-Guide-2266873-Page-29.png)
![703.0 Operating the Unit3.3 Command-Line OptionsDAP-Imager includes several commands to control it from an external application.3.3.1 SyntaxDAP-Imager [congFilePath] [-b] [-q] [-NextImageFilePath FilePath] [-OneShotCapture] [-SelectMode \”modeName\”] [-SetAutoFlash state] [-WaitUntilWndClosed] [-SetTopMost]Command-Line ArgumentsArgument DescriptioncongFilePath .ini le to load (optional; default path is C:\ProgramData\DAP-Imager\DAP-Imager.ini).-b Execute in background-q Quit any instance already running-NextImageFilePath Sets the path of the next image le saved (one-shot). Normally used with “-OneShot-Capture”.-OneShotCapture Shows the preview, let the user press the trigger and take a picture. When taken, DAP-Imager hides. Can be used with “-Nex-tImageFilePath” to allow a user taking a picture that is then retrieved by an external application.-SelectMode The next parameter is the name of the mode to select (Portrait, Landscape, Macro, Barcode)-ResetOptions: Ignores DAP-Imager.ini and use the default settings-WaitUntilWndClosed Shows DAP-Imager and do not return before it’s hidden](https://usermanual.wiki/TransCore/76007.User-Manual-3/User-Guide-2266873-Page-30.png)