TransCore 76007 FHSS TRANSCEIVER MODULE User Manual 1
TransCore FHSS TRANSCEIVER MODULE 1
UserManual.wiki
>
TransCore
>
76007 User Manual
>
User Manual 1
Contents
1.
Users Manual
2.
User Manual 1
3.
User Manual 2
4.
User Manual 3
5.
User Manual 4
User Manual 1
Navigation menu
Upload a User Manual
Namespaces
Wiki Guide
HTML
PDF
Info
Views
User Manual
Discussion / Help
Navigation
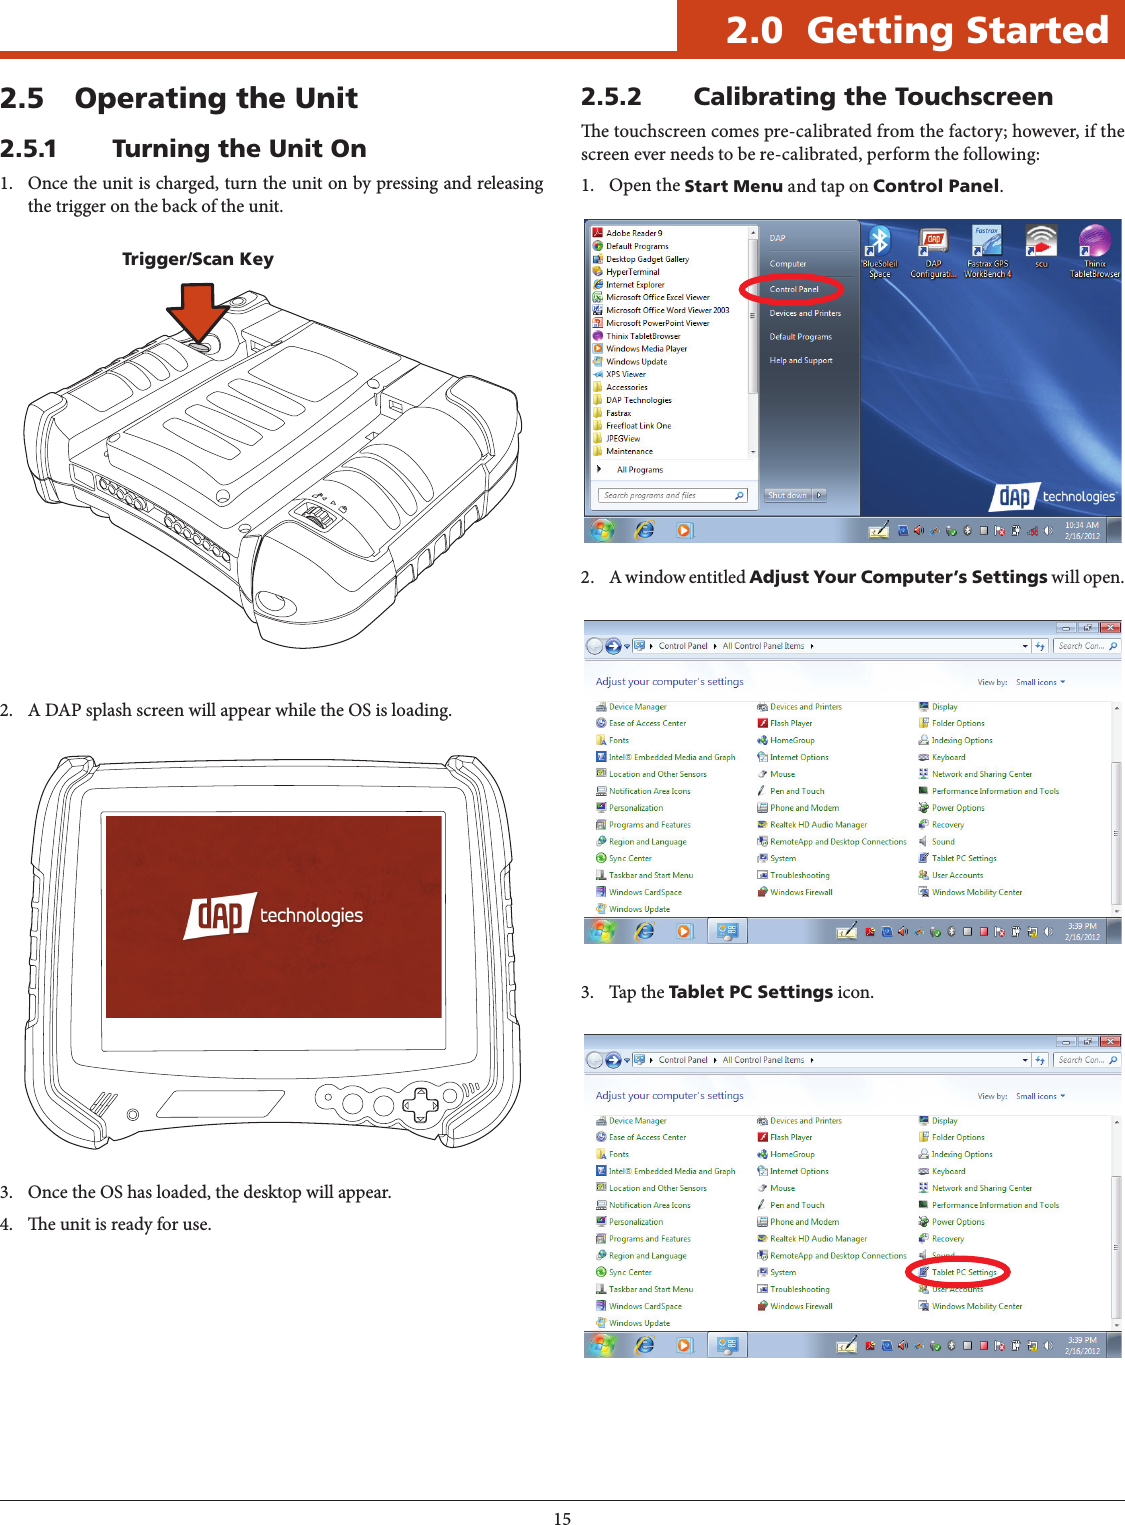
![42.10.9.3 run(program, argument, delay) ...........542.10.10 Serial Port .......................................552.10.10.1 closePort() .............................552.10.10.2 getDTR()...............................552.10.10.3 getRTS() ...............................552.10.10.4 openPort() .............................552.10.10.5 setDTR(status)..........................562.10.10.6 setRTS(status) ..........................562.10.11 Miscellaneous....................................562.10.11.1 ean128(data, strict) ......................562.10.11.2 exit() ..................................562.10.11.3 exitWindows(options) ...................572.10.11.4 getProle() .............................572.10.11.5 getTickCount() .........................572.10.11.6 lockWorkStation().......................572.10.11.7 setProle(prole)........................582.10.11.8 setTimer(interval).......................582.10.11.9 sleep(duration)..........................582.10.12 Notication Area Icon ............................582.10.13 Migration guide WLinq 3.x to Link*One ............592.10.13.1 Duplicate String Filter ...................592.10.13.2 Case Setting ............................592.10.13.3 Character Translation ...................592.10.13.4 Send Pre- and Postx Keys ...............592.10.13.5 Lock Output Window....................592.10.13.6 Initialization String .....................592.10.13.7 Filter Unknown Data Strings .............592.10.13.8 Input Data Replacements.................602.10.13.9 Criteria ................................602.10.13.10 Data Format Output .....................602.10.14 Support for in Clients, Java Applications, and Flash Applications ............................622.10.15 Lua Copyright ...................................622.10.16 Version History ..................................623.0 Operating the Unit ..........................633.1 GPS Instructions .......................................633.1.1 Requirements:....................................633.1.2 Set up to use the GPS..............................633.1.3 Integration to Windows 7..........................643.2 DAP-Imager Instructions ...............................643.2.1 What is DAP-Imager..............................643.2.2 Selecting the Right Mode ..........................643.2.3 Pictures .........................................643.2.3.1 How to Take a Picture ...................643.2.3.2 Flash ..................................643.2.3.3 Geotagging.............................653.2.3.3.1 How to enable the GPS........653.2.3.3.2 How to View Geotagging Data........................653.2.3.4 How to Locate a Saved Picture ............653.2.3.5 General Options ........................653.2.4 Barcodes ........................................653.2.4.1 How to Scan Barcodes ...................663.2.4.1.1 Using ScannerManager........663.2.4.1.2 Using DAP-Imager as a Stand-Alone Application ...... 663.2.4.2 Decoder Conguration ..................663.2.5 .INI Conguration File............................663.2.6 [General] . . . . . . . . . . . . . . . . . . . . . . . . . . . . . . . . . . . . . . . .673.2.6.1 TargetFolder = %PICTURES%\%YEAR%-%MONTH%-%DAY% ...................673.2.6.2 FileNameTemplate = %HOUR%h%MINUTE%m%SECOND%s..673.2.6.3 DefaultImagerMode = Portrait............673.2.6.4 FlashLightDurationMs = 10000...........673.2.6.5 Func1VirtualKey = 135 ..................673.2.6.6 Func2VirtualKey = 117 ..................673.2.6.7 Func1KeyModiers = 0 ..................673.2.6.8 Func2KeyModiers = 0 ..................673.2.6.9 Func1KeySystemWide = 1 ................673.2.6.10 Func2KeySystemWide = 0 ................673.2.7 [Camera] ........................................673.2.7.1 InactiveTimeBeforeStandbyLevel1 = 10000..................................673.2.7.2 ActivateDapImagerOnTrigger = OFF ......673.2.7.3 ShowImageNameOnPreview = OFF .......673.2.8 [Barcodes] . . . . . . . . . . . . . . . . . . . . . . . . . . . . . . . . . . . . . . .673.2.8.1 EnableAutoPreview = ON ................673.2.8.2 PreviewWndRect = 0 0 320 240 ...........673.2.8.3 UIPolicy = Legacy.......................673.2.8.4 DefaultFocus = 3733 .....................683.2.8.5 Aimer = ON ............................683.2.8.6 DecodeAerAutofocus = ON .............683.2.8.7 MaxNbrResults = 1......................683.2.8.8 DecodeTimeoutMs = 1500................683.2.8.9 MaxNbrAttempts = 1 ....................683.2.8.10 InactiveTimeBeforeStandbyLevel1 = 10000..................................683.2.8.11 InactiveTimeBeforeStandbyLevel2 = 10000..................................683.2.8.12 KbWedge = OFF ........................683.2.8.13 AddTab = OFF ..........................683.2.8.14 AddEnter = ON .........................683.2.8.15 Preamble = .............................683.2.8.16 Postamble = ............................683.2.8.17 InterCharDelay = 0 ......................683.2.8.18 MaxGainWithoutMVLight = 2500 ........683.2.8.19 MinGainWithMovieLight = 1000 .........683.2.8.20 MaxGain = 4000 . . . . . . . . . . . . . . . . . . . . . . . .683.2.8.21 GainStep = 200 .........................683.2.8.22 IdealGain = 2000........................683.2.8.23 FlashIntensityStep = 100 .................683.2.8.24 MaxFlashIntensity = 100 .................683.2.8.25 MaxShutter = 4000 ......................683.2.8.26 ShutterStep = 260 .......................683.2.8.27 IdealShutter = 575.......................683.2.8.28 AppendSymbology = OFF ................683.2.9 [OCR]...........................................683.2.10 [ImagerModes]...................................683.2.8.1 ModeList = Portrait,Landscape,Macro,Barcode, .......683.2.11 [ImagerMode:XXXX] .............................683.2.11.1 ModeType = 0...........................683.2.11.2 IconID = 142 ...........................683.2.11.3 SelectionButtonImageFileName = res\button-mode-portrait80.png ..........683.2.11.4 Enabled = ON ..........................693.2.11.5 AutoFlash = ON.........................693.2.11.6 GpsReportTypes = 1 .....................693.2.11.7 PreviewWidth = 640.....................693.2.11.8 PreviewHeight = 480 ....................693.2.11.9 StillWidth = 1600 .......................693.2.11.10 StillHeight = 1200 .......................69](https://usermanual.wiki/TransCore/76007.User-Manual-1/User-Guide-2266871-Page-4.png)
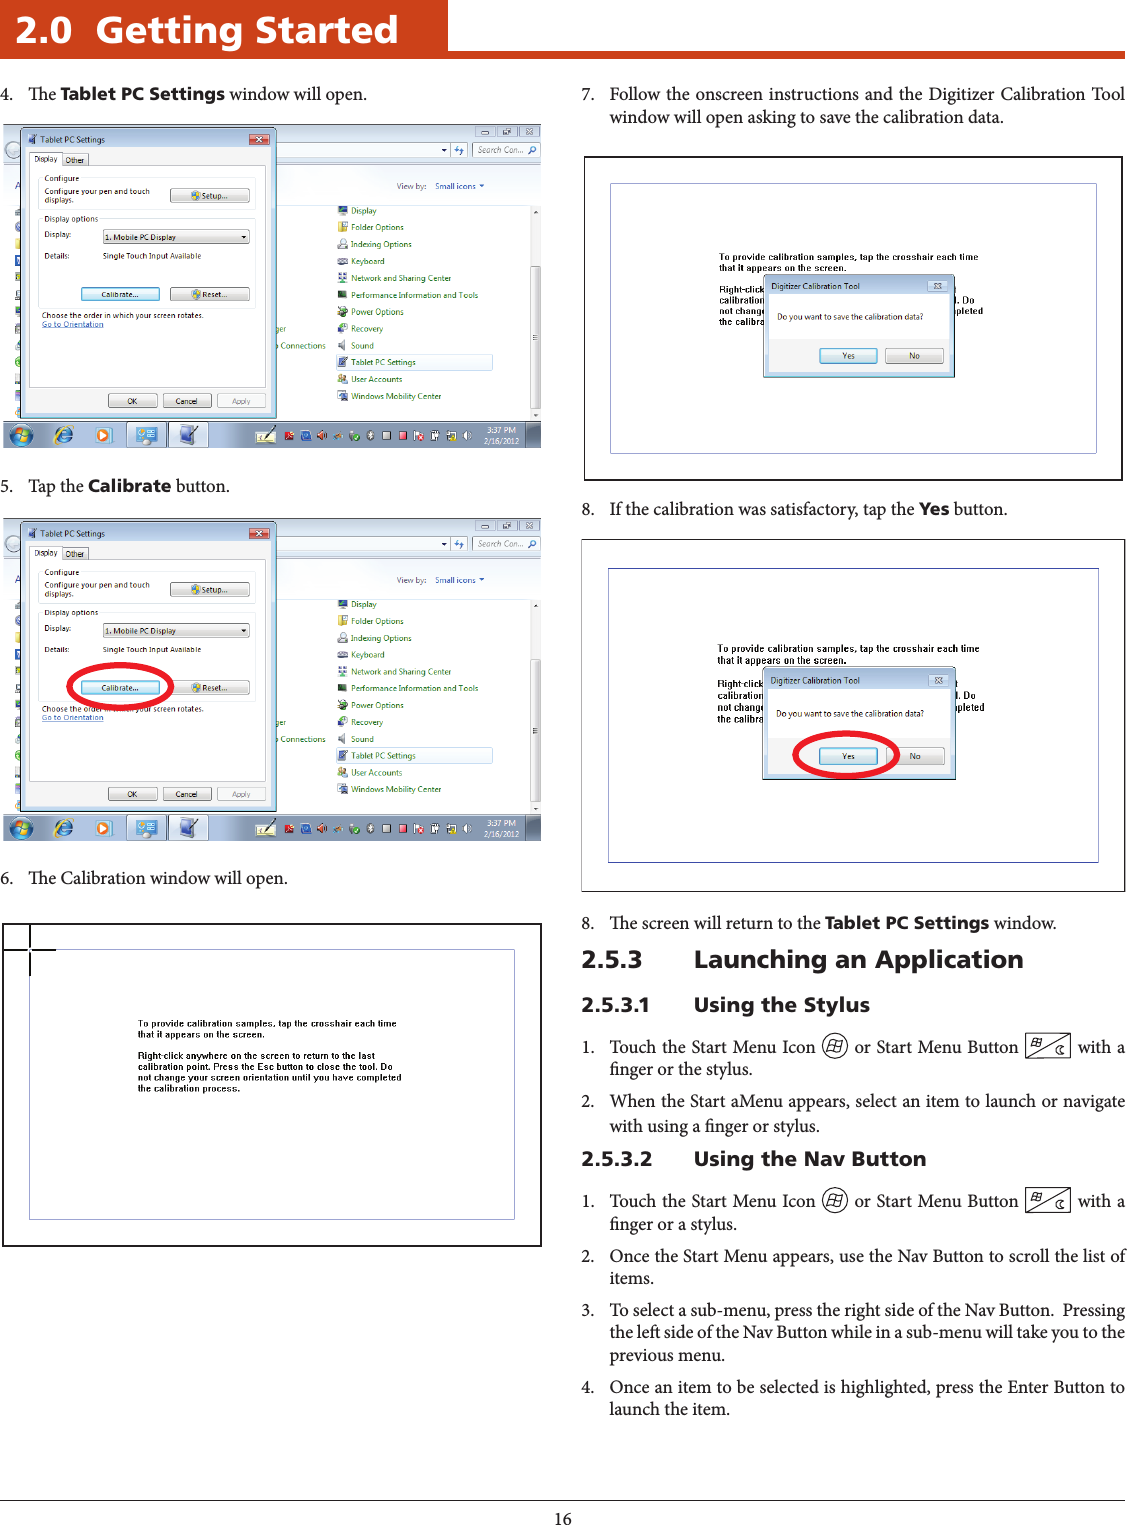
![53.2.11.11 ColorSpace = 16.........................693.2.11.12 FrameRate = 30.000000 ..................693.2.11.13 Shutter = 10000 .........................693.2.11.14 Brightness = 5000 .......................693.2.11.15 GlobalGain = 0 .........................693.2.11.16 Exposure = 5000 ........................693.2.11.17 FlipMode = 1 ...........................693.2.11.18 AutoExposure = ON.....................693.2.11.19 LightingMode = 0 .......................693.2.11.20 LightingPower = 0.......................693.2.11.21 Aimer = OFF ...........................693.2.11.22 Compression = ON ......................693.2.11.23 CompressionRatio = 13 ..................693.2.11.24 FocusPosition = 500 .....................693.2.11.25 Autofocus = ON.........................693.2.11.26 WhiteBalancePreset = 0..................693.2.11.27 ManualWhiteBalance = OFF .............693.2.11.28 WhiteBalanceKelvin = 8267 ..............693.2.11.29 PreviewToWindow = ON.................693.2.12 [Permissions] ....................................693.2.12.1 Option(More) = 3 .......................693.3 Command-Line Options ................................703.3.1 Syntax ..........................................704.0 Programming the Unit ....................714.1 Bar Code Parameter Menus ............................714.2 Bar Code Settings......................................744.2.1 Set Default Parameter .............................744.2.2 Beeper Volume ...................................744.2.3 Beeper Tone .....................................744.2.4 Beeper Frequency Adjustment .....................744.2.5 Laser On Time ...................................754.2.6 Aim Duration....................................754.2.7 Scan Angle ......................................754.2.8 Power Mode .....................................754.2.9 Triggering Modes.................................764.2.10 Time-out Between Same Symbol ...................764.2.11 Beep Aer Good Decode ..........................764.2.12 Transmit “No Read” Message ......................764.2.13 Parameter Scanning ..............................774.2.14 Linear Code Type Security Level ...................774.2.15 Bi-directional Redundancy ........................775.0 UPC Types .......................................785.1 UPC / EAN..............................................785.1.1 Enable/Disable UPC-A : Parameter # 0x01...........785.1.2 Enable/Disable UPC-E : Parameter # 0x02 ...........785.1.3 Enable/Disable UPC-E1 : Parameter # 0x0C .........785.1.4 Enable/Disable EAN-8 : Parameter # 0x04 ...........785.1.5 Enable/Disable EAN-13 : Parameter # 0x03 ..........785.1.6 Enable/Disable Bookland EAN : Parameter # 0x53....785.1.7 Decode UPC/EAN Supplementals : Parameter # 0x10 .................................795.1.8 Decode UPC/EAN Supplemental Redundancy : Parameter # 0x50 .................................795.1.9 Transmit UPC-A Check Digit : Parameter # 0x28.....805.1.10 Transmit UPC-E Check Digit : Parameter # 0x29 .....805.1.11 Transmit UPC-E1 Check Digit : Parameter # 0x2A ...805.1.12 UPC-A Preamble : Parameter # 0x22................805.1.13 UPC-E Preamble : Parameter # 0x23 ................805.1.14 UPC-E1 Preamble : Parameter # 0x24 ...............815.1.15 Convert UPC-E to UPC-A : Parameter # 0x25........815.1.16 Convert UPC-E1 to UPC-A : Parameter # 0x26.......815.1.17 EAN Zero Extend : Parameter # 0x27 ...............815.1.18 Convert EAN-8 to EAN-13 Type : Parameter # 0xE0.................................815.1.19 UPC/EAN Security Level : Parameter # 0x4D . . . . . . . .825.1.20 UCC Coupon Extended Code : Parameter # 0x55.....825.2 Code 128 ..............................................825.2.1 Enable/Disable Code 128 : Parameter # 0x08 .........825.2.2 Enable/Disable UCC/EAN-128 : Parameter # 0x0E.................................825.2.3 Enable/Disable ISBT 128 : Parameter # 0x54 .........835.2.4 Lengths for Code 128 .............................835.3 Code 39................................................835.3.1 Enable/Disable Code 39 : Parameter # 0x00 ..........835.3.2 Enable/Disable Trioptic Code 39 : Parameter # 0x0D.................................835.3.3 Convert Code 39 to Code 32 (Italian Pharma Code) : Parameter # 0x56 ..........................835.3.4 Code 32 Prex : Parameter # 0xE7 ..................835.3.5 Set Lengths for Code 39 : Parameter # L1 = 0x12, L2 = 0x13...................835.3.6 Code 39 Check Digit Verication : Parameter # 0x30 .................................845.3.7 Transmit Code 39 Check Digit : Parameter # 0x2B.................................845.3.8 Enable/Disable Code 39 Full ASCII : Parameter # 0x11 . . . . . . . . . . . . . . . . . . . . . . . . . . . . . . . . .845.4 Code 93................................................855.4.1 Enable/Disable Code 93 : Parameter # 0x00 ..........855.4.2 Set Lengths for Code 93 : Parameter # L1 = 0x1A, L2 = 0x1B ..................855.5 Code 11................................................855.5.1 Enable/Disable Code 11 : Parameter # 0x0A..........855.5.2 Set Lengths for Code 11 : Parameter # L1 = 0x1C, L2 = 0x1D..................855.5.3 Code 11 Check Digit Verication : Parameter # 0x34 .................................865.5.4 Transmit Code 11 Check Digits : Parameter # 0x2F.................................865.6 Interleaved 2 of 5......................................865.6.1 Enable/Disable Interleaved 2 of 5 : Parameter # 0x06 .................................865.6.2 Set Lengths for Interleaved 2 of 5 : Parameter # L1 = 0x16, L2 = 0x17...................865.6.3 Interleaved 2 of 5 Check Digit Verication : Parameter # 0x31 .................................875.6.4 Transmit Interleaved 2 of 5 Check Digit : Parameter # 0x2C ................................875.6.5 Convert Interleaved 2 of 5 to EAN-13 : Parameter # 0x52 .................................875.7 Discrete 2 of 5 ........................................885.7.1 Enable/Disable Discrete 2 of 5 : Parameter # 0x05 ....885.7.2 Set Lengths for Discrete 2 of 5 : Parameter # L1 = 0x14, L2 = 0x15...................885.8 Chinese 2 of 5 .........................................885.8.1 Enable/Disable Chinese 2 of 5 : Parameter # 0xF0 0x98 ............................885.9 Codabar ...............................................885.9.1 Enable/Disable Codabar : Parameter # 0x07 .................................885.9.2 Set Lengths for Codabar : Parameter # L1 = 0x18, L2 = 0x19...................89](https://usermanual.wiki/TransCore/76007.User-Manual-1/User-Guide-2266871-Page-5.png)
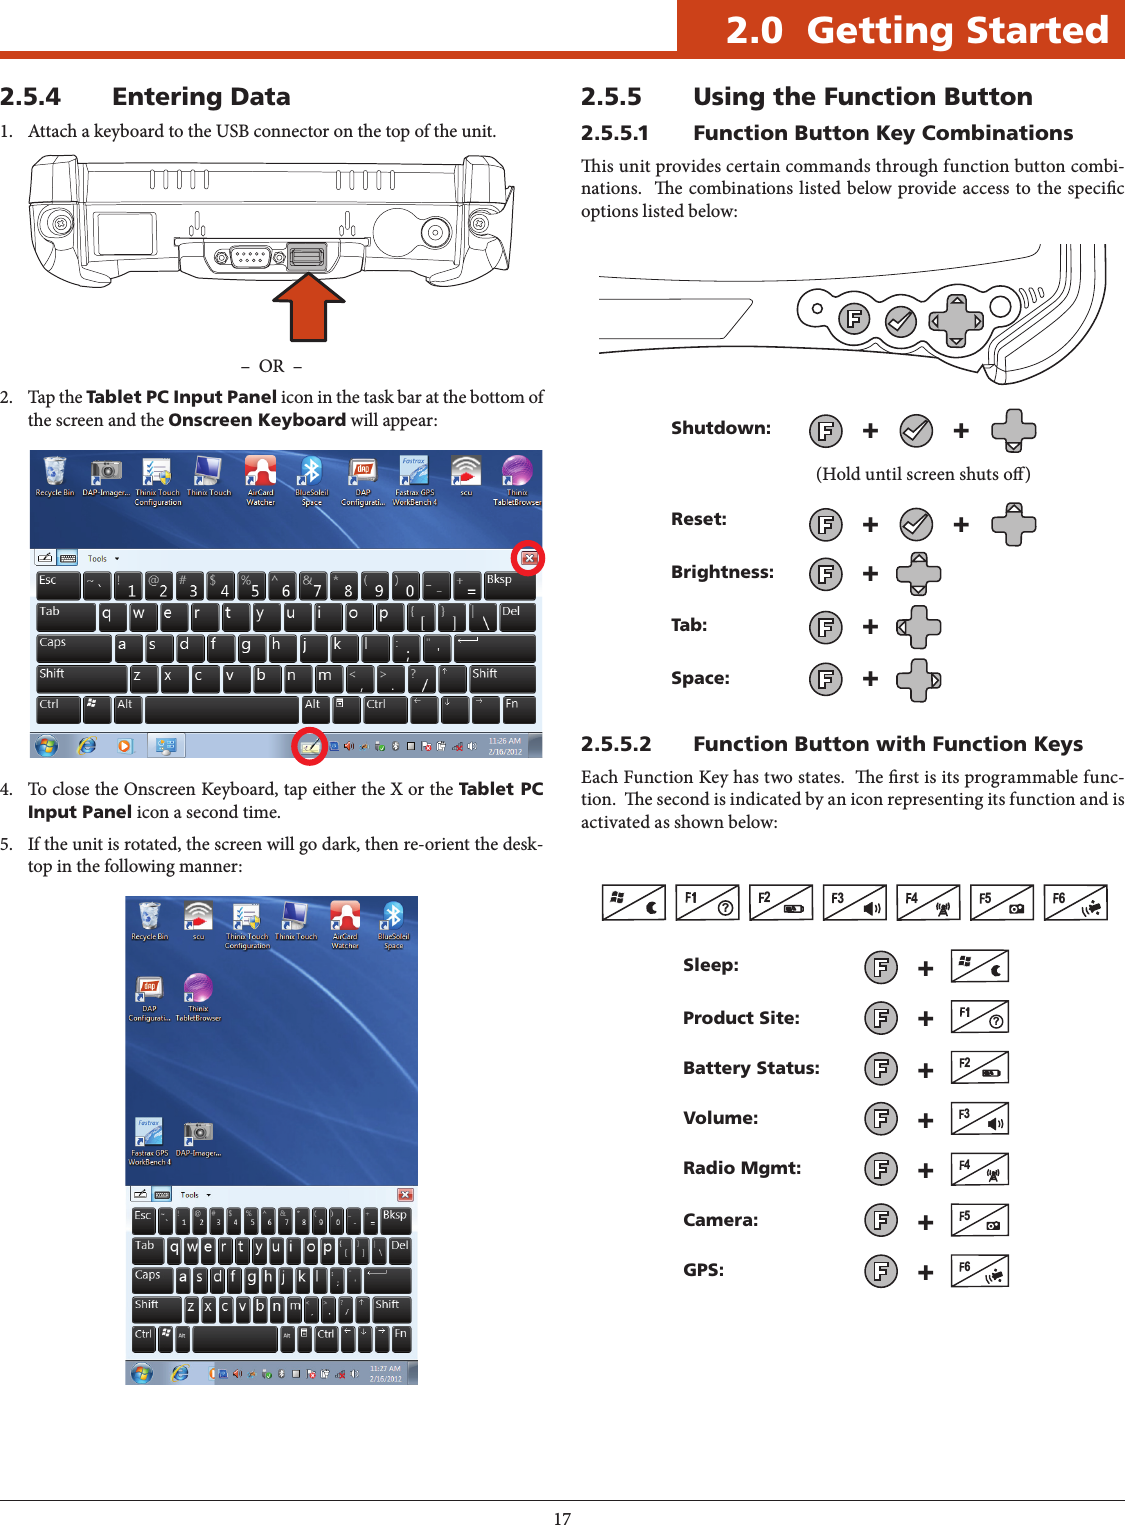
![71.0 Introduction1.1 User and Product Safety• DonotstareintothelaserorLEDbeamdirectlyorshineitintoeyes.• Neverusestrongpressureontothescreenorsubjectittosevereim-pact, as the LCD panel could become cracked and possibility causepersonal injury. If the LCD panel is broken, never touch the liquidinside because the liquid irritates the skin.• AlthoughthePDThaspassedthetestofIP65standardforwateranddust resistance, avoid prolonged exposure to rain or other concentrat-ed moisture. Such condition exceeds the IP65 standard, and couldresult in water or other contaminants entering into the PDT.• UseonlytheoriginalapprovedACAdapterwiththePDT.Useofanunapproved AC Adapter could result in electrical problems, or evencause a re or electrical shock to the user.• DonotdisassemblethePDT.Servicingshouldbedonebysupplieronly. If the PDT or accessories gets damaged due to wrong handling or unauthorized repair, warranty is void. In case the warranty sealsare broken, warranty is void too.• Makeregularlyback-upofallimportantdata.• Undernocircumstancewillsupplierbeliableforanydirect,indirect,consequential or incidental damages baring out of the use or inability to use the hardware and soware and/or any data loss, even if sup-plier has been informed about the possibility of such damages.• LASERRADIATION:DONOTSTAREINTOBEAMCLASS2LA-SER PRODUCT.1.2 LED and LASER Safety Information• M9000isaClassIILED/LaserProduct.• DONOTSTAREattheLED/Laserorshineintoeyes.• Donotallowyoungchildrentousetheproductwithoutadultsuper-vision.• Donotreplace/repairtheLED/Laser;thesearenotuserreplaceable.• DonotshinetheLED/Laseronashinyreectivesurface.1.3 FCC Interference Statementis equipment has been tested and found to comply with the limits for a Class B digital device, pursuant to Part 15 of the FCC Rules. ese limits are designed to provide reasonable protection against harmful interference in a residential installation. is equipment generates uses and can radiate radio frequency energy and, if not installed and used in accordance with the instructions, may cause harmful interference to 1.0 Introduction–RADIATION EXPOSURE STATEMENT –is equipment complies with FCC radiation exposure limits set forth for an uncontrolled environment. End users must follow the specic operating instructions for satisfying RF exposure compliance. To maintain compliance with FCC RF exposure compliance requirements, please follow operation instruction as documented in this manual.is transmitter must not be co-located or operating in con-junction with any other antenna or transmitter. e availability of some specic channels and/or operational frequency bands are country dependent and are rmware pro-grammed at the factory to match the intended destination. e rmware setting is not accessible by the end user.radio communications. However, there is no guarantee that interference will not occur in a particular installation. If this equipment does cause harmful interference to radio or television reception, which can be de-termined by turning the equipment o and on, the user is encouraged to try to correct the interference by one of the following measures:- Reorient or relocate the receiving antenna.- Increase the separation between the equipment and receiver.- Connect the equipment into an outlet on a circuit dierent from that to which the receiver is connected.- Consult the dealer or an experienced radio/TV technician for help. FCC Caution: Any changes or modications not expressly approved by the party responsible for compliance could void the user’s authority to operate this equipment. is device complies with Part 15 of the FCC Rules. Operation is subject to the following two conditions: (1) is de-vice may not cause harmful interference, and (2) this device must accept any interference received, including interference that may cause unde-sired operation.Complies with 21 CFR 1040.10 and 1040.11 except for deviations pur-suant to Laser Notice No. 50, dated June 24, 2007.Specic Absorption Rate (SAR) Informatione SAR Limit of USA (FCC) is 1.6W/kg averaged over one gram of tissue. e device has been tested against this SAR limit. e highest SAR value reported under this standard during product certification for properly worn on the body is 1.37W/kg. This device was tested for typical body-worn operations with the back of the Tablet PC kept 0 cm from the body. Any Changes or modications not expressly approved by the party responsible for compliance could void the user’s authority to operate the equipment.1.4 Industry Canada Statementis Class B digital apparatus complies with Canadian ICES-003. Op-eration is subject to the following two conditions:1. is device may not cause interference and2. is device must accept any interference, including interference that may cause undesired operation of the device.Le présent appareil est conforme aux CNR d’Industrie Can-ada applicables aux appareils radio exempts de licence. L’exploitation est autorisée aux deux conditions suivantes : (1) l’appareil ne doit pas produire de brouillage, et (2) l’utilisateur de l’appareil doit accepter tout brouillage radioélectrique subi, même si le brouillage est susceptible d’en compromettre le fonctionnement.Cet appareil numérique de la classe [B] est conforme à la norme NMB-003 du Canada.1.5 Battery SafetyLithium-ion battery packs might get hot, explode, ignite and/or cause serious injury if exploded by abusive using. Please follow the safety warnings listed as below:• Donotthrowthebatterypackinre.Donotexposethebatterytohigh temperatures.• Donotconnectthepositivebatterypackwithnegativebatterypackto each other with any metal object (like wire).–WARNING –Risk of explosion if battery is replaced by an incorrect type. Dis-pose of used batteries according to the instructions.](https://usermanual.wiki/TransCore/76007.User-Manual-1/User-Guide-2266871-Page-7.png)

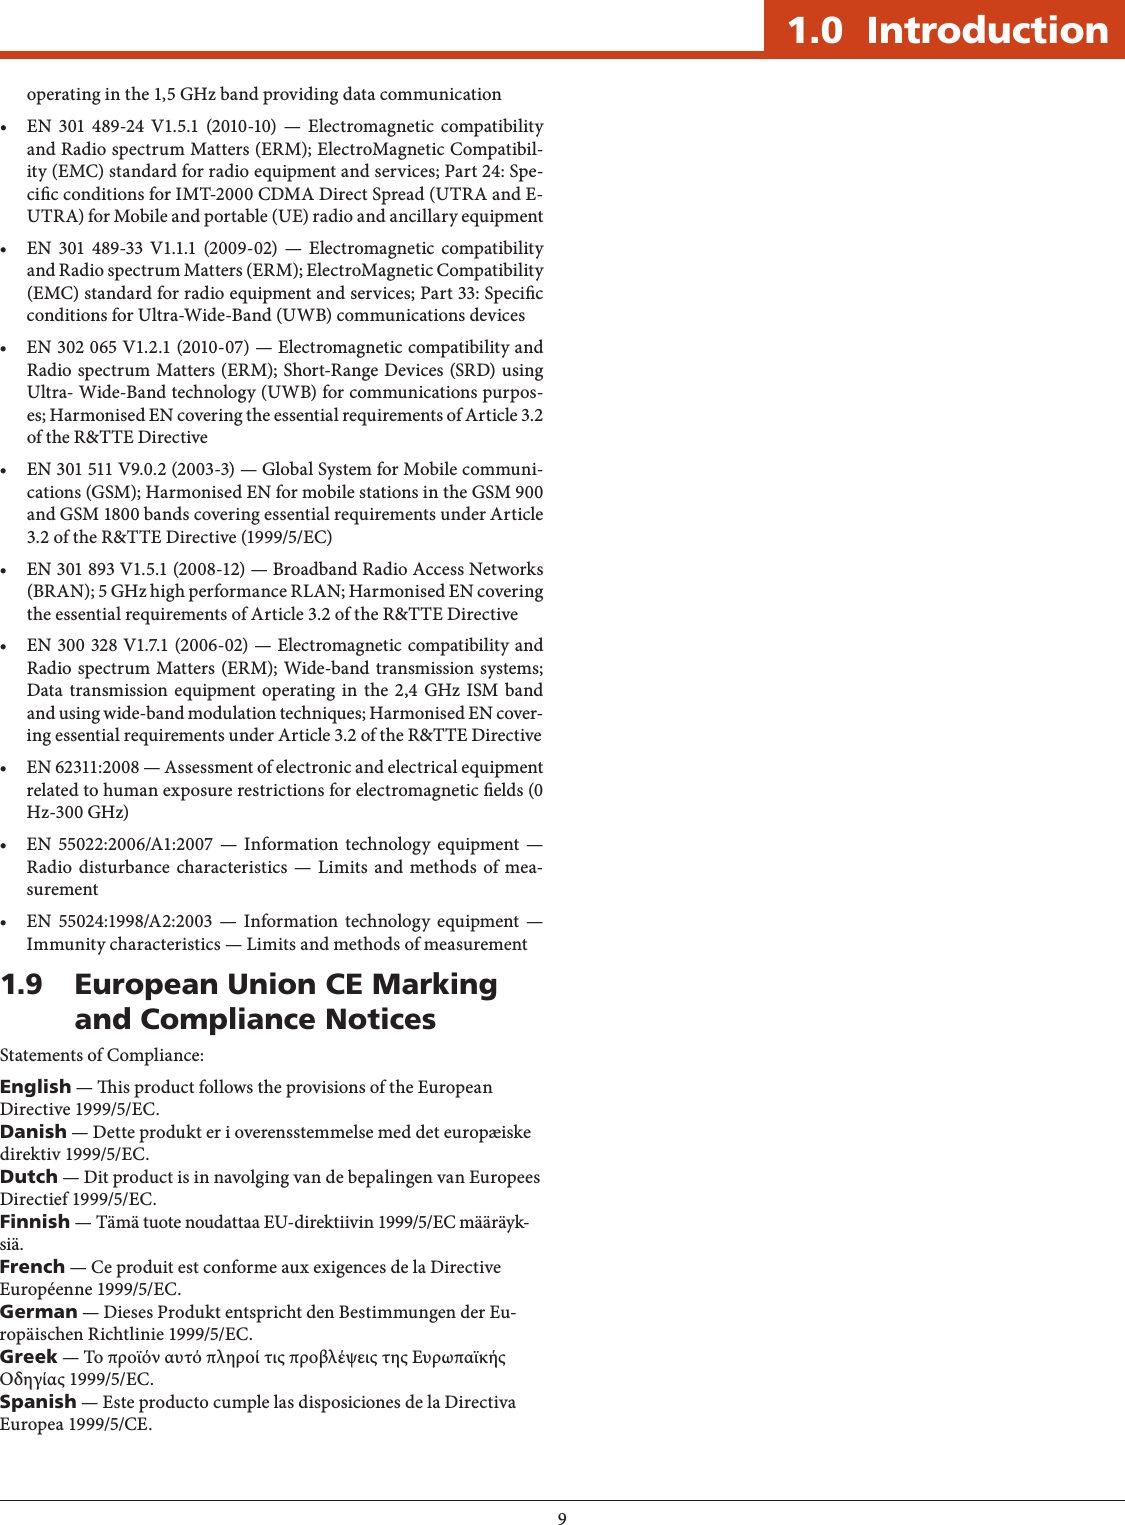
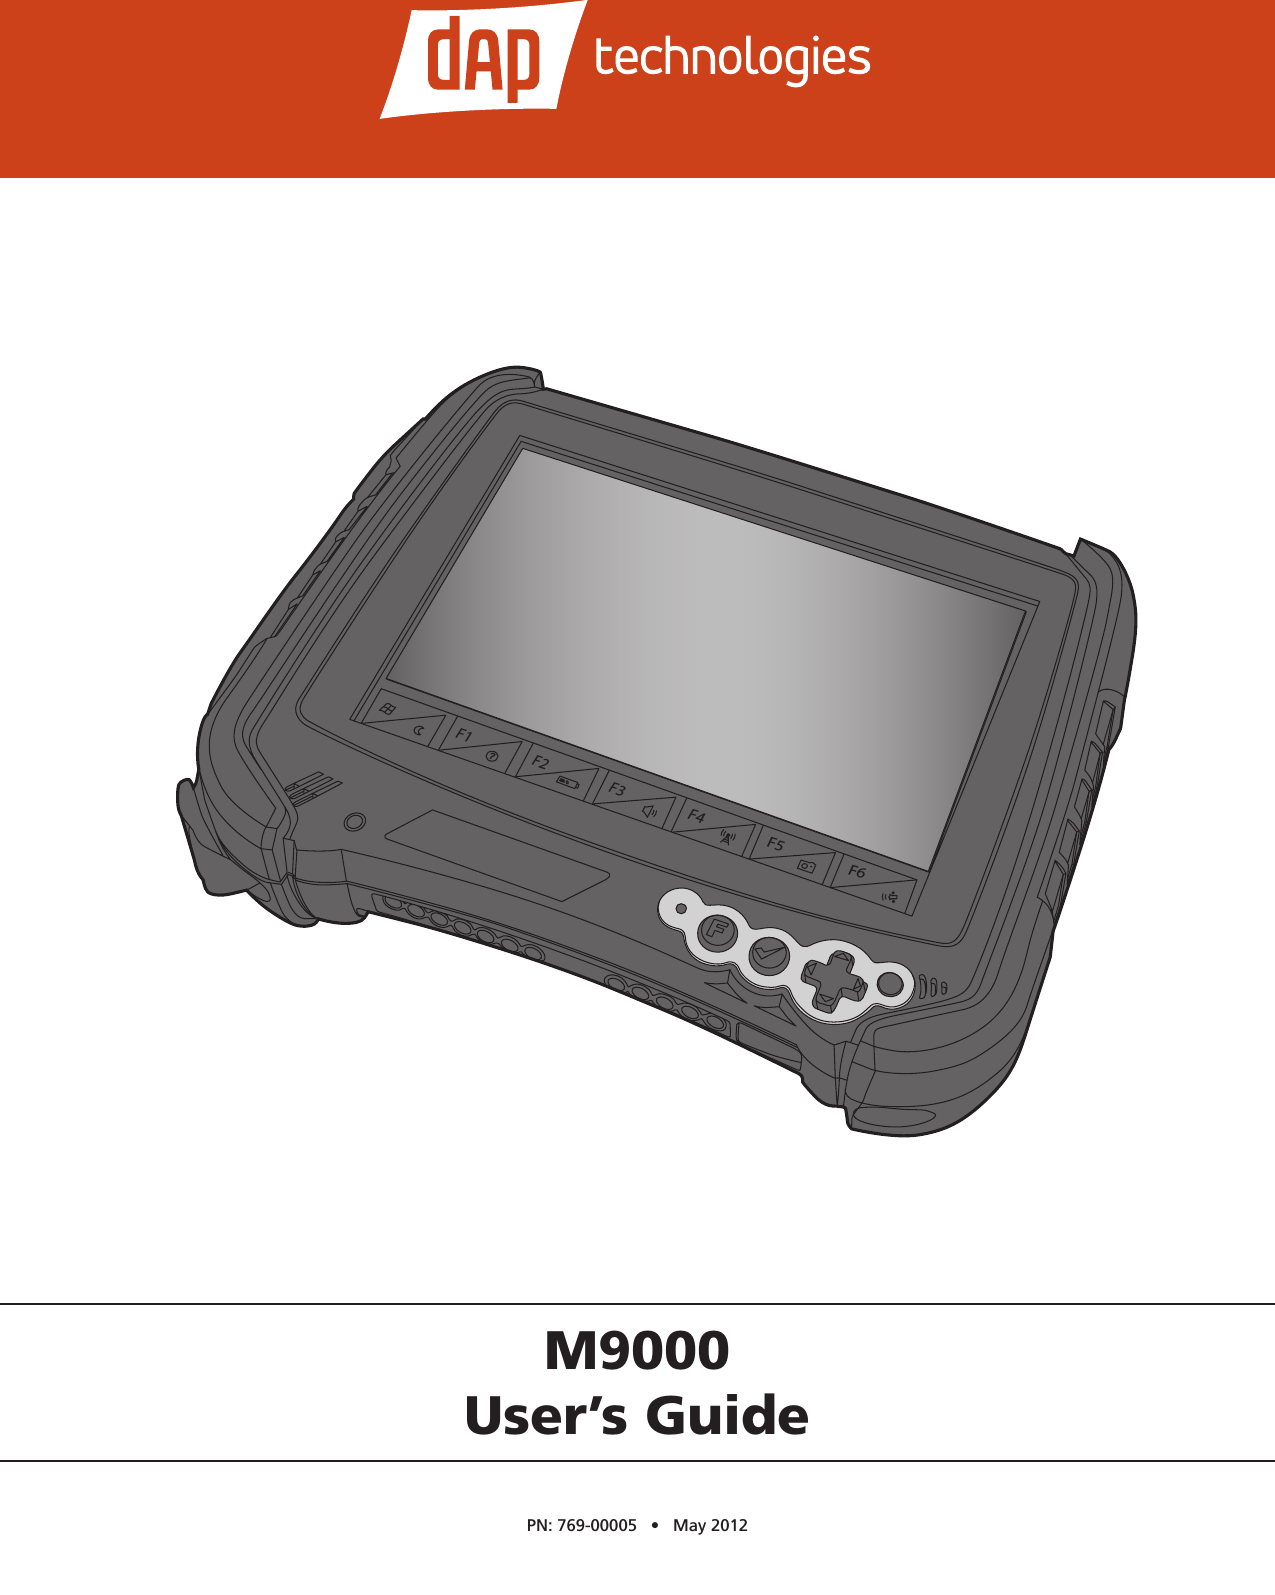
![101.0 Introduction1.10 SpecicationsOperating Sys-temWindows® Embedded Standard 7, Windows® CE 6.0 ProfessionalProcessor Intel® Atom™ E660T 1.3 GHzMemory 1 GB DDR2 SDRAM (2 GB optional)Storage 16 GB solid state drive (32 or 64 GB optional)DisplaySunlight-viewableHardened touchscreenLandscape or portrait orientationPassive stylus or nger operation7-inch WVGA (800 x 480)550 nitsSensorsLight sensor for auto backlight adjustmentPosition sensor (accelerometer) for portrait or land-scape screen orientationKeypad / Buttons3-key keypad (enter, navigation, function)7 programmable keys (touchscreen)Adjustable keypad backlightProgrammable trigger on undersideCommunicationsWLAN — Summit 802.11 a/b/g/nWWAN — Gobi™ 3000: (CDMA, EVDO, UMTS, GSM, GPRS, EDGE, DTM, HSPA, 3G: 14.4 / 5.76 Mbps, DOrA: 3.1 /1.8 Mbps)GPS — Gobi™ 3000 (Standalone, XTRA, AGPS)Zigbee® — Building Automation (BA) Home Automation (HA) Smart Energy (SE)Wireless USB — Video/dataBluetooth® — v2.1 + EDR Class II (BlueSoleil stack)Input / OutputPower jack1x RS-2321x USB 2.0Via dock connector: 1x USB 2.0 1x EthernetBarcode ScanningShort range barcode: 1D laserCamera:5-MPcolorcamerawithashExpansion SlotsSD card slot (supports up to 32 GB)Multi-I/O interface: 2x USB 2.0 1x CAN bus 2.0 (interface only) 1x SDVO (Serial Digital Video Out) 2x RS-232AudioSpeakerIntel® HD Audio3.2 mm stereo headset jackSoftwareWindows® Embedded 7:IE8, IIS 7.0, .NET 3.5, Remote Desktop, SQL, Backup and Restore, Boot from VHD or USB, Power Manage-ment, EWF and FBWFWindows® CE 6.0 Professional:ActiveSync, FTP client/server, IE 6.0, Viewers for Mi-croso® Oce and PDF les, Inbox, Windows Media Player, Remote Desktop, Terminal Services ,Voice Re-corder, Backup and Restore, Barcode Scanner UtilityPowerPrimary internal: Li-ion battery, 7.4 V, 3000 mAhSecondary battery: Li-ion battery pack, 7.4 V, 3000 mAhInput: 10–20 VDC, 2 ADimensions & Weight9.0 (L) x 7.3 (W) x 2.3 (H) inches [230 x 185 x 60 mm]2.96 lb. [1346 g]RegulatoryFCC Class BCERoHSWEEELaser safety:A21CFR1040.10 IEC/EN 60825-1EnvironmentOperating temperature: -4 to +122 °F [-20 to +50 °C]Charging temperature: 32 to +104 °F [0 to +40 °C]Storage temperature: -22 to +158 °F [-30 to +70 °C]Drop: Multiple 6-foot (1.8-meter) drops to concreteESD: 15 kV air discharge, 8 kV direct dischargeSealing: IP67 certiedHumidity: 5%-95%, non-condensingVibration: MIL-STD-810F](https://usermanual.wiki/TransCore/76007.User-Manual-1/User-Guide-2266871-Page-10.png)