VTech Telecommunications 80-6101-00 Cordless Telephone System with BT Enabled Base User Manual Part B
VTech Telecommunications Ltd Cordless Telephone System with BT Enabled Base Part B
Contents
Part B
5
Getting started
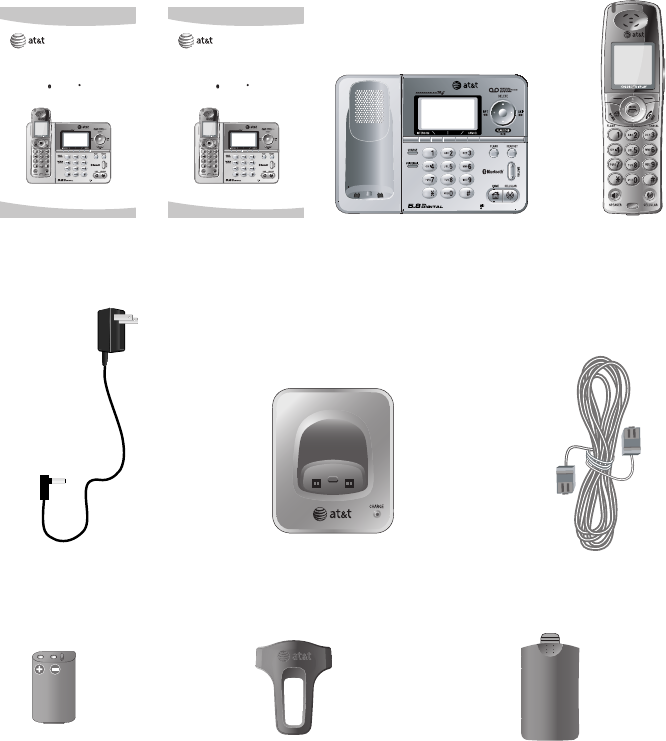
Telephone base with mounting
bracket installed
Cordless telephone
handset
(1 for EP5632)
(2 for EP5632-2)
Battery
(1 for EP5632)
(2 for EP5632-2)
Belt clip
(1 for EP5632)
(2 for EP5632-2)
Battery compartment cover
(1 for EP5632)
(2 for EP5632-2)
Base adapter Telephone line cord
Parts checklist
Save your sales receipt and original packaging in case it is necessary
to ship your telephone for warranty service.
Check to make sure the telephone package includes the following. The
model number of your telephone can be found on the label located on
the bottom of the telephone base.
User's manual Quick start guide
Charger for handset
(Only for EP5632-2)
User’s manual
5.8 GHz Cordless
telephone/speakerphone
answering system with
Bluetooth functions
EP5632/EP5632-2
with caller ID & call waiting
Quick start guide
5.8 GHz Cordless
telephone/speakerphone
answering system with
Bluetooth functions
EP5632/EP5632-2
with caller ID & call waiting
6
Getting started
Telephone base installation
Choose a central location close to a telephone jack and a power outlet
not connected to a wall switch. The telephone base can be placed on
a flat surface or mounted on a standard wall plate. For optimum range
and better reception, place the telephone base in a high and open loca-
tion.
Avoid placing the telephone base too close to:
• Communication devices such as: personal computers, computer rout-
ers, television sets, VCRs, wireless routers (wireless broadband, wi-fi,
or 802.11) or other cordless telephones.
• Excessive heat sources.
• Noise sources such as a window with traffic outside, motors, micro-
wave ovens, refrigerators, or fluorescent lighting.
• Excessive dust sources such as a workshop or garage.
• Excessive moisture.
• Extremely low temperatures.
• Mechanical vibration or shock such as on top of the washing machine
or work bench.

7
Getting started
Telephone base installation
NOTES:
1. Use only the power cord supplied with this product. If you need a replacement, visit our web site at
www.telephones.att.com or call 1 (800) 222-3111; in Canada dial 1 (866) 288-4268.
2. Be sure to use an electrical outlet not controlled by a wall switch.
3. This power adapter is intended to be plugged into a vertical wall outlet or a floor outlet. The
prongs are not designed to hold the plug in place if it is plugged into a ceiling, under-the-table
or cabinet outlet.
4. If you receive high speed internet through your telephone line (commonly referred to as DSL),
and you are experiencing inference during telephone conversations and/or your caller ID features
are not functioning properly, install a DSL filter to the telephone line between the telephone
base and the telephone wall jack. Contact your DSL service provider for a DSL filter.
Telephone line cord
DSL filter
Optional for DSL users (see number
four in the NOTES section below.)
Power adapter
8
Getting started
FCC ID:EW780-6101-00
IC: 1135A-80610100
CAUTION:
To Reduce Risk
of Fire, Use Only
Supplied Battery
or Battery 103
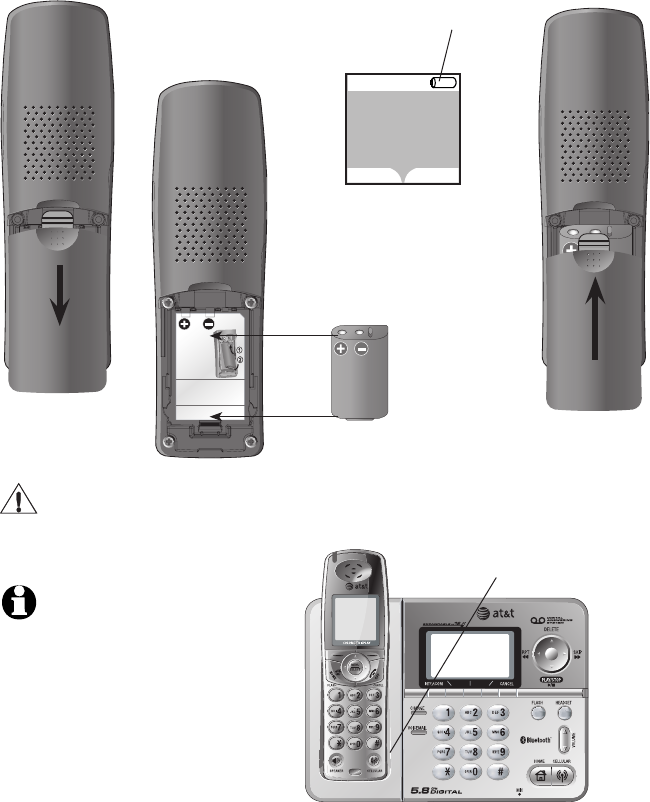
Battery installation & charging
After installation, place the handset in the telephone base and allow the
battery to charge for 16 hours before use. You can keep battery charged by
returning the handset to the telephone base after each use. When the bat-
tery power is completely depleted, a full recharge takes about 16 hours.
Place handset in telephone base to
charge for at least 16 hours before
first use.
Press tab and
slide cover away
from the battery
compartment.
Insert supplied battery as
indicated. Insert the top
edge (contacts and tab)
first, then push down on
the lower portion.
Caution: Use only the supplied
rechargeable battery or replacement battery
(Model 103, part number 89-0429-00-00).
Low battery indicator
Return handset to telephone base to
recharge when this symbol flashes.
(Handset will beep when battery is low.)
Replace battery compartment cover.
12:00AM
REDIAL CALLER ID
HANDSET 2
Low Battery
NOTES:
1. When fully charged, the battery in
the handset can provide 5 hours
of talk time or 3 days of standby
time (when idle and away from
the telephone base).
2. For installation of the spare
battery into the spare battery
compartment on the telephone
base, please see page XX.
1.
2.
9
Getting started
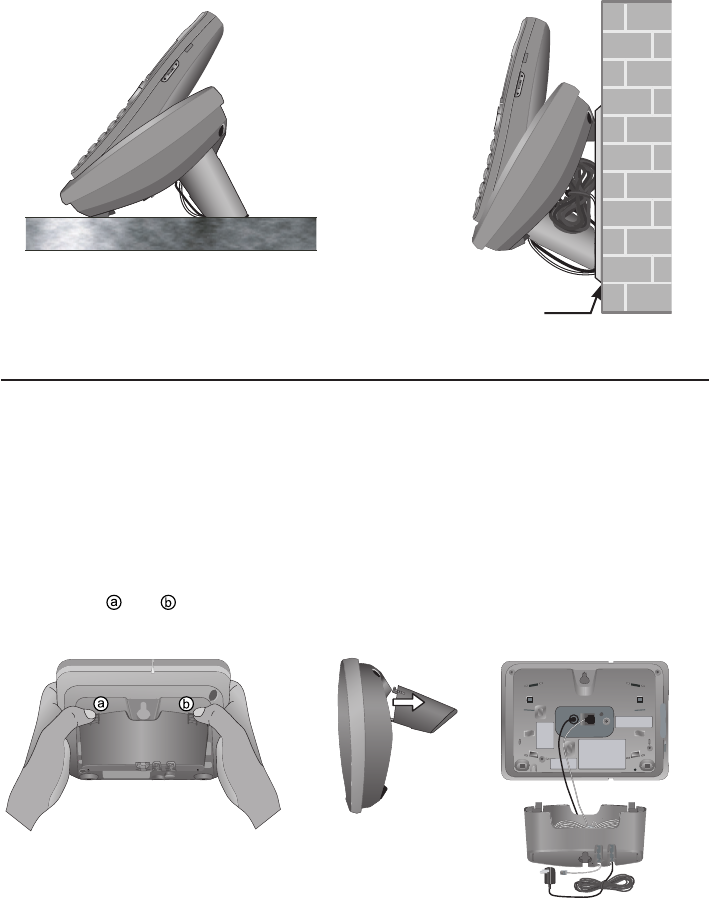
Installation options
1. To remove the mounting bracket,
hold the telephone base in both
hands. Press the two bracket tabs
and lift the mounting bracket away
from slots and .
2. Connect the telephone line cord and power
adapter to the jacks on the bottom of the
telephone base. Bundle the telephone cord,
and secure it with a twist tie before placing
it inside the mounting bracket.
Wall mounting
The telephone base comes with the mounting bracket already installed for
tabletop use. If wall mounting is desired, a telephone outlet wall mounting
plate with mounting studs is required. This mounting plate with studs may be
available for purchase from many hardware or consumer electronics retailers
and may require professional installation.
Tabletop mount Wall mount
Telephone outlet
mounting plate with
mounting studs