Yaesu Musen 30573X30 HANDHELD MARINE TRANSCEIVER User Manual 3
Yaesu Musen Co., Ltd. HANDHELD MARINE TRANSCEIVER 3
Contents
- 1. User Manual
- 2. User Manual 2
- 3. User Manual 3
- 4. User Manual 4
- 5. User Manual 5
User Manual 3
Page 61
HX870
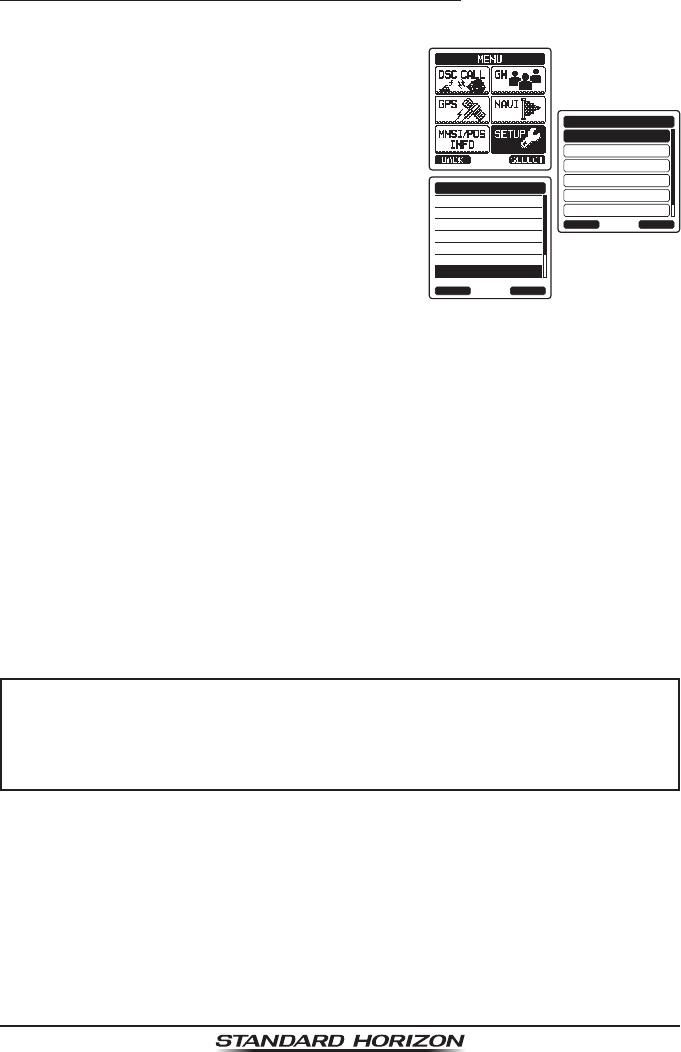
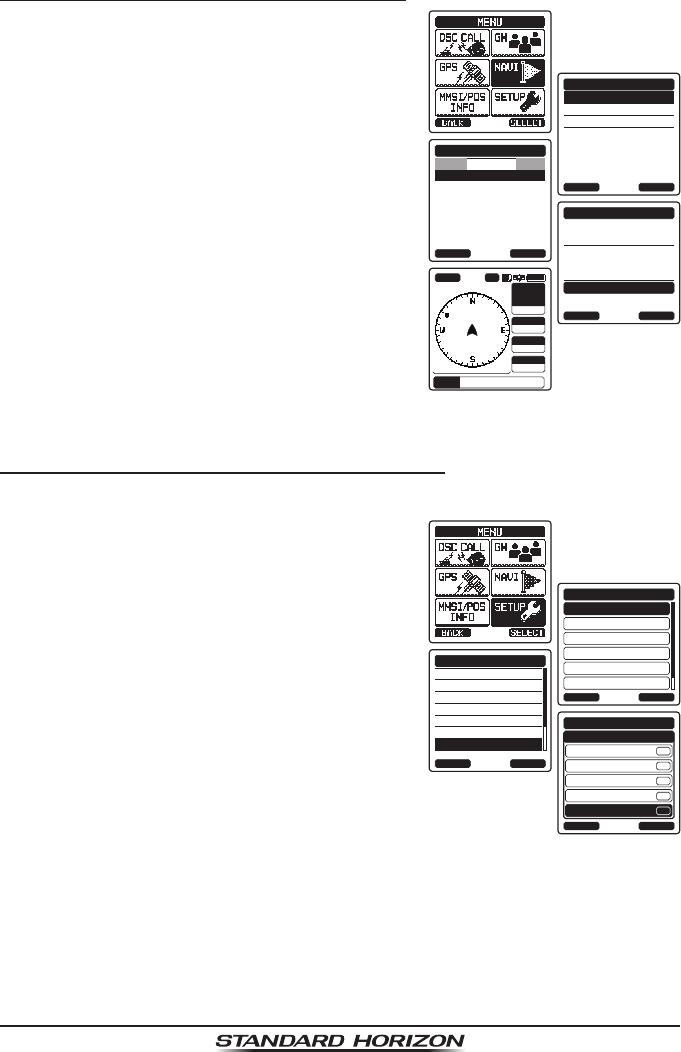
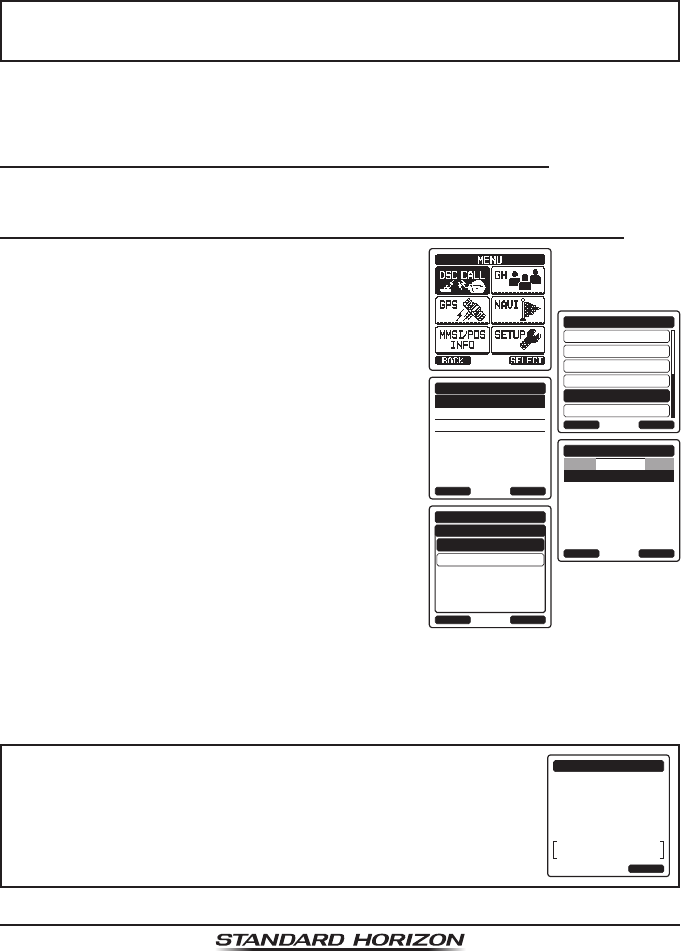
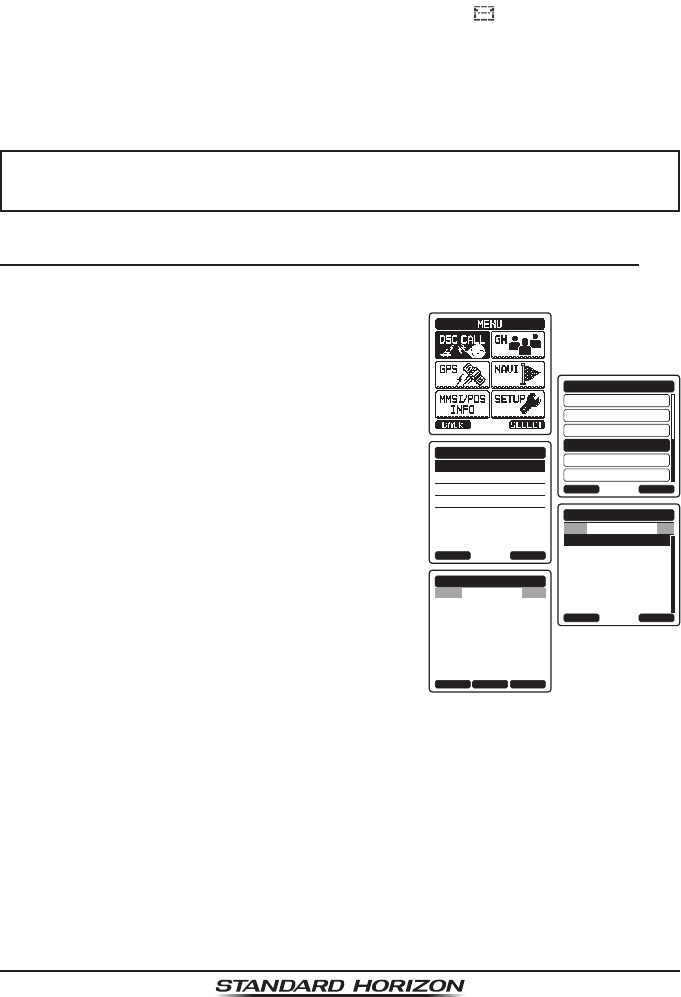
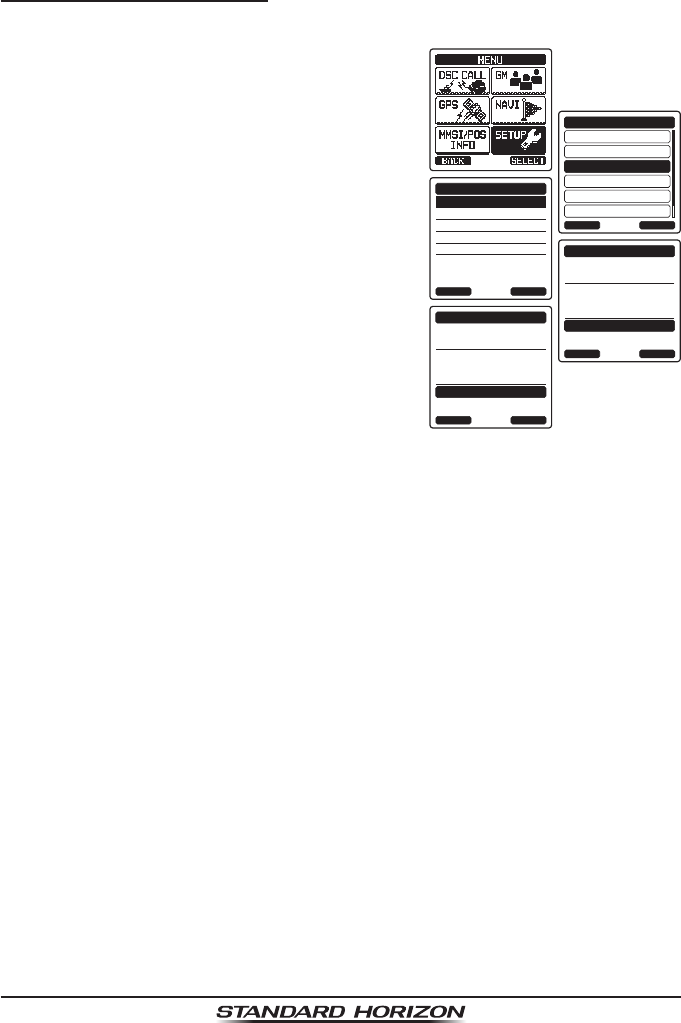
10.7.4 Setting up a Position Request Ringer
The HX870 has the capability to turn off the position request ringer.
1. Press the MENU key to display “MENU”.
DSC SETUP
GM SETUP
BACK
SETUP
WAYPOINT SETUP
CH SETUP
GPS SETUP
ATIS SETUP
SELECT
INDIVIDUAL DIR.
INDIVIDUAL REPLY
INDIVIDUAL ACK.
INDIVIDUAL RING
GROUP DIR.
POSITION REPLY
DSC BEEP
DSC SETUP
BACK SELECT
2. Press the CH▲/CH▼/◄/► key to select
“SETUP”.
3. Select “DSC SETUP” menu with the CH▲/
CH▼ key.
4. Press the [SELECT] soft key, then select
“DSC BEEP” with the CH▲/CH▼ key.
5. Press the [SELECT] soft key, then select
“POS REQUEST” with the CH▲/CH▼ key.
6. Press the [SELECT] soft key, then select
“OFF” with the CH▲/CH▼ key.
7. Press the [SELECT] soft key to store the
selected setting.
8. Press the CLR key to return to radio operation.
To re-enable the ringer tone, repeat the above procedure, pressing the CH▲/
CH▼ key to select “ON” in step 6 above.
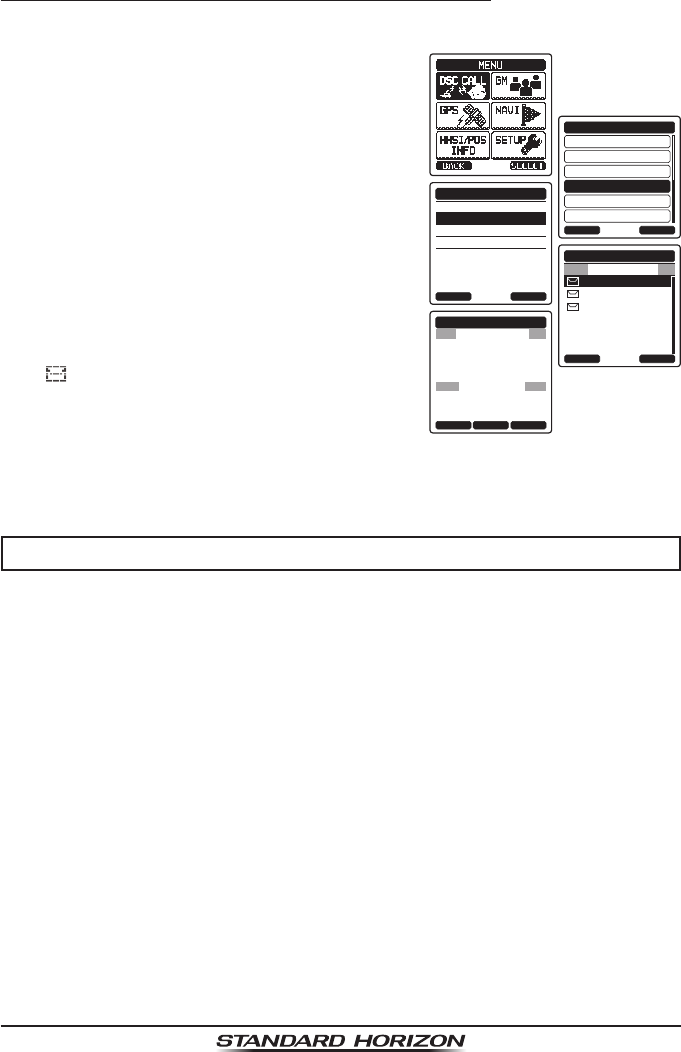
10.8 POSITION REPORT
The feature is similar to position request, however instead of requesting a posi-
tion of another vessel this function allows you to send your position to another
vessel. Your vessel must mark the internal GPS receiver for the HX870 to send
the position.
NOTE
To transmit a position report call, the HX870 individual directory must
be programmed with stations you wish to send your position to. To
setup this directory refer to section “10.5.1 Setting up the Individual
/ Position Call Directory”.
Page 62
HX870
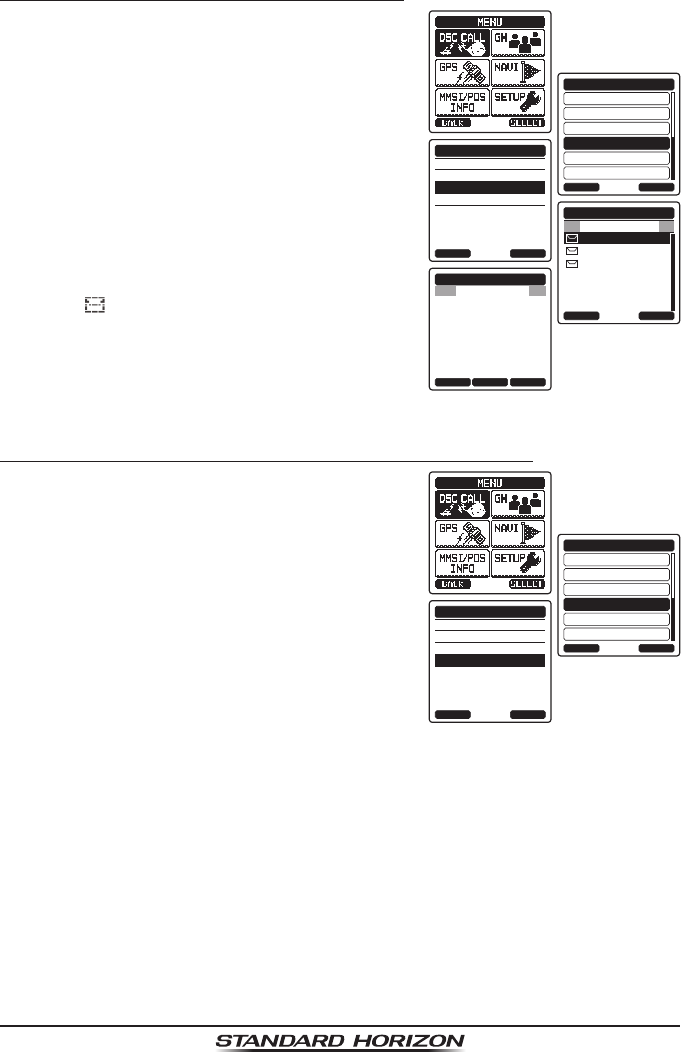
10.8.1 Transmitting a DSC Position Report Call
DSC Position Report Call using the Individual/Position Directory
1. Press the MENU key to display “MENU”, then
select “DSC CALL” with the CH▲/CH▼/◄/►
key.
INDIVIDUAL
GROUP
BACK
DSC CALL
ALL SHIPS
POS REQUEST
POS REPORT
DIST ALERT MSG
SELECT
HISTORY
MEMORY
NEW ID
POS REQUEST
BACK SELECT
KAREN
BOB
366901254
Horizon-1
Standard
Horizon-2
USCG
POS REQUEST
BACK SELECT
HISTORY
POS REQUEST
Do you want to
transmit a Call?
CATEG:
SAFETY
Horizon-1
987654321
POS:
YES NO
24°
25.975S
118°
59.456W
POS
POS REQUEST
Transmitted
CATEG:
SAFETY
Horizon-1
987654321
POS:
QUIT
24°
25.975S
118°
59.456W
2. Press the CH▲/CH▼ key to select “POS
REPORT”. (To cancel, press the [BACK] soft
key.)
3. Press the [SELECT] soft key.
4. Press the CH▲/CH▼ key to select the
category (“HISTORY”, “MEMORY” or “NEW ID”).
5. Press the [SELECT] soft key.
6. Press the CH▲/CH▼ key to select the name
in the directory, then press the [SELECT]
soft key.
7. Press the [YES] soft key to send your posi-
tion to the selected vessel.
8. Press the [QUIT] soft key to return to radio
operation.
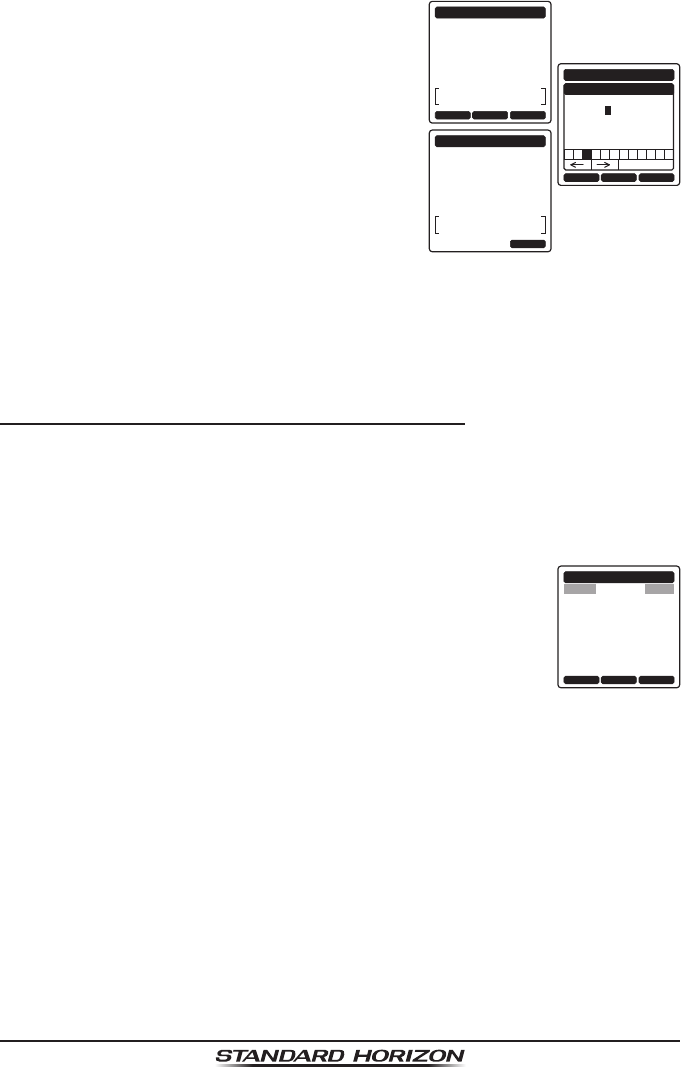
DSC Position Report Call Manually Entering an MMSI
This feature allows you to send your position to another vessel by manually
entering the MMSI of the ship you want to send your position to.
1. Press the MENU key to display “MENU”, then
select “DSC CALL” with the CH▲/CH▼/◄/►
key.
INDIVIDUAL
GROUP
BACK
DSC CALL
ALL SHIPS
POS REQUEST
POS REPORT
DIST ALERT MSG
SELECT
HISTORY
MEMORY
NEW ID
POS REPORT
BACK SELECT
BACK SELECTFINISH
POS REPORT
MMSI
-98765432
1 5 6 7 8 9 02 4
Delete
3
2. Press the CH▲/CH▼ key to select “POS
REPORT”. (To cancel, press the [QUIT] soft
key.)
3. Press the [SELECT] soft key. The trans-
ceiver will beep, and the POS report call
menu will appear.
4. Press the CH▲/CH▼ key to select “NEW ID”,
then press the [SELECT] soft key.
5. Press the CH▲/CH▼ key to select the rst
number of the MMSI which you want to
contact, then press the [SELECT] soft key
to step to the next number.
Page 63
HX870
6. Repeat step 5 to set the MMSI number.
If a mistake was made entering in the MMSI
number, repeatedly press the [BACK] soft
key until the wrong number is selected, then
press the CH▲/CH▼ key to correct the
entry.
POS REPORT
CATEG:
SAFETY
Horizon-1
987654321
POS:
24°
25.975S
118°
59.456W
Do you want to
transmit a Call?
YES NOPOS
BACK SELECTFINISH
POS REPORT
POSITION
1 2 4 5 6 7 8 9 0 S N
Delete
3
Lat
Lon
34°
25.975S
118°
59.456W
POS REPORT
Transmitted
CATEG:
SAFETY
Horizon-1
987654321
POS:
QUIT
24°
25.975S
118°
59.456W
7. When nished entering the MMSI number,
press the [FINISH] soft key.
8. If another position is displayed, press the
[POS] soft key to go to the position informa-
tion input screen. After inputting new position
information, press the [FINISH] soft key to
conrm.
9. Press the [YES] soft key to send your position to the selected vessel.
10. Press the [QUIT] soft key to return to radio operation.
10.8.2 Receiving a DSC Position Report Call
When another vessel transmits their vessels location to the HX870 the follow-
ing will happen:
1. A ringing sound will be produced when the
call is received and NMEA sentences (DSC,
DSE) are outputted on the USB Data Jack. RX POS REPORT
Horizon
POS INFO
987654321
POS:
24°
25.975N
118°
59.456W
POS TM:
12
DST:
10
BRG:
006
°
56AM LOC
NH
°
T
TO UPT QUITBACK
2. Press any key to stop ringing.
3. Press the [INFO] soft key to see more
detailed position information of the station.
4. To exit to radio mode, press the [QUIT] soft
key.
Page 64
HX870
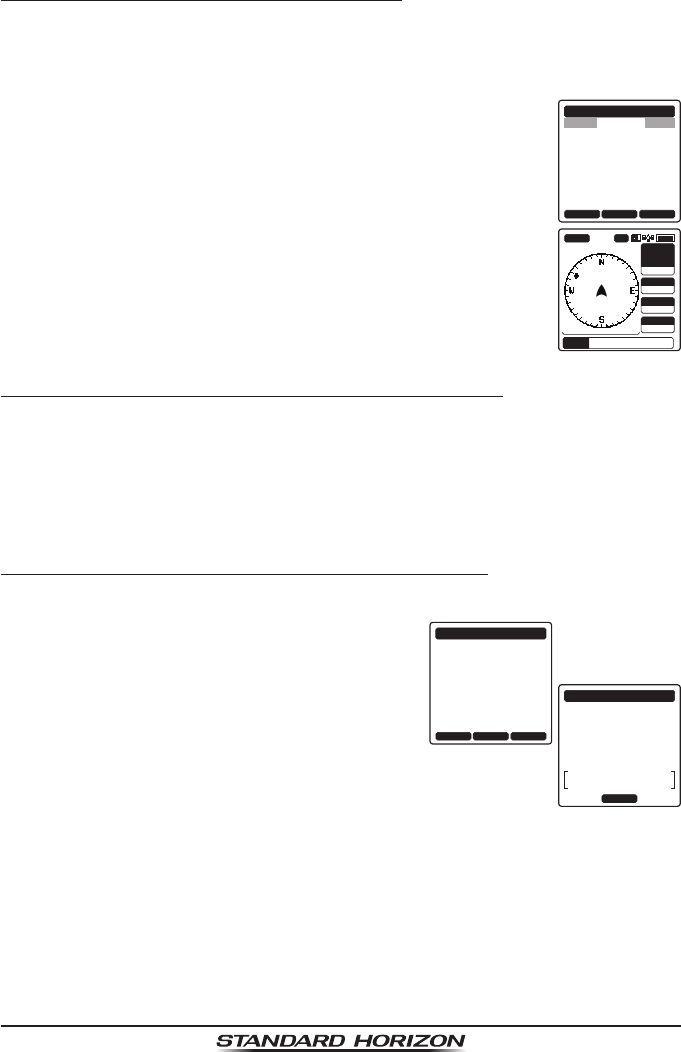
10.8.3 Navigating to a Position Report
The HX870 has a feature that allows navigation to a received position report
call by using the compass display. Navigating to the position of a position report
call may be enabled by the procedure below.
1. After the position report call has been received, press the
[TO WPT] soft key.
RX POS REPORT
Horizon
POS INFO
987654321
POS:
24°
25.975N
118°
59.456W
POS TM:
12
DST:
10
BRG:
006
°
56AM LOC
NH
°
T
TO UPT QUITBACK
SOGkph
36.0
DSTkm
35.2
BRG T
WPT Horizon
HIUSA
WPT
N-UP 20nm
BUSY
300
25
°
DW-16
2. To start navigating using the compass display, press the
[START] soft key until the compass page is shown. The
display indicates the distance and direction of the received
vessel, and also the compass indicates the received vessel
by dot ().
10.8.4 Stopping Navigation to a Position Report
1. Press one of the soft keys to show the key selections.
2. Press the [STOP] key. The radio will stop navigating to a the waypoint and
the Normal VHF display will be shown.
10.8.5 Saving a Position Report as a Waypoint
The HX870 can save a position report call in the radio’s memory as a waypoint.
1. After the position report call has been
received, press the [SAVE] soft key. CATEG:
SAFETY
RX POS REPORT
Horizon
987654321
POS:
24°
25.975N
118°
59.456W
POS TM:
12
SINCE:
00:05
°
56AM LOC
TO UPT SAVEINFO
RX POS REPORT
Horizon
987654321
OK
CATEG:
SAFETY
POS:
24°
25.975N
118°
59.456W
POS TM:
12°
56AM LOC
Saved
2. Press the CH▲/CH▼ key to change the rst
letter in the name of the waypoint and press
the [SELECT] soft key.
3. Repeat step 2 until the WPT name is
entered.
4. Press the [FINISH] soft key to save the
waypoint into memory.
Page 65
HX870
10.8.3 Navigating to a Position Report
The HX870 has a feature that allows navigation to a received position report
call by using the compass display. Navigating to the position of a position report
call may be enabled by the procedure below.
1. After the position report call has been received, press the
[TO WPT] soft key.
RX POS REPORT
Horizon
POS INFO
987654321
POS:
24°
25.975N
118°
59.456W
POS TM:
12
DST:
10
BRG:
006
°
56AM LOC
NH
°
T
TO UPT QUITBACK
SOGkph
36.0
DSTkm
35.2
BRG T
WPT Horizon
HIUSA
WPT
N-UP 20nm
BUSY
300
25
°
DW-16
2. To start navigating using the compass display, press the
[START] soft key until the compass page is shown. The
display indicates the distance and direction of the received
vessel, and also the compass indicates the received vessel
by dot ().
10.8.4 Stopping Navigation to a Position Report
1. Press one of the soft keys to show the key selections.
2. Press the [STOP] key. The radio will stop navigating to a the waypoint and
the Normal VHF display will be shown.
10.8.5 Saving a Position Report as a Waypoint
The HX870 can save a position report call in the radio’s memory as a waypoint.
1. After the position report call has been
received, press the [SAVE] soft key.
CATEG:
SAFETY
RX POS REPORT
Horizon
987654321
POS:
24°
25.975N
118°
59.456W
POS TM:
12
SINCE:
00:05
°
56AM LOC
TO UPT SAVEINFO
RX POS REPORT
Horizon
987654321
OK
CATEG:
SAFETY
POS:
24°
25.975N
118°
59.456W
POS TM:
12°
56AM LOC
Saved
2. Press the CH▲/CH▼ key to change the rst
letter in the name of the waypoint and press
the [SELECT] soft key.
3. Repeat step 2 until the WPT name is
entered.
4. Press the [FINISH] soft key to save the
waypoint into memory.
10.8.6 Navigating to a Saved Waypoint
1. Press the MENU key to display “MENU”.
HISTORY
MEMORY
MANUAL
WAYPOINT
BACK SELECT
KAREN
BOB
366901254
Horizon-1
Standard
Horizon-2
USCG
WAYPOINT
BACK SELECT
HISTORY
NAME:
KAREN-----------
ENTER
WAYPOINT
BACK
GOTO
POSITION:
34°
25.975S
118°
59.456W
SOGkph
36.0
DSTkm
35.2
BRG T
WPT KAREN
HIUSA
WPT
N-UP 20nm
BUSY
300
25
°
DW-16
2. Select “NAVI” with the CH▲/CH▼/◄/► key.
3. Press the [SELECT] soft key.
4. Press the CH▲/CH▼ key to select the
category (“HISTORY”, “MEMORY” or “MANUAL”).
5. Press the [SELECT] soft key.
6. Press the CH▲/CH▼ key to select the
waypoint name and press the [SELECT]
soft key.
7. Press the [ENTER] key so show the
compass display and to navigate to the
waypoint. The display indicates the distance
and direction of the saved waypoint, and
also the compass indicates the saved
waypoint by dot ().
To stop the navigation to a saved waypoint, press the [STOP] soft key.
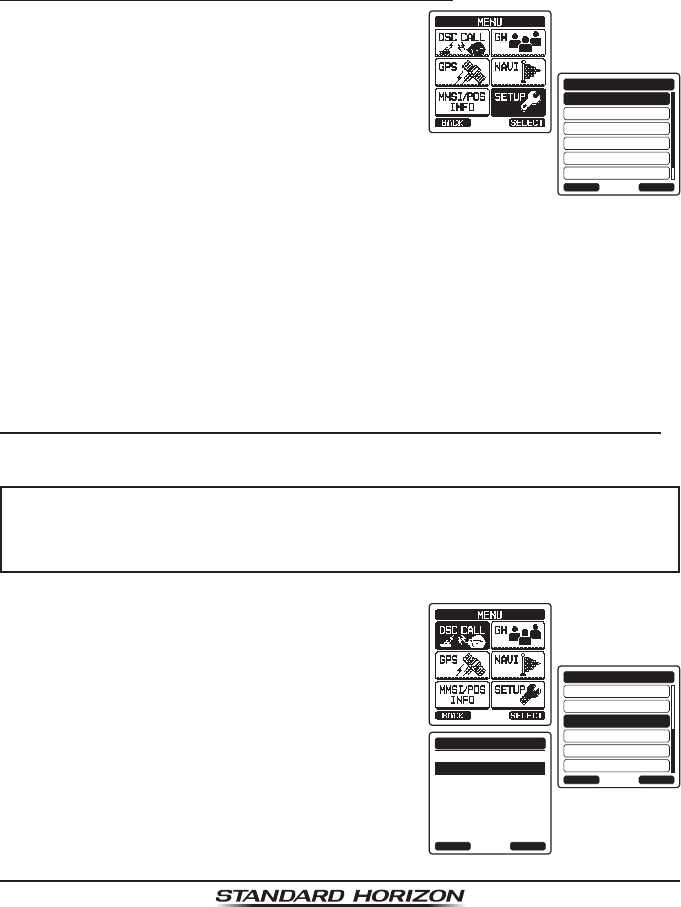
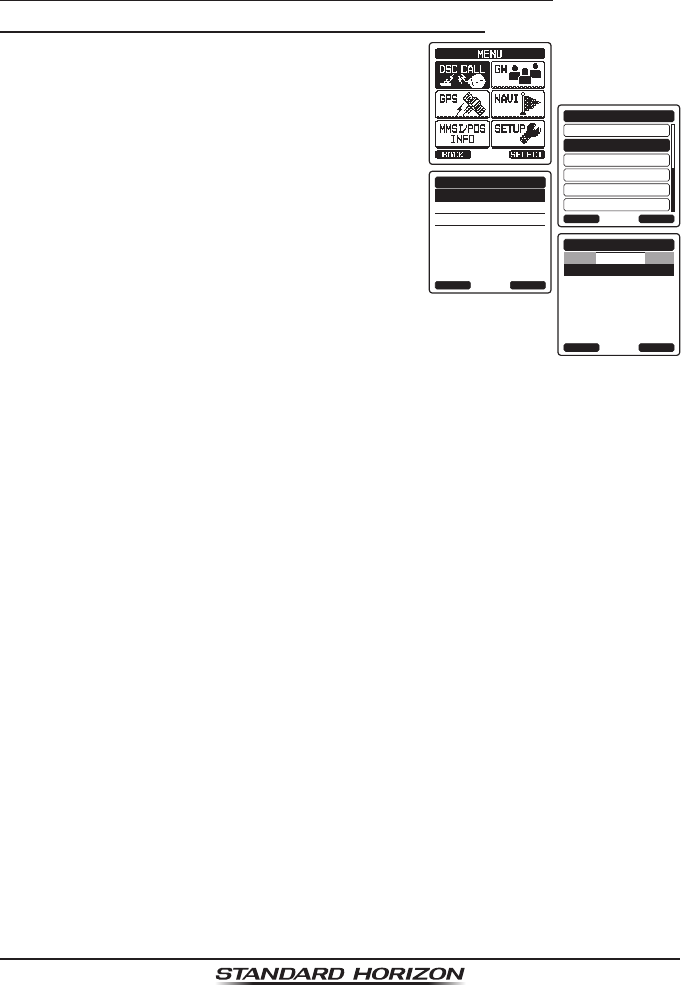
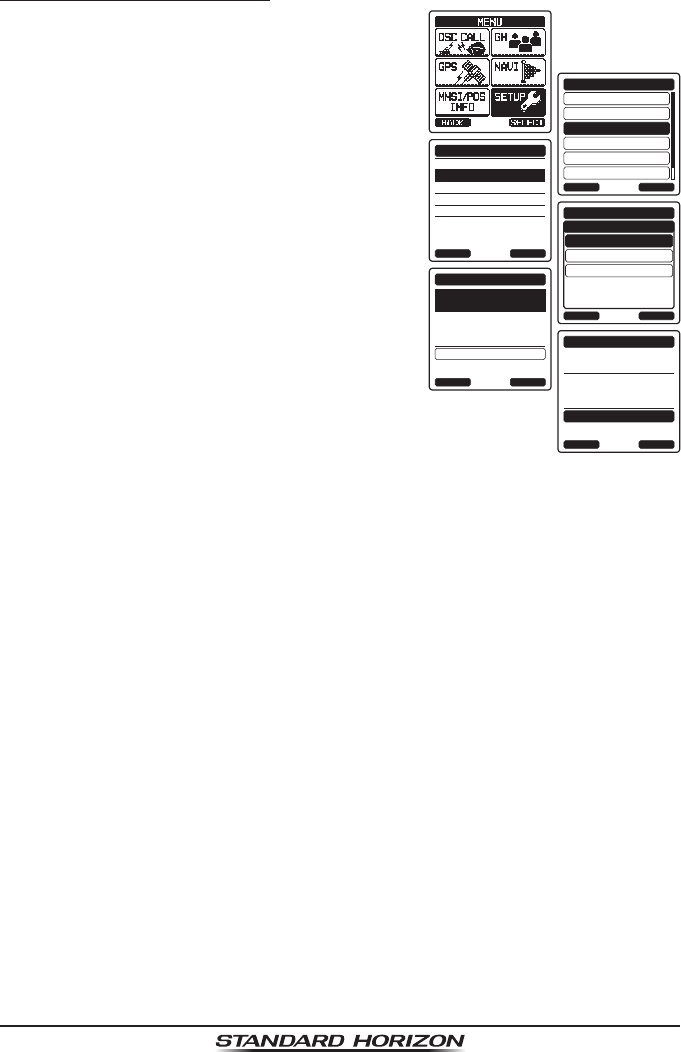
10.8.7 Setting up a Position Report Ringer
The HX870 has the capability to turn off the position report ringer.
1. Press the MENU key to display “MENU”.
DSC SETUP
GM SETUP
BACK
SETUP
WAYPOINT SETUP
CH SETUP
GPS SETUP
ATIS SETUP
SELECT
INDIVIDUAL DIR.
INDIVIDUAL REPLY
INDIVIDUAL ACK.
INDIVIDUAL RING
GROUP DIR.
POSITION REPLY
DSC BEEP
DSC SETUP
BACK SELECT
INDIVIDUAL
BACK
DSC SETUP
GROUP
ALL SHIPS
POS REQUEST
POS REPORT
SELECT
DSC BEEP
ON
ON
ON
ON
ON
2. Press the CH▲/CH▼/◄/► key to select
“SETUP”.
3. Select “DSC SETUP” menu with the CH▲/
CH▼ key.
4. Press the [SELECT] soft key, then select
“DSC BEEP” with the CH▲/CH▼ key.
5. Press the [SELECT] soft key, then select
“POS REPORT” with the CH▲/CH▼ key.
6. Press the [SELECT] soft key, then select
“OFF” with the CH▲/CH▼ key.
7. Press the [SELECT] soft key to store the
selected setting.
8. Press the CLR key to return to radio opera-
tion.
To re-enable the ringer tone, repeat the above procedure, pressing the CH▲/
CH▼ key to select “ON” in the step 6 above.
Page 66
HX870
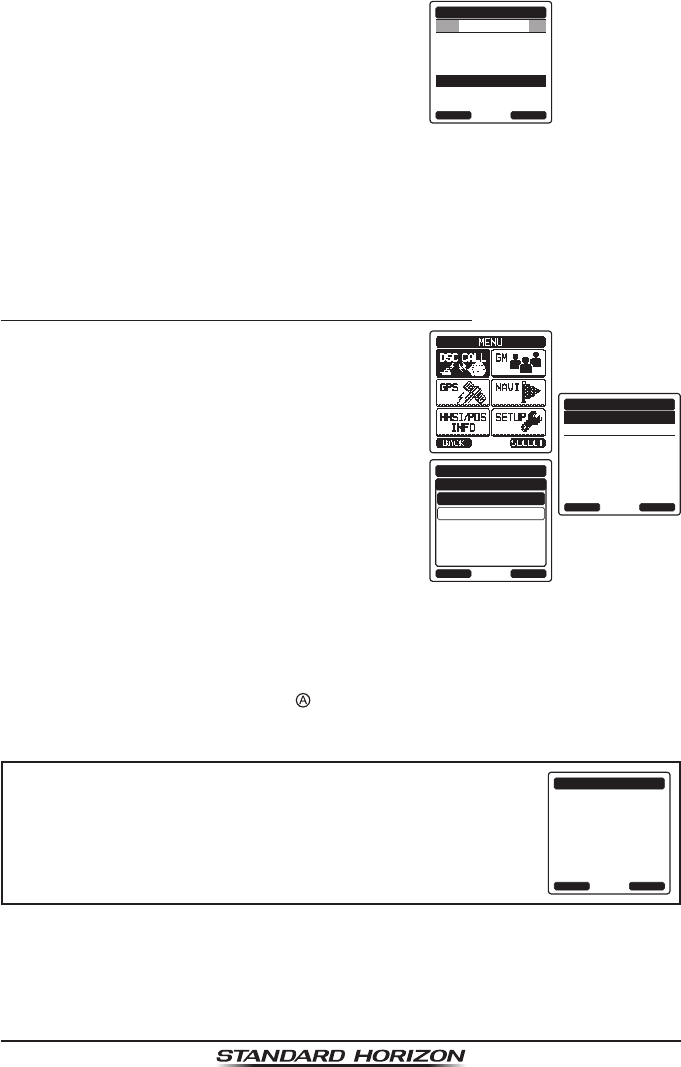
10.9 MANUAL INPUT OF A GPS LOCATION (LAT/LON)
You may send the latitude and longitude of your vessel manually even if the
HX870 is located in an area where GPS reception is limited.
After the position is entered, transmitting a DSC distress, position request reply,
or position report will contain the manually entered position.
1. Press the MENU key to display “MENU”.
366901234
OK POS/TM
MMSI/POS INFO
Lat
Lon
23°
56.469N
108°
11.284E
BACK SELECTFINISH
MMSI INPUT
MMSI
1 2 4 5 6 7 8 9 0
Delete
3
------------1st:
BACK SELECTFINISH
MMSI INPUT
MMSI
1 2 4 5 6 7 8 9 0
Delete
3669000011st:
3
OK
MMSI INPUT
MMSI
STORED MMSI!
366900001
2. Press the CH▲/CH▼/◄/► key to select
“MMSI/POS INFO” menu then press the
[SELECT] soft key.
3. Press the [POS/TM] soft key.
4. Enter the latitude/longitude of your vessel
and your local UTC time in the 24-hour nota-
tion by the CH▲/CH▼ key. Press the CH▲/
CH▼ key to select the number and press
the [SELECT] soft key to move the cursor
to the next character. You may backspace
the cursor by pressing the [BACK] soft key,
if you make a mistake.
5. Press the [FINISH] soft key to store the
selected setting.
6. Press the [OK] soft key.
7. Press the CLR key to return to radio operation.
Page 67
HX870
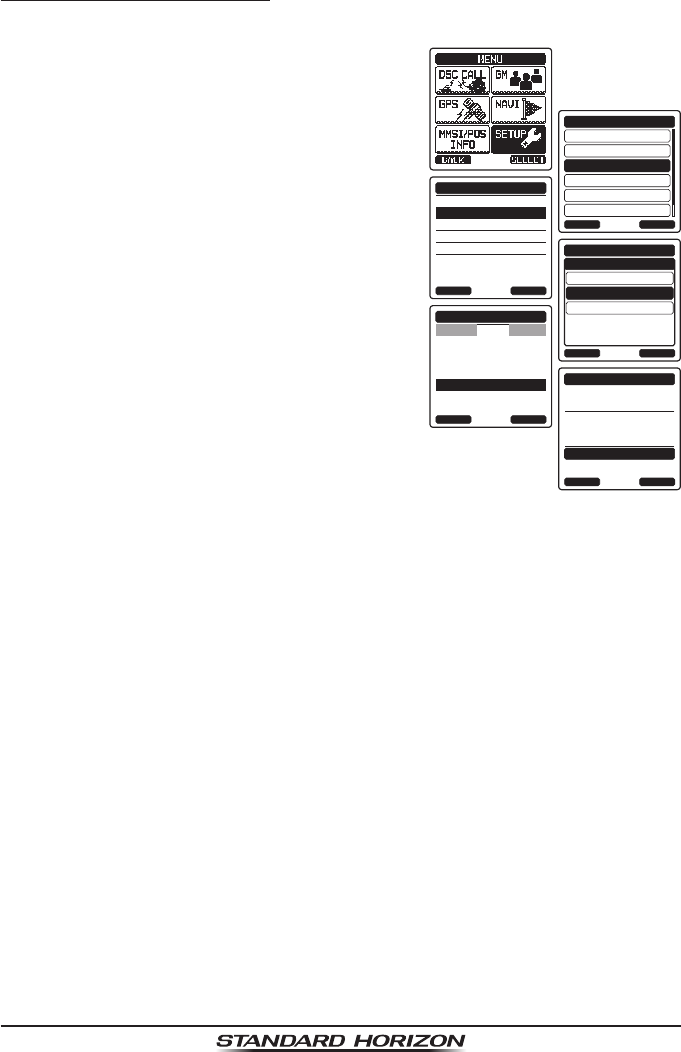
10.10 AUTO POS POLLING
The HX870 has the capability to automatically track seven stations programmed
into the individual directory.
The following procedure allows the time interval between position requests to
be setup.
10.10.1 Setting up the Polling Time Interval
1. Press the MENU key to display “MENU”.
DSC SETUP
GM SETUP
BACK
SETUP
WAYPOINT SETUP
CH SETUP
GPS SETUP
ATIS SETUP
SELECT
2. Press the CH▲/CH▼/◄/► key to select
“SETUP”.
3. Select “DSC SETUP” menu with the CH▲/
CH▼ key.
4. Press the [SELECT] soft key, then select
“AUTO POS INTERVAL” with the CH▲/CH▼
key.
5. Press the [SELECT] soft key.
6. Press the CH▲/CH▼ key to select the
desired interval time (30 second, 1, 2, 3, 4
and 5 minutes) and press the [ENTER] soft
key.
7. Press the CLR key to return to radio opera-
tion.
10.10.2 Selecting Stations to be Automatically Polled (Tracked)
NOTE
The radio uses the individual directory to select stations. Refer to
section “10.5.1 Setting up the Individual / Position Call Directory”
and to enter MMSI of stations you want to poll before proceeding.
1. Press the MENU key to display “MENU”, then
select “DSC CALL” with the CH▲/CH▼/◄/►
key.
DIST ALERT MSG
POLLING
BACK
DSC CALL
AUTO POS POLLING
DSC LOG
DSC TEST
DSC LOOP BACK
SELECT
ACTIVATION
SELECTED ID
AUTO POS POLLING
BACK SELECT
2. Press the CH▲/CH▼ key to select “AUTO
POS POLLING”, then press the [SELECT]
soft key.
3. Press the CH▲/CH▼ key to select the
“SELECT ID”, then press the [SELECT] soft
key.
Page 68
HX870
4. The radio will show 7 calling stations to be
selected, select a station and press the
[SELECT] soft key.
366901254
BOB
Horizon-1
Horizon-2
KAREN
Standard
USCG
AUTO POS POLLING
BACK SELECT
SELECTED ID
5. The radio will show the stations programmed
in the individual directory. Press the CH▲/
CH▼ key to select the desired station and
press the [SELECT] soft key.
6. Repeat steps 4 and 5 for CALL 2, CALL 3
and CALL 4 entries.
7. When nished, press the CLR key to exit to
the radio mode.
10.10.3 Enabling/Disabling Auto POS Polling
1. Press the MENU key to display “MENU”, then
select “DSC CALL” with the CH▲/CH▼/◄/►
key.
ACTIVATION
SELECTED ID
AUTO POS POLLING
BACK SELECT
START
BACK
AUTO POS POLLING
STOP
SELECT
ACTIVATION
2. Press the CH▲/CH▼ key to select “AUTO
POS POLLING”, then press the [SELECT]
soft key.
3. Press the CH▲/CH▼ key to select the
“ACTIVATION”, then press the [SELECT]
soft key.
4. Select “START” to enable transmissions to
the stations or “STOP” to disable transmis-
sions to stations.
5. Press the [ENTER] soft key.
6. Press the CLR key to return to radio operation.
7. Auto POS Polling starts and “ ” will light up on the screen.
NOTE
When the radio receives position reports from a called
vessel the display will show the image as in the right and
also output NMEA 0183 DSC and DSE sentences to a
GPS chart plotter from DATA jack (USB).
RX POLLING CALL
Horizon
987654321
CATEG:
ROUTINE
SINCE:
00:05
REPLY QUIT
Page 69
HX870
10.11 DSC TEST
This function is used to contact another DSC equipped vessel to ensure the
DSC functions of the radio are operating.
NOTE
To use this feature, the radio you will be transmitting the test call to
needs to have the DSC Test feature.
To perform the DSC test you will need to enter a MMSI of another vessel into the
individual directory or manually enter in the MMSI using the procedure below.
10.11.1 Programming MMSI into Individual Directory
Refer to section “10.5.1 Setting up the Individual / Position Call Directory”.
10.11.2 DSC Test call by using Individual/Position Directory
1. Press the MENU key to display “MENU”, then
select “DSC CALL” with the CH▲/CH▼/◄/►
key.
DIST ALERT MSG
POLLING
BACK
DSC CALL
AUTO POS POLLING
DSC LOG
DSC TEST
DSC LOOP BACK
SELECT
HISTORY
MEMORY
NEW ID
DSC TEST CALL
BACK SELECT
KAREN
BOB
366901254
Horizon-1
Standard
Horizon-2
USCG
DSC TEST CALL
BACK SELECT
HISTORY
ABLE
BACK
DSC TEST CALL
UNABLE
ENTER
TEST ACK.
2. Press the CH▲/CH▼ key to select “DSC
TEST”, then press the [SELECT] soft key.
3. Press the CH▲/CH▼ key to select the
category (“HISTORY”, “MEMORY” or “NEW ID”).
4. Press the CH▲/CH▼ key to select the ship
name and press the [SELECT] soft key.
5. Press the [YES] soft key to transmit the DSC
test call to the other vessel.
6. Press the [QUIT] soft key to return to radio
operation.
NOTE
After the radio receives a test call reply from the vessel
that was called, the radio will ring and show “RX TEST
CALL” display, which confirms the radio you called
received the test call.
RX TEST CALL
Horizon
987654321
CATEG:
ROUTINE
SINCE:
00:05
QUIT
Replied
Page 70
HX870
10.11.3 DSC Test Call by Manually Entering an MMSI
1. Press the MENU key to display “MENU”, then
select “DSC CALL” with the CH▲/CH▼/◄/►
key.
DIST ALERT MSG
POLLING
BACK
DSC CALL
AUTO POS POLLING
DSC LOG
DSC TEST
DSC LOOP BACK
SELECT
HISTORY
MEMORY
NEW ID
RX TEST CALL
BACK SELECT
2. Press the CH▲/CH▼ key to select “DSC
TEST”, then press the [SELECT] soft key.
3. Press the CH▲/CH▼ key to select “NEW ID”
and press the [SELECT] soft key.
4. Press the CH▲/CH▼ key to select the rst
digit in the MMSI and press the [SELECT]
soft key.
5. Repeat step 4 until all the numbers of the
MMSI are shown on the display.
6. Press the [FINISH] soft key to show the test
call page.
7. Press the [YES] soft key to transmit the DSC
test call to the other vessel.
8. Press the [QUIT] soft key to return to radio
operation.
NOTE
After the radio receives a test call reply from the vessel
that was called, the radio will ring and show “RX TEST
CALL” display, which confirms the radio you called
received the test call.
RX TEST CALL
Horizon
987654321
CATEG:
ROUTINE
SINCE:
00:05
QUIT
Replied
Page 71
HX870
10.12 POLLING CALL
The HX870 has the capability to track another vessel.
10.12.1 Transmitting a Polling Call to Another Vessel
Polling Call using the Individual/Position Call Directory
1. Press the MENU key to display “MENU”, then
select “DSC CALL” with the CH▲/CH▼/◄/►
key.
DIST ALERT MSG
POLLING
BACK
DSC CALL
AUTO POS POLLING
DSC LOG
DSC TEST
DSC LOOP BACK
SELECT
HISTORY
MEMORY
NEW ID
POLLING CALL
BACK SELECT
KAREN
BOB
366901254
Horizon-1
Standard
Horizon-2
USCG
POLLING CALL
BACK SELECT
HISTORY
2. Press the CH▲/CH▼ key to select “POLL-
ING”, then press the [SELECT] soft key.
3. Press the CH▲/CH▼ key to select the
category (“HISTORY”, “MEMORY” or “NEW ID”).
4. Press the CH▲/CH▼ key to select a name
that was stored in the individual/position call
directory, then press the [SELECT] soft key.
5. Press the [YES] soft key to transmit the
polling call.
6. After a polling call is transmitted, if the reply
signal is not received, “Waiting for ACK”
is shown on the display which means the
HX870 is waiting for the vessel you called
to send an acknowledgement.
7. To transmit the call again, press the
[RESEND] soft key.
8. When an acknowledgement is received from the polled vessel, the HX870
will show the display as in the right.
9. Press the [QUIT] soft key to return to radio operation.
Page 72
HX870
Polling Call by Manually Entering an MMSI
This feature allows you to contact a vessel by manually entering the MMSI of
the ship you want to track.
1. Press the MENU key to display “MENU”, then
select “DSC CALL” with the CH▲/CH▼/◄/►
key.
DIST ALERT MSG
POLLING
BACK
DSC CALL
AUTO POS POLLING
DSC LOG
DSC TEST
DSC LOOP BACK
SELECT
HISTORY
MEMORY
NEW ID
POLLING CALL
BACK SELECT
1 5 6 7 8 9 02 4
Delete
3
BACK SELECTFINISH
POLLING CALL
MMSI
-98765432
2. Press the CH▲/CH▼ key to select “POLL-
ING CALL”, then press the [SELECT] soft
key.
3. Press the CH▲/CH▼ key to select “NEW ID”
and press the [SELECT] soft key.
4. Press the CH▲/CH▼ key to select the
rst number in the MMSI and press the
[SELECT] soft key.
5. Repeat step 4 until all the digits of the MMSI
are shown on the display.
6. If a mistake was made entering in the MMSI
number, repeatedly press the [BACK] soft
key until the wrong digit is selected, then
press the CH▲/CH▼ key to correct the
entry.
7. When nished entering the MMSI number, press the [FINISH] soft key.
8. Press the [YES] soft key to transmit the polling call.
9. Press the [QUIT] soft key to return to radio operation.
10.12.2 Receiving a Polling Call
When another vessel transmits a polling call to the HX870 the following will
happen:
1. When a polling call is received, the radio will automatically
respond to the calling vessel.
RX POLLING CALL
Horizon
987654321
CATEG:
ROUTINE
SINCE:
00:05
QUIT
Replied
2. To exit from the polling call display, press the [QUIT] soft
key.
Page 73
HX870
10.13 DSC LOG OPERATION
The HX870 logs transmitted calls, received DSC distress calls, and other calls
(individual, group, all ships, etc.). The DSC log feature is similar to an answer
machine where calls are recorded for review and a “ ” icon will appear on
the radios display. The HX870 can store up to 24 transmitted calls, up to the
latest 27 distress calls, and up to the latest 64 other calls (individual, group,
all ships, position report, position request ack, test call ack, and polling calls).
NOTE
When the “DSC LOG” menu is selected, the HX870 may display high-
priority logged call automatically.
10.13.1 Reviewing and Resending a Transmitted Logged Call
The HX870 allows transmitted logged calls to be reviewed and to resend the call.
1. Press the MENU key to display “MENU”, then
select “DSC CALL” with the CH▲/CH▼/◄/►
key.
DIST ALERT MSG
POLLING
BACK
DSC CALL
AUTO POS POLLING
DSC LOG
DSC TEST
DSC LOOP BACK
SELECT
TRANSMITTED
RX DISTRESS
RX OTHER CALL
LOG DELETE
DSC LOG
BACK SELECT
12:16 125932502
12:30 366901254
13:02 325401690
13:06 336605425
DSC LOG
BACK SELECT
TRANSMITTED
TRANSMITTED LOG
YAESU-1
125932502
CATEG:
SAFETY
10°
55
POS:
TX TM:
24
POS TM:
°
25.975S
BACK DELETECALL
POS REPORT
118°
59.456W
UTC
12°
56 UTC
2. Press the CH▲/CH▼ key to select “DSC
LOG” menu.
3. Press the [SELECT] soft key, then conrm
“TRANSMITTED” is selected.
4. Press the [SELECT] soft key, then press the
CH▲/CH▼ key to select the station (name
or MMSI number) you want to review and/
or resend the call.
5. Press the [SELECT] soft key to review
details for the selected station.
6. Press the [CALL] soft key to resend the call
or press the [BACK] soft key repeatedly to
go back to the DSC transmitted call list.
Page 74
HX870
10.13.2 Reviewing a Logged DSC Distress Call
The HX870 allows logged DSC distress call to be reviewed.
1. Press the MENU key to display “MENU”, then
select “DSC CALL” with the CH▲/CH▼/◄/►
key.
DIST ALERT MSG
POLLING
BACK
DSC CALL
AUTO POS POLLING
DSC LOG
DSC TEST
DSC LOOP BACK
SELECT
TRANSMITTED
RX DISTRESS
RX OTHER CALL
LOG DELETE
DSC LOG
BACK SELECT
12:16 125932502
12:30 366901254
13:02 325401690
13:06 336605425
DSC LOG
BACK SELECT
RX DISTRESS
RX DISTRESS LOG
YAESU-1
125932502
10:25
DATE:
TX TM:
25/Jan
BACK DELETEINFO
YAESU-1
125932502
AM LOC
DIST VESSEL
OWN DISTRESS
2. Press the CH▲/CH▼ key to select “DSC
LOG” menu.
3. Press the [SELECT] soft key, then press the
CH▲/CH▼ key to select “RX DISTRESS”.
4. Press the [SELECT] soft key, then press the
CH▲/CH▼ key to select the station (name
or MMSI number) you want to review and/
or relay the distress call to other vessels.
Note: When there is an unread received call,
“” icon will appear behind the station
name (or MMSI number).
5. Press the [SELECT] soft key to review
details for the selected station.
6. Press the CLR key to return to radio operation.
NOTE
Not all DSC radios can receive a DSC distress relay call.
Page 75
HX870
10.13.3 Reviewing Other Logged Calls
1. Press the MENU key to display “MENU”, then
select “DSC CALL” with the CH▲/CH▼/◄/►
key.
DIST ALERT MSG
POLLING
BACK
DSC CALL
AUTO POS POLLING
DSC LOG
DSC TEST
DSC LOOP BACK
SELECT
TRANSMITTED
RX DISTRESS
RX OTHER CALL
LOG DELETE
DSC LOG
BACK SELECT
12:16 125932502
12:30 366901254
13:02 325401690
13:06 336605425
DSC LOG
BACK SELECT
RX OTHER CALL
RX OTHER CALL LOG
YAESU-1
125932502
ROUTINE
CH:
CATEG:
26
BACK DELETECALL
INDIVIDUAL
10:55
RX DT:
RX TM:
25/Jan
UTC
2. Press the CH▲/CH▼ key to select “DSC
LOG” menu.
3. Press the [SELECT] soft key, then press the
CH▲/CH▼ key to select “RX OTHER CALL”.
4. Press the [SELECT] soft key, then press the
CH▲/CH▼ key to select the station (name
or MMSI number) you want to review and/or
call back. When there is an unread received
call, “ ” icon will appear behind the station
name (or MMSI number).
5. Press the [SELECT] soft key to review
details for the selected station.
6. Press the CLR key to return to radio operation.
10.13.4 Deleting a Call from the DSC Log Directory
1. Press the MENU key to display “MENU”, then
select “DSC CALL” with the CH▲/CH▼/◄/►
key.
DIST ALERT MSG
POLLING
BACK
DSC CALL
AUTO POS POLLING
DSC LOG
DSC TEST
DSC LOOP BACK
SELECT
TRANSMITTED
RX DISTRESS
RX OTHER CALL
LOG DELETE
DSC LOG
BACK SELECT
2. Press the CH▲/CH▼ key to select “DSC
LOG” menu.
3. Press the [SELECT] soft key, then press
the CH▲/CH▼ key to select “LOG DELETE”
menu.
4. Press the [SELECT] soft key, then press
the CH▲/CH▼ key to select the category
(“TRANSMITTED LOG”, “RX DISTRESS” or “RX
OTHER CALL”) to be deleted.
5. Press the [SELECT] soft key, then press the
CH▲/CH▼ key to select “ALL LOG DELETE”
or “VIEW LOG LIST”.
1) If you want to delete all stations at a time,
select the “ALL LOG DELETE” with the
CH▲/CH▼ key, press the [SELECT] soft
key.

Page 76
HX870
2) If you want to delete one of the logged
stations, select the “VIEW LOG LIST”
with the CH▲/CH▼ key, then press the
[SELECT] soft key. Press the CH▲/CH▼
key to select the station (name or MMSI
number) to be deleted, then press the
[DELETE] soft key.
3) The display will show “Do you want to
delete a Log?”. Press the [OK] soft key.
“view loG liSt”“all loG Delete”
6. Press the CLR key to return to radio opera-
tion.
Page 77
HX870
11 NAVIGATION
The HX870 is capable of storing up to 200 waypoints and navigating to them
using the compass page.
In addition DSC distress calls with position or a position received from another
DSC radio using DSC polling can be navigated to.
11.1 OPERATION
11.1.1 Operation
1. Press the MENU key to display “MENU”, then
select “NAVI” with the CH▲/CH▼/◄/►key.
HISTORY
MEMORY
MANUAL
WAYPOINT
BACK SELECT
2. Press the [SELECT] soft key, then select
“WAYPOINT”.
3. Press the [SELECT] soft key, then select the
desired category (“HISTORY” or “MEMORY”),
then press the [SELECT] soft key.
4. Press the CH▲/CH▼ key to select a way
point, then press the [SELECT] soft key. The
navigation screen appears.
5. Press the CLR key to return to radio opera-
tion.
11.1.2 Navigating to a Saved Waypoint
The HX870 can navigate to a saved waypoint using the compass display.
Refer to section “10.8.6 Navigating to a Saved Waypoint” for details.
Page 78
HX870
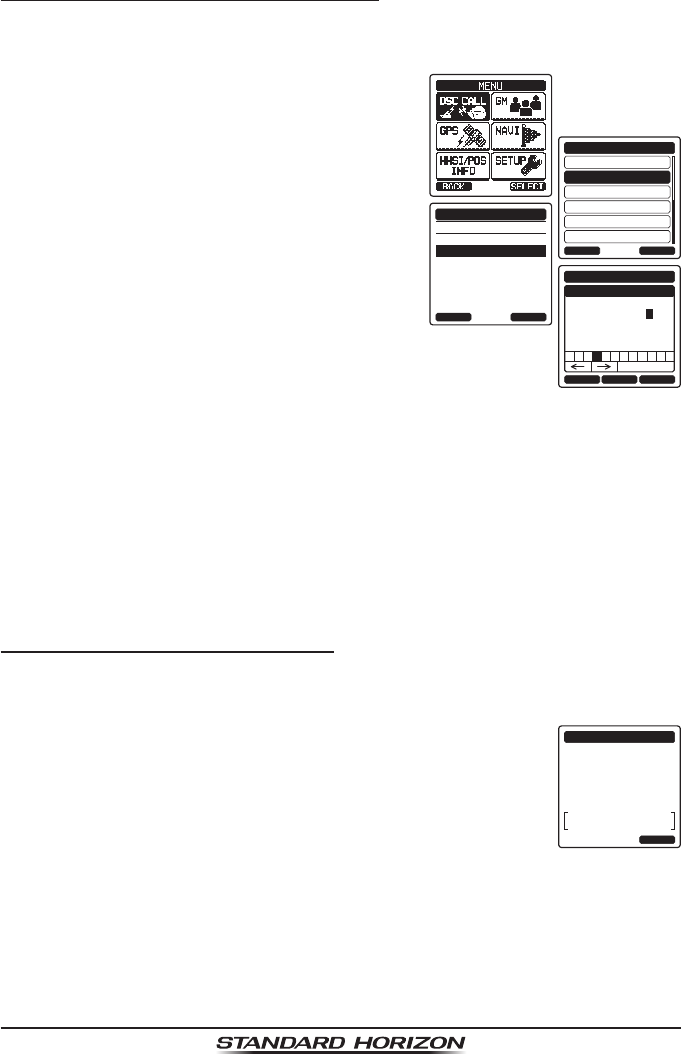
11.2 SETTING UP WAYPOINT DIRECTORY
11.2.1 Marking a Position
This feature allows the radio to mark the current position of the vessel.
1. Press the MENU key to display “MENU”, then
select “SETUP” with the CH▲/CH▼/◄/►
key.
DSC SETUP
GM SETUP
BACK
SETUP
WAYPOINT SETUP
CH SETUP
GPS SETUP
ATIS SETUP
SELECT
MARK POSITION
WAYPOINT DIR.
DISPLAY RANGE
ARRIVED RANGE
ROUTING OPERATION
WAYPOINT SETUP
BACK SELECT
NAME:
001MARK----------
ENTER
MARK POSITION
BACK
SAVE
POSITION:
24°
25.975S
118°
59.456W
NAME:
001MARK----------
ENTER
MARK POSITION
BACK
Saved
POSITION:
24°
25.975S
118°
59.456W
2. Press the CH▲/CH▼ key to select
“WAYPOINT SETUP”.
3. Press the [SELECT] soft key, then select
“MARK POSITION” with the CH▲/CH▼ key.
4. Press the [SELECT] soft key, then enter the
waypoint name by pressing the CH▲/CH▼
key to select the rst letter.
5. Press the [SELECT] soft key to store the
rst letter and to move to the second letter
in the name.
6. Repeat steps 4 and 5 until the name is
shown. Select “→” to skip a letter if needed.
7. With “SAVE” highlighted, press the [SELECT]
soft key to save the waypoint into memory.
8. Press the CLR key to return to radio opera-
tion.
Page 79
HX870
11.2.2 Adding a Waypoint
1. Press the MENU key to display “MENU”, then
select “SETUP” with the CH▲/CH▼/◄/►
key.
DSC SETUP
GM SETUP
BACK
SETUP
WAYPOINT SETUP
CH SETUP
GPS SETUP
ATIS SETUP
SELECT
MARK POSITION
WAYPOINT DIR.
DISPLAY RANGE
ARRIVED RANGE
ROUTING OPERATION
WAYPOINT SETUP
BACK SELECT
ADD
WAYPOINT SETUP
EDIT
DELETE
WAYPOINT DIR.
BACK SELECT
NAME:
001WPT----------
SELECT
WAYPOINT DIR.
BACK
SAVE
POSITION:
--°
--.----
-
---°
--.---
NAME:
STANDARD---------
ENTER
WAYPOINT DIR.
BACK
SAVE
POSITION:
34°
25.975S
118°
59.456W
2. Press the CH▲/CH▼ key to select
“WAYPOINT SETUP”.
3. Press the [SELECT] soft key, then select
“WAYPOINT DIR.” with the CH▲/CH▼ key.
4. Press the [SELECT] soft key, then select
“ADD” with the CH▲/CH▼ key.
5. Press the [SELECT] soft key.
6. Enter the waypoint name by rotating the
CH▲/CH▼ key to select the rst letter.
7. Press the [SELECT] soft key to store the
rst letter and to move to the second letter
in the name.
8. Repeat steps 6 and 7 until the name is
shown. Select “→” to skip a letter if needed.
9. With “SAVE” highlighted, press the [SELECT]
soft key, then enter the coordinates of the
waypoint position by pressing the CH▲/
CH▼ key to select the rst digit in the lati-
tude.
10. Press the [SELECT] soft key to store the rst number and to move to the
second number in the position.
11. Repeat steps 9 and 10 until the latitude is shown including N or S in the
last digit.
12. Press the [SELECT] soft key to select the rst digit of the longitude is blink-
ing.
13. Press the CH▲/CH▼ key to select the rst digit in the longitude.
14. Press the [SELECT] soft key to store the rst number and to move to the
second number in the position.
15. Repeat steps 13 and 14 until the longitude is shown including E or W in
the last digit.
16. After all information is entered, with “SAVE” highlighted, press the [ENTER]
soft key to store the waypoint into memory.
17. Press the CLR key to return to radio operation.
Page 80
HX870
11.2.3 Editing a Waypoint
This function allows a previously entered waypoint to be edited.
1. Press the MENU key to display “MENU”, then
select “SETUP” with the CH▲/CH▼/◄/►
key.
DSC SETUP
GM SETUP
BACK
SETUP
WAYPOINT SETUP
CH SETUP
GPS SETUP
ATIS SETUP
SELECT
MARK POSITION
WAYPOINT DIR.
DISPLAY RANGE
ARRIVED RANGE
ROUTING OPERATION
WAYPOINT SETUP
BACK SELECT
ADD
WAYPOINT SETUP
EDIT
DELETE
WAYPOINT DIR.
BACK SELECT
Standard
USCG
WAYPOINT DIR.
BACK SELECT
EDIT
KAREN
366901254
BOB
Horizon-1
Horizon-2
NAME:
STANDARD---------
ENTER
WAYPOINT DIR.
BACK
SAVE
POSITION:
34°
25.975S
118°
59.456W
2. Press the CH▲/CH▼ key to select
“WAYPOINT SETUP”.
3. Press the [SELECT] soft key, then select
“WAYPOINT DIR.” with the CH▲/CH▼ key.
4. Press the [SELECT] soft key, then select
“EDIT” with the CH▲/CH▼ key.
5. Press the [SELECT] soft key, then press the
CH▲/CH▼ key to select the waypoint to be
edited.
6. Press the [SELECT] soft key to show the
waypoint input display.
7. Press the [SELECT] soft key repeatedly until
the number or letter is selected that is to be
changed.
8. Press the CH▲/CH▼ key to change the
letter or number.
9. Repeat steps 7 and 8 until the waypoint is updated.
10. With “SAVE” highlighted, press the [ENTER] soft key to store the edited
waypoint into memory.
11. Press the CLR key to return to radio operation.