Yaesu Musen 30573X30 HANDHELD MARINE TRANSCEIVER User Manual 4
Yaesu Musen Co., Ltd. HANDHELD MARINE TRANSCEIVER 4
Contents
- 1. User Manual
- 2. User Manual 2
- 3. User Manual 3
- 4. User Manual 4
- 5. User Manual 5
User Manual 4
Page 81
HX870
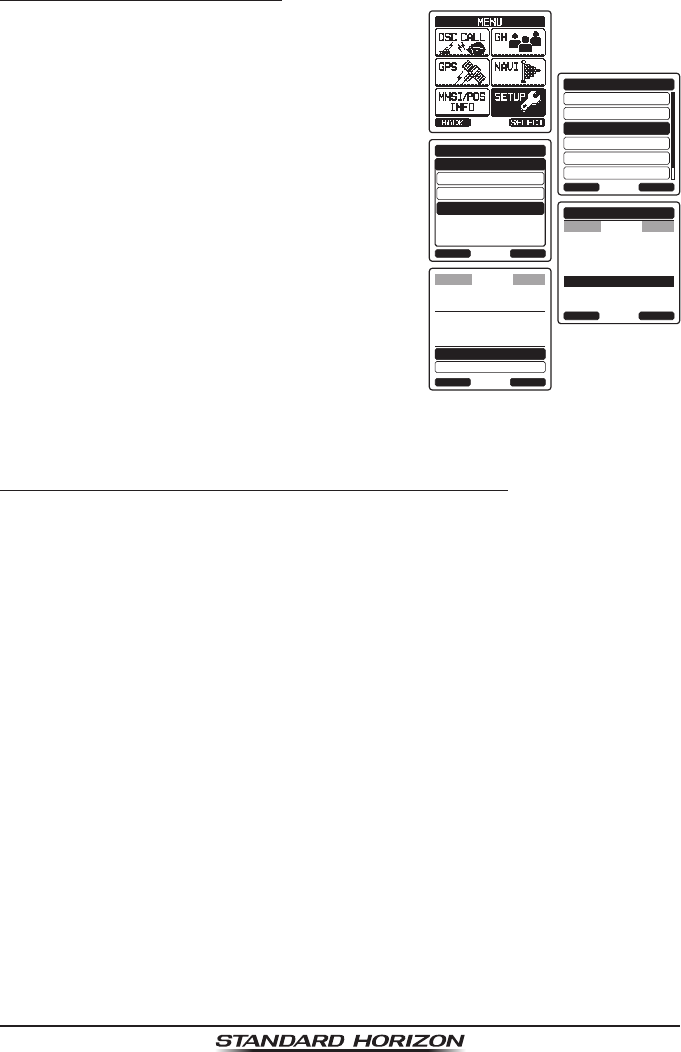
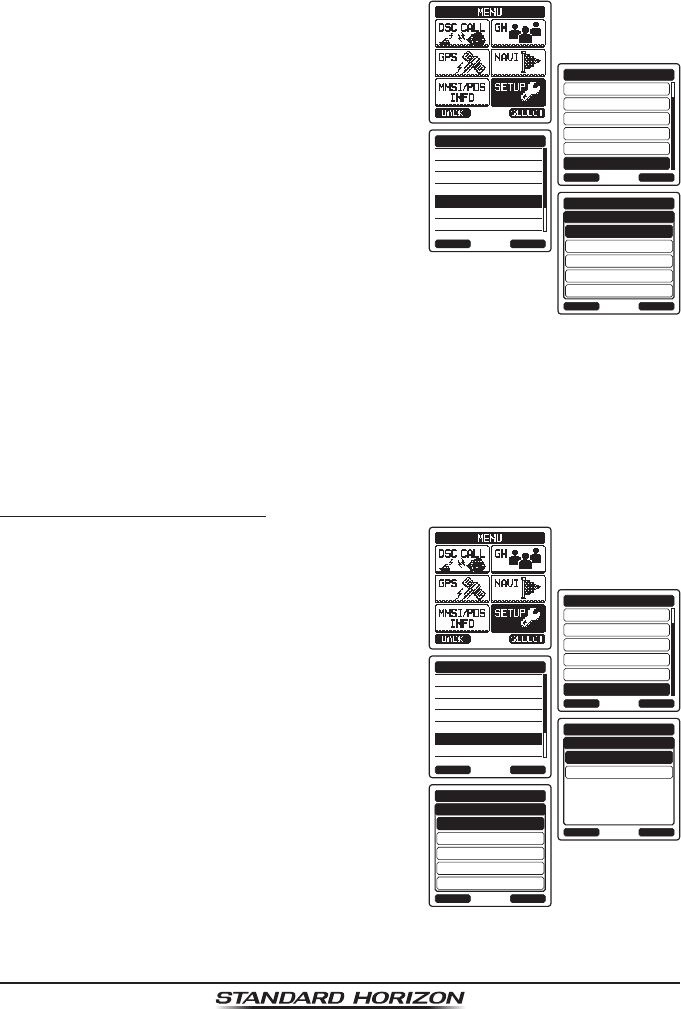
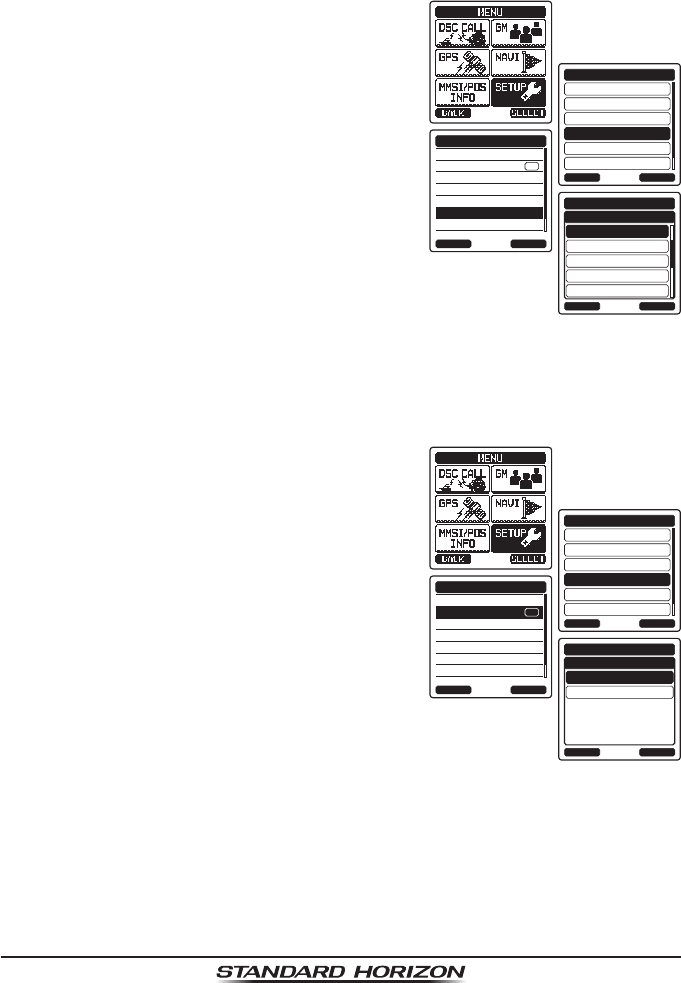
11.2.4 Deleting a Waypoint
1. Press the MENU key to display “MENU”, then
select “SETUP” with the CH▲/CH▼/◄/►
key.
DSC SETUP
GM SETUP
BACK
SETUP
WAYPOINT SETUP
CH SETUP
GPS SETUP
ATIS SETUP
SELECT
ADD
WAYPOINT SETUP
EDIT
DELETE
WAYPOINT DIR.
BACK SELECT
Standard
USCG
WAYPOINT DIR.
BACK SELECT
KAREN
366901254
BOB
Horizon-1
Horizon-2
DELETE
NAME:
KAREN------------
ENTERBACK
CANCEL
OK
POSITION:
34°
25.975S
118°
59.456W
DELETE
2. Press the CH▲/CH▼ key to select
“WAYPOINT SETUP”.
3. Press the [SELECT] soft key, then select
“WAYPOINT DIR.” with the CH▲/CH▼ key.
4. Press the [SELECT] soft key, then select
“DELETE” with the CH▲/CH▼ key.
5. Press the [SELECT] soft key, then press the
CH▲/CH▼ key to highlight the waypoint to
be deleted.
6. Press the [SELECT] soft key.
7. Conrm the waypoint to be deleted, then
with “OK” highlighted, press the [ENTER]
soft key.
8. Press the CLR key to return to radio operation.
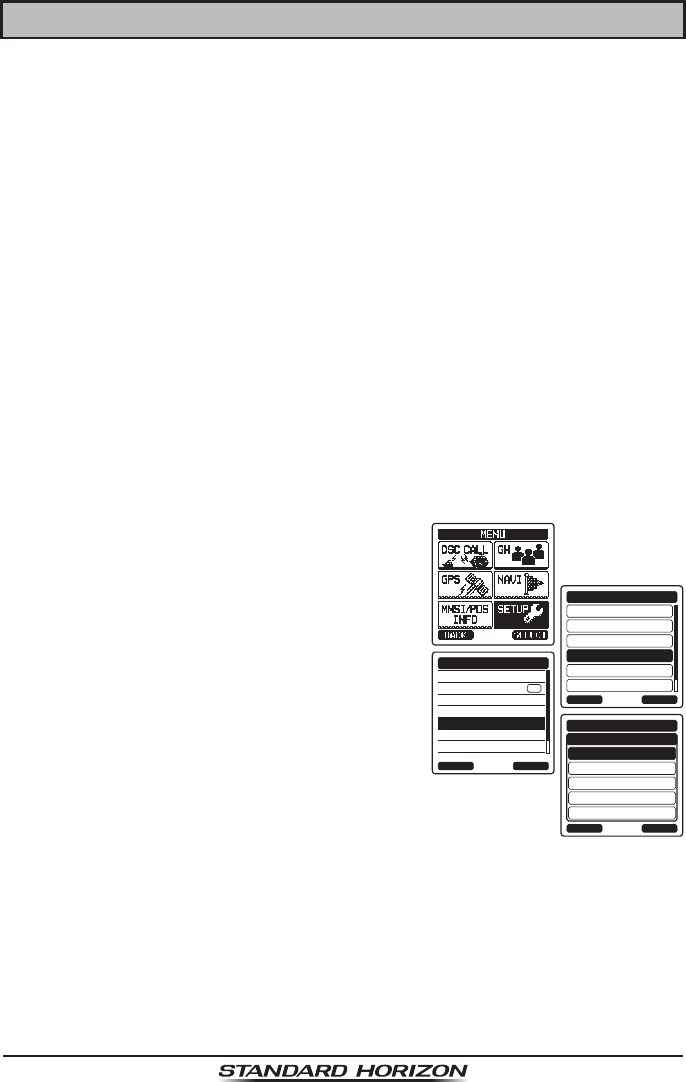
11.2.5 Saving a DSC Position Call as a Waypoint
When a position is received from another DSC radio the HX870 allows the
position to be saved as a waypoint.
Refer to section “10.8.5 Saving a Position Report as a Waypoint” for details.
Page 82
HX870
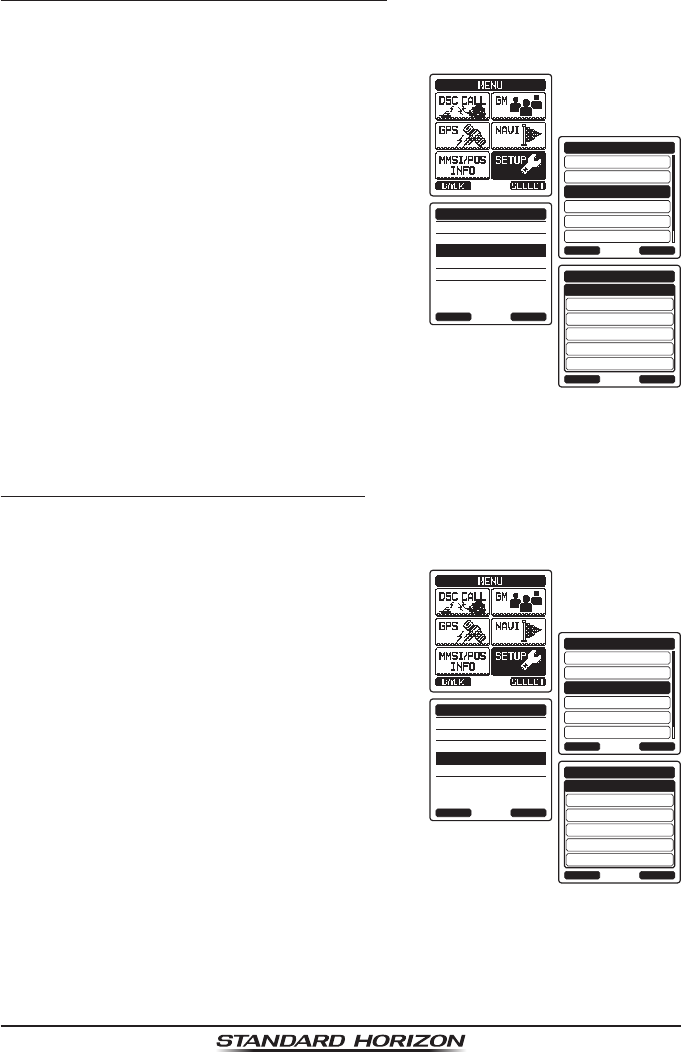
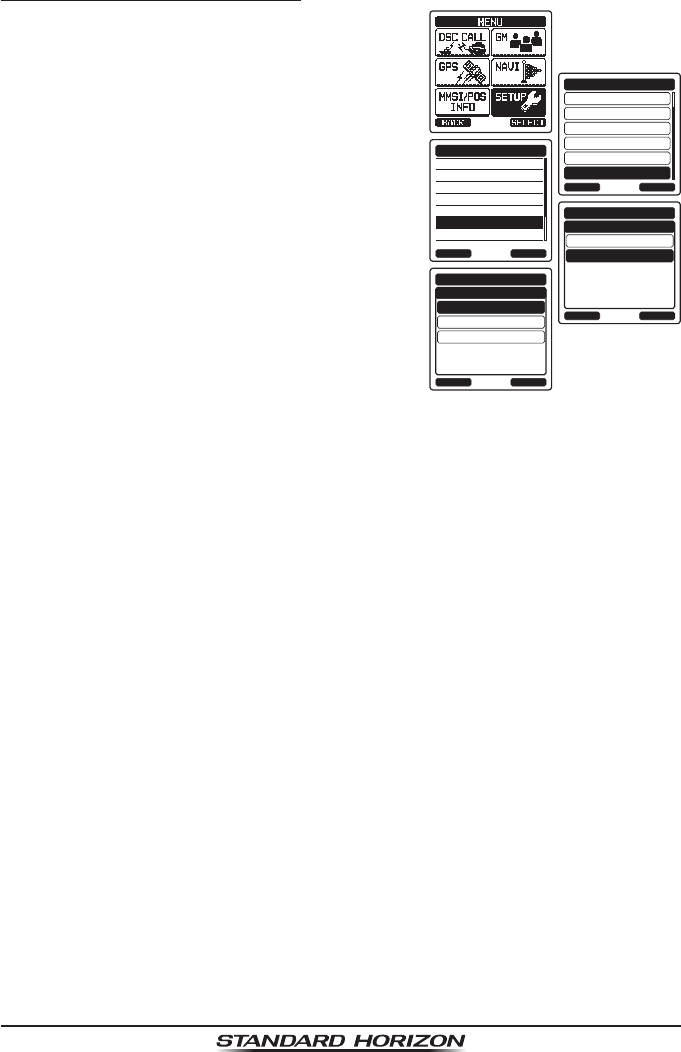
11.2.6 Selecting the Waypoint Range
This menu item allows setting of the range on the display. The default setting
is “10nm”.
1. Press the MENU key to display “MENU”, then
select “SETUP” with the CH▲/CH▼/◄/►
key.
DSC SETUP
GM SETUP
BACK
SETUP
WAYPOINT SETUP
CH SETUP
GPS SETUP
ATIS SETUP
SELECT
MARK POSITION
WAYPOINT DIR.
DISPLAY RANGE
ARRIVED RANGE
ROUTING OPERATION
WAYPOINT SETUP
BACK SELECT
1nm
BACK
WAYPOINT SETUP
5nm
10nm
15nm
30nm
ENTER
WAYPOINT RANGE
2. Press the CH▲/CH▼ key to select
“WAYPOINT SETUP”.
3. Press the [SELECT] soft key, then select
“DISPLAY RANGE” with the CH▲/CH▼ key.
4. Press the [SELECT] soft key.
5. Press the CH▲/CH▼ key to select desired
range. Available selections are “1nm”,
“5nm”, “10nm”, “15nm”, and “30nm”.
6. Press the [ENTER] soft key to store the
selected setting.
7. Press the CLR key to return to radio opera-
tion.
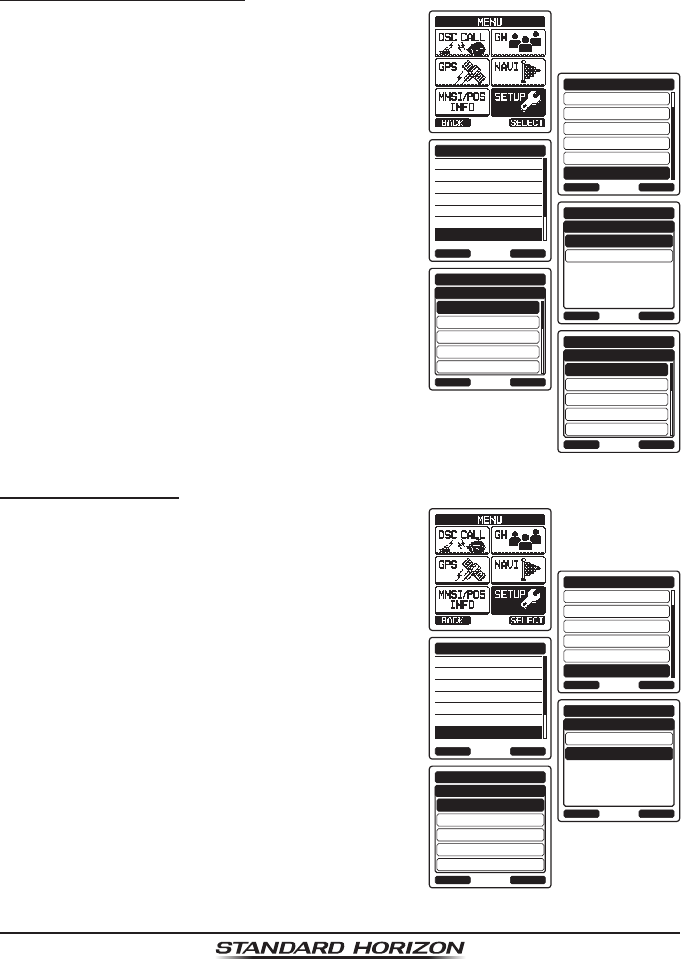
11.2.7 Selecting the Arrived Range
To stop navigating to a waypoint, the radio must be switched to the normal
mode with the following procedure.
1. Press the MENU key to display “MENU”, then
select “SETUP” with the CH▲/CH▼/◄/►
key.
DSC SETUP
GM SETUP
BACK
SETUP
WAYPOINT SETUP
CH SETUP
GPS SETUP
ATIS SETUP
SELECT
MARK POSITION
WAYPOINT DIR.
DISPLAY RANGE
ARRIVED RANGE
ROUTING OPERATION
WAYPOINT SETUP
BACK SELECT
50m
BACK
WAYPOINT SETUP
100m
200m
500m
1km
ENTER
ARRIVED RANGE
2. Press the CH▲/CH▼ key to select
“WAYPOINT SETUP”.
3. Press the [SELECT] soft key, then select
“ARRIVED RANGE” with the CH▲/CH▼ key.
4. Press the [ENTER] soft key.
5. Press the CH▲/CH▼ key to select desired
range. Available selections are “50 m”, “100
m”, “200 m”, “500 m”, and “1 km”.
6. Press the [ENTER] soft key to store the
selected setting.
Page 83
HX870
12 CONFIGURATION
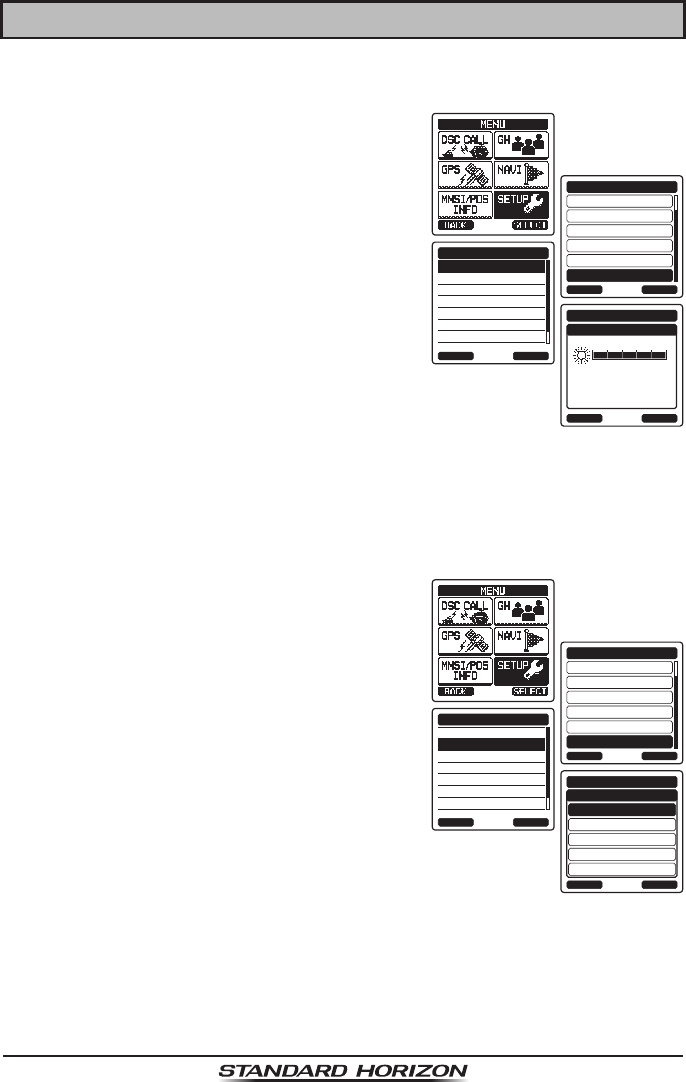
12.1 DIMMER ADJUSTMENT
This menu selection adjusts the backlight intensity.
1. Press the MENU key to display “MENU”, then
select “SETUP” with the CH▲/CH▼/◄/►
key.
GM SETUP
WAYPOINT SETUP
BACK
SETUP
CH SETUP
GPS SETUP
ATIS SETUP
CONFIGURATION
SELECT
DIMMER
LAMP
CONTRAST
KEY BEEP
BATTERY SAVE
STROBE LED
SOFT KEY
CONFIGURATION
BACK SELECT
DIMMER
5
CONFIGURATION
BACK ENTER
2. Press the CH▲/CH▼ key to select “CONFIG-
URATION” menu.
3. Press the [SELECT] soft key, then select
“DIMMER” with the CH▲/CH▼ key.
4. Press the [SELECT] soft key.
5. Press the CH▲/CH▼ key to select the
desired level (“5” is default). When “OFF” is
selected, the lamp is turned off.
6. Press the [SELECT] soft key to store the
selected level.
7. Press the CLR key to return to radio operation.
12.2 LAMP
This menu selection is used to setup the illumination time of the display and
keypad. The default setting is “OFF”.
1. Press the MENU key to display “MENU”, then
select “SETUP” with the CH▲/CH▼/◄/►
key.
GM SETUP
WAYPOINT SETUP
BACK
SETUP
CH SETUP
GPS SETUP
ATIS SETUP
CONFIGURATION
SELECT
DIMMER
LAMP
CONTRAST
KEY BEEP
BATTERY SAVE
STROBE LED
SOFT KEY
CONFIGURATION
BACK SELECT
OFF
BACK
CONFIGRATION
3sec
5sec
10sec
CONTINUOUS
SELECT
LAMP
2. Press the CH▲/CH▼ key to select “CONFIG-
URATION” menu.
3. Press the [SELECT] soft key, then select
“LAMP” with the CH▲/CH▼ key.
4. Press the [SELECT] soft key.
5. Press the CH▲/CH▼ key to select the
desired time.
CONTINUOUS: Illuminates the display/keypad
continuously.
3/5/10 Sec: Illuminates the display/keypad
for the selected time when
press any key (except the
PTT switch).
OFF: Disables the display/keypad lamp illumination.
6. Press the [SELECT] soft key to store the selected setting.
Page 84
HX870
7. Press the CLR key to return to radio operation.
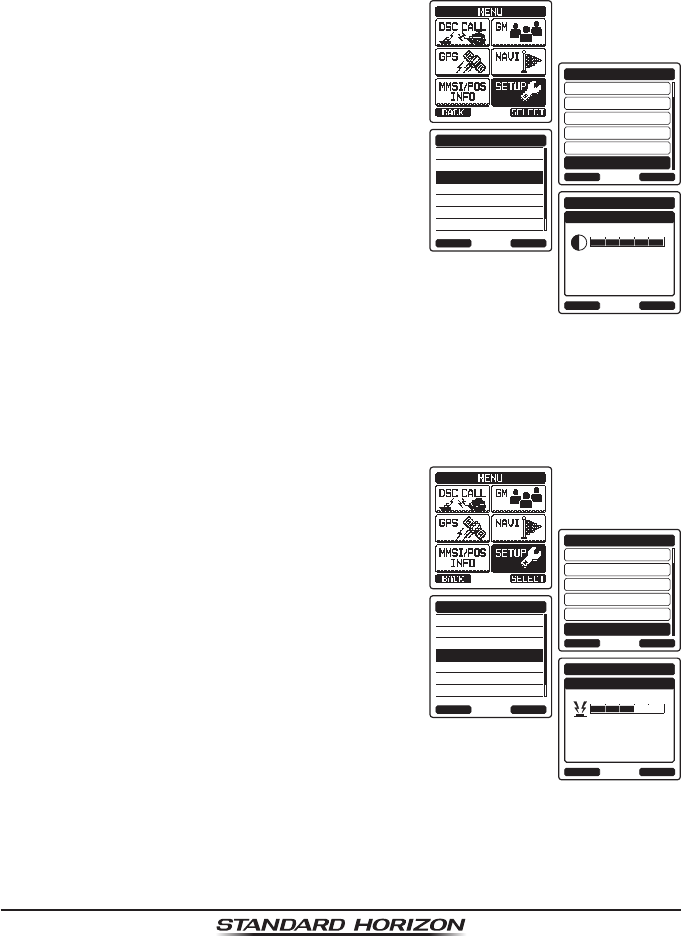
12.3 DISPLAY CONTRAST
The display contrast can be adjusted to suit overhead or dash board installa-
tions.
1. Press the MENU key to display “MENU”, then
select “SETUP” with the CH▲/CH▼/◄/►
key.
GM SETUP
WAYPOINT SETUP
BACK
SETUP
CH SETUP
GPS SETUP
ATIS SETUP
CONFIGURATION
SELECT
DIMMER
LAMP
CONTRAST
KEY BEEP
BATTERY SAVE
STROBE LED
SOFT KEY
CONFIGURATION
BACK SELECT
CONTRAST
30
CONFIGURATION
BACK ENTER
2. Press the CH▲/CH▼ key to select “CONFIG-
URATION” menu.
3. Press the [SELECT] soft key, then select
“CONTRAST” with the CH▲/CH▼ key.
4. Press the [SELECT] soft key.
5. Press the CH▲/CH▼ key to select the
desired level. The contrast level can be set
from “0” to “30” (“15” is default).
6. Press the [SELECT] soft key to store the
selected level.
7. Press the CLR key to return to radio operation.
12.4 KEY BEEP
This selection is used to select the beep tone volume level when a key is
pressed.
1. Press the MENU key to display “MENU”, then
select “SETUP” with the CH▲/CH▼/◄/►
key.
GM SETUP
WAYPOINT SETUP
BACK
SETUP
CH SETUP
GPS SETUP
ATIS SETUP
CONFIGURATION
SELECT
DIMMER
LAMP
CONTRAST
KEY BEEP
BATTERY SAVE
STROBE LED
SOFT KEY
CONFIGURATION
BACK SELECT
KEY BEEP
3
CONFIGURATION
BACK ENTER
2. Press the CH▲/CH▼ key to select “CONFIG-
URATION” menu.
3. Press the [SELECT] soft key, then press the
CH▲/CH▼ key to select “KEY BEEP”.
4. Press the [SELECT] soft key.
5. Press the CH▲/CH▼ key to select the
desired level. The beep level can be set from
“LEVEL 1” to “LEVEL 5”, or “OFF”.
6. Press the [SELECT] soft key to store the
selected level.
7. Press the CLR key to return to radio operation.
Page 85
HX870
12.5 BATTERY SAVER
This function allows you to change the battery save mode setting.
1. Press the MENU key to display “MENU”, then
select “SETUP” with the CH▲/CH▼/◄/►
key.
GM SETUP
WAYPOINT SETUP
BACK
SETUP
CH SETUP
GPS SETUP
ATIS SETUP
CONFIGURATION
SELECT
DIMMER
LAMP
CONTRAST
KEY BEEP
BATTERY SAVE
STROBE LED
SOFT KEY
CONFIGURATION
BACK SELECT
OFF
BACK
CONFIGURATION
50%
70%
80%
90%
ENTER
BATTERY SAVE
2. Press the CH▲/CH▼ key to select “CONFIG-
URATION” menu.
3. Press the [SELECT] soft key, then press the
CH▲/CH▼ key to select “BATTERY SAVE”.
4. Press the [SELECT] soft key.
5. Press the CH▲/CH▼ key to select the
desired setting. You can select one from
“OFF”, “50%”, “70%”, “80%”, or “90%”.
6. Press the [SELECT] soft key to store the
selected setting.
7. Press the CLR key to return to radio opera-
tion.
12.6 STROBE LED
This function allows you to change the EMARGENCY LED and WATER
HAZARD LED settings.
12.6.1 EMARGENCY LED
1. Press the MENU key to display “MENU”, then
select “SETUP” with the CH▲/CH▼/◄/►
key.
GM SETUP
WAYPOINT SETUP
BACK
SETUP
CH SETUP
GPS SETUP
ATIS SETUP
CONFIGURATION
SELECT
DIMMER
LAMP
CONTRAST
KEY BEEP
BATTERY SAVE
STROBE LED
SOFT KEY
CONFIGURATION
BACK SELECT
EMERGENCY LED
BACK
CONFIGURATION
WATER HAZARD LED
SELECT
STROBE LED
CONTINIUS
BACK
CONFIGURATION
SOS
BLINK1
BLINK2
BLINK3
SELECT
EMARGENCY LED
2. Press the CH▲/CH▼ key to select “CONFIG-
URATION” menu.
3. Press the [SELECT] soft key, then press the
CH▲/CH▼ key to select “STROBE LED”.
4. Press the [SELECT] soft key.
5. Press the CH▲/CH▼ key to select “EMAR-
GENCY LED”.
6. Press the CH▲/CH▼ key to select the
desired setting. You can select one from
“CONTINIUS”, “SOS”, “BLINK 1”, “BLINK 2”,
or “BLINK 3”.
7. Press the [SELECT] soft key to store the
selected setting.
8. Press the CLR key to return to radio operation.
Page 86
HX870
12.6.2 WATER HAZARD LED
1. Press the MENU key to display “MENU”, then
select “SETUP” with the CH▲/CH▼/◄/►
key.
GM SETUP
WAYPOINT SETUP
BACK
SETUP
CH SETUP
GPS SETUP
ATIS SETUP
CONFIGURATION
SELECT
DIMMER
LAMP
CONTRAST
KEY BEEP
BATTERY SAVE
STROBE LED
SOFT KEY
CONFIGURATION
BACK SELECT
EMERGENCY LED
BACK
CONFIGURATION
WATER HAZARD LED
SELECT
STROBE LED
OFF
BACK
CONFIGURATION
ON
ON/PWR ON
SELECT
WATER HAZARD LED
2. Press the CH▲/CH▼ key to select “CONFIG-
URATION” menu.
3. Press the [SELECT] soft key, then press the
CH▲/CH▼ key to select “STROBE LED”.
4. Press the [SELECT] soft key.
5. Press the CH▲/CH▼ key to select “EMAR-
GENCY LED”.
6. Press the CH▲/CH▼ key to select the
desired setting. You can select one from
“OFF”, “ON”, or “ON/PWR ON”.
OFF: The LED does not light up.
ON: The LED lights up.
ON/PWR ON: The LED lights up and the
transceiver turns on if it is off.
7. Press the [SELECT] soft key to store the
selected setting.
8. Press the CLR key to return to radio operation.
Page 87
HX870
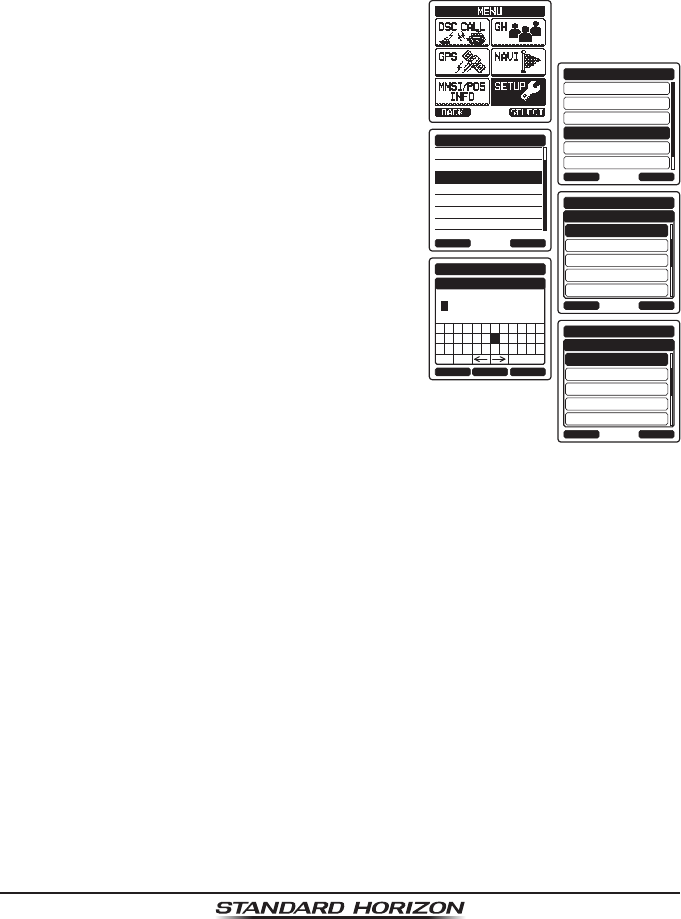
12.7 SOFT KEYS
This menu item allows selection of the number of soft keys, soft key selection
and how long the display will show the soft key icon after a soft key is pressed.
12.7.1 Key Assignment
1. Press the MENU key to display “MENU”, then
select “SETUP” with the CH▲/CH▼/◄/►
key.
GM SETUP
WAYPOINT SETUP
BACK
SETUP
CH SETUP
GPS SETUP
ATIS SETUP
CONFIGURATION
SELECT
DIMMER
LAMP
CONTRAST
KEY BEEP
BATTERY SAVE
STROBE LED
SOFT KEY
CONFIGURATION
BACK SELECT
KEY ASSIGNMENT
BACK
CONFIGURATION
KEY TIMER
SELECT
SOFT KEY
1:WX/CH
BACK
CONFIGURATION
2:DUAL WATCH
3:TX HI/LOW
4:SCAN
5:CH NAME
SELECT
KEY ASSIGNMENT
WX/CH
BACK
CONFIGURATION
DUAL WATCH
TX HI/LOW
SCAN
CH NAME
ENTER
KEY SELECTION
2. Press the CH▲/CH▼ key to select “CONFIG-
URATION” menu.
3. Press the [SELECT] soft key, then press the
CH▲/CH▼ key to select “SOFT KEY”.
4. Press the [SELECT] soft key, then press the
CH▲/CH▼ key to “KEY ASSIGNMENT”.
5. Press the [SELECT] soft key to select
the key to be programmed, and press the
[SELECT] soft key.
6. Press the CH▲/CH▼ key to select the
new function to be assigned, and press the
[ENTER] soft key. Available functions are
listed in the next page. Repeat steps 5 and
6 to program other soft keys.
12.7.2 Key Timer
1. Press the CH▲/CH▼ key to select “KEY
TIMER” (selects how long the soft key icon
will be shown on the display after a soft key
is pressed; default is 5 seconds). Then,
press the [SELECT] soft key.
GM SETUP
WAYPOINT SETUP
BACK
SETUP
CH SETUP
GPS SETUP
ATIS SETUP
CONFIGURATION
SELECT
DIMMER
LAMP
CONTRAST
KEY BEEP
BATTERY SAVE
STROBE LED
SOFT KEY
CONFIGURATION
BACK SELECT
KEY ASSIGNMENT
BACK
CONFIGURATION
KEY TIMER
SELECT
SOFT KEY
3sec
BACK
CONFIGURATION
5sec
7sec
10sec
15sec
ENTER
KEY TIMER
2. Press the CH▲/CH▼ key to select the
desired time.
3. Press the [ENTER] soft key to store the
selected setting.
4. Press the CLR key to return to radio opera-
tion.

Page 88
HX870
DISPLAY FUNCTION
WX/CH Switches channels between weather and marine.
HI/MD/LO Congures transmission.
SCAN Starts and stops scanning.
DW Starts and stops dual watch scan.
MOB Registers the position where people fall overboard.
COMP Shows the “Compass” display.
WPT Shows the “Waypoint” navigation display.
MARK Mark the current position for a “Waypoint”.
MEM Switches on and off of the memory channel scan
PRESET Porgrams or deletes the preset memory channel.
STOROBE Activates the strobe LED.
NAME Registers channel names.
LOGGER Starts and stops logging position data.
Page 89
HX870
13 CHANNEL FUNCTION SETUP
13.1 CHANNEL GROUP
This section selects a channel group from USA, Canada, and International.
Refer to section “8.6 USA, INTERNATIONAL, AND CANADA MODE” for
details.
13.2 SCAN MEMORY
To be able to scan channels the radio must be programmed. This section allows
channels to be stored in scan memory.
Refer to section “8.9.2 Programming Scan Memory” for details.
13.3 SCAN TYPE
This selection is used to select the scan mode between “Memory Scan” and
“Priority Scan”. The default setting is “Priority Scan”.
Refer to section “8.9.1 Selecting the Scan Type” for details.
13.4 SCAN RESUME
This selection is used to select the time the HX870 waits after a transmission
ends before the radio start to scan channels again. The default setting is 2
seconds.
1. Press the MENU key to display “MENU”, then
select “SETUP” with the CH▲/CH▼/◄/►
key.
DSC SETUP
GM SETUP
BACK
SETUP
WAYPOINT SETUP
CH SETUP
GPS SETUP
ATIS SETUP
SELECT
CH GROUP
WX ALERT
SCAN MEMORY
SCAN TYPE
SCAN RESUME
PRIORITY CH
SUB CH
CH SETUP
BACK SELECT
ON
0sec
BACK
CH SETUP
1sec
2sec
3sec
5sec
ENTER
SCAN RESUME
2. Press the CH▲/CH▼ key to select “CH
SETUP”.
3. Press the [SELECT] soft key, then select
“SCAN RESUME” with the CH▲/CH▼ key.
4. Press the [SELECT] soft key.
5. Press the CH▲/CH▼ key to select the
desired resume time, default is 2 seconds.
The resume time can be set to “0sec”
through “3sec” or “5sec”. In the “0sec”
selection, the scanner will resume after
another station stops transmitting (carrier
drops).
6. Press the [ENTER] soft key to store the new setting.
7. Press the CLR key to return to radio operation.
Page 90
HX870
13.5 PRIORITY CHANNEL
By default the radio priority channel is set to Channel 16. This procedure allows
the radio to use a different priority channel used when priority scanning.
1. Press the MENU key to display “MENU”, then
select “SETUP” with the CH▲/CH▼/◄/►
key.
DSC SETUP
GM SETUP
BACK
SETUP
WAYPOINT SETUP
CH SETUP
GPS SETUP
ATIS SETUP
SELECT
CH GROUP
WX ALERT
SCAN MEMORY
SCAN TYPE
SCAN RESUME
PRIORITY CH
SUB CH
CH SETUP
BACK SELECT
ON
CH:16
BACK
CH SETUP
CH:17
CH:18A
CH:19
CH:20
ENTER
PRIORITY CH
2. Press the CH▲/CH▼ key to select “CH
SETUP”.
3. Press the [SELECT] soft key, then select
“PRIORITY CH” with the CH▲/CH▼ key.
4. Press the [SELECT] soft key.
5. Press the CH▲/CH▼ key to select the
desired channel to be a priority.
6. Press the [ENTER] soft key to store the new
setting.
7. Press the CLR key to return to radio opera-
tion.
13.6 WEATHER ALERT
Enables/disables the NOAA Weather Alert function. The default setting is “ON”.
1. Press the MENU key to display “MENU”, then
select “SETUP” with the CH▲/CH▼/◄/►
key.
DSC SETUP
GM SETUP
BACK
SETUP
WAYPOINT SETUP
CH SETUP
GPS SETUP
ATIS SETUP
SELECT
CH GROUP
WX ALERT
SCAN MEMORY
SCAN TYPE
SCAN RESUME
PRIORITY CH
SUB CH
CH SETUP
BACK SELECT
ON
OFF
BACK
CH SETUP
ON
ENTER
WX ALERT
2. Press the CH▲/CH▼ key to select “CH
SETUP”.
3. Press the [SELECT] soft key, then select
“WX ALERT” with the CH▲/CH▼ key.
4. Press the [SELECT] soft key.
5. Press the CH▲/CH▼ key to select “ON” or
“OFF”.
6. Press the [ENTER] soft key to store the
selected level.
7. Press the CLR key to return to radio opera-
tion.
Page 91
HX870
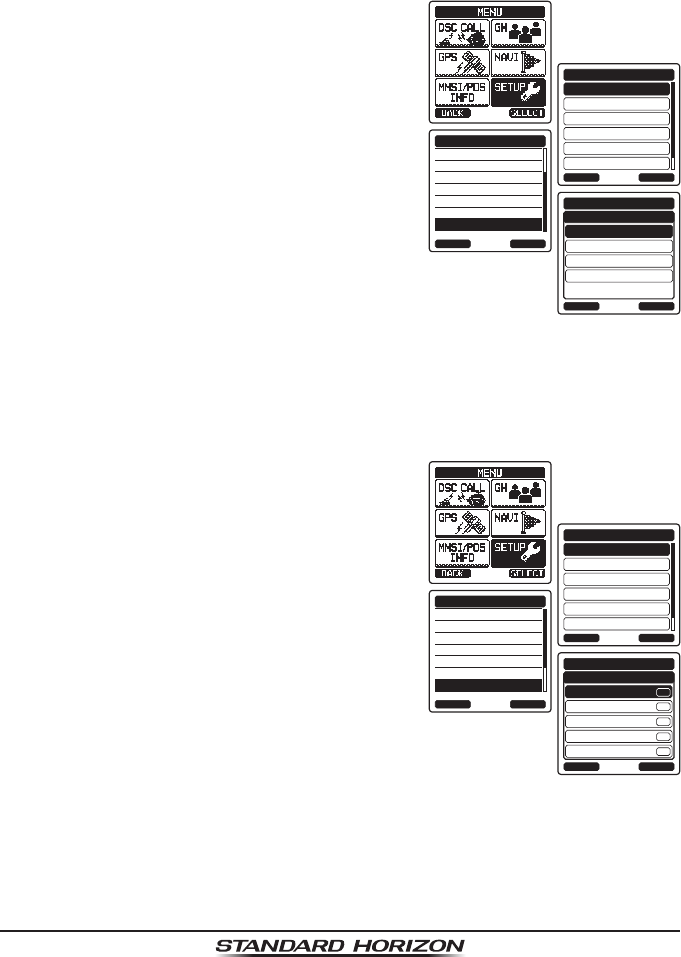
13.7 CHANNEL NAME
When the radio (“Normal”) mode is selected, the display will show a name under
the channel number. This name describes the use of the channel. The radio
has the capability to customize the name by the procedure below.
Example: CH69 PLEASURE to HOOKUP
1. Press the MENU key to display “MENU”, then
select “SETUP” with the CH▲/CH▼/◄/►
key.
DSC SETUP
GM SETUP
BACK
SETUP
WAYPOINT SETUP
CH SETUP
GPS SETUP
ATIS SETUP
SELECT
PRIORITY CH
SUB CH
CH NAME
NOISE CANCEL
VOX
VOX LEVEL
VOX DELAY
CH SETUP
BACK SELECT
16:DISTRESS
BACK
CH SETUP
17:SAR
18A COMMERCIAL
19:COMMERCIAL
20:PORT OPERATI
SELECT
CH NAME
BACK SELECTFINISH
CH SETUP
CH NAME
ZY 1 2
a&
[
3 4 5 6 7 8 9 0
NM O P Q R ST U V W X
BA C D E F G H I J K L
Delete
DISTRTESS-------
16:SHIP WRECK
BACK
CH SETUP
17:SAR
18A COMMERCIAL
19:COMMERCIAL
20:PORT OPERATI
SELECT
CH NAME
2. Press the CH▲/CH▼ key to select “CH
SETUP”.
3. Press the [SELECT] soft key, then select
“CH NAME” with the CH▲/CH▼ key.
4. Press the [SELECT] soft key.
5. Press the CH▲/CH▼ key to select the chan-
nel to be named, then press the [SELECT]
soft key.
6. Press the CH▲/CH▼ key to scroll through
the rst letter of the new channel name.
7. Press the [SELECT] soft key to store the
rst letter in the name and step to the next
letter to the right.
8. Repeat step 6 and 7 until the name is
complete. The name can consist of up to 16
characters, if you do not use all 16 charac-
ters, select “→” to move to the next space.
This method can also be used to enter a
blank space in the name. If a mistake was
made entering in the name repeatedly press
the [BACK] key until the wrong character is
selected, then press the CH▲/CH▼ key to
correct the entry.
9. Press the [FINISH] soft key to save the name.
10. If you want to enter the name of another channel, repeat the steps 5 through
9.
11. Press the CLR key to return to radio operation.

Page 92
HX870
13.8 SUMMARY OF THE CANNEL FUNCTION SETUP
Item Description Default Value
CH GROUP Selects a channel group USA: USA
EU: INTL
WX ALERT Switches on and off of the weather alert
function On
SCAN MEMORY Selects a channel for scan memory −
SCAN TYPE Switches the priority scan and memory
scan PRI SCAN
SCAN RESUME Sets the resume time of scanning
PRIORITY CH Selects a priority channel CH16
SUB CH Selects a sub channel CH09
CH NAME Sets the name of memory channels −
NOISE CANCEL Switches on and off of noise cancelling
function (independently available for trans-
mission and reception)
Off
VOX Switches on and off of the VOX function Off
VOX LEVEL Selects a VOX gain LOW
VOX DELAY Selects a VOX delay time 3 sec

Page 93
HX870
14 DSC SETUP
14.1 INDIVIDUAL DIRECTORY
The HX870 has a DSC directory that allows you to store a vessel or person’s
name and the MMSI number associated with vessels you wish to transmit
individual calls, position requests and position report transmissions.
To transmit an individual call you must program this directory with information
of the persons you wish to call, similar to a cellular phones telephone directory.
Refer to section “10.5.1 Setting up the Individual / Position Call Directory”
for details.
14.2 INDIVIDUAL REPLY
This menu item sets up the radio to automatically (default setting) or manually
respond to a DSC Individual call requesting you to switch to a working channel
for voice communications. When “MANUAL” is selected the MMSI of the calling
vessel is shown allowing you to see who is calling. This function is similar to
caller id on a cellular phone.
Refer to section “10.5.2 Setting up the Individual Call Reply” for details.
14.3 INDIVIDUAL ACKNOWLEDGMENT
The radio can be setup to transmit a reply automatically (default) or set so the
radio will not reply to an individual call.
Refer to section “10.5.3 Enabling the Individual Call Acknowledgment” for
details.
14.4 INDIVIDUAL RINGER
The radio can be setup to ring like a telephone to alert you the radio received
a DSC individual call. The default setting is 2 minutes, however this can be
changed to 15, 10 or 5 seconds with the procedure below.
Refer to section “10.5.6 Setting up the Individual Call Ringer” for details.
14.5 GROUP DIRECTORY
For this function to operate, the same group MMSI must be programmed into all
the DSC VHF radios within the group of vessels that will be using this feature.
Refer to section “10.6.1 Setting up a Group Call” for details.

Page 94
HX870
14.6 POSITION REPLY
The HX870 can be set up to automatically (default setting) or manually send
your position when requested by another vessel. This selection is important
if you are concerned about someone polling the position of your vessel that
you may not want to. In the manual mode you will see the MMSI or persons
name shown on the display allowing you to choose to send your position to
the requesting vessel.
Refer to section “10.7.1 Setting up a Position Request Reply” for details.
14.7 AUTO POS POLLING
The HX870 has the capability to automatically track four stations programmed
into the individual directory.
Refer to section “10.10 AUTO POS POLLING” for details.
14.8 AUTO POS INTERVAL
The HX870 has the capability to automatically track four stations programmed
into the individual directory.
Selecting the auto position polling time interval between position request trans-
missions to be setup.
Refer to section “10.10.1 Setting up the Polling Time Interval” for details.
14.9 AUTO CH CHANGE
When a DSC distress or an all ships (urgency or safety) call is received, the
HX870 will automatically switch to Channel 16.
This menu selection allows the automatic switch time to be changed. The
default selection is 30 seconds.
1. Press the MENU key to display “MENU”, then
select “SETUP” with the CH▲/CH▼/◄/►
key.
DSC SETUP
GM SETUP
BACK
SETUP
WAYPOINT SETUP
CH SETUP
GPS SETUP
ATIS SETUP
SELECT
INDIVIDUAL ACK.
INDIVIDUAL RING
GROUP DIR.
POSITION REPLY
DSC BEEP
CH SWITCH TIMER
NO ACT TIMER
DSC SETUP
BACK SELECT
DEFAULT
BACK
DSC SETUP
5min
10min
15min
ENTER
CH SWITCH TIMER
2. Press the CH▲/CH▼ key to select “DSC
SETUP”.
3. Press the [SELECT] soft key, then select “CH
SWITCH TIMER” with the CH▲/CH▼ key.
4. Press the [SELECT] soft key, then press the
CH▲/CH▼ key to select the desired time
and press the [ENTER] soft key.
5. Press the CLR key to return to radio opera-
tion.
Page 95
HX870
14.10 NO ACT TIMER
If a key is not pressed during the distress operation, the HX870 will automati-
cally return to radio operation.
The default selection is 15 seconds.
1. Press the MENU key to display “MENU”, then
select “SETUP” with the CH▲/CH▼/◄/►
key.
DSC SETUP
GM SETUP
BACK
SETUP
WAYPOINT SETUP
CH SETUP
GPS SETUP
ATIS SETUP
SELECT
INDIVIDUAL ACK.
INDIVIDUAL RING
GROUP DIR.
POSITION REPLY
DSC BEEP
CH SWITCH TIMER
NO ACT TIMER
DSC SETUP
BACK SELECT
DEFAULT
BACK
DSC SETUP
5min
10min
15min
ENTER
NO ACT TIMER
2. Press the CH▲/CH▼ key to select “DSC
SETUP”.
3. Press the [SELECT] soft key, then select
“NO ACT TIMER” with the CH▲/CH▼ key.
4. Press the [SELECT] soft key, then press the
CH▲/CH▼ key to select the desired time
and press the [ENTER] soft key.
5. Press the CLR key to return to radio opera-
tion.
14.11 DSC BEEP
This feature allows the alarm beeps to be turned on (default setting) or off when
a DSC call is received. The DSC calls that can be customized are: individual,
group, all ships, position request, and position report.
1. Press the MENU key to display “MENU”, then
select “SETUP” with the CH▲/CH▼/◄/►
key.
DSC SETUP
GM SETUP
BACK
SETUP
WAYPOINT SETUP
CH SETUP
GPS SETUP
ATIS SETUP
SELECT
INDIVIDUAL DIR.
INDIVIDUAL REPLY
INDIVIDUAL ACK.
INDIVIDUAL RING
GROUP DIR.
POSITION REPLY
DSC BEEP
DSC SETUP
BACK SELECT
INDIVIDUAL
BACK
DSC SETUP
GROUP
ALL SHIPS
POS REQUEST
POS REPORT
SELECT
DSC BEEP
ON
ON
ON
ON
ON
2. Press the CH▲/CH▼ key to select “DSC
SETUP” menu.
3. Press the [SELECT] soft key, then select
“DSC BEEP” with the CH▲/CH▼ key.
4. Press the [SELECT] soft key, then press the
CH▲/CH▼ key to select the desired DSC
call type and press the [ENTER] soft key.
5. Press the CH▲/CH▼ key to turn “ON”
or “OFF” the DSC beep and press the
[SELECT] soft key.
6. Press the CLR key to return to radio opera-
tion.