ZyXEL Communications P660HWD1V2 802.11g WIRELESS ADSL2+ 4-PORT GATEWAY User Manual P 660H HW W T Series V3 40 User s Guide
ZyXEL Communications Corporation 802.11g WIRELESS ADSL2+ 4-PORT GATEWAY P 660H HW W T Series V3 40 User s Guide
Contents
users manual 4

P-660H/HW-D Series User’s Guide
Chapter 10 Firewall Configuration 158
4Does a rule that allows Internet users access to resources on the LAN create a security
vulnerability? For example, if FTP ports (TCP 20, 21) are allowed from the Internet to the
LAN, Internet users may be able to connect to computers with running FTP servers.
5Does this rule conflict with any existing rules?
6Once these questions have been answered, adding rules is simply a matter of plugging the
information into the correct fields in the web configurator screens.
10.3.3 Key Fields For Configuring Rules
10.3.3.1 Action
Should the action be to Drop, Reject or Permit?
Note: “Drop” means the firewall silently discards the packet. “Reject” means the
firewall discards packets and sends an ICMP destination-unreachable
message to the sender.
10.3.3.2 Service
Select the service from the Service scrolling list box. If the service is not listed, it is necessary
to first define it. See Section 10.8 on page 170 for more information on predefined services.
10.3.3.3 Source Address
What is the connection’s source address; is it on the LAN or WAN? Is it a single IP, a range of
IPs or a subnet?
10.3.3.4 Destination Address
What is the connection’s destination address; is it on the LAN or WAN? Is it a single IP, a
range of IPs or a subnet?
10.4 Connection Direction
This section describes examples for firewall rules for connections going from LAN to WAN
and from WAN to LAN.
LAN to LAN/ Router and WAN to WAN/ Router rules apply to packets coming in on the
associated interface (LAN or WAN respectively). LAN to LAN/ Router means policies for
LAN-to-ZyXEL Device (the policies for managing the ZyXEL Device through the LAN
interface) and policies for LAN-to-LAN (the policies that control routing between two subnets
on the LAN). Similarly, WAN to WAN/ Router polices apply in the same way to the WAN
port.
P-660H/HW-D Series User’s Guide
159 Chapter 10 Firewall Configuration
10.4.1 LAN to WAN Rules
The default rule for LAN to WAN traffic is that all users on the LAN are allowed non-
restricted access to the WAN. When you configure a LAN to WAN rule, you in essence want
to limit some or all users from accessing certain services on the WAN. WAN to LAN Rules
The default rule for WAN to LAN traffic blocks all incoming connections (WAN to LAN). If
you wish to allow certain WAN users to have access to your LAN, you will need to create
custom rules to allow it.
10.4.2 Alerts
Alerts are reports on events, such as attacks, that you may want to know about right away. You
can choose to generate an alert when a rule is matched in the Edit Rule screen (see Figure 88
on page 163). When an event generates an alert, a message can be immediately sent to an e-
mail account that you specify in the Log Settings screen. Refer to the chapter on logs for
details
10.5 General Firewall Policy
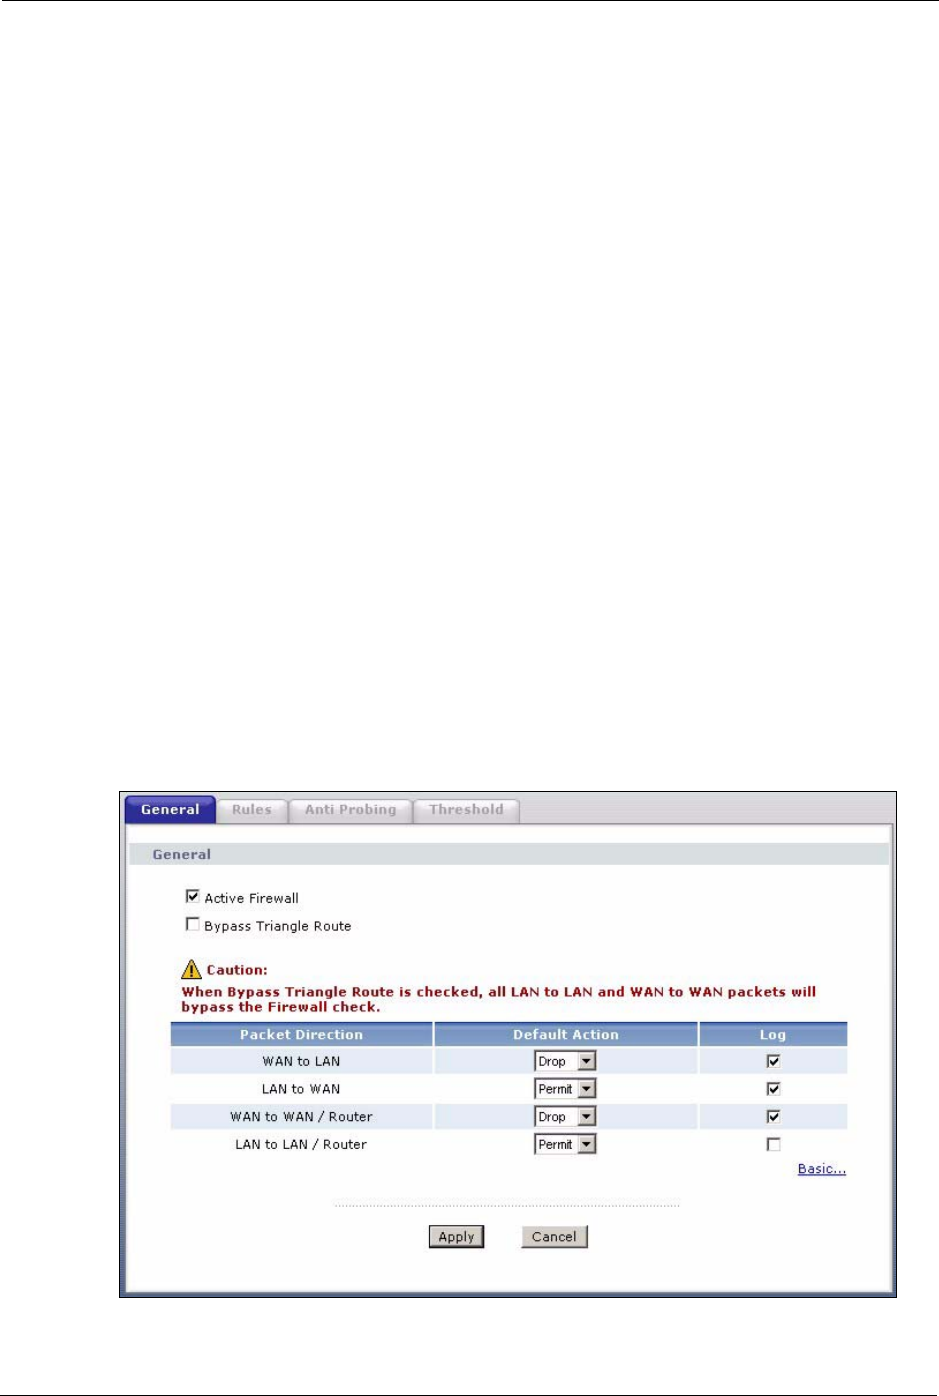
Click Security > Firewall to display the following screen. Activate the firewall by selecting
the Active Firewall check box as seen in the following screen.
Refer to Section 9.1 on page 144 for more information.
Figure 86 Firewall: General
P-660H/HW-D Series User’s Guide
Chapter 10 Firewall Configuration 160
The following table describes the labels in this screen.
10.6 Firewall Rules Summary
Note: The ordering of your rules is very important as rules are applied in turn.
Refer to Section 9.1 on page 144 for more information.
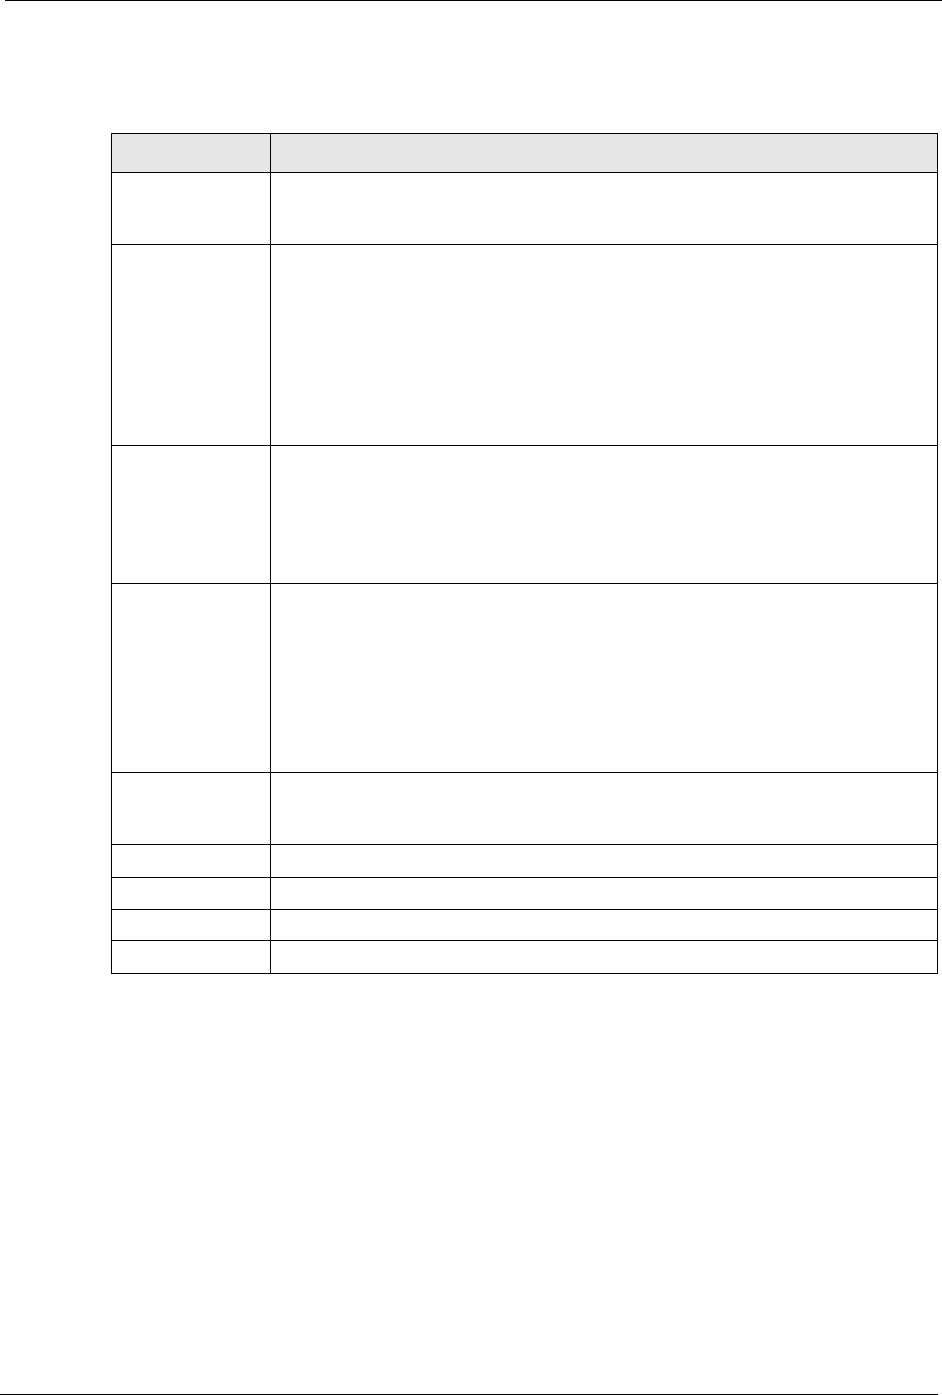
Click Security > Firewall > Rules to bring up the following screen. This screen displays a list
of the configured firewall rules. Note the order in which the rules are listed.
Table 56 Firewall: General
LABEL DESCRIPTION
Active Firewall Select this check box to activate the firewall. The ZyXEL Device performs access
control and protects against Denial of Service (DoS) attacks when the firewall is
activated.
Bypass Triangle
Route
Select this check box to have the ZyXEL Device firewall permit the use of triangle
route topology on the network. See the appendix for more on triangle route
topology.
Note: Allowing asymmetrical routes may let traffic from the WAN go
directly to a LAN computer without passing through the
router. See Appendix N on page 350 for more on triangle
route topology and how to deal with this problem.
Packet Direction This is the direction of travel of packets (LAN to LAN / Router, LAN to WAN,
WAN to WAN / Router, WAN to LAN).
Firewall rules are grouped based on the direction of travel of packets to which they
apply. For example, LAN to LAN / Router means packets traveling from a
computer/subnet on the LAN to either another computer/subnet on the LAN
interface of the ZyXEL Device or the ZyXEL Device itself.
Default Action Use the drop-down list boxes to select the default action that the firewall is take on
packets that are traveling in the selected direction and do not match any of the
firewall rules.
Select Drop to silently discard the packets without sending a TCP reset packet or
an ICMP destination-unreachable message to the sender.
Select Reject to deny the packets and send a TCP reset packet (for a TCP packet)
or an ICMP destination-unreachable message (for a UDP packet) to the sender.
Select Permit to allow the passage of the packets.
Log Select the check box to create a log (when the above action is taken) for packets
that are traveling in the selected direction and do not match any of your customized
rules.
Expand... Click this button to display more information.
Basic... Click this button to display less information.
Apply Click Apply to save your changes back to the ZyXEL Device.
Cancel Click Cancel to begin configuring this screen afresh.
P-660H/HW-D Series User’s Guide
161 Chapter 10 Firewall Configuration
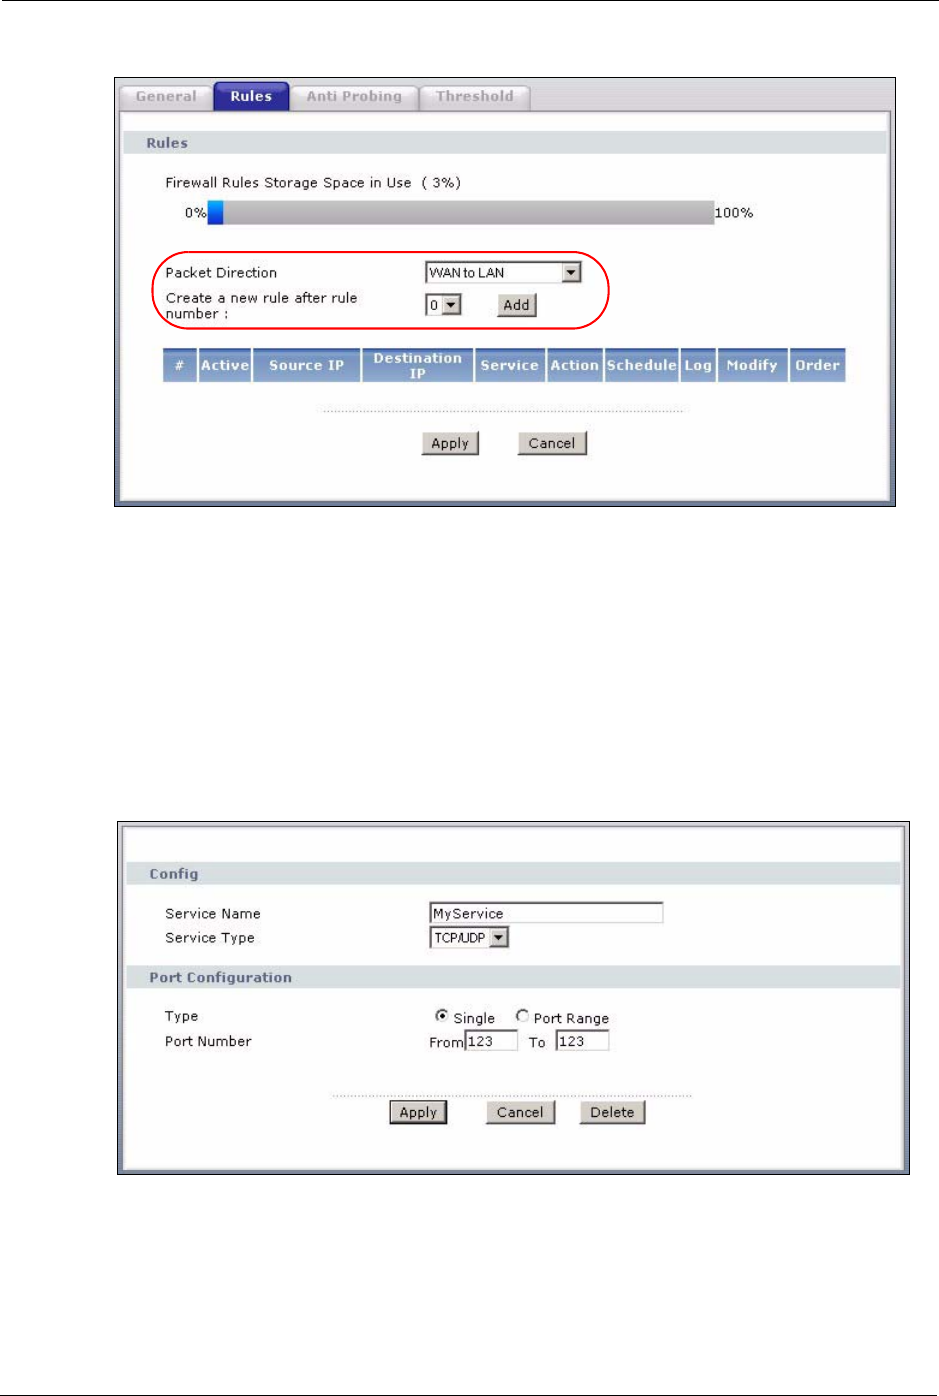
Figure 87 Firewall Rules
The following table describes the labels in this screen.
Table 57 Firewall Rules
LABEL DESCRIPTION
Firewall Rules
Storage Space
in Use
This read-only bar shows how much of the ZyXEL Device's memory for recording
firewall rules it is currently using. When you are using 80% or less of the storage
space, the bar is green. When the amount of space used is over 80%, the bar is red.
Packet Direction Use the drop-down list box to select a direction of travel of packets for which you
want to configure firewall rules.
Create a new
rule after rule
number
Select an index number and click Add to add a new firewall rule after the selected
index number. For example, if you select “6”, your new rule becomes number 7 and
the previous rule 7 (if there is one) becomes rule 8.
The following read-only fields summarize the rules you have created that apply to
traffic traveling in the selected packet direction. The firewall rules that you configure
(summarized below) take priority over the general firewall action settings in the
General screen.
#This is your firewall rule number. The ordering of your rules is important as rules are
applied in turn.
Active This field displays whether a firewall is turned on or not. Select the check box to
enable the rule. Clear the check box to disable the rule.
Source IP This drop-down list box displays the source addresses or ranges of addresses to
which this firewall rule applies. Please note that a blank source or destination
address is equivalent to Any.
Destination IP This drop-down list box displays the destination addresses or ranges of addresses to
which this firewall rule applies. Please note that a blank source or destination
address is equivalent to Any.
Service This drop-down list box displays the services to which this firewall rule applies. See
Section 10.8 on page 170 for more information.
P-660H/HW-D Series User’s Guide
Chapter 10 Firewall Configuration 162
10.6.1 Configuring Firewall Rules
Refer to Section 9.1 on page 144 for more information.
In the Rules screen, select an index number and click Add or click a rule’s Edit icon to display
this screen and refer to the following table for information on the labels.
Action This field displays whether the firewall silently discards packets (Drop), discards
packets and sends a TCP reset packet or an ICMP destination-unreachable
message to the sender (Reject) or allows the passage of packets (Permit)
Schedule This field tells you whether a schedule is specified (Yes) or not (No).
Log This field shows you whether a log is created when packets match this rule (Yes) or
not (No).
Modify Click the Edit icon to go to the screen where you can edit the rule.
Click the Remove icon to delete an existing firewall rule. A window displays asking
you to confirm that you want to delete the firewall rule. Note that subsequent firewall
rules move up by one when you take this action.
Order Click the Move icon to display the Move the rule to field. Type a number in the Move
the rule to field and click the Move button to move the rule to the number that you
typed. The ordering of your rules is important as they are applied in order of their
numbering.
Apply Click Apply to save your changes back to the ZyXEL Device.
Cancel Click Cancel to begin configuring this screen afresh.
Table 57 Firewall Rules (continued)
LABEL DESCRIPTION
P-660H/HW-D Series User’s Guide
163 Chapter 10 Firewall Configuration
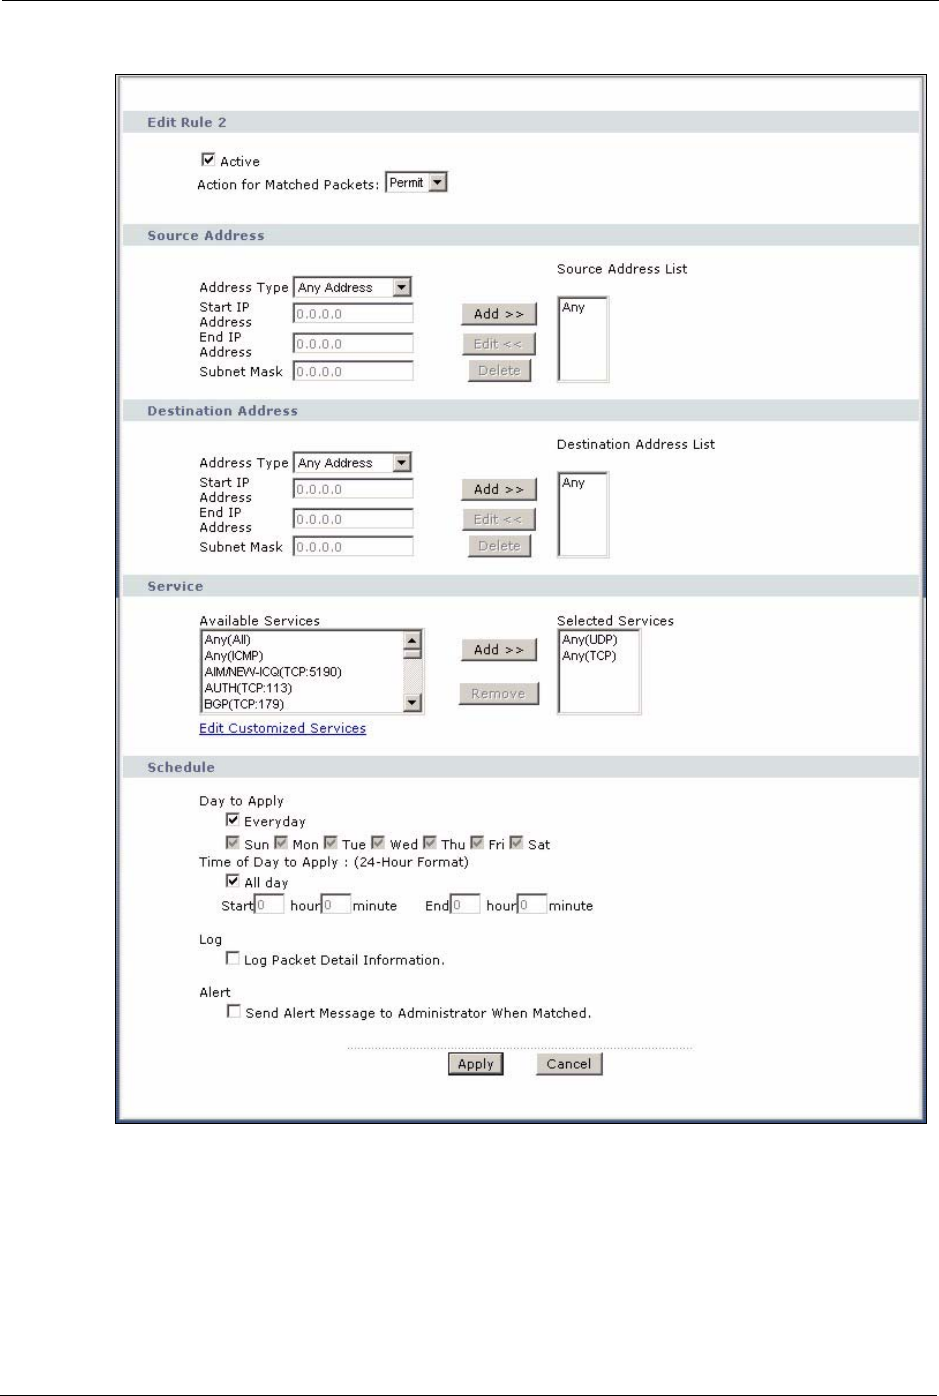
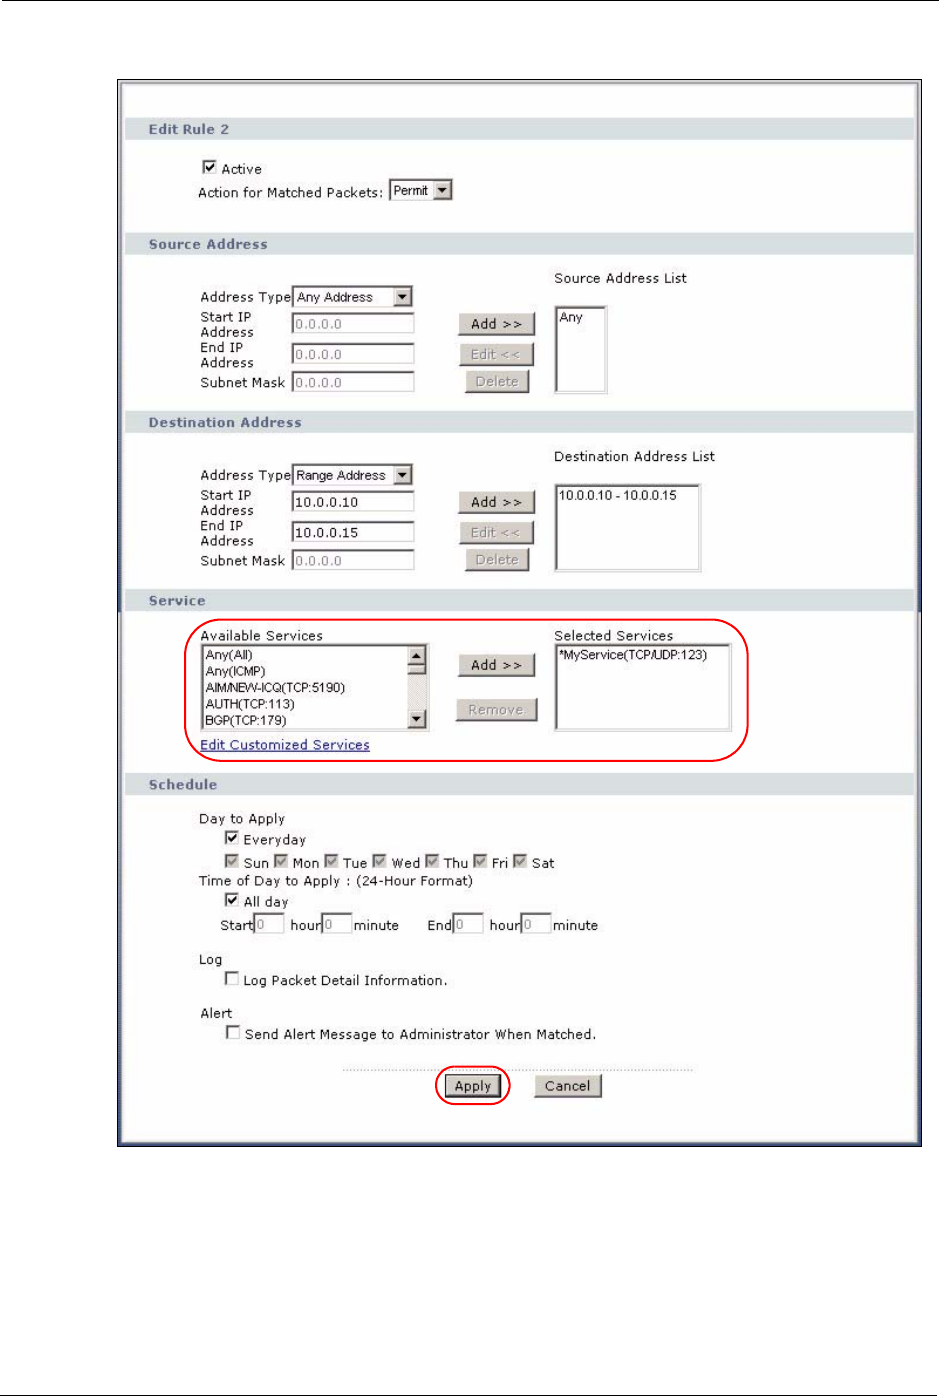
Figure 88 Firewall: Edit Rule
P-660H/HW-D Series User’s Guide
Chapter 10 Firewall Configuration 164
The following table describes the labels in this screen.
Table 58 Firewall: Edit Rule
LABEL DESCRIPTION
Active Select this option to enable this firewall rule.
Action for Matched
Packet
Use the drop-down list box to select what the firewall is to do with packets that
match this rule.
Select Drop to silently discard the packets without sending a TCP reset packet
or an ICMP destination-unreachable message to the sender.
Select Reject to deny the packets and send a TCP reset packet (for a TCP
packet) or an ICMP destination-unreachable message (for a UDP packet) to the
sender.
Select Permit to allow the passage of the packets.
Source/Destination
Address
Address Type Do you want your rule to apply to packets with a particular (single) IP, a range of
IP addresses (e.g., 192.168.1.10 to 192.169.1.50), a subnet or any IP address?
Select an option from the drop-down list box that includes: Single Address,
Range Address, Subnet Address and Any Address.
Start IP Address Enter the single IP address or the starting IP address in a range here.
End IP Address Enter the ending IP address in a range here.
Subnet Mask Enter the subnet mask here, if applicable.
Add >> Click Add >> to add a new address to the Source or Destination Address box.
You can add multiple addresses, ranges of addresses, and/or subnets.
Edit << To edit an existing source or destination address, select it from the box and click
Edit <<.
Delete Highlight an existing source or destination address from the Source or
Destination Address box above and click Delete to remove it.
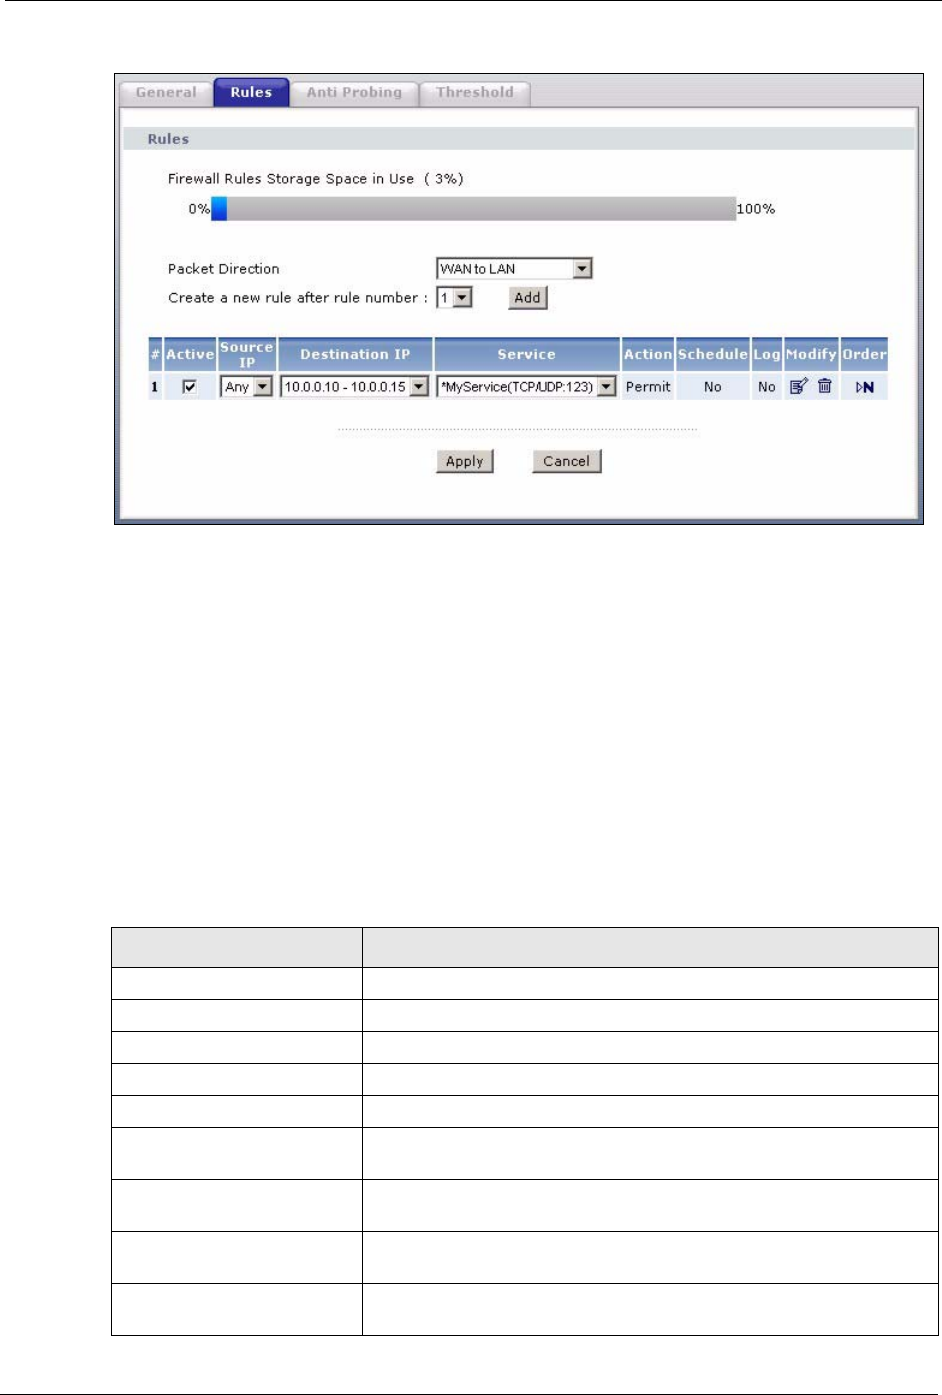
Services
Available/ Selected
Services
Please see Section 10.8 on page 170 for more information on services available.
Highlight a service from the Available Services box on the left, then click Add
>> to add it to the Selected Services box on the right. To remove a service,
highlight it in the Selected Services box on the right, then click Remove.
Edit Customized
Service
Click the Edit Customized Services link to bring up the screen that you use to
configure a new custom service that is not in the predefined list of services.
Schedule
Day to Apply Select everyday or the day(s) of the week to apply the rule.
Time of Day to
Apply (24-Hour
Format)
Select All Day or enter the start and end times in the hour-minute format to apply
the rule.
Log
Log Packet Detail
Information
This field determines if a log for packets that match the rule is created or not. Go
to the Log Settings page and select the Access Control logs category to have
the ZyXEL Device record these logs.
Alert
Send Alert Message
to Administrator
When Matched
Select the check box to have the ZyXEL Device generate an alert when the rule
is matched.
P-660H/HW-D Series User’s Guide
165 Chapter 10 Firewall Configuration
10.6.2 Customized Services
Configure customized services and port numbers not predefined by the ZyXEL Device. For a
comprehensive list of port numbers and services, visit the IANA (Internet Assigned Number
Authority) website. For further information on these services, please read Section 10.8 on page
170. Click the Edit Customized Services link while editing a firewall rule to configure a
custom service port. This displays the following screen.
Refer to Section 9.1 on page 144 for more information.
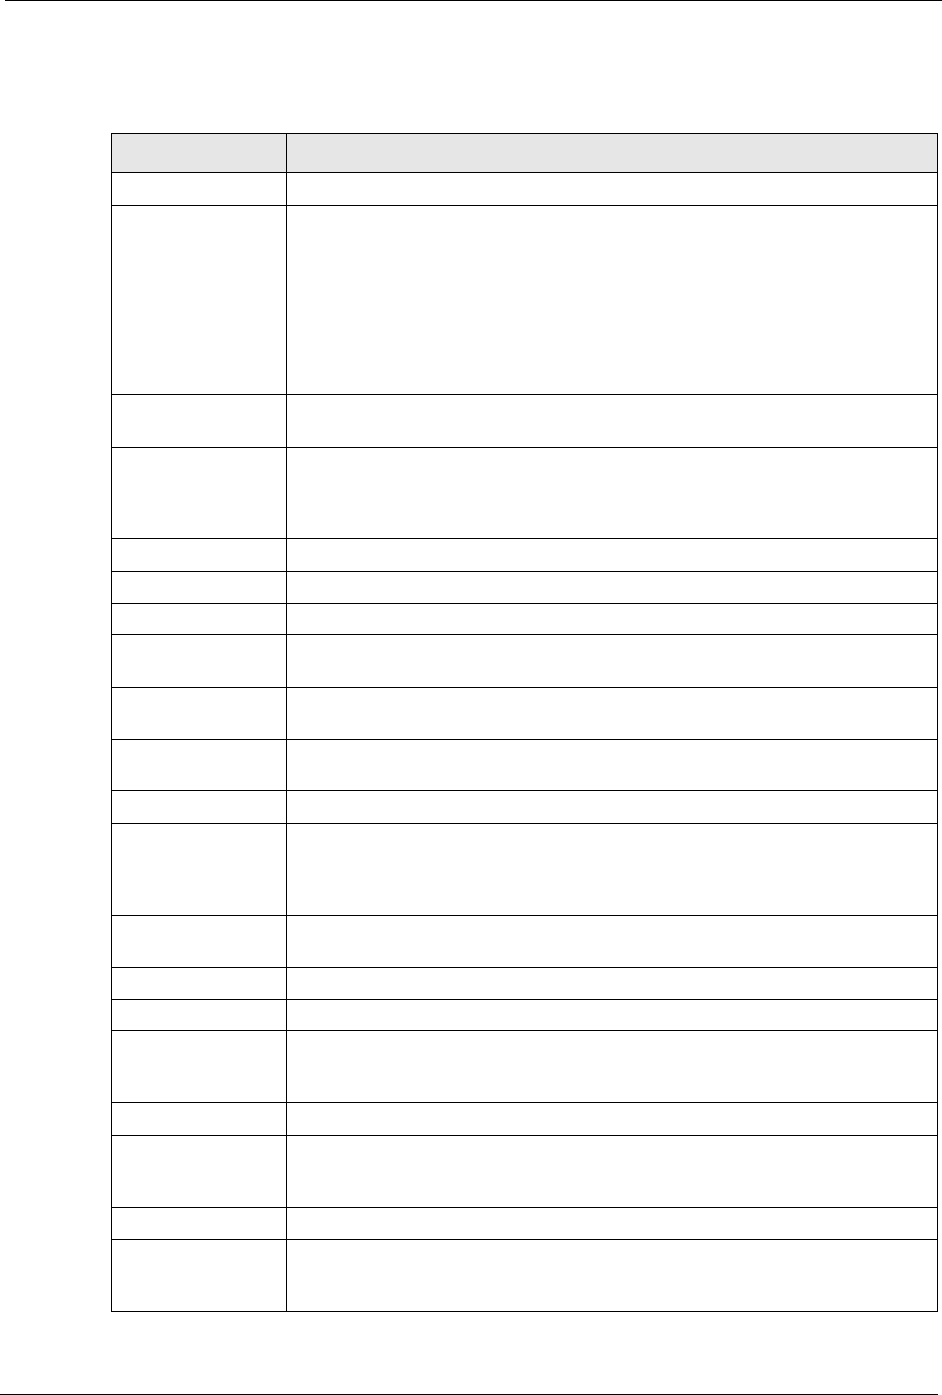
Figure 89 Firewall: Customized Services
The following table describes the labels in this screen.
Apply Click Apply to save your customized settings and exit this screen.
Cancel Click Cancel to exit this screen without saving.
Table 58 Firewall: Edit Rule (continued)
LABEL DESCRIPTION
Table 59 Customized Services
LABEL DESCRIPTION
No. This is the number of your customized port. Click a rule’s number of a service to go to a
screen where you can configure or edit a customized service. See Section 10.6.3 on
page 166 for more information.
Name This is the name of your customized service.
Protocol This shows the IP protocol (TCP, UDP or TCP/UDP) that defines your customized
service.
Port This is the port number or range that defines your customized service.
Back Click Back to return the Firewall Edit Rule screen.
P-660H/HW-D Series User’s Guide
Chapter 10 Firewall Configuration 166
10.6.3 Configuring A Customized Service
Click a rule number in the Firewall Customized Services screen to create a new custom port
or edit an existing one. This action displays the following screen.
Refer to Section 9.1 on page 144 for more information.
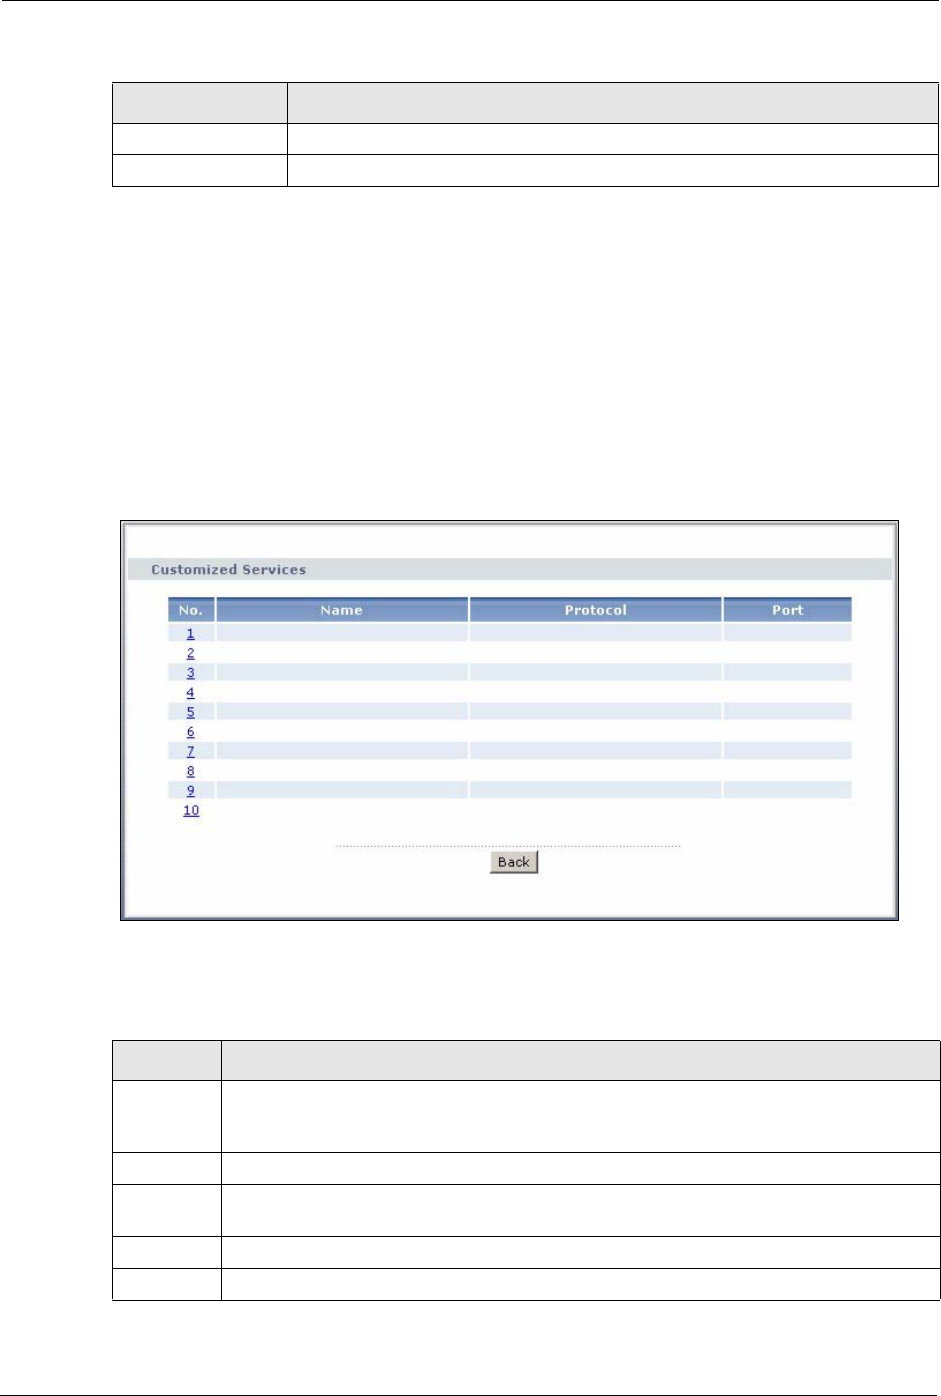
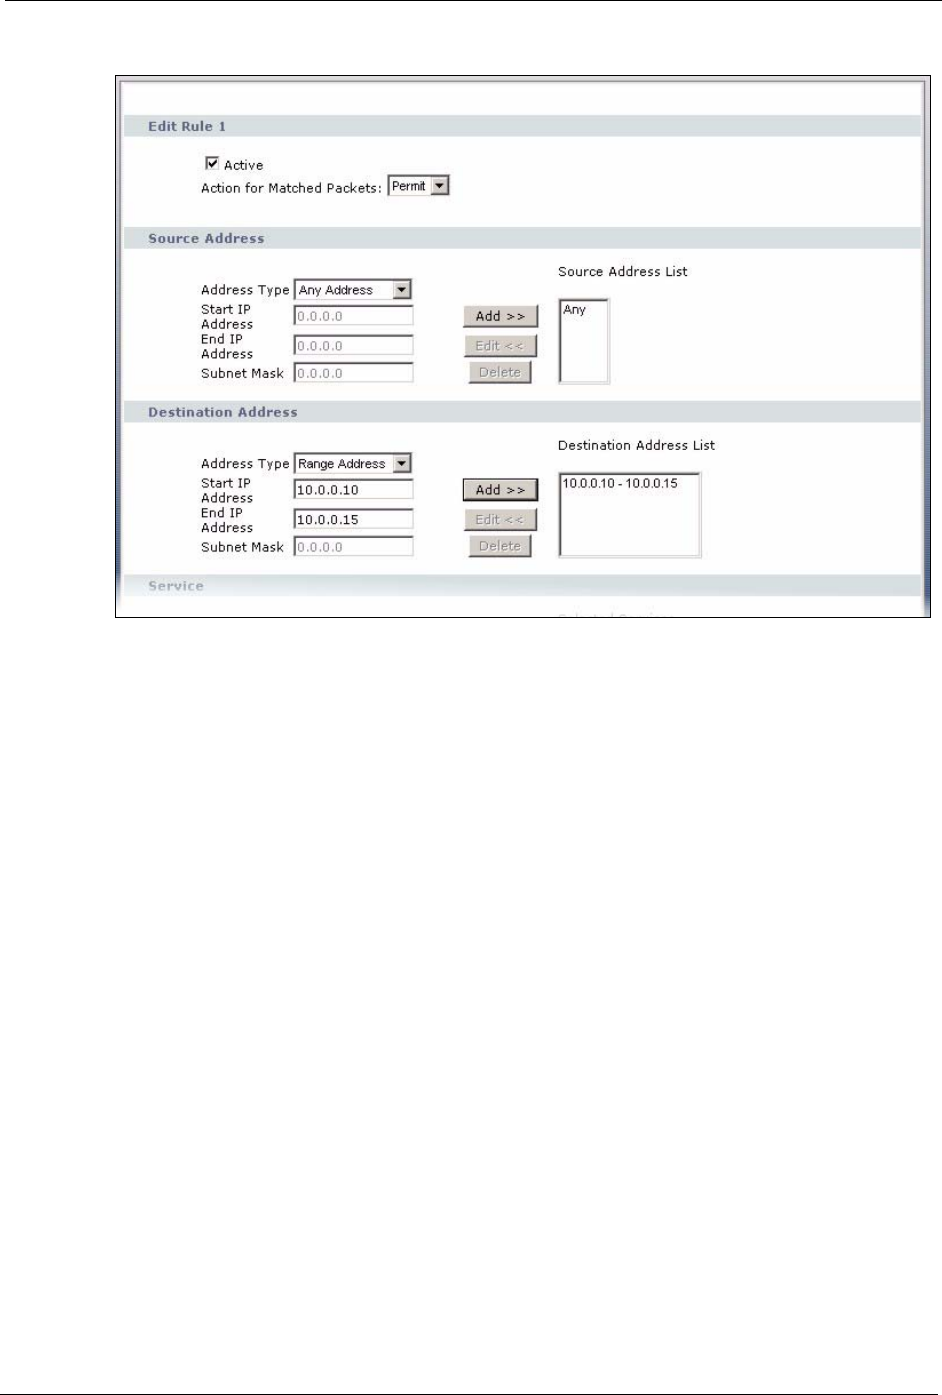
Figure 90 Firewall: Configure Customized Services
The following table describes the labels in this screen.
10.7 Example Firewall Rule
The following Internet firewall rule example allows a hypothetical “MyService” connection
from the Internet.
1Click Security > Firewall > Rules.
2Select WAN to LAN in the Packet Direction field.
Table 60 Firewall: Configure Customized Services
LABEL DESCRIPTION
Service Name Type a unique name for your custom port.
Service Type Choose the IP port (TCP, UDP or TCP/UDP) that defines your customized port from
the drop down list box.
Port Configuration
Type Click Single to specify one port only or Range to specify a span of ports that define
your customized service.
Port Number Type a single port number or the range of port numbers that define your customized
service.
Apply Click Apply to save your customized settings and exit this screen.
Cancel Click Cancel to return to the previous screen.
Delete Click Delete to delete the current rule and return to the previous screen.
P-660H/HW-D Series User’s Guide
167 Chapter 10 Firewall Configuration
Figure 91 Firewall Example: Rules
3In the Rules screen, select the index number after that you want to add the rule. For
example, if you select “6”, your new rule becomes number 7 and the previous rule 7 (if
there is one) becomes rule 8.
4Click Add to display the firewall rule configuration screen.
5In the Edit Rule screen, click the Edit Customized Services link to open the
Customized Service screen.
6Click an index number to display the Customized Services Config screen and configure
the screen as follows and click Apply.
Figure 92 Edit Custom Port Example
7Select Any in the Destination Address box and then click Delete.
8Configure the destination address screen as follows and click Add.
P-660H/HW-D Series User’s Guide
Chapter 10 Firewall Configuration 168
Figure 93 Firewall Example: Edit Rule: Destination Address
9Use the Add >> and Remove buttons between Available Services and Selected Services
list boxes to configure it as follows. Click Apply when you are done.
Note: Custom services show up with an “*” before their names in the Services list
box and the Rules list box.
P-660H/HW-D Series User’s Guide
169 Chapter 10 Firewall Configuration
Figure 94 Firewall Example: Edit Rule: Select Customized Services
On completing the configuration procedure for this Internet firewall rule, the Rules screen
should look like the following.
Rule 1 allows a “MyService” connection from the WAN to IP addresses 10.0.0.10 through
10.0.0.15 on the LAN.
P-660H/HW-D Series User’s Guide
Chapter 10 Firewall Configuration 170
Figure 95 Firewall Example: Rules: MyService
10.8 Predefined Services
The Available Services list box in the Edit Rule screen (see Section 10.6.1 on page 162)
displays all predefined services that the ZyXEL Device already supports. Next to the name of
the service, two fields appear in brackets. The first field indicates the IP protocol type (TCP,
UDP, or ICMP). The second field indicates the IP port number that defines the service. (Note
that there may be more than one IP protocol type. For example, look at the default
configuration labeled “(DNS)”. (UDP/TCP:53) means UDP port 53 and TCP port 53. Up to 128
entries are supported. Custom service ports may also be configured using the Edit
Customized Services function discussed previously.
Table 61 Predefined Services
SERVICE DESCRIPTION
AIM/NEW_ICQ(TCP:5190) AOL’s Internet Messenger service, used as a listening port by ICQ.
AUTH(TCP:113) Authentication protocol used by some servers.
BGP(TCP:179) Border Gateway Protocol.
BOOTP_CLIENT(UDP:68) DHCP Client.
BOOTP_SERVER(UDP:67) DHCP Server.
CU-SEEME(TCP/UDP:7648,
24032)
A popular videoconferencing solution from White Pines Software.
DNS(UDP/TCP:53) Domain Name Server, a service that matches web names (e.g.
www.zyxel.com) to IP numbers.
FINGER(TCP:79) Finger is a UNIX or Internet related command that can be used to find
out if a user is logged on.
FTP(TCP:20.21) File Transfer Program, a program to enable fast transfer of files,
including large files that may not be possible by e-mail.

P-660H/HW-D Series User’s Guide
171 Chapter 10 Firewall Configuration
H.323(TCP:1720) Net Meeting uses this protocol.
HTTP(TCP:80) Hyper Text Transfer Protocol - a client/server protocol for the world
wide web.
HTTPS HTTPS is a secured http session often used in e-commerce.
ICQ(UDP:4000) This is a popular Internet chat program.
IPSEC_TRANSPORT/
TUNNEL(AH:0)
The IPSEC AH (Authentication Header) tunneling protocol uses this
service.
IPSEC_TUNNEL(ESP:0) The IPSEC ESP (Encapsulation Security Protocol) tunneling protocol
uses this service.
IRC(TCP/UDP:6667) This is another popular Internet chat program.
MSN Messenger(TCP:1863) Microsoft Networks’ messenger service uses this protocol.
MULTICAST(IGMP:0) Internet Group Multicast Protocol is used when sending packets to a
specific group of hosts.
NEWS(TCP:144) A protocol for news groups.
NFS(UDP:2049) Network File System - NFS is a client/server distributed file service that
provides transparent file-sharing for network environments.
NNTP(TCP:119) Network News Transport Protocol is the delivery mechanism for the
USENET newsgroup service.
PING(ICMP:0) Packet INternet Groper is a protocol that sends out ICMP echo
requests to test whether or not a remote host is reachable.
POP3(TCP:110) Post Office Protocol version 3 lets a client computer get e-mail from a
POP3 server through a temporary connection (TCP/IP or other).
PPTP(TCP:1723) Point-to-Point Tunneling Protocol enables secure transfer of data over
public networks. This is the control channel.
PPTP_TUNNEL(GRE:0) Point-to-Point Tunneling Protocol enables secure transfer of data over
public networks. This is the data channel.
RCMD(TCP:512) Remote Command Service.
REAL_AUDIO(TCP:7070) A streaming audio service that enables real time sound over the web.
REXEC(TCP:514) Remote Execution Daemon.
RLOGIN(TCP:513) Remote Login.
RTELNET(TCP:107) Remote Telnet.
RTSP(TCP/UDP:554) The Real Time Streaming (media control) Protocol (RTSP) is a remote
control for multimedia on the Internet.
SFTP(TCP:115) Simple File Transfer Protocol.
SMTP(TCP:25) Simple Mail Transfer Protocol is the message-exchange standard for
the Internet. SMTP enables you to move messages from one e-mail
server to another.
SNMP(TCP/UDP:161) Simple Network Management Program.
SNMP-TRAPS (TCP/
UDP:162)
Traps for use with the SNMP (RFC:1215).
SQL-NET(TCP:1521) Structured Query Language is an interface to access data on many
different types of database systems, including mainframes, midrange
systems, UNIX systems and network servers.
Table 61 Predefined Services (continued)
SERVICE DESCRIPTION

P-660H/HW-D Series User’s Guide
Chapter 10 Firewall Configuration 172
10.9 Anti-Probing
If an outside user attempts to probe an unsupported port on your ZyXEL Device, an ICMP
response packet is automatically returned. This allows the outside user to know the ZyXEL
Device exists. The ZyXEL Device supports anti-probing, which prevents the ICMP response
packet from being sent. This keeps outsiders from discovering your ZyXEL Device when
unsupported ports are probed.
Internet Control Message Protocol (ICMP) is a message control and error-reporting protocol
between a host server and a gateway to the Internet. ICMP uses Internet Protocol (IP)
datagrams, but the messages are processed by the TCP/IP software and directly apparent to the
application user.
Refer to Section 9.1 on page 144 for more information.
Click Security > Firewall > Anti Probing to display the screen as shown.
Figure 96 Firewall: Anti Probing
SSDP(UDP:1900) Simole Service Discovery Protocol (SSDP) is a discovery service
searching for Universal Plug and Play devices on your home network
or upstream Internet gateways using DUDP port 1900.
SSH(TCP/UDP:22) Secure Shell Remote Login Program.
STRMWORKS(UDP:1558) Stream Works Protocol.
SYSLOG(UDP:514) Syslog allows you to send system logs to a UNIX server.
TACACS(UDP:49) Login Host Protocol used for (Terminal Access Controller Access
Control System).
TELNET(TCP:23) Telnet is the login and terminal emulation protocol common on the
Internet and in UNIX environments. It operates over TCP/IP networks.
Its primary function is to allow users to log into remote host systems.
TFTP(UDP:69) Trivial File Transfer Protocol is an Internet file transfer protocol similar
to FTP, but uses the UDP (User Datagram Protocol) rather than TCP
(Transmission Control Protocol).
VDOLIVE(TCP:7000) Another videoconferencing solution.
Table 61 Predefined Services (continued)
SERVICE DESCRIPTION
P-660H/HW-D Series User’s Guide
173 Chapter 10 Firewall Configuration
The following table describes the labels in this screen.
10.10 DoS Thresholds
For DoS attacks, the ZyXEL Device uses thresholds to determine when to drop sessions that
do not become fully established. These thresholds apply globally to all sessions.
You can use the default threshold values, or you can change them to values more suitable to
your security requirements.
Refer to Section 10.10.3 on page 175 to configure thresholds.
10.10.1 Threshold Values
Tune these parameters when something is not working and after you have checked the firewall
counters. These default values should work fine for most small offices. Factors influencing
choices for threshold values are:
• The maximum number of opened sessions.
• The minimum capacity of server backlog in your LAN network.
• The CPU power of servers in your LAN network.
• Network bandwidth.
• Type of traffic for certain servers.
Table 62 Firewall: Anti Probing
LABEL DESCRIPTION
Respond to PING
on
The ZyXEL Device does not respond to any incoming Ping requests when Disable
is selected.
Select LAN to reply to incoming LAN Ping requests.
Select WAN to reply to incoming WAN Ping requests.
Otherwise select LAN & WAN to reply to both incoming LAN and WAN Ping
requests.
Do Not Respond to
Requests for
Unauthorized
Services.
Select this option to prevent hackers from finding the ZyXEL Device by probing for
unused ports. If you select this option, the ZyXEL Device will not respond to port
request(s) for unused ports, thus leaving the unused ports and the ZyXEL Device
unseen. By default this option is not selected and the ZyXEL Device will reply with
an ICMP Port Unreachable packet for a port probe on its unused UDP ports, and a
TCP Reset packet for a port probe on its unused TCP ports.
Note that the probing packets must first traverse the ZyXEL Device's firewall
mechanism before reaching this anti-probing mechanism. Therefore if the firewall
mechanism blocks a probing packet, the ZyXEL Device reacts based on the
corresponding firewall policy to send a TCP reset packet for a blocked TCP packet
or an ICMP port-unreachable packet for a blocked UDP packets or just drop the
packets without sending a response packet.
Apply Click Apply to save your changes back to the ZyXEL Device.
Cancel Click Cancel to begin configuring this screen afresh.

P-660H/HW-D Series User’s Guide
Chapter 10 Firewall Configuration 174
If your network is slower than average for any of these factors (especially if you have servers
that are slow or handle many tasks and are often busy), then the default values should be
reduced.
You should make any changes to the threshold values before you continue configuring
firewall rules.
10.10.2 Half-Open Sessions
An unusually high number of half-open sessions (either an absolute number or measured as
the arrival rate) could indicate that a Denial of Service attack is occurring. For TCP, "half-
open" means that the session has not reached the established state-the TCP three-way
handshake has not yet been completed (see Figure 82 on page 147). For UDP, "half-open"
means that the firewall has detected no return traffic.
The ZyXEL Device measures both the total number of existing half-open sessions and the rate
of session establishment attempts. Both TCP and UDP half-open sessions are counted in the
total number and rate measurements. Measurements are made once a minute.
When the number of existing half-open sessions rises above a threshold (max-incomplete
high), the ZyXEL Device starts deleting half-open sessions as required to accommodate new
connection requests. The ZyXEL Device continues to delete half-open requests as necessary,
until the number of existing half-open sessions drops below another threshold (max-
incomplete low).
When the rate of new connection attempts rises above a threshold (one-minute high), the
ZyXEL Device starts deleting half-open sessions as required to accommodate new connection
requests. The ZyXEL Device continues to delete half-open sessions as necessary, until the rate
of new connection attempts drops below another threshold (one-minute low). The rate is the
number of new attempts detected in the last one-minute sample period.
10.10.2.1 TCP Maximum Incomplete and Blocking Time
An unusually high number of half-open sessions with the same destination host address could
indicate that a Denial of Service attack is being launched against the host.
Whenever the number of half-open sessions with the same destination host address rises above
a threshold (TCP Maximum Incomplete), the ZyXEL Device starts deleting half-open
sessions according to one of the following methods:
• If the Blocking Time timeout is 0 (the default), then the ZyXEL Device deletes the oldest
existing half-open session for the host for every new connection request to the host. This
ensures that the number of half-open sessions to a given host will never exceed the
threshold.
• If the Blocking Time timeout is greater than 0, then the ZyXEL Device blocks all new
connection requests to the host giving the server time to handle the present connections.
The ZyXEL Device continues to block all new connection requests until the Blocking
Time expires.
P-660H/HW-D Series User’s Guide
175 Chapter 10 Firewall Configuration
10.10.3 Configuring Firewall Thresholds
The ZyXEL Device also sends alerts whenever TCP Maximum Incomplete is exceeded. The
global values specified for the threshold and timeout apply to all TCP connections.
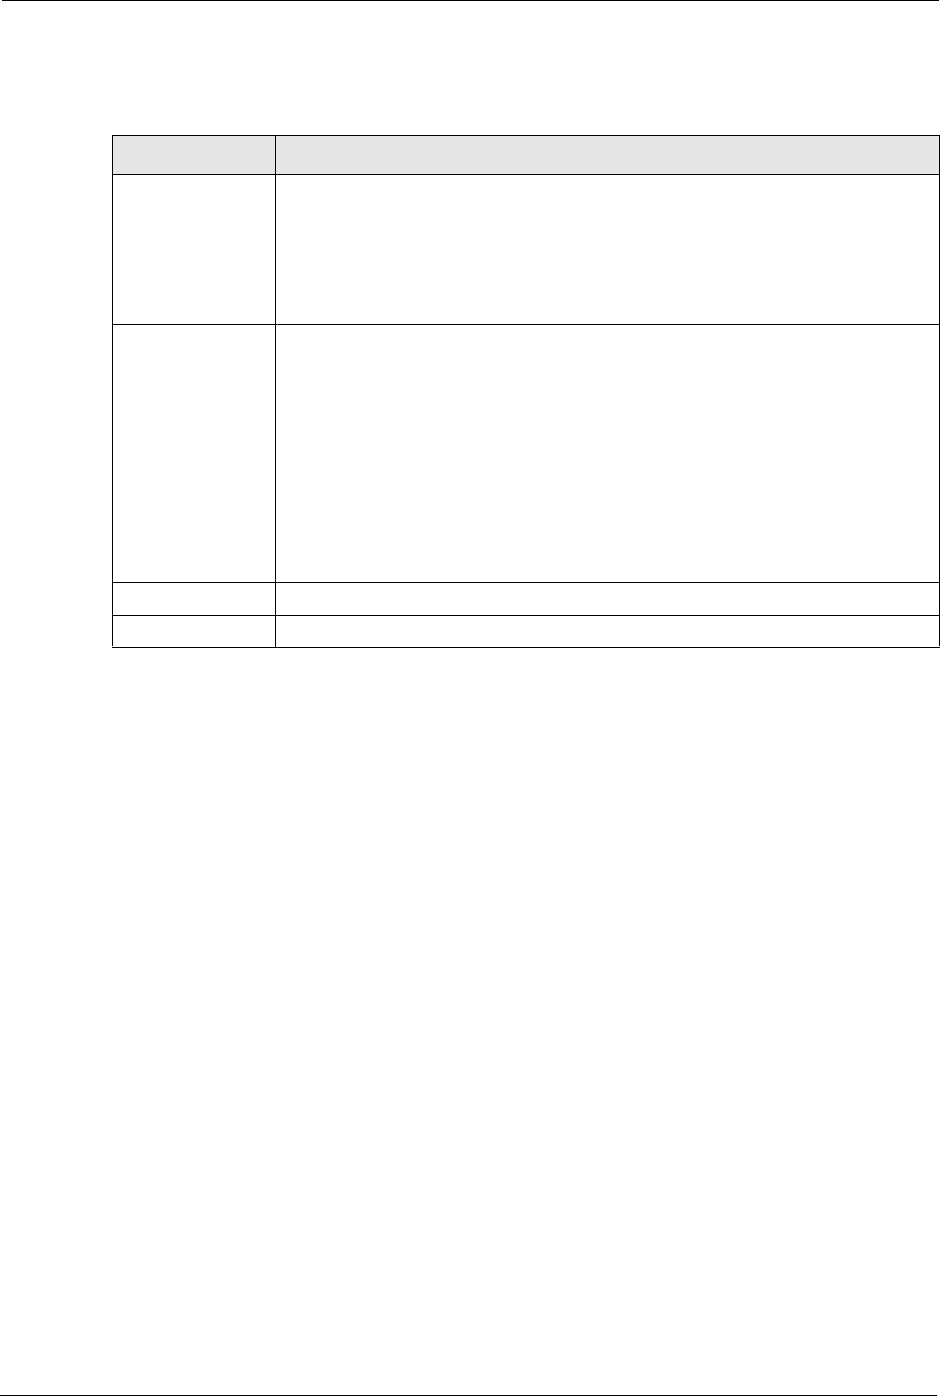
Click Firewall, and Threshold to bring up the next screen.
Figure 97 Firewall: Threshold
The following table describes the labels in this screen.
Table 63 Firewall: Threshold
LABEL DESCRIPTION DEFAULT VALUES
Denial of Service
Thresholds
One Minute Low This is the rate of new half-open sessions that
causes the firewall to stop deleting half-open
sessions. The ZyXEL Device continues to
delete half-open sessions as necessary, until
the rate of new connection attempts drops
below this number.
80 existing half-open sessions.
One Minute High This is the rate of new half-open sessions that
causes the firewall to start deleting half-open
sessions. When the rate of new connection
attempts rises above this number, the ZyXEL
Device deletes half-open sessions as
required to accommodate new connection
attempts.
100 half-open sessions per minute.
The above numbers cause the
ZyXEL Device to start deleting half-
open sessions when more than
100 session establishment
attempts have been detected in the
last minute, and to stop deleting
half-open sessions when fewer
than 80 session establishment
attempts have been detected in the
last minute.

P-660H/HW-D Series User’s Guide
Chapter 10 Firewall Configuration 176
Maximum
Incomplete Low
This is the number of existing half-open
sessions that causes the firewall to stop
deleting half-open sessions. The ZyXEL
Device continues to delete half-open requests
as necessary, until the number of existing
half-open sessions drops below this number.
80 existing half-open sessions.
Maximum
Incomplete High
This is the number of existing half-open
sessions that causes the firewall to start
deleting half-open sessions. When the
number of existing half-open sessions rises
above this number, the ZyXEL Device deletes
half-open sessions as required to
accommodate new connection requests. Do
not set Maximum Incomplete High to lower
than the current Maximum Incomplete Low
number.
100 existing half-open sessions.
The above values causes the
ZyXEL Device to start deleting half-
open sessions when the number of
existing half-open sessions rises
above 100, and to stop deleting
half-open sessions with the
number of existing half-open
sessions drops below 80.
TCP Maximum
Incomplete
This is the number of existing half-open TCP
sessions with the same destination host IP
address that causes the firewall to start
dropping half-open sessions to that same
destination host IP address. Enter a number
between 1 and 256. As a general rule, you
should choose a smaller number for a smaller
network, a slower system or limited
bandwidth.
30 existing half-open TCP
sessions.
Action taken when the TCP Maximum Incomplete threshold is reached.
Delete the oldest
half open session
when new
connection
request comes
Select this radio button to clear the oldest half
open session when a new connection request
comes.
Deny new
connection
request for
Select this radio button and specify for how
long the ZyXEL Device should block new
connection requests when TCP Maximum
Incomplete is reached.
Enter the length of blocking time in minutes
(between 1 and 256).
Apply Click Apply to save your changes back to the ZyXEL Device.
Cancel Click Cancel to begin configuring this screen afresh.
Table 63 Firewall: Threshold (continued)
LABEL DESCRIPTION DEFAULT VALUES

P-660H/HW-D Series User’s Guide
177 Chapter 10 Firewall Configuration
P-660H/HW-D Series User’s Guide
Chapter 11 Content Filtering 178
CHAPTER 11
Content Filtering
This chapter covers how to configure content filtering.
11.1 Content Filtering Overview
Internet content filtering allows you to create and enforce Internet access policies tailored to
your needs. Content filtering gives you the ability to block web sites that contain key words
(that you specify) in the URL. You can set a schedule for when the ZyXEL Device performs
content filtering. You can also specify trusted IP addresses on the LAN for which the ZyXEL
Device will not perform content filtering.
11.2 Configuring Keyword Blocking
Use this screen to block sites containing certain keywords in the URL. For example, if you
enable the keyword "bad", the ZyXEL Device blocks all sites containing this keyword
including the URL http://www.website.com/bad.html, even if it is not included in the Filter
List.
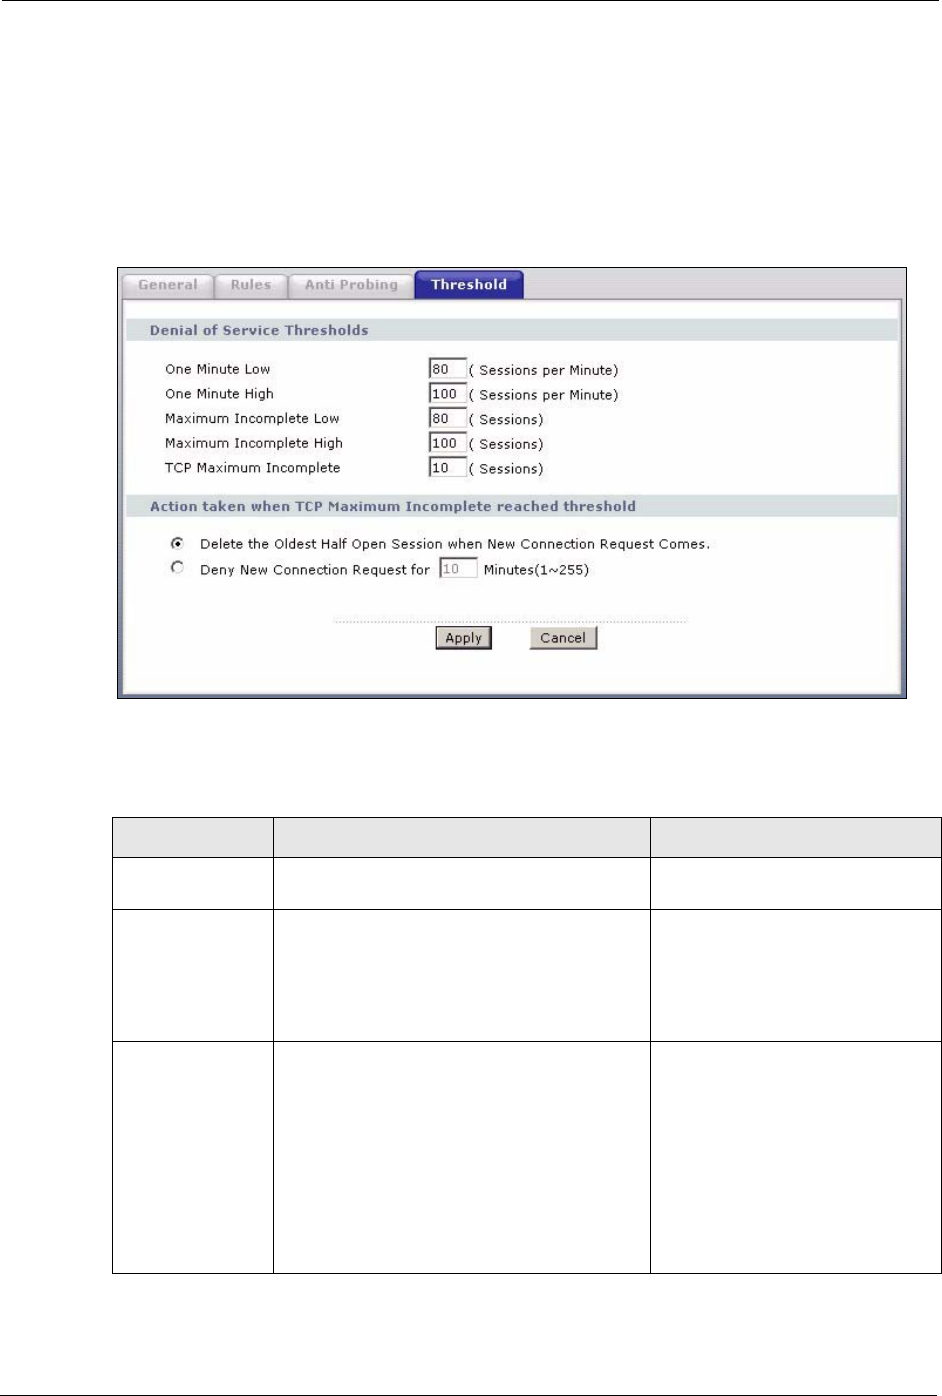
To have your ZyXEL Device block Web sites containing keywords in their URLs, click
Security > Content Filter. The screen appears as shown.
Figure 98 Content Filter: Keyword
P-660H/HW-D Series User’s Guide
179 Chapter 11 Content Filtering
The following table describes the labels in this screen.
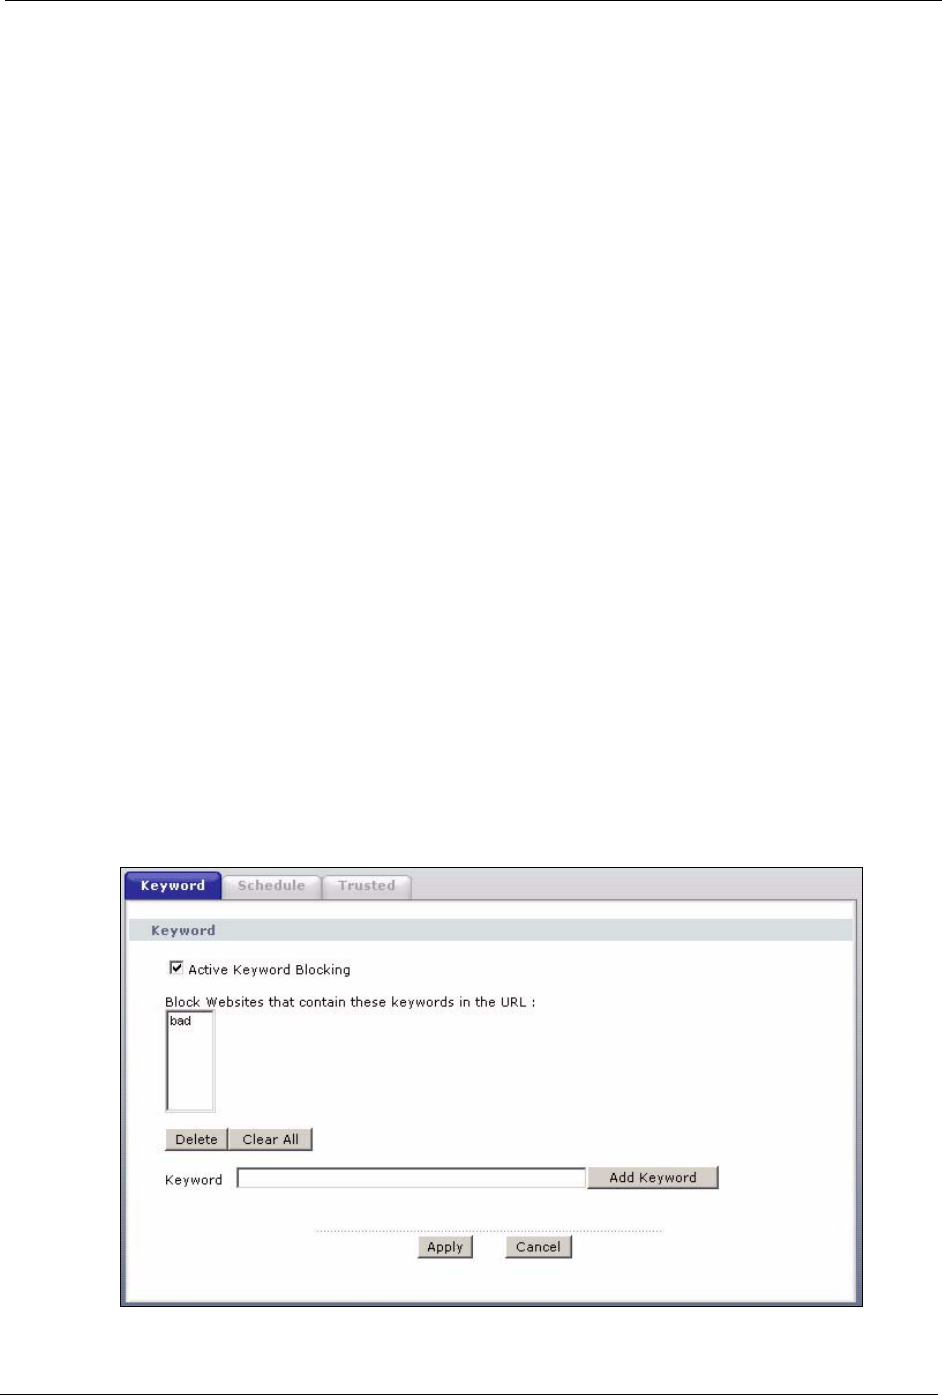
11.3 Configuring the Schedule
To set the days and times for the ZyXEL Device to perform content filtering, click Security >
Content Filter > Schedule. The screen appears as shown.
Figure 99 Content Filter: Schedule
Table 64 Content Filter: Keyword
LABEL DESCRIPTION
Active Keyword Blocking Select this check box to enable this feature.
Block Websites that contain
these keywords in the URL:
This box contains the list of all the keywords that you have configured the
ZyXEL Device to block.
Delete Highlight a keyword in the box and click Delete to remove it.
Clear All Click Clear All to remove all of the keywords from the list.
Keyword Type a keyword in this field. You may use any character (up to 127
characters). Wildcards are not allowed.
Add Keyword Click Add Keyword after you have typed a keyword.
Repeat this procedure to add other keywords. Up to 64 keywords are
allowed.
When you try to access a web page containing a keyword, you will get a
message telling you that the content filter is blocking this request.
Apply Click Apply to save your changes back to the ZyXEL Device.
Cancel Click Cancel to return to the previously saved settings.
P-660H/HW-D Series User’s Guide
Chapter 11 Content Filtering 180
The following table describes the labels in this screen.
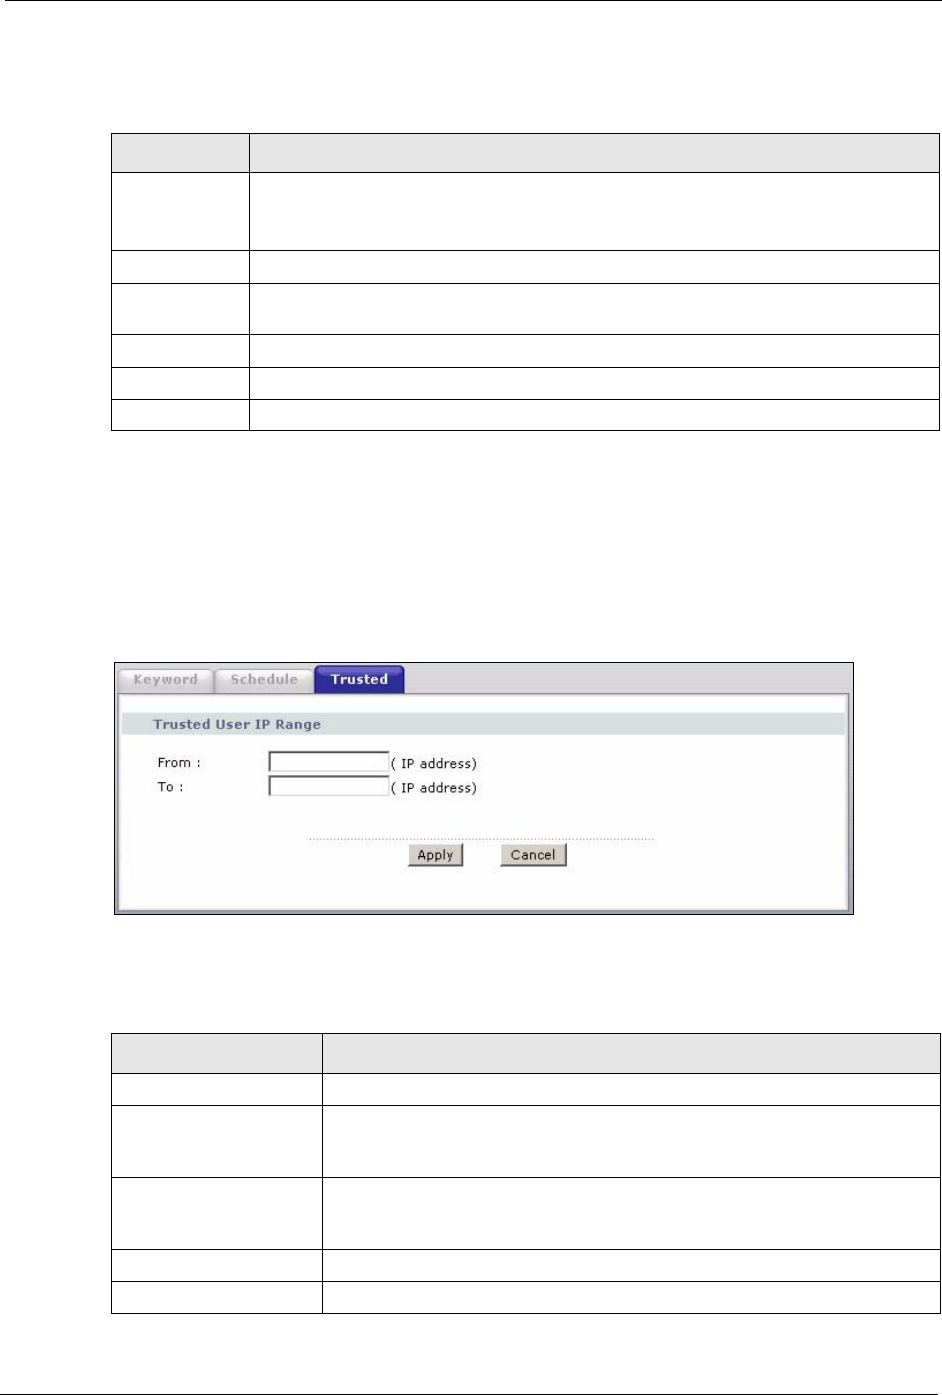
11.4 Configuring Trusted Computers
To exclude a range of users on the LAN from content filtering on your ZyXEL Device, click
Security > Content Filter > Trusted. The screen appears as shown.
Figure 100 Content Filter: Trusted
The following table describes the labels in this screen.
Table 65 Content Filter: Schedule
LABEL DESCRIPTION
Schedule Select Active Everyday to Block to make the content filtering active everyday.
Otherwise, select Edit Daily to Block and configure which days of the week (or
everyday) and which time of the day you want the content filtering to be active.
Active Select the check box to have the content filtering to be active on the selected day.
Start TIme Enter the start time when you want the content filtering to take effect in hour-minute
format.
End Time Enter the end time when you want the content filtering to stop in hour-minute format.
Apply Click Apply to save your changes.
Cancel Click Cancel to return to the previously saved settings.
Table 66 Content Filter: Trusted
LABEL DESCRIPTION
Trusted User IP Range
From Type the IP address of a computer (or the beginning IP address of a specific
range of computers) on the LAN that you want to exclude from content
filtering.
To Type the ending IP address of a specific range of users on your LAN that
you want to exclude from content filtering. Leave this field blank if you want
to exclude an individual computer.
Apply Click Apply to save your changes back to the ZyXEL Device.
Cancel Click Cancel to return to the previously saved settings.

P-660H/HW-D Series User’s Guide
181 Chapter 11 Content Filtering
P-660H/HW-D Series User’s Guide
Chapter 12 Static Route 182
CHAPTER 12
Static Route
This chapter shows you how to configure static routes for your ZyXEL Device.
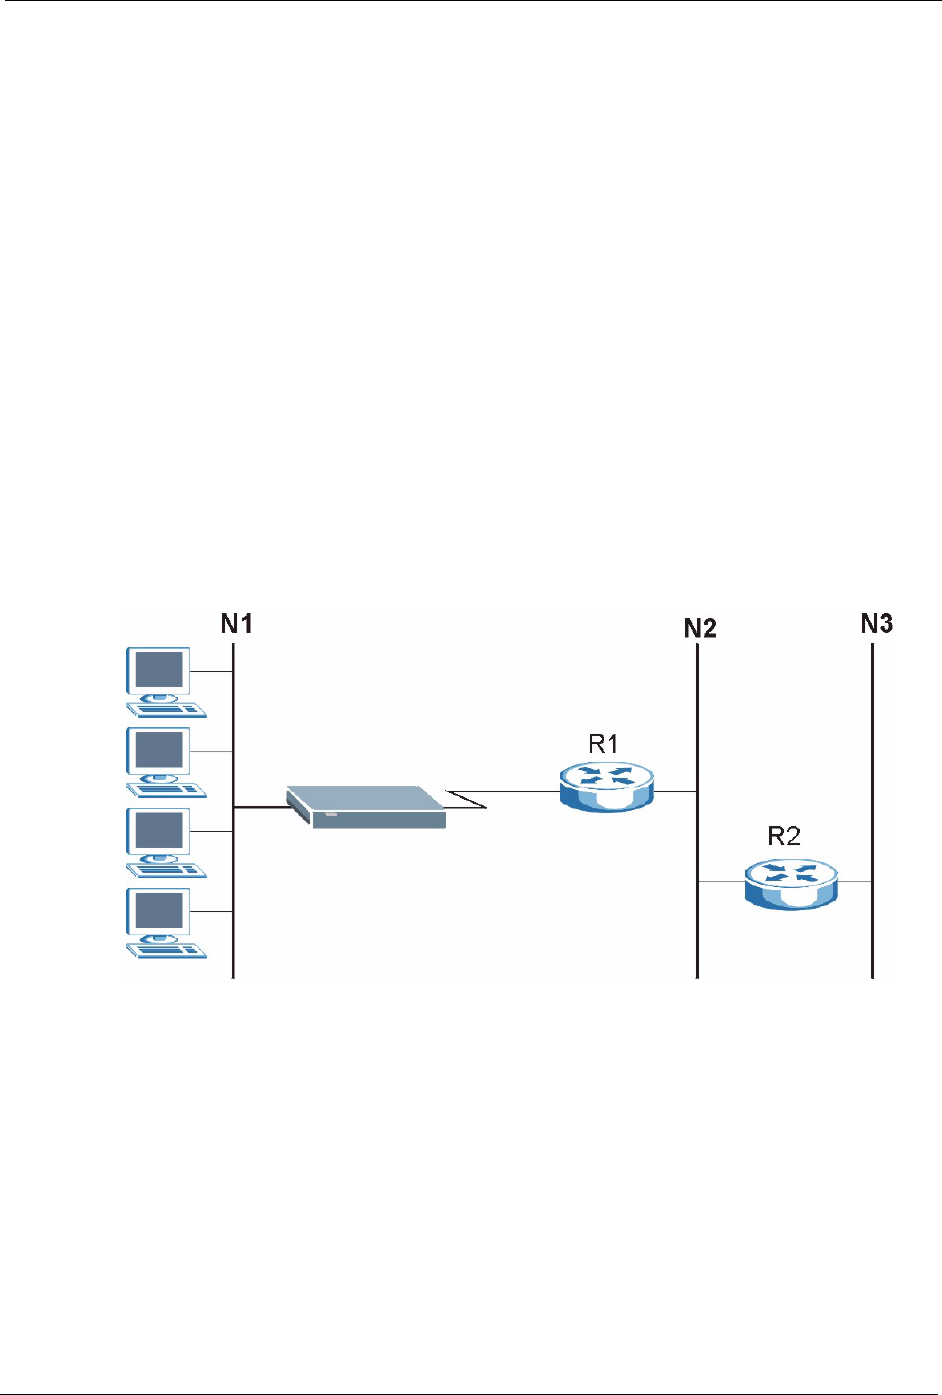
12.1 Static Route
Each remote node specifies only the network to which the gateway is directly connected, and
the ZyXEL Device has no knowledge of the networks beyond. For instance, the ZyXEL
Device knows about network N2 in the following figure through remote node Router 1.
However, the ZyXEL Device is unable to route a packet to network N3 because it doesn't
know that there is a route through the same remote node Router 1 (via gateway Router 2). The
static routes are for you to tell the ZyXEL Device about the networks beyond the remote
nodes.
Figure 101 Example of Static Routing Topology
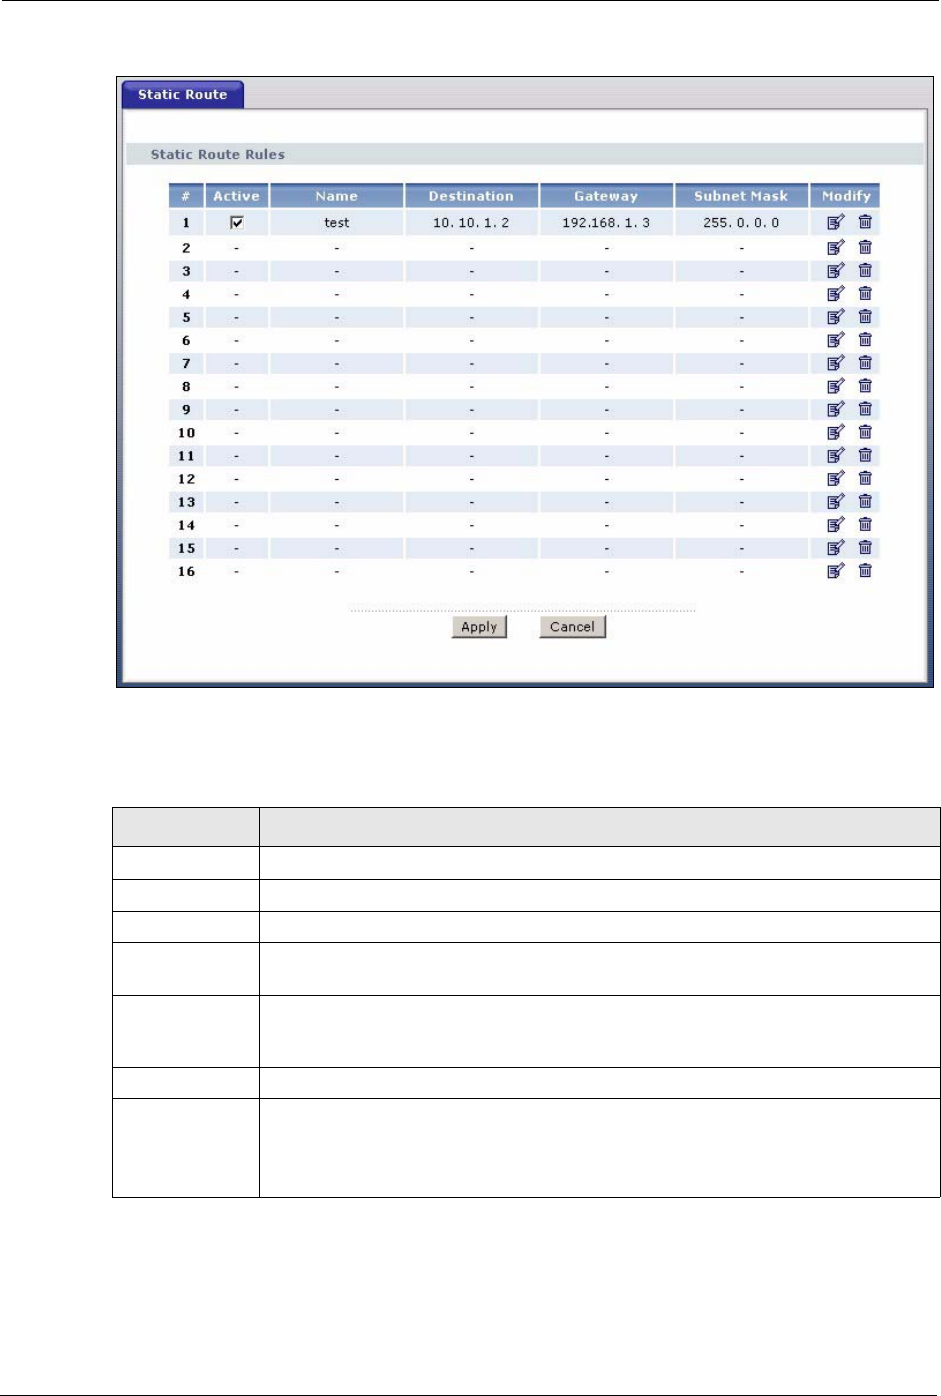
12.2 Configuring Static Route
Click Advanced > Static Route to open the Static Route screen.
P-660H/HW-D Series User’s Guide
183 Chapter 12 Static Route
Figure 102 Static Route
The following table describes the labels in this screen.
12.2.1 Static Route Edit
Select a static route index number and click Edit. The screen shown next appears. Use this
screen to configure the required information for a static route.
Table 67 Static Route
LABEL DESCRIPTION
#This is the number of an individual static route.
Active Select the check box to activate this static route. Otherwise, clear the check box.
Name This is the name that describes or identifies this route.
Destination This parameter specifies the IP network address of the final destination. Routing is
always based on network number.
Gateway This is the IP address of the gateway. The gateway is a router or switch on the same
network segment as the device's LAN or WAN port. The gateway helps forward
packets to their destinations.
Subnet Mask This is the IP subnet mask.
Modify Click the Edit icon to go to the screen where you can set up a static route on the
ZyXEL Device.
Click the Delete icon to remove a static route from the ZyXEL Device. A window
displays asking you to confirm that you want to delete the route.

P-660H/HW-D Series User’s Guide
Chapter 12 Static Route 184
Figure 103 Static Route Edit
The following table describes the labels in this screen.
Table 68 Static Route Edit
LABEL DESCRIPTION
Active This field allows you to activate/deactivate this static route.
Route Name Enter the name of the IP static route. Leave this field blank to delete this static route.
Destination IP
Address
This parameter specifies the IP network address of the final destination. Routing is
always based on network number. If you need to specify a route to a single host, use
a subnet mask of 255.255.255.255 in the subnet mask field to force the network
number to be identical to the host ID.
IP Subnet Mask Enter the IP subnet mask here.
Gateway IP
Address
Enter the IP address of the gateway. The gateway is a router or switch on the same
network segment as the device's LAN or WAN port. The gateway helps forward
packets to their destinations.
Back Click Back to return to the previous screen without saving.
Apply Click Apply to save your changes back to the ZyXEL Device.
Cancel Click Cancel to begin configuring this screen afresh.

P-660H/HW-D Series User’s Guide
185 Chapter 12 Static Route

P-660H/HW-D Series User’s Guide
Chapter 13 Bandwidth Management 186
CHAPTER 13
Bandwidth Management
This chapter contains information about configuring bandwidth management, editing rules and
viewing the ZyXEL Device’s bandwidth management logs.
13.1 Bandwidth Management Overview
ZyXEL’s Bandwidth Management allows you to specify bandwidth management rules based
on an application and/or subnet. You can allocate specific amounts of bandwidth capacity
(bandwidth budgets) to different bandwidth rules.
The ZyXEL Device applies bandwidth management to traffic that it forwards out through an
interface. The ZyXEL Device does not control the bandwidth of traffic that comes into an
interface.
Bandwidth management applies to all traffic flowing out of the router, regardless of the
traffic's source.
Traffic redirect or IP alias may cause LAN-to-LAN traffic to pass through the ZyXEL Device
and be managed by bandwidth management.
The sum of the bandwidth allotments that apply to any interface must be less than or equal to
the speed allocated to that interface in the Bandwidth Management > Summary screen.
13.2 Application-based Bandwidth Management
You can create bandwidth classes based on individual applications (like VoIP, Web, FTP, E-
mail and Video for example).
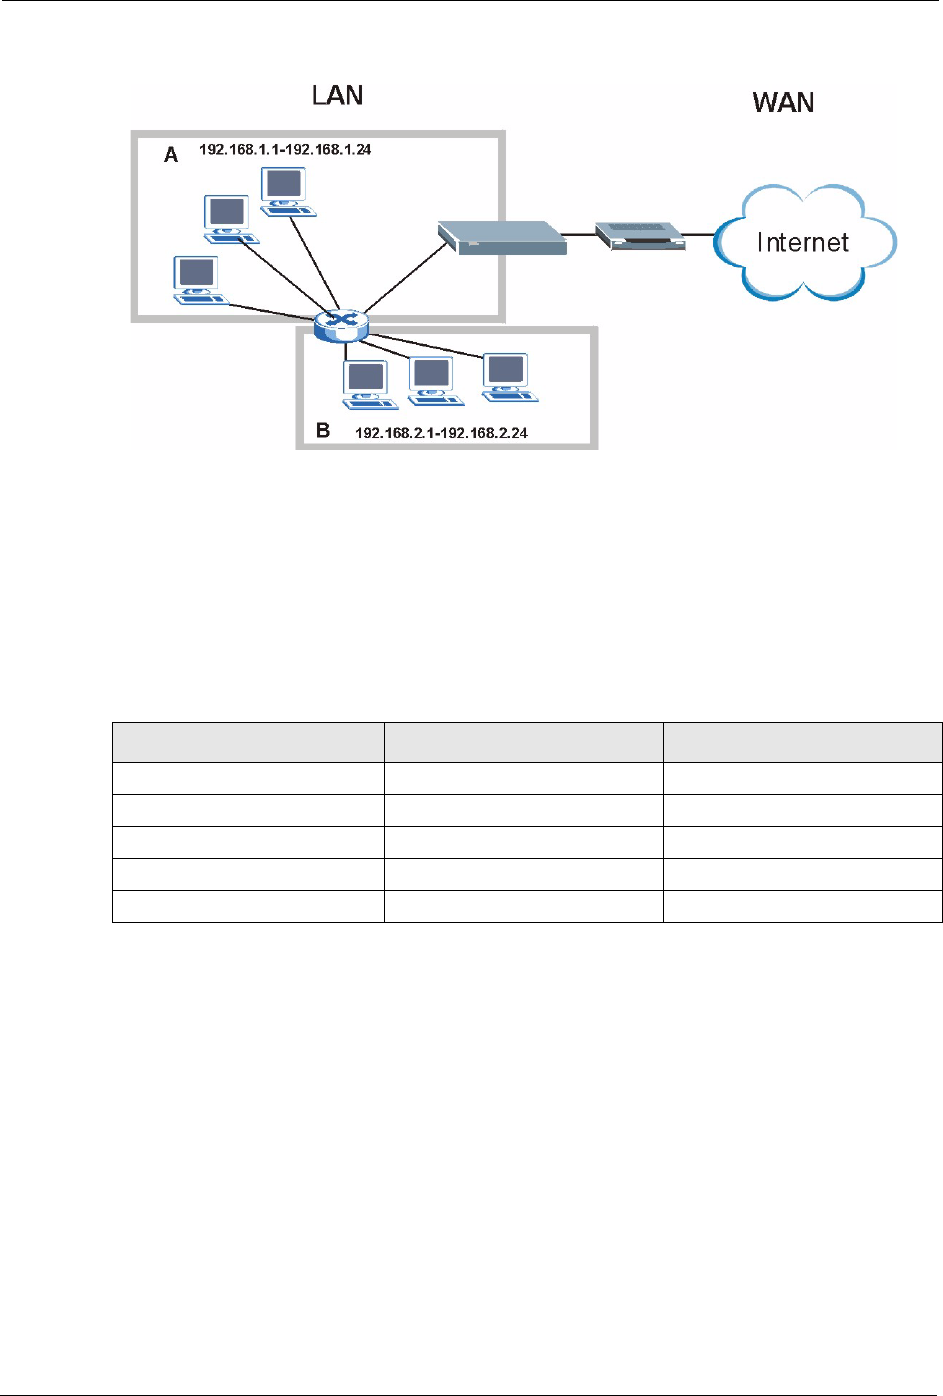
13.3 Subnet-based Bandwidth Management
You can create bandwidth classes based on subnets.
The following figure shows LAN subnets. You could configure one bandwidth class for
subnet A and another for subnet B.
P-660H/HW-D Series User’s Guide
187 Chapter 13 Bandwidth Management
Figure 104 Subnet-based Bandwidth Management Example
13.4 Application and Subnet-based Bandwidth Management
You could also create bandwidth classes based on a combination of a subnet and an
application. The following example table shows bandwidth allocations for application specific
traffic from separate LAN subnets.
13.5 Scheduler
The scheduler divides up an interface’s bandwidth among the bandwidth classes. The ZyXEL
Device has two types of scheduler: fairness-based and priority-based.
13.5.1 Priority-based Scheduler
With the priority-based scheduler, the ZyXEL Device forwards traffic from bandwidth classes
according to the priorities that you assign to the bandwidth classes. The larger a bandwidth
class’s priority number is, the higher the priority. Assign real-time applications (like those
using audio or video) a higher priority number to provide smoother operation.
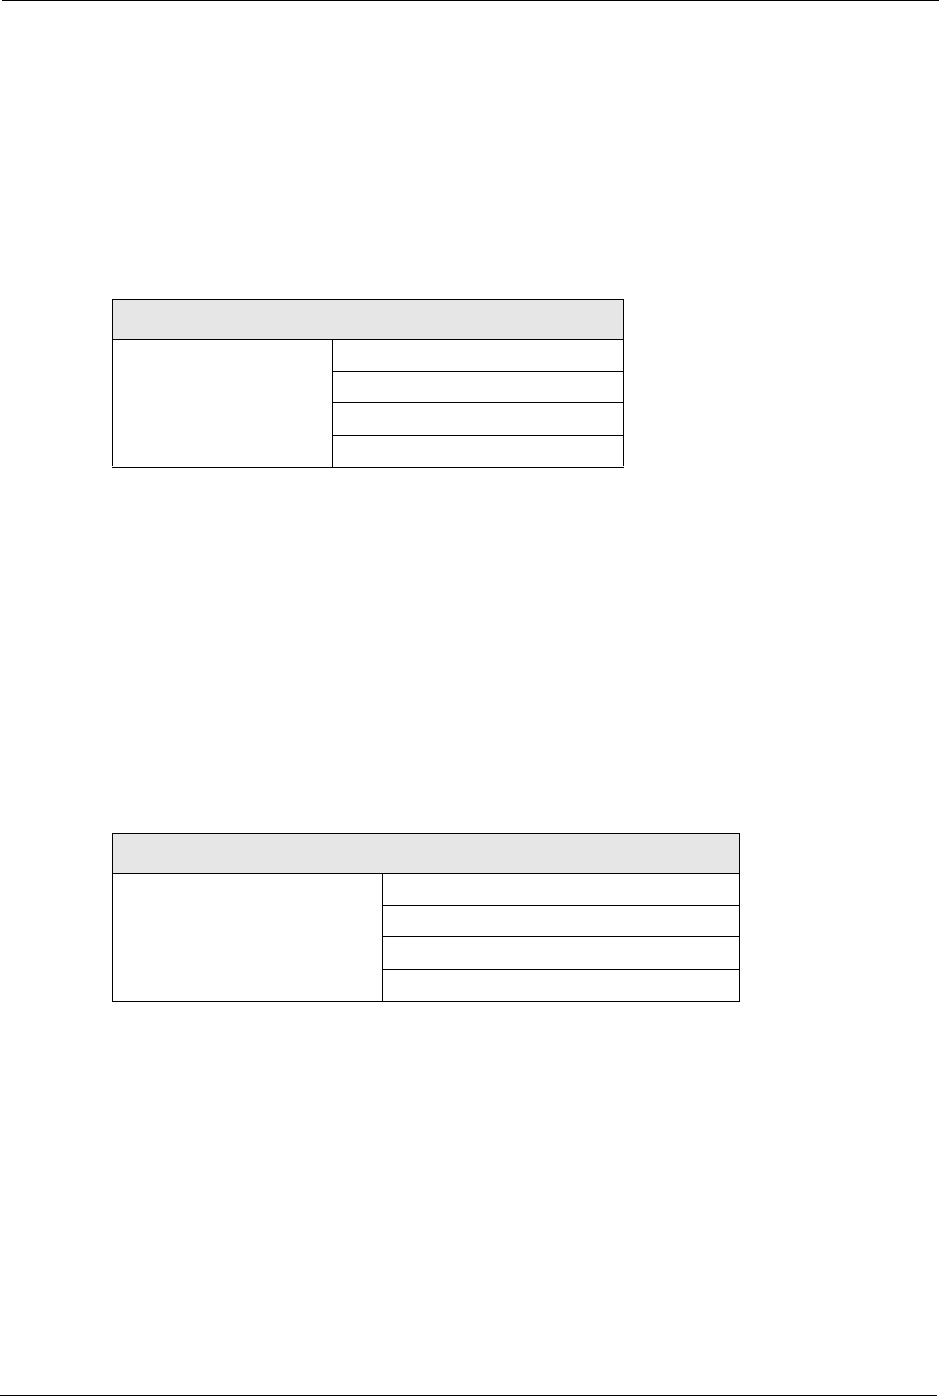
Table 69 Application and Subnet-based Bandwidth Management Example
TRAFFIC TYPE FROM SUBNET A FROM SUBNET B
VoIP 64 Kbps 64 Kbps
Web 64 Kbps 64 Kbps
FTP 64 Kbps 64 Kbps
E-mail 64 Kbps 64 Kbps
Video 64 Kbps 64 Kbps

P-660H/HW-D Series User’s Guide
Chapter 13 Bandwidth Management 188
13.5.2 Fairness-based Scheduler
The ZyXEL Device divides bandwidth equally among bandwidth classes when using the
fairness-based scheduler; thus preventing one bandwidth class from using all of the interface’s
bandwidth.
13.6 Maximize Bandwidth Usage
The maximize bandwidth usage option (see Figure 105 on page 191) allows the ZyXEL
Device to divide up any available bandwidth on the interface (including unallocated
bandwidth and any allocated bandwidth that a class is not using) among the bandwidth classes
that require more bandwidth.
When you enable maximize bandwidth usage, the ZyXEL Device first makes sure that each
bandwidth class gets up to its bandwidth allotment. Next, the ZyXEL Device divides up an
interface’s available bandwidth (bandwidth that is unbudgeted or unused by the classes)
depending on how many bandwidth classes require more bandwidth and on their priority
levels. When only one class requires more bandwidth, the ZyXEL Device gives extra
bandwidth to that class.
When multiple classes require more bandwidth, the ZyXEL Device gives the highest priority
classes the available bandwidth first (as much as they require, if there is enough available
bandwidth), and then to lower priority classes if there is still bandwidth available. The ZyXEL
Device distributes the available bandwidth equally among classes with the same priority level.
13.6.1 Reserving Bandwidth for Non-Bandwidth Class Traffic
Do the following three steps to configure the ZyXEL Device to allow bandwidth for traffic
that is not defined in a bandwidth filter.
1Leave some of the interface’s bandwidth unbudgeted.
2Do not enable the interface’s Maximize Bandwidth Usage option.
3Do not enable bandwidth borrowing on the child-classes that have the root class as their
parent (see Section 13.9 on page 192).
P-660H/HW-D Series User’s Guide
189 Chapter 13 Bandwidth Management
13.6.2 Maximize Bandwidth Usage Example
Here is an example of a ZyXEL Device that has maximize bandwidth usage enabled on an
interface. The following table shows each bandwidth class’s bandwidth budget. The classes
are set up based on subnets. The interface is set to 10240 kbps. Each subnet is allocated 2048
kbps. The unbudgeted 2048 kbps allows traffic not defined in any of the bandwidth filters to
go out when you do not select the maximize bandwidth option.
The ZyXEL Device divides up the unbudgeted 2048 kbps among the classes that require more
bandwidth. If the administration department only uses 1024 kbps of the budgeted 2048 kbps,
the ZyXEL Device also divides the remaining 1024 kbps among the classes that require more
bandwidth. Therefore, the ZyXEL Device divides a total of 3072 kbps of unbudgeted and
unused bandwidth among the classes that require more bandwidth.
13.6.2.1 Priority-based Allotment of Unused and Unbudgeted Bandwidth
The following table shows the priorities of the bandwidth classes and the amount of bandwidth
that each class gets.
Suppose that all of the classes except for the administration class need more bandwidth.
• Each class gets up to its budgeted bandwidth. The administration class only uses 1024
kbps of its budgeted 2048 kbps.
• The sales and marketing are first to get extra bandwidth because they have the highest
priority (6). If they each require 1536 kbps or more of extra bandwidth, the ZyXEL
Device divides the total 3072 kbps total of unbudgeted and unused bandwidth equally
between the sales and marketing departments (1536 kbps extra to each for a total of 3584
kbps for each) because they both have the highest priority level.
Table 70 Maximize Bandwidth Usage Example
BANDWIDTH CLASSES AND ALLOTMENTS
Root Class: 10240 kbps Administration: 2048 kbps
Sales: 2048 kbps
Marketing: 2048 kbps
Research: 2048 kbps
Table 71 Priority-based Allotment of Unused and Unbudgeted Bandwidth Example
BANDWIDTH CLASSES, PRIORITIES AND ALLOTMENTS
Root Class: 10240 kbps Administration: Priority 4, 1024 kbps
Sales: Priority 6, 3584 kbps
Marketing: Priority 6, 3584 kbps
Research: Priority 5, 2048 kbps
P-660H/HW-D Series User’s Guide
Chapter 13 Bandwidth Management 190
• Research requires more bandwidth but only gets its budgeted 2048 kbps because all of the
unbudgeted and unused bandwidth goes to the higher priority sales and marketing
classes.
13.6.2.2 Fairness-based Allotment of Unused and Unbudgeted Bandwidth
The following table shows the amount of bandwidth that each class gets.
Suppose that all of the classes except for the administration class need more bandwidth.
• Each class gets up to its budgeted bandwidth. The administration class only uses 1024
kbps of its budgeted 2048 kbps.
• The ZyXEL Device divides the total 3072 kbps total of unbudgeted and unused
bandwidth equally among the other classes. 1024 kbps extra goes to each so the other
classes each get a total of 3072 kbps.
13.6.3 Bandwidth Management Priorities
The following table describes the priorities that you can apply to traffic that the ZyXEL
Device forwards out through an interface.
Table 72 Fairness-based Allotment of Unused and Unbudgeted Bandwidth Example
BANDWIDTH CLASSES AND ALLOTMENTS
Root Class: 10240 kbps Administration: 1024 kbps
Sales: 3072 kbps
Marketing: 3072 kbps
Research: 3072 kbps
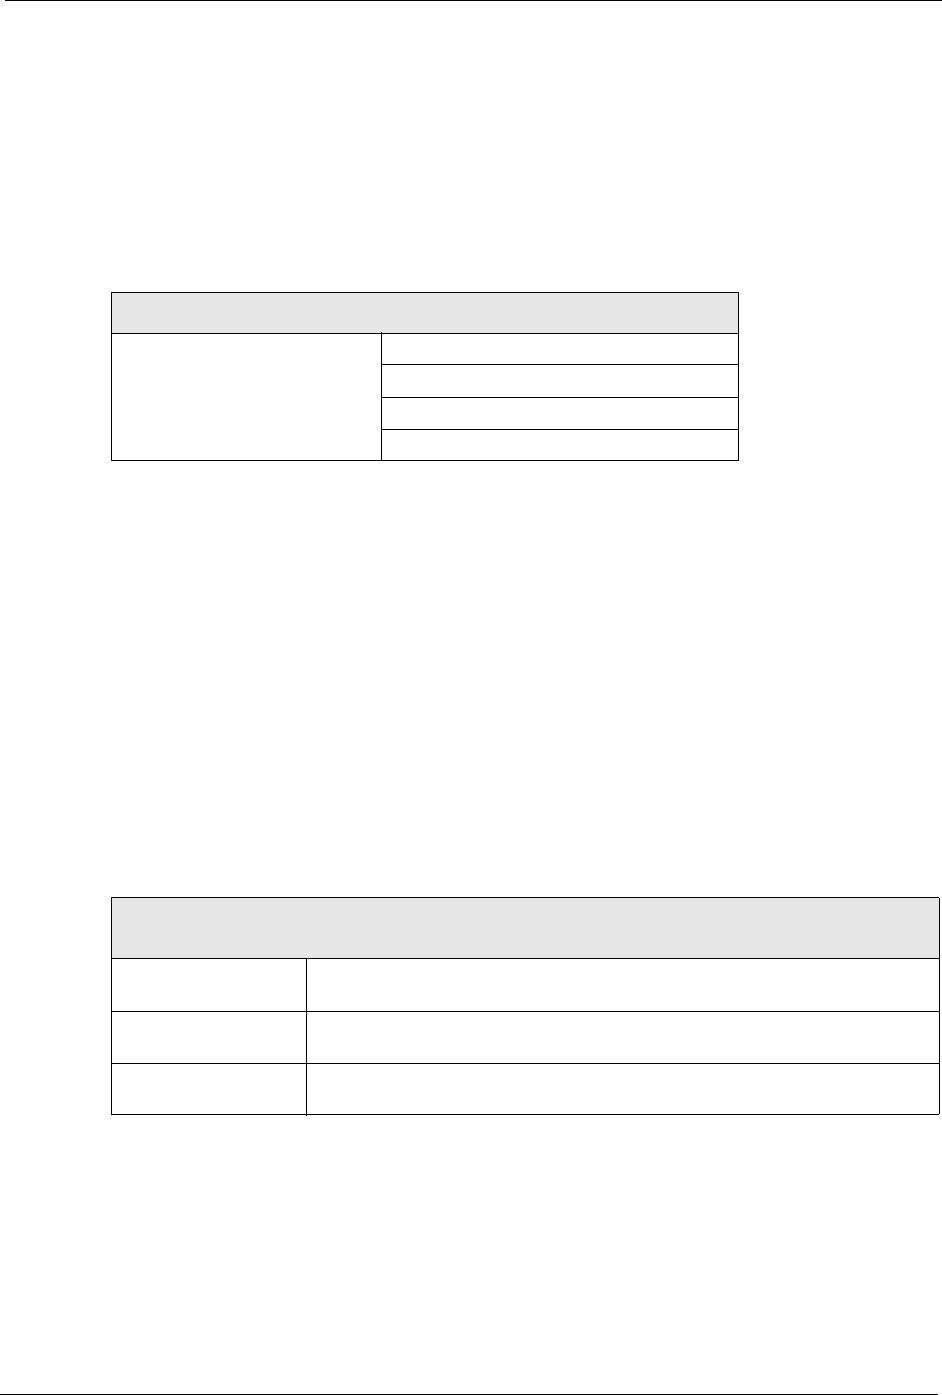
Table 73 Bandwidth Management Priorities
PRIORITY LEVELS: TRAFFIC WITH A HIGHER PRIORITY GETS THROUGH FASTER WHILE
TRAFFIC WITH A LOWER PRIORITY IS DROPPED IF THE NETWORK IS CONGESTED.
High Typically used for voice traffic or video that is especially sensitive to jitter (jitter
is the variations in delay).
Mid Typically used for “excellent effort” or better than best effort and would include
important business traffic that can tolerate some delay.
Low This is typically used for non-critical “background” traffic such as bulk transfers
that are allowed but that should not affect other applications and users.
P-660H/HW-D Series User’s Guide
191 Chapter 13 Bandwidth Management
13.7 Over Allotment of Bandwidth
You can set the bandwidth management speed for an interface higher than the interface’s
actual transmission speed. Higher priority traffic gets to use up to its allocated bandwidth,
even if it takes up all of the interface’s available bandwidth. This could stop lower priority
traffic from being sent. The following is an example.
If you use VoIP and NetMeeting at the same time, the device allocates up to 500 Kbps of
bandwidth to each of them before it allocates any bandwidth to FTP. As a result, FTP can only
use bandwidth when VoIP and NetMeeting do not use all of their allocated bandwidth.
Suppose you try to browse the web too. In this case, VoIP, NetMeeting and FTP all have
higher priority, so they get to use the bandwidth first. You can only browse the web when
VoIP, NetMeeting, and FTP do not use all 1000 Kbps of available bandwidth.
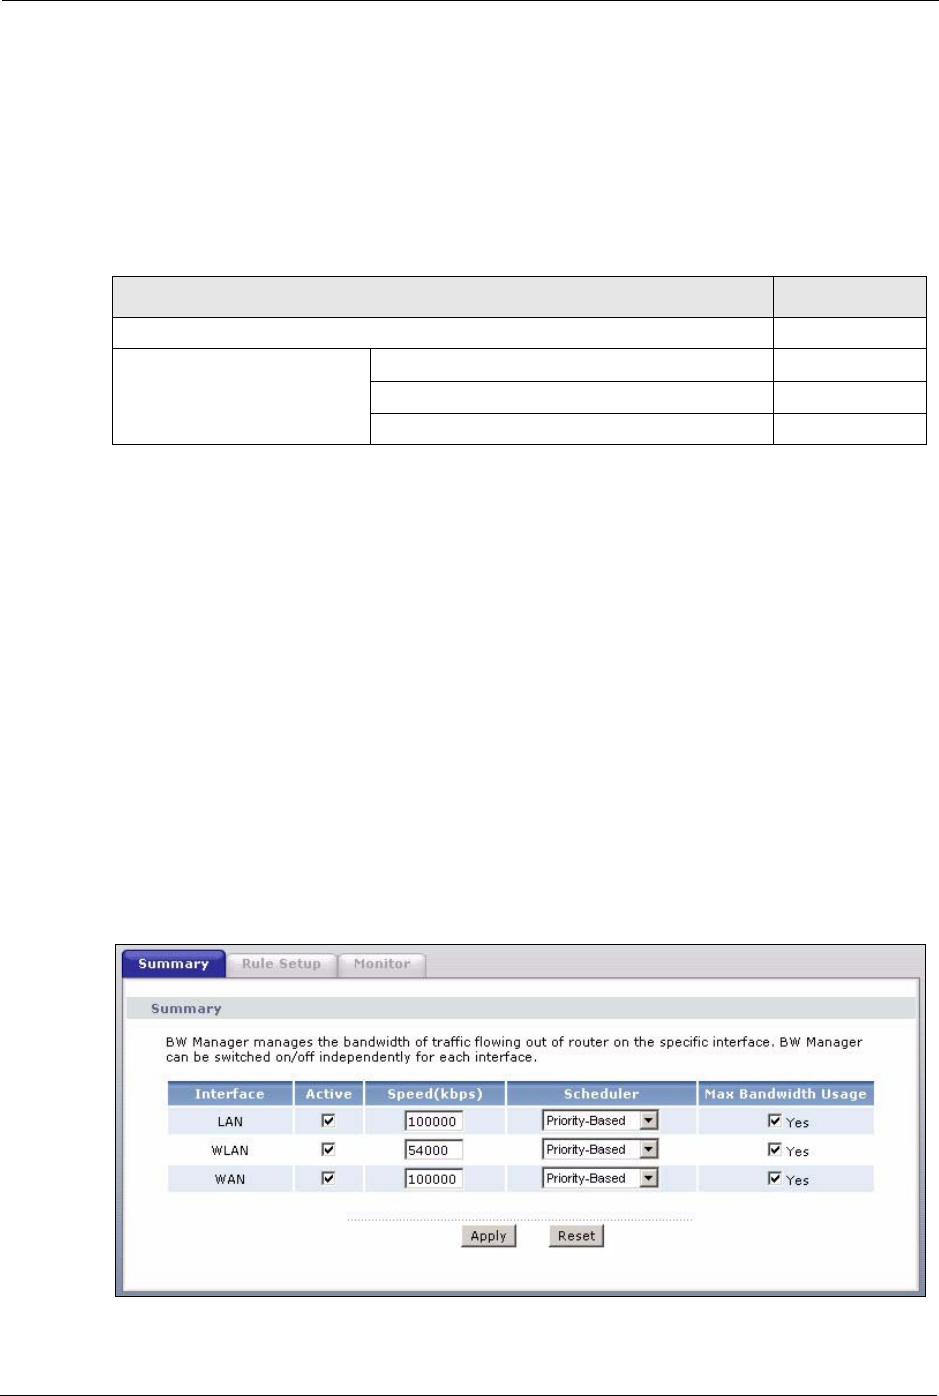
13.8 Configuring Summary
Click Advanced > Bandwidth MGMT to open the screen as shown next.
Enable bandwidth management on an interface and set the maximum allowed bandwidth for
that interface.
Figure 105 Bandwidth Management: Summary
Table 74 Over Allotment of Bandwidth Example
BANDWIDTH CLASSES, ALLOTMENTS PRIORITIES
Actual outgoing bandwidth available on the interface: 1000 kbps
Root Class: 1500 kbps (same
as Speed setting)
VoIP traffic (Service = SIP): 500 Kbps High
NetMeeting traffic (Service = H.323): 500 kbps High
FTP (Service = FTP): 500 Kbps Medium

P-660H/HW-D Series User’s Guide
Chapter 13 Bandwidth Management 192
The following table describes the labels in this screen.
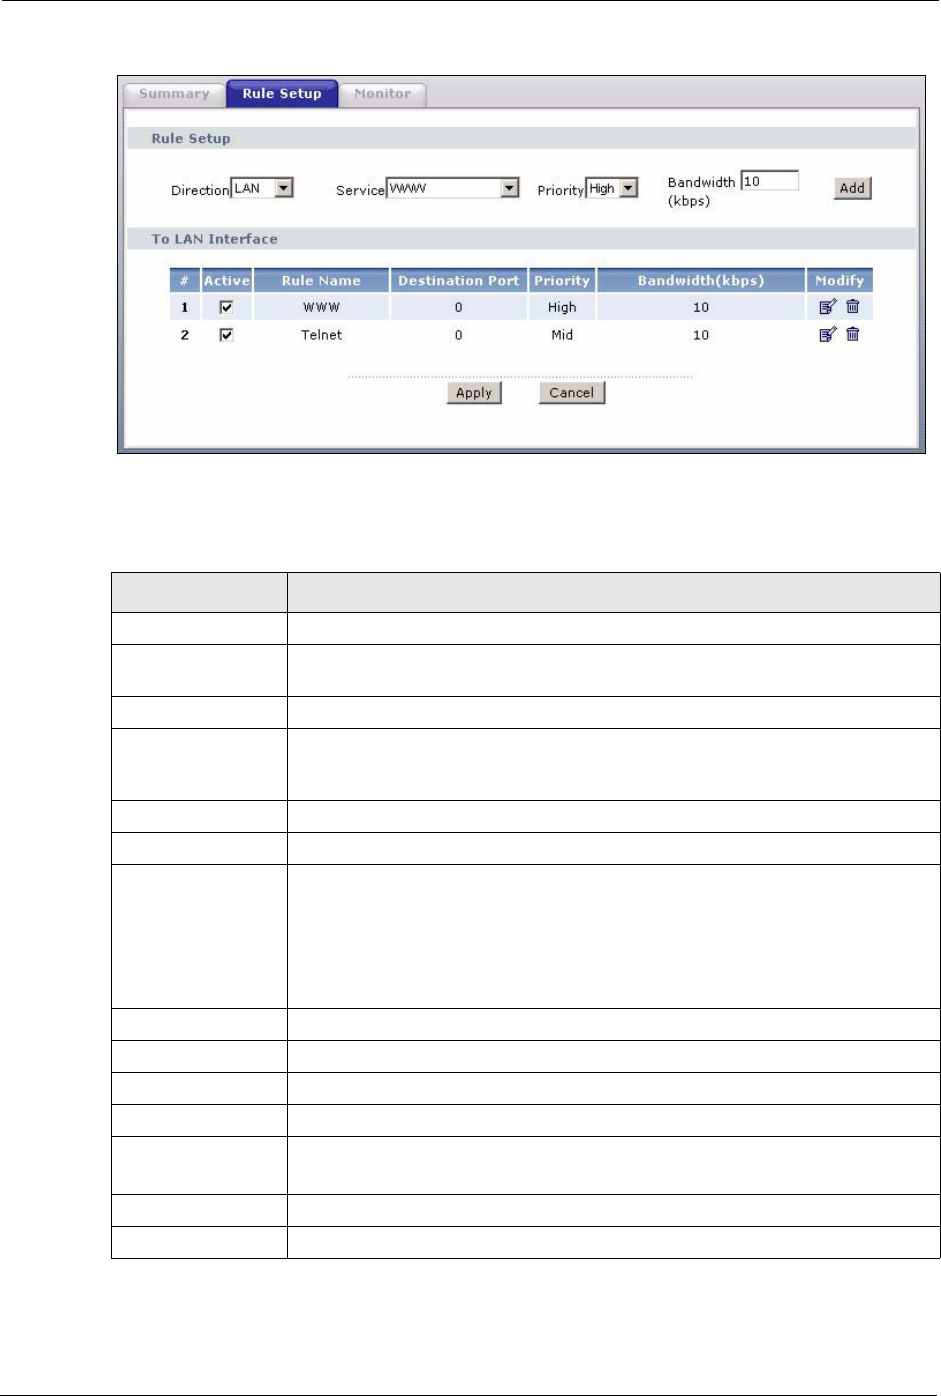
13.9 Bandwidth Management Rule Setup
You must use the Bandwidth Management Summary screen to enable bandwidth
management on an interface before you can configure rules for that interface.
Click Advanced > Bandwidth MGMT > Rule Setup to open the following screen.
Table 75 Media Bandwidth Management: Summary
LABEL DESCRIPTION
Interface These read-only labels represent the physical interfaces. Select an interface’s check
box to enable bandwidth management on that interface. Bandwidth management
applies to all traffic flowing out of the router through the interface, regardless of the
traffic’s source.
Traffic redirect or IP alias may cause LAN-to-LAN traffic to pass through the ZyXEL
Device and be managed by bandwidth management.
Active Select an interface’s check box to enable bandwidth management on that interface.
Speed (kbps) Enter the amount of bandwidth for this interface that you want to allocate using
bandwidth management.
The recommendation is to set this speed to match the interface’s actual transmission
speed. For example, set the WAN interface speed to 1000 kbps if your Internet
connection has an upstream transmission speed of 1 Mbps.
You can set this number higher than the interface’s actual transmission speed. This
may stop lower priority traffic from being sent if higher priority traffic uses all of the
actual bandwidth.
You can also set this number lower than the interface’s actual transmission speed. If
you do not enable Max Bandwidth Usage, this will cause the ZyXEL Device to not use
some of the interface’s available bandwidth.
Scheduler Select either Priority-Based or Fairness-Based from the drop-down menu to control
the traffic flow.
Select Priority-Based to give preference to bandwidth classes with higher priorities.
Select Fairness-Based to treat all bandwidth classes equally.
Max
Bandwidth
Usage
Select this check box to have the ZyXEL Device divide up all of the interface’s
unallocated and/or unused bandwidth among the bandwidth classes that require
bandwidth. Do not select this if you want to reserve bandwidth for traffic that does not
match a bandwidth class or you want to limit the speed of this interface (see the Speed
field description).
Apply Click Apply to save your settings back to the ZyXEL Device.
Cancel Click Cancel to begin configuring this screen afresh.
P-660H/HW-D Series User’s Guide
193 Chapter 13 Bandwidth Management
Figure 106 Bandwidth Management: Rule Setup
The following table describes the labels in this screen.
Table 76 Bandwidth Management: Rule Setup
LABEL DESCRIPTION
Direction Select the direction of traffic to which you want to apply bandwidth management.
Service Select a service for your rule or you can select User Defined to go to the screen
where you can define your own.
Priority Select a priority from the drop down list box. Choose High, Mid or Low.
Bandwidth (kbps) Specify the maximum bandwidth allowed for the rule in kbps. The
recommendation is a setting between 20 kbps and 20000 kbps for an individual
rule.
Add Click this button to add a rule to the following table.
#This is the number of an individual bandwidth management rule.
Active This displays whether the rule is enabled. Select this check box to have the
ZyXEL Device apply this bandwidth management rule.
Enable a bandwidth management rule to give traffic that matches the rule priority
over traffic that does not match the rule.
Enabling a bandwidth management rule also allows you to control the maximum
amounts of bandwidth that can be used by traffic that matches the rule.
Rule Name This is the name of the rule.
Destination Port This is the port number of the destination. 0 means any destination port.
Priority This is the priority of this rule.
Bandwidth (kbps) This is the maximum bandwidth allowed for the rule in kbps.
Modify Click the Edit icon to go to the screen where you can edit the rule.
Click the Remove icon to delete an existing rule.
Apply Click Apply to save your changes back to the ZyXEL Device.
Cancel Click Cancel to begin configuring this screen afresh.
P-660H/HW-D Series User’s Guide
Chapter 13 Bandwidth Management 194
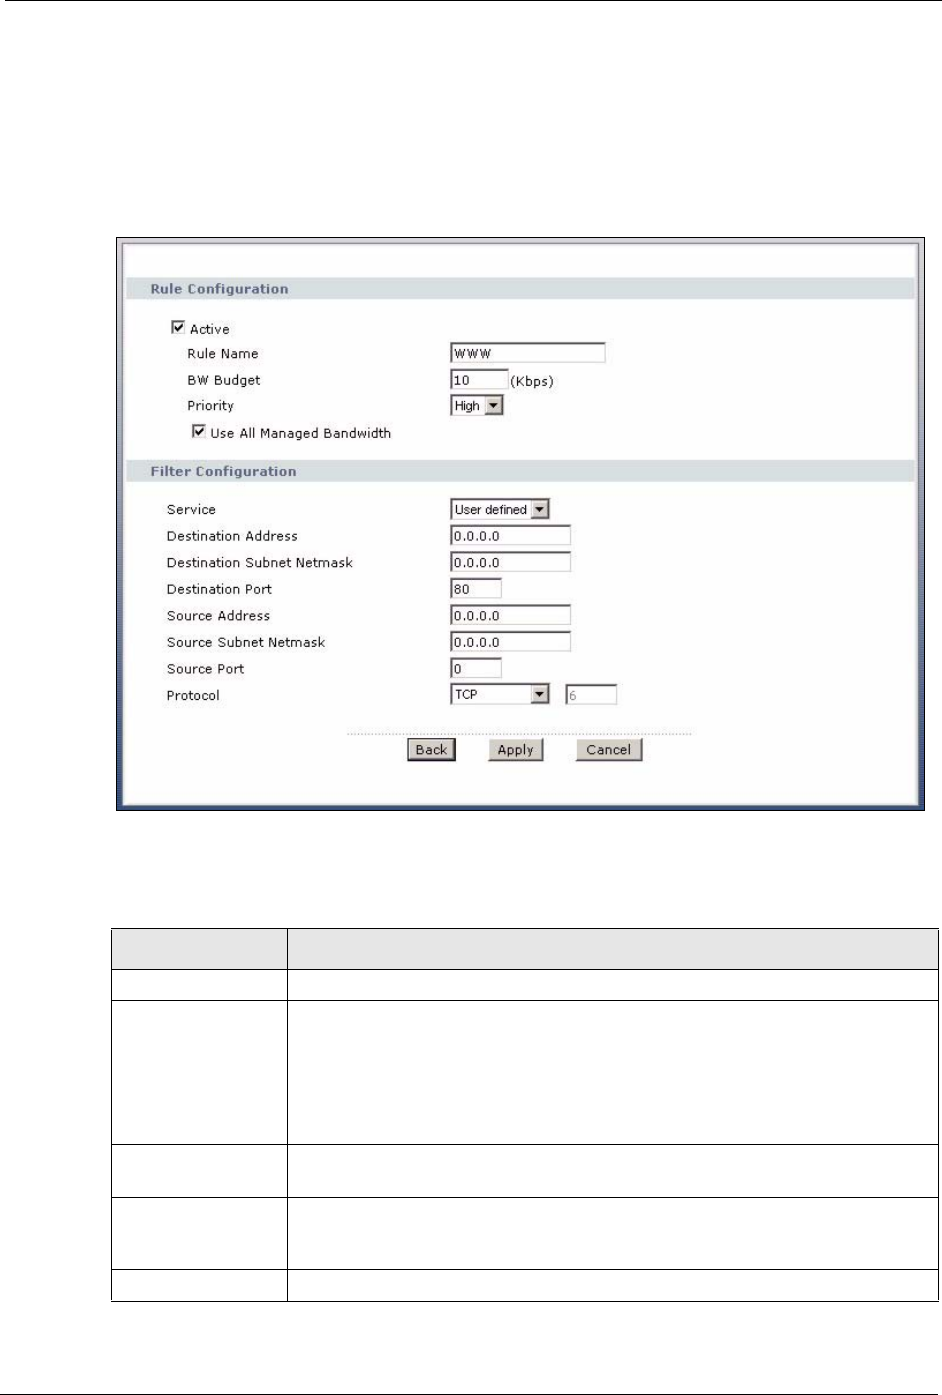
13.9.1 Rule Configuration
Click the Edit icon or select User Defined from the Service drop-down list in the Rule Setup
screen to configure a bandwidth management rule. Use bandwidth rules to allocate specific
amounts of bandwidth capacity (bandwidth budgets) to specific applications and/or subnets.
Figure 107 Bandwidth Management Rule Configuration
The following table describes the labels in this screen.
Table 77 Bandwidth Management Rule Configuration
LABEL DESCRIPTION
Rule Configuration
Active Select this check box to have the ZyXEL Device apply this bandwidth
management rule.
Enable a bandwidth management rule to give traffic that matches the rule priority
over traffic that does not match the rule.
Enabling a bandwidth management rule also allows you to control the maximum
amounts of bandwidth that can be used by traffic that matches the rule.
Rule Name Use the auto-generated name or enter a descriptive name of up to 20
alphanumeric characters, including spaces.
BW Budget Specify the maximum bandwidth allowed for the rule in kbps. The
recommendation is a setting between 20 kbps and 20000 kbps for an individual
rule.
Priority Select a priority from the drop down list box. Choose High, Mid or Low.

P-660H/HW-D Series User’s Guide
195 Chapter 13 Bandwidth Management
Use All Managed
Bandwidth
Select this option to allow a rule to borrow unused bandwidth on the interface.
Bandwidth borrowing is governed by the priority of the rules. That is, a rule with
the highest priority is the first to borrow bandwidth. Do not select this if you want
to leave bandwidth available for other traffic types or if you want to restrict the
amount of bandwidth that can be used for the traffic that matches this rule.
Filter Configuration
Service This field simplifies bandwidth class configuration by allowing you to select a
predefined application. When you select a predefined application, you do not
configure the rest of the bandwidth filter fields (other than enabling or disabling
the filter).
SIP (Session Initiation Protocol) is a signaling protocol used in Internet
telephony, instant messaging and other VoIP (Voice over IP) applications. Select
SIP from the drop-down list box to configure this bandwidth filter for traffic that
uses SIP.
File Transfer Protocol (FTP) is an Internet file transfer service that operates on
the Internet and over TCP/IP networks. A system running the FTP server
accepts commands from a system running an FTP client. The service allows
users to send commands to the server for uploading and downloading files.
Select FTP from the drop-down list box to configure this bandwidth filter for FTP
traffic.
H.323 is a standard teleconferencing protocol suite that provides audio, data and
video conferencing. It allows for real-time point-to-point and multipoint
communication between client computers over a packet-based network that
does not provide a guaranteed quality of service. Select H.323 from the drop-
down list box to configure this bandwidth filter for traffic that uses H.323.
Select User defined from the drop-down list box if you do not want to use a
predefined application for the bandwidth class. When you select User defined,
you need to configure at least one of the following fields (other than the Subnet
Mask fields which you only enter if you also enter a corresponding destination or
source IP address).
Destination Address Enter the destination IP address in dotted decimal notation.
Destination Subnet
Netmask
Enter the destination subnet mask. This field is N/A if you do not specify a
Destination Address. Refer to the appendices for more information on IP
subnetting.
Destination Port Enter the port number of the destination. See Table 78 on page 196 for some
common services and port numbers. A blank destination IP address means any
destination IP address.
Source Address Enter the source IP address in dotted decimal notation. A blank source IP
address means any source IP address.
Source Subnet
Netmask
Enter the destination subnet mask. This field is N/A if you do not specify a
Source Address. Refer to the appendices for more information on IP subnetting.
A blank source port means any source port number.
Source Port Enter the port number of the source. See Table 78 on page 196 for some
common services and port numbers.
Protocol Select the protocol (TCP or UDP) or select User defined and enter the protocol
(service type) number. 0 means any protocol number.
Back Click Back to go to the previous screen.
Apply Click Apply to save your changes back to the ZyXEL Device.
Cancel Click Cancel to begin configuring this screen afresh.
Table 77 Bandwidth Management Rule Configuration (continued)
LABEL DESCRIPTION
P-660H/HW-D Series User’s Guide
Chapter 13 Bandwidth Management 196
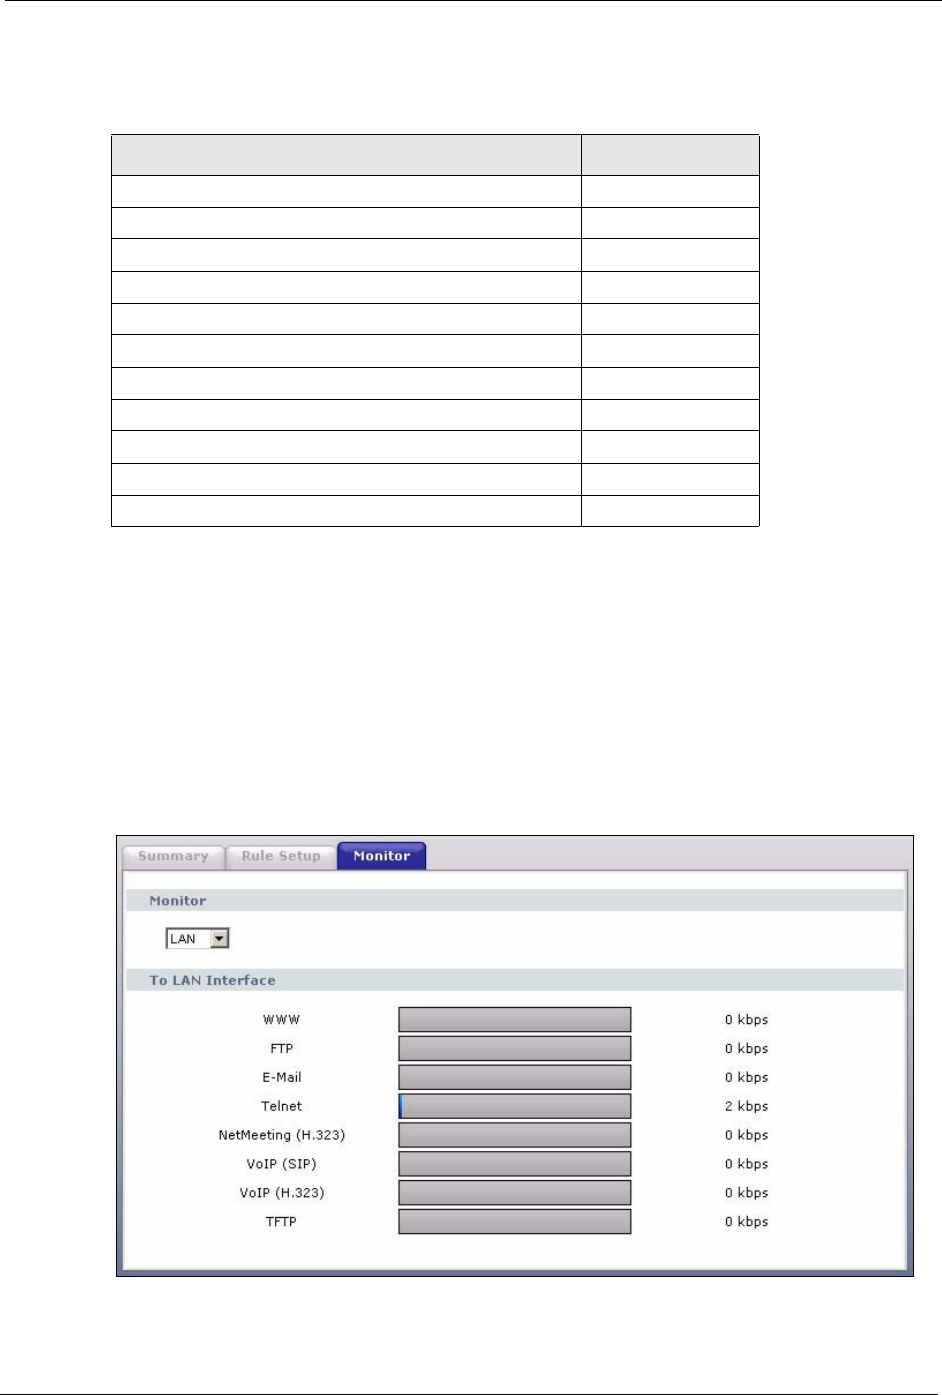
13.10 Bandwidth Monitor
To view the ZyXEL Device’s bandwidth usage and allotments, click Advanced > Bandwidth
MGMT > Monitor. The screen appears as shown. Select an interface from the drop-down list
box to view the bandwidth usage of its bandwidth rules. The gray section of the bar represents
the percentage of unused bandwidth and the blue color represents the percentage of bandwidth
in use.
Figure 108 Bandwidth Management: Monitor
Table 78 Services and Port Numbers
SERVICES PORT NUMBER
ECHO 7
FTP (File Transfer Protocol) 21
SMTP (Simple Mail Transfer Protocol) 25
DNS (Domain Name System) 53
Finger 79
HTTP (Hyper Text Transfer protocol or WWW, Web) 80
POP3 (Post Office Protocol) 110
NNTP (Network News Transport Protocol) 119
SNMP (Simple Network Management Protocol) 161
SNMP trap 162
PPTP (Point-to-Point Tunneling Protocol) 1723