ZyXEL Communications P660HWD1V2 802.11g WIRELESS ADSL2+ 4-PORT GATEWAY User Manual P 660H HW W T Series V3 40 User s Guide
ZyXEL Communications Corporation 802.11g WIRELESS ADSL2+ 4-PORT GATEWAY P 660H HW W T Series V3 40 User s Guide
Contents
users manual 5

P-660H/HW-D Series User’s Guide
197 Chapter 13 Bandwidth Management

P-660H/HW-D Series User’s Guide
Chapter 14 Dynamic DNS Setup 198
CHAPTER 14
Dynamic DNS Setup
This chapter discusses how to configure your ZyXEL Device to use Dynamic DNS.
14.1 Dynamic DNS Overview
Dynamic DNS allows you to update your current dynamic IP address with one or many
dynamic DNS services so that anyone can contact you (in NetMeeting, CU-SeeMe, etc.). You
can also access your FTP server or Web site on your own computer using a domain name (for
instance myhost.dhs.org, where myhost is a name of your choice) that will never change
instead of using an IP address that changes each time you reconnect. Your friends or relatives
will always be able to call you even if they don't know your IP address.
First of all, you need to have registered a dynamic DNS account with www.dyndns.org. This is
for people with a dynamic IP from their ISP or DHCP server that would still like to have a
domain name. The Dynamic DNS service provider will give you a password or key.
14.1.1 DYNDNS Wildcard
Enabling the wildcard feature for your host causes *.yourhost.dyndns.org to be aliased to the
same IP address as yourhost.dyndns.org. This feature is useful if you want to be able to use,
for example, www.yourhost.dyndns.org and still reach your hostname.
If you have a private WAN IP address, then you cannot use Dynamic DNS.
See Section 14.2 on page 198 for configuration instruction.
14.2 Configuring Dynamic DNS
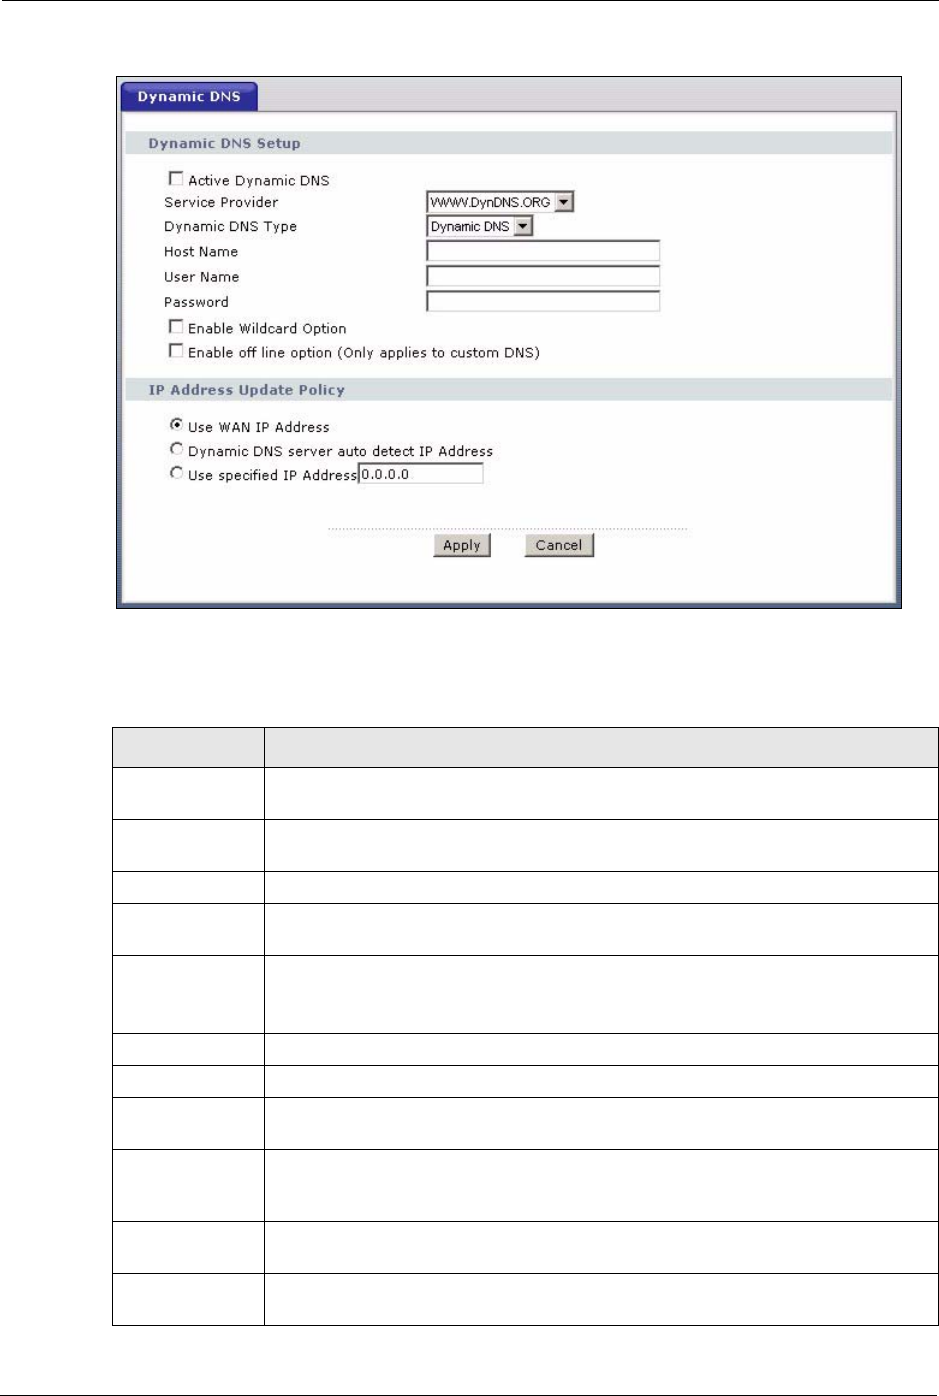
To change your ZyXEL Device’s DDNS, click Advanced > Dynamic DNS. The screen
appears as shown.
See Section 14.1 on page 198 for more information.
P-660H/HW-D Series User’s Guide
199 Chapter 14 Dynamic DNS Setup
Figure 109 Dynamic DNS
The following table describes the fields in this screen.
Table 79 Dynamic DNS
LABEL DESCRIPTION
Dynamic DNS
Setup
Active Dynamic
DNS
Select this check box to use dynamic DNS.
Service Provider This is the name of your Dynamic DNS service provider.
Dynamic DNS
Type
Select the type of service that you are registered for from your Dynamic DNS
service provider.
Host Name Type the domain name assigned to your ZyXEL Device by your Dynamic DNS
provider.
You can specify up to two host names in the field separated by a comma (",").
User Name Type your user name.
Password Type the password assigned to you.
Enable Wildcard
Option
Select the check box to enable DynDNS Wildcard.
Enable off line
option
This option is available when Custom DNS is selected in the DDNS Type field.
Check with your Dynamic DNS service provider to have traffic redirected to a URL
(that you can specify) while you are off line.
IP Address
Update Policy
Use WAN IP
Address
Select this option to update the IP address of the host name(s) to the WAN IP
address.

P-660H/HW-D Series User’s Guide
Chapter 14 Dynamic DNS Setup 200
Dynamic DNS
server auto
detect IP
Address
Select this option only when there are one or more NAT routers between the ZyXEL
Device and the DDNS server. This feature has the DDNS server automatically
detect and use the IP address of the NAT router that has a public IP address.
Note: The DDNS server may not be able to detect the proper IP
address if there is an HTTP proxy server between the ZyXEL
Device and the DDNS server.
Use specified IP
Address
Type the IP address of the host name(s). Use this if you have a static IP address.
Apply Click Apply to save your changes back to the ZyXEL Device.
Cancel Click Cancel to begin configuring this screen afresh.
Table 79 Dynamic DNS (continued)
LABEL DESCRIPTION

P-660H/HW-D Series User’s Guide
201 Chapter 14 Dynamic DNS Setup

P-660H/HW-D Series User’s Guide
Chapter 15 Remote Management Configuration 202
CHAPTER 15
Remote Management
Configuration
This chapter provides information on configuring remote management.
15.1 Remote Management Overview
Remote management allows you to determine which services/protocols can access which
ZyXEL Device interface (if any) from which computers.
Note: When you configure remote management to allow management from the WAN,
you still need to configure a firewall rule to allow access.
You may manage your ZyXEL Device from a remote location via:
• Internet (WAN only)
• ALL (LAN and WAN)
• LAN only,
• Neither (Disable).
Note: When you choose WAN only or LAN & WAN, you still need to configure a
firewall rule to allow access.
To disable remote management of a service, select Disable in the corresponding Access
Status field.
You may only have one remote management session running at a time. The ZyXEL Device
automatically disconnects a remote management session of lower priority when another
remote management session of higher priority starts. The priorities for the different types of
remote management sessions are as follows.
1Telnet
2HTTP
15.1.1 Remote Management Limitations
Remote management over LAN or WAN will not work when:
• You have disabled that service in one of the remote management screens.
P-660H/HW-D Series User’s Guide
203 Chapter 15 Remote Management Configuration
• The IP address in the Secured Client IP field does not match the client IP address. If it
does not match, the ZyXEL Device will disconnect the session immediately.
• There is already another remote management session with an equal or higher priority
running. You may only have one remote management session running at one time.
• There is a firewall rule that blocks it.
15.1.2 Remote Management and NAT
When NAT is enabled:
• Use the ZyXEL Device’s WAN IP address when configuring from the WAN.
• Use the ZyXEL Device’s LAN IP address when configuring from the LAN.
15.1.3 System Timeout
There is a default system management idle timeout of five minutes (three hundred seconds).
The ZyXEL Device automatically logs you out if the management session remains idle for
longer than this timeout period. The management session does not time out when a statistics
screen is polling.
15.2 WWW
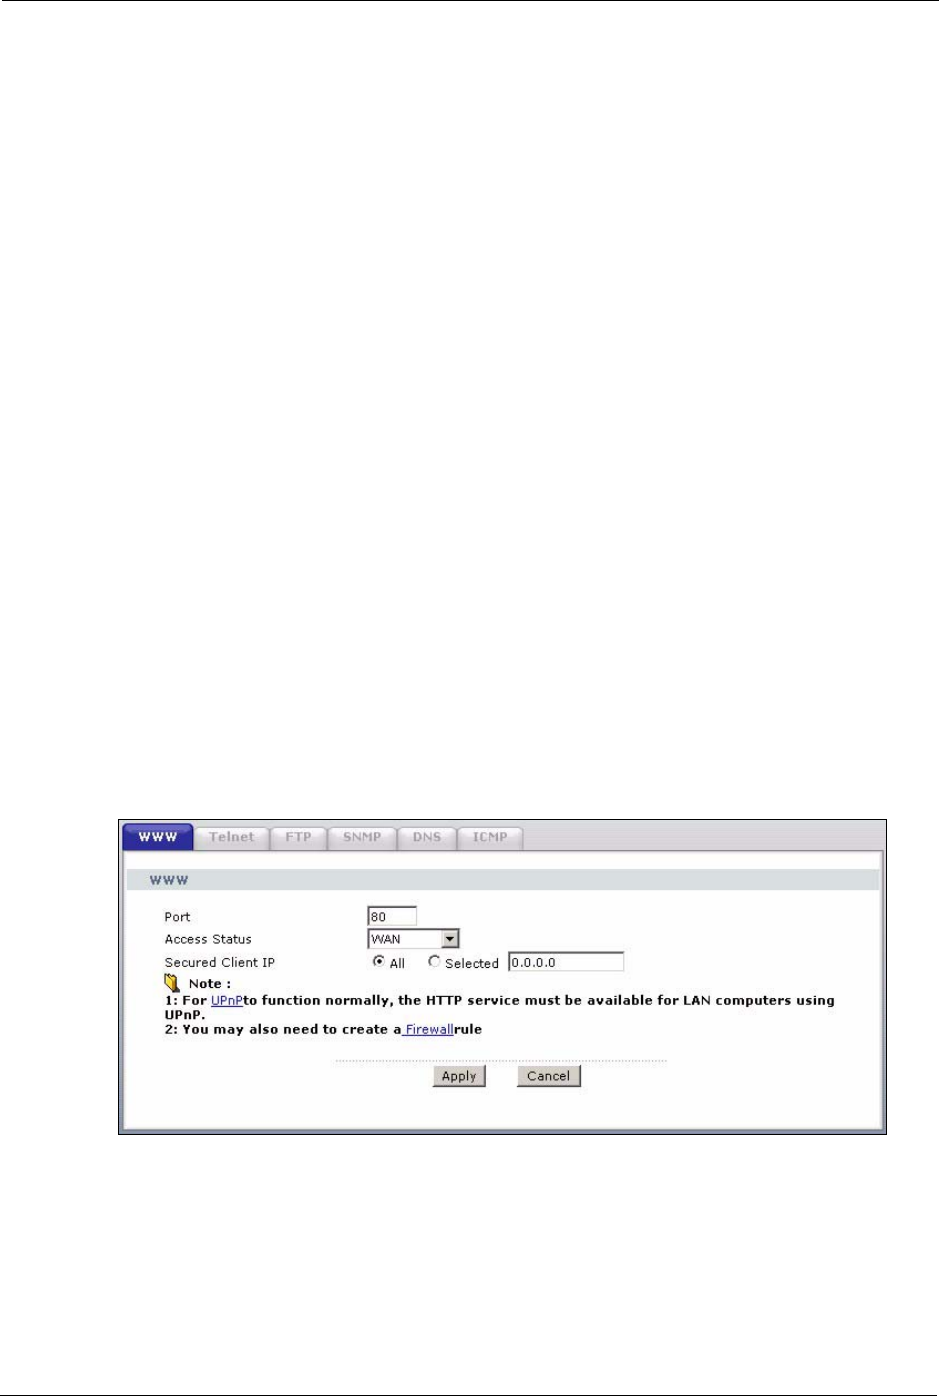
To change your ZyXEL Device’s World Wide Web settings, click Advanced > Remote
MGMT to display the WWW screen.
Figure 110 Remote Management: WWW
P-660H/HW-D Series User’s Guide
Chapter 15 Remote Management Configuration 204
The following table describes the labels in this screen.
15.3 Telnet
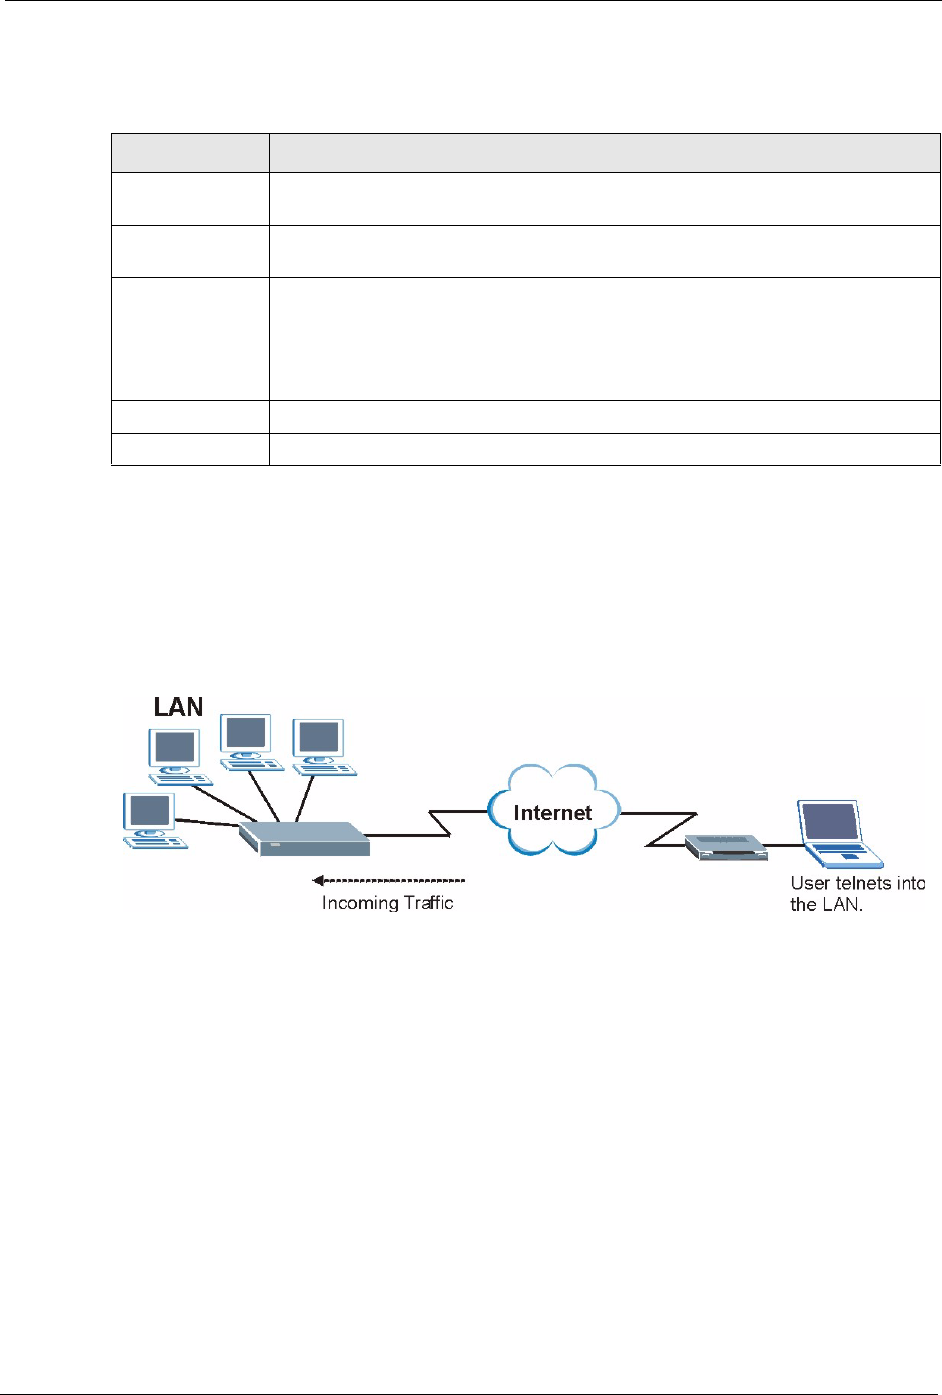
You can configure your ZyXEL Device for remote Telnet access as shown next. The
administrator uses Telnet from a computer on a remote network to access the ZyXEL Device.
Figure 111 Telnet Configuration on a TCP/IP Network
15.4 Configuring Telnet
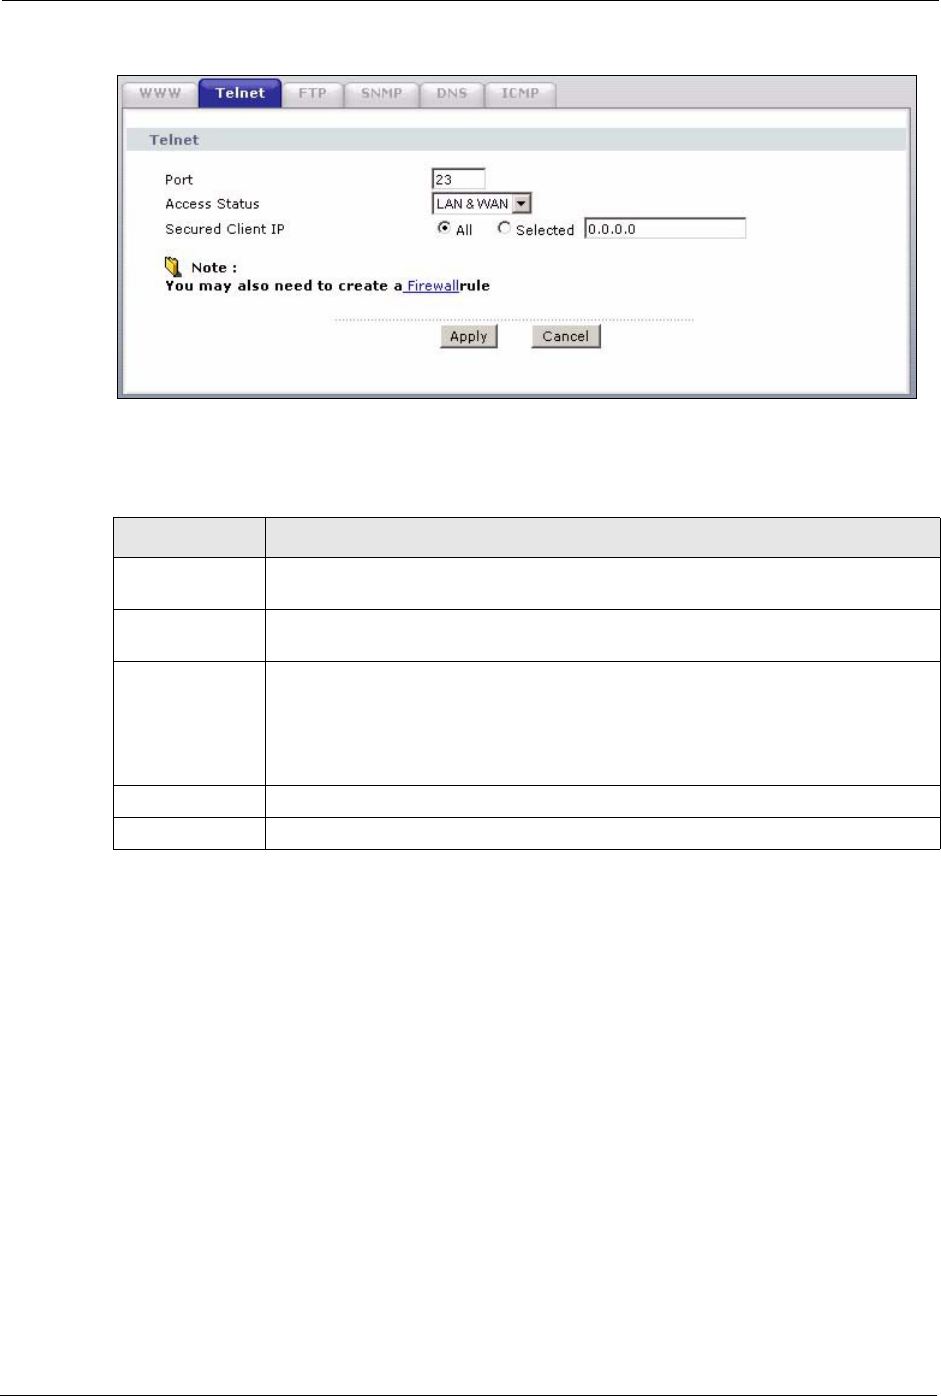
Click Advanced > Remote MGMT > Tel n e t tab to display the screen as shown.
Table 80 Remote Management: WWW
LABEL DESCRIPTION
Port You may change the server port number for a service if needed, however you must
use the same port number in order to use that service for remote management.
Access Status Select the interface(s) through which a computer may access the ZyXEL Device
using this service.
Secured Client IP A secured client is a “trusted” computer that is allowed to communicate with the
ZyXEL Device using this service.
Select All to allow any computer to access the ZyXEL Device using this service.
Choose Selected to just allow the computer with the IP address that you specify to
access the ZyXEL Device using this service.
Apply Click Apply to save your settings back to the ZyXEL Device.
Cancel Click Cancel to begin configuring this screen afresh.
P-660H/HW-D Series User’s Guide
205 Chapter 15 Remote Management Configuration
Figure 112 Remote Management: Telnet
The following table describes the labels in this screen.
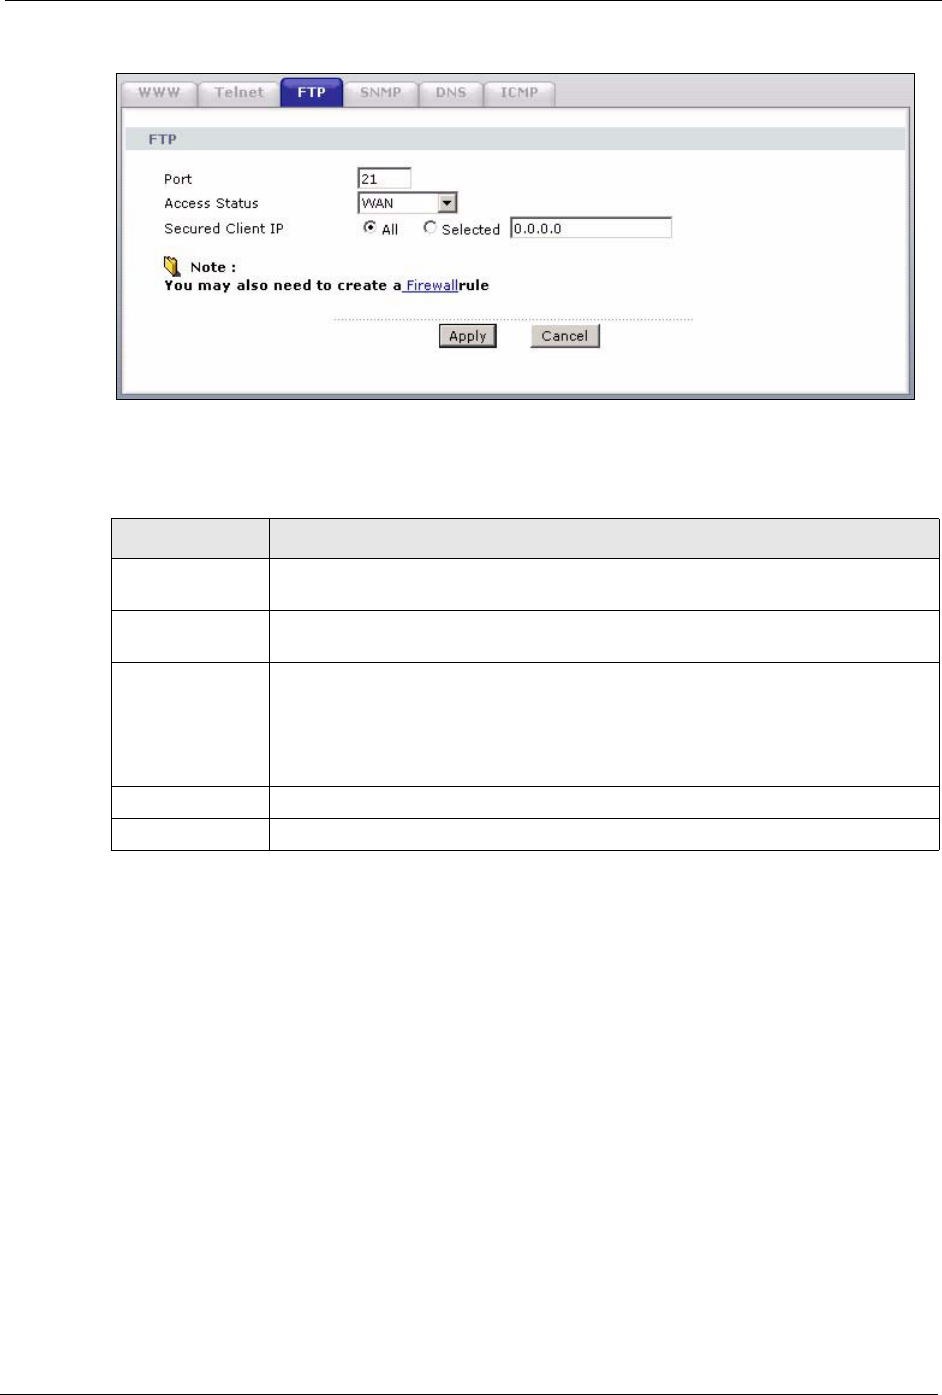
15.5 Configuring FTP
You can upload and download the ZyXEL Device’s firmware and configuration files using
FTP, please see the chapter on firmware and configuration file maintenance for details. To use
this feature, your computer must have an FTP client.
To change your ZyXEL Device’s FTP settings, click Advanced > Remote MGMT > FTP
tab. The screen appears as shown.
Table 81 Remote Management: Telnet
LABEL DESCRIPTION
Port You may change the server port number for a service if needed, however you must
use the same port number in order to use that service for remote management.
Access Status Select the interface(s) through which a computer may access the ZyXEL Device
using this service.
Secured Client IP A secured client is a “trusted” computer that is allowed to communicate with the
ZyXEL Device using this service.
Select All to allow any computer to access the ZyXEL Device using this service.
Choose Selected to just allow the computer with the IP address that you specify to
access the ZyXEL Device using this service.
Apply Click Apply to save your customized settings and exit this screen.
Cancel Click Cancel to begin configuring this screen afresh.
P-660H/HW-D Series User’s Guide
Chapter 15 Remote Management Configuration 206
Figure 113 Remote Management: FTP
The following table describes the labels in this screen.
15.6 SNMP
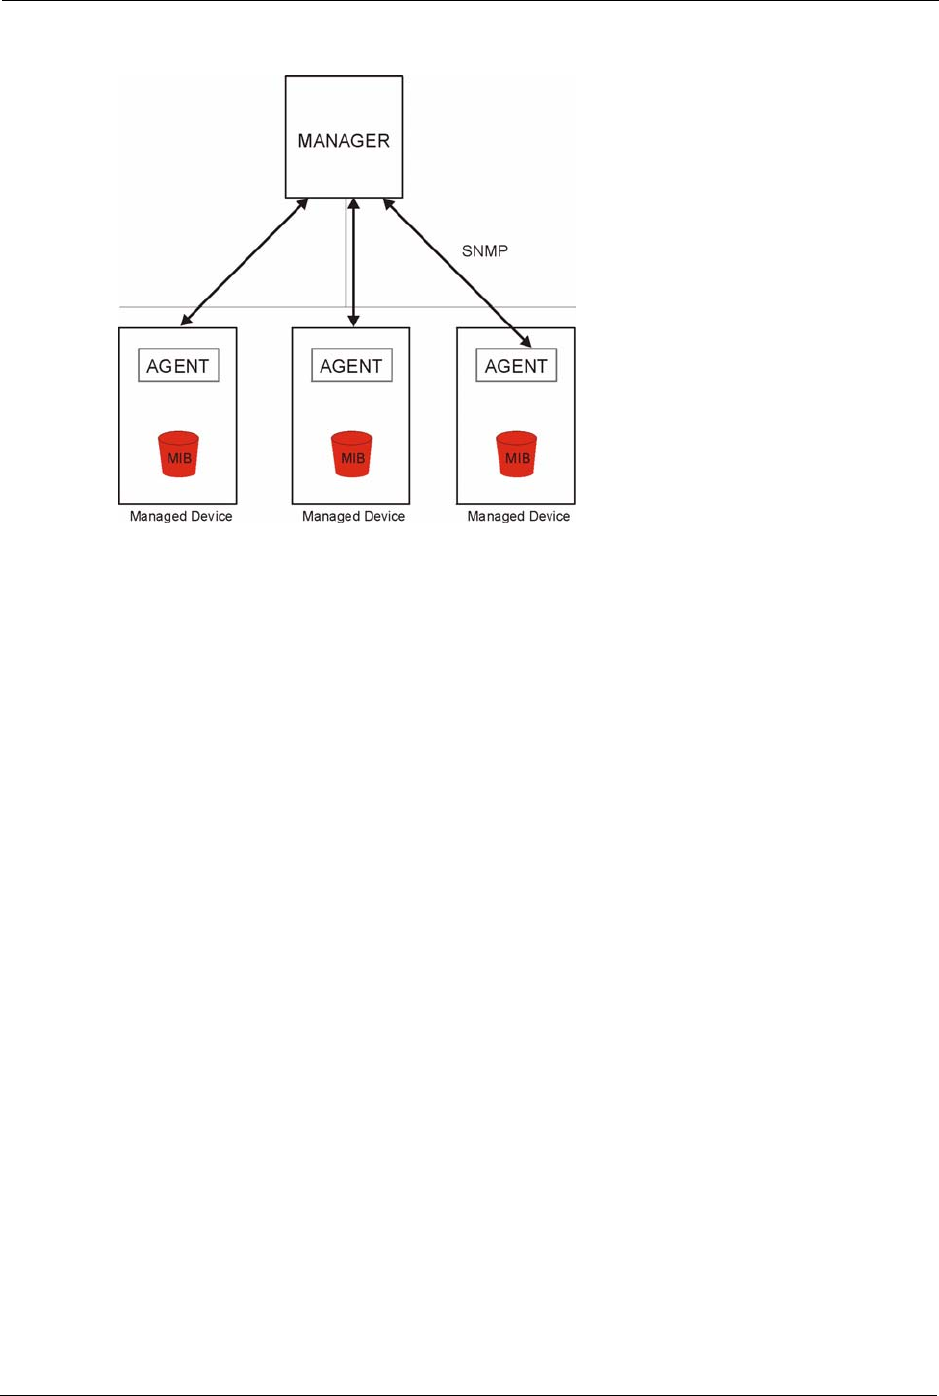
Simple Network Management Protocol (SNMP) is a protocol used for exchanging
management information between network devices. SNMP is a member of the TCP/IP
protocol suite. Your ZyXEL Device supports SNMP agent functionality, which allows a
manager station to manage and monitor the ZyXEL Device through the network. The ZyXEL
Device supports SNMP version one (SNMPv1) and version two (SNMPv2). The next figure
illustrates an SNMP management operation.
Note: SNMP is only available if TCP/IP is configured.
Table 82 Remote Management: FTP
LABEL DESCRIPTION
Port You may change the server port number for a service if needed, however you must
use the same port number in order to use that service for remote management.
Access Status Select the interface(s) through which a computer may access the ZyXEL Device
using this service.
Secured Client IP A secured client is a “trusted” computer that is allowed to communicate with the
ZyXEL Device using this service.
Select All to allow any computer to access the ZyXEL Device using this service.
Choose Selected to just allow the computer with the IP address that you specify to
access the ZyXEL Device using this service.
Apply Click Apply to save your customized settings and exit this screen.
Cancel Click Cancel to begin configuring this screen afresh.
P-660H/HW-D Series User’s Guide
207 Chapter 15 Remote Management Configuration
Figure 114 SNMP Management Model
An SNMP managed network consists of two main types of component: agents and a manager.
An agent is a management software module that resides in a managed device (the ZyXEL
Device). An agent translates the local management information from the managed device into
a form compatible with SNMP. The manager is the console through which network
administrators perform network management functions. It executes applications that control
and monitor managed devices.
The managed devices contain object variables/managed objects that define each piece of
information to be collected about a device. Examples of variables include such as number of
packets received, node port status etc. A Management Information Base (MIB) is a collection
of managed objects. SNMP allows a manager and agents to communicate for the purpose of
accessing these objects.
SNMP itself is a simple request/response protocol based on the manager/agent model. The
manager issues a request and the agent returns responses using the following protocol
operations:
• Get - Allows the manager to retrieve an object variable from the agent.
• GetNext - Allows the manager to retrieve the next object variable from a table or list
within an agent. In SNMPv1, when a manager wants to retrieve all elements of a table
from an agent, it initiates a Get operation, followed by a series of GetNext operations.
• Set - Allows the manager to set values for object variables within an agent.
• Trap - Used by the agent to inform the manager of some events.
15.6.1 Supported MIBs
The ZyXEL Device supports MIB II that is defined in RFC-1213 and RFC-1215. The focus of
the MIBs is to let administrators collect statistical data and monitor status and performance.
P-660H/HW-D Series User’s Guide
Chapter 15 Remote Management Configuration 208
15.6.2 SNMP Traps
The ZyXEL Device will send traps to the SNMP manager when any one of the following
events occurs:
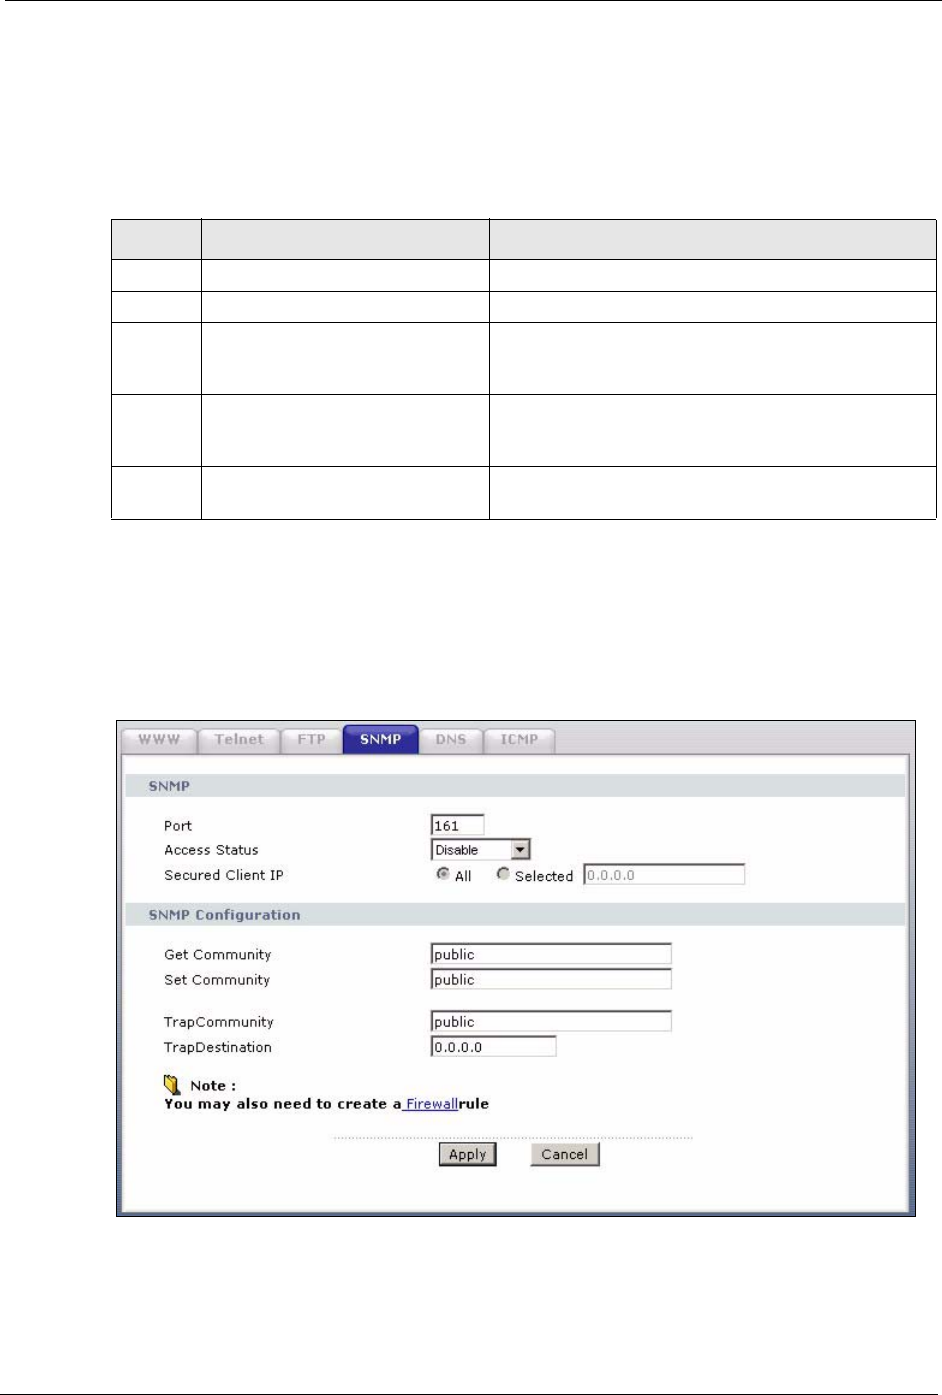
15.6.3 Configuring SNMP
To change your ZyXEL Device’s SNMP settings, click Advanced > Remote MGMT >
SNMP. The screen appears as shown.
Figure 115 Remote Management: SNMP
Table 83 SNMP Traps
TRAP # TRAP NAME DESCRIPTION
0coldStart (defined in RFC-1215)A trap is sent after booting (power on).
1warmStart (defined in RFC-1215)A trap is sent after booting (software reboot).
6whyReboot (defined in ZYXEL-
MIB)
A trap is sent with the reason of restart before
rebooting when the system is going to restart (warm
start).
6a For intentional reboot: A trap is sent with the message "System reboot by
user!" if reboot is done intentionally, (for example,
download new files, CI command "sys reboot", etc.).
6b For fatal error: A trap is sent with the message of the fatal code if the
system reboots because of fatal errors.

P-660H/HW-D Series User’s Guide
209 Chapter 15 Remote Management Configuration
The following table describes the labels in this screen.
15.7 Configuring DNS
Use DNS (Domain Name System) to map a domain name to its corresponding IP address and
vice versa. Refer to the chapter on LAN for background information.
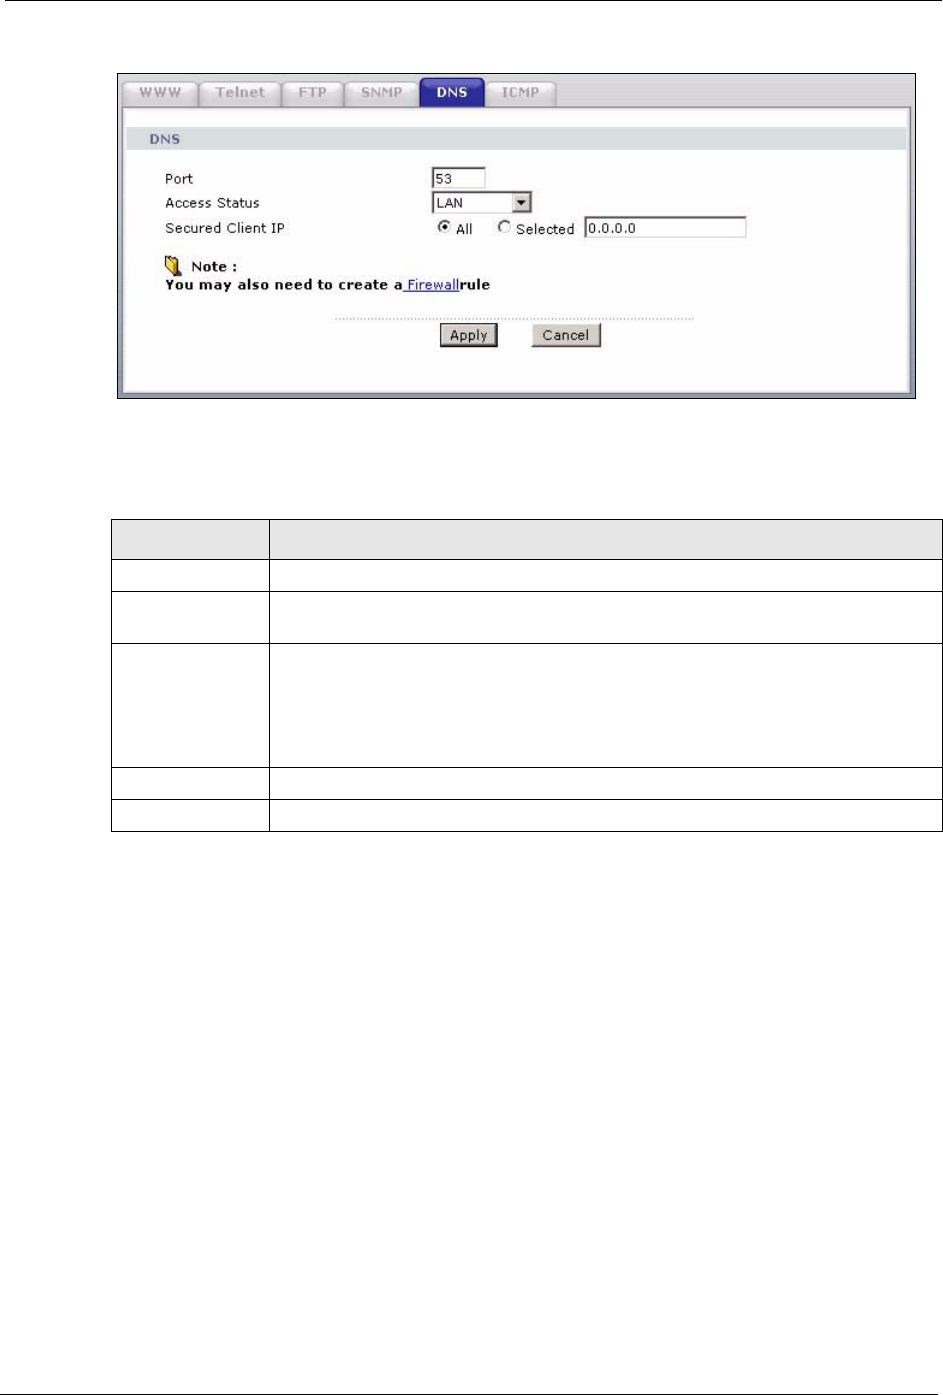
To change your ZyXEL Device’s DNS settings, click Advanced > Remote MGMT > DNS.
The screen appears as shown. Use this screen to set from which IP address the ZyXEL Device
will accept DNS queries and on which interface it can send them your ZyXEL Device’s DNS
settings.
Table 84 Remote Management: SNMP
LABEL DESCRIPTION
SNMP
Port You may change the server port number for a service if needed, however you
must use the same port number in order to use that service for remote
management.
Access Status Select the interface(s) through which a computer may access the ZyXEL Device
using this service.
Secured Client IP A secured client is a “trusted” computer that is allowed to communicate with the
ZyXEL Device using this service.
Select All to allow any computer to access the ZyXEL Device using this service.
Choose Selected to just allow the computer with the IP address that you specify
to access the ZyXEL Device using this service.
SNMP Configuration
Get Community Enter the Get Community, which is the password for the incoming Get and
GetNext requests from the management station. The default is public and allows
all requests.
Set Community Enter the Set community, which is the password for incoming Set requests
from the management station. The default is public and allows all requests.
Trap
Community Type the trap community, which is the password sent with each trap to the
SNMP manager. The default is public and allows all requests.
Destination Type the IP address of the station to send your SNMP traps to.
Apply Click Apply to save your customized settings and exit this screen.
Cancel Click Cancel to begin configuring this screen afresh.
P-660H/HW-D Series User’s Guide
Chapter 15 Remote Management Configuration 210
Figure 116 Remote Management: DNS
The following table describes the labels in this screen.
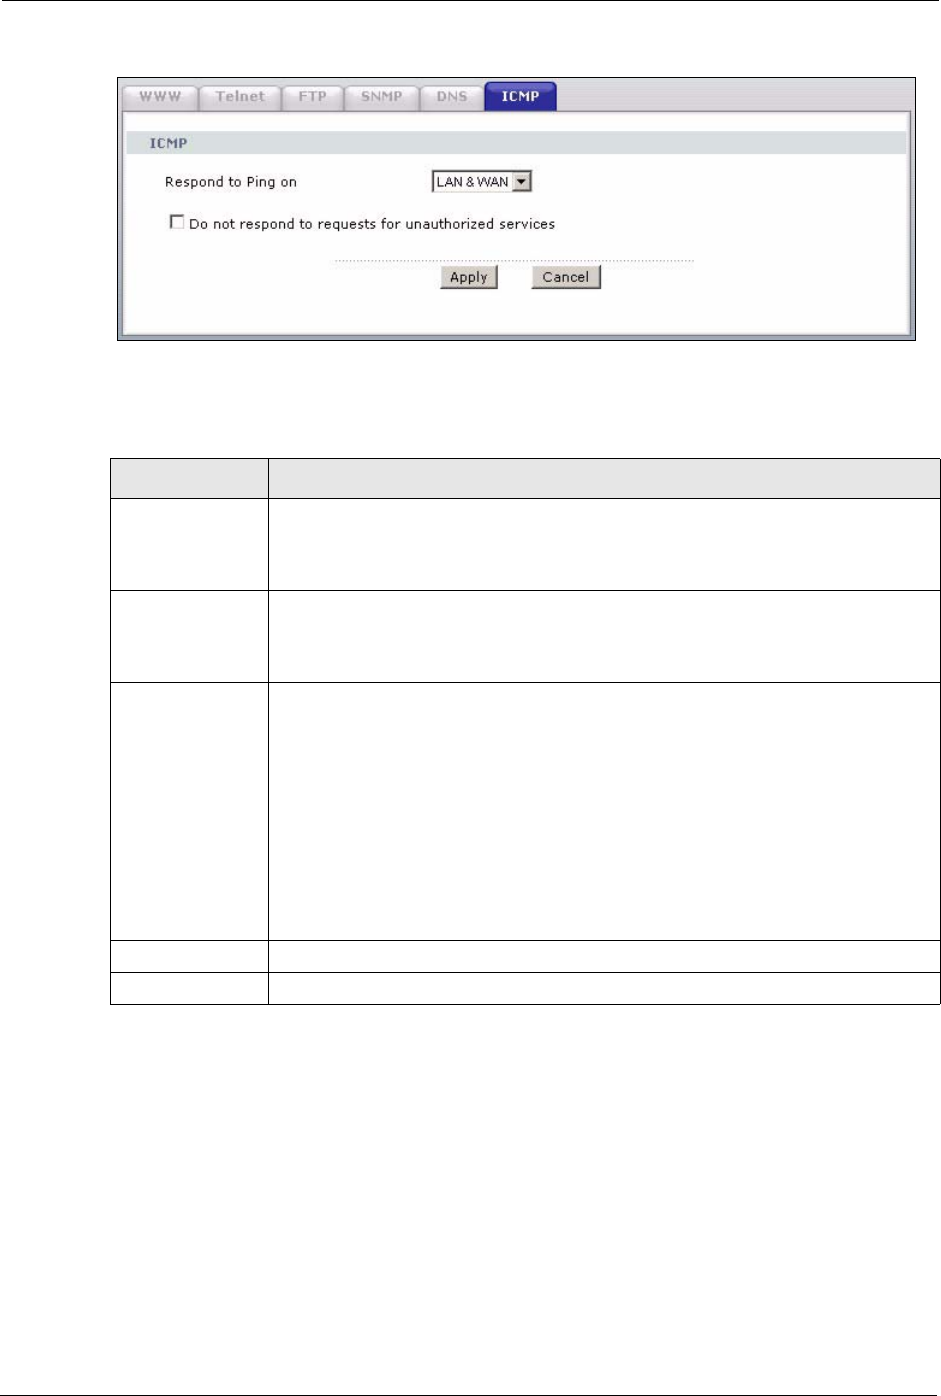
15.8 Configuring ICMP
To change your ZyXEL Device’s security settings, click Advanced > Remote MGMT >
ICMP. The screen appears as shown.
If an outside user attempts to probe an unsupported port on your ZyXEL Device, an ICMP
response packet is automatically returned. This allows the outside user to know the ZyXEL
Device exists. Your ZyXEL Device supports anti-probing, which prevents the ICMP response
packet from being sent. This keeps outsiders from discovering your ZyXEL Device when
unsupported ports are probed.
Table 85 Remote Management: DNS
LABEL DESCRIPTION
Port The DNS service port number is 53.
Access Status Select the interface(s) through which a computer may send DNS queries to the
ZyXEL Device.
Secured Client IP A secured client is a “trusted” computer that is allowed to send DNS queries to the
ZyXEL Device.
Select All to allow any computer to send DNS queries to the ZyXEL Device.
Choose Selected to just allow the computer with the IP address that you specify to
send DNS queries to the ZyXEL Device.
Apply Click Apply to save your customized settings and exit this screen.
Cancel Click Cancel to begin configuring this screen afresh.
P-660H/HW-D Series User’s Guide
211 Chapter 15 Remote Management Configuration
Figure 117 Remote Management: ICMP
The following table describes the labels in this screen.
15.9 TR-069
TR-069 is a protocol that defines how your ZyXEL Device can be managed via a management
server such as ZyXEL’s Vantage CNM Access.
An administrator can use CNM Access to remotely set up the ZyXEL device, modify settings,
perform firmware upgrades as well as monitor and diagnose the ZyXEL device. All you have
to do is enable the device to be managed by CNM Access and specify the CNM Access IP
address or domain name and username and password.
Table 86 Remote Management: ICMP
LABEL DESCRIPTION
ICMP Internet Control Message Protocol is a message control and error-reporting
protocol between a host server and a gateway to the Internet. ICMP uses Internet
Protocol (IP) datagrams, but the messages are processed by the TCP/IP software
and directly apparent to the application user.
Respond to Ping
on
The ZyXEL Device will not respond to any incoming Ping requests when Disable is
selected. Select LAN to reply to incoming LAN Ping requests. Select WAN to reply
to incoming WAN Ping requests. Otherwise select LAN & WAN to reply to both
incoming LAN and WAN Ping requests.
Do not respond to
requests for
unauthorized
services
Select this option to prevent hackers from finding the ZyXEL Device by probing for
unused ports. If you select this option, the ZyXEL Device will not respond to port
request(s) for unused ports, thus leaving the unused ports and the ZyXEL Device
unseen. By default this option is not selected and the ZyXEL Device will reply with
an ICMP Port Unreachable packet for a port probe on its unused UDP ports, and a
TCP Reset packet for a port probe on its unused TCP ports.
Note that the probing packets must first traverse the ZyXEL Device's firewall
mechanism before reaching this anti-probing mechanism. Therefore if the firewall
mechanism blocks a probing packet, the ZyXEL Device reacts based on the
corresponding firewall policy to send a TCP reset packet for a blocked TCP packet
or an ICMP port-unreachable packet for a blocked UDP packets or just drop the
packets without sending a response packet.
Apply Click Apply to save your customized settings and exit this screen.
Cancel Click Cancel to begin configuring this screen afresh.

P-660H/HW-D Series User’s Guide
Chapter 15 Remote Management Configuration 212
Follow the procedure below to configure your ZyXEL Device to be managed by CNM Access.
See the Command Interpreter appendix for information on the command structure and how to
access the CLI (Command Line Interface) on the ZyXEL Device.
Note: In this example a.b.c.d is the IP address of CNM Access. You must change this
value to reflect your actual management server IP address or domain name.
See Table 87 on page 212 for detailed descriptions of the commands.
Figure 118 Enabling TR-069
The following table gives a description of TR-069 commands.
ras> wan tr069 load
ras> wan tr069 acsUrl a.b.c.d
Auto-Configuration Server URL: http://a.b.c.d
ras> wan tr069 periodicEnable 1
ras> wan tr069 informInterval 2400
TR069 Informinterval 2400
ras> wan tr069 active 1
ras> wan tr069 save
Table 87 TR-069 Commands
Root Command or
Subdirectory Command Description
wan tr069 All TR-069 related commands must be preceded by wan tr069.
load Start configuring TR-069 on your ZyXEL Device.
active [0:no/
1:yes]
Enable/disable TR-069 operation.
acsUrl <URL> Set the IP address or domain name of CNM Access.
username
[maxlength:15]
Username used to authenticate the device when making a
connection to CNM Access. This username is set up on the server
and must be provided by the CNM Access administrator.
password
[maxlength:15]
Password used to authenticate the device when making a
connection to CNM Access. This password is set up on the server
and must be provided by the CNM Access administrator.
periodicEnable
[0:Disable/
1:Enable]
Whether or not the device must periodically send information to
CNM Access. It is recommended to set this value to 1 in order for
the ZyXEL Device to send information to CNM Access.
informInterval
[sec]
The duration in seconds of the interval for which the device MUST
attempt to connect with CNM Access to send information and
check for configuration updates. Enter a value between 30 and
2147483647 seconds.
save Save the TR-069 settings to your ZyXEL Device.

P-660H/HW-D Series User’s Guide
213 Chapter 15 Remote Management Configuration

P-660H/HW-D Series User’s Guide
Chapter 16 Universal Plug-and-Play (UPnP) 214
CHAPTER 16
Universal Plug-and-Play (UPnP)
This chapter introduces the UPnP feature in the web configurator.
16.1 Introducing Universal Plug and Play
Universal Plug and Play (UPnP) is a distributed, open networking standard that uses TCP/IP
for simple peer-to-peer network connectivity between devices. A UPnP device can
dynamically join a network, obtain an IP address, convey its capabilities and learn about other
devices on the network. In turn, a device can leave a network smoothly and automatically
when it is no longer in use.
See Section 16.2.1 on page 215 for configuration instructions.
16.1.1 How do I know if I'm using UPnP?
UPnP hardware is identified as an icon in the Network Connections folder (Windows XP).
Each UPnP compatible device installed on your network will appear as a separate icon.
Selecting the icon of a UPnP device will allow you to access the information and properties of
that device.
16.1.2 NAT Traversal
UPnP NAT traversal automates the process of allowing an application to operate through
NAT. UPnP network devices can automatically configure network addressing, announce their
presence in the network to other UPnP devices and enable exchange of simple product and
service descriptions. NAT traversal allows the following:
• Dynamic port mapping
• Learning public IP addresses
• Assigning lease times to mappings
Windows Messenger is an example of an application that supports NAT traversal and UPnP.
See the NAT chapter for more information on NAT.
P-660H/HW-D Series User’s Guide
215 Chapter 16 Universal Plug-and-Play (UPnP)
16.1.3 Cautions with UPnP
The automated nature of NAT traversal applications in establishing their own services and
opening firewall ports may present network security issues. Network information and
configuration may also be obtained and modified by users in some network environments.
When a UPnP device joins a network, it announces its presence with a multicast message. For
security reasons, the ZyXEL Device allows multicast messages on the LAN only.
All UPnP-enabled devices may communicate freely with each other without additional
configuration. Disable UPnP if this is not your intention.
16.2 UPnP and ZyXEL
ZyXEL has achieved UPnP certification from the Universal Plug and Play Forum UPnP™
Implementers Corp. (UIC). ZyXEL's UPnP implementation supports Internet Gateway Device
(IGD) 1.0.
See the following sections for examples of installing and using UPnP.
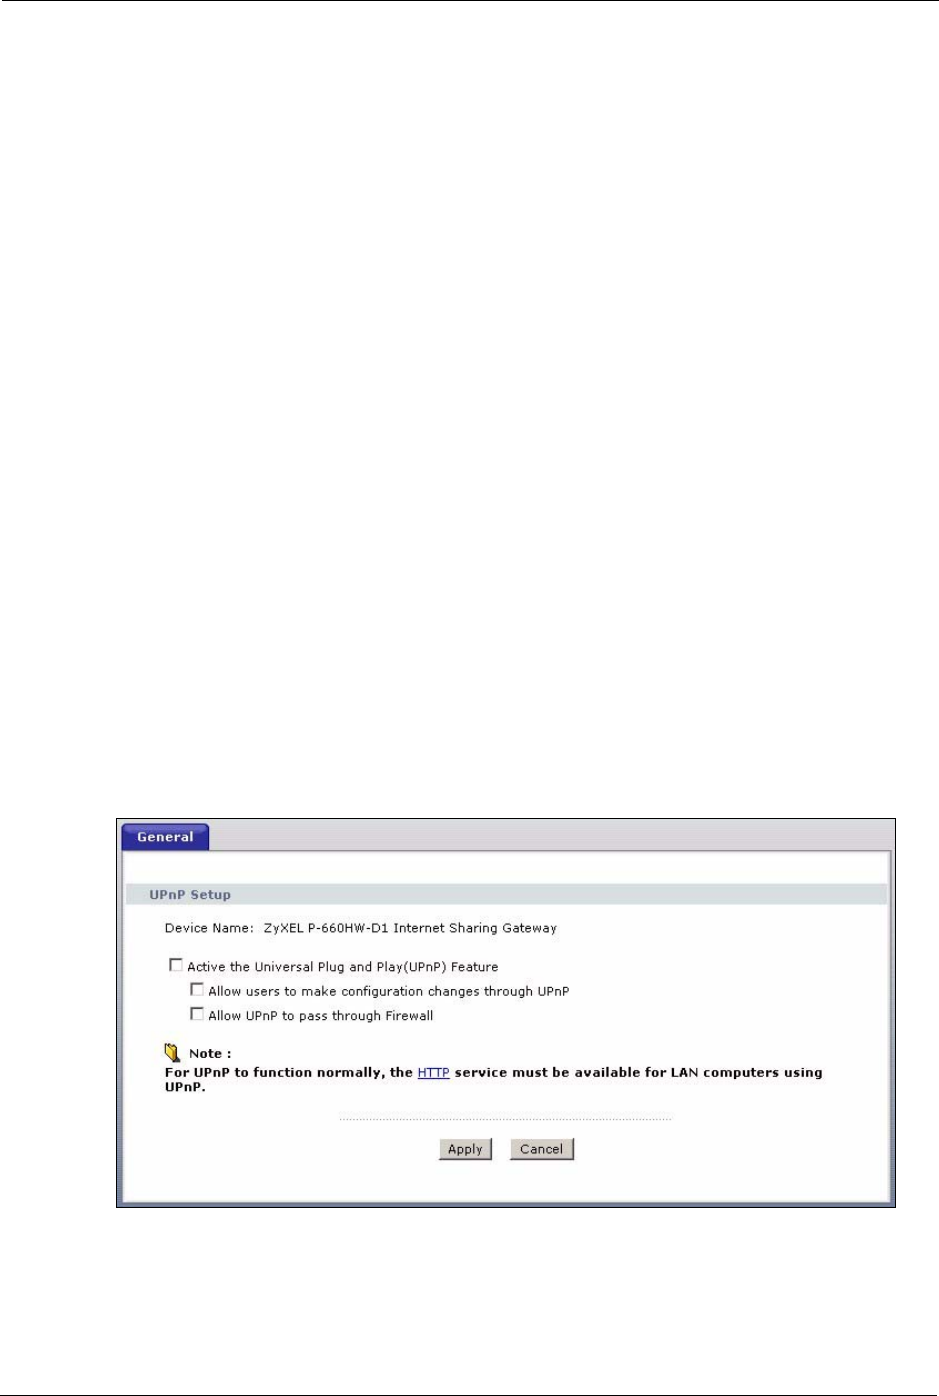
16.2.1 Configuring UPnP
Click Advanced > UPnP to display the screen shown next.
See Section 16.1 on page 214 for more information.
Figure 119 Configuring UPnP

P-660H/HW-D Series User’s Guide
Chapter 16 Universal Plug-and-Play (UPnP) 216
The following table describes the fields in this screen.
16.3 Installing UPnP in Windows Example
This section shows how to install UPnP in Windows Me and Windows XP.
16.3.1 Installing UPnP in Windows Me
Follow the steps below to install the UPnP in Windows Me.
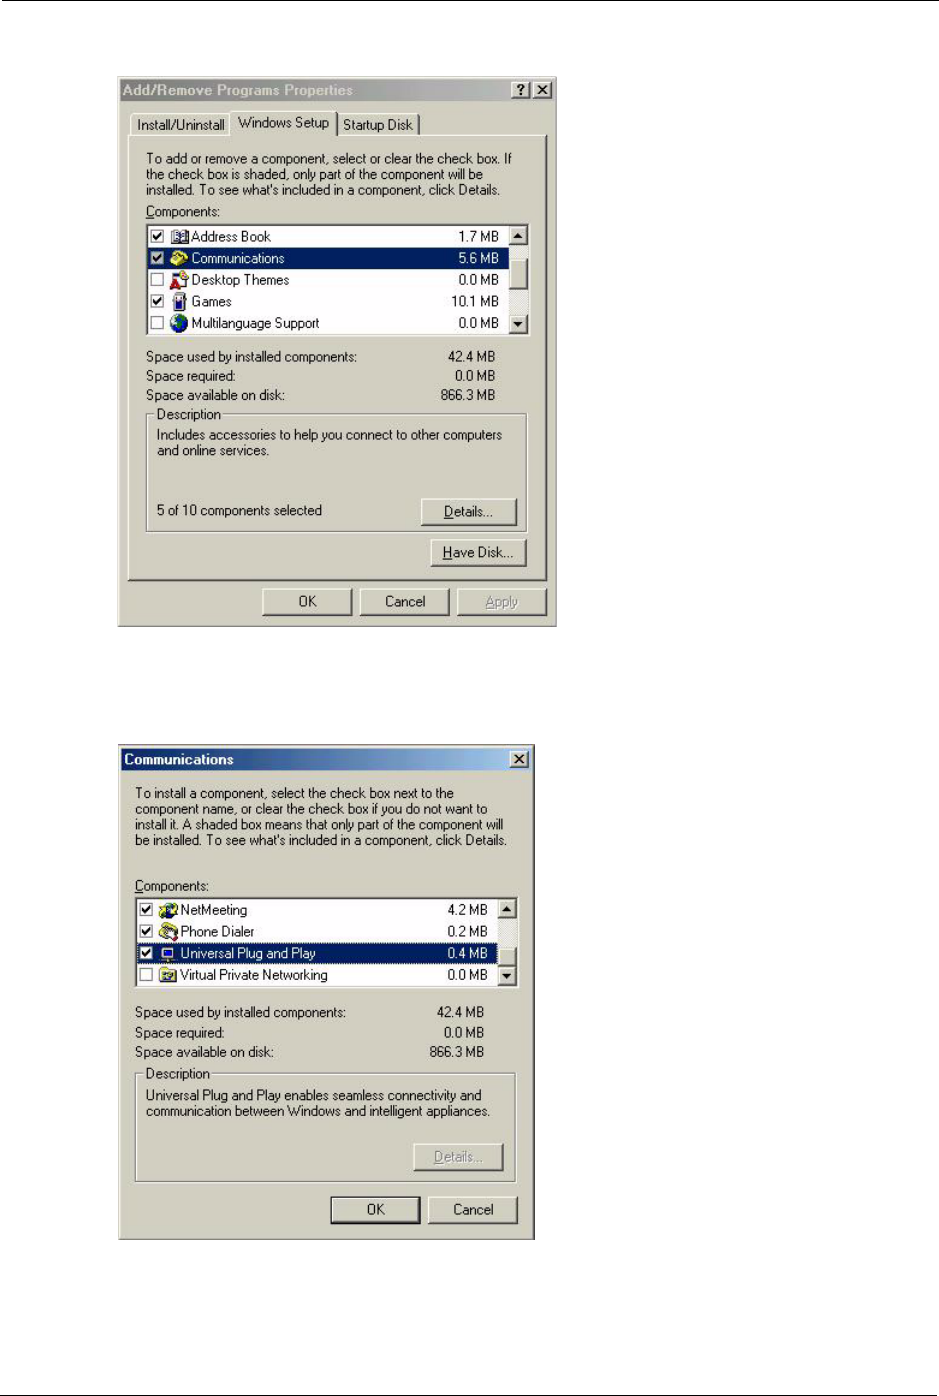
1Click Start and Control Panel. Double-click Add/Remove Programs.
2Click on the Windows Setup tab and select Communication in the Components
selection box. Click Details.
Table 88 Configuring UPnP
LABEL DESCRIPTION
Active the Universal Plug and
Play (UPnP) Feature
Select this check box to activate UPnP. Be aware that anyone could use
a UPnP application to open the web configurator's login screen without
entering the ZyXEL Device's IP address (although you must still enter
the password to access the web configurator).
Allow users to make
configuration changes
through UPnP
Select this check box to allow UPnP-enabled applications to
automatically configure the ZyXEL Device so that they can
communicate through the ZyXEL Device, for example by using NAT
traversal, UPnP applications automatically reserve a NAT forwarding
port in order to communicate with another UPnP enabled device; this
eliminates the need to manually configure port forwarding for the UPnP
enabled application.
Allow UPnP to pass through
Firewall
Select this check box to allow traffic from UPnP-enabled applications to
bypass the firewall.
Clear this check box to have the firewall block all UPnP application
packets (for example, MSN packets).
Apply Click Apply to save the setting to the ZyXEL Device.
Cancel Click Cancel to return to the previously saved settings.
P-660H/HW-D Series User’s Guide
217 Chapter 16 Universal Plug-and-Play (UPnP)
Figure 120 Add/Remove Programs: Windows Setup: Communication
3In the Communications window, select the Universal Plug and Play check box in the
Components selection box.
Figure 121 Add/Remove Programs: Windows Setup: Communication: Components
4Click OK to go back to the Add/Remove Programs Properties window and click Next.
5Restart the computer when prompted.
P-660H/HW-D Series User’s Guide
Chapter 16 Universal Plug-and-Play (UPnP) 218
16.3.2 Installing UPnP in Windows XP
Follow the steps below to install the UPnP in Windows XP.
1Click start and Control Panel.
2Double-click Network Connections.
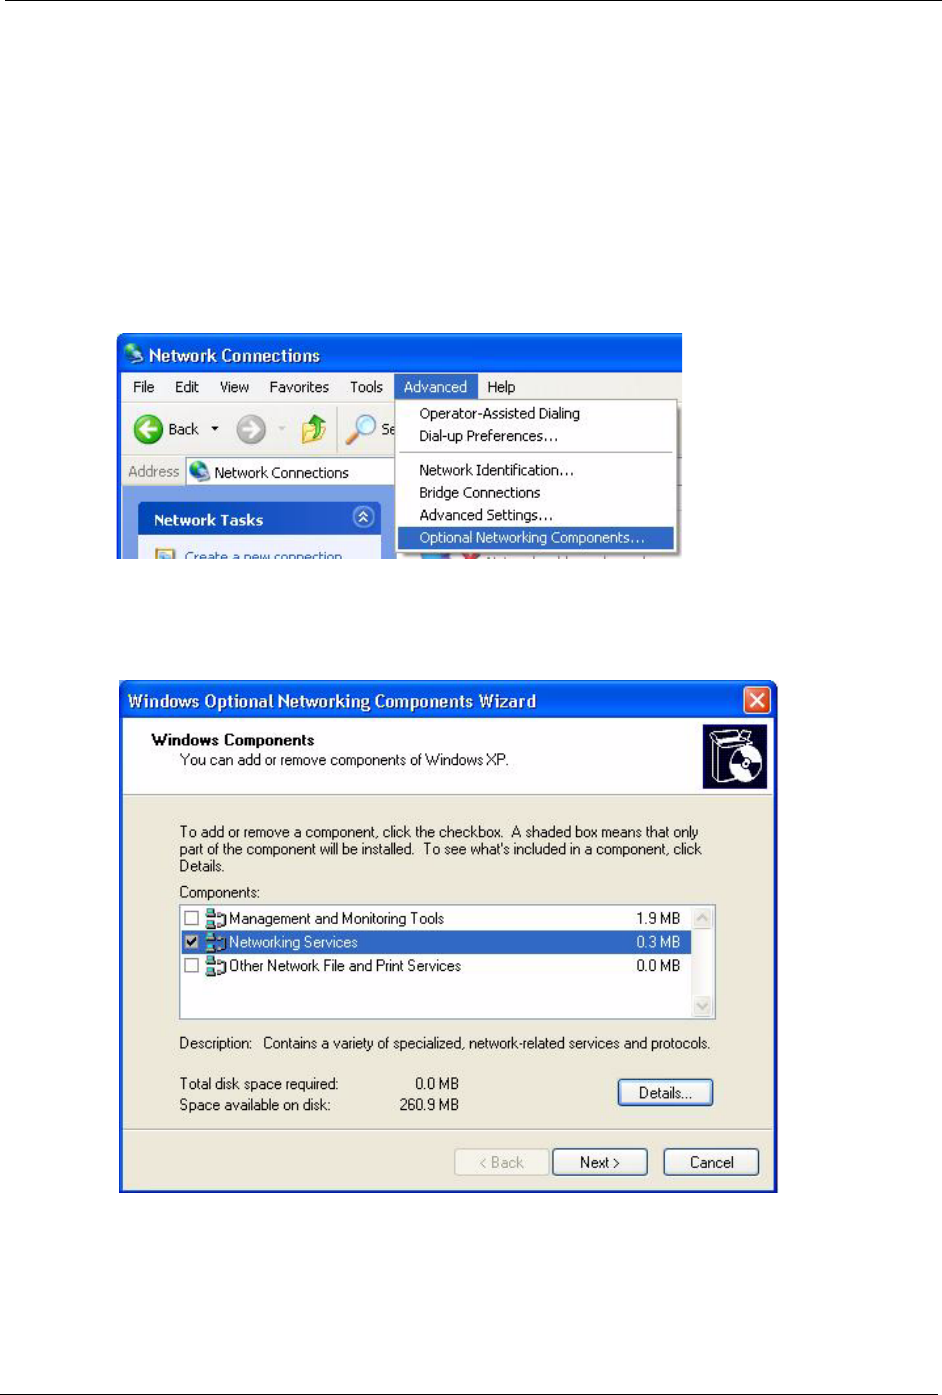
3In the Network Connections window, click Advanced in the main menu and select
Optional Networking Components ….
Figure 122 Network Connections
4The Windows Optional Networking Components Wizard window displays. Select
Networking Service in the Components selection box and click Details.
Figure 123 Windows Optional Networking Components Wizard
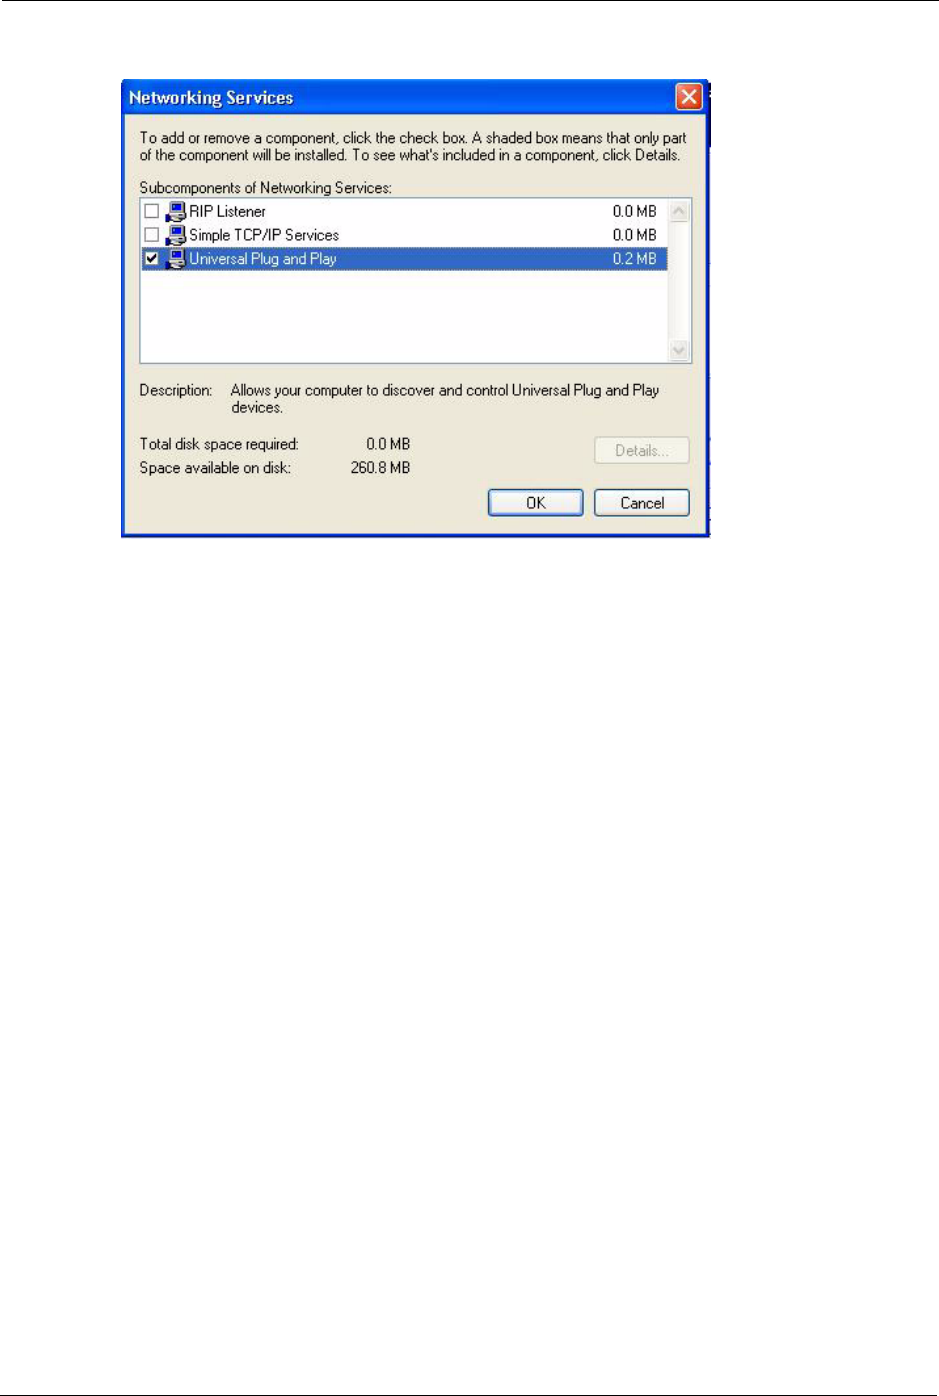
5In the Networking Services window, select the Universal Plug and Play check box.
P-660H/HW-D Series User’s Guide
219 Chapter 16 Universal Plug-and-Play (UPnP)
Figure 124 Networking Services
6Click OK to go back to the Windows Optional Networking Component Wizard
window and click Next.
16.4 Using UPnP in Windows XP Example
This section shows you how to use the UPnP feature in Windows XP. You must already have
UPnP installed in Windows XP and UPnP activated on the ZyXEL Device.
Make sure the computer is connected to a LAN port of the ZyXEL Device. Turn on your
computer and the ZyXEL Device.
16.4.1 Auto-discover Your UPnP-enabled Network Device
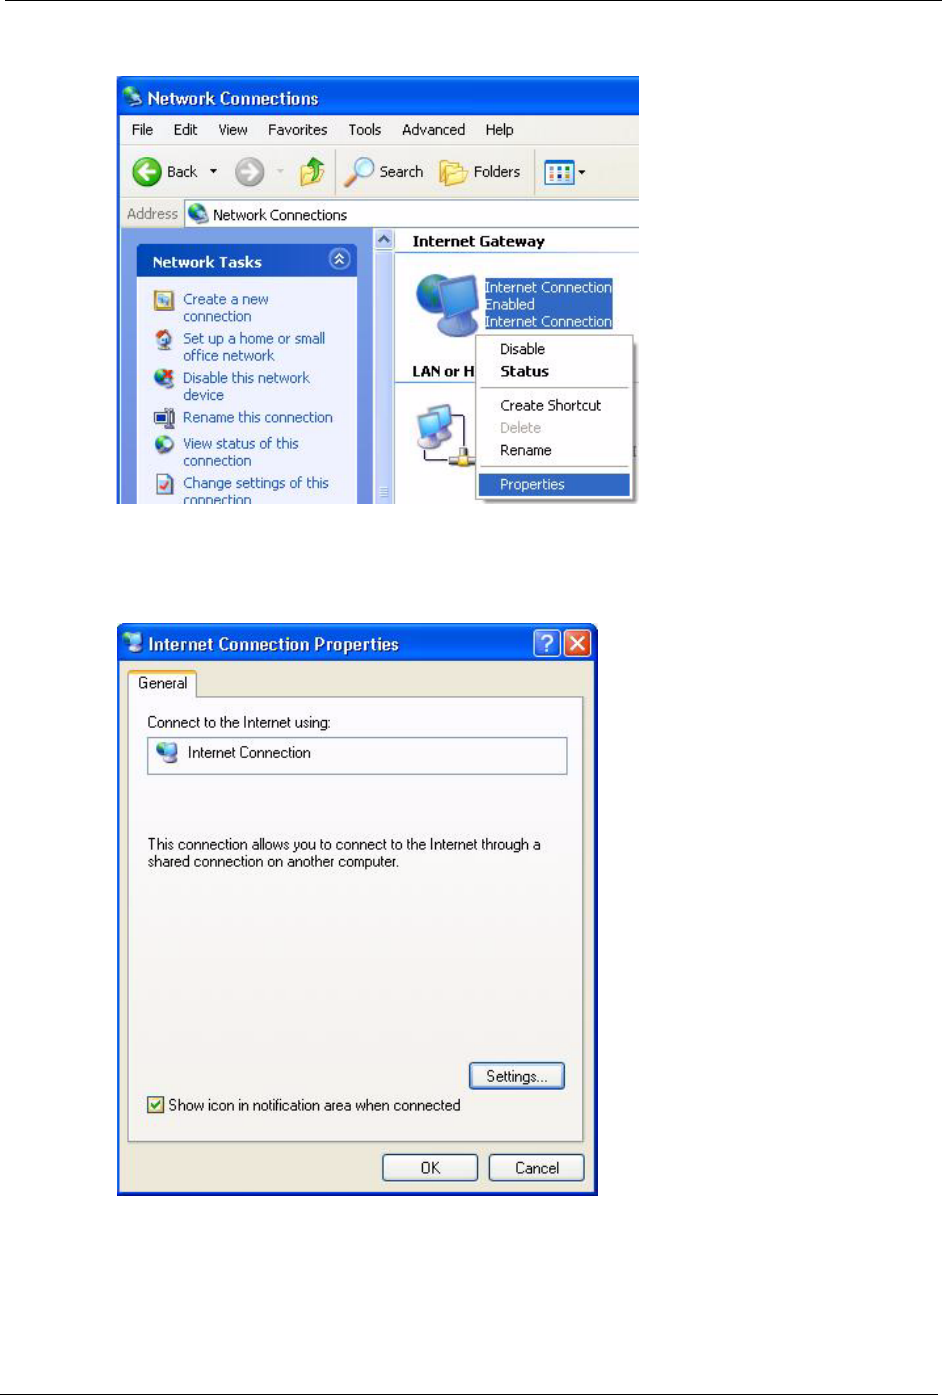
1Click start and Control Panel. Double-click Network Connections. An icon displays
under Internet Gateway.
2Right-click the icon and select Properties.
P-660H/HW-D Series User’s Guide
Chapter 16 Universal Plug-and-Play (UPnP) 220
Figure 125 Network Connections
3In the Internet Connection Properties window, click Settings to see the port mappings
there were automatically created.
Figure 126 Internet Connection Properties
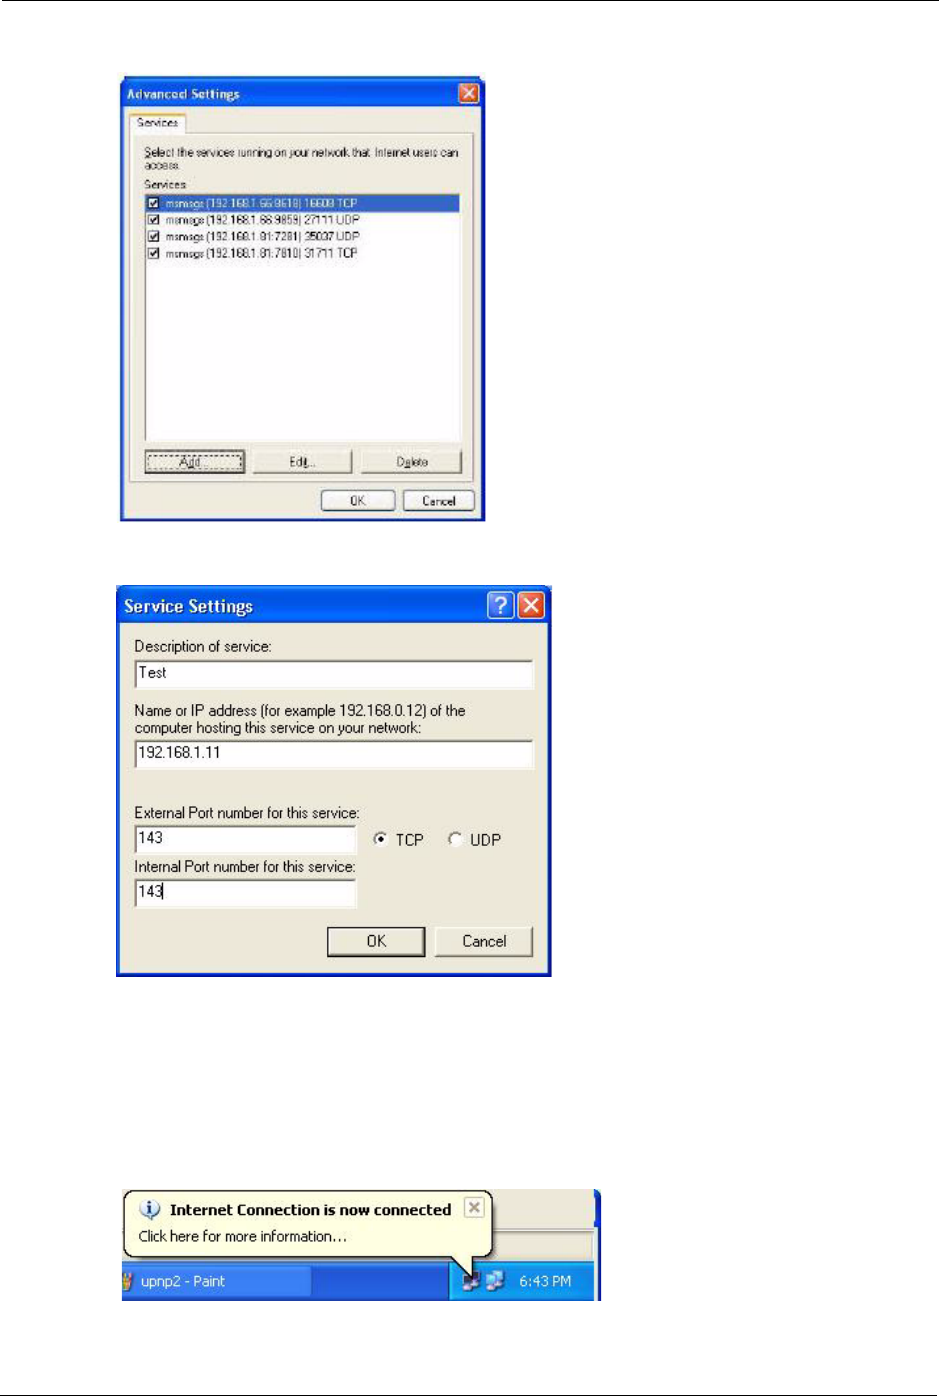
4You may edit or delete the port mappings or click Add to manually add port mappings.
P-660H/HW-D Series User’s Guide
221 Chapter 16 Universal Plug-and-Play (UPnP)
Figure 127 Internet Connection Properties: Advanced Settings
Figure 128 Internet Connection Properties: Advanced Settings: Add
Note: When the UPnP-enabled device is disconnected from your computer, all port
mappings will be deleted automatically.
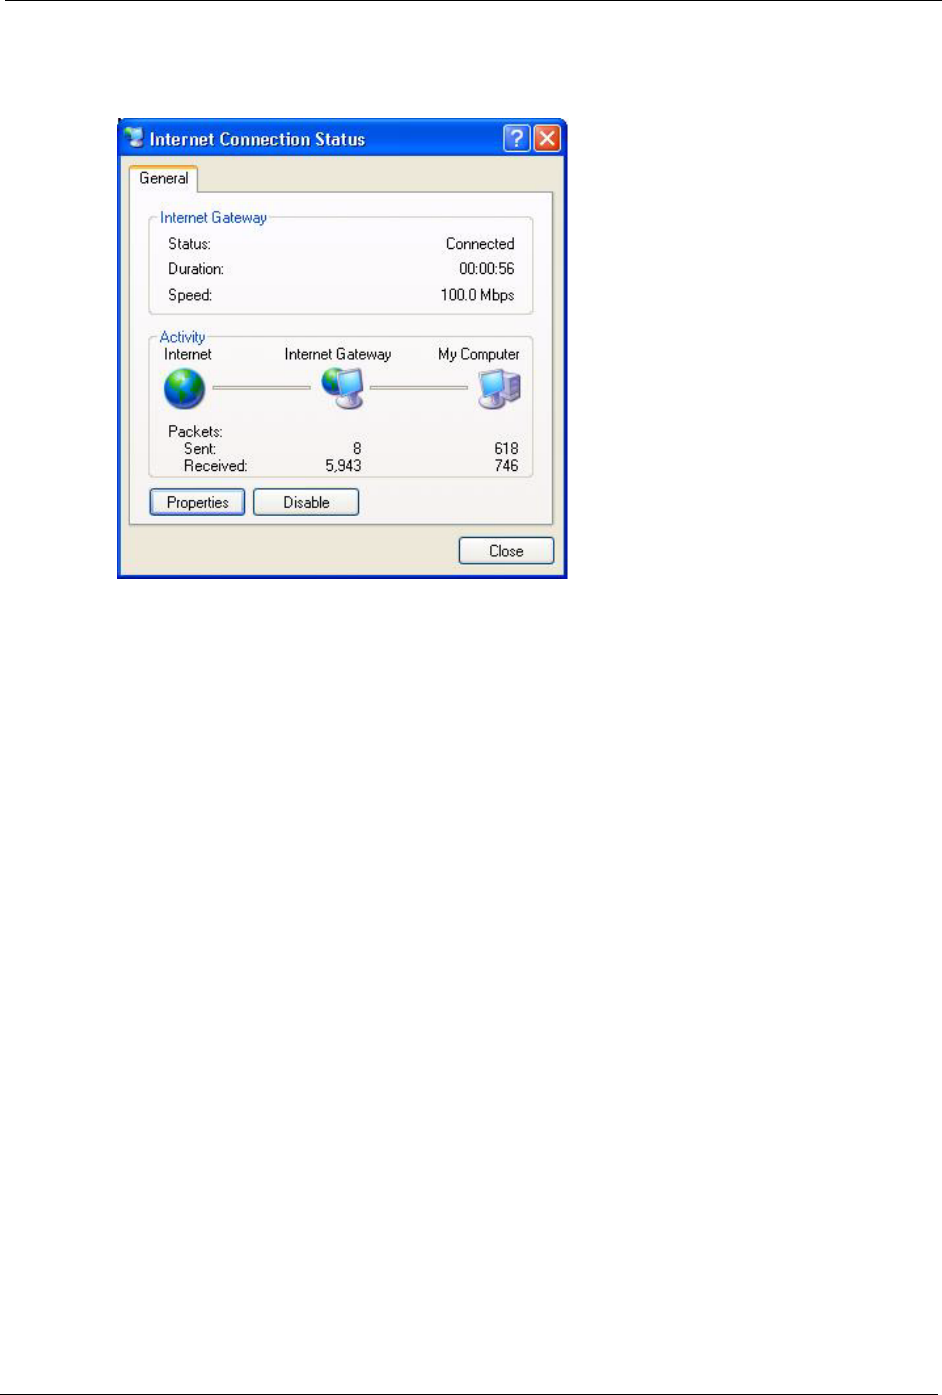
5Select Show icon in notification area when connected option and click OK. An icon
displays in the system tray.
Figure 129 System Tray Icon
P-660H/HW-D Series User’s Guide
Chapter 16 Universal Plug-and-Play (UPnP) 222
6Double-click on the icon to display your current Internet connection status.
Figure 130 Internet Connection Status
16.4.2 Web Configurator Easy Access
With UPnP, you can access the web-based configurator on the ZyXEL Device without finding
out the IP address of the ZyXEL Device first. This comes helpful if you do not know the IP
address of the ZyXEL Device.
Follow the steps below to access the web configurator.
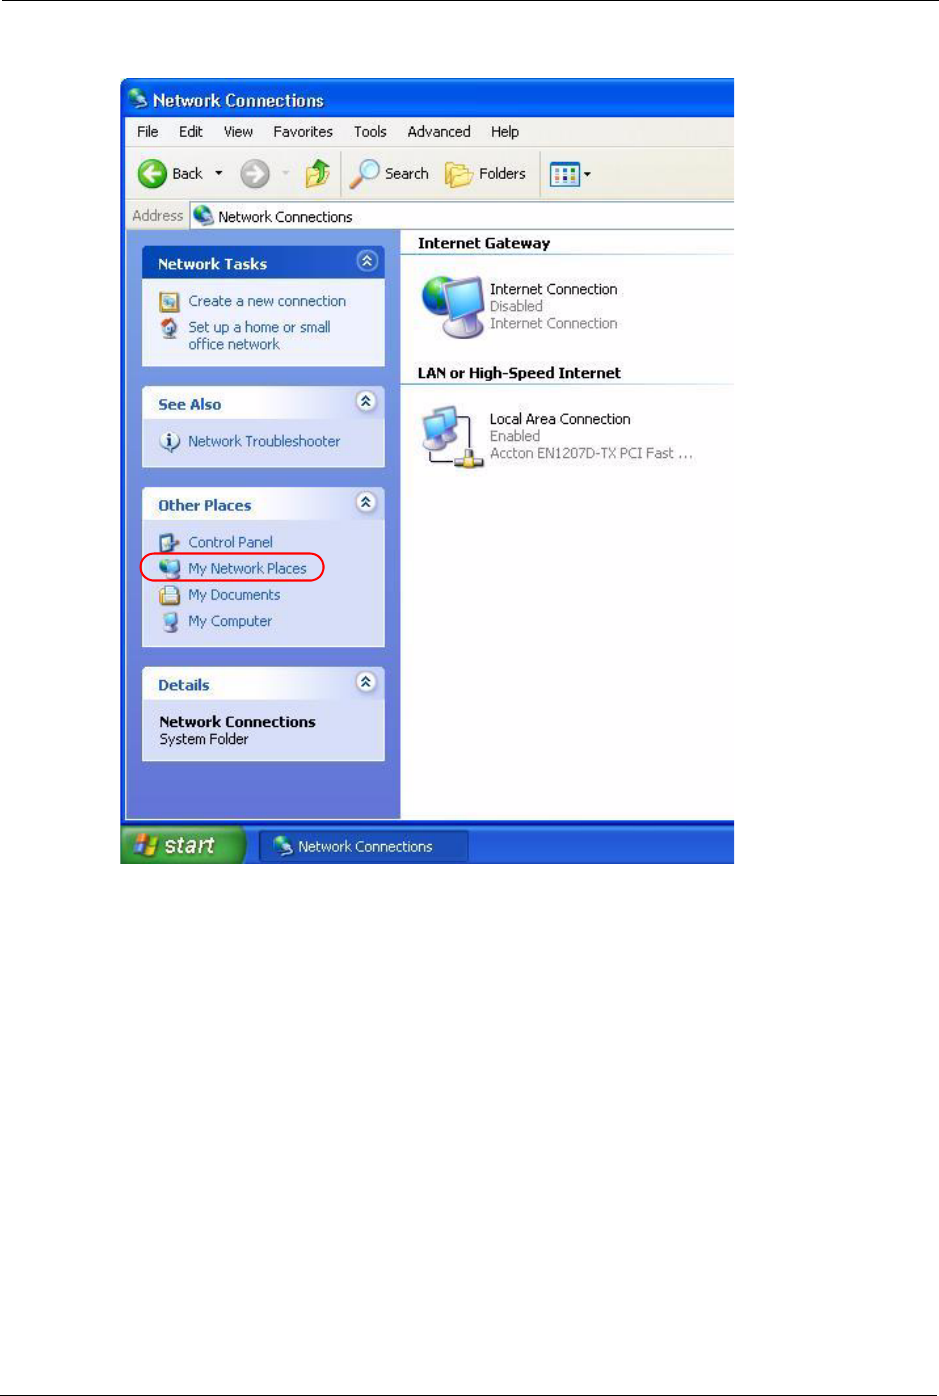
1Click Start and then Control Panel.
2Double-click Network Connections.
3Select My Network Places under Other Places.
P-660H/HW-D Series User’s Guide
223 Chapter 16 Universal Plug-and-Play (UPnP)
Figure 131 Network Connections
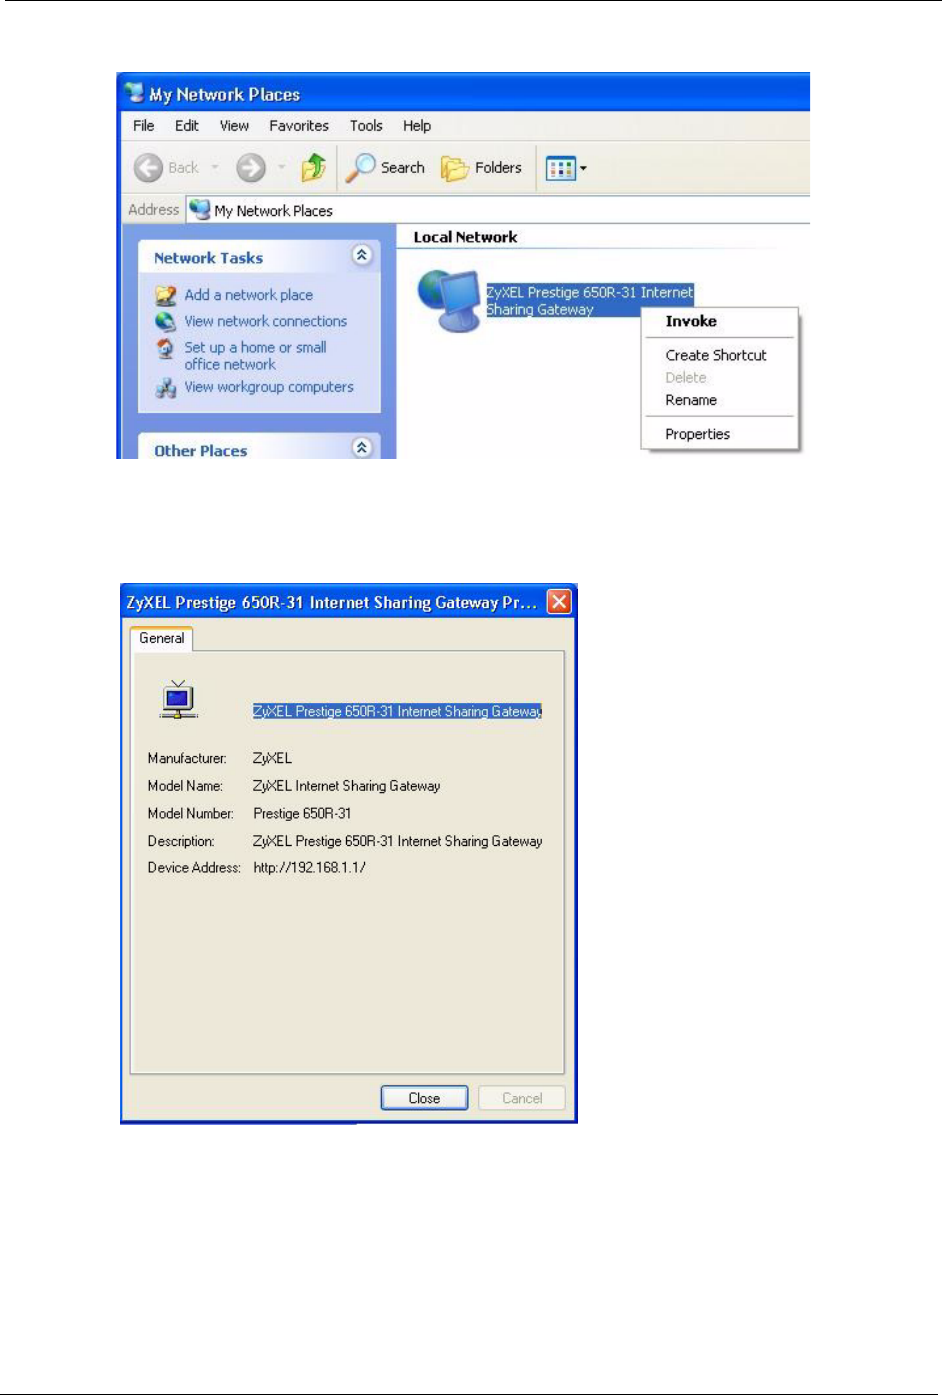
4An icon with the description for each UPnP-enabled device displays under Local
Network.
5Right-click on the icon for your ZyXEL Device and select Invoke. The web configurator
login screen displays.
P-660H/HW-D Series User’s Guide
Chapter 16 Universal Plug-and-Play (UPnP) 224
Figure 132 Network Connections: My Network Places
6Right-click on the icon for your ZyXEL Device and select Properties. A properties
window displays with basic information about the ZyXEL Device.
Figure 133 Network Connections: My Network Places: Properties: Example

P-660H/HW-D Series User’s Guide
225 Chapter 16 Universal Plug-and-Play (UPnP)

P-660H/HW-D Series User’s Guide
Chapter 17 System 226
CHAPTER 17
System
Use this screen to configure the ZyXEL Device’s time and date settings.
17.1 General Setup
17.1.1 General Setup and System Name
General Setup contains administrative and system-related information. System Name is for
identification purposes. However, because some ISPs check this name you should enter your
computer's "Computer Name".
• In Windows 95/98 click Start, Settings, Control Panel, Network. Click the
Identification tab, note the entry for the Computer Name field and enter it as the System
Name.
• In Windows 2000, click Start, Settings, Control Panel and then double-click System.
Click the Network Identification tab and then the Properties button. Note the entry for
the Computer name field and enter it as the System Name.
• In Windows XP, click start, My Computer, View system information and then click
the Computer Name tab. Note the entry in the Full computer name field and enter it as
the ZyXEL Device System Name.
17.1.2 General Setup
The Domain Name entry is what is propagated to the DHCP clients on the LAN. If you leave
this blank, the domain name obtained by DHCP from the ISP is used. While you must enter
the host name (System Name), the domain name can be assigned from the ZyXEL Device via
DHCP.
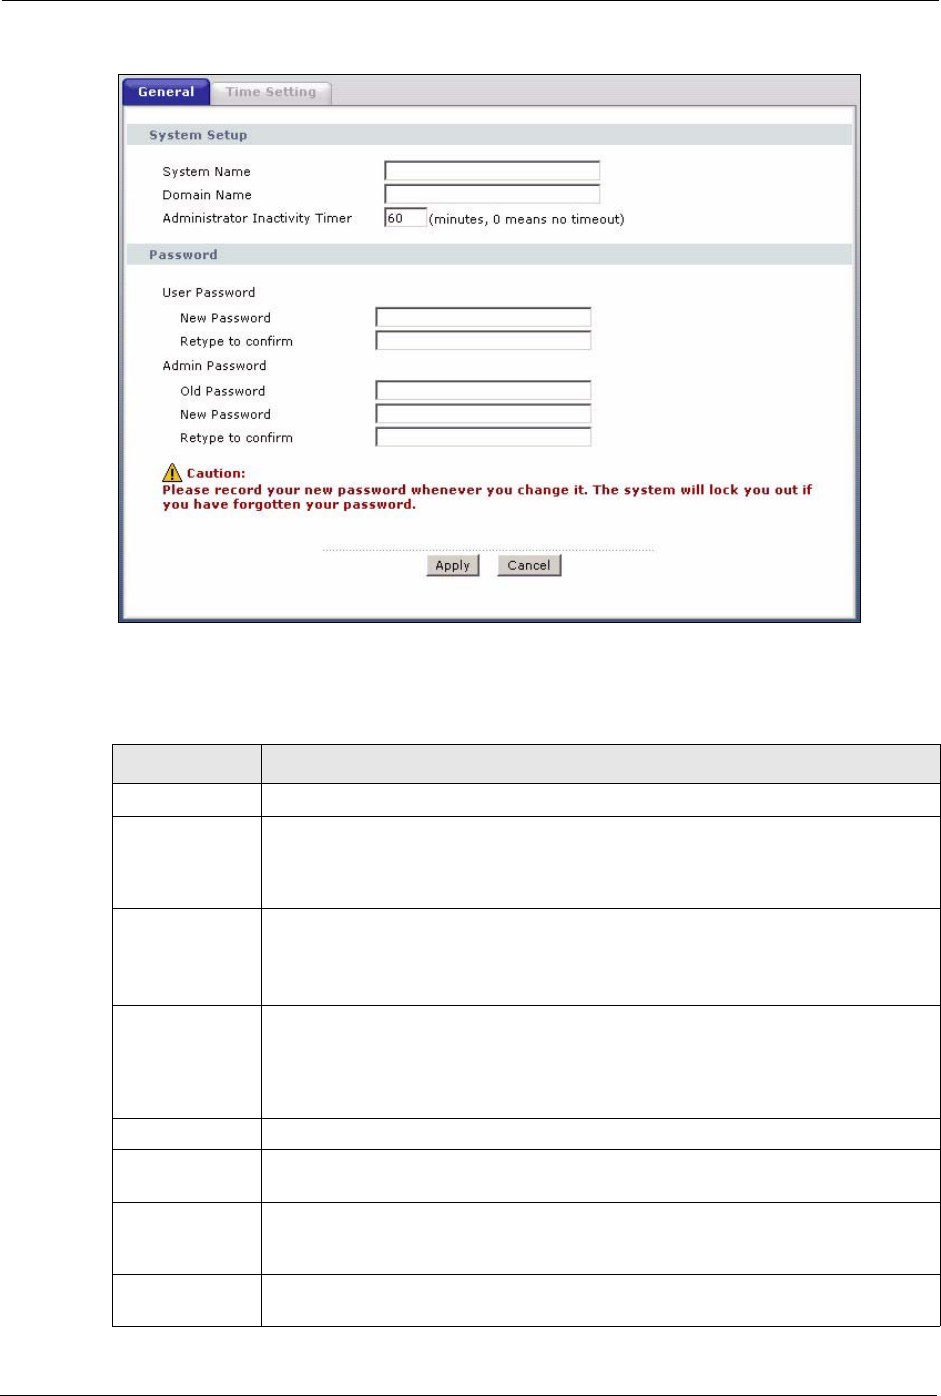
Click Maintenance > System to open the General screen.
P-660H/HW-D Series User’s Guide
227 Chapter 17 System
Figure 134 System General Setup
The following table describes the labels in this screen.
Table 89 System General Setup
LABEL DESCRIPTION
General Setup
System Name Choose a descriptive name for identification purposes. It is recommended you enter
your computer’s “Computer name” in this field. This name can be up to 30
alphanumeric characters long. Spaces are not allowed, but dashes “-” and
underscores "_" are accepted.
Domain Name Enter the domain name (if you know it) here. If you leave this field blank, the ISP
may assign a domain name via DHCP.
The domain name entered by you is given priority over the ISP assigned domain
name.
Administrator
Inactivity Timer
Type how many minutes a management session can be left idle before the session
times out. The default is 5 minutes. After it times out you have to log in with your
password again. Very long idle timeouts may have security risks. A value of "0"
means a management session never times out, no matter how long it has been left
idle (not recommended).
Password
User Password If you log in with the user password, you can only view the ZyXEL Device status.
The default user password is user.
New Password Type your new system password (up to 30 characters). Note that as you type a
password, the screen displays a (*) for each character you type. After you change
the password, use the new password to access the ZyXEL Device.
Retype to
Confirm
Type the new password again for confirmation.
P-660H/HW-D Series User’s Guide
Chapter 17 System 228
17.2 Time Setting
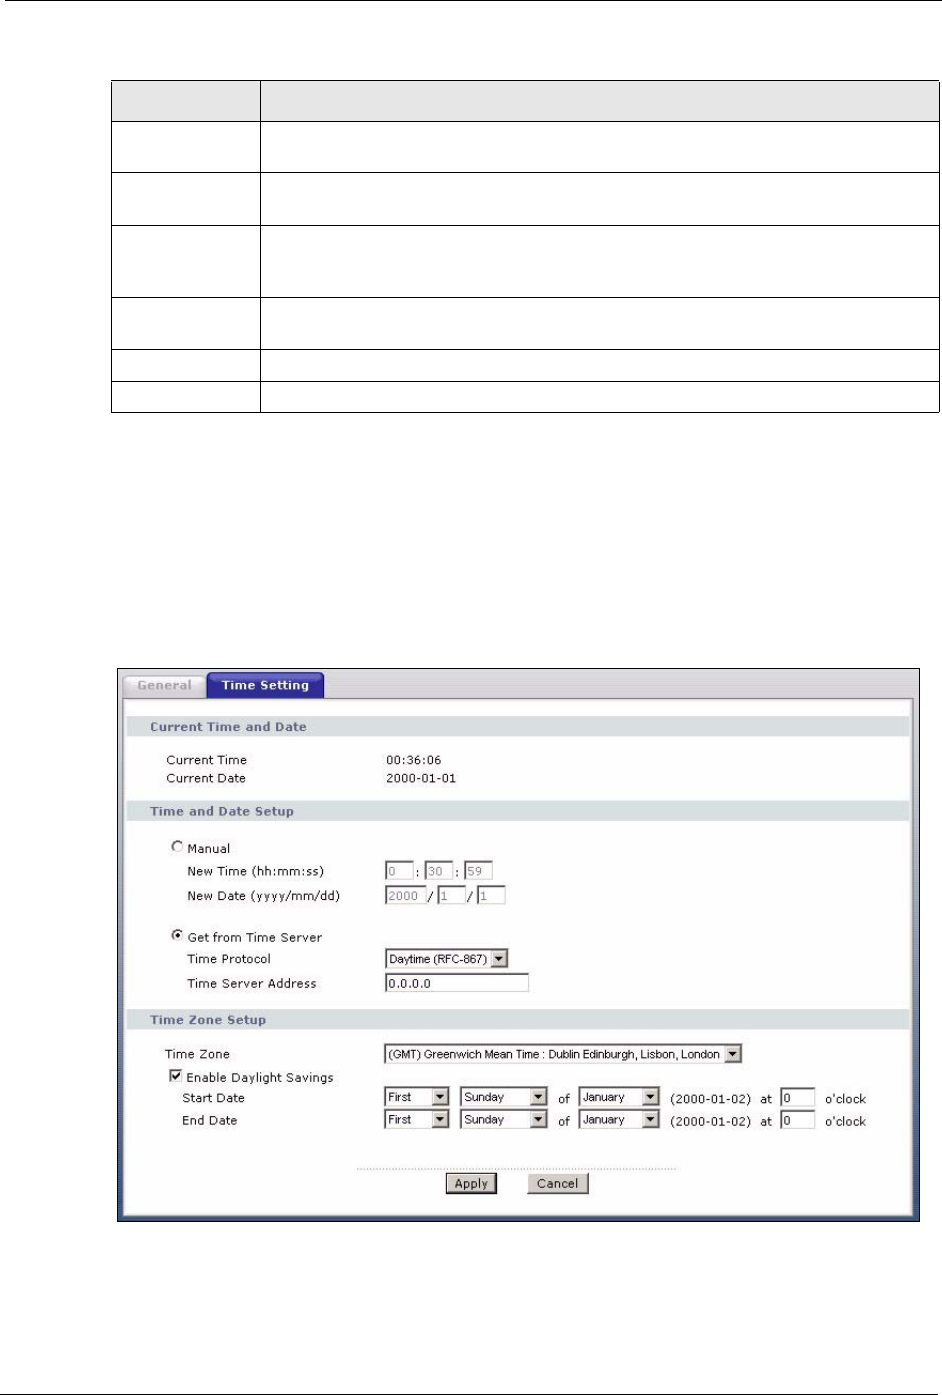
To change your ZyXEL Device’s time and date, click Maintenance > System > Time
Setting. The screen appears as shown. Use this screen to configure the ZyXEL Device’s time
based on your local time zone.
Figure 135 System Time Setting
Admin Password If you log in with the admin password, you can configure the advanced features as
well as the wizard setup on the ZyXEL Device.
Old Password Type the default admin password (1234) or the existing password you use to access
the system for configuring advanced features.
New Password Type your new system password (up to 30 characters). Note that as you type a
password, the screen displays a (*) for each character you type. After you change
the password, use the new password to access the ZyXEL Device.
Retype to
Confirm
Type the new password again for confirmation.
Apply Click Apply to save your changes back to the ZyXEL Device.
Cancel Click Cancel to begin configuring this screen afresh.
Table 89 System General Setup
LABEL DESCRIPTION

P-660H/HW-D Series User’s Guide
229 Chapter 17 System
The following table describes the fields in this screen.
Table 90 System Time Setting
LABEL DESCRIPTION
Current Time and
Date
Current Time This field displays the time of your ZyXEL Device.
Each time you reload this page, the ZyXEL Device synchronizes the time with the
time server.
Current Date This field displays the date of your ZyXEL Device.
Each time you reload this page, the ZyXEL Device synchronizes the date with the
time server.
Time and Date
Setup
Manual Select this radio button to enter the time and date manually. If you configure a new
time and date, Time Zone and Daylight Saving at the same time, the new time and
date you entered has priority and the Time Zone and Daylight Saving settings do
not affect it.
New Time
(hh:mm:ss)
This field displays the last updated time from the time server or the last time
configured manually.
When you set Time and Date Setup to Manual, enter the new time in this field
and then click Apply.
New Date
(yyyy/mm/dd)
This field displays the last updated date from the time server or the last date
configured manually.
When you set Time and Date Setup to Manual, enter the new date in this field
and then click Apply.
Get from Time
Server
Select this radio button to have the ZyXEL Device get the time and date from the
time server you specified below.
Time Protocol Select the time service protocol that your time server uses. Not all time servers
support all protocols, so you may have to check with your ISP/network
administrator or use trial and error to find a protocol that works.
The main difference between them is the format.
Daytime (RFC 867) format is day/month/year/time zone of the server.
Time (RFC 868) format displays a 4-byte integer giving the total number of
seconds since 1970/1/1 at 0:0:0.
The default, NTP (RFC 1305), is similar to Time (RFC 868).
Time Server
Address
Enter the IP address or URL (up to 20 extended ASCII characters in length) of
your time server. Check with your ISP/network administrator if you are unsure of
this information.
Time Zone Setup
Time Zone Choose the time zone of your location. This will set the time difference between
your time zone and Greenwich Mean Time (GMT).
Enable Daylight
Savings
Daylight saving is a period from late spring to early fall when many countries set
their clocks ahead of normal local time by one hour to give more daytime light in
the evening.
Select this option if you use Daylight Saving Time.

P-660H/HW-D Series User’s Guide
Chapter 17 System 230
Start Date Configure the day and time when Daylight Saving Time starts if you selected
Enable Daylight Saving. The o'clock field uses the 24 hour format. Here are a
couple of examples:
Daylight Saving Time starts in most parts of the United States on the first Sunday
of April. Each time zone in the United States starts using Daylight Saving Time at
2 A.M. local time. So in the United States you would select First, Sunday, April
and type 2 in the o'clock field.
Daylight Saving Time starts in the European Union on the last Sunday of March.
All of the time zones in the European Union start using Daylight Saving Time at
the same moment (1 A.M. GMT or UTC). So in the European Union you would
select Last, Sunday, March. The time you type in the o'clock field depends on
your time zone. In Germany for instance, you would type 2 because Germany's
time zone is one hour ahead of GMT or UTC (GMT+1).
End Date Configure the day and time when Daylight Saving Time ends if you selected
Enable Daylight Saving. The o'clock field uses the 24 hour format. Here are a
couple of examples:
Daylight Saving Time ends in the United States on the last Sunday of October.
Each time zone in the United States stops using Daylight Saving Time at 2 A.M.
local time. So in the United States you would select Last, Sunday, October and
type 2 in the o'clock field.
Daylight Saving Time ends in the European Union on the last Sunday of October.
All of the time zones in the European Union stop using Daylight Saving Time at the
same moment (1 A.M. GMT or UTC). So in the European Union you would select
Last, Sunday, October. The time you type in the o'clock field depends on your
time zone. In Germany for instance, you would type 2 because Germany's time
zone is one hour ahead of GMT or UTC (GMT+1).
Apply Click Apply to save your changes back to the ZyXEL Device.
Cancel Click Cancel to begin configuring this screen afresh.
Table 90 System Time Setting (continued)
LABEL DESCRIPTION

P-660H/HW-D Series User’s Guide
231 Chapter 17 System

P-660H/HW-D Series User’s Guide
Chapter 18 Logs 232
CHAPTER 18
Logs
This chapter contains information about configuring general log settings and viewing the
ZyXEL Device’s logs. Refer to the appendix for example log message explanations.
18.1 Logs Overview
The web configurator allows you to choose which categories of events and/or alerts to have
the ZyXEL Device log and then display the logs or have the ZyXEL Device send them to an
administrator (as e-mail) or to a syslog server.
18.1.1 Alerts and Logs
An alert is a type of log that warrants more serious attention. They include system errors,
attacks (access control) and attempted access to blocked web sites. Some categories such as
System Errors consist of both logs and alerts. You may differentiate them by their color in the
View Log screen. Alerts display in red and logs display in black.
18.2 Viewing the Logs
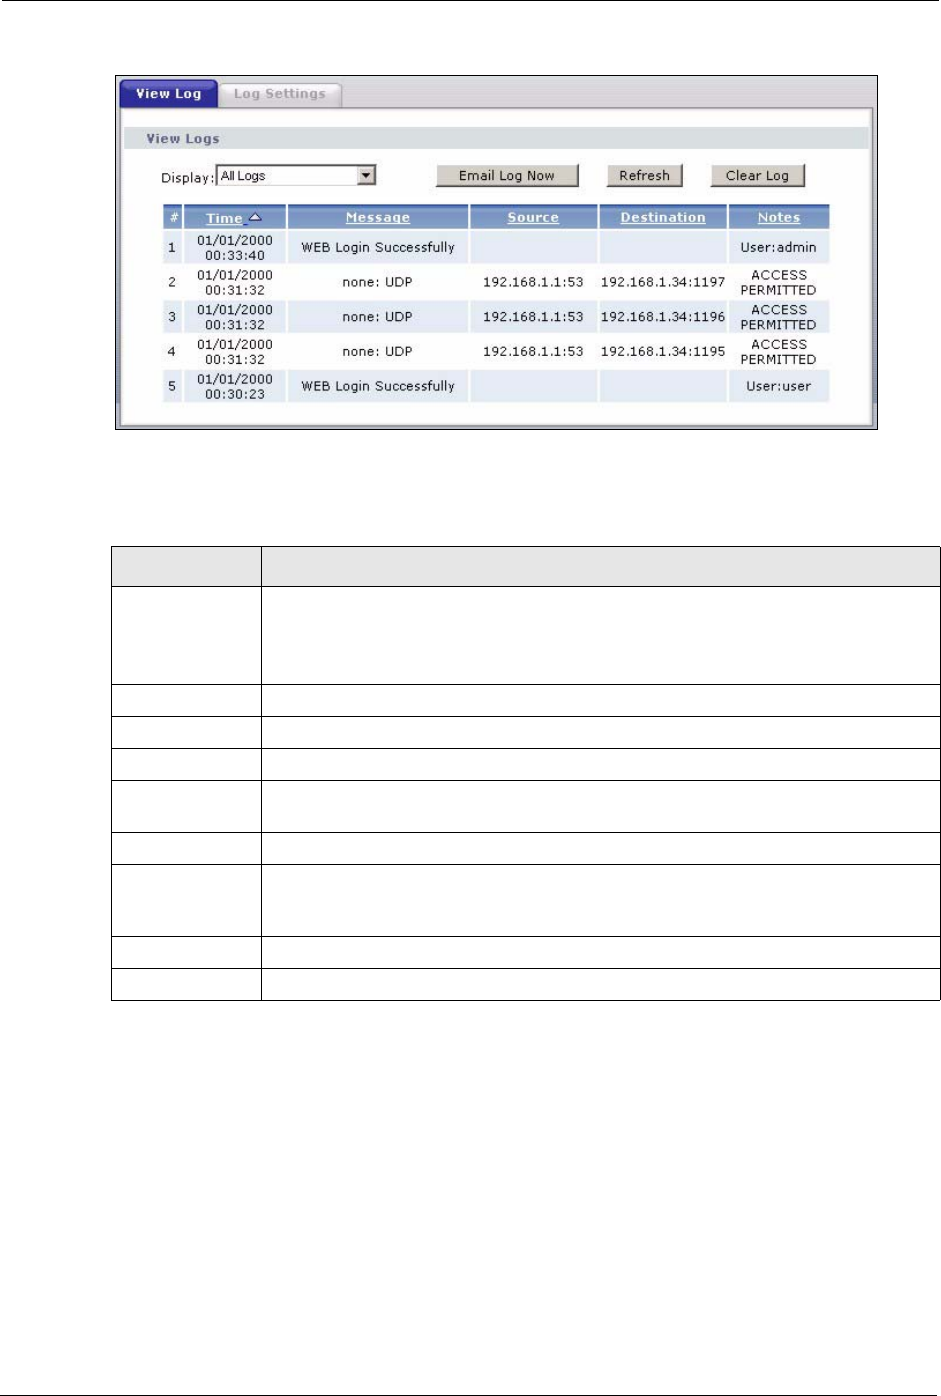
Click Maintenance > Logs to open the View Log screen. Use the View Log screen to see the
logs for the categories that you selected in the Log Settings screen (see Section 18.3 on page
233).
Log entries in red indicate alerts. The log wraps around and deletes the old entries after it fills.
Click a column heading to sort the entries. A triangle indicates ascending or descending sort
order.
P-660H/HW-D Series User’s Guide
233 Chapter 18 Logs
Figure 136 View Log
The following table describes the fields in this screen.
18.3 Configuring Log Settings
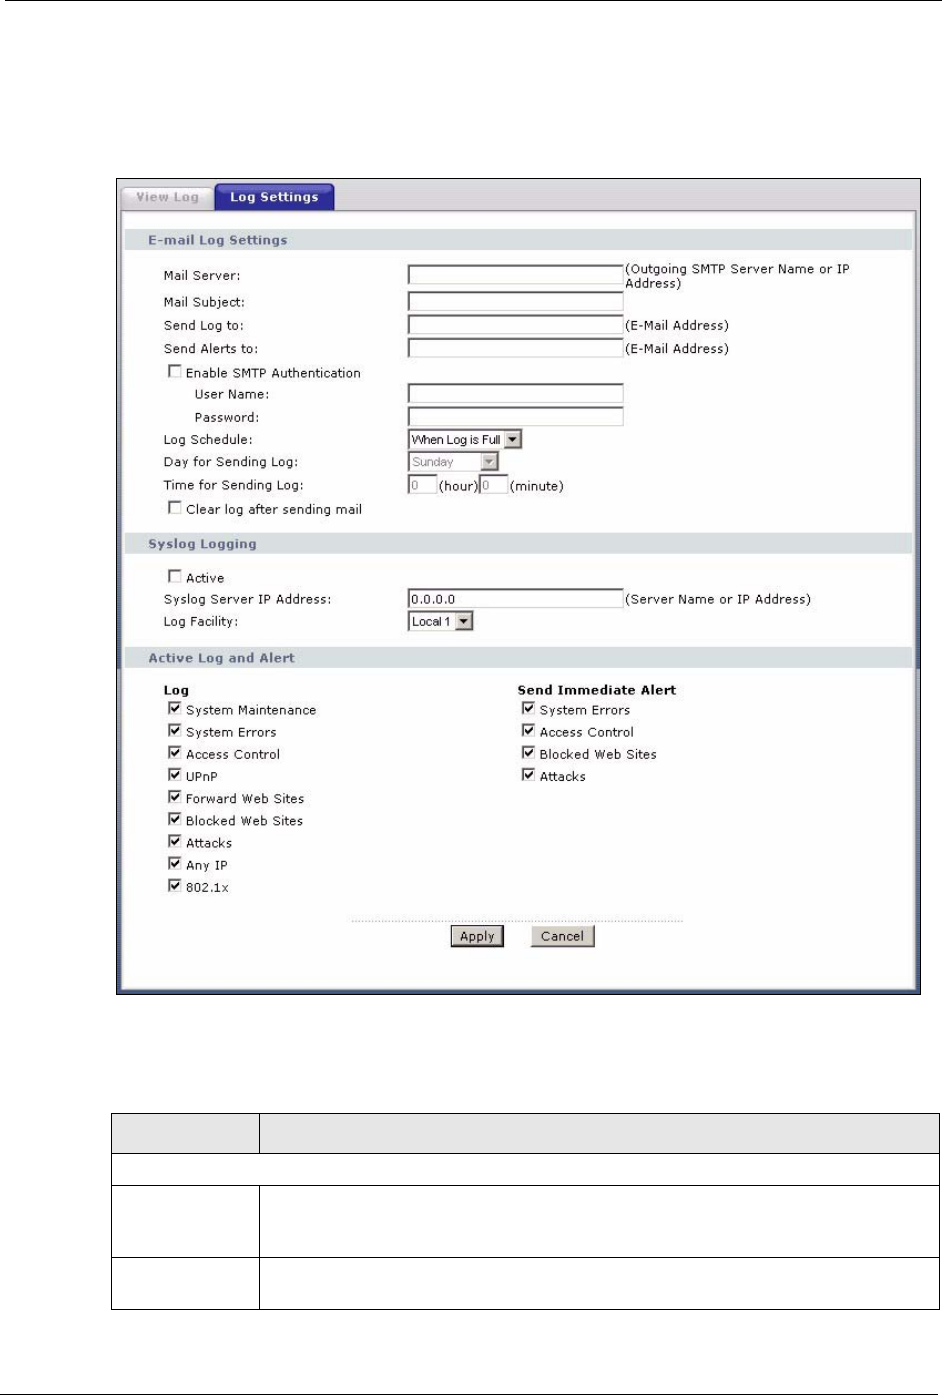
Use the Log Settings screen to configure to where the ZyXEL Device is to send logs; the
schedule for when the ZyXEL Device is to send the logs and which logs and/or immediate
alerts the ZyXEL Device is to record. See Section 18.1 on page 232 for more information.
To change your ZyXEL Device’s log settings, click Maintenance > Logs > Log Settings. The
screen appears as shown.
Table 91 View Log
LABEL DESCRIPTION
Display The categories that you select in the Log Settings screen display in the drop-down
list box.
Select a category of logs to view; select All Logs to view logs from all of the log
categories that you selected in the Log Settings page.
Time This field displays the time the log was recorded.
Message This field states the reason for the log.
Source This field lists the source IP address and the port number of the incoming packet.
Destination This field lists the destination IP address and the port number of the incoming
packet.
Notes This field displays additional information about the log entry.
Email Log Now Click Email Log Now to send the log screen to the e-mail address specified in the
Log Settings page (make sure that you have first filled in the E-mail Log Settings
fields in Log Settings).
Refresh Click Refresh to renew the log screen.
Clear Log Click Clear Log to delete all the logs.
P-660H/HW-D Series User’s Guide
Chapter 18 Logs 234
Alerts are e-mailed as soon as they happen. Logs may be e-mailed as soon as the log is full.
Selecting many alert and/or log categories (especially Access Control) may result in many e-
mails being sent.
Figure 137 Log Settings
The following table describes the fields in this screen.
Table 92 Log Settings
LABEL DESCRIPTION
E-mail Log Settings
Mail Server Enter the server name or the IP address of the mail server for the e-mail addresses
specified below. If this field is left blank, logs and alert messages will not be sent via
E-mail.
Mail Subject Type a title that you want to be in the subject line of the log e-mail message that the
ZyXEL Device sends. Not all ZyXEL models have this field.

P-660H/HW-D Series User’s Guide
235 Chapter 18 Logs
Send Log To The ZyXEL Device sends logs to the e-mail address specified in this field. If this field
is left blank, the ZyXEL Device does not send logs via e-mail.
Send Alerts To Alerts are real-time notifications that are sent as soon as an event, such as a DoS
attack, system error, or forbidden web access attempt occurs. Enter the E-mail
address where the alert messages will be sent. Alerts include system errors, attacks
and attempted access to blocked web sites. If this field is left blank, alert messages
will not be sent via E-mail.
Enable SMTP
Authentication
SMTP (Simple Mail Transfer Protocol) is the message-exchange standard for the
Internet. SMTP enables you to move messages from one e-mail server to another.
Select the check box to activate SMTP authentication. If mail server authentication is
needed but this feature is disabled, you will not receive the e-mail logs.
User Name Enter the user name (up to 31 characters) (usually the user name of a mail account).
Password Enter the password associated with the user name above.
Log Schedule This drop-down menu is used to configure the frequency of log messages being sent
as E-mail:
•Daily
• Weekly
•Hourly
• When Log is Full
•None.
If you select Weekly or Daily, specify a time of day when the E-mail should be sent.
If you select Weekly, then also specify which day of the week the E-mail should be
sent. If you select When Log is Full, an alert is sent when the log fills up. If you
select None, no log messages are sent.
Day for Sending
Log
Use the drop down list box to select which day of the week to send the logs.
Time for Sending
Log
Enter the time of the day in 24-hour format (for example 23:00 equals 11:00 pm) to
send the logs.
Clear log after
sending mail
Select the checkbox to delete all the logs after the ZyXEL Device sends an E-mail of
the logs.
Syslog Logging The ZyXEL Device sends a log to an external syslog server.
Active Click Active to enable syslog logging.
Syslog Server IP
Address
Enter the server name or IP address of the syslog server that will log the selected
categories of logs.
Log Facility Select a location from the drop down list box. The log facility allows you to log the
messages to different files in the syslog server. Refer to the syslog server manual for
more information.
Active Log and
Alert
Log Select the categories of logs that you want to record.
Send Immediate
Alert
Select log categories for which you want the ZyXEL Device to send E-mail alerts
immediately.
Apply Click Apply to save your customized settings and exit this screen.
Cancel Click Cancel to return to the previously saved settings.
Table 92 Log Settings
LABEL DESCRIPTION