Samsung Electronics Co SLM4030ND Printer User Manual
Samsung Electronics Co Ltd Printer
Contents
Users Manual 6
51
2. Menu Overview and Basic Setup
Using USB memory device
This chapter explains how to use a USB memory device with your machine.
13
About USB memory device
USB memory devices are available with a variety of memory capacities to give
you more room for storing documents, presentations, music and videos, high
resolution photographs, or whatever other files you want to store or move.
You can do the following tasks on your machine by using a USB memory device.
• Scan documents and save them on a USB memory device
• Print data stored on a USB memory device
• Restore backup files to the machine’s memory
• Format the USB memory device
• Check the available memory space
Your machine supports USB memory devices with FAT16/FAT32 and sector size
of 512 bytes.
Check your USB memory device’s file system from your dealer.
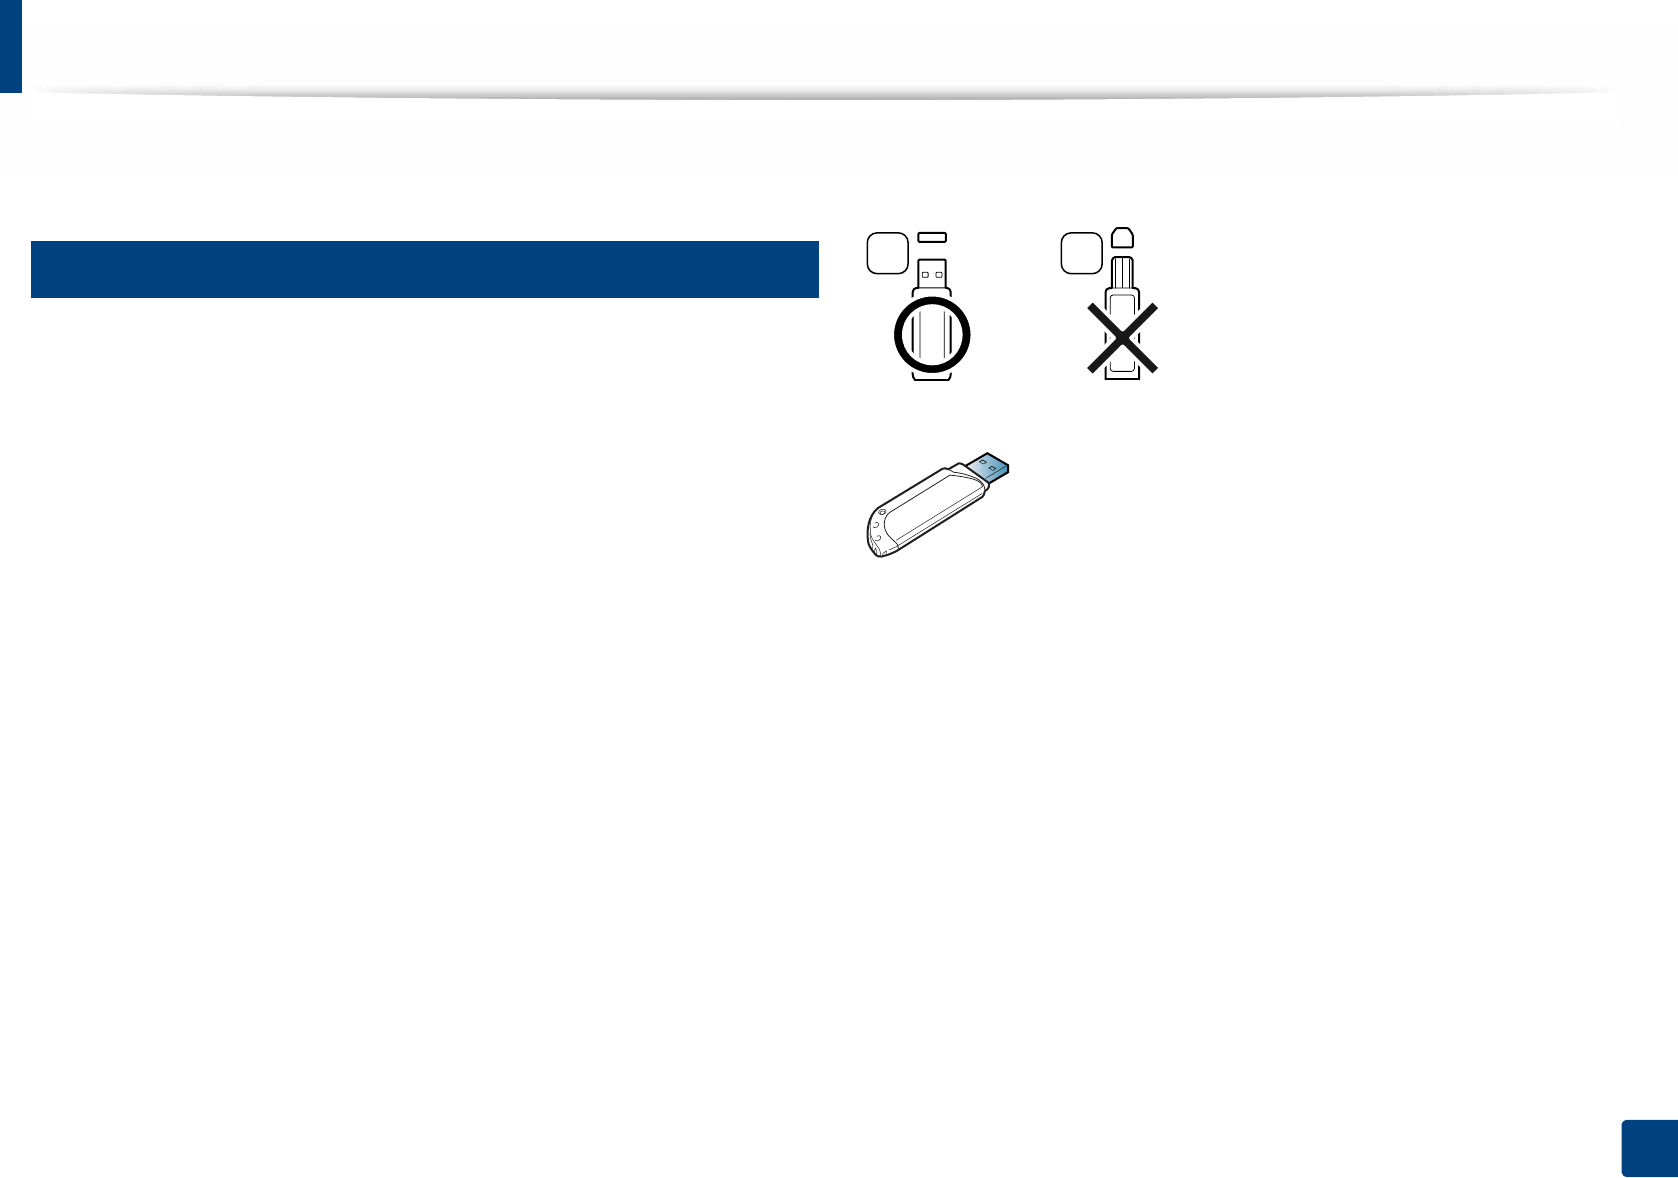
You must use only an authorized USB memory device with an A plug type
connector.
Use only a USB memory device with metal-shielded connector.
Only use a USB memory device that has obtained compatibility certification,
otherwise, the machine might not recognize it.
A B
Using USB memory device
52
2. Menu Overview and Basic Setup
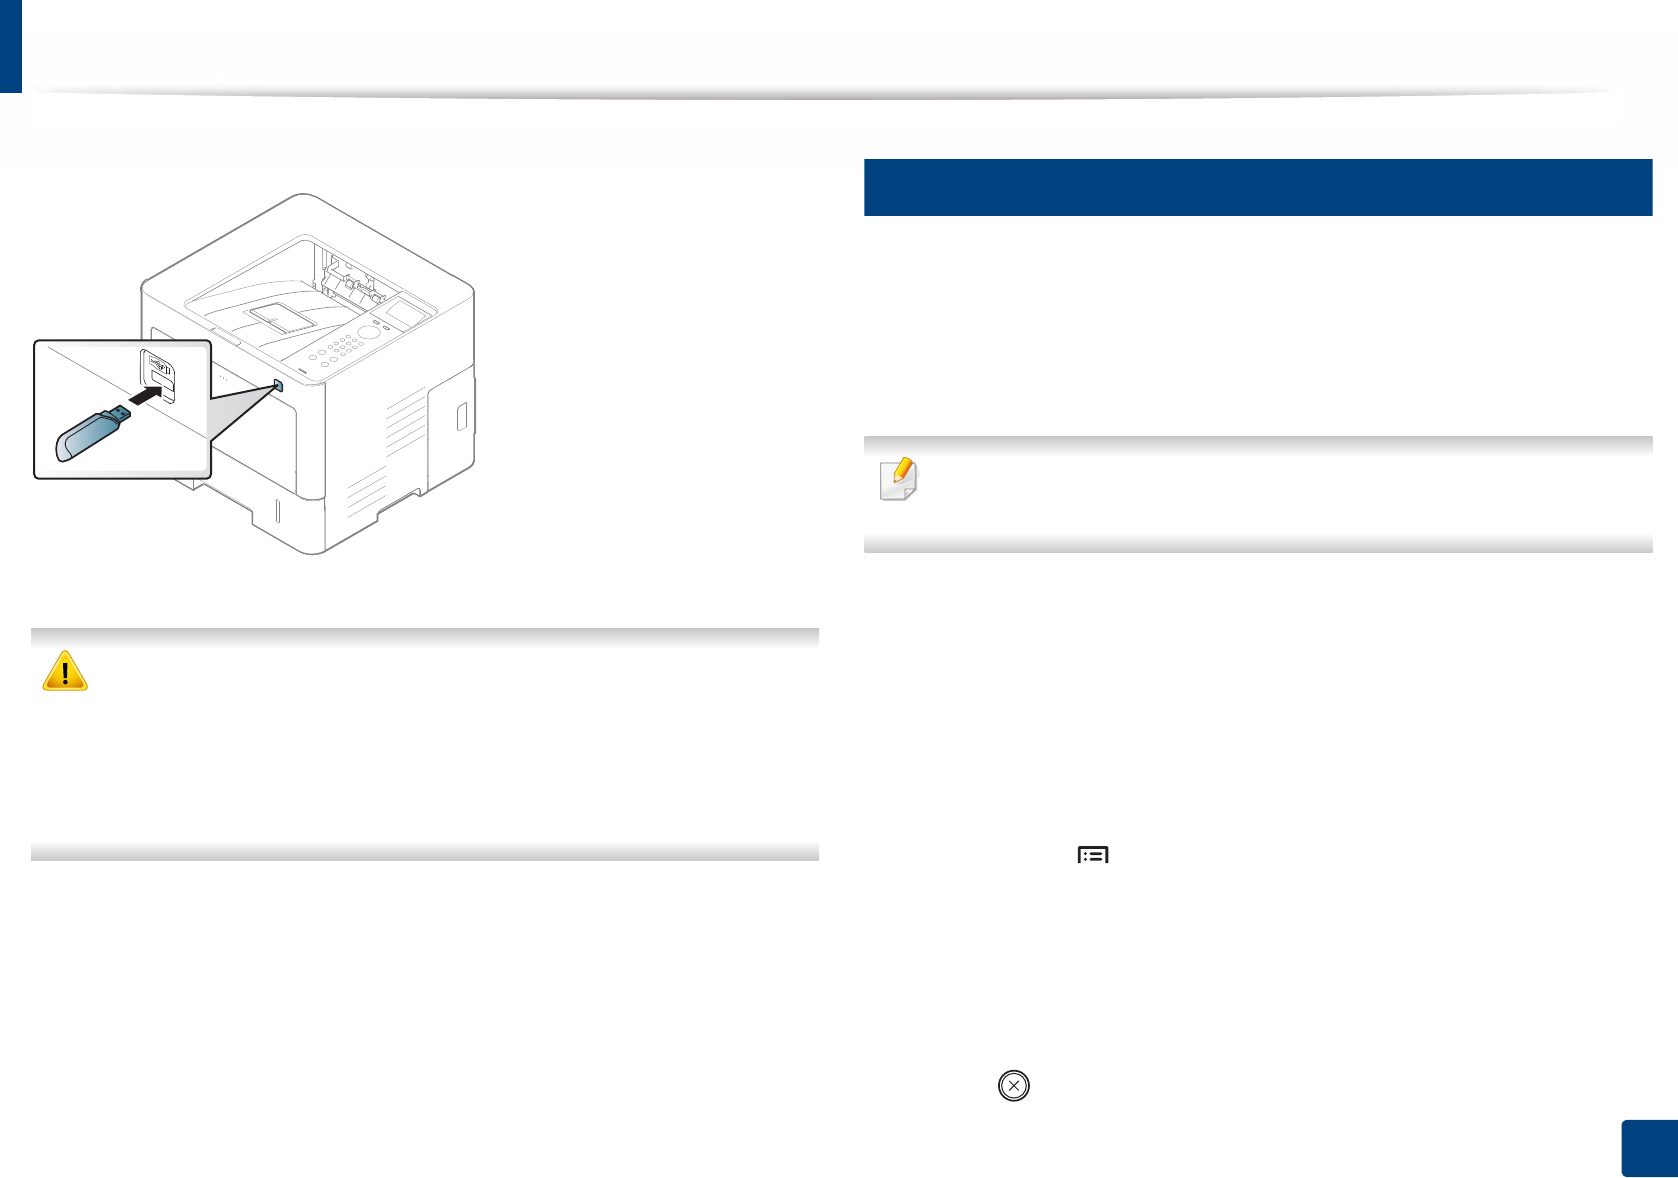
Insert a USB memory device into the USB memory port on your machine.
• Do not remove the USB memory device while it is in use. The machine
warranty does not cover damage caused by user’s misuse.
• If your USB memory device has certain features such as security settings
and password settings, your machine may not automatically detect it.
For details about these features, see the user’s guide of the USB memory
device.
14
Printing from a USB memory device
You can directly print files stored on a USB memory device.
Direct Print option supported file types:
•PRN: Only files created by provided driver with your machine are
compatible.
If you print PRN files created from other machine, the printout would be
different.
•TIFF: TIFF 6.0 Baseline
•JPEG: JPEG Baseline
•PDF: PDF 1.7 or lower
To print a document from a USB memory device:
1Insert a USB memory device into the USB memory port on your machin
2 Select Menu() > Direct USB > Print From on the control panel.
3 Select the folder or file you want.
4 Select the number of copies to be printed or enter the number.
5 Press OK.
6 Press (Stop/Clear) button to return to ready mode.
Using USB memory device
53
2. Menu Overview and Basic Setup
15
Backing up data
Data in the machine’s memory can be accidentally erased due to power failure
or storage failure. Backup helps you protect the system settings by storing them
as backup files on a USB memory device.
Backing up data
1Insert the USB memory device into the USB memory port on your
machine.
2 Select Menu() > Admin Setup > Export Setting on the control
panel.
3 Press OK when the confirmation window appears.
4 Press (Stop/Clear) button to return to ready mode.
Restoring data
1Insert the USB memory device on which the backup data is stored in to
the USB memory port.
2 Select Menu() > Admin Setup > Import Setting on the control
panel.
3 Select Setup File.
4 Select the file you want to restore.
5 Press OK when the confirmation window appears.
6 Press (Stop/Clear) button to return to ready mode.
16
Managing USB memory
You can delete image files stored on a USB memory device one by one or all at
once by reformatting the device.
After deleting files or reformatting a USB memory device, files cannot be
restored. Therefore, confirm that you no longer need the data before
deleting it.
Deleting an image file
1Insert a USB memory device into the USB memory port on your machine.
2 Select Menu() > Direct USB >File Manage > Delete on the control
panel.
3 Press OK when the confirmation window appears.

Using USB memory device
54
2. Menu Overview and Basic Setup
4 Press (Stop/Clear) button to return to ready mode.
Formatting a USB memory device
1Insert a USB memory device into the USB memory port on your machine.
2 Select Menu() > Direct USB > File Manage >Format on the control
panel.
3 Press OK when the confirmation window appears.
4 Press (Stop/Clear) button to return to ready mode.
Viewing the USB memory status
You can check the amount of memory space available for scanning and saving
documents.
1Insert a USB memory device into the USB memory port on your machine.
2 Select Menu() > Direct USB > Show Space on the control panel.
3 The available memory space appears on the display.
4 Press (Stop/Clear) button to return to ready mode.

3. Maintenance
This chapter provides information about purchasing supplies, accessories and maintenance parts available for your
machine.
• Ordering supplies and accessories 56
• Available consumables 57
• Available accessories 58
• Available maintenance parts 59
• Storing the toner cartridge 60
• Redistributing toner 62
• Replacing the toner cartridge 63
• Installing accessories 65
• Monitoring the supplies life 69
• Setting the toner 70
• Cleaning the machine 71
• Tips for moving & storing your machine 76

56
3. Maintenance
Ordering supplies and accessories
Available accessories may differ from country to country. Contact your sales representatives to obtain the list of available supplies, and maintenance parts (see
"Available consumables" on page 57,"Available accessories" on page 58).
To order Samsung-authorized supplies, accessories, and maintenance parts, contact your local Samsung dealer or the retailer where you purchased your machine.
You can also visit www.samsung.com/supplies, and then select your country/region to obtain the contact information for service.

57
3. Maintenance
Available consumables
When supplies reach the end of their life spans, you can order the followings of consumables for your machine:
Depending on the options, percentage of image area and job mode used, the toner cartridge’s lifespan may differ.
When purchasing new toner cartridges or other consumables, these must be purchased in the same country as the machine you are using. Otherwise, new toner
cartridges or other consumables will be incompatible with your machine due to different configurations of toner cartridges and other consumables according to the
specific country conditions.
Samsung does not recommend using non-genuine Samsung toner cartridge such as refilled or remanufactured toner. Samsung cannot guarantee non-genuine
Samsung toner cartridge's quality. Service or repair required as a result of using non-genuine Samsung toner cartridges will not be covered under the machine’s
warranty.
Type Average yielda
a. Declared yield value in accordance with ISO/IEC 19752. The number of pages may be affected by operating environment, printing interval, graphics, media type and media size.
Part name
Toner cartridge
Average continuous cartridge yield : Approx. 10,000 standard pages MLT-D201S
Average continuous cartridge yield : Approx. 20,000 standard pages MLT-D201L
58
3. Maintenance
Available accessories
You can purchase and install accessories to enhance your machine’s performance and capacity.
Some features and optional goods may not be available depending on models or country (see "Features by model" on page 7).
Accessory Function Part name
Memory module Extends your machine’s memory capacity. SL-MEM001: 2 GB
Optional trays (Tray2, Tray3, Tray4, Tray 5) If you are experiencing frequent paper supply problems, you can attach an additional
550a Sheet trays.
a. Plain paper 75g/m2 (20 lb bond).
SL-SCF4000
Wireless /NFC kit This kit lets you use your machine as a Wireless and NFC machine. SL-NWE001X

59
3. Maintenance
Available maintenance parts
You need to replace the maintenance parts at specific intervals to keep the machine in the best condition and avoid print quality and paper feeding problems
resulting from the worn-out parts. Maintenance parts are mostly rollers, belts and pads. However, the replacement period and parts may differ depending on the
model. Replacing maintenance parts can be performed only by an authorized service provider, dealer, or the retailer where you bought the machine. To purchase
maintenance parts, contact the retailer where you bought the machine. The replacement period for the maintenance parts is informed by the "Samsung Printer
Status" program. Or on the UI (User Interface) if your machine supports a display screen. The replacement period varies based on the operating system used,
computing performance, application software, connecting method, paper type, paper size, and job complexity.
60
3. Maintenance
Storing the toner cartridge
Toner cartridges contain components that are sensitive to light, temperature
and humidity. Samsung suggests users follow these recommendations to
ensure optimal performance, highest quality, and longest life from your new
Samsung toner cartridge.
Store this cartridge in the same environment in which the printer will be used.
This should be in controlled temperature and humidity conditions. The toner
cartridge should remain in its original and unopened package until installation
– if original packaging is not available, cover the top opening of the cartridge
with paper and store in a dark cabinet.
Opening the cartridge package prior to use dramatically shortens its useful shelf
and operating life. Do not store on the floor. If the toner cartridge is removed
from the printer, follow the instructions below to store the toner cartridge
properly.
• Store the cartridge inside the protective bag from the original package.
• Store lying flat (not standing on end) with the same side facing up as if it
were installed in the machine.
• Do not store consumables in any of the following conditions:
- Temperature greater than 30°C (86°F).
- Humidity range less than 20% or greater than 80%.
- An environment with extreme changes in humidity or temperature.
- Direct sunlight or room light.
- Dusty places.
- A car for a long period of time.
- An environment where corrosive gases are present.
- An environment with salty air.
1
Handling instructions
• Do not touch the surface of the photoconductive drum in the cartridge.
• Do not expose the cartridge to unnecessary vibrations or shock.
• Never manually rotate the drum, especially in the reverse direction; this can
cause internal damage and toner spillage.
2
Toner cartridge usage
Samsung Electronics does not recommend or approve the use of non-Samsung
brand toner cartridges in your printer including generic, store brand, refilled, or
remanufactured toner cartridges.
Samsung’s printer warranty does not cover damage to the machine caused
by the use of a refilled, remanufactured, or non-Samsung brand toner
cartridges.

Storing the toner cartridge
61
3. Maintenance
3
Estimated cartridge life
Estimated cartridge life (the life of the toner cartridge yield) depends on the
amount of toner that print jobs require. The actual print yield may vary
depending on the print density of the pages you print on, operating
environment, percentage of image area, printing interval, media type and/or
media size. For example, if you print a lot of graphics, the consumption of the
toner is higher and you may need to change the cartridge more often.
62
3. Maintenance
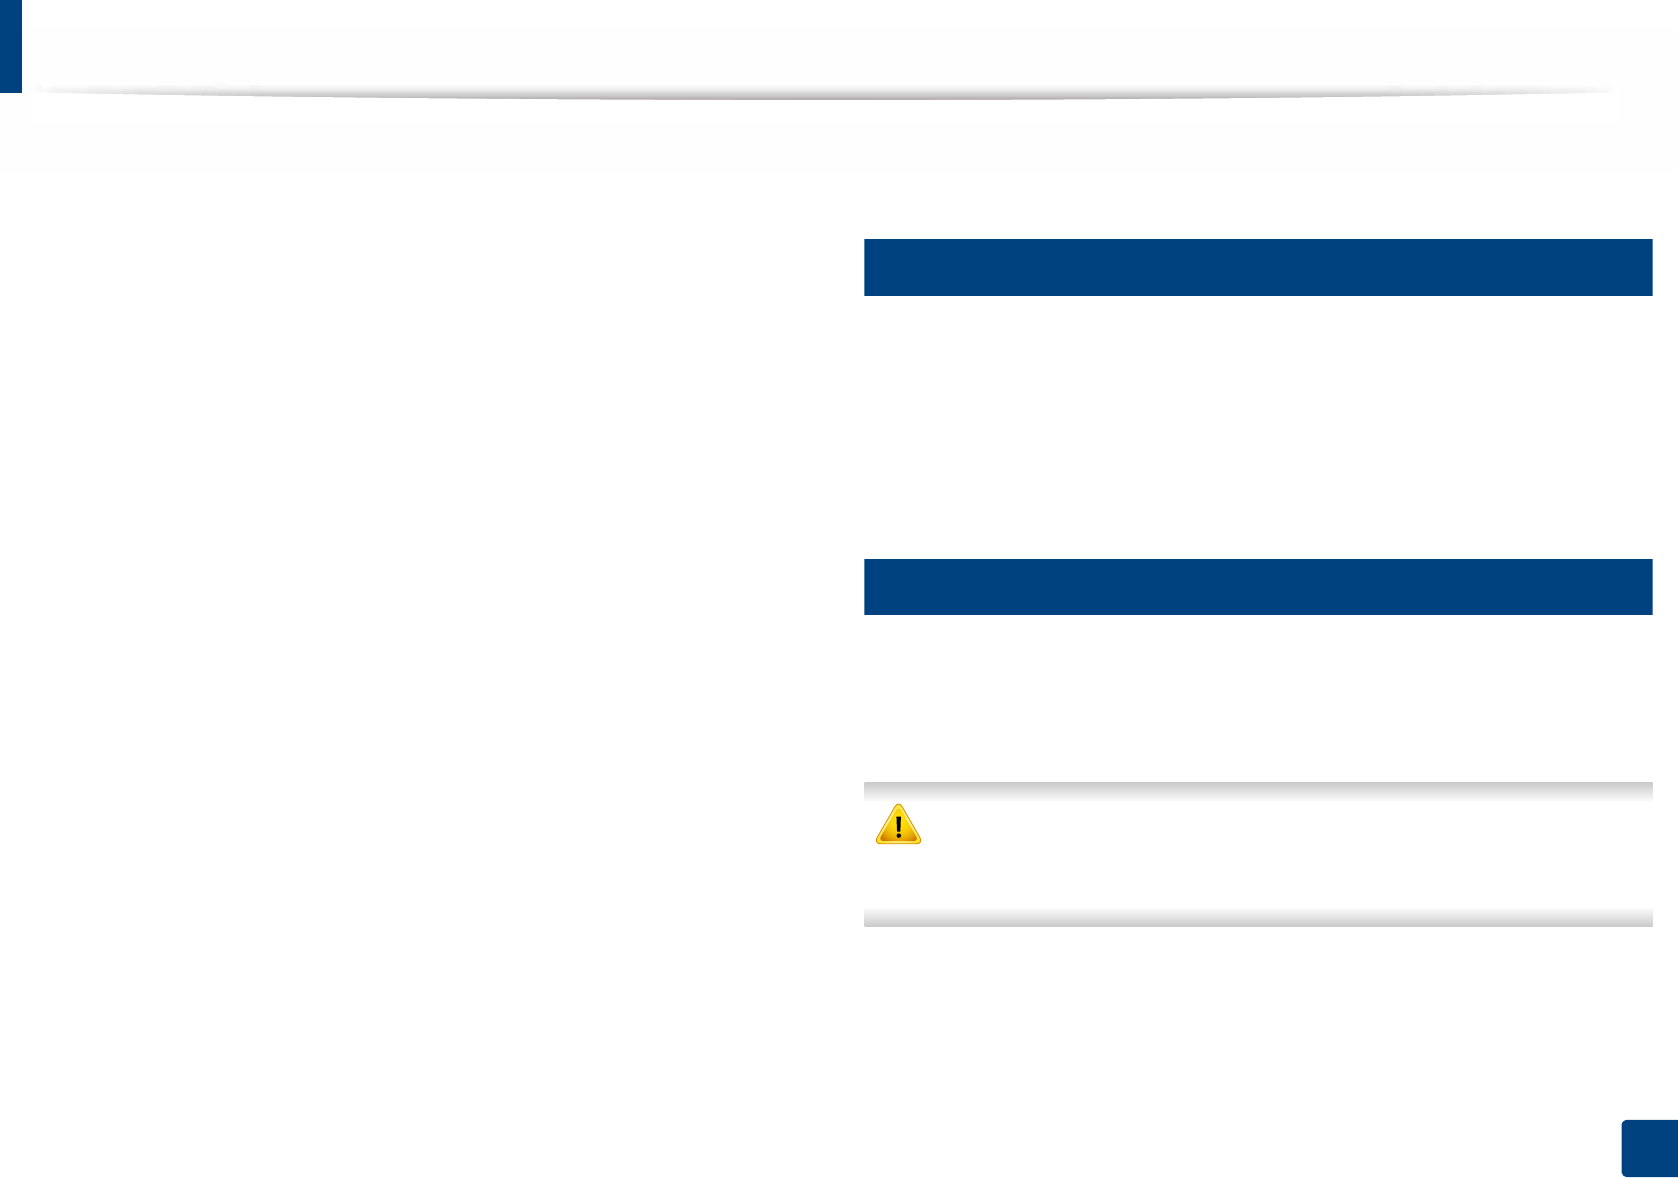
Redistributing toner
When the toner cartridge is near the end of its life:
• White streaks or light printing occurs and/or density varies from side to side.
• The Status LED blinks orange. The toner-related message saying that the toner is low may appear on the display.
• The computer’s Samsung Printing Status program window appears on the computer telling you which color cartridge is low on toner (see "Using Samsung Printer
Status" on page 216).
If this happens, you can temporarily improve print quality by redistributing the remaining toner in the cartridge. In some cases, white streaks or light printing will still
occur even after you have redistributed the toner.
Illustrations on this user’s guide may differ from your machine depending on its options or models. Check your machine type (see "Front view" on page 18).
• To prevent damage to the toner cartridge, do not expose it to light for more than a few minutes. Cover it with a piece of paper, if necessary.
• Do not touch the green area of the toner cartridge. Use the handle on the cartridge to avoid touching this area.
• Do not use sharp objects such as a knife or scissors to open the toner cartridge package. They might scratch the drum of the cartridge.
• If toner gets on your clothing, wipe it off with a dry cloth and wash clothing in cold water. Hot water sets toner into fabric.
1
2
63
3. Maintenance
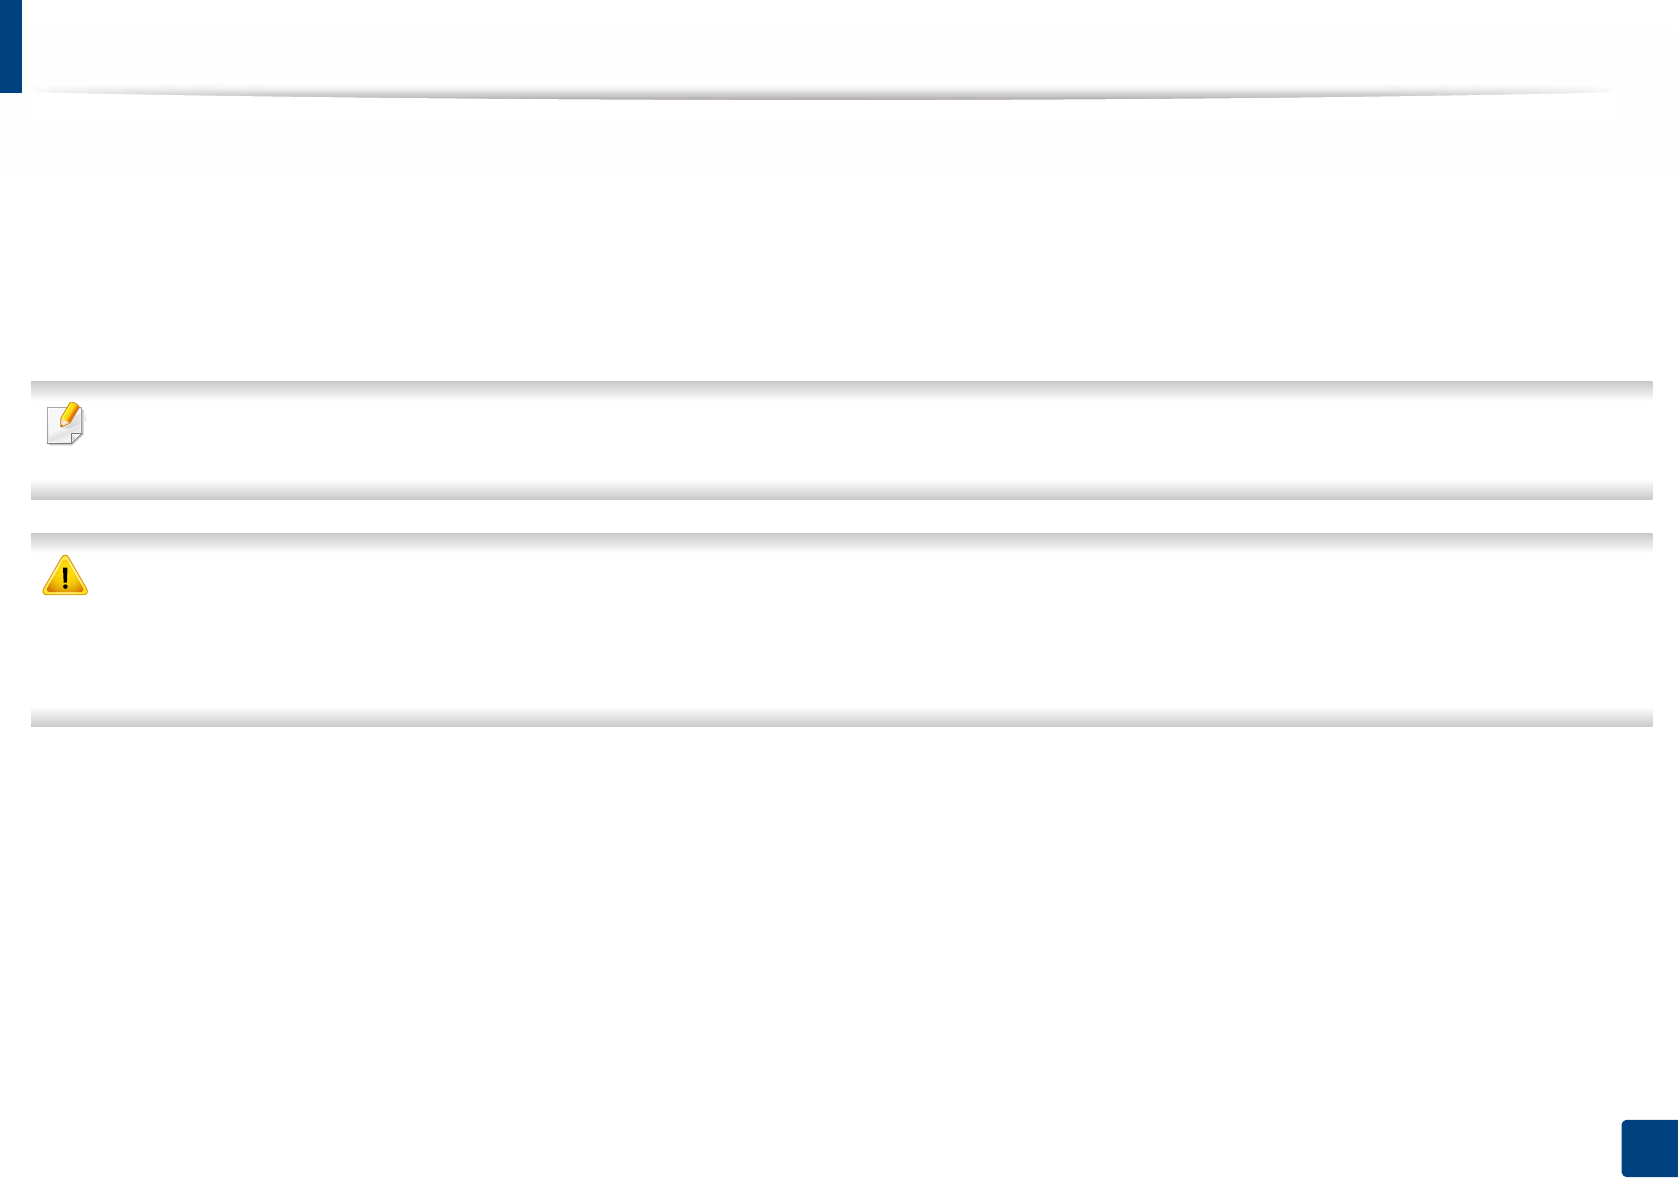
Replacing the toner cartridge
A toner cartridge has almost reached its estimated cartridge life:
• The status LED and the toner-related message on the display indicate when the toner cartridge should be replaced.
• The computer’s Samsung Printing Status Program window appears on the computer telling you when the cartridge is empty (see "Using Samsung Printer Status"
on page 216).
Check the type of the toner cartridge for your machine (see "Available consumables" on page 57).
• Shake the toner cartridge thoroughly, it will increase the initial print quality.
• Illustrations on this user’s guide may differ from your machine depending on its options or models. Check your machine type (see "Front view" on page 18).
• To prevent damage to the toner cartridge, do not expose it to light for more than a few minutes. Cover it with a piece of paper, if necessary.
• Do not touch the green area of the toner cartridge. Use the handle on the cartridge to avoid touching this area.
• Do not use sharp objects such as a knife or scissors to open the toner cartridge package. They might scratch the drum of the cartridge.
• If toner gets on your clothing, wipe it off with a dry cloth and wash clothing in cold water. Hot water sets toner into fabric.
Replacing the toner cartridge
64
3. Maintenance
When a toner cartridge has reached the end of life, the machine will stop printing.
2
1

65
3. Maintenance
Installing accessories
4
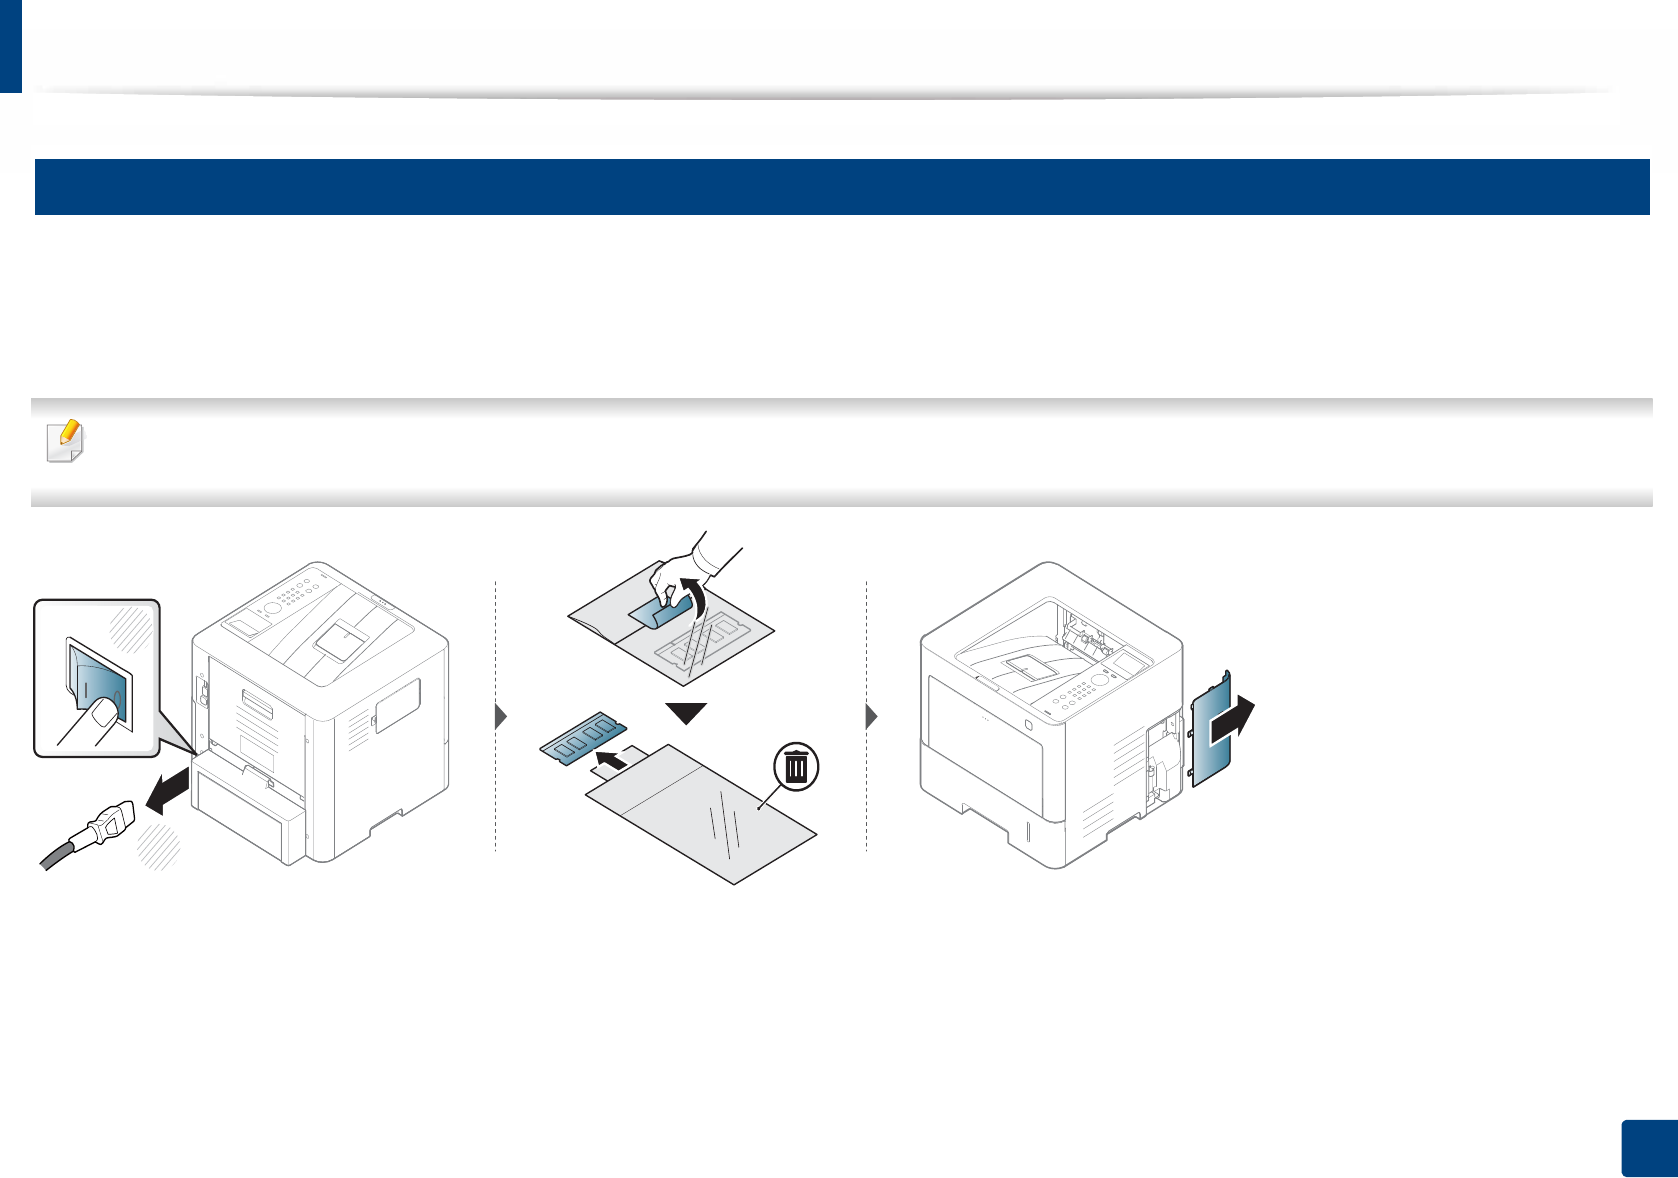
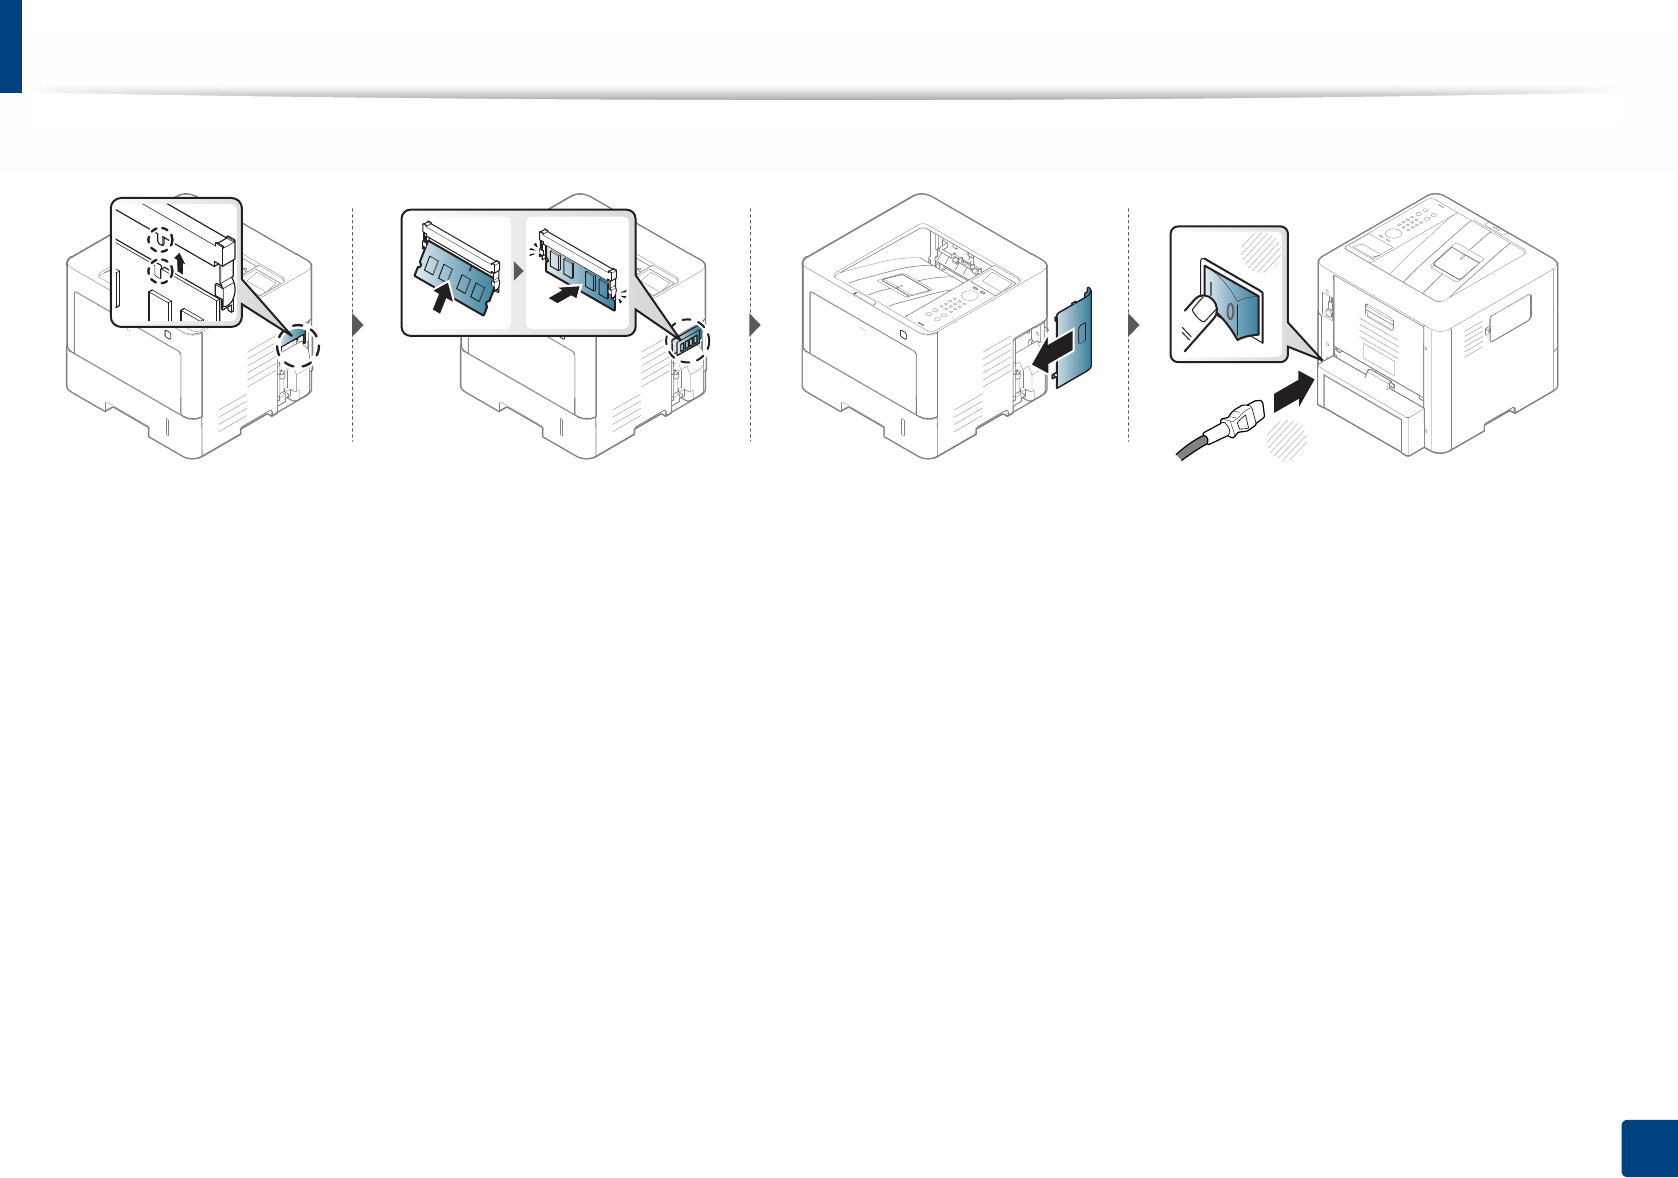
Precautions
• Disconnect the power cord
Never remove the control board cover while the power is turned on.
To avoid the possibility of an electrical shock, always disconnect the power
cord when installing or removing ANY internal or external accessories.
• Discharge static electricity
The control board and internal accessories (network interface card or
memory module) are sensitive to static electricity. Before installing or
removing any internal accessories, discharge static electricity from your
body by touching something metal, such as the metal back plate on any
device plugged into a grounded power source. If you walk around before
finishing the installation, repeat this procedure to discharge any static
electricity again.
When installing accessories, the battery inside the machine is a service
component. Do not change it by yourself. There is a risk of an explosion if
battery is replaced by an incorrect type. Your service provider should
remove the old batttery from your device and dispose of it in accordance
with the relevant regulations in your country.
5
Setting Device Options
When you install the optional devices such as optional tray, memory, etc, this
machine automatically detects and sets the optional devices. If you cannot use
the optional devices you installed in this driver, you need to set the optional
devices in Device Options.
1Click the Windows Start menu.
• For Windows 8, from the Charms, select Search > Settings.
2 For Windows XP Service Pack 3/2003, select Printers and Faxes.
• For Windows 2008/Vista, select Control Panel > Hardware and
Sound > Printers.
• For Windows 7, select Control Panel > Hardware and Sound >
Devices and Printers.
• For Windows 8, search for Devices and Printers.
• For Windows Server 2008 R2, select Control Panel > Hardware >
Devices and Printers.
3 Right-click your machine.
4 For Windows XP Service Pack 3/2003/2008/Vista, press Properties.
For Windows 7, For Windows 8, and Windows Server 2008 R2, from
context menus, select the Printer properties.
Installing accessories
66
3. Maintenance
If Printer properties item has ▶ mark, you can select other printer drivers
connected with selected printer.
5 Select Device Options.
The Properties window may differ depending on the driver or operating
system you are using.
6 Select the appropriate option.
Some menus may not appear in the display depending on options or
models. if so, it is not applicable to your machine.
•Tray Options: Select the optional tray you installed. You can select
the tray.
•Storage Options: Select the optional memory you installed. If this
feature is checked, you can select the Print Mode.
•Printer Configuration: Select the printer language for the print job.
•Administrator Settings: You can select the Printer Status and EMF
Spooling.
•Admin Job Accounting: Allows you to associate user and account
identification information with each document you print.
-User permission: If you check this option, only users with user
permission can start a print job.
-Group permission: If you check this option, only groups with
group permission can start a print job.
If you want to encrypt job accounting password, check Job Accounting
Password Encryption.
•Custom Paper Size Settings: You can specify custom paper size.
7 Click OK until you exit the Properties or Printer properties window.
Installing accessories
67
3. Maintenance
6
Upgrading a memory module
Your machine has a dual in-line memory module (DIMM). Use this memory module slot to install additional memory. We recommend the use of only genuine
Samsung DIMM's. You may void your warranty if it is determined that your machine problem is being caused by third party DIMM's.
The order information is provided for optional accessories (see "Available accessories" on page 58).
• After installing the optional memory, you can use the advanced printing features, such as proofing a job and specifying of printing a secure print job in the printer
properties window. You can control the active job queue and file policy in Job Management menu.
1
2
Installing accessories
68
3. Maintenance
1
2

69
3. Maintenance
Monitoring the supplies life
If you experience frequent paper jams or printing problems, check the number of pages the machine has printed or scanned. Replace the corresponding parts, if
necessary.
1Select (Menu) > System Setup > Maintenance > Supplies Life on the control panel.
2 Select the option you want and press OK.
3 Press (Stop/Clear) to return to ready mode.
70
3. Maintenance
Setting the toner
If the amount of toner in the cartridge is low, a message or LED informing the user to change the toner cartridge appears. You can set the option for whether or not
this message or LED appears.
• You change the machine’s setting set in the machine from Samsung Easy Printer Manager program or SyncThru™ Web Service.
- If you machine is connected to the local, you can set the machine’s setting from Samsung Easy Printer Manager > Advanced Setting > Device Settings
(see "Using Samsung Easy Printer Manager" on page 214).
- If your machine is connected to the network, you can set the machine’s setting from SyncThru™ Web Service > Settings tab > Machine Settings (see "Using
SyncThru™ Web Service" on page 207).
1Select (Menu) > Admin Setup > Supplies Management > Toner Low Alert on the control panel.
2 Select the option you want and press OK to save the selection.
3 Press (Stop/Clear) to return to ready mode.
71
3. Maintenance
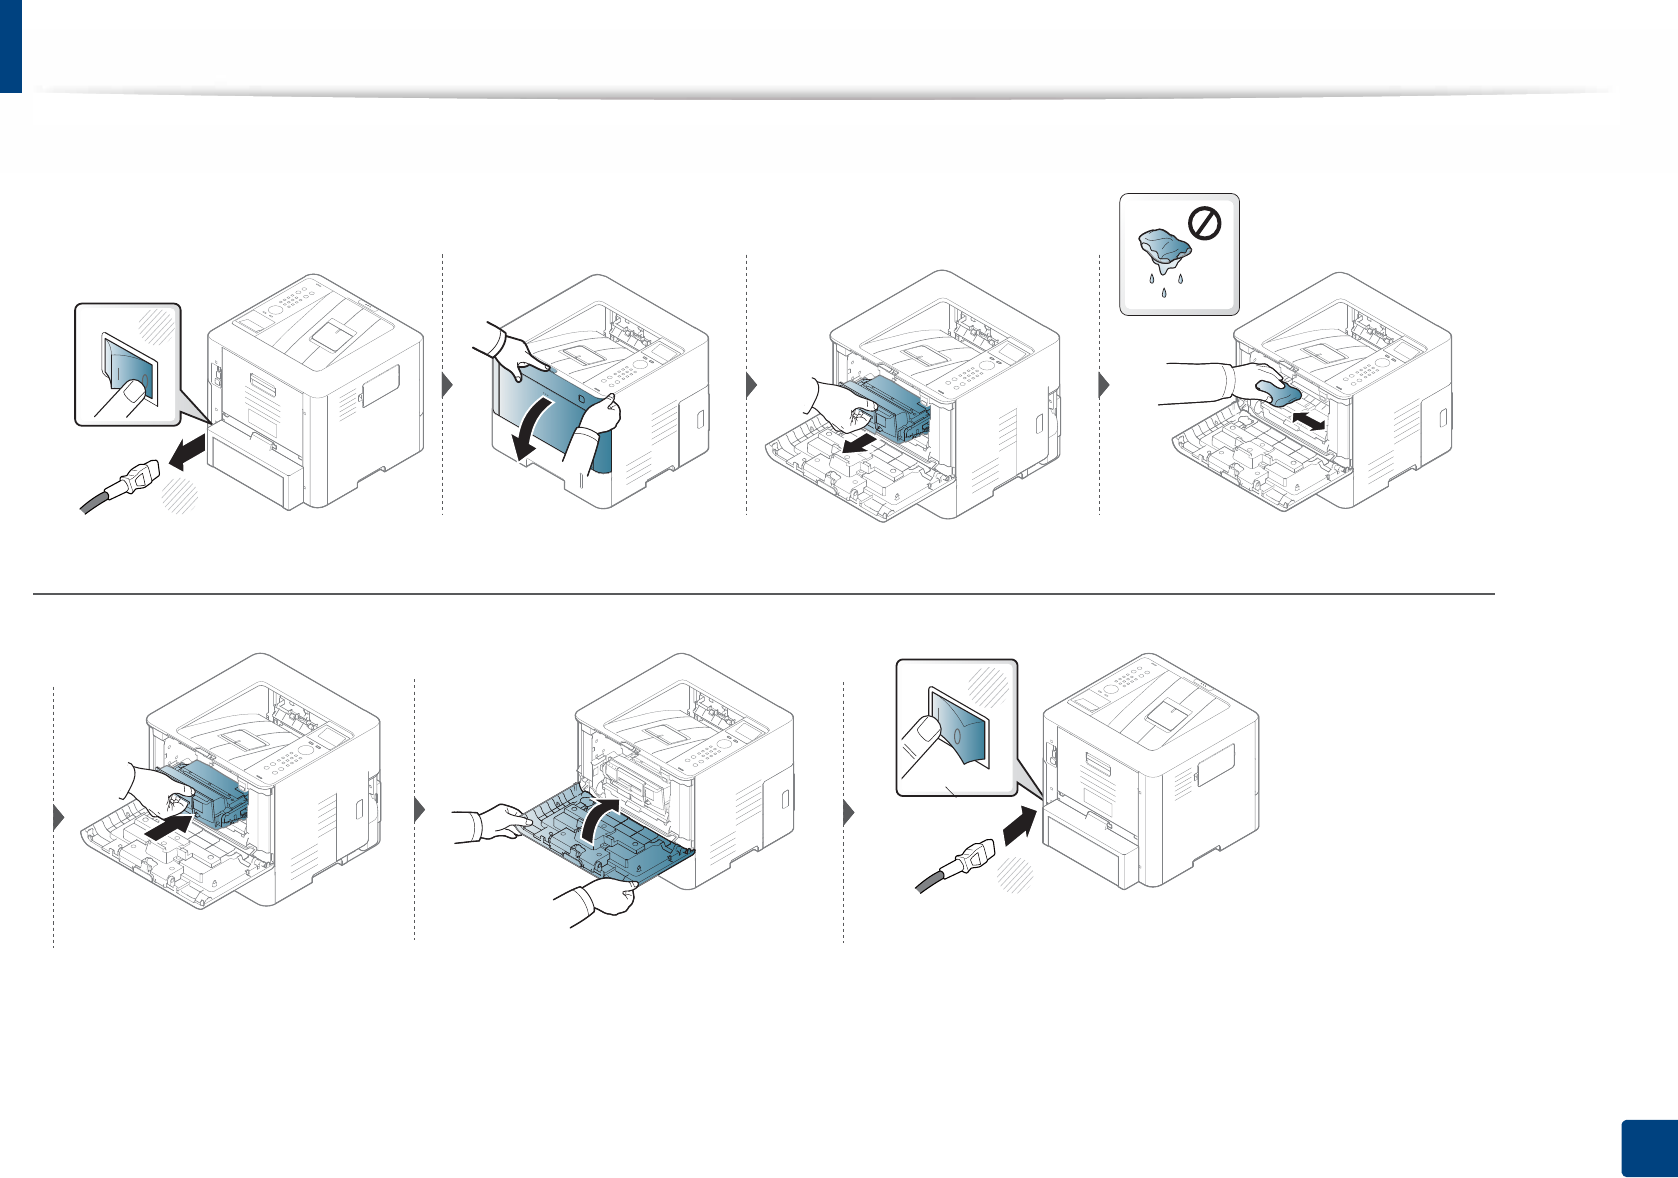
Cleaning the machine
If printing quality problems occur or if you use your machine in a dusty environment, you need to clean your machine regularly to keep it in the best printing
condition and use your machine longer.
• Cleaning the cabinet of the machine with cleaning materials containing large amounts of alcohol, solvents, or other strong substances can discolor or distort the
cabinet.
• If your machine or the surrounding area is contaminated with toner, we recommend you use a cloth or tissue dampened with water to clean it. If you use a vacuum
cleaner, toner blows in the air and might be harmful to you.
•During the printing process, paper, toner, and dust particles can accumulate inside the machine. This buildup can cause print quality problems, such as toner
specks or smearing. Cleaning the inside of the machine clears and reduces these problems.
7
Cleaning the outside
Clean the machine cabinet with a soft, lint-free cloth. Dampen the cloth slightly with water, but be careful not to let any water drip onto or into the machine.
Cleaning the machine
72
3. Maintenance
8
Cleaning the inside
During the printing process, paper, toner, and dust particles can accumulate inside the machine. This buildup can cause print quality problems, such as toner specks
or smearing. Cleaning the inside of the machine clears and reduces these problems.
• To prevent damage to the toner cartridge, do not expose it to light for more than a few minutes. Cover it with a piece of paper, if necessary.
• Do not touch the green area of the toner cartridge. Use the handle on the cartridge to avoid touching this area.
• Use a dry lint free cloth when cleaning the inside of the machine, be careful not to damage the transfer roller or any other inside parts. Do not use solvents such
as benzene or thinner. Printing quality problems can occur and cause damage to the machine.
• Use a dry lint-free cloth to clean the machine.
• Turn the machine off and unplug the power cord. Wait for the machine to cool down. If your machine has a power switch, turn the power switch off before
cleaning the machine.
• Illustrations on this user’s guide may differ from your machine depending on its options or models. Check your machine type (see "Front view" on page 18).
Cleaning the machine
73
3. Maintenance
1
2
2
1
Cleaning the machine
74
3. Maintenance
9
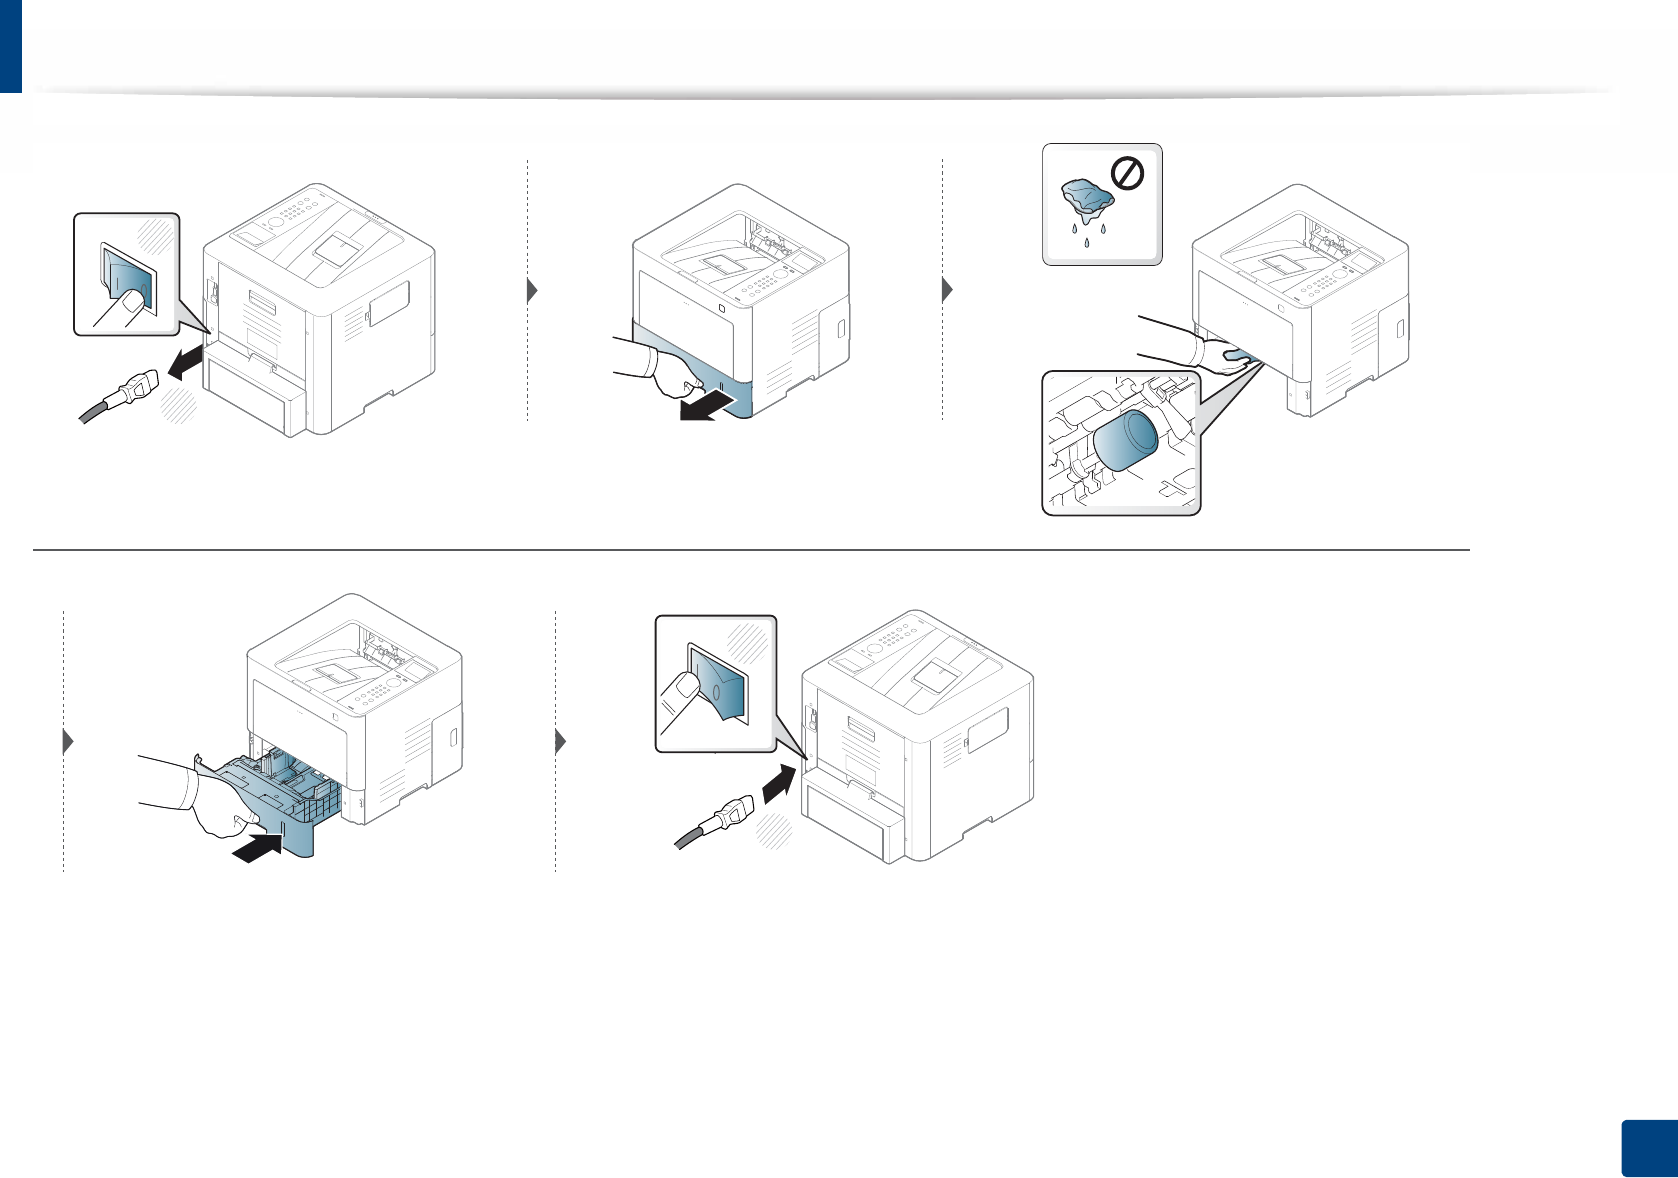
Cleaning the pickup roller
• Turn the machine off and unplug the power cord. Wait for the machine to cool down. If your machine has a power switch, turn the power switch off before
cleaning the machine.
• Illustrations on this user’s guide may differ from your machine depending on its options or models. Check your machine type (see "Front view" on page 18).
Cleaning the machine
75
3. Maintenance
2
1
1
2