Thrane and Thrane A S IPHANDSET Wireless VoIP Handset User Manual VoIP UM
Thrane & Thrane A/S Wireless VoIP Handset VoIP UM
Contents
- 1. Manual 1
- 2. Manual 2
- 3. Manual revised 1
- 4. Manual revised 2
- 5. Manual revised 3
Manual revised 2
Chapter 2: Getting started
Getting started with the wireless IP Handset 15
22222
Getting started
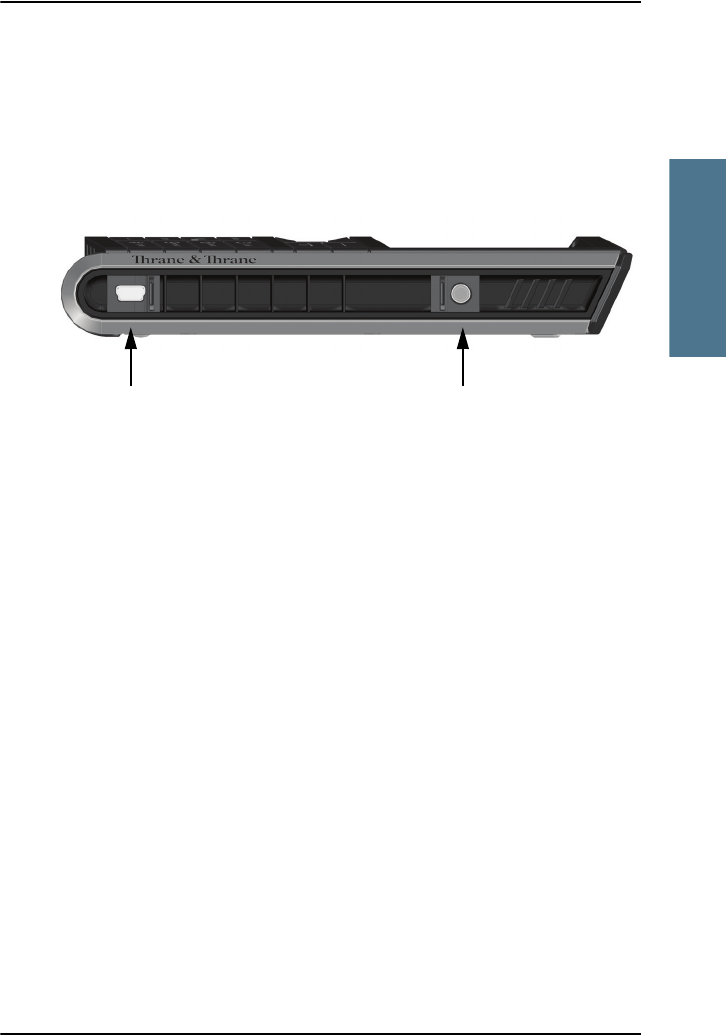
IP Handset connectors
The handset has two connectors on the side of the handset:
• one connector for connecting a headset.
• one Mini-USB 5-pin connector, for charging the handset from a computer
or USB charger.
Preparing the hardware
Overview
For the wireless IP Handset you need the following hardware:
• a wireless access point complying to the Wireless Local Area Networking
(WLAN) standard 802.11b/g
• for charging the handset:
• an external power supply with 12 V DC to 24 V DC nominal power,
min. 7 W, or
• a computer and a USB cable with a mini-USB 5-pin connector at one
end and a USB-A connector at the other end.
To connect the wireless access point
You may connect the wireless access point to a BGAN terminal or to your
standard network connection.
For information on how to install the wireless access point, refer to the
documentation that comes with your wireless access point.
Mini-USB for charging Jack connector for headset
VoIP_UM.book Page 15 Wednesday, June 25, 2008 11:06 AM
Chapter 2: Getting started
16 Getting started with the wireless IP Handset
To connect the external power supply to the cradle
The cradle for the IP Handset serves as a charger when it is connected to an
external power supply (12-24 V DC, 7 W).
If you only have access to AC power, a compatible AC-DC power supply, TT-
3682L, is available from Thrane & Thrane. This power supply is also used for
the EXPLORER 300/500 BGAN terminal.
To connect the power supply, do as follows:
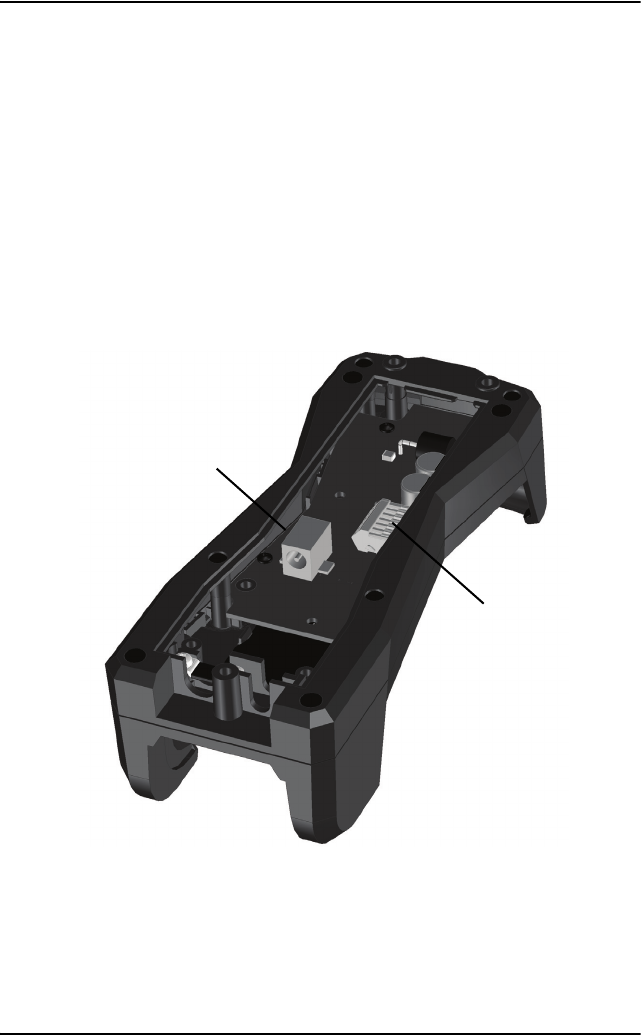
1. On the back of the cradle, unscrew the two screws holding the cover.
2. Remove the cover.
3. Connect your power supply to the cradle.
There are two options for connecting to the cradle:
• Using the internal DC connector in the cradle.
The connector is a proprietary DC Jack, 2.5 mm, positive center.
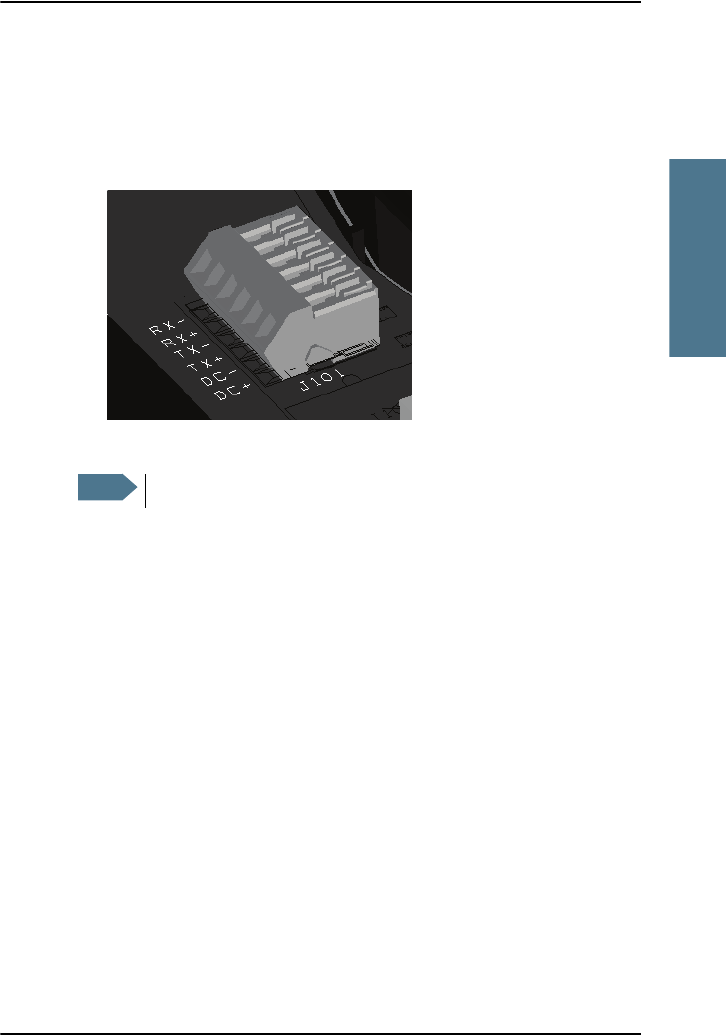
Terminal block J101
DC Connector
VoIP_UM.book Page 16 Wednesday, June 25, 2008 11:06 AM
Chapter 2: Getting started
Getting started with the wireless IP Handset 17
22222
Getting started
The connector on the EXPLORER power supply is compatible with this
connector.
• Using the internal terminal block (J101).
Connect the wires from your DC supply to DC+ and DC- in the terminal
block J101.
4. Secure the cable with a cable relief at the cable exit on the cradle.
5. Mount the cover and fasten the two screws.
For information on how to mount the cradle on a wall or desktop, see
Installing the cradle on page 11.
Note Make sure the cable relief matches the size of the cable.
VoIP_UM.book Page 17 Wednesday, June 25, 2008 11:06 AM

Chapter 2: Getting started
18 Getting started with the wireless IP Handset
Charging the handset
Introduction
The battery icon next to the handset icon
in the top right corner of the display
shows the battery status of the handset.
When the battery level is critically low, the handset makes a sound and shows
a message, and the icon starts flashing to indicate that the battery needs
recharging. If the battery is not recharged, the handset will eventually switch
off.
There are two options for charging the handset:
• using the cradle with a power supply
• using a USB cable and a computer or USB charger
To charge the handset using the cradle
The cradle must be connected to an external 12-24 V DC power supply, as
described in the previous section.
Place the IP Handset in the cradle with the display facing up. The handset
automatically starts the charging process.
To charge the handset from a computer or USB charger
You need a computer or a USB charger and a USB cable with a mini-USB 5-
pin connector at one end and a USB-A connector at the other end.
Do as follows:
1. Connect the mini-USB connector to the connector at the side of your
handset.
2. Connect the other connector on the cable to a USB port on your computer
or your USB charger.
The handset automatically starts the charging process.
VoIP_UM.book Page 18 Wednesday, June 25, 2008 11:06 AM
Chapter 2: Getting started
Getting started with the wireless IP Handset 19
22222
Getting started
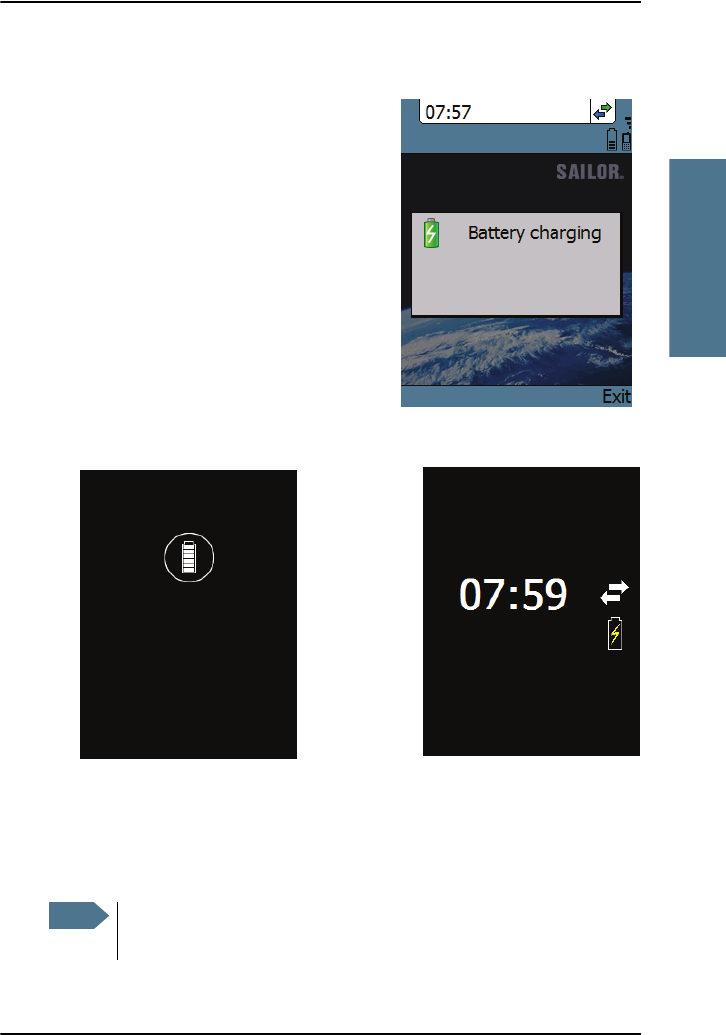
Indications during charging process
A message appears briefly in the display,
the handset makes a sound and the battery
icon is animated to show that the battery is
charging.
Below are examples of the display when the
handset is off and when the handset is in
screensaver mode while charging the
battery.
Note If the handset is out of use for a longer period of time, recharge the
battery every two years to avoid deterioration of the battery.
Handset off (animated). Screensaver mode
The icon is turned off after
a while, but reappears when
a key is pressed.
VoIP_UM.book Page 19 Wednesday, June 25, 2008 11:06 AM
Chapter 2: Getting started
20 Getting started with the wireless IP Handset
Connecting the handset to your wireless access point
Do as follows:
1. Start up the wireless access point.
2. Switch on your wireless IP Handset by pressing and holding the on hook
key until the display lights up.
3. Press the center select key to enter the menu system.
4. Select Network > Wireless network.
5. When the list of available access points appears in the display, select the
access point you want to connect to.
6. If you are prompted for security settings, select OK to enter the Profiles
menu.
7. In the Profiles menu, select the encryption used in your access point. The
handset supports WEP and WPA2-PSK (AES only).
8. Select whether your encryption code is hexadecimal or text.
9. Enter your encryption code.
10. Select Connect.
The handset will now attempt to connect to your wireless access point. If
the access point is connected to a BGAN terminal, see Establishing a
connection using BGAN terminal on page 21.
When the handset is connected to the access point, the display shows
Connected.
Note This procedure is only needed at the first connection. Once
connected, the handset will automatically attempt to connect to this
access point whenever it is switched on.
Note Access points with a profile matching your IP Handset are
marked with . If this symbol is not present, you cannot
connect to an encrypted network until you have set up your
wireless profile to match the access point. If you select an
encrypted network without a defined profile you are prompted
for security settings.
VoIP_UM.book Page 20 Wednesday, June 25, 2008 11:06 AM

Chapter 2: Getting started
Establishing a connection using BGAN terminal 21
22222
Getting started
Establishing a connection using BGAN terminal
Using a BGAN terminal
Introduction
By connecting the handset to a BGAN terminal you gain access to the BGAN
satellite network with your IP Handset.
When the IP Handset is used with the BGAN terminal, it communicates using
Internet protocol between the handset and the terminal. However, on the
BGAN network side of the terminal the call is transmitted as a circuit switched
Standard Voice or 3.1 kHz Audio call.
When connected with the BGAN terminal the IP Handset provides a dedicated
menu for the terminal.
Hardware connection
The wired handset is connected to the BGAN terminal by connecting the
Ethernet cable from the cradle to one of the LAN ports of the terminal. For
further information, see Connecting the wired handset to a BGAN terminal on
page 12.
The wireless handset is connected to the BGAN terminal by connecting the
Wi-Fi access point to one of the LAN ports of the terminal. For information on
how to connect the handset to the access point, see Connecting the handset to
your wireless access point on page 20.
VoIP_UM.book Page 21 Wednesday, June 25, 2008 11:06 AM

Chapter 2: Getting started
22 Establishing a connection using BGAN terminal
Establishing a connection
If no SIM PIN is required
If the handset is connected to a BGAN terminal where the SIM PIN is disabled
or has already been entered, the BGAN terminal automatically sets up a SIP
profile and assigns the local number 0501 to the first handset that is
connected.
If one or more handsets have already been connected to the terminal, and the
new handset has not been connected to the terminal before, you need to set
up the user name, password and local number in the handset and in the web
interface of the BGAN terminal. For further information, see Connecting
subsequent handsets to the BGAN terminal on page 24.
When the display shows the handset ready symbol in the upper right
corner, the handset is ready for making a call.
If the handset ready symbol is crossed out you cannot make a call. The
display will normally show a message explaining why the handset is not
ready.
If a SIM PIN is required
If the handset is connected to a BGAN terminal where the SIM PIN is required
and has not yet been entered, you need to enter the SIM PIN for the terminal.
To do so, you need to know the Administrator user name and password as well
as the SIM PIN for the BGAN terminal. Do as follows:
1. From the main screen of the handset, press the center select key to enter
the menu system.
2. Select BGAN.
3. Select Enter PIN code.
4. Enter the Administrator user name and select OK.
Note This menu item is not available if the PIN has already been
accepted. Select Status > PIN status to see if the PIN has been
accepted.
VoIP_UM.book Page 22 Wednesday, June 25, 2008 11:06 AM
Chapter 2: Getting started
Establishing a connection using BGAN terminal 23
22222
Getting started
For information on how to type text in the handset, see Writing text in the
handset on page 47.
5. Enter the Administrator password and select OK.
6. Enter the SIM PIN and select OK.
If the SIM PIN is rejected, see the next section Wrong PIN.
When the PIN is accepted, the BGAN terminal automatically sets up a SIP
profile and assigns the local number 0501 to the first handset that is
connected.
If one or more handsets have already been connected to the terminal, and the
new handset has not been connected to the terminal before, you need to set
up the user name, password and local number in the handset and in the web
interface of the BGAN terminal. For further information, see Connecting
subsequent handsets to the BGAN terminal on page 24.
When the display shows the handset ready symbol in the upper right
corner, the handset is ready for making a call.
If the handset ready symbol is crossed out you cannot make a call. The
display will normally show a message explaining why the handset is not
ready.
Wrong PIN
After entering the user name and password, you have 3 attempts to enter the
PIN, before you are asked to enter the PUK (Pin Unblocking Key). The PUK is
supplied with your BGAN SIM card.
Enter the PUK followed by a new PIN of your own choice. The PIN must be
from 4 to 8 digits long.
Caution! If you enter a wrong PUK 10 times, the SIM card will no
longer be functional, and you have to contact your Airtime
Provider for a new SIM card.
VoIP_UM.book Page 23 Wednesday, June 25, 2008 11:06 AM

Chapter 2: Getting started
24 Establishing a connection using BGAN terminal
Connecting subsequent handsets to the BGAN terminal
Introduction
If one ore more handsets have already been connected to the terminal, you
need to set up the user name, password and local number in the handset and
in the web interface of the BGAN terminal.
To set up the handset
To enter the user name and password in the handset, do as follows:
1. Start up your handset as described in the previous sections.
2. Enter the menu system and select SIP.
3. Move to the BGAN profile and select Options (left select key).)
4. Select Edit/View.
5. Select User name and enter the user name for your handset. Note that the
user name must be the same as the local number for your handset when
using the BGAN terminal. Available numbers are 0501 to 0516.
6. Select Password and enter the password for your handset.
7. Exit the handset menu system.
To set up the BGAN terminal
To enter the local number and password in the web interface of the BGAN
terminal, do as follows:
1. Connect a computer to the LAN interface of the BGAN terminal and start up
your browser.
2. Enter the IP address for the terminal. The default IP address is 192.168.0.1.
The web interface opens.
3. Select SETTINGS > IP handsets.
VoIP_UM.book Page 24 Wednesday, June 25, 2008 11:06 AM

Chapter 2: Getting started
Establishing a connection using BGAN terminal 25
22222
Getting started
4. Locate the local number that matches the user name of your handset and
click New.
5. Enter the password you entered in the handset.
When the terminal and the handset have recognized each other, a
“Configure” link appears next to the new handset. When you click the
Configure link the internal web interface of the handset opens. For
information on the handset web interface, see Using the web server on
page 77.
Handset ready
When the display shows the handset ready symbol in the upper right
corner, the handset is ready for making a call.
If the handset ready symbol is crossed out you cannot make a call. The
display will normally show a message explaining why the handset is not
ready.
VoIP_UM.book Page 25 Wednesday, June 25, 2008 11:06 AM
Chapter 2: Getting started
26 Making the first call
Making the first call
To make a call, type the phone number on the keypad and press the off hook
key in the left side of the keypad or press #.
The display shows that the number is being
dialled.
If the number is in the Contacts list of the
handset, you can also select the number
from there and dial up with the off hook key.
For further information on how to make calls,
see Making calls on page 40.
VoIP_UM.book Page 26 Wednesday, June 25, 2008 11:06 AM
Chapter 2: Getting started
The handset keypad and display 27
22222
Getting started
The handset keypad and display
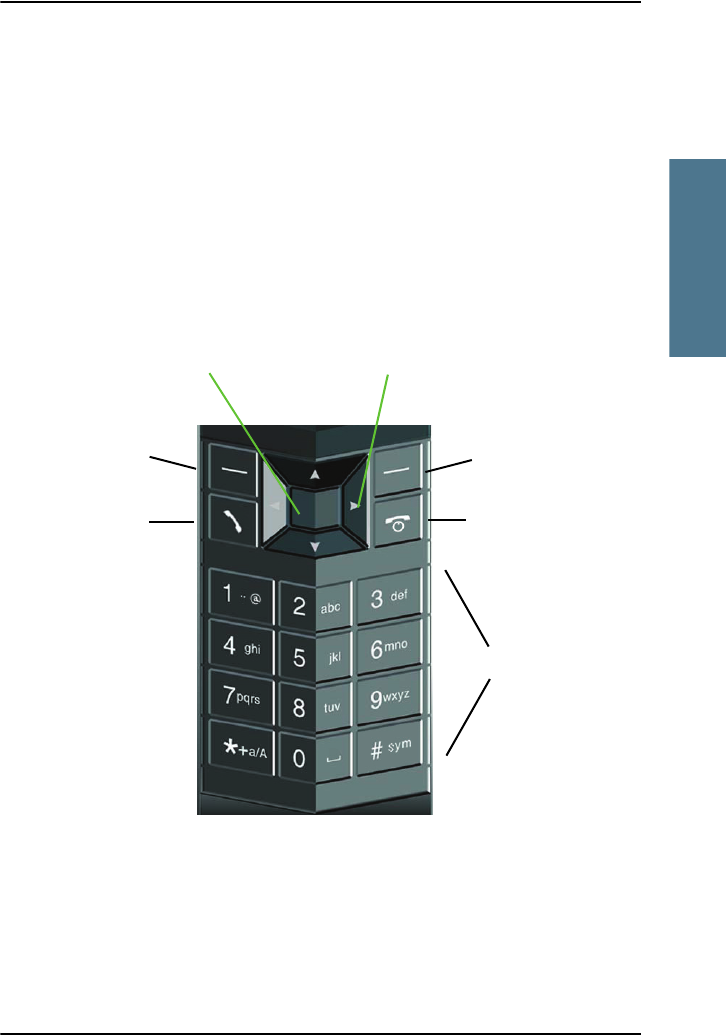
The keypad
Overview
The following drawing shows the keypad of the handset.
The next sections explain the functions of each key in the keypad.
Left select
Off hook
Right select
On hook/ Power
Select Up/ Down/ Left/ Right
Alpha-numeric
keys
VoIP_UM.book Page 27 Wednesday, June 25, 2008 11:06 AM
Chapter 2: Getting started
28 The handset keypad and display
Control keys
The below table shows the functions of the control keys in the upper section of
the keypad.
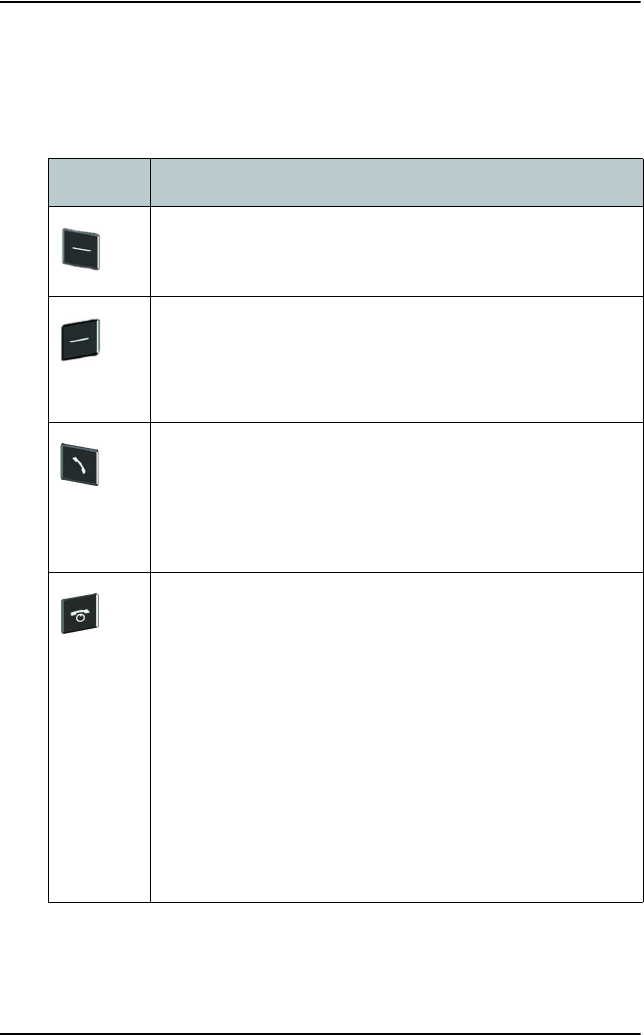
Key Functions
Left select.
Selects the function shown just above the key (left soft key).
Right select.
Selects the function shown just above the key (right soft key).
From main screen: Opens the Contacts list.
Off hook.
After entering a phone number: Initiates a call to the number.
From main screen: Opens a list of the latest calls, including
incoming, outgoing and missed calls.
On hook/ Power.
When the handset is ringing: Rejects the call.
During a call: Ends the call.
When in the menu system: Abandons the menu system and
displays the main screen.
Otherwise: Powers the handset on/off, when pressed and held
for 3 seconds.
If there is an error and the handset does not power off after
approximately 3 seconds, hold the key for 10 seconds, and the
handset will perform a hardware reset.
VoIP_UM.book Page 28 Wednesday, June 25, 2008 11:06 AM
Chapter 2: Getting started
The handset keypad and display 29
22222
Getting started
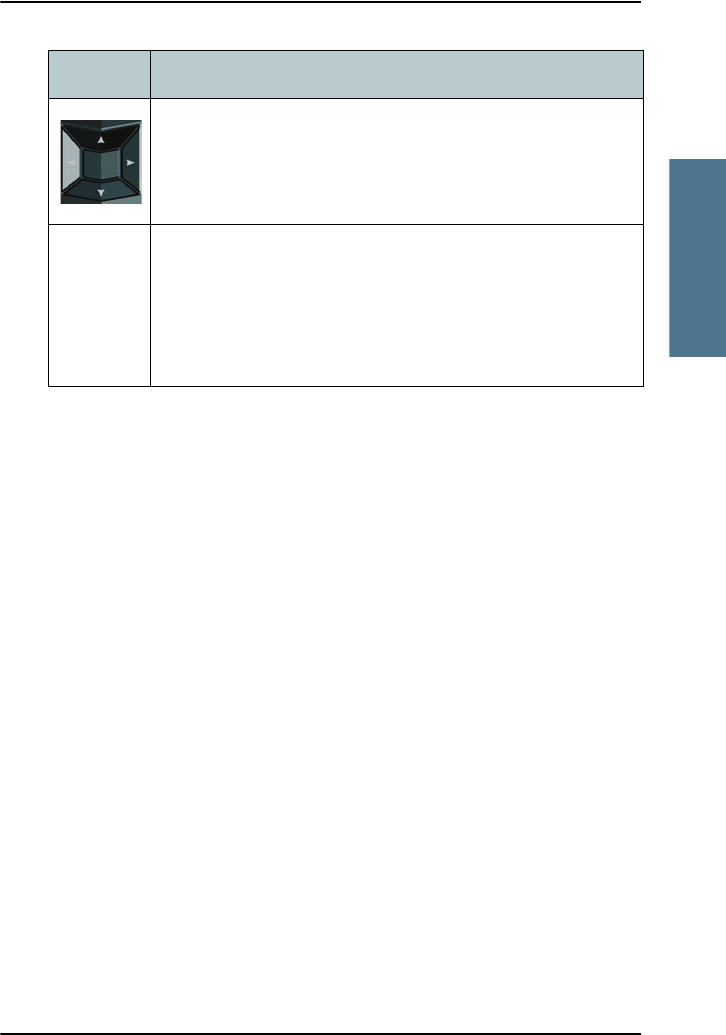
Select (center).
Selects/confirms the function highlighted in the display.
Navigation.
Navigates through the menu system in the display.
Right/Left are also used to change settings in the menus.
See also Keypad shortcuts on page 32.
Key Functions
VoIP_UM.book Page 29 Wednesday, June 25, 2008 11:06 AM
Chapter 2: Getting started
30 The handset keypad and display
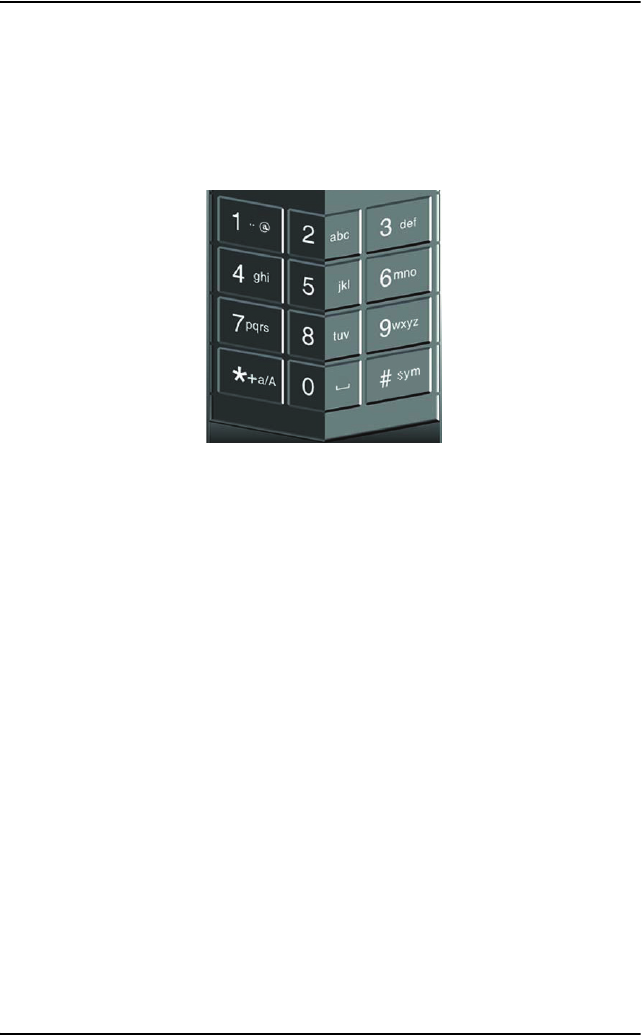
Alpha-numeric keys
This section shows the functions of the alpha-numeric keys in the lower
section of the keypad.
The functions available depend on whether you are typing a phone number
(number mode) or text (text mode).
In number mode, you get the number of the key pressed. Only ∗ has two
functions.
Press ∗ once: The display shows ∗ .
Press ∗ twice, or press and hold: The display shows +.
Press #: The display shows #.
See the available functions in text mode on the next page.
VoIP_UM.book Page 30 Wednesday, June 25, 2008 11:06 AM

Chapter 2: Getting started
The handset keypad and display 31
22222
Getting started
In text mode, you have the functions listed below.
The ∗ key switches between numeric, lowercase and uppercase characters.
To get numbers from lowercase or uppercase mode, press and hold the key.
At numerous presses on the same key, the character changes in the same
sequence that the characters are listed in the table below.
Key Numeric output Lowercase output Uppercase output
1 1 . , @ : - ? . , @ : - ?
2 2 a b c A B C
33 d e f D E F
44 g h i G H I
55 j k l J K L
66 m n o M N O
77 p q r s P Q R S
88 t u v T U V
99 w x y z W X Y Z
00 [space] [space]
∗Switches between lowercase, uppercase and numbers
# Symbols. Displays a list with the following additional symbols:
. / : @ $ % ^ & * ( ) ~ ‘ - _ = + [ ] { } \
| ; ´ “ ! < > , ? # € <CR>
VoIP_UM.book Page 31 Wednesday, June 25, 2008 11:06 AM
Chapter 2: Getting started
32 The handset keypad and display
To navigate with the keypad
To enter the menu system from the main screen, press the center select key.
To move through the menus, press the navigation keys (arrows).
To select a highlighted menu item, press the center select key.
To select one of the items in the action texts area, press the key just below the
text you want to select.
To go back one level in the current menu, press the right select key (only when
Back is displayed above the key).
Keypad shortcuts
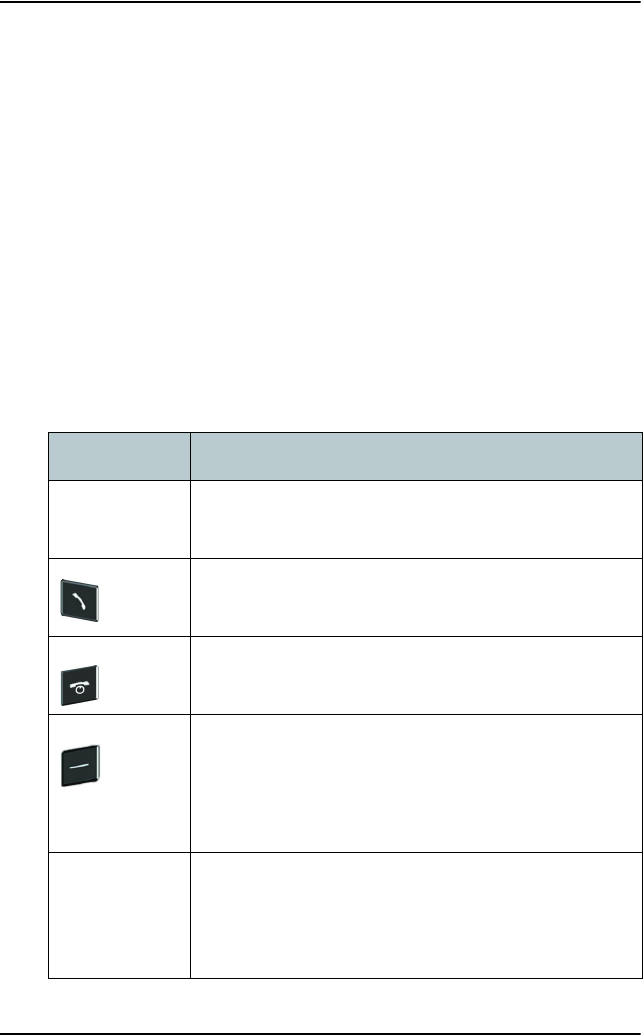
The following shortcuts are available:
When the display is in the main screen, this key gives
direct access to the list of contacts.
When the display is in the main screen, this key opens a
list of the latest incoming, outgoing and missed calls.
When the display is in the menu system, the on hook key
will exit the menu system and show the main screen.
When the display is in the main screen, the right select
key will open the list of contacts.
From inside the Contacts list, press the first letter of an
entry to access the entry in the Contacts list.
Alpha-numeric
keys
When the display is in the menu system, an alpha-
numeric key will jump to the menu item with the pressed
number or, in the Contacts list, to the first entry
beginning with the pressed letter.
VoIP_UM.book Page 32 Wednesday, June 25, 2008 11:06 AM
Chapter 2: Getting started
The handset keypad and display 33
22222
Getting started
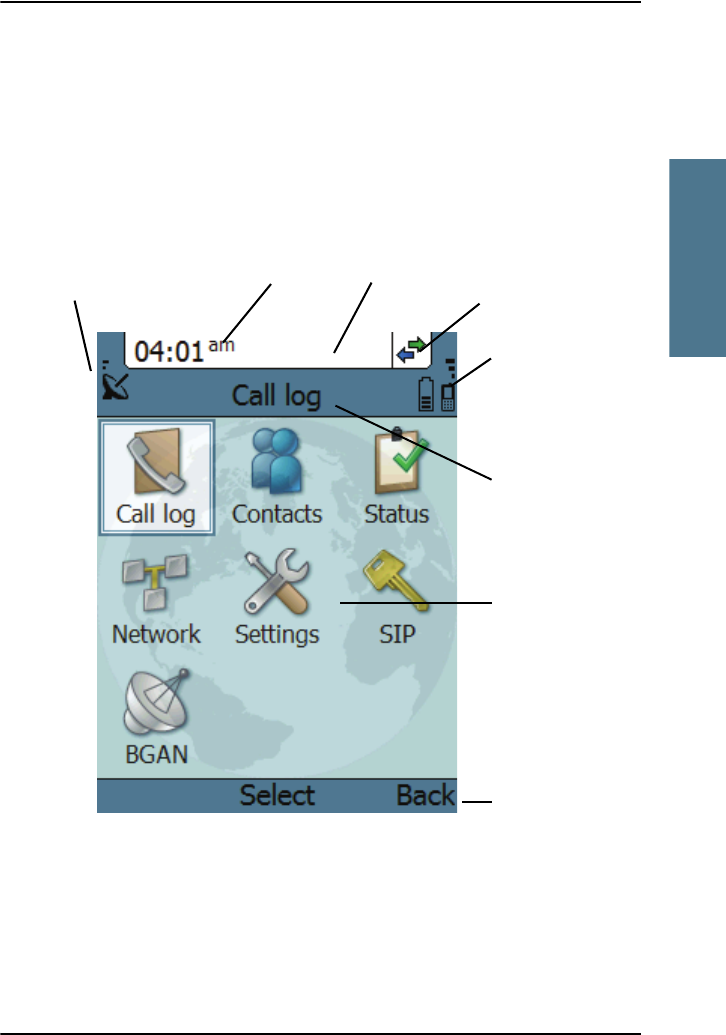
The display
Overview
The color display of the IP Handset is divided into sections with different
information. The sections are outlined below.
BGAN signal and battery status
When the IP Handset is connected to a BGAN terminal, the display shows the
signal strength of the BGAN signal. If the BGAN terminal is battery powered,
the battery status is also displayed.
Time IP handset
call status
Selected menu item
General indicationsSignal (and battery)
Action texts area
Main display area
Signal and battery
status for wireless
handset
status for BGAN terminal
VoIP_UM.book Page 33 Wednesday, June 25, 2008 11:06 AM

Chapter 2: Getting started
34 The handset keypad and display
Time
The display shows the time of day.
The format is selectable in the Settings > Date and time menu.
General indications
General indications are icons that show dynamic information such as missed
calls, sounds off, keypad locked and microphone muted.
For explanations of the icons, see Icons in the display on page 35.
IP Handset call status
This field shows handset status such as whether or not the handset is ready for
making calls, or whether there is an ongoing call.
For explanations of the icons, see Icons in the display on page 35.
Signal and battery status for wireless IP Handset
This field shows the signal strength for the wireless connection and battery
status for the wireless handset.
Main display area
The main display area primarily displays the menus and messages to the user.
Action texts area
The action texts are used to indicate an action that takes place when the
corresponding key is pressed. The corresponding key is the key directly below
the text (left select, center select or right select).
VoIP_UM.book Page 34 Wednesday, June 25, 2008 11:06 AM
Chapter 2: Getting started
The handset keypad and display 35
22222
Getting started
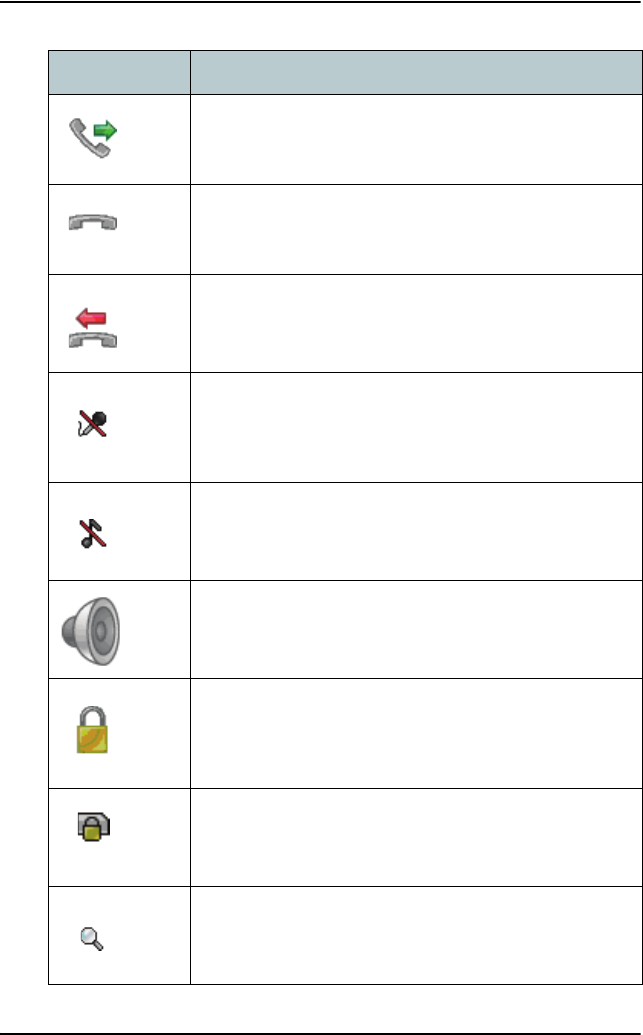
Icons in the display
The below table explains the icons in your display.
Icon Meaning
Wireless handset (used together with signal strength
and battery status).
BGAN terminal connected (used together with signal
strength and battery status if relevant).
Signal strength for wireless handset and/or for BGAN
terminal.
Battery status for wireless handset and/or for BGAN
terminal.
The handset is ready for making calls.
The handset is not ready for making calls.
Incoming call - not yet answered (the handset is
ringing).
Incoming call in progress.
Outgoing call - not yet answered.
VoIP_UM.book Page 35 Wednesday, June 25, 2008 11:06 AM
Chapter 2: Getting started
36 The handset keypad and display
Outgoing call in progress.
Call ended.
Missed call.
See the Call log for information on the call.
The microphone is muted.
To reactivate the microphone, select
Options (left select key) > Microphone.
The handset is in silent mode. All external sounds from
the handset - including ring tones - are muted. Voice is
not muted.
This symbol is shown when you are adjusting the
volume.
The keypad is locked.
To unlock the keypad, press the center select key
followed by the left select key.
This symbol is used in the Contacts list to indicate that
the number is from the phone book of the BGAN
terminal and is read-only.
When an alpha-numeric key is pressed from inside the
Contacts list, this symbol is shown while the handset is
searching for entries with the letter pressed.
Icon Meaning
VoIP_UM.book Page 36 Wednesday, June 25, 2008 11:06 AM
Chapter 2: Getting started
The handset keypad and display 37
22222
Getting started
Wait - a task is in progress.
Shown in the list of wireless access points: The wireless
connection is encrypted.
Shown in the list of wireless access points: The wireless
connection is not encrypted.
Shown in the list of wireless access points: The profile
for the wireless access point matches the handset.
Icon Meaning
VoIP_UM.book Page 37 Wednesday, June 25, 2008 11:06 AM

Chapter 2: Getting started
38 What’s next?
Screensaver
You can choose to have a screensaver activated when the handset is not used
for 1 minute. This screen shows only the time, handset status and general
indications such as missed calls.
When you press a key the display returns to the normal display function.
To enable or disable the screensaver, enter the menu system, select Settings >
Display and select Screensaver. When the box is checked, the screensaver is
enabled.
What’s next?
After reading this chapter you should be able to connect the IP Handset, start
up and make a call.
The next chapters provide more information on the user interfaces and the
setup of the IP Handset. The following chapter, Operating the IP Handset,
explains how to setup and use the IP Handset.
VoIP_UM.book Page 38 Wednesday, June 25, 2008 11:06 AM

39
Chapter 3
33333
Operating the IP Handset
Operating the IP Handset 3
In this chapter
This chapter describes how to use the IP Handset. It also describes how to
configure the handset and use the display menu system, including a short
description of how to use the IP Handset with a BGAN terminal.
For information on how to connect and start up the handset, and how to
navigate with the keypad, refer to the previous chapter, Getting started.
User interfaces
The main user interface for the handset is the display menu system. However,
with a computer and a browser you can also use the built-in web server to
access the handset. This way you can take advantage of a larger screen and
still access a subset of the handset settings.
•The display menu system is described in The menu system on page 49.
For an overview of the keys and display, and explanation of keys and
display symbols, see The handset keypad and display on page 27.
•The web server is described in Using the web server on page 77.
VoIP_UM.book Page 39 Wednesday, June 25, 2008 11:06 AM

Chapter 3: Operating the IP Handset
40 Handset functions
Handset functions
Making calls
Handset ready
When the status field for the IP Handset shows ready , you can make or
receive calls.
VoIP_UM.book Page 40 Wednesday, June 25, 2008 11:06 AM
Chapter 3: Operating the IP Handset
Handset functions 41
33333
Operating the IP Handset
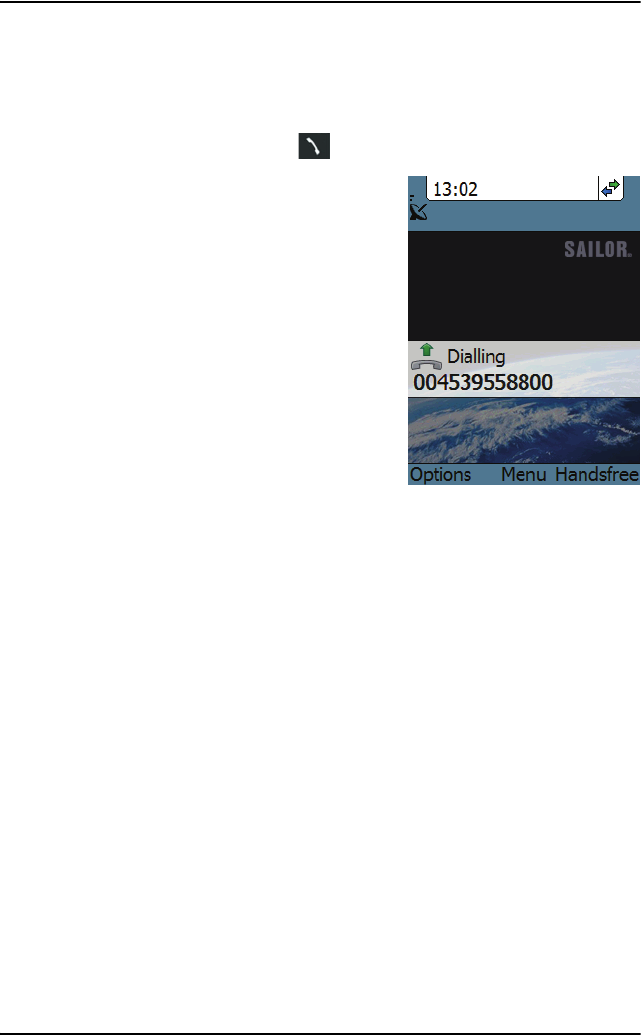
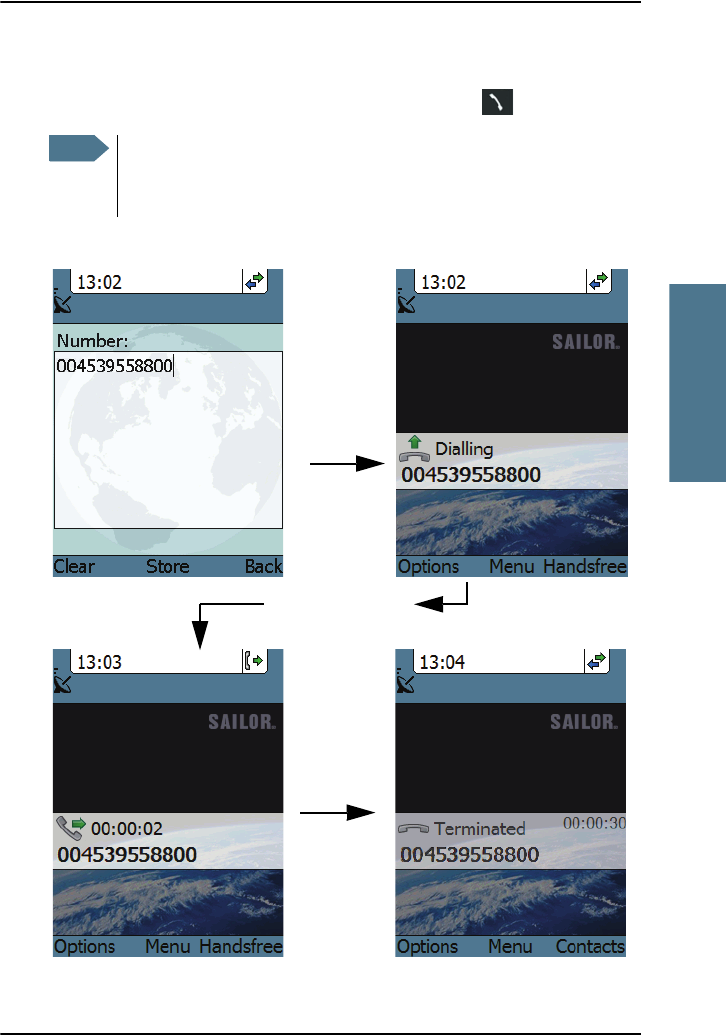
To make a call
To make a call, simply type the phone number and press or #.
The display shows the progress as follows:
Note If the handset is in the cradle while you make the call, the mode will
automatically be hands-free (default function). For further
information, see To set up the function of the cradle on page 66.
Press off hook
Hang up
The call is answered
VoIP_UM.book Page 41 Wednesday, June 25, 2008 11:06 AM
Chapter 3: Operating the IP Handset
42 Handset functions
You can also call a number from your contacts or from a list of recent calls:
•Contacts: Press the right select key from the main screen and move to the
contact you want to call. Then press the off hook key.
•Recent calls: To see the latest calls (incoming, outgoing and missed calls),
press from the main screen. Press again to call the selected
number.
For information on how to make calls using a BGAN terminal, see Making a
call using a BGAN terminal on page 43.
To receive a call
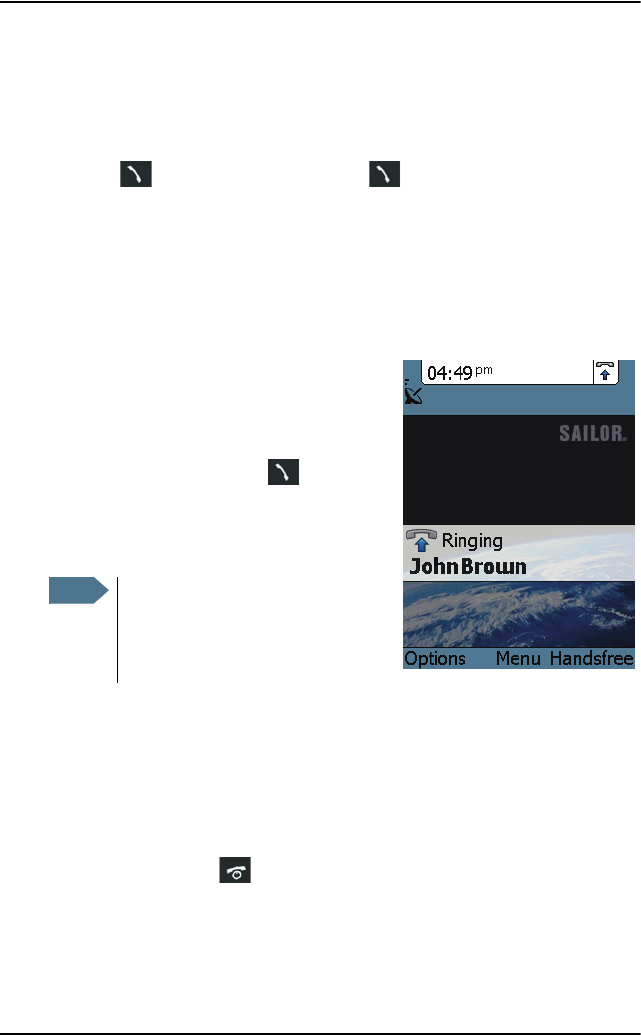
When the handset is ringing, the display
shows the calling name or number, if
known.
Answer the call by pressing the off hook key
in the left side of the keypad , or by
removing the handset from the cradle. For
information on cradle detection, see To set
up the function of the cradle on page 66.
Any open menus are closed down when the handset is ringing.
You can see unanswered calls under Call log in the IP handset menus or in the
web interface.
To end or reject a call
Press the on hook key to end an ongoing call or to reject an incoming
call.
When the handset is in hand-held mode, you can also end the call by placing
the handset in the cradle.
Note If the handset is in the cradle while
you answer the call, the mode will
automatically be hands-free (by
default).
VoIP_UM.book Page 42 Wednesday, June 25, 2008 11:06 AM

Chapter 3: Operating the IP Handset
Handset functions 43
33333
Operating the IP Handset
Making a call using a BGAN terminal
To make a call from a handset connected to a BGAN terminal
To make a call from a phone or handset connected to a BGAN terminal, dial
00 <country code> <phone number> followed by or #.
Example: To call Thrane & Thrane in Denmark (+45 39558800),
dial 00 45 39558800 followed by or #.
For further information on call types and the BGAN terminal, refer to the user
manual for your BGAN terminal.
To make a call to a handset connected to a BGAN terminal
To make a call to a handset connected to the terminal, dial
+870 <Mobile number>
•+ is the prefix used in front of the country code for international calls. This
is 00 when calling from most countries.
•Mobile number: The mobile number of the terminal you are calling.
Example: If you are calling from Denmark and the mobile number for 3.1 kHz
Audio is 772112345 on your terminal, and you want to make a call
to the terminal using 3.1 kHz Audio, dial 00 870 772112345.
Note The default call type is set up in the web interface of the BGAN
terminal. However, you can select the call type for your call, using a
prefix.
Dial 1 ∗ before the number to make a Standard Voice call.
Dial 2 ∗ before the number to make a 3.1 kHz Audio call.
Example: Dial 2 ∗ 004539558800 to make a 3.1 kHz Audio call to
Thrane & Thrane in Denmark.
Note By default all handsets connected to the terminal will ring on
incoming calls.
VoIP_UM.book Page 43 Wednesday, June 25, 2008 11:06 AM

Chapter 3: Operating the IP Handset
44 Handset functions
To see the mobile numbers of your terminal, refer to the information included
with your airtime subscription.
For more information on call types and the BGAN terminal, refer to the user
manual for your BGAN terminal.
Note There are two Voice numbers, one for Standard Voice and one for
3.1 kHz Audio.
VoIP_UM.book Page 44 Wednesday, June 25, 2008 11:06 AM

Chapter 3: Operating the IP Handset
Handset functions 45
33333
Operating the IP Handset
Quick settings
To control the volume
To adjust the voice volume during a call (with the display in the main screen),
press or on the keypad.
To use hands-free operation
To enable hands-free operation during a call, use the right select key to select
Handsfree. To go back to hand-held mode, press the right select key again.
In hands-free mode the sound is routed to a speaker, so that you can use the
phone without holding it close to the ear. You can adjust the volume with
or as described in the previous section.
Handset in cradle:
You can also make a hands-free call by leaving the handset in the cradle while
making the call. Similarly you can answer a call using hands-free mode by
leaving the handset in the cradle while answering the call.
In both cases, the default function is as follows:
• If you remove the handset from the cradle during the call, the mode will
automatically change to hand-held.
• When the handset is out of the cradle in hand-held mode, the call will be
terminated when you put the handset back in the cradle.
• When the handset is out of the cradle in hands-free mode, you can put it
back in the cradle without terminating the call.
To mute the microphone
To mute the microphone during a call, select the left Options menu and select
Microphone mute.
Note You can change this default function under Settings > Cradle, if you
want the handset to be independent of the cradle. For further
information, see To set up the function of the cradle on page 66.
VoIP_UM.book Page 45 Wednesday, June 25, 2008 11:06 AM

Chapter 3: Operating the IP Handset
46 Handset functions
To lock the keypad
To lock the keypad, select the left Options menu and select Lock keypad.
When the keypad is locked you can still answer incoming calls.
To unlock the keypad, press the center select key and then the left select key.
To use night mode
The display has a night mode for operation in
low light areas. In night mode, the colors are
changed to make the display more suitable
for night operation.
To activate night mode, select the left Options
menu and select Night mode.
To use stealth mode
The display has a stealth mode which turns off all lights and/or sounds for
external events. Note, however, that the keypad will still light up when you
press a key.
To activate stealth mode, select the left Options menu and select Stealth mode.
Note Stealth mode is only activated for the items you have selected in the
Stealth mode menu. See To use stealth mode on page 64.
VoIP_UM.book Page 46 Wednesday, June 25, 2008 11:06 AM

Chapter 3: Operating the IP Handset
Handset functions 47
33333
Operating the IP Handset
Writing text in the handset
How to use the keys
Press ∗ before the alpha-numeric key to switch between lower case, upper
case and numbers.
There are 3 or 4 letters on each key. To obtain the other letters on the key,
press the key again.
To move the cursor in the text, use the arrow keys.
To delete the letter just before the cursor, press the left select key Clear. Hold
the key to delete all the text.
For a list of the key-functions in text-mode, see the table on page 31.
Example
To type “He”, do as follows:
1. Press ∗ one or two times until the lower left corner of the display shows
upper case letters.
2. Press the key 4 ghi two times to display the letter H.
3. Press ∗ again until the lower left corner of the display shows lower case
letters.
4. Press the key 3 def two times to display the letter e.
VoIP_UM.book Page 47 Wednesday, June 25, 2008 11:06 AM

Chapter 3: Operating the IP Handset
48 Handset functions
Using a headset
You can connect a headset to the wireless IP Handset as follows:
Plug the headset jack into the jack connector on the side of the handset.
The microphone and speaker of the handset are automatically disabled and
the headset is used instead.
VoIP_UM.book Page 48 Wednesday, June 25, 2008 11:06 AM

Chapter 3: Operating the IP Handset
The menu system 49
33333
Operating the IP Handset
The menu system
Accessing the menu system
To access the menu system from the main screen, press the center select key.
Move around in the menus with the arrow keys and select with the select keys.
Leave the menu system by pressing the on hook key.
VoIP_UM.book Page 49 Wednesday, June 25, 2008 11:06 AM
Chapter 3: Operating the IP Handset
50 The menu system
Menu overview
The following drawing shows an overview of the menu system.
Note The Wireless network menu under Network and the Country menu
under Network > Settings are not present in the wired handset!
BGAN
Registered
Profile 2
Not in use
Profile 3
Not in use
Missed calls
Received calls
Dialled numbers
Manage
Call log
Contacts
Status
Network
Settings
SIP
BGAN
Main
menu
Phone identification
Network information
Software version
Status
Enter PIN code
Sound
Stealth
Call services
Cradle
Display
Web server
Date and time
Language
Factory default
Wireless network
Settings Noise cancellation
Echo cancellation
Use BGAN time
Time
Date
Format (12/24h)
Time zone
Active backlight (%)
Standby backlight (%)
Scre ensa ver
Transparency
Ringing tone
Tones volume
Key pad cli ck
Suppress audio
Suppress backlight
Use stealth
Country
Automatic IP (DHCP)
UMTS status
CNo (signal strength)
PIN status
Access P 1
Connected
Access P 2
Answer when lifted
VoIP_UM.book Page 50 Wednesday, June 25, 2008 11:06 AM
Chapter 3: Operating the IP Handset
The menu system 51
33333
Operating the IP Handset
Call log
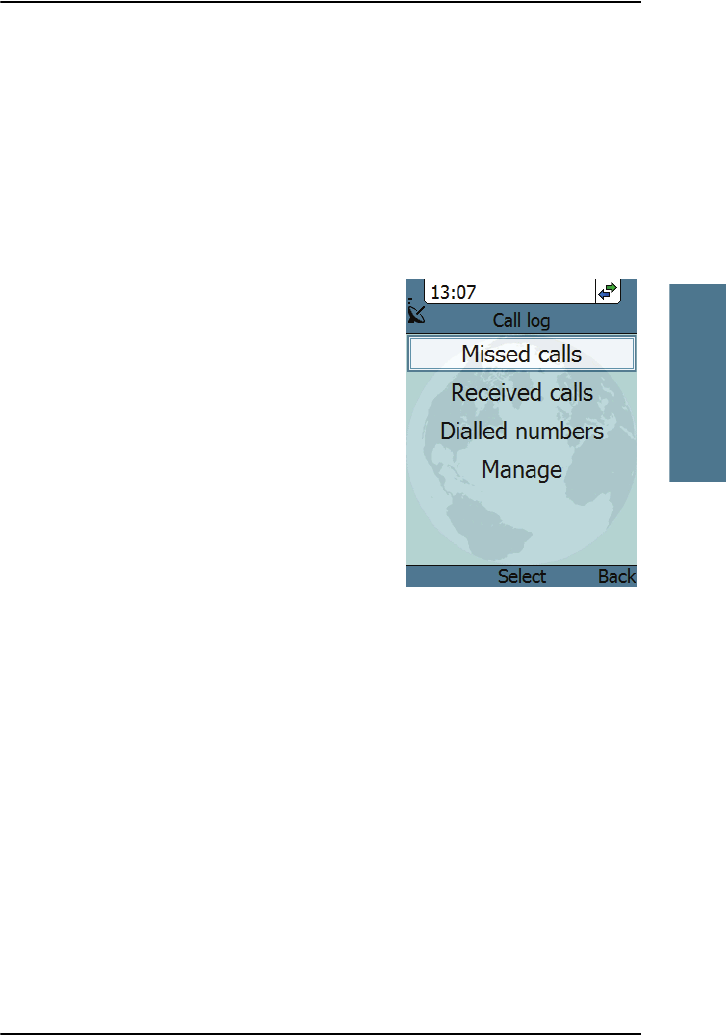
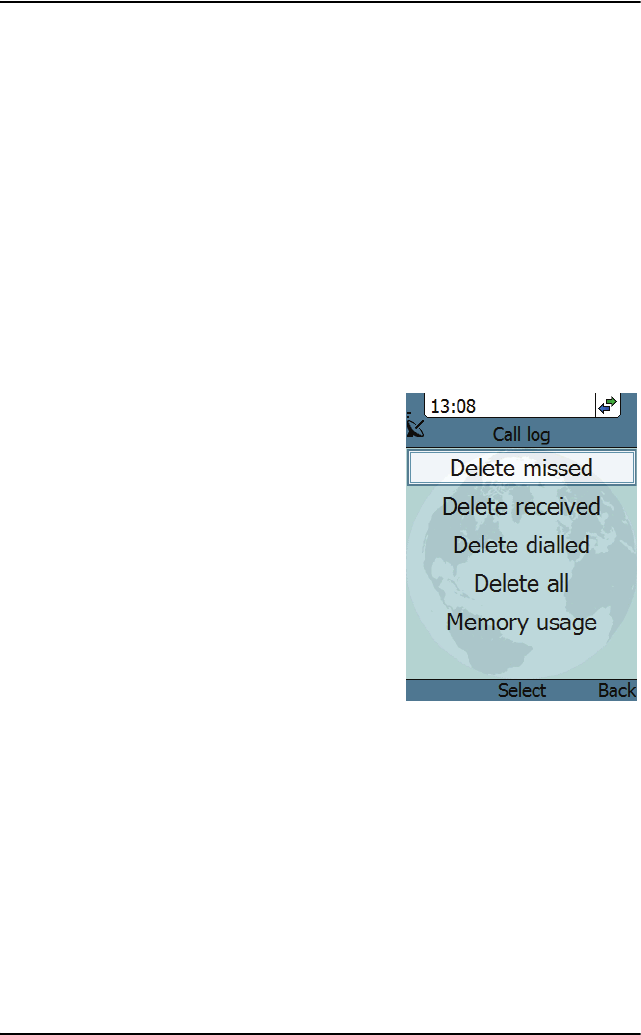
To see the call log
Note that the call log can hold maximum 100 calls. You can delete calls from
the call log. For further information, see the next pages in this section.
Do as follows:
1. From the main menu, select Call log.
2. Select the list you want to see.
3. If you want to see details for a call, move
to the call and select View.
The display shows the name (if known),
the number, time of the call and
duration.
To add a number from the call log to the Contacts
Do as follows:
1. In the call log, go to the call and select Options.
2. Select Add to contacts.
Note that the Contacts list can hold maximum 100 entries.
3. Type in the name of your new contact and select OK.
VoIP_UM.book Page 51 Wednesday, June 25, 2008 11:06 AM
Chapter 3: Operating the IP Handset
52 The menu system
To delete a number from the call log
Do as follows:
1. In the call log, go to the call and select Options.
2. Select Delete.
3. Select Yes.
To delete all numbers in a call log folder
Do as follows to delete all numbers in the call log, or all numbers in a
subfolder of the call log.
1. In the call log menu (not in one of the
subfolders) select Manage.
2. Select the folder you want to empty.
3. Select Yes.
To see memory usage in the call log
To see the number of stored entries and the maximum allowed number of
entries, do as follows:
1. In the call log menu (not in one of the subfolders) select Manage.
2. Select Memory usage.
VoIP_UM.book Page 52 Wednesday, June 25, 2008 11:06 AM

Chapter 3: Operating the IP Handset
The menu system 53
33333
Operating the IP Handset
Contacts
To see your contacts
Do one of the following:
• From the main screen, press the right select key,
• from the main screen, press , or
• from the main menu, select Contacts.
If a contact is from the BGAN phone book it is marked with . This means
you cannot edit or delete the entry.
To call a contact
Do as follows:
1. In your Contacts list, scroll to the contact you want to call.
2. Press the off hook key.
To add a contact
Do as follows:
1. In your Contacts list, press the left select key, Options.
2. Select Add.
Note that the Contacts list can hold maximum 100 entries.
3. Type in the name of your contact and select OK.
The name can be maximum 32 characters.
For information on how to enter text, see Writing text in the handset on
page 47.
4. Scroll to Number and select Edit.
5. Type in the number of your contact and select OK.
The number can be maximum 32 characters.
VoIP_UM.book Page 53 Wednesday, June 25, 2008 11:06 AM

Chapter 3: Operating the IP Handset
54 The menu system
To edit a contact
Do as follows:
1. In your Contacts list, scroll to the contact you want to edit.
2. Press the left select key, Options.
3. Select View/Edit.
4. Select Edit.
5. Change the name of your contact and select OK.
For information on how to enter text, see Writing text in the handset on
page 47.
6. Scroll to Number and select Edit.
7. Change the number of your contact and select OK.
To delete a contact
Do as follows:
1. In your Contacts list, scroll to the contact you want to delete.
2. Press the left select key, Options.
3. Select Delete.
4. Press the left select key, Yes.
The contact is now deleted from your Contacts list.
VoIP_UM.book Page 54 Wednesday, June 25, 2008 11:06 AM
Chapter 3: Operating the IP Handset
The menu system 55
33333
Operating the IP Handset
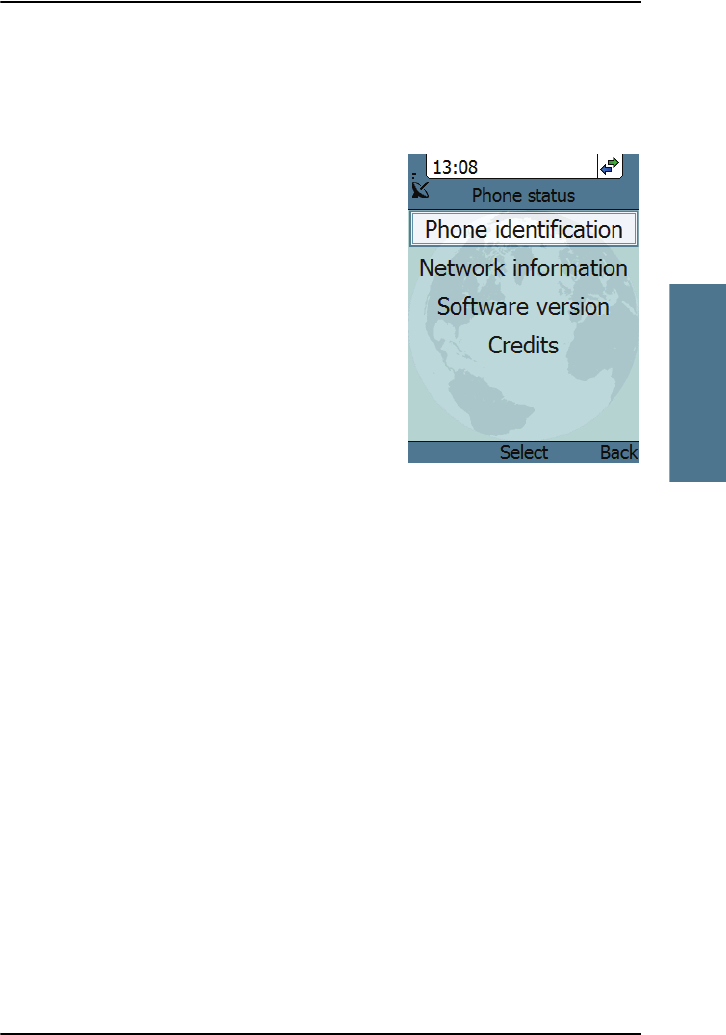
Status
To view status for the handset, do as follows:
1. From the main menu, select Status.
2. Select Phone identification to see the
serial number of the IP Handset.
3. Select Network information to see:
• DHCP Enabled/Disabled
• IP address
• Subnet mask address
• Default gateway
• Physical address (MAC)
4. Select Software version to see the
version of the IP Handset software.
VoIP_UM.book Page 55 Wednesday, June 25, 2008 11:06 AM
Chapter 3: Operating the IP Handset
56 The menu system
Network
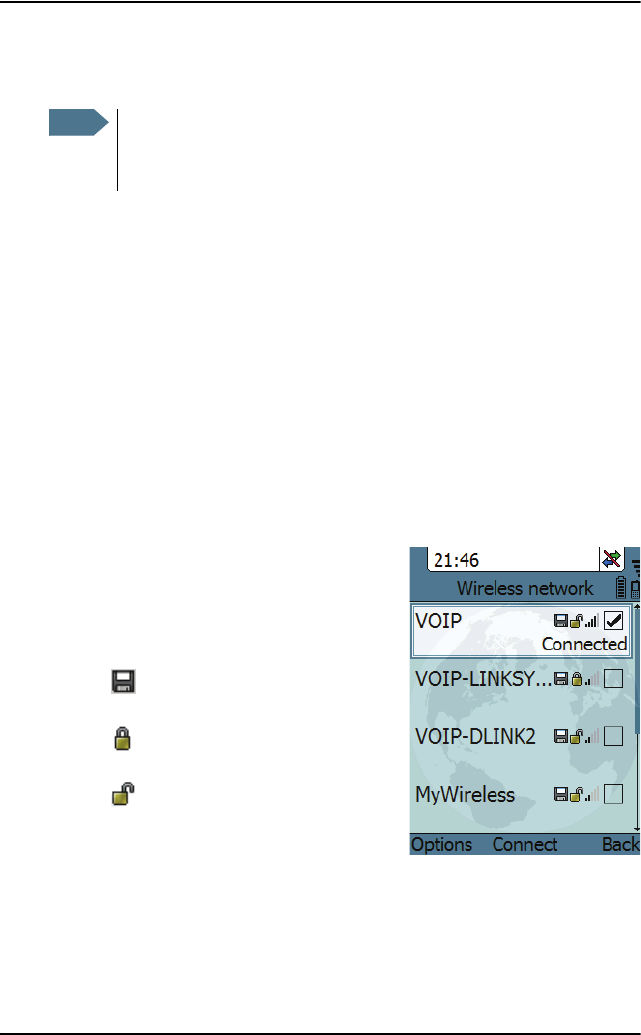
To connect to the wireless network
If your handset has been connected to the wireless access point before, it will
automatically attempt to establish a connection as soon as the access point is
within reach.
If it is the first time you connect your handset to the wireless access point, you
need to manually connect to the access point.
To connect to the access point, do as follows:
1. Start up your wireless access point.
2. Start up the handset.
3. Enter the menu system and select
Network > Wireless network.
A list appears with all wireless access
points within reach, together with
previously connected access points.
• means the handset already has a
profile for this access point.
• means the access point uses
encryption.
• means the access point does not
use encryption.
The connected access point (if any) is
always placed at the top.
4. Select Connect at the network you want to connect to.
If your access point does not use encryption, the handset will automatically
connect and create a new profile for the access point.
Note The Wireless network menu described in the following sections is
only available in the wireless handset. For the wired handset, go to
To select the IP mode on page 61.
VoIP_UM.book Page 56 Wednesday, June 25, 2008 11:06 AM
Chapter 3: Operating the IP Handset
The menu system 57
33333
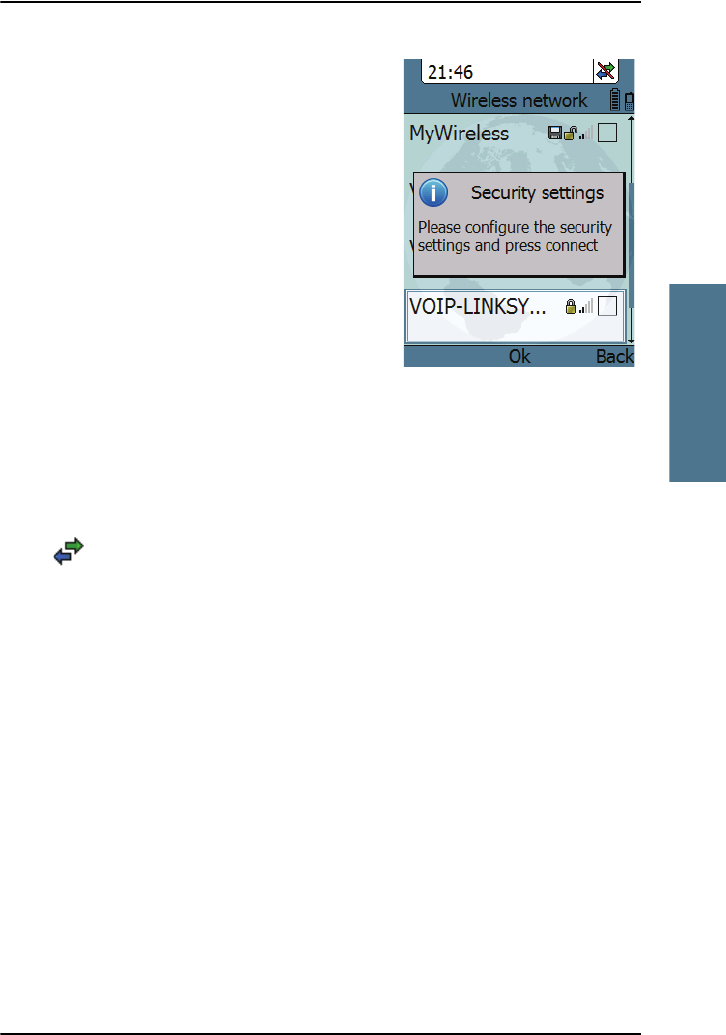
Operating the IP Handset
If your access point uses encryption and it is
the first time you connect, you will be
prompted for security settings.
Select OK to enter the Profiles menu. Then
enter the encryption key as described in the
next section (from step 5).
When the profile matches the access point, and you have selected Connect,
the handset will attempt to establish a connection. If the access point is
connected to a BGAN terminal, see Using a BGAN terminal on page 21 for
information on how to connect to the BGAN network.
When the handset is ready for use, you will see the handset ready symbol
in the top right corner of the display.
VoIP_UM.book Page 57 Wednesday, June 25, 2008 11:06 AM
Chapter 3: Operating the IP Handset
58 The menu system
To edit a Wireless network profile
To edit a Wireless network profile, do as follows:
1. From the main menu, select Network > Wireless network.
2. Select the access point you want to change profile for.
3. Press the left select key, Options.
Note that if no profile is defined for the
selected access point, this menu will only
show Connect and Manage.
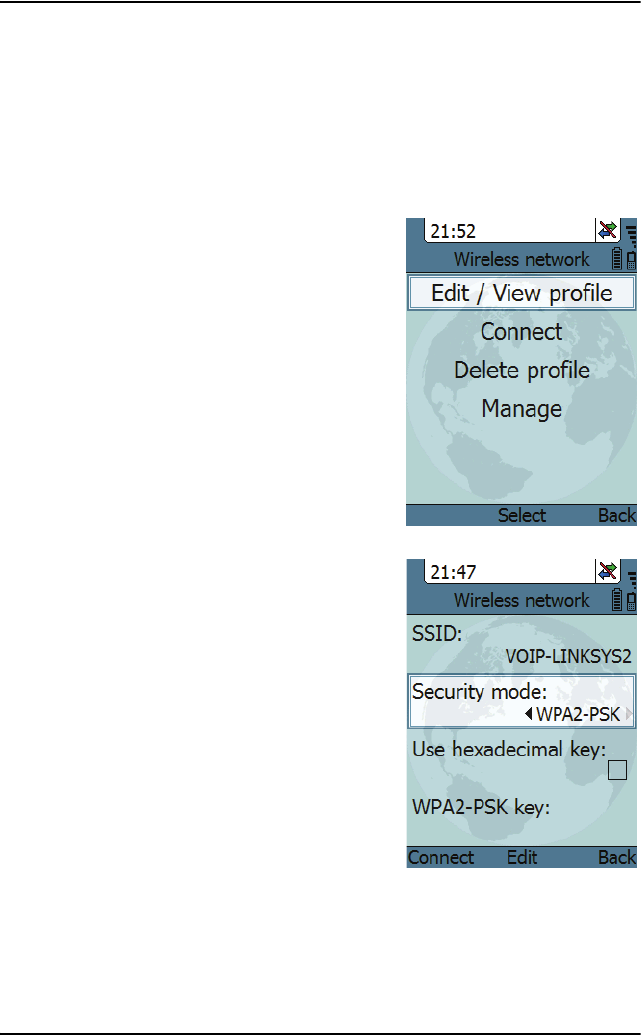
4. Select Edit/View profile.
There are three types of profile,
depending on the type of encryption
used. There are three types of encryption
mode:
•WEP
•WPA2-PSK (AES only)
•No security
In this example, the security mode is
WPA2-PSK.
The SSID and security mode of the
selected access point are automatically
detected by the handset.
5. Select whether you will enter the
encryption key in hexadecimal numbers
or text.
6. Enter your encryption key.
7. Select one of the following:
• Connect (left key) if you want to
connect immediately to the access
point, or
• Back (right key) if you want to save the profile for later.
VoIP_UM.book Page 58 Wednesday, June 25, 2008 11:06 AM
Chapter 3: Operating the IP Handset
The menu system 59
33333
Operating the IP Handset
To delete a Wireless network profile
To delete a Wireless network profile, do as follows:
1. In the Wireless network list, go to the access point for which you want to
delete the profile.
2. Select Options (left select).
3. Select Delete profile.
4. Select Yes (left select).
The profile for the selected access point is
now deleted. If the access point uses
encryption, your handset will not be able to
connect to the access point unless the
security settings are entered again.
To delete all Wireless network profiles
To delete all Wireless network profiles, do as follows:
1. From the Wireless network list, select
Options (left select).
2. Select Manage.
3. Select Delete all profiles.
4. Select Yes (left select) to confirm.
Important When you delete all
profiles you will not be able
to connect to any access
point using encryption,
unless you enter the
security settings again!
VoIP_UM.book Page 59 Wednesday, June 25, 2008 11:06 AM
Chapter 3: Operating the IP Handset
60 The menu system
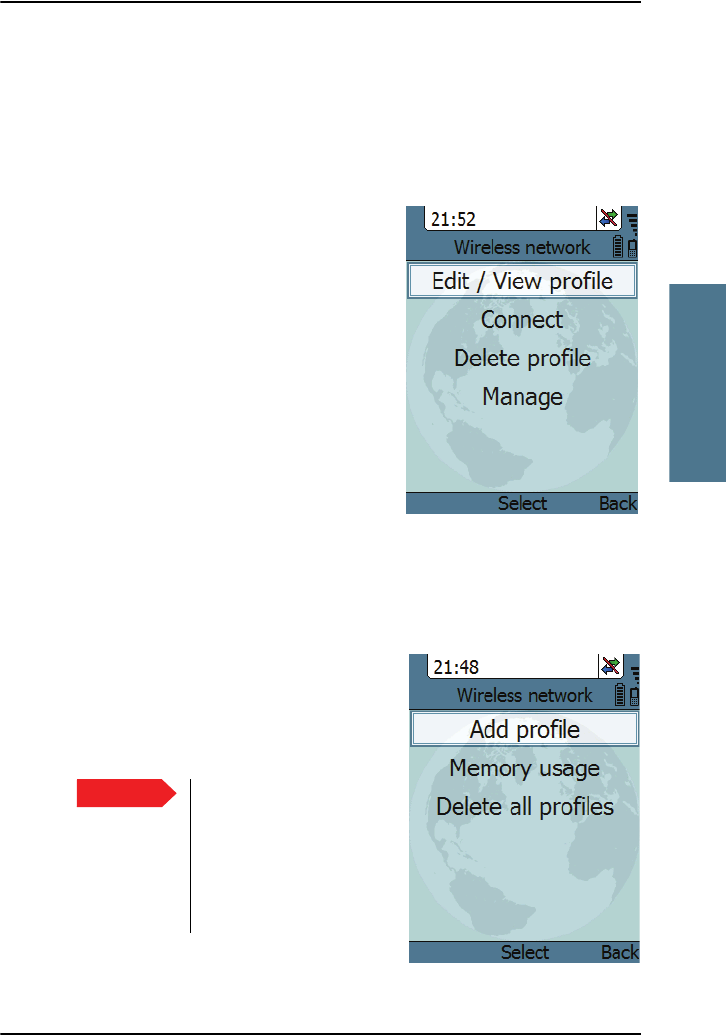
To create a new Wireless network profile
Normally a new profile is automatically created when you connect to an access
point.
If you need to define a profile for an access point that is not currently within
reach, do as follows:
1. From the Wireless network list, select Options (left select).
2. Select Manage.
3. Select Add profile.
4. Type in the SSID of the access point.
5. Select OK.
A new profile is now created
6. Enter the security information for the
access point. For further information, see
To edit a Wireless network profile on
page 58.
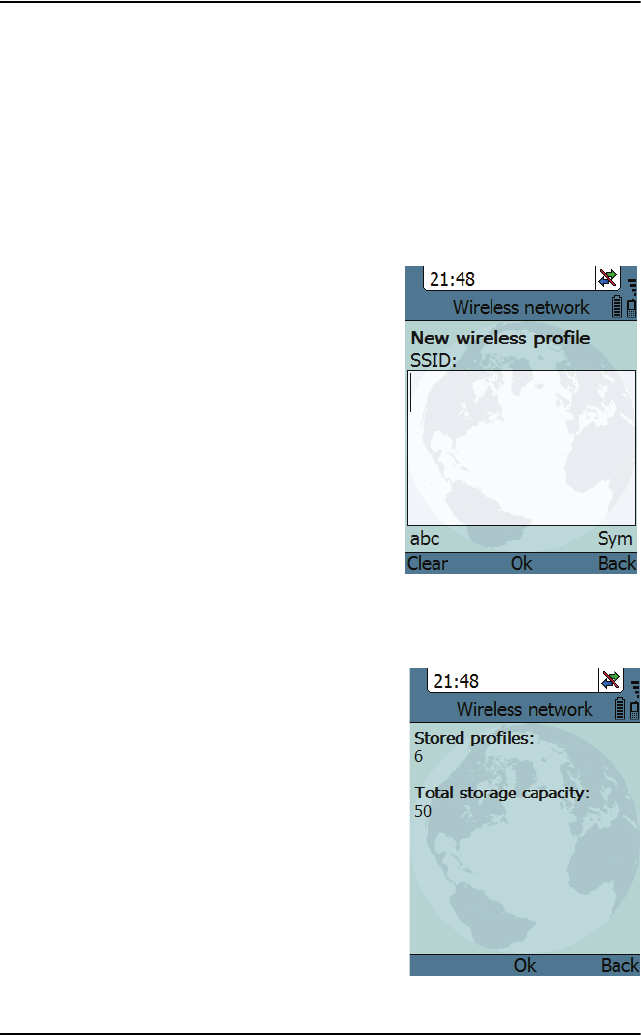
To see memory usage in the list of Wireless network profiles
To see the number of stored profiles and the
maximum allowed number of profiles, do as
follows:
1. From the Wireless network list, select
Options (left select).
2. Select Manage.
3. Select Memory usage.
VoIP_UM.book Page 60 Wednesday, June 25, 2008 11:06 AM
Chapter 3: Operating the IP Handset
The menu system 61
33333
Operating the IP Handset
To set the country for wireless network use
To make sure you have the right settings for the country your handset is
currently located in, you have to enter the country in the handset.
To enter the country, do as follows:
1. Select Network > Settings > Country.
2. Scroll to the country your handset is located in and select it.
If the country is not in the list, select Other.
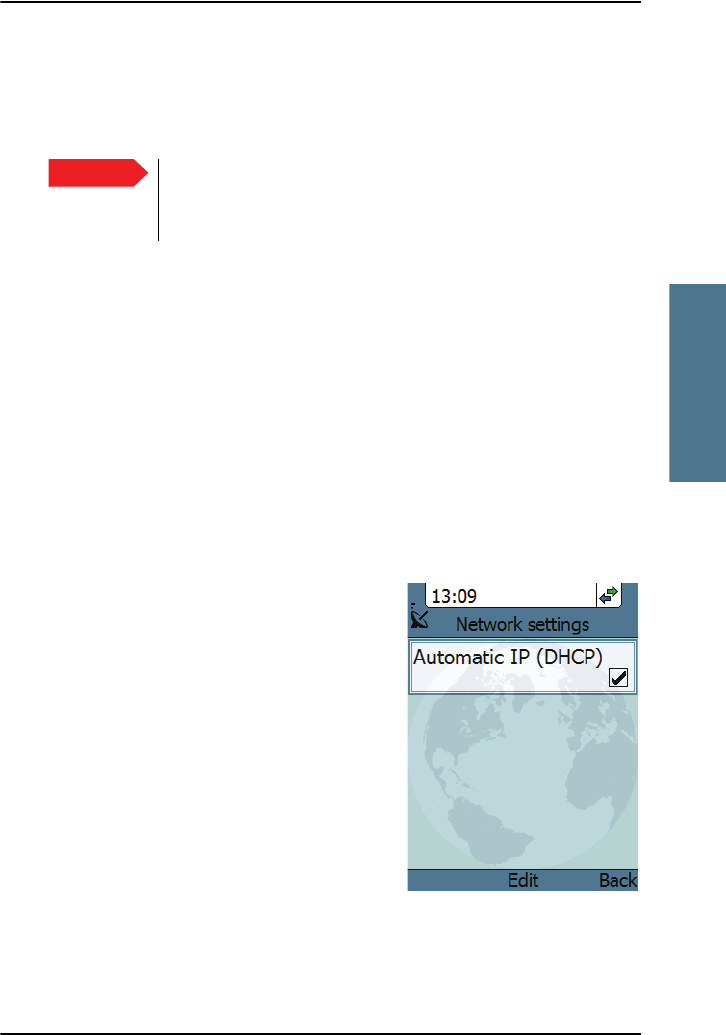
To select the IP mode
You can select whether or not the IP Handset should use DHCP to obtain a
dynamic IP address. We recommend using DHCP.
Do as follows:
1. From the main menu, select Network.
2. Select Settings.
3. Do one of the following:
• If the IP Handset should use DHCP to
automatically obtain an IP address,
check the box next to Automatic IP
(DHCP) and select Back or press on
hook to exit completely.
• If the IP address is to be a static IP
address, uncheck the box next to
Automatic IP (DHCP). Then select Yes
to confirm and continue to the next
step.
Important In some countries, the use of WLAN is not allowed. Before
continuing, make sure WLAN is allowed and licensed in the
country where you intend to use it.
VoIP_UM.book Page 61 Wednesday, June 25, 2008 11:06 AM

Chapter 3: Operating the IP Handset
62 The menu system
4. If you selected not to use DHCP, scroll
down to IP address.
5. Click Edit, type in the IP address and
select OK.
6. Continue to Subnet mask, Gateway,
Primary DNS and Secondary DNS and
enter them in the same way.
7. S ele ct Back or press on hook to exit.
The handset will now use the static
information you entered, in stead of
using DHCP.
VoIP_UM.book Page 62 Wednesday, June 25, 2008 11:06 AM
Chapter 3: Operating the IP Handset
The menu system 63
33333
Operating the IP Handset
Settings
Overview
To access the Settings menu, select Settings
from the main menu.
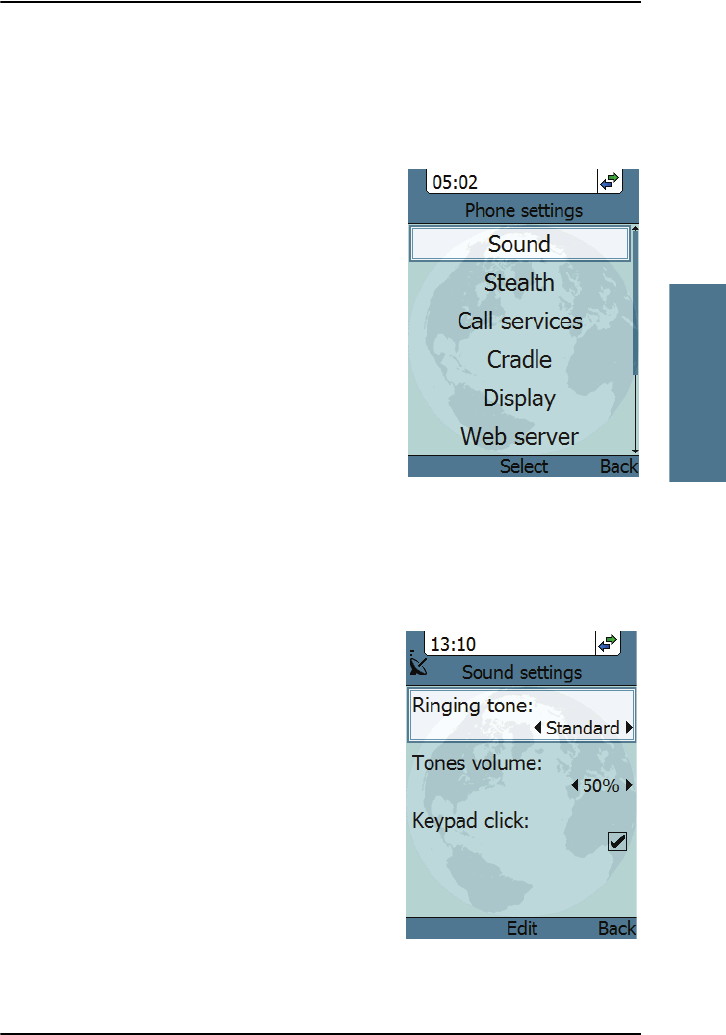
To adjust the sound
To adjust the sounds of the handset, do as follows:
1. From the Settings menu, select Sound.
2. Move to the sound you want to adjust.
3. For Keypad click, select Edit to change
the setting.
4. For the other settings, use the keys
and to change the setting, or
select Edit, select the setting you want
and select OK.
VoIP_UM.book Page 63 Wednesday, June 25, 2008 11:06 AM
Chapter 3: Operating the IP Handset
64 The menu system
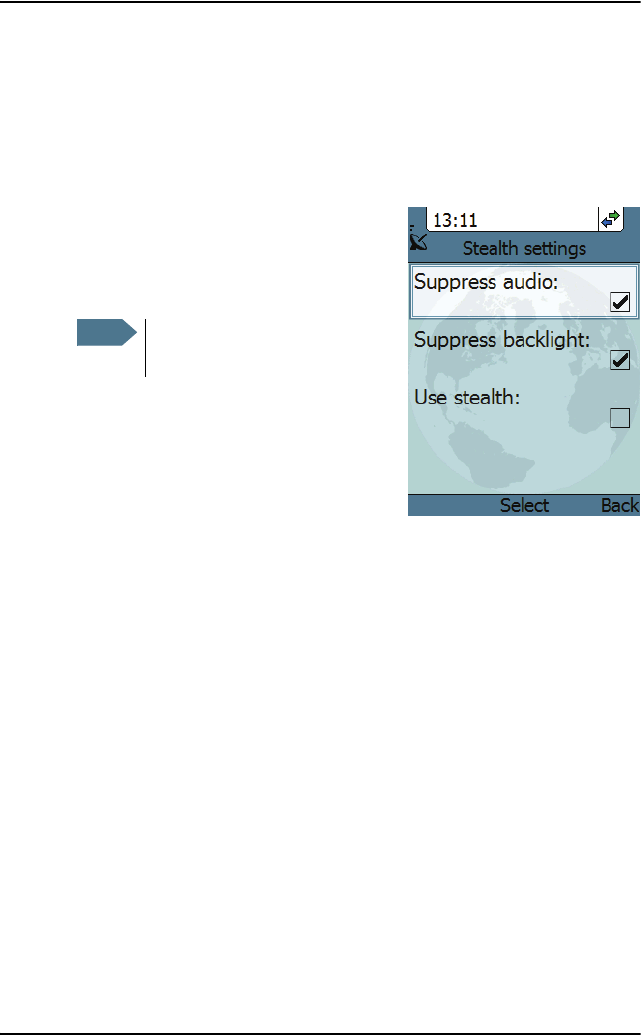
To use stealth mode
Stealth mode is used when the IP Handset should not be noticed. You can
select stealth for sound, for light, or for both.
Do as follows:
1. From the Settings menu, select Stealth.
2. Move to Suppress audio and/or
Suppress backlight and select Edit to
change the setting.
3. Move to Use stealth and press Edit to
check/uncheck the box.
4. When stealth is set up in this menu you
can activate and deactivate it from the
main screen by selecting Options >
Stealth.
Note These settings are only activated
when Use stealth is checked.
VoIP_UM.book Page 64 Wednesday, June 25, 2008 11:06 AM
Chapter 3: Operating the IP Handset
The menu system 65
33333
Operating the IP Handset
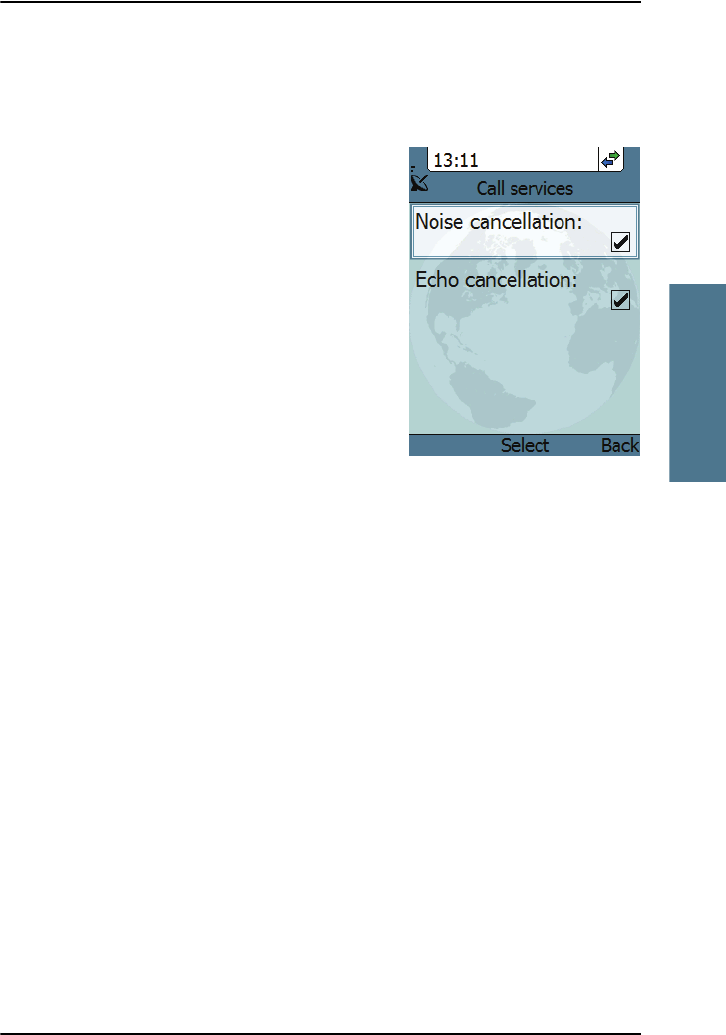
To enable or disable Noise cancellation and Echo cancellation
Do as follows:
1. From the Settings menu, select Call
services.
2. Move to Noise cancellation and/or Echo
cancellation and use Select to change
the setting.
• Echo cancellation should normally
be checked (on).
• Noise cancellation should only be
checked when the handset is used in
a noisy environment.
VoIP_UM.book Page 65 Wednesday, June 25, 2008 11:06 AM
Chapter 3: Operating the IP Handset
66 The menu system
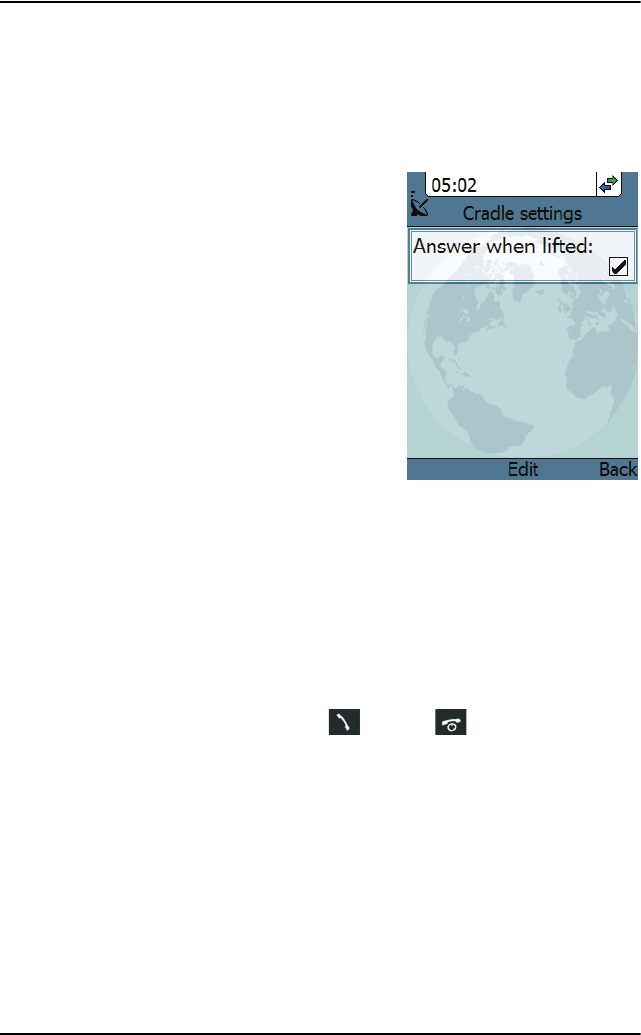
To set up the function of the cradle
You can select whether the handset should detect the cradle or not. Do as
follows:
1. From the Settings menu, select Cradle.
2. To have the handset detect whether or
not it is in the cradle, check the box.
This is the default mode. The function is
as follows:
• You can answer calls by removing
the handset from the cradle, and
terminate a call by putting the
handset back in the cradle.
• The handset automatically changes
to hands-free when you make or
answer a call with the handset in the
cradle.
• If you take the handset from the cradle during the call, it automatically
changes back to hand-held.
• In hand-held mode, when you put the handset in the cradle, the call is
terminated.
• In hands-free mode, when you put the handset in the cradle the call is
not affected.
3. To make the handset independent of the cradle, uncheck the box.
This means you must always use or # and to start and end calls,
and you can only enable or disable hands-free operation by using the
keypad.
VoIP_UM.book Page 66 Wednesday, June 25, 2008 11:06 AM
Chapter 3: Operating the IP Handset
The menu system 67
33333
Operating the IP Handset
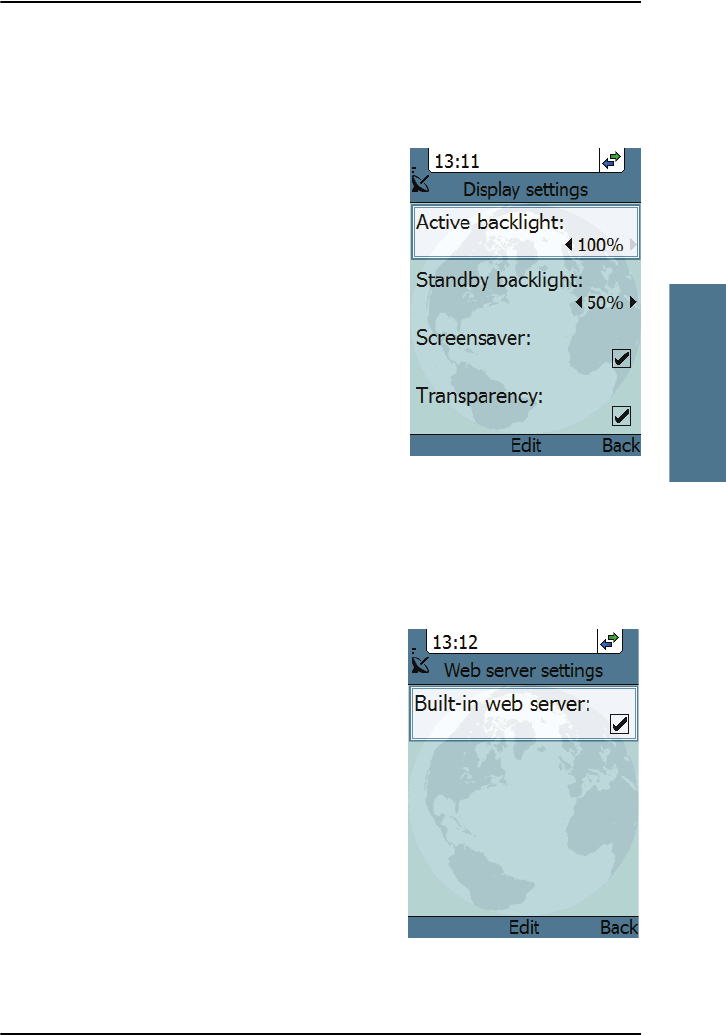
To set up the display
To change the display settings, do as follows:
1. From the Settings menu, select Display.
2. Move to the setting you want to change.
3. For the backlight settings, use the keys
and to change the percentage.
Standby backlight can be set to maximum
50%, and the Standby backlight cannot
be set higher than the Active backlight.
4. For the remaining settings, select Edit to
check/uncheck the box.
The backlight is on for 15 seconds after the
last key press.
The screensaver is activated 1 minute after the last key press.
To enable or disable the web server
To enable or disable the built-in web server of the handset, do as follows:
1. From the Settings menu, select Web
server.
2. Select Edit to enable or disable the web
server. The default settings is enabled
(checked).
For information on the web server, see Using
the web server on page 77.
VoIP_UM.book Page 67 Wednesday, June 25, 2008 11:06 AM
Chapter 3: Operating the IP Handset
68 The menu system
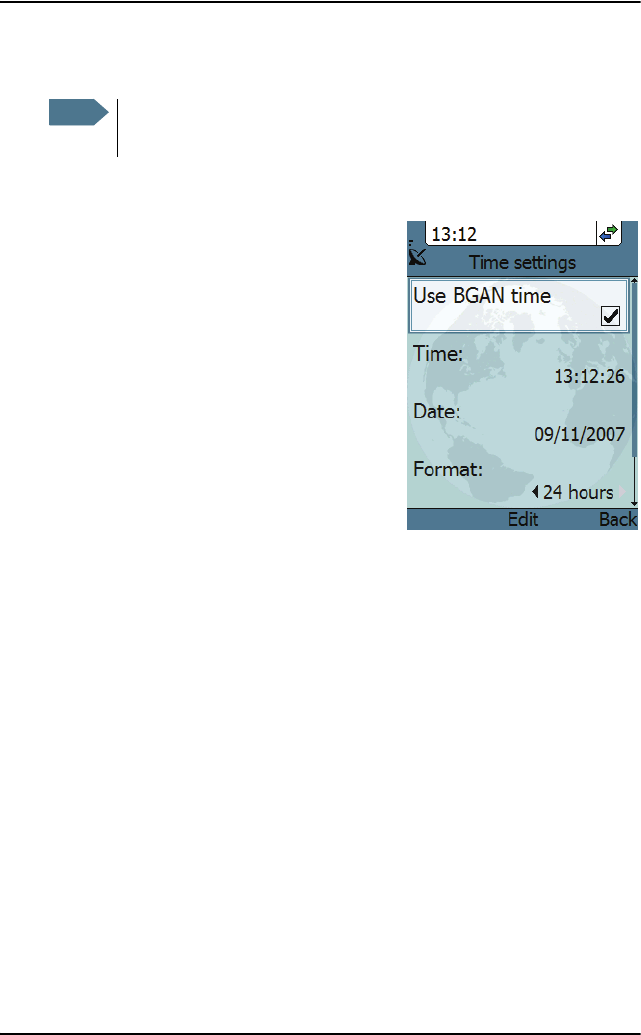
To set the date and time
To set the date and time, do as follows:
1. From the Settings menu, select Date and
time.
2. If your handset is connected to a BGAN
terminal and you want to use the UTC
time received from the BGAN satellite,
select Use BGAN time. Then leave the
menu.
3. If you want to set the date and time
manually, uncheck the Use BGAN time
box. Then continue to the following
steps.
4. To change the time, move to Time: and
press Edit. Then type in the new time and
select OK. The new time is activated immediately.
5. To change the date, move to Date: and press Edit. Then type in the new
date and select OK.
6. To switch the time format between 24h and 12h, use the keys and , or
select Edit and select the wanted format.
7. To change the time zone, use the keys and , or select Edit and select
the wanted time zone.
To select the language
This setting is for future use. Only English language is available at this time.
Note The date and time is only maintained as long as the handset is
powered!
VoIP_UM.book Page 68 Wednesday, June 25, 2008 11:06 AM
Chapter 3: Operating the IP Handset
The menu system 69
33333
Operating the IP Handset
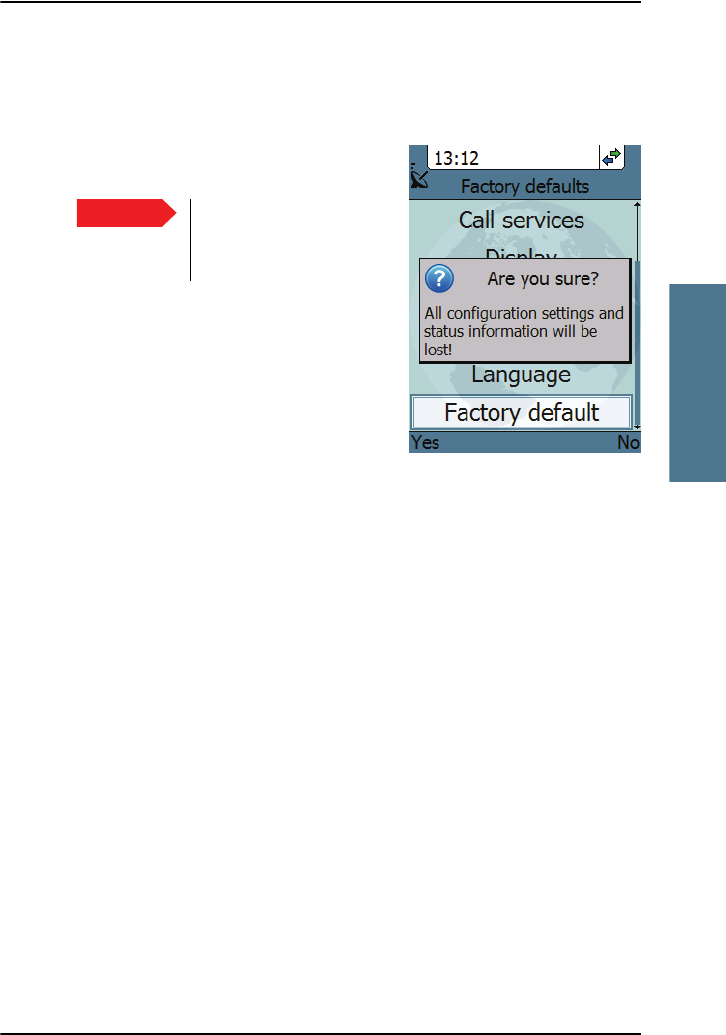
To apply factory default settings
To return to factory default for all settings, do as follows:
1. From the Settings menu, select Factory
default.
2. Select Yes.
All settings and status information are
now changed to factory default settings.
Note that in some cases this operation
may take up to 30 seconds.
Important All settings and status
information are lost when
you accept this setting!
VoIP_UM.book Page 69 Wednesday, June 25, 2008 11:06 AM
Chapter 3: Operating the IP Handset
70 The menu system
SIP
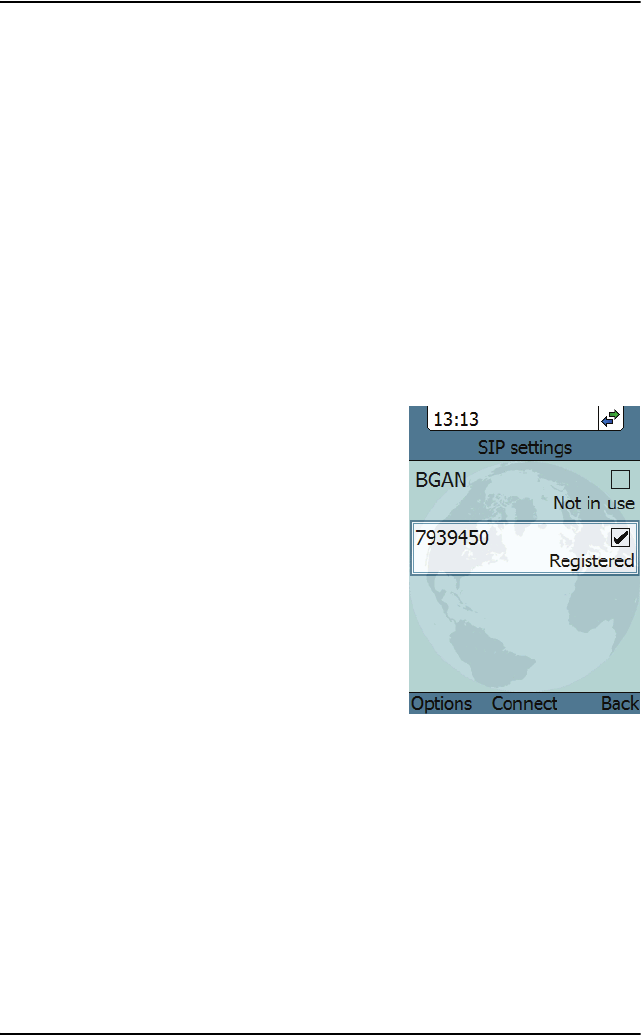
Overview
The handset communicates using Session Initiation Protocol (SIP). The profile
used for communication depends on your subscription.
To activate a profile
The default profile is the BGAN profile, which is used when the IP Handset is
connected to a BGAN terminal.
To activate a profile, do as follows:
1. From the main menu, select SIP.
2. Move to the profile you want to use for
communication, and select Connect.
VoIP_UM.book Page 70 Wednesday, June 25, 2008 11:06 AM
Chapter 3: Operating the IP Handset
The menu system 71
33333
Operating the IP Handset
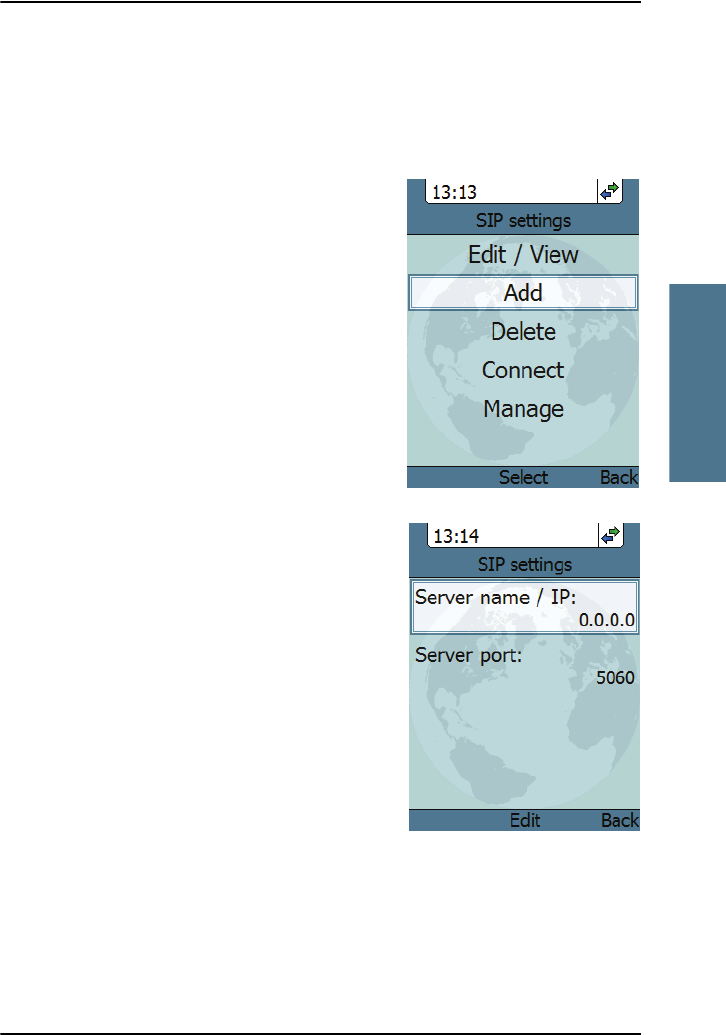
To add a new SIP profile
The handset can hold up to 10 profiles.
Do as follows:
1. In the SIP menu, select Options (left
select key).
2. Select Add.
3. Type in the name to use for the new
profile and select OK.
4. Move to SIP server and select Edit.
5. At Server name / IP:, select Edit again.
6. Type in the server name (URL) or IP
address and select OK.
7. Type in the port number for the SIP
server and select OK.
8. Select Back.
VoIP_UM.book Page 71 Wednesday, June 25, 2008 11:06 AM

Chapter 3: Operating the IP Handset
72 The menu system
9. Continue through the items in the list,
selecting Edit, typing in the information
and entering with OK.
The items are:
•User name
When connecting to a BGAN terminal,
the user name should be the same as
the local number for the handset.
•Password
When connecting to a BGAN terminal,
the password must match the handset
password entered in the terminal.
•Codec priority
Select the codec type that should have the highest priority. You may
select G.711 or G.729 A/B.
10. When you have made your changes, select Back.
11. If you want to connect immediately with the new profile, select Connect. If
not, select Back to leave the menu.
To edit a profile
1. In the list of profiles, go to the profile you want to change and select
Options > Edit/View.
2. Edit the settings as described in the previous section.
Note For the BGAN profile, only the user name and password can be
changed. The default user name and password are 0501 and 0501.
VoIP_UM.book Page 72 Wednesday, June 25, 2008 11:06 AM
Chapter 3: Operating the IP Handset
The menu system 73
33333
Operating the IP Handset
To delete a profile
Do as follows:
1. In the SIP menu, move to the profile you want to delete and select Options.
2. Select Delete.
3. Select Yes.
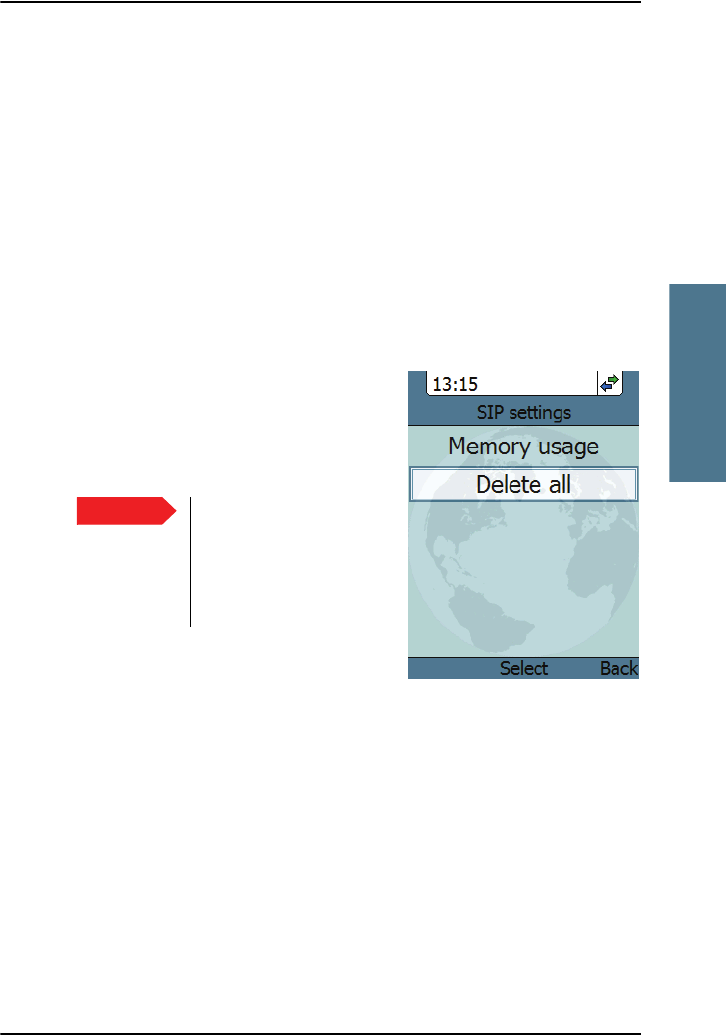
To delete all profiles
Do as follows:
1. From the SIP settings menu, select
Options (left select key).
2. Select Manage.
3. Select Delete all.
4. Select Yes.
To see memory usage in the list of SIP profiles
To see the number of profiles in the list and the maximum allowed number of
profiles, do as follows:
1. From the SIP settings menu, select Options (left select key).
2. Select Manage.
3. Select Memory usage.
Important All profiles except BGAN
are deleted - this means
that you will only be able
to connect your handset
using the BGAN profile.
VoIP_UM.book Page 73 Wednesday, June 25, 2008 11:06 AM
Chapter 3: Operating the IP Handset
74 The menu system
BGAN
Overview
When the IP Handset is connected to a BGAN terminal, the handset provides a
dedicated BGAN menu for the terminal. The following sections describe this
menu.
To see the BGAN status
Do as follows:
1. From the menu system select BGAN.
2. Select Status.
The status menu shows the following
information:
•UMTS status shows the status of the
BGAN connection, for example
Ready or Registering.
•CNo shows the signal strength of the
BGAN connection.
•PIN status shows status of the PIN,
for example whether the terminal is
waiting for a PIN.
VoIP_UM.book Page 74 Wednesday, June 25, 2008 11:06 AM
Chapter 3: Operating the IP Handset
What’s next? 75
33333
Operating the IP Handset
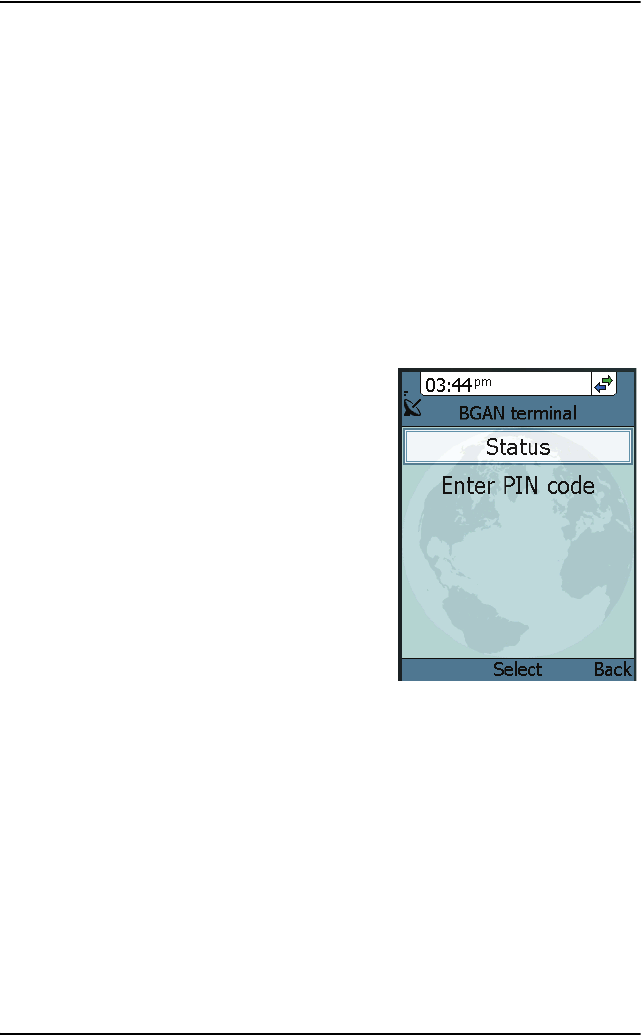
To enter the PIN for the BGAN terminal
Note that this menu item is only available if the BGAN terminal is waiting for a
PIN.
Do as follows:
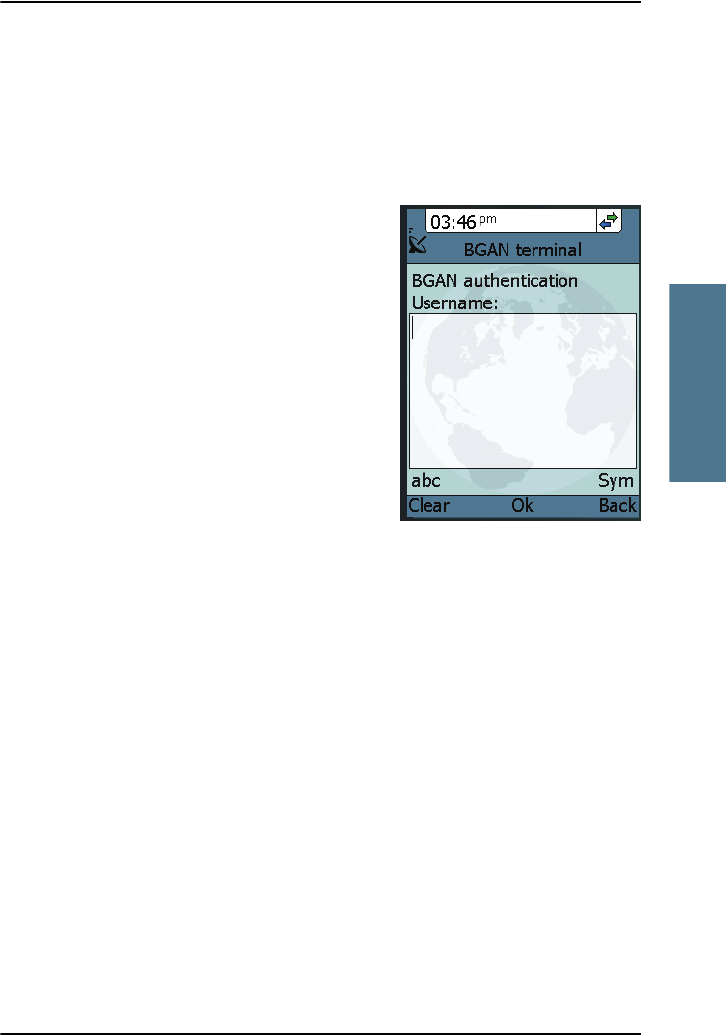
1. From the BGAN menu select Enter PIN
code.
2. Type in the Administrator user name for
the terminal and select OK.
For information on how to type text in
the handset, see Writing text in the
handset on page 47.
3. Type in the Administrator password for
the terminal and select OK.
4. Type in the PIN for the terminal and
select OK.
What’s next?
This chapter has described the basics of how to use the IP Handset.
The following chapter, Using the web server, describes how to use the built-in
web server of the IP Handset.
VoIP_UM.book Page 75 Wednesday, June 25, 2008 11:06 AM

Chapter 3: Operating the IP Handset
76 What’s next?
VoIP_UM.book Page 76 Wednesday, June 25, 2008 11:06 AM

77
Chapter 4
44444
Using the web server
Using the web server 4
In this chapter
This chapter describes how to use the web server in your IP Handset system.
Introduction
The web server
The web server is built into the IP Handset and is primarily used for uploading
software and for editing contacts.
You can access the web server from a computer connected to the BGAN
terminal you are using for your handset. Use a standard Internet browser.
Internet Explorer 6.0 and 7.0 on Windows, Firefox 2.0 on Windows, Firefox on
Linux and Safari on MAC have been tested successfully with the web server.
You may be able to use other browser versions as well.
Browser settings
The Proxy server settings in your browser must be disabled before accessing
the web server.
Most browsers support disabling of the Proxy server settings for one specific IP
address, so you can disable Proxy server settings for the web server only, if
you wish. Consult your browser help for information.
VoIP_UM.book Page 77 Wednesday, June 25, 2008 11:06 AM

Chapter 4: Using the web server
78 Introduction
To disable the use of a Proxy server completely, do as follows:
1. In Microsoft Internet Explorer, select Tools > Internet Options >
Connections > LAN Settings.
2. Uncheck the box labeled Use a proxy server for your LAN.
3. Click OK.
When the proxy server settings are disabled, close your browser.
You may need to change this setting back on return to your Internet
connection.
Note The following description is for Microsoft Internet Explorer. If you are
using a different browser, the procedure may be different.
VoIP_UM.book Page 78 Wednesday, June 25, 2008 11:06 AM

Chapter 4: Using the web server
Introduction 79
44444
Using the web server
Accessing and navigating the web server
To access the web server
To access the web server from a computer, do as follows:
1. Start up your computer, the BGAN terminal and the IP Handset.
2. Connect your computer to the BGAN terminal using a standard LAN cable.
3. Connect your IP Handset to the BGAN terminal as described in Getting
started on page 7.
4. Open your browser on the computer and enter the IP address of the
IP Handset.
You can find the IP address in the handset menus under Status > Network
information.
VoIP_UM.book Page 79 Wednesday, June 25, 2008 11:06 AM
Chapter 4: Using the web server
80 Introduction
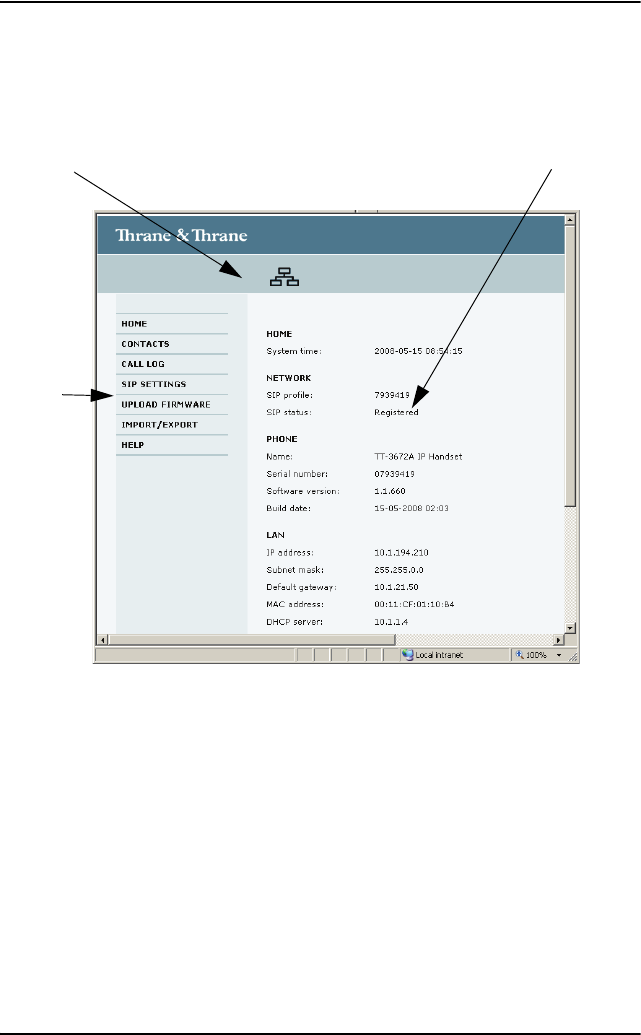
Overview of the web server
The web server consists of the following sections.
•The navigation pane holds the main menu. Clicking an item in the menu
opens a submenu in the navigation pane or a new page in the contents
section.
•The icon bar shows a LAN icon when the handset is connected using the
LAN interface, or a Wireless LAN icon if the handset is connected using the
Wireless LAN interface.
•The contents section shows the page selected in the navigation pane. This
section is used for viewing or changing settings, or for performing actions.
Navigation
Icon Bar
Pane
Contents Section
VoIP_UM.book Page 80 Wednesday, June 25, 2008 11:06 AM