VELUX America 835403 Remote control User Manual 453347 2014 02 KLR web GB 2 1 indd
VELUX America Inc. Remote control 453347 2014 02 KLR web GB 2 1 indd
Contents
- 1. Quick guide
- 2. User guide-1
- 3. User guide-2
- 4. User guide-3
- 5. warning
User guide-1
VELUX INTEGRA®
KLR 200
Version: 002.001.xxx.xxx
Congratulations on your new VELUX INTEGRA® product!
Thank you for buying this VELUX INTEGRA® product.
The control pad has been produced and tested in accordance with the newest
methods and strictest requirements and will help you to get the most out of all your
VELUX INTEGRA® products.
DIRECTIONS FOR USE FOR VELUX INTEGRA® KLR 200. ©2013, 2014 VELUX GROUP
® VELUX, THE VELUX LOGO, INTEGRA, io-homecontrol AND THE io-homecontrol LOGO ARE REGISTERED TRADEMARKS USED UNDER LICENCE BY THE VELUX GROUP VAS 453347-2014-01

VELUX INTEGRA®
KLR 200
VELUX 2
Contents
Important information 4
1 Control pad
Control pad functions 5
2 Operation
Basic operation
Operation of windows 6
Operation of sunscreening products 7
Operation of lights 8
Operation of products connected to on/off switch 8
Operation of other types of io-homecontrol products 8
Product position 8
Turn on/Home/Stop all products 8
Programs
Using programs 9
VELUX programs 10-14
- Using a program 10-11
- Editing a program 12-13
- Adding a program to the product navigator 14
- Resetting to default settings 14
Own programs 15-22
- Creating a program 15-17
- Editing a program 18-19
- Adding a program to the product navigator 20
- Renaming a program 21
- Silent mode operation 22
- Deleting a program 22
Smart operation
Finding products 23
Keyboard 23
Renaming products 24
Groups 25-28
- Creating a group 25
- Editing a group 26
- Renaming a group 27
- Deleting a group 28
Rooms 29-32
- Creating a room 29
- Editing a room 30
- Renaming a room 31
- Deleting a room 32
®

VELUX INTEGRA®
KLR 200
VELUX 3
Contents
Favourites 33-34
- Editing order of products in the product navigator 33
- Editing favourites 34
Operation without using the control pad
Manual operation of centre-pivot windows 35
Closing centre-pivot windows in case of power failure or discharged battery 36
Closing windows if the control pad has been mislaid 37
3 Setting up
Start-up of a new VELUX INTEGRA® system
Initial set-up 38
If the initial set-up fails 39
Extension of your VELUX INTEGRA® system
Adding products to the control pad 40
Adding a control 41-93
- Adding a control to your system already operated with a VELUX INTEGRA control pad KLR 200 41-53
- Adding a VELUX INTEGRA control pad KLR 200 to your system already operated with another control 54-68
- Allowing controls already in use in their separate systems to operate each other’s products 69-93
Deleting products in the control pad 94
Joint operation of io-homecontrol products 95-97
- Sending the security key to another io-homecontrol control 96
- Receiving the security key of another io-homecontrol control 97
- Creating a new security key in VELUX INTEGRA control pad KLR 200 97
Settings
Time and date 98-99
Language 100
Silent mode operation of products 100
Resetting the control pad 101
Security
Password 102
Changing the security key 103-113
4 Installation
Fitting the control pad to the wall 114
Repositioning the rain sensor in case of retrofitting 115
Declaration of conformity 116
®
®
®
®
®
®

Important information
VELUX INTEGRA®
KLR 200
VELUX 4
Read instructions carefully before installation. Please keep
instructions for future reference and hand them over to any new
user.
Note: These instructions cover products, product features and
product offerings that may vary with markets and selected lan-
guage. Consequently, the display illustrations, the display texts
and the available features related to your product may differ
from what is shown in these instructions. Contact your VELUX
sales company for specific information, see telephone list or
www.velux.com.
Safety
• The control pad is intended for operation by persons with the
relative experience and knowledge or persons who have been
given instruction concerning its use by a person responsible
for their safety.
• Children must not be allowed to play with the window and its
electrical products, and the control pad should be kept out of
their reach.
• If repair or adjustment work is needed, disconnect from mains
or battery supply and ensure that it cannot be reconnected
unintentionally.
• Before operating, ensure that the window and its electrical
products can be operated without risk of damage to property
or injury to people or animals.
• For personal safety, never have your hand or body out of the
window without first having switched off the mains or bat-
tery supply.
Function
• If the rain sensor gets wet, the window operator automati-
cally closes the window; however, the ventilation flap remains
open.
• Disabling the rain sensor implies acceptance of the risk of rain
water being able to enter the building while the window is
open.
• To prevent the window from closing because of very fine/
weak rain, fog or dew, the rain sensor is equipped with a heat-
ing element to keep the surface dry.
• If the window has been opened manually, the window opera-
tor will not be activated via the rain sensor or other automatic
functions.
• From fully open, it will take up to one minute from the time of
activation before the window is completely closed. Therefore,
in case of sudden rain, water may enter the room before the
window is closed.
• In case of snow and/or ice, the operation of the window may
be blocked.
• It is recommended to place a control pad in the room where
the window and its electrical products have been installed.
Product
• The control pad has been designed for use with genuine
VELUX products. Connection to other products may cause
damage or malfunction.
• The control pad is, within each market region, compatible
with products with the io-homecontrol® logo.
• Electrical products must be disposed of in conformity with
national regulations for electronic waste and not with house-
hold waste.
• Used batteries must not be disposed of together with house-
hold waste but have to be disposed of in conformity with the
relevant national environmental regulations. Batteries contain
substances that can be harmful if not handled and recycled
correctly.
• Use local authority battery disposal point where available.
• The packaging can be disposed of with usual household
waste.
• Sound pressure level: Max 70 dB(A).
• Radio frequency band: 868 MHz within Europe and 2.4 GHz in
most countries outside Europe.
• Radio frequency range: 200 m free field. Depending on build-
ing construction, the indoor range is approx 20 m. However,
constructions with reinforced concrete, metal ceilings and
plaster walls with steel members may reduce the range.
• Expected battery lifetime of control pad: Up to 1 year.
• Expected battery lifetime of solar powered window operator:
Approx 10 years.
Maintenance and service
• Disconnect from mains or battery supply before carrying out
any maintenance or service work to the window and products
connected to it and ensure that it cannot be reconnected
unintentionally during this time.
• Maintenance and installation must be carried out in consid-
eration to Health and Safety at work requirements.
• If mains cable is damaged, it must be replaced by qualified
personnel in accordance with national regulations.
• Clean the control pad with a soft dry or damp cloth.
• Dirt on the rain sensor may cause operating problems. There-
fore, it is recommended to clean the rain sensor with a soft,
wet cloth once or twice a year or when needed.
• In case of accumulation of dirt, the solar cell should be
cleaned with water and ordinary household cleaners.
• Spare parts are available through your VELUX sales company.
Please provide information from the data label.
• If you have any technical questions, please contact your
VELUX sales company, see telephone list or www.velux.com.
io-homecontrol® provides advanced and secure radio technology that is easy to install.
io-homecontrol® labelled products communicate with each other, improving comfort,
security and energy savings. www.io-homecontrol.com
Control pad
Control pad functions 1
VELUX INTEGRA®
KLR 200
VELUX 5
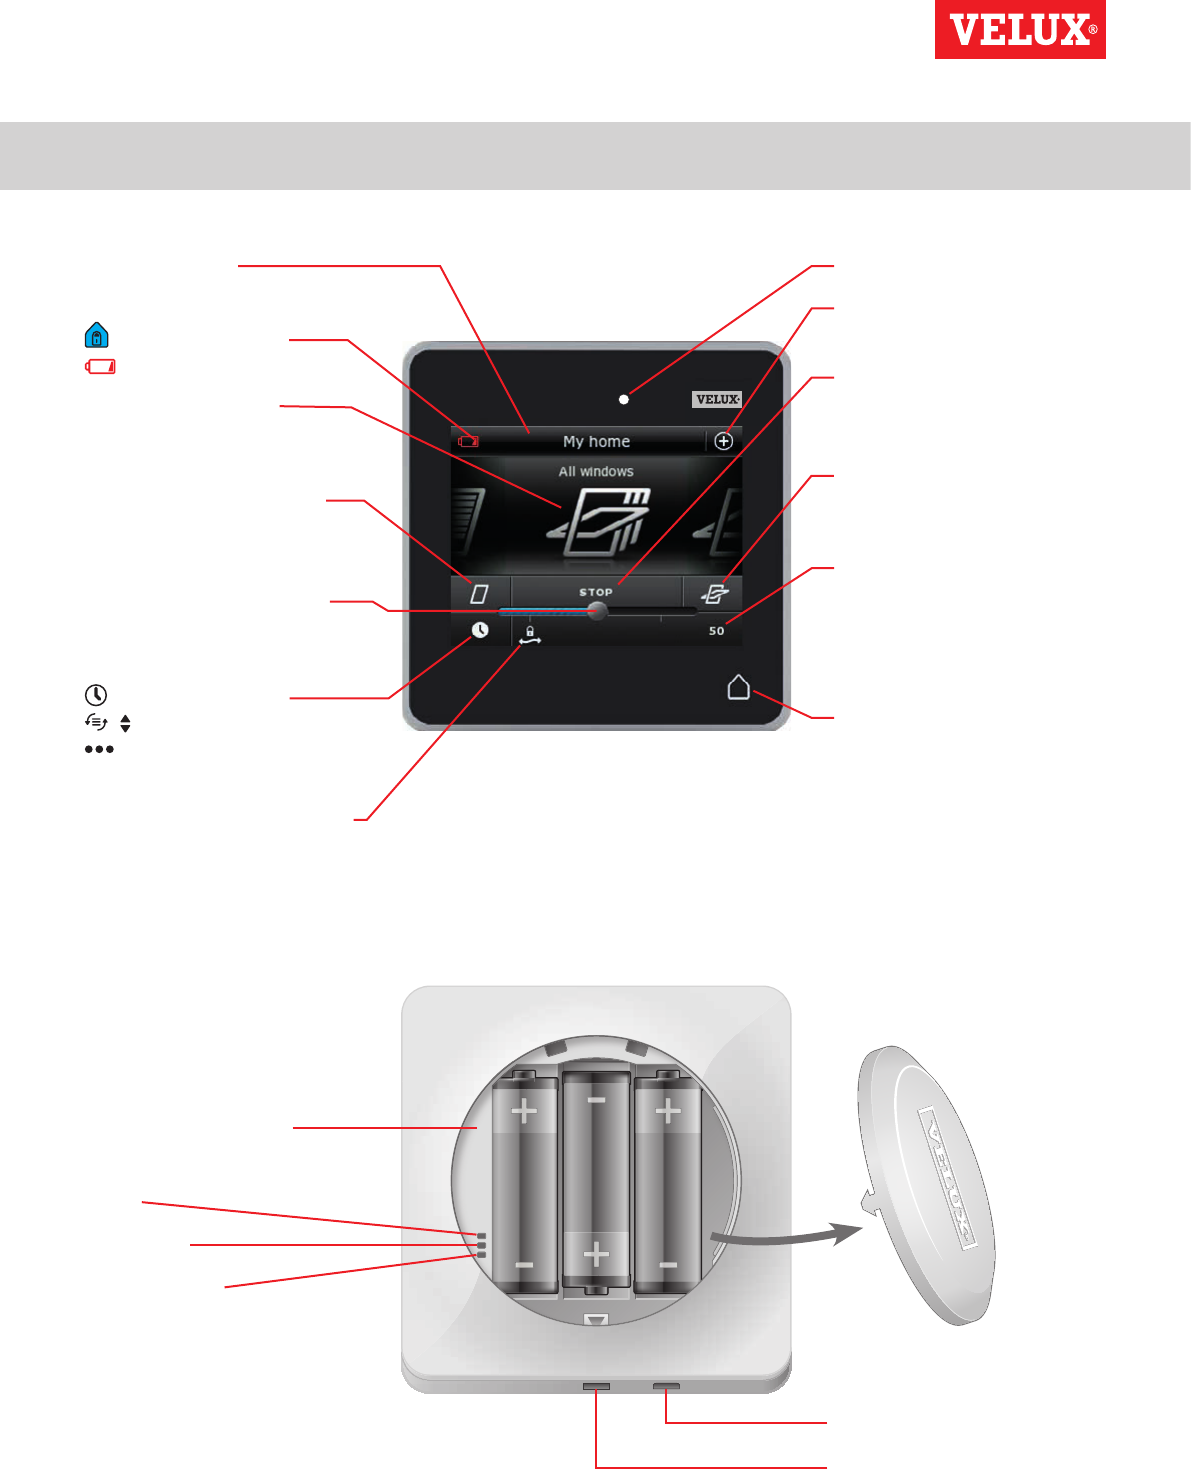
Shows product
location
Running program
Low battery
Product navigator.
Shows operable product or
program
Activates products, for in-
stance closing a window
or running up a blind
Sets the product position,
for instance running a blind
partly down
Pre-set closing
/ Awning blind control
Roller shutter with up-
per/lower elements
Opens the ventilation flap of
the window. The window is
still closed
Battery compartment
Diode
Key button
RESET button
Light gauge
Access to programs and set-
tings
Stops running products.
Shows the position of the
product shown in the display
Activates products, for in-
stance opening a window or
running down a blind
Indicates the product position
from 0-100. A fully opened
window is 100 (100 % open),
and a fully closed blind is 100
(100 % closed)
Tapping the Home button
turns on the display again
after sleep mode and shows
the first product in the prod-
uct navigator. Touching and
holding it for 3 seconds stops
all products
USB stick (type micro-USB B)
Release button for battery
compartment lid
321
6
8
5
4
7
VELUX INTEGRA®
KLR 200
VELUX 6
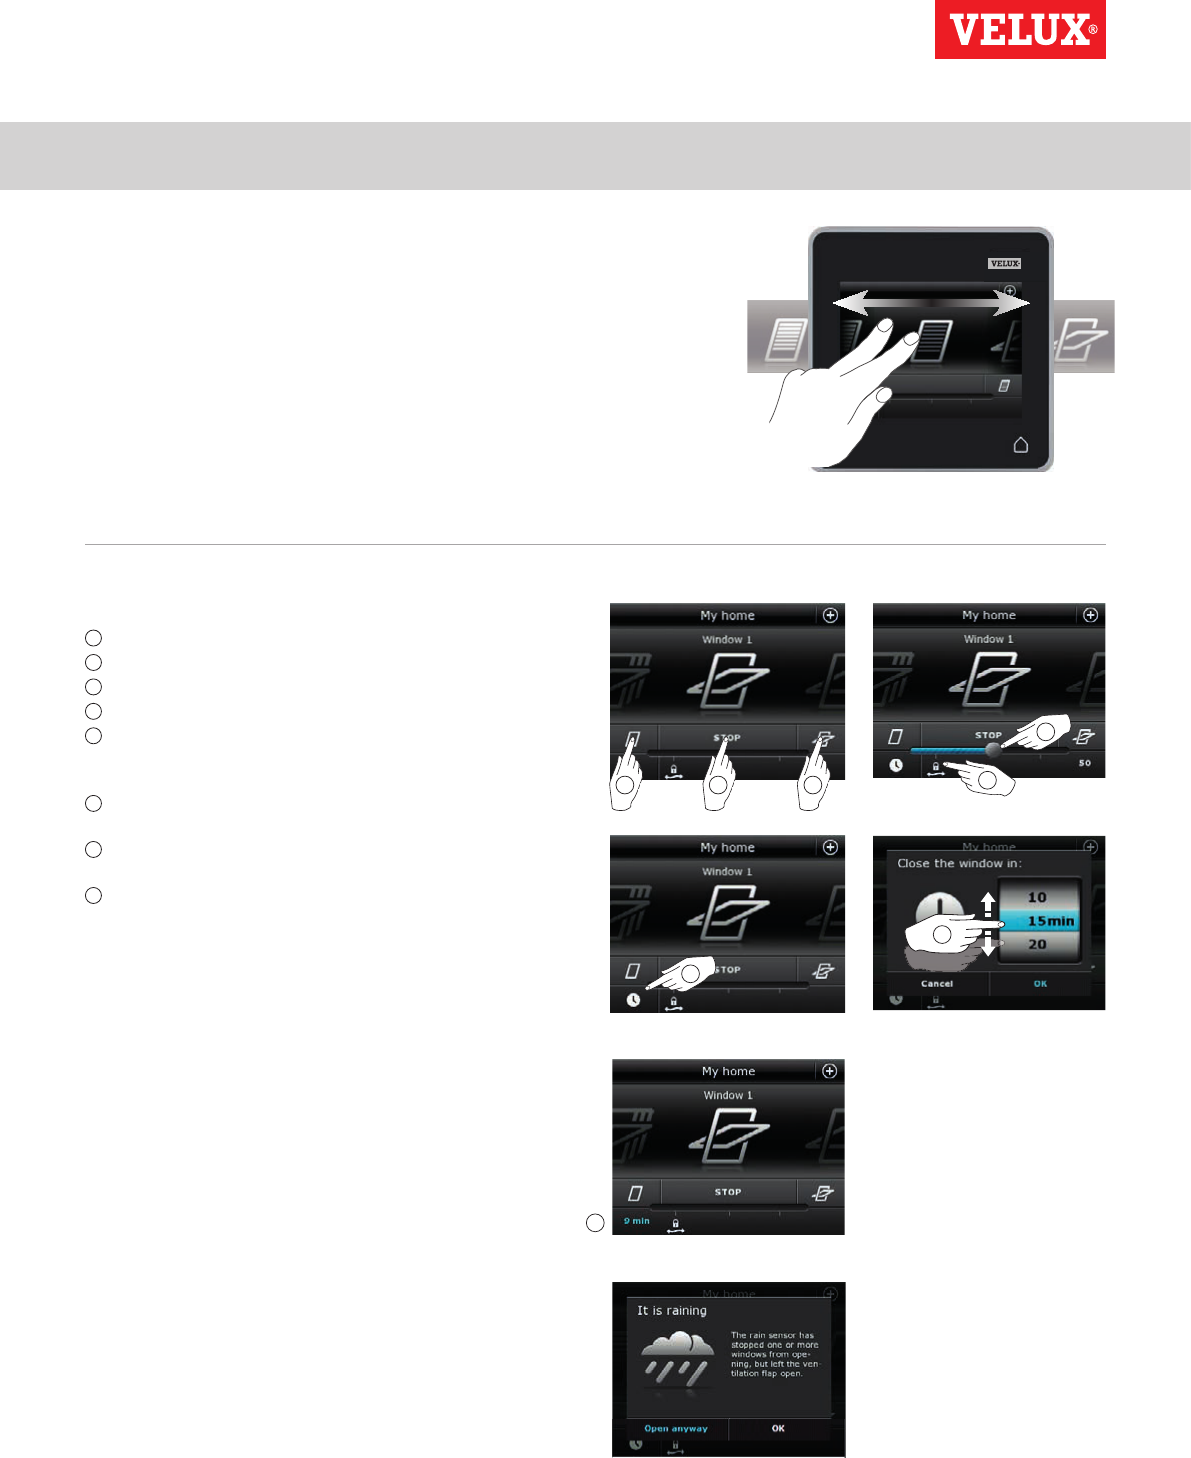
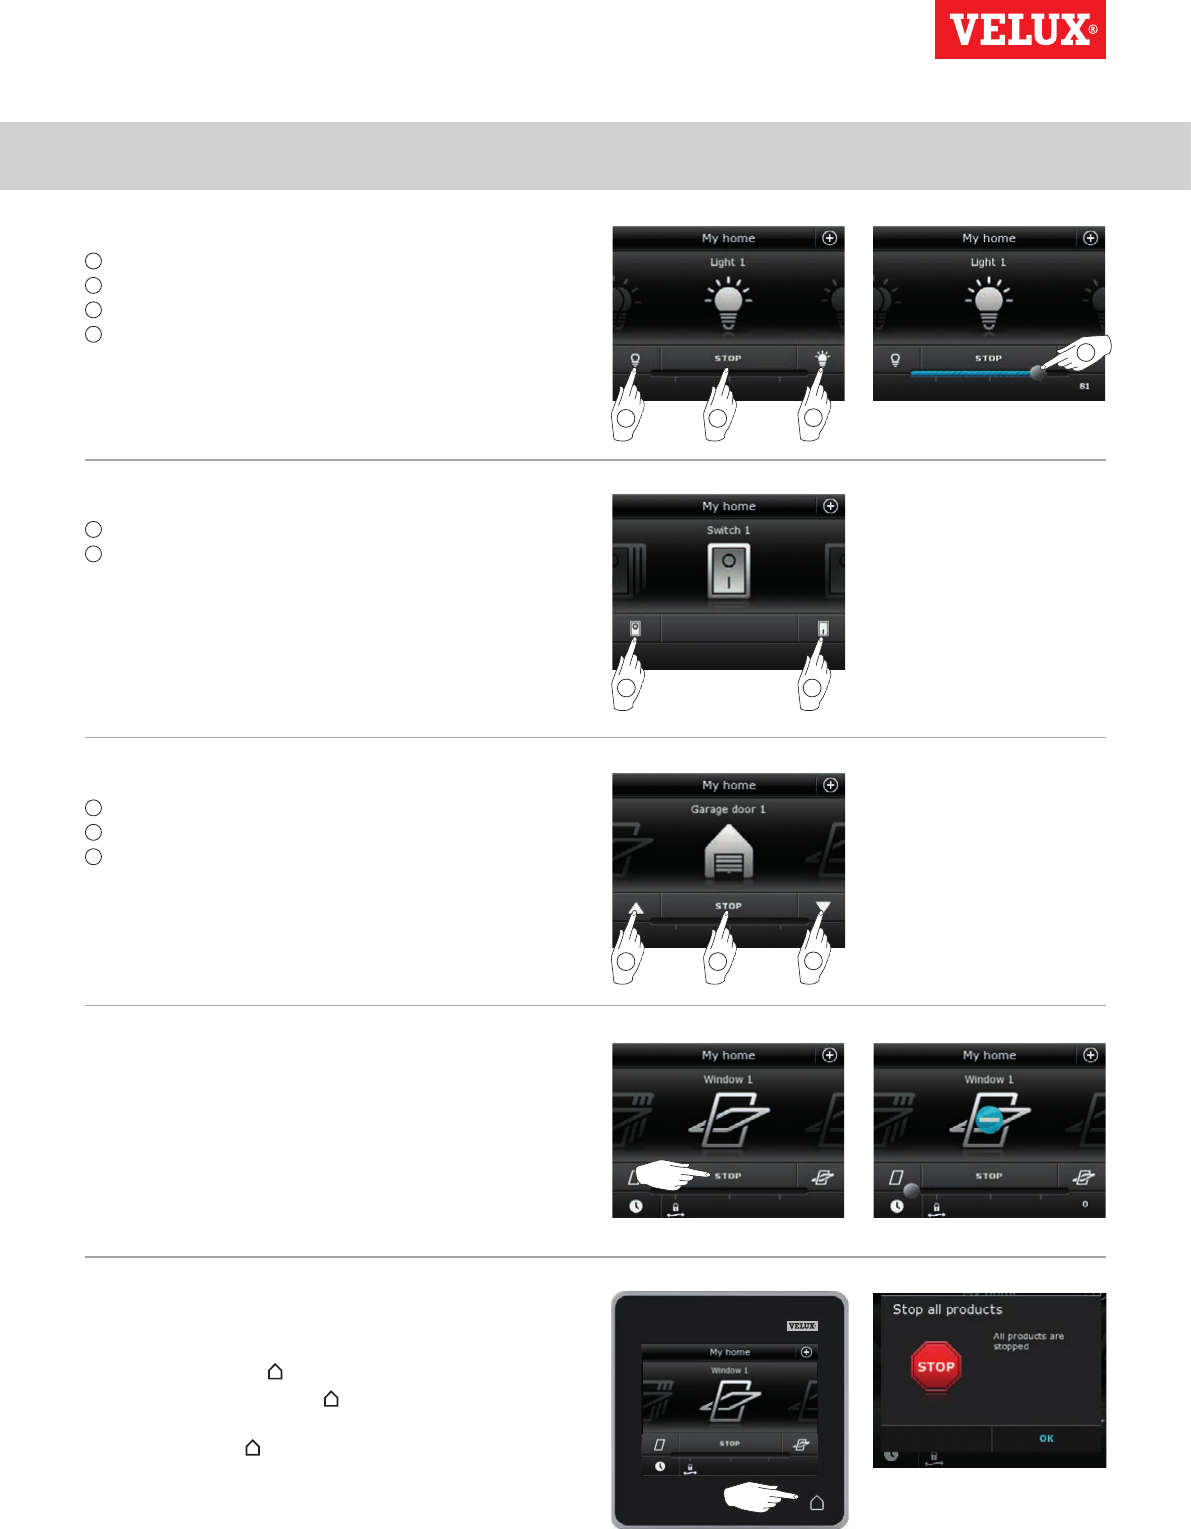
You can operate all products by tapping icons/buttons or by drag-
ging the slider and tapping the bar in the display.
The product to be operated is shown in the middle of the product
navigator display. If more products are registered in the control
pad, they are shown as shadows in the display sides. Select the
product you want to operate by swiping a finger over the display
in the directions of the arrows.
Operation of windows
1 Close
2 Stop
3 Open
4 Open ventilation flap only. The window is still closed.
5 Drag the slider or tap the bar to open the window to desired
position. The position from 0-100 is shown in the bottom right
corner.
6 Tap the clock to close the window automatically after a given
period of time.
7 Choose for how many minutes the window is to be open and tap
"OK".
8 The icon in the bottom left corner shows for how many minutes
the window will still be open.
Note: If you try to open a window while it is raining, only the
ventilation flap will be opened. This function prevents the rain from
coming in. Tap "OK" to accept.
Alternatively, tap "Open anyway" if you want to open the window
even if it is raining. The window can now be opened up to a maxi-
mum of 50 %. After 15 minutes, the window will close automati-
cally if it is still raining.
If you set the automatic closing to less than 15 minutes, the win-
dow will close automatically at the end of this time period.
Operation
Basic operation 2
3
21
4
3
8
2
7
1
6
5
4
9
10
57
6
VELUX INTEGRA®
KLR 200
VELUX 7
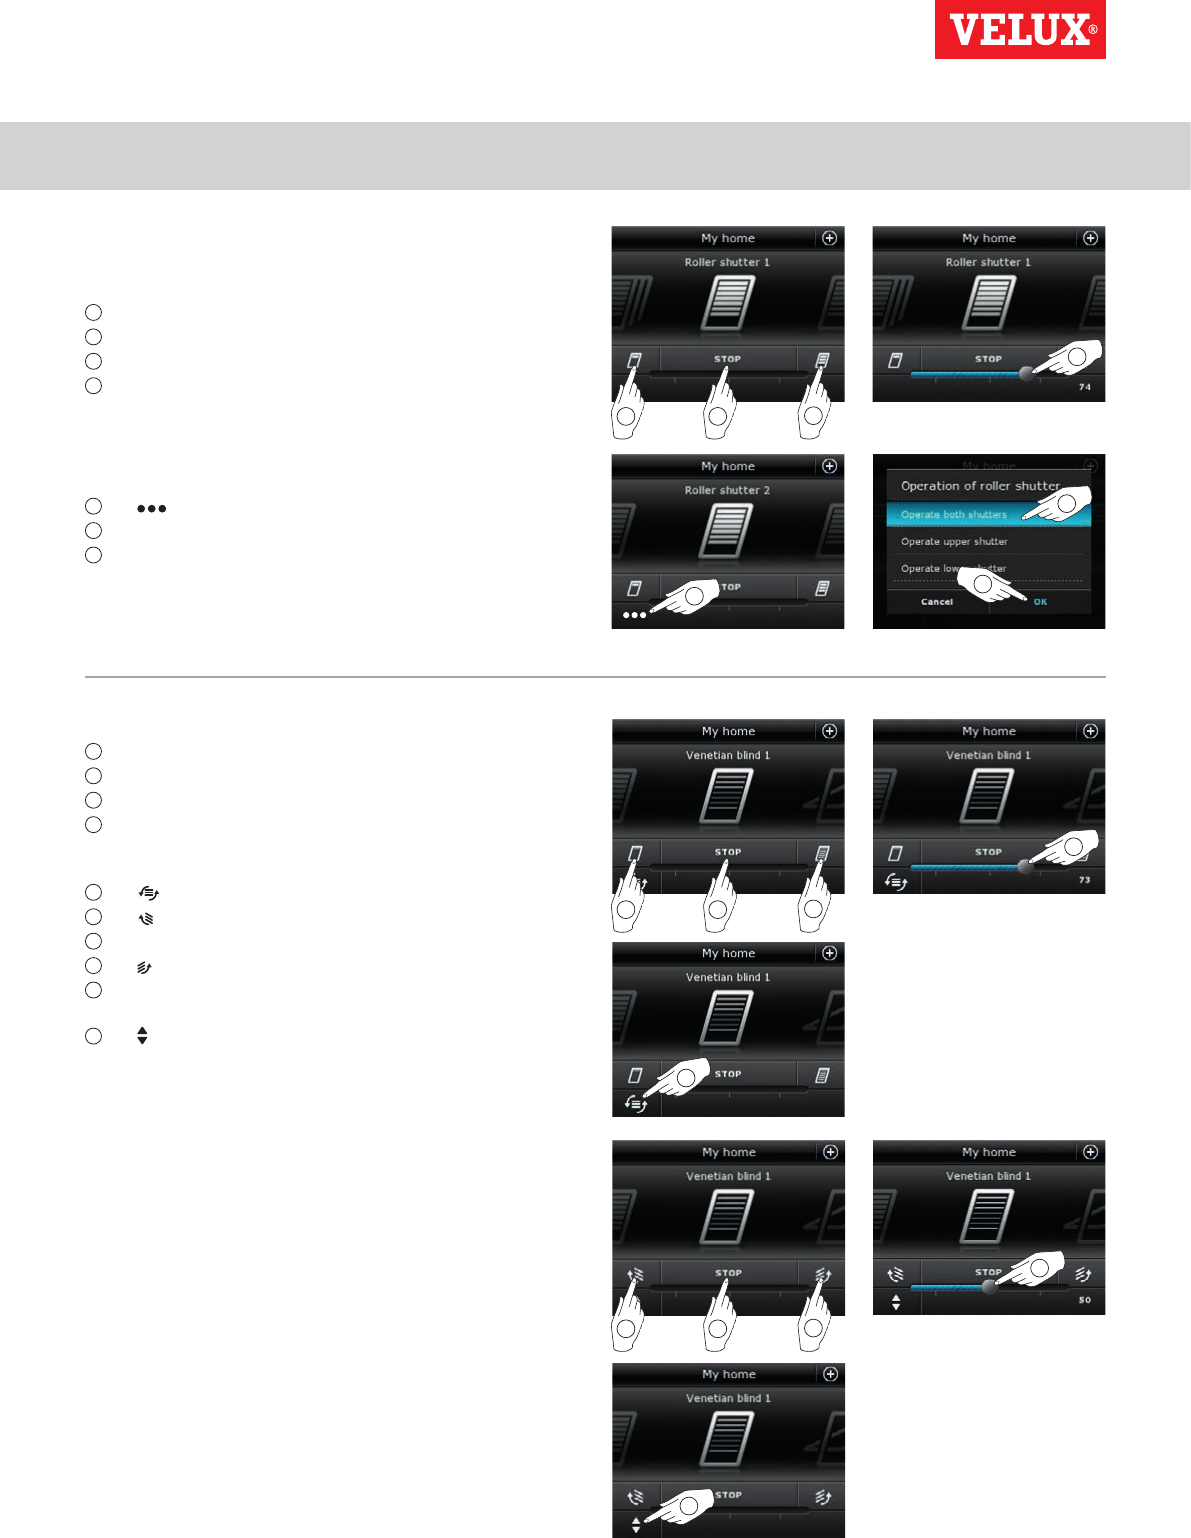
Operation of sunscreening products
Roller shutters/Awnings blinds/Blinds
1 Run up
2 Stop
3 Run down
4 Drag the slider or tap the bar to set the position of the sun-
screening product. The position from 0-100 is shown in the
bottom right corner.
Roller shutters with upper/lower elements
5 Tap .
6 Tap the element you want to operate.
7 Tap "OK". You can now operate the element as described above.
Operation
Basic operation 2
Venetian blinds
1 Run up
2 Stop
3 Run down
4 Drag the slider or tap the bar to set the position of the Venetian
blind. The position from 0-100 is shown in the bottom right
corner.
5 Tap to set the tilting of the slats.
6 Tap to tilt the slats upwards.
7 Stop
8 Tap to tilt the slats downwards.
9 Drag the slider or tap the bar to set the tilting of the slats.
The tilting from 0-100 is shown in the bottom right corner.
10 Tap to return to setting the position of the Venetian blind.
Operation
Basic operation 2
3
21
21
4
3
21
VELUX INTEGRA®
KLR 200
VELUX 8
Operation of lights
1 Turn off
2 Stop
3 Turn on
4 Drag the slider or tap the bar to set the intensity of the light.
The intensity from 0-100 is shown in the bottom right corner.
Operation of products connected to on/off switch
1 Turn off
2 Turn on
Operation of other types of io-homecontrol® products
1 Open
2 Stop
3 Close
Note: The example shows a garage door.
Product position
Tap "STOP" and the position of the product can now be seen in
the bottom right hand corner of the product navigator display. For
instance, you can see how far a window is open.
Turn on/Home/Stop all products
To prolong the lifetime of the control pad batteries, the display
goes into sleep mode shortly after the last touch. You turn on the
display again by tapping .
When the display is on, a tap on takes you home to the first
product in the product navigator.
Touching and holding for at least 3 seconds stops all products.
Operation
Programs - Using programs 2
VELUX INTEGRA®
KLR 200
VELUX 9
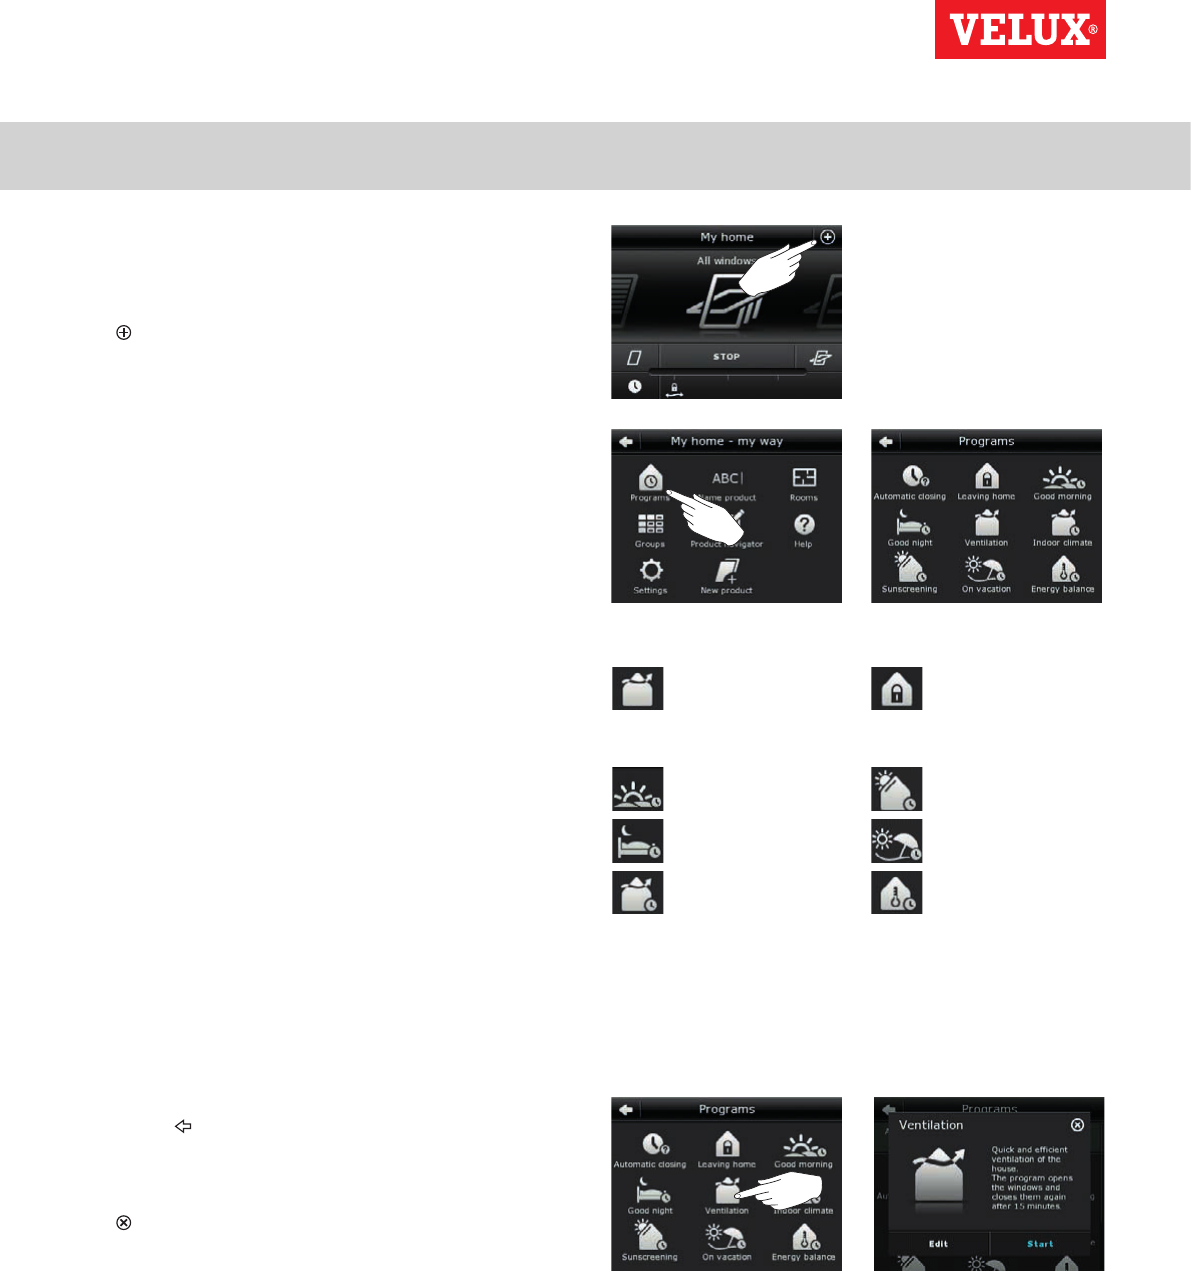
A program can help you get a smarter home. It can ensure that
your house is ventilated regularly, that internal temperatures are
kept down during the day when necessary, and that the heat loss
is reduced at night.
Tap in the top right corner of the display to get access to the
programs.
Under "Programs", you will find the VELUX programs available for
the products registered in your control pad. The more different
products registered, the more VELUX programs available. There
are eight VELUX programs.
Two programs will run only once when activated. You can edit
these programs.
Six programs, when activated, will automatically run repeatedly
according to a set schedule until you stop them. You can edit the
programs. A clock at the bottom right of the program icons indi-
cates that the program will run repeatedly.
In addition, you can make your own programs, see the section
Creating a program. Here you can combine the program settings
as you wish.
When choosing a VELUX program, its contents are shown on the
display. Tap to go back.
Tap "Start" to activate a program. Tap "Edit" to change the indi-
vidual actions/settings of the program to make them match your
wishes.
Tap to go back.
Good morning
Good night
Indoor climate
Sunscreening
On vacation
Energy Balance
Ventilation Leaving home

Operation
Programs - VELUX programs 2
2
3
1
5
7 8
6
4
VELUX INTEGRA®
KLR 200
VELUX 10
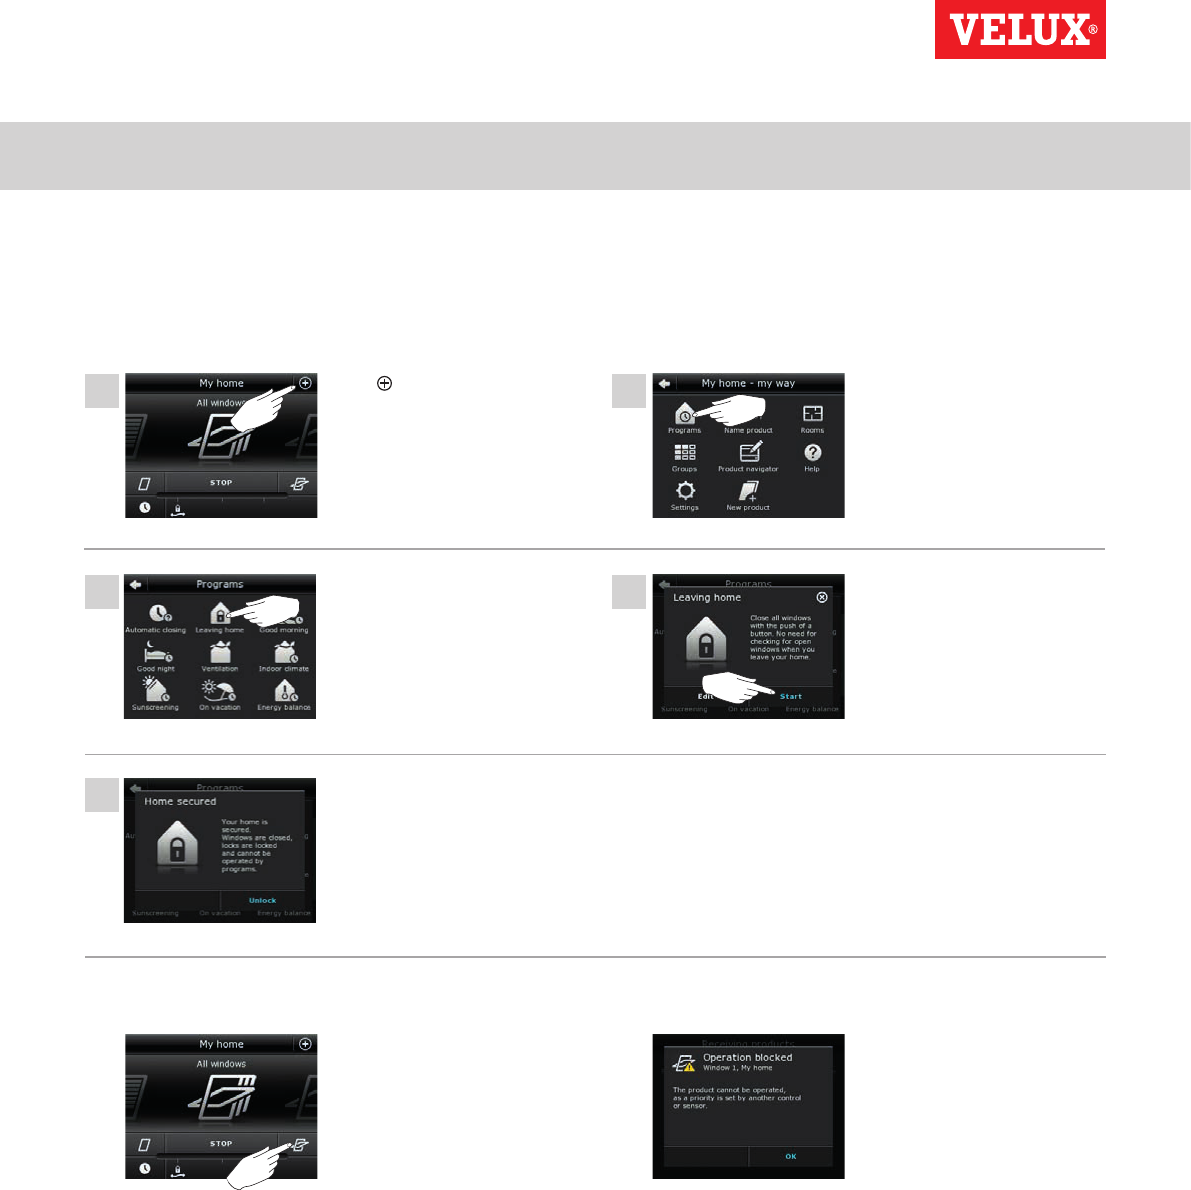
Using a program
Two examples of how to use VELUX programs are shown.
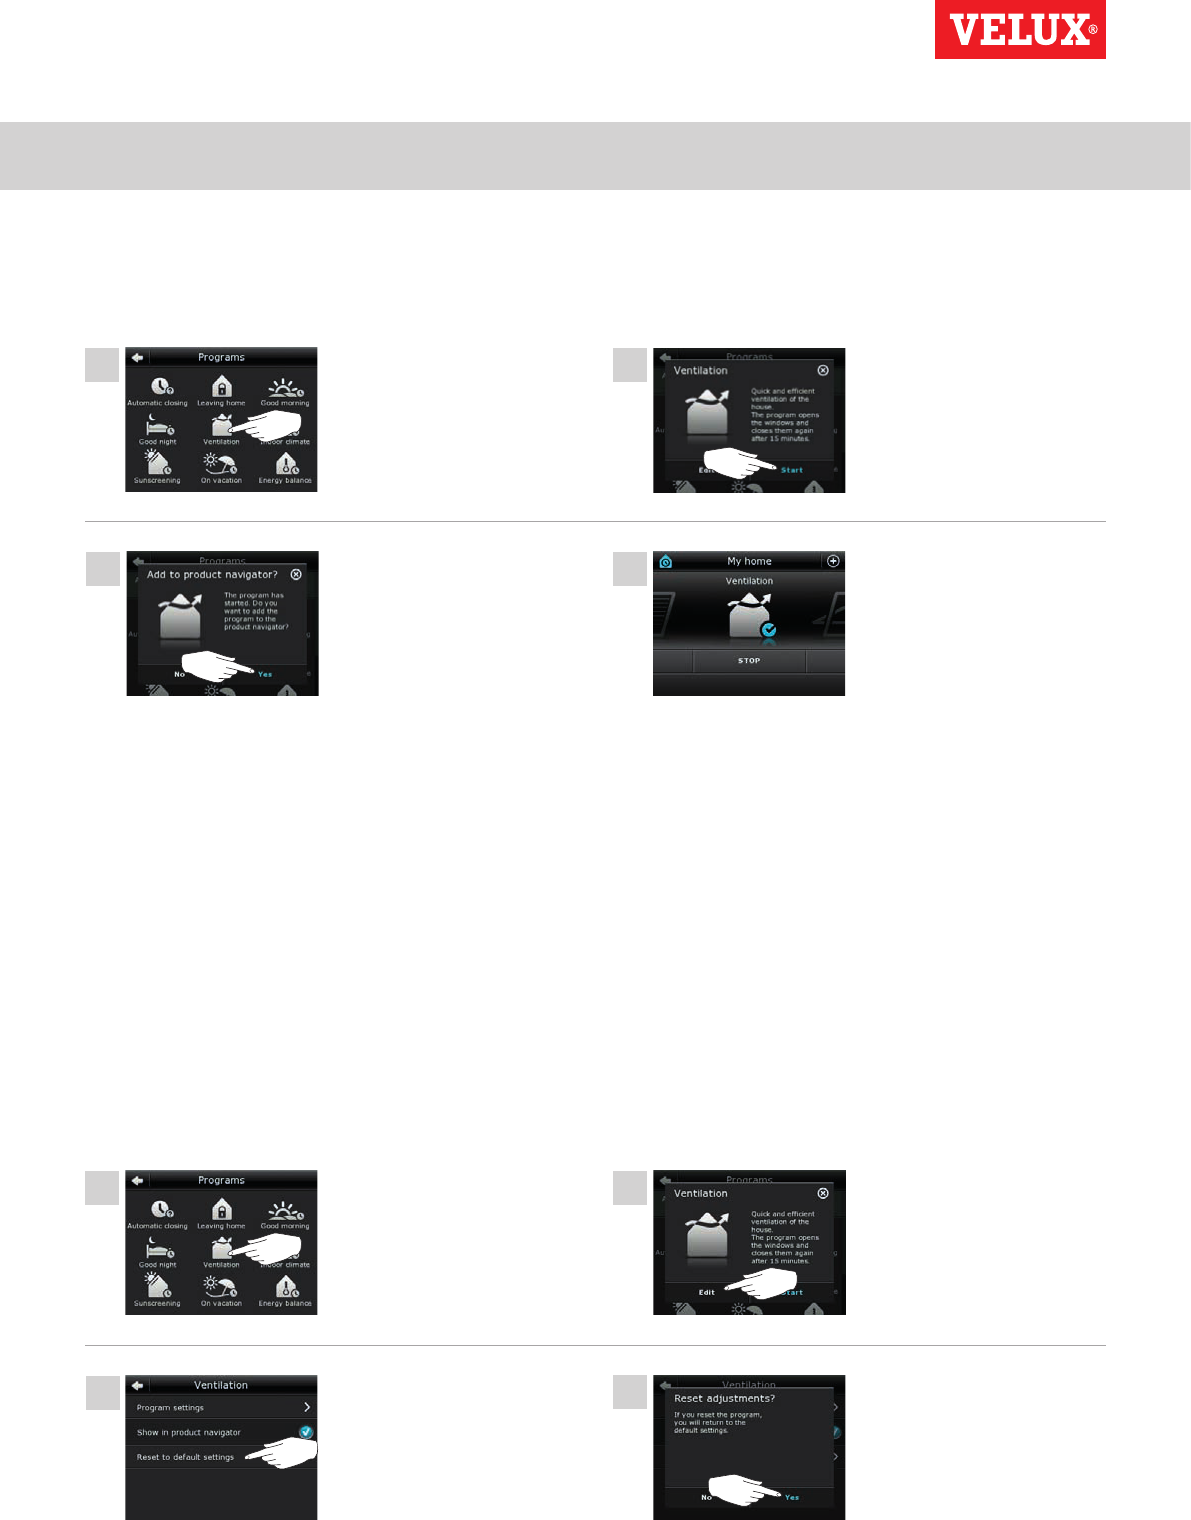
Example 1
The program "Ventilation" makes it easy to open and close your windows.
The example shows how to use it.
Tap "Ventilation". Tap "Start".
The clock turns blue when the
program is running.
Tap "Ventilation" to stop the
program.
Tap to finish.
Tap "Stop".
The display asks if you want to
add the program to the prod-
uct navigator for easier access.
Tap "No".
Note: Tap "Yes" if you want to
add the program to the prod-
uct navigator (see page 14).
Tap .Tap "Programs".
Operation
Programs - VELUX programs 2
2
4
5
1
3
VELUX INTEGRA®
KLR 200
VELUX 11
Tap "Leaving home". Tap "Start".
Note: The display notifies you
if a window has been opened
manually. This window must
be closed manually again to en-
able you to secure your home.
Example 2
The program "Leaving home" ensures that all windows are closed and that all registered locks are operated.
The example shows how to use it.
Tap .Tap "Programs".
After starting "Leaving home",
you can still operate products
ordinarily with another control
pad or control.
Your home is now secured until
you tap "Unlock".
NOTE!
However, if you try to activate a
program, the display shows
that operation has been
blocked.
Operation
Programs - VELUX programs 2
1
2
2
1
3
6
8
10
4
5
7
9
1 2
Continue on the next page
VELUX INTEGRA®
KLR 200
VELUX 12
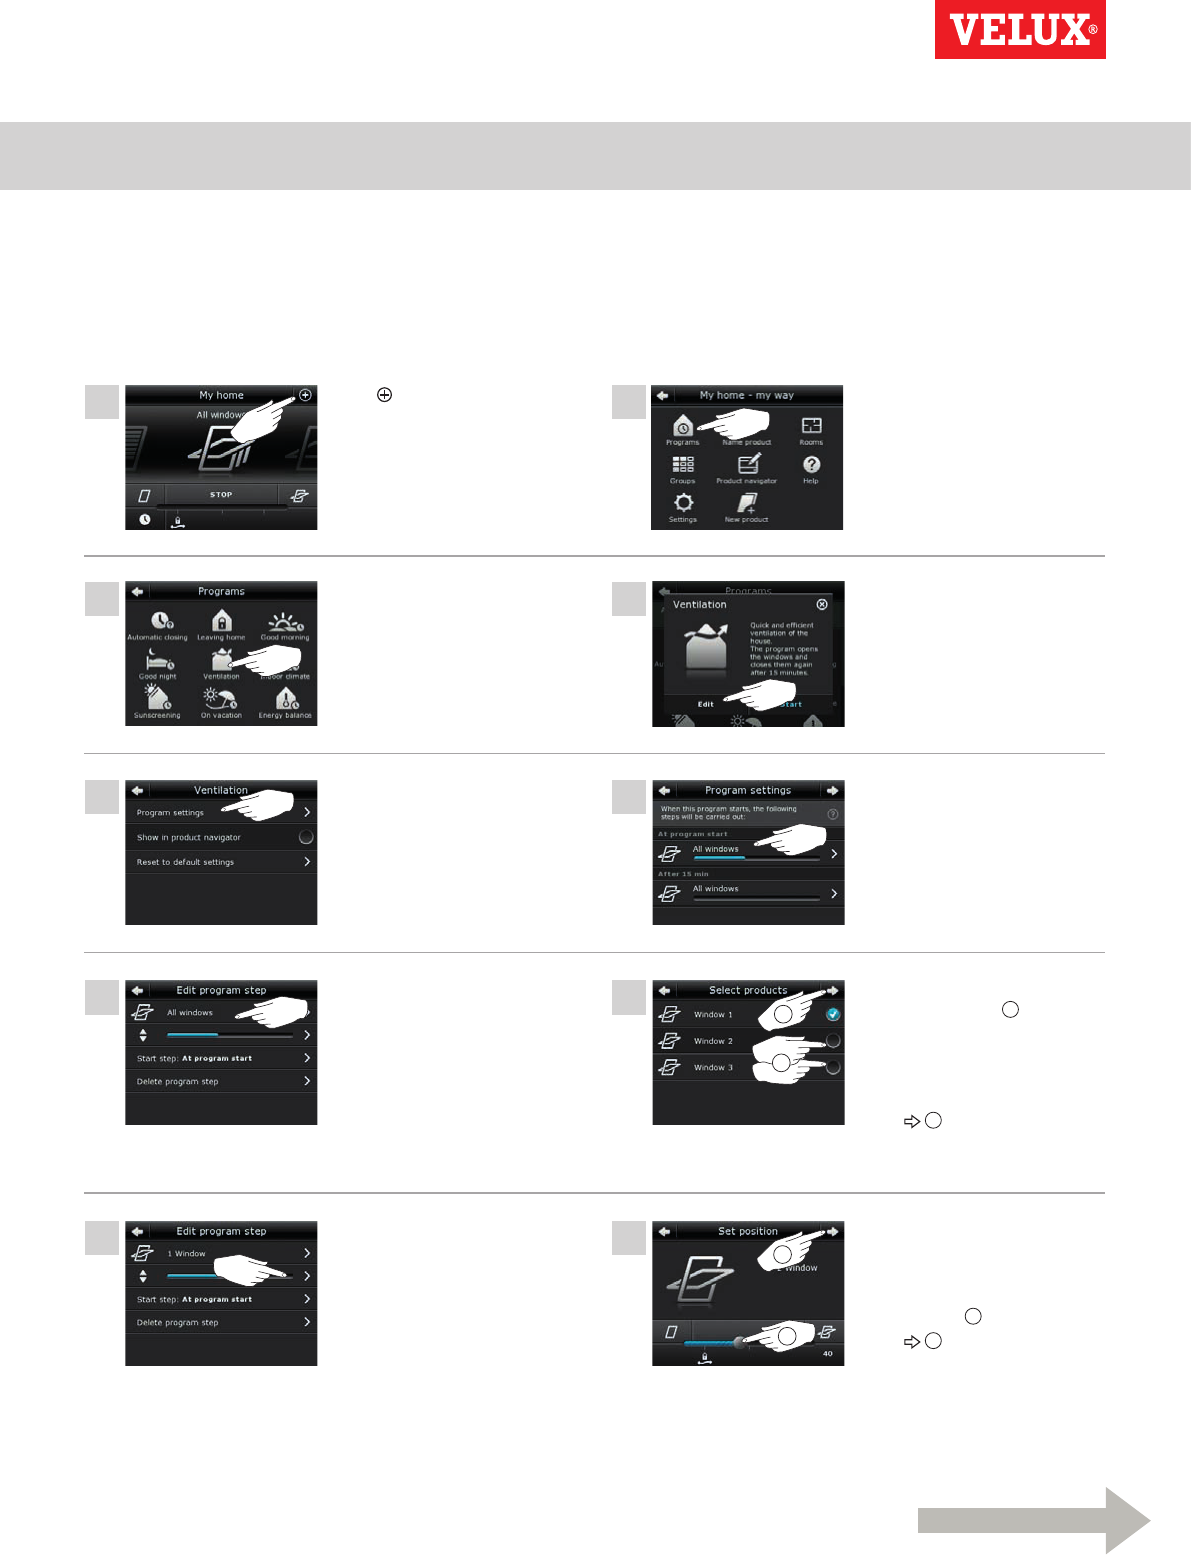
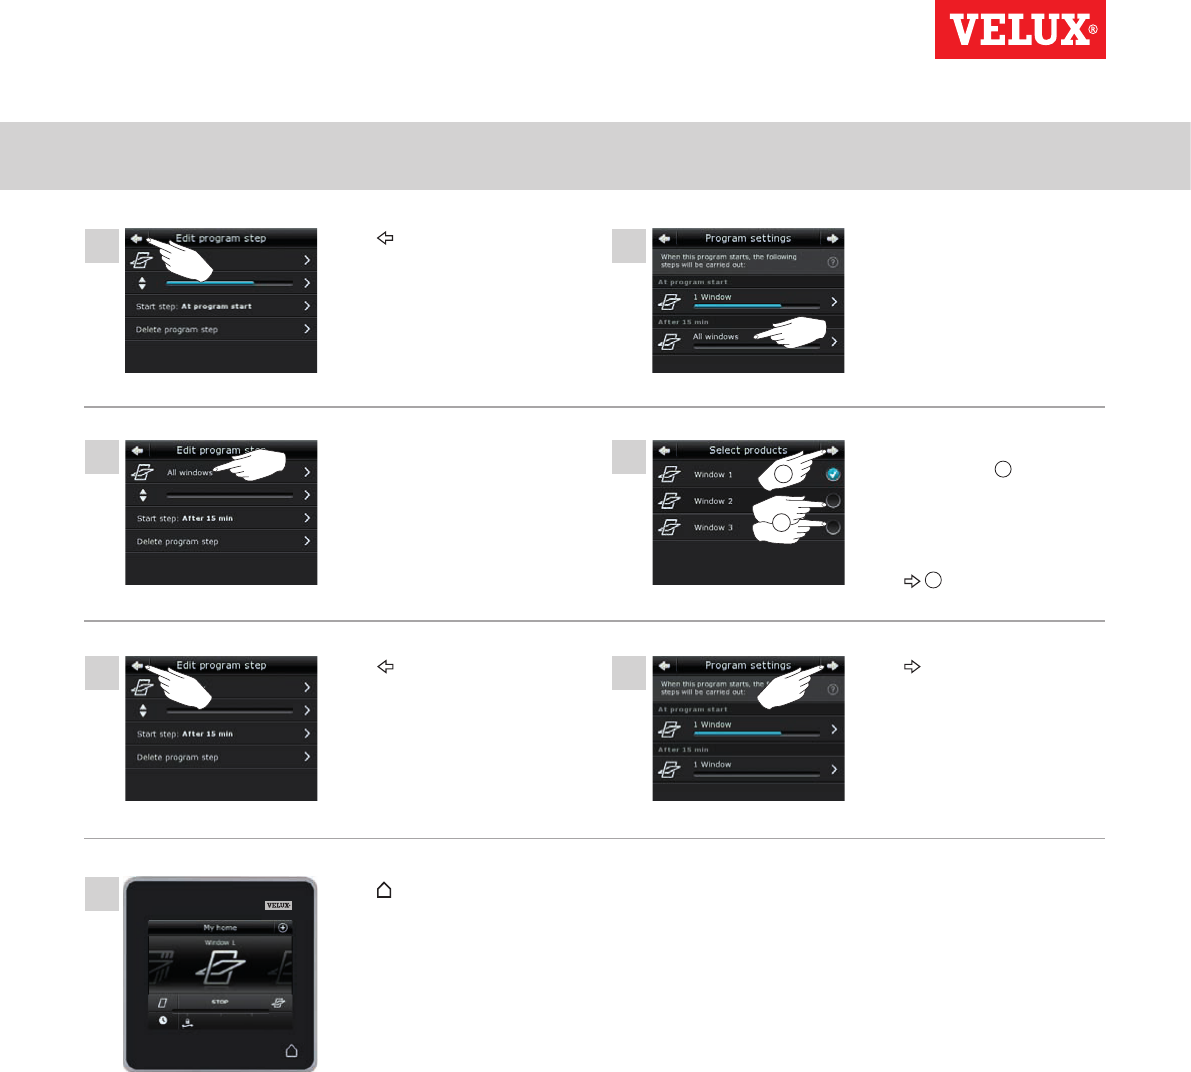
Tap the bar with the blue slider.
Tap "All windows".
Tap "Program settings". Tap "All windows".
Tap "Ventilation". Tap "Edit".
Remove ticks for the windows
not to be opened 1.
Note: The individual products
can be identified by tapping
the icon. See also the section
Finding products.
Tap 2.
Drag the slider or tap the bar
to open window to desired
position. The position from
0-100 is shown in the bottom
right corner 1.
Tap 2.
Editing a program
You can change the settings in a program to make it suit you better.
The example shows how to change the settings in the program "Ventilation" into opening just one window and setting its opening position
for ventilation purposes.
Tap .Tap "Programs".
Operation
Programs - VELUX programs 2
1
2
11 12
13
16
14
15
17
VELUX INTEGRA®
KLR 200
VELUX 13
Tap "All windows".
Tap .
Tap "All windows".
Tap .
Tap to finish.
Remove ticks for the windows
not to be closed 1.
Note: The individual products
can be identified by tapping
the icon. See also the section
Finding products.
Tap 2.
Tap .
Operation
Programs - VELUX programs 2
1
1
3
3
4
4
2
2
VELUX INTEGRA®
KLR 200
VELUX 14
Resetting to default settings
To cancel your settings, you can reset to default settings.
Adding a program to the product navigator
You can place your program in the product navigator to make it easier to activate.
The example shows how to add the program "Ventilation" to the product navigator.
Tap "Ventilation".
Tap "Ventilation".
Now the program has been
added to the product navigator
where you can access it easier.
Tap "Yes".
The display asks whether you
want to add the program to
the product navigator.
Tap "Yes".
Tap "Reset to default settings".
Tap "Start".
Tap "Edit".
Operation
Programs - Own programs 2
1
3
5
7
9
2
4
6
8
10 2
1
2
22
1
1
1
Continue on the next page
VELUX INTEGRA®
KLR 200
VELUX 15
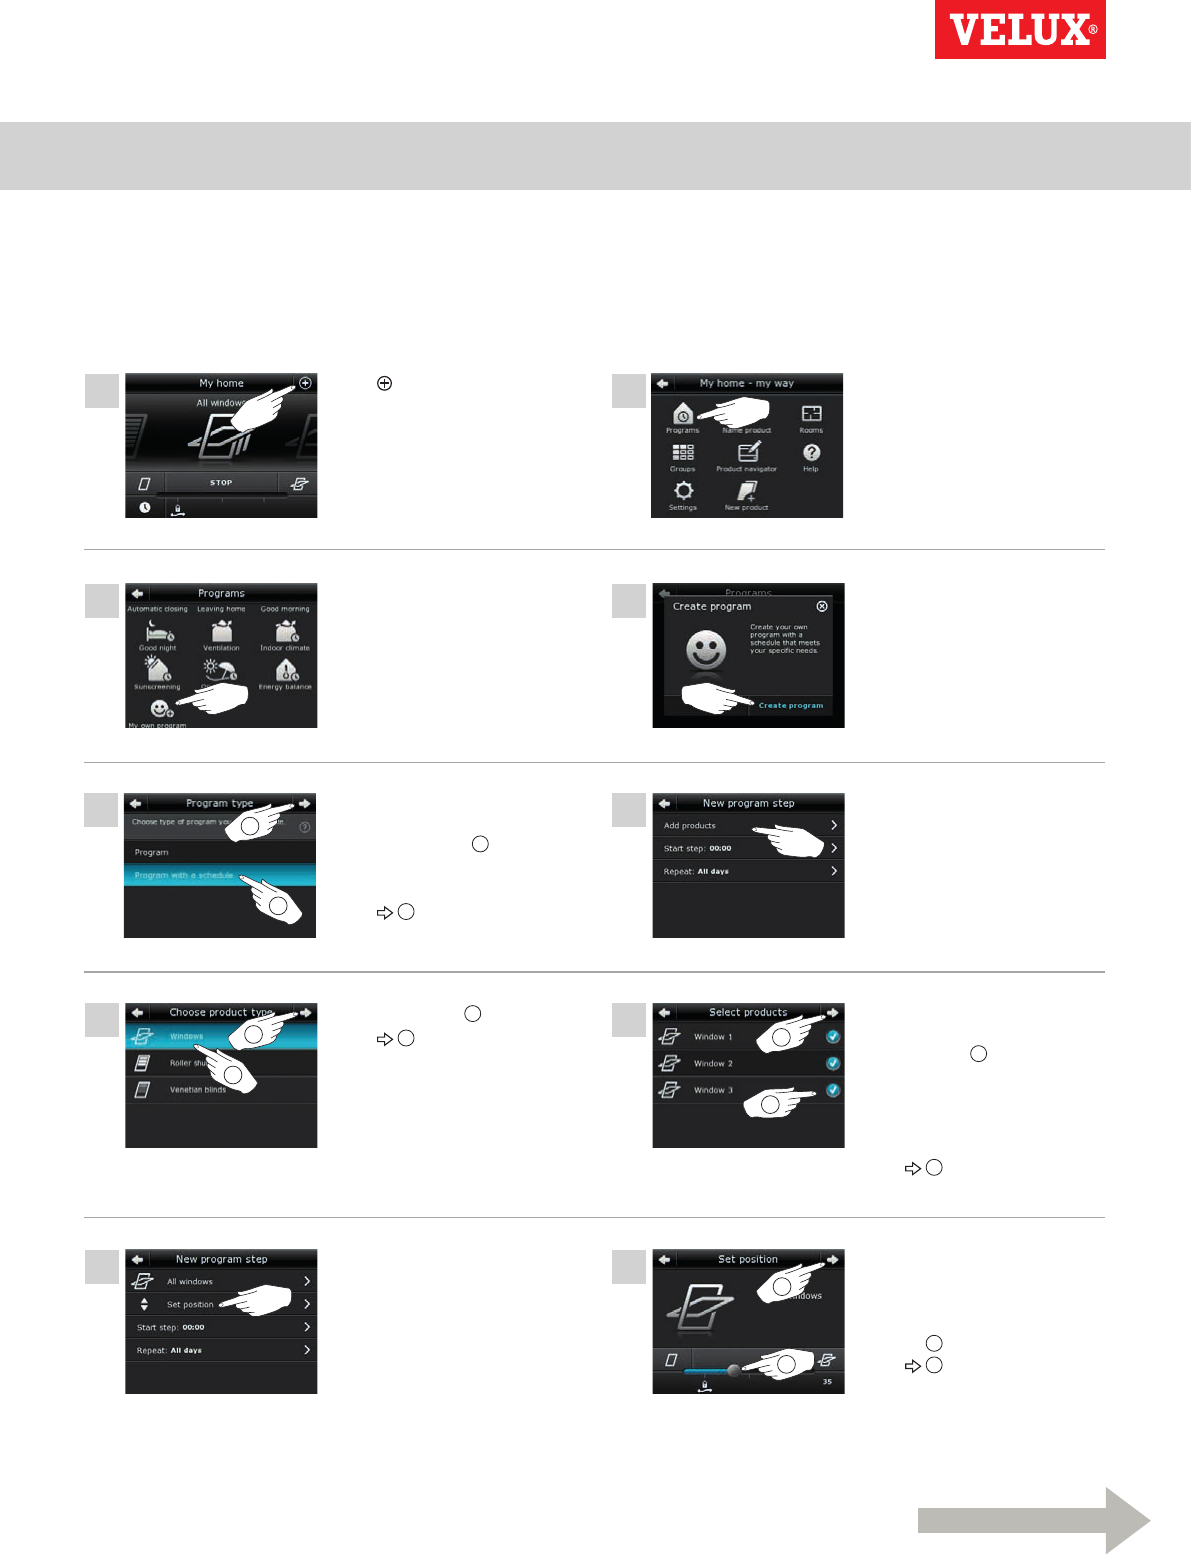
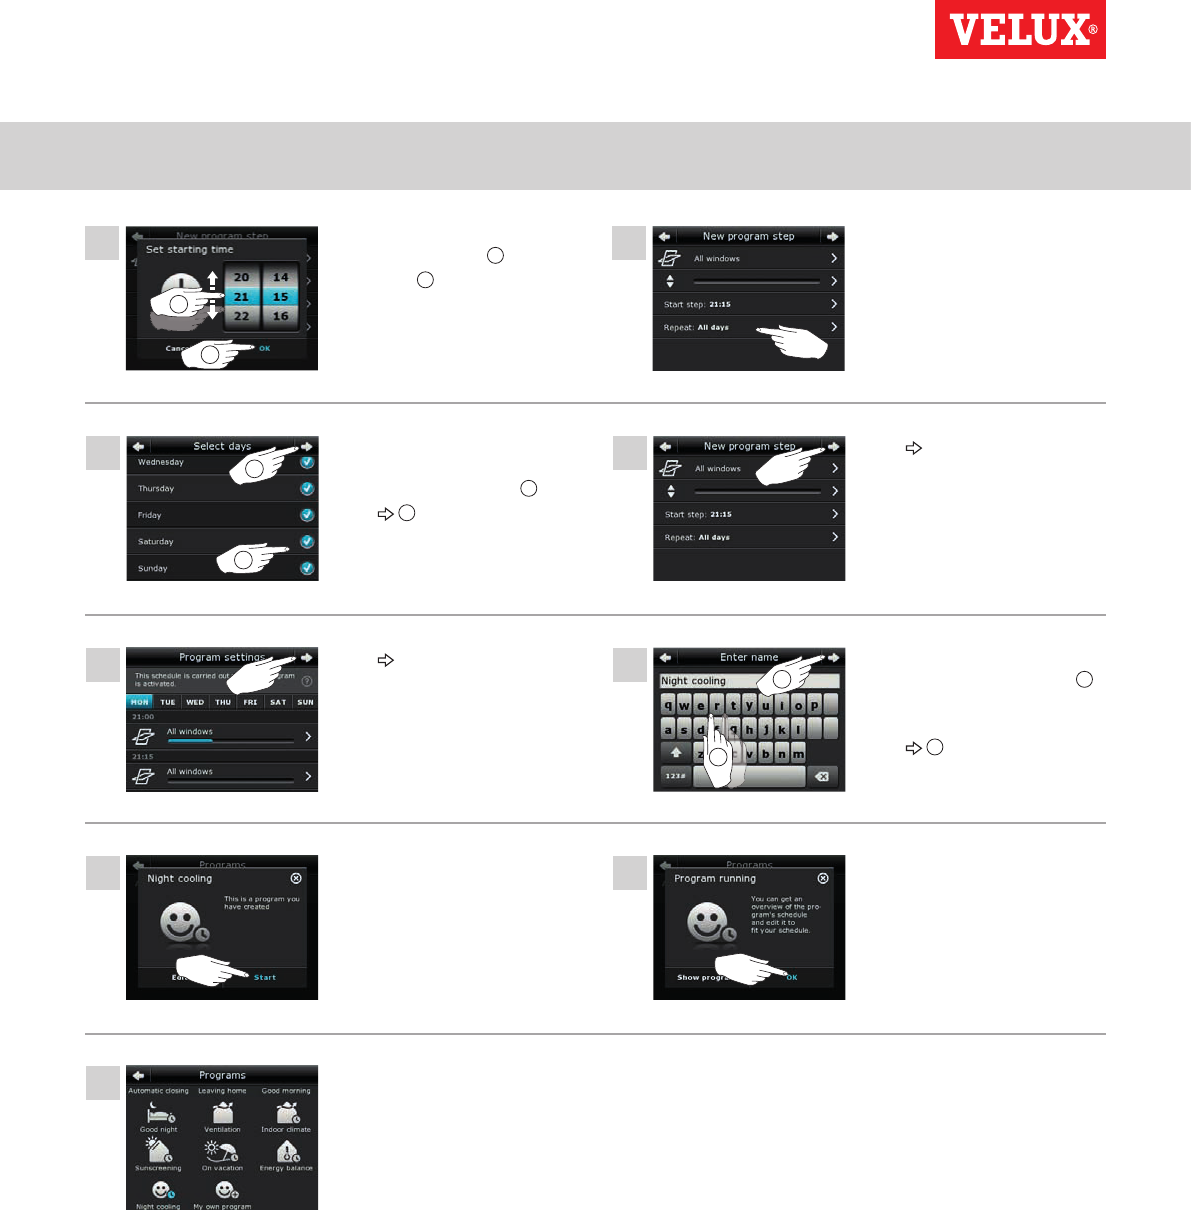
Creating a program
If the VELUX programs do not cover your requirements, you can make your own program. You may for instance need to ventilate a room
at a certain time every day.
The example shows how to make a program with the name "Night cooling".
Tap .Tap "Programs".
Tap "Create program".
Tap "Add products".
Scroll down the display and tick
the windows to be included in
the program 1.
Note: The individual products
can be identified by tapping the
icon. See also the section Find-
ing products.
Tap 2.
Drag the slider or tap the bar to
set the opening of the win-
dows. The position from 0-100
is shown in the bottom right
corner 1.
Tap 2.
Tap "My own program".
Tap "Program with a schedule"
if the program is to be repeated
on selected days 1.
Note: Tap "Program" only if the
program is to run immediately.
Tap 2.
Tap "Windows" 1.
Tap 2.
Tap "Set position".
Operation
Programs - Own programs 2
2
1
13
16
18
20
22
14
15
17
19
21
2
1
2
2
1
1
11 12
1
2
Continue on the next page
VELUX INTEGRA®
KLR 200
VELUX 16
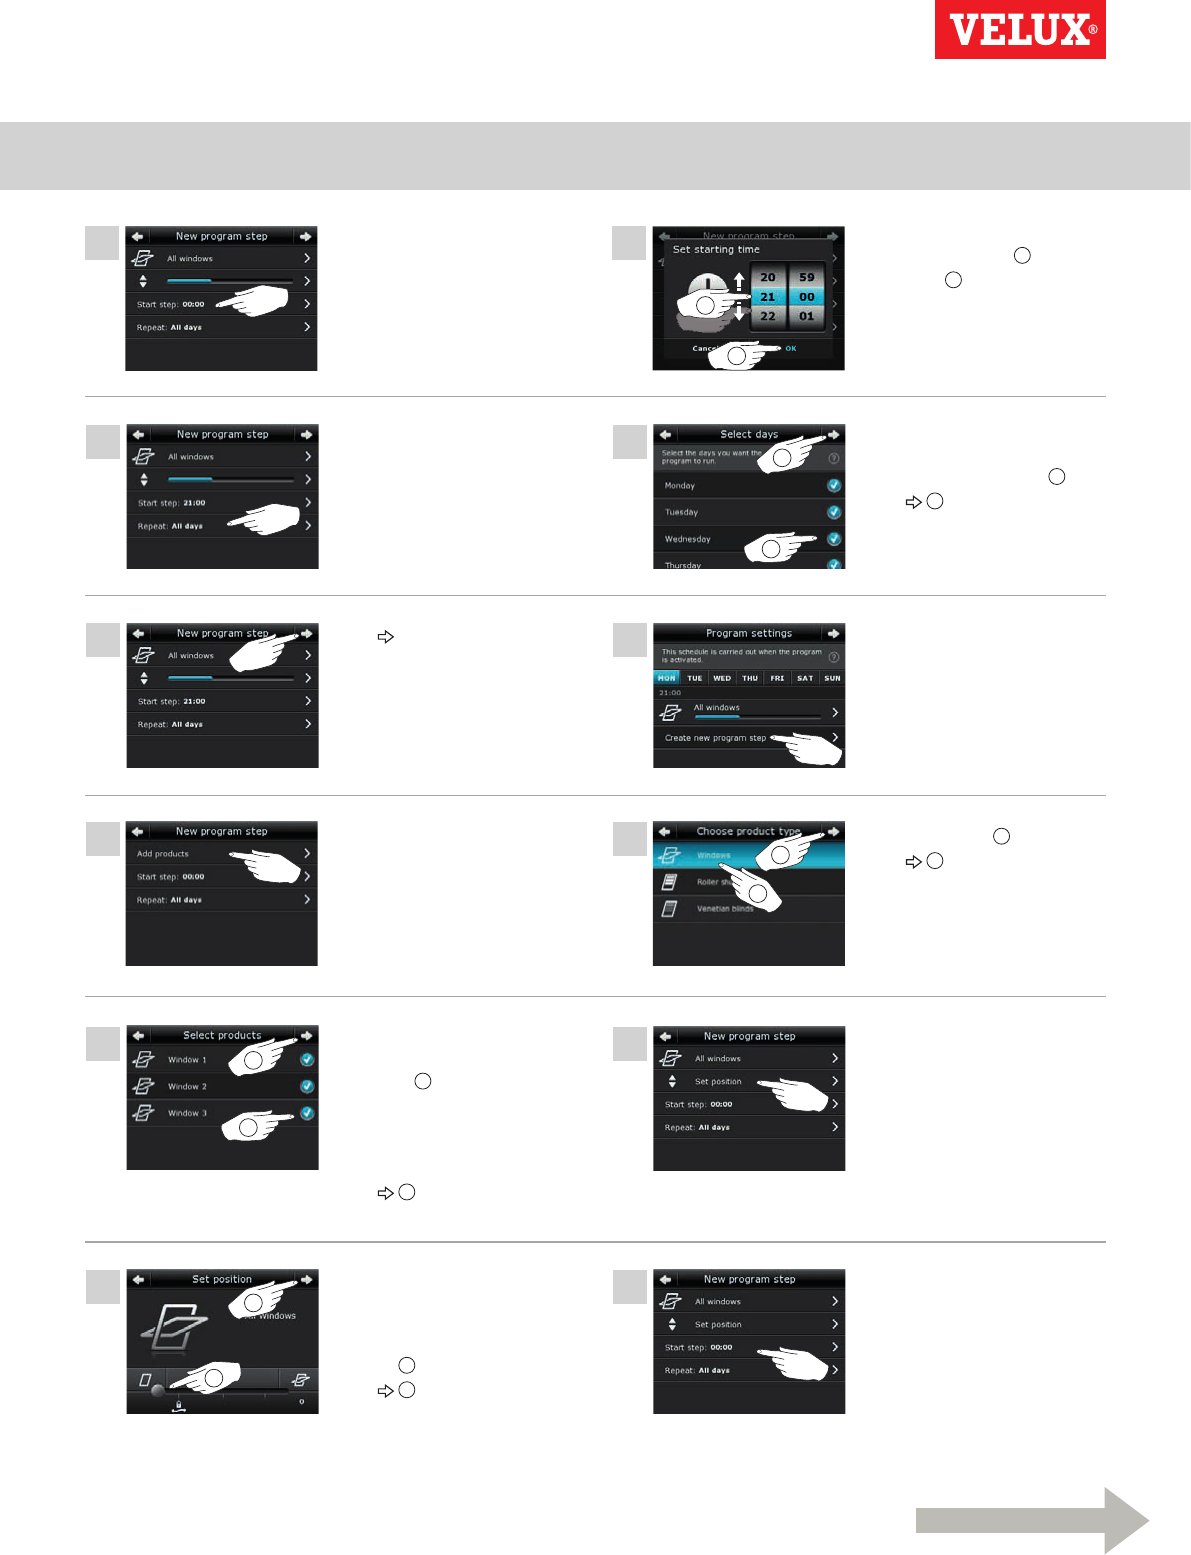
Tap "Start step: 00:00".
Tap "Repeat: All days".
Tap .
Tap "Add products".
Scroll down the display and tick
the windows to be part of the
program 1.
Note: The individual products
can be identified by tapping the
icon. See also the section Find-
ing products.
Tap 2.
Roll the wheel to set the time to
open the windows 1.
Tap "OK" 2.
Scroll down the display and
remove tick for the days not to
be part of the program 1.
Tap 2.
Tap "Create new program step"
to set the time to close the
windows again.
Tap "Windows" 1.
Tap 2.
Tap "Set position".
Drag the slider or tap the bar to
set the opening of the windows
to 0%. The position from 0-100
is shown in the bottom right
corner 1.
Tap 2.
Tap "Start step: 00:00".
Operation
Programs - Own programs 2
27
30
28
29
31
2
1
25 26
2
1
23 24
1
2
VELUX INTEGRA®
KLR 200
VELUX 17
Roll the wheel to set the time to
close the windows 1.
Tap "OK" 2.
Scroll down the display and
remove tick for the days not to
be part of the program 1.
Tap 2.
Tap "Repeat: All days".
Tap .
Tap .
Enter a name for the program,
in this case "Night cooling" 1.
For use of keyboard, see the sec-
tion Keyboard.
Tap 2.
Tap "Start" to activate the
program.
Tap "OK".
The program "Night cooling" is
now in the program overview.
From this overview you may
start, stop and edit the program
at any time. When you start it,
the clock turns blue.
Operation
Programs - Own programs 2
3
6
8
10
4
5
7
9
1 2
Continue on the next page
VELUX INTEGRA®
KLR 200
VELUX 18
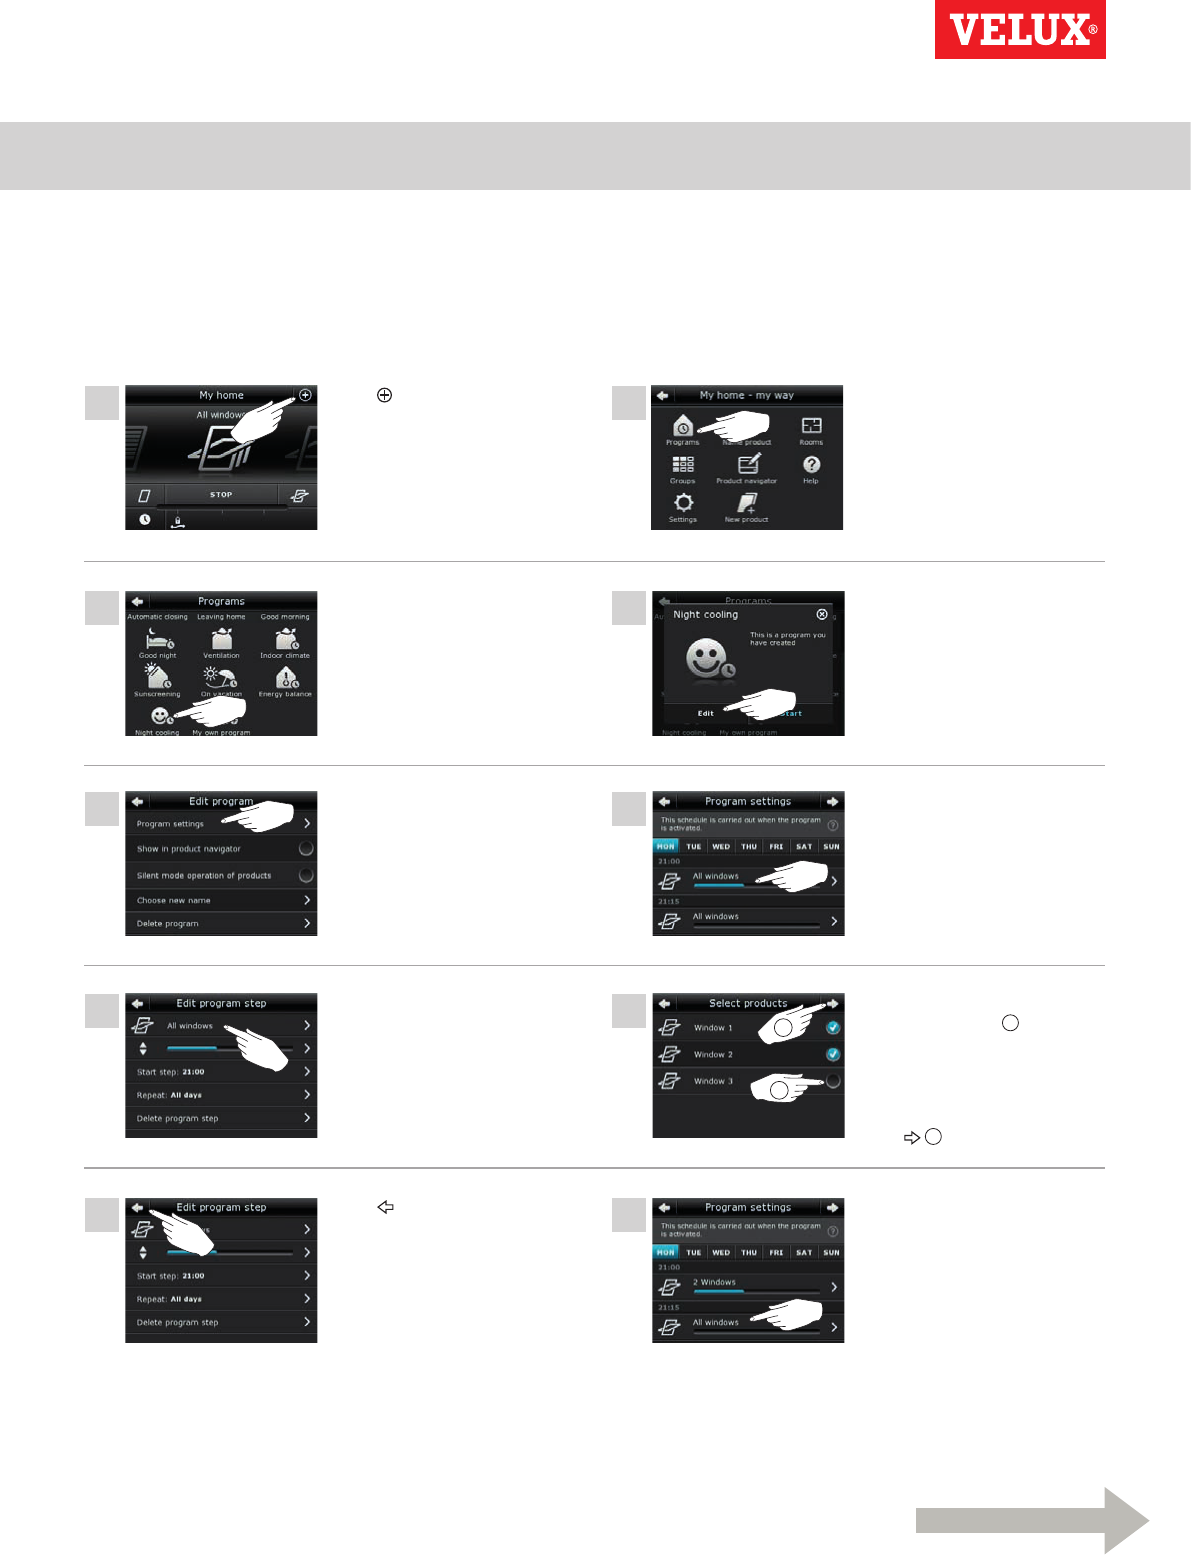
1
2
Tap .
Tap "All windows".
Tap "Program settings". Tap "All windows".
Tap "Night cooling". Tap "Edit".
Remove tick for the window
not to be opened 1.
Note: The individual products
can be identified by tapping
the icon. See also the section
Finding products.
Tap 2.
Tap "All windows".
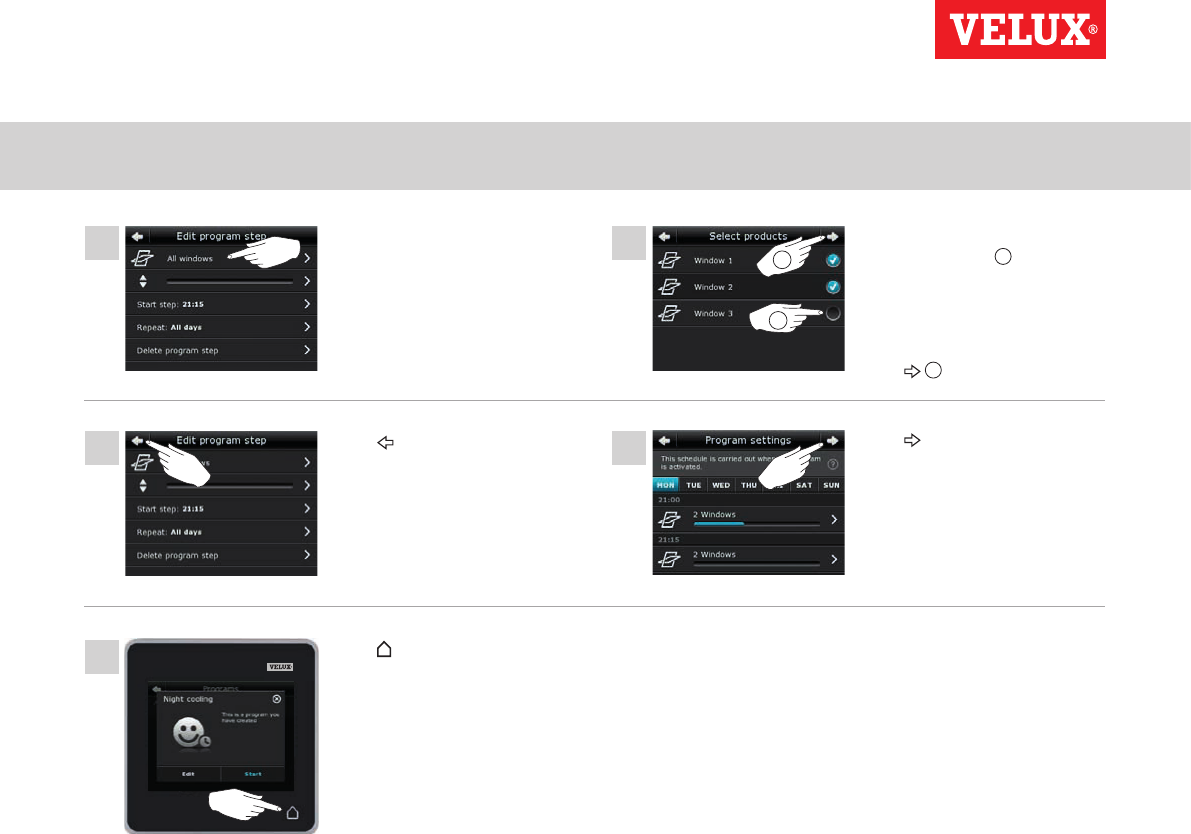
Editing a program
You can change the settings in a program to make it better suit your requirements.
The example shows how to change the settings so that Window 3 is no longer part of the program "Night cooling".
Tap .Tap "Programs".
Operation
Programs - Own programs 2
13 14
15
11 12
VELUX INTEGRA®
KLR 200
VELUX 19
Tap .
Tap "All windows". Remove tick for the window
not to be closed 1.
Note: The individual products
can be identified by tapping
the icon. See also the section
Finding products.
Tap 2.
Tap .
Tap to finish.
1
2
Operation
Programs - Own programs 2
3
5
6 7
4
1 2
VELUX INTEGRA®
KLR 200
VELUX 20
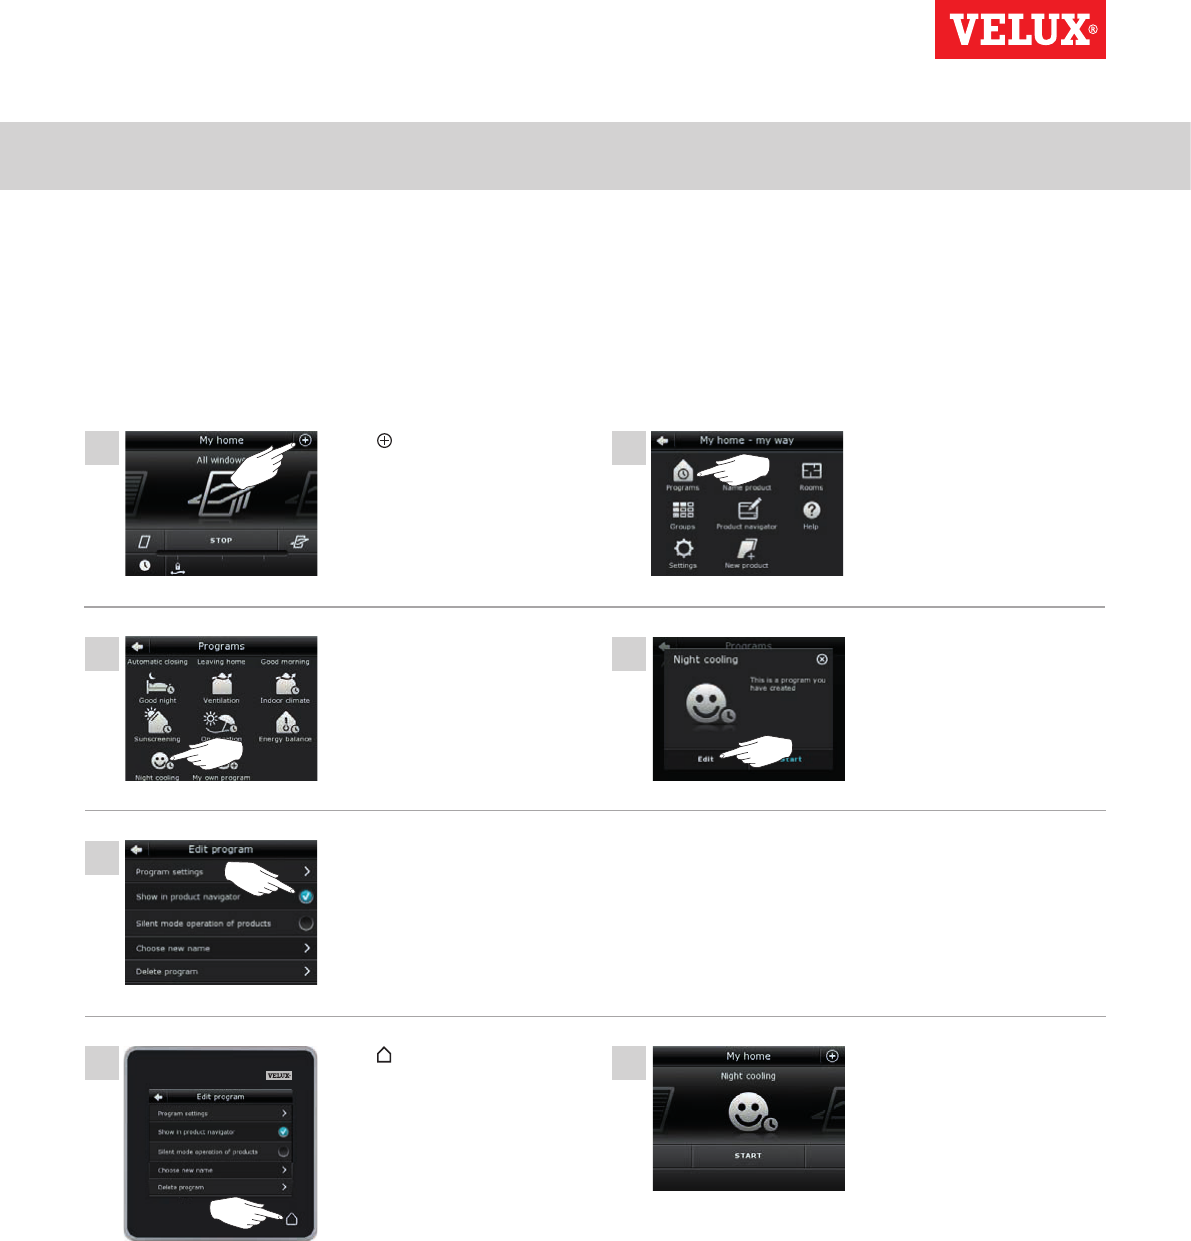
Tap "Night cooling".
Tick "Show in product naviga-
tor".
Tap to finish. Now the program has been
added to the product naviga-
tor where you can start and
stop it.
Tap "Edit".
Adding a program to the product navigator
You can place a program in the product navigator to make it easier for you to activate it.
The example shows how to add the program "Night cooling" to the product navigator.
Tap .Tap "Programs".
Operation
Programs - Own programs 2
1
3
5
4
6
8
2
7
2
1
VELUX INTEGRA®
KLR 200
VELUX 21
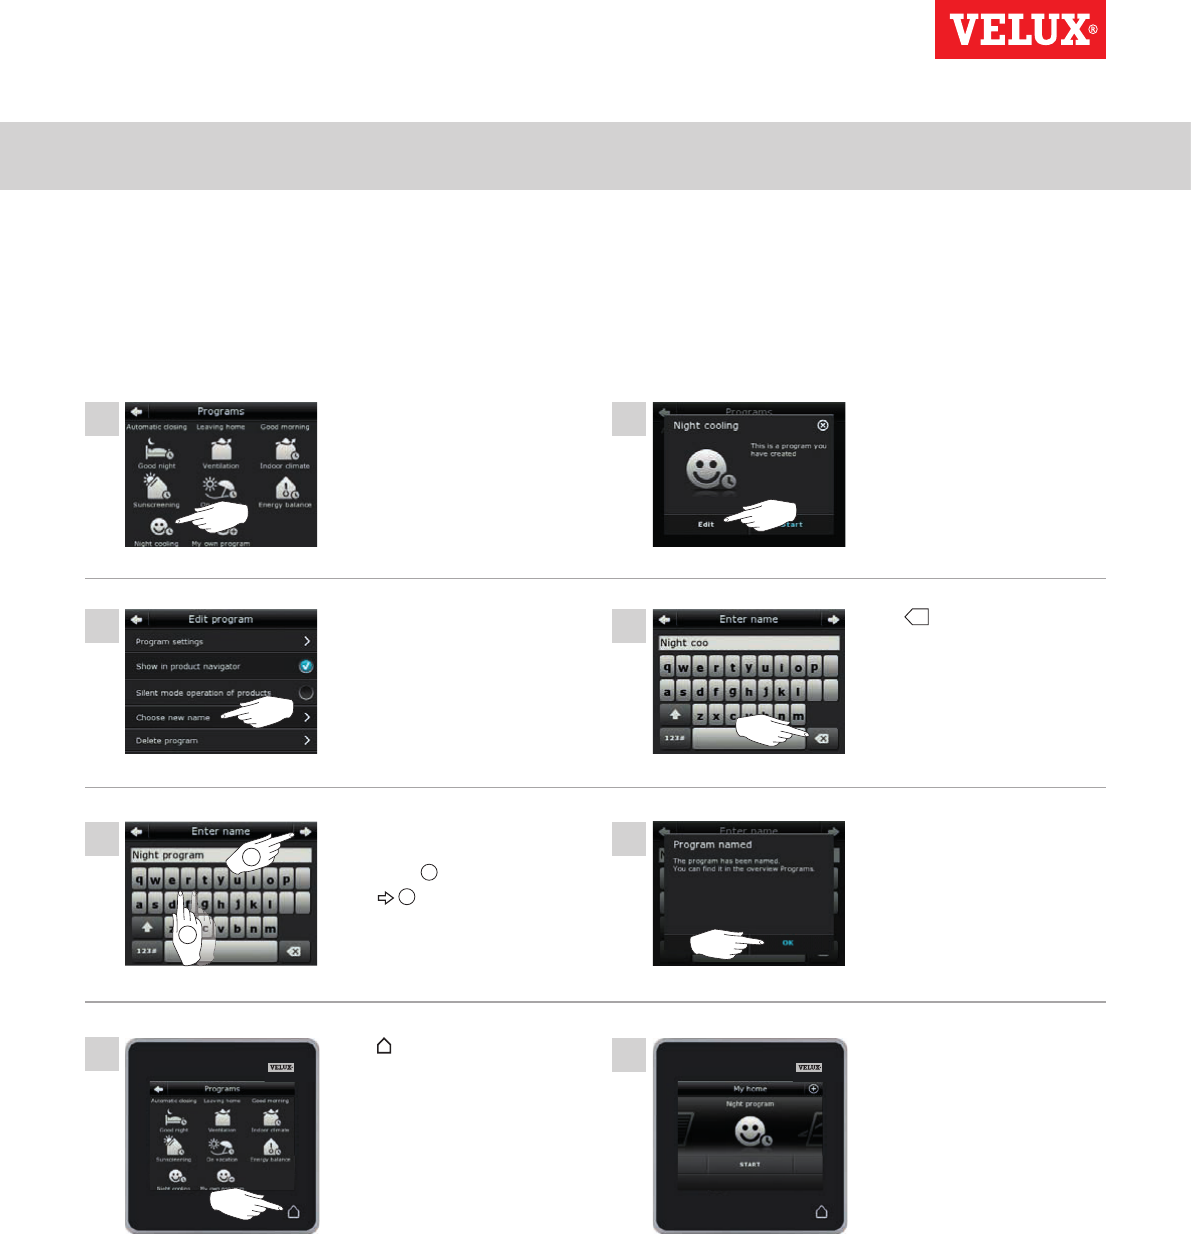
Renaming a program
You can rename your own programs.
In the example, the name of the program "Night cooling" is changed into "Night program".
Tap "Night cooling".
Tap
+
repeatedly to delete
the present name. For use
of keyboard, see the section
Keyboard.
Tap "OK".
You can find the program with
the new name in the product
navigator.
Tap "Choose new name".
Enter a new name for the
program, in this case "Night
program" 1.
Tap 2.
Tap "Edit".
Tap to finish.
Operation
Programs - Own programs 2
1
34
2
1
3 4
5
2
VELUX INTEGRA®
KLR 200
VELUX 22
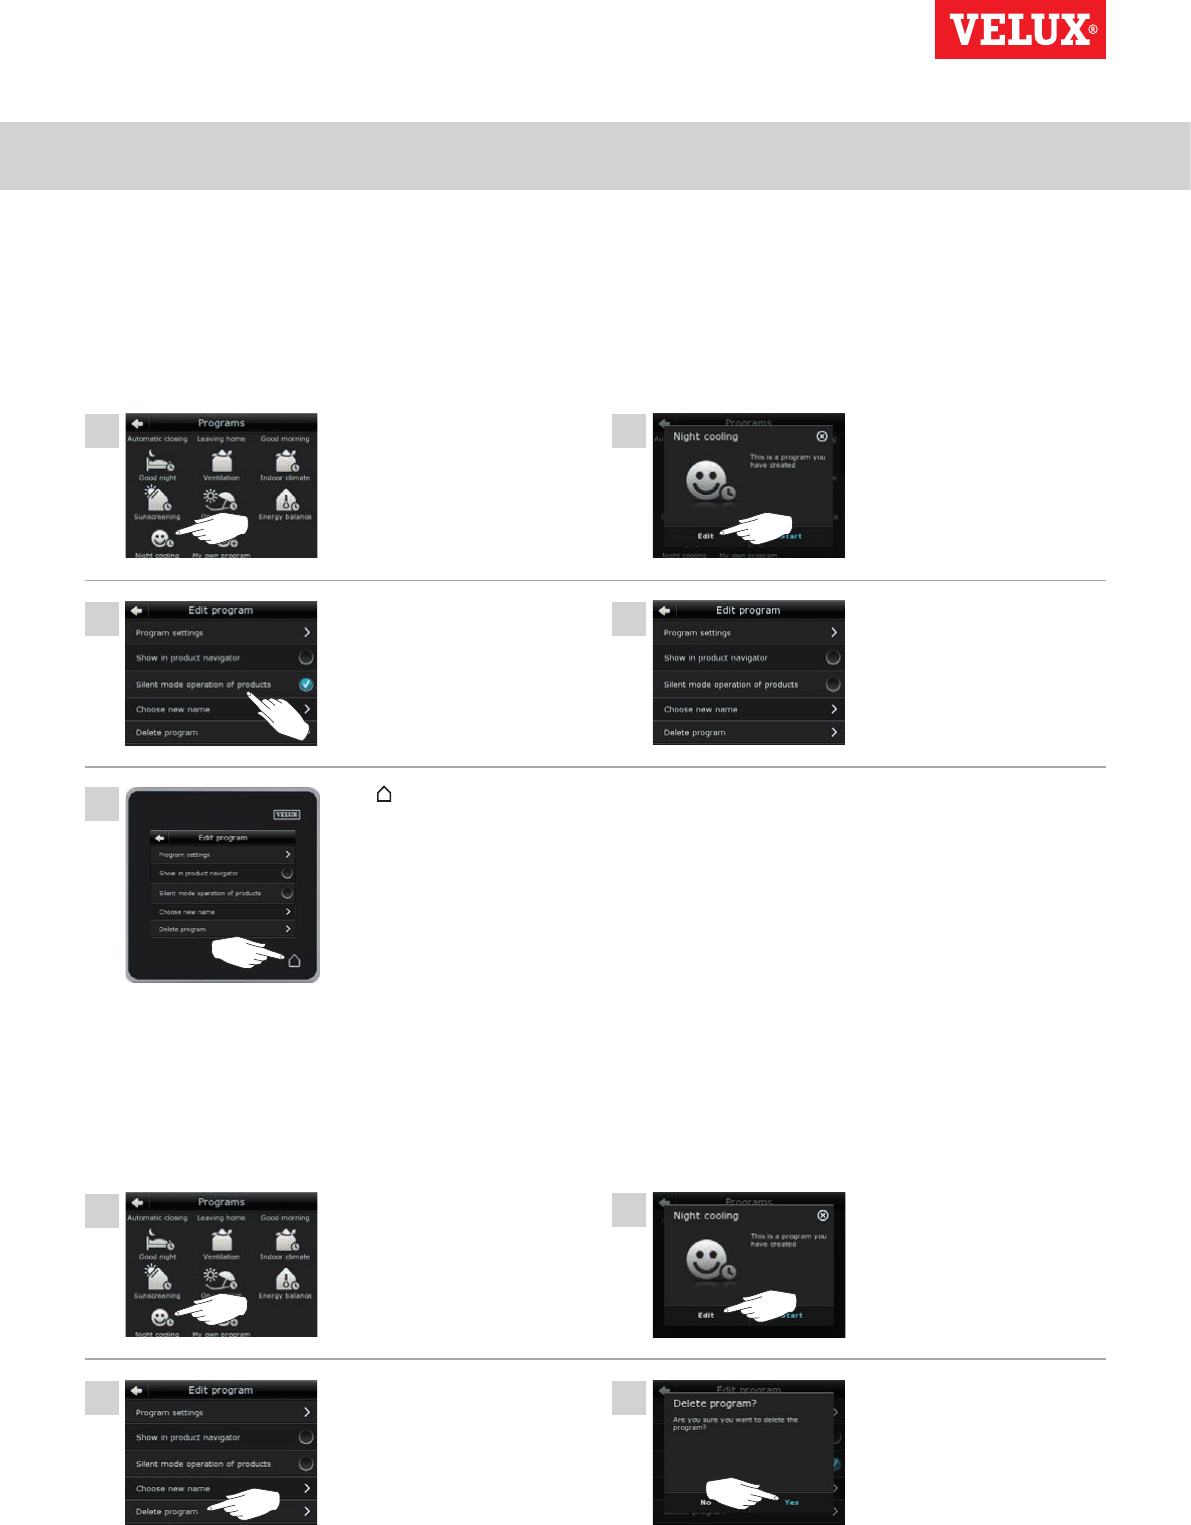
Deleting a program
If you do not want to use one of your own programs anymore, you can delete it.
The example shows how to delete the program "Night cooling".
Tap "Night cooling".
Tap "Yes".Tap "Delete program".
Tap "Edit".
Tap "Night cooling".
Remove the tick for "Silent
mode operation of products".
Silent mode operation has now
been deselected.
Tap to finish.
Tap "Edit".
Silent mode operation
Some products have been set to silent mode operation when they are activated by programs running according to a schedule, see also
the section Using programs. This may for instance be convenient if the products are activated automatically at night. Please note that
products run slower when they have been set to silent mode operation. If you opt out of silent mode operation, the products will run
faster.
The example shows how to deselect silent mode operation of products operated via the program "Night cooling".

Operation
Smart operation 2
1
1
2
2
3
2
2
3
1
1
VELUX INTEGRA®
KLR 200
VELUX 23
Tap for "Window 3".
Switching between lower and
upper case letters and between
figures and special characters.
Switching between letters and
figures.
Deleting the latest entered
character.
Tap "Show".
The example shows how to use the keyboard, for instance when you
are renaming groups and want to call a group "Group 1".
Window 3 will now run briefly
back and forwards so you can
see whether you found the right
one or not.
Tap "Window 3".
You can now continue renaming
the window or finding another
product.
Enter "Group" 1.
Tap "123#" to switch to
figures 2.
Finding products
It may be difficult to tell the products from each other in the product navigator. If you are in doubt you can identify the product of interest
by tapping the icon for product, for instance at Window 3.
The example shows how to find Window 3 if for instance you are renaming the window.
Keyboard
To change the names created automatically, you can enter new names via the keyboard. The keyboard is only visible when it is possible to
use it.
Keyboard functions:
Tap the space bar 1.
Enter "1" 2.
Tap to continue 3.
Operation
Smart operation 2
1
5 6
4
87
9
10 11
2
32
2
1
1
2
1
2
1
VELUX INTEGRA®
KLR 200
VELUX 24
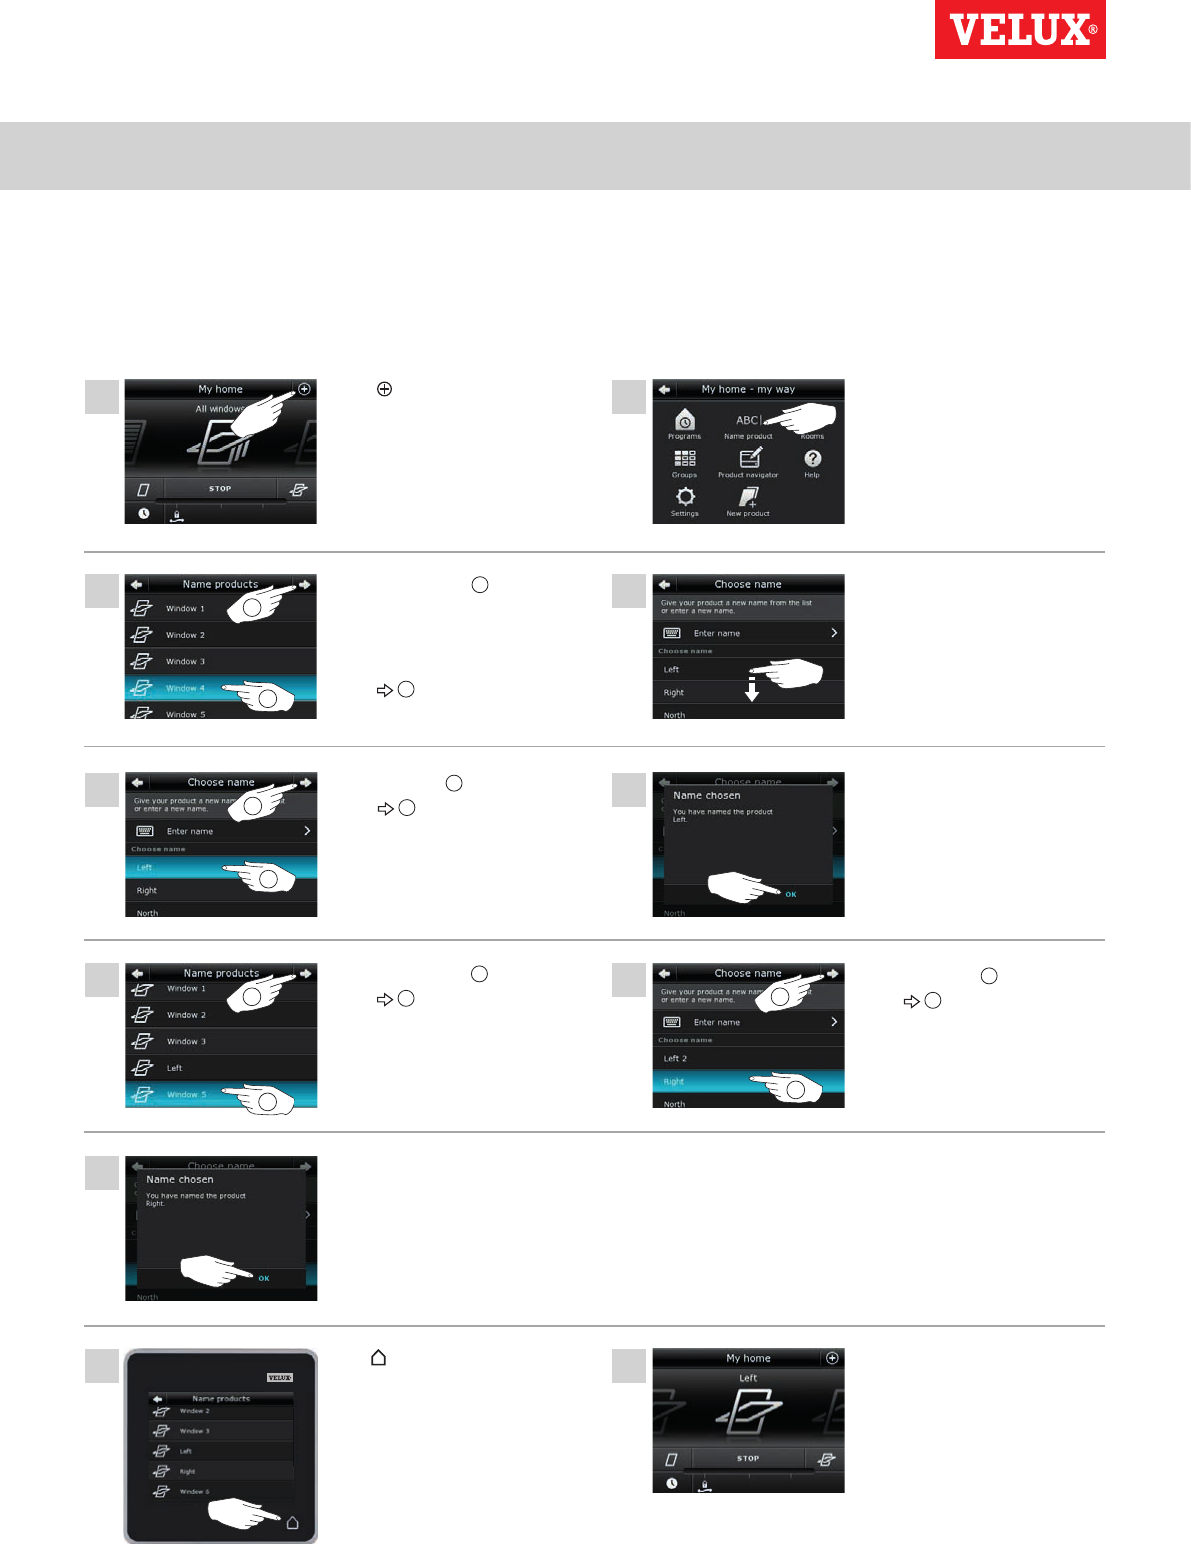
Renaming products
You can change the names of products to make it easier to find and operate them.
The example shows how to change the names of Window 4 and Window 5 into Left and Right respectively.
Tap .Tap "Name product".
Select "Left" 1.
Tap 2.
Tap "OK".
Scroll down the display to find a
name for the product on the list.
Note: You can also enter a
name of your own by tapping
"Enter name". For use of key-
board, see the section Keyboard.
Tap "Window 4" 1.
Note: The individual products
can be identified by tapping the
icon. See also the section Find-
ing products.
Tap 2.
Tap "Window 5" 1.
Tap 2.
Select "Right" 1.
Tap 2.
Tap "OK".
The windows are now called
"Left" and "Right" in the
product navigator.
Tap to finish.
Operation
Smart operation - Groups 2
1
4
6
8
2
3
5
7
2
1
2
1
2
1
VELUX INTEGRA®
KLR 200
VELUX 25
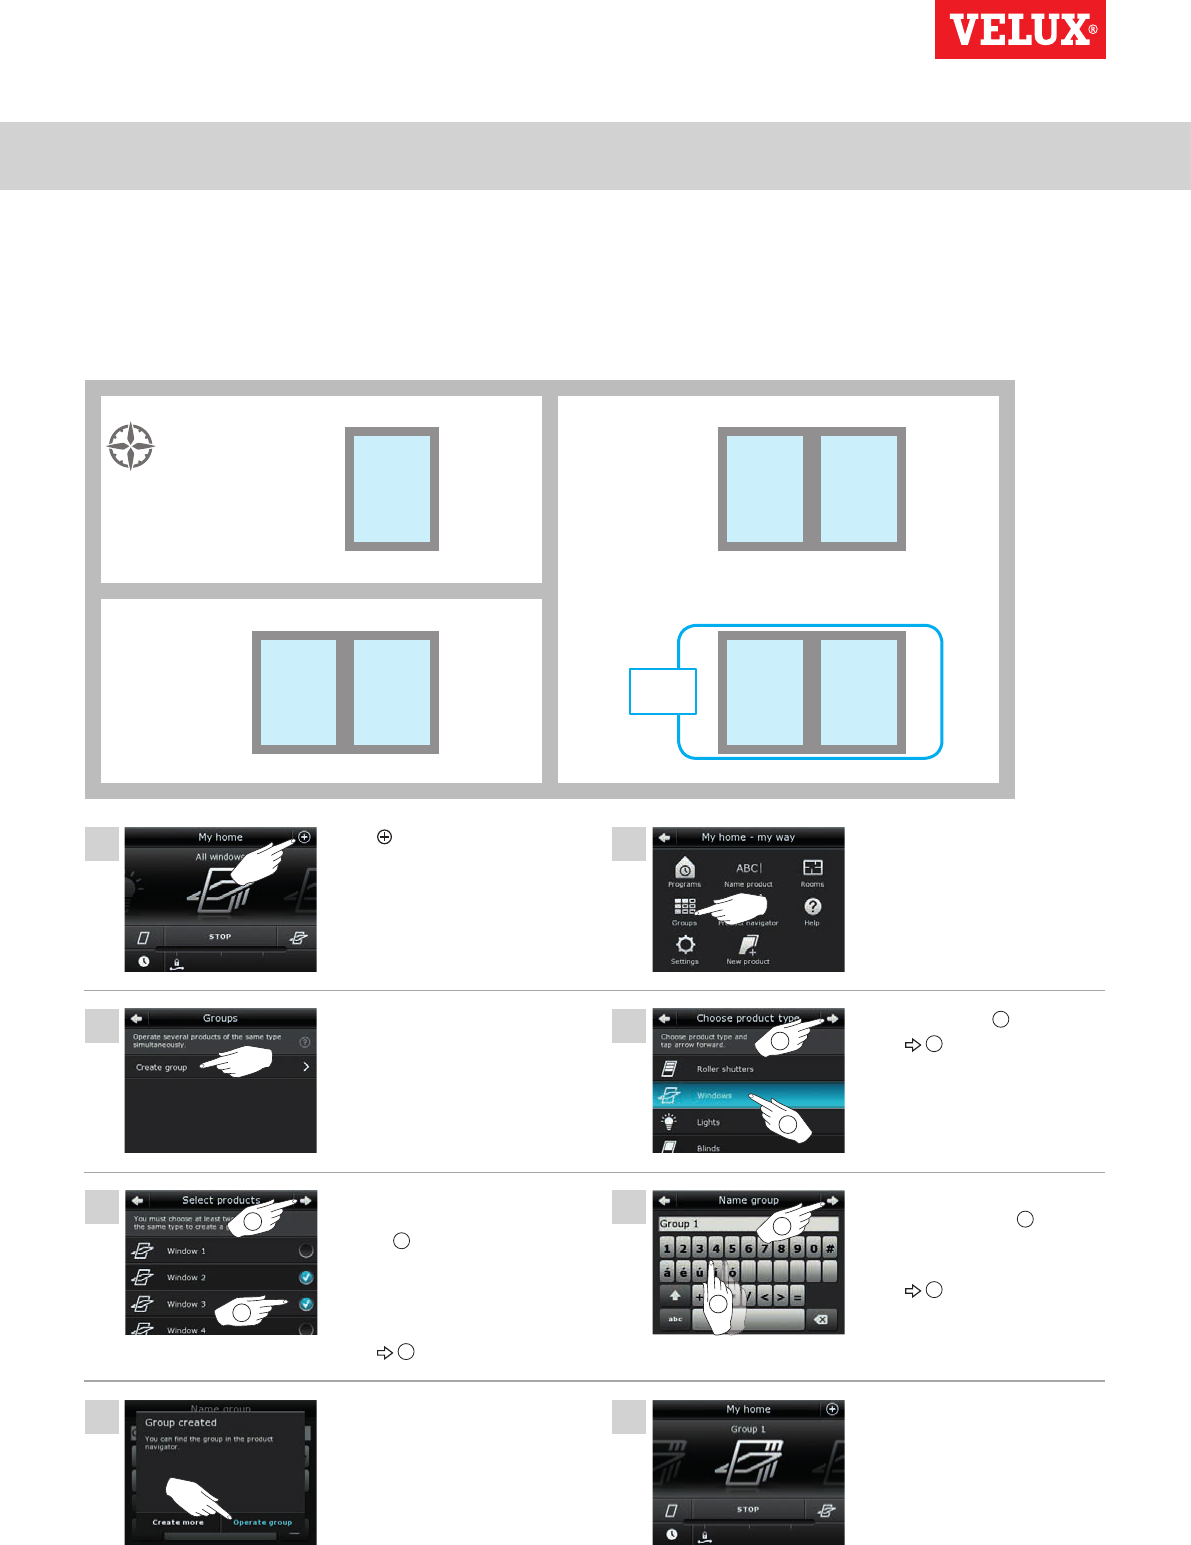
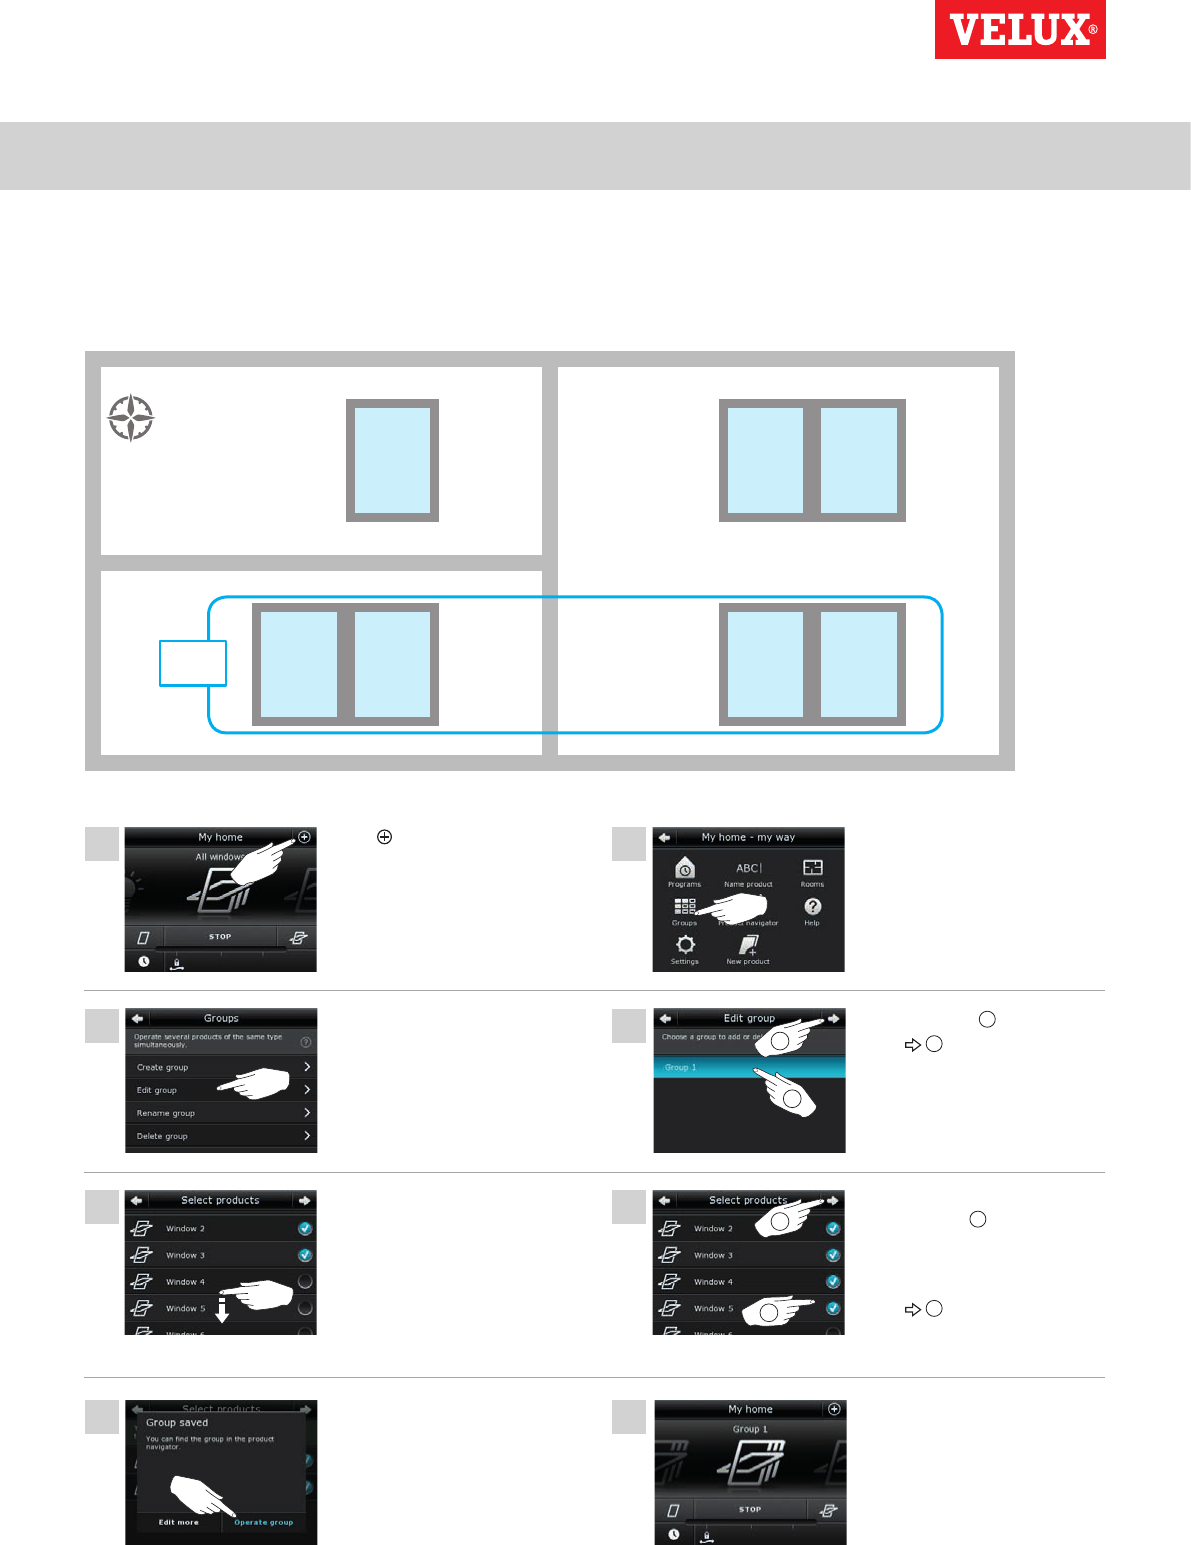
Creating a group
If you have several products of the same type, you can operate them simultaneously by grouping them. For instance, you can open
and close all windows facing south or all windows in a room at the tap on a button.
The example shows how to create the group "Group 1" containing Window 2 and Window 3.
Tap .Tap "Groups".
Tap "Windows" 1.
Tap 2.
Enter a name for the group, in
this case "Group 1" 1.
For use of keyboard, see the
section Keyboard.
Tap 2.
You can find the group
"Group 1" in the product
navigator.
Tap "Create group".
Scroll down the display and tick
the windows to be included in the
group 1.
Note: The individual products
can be identified by tapping the
icon. See also the section Finding
products.
Tap 2.
Tap "Operate group" to finish.
Note: Tap "Create more" to cre-
ate more settings.
Blind 2
Light 3 Light 1
Blind 1Venetian blind 1
Window
6
Window
7
Window
1
Roller shutter 2 Roller shutter 4
Light 2 Light 4
Roller shutter 1 Roller shutter 3
Window
4
Window
2
Window
5
Window
3
N
Group
1
Operation
Smart operation - Groups 2
1
4
6
2
3
5
7 8
2
1
2
1
VELUX INTEGRA®
KLR 200
VELUX 26
Editing a group
You can change the contents of a group by adding or removing products.
The example shows how to add Window 4 and Window 5 to the group "Group 1" already consisting of Window 2 and Window 3.
Tap .Tap "Groups".
Tap "Group 1" 1.
Tap 2.
You can find the group
"Group 1" containing the ad-
ditional products in the product
navigator.
Tick the windows to be added
to the group 1.
Note: Products can similarly
be removed from a group by
removing the tick.
Tap 2.
Tap "Edit group".
Scroll down the display to find
the relevant windows.
Note: The individual products
can be identified by tapping the
icon. See also the section Finding
products.
Tap "Operate group" to finish.
Note: Tap "Edit more" to create
more settings.
Blind 2
Light 3 Light 1
Blind 1Venetian blind 1
Window
6
Window
7
Window
1
Roller shutter 2 Roller shutter 4
Light 2 Light 4
Roller shutter 1 Roller shutter 3
Window
4
Window
2
Window
5
Window
3
N
Group
1
Operation
Smart operation - Groups 2
1
4
6
2
3
5
7
2
1
2
1
VELUX INTEGRA®
KLR 200
VELUX 27
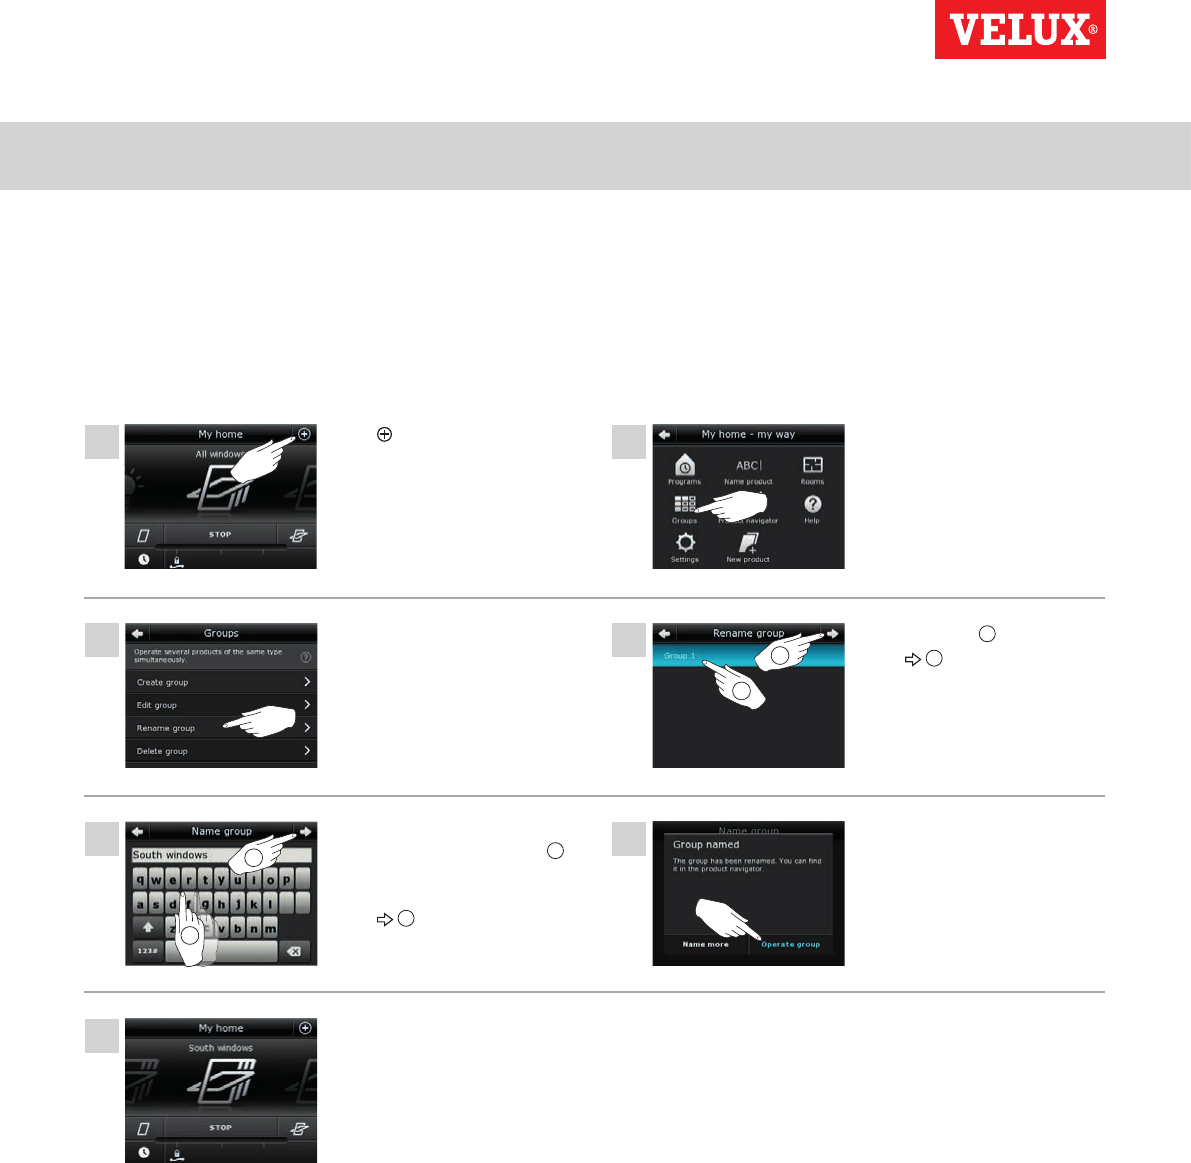
Renaming a group
You can change the name of a group.
The example shows how to change the name "Group 1" into "South windows".
Tap .Tap "Groups".
Tap "Group 1" 1.
Tap 2.
Tap "Operate group" to finish.
Note: Tap "Name more" to cre-
ate more settings.
Tap "Rename group".
Enter a name for the group, in
this case "South windows" 1.
For use of keyboard, see the sec-
tion Keyboard.
Tap 2.
The group is now called "South
windows" in the product navi-
gator.