VELUX America 835403 Remote control User Manual 453347 2014 02 KLR web GB 2 1 indd
VELUX America Inc. Remote control 453347 2014 02 KLR web GB 2 1 indd
Contents
- 1. Quick guide
- 2. User guide-1
- 3. User guide-2
- 4. User guide-3
- 5. warning
User guide-2

Operation
Smart operation - Groups 2
1
4
5
2
3
6
7
2
1
VELUX INTEGRA®
KLR 200
VELUX 28
Deleting a group
You can delete a group if it is not relevant anymore.
The example shows how to delete the group "South windows".
Note: Only the group is deleted. You can still operate the products individually via the product navigator.
Tap .Tap "Groups".
Tap the group to be deleted, in
this case "South windows" 1.
Tap 2.
Tap "Yes".
Tap "Delete group".
Tap to finish.
The group "South windows" is
not in the product navigator
anymore.
However, you can still operate
the products individually via
the product navigator.
Operation
Smart operation - Rooms 2
1
4
6
8
2
3
5
7
22
1
1
VELUX INTEGRA®
KLR 200
VELUX 29
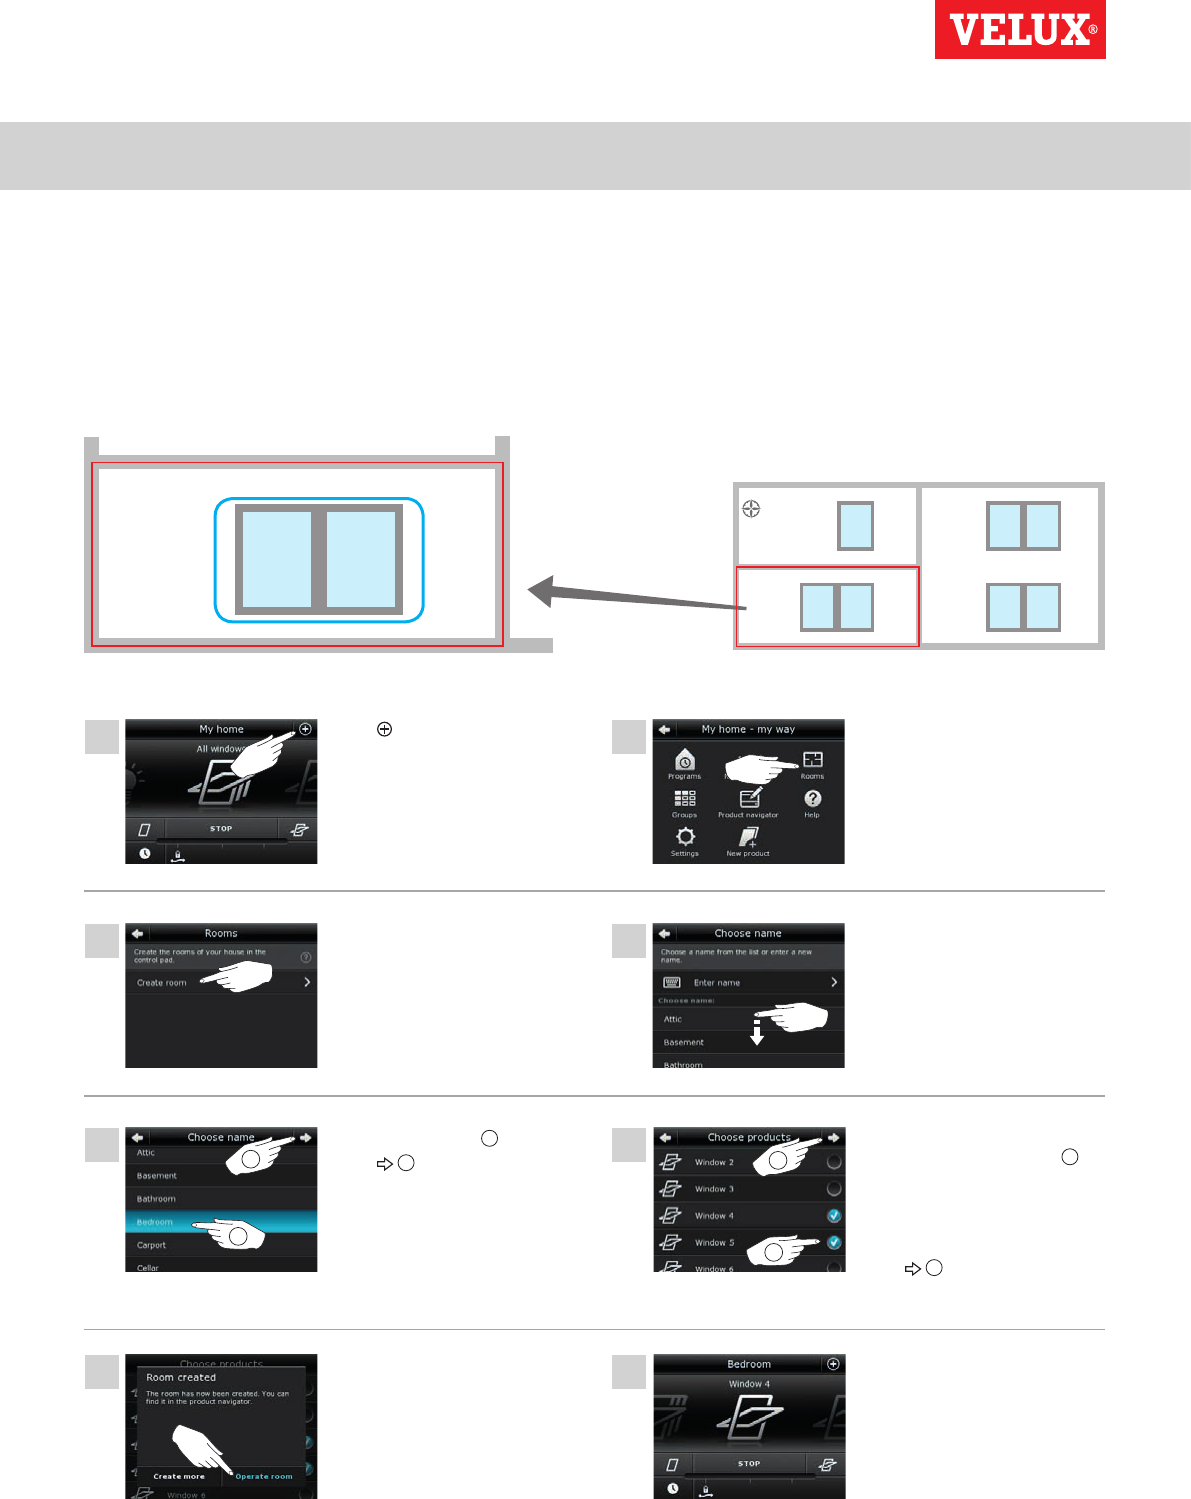
Creating a room
You can create rooms corresponding to the actual rooms in your home, and put your VELUX products in them. This makes it easier to find
and operate the right products.
The example shows how to create the room "Bedroom" including Window 4 and Window 5 in it.
Tap .Tap "Rooms".
Scroll down the display to find a
name for the room on the list.
Note: You can also enter a
name of your own by tap-
ping "Enter name". For use
of keyboard, see the section
Keyboard.
Scroll down the display and tick
the windows in the room 1.
Note: The individual products
can be identified by tapping the
icon. See also the section Find-
ing products.
Tap 2.
You can now find the room
"Bedroom" in the product
navigator.
Tap "Create room".
Select "Bedroom" 1.
Tap 2.
Tap "Operate room" to finish.
Note: Tap "Create more" to cre-
ate more settings.
Roller shutter 2 Roller shutter 1
Window
4
Window
5
Blind 2
Light 3 Light 1
Blind 1Venetian blind 1
Window
6
Window
7
Window
1
Roller shutter 2 Roller shutter 4
Light 2 Light 4
Roller shutter 1 Roller shutter 3
Window
4
Window
2
Window
5
Window
3
Bedroom
N
Operation
Smart operation - Rooms 2
1
4
6
8
2
3
5
7
2
2
1
1
VELUX INTEGRA®
KLR 200
VELUX 30
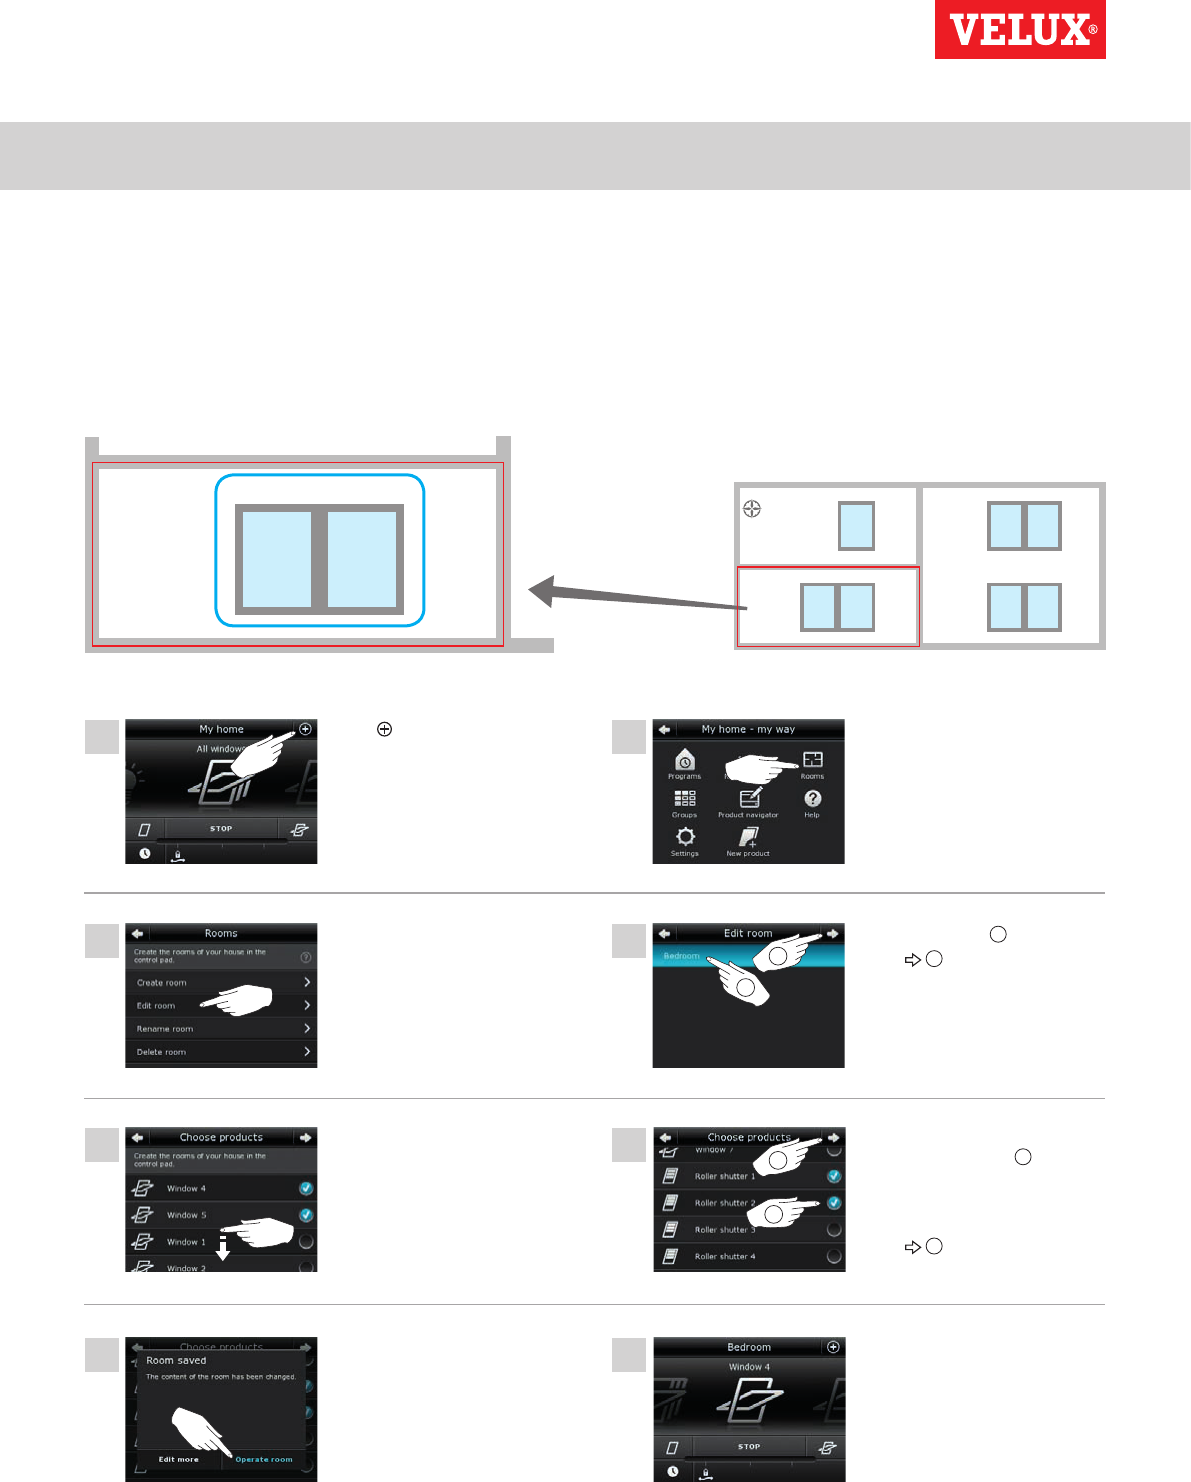
Tap .Tap "Rooms".
Tap "Bedroom" 1.
Tap 2.
Tick the roller shutters to be
added to the room 1.
Note: Products can similarly be
removed from a room by remov-
ing the tick.
Tap 2.
You can now see the changed
contents of the room
"Bed room" in the product
navigator.
Tap "Edit room".
Scroll down the display to find
the roller shutters in the room.
Note: The individual products
can be identified by tapping the
icon. See also the section Finding
products.
Tap "Operate room" to finish.
Note: Tap "Edit more" to create
more settings.
Editing a room
You can change the contents of a room by adding or removing products.
The example shows how to add Roller shutter 2 and Roller shutter 1 to the room "Bedroom" already consisting of Window 4 and
Window 5.
Roller shutter 2 Roller shutter 1
Window
4
Window
5
Blind 2
Light 3 Light 1
Blind 1Venetian blind 1
Window
6
Window
7
Window
1
Roller shutter 2 Roller shutter 4
Light 2 Light 4
Roller shutter 1 Roller shutter 3
Window
4
Window
2
Window
5
Window
3
Bedroom
N

Operation
Smart operation - Rooms 2
1
4
6
8
2
3
5
7
2
1
2
1
VELUX INTEGRA®
KLR 200
VELUX 31
Renaming a room
You can change the name of a room.
The example shows how to change the name "Bedroom" into "Child's room".
Tap .Tap "Rooms".
Tap "Bedroom" 1.
Tap 2.
Select "Child's room" 1.
Tap 2.
The room is now called "Child's
room" in the product navigator.
Tap "Rename room".
Scroll down the display to find a
name for the room on the list.
Note: You can also enter a name
of your own by tapping "Enter
name". For use of keyboard, see
the section Keyboard.
Tap "Operate room" to finish.
Note: Tap "Rename more" to
create more settings.
Operation
Smart operation - Rooms 2
1
4
5
7
2
3
6
2
1
VELUX INTEGRA®
KLR 200
VELUX 32
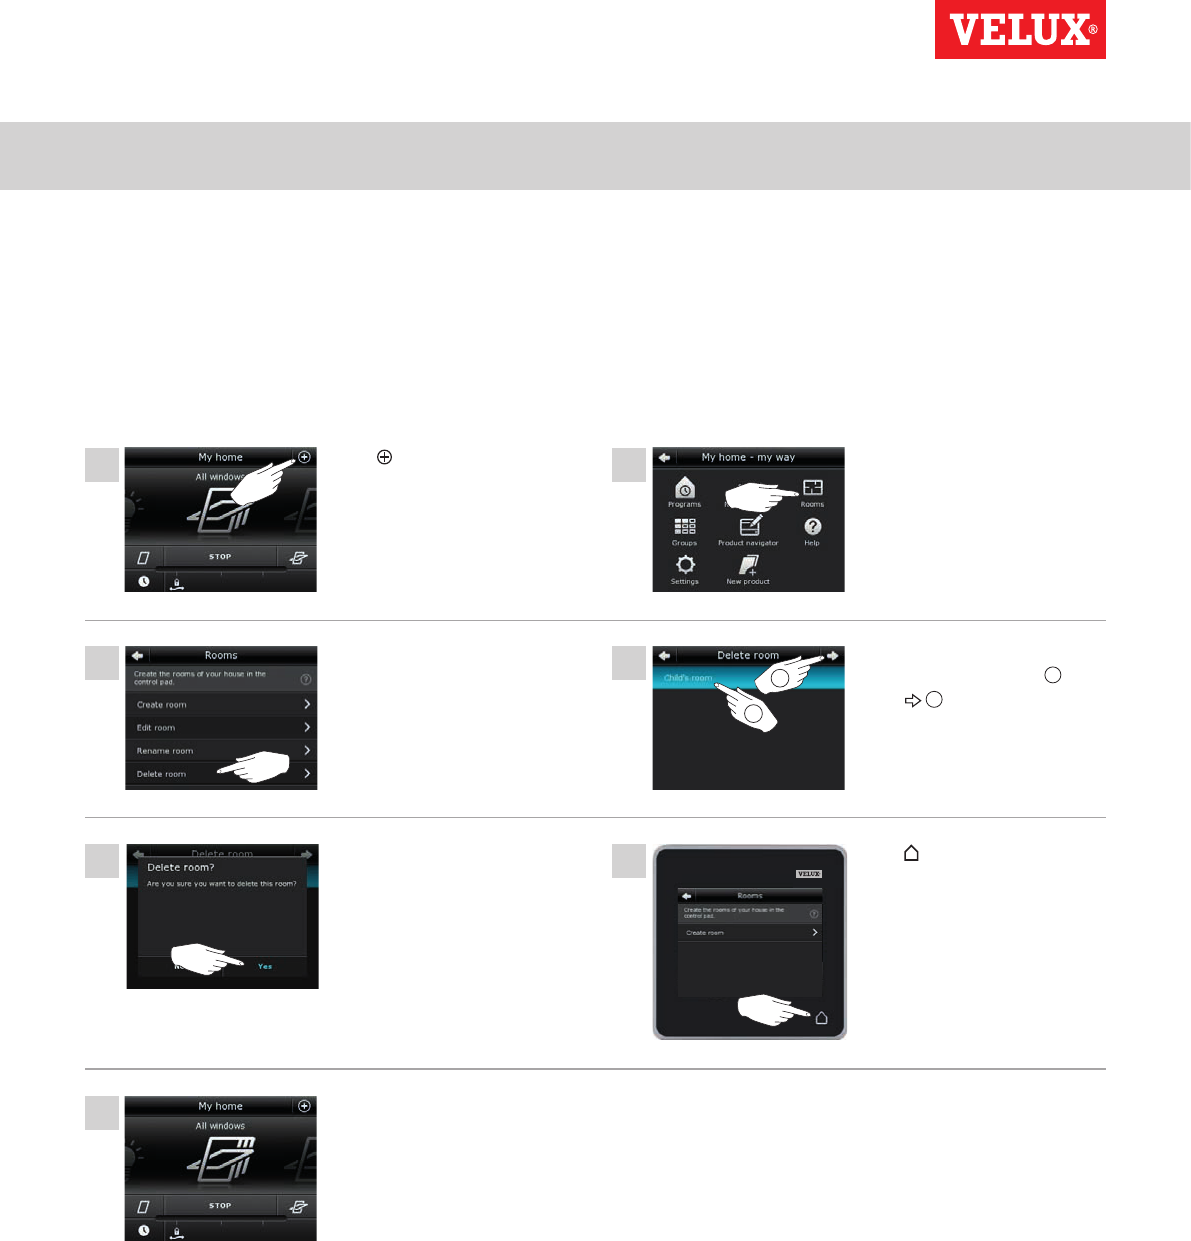
Deleting a room
You can delete a room if it is not relevant anymore.
The example shows how to delete the room "Child's room".
Note: Only the room is deleted. You can still operate the products individually via the product navigator.
Tap .Tap "Rooms".
Tap the room to be deleted, in
this case "Child's room 1.
Tap 2.
Tap "Yes".
Tap "Delete room".
Tap to finish.
The room "Child's room" is
not in the product navigator
anymore.
However, you can still operate
the products individually via
the product navigator.
Operation
Smart operation - Favourites 2
1
4
5
7
9
11
2
3
6
8
10
12
VELUX INTEGRA®
KLR 200
VELUX 33
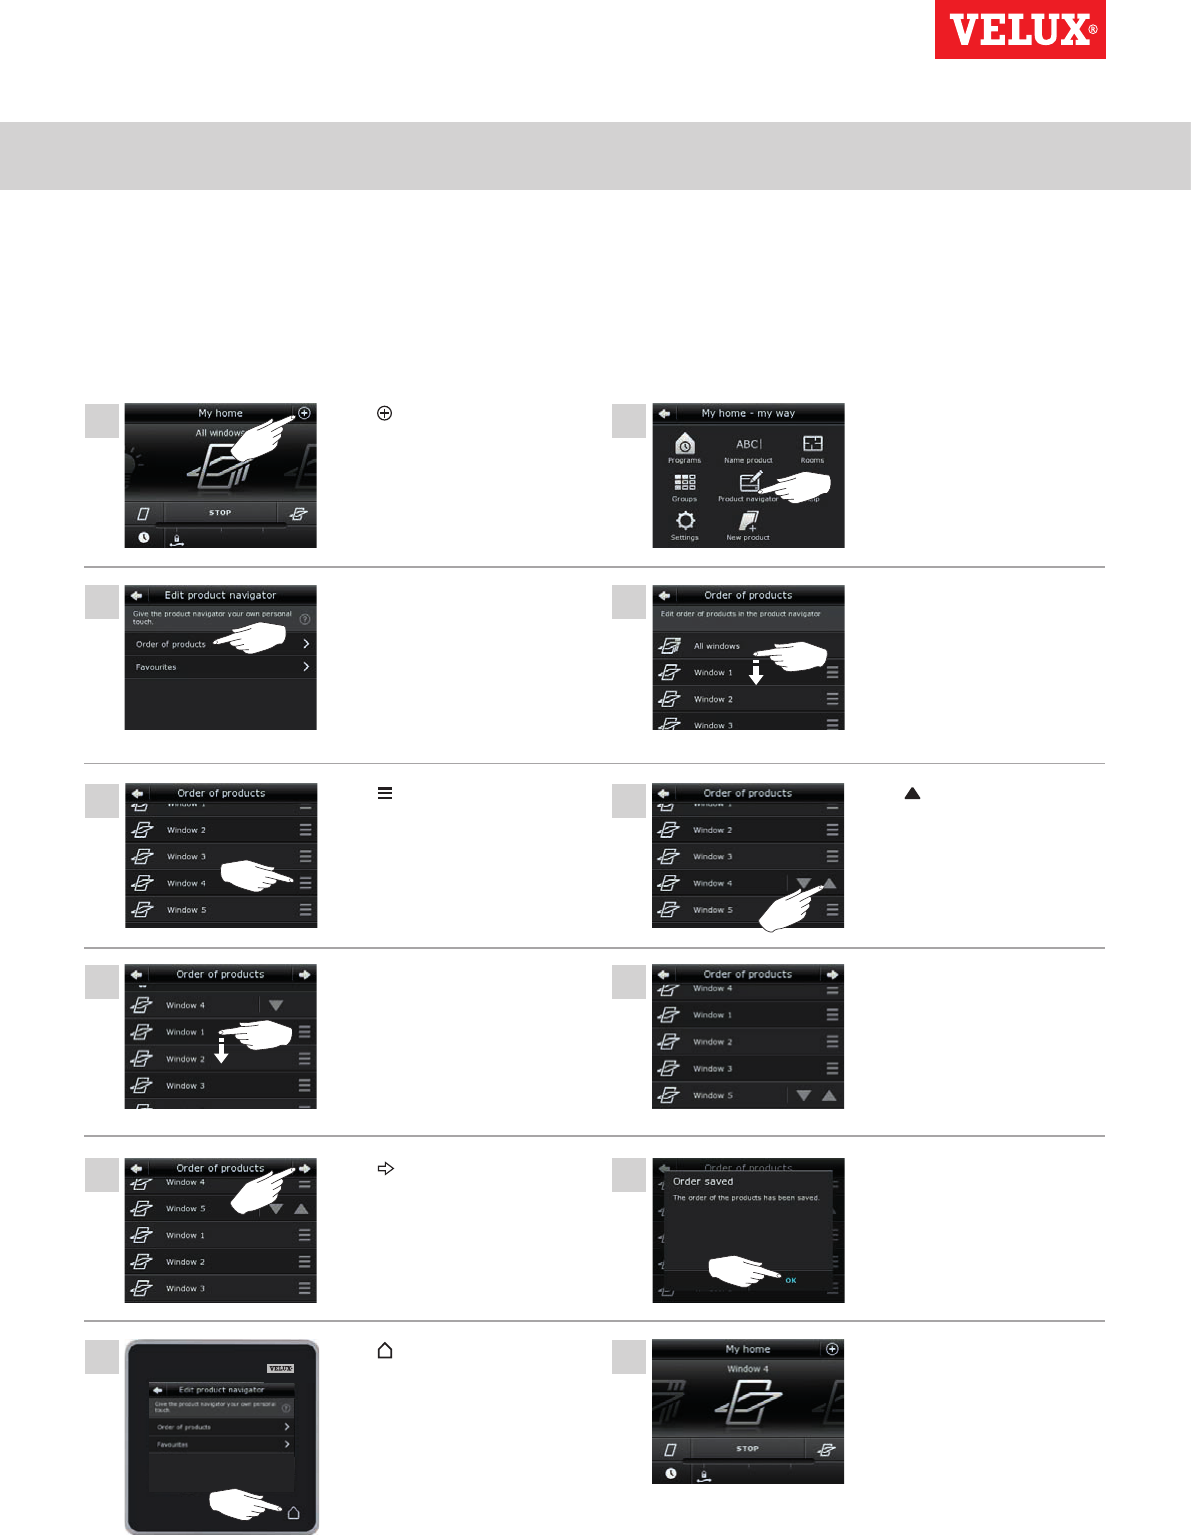
Tap .Tap "Product navigator".
Scroll down the display to find
the relevant product, in this
case "Window 4".
Note: The individual products
can be identified by tapping the
icon. See also the section Find-
ing products.
Tap .
Tap "Order of products".
Tap three consecutive times
to put Window 4 in front of
Window 1.
Tap to finish.
Scroll down the display to find
the relevant product, in this
case "Window 5".
Note: The individual products
can be identified by tapping the
icon. See also the section Find-
ing products.
Complete the actions in items
5 and 6 for Window 5 to put it
beneath Window 4.
Tap .Tap "OK".
Window 4 and Window 5 are
now at the top of the product
navigator.
Editing order of products in the product navigator
If you use some products, groups or programs more often than others, it may be convenient to show them in another order in the product
navigator.
The example shows how to put the products Window 4 and Window 5 first in the product navigator.
Operation
Smart operation - Favourites 2
1
4
5 6
7 8
9
2
3
VELUX INTEGRA®
KLR 200
VELUX 34
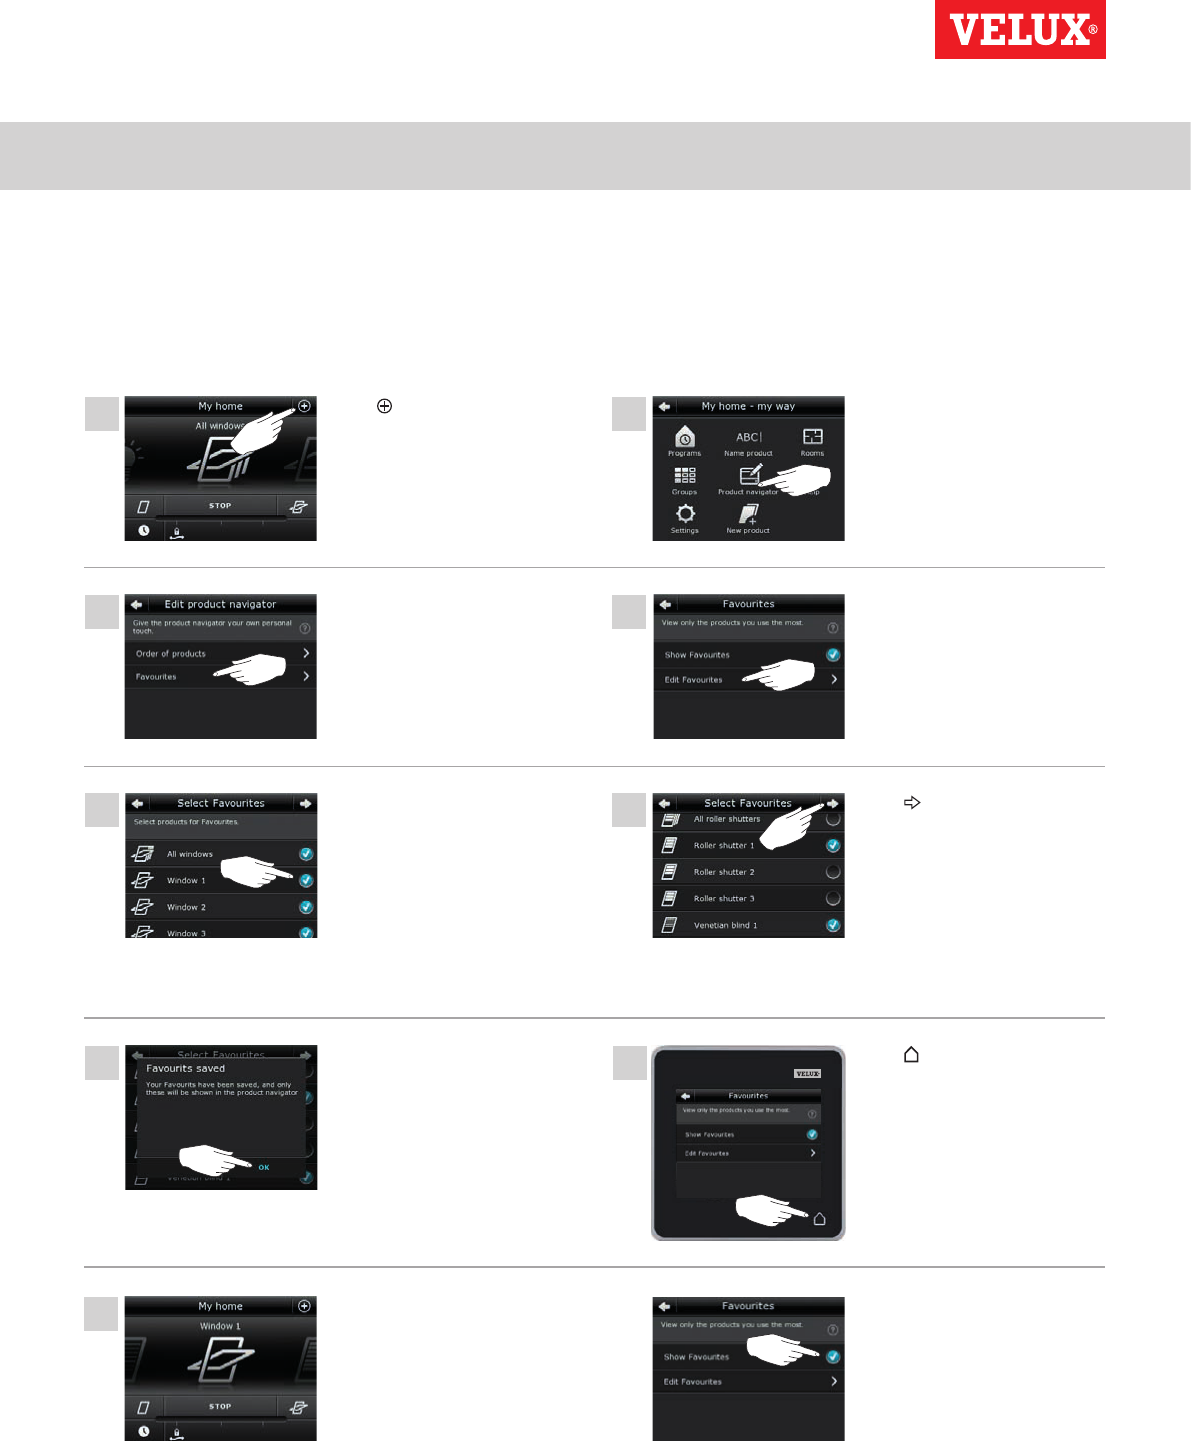
Editing favourites
When activating the function "Favourites", the product navigator only shows the products, groups and/or programs you use most often.
You can at any time choose to see all your products, groups and/or programs again.
The example shows how to choose Window 1, Roller shutter 1 and Venetian blind 1 as favourites. In consequence, these products will be
the only ones shown in the product navigator. This may be convenient if the control pad is only to be used in the room where these prod-
ucts are located.
Tap .Tap "Product navigator".
Tap "Edit favourites".
As default all products have
been chosen as favourites.
Remove the tick for all products
not to be favourites.
Note: The individual products
can be identified by tapping the
icon. See also the section Find-
ing products.
Tap "Favourites".
The product navigator now
shows the three chosen prod-
ucts only.
Tap when only the products
to be favourites remain ticked,
in this case Window 1, Roller
shutter 1 and Venetian blind 1.
Tap "OK". Tap to finish.
To be able to see all products
again, you must remove the tick
for "Show favourites" in item 8.
Operation
Operation without using the control pad 2
VELUX INTEGRA®
KLR 200
VELUX 35
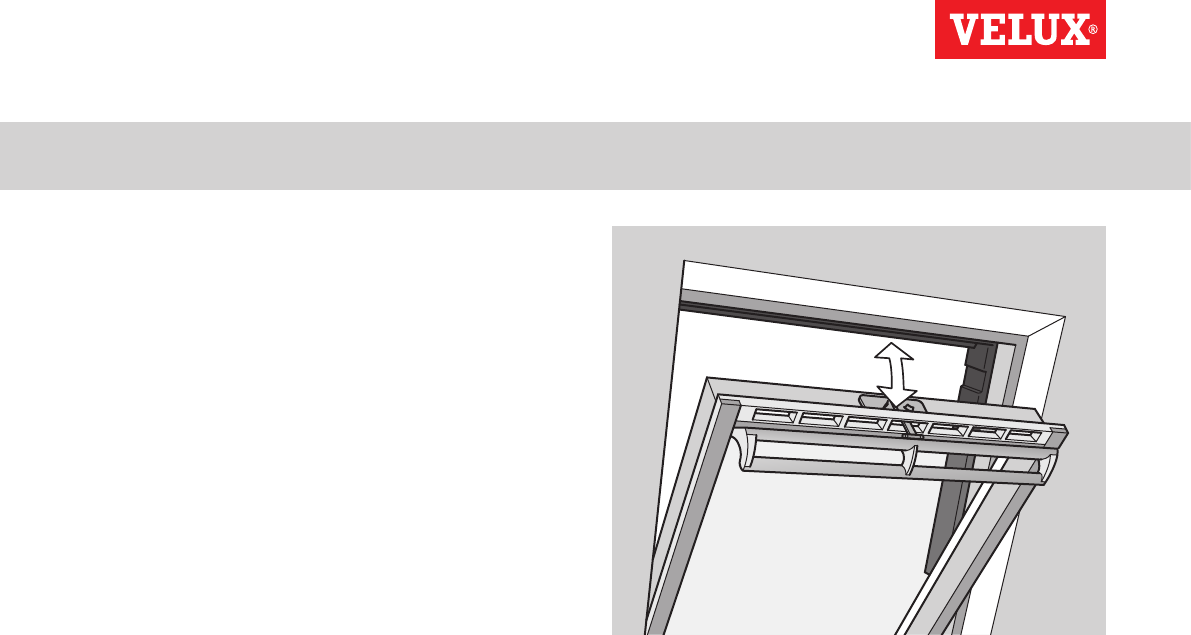
Manual operation of centre-pivot windows
You can open and close your centre-pivot window manually.
If the window is already open, you must close it fully via the con-
trol pad first.
• Open the window by pulling downwards on the control bar of
the window.
• Close the window again by pushing the control bar back again.
Note: If you have opened the window manually, you must also
close it manually to be able to operate it with the control pad
again. This also applies to making the programs run and the win-
dow close automatically in case of rain.
Operation
Operation without using the control pad 2
2
1
A
A
3
B
B
1
2
VELUX INTEGRA®
KLR 200
VELUX 36
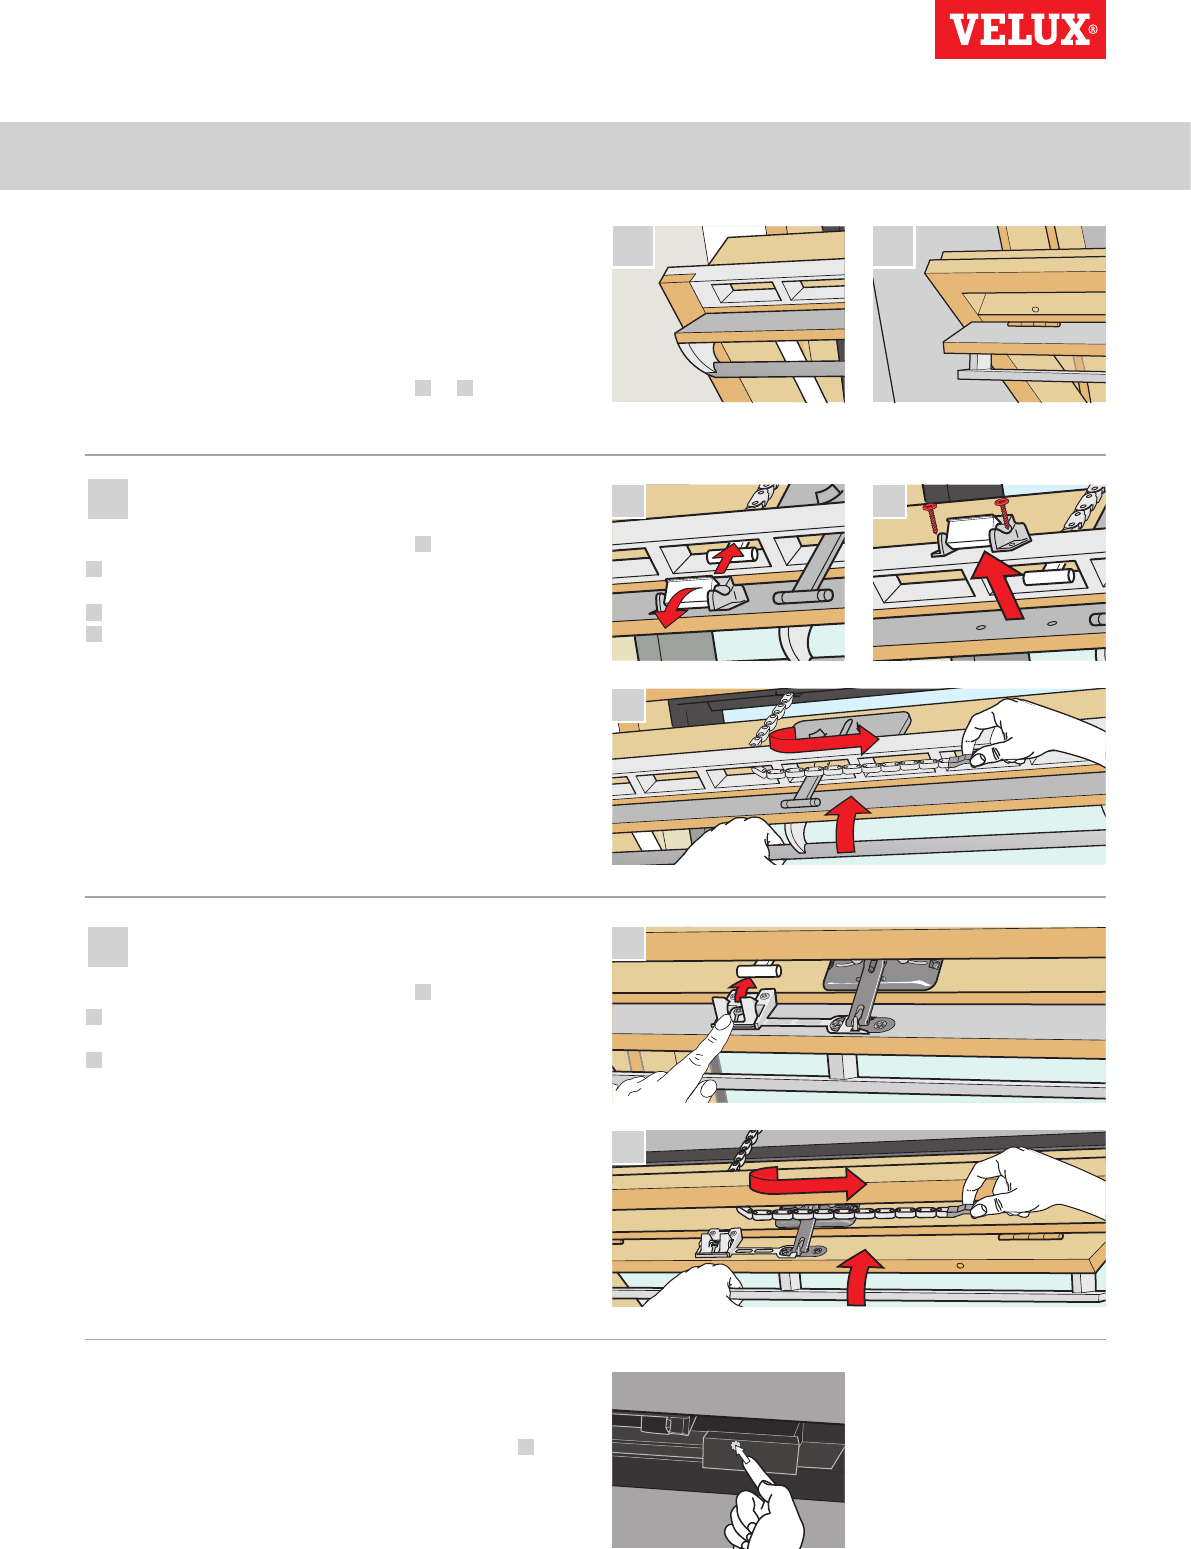
Closing centre-pivot windows in case of power failure or dis-
charged battery
In case of power failure or discharged battery, you can close your
centre-pivot window manually by disengaging the chain on the venti-
lation flap of the window.
There are two different ways of doing this, depending on window
type, where the ventilation flap can look like A or B. See below on
how to disengage the chain on the ventilation flap according to your
window type.
The ventilation flap of the window looks like A:
1 Disengage the chain by pressing the release clip on the flap
bracket.
2 Remove the flap bracket.
3 Fold the chain as shown, and close the ventilation flap of the
window to ventilation position.
The ventilation flap of the window looks like B:
1 Disengage the chain by pressing the release clip on the flap
bracket.
2 Fold the chain as shown, and close the window manually.
When the power has been reconnected or the battery has been
recharged, you must re-engage the chain.
• Open the window manually and unfold the chain.
• Replace the flap bracket if the ventilation flap looks like A.
• Run back the chain by pressing the test button on the window
operator briefly.
• Close the window manually.
Operation
Operation without using the control pad 2
A
B
2
1
1
1
2
2
VELUX INTEGRA®
KLR 200
VELUX 37
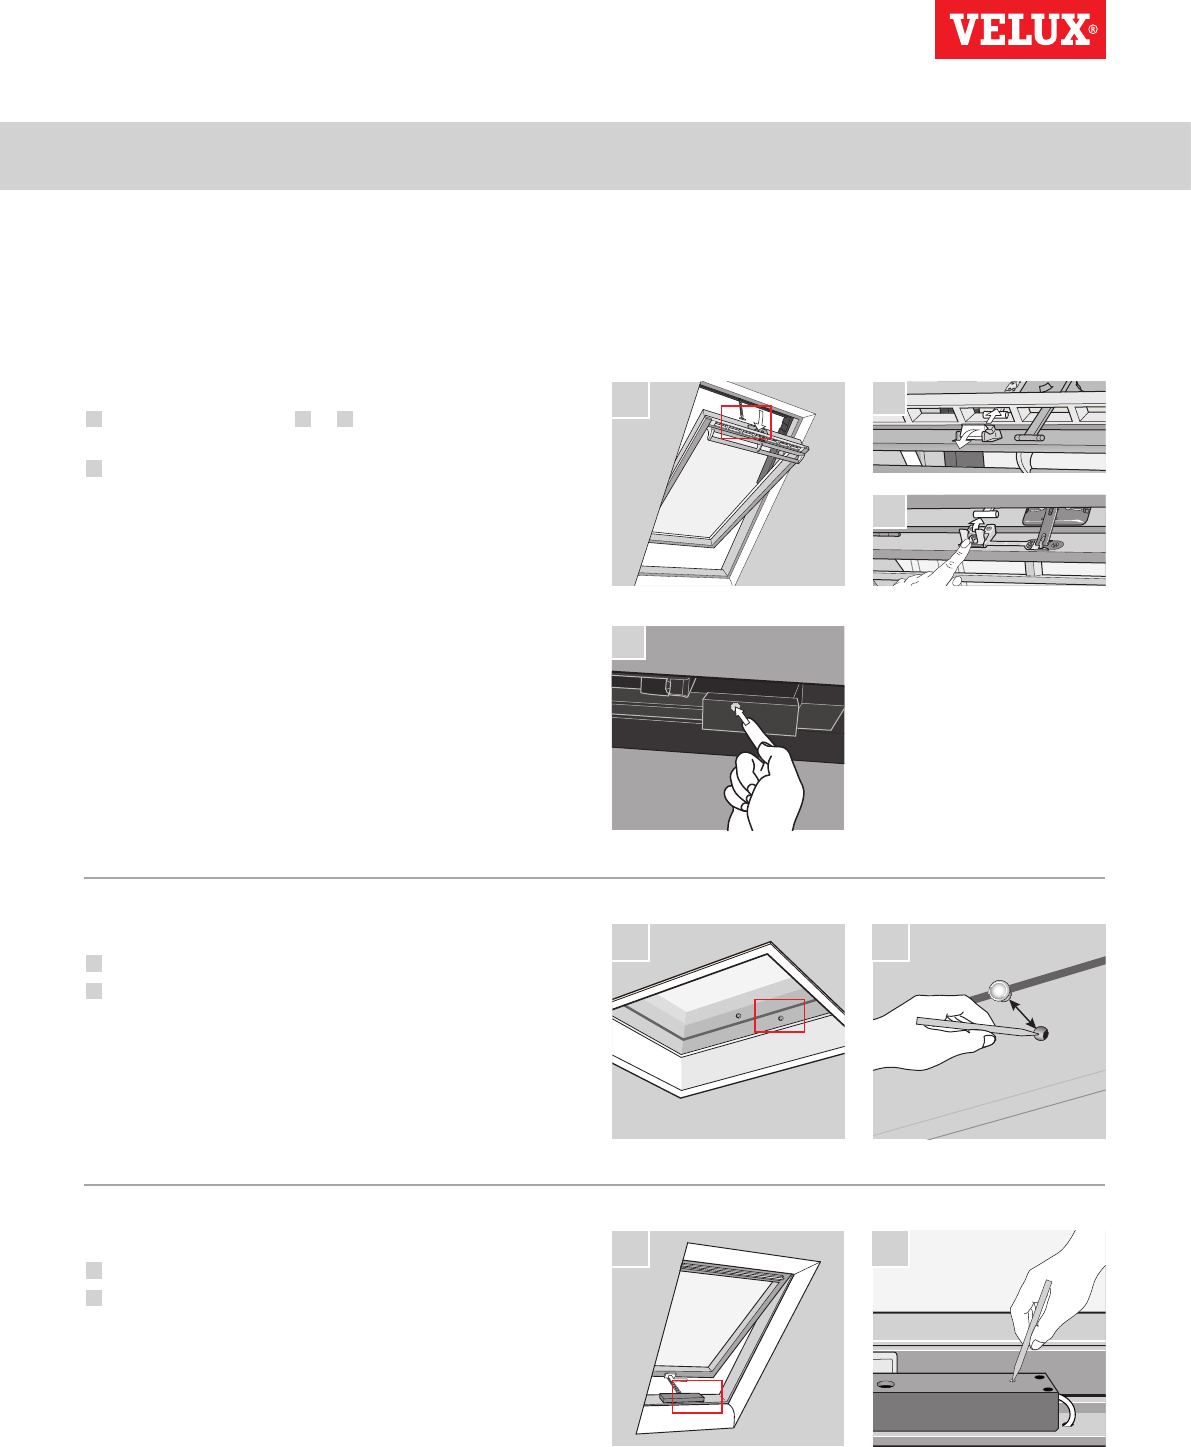
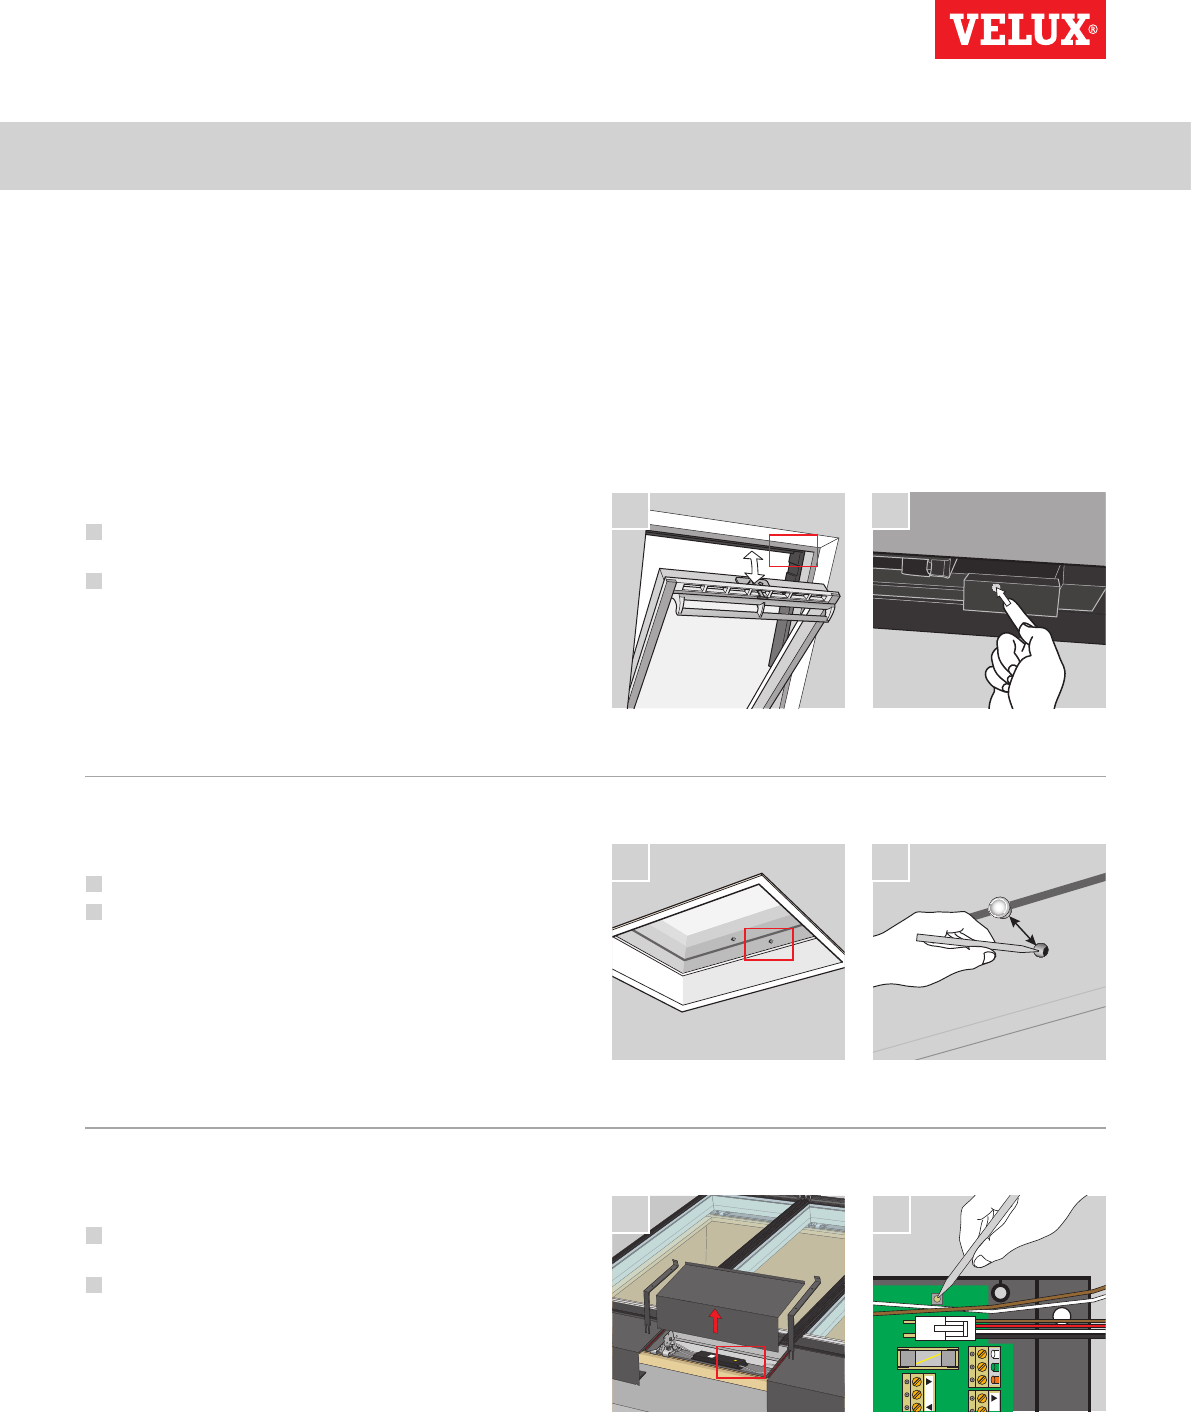
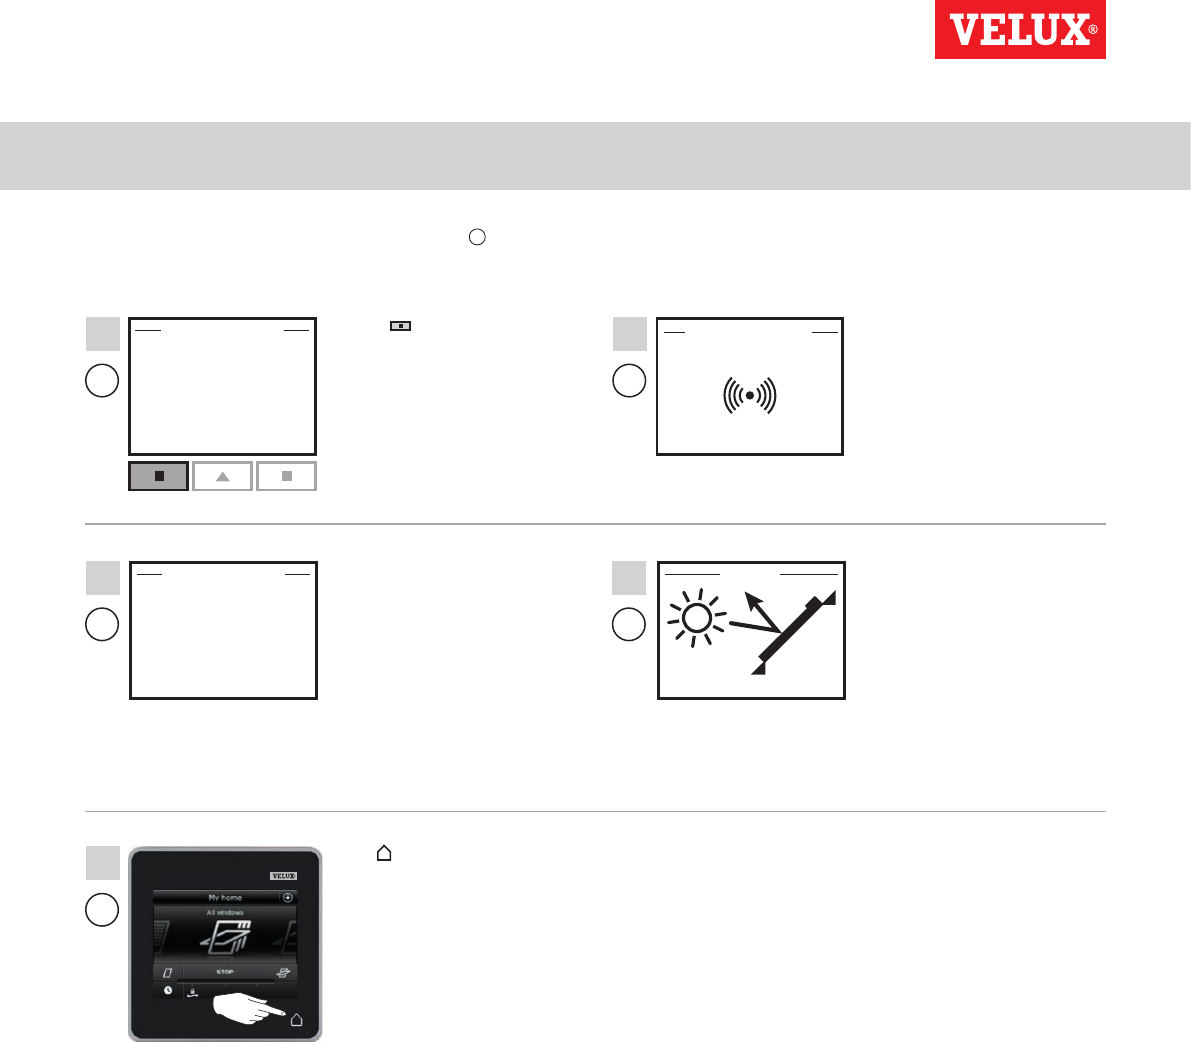
Centre-pivot windows
1 Determine window type A or B as shown on the previous
page. Disengage the chain according to window type.
2 Press the test button on the window operator briefly. Wait
until the chain stops moving then close the window manually.
Flat roof windows
1 Carefully remove the cover cap on the kerb.
2 Press the test button on the window operator behind the cover
cap briefly and refit the cover cap.
Top-hung windows
1 Remove the cover of the window operator.
2 Press the test button on the window operator briefly and refit
the cover.
Closing windows if the control pad has been mislaid
If your control pad has been mislaid, you can still close your window by carrying out the following actions.
Note: This feature is only available for the products shown.
1
2
3
1
2 3
4 5
VELUX INTEGRA®
KLR 200
VELUX 38
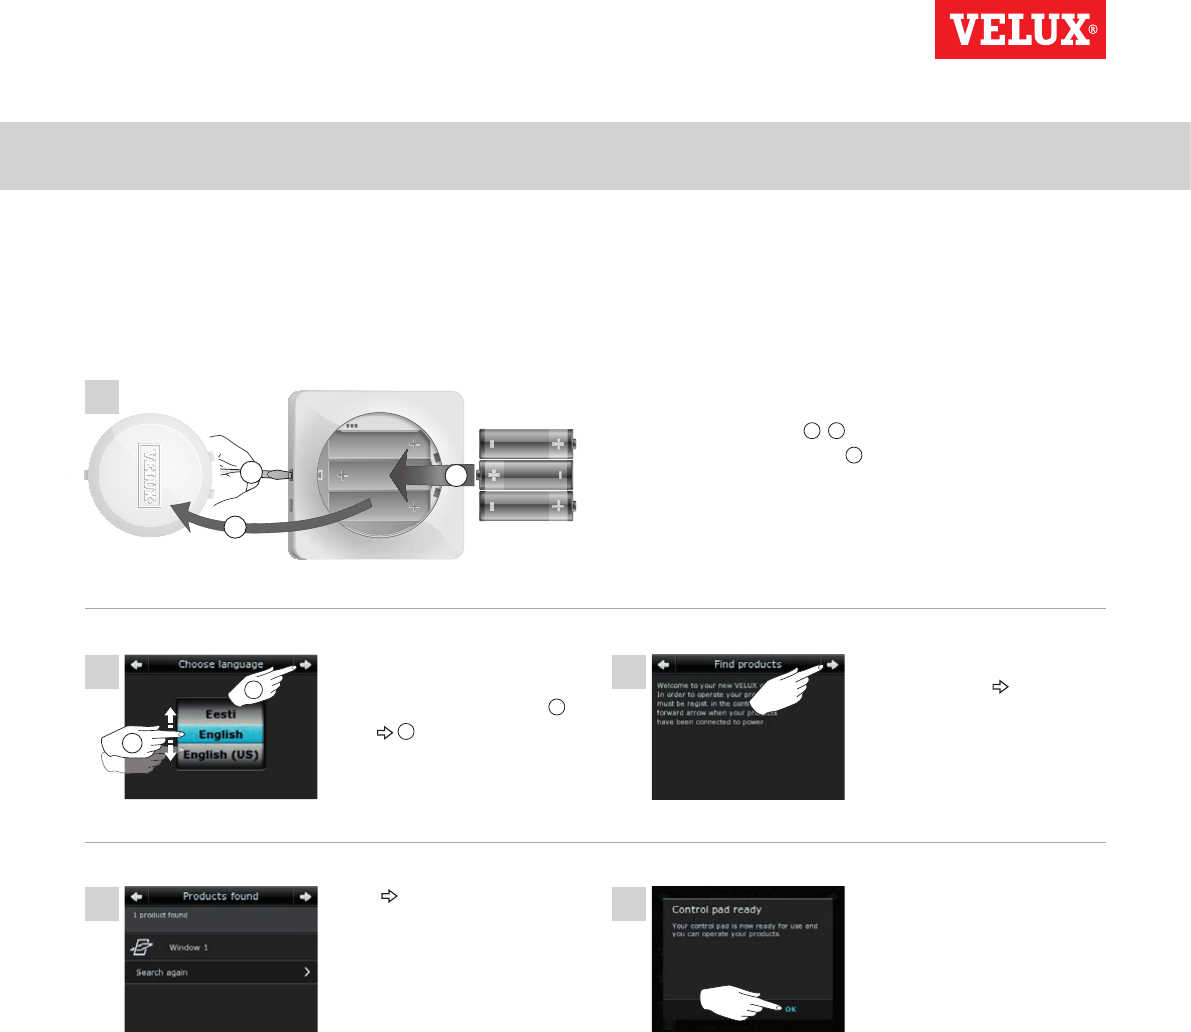
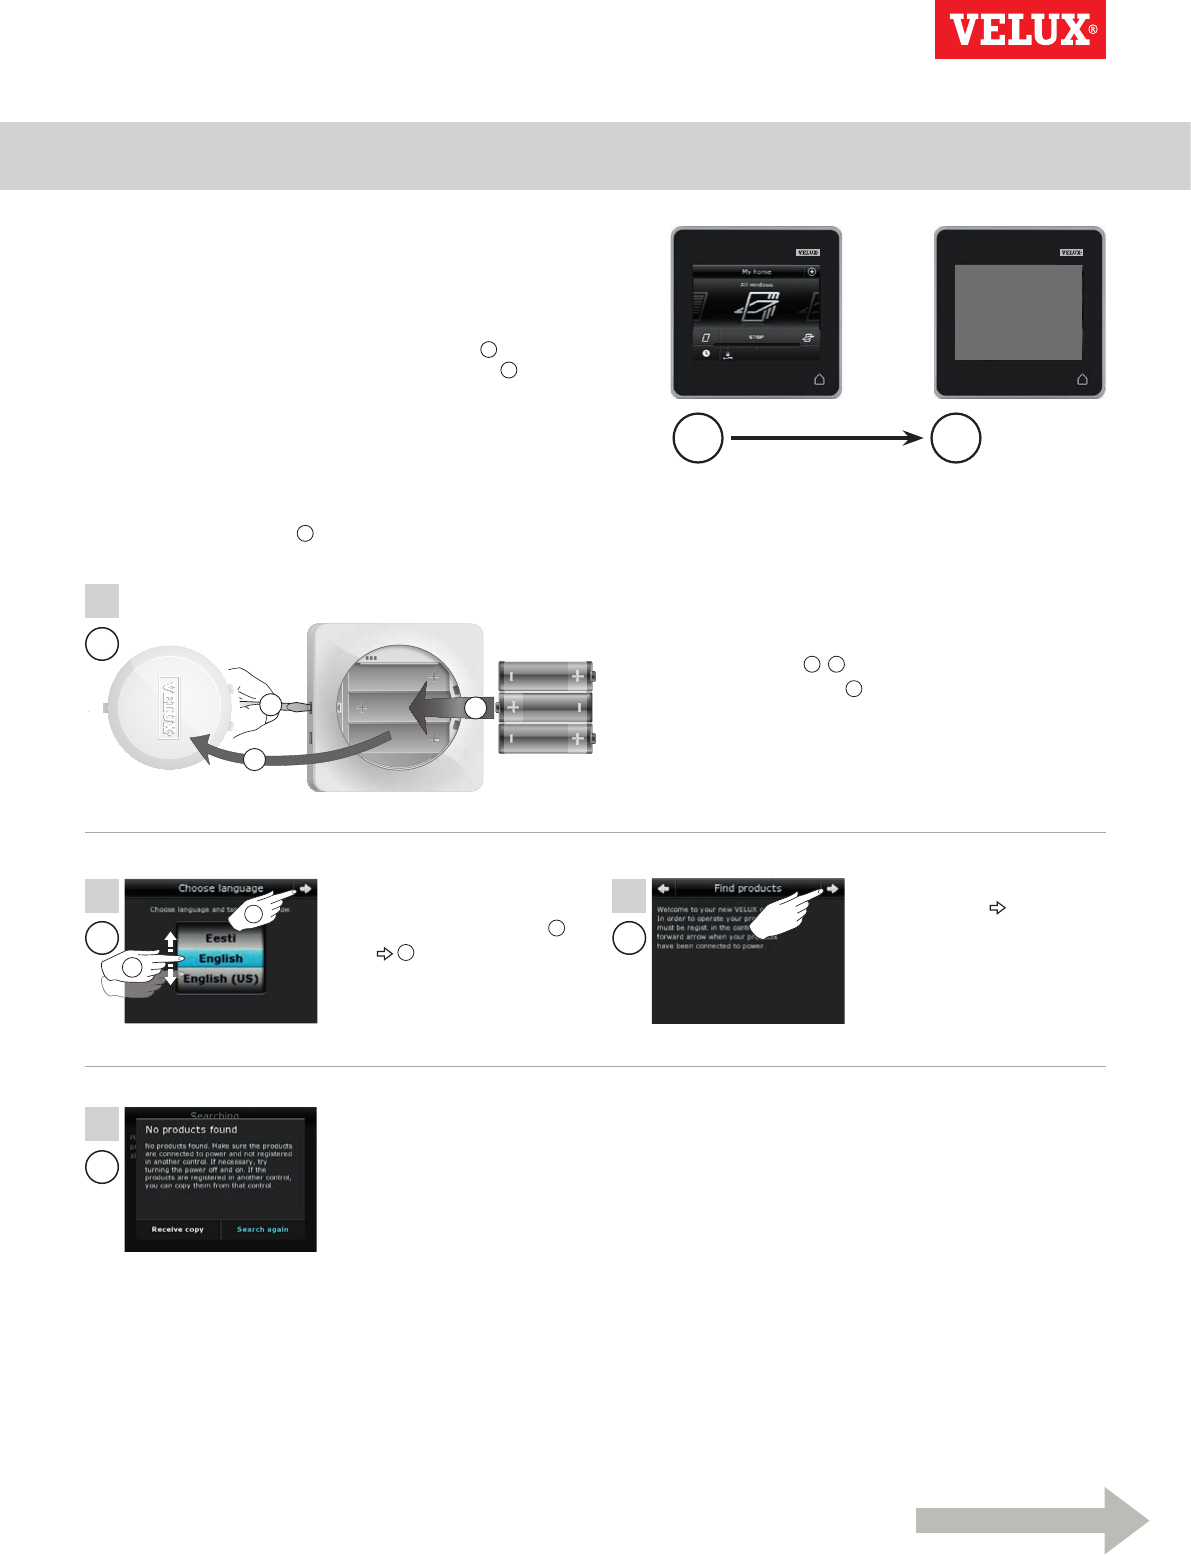
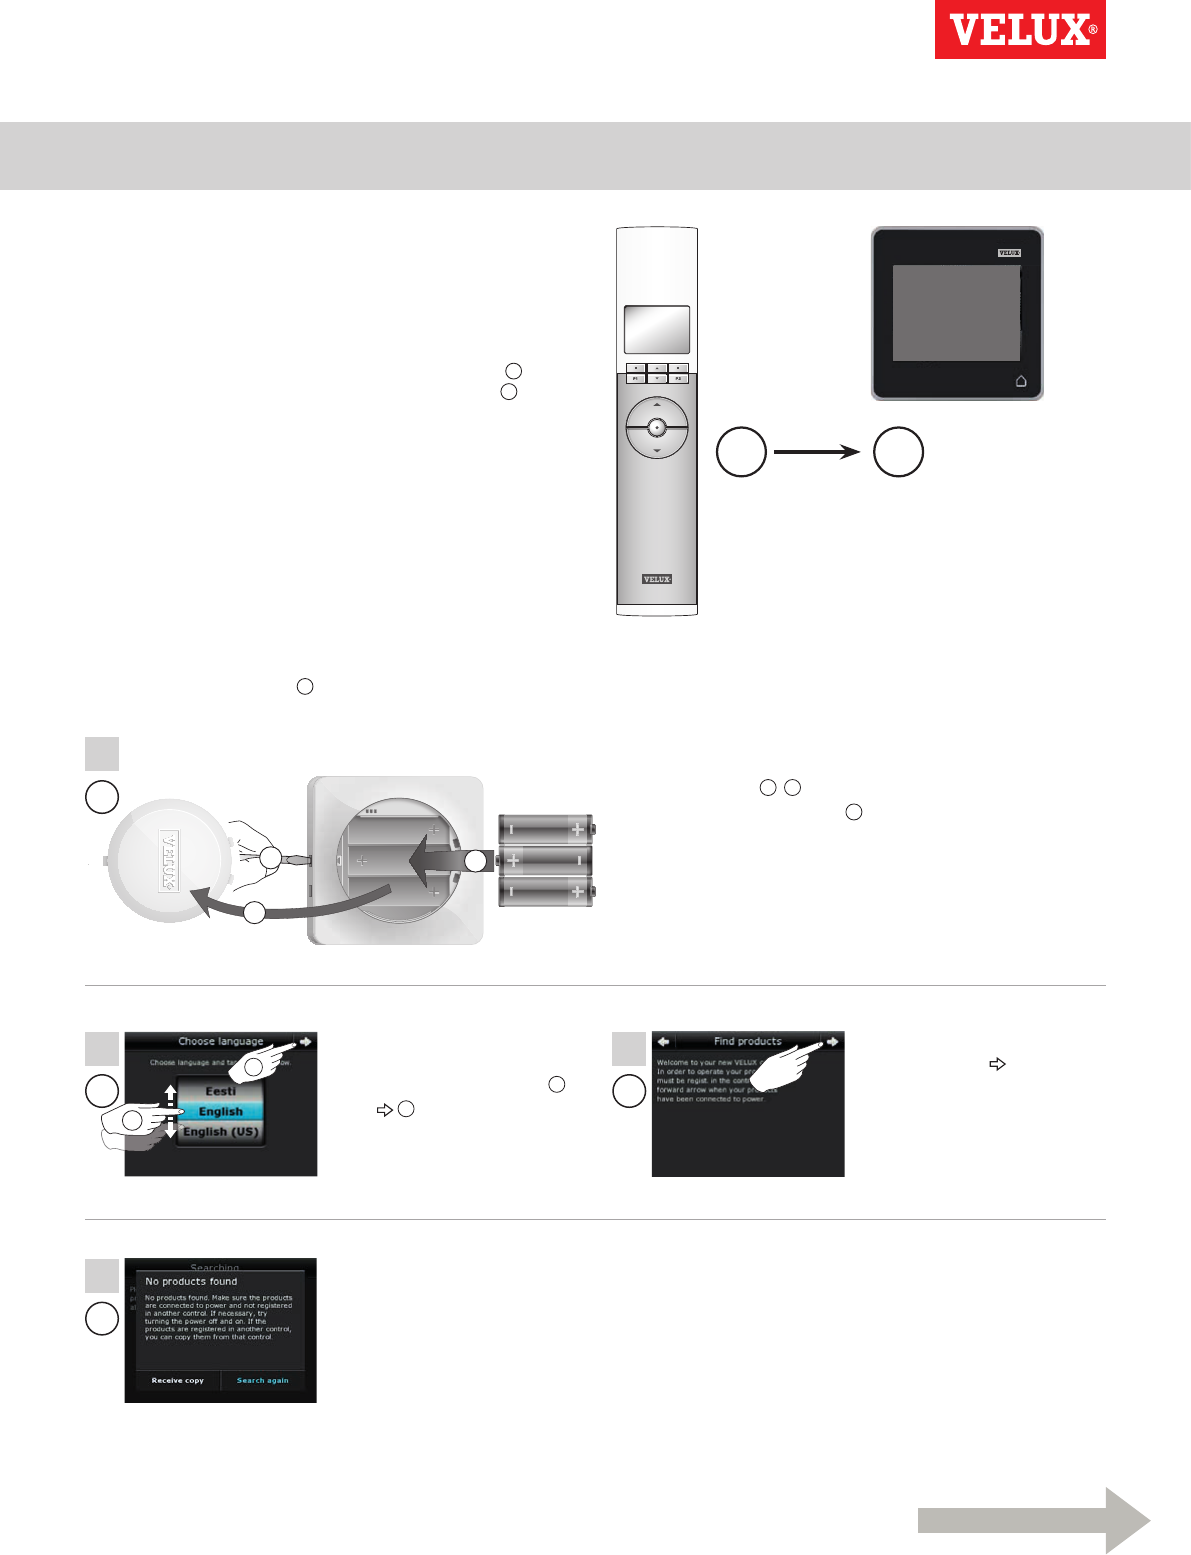
Initial set-up
Before you can operate your VELUX INTEGRA® products, they must be registered in the control pad.
Remove the battery compartment lid
by pressing the release button with a
screwdriver as illustrated 1, 2.
Insert batteries (type AA/LR6) 3.
Replace lid.
Follow the instructions in the
display, and tap when you
are ready.
Tap when the control pad
has found all products.
Note: Tap "Search again" if
the control pad did not find
all products and follow the
instructions in the display. Go
to the section If the initial set-
up fails if the control pad still
cannot find all products even if
they are connected to power.
In the display screen, roll the
wheel in the directions of the
arrows to choose language 1.
Tap 2.
Tap "OK".
Setting up
Start-up of a new VELUX INTEGRA® system 3
1
2
O
INT
1
1
1
2
2
2
VELUX INTEGRA®
KLR 200
VELUX 39
Centre-pivot windows
1 Open window manually (if the window is already open, close it
by pressing the test button on the window operator).
2 Press the test button on the window operator for at least
10 seconds.
The window operator and other electrical products on the
window will run briefly back and forth. Frame lights, if installed,
will flash briefly.
Flat roof windows
1 Carefully remove the cover cap on the kerb.
2 Press the test button on the window operator behind the cover
cap for at least 10 seconds.
The window operator and other electrical products on the
window will run briefly back and forth. Refit cover cap.
Modular skylights
1 Remove bottom flashing section from the modular skylight and
unscrew the small, right-hand cover of the control unit.
2 Press the reset button in the control unit for 6-10 seconds.
Screw on the cover again and refit bottom flashing section.
Note: As registration in the control pad must take place within
10 minutes, you are advised to register the products before refit-
ting bottom flashing section.
If the initial set-up fails
If the control pad cannot find some of the products, you can make the products ready for registration by manually resetting them to their
initial factory settings.
Note: Reset products cannot be operated until they have been registered in the control pad. See the section Initial set-up.
Products can be reset in different ways, depending on window type.
Note: Contact your local VELUX sales company for reset of products not shown.
Setting up
Start-up of a new VELUX INTEGRA® system 3
Setting up
Extension of your VELUX INTEGRA® system 3
1
4
2
3
5
VELUX INTEGRA®
KLR 200
VELUX 40
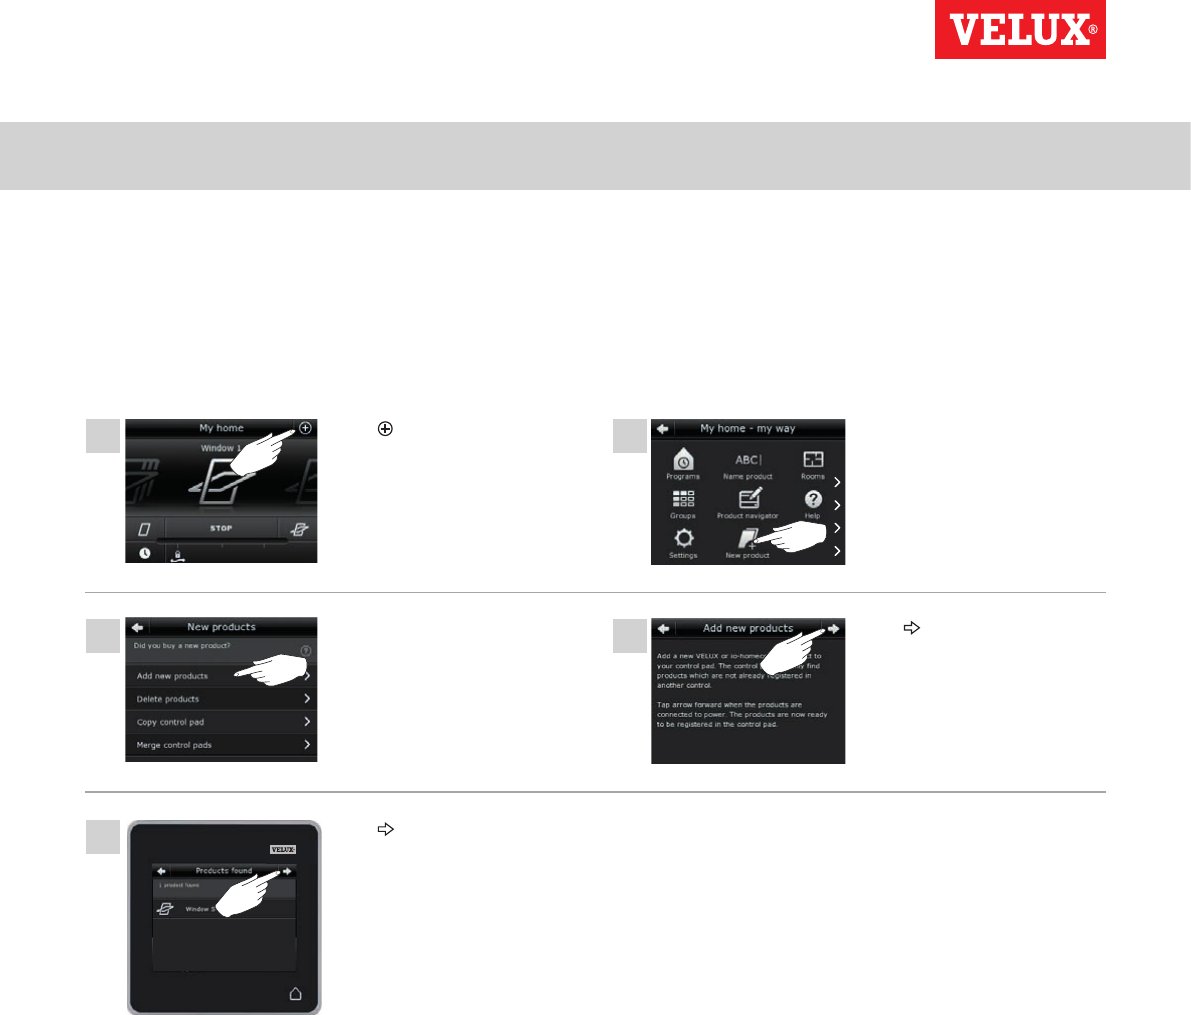
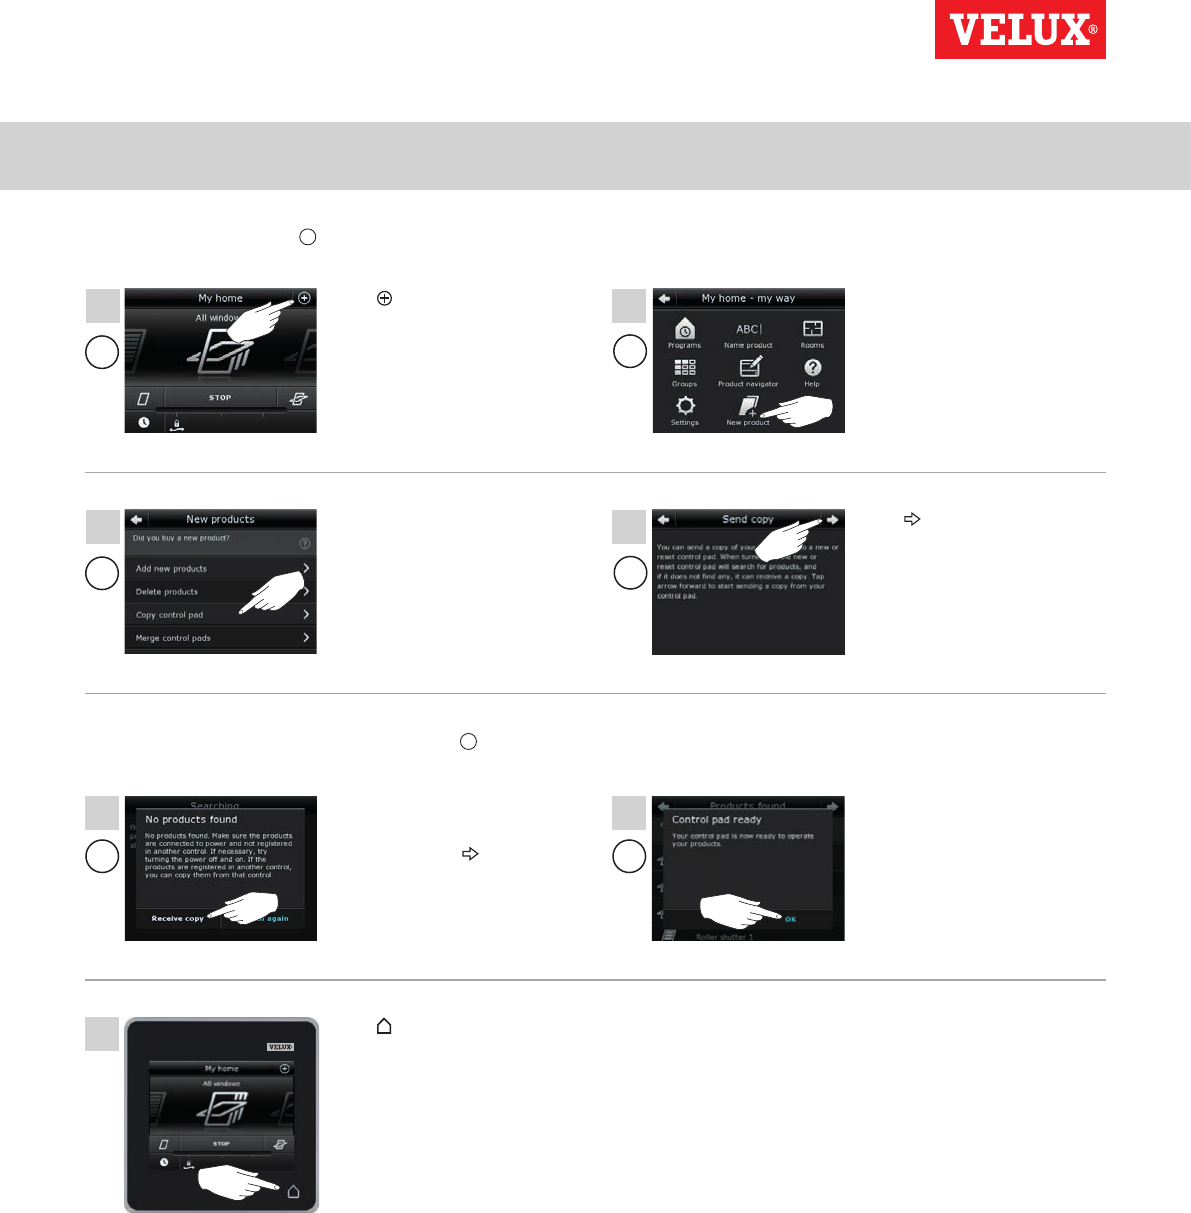
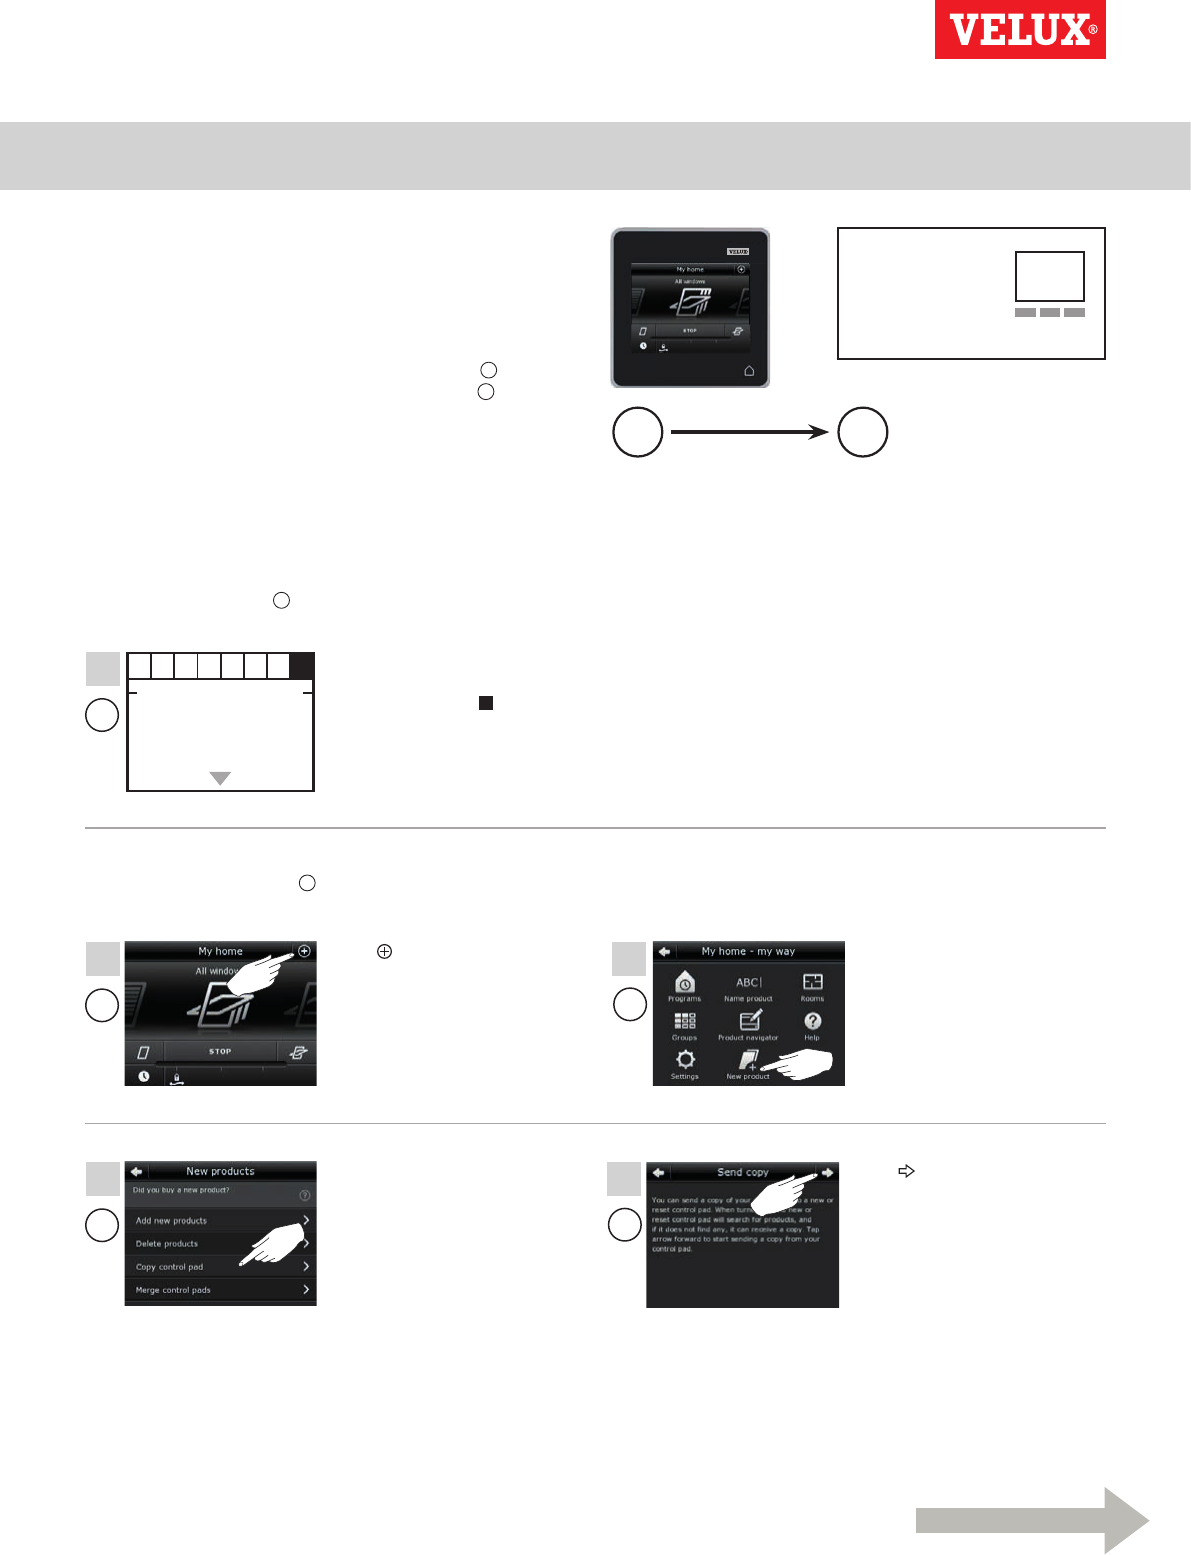
Adding products to the control pad
You can operate up to 200 products, for instance windows, roller shutters and blinds, by registering them in your control pad.
The example shows how to add more products to the control pad by following the instructions in the display.
Tap .Tap "New product".
Tap .
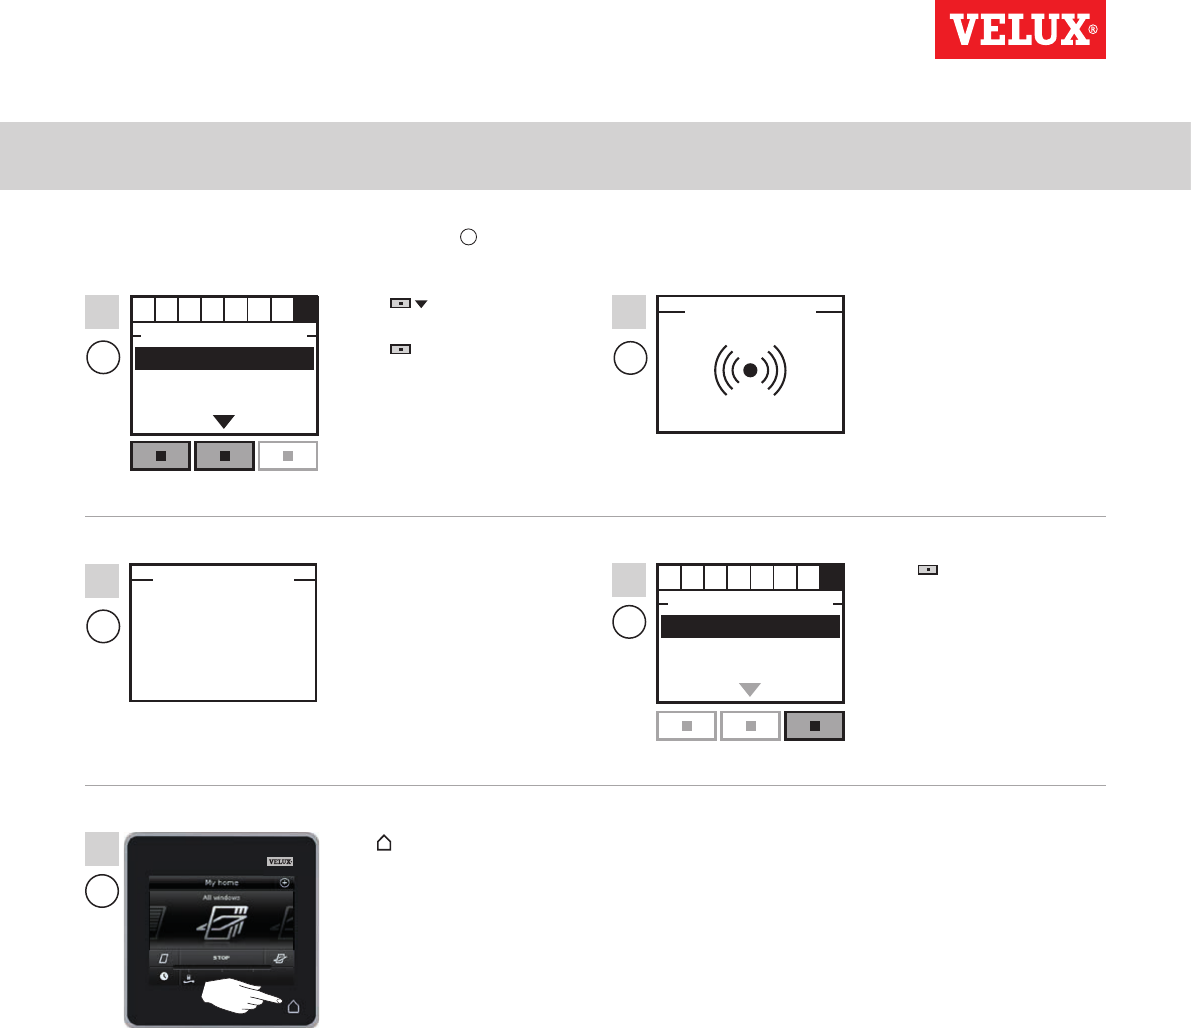
Tap "Add new products".
Tap when the control pad
has found the products.
You can now operate the new
products.
Setting up
Extension of your VELUX INTEGRA® system - Adding a control 3
123
456
789
¿0#
VELUX INTEGRA®
KLR 200
VELUX 41
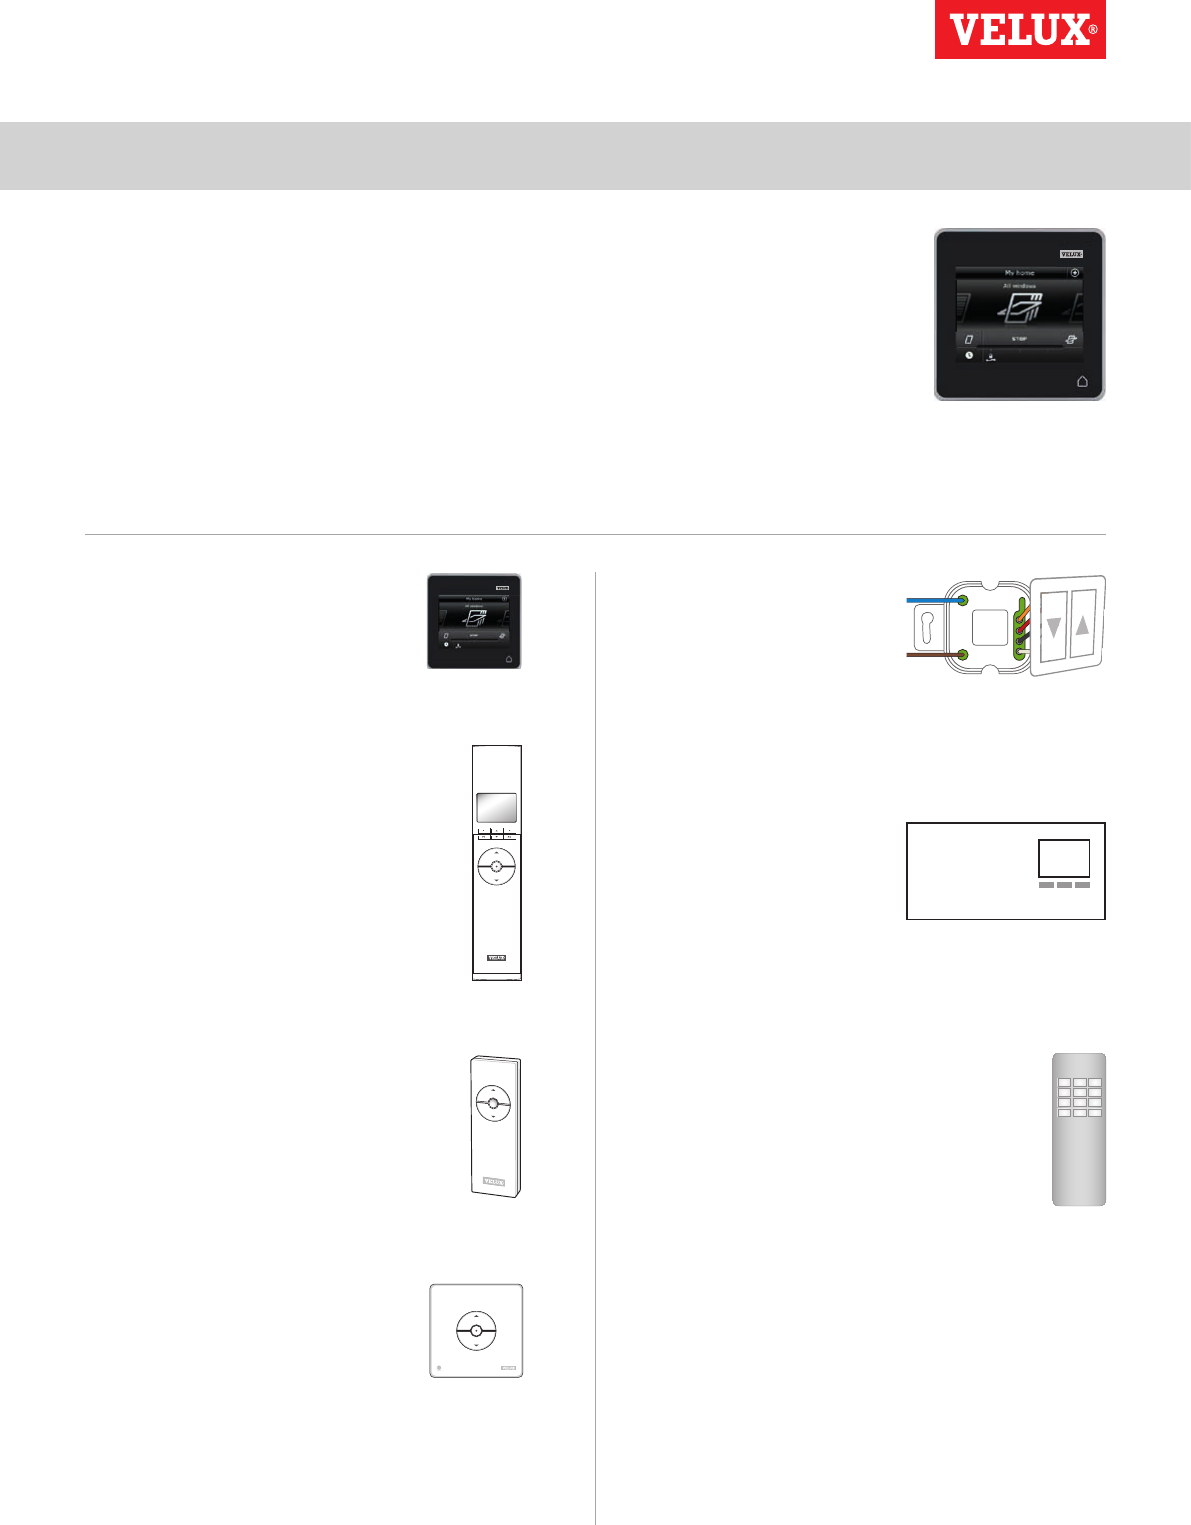
Adding a control to your system already operated with a
VELUX INTEGRA® control pad KLR 200
"Control" is used as a generic term for all devices that can operate
VELUX INTEGRA® products.
To operate your VELUX INTEGRA® products with additional controls,
the contents of the control pad KLR 200 already in use can be copied
to other controls.
Note: If you have edited the standard programs or made your own
programs, these are not copied to the additional control.
To find the control you want to add to your system, please see the
page references below.
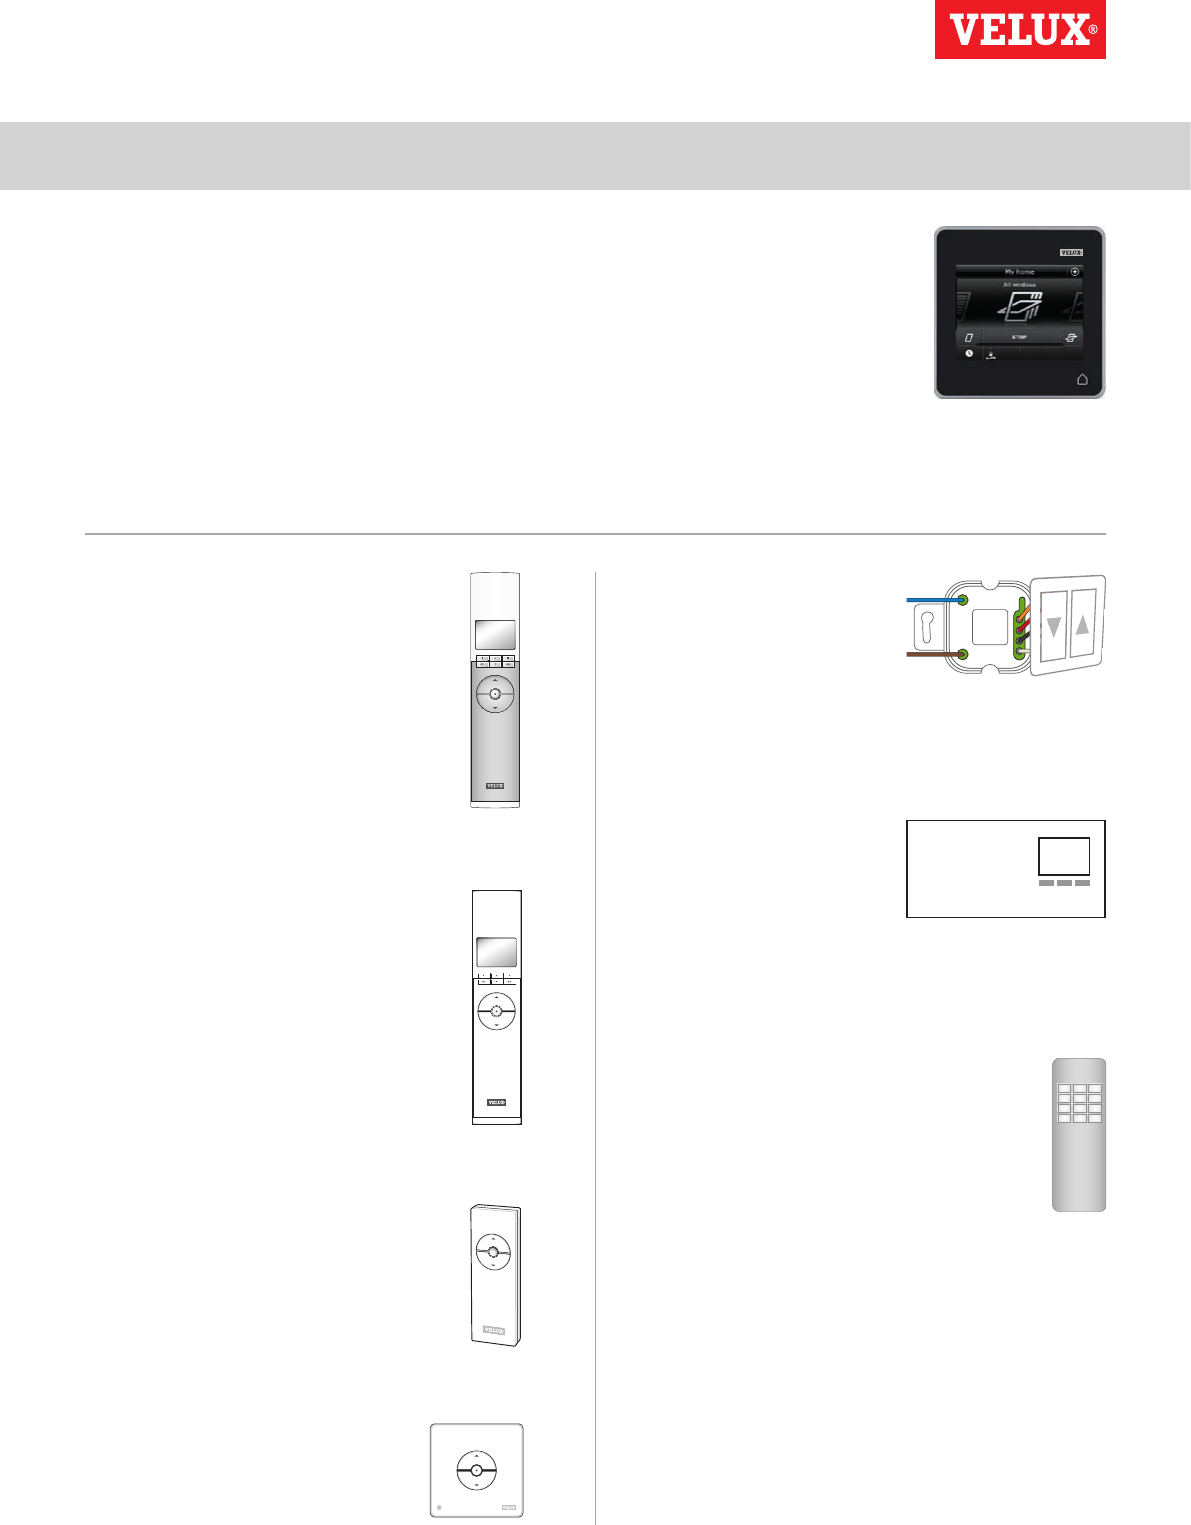
VELUX INTEGRA®
control pad KLR 200
(3LR A02)
Pages 42-43
VELUX INTEGRA®
controller KRX 100
(3LF D02)
Pages 44-46
VELUX INTEGRA®
remote control without display
(3UR B01)
Page 47
VELUX INTEGRA®
control switch KLI 110
(3LI D01)
Page 48
VELUX INTEGRA®
interface KLF 050 fitted
into a wall switch/socket
of another make
(3LF D50)
Page 49
VELUX INTEGRA®
interface KLF 100
(3LF D01)
Pages 50-51
Other types of io-homecontrol®
controls
Pages 52-53
Setting up
Extension of your VELUX INTEGRA® system - Adding a control 3
A B
Continue on the next page
B
B
B
1
2
3
2 3
4
1
B
1
2
VELUX INTEGRA®
KLR 200
VELUX 42
Adding a VELUX INTEGRA® control pad KLR 200 to your sys-
tem already operated with a control pad KLR 200
The instructions below show how to copy the contents of one
control pad KLR 200 to another.
Control pad KLR 200 to send a copy is called control A.
Control pad KLR 200 to receive a copy is called control B.
First execute items 1-4 with B.
In the display screen, roll the
wheel in the directions of the
arrows to choose language 1.
Tap 2.
Follow the instructions in the
display and tap when you
are ready.
Remove the battery compartment lid
by pressing the release button with a
screwdriver as illustrated 1, 2.
Insert batteries (type AA/LR6) 3.
Replace lid.
Do not tap "Receive copy" until
item 9.
Setting up
Extension of your VELUX INTEGRA® system - Adding a control 3
B
11
10
A
8
B
9
AA
A
7
5 6
VELUX INTEGRA®
KLR 200
VELUX 43
Now execute items 5-8 with A.
Tap "OK".
Tap on both control pads to
finish.
Tap .
Tap "Receive copy".
Follow the instructions in the
display and tap when you
are ready.
You now have two minutes to execute item 9 with B.
Tap .Tap "New product".
Tap "Copy control pad".
Setting up
Extension of your VELUX INTEGRA® system - Adding a control 3
RESET
P1 P2
Enter
Dansk
English
Français
Deutsch
LANGUAGE
11:00
P1 P2
Enter Back
SET TIME
A B
B
B B
2 3
1
Continue on the next page
VELUX INTEGRA®
KLR 200
VELUX 44
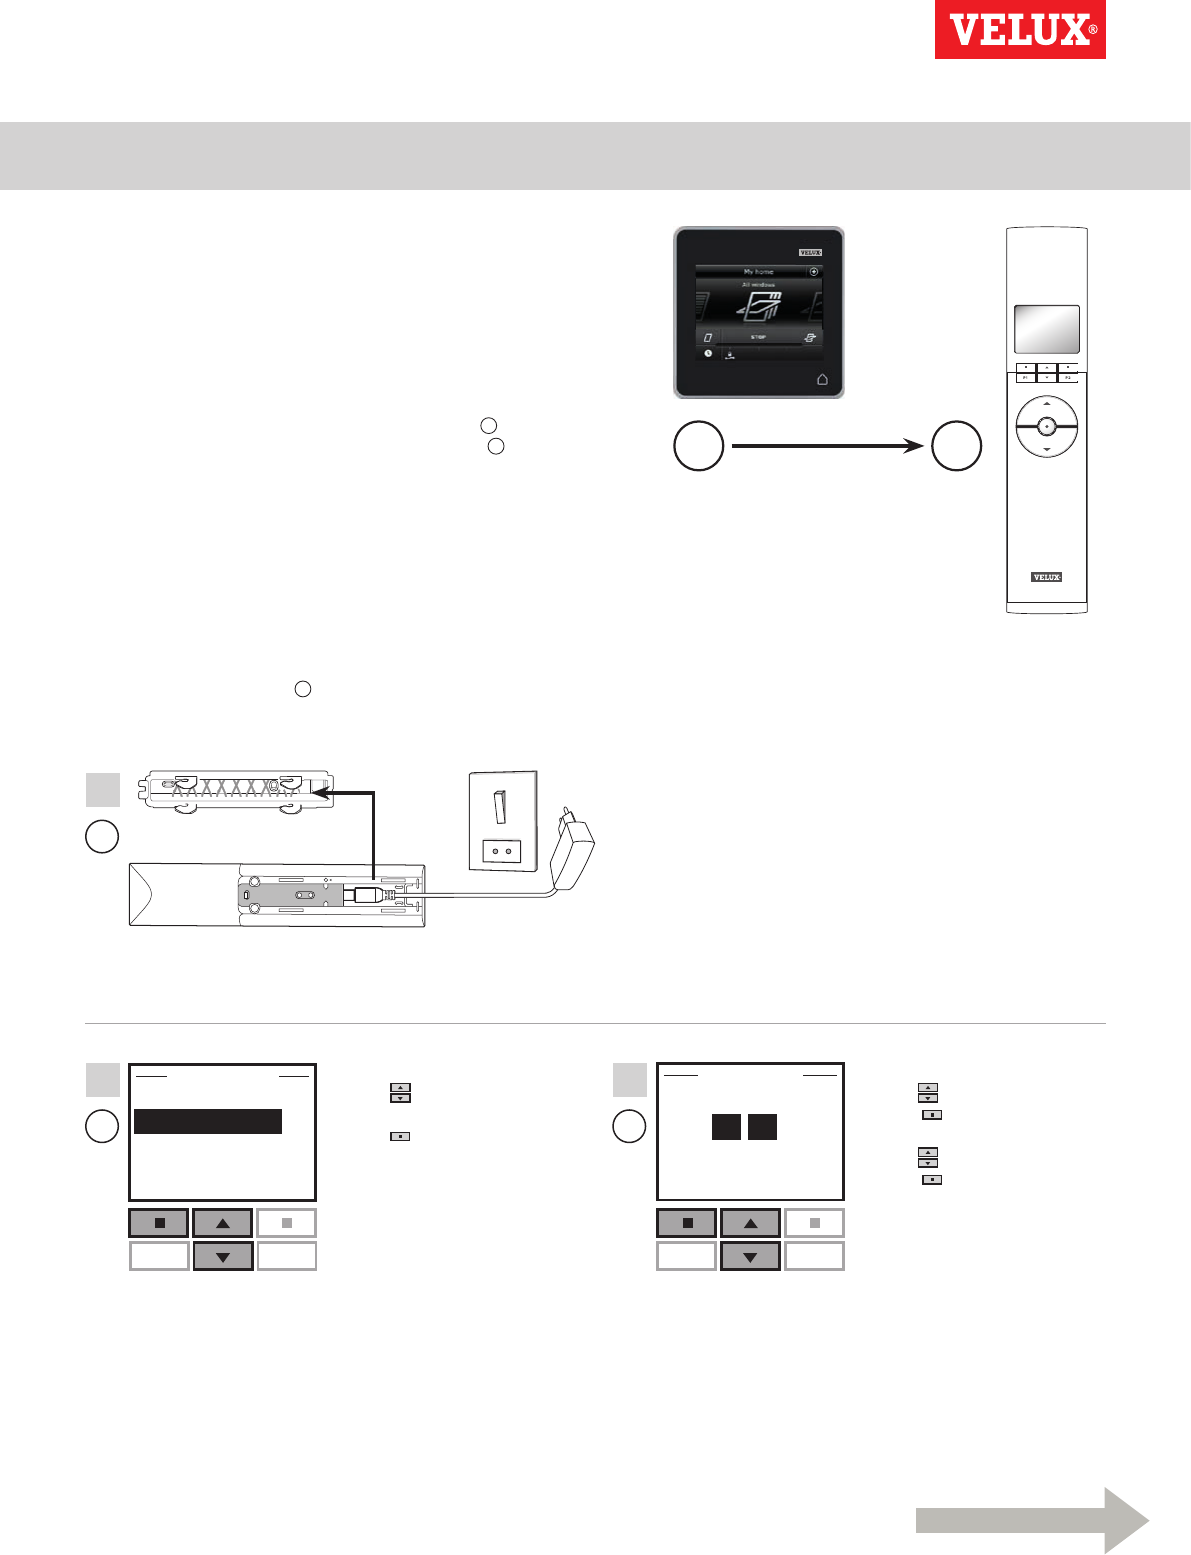
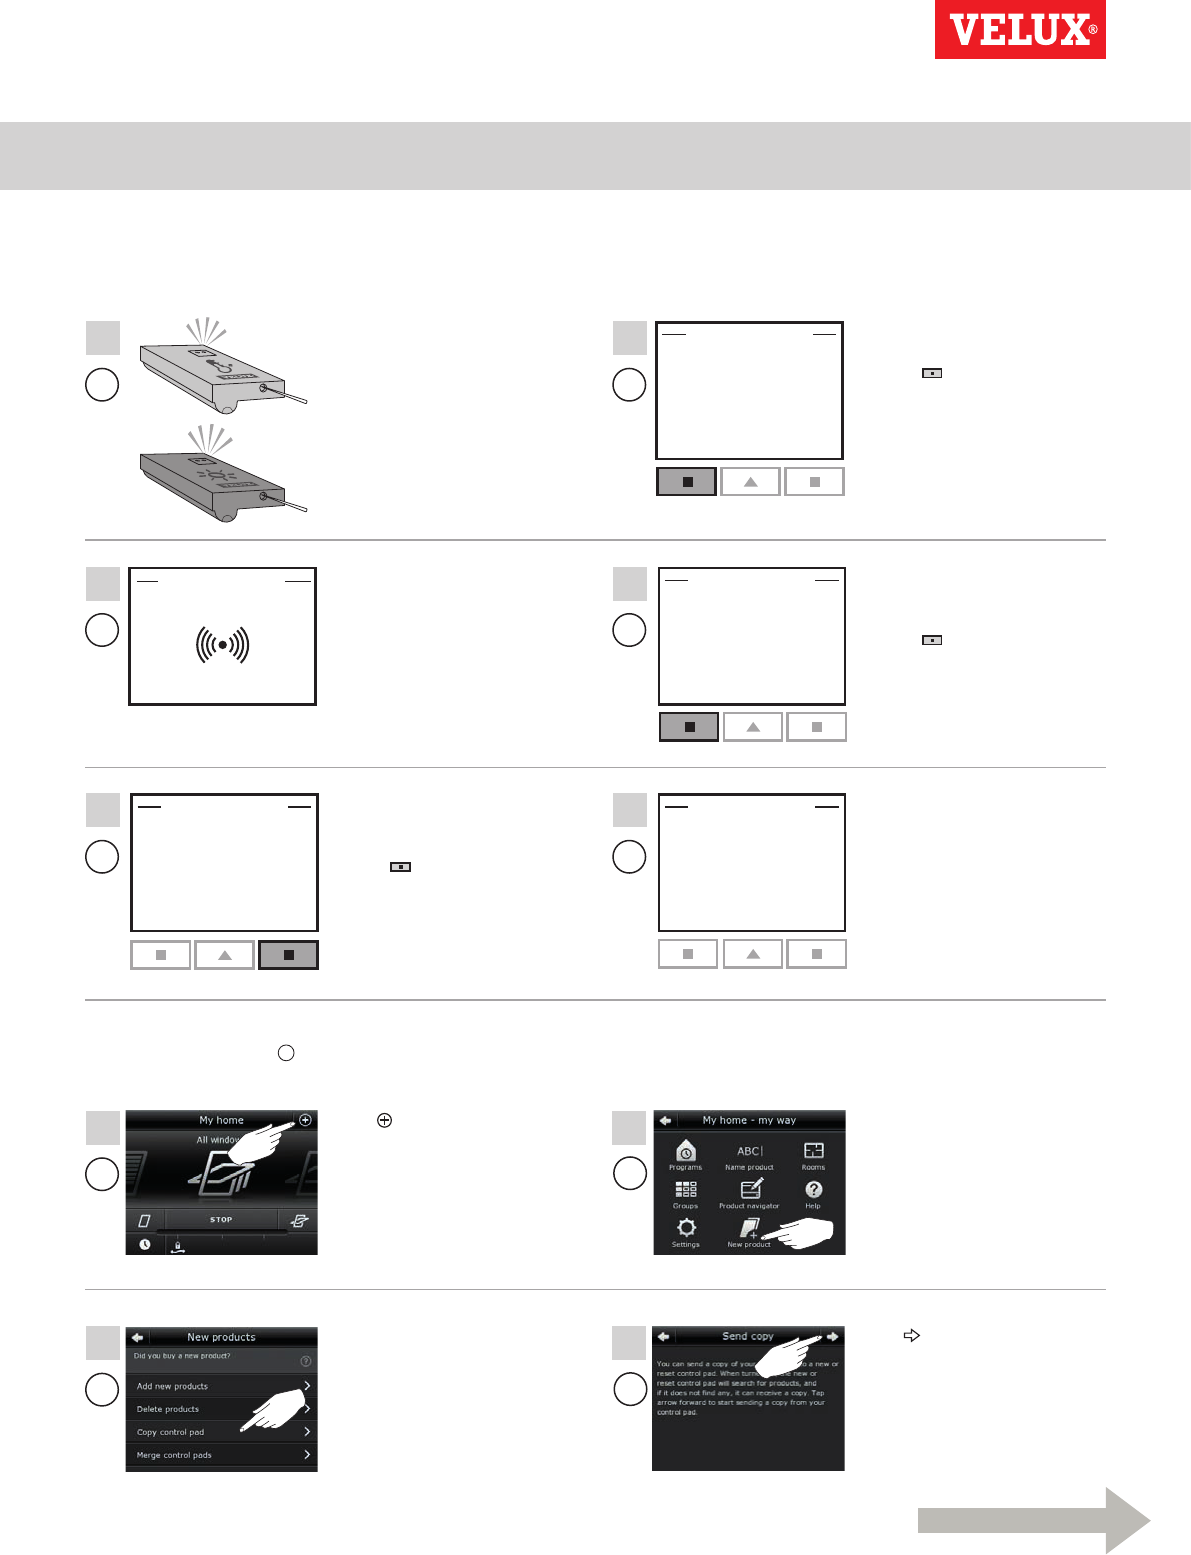
Adding a VELUX INTEGRA® controller KRX 100 to your system
already operated with a control pad KLR 200
The instructions below show how to copy the contents of control
pad KLR 200 to controller KRX 100. See also the instructions for
the controller.
Note: Only available for VELUX INTEGRA® products with radio
frequency 868 MHz.
Control pad KLR 200 to send a copy is called control A.
Controller KRX 100 to receive a copy is called control B.
First execute items 1-3 with B.
Connect to mains supply:
Remove the back cover of the controller as shown. Click the adap-
tor plug into the controller and replace the cover. Connect the
adaptor to mains supply.
Note: The controller saves the selected settings even if the mains
supply is disconnected. Therefore, it is advisable not to fit the
controller permanently until the sunscreening products and the
sensors have been registered in the controller.
However, time and date are only saved for 30 seconds after dis-
connection of mains supply.
Select language:
Press to highlight your
language.
Press "Enter" to confirm
your choice.
Set time:
Press to set minutes.
Press "Enter" to change to
hours.
Press to set hours.
Press "Enter" to confirm
your settings.
Setting up
Extension of your VELUX INTEGRA® system - Adding a control 3
reset
reset
Register Back
Prepare sensors
for registration and
press Register
within 10 minutes
AUTO SET-UP
BackRegister
Prepare products
for registration and
press Register
AUTO SET-UP
Menu
Continue
Enable
VELUX ACTIVE
not enabled
Sensor
registered
INFORMATION
INFORMATION
AUTO SET-UP
B
B
B
B
B
B
4
6
8
5
7
9
AA
A
12
10 11
A
13
Continue on the next page
VELUX INTEGRA®
KLR 200
VELUX 45
Prepare sensors for registration:
Press the button at the bottom
of the sensor with a pointed
object for at least 5 seconds
until the diode flashes.
Prepare sensors and register them in the controller.
Note: You have 10 minutes to execute items 4-8.
Register sensors in the control-
ler:
Press "Register" to register
the two sensors.
The display shows "Sensor reg-
istered" when the sensors have
been registered.
Press "Continue" to pro-
ceed.
Do not press "Register" until
item 14.
Registration is running. This
may take several minutes.
The display shows that the
program VELUX ACTIVE has
not been enabled.
Press "Enable" to start
registration of sunscreening
products in the controller.
Execute items 10-13 with A.
Tap .Tap "New product".
Tap "Copy control pad". Tap .
Setting up
Extension of your VELUX INTEGRA® system - Adding a control 3
AUTO SET-UP
Register Back
Prepare products
for registration and
press Register
AUTO SET-UP
Menu
VELUX ACTIVE
enabled
Details
INFORMATION 12 : 32
Menu Disable
25°C
B
B
A
B
B
15
17
18
14
16
VELUX INTEGRA®
KLR 200
VELUX 46
Press "Register" in the con-
troller to start registration.
The display shows that the
program VELUX ACTIVE has
been enabled.
If the display shows that the
program VELUX ACTIVE has
not been enabled, please refer
to the section Initial set-up,
Interior sunscreening products
in the instructions for the
controller.
Registration is running. This
may take several minutes.
The display shows the program
mode including current tem-
perature and time.
You now have two minutes to execute item 14 with B.
Tap to finish.
Setting up
Extension of your VELUX INTEGRA® system - Adding a control 3
Max 1 sec
A B
AA
A
A
B A
A
3
5
6 7
1 2
4
2
1
VELUX INTEGRA®
KLR 200
VELUX 47
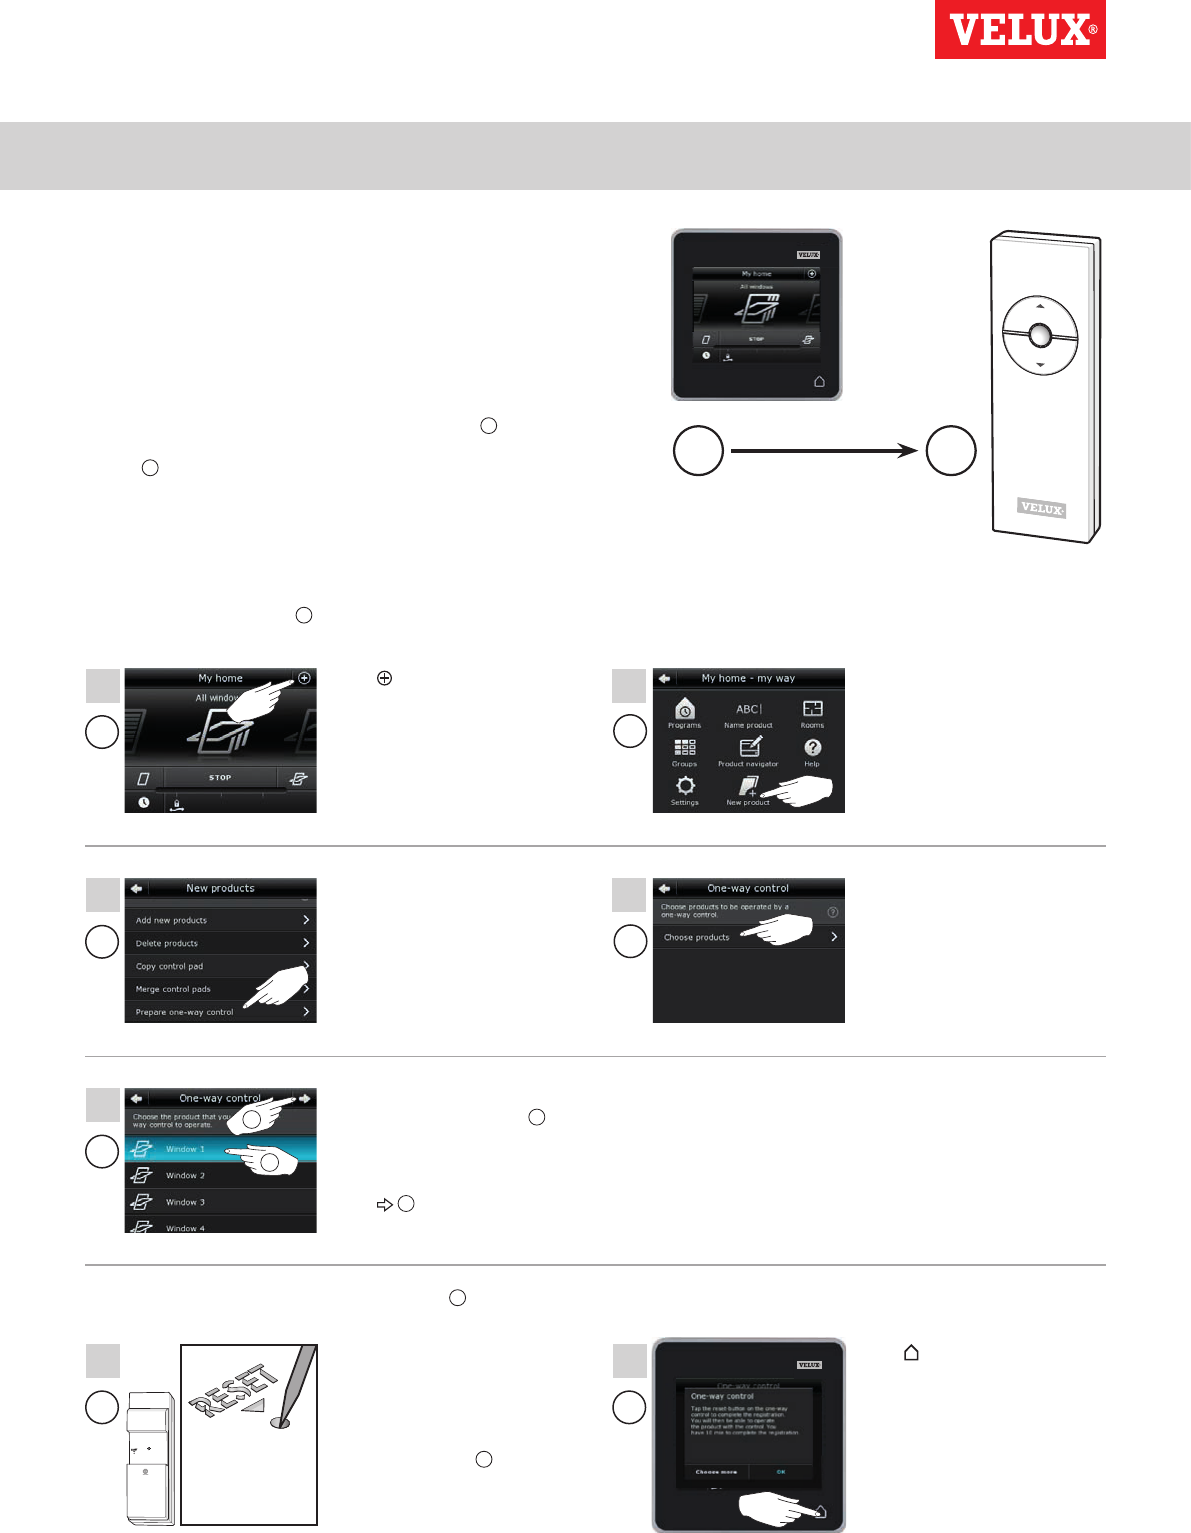
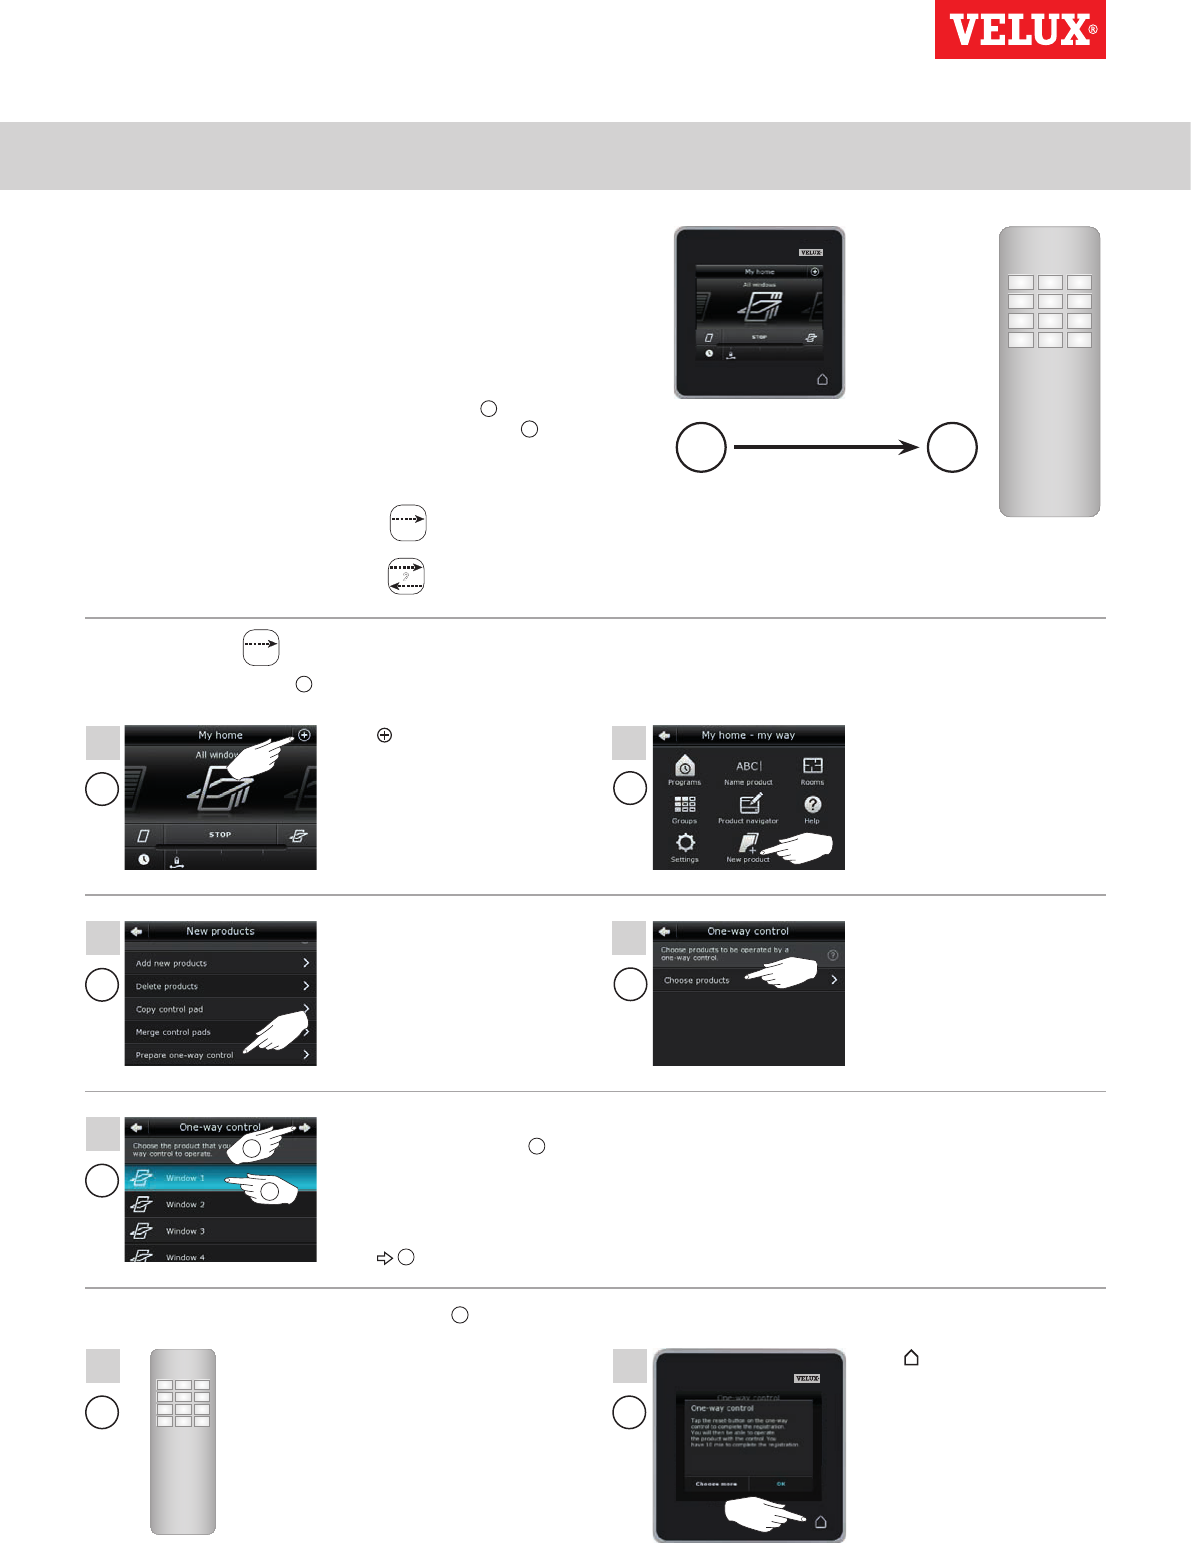
Tap .Tap "New product".
Tap "Choose products".
You now have 10 minutes to execute item 6 with B.
Press briefly the RESET button
on the back with a pointed
object to register the new
product.
You can now operate the cho-
sen product with B.
Tap to finish.
Note: To add more products,
tap "Choose more" and repeat
items 5-7.
Tap "Prepare one-way control".
Scroll down the display and choose
the product to be added 1.
Note: individual products can be
identified by tapping the icon. See
also the section Finding products.
Tap 2.
Adding a VELUX INTEGRA® remote control without display to
your system already operated with a control pad KLR 200
The instructions below show how to copy the contents of control
pad KLR 200 to the remote control without display. See also the
instructions for the remote control.
Note: Only available for VELUX INTEGRA® products with radio
frequency 868 MHz.
Control pad KLR 200 to send a copy is called control A.
The remote control without display to receive a copy is called
control B.
First execute items 1-5 with A.
Setting up
Extension of your VELUX INTEGRA® system - Adding a control 3
+
+
Max 1 sec
A B
AA
A
A
B A
A
3
5
6 7
1 2
4
2
1
VELUX INTEGRA®
KLR 200
VELUX 48
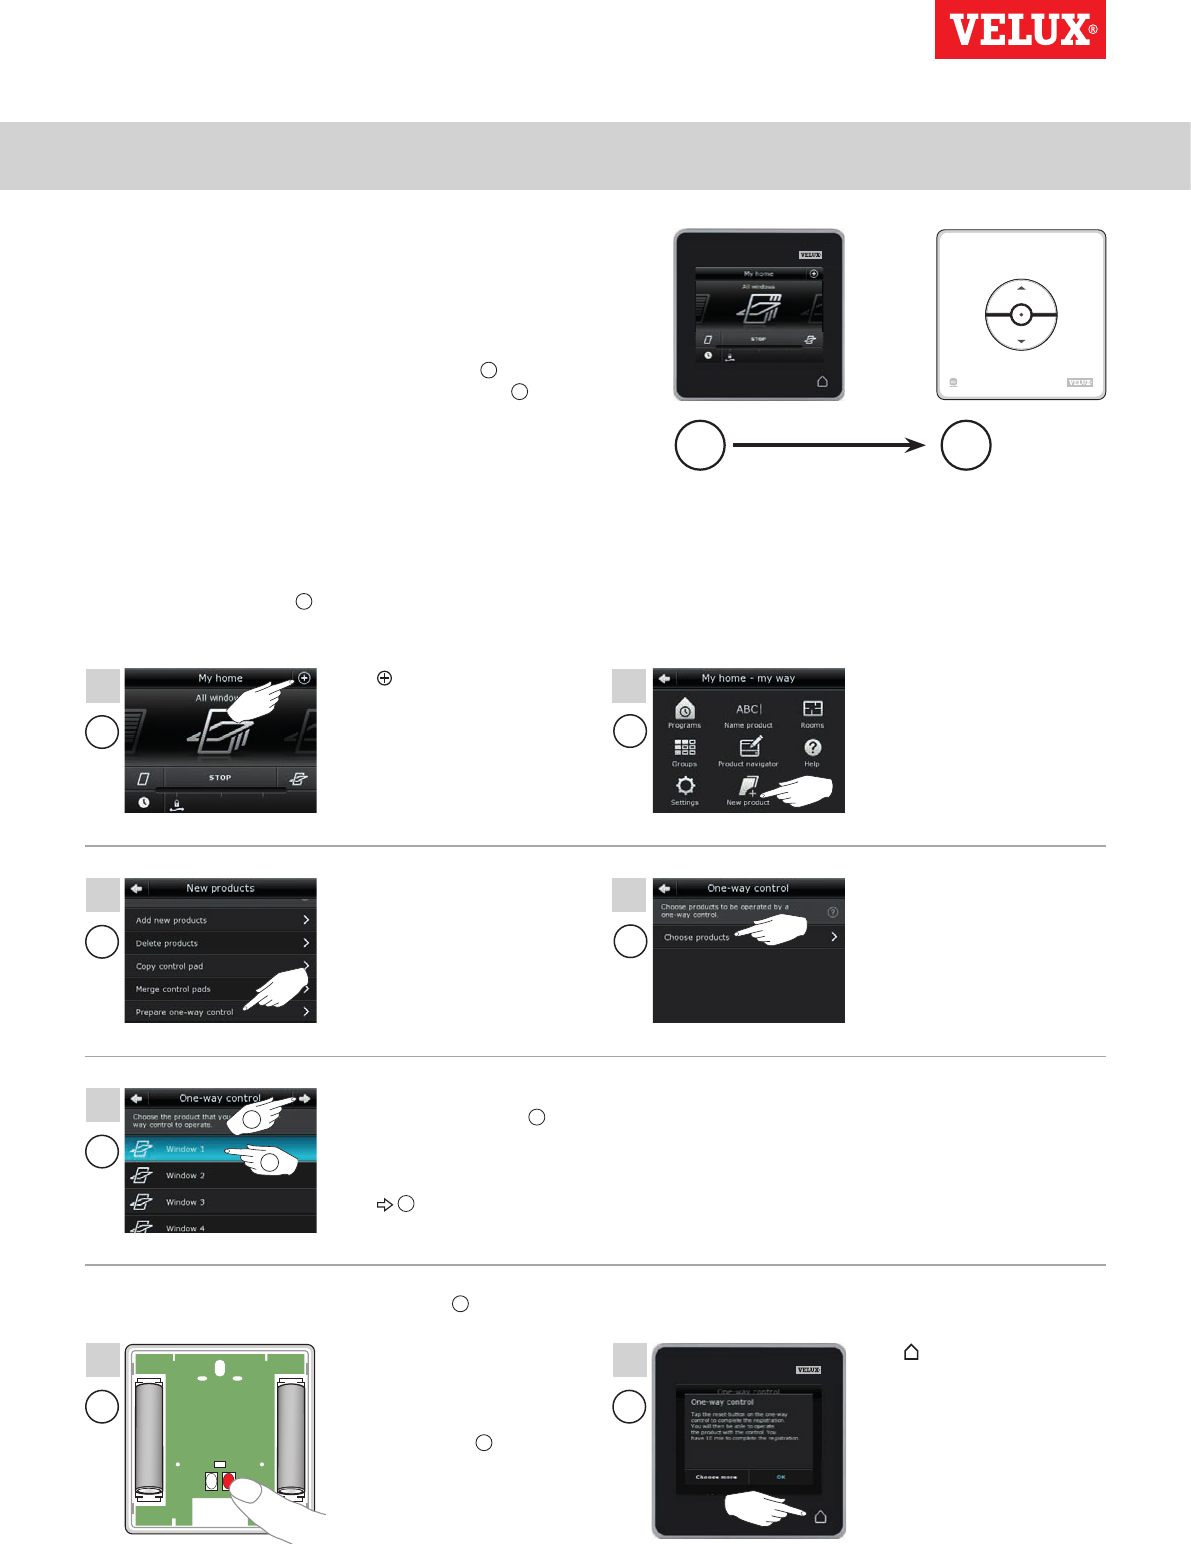
Adding a VELUX INTEGRA® control switch KLI 110 to your
system already operated with a control pad KLR 200
The instructions below show how to copy the contents of control
pad KLR 200 to control switch KLI 110. See also the instructions
for the control switch.
Control pad KLR 200 to send a copy is called control A.
Control switch KLI 110 to receive a copy is called control B.
First execute items 1-5 with A.
Tap .Tap "New product".
Tap "Choose products".
You now have 10 minutes to execute item 6 with B.
Press briefly the RESET button
on the back to register the new
product.
You can now operate the cho-
sen product with B.
Tap to finish.
Note: To add more products,
tap "Choose more" and repeat
items 5-7.
Tap "Prepare one-way control".
Scroll down the display and choose
the product to be added 1.
Note: individual products can be
identified by tapping the icon. See
also section Find products.
Tap 2.
Setting up
Extension of your VELUX INTEGRA® system - Adding a control 3
Max 1 sec
A B
AA
A
A
B A
A
3
5
6 7
1 2
4
2
1
VELUX INTEGRA®
KLR 200
VELUX 49
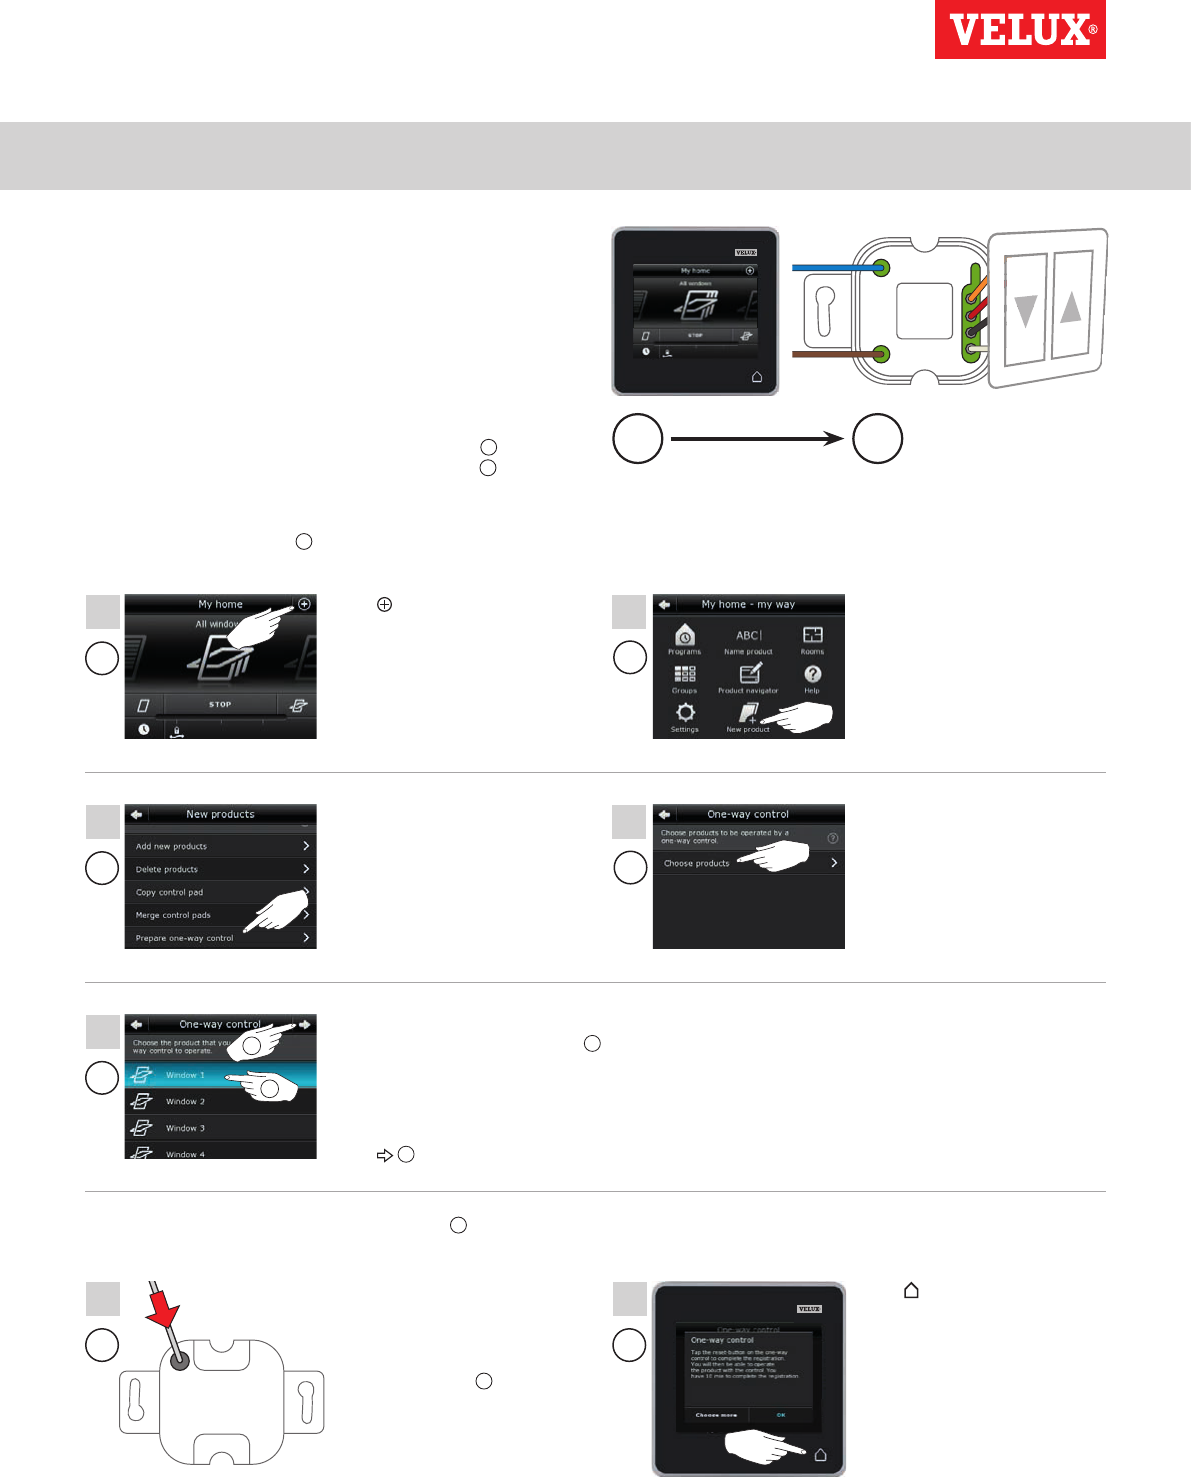
Adding a VELUX INTEGRA® interface KLF 050, which is fitted
into a wall switch/socket of another make, to your system
already operated with a control pad KLR 200
The instructions below show how to copy the contents of control
pad KLR 200 to interface KLF 050 fitted into a wall switch/sock-
et of another make. See also the instructions for the interface.
Note: Only available for VELUX INTEGRA® products with radio
frequency 868 MHz.
Control pad KLR 200 to send a copy is called control A.
Interface KLF 050 to receive a copy is called control B.
First execute items 1-5 with A.
Tap .Tap "New product".
Tap "Choose products".
You now have 10 minutes to execute item 6 with B.
Press briefly the SET button on
the back with a pointed object
to register the new product.
You can now operate the cho-
sen product with B.
Tap to finish.
Note: To add more products,
tap "Choose more" and repeat
items 5-7.
Tap "Prepare one-way control".
Scroll down the display and
choose the product to be added 1.
Note: The individual products
can be identified by tapping the
icon. See also the section Finding
products.
Tap 2.
Setting up
Extension of your VELUX INTEGRA® system - Adding a control 3
Enter Back
ABCDEFGH
Register products
Select products
Security key
SYSTEM SETTINGS
A
B
A
A
4
2
1
3
A B
Continue on the next page
A
5
VELUX INTEGRA®
KLR 200
VELUX 50
Tap .
Follow the instructions for
the interface until the section
where menu item H is high-
lighted.
Tap "New product".
Now execute items 2-5 with A.
Tap "Copy control pad".
Adding a VELUX INTEGRA® interface KLF 100 to your system
already operated with a control pad KLR 200
The instructions below show how to copy the contents of control
pad KLR 200 to interface KLF 100. See also the instructions for
the interface.
Control pad KLR 200 to send a copy is called control A.
Interface KLF 100 to receive a copy is called control B.
First execute item 1 with B.
Tap .
Setting up
Extension of your VELUX INTEGRA® system - Adding a control 3
Enter Back
ABCDEFGH
Register products
Select products
Security key
SYSTEM SETTINGS
Back
AUTO SET-UP
Back
INFORMATION
New products reg-
istered
Enter Back
ABCDEFGH
Register products
Select products
Security key
SYSTEM SETTINGS
B
B
B
6
8
7
A
B
10
9
VELUX INTEGRA®
KLR 200
VELUX 51
Automatic registration is run-
ning. Please wait. The registra-
tion can take up to one minute.
The display shows that the
new product(s) has/have been
registered.
Press to highlight
"Register products".
Press "Enter" to confirm
your choice.
Press "Back" to finish.
Tap to finish.
You now have two minutes to execute item 6 with B.
Setting up
Extension of your VELUX INTEGRA® system - Adding a control 3
A B
AA
A
A
B A
A
3
5
6 7
1 2
4
2
1
VELUX INTEGRA®
KLR 200
VELUX 52
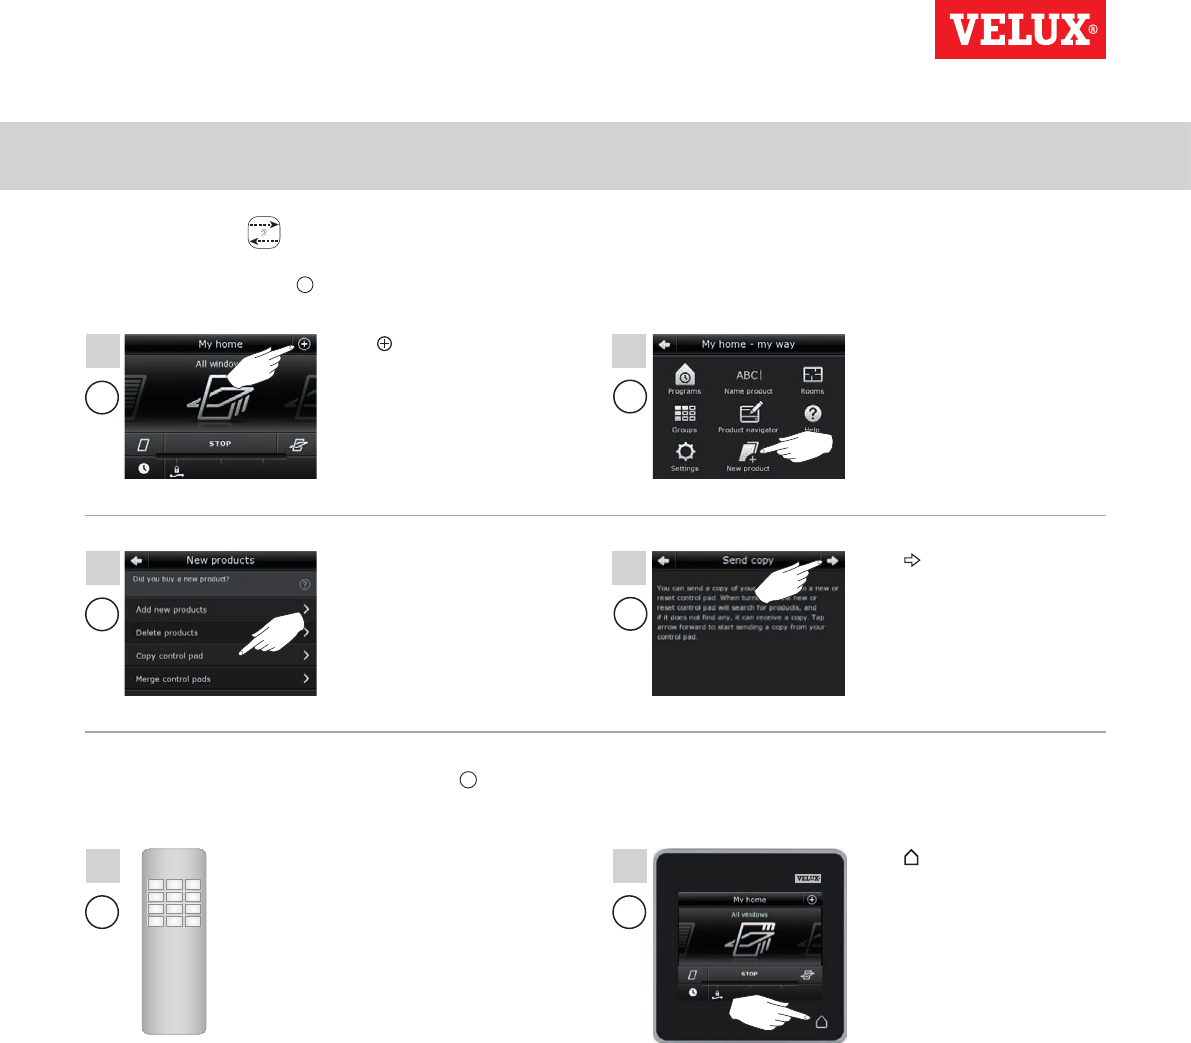
Adding other types of io-homecontrol® controls to your system
already operated with a VELUX INTEGRA® control pad KLR 200
The instructions below show how to copy the contents of control
pad KLR 200 to another type of io-homecontrol® control. See also
the instructions for the control in question.
Note: Only available for VELUX INTEGRA® products with radio
frequency 868 MHz.
Control pad KLR 200 to send a copy is called control A.
io-homecontrol® control to receive a copy is called control B.
Tap .Tap "New product".
Tap "Choose products".
You now have 10 minutes to execute item 6 with B.
See instructions for the
io-homecontrol® control. Tap to finish.
Tap "Prepare one-way control".
Scroll down the display and choose
the product to be added 1.
Note: The individual products
can be identified by tapping the
icon. See also the section Finding
products.
Tap 2.
123
456
789
¿0#
123
456
789
¿0#
The instructions are divided into two
sections:
Instructions for one-way controls
marked with this symbol on the product
Instructions for two-way controls
marked with this symbol on the product
One-way controls
First execute items 1-5 with A.
1
1
2
Setting up
Extension of your VELUX INTEGRA® system - Adding a control 3
B A
5 6
AA
AA
3
1 2
4
VELUX INTEGRA®
KLR 200
VELUX 53
You now have two minutes to execute item 5 with B.
See instructions for the
io-homecontrol® control.
You may also refer to the
section Joint operation of
io-homecontrol® products.
Tap to finish.
Tap .
Tap "Copy control pad".
Tap "New product".
Tap .
Two-way controls
First execute items 1-4 with A.
123
456
789
¿0#
2
Setting up
Extension of your VELUX INTEGRA® system - Adding a control 3
123
456
789
¿0#
VELUX INTEGRA®
KLR 200
VELUX 54
VELUX INTEGRA®
remote control KLR 100
(3LR A01)
Pages 55-56
VELUX INTEGRA®
controller KRX 100
(3LF D02)
Pages 57-58
VELUX INTEGRA®
interface KLF 100
(3LF D01)
Pages 65-66
Other types of io-homecontrol®
control
Pages 67-68
VELUX INTEGRA®
remote control without display
(3UR B01)
Pages 59-60
VELUX INTEGRA®
control switch KLI 110
(3LI D01)
Pages 61-62
VELUX INTEGRA®
interface KLF 050 fitted
into a wall switch/socket
of another make
(3LF D50)
Pages 63-64
Adding a VELUX INTEGRA® control pad KLR 200 to your system
already operated with another control
"Control" is used as a generic term for all devices that can operate
VELUX INTEGRA® products.
To operate your VELUX INTEGRA® products with additional controls,
the contents of the control already in use can be copied to your new
control pad KLR 200.
Note: If you have edited the standard programs or made your own
programs, these are not copied to your new control pad.
To find the control already operating your system, please see the
page references below.
Setting up
Extension of your VELUX INTEGRA® system - Adding a control 3
A B
B
B
B
1
2
3
1
2 3
4
1
B
Continue on the next page
2
VELUX INTEGRA®
KLR 200
VELUX 55
Adding a VELUX INTEGRA® control pad KLR 200 to your
system already operated with a remote control KLR 100
The instructions below show how to copy the contents from the
remote control KLR 100 already in use to control pad KLR 200.
See also the instructions for the remote control.
Remote control KLR 100 to send a copy is called control A.
Control pad KLR 200 to receive a copy is called control B.
First execute items 1-4 with B.
Remove the battery compartment lid by
pressing the release button with a screw-
driver as illustrated 1, 2.
Insert batteries (type AA/LR6) 3.
Replace lid.
Follow the instructions in the
display and tap when you
are ready.
Do not tap "Receive copy" until
item 8.
In the display screen, roll the
wheel in the directions of the
arrows to choose language 1.
Tap 2.