Welch Allyn FN802FH Propaq 802 LTRN User Manual part 9 of 10
Welch Allyn, Inc. Propaq 802 LTRN Users Manual part 9 of 10
Contents
Users Manual part 9 of 10

8
111
Monitor Configuration
Overview . . . . . . . . . . . . . . . . . . . . . . . . . . . . . . . . . . . . . . . . . . . . . . . . . . . . . . 111
About Factory Configuration . . . . . . . . . . . . . . . . . . . . . . . . . . . . . . . . . . . . . . . 112
About Default Configuration . . . . . . . . . . . . . . . . . . . . . . . . . . . . . . . . . . . . . . . 112
About Temporary Configuration. . . . . . . . . . . . . . . . . . . . . . . . . . . . . . . . . . . . . 113
About Acuity-Defined Configuration . . . . . . . . . . . . . . . . . . . . . . . . . . . . . . . . . 113
Overview
The monitor can be configured in various ways.
Each facility can define as many default configurations as required to both meet the
needs of individual departments and units and to conform to the facility’s general
methods and standards.
• Each time the patient mode is changed, the monitor settings return to this default
configuration.
• Each time the monitor is turned on, the clinician chooses whether to retain the
most recently used temporary, patient-specific settings (see below) or to reset
the monitor to its default configuration.
Clinicians can use the monitor buttons to temporarily customize settings to meet the
needs of individual patients. These custom settings can be retained through a monitor
shut-down and restart, but they are lost if the patient mode is changed.
When a wireless monitor is in communication with an Acuity Central Station, Acuity
imposes several monitor settings to assure conformance and consistency among all
monitors on a network. These settings override the factory configuration, the default
configuration, and any temporary patient-specific settings. If the monitor power is cycled
while the monitor is no longer in communication with Acuity, the monitor powers up with
the default configuration or with the custom settings for the previously monitored patient.
112 Monitor Configuration Welch Allyn Propaq LT Vital Signs Monitor
About Factory Configuration
When the monitor arrives from the factory, it is fully configured and ready for operation.
The factory configuration defines every setting and behavior for the monitor. Each
setting and behavior defined in the factory configuration remains in effect until it is
changed by a custom configuration or by a temporary adjustment. Unless the factory
configuration is replaced by a custom configuration, the factory settings and behaviors are
restored to the monitor each time the monitor is powered up and Start New Patient is
selected.
When a custom configuration is downloaded to the monitor, the settings and behaviors
defined in the custom configuration become the power-up defaults for the monitor, and
the factory configuration is no longer in effect. However, the factory configuration
information can always be restored by qualified service personnel and can also be
restored by downloading the configuration file PropaqLTFactoryConfig.mnt from a PC to
the monitor.
The factory settings are shown in the “Parameter Configuration Matrix” on page 113.
About Default Configuration
Most facilities, before putting a new monitor into service, reconfigure it to conform to
local protocol and to adapt it to the clinical environment in which it is to be used. This
reconfiguration results in a set of default settings and monitor behaviors.
Creating a custom default configuration requires the following:
• A Propaq LT Monitor Configuration Utility running on a PC, and
• A cradle with the USB data transfer option
For information about the monitor configuration utility, refer to “Configuring the Monitor”
on page 126.
To learn which parameters can be defined using the Configuration Utility, see the
“Parameter Configuration Matrix” on page 113.

Directions for Use Monitor Configuration 113
About Temporary Configuration
While monitoring a patient, you can use the monitor buttons to temporarily adjust many of
the monitor settings to accommodate the needs of a specific patient. These custom
settings persist through a power cycle if you select to save patient data on shut-down.
The persist until they are changed manually or by Acuity, or until the monitor is powered
down and then powered up to monitor another patient.
To learn which parameters can be temporarily defined using the User Interface, see the
“Parameter Configuration Matrix” on page 113.
About Acuity-Defined Configuration
When the monitor comes into communication with the Acuity Central Station, Acuity
downloads some parameter values to the monitor.
The Acuity-defined configuration persists until the monitor is powered off.
To learn which parameters are defined by Acuity, see “Parameter Configuration Matrix”
on page 113.
Parameter Configuration Matrix
This table lists shows the factory settings and the possible values for all parameters, and
indicates which parameters and settings can be defined by Acuity, through the
Configuration Utility, or by the clinician through the monitor buttons.
Note This table shows only those parameters that can be changed.
Note Except for Radio ESSID (NetName) and Can Disable HR/PR Alarm Limits, this
table does not show parameters intended for use only by qualified service
personnel.
114 Monitor Configuration Welch Allyn Propaq LT Vital Signs Monitor
Table 11. Parameter Configuration Matrix
Parameter Factory Setting Possible Values Where Set
General
Patient Name
(Last, First, MI)
[blank] (≤16 characters displayed; actual
number of characters depends on
character width)
Monitor, Acuity
Patient ID [blank] (12 characters) Monitor, Acuity
Room [blank] (5 characters) Monitor, Acuity
Regulatory Setting US US, European EC, Japan Metrology Configuration Utility,
Acuity
Patient Mode Adult Adult, Pediatric, Neonate Monitor, Configuration
Utility, Acuity
LCD Bias 32 1 - 64 Monitor
Network
Radio Card ON and Acuity
Enabled
YES if the radio
card is installed.
NO if the radio card
is not installed.
Yes, No Configuration Utility
Radio ESSID (NetName) com.protocol com.protocol(1), demo.protocol(2)
com1.protocol(3), com2.protocol(4)
com1.protocol(5), com2.protocol(6)
com1.protocol(7), com2.protocol(8)
com1.protocol(9), com2.protocol(10)
com1.protocol(11), com2.protocol(12)
com1.protocol(13), com2.protocol(14)
com1.protocol(15), com2.protocol(16)
com1.protocol(17), com2.protocol(18)
com1.protocol(19), com2.protocol(20)
Monitor
CAUTION Do not attempt to change the network name unless you are a qualified
biomedical service engineer or technician. Changing the network name causes
the monitor to disconnect from the current FlexNet network, restart (deleting all stored
patient data), and attempt to connect to the FlexNet network corresponding to the new
network name.
To change the network name:
1. Enter the Service menu.
2. Highlight Radio.
3. Highlight NetName and press .
4. Select another network name and press .
5. Press to return to the monitoring display.
Radio Disconnect Not Disconnected Disconnected, Not Disconnected Monitor

Directions for Use Monitor Configuration 115
User Interface
Configuration Name Factory 1.00 0 - 40 characters Configuration Utility
Facility Name [blank] 0 - 40 characters Configuration Utility
Contact Name [blank] 0 - 40 characters Configuration Utility
Unit/Department ID [blank] 0 - 40 characters Configuration Utility
Contact Telephone [blank] 0 - 40 characters Configuration Utility
Time Format 24-Hr 12-Hr, 24-Hr Monitor, Configuration
Utility
Configured Language English Dutch, English, French, German, Italian,
Polish, Portuguese, Spanish, Swedish
Monitor, Acuity,
Configuration Utility
Decimal Format Dot Comma, Dot Configuration Utility
Date Format MM/DD/YY MM/DD/YY, DD.MM.YY, YY/MM/DD Monitor, Configuration
Utility
Alarm/Alert Tone Level Medium Low, Medium, High Monitor, Configuration
Utility, Acuity
HR/Pulse Tone Level Medium Off, Low, Medium, High Monitor, Configuration
Utility
NIBP Units mmHg mmHg, kPa Monitor, Configuration
Utility
Audible Alarm Suspension
Time
4 min Disable, 90 sec, 2 min, 3 min, 4 min,
5 min, 10 min, 15 min, 30 min, 60 min,
Always On
Monitor, Configuration
Utility
Pacer Indicator On No Yes, No Monitor, Configuration
Utility
Buttons Lock-Out Enabled Yes Yes, No Configuration Utility,
Acuity
Display Lock-Out Enabled Yes Yes, No Configuration Utility
Back Light Lock-Out Enabled Yes Yes, No Configuration Utility
Back Light Time-Out 2 min Always Off, 2 min, 5 min, 10 min,
15 min, 30 min, Always On
Monitor, Configuration
Utility
Display Time-Out Always On 2 min, 5 min, 10 min, 15 min, 30 min,
Always On
Monitor, Configuration
Utility
Adult NIBP Mean Numerics Small Small, Large, Off Monitor, Configuration
Utility
Pediatric NIBP Mean
Numerics
Small Small, Large, Off Monitor, Configuration
Utility
Neonatal NIBP Mean
Numerics
Large Small, Large, Off Monitor, Configuration
Utility
Table 11. Parameter Configuration Matrix (continued)
Parameter Factory Setting Possible Values Where Set

116 Monitor Configuration Welch Allyn Propaq LT Vital Signs Monitor
Display All ECG Vectors Yes Yes, No Configuration Utility
ECG I Wave Size 1 mV/cm 8 mV/cm, 4 mV/cm, 2 mV/cm, 1 mV/cm,
0.5 mV/cm, 0.2 mV/cm
Monitor
ECG II Wave Size 1 mV/cm 8 mV/cm, 4 mV/cm, 2 mV/cm, 1 mV/cm,
0.5 mV/cm, 0.2 mV/cm
Monitor
ECG III Wave Size 1 mV/cm 8 mV/cm, 4 mV/cm, 2 mV/cm, 1 mV/cm,
0.5 mV/cm, 0.2 mV/cm
Monitor
ECG V Wave Size 1 mV/cm 8 mV/cm, 4 mV/cm, 2 mV/cm, 1 mV/cm,
0.5 mV/cm, 0.2 mV/cm
Monitor
ECG aVR Wave Size 1 mV/cm 8 mV/cm, 4 mV/cm, 2 mV/cm, 1 mV/cm,
0.5 mV/cm, 0.2 mV/cm
Monitor
ECG aVL Wave Size 1 mV/cm 8 mV/cm, 4 mV/cm, 2 mV/cm, 1 mV/cm,
0.5 mV/cm, 0.2 mV/cm
Monitor
ECG aVF Wave Size 1 mV/cm 8 mV/cm, 4 mV/cm, 2 mV/cm, 1 mV/cm,
0.5 mV/cm, 0.2 mV/cm
Monitor
SpO2 Wave Size 2x 1x, 2x, 4x, 8x Monitor
Resp Wave Size 2x 0.5x, 1x, 2x, 4x, 8x, 16x Monitor
ParamSet Enable Yes Yes, No Configuration Utility
NIBP Turbo Mode Enable Yes Yes, No Configuration Utility
Tab Trend Display Interval 5 min 1 min, 5 min, 10 min, 15 min, 30 min,
60 min
Monitor, Configuration
Utility
Current Screen Display 1 Display 1, Display 2, Display 3 Monitor
Display 1
Format Large Numerics Large Numerics, Single Waveform,
Dual Waveform, Tabular Trends,
Tabular Trends with Waveform
Monitor, Configuration
Utility
Top Waveform (if any) Lead II Lead I, Lead II, Lead III, Lead V, aVR, aVL,
aVF, SpO2, Resp
Monitor, Configuration
Utility
Show Top Waveform 6
Seconds
No Yes, No Monitor, Configuration
Utility
Show Bottom Waveform 6
Seconds
No Yes, No Monitor
Bottom Waveform (if any) Lead V Lead I, Lead II, Lead III, Lead V, aVR, aVL,
aVF, SpO2, Resp
Monitor, Configuration
Utility
Tabular Trends Display
Interval
5 min 1 min, 5 min, 10 min, 15 min, 30 min,
60 min
Monitor, Configuration
Utility
Table 11. Parameter Configuration Matrix (continued)
Parameter Factory Setting Possible Values Where Set

Directions for Use Monitor Configuration 117
Display 2
Format Single Waveform Large Numerics, Single Waveform,
Dual Waveform, Tabular Trends,
Tabular Trends with Waveform
Monitor, Configuration
Utility
Top Waveform (if any) Lead II Lead I, Lead II, Lead III, Lead V, aVR, aVL,
aVF, SpO2, Resp
Monitor, Configuration
Utility
Show Top Waveform 6
Seconds
No Yes, No Monitor, Configuration
Utility
Show Bottom Waveform 6
Seconds
No Yes, No Monitor
Bottom Waveform (if any) Lead V Lead I, Lead II, Lead III, Lead V, aVR, aVL,
aVF, SpO2, Resp
Monitor, Configuration
Utility
Tabular Trends Display
Interval
5 min 1 min, 5 min, 10 min, 15 min, 30 min,
60 min
Monitor, Configuration
Utility
Display 3
Format Tabular Trends with
Waveform
Large Numerics, Single Waveform,
Dual Waveform, Tabular Trends,
Tabular Trends with Waveform
Monitor, Configuration
Utility
Top Waveform (if any) Lead II Lead I, Lead II, Lead III, Lead V, aVR, aVL,
aVF, SpO2, Resp
Monitor, Configuration
Utility
Show Top Waveform 6
Seconds
No Yes, No Monitor, Configuration
Utility
Show Bottom Waveform 6
Seconds
No Yes, No Monitor
Bottom Waveform (if any) SpO2Lead I, Lead II, Lead III, Lead V, aVR, aVL,
aVF, SpO2, Resp
Monitor, Configuration
Utility
Tabular Trends Display
Interval
5 min 1 min, 5 min, 10 min, 15 min, 30 min,
60 min
Monitor, Configuration
Utility
ECG
ECG Bandwidth Monitor Monitor, Extended Monitor, Configuration
Utility, Acuity
HR/PR General
HR/PR Selected Source ECG ECG, SpO2Monitor, Acuity
Can Disable HR/PR Alarm
Limits
Yes
(No if lang=French)
Yes, No Monitor
Power Source Filter 60 Hz 50 Hz, 60 Hz, Off Monitor, Configuration
Utility, Acuity
ParamSet for Upper HR/PR
Limit
20% 5% - 25% Configuration Utility
ParamSet for Lower HR/PR
Limit
20% 5% - 25% Configuration Utility
Table 11. Parameter Configuration Matrix (continued)
Parameter Factory Setting Possible Values Where Set

118 Monitor Configuration Welch Allyn Propaq LT Vital Signs Monitor
HR/PR Adult
Upper Alarm Limit 120 beats/min 27 - 300 beats/min Monitor
Lower Alarm Limit 50 beats/min 25 - 298 beats/min Monitor
HR/PR Pediatric
Upper Alarm Limit 150 beats/min 27 - 300 beats/min Monitor
Lower Alarm Limit 50 beats/min 25 - 298 beats/min Monitor
HR/PR Neonate
Upper Alarm Limit 150 beats/min 27 - 300 beats/min Monitor
Lower Alarm Limit 50 beats/min 25 - 298 beats/min Monitor
NIBP General
NIBP Mode Manual Auto, Manual, Turbo Monitor, Acuity
Auto Interval 15 min 1 min, 2 min, 3 min, 5 min, 10 min,
15 min, 30 min, 60 min
Monitor, Configuration
Utility
ParamSet for Upper NIBP
Systolic
15% 5% - 25% Configuration Utility
ParamSet for Lower NIBP
Systolic
15% 5% - 25% Configuration Utility
ParamSet for Upper NIBP
Diastolic
15% 5% - 25% Configuration Utility
ParamSet for Lower NIBP
Diastolic
15% 5% - 25% Configuration Utility
ParamSet for Upper NIBP
Mean
10% 5% - 15% Configuration Utility
ParamSet for Lower NIBP
Mean
10% 5% - 15% Configuration Utility
NIBP Adult
Systolic Upper Alarm Limit 220 mmHg
29.3 kPa
32 - 260 mmHg
4.3 - 34.7 kPa
Monitor, Acuity
Systolic Lower Alarm Limit 75 mmHg
10.0 kPa
30 - 258 mmHg
4.0 - 34.4 kPa
Monitor, Acuity
Diastolic Upper Alarm Limit 110 mmHg
14.7 kPa
22 - 235 mmHg
2.9 - 31.3 kPa
Monitor, Acuity
Diastolic Lower Alarm Limit 35 mmHg
4.7 kPa
20 - 233 mmHg
2.7 - 31.1 kPa
Monitor, Acuity
Mean Upper Alarm Limit 120 mmHg
16.0 kPa
22 - 255 mmHg
2.9 - 34.0 kPa
Monitor, Acuity
Mean Lower Alarm Limit 50 mmHg
6.7 kPa
20 - 253 mmHg
2.7 - 33.7 kPa
Monitor, Acuity
Table 11. Parameter Configuration Matrix (continued)
Parameter Factory Setting Possible Values Where Set

Directions for Use Monitor Configuration 119
NIBP Pediatric
Systolic Upper Alarm Limit 145 mmHg
19.3 kPa
32 - 160 mmHg
4.3 - 21.3 kPa
Monitor, Acuity
Systolic Lower Alarm Limit 75 mmHg
10.0 kPa
30 - 158 mmHg
4.0 - 21.1 kPa
Monitor, Acuity
Diastolic Upper Alarm Limit 100 mmHg
13.3 kPa
17 - 130 mmHg
2.3 - 17.3 kPa
Monitor, Acuity
Diastolic Lower Alarm Limit 35 mmHg
4.7 kPa
15 - 128 mmHg
2.0 - 17.1 kPa
Monitor, Acuity
Mean Upper Alarm Limit 110 mmHg
14.7 kPa
17 - 140 mmHg
2.3 - 18.7 kPa
Monitor, Acuity
Mean Lower Alarm Limit 50 mmHg
6.7 kPa
15 - 138 mmHg
2.0 - 18.4 kPa
Monitor, Acuity
NIBP Neonatal
Systolic Upper Alarm Limit 100 mmHg
13.3 kPa
27 - 120 mmHg
3.6 - 16.0 kPa
Monitor, Acuity
Systolic Lower Alarm Limit 50 mmHg
6.7 kPa
25 - 118 mmHg
3.33 - 15.7 kPa
Monitor, Acuity
Diastolic Upper Alarm Limit 70 mmHg
9.3 kPa
12 - 105 mmHg
1.6 - 14.0 kPa
Monitor, Acuity
Diastolic Lower Alarm Limit 30 mmHg
4.0 kPa
10 - 103 mmHg
1.3 - 13.7 kPa
Monitor, Acuity
Mean Upper Alarm Limit 80 mmHg
10.7 kPa
12 - 110 mmHg
1.6 - 14.7 kPa
Monitor, Acuity
Mean Lower Alarm Limit 35 mmHg
4.7 kPa
10 - 108 mmHg
1.3 - 14.4 kPa
Monitor, Acuity
SpO2 General
Enable Spot Checks Yes Yes, No Configuration Utility
ParamSet for Upper SpO25% 5% - 10% Configuration Utility
ParamSet for Lower SpO25% 5% - 10% Configuration Utility
SpO2 Adult
Upper Alarm Limit 100% 52% - 100% Monitor, Acuity
Lower Alarm Limit 90% 50% - 98% Monitor, Acuity
SpO2 Pediatric
Upper Alarm Limit 100% 52% - 100% Monitor, Acuity
Lower Alarm Limit 90% 50% - 98% Monitor, Acuity
Table 11. Parameter Configuration Matrix (continued)
Parameter Factory Setting Possible Values Where Set

120 Monitor Configuration Welch Allyn Propaq LT Vital Signs Monitor
SpO2 Neonatal
Upper Alarm Limit 98% 52% - 100% Monitor, Acuity
Lower Alarm Limit 85% 50% - 98% Monitor, Acuity
Resp General
ParamSet for Upper Resp 5% 5% - 25% Configuration Utility
ParamSet for Lower Resp 5% 5% - 25% Configuration Utility
Resp On/Off Yes Yes, No Monitor, Configuration
Utility
Resp Adult
Vector Ld1 Ld1 (RA-LA), Ld2 (RA-LL) Monitor, Configuration
Utility, Acuity
Upper Alarm Limit 30/min 4/min - 150/min Monitor, Acuity
Lower Alarm Limit 5/min 2/min - 148/min Monitor, Acuity
Resp Pediatric
Vector Ld1 Ld1 (RA-LA), Ld2 (RA-LL) Monitor, Configuration
Utility, Acuity
Upper Alarm Limit 45/min 4/min - 150/min Monitor, Acuity
Lower Alarm Limit 10/min 2/min - 148/min Monitor, Acuity
Resp Neonatal
Vector Ld1 Ld1 (RA-LA), Ld2 (RA-LL) Monitor, Configuration
Utility, Acuity
Upper Alarm Limit 60/min 5/min - 150/min Monitor, Acuity
Lower Alarm Limit 10/min 3/min - 148/min Monitor, Acuity
Table 11. Parameter Configuration Matrix (continued)
Parameter Factory Setting Possible Values Where Set

9
121
PC Utility
Introduction . . . . . . . . . . . . . . . . . . . . . . . . . . . . . . . . . . . . . . . . . . . . . . . . . . . .121
Installation . . . . . . . . . . . . . . . . . . . . . . . . . . . . . . . . . . . . . . . . . . . . . . . . . . . . .122
Configuring the Monitor . . . . . . . . . . . . . . . . . . . . . . . . . . . . . . . . . . . . . . . . . .126
About AutoPrint . . . . . . . . . . . . . . . . . . . . . . . . . . . . . . . . . . . . . . . . . . . . . . . . .136
Configuration Worksheet. . . . . . . . . . . . . . . . . . . . . . . . . . . . . . . . . . . . . . . . . .137
Introduction
Use the Propaq LT Monitor PC Utility to install either or both of the following utilities on
aPC:
• Propaq LT Monitor Configuration Utility
• Propaq LT Monitor AutoPrint Utility
These utilities can then be used to control the behavior of any Propaq LT monitor.
Propaq LT Monitor Configuration Utility
The monitor comes fully configured and ready for operation. If the factory configuration
does not match your specific needs, you can use the Propaq LT Monitor Configuration
Utility to customize the monitor to fit the requirements of your clinical situation.
To configure the monitor, follow these steps:
1. Use the configuration worksheet to specify the monitor settings. (See “Configuration
Worksheet” on page 137.)
2. On a PC running the Propaq LT Monitor Configuration Utility, enter the settings into a
configuration file. (See “Making a Configuration File” on page 126.)
3. On a PC connected to a Propaq LT Monitor Charging/Communications Cradle
configured with the optional data link capability, download the configuration file to any
number of Propaq LT monitors. (See “Configuring a Monitor” on page 130.)
122 PC Utility Welch Allyn Propaq LT Vital Signs Monitor
Propaq LT Monitor AutoPrint Utility
With a PC connected to a printer and with a cradle configured with the optional data link
capability, you can configure the PC to print, manually or automatically, all patient data
stored in the monitor each time the monitor is placed in the cradle. (See “Printing Patient
Data” on page 103.)
Installation
System Requirements
PC on Which You Have Administrator Privileges
• CPU: 800 MHz or faster
• Hard drive: 20 GB or more
• Available RAM: 256 MB or more
• Available Port: USB 1.1
• OS: Windows 2000 or Windows XP
Printer
• Installed and configured
• Resolution: 300 minimum; 600 or higher recommended
Procedure
Launching the Installation
1. Insert the software distribution CD in a CD-ROM drive of your PC.
2. When the installation program starts, follow the instructions presented on your
computer monitor.
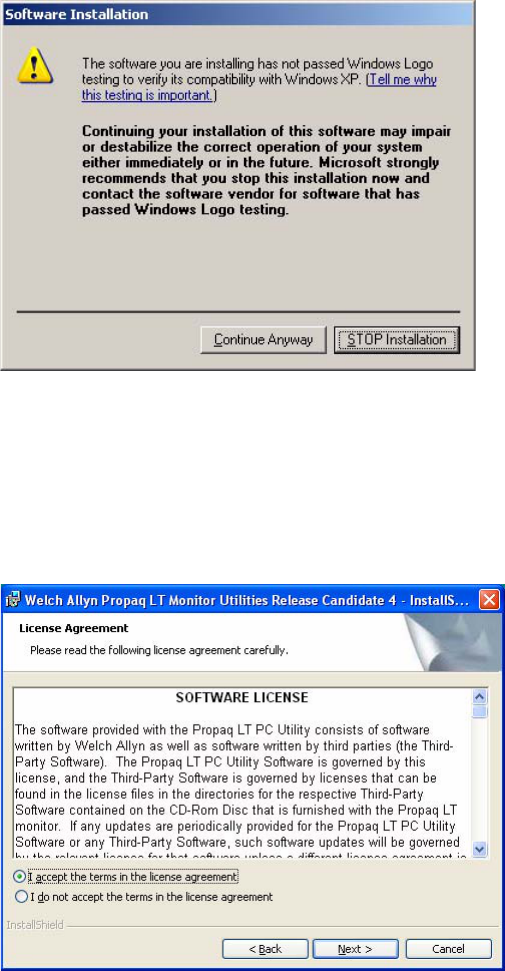
If you are installing on a PC running Windows XP, you might see the message shown
below. Click Continue Anyway to continue the installation.
Directions for Use PC Utility 123
Figure 101. Windows Logo Message
Usually, the installation completes quickly. However, if the utility also has to install
.NET Framework on your computer, this can add several minutes.
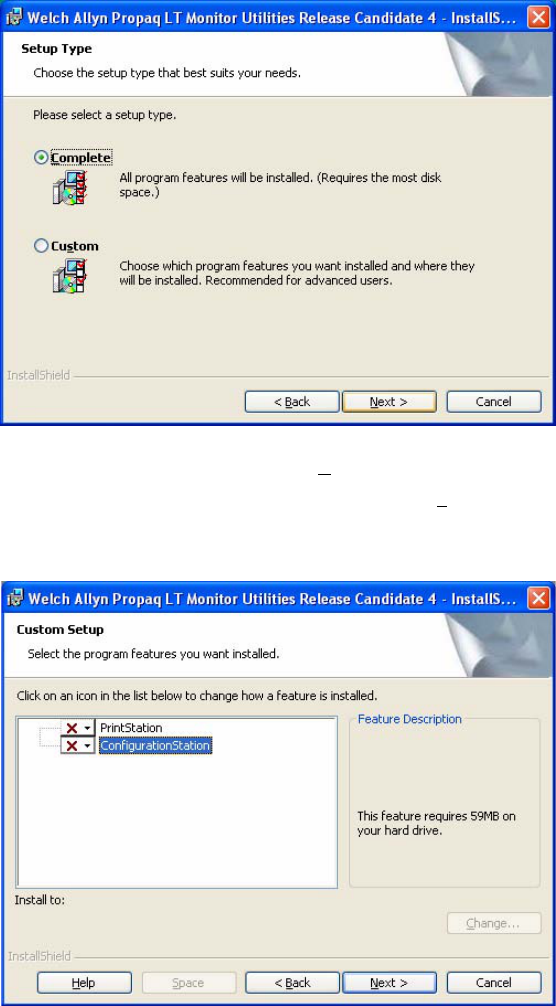
3. Click through the Welcome screen and the license agreement.
You must accept the terms of the license agreement to proceed with the installation.
Figure 102. Accepting the Terms of the Software License
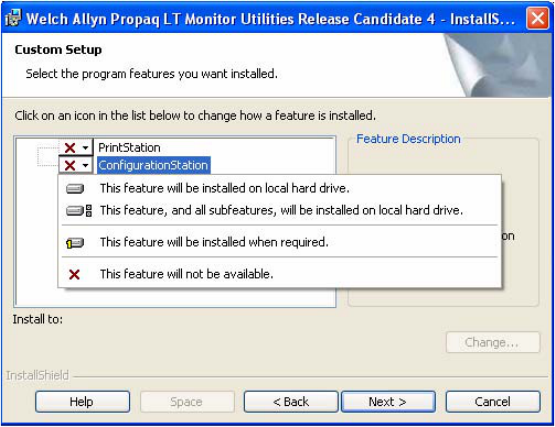
4. Determine whether you want to install the Configuration Utility only, the AutoPrint
Utility only, or both utilities.
124 PC Utility Welch Allyn Propaq LT Vital Signs Monitor
Figure 103. Complete or Custom Installation
• To install both utilities, click Complete.
• To install only one of the utilities, click Custom and, in the next screen
(Figure 104), select the utility you want to install.
Figure 104. Selecting to Install Either the AutoPrint Utility or the Configuration Utility
If you click the next to your choice, you can also select one of the installation options
available for that choice (Figure 105).
Directions for Use PC Utility 125
Figure 105. Menu of Installation Options
5. The installation prompts you occasionally for information. At each prompt, provide the
requested information and then click Next. The installation continues until it is
finished.
126 PC Utility Welch Allyn Propaq LT Vital Signs Monitor
Configuring the Monitor
Making a Configuration File
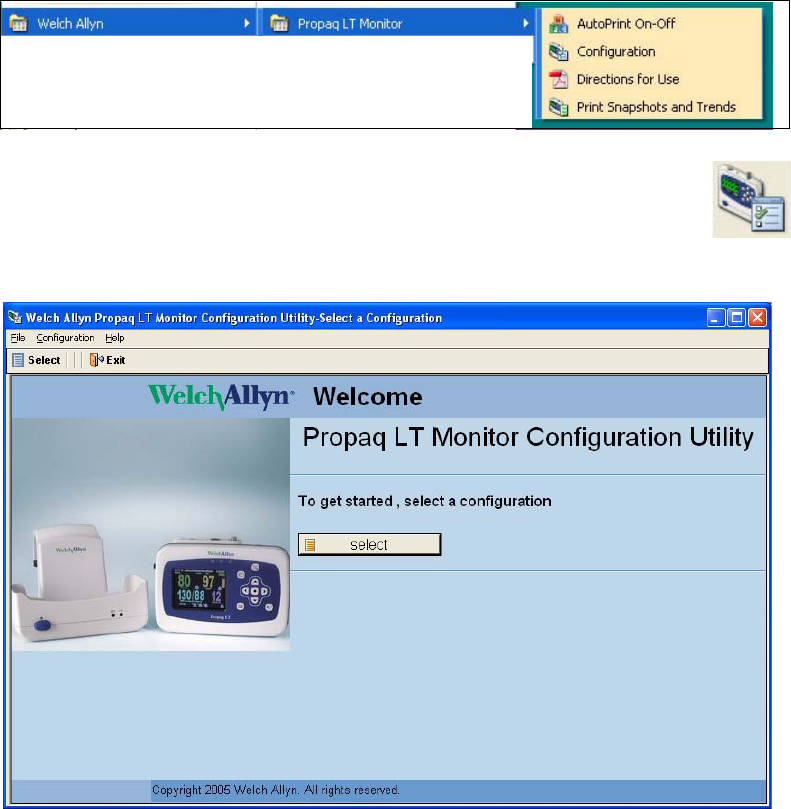
1. On a PC, start the Propaq LT Monitor Configuration Utility (Figure 106):
Start >Programs >Welch Allyn >Propaq LT Monitor >Configuration
Figure 106. Starting the Configuration Utility - Start Menu
You can also start the utility by double-clicking the Configuration icon on
the computer desktop.
The configuration utility Welcome screen (Figure 107) appears.
Figure 107. Configuration Utility Welcome Screen
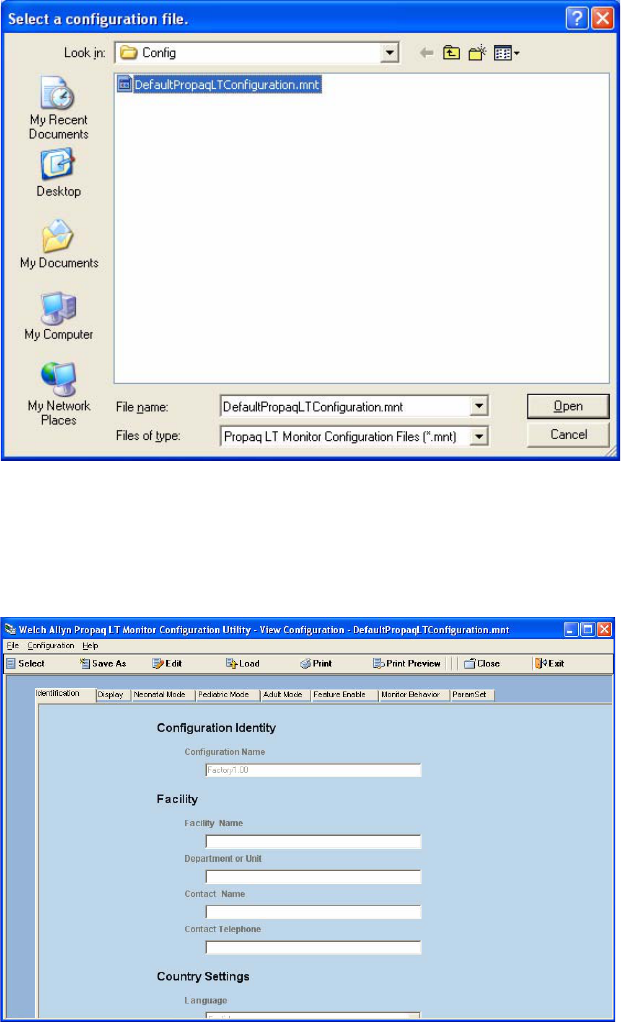
2. Click Select. A file-selection window appears (Figure 108), displaying all configuration
files (*.mnt) in the Config folder. For a new installation of the utility,
DefaultPropaqLTConfiguration.mnt is the only file in the folder.
Directions for Use PC Utility 127
Figure 108. Selecting a Configuration File for Display
3. Select DefaultPropaqLTConfiguration.mnt and click Open. The file is opened for
viewing in the configuration display (Figure 109). (See “About the Configuration
Display” on page 130.)
Figure 109. Configuration Display
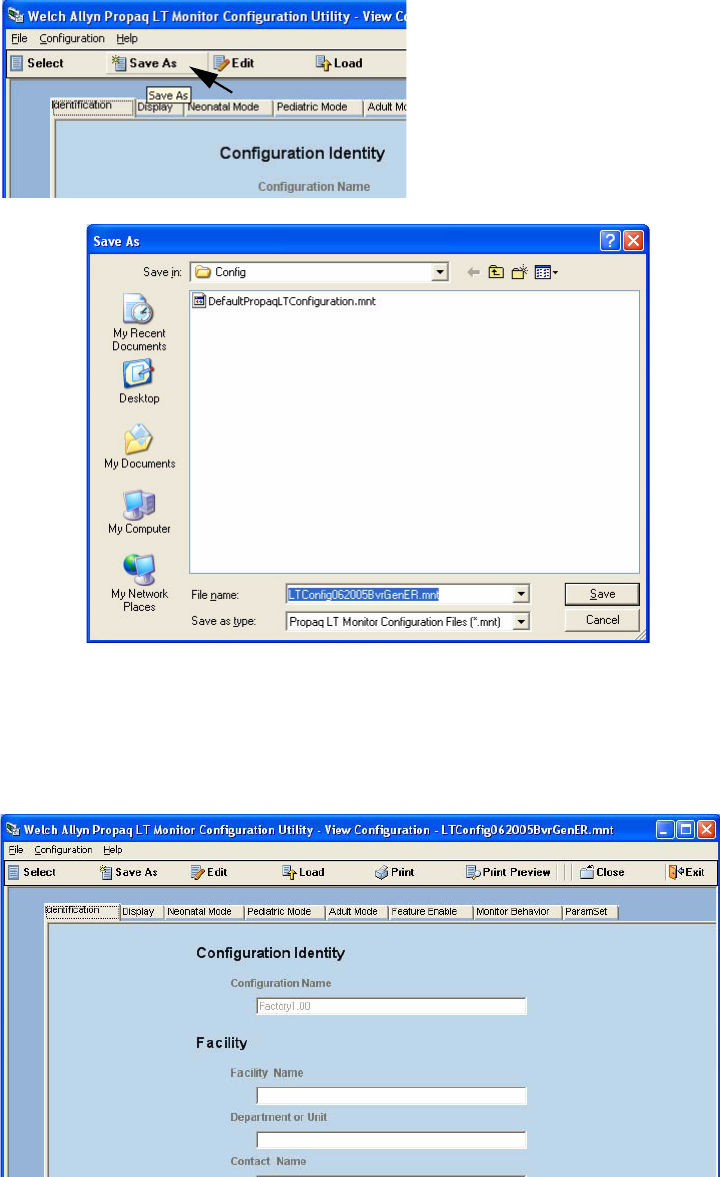
4. The program does not permit you to modify DefaultPropaqLTConfiguration.mnt. To
make a new configuration file, save DefaultPropaqLTConfiguration.mnt under a new
name (Figure 110) and then edit the new file as needed.
128 PC Utility Welch Allyn Propaq LT Vital Signs Monitor
Figure 110. Creating a New Configuration File (Save As)
The utility displays the new file (Figure 111).
5. To open the new file for editing, click Edit. You can now enter text and select
parameter options.
Figure 111. File Opened for Editing
Directions for Use PC Utility 129
6. Define the monitor settings for the new configuration. Examine each field in the
configuration utility. Change any value that is not appropriate for your clinical situation.
7. When the form is complete and the value in each field is correct, click Save.
Alternatively, to save the file and close it, click Save/Close.
Printing a Configuration File
To print this configuration file, click Print.
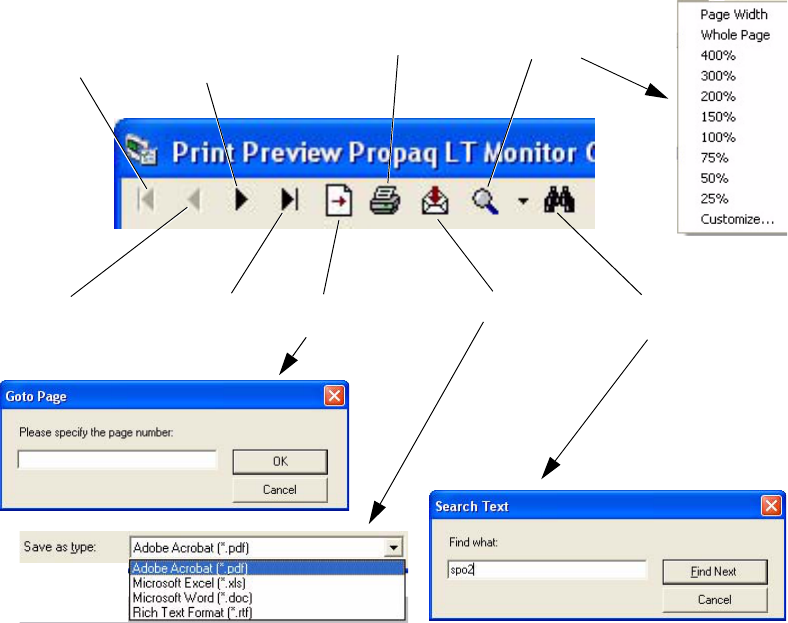
To see what the printed report looks like before you print it, click Print Preview. The Print
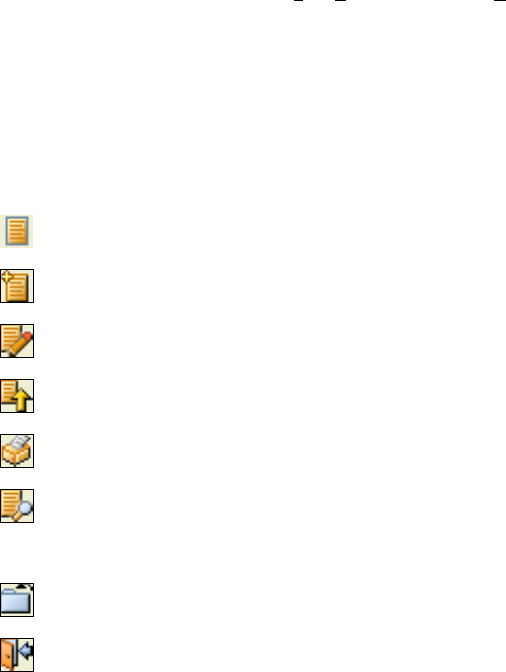
Preview screen (Figure 112) displays a report of the configuration file and gives you
several options for printing, viewing, exporting, and searching the report.
Figure 112. Print Preview - Options
Search the report
for a text string.
Go to the first page
of the report.
Go to the previous
page of the report.
Go to the next
page of the report.
Go to the last
page of the report.
Go to the specified
page of the report.
Print the report.
Export the report.
Zoom the report display.
130 PC Utility Welch Allyn Propaq LT Vital Signs Monitor
Modifying a Configuration File
To change a configuration file that has already been completed, follow these steps:
1. Start the utility.
2. Select the configuration file that you want to modify.
3. Click Edit.
4. Using the section tabs, navigate to the setting you want to change.
5. Enter the new value.
6. Repeat steps 4 and 5 until you have updated all of the settings you want to change.
7. Click Save or Save/Close.
Configuring a Monitor
1. Seat the monitor in the cradle.
2. If the monitor is off, turn it on and select Start New Patient.
3. Start the utility.
4. Select the configuration file that you want to upload.
5. Click Load.
6. Wait a few seconds. When the upload is complete, a completion message appears
and then the monitor shuts off.
7. Remove the monitor from the cradle. It is now configured.
About the Configuration Display
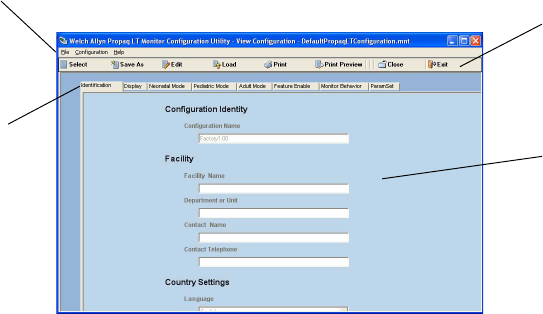
Figure 113. Configuration Display
Configuration
commands
Windows command menus
Page tabs
Configuration settings
and parameters
Directions for Use PC Utility 131
The configuration display contains the following elements:
• Windows command bar
• Configuration command bar
• Page tabs
• Configuration settings and parameters.
The Windows command bar includes File, Configuration, and Help.
The configuration commands include the following:
File Save, Close, Save and Close, Exit
Configuration Select, Save As, Edit, Load, Print, Print Preview
Help About Propaq LT Monitor Configuration Utility
Select Open a file-selection dialog. This has the same function as the Select button
on the Welcome screen (Figure 107 on page 126).
Save As Save the configuration file as a new file with another name.
Edit Enable the configuration file for editing.
Load Upload the configuration file to the monitor currently in the cradle.
Print Print the configuration file.
Print Preview Open the Print Preview window. This presents options for navigating the
configuration file, enlarging or reducing the size of the display, searching for
occurrences of specified text in the file, printing the file, and exporting an
electronic (PDF) version of the file.
Close Close the configuration file.
Exit Exit the configuration utility application.
132 PC Utility Welch Allyn Propaq LT Vital Signs Monitor
The page tabs link you to the sections of the configuration file:
The utility is divided into eight sections, each represented by a labeled tab across the top
of the form. The first page of the worksheet (see Figure 111) describes the content of
each section. Individual settings are described in the worksheet.
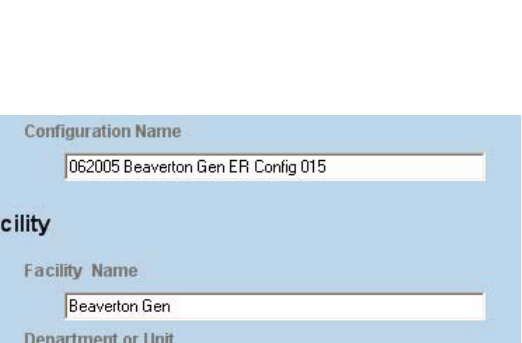
The first five settings, under the Identification tab, are text fields. You can enter text
(Figure 114) in each field.
Figure 114. Text Entered Into a Text Field
In the remaining fields of the configuration utility, you either...
• select one item from a drop-down menu of items or
• use a check-box to choose between Ye s and No
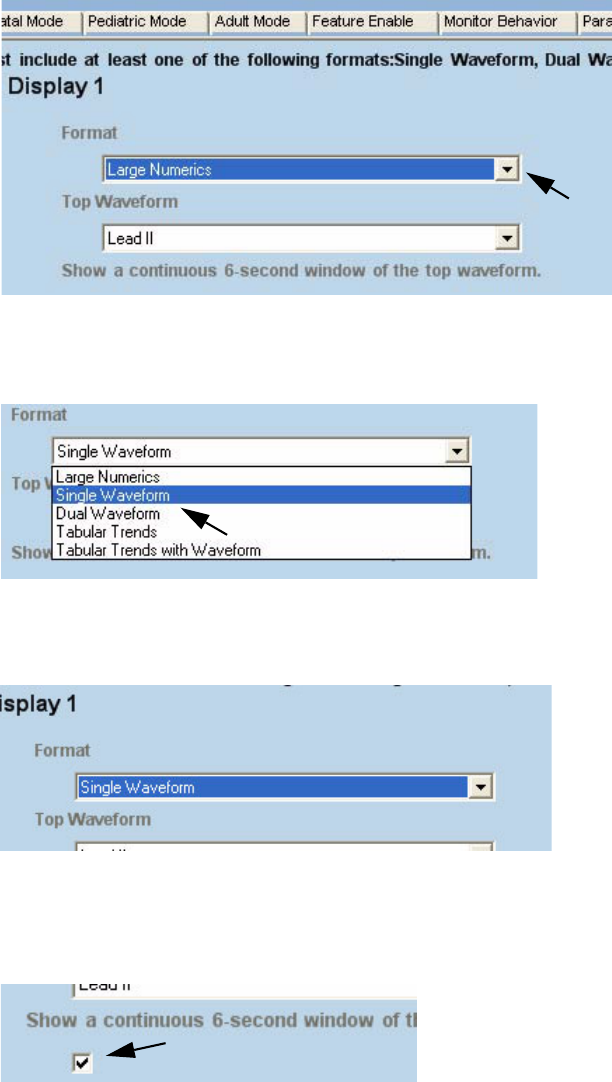
To see a drop-down menu, click the triangle at the right of the field (Figure 115).
Identification Name the configuration, define monitor ownership and
support responsibility, and define parameters related to
your locale.
Display Select and define the displays.
Neonatal Mode Define default settings for neonatal patients.
Pediatric Mode Define default settings for pediatric patients.
Adult Mode Define default settings for adult patients.
Feature Enable Specify the monitor features available to clinicians.
Monitor Behavior Define the general properties of the monitor.
ParamSet Define the alarm-limit adjustment percentages
(ParamSet) for systolic, diastolic, and mean pressures,
HR/PR, SpO2, and respiration rate.
Note These text strings can be of any length; however, the monitor displays only the
first 40 characters of the string for each field.
Directions for Use PC Utility 133
Figure 115. Opening a Drop-down Menu
Click a choice (Figure 116) to select it...
Figure 116. Selecting From a Drop-Down Menu
The new selection appears in the field (Figure 117).
Figure 117. New Selection Displayed
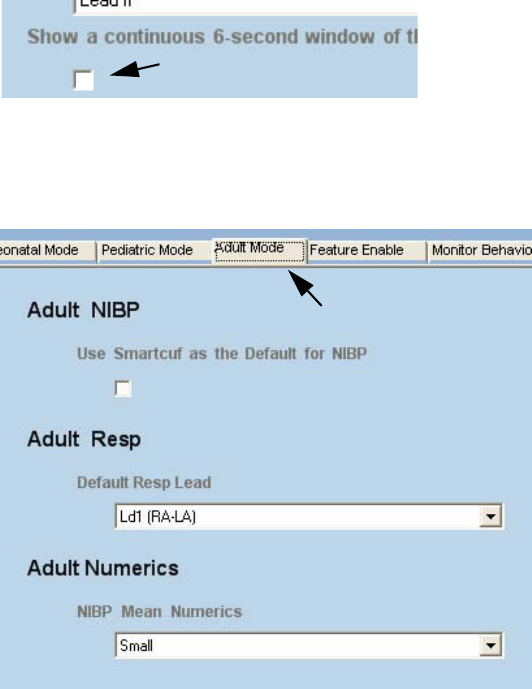
To set a value for a Yes-No item, click the box to insert a mark for Ye s (Figure 118),
or click the box to remove the mark for No (Figure 119).
Figure 118. Selecting Yes (A Check Mark)
134 PC Utility Welch Allyn Propaq LT Vital Signs Monitor
Figure 119. Selecting No (No Check Mark)
To view the settings for a topic, click the tab for that topic. For example, to see the
Default Resp Lead setting for adults, click Adult Mode (Figure 120).
Figure 120. Settings Under Adult Mode
Error Messages
• Communication with the monitor failed. Verify that the monitor is powered on and
properly seated in the cradle. Verify that the cable is connected.
• Could not read patient data from the monitor. Please contact Welch Allyn customer
service.
• The configuration file did not install on the monitor. Verify all connections between
monitor, cradle, and PC and try again. If problems continue, contact Welch Allyn
customer service.
• Configuration file format is invalid. Try editing the configuration and saving it again.
• The selected file is read-only and cannot be edited. Please select another file or Save
the File with another name.
• The Configuration File: [file name] that you are attempting to read is in the wrong
format. Please select another file.

Directions for Use PC Utility 135
About the Configuration Worksheet
The first step in customizing a monitor configuration is to complete a configuration
worksheet. This defines the settings to be stored in the monitor.
Print the worksheet (page 137 to page 156 of this document) and supply the values for
any settings you want to change. When the worksheet is complete, give it to the person
designated to create the new configuration file.
About Defaults
The settings defined for the monitor when it first arrives from the factory are called
‘factory defaults’. Factory defaults include settings for most parameters and also define
whether certain monitor features are enabled or disabled.
An example of a default setting:
The default volume of the alarm tone is set to Medium. To change the default volume
level to Low, select Low in the configuration file. (Like many other monitor settings,
the volume of the alarm tone can also be changed by the clinician while the monitor is
in use. The configuration simply defines what the setting will be when the monitor
power is turned on.)
An example of enabled and disabled features:
The monitor behavior Pacer Indicator On Default has a default value of No, so the
monitor does not, by default, include pacemaker indicators in an ECG waveform
display. To change the default behavior so that the monitor does show pacemaker
indicators in an ECG waveform display, change the value to Ye s in the custom
configuration.
The feature Back Light Lockout Enable has a factory-default value of Ye s (enabled), so
it is, by default, available to clinicians. To make this feature unavailable to clinicians,
change the value to No in the custom configuration.
Factory defaults remain in effect until you reconfigure the monitor by downloading a
custom configuration file to it from the PC.
WARNING You must read and understand the warning statements in “Enable
Wireless Communications (with Acuity)” on page 147 before any configuration
file is created based on a worksheet.
Note A worksheet is not required. The worksheet makes it possible for key clinical staff
to preview and approve the configuration, and it makes it easier to create the
configuration file.

136 PC Utility Welch Allyn Propaq LT Vital Signs Monitor
After you reconfigure the monitor, the settings defined in the new configuration become
the ‘system defaults’, and the factory defaults are no longer in effect. The new system
defaults remain in effect until another configuration is downloaded to the monitor. If you
reconfigure the monitor and then want to restore the factory defaults, download the
configuration file “DefaultPropaqLTConfiguration.mnt.”
The monitor is reset to the system defaults (not the factory defaults) every time the
monitor power is cycled off and on, with one exception: If a clinician has changed some
monitor settings at the bedside for a patient and then shuts off the monitor, the monitor
offers the options to “Delete and Shut Down” and to “Save and Shut Down”. If the
clinician selects “Save and Shut Down,” shuts off the monitor, and then turns on the
monitor again, the monitor prompts with the choice, “Start New Patient” or “Continue
Patient”. If the clinician selects “Continue Patient,” the monitor uses the settings that
were saved for that patient before the power was turned off. If the clinician selects “Start
New Patient,” the system default settings are restored.
• In the printed version of the configuration worksheet, the factory default values
are indicated by bold text.
• In the electronic version of the configuration worksheet, the factory default
values appear in the form fields when you first open the file,
PropaqLTMonCfgWS.doc.
• In the configuration utility, the factory default values appear in the data fields
when you open the default configuration file, DefaultPropaqLTConfiguration.mnt,
using the configuration utility.
About AutoPrint
For information about using the AutoPrint Utility, see “Printing Patient Data” on page 103.
Caution Do not attempt to modify a configuration file without using the Propaq
LT Configuration Utility.

Configuration Worksheet 137
Configuration Worksheet
1 Identification . . . . . . . . . . . . . . . . . . . . . . . . . . . . . . . . . . . . . . . . . . . . . . . 138
Name the configuration, define monitor ownership and support responsibility,
and define parameters related to your locale.
2 Display Configuration. . . . . . . . . . . . . . . . . . . . . . . . . . . . . . . . . . . . . . . . 141
Select and define the displays.
3 Neonatal Mode . . . . . . . . . . . . . . . . . . . . . . . . . . . . . . . . . . . . . . . . . . . . . 144
Define default settings for neonatal patients.
4Pediatric Mode . . . . . . . . . . . . . . . . . . . . . . . . . . . . . . . . . . . . . . . . . . . . . 145
Define default settings for pediatric patients.
5 Adult Mode . . . . . . . . . . . . . . . . . . . . . . . . . . . . . . . . . . . . . . . . . . . . . . . . 146
Define default settings for adult patients.
6 Feature Enable . . . . . . . . . . . . . . . . . . . . . . . . . . . . . . . . . . . . . . . . . . . . . 147
Specify the monitor features available to clinicians.
7 Monitor Behavior . . . . . . . . . . . . . . . . . . . . . . . . . . . . . . . . . . . . . . . . . . . 151
Define the general properties of the monitor.
8 ParamSet . . . . . . . . . . . . . . . . . . . . . . . . . . . . . . . . . . . . . . . . . . . . . . . . . . 154
Define the alarm-limit adjustment percentages (ParamSet) for systolic,
diastolic, and mean pressures, HR/PR, SpO2, and Resp.
The final page of this worksheet is the worksheet authorization, which identifies the
person responsible for defining the custom configuration. The information on the
authorization page is not part of the monitor configuration.

138 Welch Allyn Propaq LT Vital Signs Monitor
1 Identification
1.1 Configuration Identity
For each configuration, enter a unique name that identifies the following:
• the hospital and the care unit or department that owns the monitor
• the date on which this configuration is created
The name can include any standard keyboard characters other than the comma (,).
For example:
StEGH #9 West Dec_29 2003
If multiple configuration files are created on the same day, include additional
identifying information to the configuration name.
For example:
StEGH #9 West Dec_29 2003 Pediatric
StEGH #9 West Dec_29 2003 Neonate
What name do you want to give this configuration?
Configuration Name
(Up to 40 characters.)
Note All configuration parameters are set at the factory. You do not have to change any
settings for the monitor to work properly.

Configuration Worksheet 139
1.2 Facility
This information further clarifies ownership of the monitor, and it identifies a person
who should be notified if the monitor needs attention.
What facility, department, and individual is responsible for this monitor?
Facility Name
(Up to 40 characters.)
Department or Unit
(Up to 40 characters.)
Contact Name
(Up to 40 characters.)
Contact Telephone
(Up to 40 characters.)
1.3 Country Settings
This section determines the appearance of information on the monitor display, and
specifies an electrical setting and a regulatory setting.
For each parameter, the factory setting is shown in bold. The factory setting is used
until another value is uploaded to the monitor.
1.3.1 Language
In what language are monitor messages and text to be displayed?
__ English
__ Dutch
__ French
__ German
__ Italian
__ Polish
__ Portuguese
__ Spanish
__ Swedish
1.3.2 Time Format
How do you want the monitor to display time?
__ 12-hour AM/PM
__ 24-hour
Note All configuration parameters are set at the factory. The monitor works even if you
do not change any settings.

140 Welch Allyn Propaq LT Vital Signs Monitor
1.3.3 Date Format
How do you want the monitor to display the date?
__ mm/dd/yy
__ dd.mm.yy
__ yy/mm/dd
1.3.4 Decimal Format
You can configure the monitor to use a dot (for example, 195.18) or a comma (195,18)
to display the decimal point.
How do you want the monitor to display the decimal point?
__ Dot
__ Comma
1.3.5 Power Source Filter
Set the power-source interference filter to the appropriate frequency for your location.
If the filter is not set, the ECG waveform displays might contain high-frequency noise
caused by the interference generated from the facility ac power supply.
Which filter, if any, should be used to reduce interference from the ac power
supply?
__ 60 Hz
__ 50 Hz
__ Off
1.3.6 Regulatory Set
In which regulatory area is this facility located?
__ US
__ European EC
__ Japan Metrology
60 Hz North America, Taiwan, and Japan
50 Hz All other locations
Off
Configuration Worksheet 141
2 Display Configuration
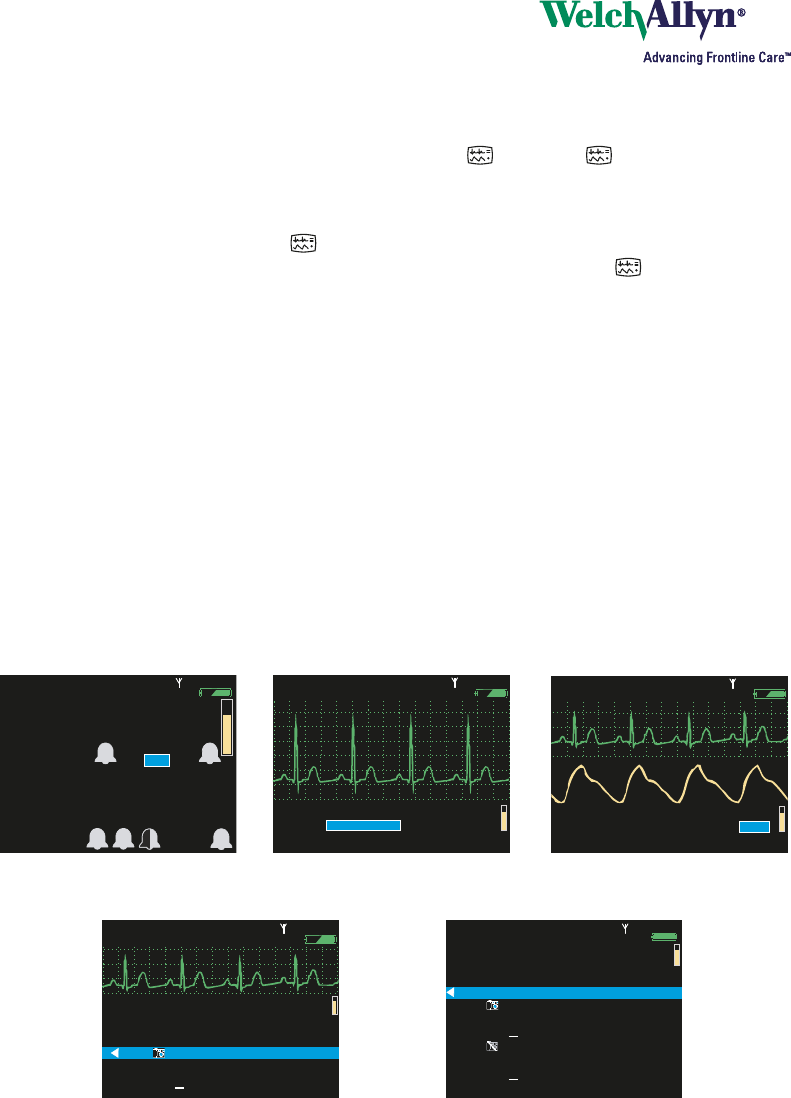
The monitor interface includes a Display button: . Pressing cycles the display
quickly through the three views you specify below.
In the configuration, you can choose any three of the five display choices shown
below for quick display with . For example, if you select Large Numerics, Single
Waveform, and Dual Waveform, a clinician can repeatedly press to see a
patient’s vital signs displayed first as large numerics, second as a single waveform
with small numerics, and finally as a dual waveform with small numerics.
• You must include at least one display with a waveform.
• If you select Single Waveform and do not select Dual Waveform, Ta b u l a r
Tr e n d s , or Ta b u l a r Tr e n d s w i t h Wa v e f o rm , users can still view dual waveforms,
tabular trends, and tabular trends with a single waveform.
• If you do not select Large Numerics, clinicians cannot access the Large
Numerics display.
After you select three displays (see “Display Format” on page 142), you can select
the default appearance for each.
For each parameter, the factory default value is shown in bold. The default value is
used by the monitor unless you specify another value in this worksheet.
140/78
140/78
80
80
12
12
97
97 %
HALL, ROBERT E.
HALL, ROBERT E.
3456187
3456187
3:00:06P
3:00:06P
Adult
Adult
Rm 239
Rm 239
HR/min
HR/min
NIBP mmHg (102)
NIBP mmHg (102)
@2:47P Manual
@2:47P Manual
Resp/min
Resp/min
SpO2
SpO2
SpO2
SpO2
2x
2x
II 1mV/cm
II 1mV/cm
80
80
97
97
140/
78
78
12
12
HALL, ROBERT E.
HALL, ROBERT E.
3456187
3456187
3:00:06P
3:00:06P
Adult
Adult
Rm 239
Rm 239
NIBP mmHg (102) Manual
NIBP mmHg (102) Manual
2:47P
2:47P
Resp/min
Resp/min
HR/min
HR/min
SpO2
SpO2
%
S D M
%
140/78
140/78
80
80
12
12
97
97
HALL, ROBERT E.
HALL, ROBERT E.
3456187
3456187
3:00:06P
3:00:06P
Adult
Adult
Rm 239
Rm 239
HR/min
HR/min
NIBP mmHg (102)
NIBP mmHg (102)
@2:47P Manual
@2:47P Manual
Resp/min
Resp/min
SpO2
SpO2
II 1mV/cm
II 1mV/cm
II 1mV/cm
II 1mV/cm
%
12:41
12:41
12:40
12:40
12:39
12:39
12:38
12:38
12:37
12:37
12:38
12:38
12:36
12:36
125
125
122
122
100
100
75
75
50
50
25
25
130/65 (93)
130/65 (93)
112/87 (87)
112/87 (87)
192/110 (130)
192/110 (130)
n/a
n/a
n/a
n/a
n/a
n/a
n/a
n/a
22
22
18
18
16
16
17
17
19
19
19
19
98
98
98
98
99
99
99
99
98
98
100
100
n/a
n/a
12
12
SpO2
SpO2
SEARCH
SEARCH
Tabular
Tabular
Time
Time
80
80
140/78
140/78
HR/min
HR/min
NIBP mmHg
NIBP mmHg
Resp/min
Resp/min
n/a
n/a
HALL, ROBERT E.
HALL, ROBERT E.
3456187
3456187
12:41:32
12:41:32
Adult
Adult
Rm 239
Rm 239
%
12:41
12:41
12:40
12:40
12:39
12:39
12:38
12:38
12:37
12:37
12:38
12:38
12:36
12:36
12:35
12:35
12:34
12:34
12:33
12:33
12:32
12:32
12:31
12:31
125
125
122
122
100
100
75
75
50
50
25
25
100
100
50
50
25
25
100
100
130/65 (93)
130/65 (93)
112/87 (87)
112/87 (87)
192/110 (130)
192/110 (130)
152/78 (115)
152/78 (115)
152/78 (115)
152/78 (115)
22
22
18
18
16
16
17
17
19
19
19
19
19
19
19
19
19
19
19
19
17
17
98
98
98
98
99
99
99
99
98
98
100
100
98
98
98
98
98
98
100
100
152/78 (115)
152/78 (115)
n/a
n/a
n/a
n/a
n/a
n/a
n/a
n/a
n/a
n/a
n/a
n/a
n/a
n/a
n/a
n/a
12
12
SpO2
SpO2
SEARCH
SEARCH
HALL, ROBERT E.
HALL, ROBERT E.
3456187
3456187
12:41:32
12:41:32
Adult
Adult
Rm 239
Rm 239
Tabular
Tabular
Time
Time
80
80
140/78
140/78
HR/min
HR/min
NIBP mmHg
NIBP mmHg
Resp/min
Resp/min
Off
Off
Large Numerics Single Waveform Dual Waveform
Tabular TrendsTabular Trends with Waveform

142 Welch Allyn Propaq LT Vital Signs Monitor
Display Format
Which display format do you want to use for ...
Display 1 Display 2 Display 3
__ Large Numerics __ Large Numerics __ Large Numerics
__ Single Waveform __ Single Waveform __ Single Waveform
__ Dual Waveform __ Dual Waveform __ Dual Waveform
__ Tabular Trends __ Tabular Trends __ Tabular Trends
__ Tabular Trends with
Waveform
__ Tabular Trends with
Waveform
__ Ta b u l a r Tre n d s w i t h
Waveform
__ None __ None
If the format includes a waveform, then from which Lead is the waveform to be
displayed?
Display 1 Display 2 Display 3
__ Lead I __ Lead I __ Lead I
__ Lead II __ Lead II __ Lead II
__ Lead III __ Lead III __ Lead III
__ Lead V __ Lead V __ Lead V
__ aVR __ aVR __ aVR
__ aVL __ aVL __ aVL
__ aVF __ aVF __ aVF
__ SpO2__ SpO2__ SpO2
__ Resp __ Resp __ Resp
Do you want to enable 6-second display of the top waveform?
Display 1 Display 2 Display 3
(Yes) (Yes) (Yes)
(No) (No) (No)
If you select (Yes), the monitor displays two consecutive 3-second periods of the
top waveform.
If you select (No), the monitor displays 3 seconds of the top waveform and, if Dual
Waveform is selected, 3 seconds of the bottom waveform.

Configuration Worksheet 143
Display Format (continued)
If Dual Waveform display is enabled, which signal is to be displayed as the
default bottom waveform?
Display 1 Display 2 Display 3
__ Lead I __ Lead I __ Lead I
__ Lead II __ Lead II __ Lead II
__ Lead III __ Lead III __ Lead III
__ Lead V __ Lead V __ Lead V
__ aVR __ aVR __ aVR
__ aVL __ aVL __ aVL
__ aVF __ aVF __ aVF
__ SpO2__ SpO2__ SpO2
__ Resp __ Resp __ Resp
If Tabular Trends display is enabled, what is the default data interval?
__ 1 minute __ 1 minute __ 1 minute
__ 5 minutes __ 5 minutes __ 5 minutes
__ 10 minutes __ 10 minutes __ 10 minutes
__ 15 minutes __ 15 minutes __ 15 minutes
__ 30 minutes __ 30 minutes __ 30 minutes
__ 60 minutes __ 60 minutes __ 60 minutes

144 Welch Allyn Propaq LT Vital Signs Monitor
3 Neonatal Mode
For each parameter, the factory default value is shown in bold. The default value is
used by the monitor unless you specify another value in this worksheet.
3.1 Use Smartcuf as Default for NIBP
An NIBP measurement can be adversely affected by many factors, including body
motion (such as convulsions or shivering), ambient vibration, vehicle motion, weak
pulse, a sudden change in blood pressure, or sudden cuff movement. When these
factors are present, Welch Allyn’s patented Smartcuf technology can greatly increase
the accuracy of NIBP measurements.
Do you want to use Smartcuf as the default for neonatal NIBP measurements?
(Yes)
(No)
3.2 Default Resp Lead
The default Resp Lead for neonatal patients is:
__ Lead 1 (RA-LA)
__ Lead 2 (RA-LL)
3.3 NIBP Mean Numerics
Note: Selecting Large reduces the size of the systolic and diastolic displays.
What character size, if any, to you want to use as the default for displaying the
NIBP Mean Numeric for neonatal patients?
__ Small
__ Large
__ Off
Note Smartcuf will be available in 2006.
Note Smartcuf functions only during ECG monitoring.

Configuration Worksheet 145
4 Pediatric Mode
For each parameter, the factory default value is shown in bold. The default value is
used by the monitor unless you specify another value in this worksheet.
4.1 Use Smartcuf as Default for NIBP
An NIBP measurement can be adversely affected by many factors, including body
motion (such as convulsions or shivering), ambient vibration, vehicle motion, weak
pulse, a sudden change in blood pressure, or sudden cuff movement. When these
factors are present, Welch Allyn’s patented Smartcuf technology can greatly increase
the accuracy of NIBP measurements.
Do you want to use Smartcuf as the default for pediatric NIBP measurements?
(Yes)
(No)
4.2 Default Resp Lead
The default Resp Lead for pediatric patients is:
__ Lead 1 (RA-LA)
__ Lead 2 (RA-LL)
4.3 NIBP Mean Numerics
Note: Selecting Large reduces the size of the systolic and diastolic displays.
What character size, if any, to you want to use as the default for displaying the
NIBP Mean Numeric for pediatric patients?
__ Small
__ Large
__ Off
Note Smartcuf will be available in 2006.
Note Smartcuf functions only during ECG monitoring.

146 Welch Allyn Propaq LT Vital Signs Monitor
5 Adult Mode
For each parameter, the factory default value is shown in bold. The default value is
used by the monitor unless you specify another value in this worksheet.
5.1 Use Smartcuf as Default for NIBP
An NIBP measurement can be adversely affected by many factors, including body
motion (such as convulsions or shivering), ambient vibration, vehicle motion, weak
pulse, a sudden change in blood pressure, or sudden cuff movement. When these
factors are present, Welch Allyn’s patented Smartcuf technology can greatly increase
the accuracy of NIBP measurements.
Do you want to use Smartcuf as the default for adult NIBP measurements?
(Yes)
(No)
5.2 Default Resp Lead
The default Resp Lead for adult patients is:
__ Lead 1 (RA-LA)
__ Lead 2 (RA-LL)
5.3 NIBP Mean Numerics
Note: Selecting Large reduces the size of the systolic and diastolic displays.
What character size, if any, to you want to use as the default for displaying the
NIBP Mean Numeric for adult patients?
__ Small
__ Large
__ Off
Note Smartcuf will be available in 2006.
Note Smartcuf functions only during ECG monitoring.

Configuration Worksheet 147
6 Feature Enable
These settings specify whether or not certain features are available to the clinician.
If you enable a feature in the configuration, then it is available to the clinician. If you
disable a feature in the configuration, then it is not available to the clinician.
For each parameter, the factory value is shown in bold. Factory values are used until
other values are uploaded to the monitor.
6.1 Enable Wireless Communications (with Acuity)
For wireless monitors that must communicate with Acuity, this must be set to
(Yes). If this is set to (No), the monitor cannot communicate with Acuity.
For standalone monitors that do not communicate with Acuity, always set this
to (No). If this is set to (Yes), the configuration file is not valid and cannot be
uploaded to the monitor.
Do you want to enable wireless communication with Acuity?
(Yes)
(No)
Note If (Yes) is selected, NIBP Units Default (see “NIBP Units Default” on
page 153) must be set to mmHg.

148 Welch Allyn Propaq LT Vital Signs Monitor
6.2 Enable Lockouts
If lockouts are enabled, simultaneously pressing the Left Arrow, Right Arrow, and
Down Arrow buttons locks out one or more of the following:
For the following questions, select which lockouts, if any, to enable for this monitor
configuration.
6.2.1 Buttons Lockout Enable
Buttons lockout prevents unauthorized personnel from operating the monitor.
If you enable buttons lockout, the 3-button combination (Up Arrow, Down Arrow,
and Right Arrow) locks out the monitor until the combination is repeated or until an
alarm or alert condition arises.
Do you want to enable buttons lockout on this monitor?
(Yes)
(No)
6.2.2 Display Lockout Enable
Display lockout enable prevents unauthorized viewing of patient vital signs.
If display lockout is enabled, the 3-button combination (Up Arrow, Down Arrow, and
Right Arrow) locks out the monitor display until the combination is repeated or until
an alarm or alert condition arises.
Do you want to enable display lockout on this monitor?
(Yes)
(No)
6.2.3 Back Light Lockout Enable
Back light lockout prevents unauthorized viewing of patient vital signs.
If back light lockout is enabled, the 3-button combination (Up Arrow, Down Arrow,
and Right Arrow) locks out the monitor display back light until the combination is
repeated or until an alarm or alert condition arises.
Do you want to enable back light lockout on this monitor?
(Yes)
(No)
Buttons Block access to the monitor buttons
Back Light Extend the battery charge life
Display Prevent unauthorized viewing of confidential patient information

Configuration Worksheet 149
6.3 Display Time Out
Display Time Out greatly increases monitor run time on battery power.
Display Time Out completely shuts off the display if the monitor detects no button
press and no alarm for a number of minutes defined below. When the display is off,
no monitor information is visible.
Any alarm condition, alert condition, or button press immediately restores the display.
If the buttons are locked out (see “Buttons Lockout Enable” on page 148), pressing
the 3-button combination (Up Arrow, Down Arrow, and Right Arrow) and then any
other button immediately restores the display.
How soon after the last button press or alarm should the monitor turn off the
display?
__ 2 minutes
__ 5 minutes
__ 10 minutes
__ 15 minutes
__ 30 minutes
__ Always On (display always timed out)
6.4 Back Light Time Out
Back Light Time Out increases monitor run time on battery power.
Back Light Time Out turns off the back light if the monitor detects no button press and
no alarm for the number of minutes defined below. When the back light is off, the
display continues to be visible, although slightly dimmer, in ambient light.
Any alarm condition, alert condition, or button press immediately restores the back
light. If the buttons are locked out (see “Buttons Lockout Enable” on page 148),
pressing the 3-button combination (Up Arrow, Down Arrow, and Right Arrow) and
then any other button immediately restores the back light.
How soon after the last button press or alarm should the monitor turn off the
back light?
__ Always Off
__ 2 minutes
__ 5 minutes
__ 10 minutes
__ 15 minutes
__ 30 minutes
__ Always On (back light always timed out)

150 Welch Allyn Propaq LT Vital Signs Monitor
6.5 SpO2 Spot Check Enable
If SpO2 Spot Check is enabled, a clinician can perform a quick SpO2 measurement
when SpO2 monitoring is turned off. For detailed information, see Propaq LT Vital
Signs Monitor Directions for Use.
Do you want to enable SpO2 Spot Check?
(Yes)
(No)
6.6 NIBP Turbo Mode Enable
When the monitor takes automatic NIBP measurements in Turbo Mode, it takes as
many measurements as possible within the 5-minute Turbo Mode measurement
period.
Do you want to enable NIBP turbo mode?
(Yes)
(No)

Configuration Worksheet 151
7 Monitor Behavior
For each parameter, the factory value is shown in bold. The factory value is used until
another value is uploaded to the monitor.
7.1 Patient Mode Default
In what default patient mode should the monitor be set for new patients?
__ Adult
__ Pediatric
__ Neonatal
7.2 Display All ECG Vectors
If a 5-lead ECG cable is connected to the monitor, should the monitor be able to
display the optional aVR, aVL, and aVF waveforms?
(Yes)
(No)
7.3 ECG Bandwidth Default
ECG Bandwidth refers to the frequency range used to display and print patient
data.
Monitor bandwidth is less susceptible to artifact such as patient motion.
Extended bandwidth, although more susceptible to artifact, can provide for more
detailed data analysis.
Which ECG bandwidth should be displayed by default?
__ Monitor
__ Extended
Monitor-Mode Bandwidth
Adult 0.5 Hz to 40 Hz
Pediatric/Neonate 0.5 Hz to 80 Hz
Extended-Mode Bandwidth
Adult 0.05 Hz to 40 Hz
Pediatric/Neonate 0.05 Hz to 80 Hz

152 Welch Allyn Propaq LT Vital Signs Monitor
7.4 Pacer Indicator On Default
If a patient being monitored has a pacemaker, the monitor detects the occurrence
of pacemaker signals and optionally indicates them with vertical dashed lines in
the waveform.
If the pacemaker signal is strong enough, the monitor displays it as a spike. This
spike is displayed whether the pacemaker indicator is on or off.
Should the pacemaker indicator be on by default?
(Yes)
(No)
7.5 Alarm Tone Level Default
What should be the default volume level of the alarm tones?
__ Low
__ Medium
__ High
7.6 HR/PR Tone Level Default
What should be the default volume level of the HR/PR tone?
__ Off
__ Low
__ Medium
__ High
Pacemaker signal indicators

Configuration Worksheet 153
7.7 Audible Alarms Suspension Time Default
While monitoring a patient, the clinician can use the settings menu to suspend all
alarm tones for all parameters for a configurable period.
What is the period for which alarm tones are to be suspended?
__ Disable (alarm tones cannot be suspended)
__ 90 seconds
__ 2 minutes
__ 3 minutes
__ 4 minutes
__ 5 minutes
__ 10 minutes
__ 15 minutes
__ 30 minutes
__ 60 minutes
__ Always On (alarm tones always suspended)
7.8 NIBP Units Default
Select the NIBP display units. (Note: If the monitor is connected to an Acuity
Central Station, this setting is forced to mmHg.)
__ mmHg
__ kPa
7.9 NIBP Auto Mode Interval (minutes)
When the monitor is in Auto NIBP mode, what is the default interval, in
minutes, between automatic NIBP measurements?
__ 1
__ 2
__ 3
__ 5
__ 10
__ 15
__ 30
__ 60
7.10 Resp On Default
During ECG monitoring, should the monitor also monitor impedance respiration
rate (Resp) by default?
(Yes)
(No)
Note This parameter does not affect the behavior of , (Silence/Reset). Regardless
of how this parameter is configured, pressing silences a sounding alarm
tone for 90 seconds.
Suspend can be turned on or off by the clinician, but the suspend period
cannot be changed by the clinician.

154 Welch Allyn Propaq LT Vital Signs Monitor
8 ParamSet
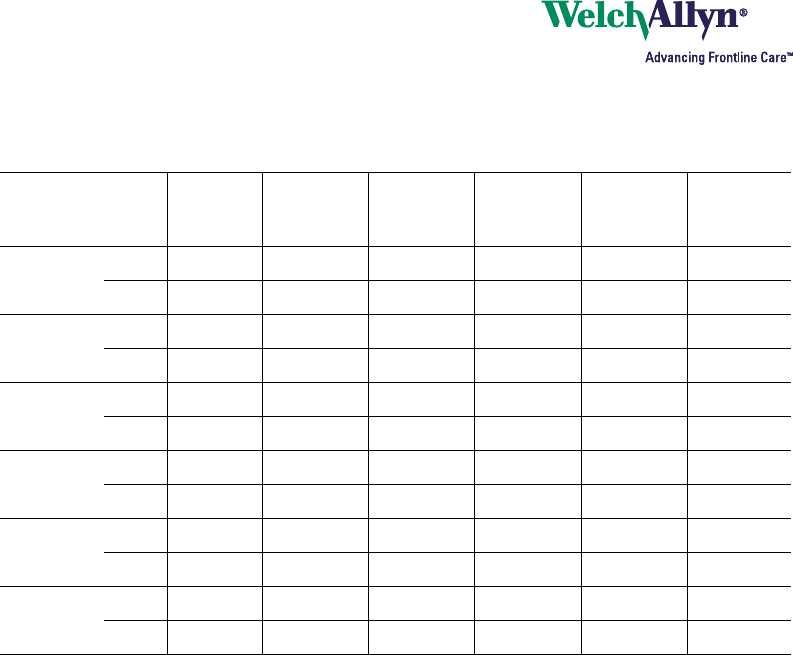
If ParamSet is enabled, the clinician can quickly and easily change the current alarm
limits for any vital sign. If you choose to enable ParamSet, you can then define the
percentage by which the alarm limit for each vital sign is changed.
To Adjust Alarm Limits Quickly with ParamSet:
When the ParamSet message appears, press twice.
Example:
The ParamSet value for the Upper HR/PR alarm limit is configured to be 15%.
Patient Jane’s Upper HR/PR alarm limit is set to 100. At the default alarm settings,
Jane triggers an Upper HR/PR alarm with a heart rate of 103. Her clinician,
knowing that a heart rate of 103 is acceptable for Jane, wants to quickly set a
higher Upper HR/PR alarm limit for this patient.
The monitor displays the message, “Press Select to ParamSet the upper HR/PR
limit to 118.” The clinician presses to get to the HR/PR control screen and
immediately presses again to accept the ParamSet adjustment. Jane’s alarm
limit for Upper HR/PR is immediately changed to 118, and the main vital-signs
screen is again displayed.
(103 + 15% of 103 = approximately 118)
ParamSet can be used multiple times for any alarm limit. Each time you press
ParamSet for a given vital sign, the alarm limit expands by the configured percentage.
However, the alarm limits can never be expanded beyond the limit boundaries built
into the monitor. (See the specifications for vital signs in Appendix A, starting with
“ECG” on page 163.)
This table shows the effect of ParamSet for various vital signs, based on a patient’s
normal levels for each vital sign. These values are based on the assumption that:
• the patient mode is Adult
• the monitor is initially using factory default alarm levels
Note The ParamSet default values can be changed only by downloading another
monitor configuration.
When monitor power is cycled, the factory default alarm limits and ParamSet
default values are again in effect.
Configuration Worksheet 155
For each parameter listed below, the factory value is shown in bold. The factory value
is used until another value is uploaded to the monitor.
Parameter Alarming
Level
Alarm Limit
(ParamSet
= 5%)
Alarm Limit
(Paramset
= 10%)
Alarm Limit
(ParamSet
= 15%)
Alarm Limit
(Paramset
= 20%)
Alarm Limit
(Paramset
= 25%)
HR/PR Upper 90 94 99 104 108 113
Lower 60 57 54 51 48 45
NIBP Systolic Upper 140 147 154 161 168 175
Lower 100 95 90 85 80 75
NIBP
Diastolic
Upper 90 94 99 104 108 113
Lower 60 57 54 51 48 45
NIBP MAP Upper 107 112 118 123 128 134
Lower 73 69 66 62 58 55
SpO2Upper 100 100 100 100 100 100
Lower 90 86 81 77 72 68
Resp Upper 20 21 22 23 24 25
Lower 12 11 11 10 10 9

156 Welch Allyn Propaq LT Vital Signs Monitor
8.1 ParamSet Enable
Do you want to enable ParamSet?
(Yes)
(No)
8.2 ParamSet % for Upper HR/PR
ParamSet increases the Upper HR/PR limit by ____%. (5, 10, 15, 20, 25)
8.3 ParamSet % for Lower HR/PR
ParamSet decreases the Lower HR/PR limit by ____%. (5, 10, 15, 20, 25)
8.4 ParamSet % for Upper NIBP Systolic
ParamSet increases the Upper NIBP Systolic limit by ____%. (5, 10, 15, 20, 25)
8.5 ParamSet % for Lower NIBP Systolic
ParamSet decreases the Lower NIBP Systolic limit by ____%. (5, 10, 15, 20, 25)
8.6 ParamSet % for Lower NIBP Diastolic
ParamSet increases the Upper NIBP Diastolic limit by ____%. (5, 10, 15, 20, 25)
8.7 ParamSet % for Lower NIBP Diastolic
ParamSet decreases the Lower NIBP Diastolic limit by ____%. (5, 10, 15, 20, 25)
8.8 ParamSet % for Upper NIBP Mean
ParamSet increases the Upper NIBP Mean limit by ____%. (5, 10, 15)
8.9 ParamSet % for Lower NIBP Mean
ParamSet decreases the Lower NIBP Mean limit by ____%. (5, 10, 15)
8.10 ParamSet % for Upper SpO2
ParamSet increases the Upper SpO2 limit by ____%. (5, 10)
8.11 ParamSet % for Lower SpO2
ParamSet decreases the Lower SpO2 limit by ____%. (5, 10)
8.12 ParamSet % for Upper Resp
ParamSet increases the Upper Resp limit by ____%. (5, 10, 15, 20, 25)
8.13 ParamSet % for Lower Resp
ParamSet decreases the Lower Resp limit by ____%. (5, 10, 15, 20, 25)
Note If you select (No), disregard the rest of the ParamSet settings.

Configuration Worksheet 157
Configuration Worksheet Authorization
The information on this page relates only to this worksheet, and is not entered into
the monitor configuration. Users are encouraged to provide their own procedures for
defining, categorizing, storing, and approving configuration files.
Date _________________________________________________
Hospital _________________________________________________
Department _________________________________________________
Name _________________________________________________
Title _________________________________________________
Phone _________________________________________________
Signature _________________________________________________

158 Welch Allyn Propaq LT Vital Signs Monitor