ADC Telecommunications DSR0805A Digivance WBDR Base Station User Manual EMSUser
ADC Telecommunications Inc Digivance WBDR Base Station EMSUser
Contents
wbdr part 3

3 USING EMS FOR
NETWORK TASKS
Element Management System (EMS) 4.0 User Manual
27
USING EMS FOR
NETWORK TASKS
This section contains instructions for all tasks performed using the Maintenance
Interface. Some of these tasks can also be done using the NOC-NEM interface. If
so, there is a cross-reference to the NOC-NEM instructions in Section 5. This
section also includes instructions for viewing the EMS log file.
3.1 Master List of Tasks
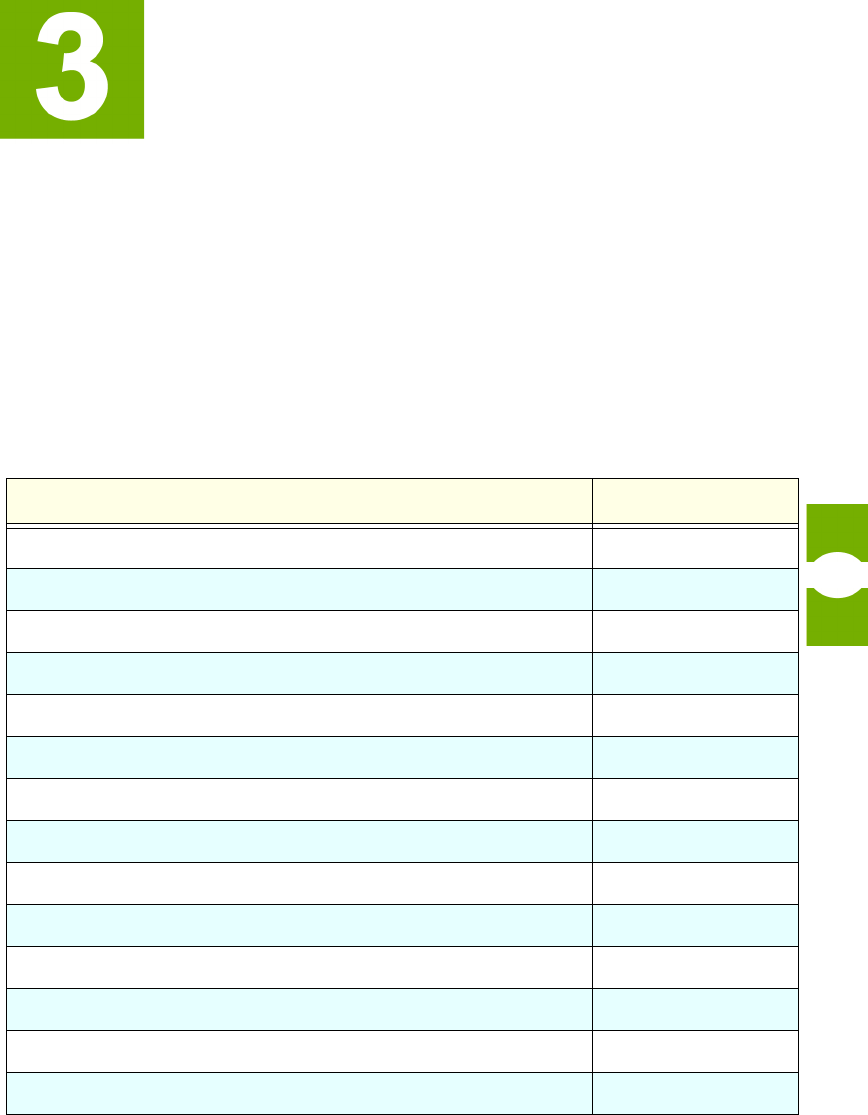
Table 2 lists all EMS tasks and tells where to look for instructions.
Table 2: Master List of EMS Tasks
YOU CAN SEE TOPIC
Start EMS. 3.2 on page 28
Define EMS ports. 3.3 on page 29
Set directory (folder) for EMS program file. 3.4 on page 31
Set name, directory, and trim time for EMS log file. 3.5 on page 32
Set link timeout, cataloging time, and demo mode. 3.6 on page 34
Enter site names and site number for a host/remote pair. 3.7 on page 36
Use the alarm overview to view and acknowledge alarms. 3.8 on page 38
View alarm detail for a particular host/remote pair. 3.9 on page 42
Determine RF signal levels. 3.10 on page 43
Enter RF attenuation settings for remote unit antenna. 3.11 on page 44
Define RF logical channels and signal gain. 3.12 on page 46
Set the host/remote operating mode. 3.13 on page 48
Load software from EMS computer to host/remote pair. 3.14 on page 50
View the EMS log file. 3.15 on page 53
Starting EMS Section 3
Element Management System (EMS) 4.0 User Manual
28
3.2 Starting EMS
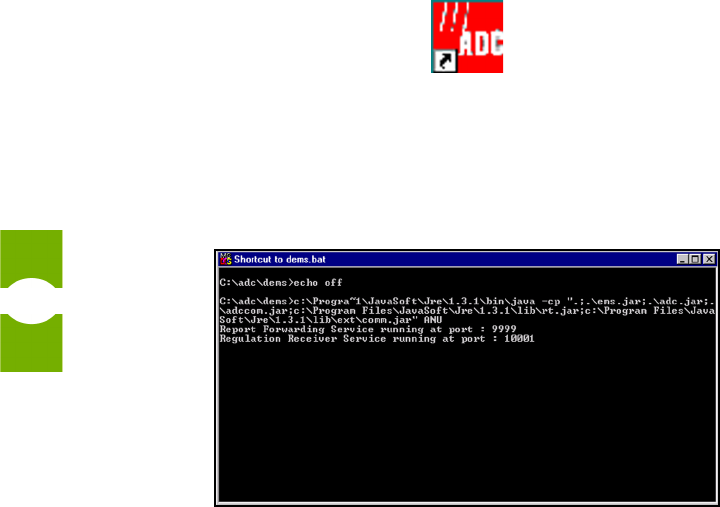
After being installed, EMS has an icon on the desktop. The icon can be used to
start EMS.
To start EMS
1. Double-click on the ADC icon, shown in Figure 13.
Figure 13. ADC Icon
2. Watch for the DEMS.BAT program to start at the DOS prompt as shown in
Figure 14.
Figure 14. DEMS.BAT Starting at DOS Command Line
3. Watch for the EMS initial screen shown in Figure 15.
Task-Based Reference Defining EMS Ports
Element Management System (EMS) 4.0 User Manual
29
Figure 15. EMS Initial Screen
3.3 Defining EMS Ports
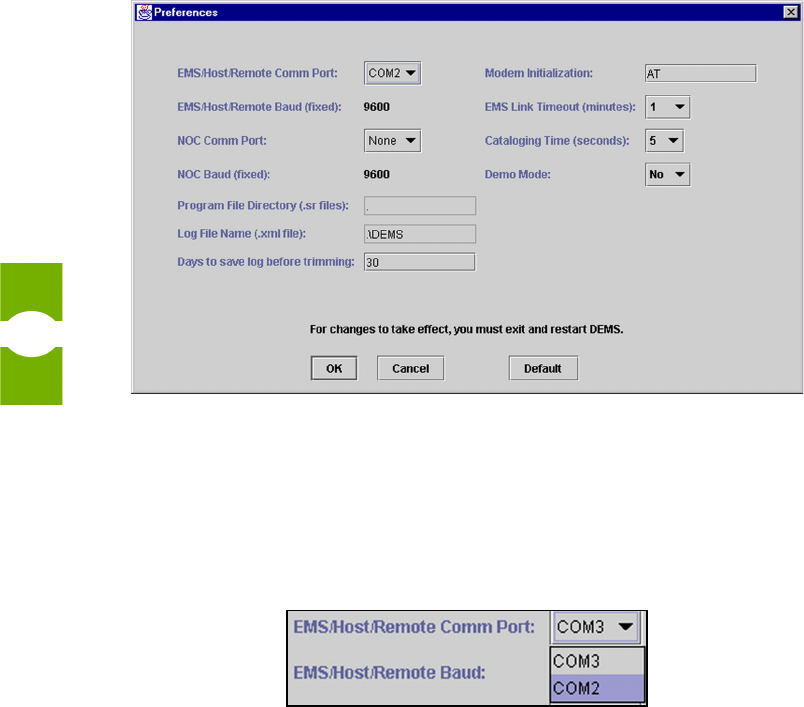
Using the Preferences window in EMS, shown in Figure 16, you can define the
communication ports to be used by EMS. For a description of the EMS ports, refer
to Topic 1.7, Use of Ports, on page 14.
To display the Preferences window
Select EditÞPreferences.
To define EMS ports
NOTE: EMS default port values may not need to be changed.
1. Check the current setting for two ports in the top left area of the Preferences
window (shown in Figure 16):
Defining EMS Ports Section 3
Element Management System (EMS) 4.0 User Manual
30
•EMS/Host/Remote Comm Port—This is the port connected via the
ADC-provided RS-232 interface cable to the DB-9 SERVICE port on
the host unit front panel. This port provides all components of the
Maintenance Interface including the NOC–NEM interface window.
•NOC Comm Port—This is an optional second port that can be
connected via an RS-232 cable to a direct data link with a remote
terminal or with a computer running a terminal emulator program.
Figure 16. Preferences Window
2. If either of these ports is incorrectly identified:
a. Click in the port pull-down menu (port names listed are PC-specific).
b. Select the port name causing it to be highlighted as shown in Figure 17.
Figure 17. Set Comm Ports Dialog
When done with all entries in the Preferences window, click on OK. For changes
to be effective, you have to quit and restart EMS

Task-Based Reference Selecting EMS Program File Directory
Element Management System (EMS) 4.0 User Manual
31
3.4 Selecting EMS Program File Directory
Using the Preferences window in EMS (shown in ". Preferences Window" on
page 30), you can select the directory (folder) to be used for host and remote
control programs and Field Programmable Gate Arrays (FPGSs).
To display the Preferences window
Select EditÞPreferences.
To select the EMS program file directory
1. Click in the data entry box for Program File Directory.
2. In the window that displays, browse to select the desired folder (causing the
folder name to display in the File name field), and click on OK. Figure 18
shows an example.
Figure 18. Selecting a Program File Directory
When done with all entries in the Preferences window, click on OK. For changes
to be effective, you have to quit and restart EMS
NOTE: You cannot use NOC-NEM to select the EMS program file directory.

Defining Log File Name and Trim Time Section 3
Element Management System (EMS) 4.0 User Manual
32
3.5 Defining Log File Name and Trim Time
Using the Preferences window (shown in Figure 16 on page 30), you can perform
the following tasks related to the EMS log file:
• Select the directory (folder) where the EMS log file is stored.
• Change the EMS log file name (EMSlog by default).
• Define the trim time.
EMS Log File—is a system-created file into which EMS periodically places
network status information. This status information includes all parameter values
and all alarm states for all NEs currently connected to the system. By default,
EMS places new entries into the log file at time intervals of 30 minutes. This time
interval can be changed for EMS as a whole, or for any particular NE, using a
SET RECORD command in the NOC-NEM window. EMS also writes a status
entry into the log file whenever any alarm changes in state (for example, from “no
alarm” to “major alarm”). The log file can be viewed using a browser such as
Internet Explorer (for more information, refer to Topic 3.15, Viewing the EMS
Log File, on page 53).
Trim Time—is the number of days that a log file entry remains in the file before
it is automatically deleted by the system. When any entry reaches an age in days
exceeding the trim time, the entry is deleted. EMS trims the log file once every 24
hours. Maximum trim time allowed is 60 days.
NOTE: To avoid losing the entries trimmed from the EMS log file, you should
periodically copy and paste the log file into another log folder. To do this, use
Windows Explorer copy and paste functions. Save the file with a unique name
such as the log file name plus the date on which the file was copied.
To display the Preferences window
Select EditÞPreferences.
Task-Based Reference Defining Log File Name and Trim
Element Management System (EMS) 4.0 User Manual
33
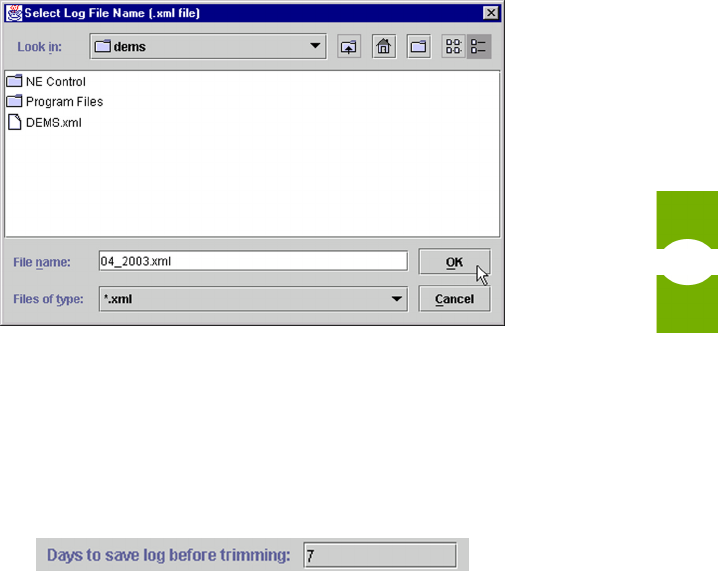
To define the current log file name
NOTE: This does not rename the existing log file, but rather creates a new log file
with a new name. The existing file remains with its original name.
1. Click on the current name in the Logfile name (.xml) field.
2. Key in or browse to select the current log file (see Figure 19).
3. Key in the new name in File name field.
4. When done, click on OK.
Figure 19. New Log File Name
To define the log file trim time
Key in the number of days in the field shown in Figure 20.
Figure 20. Defining Trim Time
When done with all items in the Preferences window, click on OK. For changes to
be effective, you have to quit and restart EMS.

Setting EMS Link Timeout, Cataloging Time, Demo Mode Section 3
Element Management System (EMS) 4.0 User Manual
34
To set the log file time interval using the NOC-NEM interface
Use the SET RECORD command (see Topic 5.5.10 on page 108).
NOTE: You cannot use NOC-NEM to define the log file name or directory.
3.6 Setting EMS Link Timeout, Cataloging Time, Demo Mode
Using the Preferences window (shown in Figure 16 on page 30), you can set the
following values:
•EMS Link Timeout—defines the number of minutes EMS will try to
reestablish communication with a network unit before regarding it as
“not found.” When this occurs, EMS reports an EMS Link Status
alarm.
• Cataloging Time—defines the number of seconds, at startup or in
response to a ToolsÞRefresh Catalog request, that EMS spends
looking for units.
•Demo Mode—controls whether EMS operates in demo mode or as a
normal working system. Demo mode can only be used when EMS is
not connected to a host/remote pair. Demo mode provides a simulated
system with two host/remote pairs.
NOTE: The Modem Initialization field, which also appears in the Preferences
window, is not currently used.
To display the Preferences window
Select EditÞPreferences.
To set EMS link timeout
Use the pull-down menu to select from the available times shown in Figure 21.

Task-Based Reference Setting EMS Link Timeout, Cataloging
Element Management System (EMS) 4.0 User Manual
35
Figure 21. Setting EMS Link Timeout
To Set Cataloging Time
Use the pull-down menu shown in Figure 22 to specify the number of seconds that
EMS should look for units on start up or in response to a ToolsÞRefresh Catalog
request.
Figure 22. Setting Cataloging Time
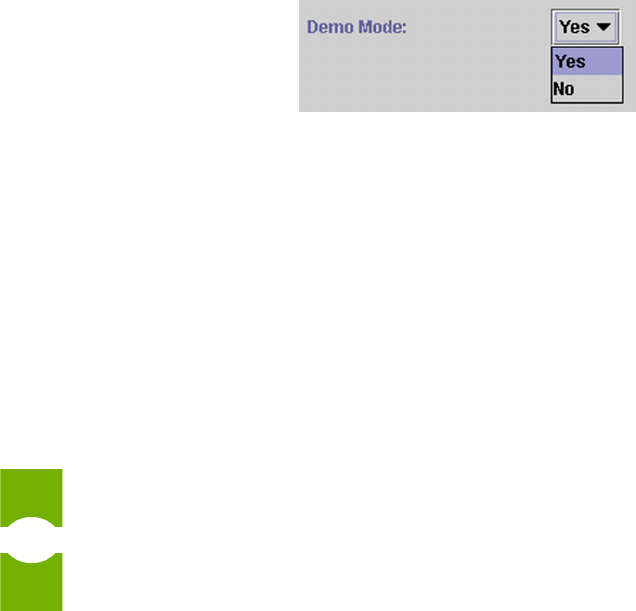
To set demo mode
If EMS is not currently connected a host/remote pair, you can start demo mode by
selecting Yes from the pull-down menu shown in Figure 23.
Entering Host/Remote Site Numbers and Site Names Section 3
Element Management System (EMS) 4.0 User Manual
36
Figure 23. Selecting Demo Mode
When done with all entries in the Preferences window, click on OK. For changes
to be effective, you have to quit and restart EMS
To set the log file time interval using the NOC-NEM interface
Use the SET RECORD command (see Topic 5.5.10 on page 108).
NOTE: You cannot use NOC-NEM to set the link timeout and cataloging time.
3.7 Entering Host/Remote Site Numbers and Site Names
Site number and site name are the basic identifiers for a network element. Each
host unit must have a unique site number and site name. A remote unit must have
a different site name than its own host unit. Host units and remote also each have a
unique node number, assigned by the system.
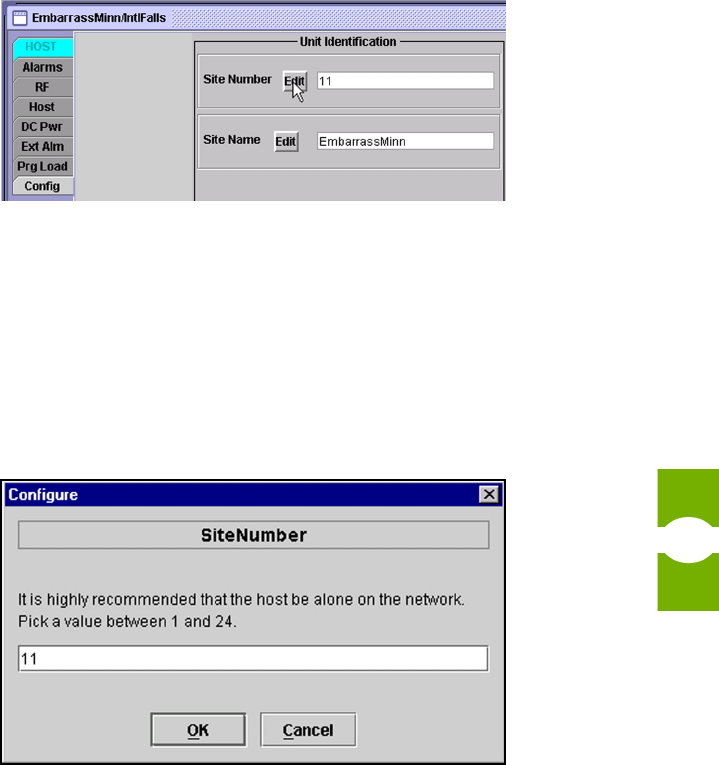
To enter a site number or site name for a network element
1. Using the View menu, select the menu item identifying the host/remote pair
for which you want to enter a site name or site number.
NOTE: If the host unit and remote unit have not yet been named, they will be
listed on the View menu as NotNamed/NotNamed.
2. Click on the host or remote Config tab to display it.
3. Click on the Edit button for Site Number or Site Name area within the Con-
fig window (see Figure 24).
Task-Based Reference Entering Host/Remote Site Numbers
Element Management System (EMS) 4.0 User Manual
37
Figure 24. Clicking on Edit Button for Site Number
4. In the SiteNumber or SiteName dialog (see example in Figure 25), key in the
desired site number or site name.
5. When done, click on OK.
NOTE: Site number can only be entered for a host unit. Site name can be entered
for either a host unit or remote unit.
Figure 25. Entering a Host Unit Site Number
To enter a site name using the NOC-NEM interface
Use the SET SITENAME command (see Topic 5.5.4 on page 99).
NOTE: You cannot use NOC-NEM to set the site number.
Using Alarm Overview to View and Acknowledge Alarms Section 3
Element Management System (EMS) 4.0 User Manual
38
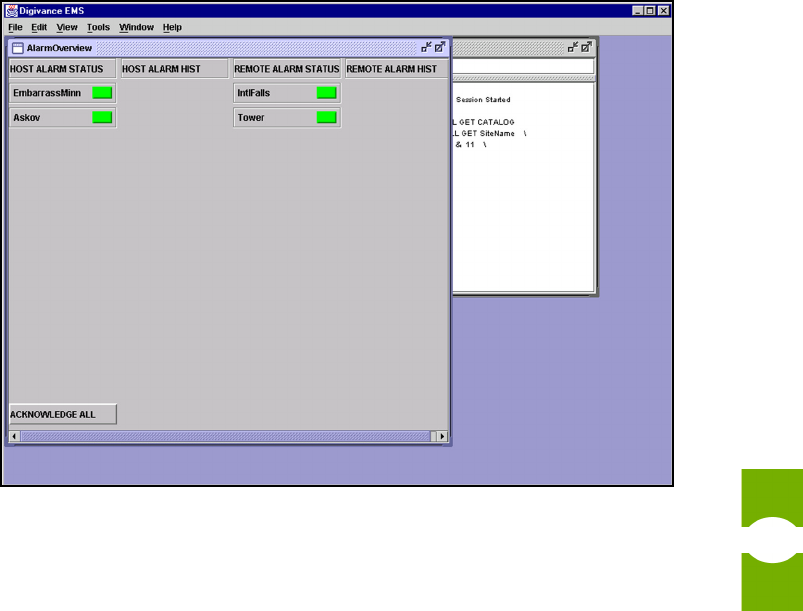
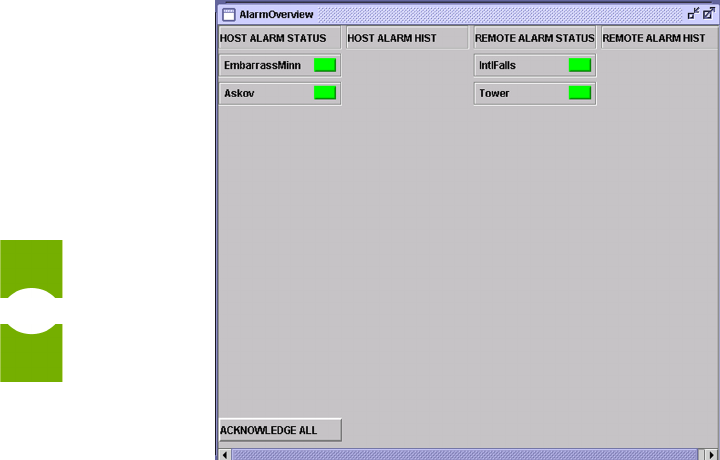
3.8 Using Alarm Overview to View and Acknowledge Alarms
Using the AlarmOverview window, shown in Figure 26, you can:
• Identify any network element that is currently reporting an alarm.
• Determine whether any alarm (currently reported or already cleared)
has not been acknowledged.
• Acknowledge any as yet unacknowledged alarm.
Figure 26. Alarm Overview Example
“Acknowledging” an alarm, as an EMS task, is a simple matter of clicking on the
appropriate indicator and then on the subsequent dialog. However, as the dialog
advises, this process also should involve checking the NOC-NEM scrollout to
determine what caused the alarm condition.
Alarm status and alarm acknowledgement are reported using two different types
of indicators:
•ALARM STATUS Indicator—always present in the display,
immediately to the right of the host or remote sitename, indicates
whether that host or remote is currently reporting any alarm.