Askey Computer WLL220C 2.4GHz/5GHz Mini-PCI Card User Manual
Askey Computer Corp 2.4GHz/5GHz Mini-PCI Card Users Manual
Contents
- 1. Manual
- 2. Revised Users Manual
- 3. Notebook Users Manual
- 4. NoteBook Users Manual
- 5. NB Users Manual Home
- 6. NB Users Manual Chap 1
- 7. NB Users Manual Chap 2
- 8. NB Users Manual Chap 3
- 9. NB Users Manual Chap 4
- 10. NB Users Manual Chap 5
- 11. NB Users Manual Chap 6
- 12. NB Users Manual Chap 7
- 13. NB Users Manual Chap 8
- 14. NB Users Manual Chap 9
- 15. NB Users Manual Warning
- 16. NB Users Manual Appendix
NB Users Manual Chap 3

The BIOS Setup Program
Introduction
Navigating through the BIOS Setup Program
The Main Menu
The System Devices Menu
The Security Menu
The Boot Menu
The Information Menu
The Exit Menu
Introduction
The BIOS (Basic Input and Output System) Setup program is a menu
driven utility that enables you to make changes to the system
configuration and tailor the operation of your Notebook to your individual
individual work needs. A ROM-based configuration utility displays the
system's configuration status and provides you with a tool to set system
parameters. These parameters are stored in nonvolatile battery backed
backed-up CMOS RAM, which saves this information even when the
power is turned off. When the computer is turned back on, the system is
is configured with the values found in CMOS. Using easy-to-use menus,
menus, you can configure such items as:
Hard drives, diskette drives and peripherals
Video display options
Password protection from unauthorized use
Boot devices
The settings made in the Setup program intimately affect how the
Notebook performs. It is important, therefore, first to try to understand all
all the available options, and second, to make settings appropriate for
the way you use the Notebook. This chapter will guide you through the
Setup program by providing clear explanations for all Setup options.
A standard configuration has already been set in the Setup program by
the factory technicians, so you will very likely have little to worry about
for now. However, eventually you may want to customize your system to
to suit your own performance needs. It is recommended that you read
this chapter and become familiar with the adjustments that can be made
made in the BIOS.
The next section explains how to move around in the Setup program, as
as well as how to specify and save your new settings. A brief discussion
discussion of the optional settings among the different submenus
follows.
第 1 頁,共 15 頁The BIOS Setup Program
2003/8/15
file://C:\WINDOWS\TEMP\~hhA73B.htm

Top
Navigating through the BIOS Setup Program
The Setup program has been designed to make it as easy to use as
possible. It is a menu driven program, which means you can scroll
through the various directories and make your selections among the
various predetermined choices. If you accidentally make a setting and
do not know which one to switch back to, use the BIOS hot keys to
return to the previous value. The hot keys are discussed in more detail
later in this chapter.
When turning on the Notebook for the first time you may get a message
message prompting you to run the BIOS Setup program. A warning
message may appear on the screen if the hardware configuration is
changed or the POST fails. This message will inform you of any errors
or invalid settings and prompt you to run the Setup program to correct
the problem.
Even if you are not prompted by a message instructing you to use the
Setup program, at some time in the future you may want to change the
configuration of your computer. For example, you may want to make
changes to the display option settings or enable the Notebook's
password function for security purposes. It will then be necessary to
reconfigure your system using the Setup program so that the computer
can recognize these changes.
The list below gives a few examples of reasons why you may want or
need to run the BIOS Setup program.
You have set up the computer for the first time and you got a message
stating that you should run the BIOS Setup program.
You want to redefine the communication ports to prevent any conflicts.
You want to change the password or make other changes to the
security setup.
The few examples listed above are by no means a complete list.
Accessing the BIOS Setup program
Launching submenus
General Help
Saving Changes and Exiting the Setup Program
Top
Accessing the BIOS Setup program
To access the BIOS Setup program, press the F2 key after the
Notebook has run through its POST.
The Menu Bar
The top of the Setup screen has a menu bar with the following
selections:
Main Use this menu to make changes to the basic
system configuration.
第 2 頁,共 15 頁The BIOS Setup Program
2003/8/15
file://C:\WINDOWS\TEMP\~hhA73B.htm

System Devices Use this menu to enable and make changes to the
advanced features available on your system.
Security Use this menu to set System and Boot passwords.
Boot Use this menu to specify the order in which the
Notebook is to check for a device to boot the
system.
Info This menu lists hardware information about your
system. The items cannot be modified.
Exit Use this menu to specify how to exit the Setup
program.
To move between menu bar items, use the [ ] and [ ] arrow keys
until the desired item is highlighted. For example, if you want to move
from the Main menu to the System Devices menu, press the right arrow
key [ ] once. The System Devices menu item should now be
highlighted.
The Legend Bar
At the bottom of the Setup screen, you will notice a legend bar. The
keys in the legend bar allow you to navigate through the various
individual setup menus. The following table lists the keys found in the
legend bar with their corresponding functions:
Legend Key Function
[Fl] or [Alt] +
[H] Displays the General Help window.
[Esc] Exits the current menu and moves you to the Exit
menu.
[ ] or [ ] Selects a different menu bar item.
[ ] or [ ] Moves the cursor up and down between fields.
[F5] / [-] Scrolls backwards through the values for the
highlighted field.
[F6] / [+] /
[Space] Scrolls forward through the values for the
highlighted field.
[F9] Sets the parameters to their default values.
[Fl0] Saves any changes and exits Setup.
[Enter] Executes commands or selects a submenu.
Top
Launching submenus
A submenu contains additional options for a field parameter. To call up
a submenu, simply move the highlight to the desired field and press the
[Enter] key. The submenu will then immediately appear. Use the legend
keys to enter values and move from field to field within a submenu just
as you would within a menu.
If you are a first time user or are not familiar with BIOS Setup programs,
programs, it is highly recommended that you take a few minutes to
familiarize yourself with each of the legend keys and their corresponding
corresponding functions. Practice navigating through the various menus
menus and submenus. If you accidentally make unwanted changes to
第 3 頁,共 15 頁The BIOS Setup Program
2003/8/15
file://C:\WINDOWS\TEMP\~hhA73B.htm

the current configuration, pressing the function key [F9] will return the
activated menu to its factory set values.
Note that on the right side of each of the BIOS screens there is a
section labeled Item Specific Help. While moving around through the
Setup program, explanations for the currently highlighted field appear
in the Item Specific Help window.
Top
General Help
In addition to the Item Specific Help window, the BIOS Setup program
also provides a General Help screen. This screen can be called up from
from any menu by simply pressing the function key [Fl], or the [Alt] + [H]
combination. The General Help screen lists the legend keys with their
corresponding alternates and functions.
When a scroll bar appears to the right of a help window, this indicates
that there is more information to be displayed that will not fit in the
window. Use the [Page Up] and [Page Down] keys or the up and down
arrow keys [ ] [ ] to scroll through the entire help document. Press
[Home] to display the first page. Press [End] to go to the last page. To
exit the help window, press the [Enter] or the [Esc] key.
Top
Saving Changes and Exiting the Setup Program
Refer to the Exit Menu section of this chapter for detailed information on
on saving changes and exiting the Setup program.
Top
The Main Menu
When the Setup program is accessed, the Information screen appears. Use the [ ]
key to select the Main Menu.
第 4 頁,共 15 頁The BIOS Setup Program
2003/8/15
file://C:\WINDOWS\TEMP\~hhA73B.htm
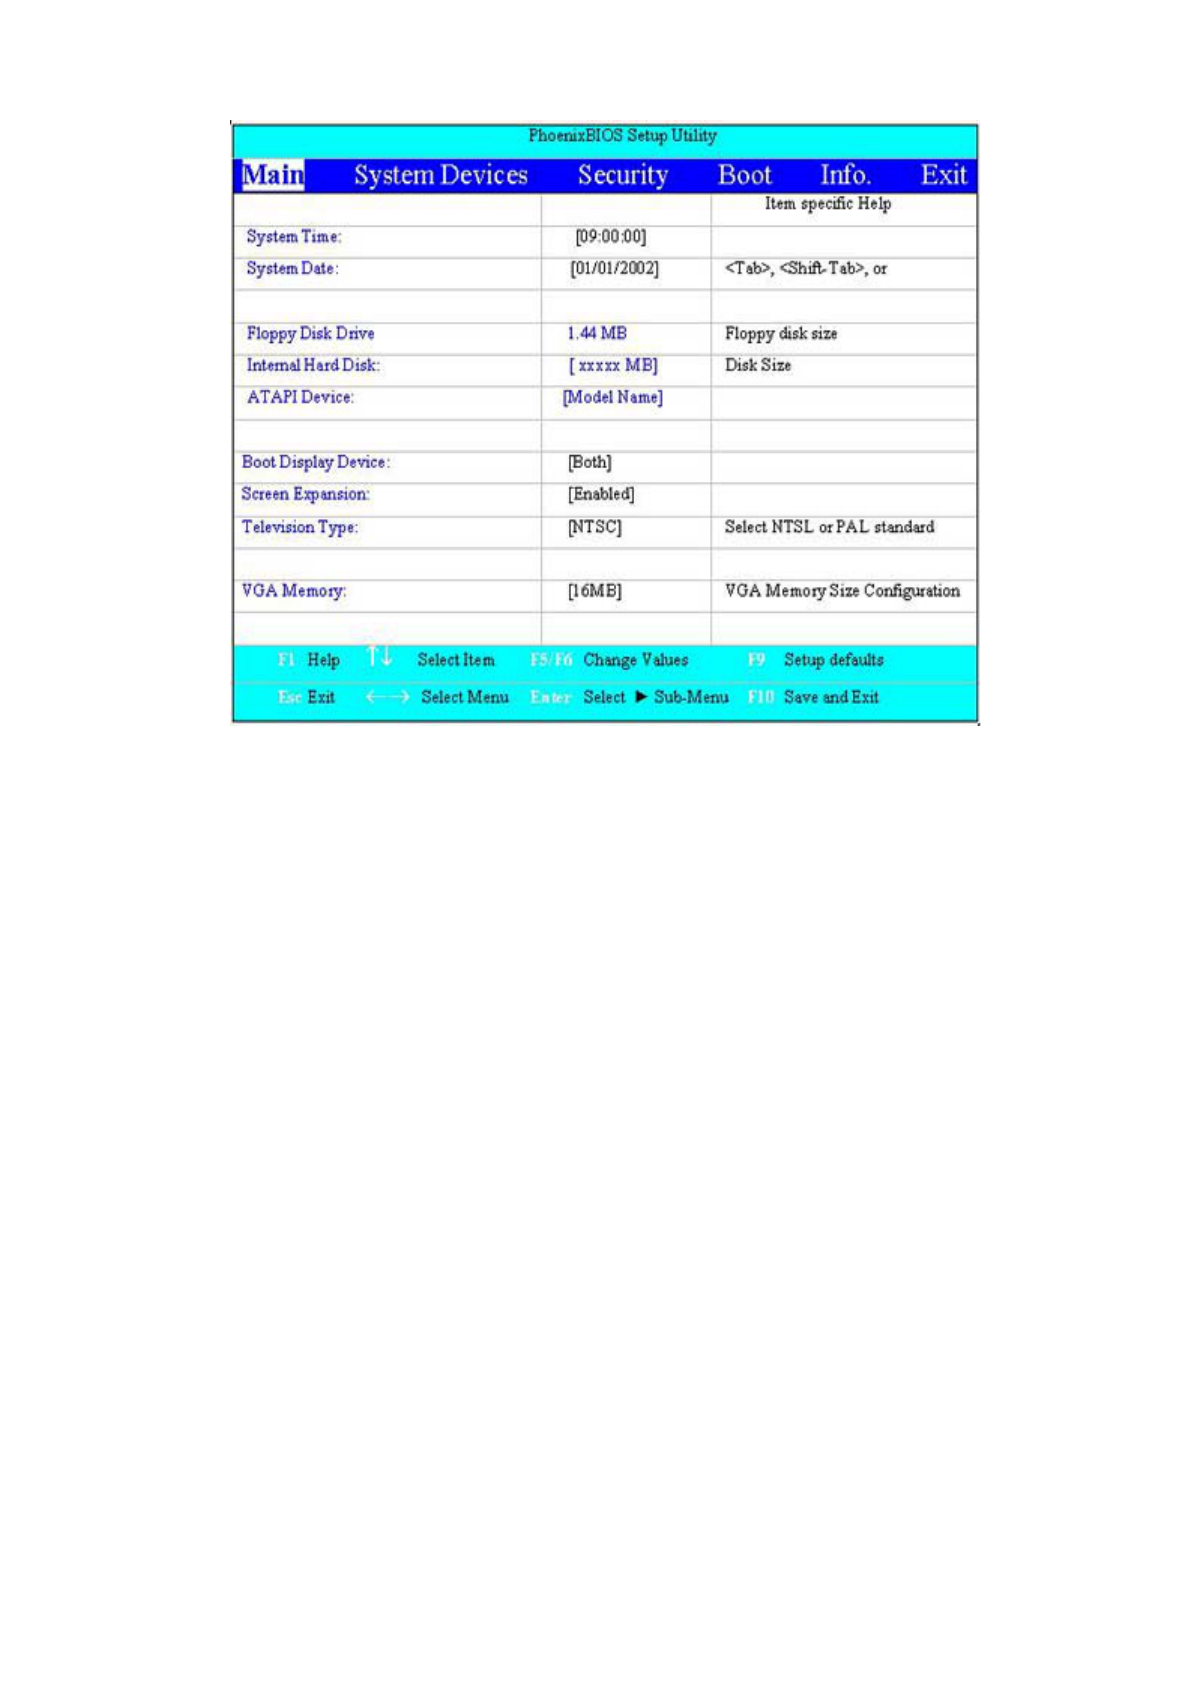
Figure 3-1: The Setup Main Menu
Enter the Main Menu of the BIOS setup program to make changes to the Notebook's
basic system configuration. Each of the fields displayed in this menu is covered below
below in detail.
System Time
Sets your system to the time that you specify (usually the current time). The format is
hour, minute, and second, using the 24-hour clock. Insert the appropriate information.
information. Use the tab key to move between the hour, minute, and second fields.
System Date
Sets your system to the date that you specify (usually the current date). The format is
is month, day, year. Type in the appropriate information. Use the tab key to move
between the month, day, and year fields.
Floppy Disk Drive
The Floppy Drive status is auto detected by the system.
Internal Hard Disk
The hard disk types and capacity are auto detected and set by the system. If there is
no hard disk present or unknown type, "None" should be shown on this field,
otherwise the capacity should be shown.
ATAPI Device
The CD-ROM, DVD-ROM or CD-RW is auto detected and set by the system. If there
is no ATAPI Device present or unknown type, "None" should be shown on this field,
otherwise the model name should be shown.
第 5 頁,共 15 頁The BIOS Setup Program
2003/8/15
file://C:\WINDOWS\TEMP\~hhA73B.htm

Boot Display Device
This field allows you to specify display type options. They are:
Auto-Selected
Both
Auto-Selected: During the power on process, the system will detect if any display
device is connected on the external video port. If any external display device is
connected, the power on display will be in CRT (or projector) only mode. Otherwise it
will be in LCD only mode. will automatically select the external display if a CRT
monitor is connected to the Notebook.
Both allow you to simultaneously view the Notebook's LCD display and an external
CRT monitor display or projector.
The default value for this field is: Both
Screen expansion
This field allows you to enlarge the LCD viewing area when you operate in lower
resolution. There are two possible settings:
Enabled
Disabled
The default value for this field is: Enabled
Television Type
This field allows you to select the television system mode. There are two possible
settings:
NTSC
PAL
The default setting for this field is: NTSC
VGA Memory
This field displays the amount of shared memory available for the Video Graphics
Array. There are three possible settings: 16MB, 32MB and 64 MB. The default value
for this field is 16MB.
NOTE: The sub-items under each device will not be shown if the device control is set
to disable or auto. This is because the user is not allowed to control the settings in
these cases.
Top
The System Devices Menu
Selecting System Devices from the menu bar displays the System Devices Menu.
Please see Figure 2-2.
第 6 頁,共 15 頁The BIOS Setup Program
2003/8/15
file://C:\WINDOWS\TEMP\~hhA73B.htm
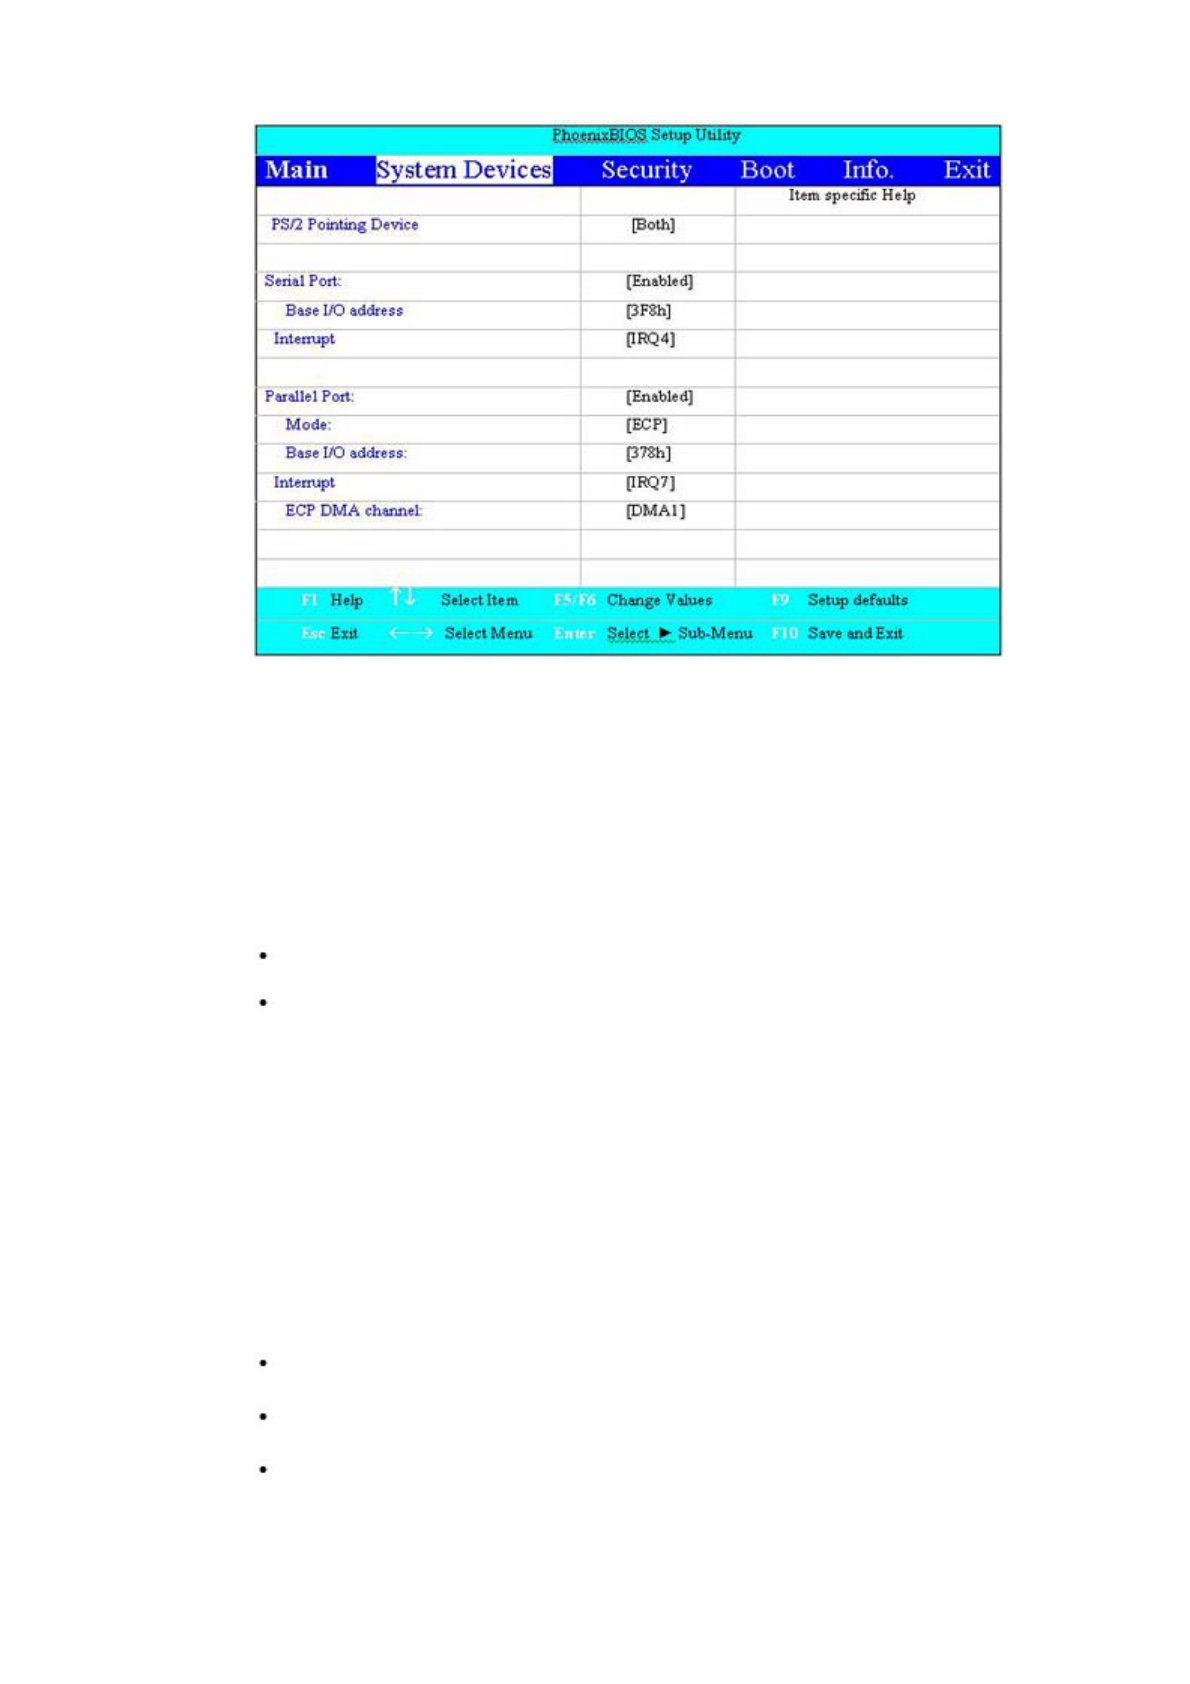
Figure 3-2: The System Devices Menu
This menu allows you to configure the Notebook's PS/2 pointing devices, and serial
and parallel ports options. Each field on this menu is covered below.
PS/2 Pointing Device
This field allows you to select whether the internal pointing device is enabled or
disabled when an external PS/2 mouse is present. Available options for this field are:
are:
Auto-Selected
Both
Auto-Selected mode will automatically disable the internal pointing device if an
external PS/2 mouse is present.
Both will allow both internal pointing device and external PS/2 mouse to be used
simultaneously.
The default value for this field is: Both
Serial Port
This field allows you to configure the Notebook's Serial Port. The following options
are available:
Enabled: configuration set by user
Disabled: no configuration
Auto: BIOS or OS chooses configuration
The default value for this field is: Enabled
第 7 頁,共 15 頁The BIOS Setup Program
2003/8/15
file://C:\WINDOWS\TEMP\~hhA73B.htm

Changing the default address and IRQ settings for the Serial and Parallel Port can
cause conflicts with other system devices or installed peripherals
Base I/O address
When the Serial Port field is set to Enabled, the "Base I/O address" field becomes
available and you can set the serial port's I/O address. The following I/O options are
available:
3F8
2F8
3E8
2E8
The default value for this field is: 3F8
Interrupt
When the Serial Port field is set to Enabled, the "Interrupt" field becomes available
and you can set the serial port's IRQ value. The following IRQ options are available:
IRQ 4
IRQ 3
The default value for this field is: IRQ 4
Parallel Port
This field allows you to configure the Notebook's Parallel Port. The following options
are available:
Enabled: configuration set by user
Disabled: no configuration
Auto: BIOS or OS chooses configuration
The default value for this field is: Enabled
Changing the default address and IRQ settings for the Serial and Parallel Port can
cause conflicts with other system devices or installed peripherals
Mode
This field allows you to configure the Notebook's Parallel Port transmission mode.
The following options are available:
Normal
Bi-directional
ECP
EPP
EPP and ECP are bi-directional modes, allowing both data input and output. The
第 8 頁,共 15 頁The BIOS Setup Program
2003/8/15
file://C:\WINDOWS\TEMP\~hhA73B.htm

EPP and ECP modes are only supported with EPP- and ECP-aware peripherals.
The default value for this field is: ECP Mode
Base I/O address
When the Parallel Port field is set to Enabled, and the mode to Normal, Bi-directional
directional or ECP, the "Base I/O address" field becomes available and you can set
the parallel port's I/O address. The following I/O options are available:
378
278
3BC
The default value for this field is: 378
Interrupt
When the Parallel Port field is set to Enabled, the "Interrupt" field becomes available
and you can set the parallel port's IRQ value. The following IRQ options are
available:
IRQ 7
IRQ 5
The default value for this field is: IRQ 7
DMA Channel
This field is only available when the Parallel Port Mode field is set to ECP. It allows
you to configure the Parallel Port's DMA Channel for ECP mode. The following
options are available:
DMA 1
DMA 3
The default value for this field is: DMA 3
Top
The Security Menu
The Notebook's advanced system of security allows you to set a password to
prevent unauthorized access to system resources, data, and the BIOS Setup
program. This section covers each parameter of the Security Menu. Selecting
Security from the menu bar displays the following menu:
第 9 頁,共 15 頁The BIOS Setup Program
2003/8/15
file://C:\WINDOWS\TEMP\~hhA73B.htm
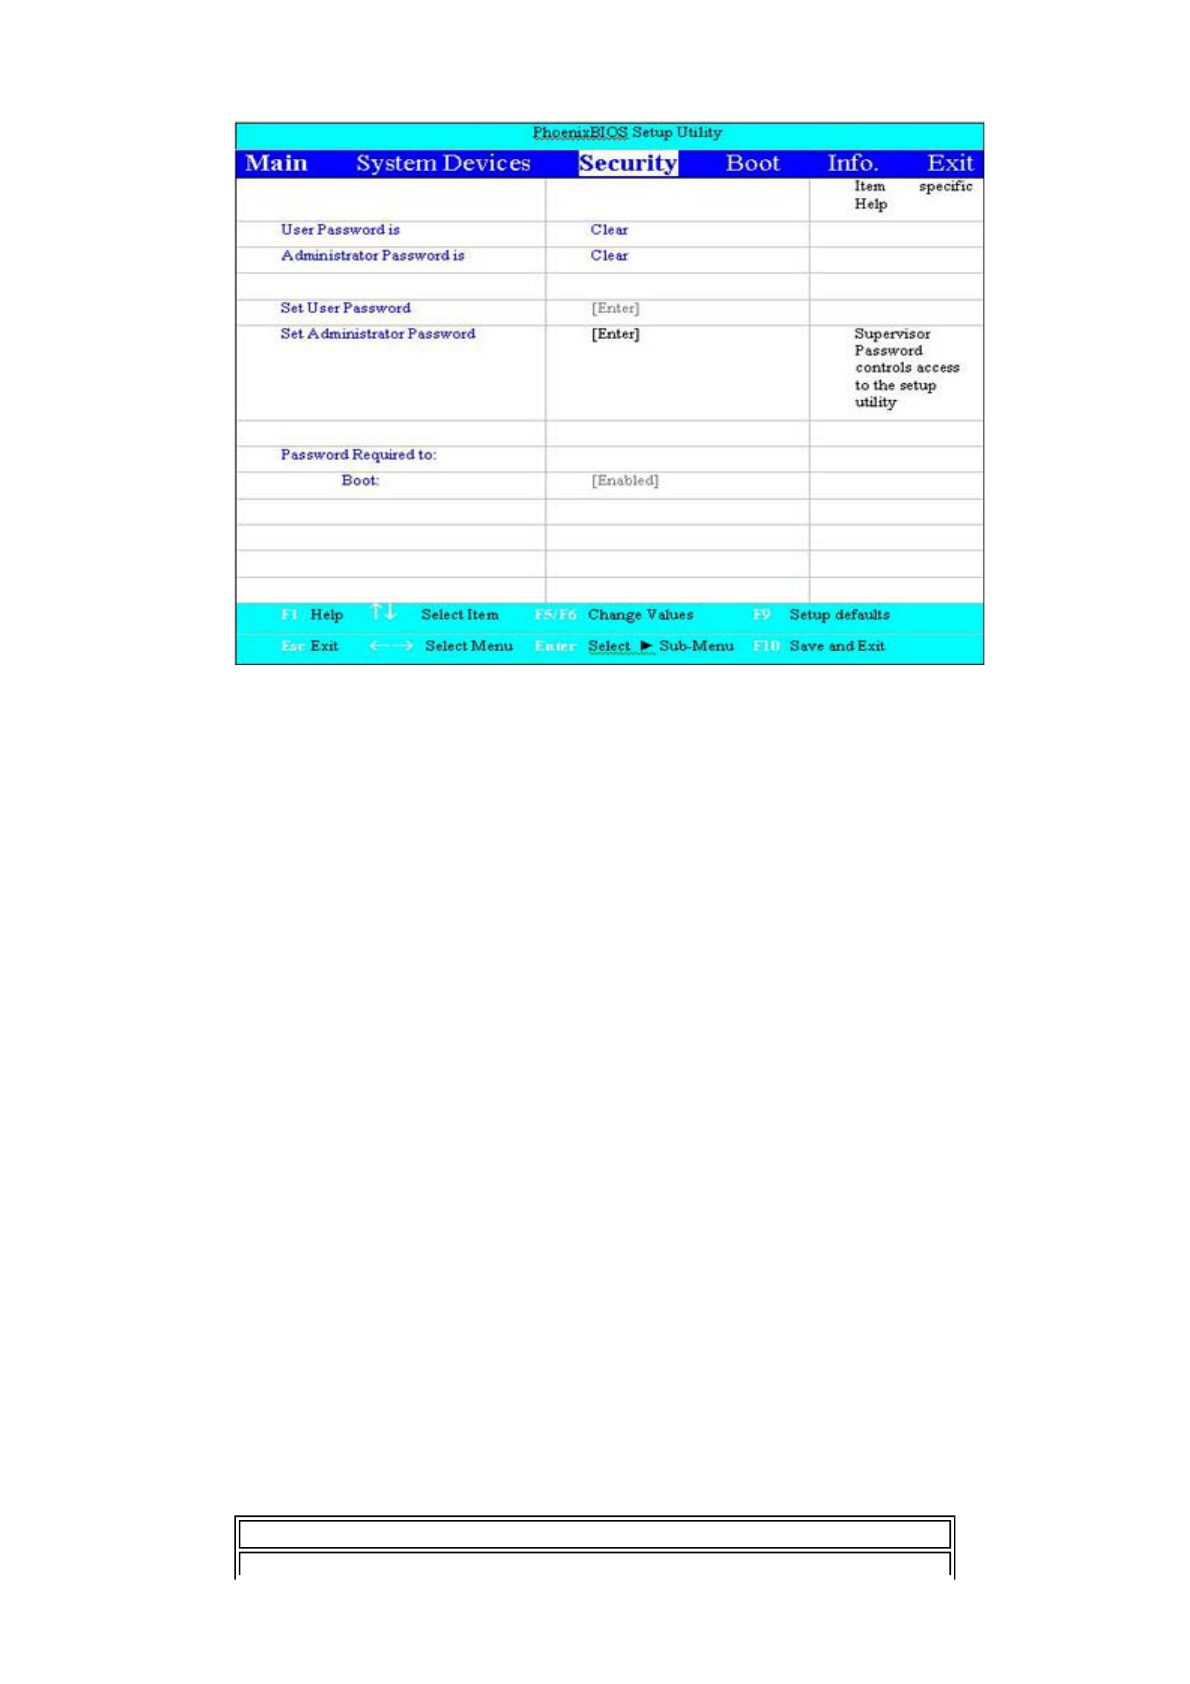
Figure 3-3: The Security Menu
Each field of the Security Menu is covered in detail below.
A Note about Passwords
The BIOS Setup program allows you to specify passwords in the Security menu. The
The passwords control access to the BIOS and certain Security menu options during
during system startup.
The passwords are not case sensitive. In other words, a password can be entered
using either upper or lower case letters; it makes no difference.
Passwords should be composed of characters A-Z, 0-9 and not exceed eight
characters in length.
The administrator password controls access to the setup utility. The administrator
password must be set before the user password can be set.
The user password controls access to the system at bootup. The format of the
password is as follows:
User Password Is / Administrator Password Is
This field will show Set when you have set a System Password as described below.
If you have not set the System Password, the field will show Clear. This is a display
only field.
Set User Password… / Set Administrator Password…
This field allows you to set the System Password. The System Password allows full
access to the BIOS Setup menus. To set the administrator password, highlight this
field and press the [Enter] key. The following dialog box appears:
Set Administrator Password
第 10 頁,共 15 頁The BIOS Setup Program
2003/8/15
file://C:\WINDOWS\TEMP\~hhA73B.htm

Enter New Password [ ]
Confirm New Password [ ]
Type the password and press the [Enter] key. You can type up to eight alphanumeric
alphanumeric characters. Symbols and other keys are ignored. To confirm the
password, type the password again and press the [Enter] key. The System password
password is now set. Note that the "Administrator Password is" field automatically
changes to Set.
To change or clear a password, highlight this field and press the [Enter] key.
The following dialog box appears:
Set Administrator Password
Enter Current Password [ ]
Enter New Password [ ]
Confirm New Password [ ]
Enter the current password, then enter the new password, and finally confirm the
new password. To clear the password, enter the current password, then press the
[Enter] key twice. The password is now cleared and the "System Password is" field is
is automatically set to Clear.
When changing or clearing the password a "Setup Notice" will inform you that
changes have been saved.
Setup Notice
Changes have been saved.
[ continue]
Press the [Enter] key to register your changes.
If the current password entered does not match the actual current password the
following message will appear:
Setup Warning
Invalid password
Re-enter Password
[ continue]
If the new password and confirm new password strings do not match this message
will appear:
Setup Warning
Password do not match
Re-enter Password
Password Required to Boot
When this field is enabled, the system will require the password before the system
can bootup. This option is only available once an administrator password has been
set. The options for this field are:
Enabled
Disabled
第 11 頁,共 15 頁The BIOS Setup Program
2003/8/15
file://C:\WINDOWS\TEMP\~hhA73B.htm
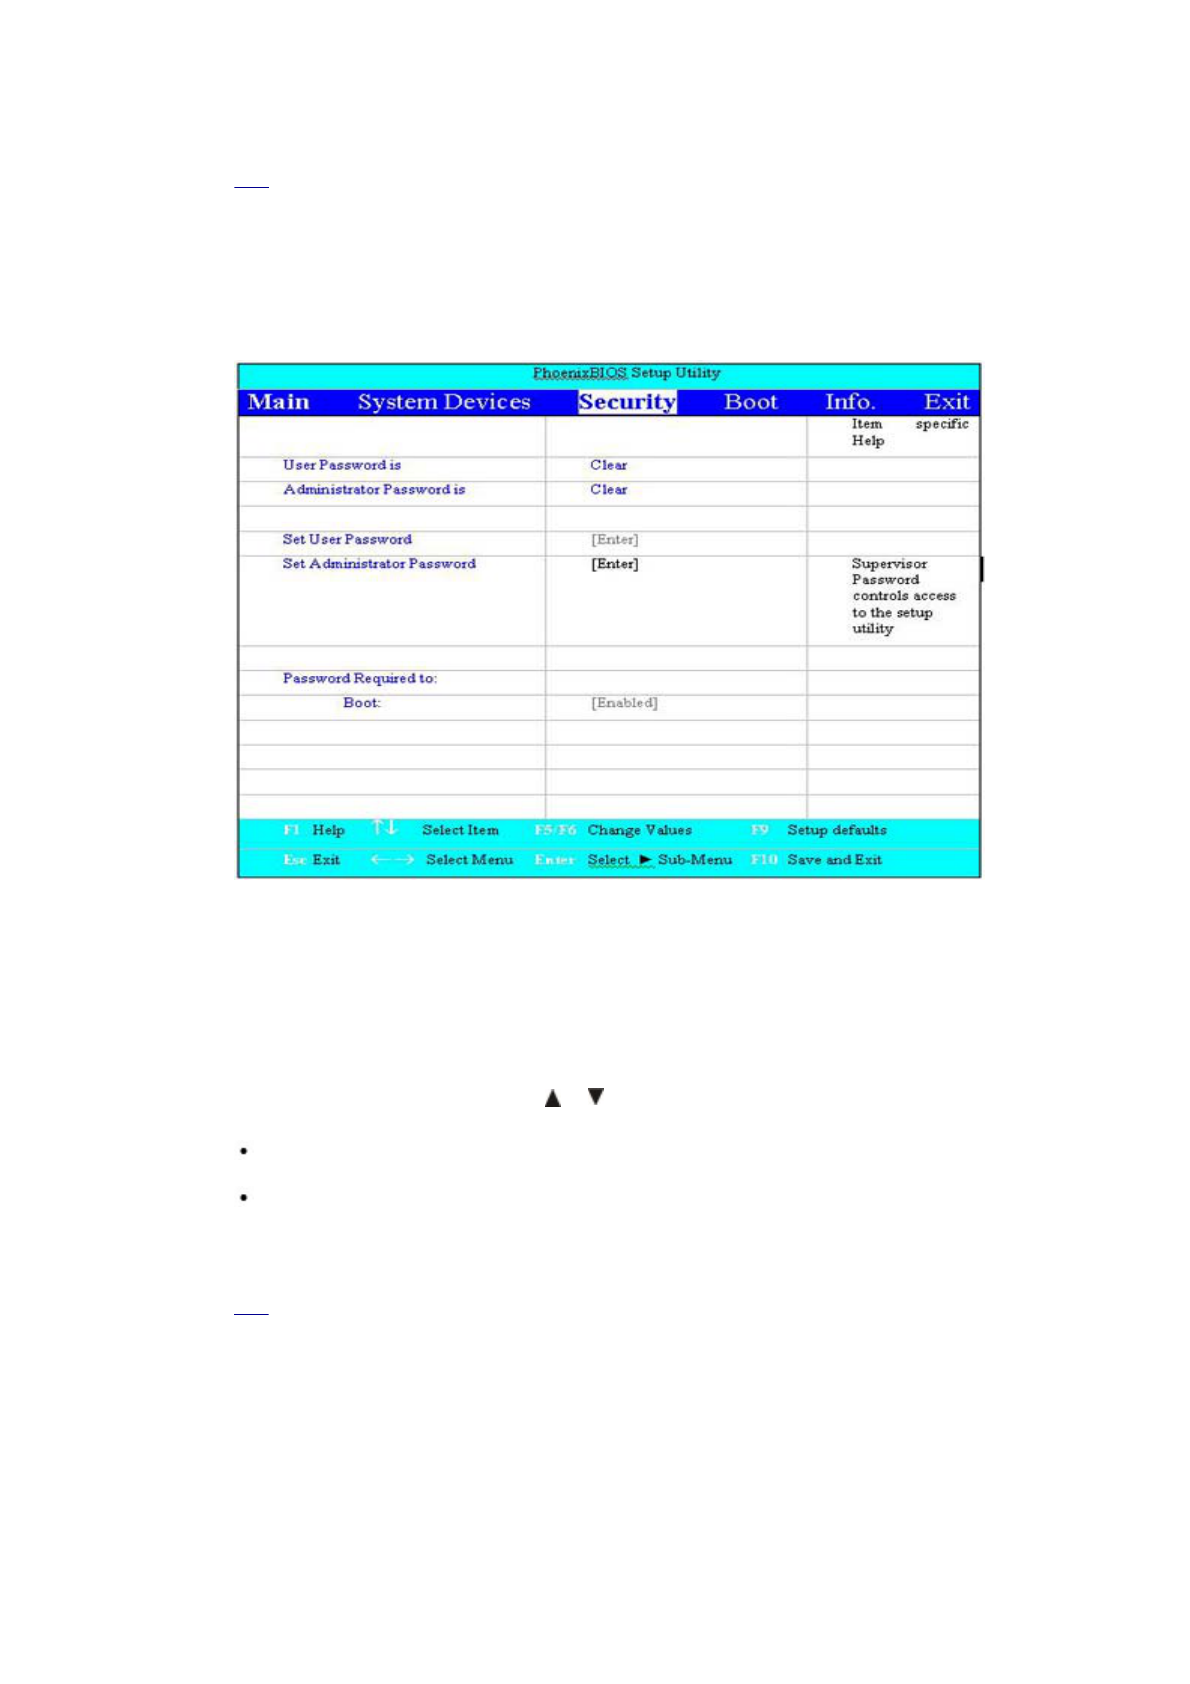
The default setting for this field is: Disabled
Top
The Boot Menu
The Boot Menu allows the user to specify the order in which the Notebook is to
check for a device to boot the system. To make changes, select Boot from the menu
menu bar. The following screen appears:
Figure 3-4: The Boot Menu
Boot Sequence
The Boot Menu allows you to alter the priority the system uses to search for the boot
boot device on system power up according to numerical order.
Use the up and down arrow keys [ ] [ ] to select a device, then press:
[F6] to move a device up the list
[F5] to move a device down the list
Press [Esc] to exit the menu.
Top
The Information Menu
The information menu displays static system information. The fields are read only.
第 12 頁,共 15 頁The BIOS Setup Program
2003/8/15
file://C:\WINDOWS\TEMP\~hhA73B.htm
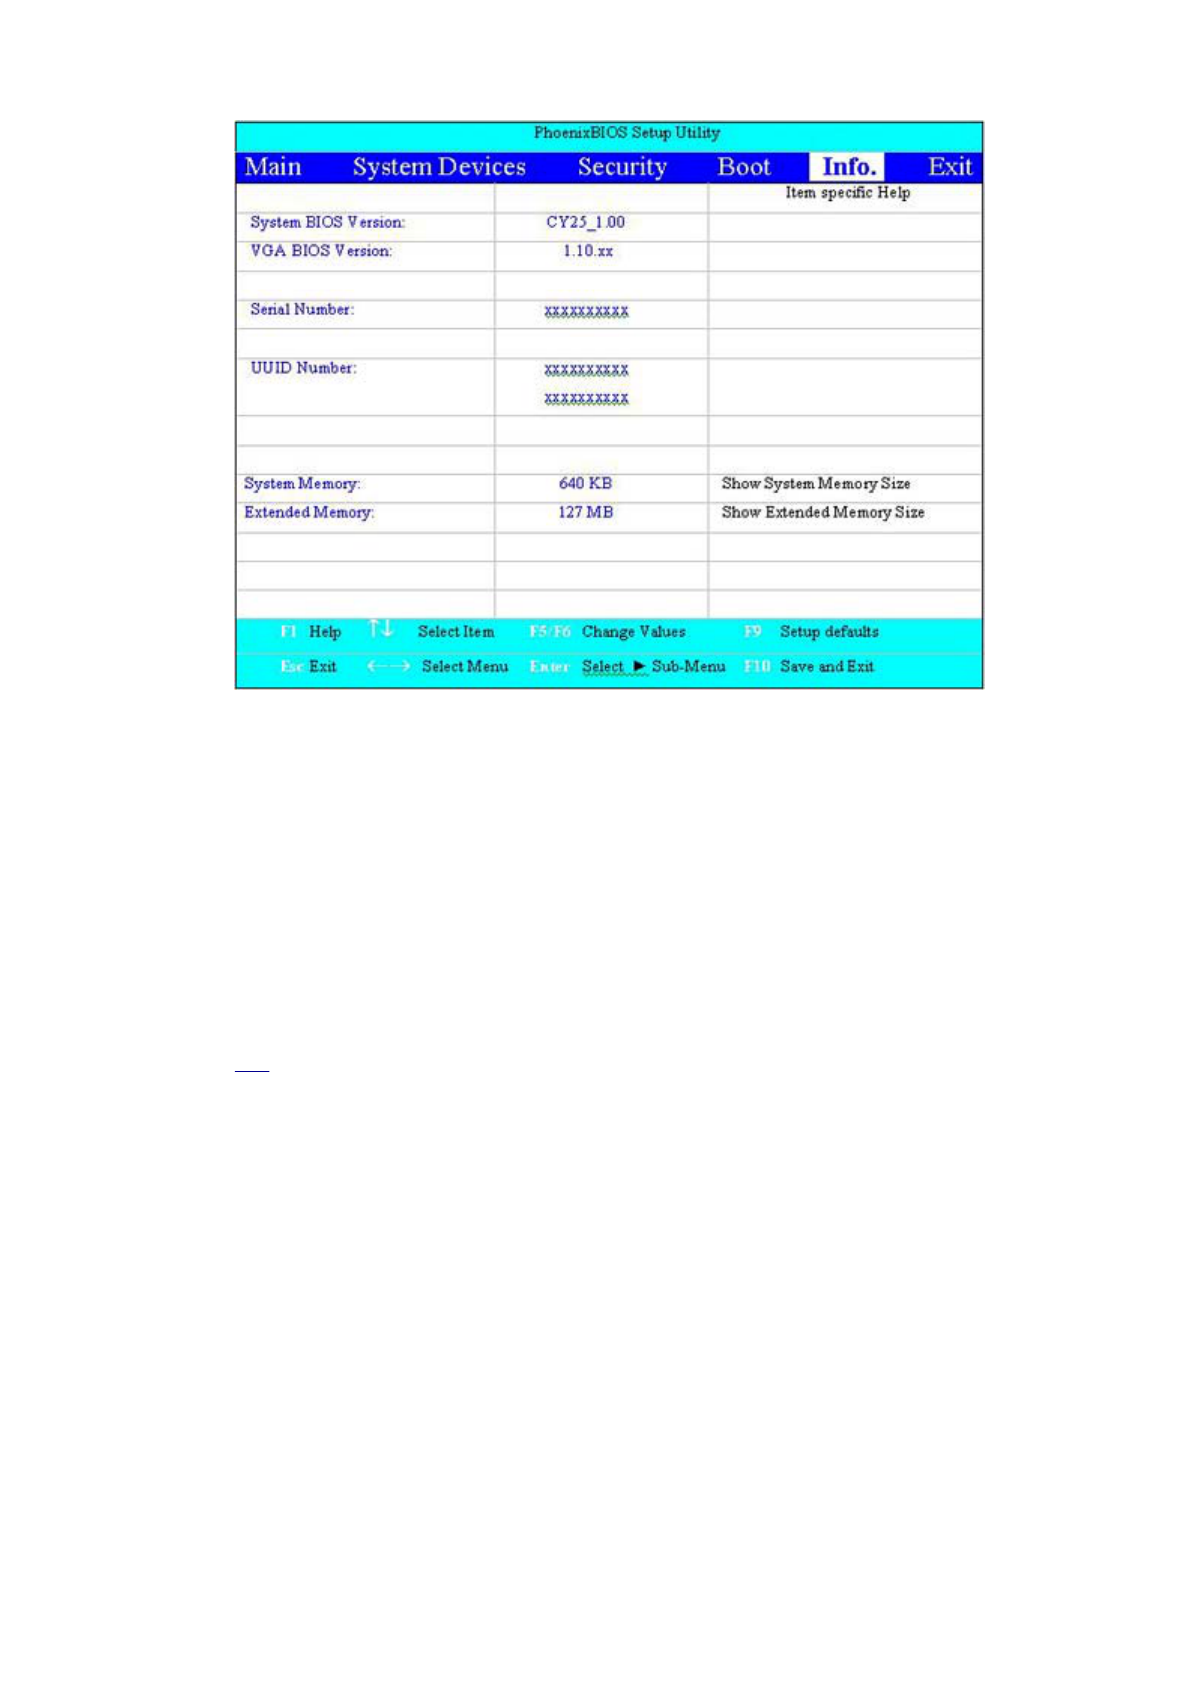
Figure 3-5: The Information Menu
System Memory
This field displays the amount of conventional memory detected by the system
during bootup. You do not need to make changes to this field. This is a display only
field.
Extended Memory
This field displays the amount of extended memory detected by the system during
bootup. You do not need to make changes to this field. This is a display only field.
Extended Memory size = Total memory size - 1 MB
Top
The Exit Menu
Once you have made all of your selections from the various menus in the Setup
program, you should save your changes and exit Setup. Select Exit from the menu
bar to display the following menu:
第 13 頁,共 15 頁The BIOS Setup Program
2003/8/15
file://C:\WINDOWS\TEMP\~hhA73B.htm
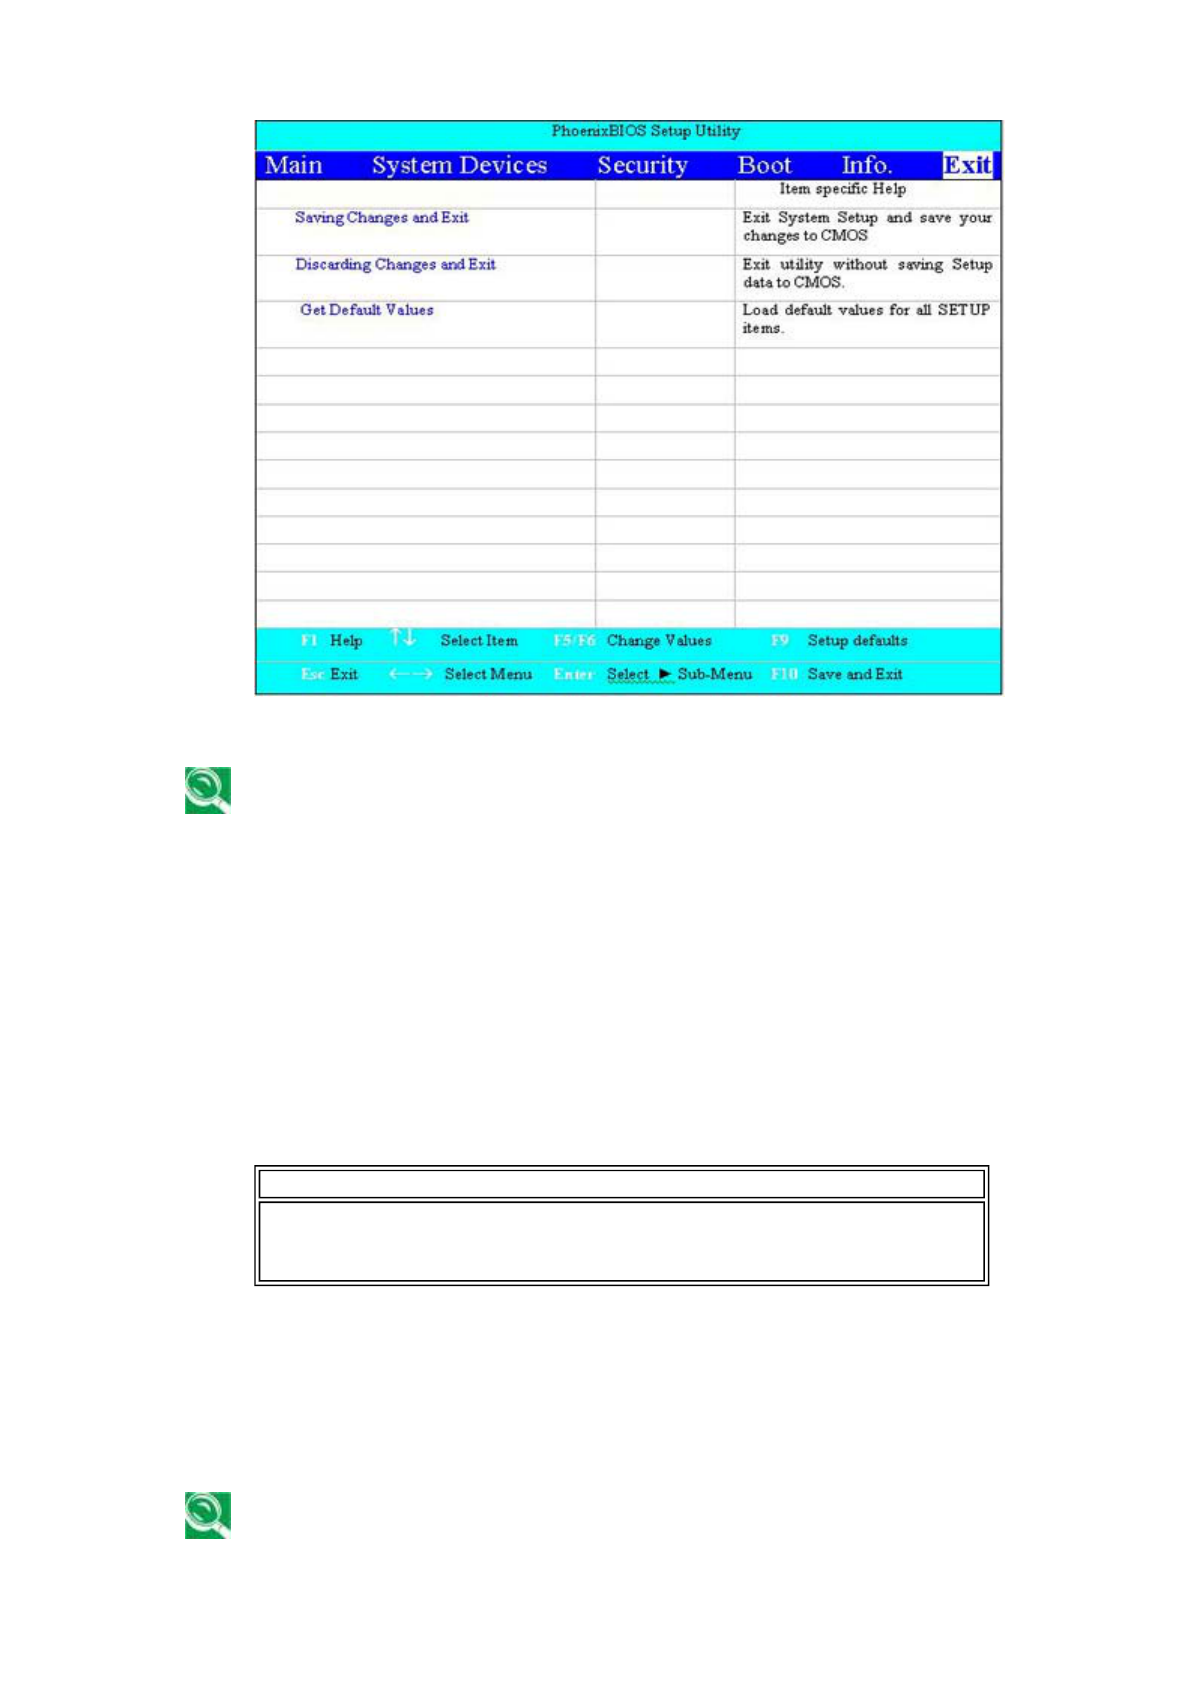
Figure 3-6: The Exit Menu
Pressing the [Esc] key does not exit this menu. You must select one of the options
from this menu or a menu bar item to exit this menu.
Each of the options on this menu is described below.
Save Changes and Exit
Once you are finished making your selections, choose this option from the Exit Menu
Menu to ensure the values you selected are saved to Non-Volatile RAM. Changes
you made to the Setup program must be changed to Non-Volatile RAM in order to
make them operative. Non-Volatile RAM differs from standard RAM memory in that it
it is sustained by an on-board battery and stays on even when the Notebook is
turned off.
Once your selections have been saved, the Setup program displays the following
message:
Setup Confirmation
Save configuration changes and exit now?
[Yes] [No]
System will reboot if Yes is selected and will stay in Setup if No is selected.
The next time you bootup the Notebook, the BIOS will attempt to load the values you
you saved in Non-Volatile memory. If these values cause the system boot to fail,
reboot and press [F2] to enter the Setup program. Once in Setup, you can try to
change the values that caused the system boot to fail. If the problem persists, load
the default values (see Get Default Values below).
If you attempt to exit the Setup program without saving your changes, the program
will prompt you with a message asking if you want to save your changes before
exiting.
第 14 頁,共 15 頁The BIOS Setup Program
2003/8/15
file://C:\WINDOWS\TEMP\~hhA73B.htm

Discard Changes and Exit
This option should only be used if you do not want to save the changes you have
made to the Setup program. The default is set to No. If you have made changes to
the fields other than system date, system time and password, the system will ask for
for confirmation when choosing Exit Discarding Changes.
Warning
Configuration has not been saved!
Save before exiting?
[Yes] [No]
The system will reboot after either selection.
Get Default Values
This option allows you to load the default values for each of the parameters on the
Setup Menus. When this option is selected, the following message is displayed:
Setup Confirmation
Load default configuration now?
[Yes] [No]
The system will remain in Setup after either selection.
You can now select Exit Saving Changes or make other changes before saving the
values to Non-Volatile RAM.
Top
第 15 頁,共 15 頁The BIOS Setup Program
2003/8/15
file://C:\WINDOWS\TEMP\~hhA73B.htm